Tag Archives: cardigan

Completed: Lemon Cabernet Cardigan

18 Apr

See? I told you I made a cardigan with that lemon fabric:

Morgan Jeans + Cabernet Cardi

Coming off the tail end of a season of greys and blacks (whatever, I love looking like a wannabe-goth in the winter, but eventually we all start craving some color), this lemon fabric was like a happy little breath of fresh spring air. As I mentioned in my last post, I love this fabric but the thickness and weight is a little heavier than what I like for my tshirts. I felt like a cardigan would be a good match for the fabric, plus, I’d be able to wear it through the duration of the spring and summer. I personally cannot stand how cold most people keep their a/c’s here in the heat, so it’s always good to have a cardigan on hand that you can throw on to protect against summer frostbite.


Morgan Jeans + Cabernet Cardi

I decided to use the Cabernet Cardigan from Skinny Bitch Curvy Chick patterns. This is a great staple pattern because it’s a true ladies-who-lunch classic – fitted, cropped (well, one version is anyway), with set-in sleeves, patch pockets, and a lovely v-neckline. I reckon you can make it a little less Betty Draper depending on the fabric you use, but I love looking like a Kate Spade advertisement whenever I can, so lemon fabric + Cabernet cardigan was exactly the combination I was looking for.

I’ve made this pattern a couple of times before (see: leopard print + navy cotton stripes), so I don’t have too much to add to what I’ve already said. I made the size XXS, in the cropped and fitted version. I had to cut 3/4 sleeves due to fabric restrictions (I cut this before I even thought about lemon underwear, so you can imagine how small my leftover pieces were!), which does make the cardi a little less overwhelmingly lemon.

Morgan Jeans + Cabernet Cardi

Morgan Jeans + Cabernet Cardi


I assembled the whole thing on my serger, and used my sewing machine to do all the straight topstitching with a contrast green thread. Since the cardigan doesn’t really need to stretch – except maybe slightly around the cuffs, where I didn’t topstitch anyway – it’s fine to use a straight stitch for this. I also think the single line of straight stitching looks a little more RTW than using a zigzag or a twin needle. I just use a ballpoint needle (and the built-in walking foot that’s on my Pfaff) and it’s all good! Really, this is a quick and satisfying sew. Even when you end up stopping in the middle of it to make undergarments 😛
Lemon Cabernet Cardigan

Lemon Cabernet Cardigan

Lemon Cabernet Cardigan

My favorite part about this fabric are those big splashes of turquoise! It really arts up the lemon print and adds some super gorgeous unexpected color.

Lemon Cabernet Cardigan

Cabernet Cardi

Also super happy with this button match – they are pretty much perfect! Funny story about these buttons – they are vintage glass, and I’d had them on an Etsy wishlist for ages. I actually bought this set at the Nashville Flea Market (for something crazy cheap, like $1 for the whole set) and it wasn’t until months later that I saw the original wish listing on Etsy. It always surprises (and delights) me when I find vintage duplicates, but this time it was actually beneficial haha. Anyway, I am happy I finally found a use for these – they look great with this fabric!

Morgan Jeans + Cabernet Cardi

Anyway, that’s all for this post – I was going to also talk about my pants (which I also made), but I’m going to save that for another post because I feel like there are enough photos of me here at it is haha. Before you ask: they are Morgan Boyfriend jeans. I also made my top ages ago, it’s a Briar tshirt with a straight hem. More on the pants later, though! Today is CARDIGAN DAY.

Also – say hello to my new summer ‘do! I just had this done a few days ago (the photos you see here is when it was like day-after-salon-fresh, so still pretty fresh) and I cannot even express how much I love it! I told my stylist I wanted something brighter for summer, so she did put in this amazing orange with yellow highlights. I feel like I have superhero hair – in the sunlight, it’s practically neon in some spots (I wish the color showed up better in these photos!). It is awesome and I’m going to be so sad when it eventually washes out haha.

OAL2015: The Winners!

3 Aug

Hey everyone! One more OAL post for this year 🙂

OAL_Banner

This was my second year co-hosting the OAL with Andi Satterlund, and I think it’s safe to say that we both had a most excellent time! There was a great turnout of participants (61 outfits in the official Ravelry thread!) and I really enjoyed following along with everyone’s progress and lurking all those beautiful finished outfits! Thanks so much to everyone who joined in – whether you made a whole outfit, just sewed or knit one piece, or watched and cheered along from the sidelines. Y’all are the best! ♥

While making an outfit is a pretty sweet deal in itself, Andi & I wanted to draw out the fun even more by offering prizes to 4 random winners who posted completed outfits in the thread. This year, we doubled up and have two sponsors who have generously donated prizes, so I’d like to take a minute and acknowledge them! The first sponsor is Indie Stitches, who you might remember also donated prizes last year. Based in Australia, Indie Stitches sells both paper patterns and downloads, and offers selections from a huge plethora of indie designers, all of which are super good! Our other sponsor is The McCall Pattern Company, who owns and manages 3 of the famous Big 4 pattern companies (McCall’s, Vogue and Butterick, as well as Kwik Sew). I absolutely adore the McCall Pattern Company, even when I’m poking fun at them (and adore them even more for being basically the best sports ever about it!), so I’m pretty thrilled to have them on as a sponsor for OAL2015!

Both Indie Stitches and The McCall Pattern Company have offered to donate one pattern to each of the 4 winners. The winners will also get two patterns of their choosing from the Untangling Knots shop. So you will get to keep on making outfits! Yay!

Now for the winners! These were pulled from the official Ravelry thread and drawn by random number generator.

kari1276
Kari // Vianne cardigan + Carolina Mae dress

Can you believe that this is Kari’s second sewing project?? That dress fits beautifully and I just love the fabric! Also loving the idea of a black Vianne – that’s definitely a sweater you can wear with anything 🙂

feminizzle
Ann Marie // Vianne cardigan + self-drafted dress

I love the colors in Ann Marie’s outfit! That orange Vianne is especially beautiful with all the subtle color gradation. The addition of a waistband on the dress is a really nice touch!

egwene2211
Angela // Myrna cardigan + V8726

Another first-timer here – this is Angela’s first cardigan! I think it turned out awesome and, again, love that orange! The colors of her cardigan & dress remind me of sherbert 🙂 Yum!

irish1970
Jeri // Cancun Lacy Box top + Angie dress

Love everything about Jeri’s outfit, but ESPECIALLY that little lacy top! Ahh!! I never realized how much I needed a lace-knit crop top until right this second. It looks great on Jeri, both with and without the dress. The whole outfit looks so cool and comfortable, perfect for summer!

Congratulations, OAL winners! Expect some emails to get those prizes out 🙂 I’m so happy to wrap up another successful OAL, and even happier to have a few new knitting and sewing patterns to add to my never-ending queue! Starting with that lace crop top. haha!

Thanks again to everyone who participated! Thanks to Andi for hosting along with me this second year, and big thanks to our sponsors Indie Stitches & The McCall Pattern Company for the great prizes! If you’d like to see more OAL garments, check out the official Ravelry thread, as well as the hashtag #OAL2015 on Twitter & Instagram 🙂

Completed: OAL2015 (M6887 dress + Vianne sweater)

31 Jul

MY GOD, you guys. I am so happy I got this finished in time for the OAL deadline! I’ve had the dress finished for a couple of weeks now, but I worried about that sweater as the time drew closer! I ended up needing to take a couple marathon days in order to finish, but I did finish! And now I’ve got an outfit to show y’all!

OAL2015 - M6887I’ll start with the dress. Again, this is McCall’s 6887, which I used cotton ikat fabric from Mood Fabrics to make it up with (this isn’t a Mood Fabrics allowances fabric; I bought this on my own dime while I was in NY last year). I used the version with the back cut-out, as well as the cap sleeves, omitted the lining in favor of bias facing, and added pockets. I’m not going to go into detail about the construction, since there’s a whole series of blog posts on the making of this dress! You can see them all here:

We are just gonna look at pictures instead. Btw, I walked through a lot of spiderwebs to take these. Appreciate me, dammit. OAL2015 - M6887

OAL2015 - M6887OAL2015 - M6887

OAL2015 - M6887OAL2015 - M6887

OAL2015 - M6887Now for the sweater part! OAL2015 - Vianne

Vianne is a sweet little top-down cardigan with lace details and a open mesh back. It’s supposed to be knitted up in DK weight yarn, but I used Cascade 220 worsted weight and was able to get gauge using size 6 needles. I knit the size XS, and the only modification I made to the pattern was to knit full-length sleeves. As in, I followed the sleeve directions and just kept knitting/decreasing until they were long enough. I’ve found that I don’t have much need for 3/4 sleeves – if I’m cold enough to wear a sweater, I am cold enough to need the full sleeve – so I went with long sleeves. I did keep the mesh back, though. The mesh back is awesome. I found the mesh+lace a little confusing to follow, so I used a bunch of stitch markers to stay on track and that helped a lot.

While I normally finish my buttonbands with a strip of petersham ribbon for stability, I did not do that with this cardigan. Vianne is a looser fit on me, and the button bands are so wide that they don’t really stretch when they are buttoned. So I left off the petersham and just sewed the buttons directly on the ribbing. One thing I will say about using a stabilizer with your button band – it makes sewing on the buttons a helluva a lot easier! Oh well! Anyway, the buttons are vintage glass from my stash – I’ve had them for YEARS and been hoarding them for a special project, which I’m happy to have finally found! I only had 4 buttons, so I left off one of the button holes. And by “left off,” I mean I originally knit it and then later closed it up with a slipstitch haha.

OAL2015 - VianneOAL2015 - Vianne

OAL2015 - VianneOAL2015 - Vianne

OAL2015 - VianneOAL2015 - Vianne

OAL2015 - VianneOAL2015 - Vianne

OAL2015 - VianneOAL2015 - Vianne

OAL2015 - VianneAs with all of Andi’s patterns, I REALLY enjoyed knitting this sweater! The yarn was so nice to work with (after a long Cascade 220 hiatus, I’m happy to be home! And I’m really happy to find a local source that is still selling it – Ewe & Company, who happen to be located here in Kingston Springs! What are the odds?) and the color is my favorite. The only thing I didn’t like was feeling rushed at the end, but that’s my own damn fault for not pacing myself earlier during the OAL. I’m glad I got it finished in time, at any rate!

As a side note, wrangling the last sleeve of the sweater got me really wanting to start doing seamed knitting. I’ve always been a fan of in-the-round, because it’s so easy, but I’m starting to feel a little comfortable and I’m kind of craving a bit of a challenge. It would be fun to learn how to properly seam a sweater. Not to mention all the pattern possibilities that open up when you’re not hung up on just one particular construction style!OAL2015 - M6887

Anyway, that’s it! Here is Vianne on Ravelry (spoiler: not any more info than what you see here!). Don’t forget to post your finished outfit in the OAL 2015 FO Thread on Ravelry for a chance to win prizes! We have prize donations from Indie Stitches and The McCall Pattern Company, as well as from Andi Satterlund herself (winner’s choice with all of these, so you won’t get stuck with something you don’t want!), and there will be 4 winners. Also, if you have blog posts to share with your FO, post them here so I can see! I need to get my lurk on 😉

Announcing the 2015 OAL!

15 May

Happy Friday, everyone! I just wanted to pop in and let y’all know that the Outfit Along is back for a second year! WOOHOOO!!!

OAL_Banner

Once again, I’m joining forces with Andi Satterlund of Untangling Knots to combine a sew-along with a knit-along. The idea behind the Outfit Along (OAL) is to make a complete outfit by sewing a garment and knitting a garment. This is a great opportunity to stretch your crafting skills, and we’ll have two official patterns that we’ll help you with along the way.

The official sewing pattern will be McCall 6887, and the official knitting pattern will be Andi’s newest cardigan pattern, Vianne. I will be blogging about the official sewing pattern and Andi be blogging about the knitting pattern so we can all sew and knit along together. If you don’t love the official patterns, you can still join in! The Outfit Along is about making an outfit you’ll really wear, so to participate, all you need to do is to sew a garment and knit a garment to make an outfit. You’re more than welcome to pick projects that fit your own style and skills. You can look through the 2014 Outfit Along FO thread in the Untangling Knots group on Ravelry to see the variety of patterns people chose to use last year.

Vianne

McCall 6887 - Pineapple dress!

You can read all the juicy details over at Untangling Knots, but in a nutshell:

– We will be kicking off the OAL on June 1, 2015.
– The deadline for completion is July 31, 2015, which gives you two months to finish both garments.
– Did I mention that finishing within the deadline means you are eligible for PRIZES? Yes! We are cooking up some fun pattern giveaways to reward those of y’all who complete their outfit within the allotted deadline, so stay tuned for more information!
– To be eligible for said prizes, you must finish BOTH garments by July 31, 2015 and post them in the OAL Finished Outfit thread in the Untangling Knots group on Ravelry. Prize winners will be randomly selected from those who finish both their knit and sewn garments and post pictures in the appropriate thread by the deadline.

Vianne_Back
The official knitting pattern, Vianne, is a seamless, top-down cardigan, knit using DK weight yarn on US 8/5mm needles, which makes it a lovely lighter weight cardigan for the summer months. The v-neck cardigan features a set of mirrored lace panels that run along the front neckline and frame a large mesh panel on the back. To celebrate Vianne’s launch, Andi is offering 20% off up until the official OAL start of June 1. Use the code OAL2015 to snag the discount! You can read more details in the Untangling Knots shop or check Vianne out on Ravelry.

McCall 6887 - Pineapple dress!
The official sewing pattern, McCall 6887, is a fun little summer dress with a surprise cut out in the back! You probably remember my Pineapple Delight version from a few weeks ago – well, I’m dying to make more, and I want to drag all y’all down with me (mwahaha). The pattern features front princess seams, skirt variations (flared or fitted) and the optional open back (there is also an option for a non-open back if that’s your jam!). I will be covering basic construction of the dress, and including tips swapping out the lining for a clean bias facing, and adding pockets. The pattern is rated as “easy,” so y’all beginners should have no problem tackling this! Also, just a head’s up – I just checked my local Joann’s and it looks like all McCall’s patterns are on sale for 3/$5 through 5/16, so go save some dollaz!

Since I’ll be traveling around Peru during the first couple of weeks of the OAL, we won’t start the sewing portion until June 22nd. Of course, you are welcome to get a head start and begin sewing on June 1; there just won’t be any sew-along posts until the 22nd! Andi will be managing the knitting posts over on her blog starting on June 1. If you knit and sew along with us, you’ll get your projects done in plenty of time.

Help spread the word and grab one of the badges below or use the hashtag #OAL2015. If you want to hang out and chat about the OAL, come join the OAL2015 Discussion Thread in the Untangling Knots group on Ravelry. You do need a Ravelry account to view and post on the thread, but it’s totally free and totally worth it if you do any knitting at all 🙂

OALBadge3


OALtag_2015

Y’all, I am SO EXCITED. Who else is joining in the Outfit Along this year?

Completed: Leopard Cabernet Cardigan

13 Apr

Good morning, everyone! Lots of changes happening in my world over the past couple of weeks – as you know, we moved out to the country, about 20 miles west of Nashville in beautiful Kingston Springs, TN. Our house sits on a 5 acre plot of land surrounded by woods, and wow, spring is gorgeous here! The leaves are finally starting to poke out – I can’t wait until all the trees are green! As I mentioned before, my best friend bought the house, and Landon and I are occupying the lower level apartment. We are still settling in, but making good progress. I promise I will share sewing room photos as soon as the space is ready. It’s still a work in progress – for one, I need to finish painting (I mean, Landon needs to help me finish painting because I am SO OVER painting by myself!), and I need to get some rugs because the floors are coooold. So it’s not quite ready for it’s ~big reveal~, but it is totally usable for makin’ shit! Which is what I’ve been doing since the second the space was finally unpacked. And here is evidence of my first completed garment in the new place! It’s not anything fancy, but it fills a fabulous gap in my wardrobe 😉

SBCC Cabernet Cardigan

Oh, right, that’s the other big change – I changed my hair color back to something a bit more normal! 🙂 My stylist and I have been talking about this for a few months – even before I went to London in November, we were planning. I was starting to get really sick of doing the upkeep myself – redying the roots, dealing with fading, hair color rubbing off on everything, etc etc – and I knew I wanted my hair to look relatively normal for when we go to Peru in June. I actually had all this done the day before we moved at the end of March. It took about 7 hours (woof) and we’re still not done – there’s a little bit of green showing through in certain spots. I need to go back later this week and get another fill or whatever, but my scalp was just done. I gotta say – I’m REALLY happy with how the color turned out! My stylist is seriously a hair magician. And while I’m not delusional enough to think that my hair is 100% undamaged as a result, it’s still in pretty outstanding condition, considering what we put it through. Eventually, I’d like to lighten everything up to a brighter, more coppery red (still natural, but less brown), as well as let her do some fun stuff with highlights. But that’s all in due time! For now, I’m loving this red-brown 🙂

Ok, back to sewing stuff!

SBCC Cabernet Cardigan

This leopard beauty is the Cabernet Cardigan from Skinny Bitch, Curvy Chic patterns. I was REALLY excited when this shit was released because I love wearing v-neck cardigans. I really like the way they look both buttoned and unbuttoned – which is the one minor complaint I have about my Jenna cardis – the crew neck just feels like it looks really weird when it’s unbuttoned, at least on me. Also, this pattern very closely mimics the poor v-neck cardigan I ripped up to use as a pattern (which was totally in vain, because that shit DID NOT WORK. But I guess it’s ok bc the cardigan in question was destined for the scrap heap anyway, since it was holey-er than, like, the Pope at that point), so yay! V neck cardis all day, erryday!

SBCC Cabernet Cardigan

See? Looks totally legit unbuttoned. Also, I promise I’m wearing a shirt under the cardigan – it’s just a white v-neck, and the sun was VERY bright that morning. So I look nakey, but honestly, I’m not that exciting of a person.

You can’t see much of the details of this piece due to the (admittedly fabulous) fabric that I used, but it has some nice and simple finishing. The sleeves and hem are finished with a wide band (same with the Jenna cardi) and the neckline also has a folded-over band. The difference between this cardigan and the Jenna is in the neck band – on the Cabernet, it’s one long piece that is interfaced only where the buttons/button holes go, and stretched just at the back of the neck. It’s also a wider band than the one on the Jenna, which means the button holes were a helluva lot easier to get in there without fucking them up.

SBCC Cabernet Cardigan

This cardigan also features the cutest little teensy pockets! Yay pockets!

SBCC Cabernet Cardigan

SBCC Cabernet Cardigan

Not a lot of changes went into the sizing of this pattern. SBCC drafts for petite proportions, so the length of both the body and the sleeves are pretty spot-on for me. I cut the size XXS, based on the pattern suggestion, but ended up taking about 1/2″ out of each side seam because I felt that even the slim version was still a bit boxy on me. This was totally a hack alteration – I’d already finished the cardigan at that point (and Instagrammed it, so you know that shit’s forreal), and rather than pull off the bottom band and do things properly… I just nipped in the sides with my serger and continued the seam down to the bottom of the band. Better to have a slightly subpar finish than a cardigan that I never wear, right?

SBCC Cabernet Cardigan

Since this was my first rodeo with the pattern, I followed the instructions as written. I topstitched everything with a straight stitch, as recommended – I was afraid it would look kind of homemade and tacky, but I think it actually looks really nice! Since the cardigan is an easy fit that doesn’t reply on much stretch (unlike, say, a tshirt), I don’t have to worry about the stitches popping. Everything else was finished on my serger, and I used regular lightweight fusible woven interfacing for the neckband. All in all, I think this took maybe 2 hours to sew, start to finish. It’s a quick little make and it’s already getting very regular rotation in my wardrobe.

Also, speaking of instructions – the booklet that comes with the pattern is super cute! (well, the printed version, which I’m totally glad I sprang for the couple of extra dollars because yay for not having to print and tape PDF patterns!) It’s about the same size as a standard piece of paper, and the pages are stitched together along one edge. The illustrations are large and very clear, and the instructions are very much direct and to the point. There are no cutting layouts included, and not a lot of hand-holding involved (i.e., no beginning section telling you how to work with knit fabrics, for example. Kind of refreshing, honestly! I think there’s enough of that out there as it is, ha). So if you’re a super beginner and want to try this pattern, but need some help with sewing knits – definitely research beforehand. It’s an easy pattern, though, and I think it’s totally doable for the beginner knit-sewer.

SBCC Cabernet Cardigan

SBCC Cabernet Cardigan

The super fabulous leopard print ponte was one of my scores from when I was in NYC last month. It was one of the very few things I had specifically on my list to pick up – leopard print ponte, yellow stretch twill, and stone washed stretch denim, to be precise (sadly, I did not find the stonewashed stretch denim. Everything available right now is dark indigo or black – wtf? Do y’all seriously not want me 90s-mom’ing it up or something?). I actually met up with Renee during my first shopping expenditure that weekend (who is just as awesome in real life as she is on her blog – maybe even more so, actually, because she came bearing a selfie stick), and while we were in Metro Textile, I asked Kashi for leopard print ponte and everyone laughed at me for being way too specific. Well, joke’s on all y’all because I found my damn ponte the next day – in Mood Fabrics, no less! (although I did get some amazing shit from Kashi. Just wait for it.). This ponte in particular is a bit more lightweight than usual, which is nice for this warmer weather. It’s stretchy, but it’s really easy to work with. My scissors did not particularly enjoy trying to cut through all the thickness, but I’m pretty sure it’s because they desperately need sharpening.

I also realize and completely acknowledge that this v-necked leopard print cardigan kiiiind of makes me look like one of those Ladies Who Lunch, but I’m totally ok with that. I like eating lunch with my lady friends.

SBCC Cabernet Cardigan

So yeah! So much newness up here today – new cardigan, new hair, new background in mah photos. I am LOVINGGGG these woods; it’s so quiet and serene out here, and you can actually see the stars at night. And we’re still a relatively short drive from Nashville, which is nice for when I need my hot chicken fix 😛

One last thing – the Sewing for Fashion Designers giveaway winner!

winner1

Congratulations, Vickie C! I will be in touch to get that book mailed out to you ASAP 🙂 The rest of y’all – as always, the book can be pre-ordered on Laurence King’s website and Amazon 🙂 Thanks for your support, y’all are the best!

Completed: The Jenna Cardi (+GIVEAWAY)

15 Sep

In my wardrobe, I have a very small selection of RTW clothing that is quickly dwindling to nothing. Out of those pieces, the majority of them are lightweight knit cardigans. You know the kind I’m talking about – sewn, rather than knitted, lightweight enough to throw in a purse, wearable for all seasons (I dunno about y’all, but I wear my cardigans throughout the summer – air conditioning is tooooo cold for me!). As I’m quickly replacing all my clothes with handmades, the one major hole – other than undergarments (which I’m working on!) – has been those damn cardigans. I love knitting cardigans, don’t get me wrong – but those take loads of time, not to mention even the lightest fingering weight yarn can’t compete with how lightweight a knit fabric is, you know?

I’ve been on the lookout for a good cardigan pattern – not even really for the pattern itself, but rather, the instructions. Y’all, the one time I tried to sew button holes on a knit, it ended up being slightly traumatizing. Then there was that time recently that I tried to use an old RTW cardigan to copy into a handmade one (cutting it apart to use as a pattern – same concept as how I made my striped hoodie). Spoiler alert: it didn’t work out at all. Clearly I can’t hack this on my own. I need someone else to do it for me.

20121202-210149

Also, that cardigan I chopped up? As much as it wasn’t really my favorite – it was the one grey cardigan that went with basically everything. And here it was, chopped up into little bits and, uh, I kinda needed it back.

Jenna Cardi

Anyway, all that being said – right about the time I realized I was making a huge mistake (chopped up cardigan and all), Kat emailed me, saying she’d just launched her new pattern company, Muse Patterns, and would I like to try and review the Jenna Cardi?

UM. YES.

Jenna Cardi

HI GUYS, LOOK, DREAM CARDI PATTERN RIGHT OVER HERE.

Jenna Cardi

The Jenna Cardi comes with a few different options, so you mix and match to create the cardigan of your dreams (I’m not the only one who dreams about cardigans, am I?). You can choose a cropped or waist length version, sleeves ranging from full, to three quarter, to short, and then there’s also an option to include a beautiful curved yoke detail.

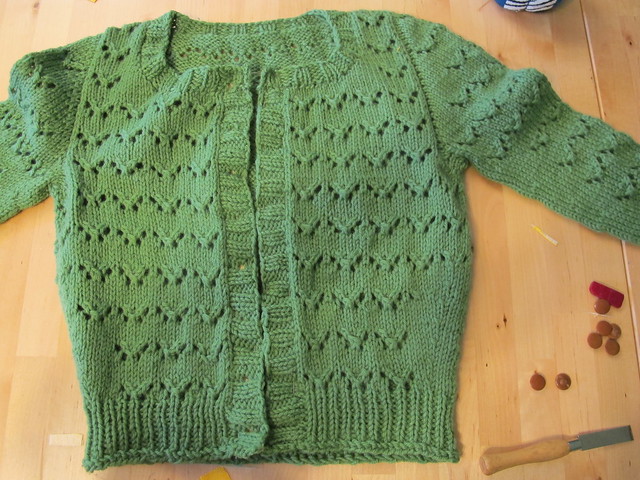
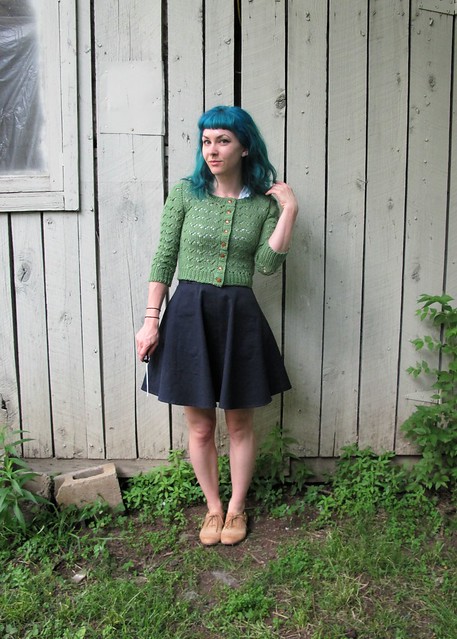
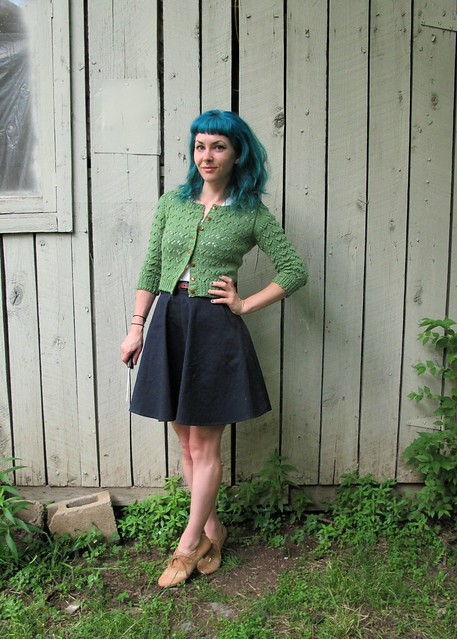
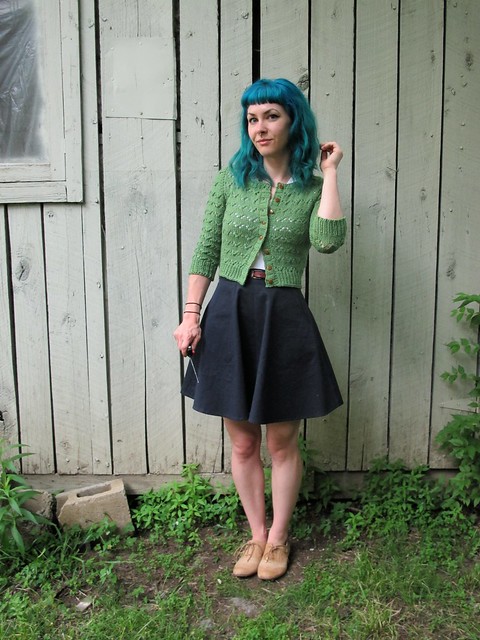
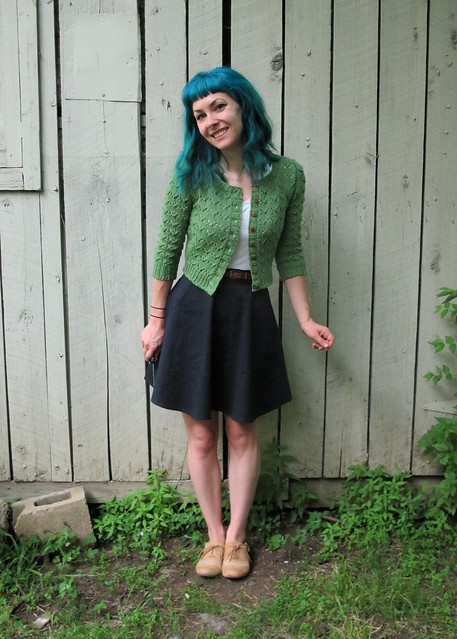
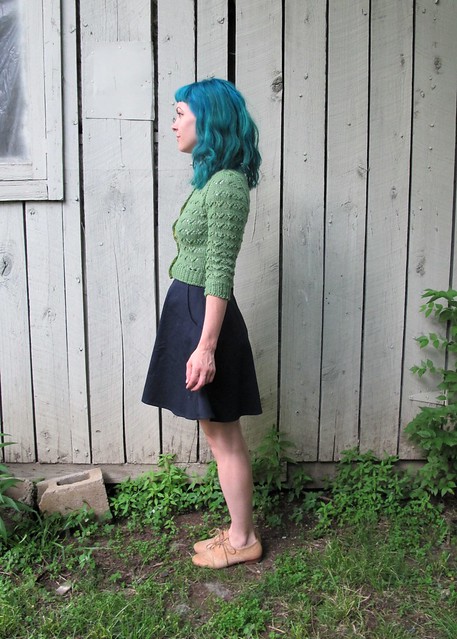
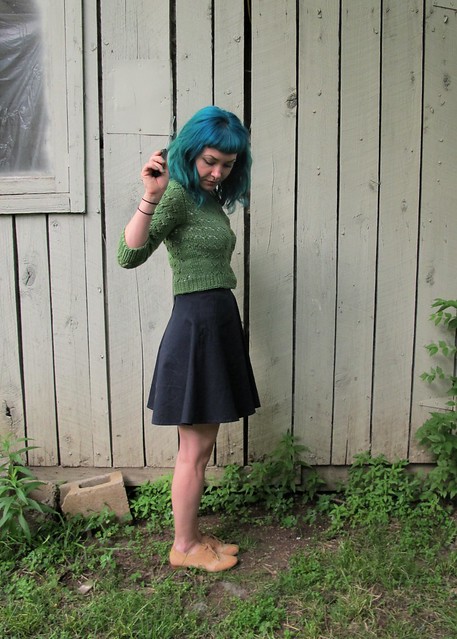
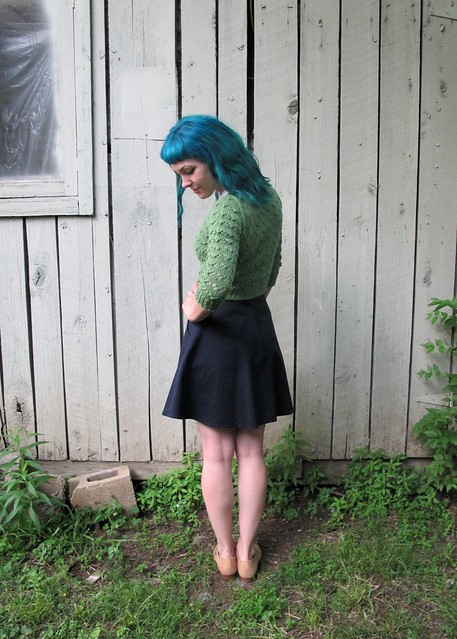
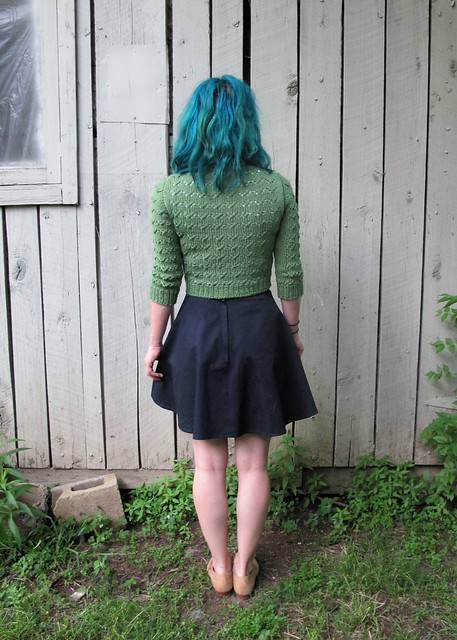
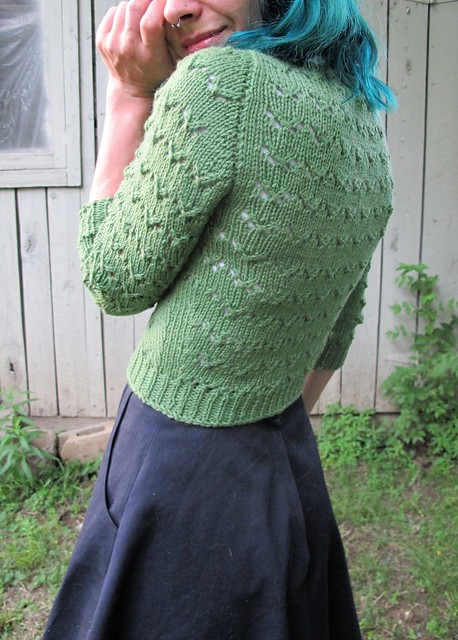
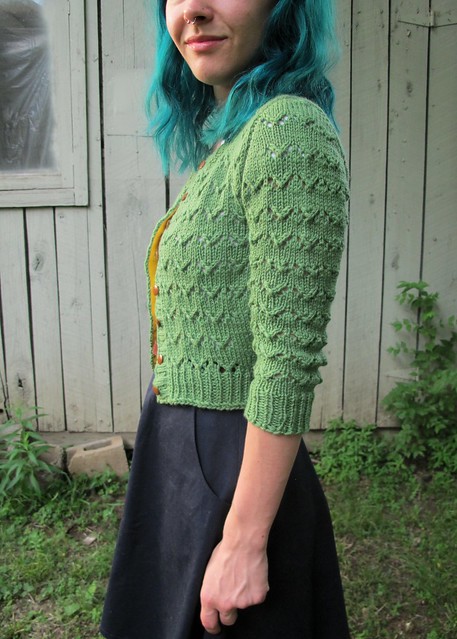
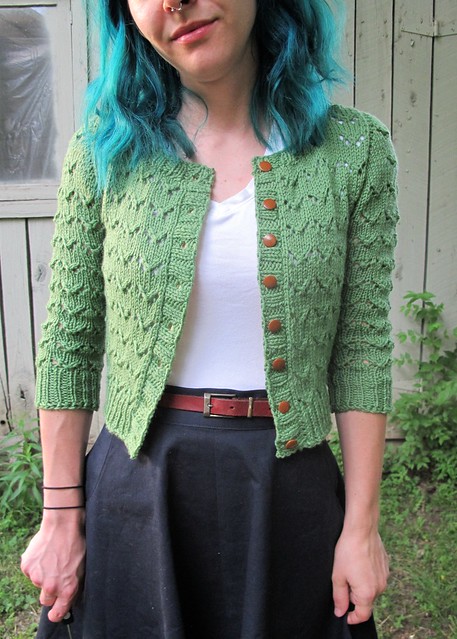
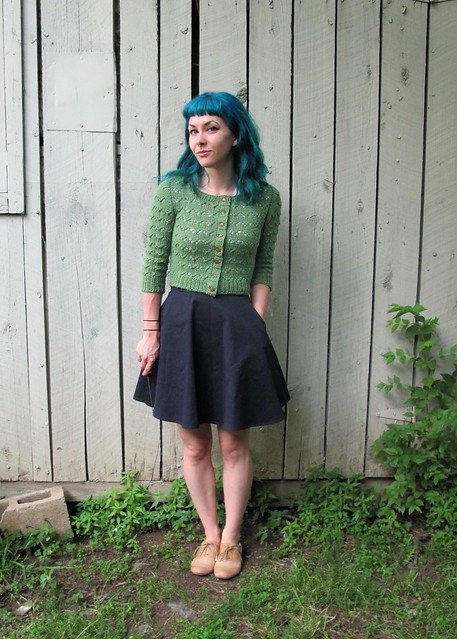
I’m a boring person with no imagination when it comes to wardrobe basics, so I chose something plain and simple for my first hurrah – cropped length, long sleeves. The thing about this cardigan that makes it so special, though (I mean, other than the fact that I SEWED IT MYSELF yaaaay for not buying RTW!), is the fabric I used! HOMEGIRL GOT HER HANDS ON SOME MERINO WOOL.

Jenna Cardi

Are we all still freaking out about merino wool or has that ship sailed? Whatever, *I’m* still freaking out over it! Ever since Katie started pushing it on me like an extraordinarily effective drug, I have been trying in vain to locate a US source. That stuff isn’t cheap, even in the best of times – and to ship it all the way from NZ obviously adds some dollarz to the cost.

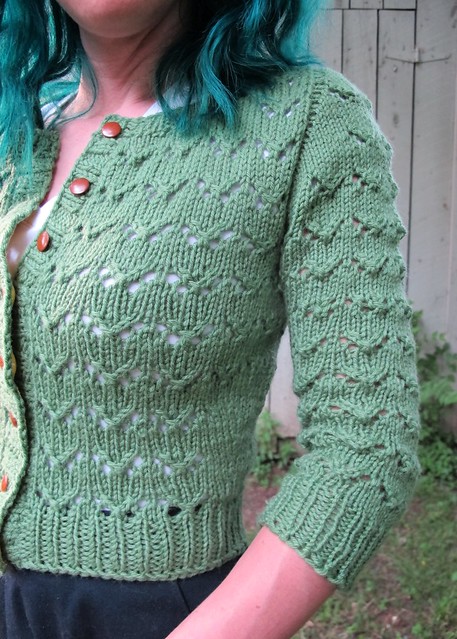
So where did I find this golden merino ticket, you might ask? Surprise – Organic Cotton Plus, of all places! They are starting to branch out to include other natural fibers than just cotton, which is all kinds of awesome. When they asked me if I’d like to try a little piece of whatever caught my fancy from the website, I stumbled across the merino wool and, forreal you guys, my heart stopped for a nanosecond. There aren’t a whole lot of options on the site at the moment – just the black I have here, as well as a natural colorway (which I almost got, but then the idea of dying that shit seemed too overwhelming. Plus, black is so useful! Even if it photographs like crap). At $33 a yard, it is not cheap – but it’s worth it. That black merino is a whopping 61″ wide, plus, IT’S MACHINE WASHABLE WOOL. Oh, and you don’t pay NZ shipping prices! Win win!

Jenna Cardi

Having used both merino wool from Organic Cotton Plus, as well as the stuff straight from New Zealand – I can confidently say that this is pretty good stuff. It’s soft and lightweight without being see-through, it has a nice stretch and drape to it, and it cuts and sews like a dream. Wait till you see the topstitching on this baby – it’s ridiculously beautiful. Ahh I just love this fabric.

Jenna Cardi

The only downside I can think of is that it does wrinkle up a bit, as you can see in these photos (it’s not nearly as noticeable in real life – otherwise, I would’ve steamed things up before taking photos. Womp whomp, deal with it). Kind of the same thing as linen – just natural wear wrinkles. If that bothers you, you’ll want to stick to something with a poly blend. For me, though, wrinkles are an ok trade-off for natural fibers!

Jenna Cardi

Anyway, I loved my Jenna cardigan so much – I immediately made a second one!

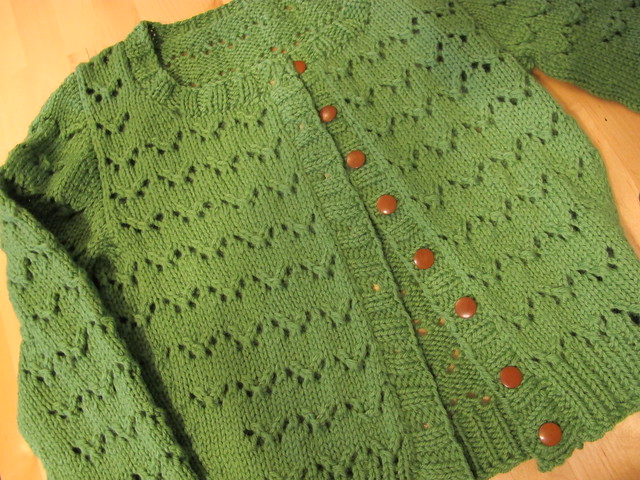
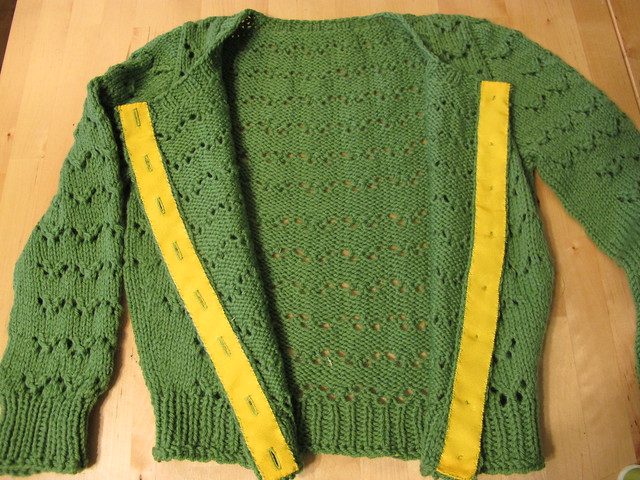
This one is pretty boringly similar to the black merino one, except it’s longer. It’s not quite the longer version – I cropped some off for my proportions – but it does look better with the shirt I’m wearing underneath it, ha 🙂 Instead of using merino wool, I used some wool knit that I picked up at Mood Fabrics when I was recently in the store. This stuff is less drapey than the merino – it’s almost like sweatshirting, except without a fleecy side. It’s also not machine washable, so there’s that. I’ll have to handwash it like I do all my hand knits, oh well.

Jenna Cardi

Sewing both of these was ridiculously easy, by the way. My second version took me all of 2 hours – not bad! I made the bust 32″ and took in the sleeves a bit because they were a little wide. I also had to shorten the sleeves by a couple of inches.

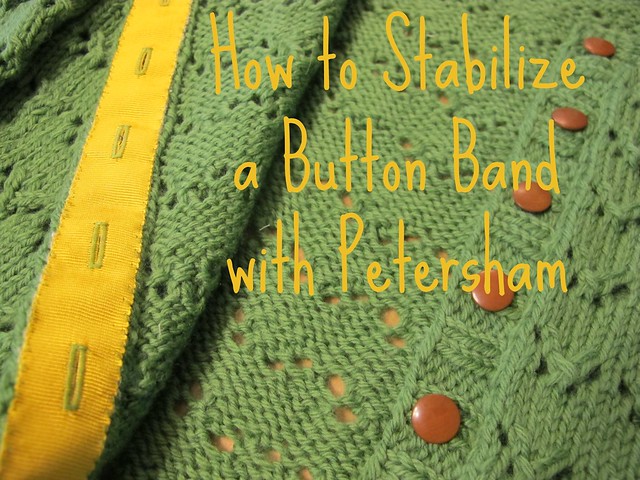
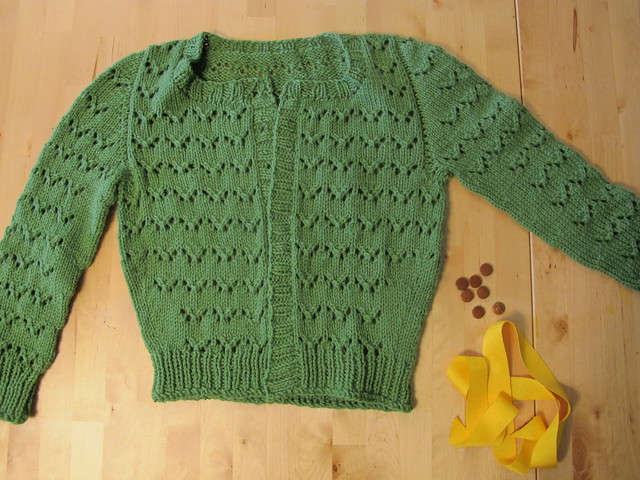
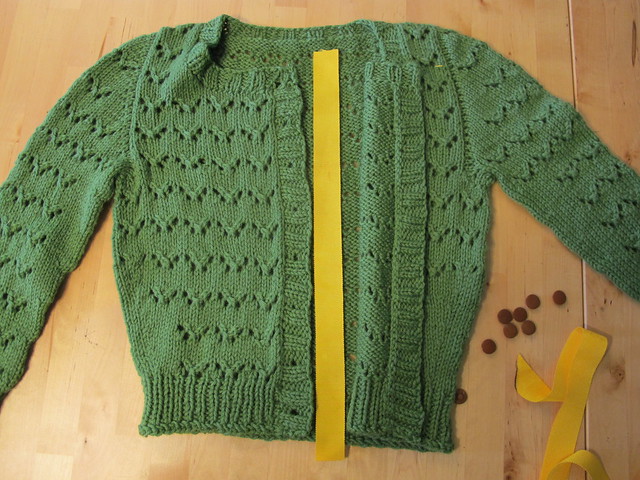
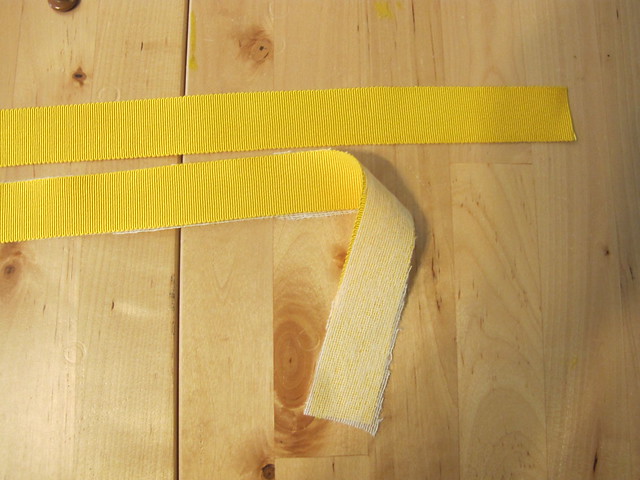
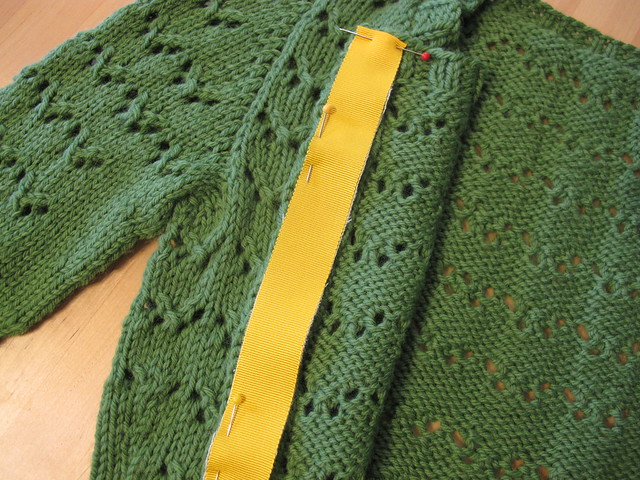
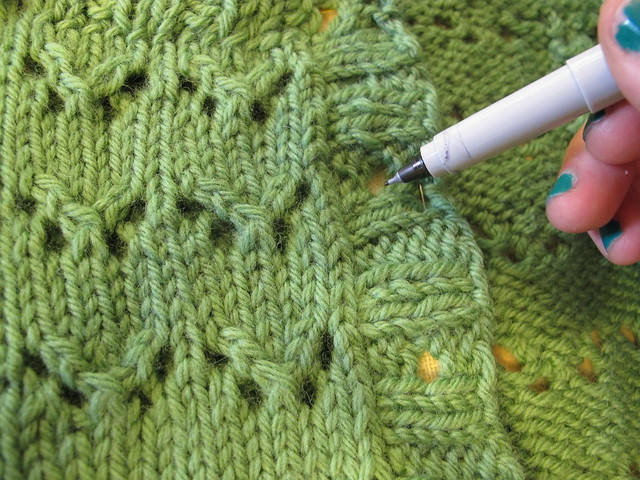
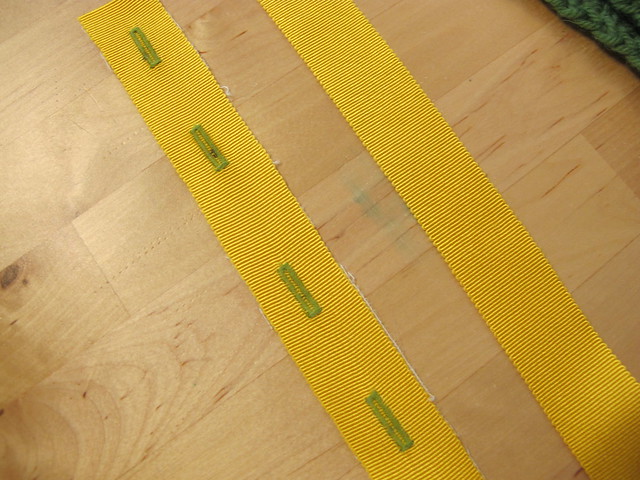
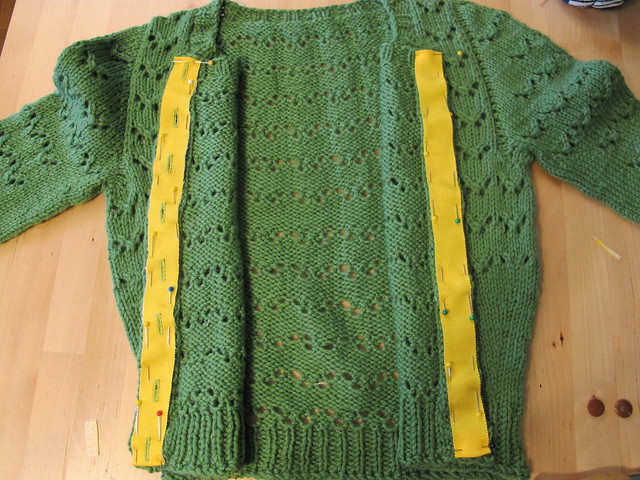
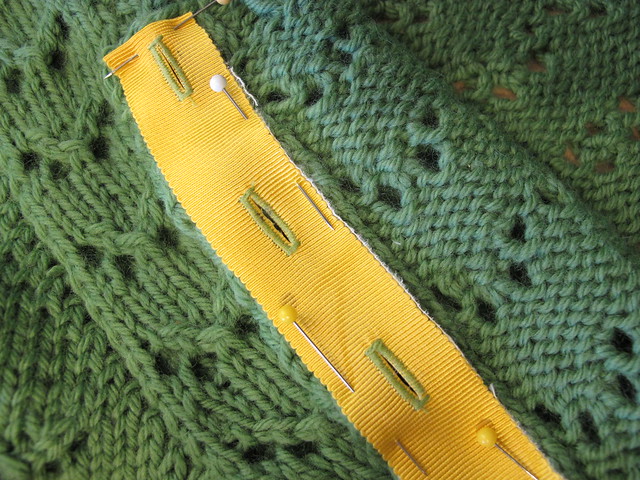
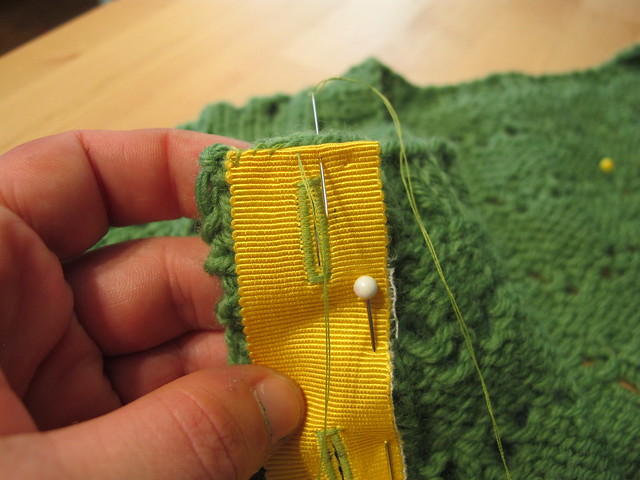
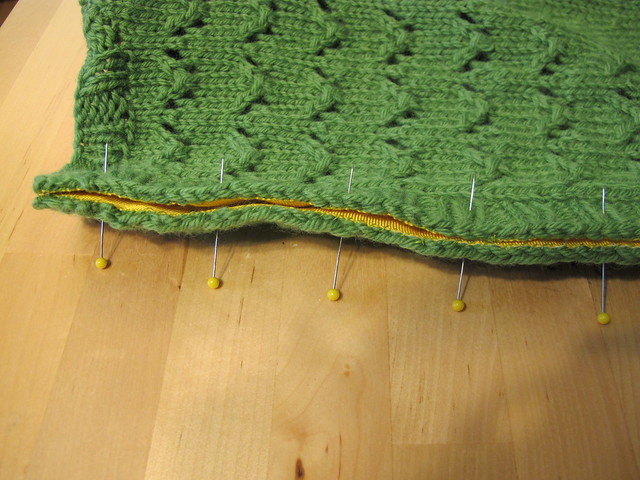
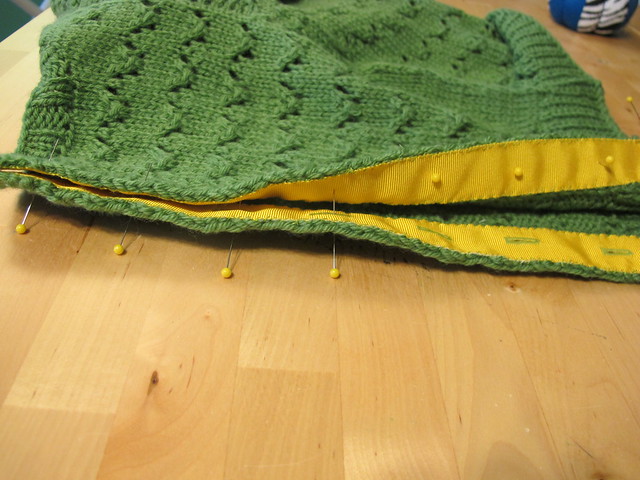
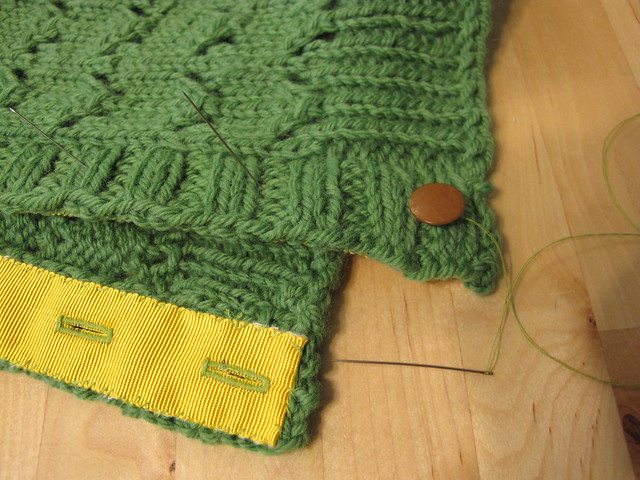
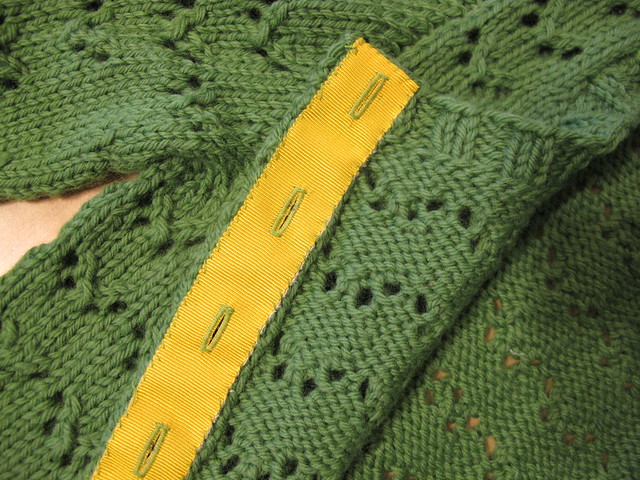
As I mentioned, I was pretty apprehensive about the button bands – but surprisingly enough, the button holes were way less problematic than I was anticipating! I made some test button holes – experimenting with interfacing, tear-away stabilizer, no interfacing – but ultimately went with the instructions, as I figure Kat knows more than I do when it comes to knit button holes 🙂 The button band is stabilized with woven fusible interfacing, and it’s sewn on with a 1:1 ratio (meaning it’s not stretched at all). This gives the knit fabric enough heft to tolerate a button hole stitch without getting eaten into the bobbin area (my former experience with this sort of thing). For the black merino cardi, I also used tear-away stabilizer in addition to the interfacing. For the grey cardi, I skipped the tear-away stablizer and just kept things purely interfaced. Both worked out splendidly!

Jenna Cardi

Another thing I’ll point out is that, while these cardigans are somewhat fitted, there’s just enough ease included to keep the button bands from gaping open. Always a plus in my book!

Jenna Cardi

Jenna Cardi

I’m thrilled that they both look just as good unbuttoned as they do buttoned – which is important to me, as a cardigan-wearer. I usually button things up, but it’s nice to have unbutton options:)

Jenna Cardi

Jenna Cardi

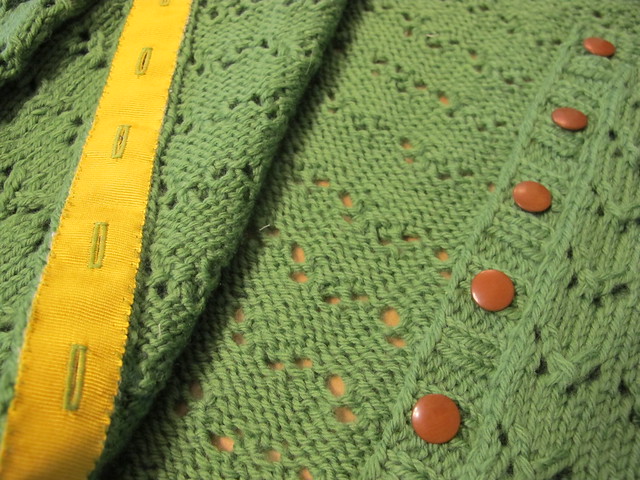
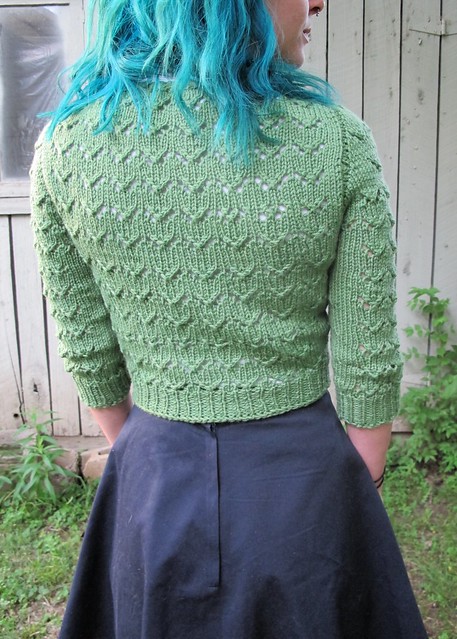
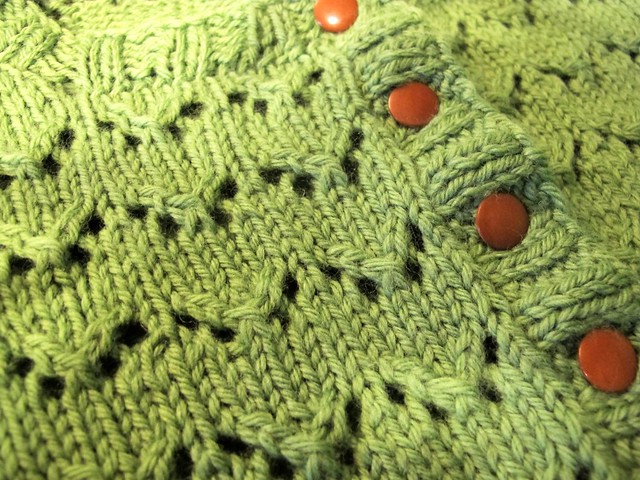
Here are some ~extreme~ close-ups of the merino wool cardigan. Check out that topstitching! Ughhh it’s so beautiful! I did add a little more topstitching than called for in the pattern – I wanted to tie in the topstitched button bands and button holes, so I included it at the shoulder seams and along the bottom band. Plus, it’s just beautiful. Seriously.

Also, how bout them buttons? These are also from Organic Cotton Plus. I know black and brown is generally frowned upon as a color combination, but I like it 🙂

Jenna Cardi

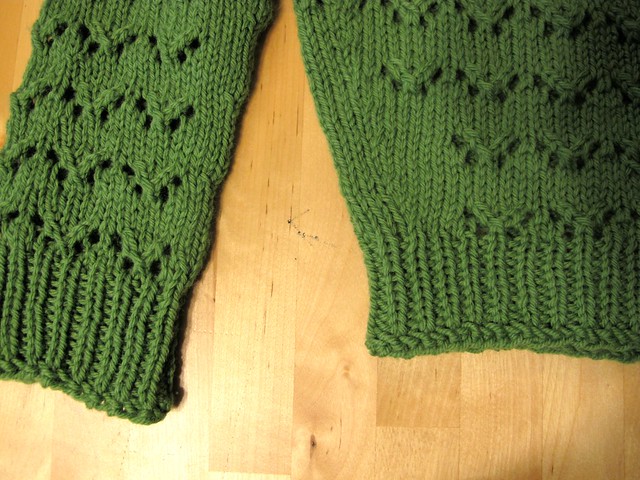
Grey cardigan close-up 🙂 Boring buttons are from my boring stash.

So what do you think – are you team sew-your-own-cardi yet? I hope so, because Muse Patterns has hooked me up with an extra pattern to giveaway! 😀

Jenna Cardi

GIVEAWAY IS NOW CLOSED
To enter to win your very own Jenna Cardi, just leave a comment on this post and tell me what you plan on makin’! Which view? Any particular fabric? Do you have a wild card up your (cardigan)sleeve? Inquiring minds want to know! 🙂 This giveaway is open WORLDWIDE and I will close the comments a week from today, on MONDAY, SEPTEMBER 22, 2014 7:00 AM CST. Good luck, y’all!
GIVEAWAY IS NOW CLOSED

**Some disclosures now – I was given the Jenna cardi pattern from the patternmaker herself, for free, to try and review. I was *also* given the organic merino wool fabric & butons from Organic Cotton Plus, again, for free to try and review. The grey wool knit was purchased at Mood Fabrics NYC out of my own pocket. No one paid me for this post – I’m just doing it for the freebs! As always, all opinions are my own 🙂

Completed: My Finished OAL Dresses!

28 Jul

Good morning, everyone! I hope your AM is filled with lots of sunshine, like mine, and coffee, unlike mine (because, *ahem* someone forgot to mention we were out after he made a pot yesterday). Anyway, that’s neither here nor there – you came here to see finished dresses and sweaters, right? Let’s get to it!

OAL 2014: Completed Simplicity 1803 + Myrna Cardigan

Fair warning – this is a pretty picture-intensive post. I have two dresses to show plus a cardigan! (You’re so lucky that I don’t have two sweaters. I tried, but the second one is technically a vest right now soooo…). While I could theoretically stretch this out into 3 posts, I actually really hate it when people do that so I’m just dumping it all in one glorious picture-filled OAL extravaganza! Hope you don’t mind looking at my mug 😉

Speaking of which… you probably noticed the change in scenery, not to mention actual decent looking photos. That’s because I didn’t take them! Ha! All photo credit for this post goes to my lovely friend, Jenna, of Kitty Cat Stevens (you may recognize her photos from last year; she took those ace ones of my Lace trench). She really did an amazing job with these and I just love how they turned out!

OAL 2014: Completed Simplicity 1803 + Myrna Cardigan

Dress #1 was made with a lightweight cotton from Mood Fabrics (purchased at the NY location while I was there in March). The bodice is view C with cap sleeves, a softly pleated skirt and a lapped zipper.

OAL 2014: Completed Simplicity 1803 + Myrna Cardigan

OAL 2014: Completed Simplicity 1803 + Myrna Cardigan

OAL 2014: Completed Simplicity 1803 + Myrna Cardigan

LOOKS SO GOOD WITH MY HAIR.

OAL 2014: Completed Simplicity 1803 + Myrna Cardigan

OAL 2014: Completed Simplicity 1803 + Myrna Cardigan

Dress #2 was made with a gorgeous rayon challis from Grey’s Fabric. I used the same pattern, swapped out the bodice for view B with bias-faced arm holes, a softly gathered skirt and an invisible zipper.

OAL 2014: Completed Simplicity 1803 + Myrna Cardigan

OAL 2014: Completed Simplicity 1803 + Myrna Cardigan

OAL 2014: Completed Simplicity 1803 + Myrna Cardigan

OAL 2014: Completed Simplicity 1803 + Myrna Cardigan

OAL 2014: Completed Simplicity 1803 + Myrna Cardigan

OAL 2014: Completed Simplicity 1803 + Myrna Cardigan

The hem on this one is finished with rayon seam binding. So pretty!
OAL 2014: Completed Simplicity 1803 + Myrna Cardigan

OAL 2014: Completed Simplicity 1803 + Myrna Cardigan

Finally – here’s Myrna herself! I guess I can talk a little more about this part of the project since I haven’t really mentioned it much on my blog (unlike that entire OAL full of posts, ha).

OAL 2014: Completed Simplicity 1803 + Myrna Cardigan

Can I just say – I LOVE THIS CARDIGAN. It was super fun and super easy to knit, not to mention super fast (how many more times can I say super in this post?). According to my Ravelry, I finished it in just under a month.

I went with the size XS, getting gauge with size 6 needles (which is typical for me + worsted weight yarn + Andi’s patterns).

OAL 2014: Completed Simplicity 1803 + Myrna Cardigan

The yarn is (super?)AMAZING, isn’t it? Something I picked up from my local yarn store, Haus of Yarn– I knew I wanted neon yellow to go with the fabric for dress #1, so I took a swatch with me and went lurkin’. Maybe it’s just my yarn store (granted, we have more in this city – actually, a surprising number of really good yarn stores – but this particular store is less than two miles from my house, so obviously I like shopping here best haha), but they never seem to have the color I want in the weight/fiber I prefer! In this case, they only had a couple options for neon yellow worsted weight wool. Because I am an adult, I picked the most expensive option – this is Jill Draper Makes Stuff, and the color is Daffodil. At $26.50 per skein, it was definitely a splurge, but I only needed 2 skeins for this sweater so I figured it was worth it 🙂 Spoiler: It totally was! This yarn was a dream to work with – so soft and squishy, with a beautiful saturated color gradient. I don’t know if this particular yellow looks any good on me, but I also don’t give a fuck because it makes me happy.

OAL 2014: Completed Simplicity 1803 + Myrna Cardigan

I knit the pattern 100% as written, and had no issues. Blocked it with a bit of gentle shampoo (I keep meaning to get that special wool washing/no rinse shit they sell at my LYS, but since I went over budget with the yarn I had to put it back. Maybe next time. Maybe never lolz). True story: I forgot to finish the keyhole until after I’d blocked the whole thing, so I had to go back and keep knitting. I’m glad I did, though – I was on the fence about the keyhole because it looks kind of wonky at first, but once it’s finished it really does make a world of difference!

OAL 2014: Completed Simplicity 1803 + Myrna Cardigan

The button bands are stabilized with Petersham ribbon. Because this cardigan has a v-neck, I steamed the Petersham with a gentle curve to mimic the shape of the neckline, and stopped it a little above the top button hole (so, before you ask: no, it doesn’t go all the way around the neck). I used this tutorial from Sunni’s blog for guidance – she’s using it to hem a skirt, but it’s the same concept with the neckline, with a less aggressive curve. The vintage glass buttons are from my stash, previously purchased at the flea market.

OAL 2014: Completed Simplicity 1803 + Myrna Cardigan

I love how well the sweater goes with dress #2, because that was not planned at all! I didn’t decide to make a second dress until I’d already started the sewalong, and knit about half of the sweater. They do look good together, though. Yay for unintentional matching!

How are y’all doing with your OAL garments? Almost finished? Remember – the deadline to enter is this Thursday, July 31. Don’t forget to post your finished outfits in the Ravelry thread, which will give us all full lurking capabilities and also enter your ass to win some prizes. We also have the Offical Unoffical Flickr Group if you don’t use Ravelry/only finished a dress – but please be aware that your two pieces need to be uploaded to the Ravelry thread to be eligible for the contest 🙂 I’m loving all the dresses and sweaters I’ve seen so far, and I need to see MORE PLS.

Feeling inspired? Here’s a link to all the tutorials covered during the OAL:
1: Choosing Your Fabric and Size
2: Cutting and Marking Your Fabric
3: Sewing the Bodice
4: Sewing Sleeves or Bias Facing
5: Attaching the Skirt
6: Inserting a Lapped Zipper (see also: My Method for Invisible Zippers)
7: Hemming & Finishing
How to Stabilize a Buttonband with Petersham Ribbon (not part of the official OAL, but useful nonetheless!)
FINALLY, you can see my Myrna Ravelry notes here.

OAL 2014: Completed Simplicity 1803 + Myrna Cardigan

Whew! That’s a lotta post for a coffee-deprived Monday morning! 😉

Tutorial: How to Stablize a Buttonband with Petersham

20 Jun

Stablizing a buttonband with Petersham

A promised, here is the much-requested tutorial for adding Petersham ribbon to the button band of your handknits! This is a little trick I’ve done for nearly all my handknits since I started cranking ’em out… it’s not 100% necessary for finishing your knits (so please don’t be freaking out if you’ve never heard of this technique before!), but it is super handy if you wear knits with negative ease and have problems with the button band/button holes gaping open. We are basically going to take a firm woven ribbon and sew it to the inside of the button band, so it will stabilize the knit and prevent it from stretching and thus gaping open.

I know there are a million ways to do this particular technique; this is my personal favorite TNT. It involves hand sewing and machine-worked button holes (although they are not sewn through the sweater as done in (Tasha’s tutorial from a few years ago). I personally like to use Petersham ribbon as my stabilizer – it’s relatively inexpensive, wears well and feels luxurious. You can also use grosgrain ribbon, seam binding, firm lace, satin ribbon, or even fabric selvedge – whatever you want! I ain’t here to judge 🙂

Stabilizing a button band with petersham
You will need: your finished+blocked cardigan, a length of petersham ribbon (this will vary depending on the length of your sweater, but aim for approximately the length of your button band x2 plus a couple inches to fold under), and your buttons.
NOTE: I am using 1″ wide petersham for this particular sweater. The width of your petersham may vary, depending on how wide your button band is. Always measure to be sure!

Stabilizing a button band with petersham
Measure your ribbon to the length of your button bands plus about 1″ extra (for 1/2″ overhang at both the top and bottom of the button band), and cut two pieces to this length.

Stabilizing a button band with petersham
OPTIONAL: You may want to interface one piece of the petersham, so the button holes are reinforced. Just cut a strip of interfacing on the straight grain and fuse it to one side of one piece of ribbon. Set the non-interfaced ribbon aside for now.

** Yes, your interfacing will show slightly on the outside of your sweater, if your gauge is loose enough. If this is a concern (obviously it’s not a concern with this sweater; but I could see how using white interfacing+black sweater miiiight look a little weird!), you might consider making a Petersham sandwich and using two lengths of the ribbon with the interfacing in between. I haven’t personally tried this, but it makes sense in my head. Also, now I want a sandwich. I just ate breakfast. Fuck.

Stabilizing a button band with petersham
Pin the interfaced ribbon to wrong side of the button band with the button holes, interfacing side on the inside, and fold under the top and bottom edges by 1/2″. Try to center the ribbon so that there is about a stitch’s worth of overhang on the outside edge of the button band.

Stabilizing a button band with petersham
Use a marking tool to mark a small dot in the center of each button hole, on the interfaced side of the petersham. You may want to use chalk or disappearing ink; I used a sharpie because I’m a terrible person with no morals.

Stabilizing a button band with petersham
Take the petersham off the button band and, using your sewing machine, stitch button holes at each of the markings you made. Dab each button hole with a drop of Fray Check (this is optional, but I think it makes for a cleaner/non-hairy button hole) and allow to completely dry. Carefully cut all the button holes open.
PROTIP: Test your button hole size first on a scrap of interfaced petersham so you can be sure that your buttons fit the holes! Ain’t nobody got time for wrong size button holes.

Stabilizing a button band with petersham
Open your sweater up and pin the petersham to the inside of each button band. Match the petersham with the buttonholes to the button band with the button holes (being careful to make sure that each button hole is aligned so that they can be used!), and match the other petersham on the button side of the button band. On both bands, fold the petersham under 1/2″ at the top and bottom. Again, try to center the ribbon so that there is about a stitch’s worth of over hang on the outside edge of each button band (this is just so it looks nice 🙂 ).

Stabilizing a button band with petersham
Here’s a close-up of my ribbon pinned to the button band. You can see there is a little bit of button band overhang on either side of the ribbon.

Stabilizing a button band with petersham
Now is a good time to check and make sure that the button bands are the same length on your sweater. If one is longer than the other (which can totally happen if you stretched the button band while pinning everything down), unpin and readjust until they are the exact same length.

Stabilizing a button band with petersham
Now time to stitch! Using doubled-up thread, whipstitch all the way around all 4 sides of the petersham, starting at the top and working your way around. Do this to both button bands.

Stabilizing a button band with petersham
Here’s another photo of the handstitching. Try to keep your stitches evenly spaced (this will give them more strength, in addition to just looking nice!) and try not to gouge a big chunk your sweater yarn with each stitch.

Don’t worry about stitching around the edges of the button holes. I always leave mine loose, and I’ve never had a problem with the buttons getting stuck and/or not being stabilized enough. I imagine if you were using super huge buttons – like, 2″ big buttons – you might want to sew around the edges, but for buttons smaller than 3/4″ it’s fine to leave them unsecured.

Stabilizing a button band with petersham
Once your button bands are stabilized with ribbon, lay them petersham sides together and raw edges matching.

Stabilizing a button band with petersham
Stick a pin down the center of each button hole.

Stabilizing a button band with petersham
Gently pull the button bands apart, pulling the head of the pin through the button hole and leaving it sticking in the button side of the ribbon.

Stabilizing a button band with petersham
Now you can use the pins as a guideline for where to sew your buttons! This ensures that they are exactly centered in the button band and also aligned with the button holes.

Stabilizing a button band with petersham
And there you go! Stabilized button bands with NO GAPE!

Stabilizing a button band with petersham

Stabilizing a button band with petersham

Stabilizing a button band with petersham
God, is that just like, the sexiest button band or what.

Hetty
And here’s the sweater on me! (Hetty, in case you missed the post!) Notice that the lacework is nice and open, thanks to the negative ease – but the button band is strong and secure and there is no pulling at the button holes. Oh petersham, how I love you ♥

Aaaaaand, that’s it! Told y’all this was an easy technique 🙂 Now, go forth and conquer that button gape once and for all!

Completed: The Hetty Cardigan

11 Jun

Omg, when was the last time I posted a completed knitting project? It’s been far too long.

Hetty

I guess we can make up for it now! Everyone, meet Hetty 🙂

Hetty

Hetty is a sweet, cropped cardigan knit entirely in lace, which makes it perfect for warmer spring/summer months. The cardigan is knit seamlessly from the top-down, which means there’s no seaming after you’ve finished the knitting – just a block and buttons and it’s ready-to-wear! I really prefer these seamless top-down (and occasionally bottom-up) patterns, as the whole seaming thing just really puts me off haha.

Hetty

As you can see, I went the copycat route and basically copied Andi verbatim with my pretty spring green yarn. Both the pattern and the yarn were actually gifted to me by reader/Ravelry follower, Julia. I was planning on joining the Hetty Knit Along when I received these goodies (which means I’ve been sitting on this pattern+yarn for… almost a year now, eep!), but other projects got in the way and I wasn’t actually able to start this until March. Oh well! Better late than never 🙂

Hetty

So… let’s talk about this pattern a little. Theoretically, this is a fairly simple pattern with VERY easy lace work. The open lace work, the cropped length, and the short(ish) sleeves mean that this should be a pretty quick knit. For me, I did struggle a lot with getting the lace work to properly match up. This is because the side seams are knitted in stockinette, so that the decreases can fit. Since the stockinette count can change from row to row, I had a hard time remembering *where* to start my lacework pattern, and thus a lot of it did not line up. I ripped out a significant amount of this sweater – including the entire back about four times (I think, I lost count because it was just too depressing haha), because I hated how the lacework wasn’t lining up. Despite all this ripping out, I still got the sweater finished in about two and a half months. I can only manage to knit a couple of hours a week at this point, so that’s pretty freaking fast!

Hetty

Here is my biggest tip regarding that damn lacework – once you start getting to stockinette territory, place a marker at the beginning of one of the lacework repeats. Doesn’t matter which one (although I’d recommend one that is a couple repeats away from where the stockinette begins) – this will just give you a visual indication of where a lace repeat needs to START, and from there you can count back to the beginning and see how many lace repeats will fit/need to be turned into stockinette. I hope this makes sense! It’s kind of hard to tell where the repeats start when you’re in the middle of a row, and I’m pretty fucking awful at tell where patterns start when I’m looking at them vertically, so this was the only way I could keep the lace pattern consistent and stacked correctly. I also only figured this out one I got to the second sleeve, hence all my ripping out. Oh well – learn from my mistakes, ok? 🙂

Hetty

Here you can sort of see the lace repeat as it turns into stockinette. Very clever for the way this is constructed, as you don’t have to worry about messing up the lace with additional decreases, but like I said – it can totally get confusing. Use those stitch markers!

Hetty

Hetty

Also, that “easy to memorize” lace pattern was VERY hard for me to memorize! I did finally get the hang of it… again, about halfway through the second sleeve. Haha! Oh well!

Hetty

Despite my big giant lace-induced headache, this was a fun sweater to knit up. I really love the open lace design and I’ve already gotten quite a bit of wear out of it – the light, open lace makes this so nice to wear in chilly air conditioned buildings, and the color is nice and summery 🙂

Hetty

Hetty

I used Cascade 220 yarn (my favorite! ♥) to knit this, and I made the size Small. Based on my gauge swatch, I was able to get gauge with size 6 needles (seems about right for me + worsted weight yarn). Fair warning – this sweater is pretty tiny while it’s being knitted. I can’t even tell you how many people asked me who’s baby I was knitting a sweater for haha (Answer: NO BABIES! Are you fucking KIDDING me?? haha!). But as you can see, it blocked out very nicely! I soaked this guy in warm water and squished it around on a towel until the lace opened up and the size was accurate for my body. I just love how it turned out!

Hetty

Hetty

Hetty

Oh, and I’m wearing my navy Hollyburn in these photos, fyi. Thought they kind of showed the skirt better than the photos in the last post! Plus, I love combination of these two colors 🙂

Hetty

I promise I did take photos of the sweater laid out in all it’s fully glory, but Flickr REFUSED to believe that the files were actual photo files. So… have some close-ups, I guess?

Hetty

Vintage buttons + petersham at the button band! I used neon yellow petersham because that’s what I had on hand, and I think it looks really pretty with the green 🙂

Speaking of Petersham, I did take photos of the process of attaching it to the button band, so keep an eye on this space next week for a TUTORIAL! Woohoo! I’ve had loads of people ask how I attach the petersham, so hopefully this will be helpful to ya 🙂

Hetty

Love looking at close-ups of handknits 🙂

Hetty

Sooo, there ya go! Pretty Hetty, just in time for… summer 😉 Now to finish my Sunshine yellow Myrna for the OAL (which is coming along FAST – almost done with the first sleeve!). Full Ravelry notes on Hetty can be found here.