Tag Archives: hollyburn

OAL2016: My Finished Outfit!

29 Jul

What up, everyone! It’s practically the end of the July – two days left to go! – which means one thing ’round these parts… The Outfit-Along is nearly over!

OAL_Banner

I’ve had a lot of fun with the pieces this year – both making and wearing them! – and I’m excited to finally show you guys my finished sweater + skirt!

OAL2016: Zinone Sweater + Hollyburn Skirt

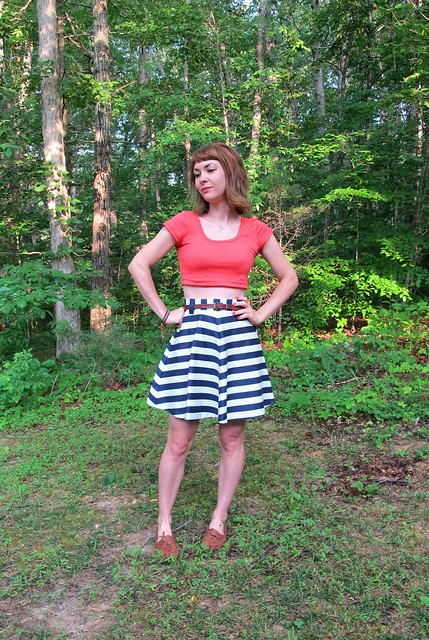
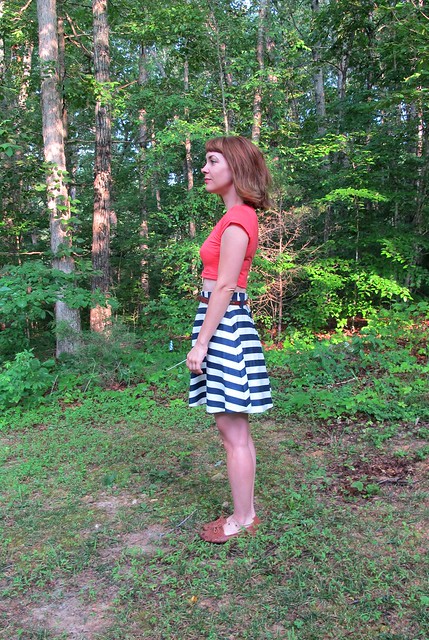
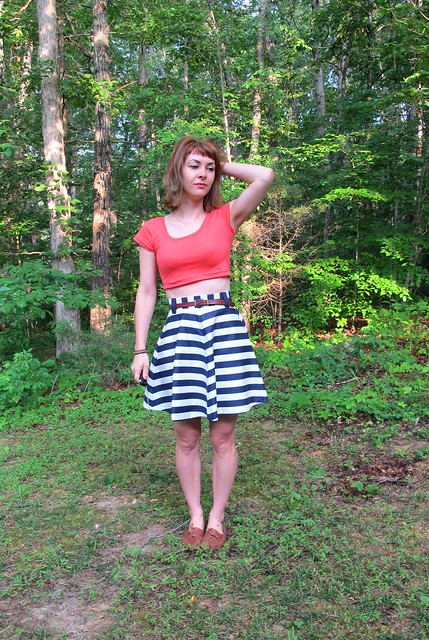
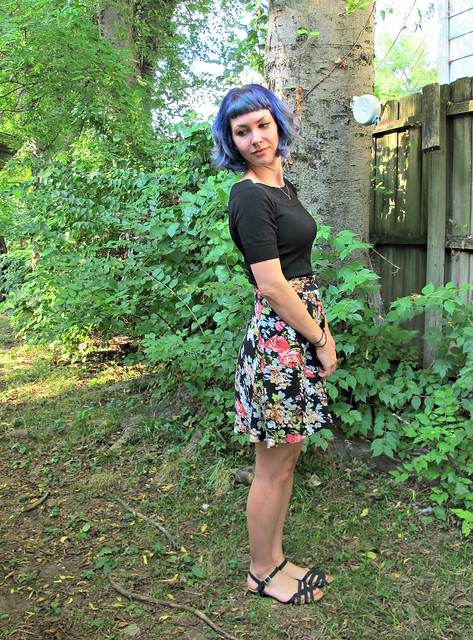
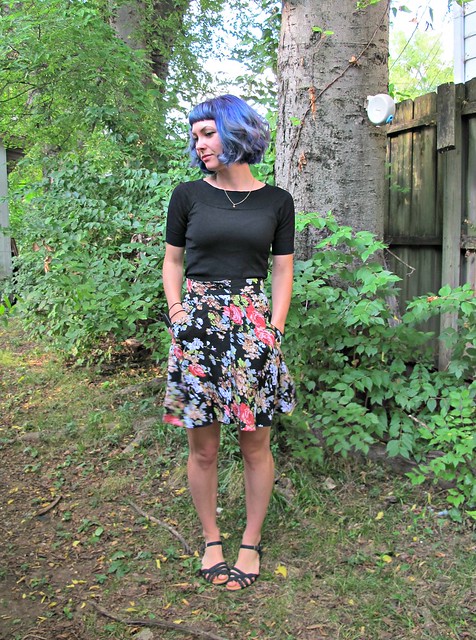
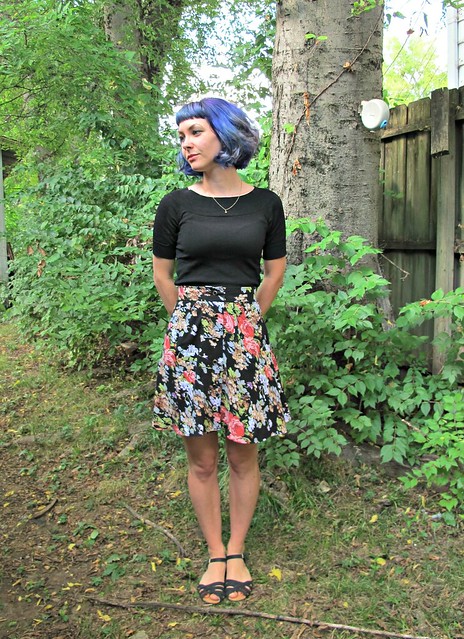
Here is the complete outfit!

The sweater is Zinone by Andi Satterlund, and the skirt is a Hollyburn from Sewaholic Patterns.

OAL2016: Zinone Sweater + Hollyburn Skirt

OAL2016: Zinone Sweater + Hollyburn Skirt

OAL2016: Zinone Sweater + Hollyburn Skirt

OAL2016: Zinone Sweater

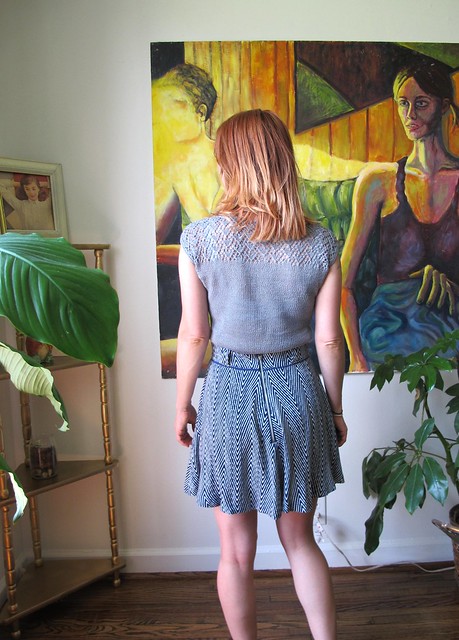
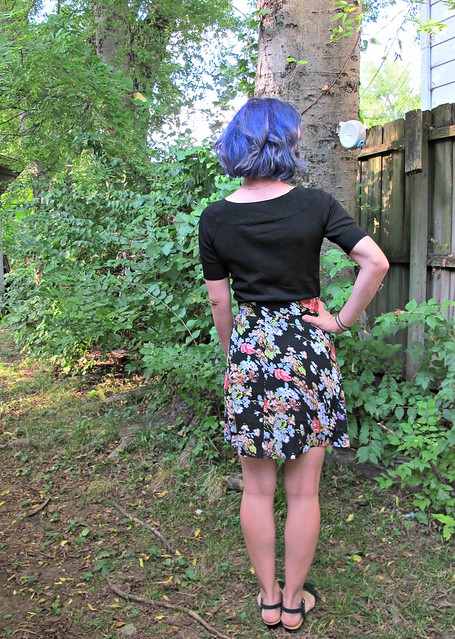
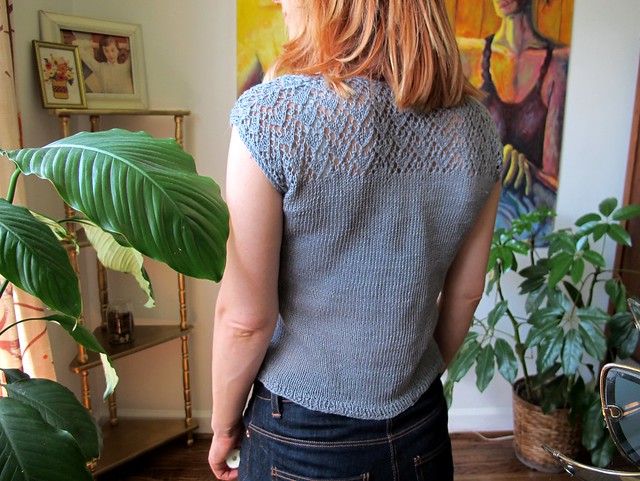
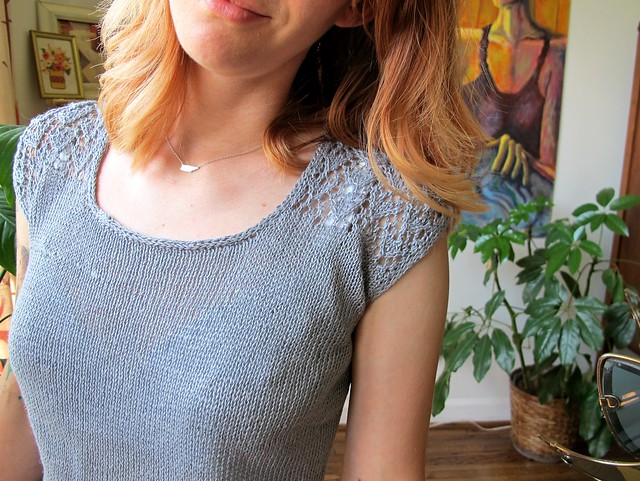
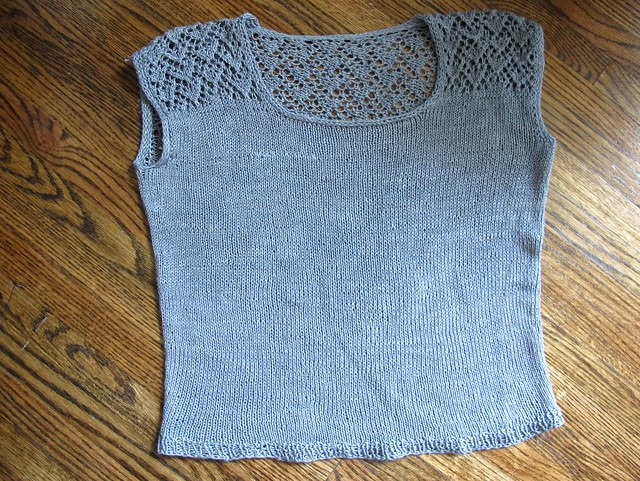
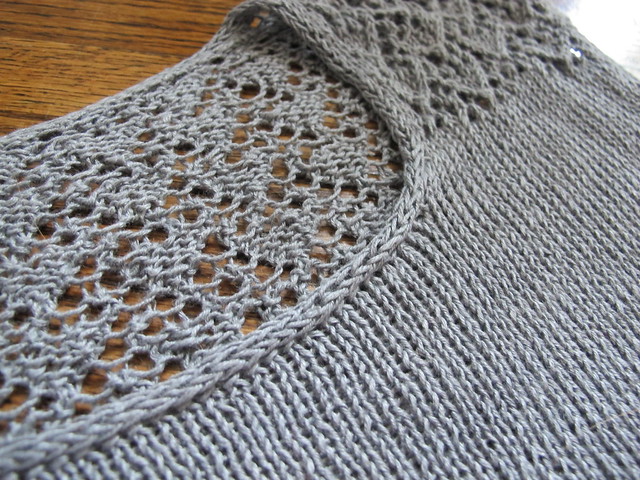
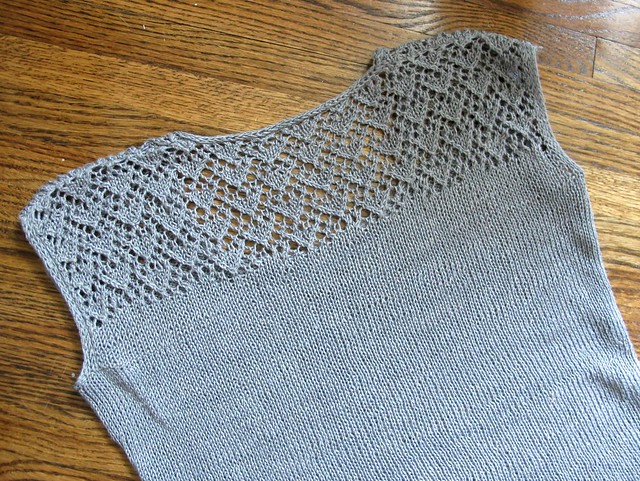
Zinone was made using the suggested yarn, Quince + Co Sparrow (the color is Moon), which is a fingering weight linen yarn. This was my first time working with linen and OMG TRUE LOVE Y’ALL. Very easy to work with and felt so good on my hands! My gauge swatch put me at size 2 needles, and I knitted the size XS (which is my usual size for Andi’s patterns and corresponds with my bust measurement). I chose to knit the version with the partial lace back, and slightly cropped. I was originally going to do the full lace version, but I guess I’m way out of lace-knittin’ practice because I had a helluva time working this one out. Fortunately, the directions for the partial and full lace back at the same for a bit at the beginning of the pattern, which gave me plenty of time to change my mind šŸ˜› I also completely frogged the entire thing and started over after finishing the lace section, because I realized way too late that I had read the pattern wrong (which is why I was having issues in the first place). I was trying to be clever and separate my repeats with stitch markers – you can’t do that with this pattern, as some of the stitches borrow from previous repeats. Whoops. Once I realized I’d done goofed, let me tell you… it was hard to rip everything out and start over. But I’m glad I did, because my second attempt at the lace looks pretty bomb-ass, if I do say so myself šŸ˜‰

I made some slight sizing and length modifications to the sweater as well – I knitted the correct number of rows for the cropped version, but somehow it ended up really short (I am thinking I read the pattern wrong). I just continued knitting until I got to the length that I wanted, and did a couple more rounds of decreases as well. Speaking of length, this sweater is only about an inch shorter than the schematics – it’s 16.5″ long from the shoulder, which hits me right about at the belly button. The cropped version on Andi appears to be a lot shorter than mine, even though it says it’s an inch longer.

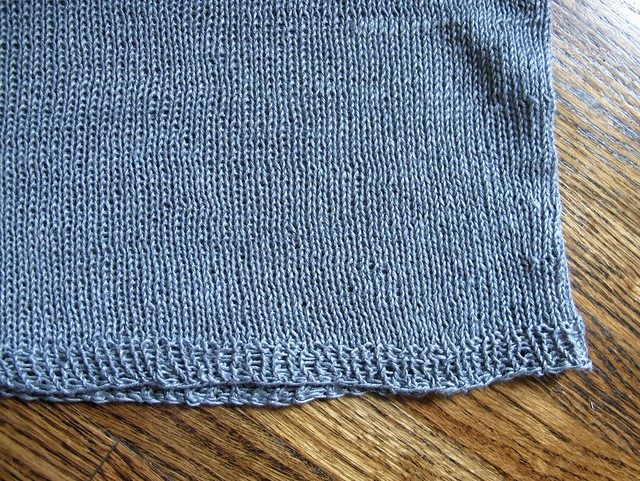
Anyway, this was a very easy and satisfying knit. I did nearly run out of yarn at the end – I bought enough for the cropped version, and ended up frogging about 3 rows of my gauge swatch. Actually, I had an extra skein but I was trying really hard not to use it so I could be cheap and return it to the store šŸ˜‰

OAL2016: Zinone Sweater

OAL2016: Zinone Sweater

I LOVE how this linen feels in the summer heat – finally, an excuse to wear my handknits even in July! šŸ˜€ And it’s pretty awesome that it’s machine washable. I haven’t done the recommend 3 washing cycles yet, though – I did one Soak wash (this is how I wash all my knits… and my lingerie for that matter. Soak is AMAZING, cannot recommend enough) and then one wash in the washing machine. My new place has me doing laundry at the ‘mat, so running 3 loads back to back to back isn’t exactly doable for me! (well, it is. But I’m not about to pay for that haha) So far, though, it has softened up considerably after even 2 washes. Can’t wait to see how it softens even more with additional wear and washing šŸ˜€

OAL2016: Zinone Sweater

OAL2016: Zinone Sweater

OAL2016: Zinone Sweater

OAL2016: Zinone Sweater

OAL2016: Zinone Sweater

Sorry, loads of photos!

OAL2016: Hollyburn Skirt

OAL2016: Hollyburn Skirt

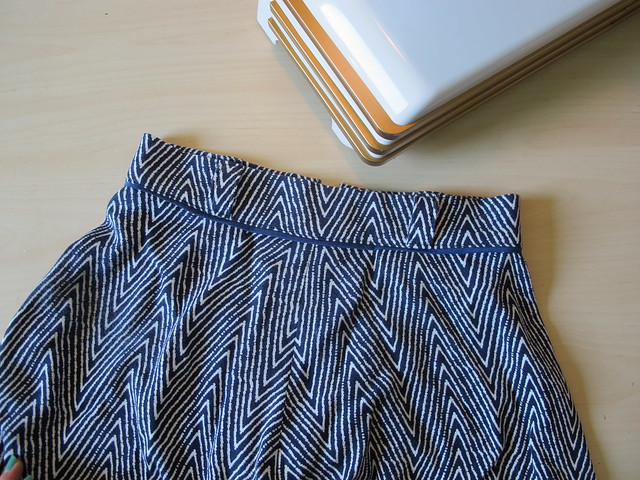
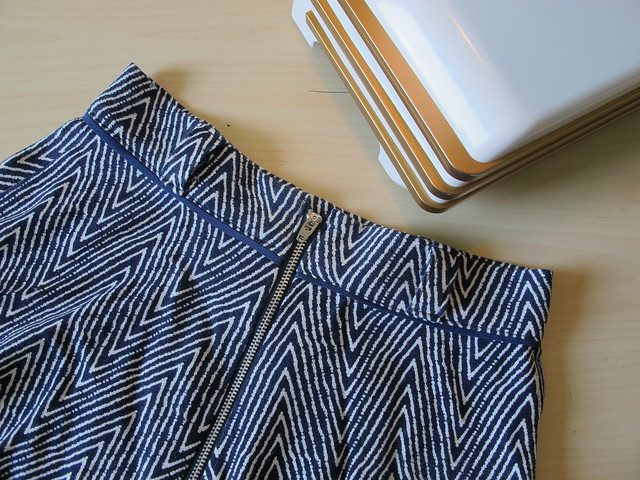
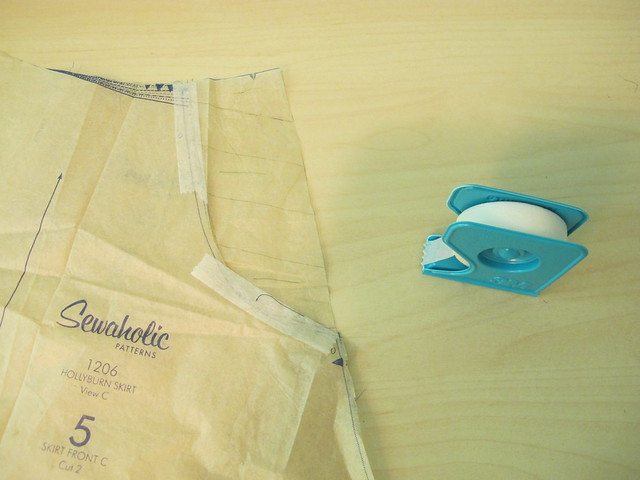
Now for the Hollyburn!

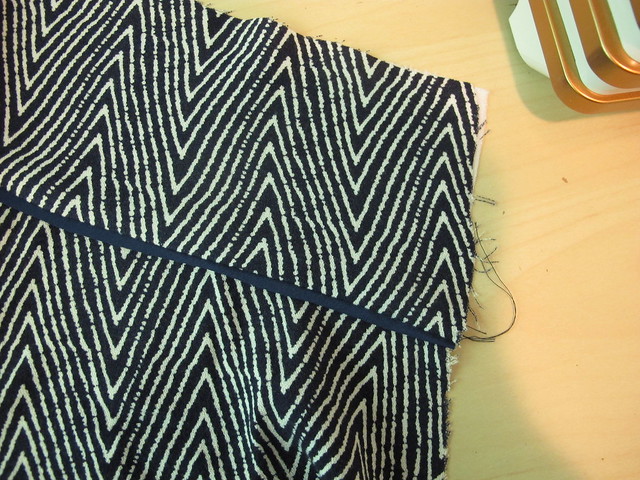
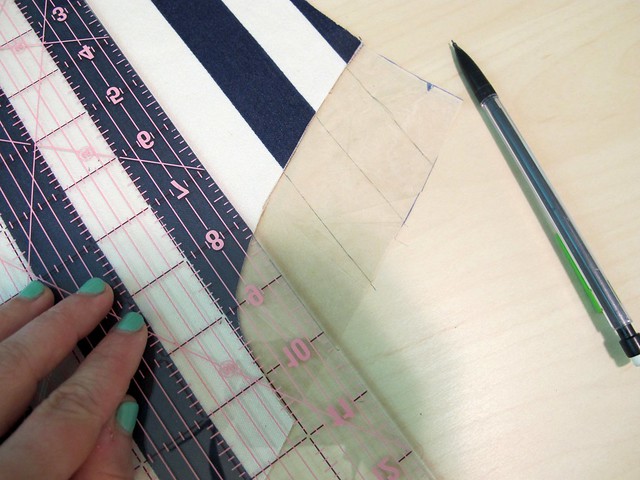
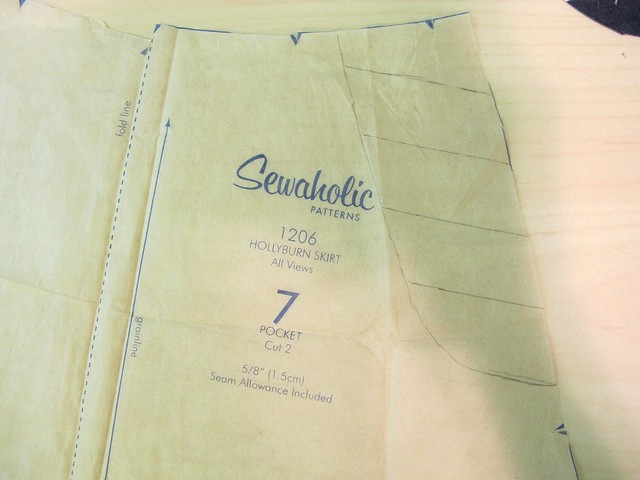
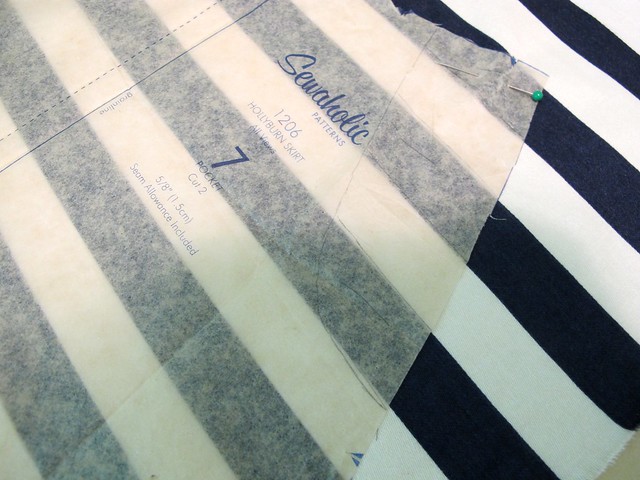
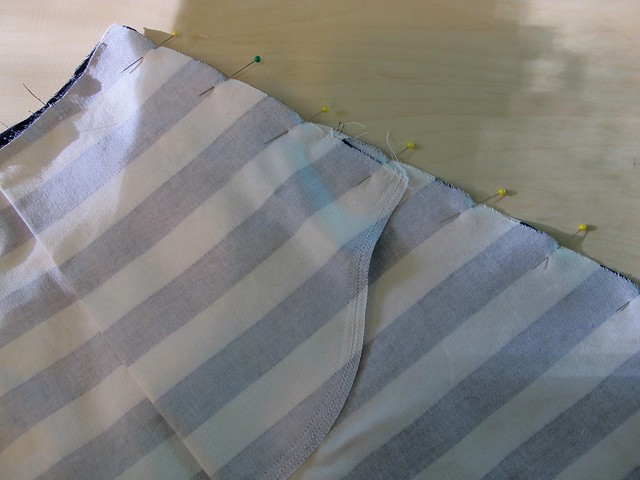
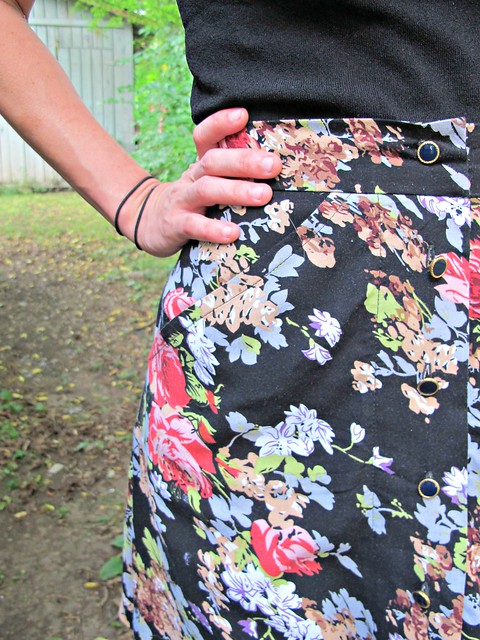
I already wrote a couple posts about the modifications to make this particular skirt (see: Choosing Your Fabric, Flat Piping, and Installing an Exposed Zipper), so I’ll just brief over the key details here.

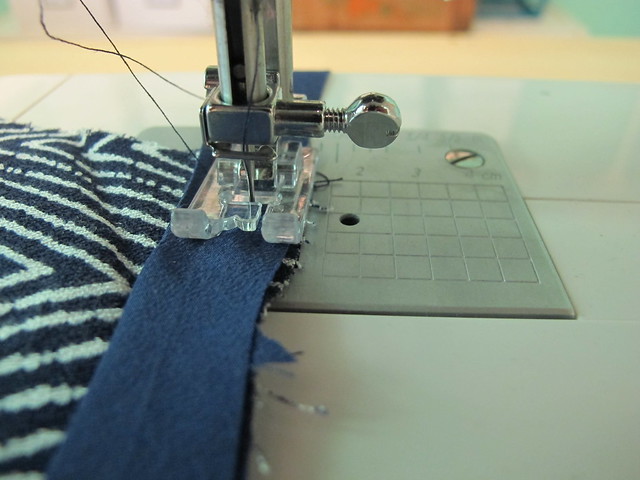
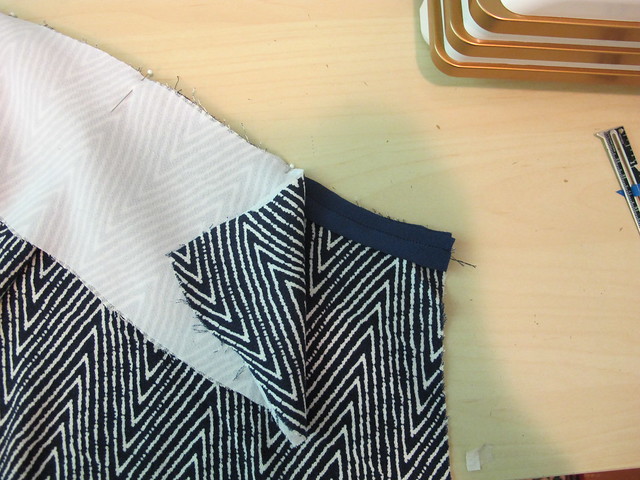
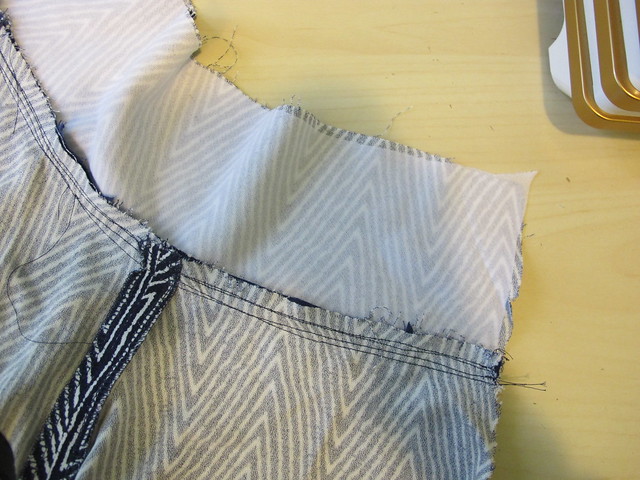
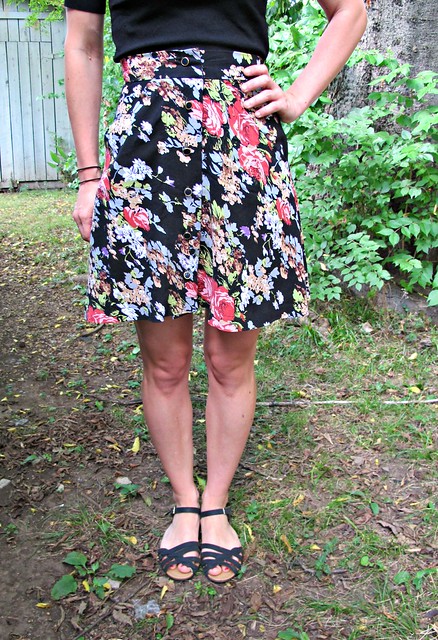
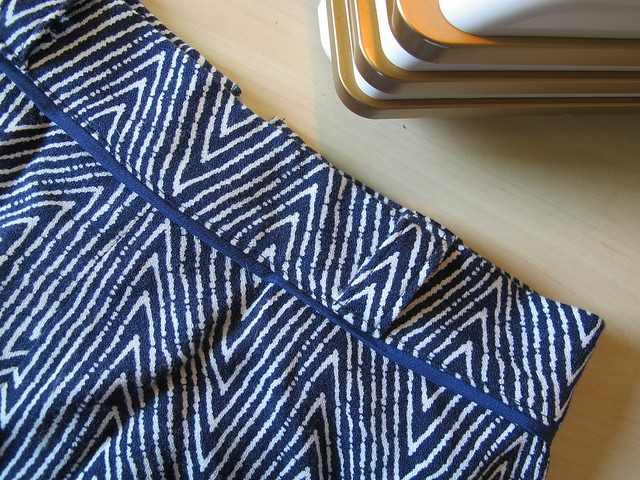
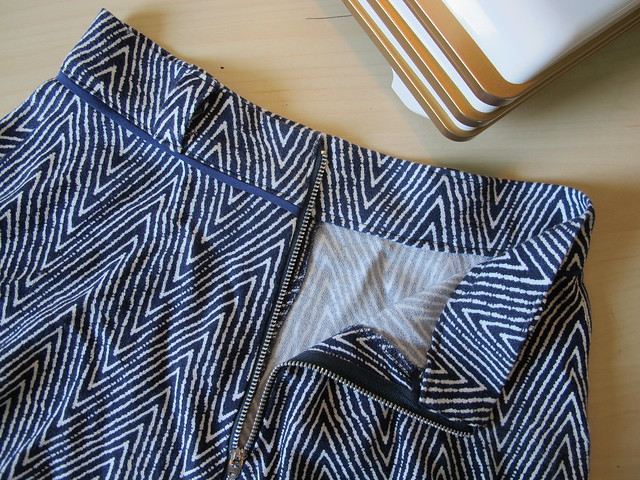
The navy rayon crepe is from StyleMaker Fabrics (who is one of our sponsors for this year’s OAL!). I added flat piping at the waistband (sewn with silk crepe – from my stash) and an exposed metal zipper to the back. I also shortened the length considerably, omitted the pockets, and used stretch interfacing on the waistband.

I sewed the entire skirt on my Spiegel 60609, and it did pretty well overall! While I don’t want to say I was concerned to see how it would handle that shifty fabric (I have sewn straight-up silk and a bra on the 60609, and it hasn’t given me any problems thus far with my fabric choices), I was still pleasantly surprised at the entire experience. I didn’t use any special stitches, and only feet that came with the machine. The zipper foot in particular was great for both applying the piping and the invisible zipper, as well as making sure the topstitching was nice and straight and close to the edge. I did find that I needed to increase the stitch length just a smidge for this fabric, as it wanted to bunch a little bit otherwise, but overall I’m pretty happy with it! I am glad that moving the needle over is an option with this machine (you just increase the zigzag width while on a straight stitch), however, I’d love to see some new feet released to use with this machine. Maybe a 1/4″ foot or an edgestitching foot? šŸ˜‰ HINT HINT.

OAL2016: Hollyburn Skirt

OAL2016: Hollyburn Skirt

OAL2016: Hollyburn Skirt

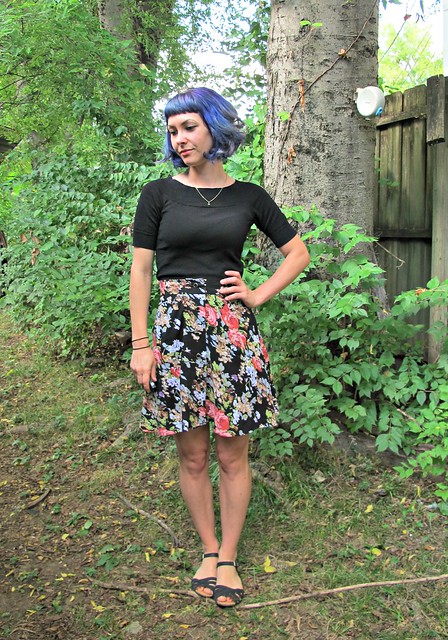
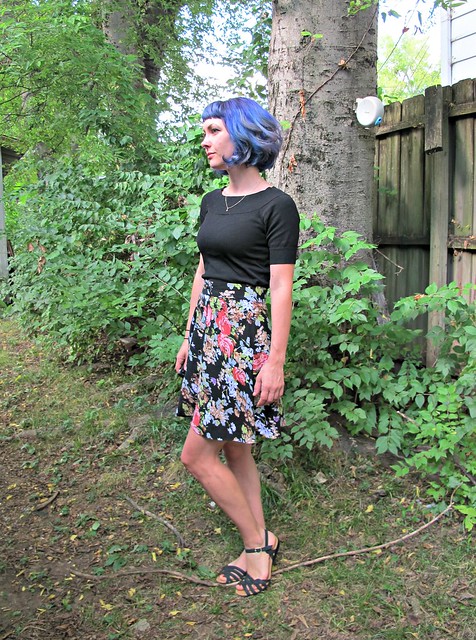
For me, the most fun part about this challenge is ending up with TWO pieces that I can mix with other garments in my wardrobe. I love this top + skirt together… but honestly, I like them even more with different things from my closet! They are definitely wearable with a bunch of what I already have (which is part of the reason why I got a little boring with the colors šŸ˜‰ I wanted the versatility!); here are a couple of examples:

OAL2016: Zinone Sweater

Zinone top + Ginger jean shorts
I don’t know about y’all, but I am LOVING the cropped trend! Slightly cropped with a slightly high-waisted bottom is my new favorite thing right now (not your cup of tea? This is the beauty of knitting your own – you get to decide the length!). I love the way this top looks tucked into a skirt, but the combination with my high-waisted Ginger shorts really makes my heart sing the most.

OAL2016: Hollyburn Skirt

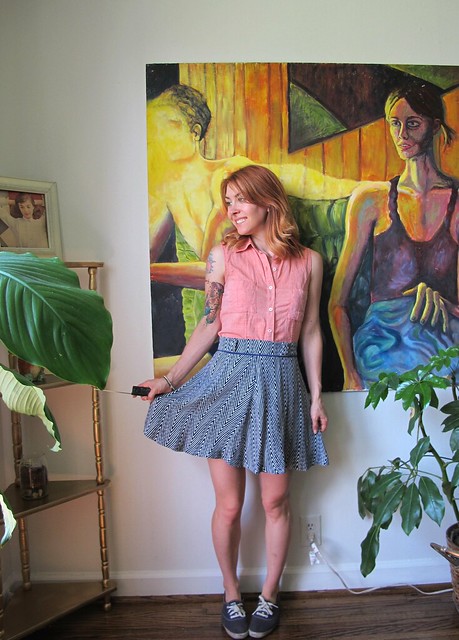
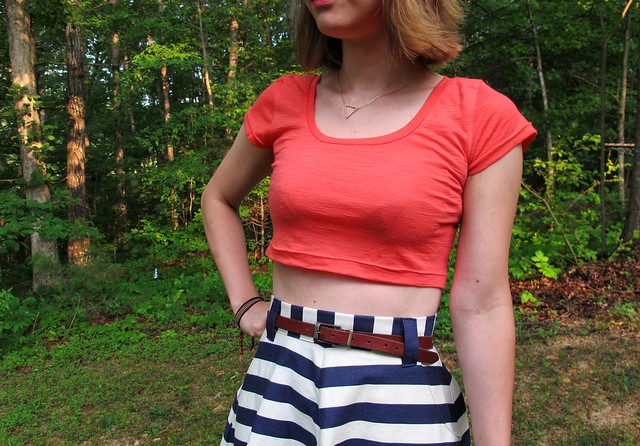
Hollyburn skirt + sleeveless coral B5526 button up
I did not realize when I made this shirt that it was going to be one of my top 10 handmade garments of all time, but it is. It goes with everything. The sleeveless option + lightweight cotton fabric make it a great option for summer, and it layers beautifully under sweaters in the winter. The color is perfection and looks especially great with navy (my go-to summer dark neutral). It’s as easy to wear as a knit tshirt, but looks a helluva lot more refined and classy.

OAL2016: Zinone Sweater + Hollyburn Skirt

Anyway, I guess that’s it for this post! Those of you still scrambling to finish your outfits – you have 2 days before the deadline! Make sure you upload your finished outfit to the Official OAL2016 Finished Outfit Thread on Ravelry before 7/31/16 Midnight PDT if you wanna win one of those sweet prizes! Andi and I will be drawing 3 winners at random, who will win fabric, sewing pattern, and knitting pattern vouchers! Even if you’re not participating, do take a look at that thread! There are some amazing outfits to drool over šŸ™‚

OAL2016: Part 2 (Zipper + Finishing)

15 Jun

Hey everyone! Welcome back for the second (and final!) sewing post of the Outfit Along šŸ™‚

OAL_Banner

At this point, you should have your skirt mostly assembled (all seams except the center back seam) with the waistband partially attached (not finished). Today, we will insert the zipper and finish the waistband in one go! IĀ  am making my skirt with this awesome rayon crepe from StyleMaker Fabrics (don’t forget that there is free US shipping/discounted international shipping on all orders through 6/30/16 when you use the code OAL2016 šŸ˜‰ ), using my Spiegel 60609 sewing machine. If you missed the previous posts, here is Part 1!

For this particular skirt, I am sewing an exposed metal zipper. If you hate exposed zippers, that’s ok! You have options! Check out my tutorial for sewing a lapped zipper, and also my tutorial for sewing an invisible zipper.

For sewing the exposed zipper:

OAL2016- Sewing an Exposed Zipper
Start by marking a rectangle where the zipper is to be inserted. For a 9″ exposed zipper on a garment with a 5/8″ seam allowance (if your measurements differ, you will need to adjust these accordingly!), make a rectangle that is 10″ long and 7/8″ across. I use a Chaco Pen liner, but again – anything works! Then go over your markings with a long basting stitch on your machine. Don’t be lazy and skip this step. I know it’s tempting, but trust me on this one. The stitches will make it visible from both sides, and also won’t rub off.

OAL2016- Sewing an Exposed Zipper
If your fabric is very lightweight and/or drapey, you will want to interface the area where the zipper is going, just to give it some extra support. I cut strips of lightweight fusible and applied them over my basting lines.

OAL2016- Sewing an Exposed Zipper
Clip into the bottom corner of the rectangle at a 45 degree angle, being careful not to snip into your basting lines.

OAL2016- Sewing an Exposed Zipper
Fold along the vertical basting stitches and press.

OAL2016- Sewing an Exposed Zipper

OAL2016- Sewing an Exposed Zipper
Starting at the horizontal basting stitches, sew the center back seam at 5/8″, ending at the hem.

OAL2016- Sewing an Exposed Zipper
Press the seam allowances open.

OAL2016- Sewing an Exposed Zipper
On the right side of the skirt, lay the zipper face down with the bottom facing toward the waistband. Line the horizontal basting stitching just below the zipper stop.

OAL2016- Sewing an Exposed Zipper

OAL2016- Sewing an Exposed Zipper
Sew along the horizontal basting ONLY, using a zipper foot. PROTIP: I just found this out, but you *can* move the needle of the Spiegel 60609. While the machine is on straight stitch (#1), increase the zigzag width to 7.0 and that will move the needle! So you can get RIGHT UP IN THERE to do that zipper!

OAL2016- Sewing an Exposed Zipper
Here is the bottom of my zipper after it is attached. You only need to sew along the basting stitches – not the entire width of the zipper tape.

OAL2016- Sewing an Exposed Zipper
Flip the zipper to the inside of the skirt and press the line you just sewed.

OAL2016- Sewing an Exposed Zipper

OAL2016- Sewing an Exposed Zipper
Now turn back the skirt pieces, one at a time, and sew the zipper tape to the skirt along the vertical basting stitches, starting at the zipper top stop and ending at the bottom stop (don’t sew all the way to the very end of the tape). Again, use a zipper foot and move your needle over to one side if you can.

OAL2016- Sewing an Exposed Zipper
Here is what things should look like after you’ve attached both sides. Note that the top of the zipper will NOT reach the top of the waistband – it should only go about halfway, since we are folding the waistband to the inside. On the Hollyburn, there is a notch to indicate where the waistband folds – so the zipperĀ  stop should reach that notch.

OAL2016- Sewing an Exposed Zipper
Now we need to finish the waistband. Fold the seam allowance (5/8″) along the long raw edge to the inside, and press. You may trim this seam allowance down to 1/4″ if it’s bulky.

OAL2016- Sewing an Exposed Zipper
Fold the remaining bits of the top of the zipper tape toward the inside of the waistband, and pin to keep them out of the way (if you accidentally sewed down this part, you gotta unpick šŸ˜‰ ).

OAL2016- Sewing an Exposed Zipper

OAL2016- Sewing an Exposed Zipper
Now fold the waistband down to meet right below (about 1/8″) the stitching line at the top of the skirt, making sure that the top zipper stop is even with the top of the waistband fold. Make sure the raw edges are tucked in around the zipper and pin everything into place.

OAL2016- Sewing an Exposed Zipper

OAL2016- Sewing an Exposed Zipper
Now to topstitch! Starting at the top of the zipper, topstitch 1/8″ from the edge down to the seamline where the skirt meets the waistband, lower your needle and pivot. Then continue around the entire waistband until you reach the other side of the zipper, pivot, and sew back up to the top.

Alternately, you can also topstitch around the entire exposed zipper – but you’ll need to sew down the waistband in a second pass šŸ™‚

OAL2016- Sewing an Exposed Zipper

OAL2016- Sewing an Exposed Zipper
Now pat yourself on the back for sewing an AWESOME EXPOSED ZIPPER WTF.

Finally, just a couple more things to finish your skirt! If you want to add belt loops or the waistband tabs, you can do so now. Then you just need to hem. I ended up taking about 3″ off my skirt length to make it more of a mini, and then finished with a double turned hem (1/4″ on the first turn, 3/4″ on the second) that is simply topstitched. Here are my hemming tutorials if you need a refresher!

That’s all for today! As always, please let me know if you have any questions!! How is your sewing coming along? šŸ™‚

OAL2016: Part 1 (Pockets + Piping)

8 Jun

Good morning, everyone! Time to get some sewin’ done for this OAL!

Before we get into the post, a few things I wanted to mention:
– Unlike previous years, I will not be doing a full step-by-step of sewing the pattern. Part of the reason is because this is a really easy pattern and the instructions are super straightforward and simple to understand on their own.
– Now, before you freak out – there IS a sewalong for the Hollyburn skirt! Not hosted on this blog, but a sewalong nonetheless! You can find it here on Lavender Lane. So if you reeeally need the help and the instructions just aren’t cutting it for some reason or another, there is that option!
– Instead of step-by-steps, I am splitting the OAL sewing stuff into 2 posts – today and next week – both with modification tutorials. I will also include links to relevant tutorials from older posts as they are needed. That way, those of you who are not following the OAL and/or don’t care about sewalong posts (I’ll be honest – I skip over them too!) – this is less for you to skip over šŸ™‚ And for those who are here for the OAL and love reaching sewalong posts – they’re still here! šŸ™‚
– And DUH, I’ve made like a zillion of these skirts – so feel free to ask me questions as well! Either in the comments, or you can email me! Don’t worry! I got ya covered!
– FINALLY, I should mention that I’m using my Spiegel 60609 sewing machine to construct my Hollyburn, so you’ll see it in the photos! I wanted to see how it handled my mega-shifty fabric šŸ™‚

Ok, back to the OAL!

OAL_Banner

Before you do anything, it’s a good idea to prewash your fabric in the same manner you will be washing/drying it once the garment is complete. Some fabric reeeeally likes to shrink, so you want to get that out of the way before it’s cut! I am using this cool zigzag rayon crepe from Style Maker Fabrics and it certainly shrunk a LOT! It’s a bit shifty to work with, but I think the payoff will be pretty sweet – it has the dreamiest, swishiest drape! I found that my increasing my stitch length just a hair (the standard stitch length on the Spiegel 60609 is a little short for sewing really delicate and shifty fabrics, I’ve learned) and using lots of pins was enough to keep the fabric in check for the most part.

Some notes on cutting:
Here is a post I wrote for the 2014 OAL on cutting and marking. Different pattern, same concept.
– It is entirely possible to make this pattern with a striped or plaid fabric! You will need extra fabric to allow for matching and it may take longer to cut, but it can be done! Depending on your stripe/plaid, you may only be able to match 2 seams instead of 4 – if this is the case, match the center front and center back seam. Mismatched side seams are less noticeable šŸ™‚ Here is my tutorial for matching plaids. Also relevant: my tutorial on matching the stripes at the pocket.
– This pattern calls for you to cut the waistband on the straight grain (parallel to the grain line). If your fabric has a bit of stretch, though, you may want to consider cutting on the cross grain (perpendicular to the grain line). This is what I did šŸ™‚ Keep in mind that if you cut on the cross grain, you’ll want to interface the waistband with a tricot interfacing to retain that stretch. I personally love the PROtricot at Fashion Sewing Supply, but most fabric stores have something similar šŸ™‚
– If your fabric is super drapey and you don’t want the pockets to bag out, you may consider eliminating them entirely (go ahead, gasp or whatever). This is what I did on my skirt, to allow for a smooth front. You can always add in-seam pockets if you’d like.

Eliminating the pockets is super easy:
OAL2016- Removing Pockets
You’ll need your pocket piece and your skirt front piece.

OAL2016- Removing Pockets
Fold the pocket piece in half along the foldline, matching the notches.

OAL2016- Removing Pockets
Lay the pocket piece behind the skirt front at the pocket opening, again matching the notches. Then just tape it down into place – I am using surgical tape because it peels off easily without tearing the paper (I can’t take credit for this – I got it in my goody bag at A Gathering of Stitches. Sam makes the BEST goody bags!), but you can also use regular tape, painter’s tape, pins, or even just trace off the pattern pieces. Whatever works!

Next steps are to construct the skirt as per the directions. Sew the pockets (if you still got ’em!). Sew the center front and side seams at 5/8″, but leave the center back seam open. If you would like to finish your seams, now is the time. I used my serger to overlock the seams after I sewed them, and then I pressed them open. Finally, staystitch the waist of your skirt (just a straight stitch about 1/2″ from the edge) to keep it from stretching out.

At this point, I decided to add flat piping to my waistband seam. So you get a tutorial!

OAL2016- Flat piping
I started with a strip of bias-cut silk crepe that was 1.5″ wide. The width of your piping will determine how wide to cut your bias – you’ll want 2x the finished width, plus 2x seam allowance. Cut enough bias to go all the way across the waist of your skirt. Fold the strip in half, length-wise, with the WRONG sides together, and press.

I promise I will get a new ironing board cover eventually. Ew, that yellow stain. haha.

If you don’t know how to cut bias, here are two really great tutorials: continuous bias (my favorite!) and bias strips.

OAL2016- Flat piping

Lay the folded bias along the waist edge of your skirt, matching raw edges at the top, and pin into place.

OAL2016- Flat piping

Sew the bias in place just within the seam allowance (I sewed at 3/8″) to hold it there. You can use a basting stitch for this step; it’ll get a second sewn pass in a minute!

OAL2016- Flat piping

Lay your interfaced waistband on top of your skirt, with right sides facing and raw edges matching. The bias strip should be sandwiched between the two.

OAL2016- Flat piping

Now sew your second pass to secure all the layers at 5/8″. Make sure to shorten your stitch back to it’s normal setting if you were basting šŸ™‚ I ended up sewing another line a little more than the seam allowance, because I wanted the piping a little bit narrower.

OAL2016- Flat piping

Check the right side to make sure that everything looks good. I have no idea how I managed that unintentional perfect pattern matching, but hey, I’ll take it!

OAL2016- Flat piping

Press all the seam allowances up toward the waistband, using lots of steam so the piping lays nice and flat. If your fabric is bulky, you may want to trim down your seam allowances and/or grade them (trimming them in staggering layers) to prevent bulk from showing from the outside.

OAL2016- Flat piping

Now admire your pretty, flat piping! Isn’t that dainty? šŸ™‚

Ok, that’s all for this week! Let me know if you have any questions about these steps šŸ™‚ Next week, we sew in the zipper and finish the thing! Woohoo!

Announcing the 2016 Outfit Along!

15 May

It’s mid-May, so you know what that means…

OAL_Banner

The Outfit Along is officially back for 2016! Yay!!

Once again, I’m teaming up with knit designer extraordinaire, Andi Satterlund, to host a combination knit-along and sew-along. The idea behind the Outfit Along (OAL) is to make a complete outfit by sewing a garment and knitting a garment. This is a great opportunity to fill your wardrobe with more beautiful handmade pieces, and we’ll have two official patterns that we will hold your hand with should you need it.

Zinone_Both_Front_02

The official sewing pattern will be the Sewaholic Hollyburn skirt, and the official knitting pattern will be Andi’s newest summery top pattern, Zinone. I will be blogging about the official sewing pattern and Andi be blogging about the knitting pattern, so we can all sew and knit along together. If you don’t love the official patterns, you can still join in! The Outfit Along is about making an outfit you’ll really wear, so to participate, all you need to do is to sew a garment and knit a garment to make an outfit. You’re more than welcome to pick projects that fit your own style and skills – after all, you’ll be the one wearing it šŸ™‚ Make a pull over and shorts, make a dress and cardigan – doesn’t matter what the combination is, as long as it makes an outfit šŸ™‚

Paisley Hollyburn

You can read all the relevant details over at Untangling Knots – as well as a FAQ for common questions – but in a nutshell:

– We will be kicking off the OAL on June 1, 2016.
– The deadline for completion is July 31, 2016, which gives you two months to finish both garments.
– There IS incentive for finishing your garments within the deadline – PRIZES!!! This year, we have two sponsors who have donated prizes to the OAL: Each winner will receive the pattern of their choice from Indie Stitches, a $20 voucher to StyleMaker Fabrics, and two knitting patterns of their choice from Untangling Knots.
– To be eligible for said prizes, you must finish BOTH garments by July 31, 2016 and post them in the OAL Finished Outfit thread in the Untangling Knots group on Ravelry. Prize winners will be randomly selected from those who finish both their knit and sewn garments and post pictures in the appropriate thread by the deadline.

Zinone_Both_Back_medium2

The official knitting pattern, Zinone, is a casual summer top knit in sport weight linen yarn. You have the option to include either a partial or full lace back, and choose either a cropped length or full length to the hips. It’s a little different from our previous OALs – definitely not a cardigan this year! – but I think it’s a really fun switch (and, again, you can totally knit a cardigan if that’s what your little hear desires. Or crochet one! Ain’t no knitting police running around over here). The top is knit in one piece, in the round, so it goes pretty fast. And linen is so lovely to wear in the summer! You can read more about the pattern here. AND, To celebrate Zinone‘s launch, Andi is offering 20% off up until the official OAL start of June 1. Use the code OAL2016 to get you that discount!

Striped Cabernet Cardigan + Yellow Hollyburn

The official sewing pattern, the Hollyburn skirt, is a great little wardrobe staple that no doubt many of you have already made! It’s a simple, flared skirt, that works great in both a rigid and fluid fabric, depending on the look you are going for. The pattern is perfect for a beginner as it’s relatively simple (and the only fitting you need to worry about is the waist measurement), but it’s also a good canvas for a variety of customization to make it your own, should you require a little more of a challenge in your sewing šŸ™‚ I will be covering basic construction of the pattern, as well as how to adjust the skirt to leave off the pockets, and installing an exposed zipper. And yes, I’ve already made like 5 of these babies (1 2 3 4 5), so you know it’s a good basic wardrobe staple!

Oh! And to help with your fabric buying needs – StyleMaker Fabrics is offering FREE SHIPPING to all US orders (and $8.95 off shipping to all international orders), through 6/30, using the code OAL2016! Definitely check them out if you’re not working from your stash – they have a fantastic selection of wonderful fabrics, and you can search by garment type and color! If you need help choosing your fabric, stick around – StyleMaker Fabrics will be guest posting on the start of the OAL as well šŸ™‚

As always, you can spread the word by using the hashtag #OAL2016 or grab a little badge below (or over on the Untangling Knots blog, where the fancy html is already embedded for you, ooh la la). And don’t forget to join the OAL2016 discussion thread in the Untangling Knots group on Ravelry, for all your OAL chatting needs. Questions? Be sure to read the FAQ on Andi’s official announcement post in case it’s already been covered, but if not… ask away! šŸ™‚

OALBadge3

OALtag_2016

I’m super excited to be running this awesome challenge for the third year in a row! šŸ˜€ Who’s in?

Completed: Um… another Hollyburn :]

17 Jul

Y’all, I don’t know how many times is too many to make the same damn pattern over and over again… but here’s Hollyburn #5. Hahaha.

Striped Hollyburn

I am pretty sure I don’t have anything else to say about the making of this pattern, considering I’ve sewn (and posted about) it soo many times. This particular rendition with the wide navy stripes has actually been in the plans since my very first Hollyburn skirt. Ever since I made my solid denim version, I’ve been on the hunt for a good striped fabric to make my dream striped flared skirt. Actually, I think I’ve been on the hunt for that fabric since way before this pattern was a little twinkle in Tasia’s eye. It’s been a couple of years, at least. And yet I’ve never been able to find what I’ve been looking for – medium weight cotton fabric with 1″ wide navy and white stripes – despite all odds being that that should be a common enough fabric. I’ve found similar stuff – but the stripes were too narrow, the wrong color, or the fabric was the wrong weight.

Striped Hollyburn

So let me tell you about where I found THIS fabric. Back when I still lived in the ‘burbs in West Nashville (ok, it wasn’t the suburbs because we were like 5 miles from the city, however, it’s more ‘burby than where I am now in the woods of Kingston Springs, so there’s that!), I went to a yard sale at the neighbor’s house 2 doors down. That whole experience was an adventure in itself – the woman living there was in her 90s and had lived in that house since she was 6. SIX!! Oh man, and she had the BEST neighborhood gossip. She also had this amazing little garden paradise of a backyard – all overgrown in the most beautiful way, and totally private and lush and green and dammit I was so jealous of that garden. AND she told me a bunch of ghost stories. Most awesome lady ever. Anyway, the yard sale was kind of like going to the flea market – lots of odds & ends and antiques and random stuff, all collected and resold for extra cash. I sniffed out the bag of fabric hidden in the shadows of the carport (I am telling you, I have a nose for this sort of thing) and found my dream fabric lurking at the bottom. Not just my dream fabric – but somewhere around 15 yards of it. Which I bought the whole lot of for $1. Apparently, this fabric lived a previous life as a kind of faux curtain/drape, arranged just so by some famous interior designer.

Striped Hollyburn

This is a really nice home decor weight cotton fabric. Unwashed, it has a little bit of a sheen to it and quite a bit of body. I tore off about 4 yards and washed it – just to see what would happen – which made is lose the sheen and gave it much more drape. It was really easy to sew and press. AND I still have over 10 yards of this stuff! Striped dresses in my future, yeah? I’m just ashamed that it’s taken me a year to get to sewing it. Too much ahead in the queue, I guess.

Striped Hollyburn

Check out how well those stripes line up at the pockets! Yeah buddy! In an effort to make this post at least somewhat useful, here is how I did that:

Striped Hollyburn

After cutting out the front skirt pieces, I laid them on top of the pocket/pocket facing piece (for this pattern, it’s all-in-one. If you’re using a pattern that has 2 separate pieces, choose accordingly) and traced along the pocket edge. Then I used a ruler to draw the pocket lines as they continue from the skirt front to the pocket facing, so that the lines were unbroken.

Striped Hollyburn

Here’s what my pattern piece looked like. Not shown but SUPER helpful – it’s a good idea to mark the colors of the lines as well, so you don’t end up with inverted stripes šŸ™‚

Striped Hollyburn

Then just lay the pattern piece on your fabric and arrange it until the lines of the print match up with the lines you drew on the pattern piece šŸ™‚ Easy!

Striped Hollyburn

I also made sure to pin each stripe before I sewed my pieces together, which made for very accurate stripe-matching.

Striped Hollyburn

I guess that’s it! Easily the cheapest garment I’ve ever made šŸ™‚ Now tell me – what’s the sewing-related yard sale haul you’ve ever been lucky enough to experience? I think this $1 mass of fabric might go right up there with the $1 DVF Vogue Designer Original pattern (that happened to be in my size, no less) score.

Completed: A Cardigan, a Skirt, and a Tshirt!

30 Apr

Woohoo y’all get a damn TRIFECTA of garments for today’s post! Lucky you!

Striped Cabernet Cardigan + Yellow Hollyburn

For my monthly Mood Sewing Network post, this month I wanted to focus on that amazing striped sweater knit that you’re probably staring at (you should be staring at it, it’s fucking awesome). But I felt really boring just making *a* sweater (a sweater that took maybe 2 hours, tops, to complete), so I overcompensated and made my entire outfit. Yay!

Striped Cabernet Cardigan + Yellow Hollyburn

We’ll start with the cardigan because it truly is the star of this outfit. It’s another SBCC Cabernet cardigan, this time with my minor adjustments made to the flat pattern (you can see my leopard Cabernet cardigan here, btw!). Since I’ve already made the pattern once, there’s not really anything new to report in terms of construction.

Striped Cabernet Cardigan + Yellow Hollyburn

Striped Cabernet Cardigan + Yellow Hollyburn

I bought the navy and white striped fabric while I was at the Mood Fabrics flagship store in NYC in March. I got soooo much good stuff while I was there, but this particular piece really takes the cake. I swear, if the bolt hadn’t been so heavy, it probably would have jumped off the shelf and fallen directly into my arms. We were like star-crossed lovers when we caught sight of one another.

ANYWAY, gushing aside – what we have here is a cotton double knit that works and feels like the perfect sweater knit. It’s wonderfully thick and squishy, and while it does drape a little bit, it also hold it’s shape quite well. It was really the perfect fabric for this pattern, as it responds really nicely to pressing and topstitching. I was careful in my cutting to not only match up the stripes at the side seams, but also the stripes blending into the sleeve cuffs and hem bands. The neckband is actually the same striped fabric – I just positioned the pattern piece so that the widest navy stripe was the only thing that showed when it’s folded in half. I knew I wanted a solid color at that neckband, but I didn’t want to try to color match, because nope.

Striped Cabernet Cardigan + Yellow Hollyburn

Because the striped knit is so thick, it was a bit of a beast to manhandle. Cutting it was painful (I REALLY need to get my scissors sharpened, dammit!) and the sewn seams were lumpy and wavy before I pressed them. It’s super important to press if you’re dealing with a fabric like this – the flatness is what makes the finished piece look so polished. Topstitching down the seam allowances also helped. As with my last cardigan, I used the straight stitch on my machine and a walking foot. The rest of the seams are serged.

Striped Cabernet Cardigan + Yellow Hollyburn

The skirt is another one of my beloved Hollyburn skirts. I cannot stress this enough, but I LOOVE this pattern. SO MUCH. As soon as I finished the denim polka dot Hollyburn, I started lurking hard for a yellow twill to make another one. I really love this neon delight of a yellow, but it’s hellish looking against my skin – so obviously, the next best thing is a skirt.

I found the fabric also while I was in NYC, also at the Mood Fabrics flagship store (sorryyyyy not sorry). I actually spent a good deal of time looking for this one – I knew I wanted yellow twill, but the stuff in the twill section wasn’t quite up to snuff. Too pale, too lightweight, too much of something. This particular fabric was actually located in the denim section – I imagine there is someone, somewhere, who has made an amazing pair of jeans with this fabric.

Striped Cabernet Cardigan + Yellow Hollyburn

This is a stretch cotton twill with lots of lycra in the content, giving it a super heavy stretch. Even though it’s on the lighter side (heavy enough to be considered a bottomweight, however), it has plenty of body that gives this skirt a great structure. The only downside to all that lycra is that it made the fabric really hard to get a good press. I ended up topstitching all the seams to keep them flat, about 1/4″ distance (as opposed to my usual 1/8″). The wider topstitching paired with this fabric really gives it a nice denim-y look, which I like. I thought about topstitching around the pocket bags to give those definition too, and “thought,” I mean I tried it and it looked absolutely terrible so I ripped it out. Don’t do that.

Striped Cabernet Cardigan + Yellow Hollyburn

The back closes with a simple lapped zipper, and all the inside seams are serged. Basic stuff!

Striped Cabernet Cardigan + Yellow Hollyburn

Finally, the most basic of the basics – my tshirt!

Striped Cabernet Cardigan + Yellow Hollyburn

This is SUCH a simple tshirt that it hardly bears a mention, however, we’re here and it’s here so let’s just roll with it. The fabric is this sheer white slubbed rayon jersey, which was WAY more sheer than I was expecting but it’s sort of awesome. It’s suuuuper soft, drapey, and the texture of the fabric makes it a tiny bit more interesting than your average plain white tshirt. I used my always-tweaking-almost-done-tweaking Frankenpattern’d tshirt to make this. The neckline is bound using Megan Nielsen’s bound neckline method, which is hands-down my FAVORITE way to finish a neckline on a slinky knit like this. It just looks really really good, and it’s nice and sturdy. I love the traditional method, of course, but some of the more drapey fabrics don’t do so hot with that method because you have to REALLY stretch them to keep them from being floppy, which ends up with a tight neckline that’s practically gathered.

Speaking of slinky knits, binding that neckline was about the only easy part of sewing this tshirt. Talk about the slinkiest knit ever! It was worth it, though, because I can always use more white tshirts. Even if they are see-through. And yes, the pocket is totally in the wrong place and I’m totally not picking it off because I don’t think the fabric can survive that kind of trama.

Detail shots:

Striped Cabernet Cardigan + Yellow Hollyburn

Striped Cabernet Cardigan + Yellow Hollyburn

Striped Cabernet Cardigan + Yellow Hollyburn

Striped Cabernet Cardigan + Yellow Hollyburn

Striped Cabernet Cardigan + Yellow Hollyburn

Striped Cabernet Cardigan + Yellow Hollyburn

Striped Cabernet Cardigan + Yellow Hollyburn

Striped Cabernet Cardigan + Yellow Hollyburn

(that’s a Sewn with Mood Fabrics tag, by the way! šŸ™‚ )

Striped Cabernet Cardigan + Yellow Hollyburn

Striped Cabernet Cardigan + Yellow Hollyburn

PHEW.

Ok, one more picture:

Striped Cabernet Cardigan + Yellow Hollyburn

Only including this one because I look like I’m about to eat whatever is in my line of vision haha.

** Note: All fabrics for this project were provided to me in exchange for a review post as per my involvement with the Mood Sewing Network.

Completed: Polka Dot Denim Hollyburn Skirt

23 Mar

Hey y’all! I just got back from a fabulous weekend in New York – in addition to teaching a very successful Weekend Pants-Making Intensive at WORKROOM SOCIAL (seriously, my students were total rockstars and sooo much fun to chat and hang out with!), I also managed to take in a pretty good fabric haul. It was a very fun, very delicious weekend in the city, but I gotta say – I’m so happy to be home, back in the lovely 75* weather. Oh, Tennessee, how I have missed you! Today, we celebrate with my new favorite skirt, which is perfect for wearing with bare legs. Yay, no tights!

Denim Hollyburn skirt

I figured it was time to revisit the Sewaholic Hollyburn skirt, so here she is! I’ll confess that I actually finished this skirt a few weeks ago, but I haven’t actually worn it until the same day these photos were taken. It’s just been too dang cold here to wear skirts with bare legs, and I was bound and determined to wear the skirt without tights. Now that the season of bare legs is starting to creep in (watch, I bet I just jinxed it with that announcement), imma wear dis shit with PRIDE and JOY.

Also, you’ll notice in about half these pictures that the sun was sooo bright, I could barely hold my eyes open. Ain’t complaining.

Denim Hollyburn skirt

Anyway, right, Hollyburn! I love this pattern so so much (see previous versions: one and two), so naturally I had to make a new version for 2015. This skirt pattern is probably my favorite, at least for right now – nice flared shape (without being so flared that it looks costumey), separate waistband with belt loops, back zip, and those wonderful pockets. I think it’s a great, solid wardrobe basic, so it made sense to add a couple more to my summer wardrobe.

Denim Hollyburn skirt

Denim Hollyburn skirt

For this version, I changed up just a couple minor things – just enough to warrant a whole blog post about it (JK I’d post about this anyway because IT’S MY BLOG AND I DO WHAT I WANT lolz). The fabric I used is a medium weight stretch denim that is printed with thousands of tiny polka dots – if it looks familiar, it’s because I made a pair of Jamie jeans with it. I LOVE putting my leftover yardages to good use, and I really really loved this fabric, so double win! Since the fabric is a stretch denim, I changed up the cutting layout just a little and cut the waistband so the stretch ran the entire long length (aka, around my body when I’m wearing it). The waistband needs to be interfaced, so I used a fusible tricot interfacing, which gave the waistband a little bit of structure but didn’t compromise the stretch.

Denim Hollyburn skirt

Also, I wanted this spotted baby to be pretty short, so I cut a few inches off the length. Yeah buddy!

Denim Hollyburn skirt

Good thing I don’t work in an office anymore, because I could not see this length (or lack thereof) being suitable for work! Ha! But isn’t it cute? The structure of the fabric really works well with the shape, which is extra exaggerated the shorter it gets.

There’s not much else to say about this skirt, so have some flat shots:

Denim Hollyburn skirt

Denim Hollyburn skirt

Denim Hollyburn skirt

Denim Hollyburn skirt

Construction was plain and straight forward – all seams were serged and pressed open, and there’s a bit of topstitching at the hem and waistband (not that you can really see it against this fabric, but, know it’s there). And, I gotta say, I’m super pleased with how nicely that invisible zipper went in. Look at that beautiful seam match and the sharp corners at the top!

Denim Hollyburn skirt

I’ve been meaning to remake a new denim skirt for AGES (sadly, my Kelly and Hummingbird are both way too big at this point, and have thus been passed on to eager friends with grabby hands), as it’s a good wardrobe basic to have that goes with pretty much everything. Actually, prepare for me to sound like a broken record for the next few months because that’s where a lot of my sewing is headed – no, not more denim skirts, just more wearable basics to replace the pieces I had that don’t fit anymore and/or are due to retire. And maybe more denim skirts. I can’t make any promises here. I actually just bought a great yellow denim at Mood this past weekend, so you can at least expect a sunshine Hollyburn in the future šŸ˜‰ yay for summer clothes and summer colors!

Oh, and in case you were wondering – my Merchant and Mills tshirt is from Uniqlo! You’ve no doubt already seen these aaaaall over Instagram, but I thought I’d point it out because we don’t have a store here and I didn’t even realize you could buy that shit online. You can see the entire collection of available goods here – and, ugh, now I’m kicking myself that I didn’t see those tote bags! Oh well! I bought 2 tshirts – which, considering that I don’t buy new clothes anymore (except for underwear, and a new pair of jeans in both 2013 & 2014), is a bit of a big step for me. I feel very strongly about fast fashion and knowing where my clothes come from and aaall that good stuff, however, I also tend to see things as very black and white with no grey area and I’m trying to get past that mental hurdle. Sometimes, you just gotta choose your battles and know when to compromise. Two little tshirts don’t make me a terrible consumer, especially since it’s not like I plan on dumping these when the season ends. For the most part, I try to shop locally and ethically, and be aware of where my food and goods come from. But every now and then, you just want to buy something mass produced from China. At the very least, at least it’s supporting (or advertising)Ā Merchant and Mills, I guess, which makes me feel a bit better.

Anyway, that’s about it! I’ll be packing and moving for the rest of the week, and hopefully by this time next week I’ll be settling into my new house IN THE WOODS. Cannot wait! šŸ˜€

Completed: Butterick 4066

5 Sep

Ummmm so this may or may not be the third garment I’ve posted this week that is made of rayon challis.

Butterick 4066

No shame.

Butterick 4066

These pictures are also horrifyingly bad and blown out, but… meh. We all know y’all don’t come here for the ~dazzling photography. Again: No shame.

Butterick 4066

I picked up this copy of Butterick 4066 while I was last at the flea market in July. The cover art is a little outdated (and not in a cool vintage way, but rather, I feel like I can probably smell my Mamaw’s house if I lean in too close. Wait, just kidding, my Mamaw’s house smells great. That shit probably smells like someone else’s Mamaw’s house, maybe), but the line drawings looked promising enough – almost like the Kelly skirt and Hollyburn skirt had a secret affair that ended up with a little love child.

Butterick 4066

It’s hard to see, thanks to my terrible photos, but the skirt has pockets, a smooth A-line shape with no darts or tucks, and buttons down the front. I used this shameless 90s black floral rayon challis from Fashion Fabrics Club, as I knew the shape would look great with a drapey fabric (just like my Crazy Paisley Hollburn).

Butterick 4066

My skirt pattern was just a smidge too big (not the fault of the pattern itself – my copy is a size too big, since we don’t normally get to be choosy when it comes to buying vintage patterns!), but that was easily fixed by taking in the side seams before attaching the waistband. The big challenge was cutting off length – a LOT of length. Even after I’d shortened the shortest version of the pattern tissue by a good 6″, I had to go back after making the skirt and hack off another 4″! Shortening the length did wonders for the overall look of the finished skirt – before, it was pretty dowdy and outdated looking (mostly due to fabric choice, I mean – we are talking about the 90s here), but I think it looks pretty cute now! Shorter skirts FTW!

Butterick 4066
Butterick 4066

I finished the seams with my serger and used these pretty black and gold buttons that I had lurking in my stash.

Butterick 4066

I love how the finished skirt turned out – and I think it’ll transition really nicely for our “fall”**, since it’s so cool and lightweight, but still has those nice dark fall/winter colors. That being said, it’ll look great with tights and a sweater, too šŸ™‚ (maybe with a silk slip, though! It’s not very warm!) I’m interested to try pairing this print with black and white stripes – I can imagine it in my head, but until I start sewing up the striped knits I got while I was in Mood last month, your guess is as good as mine.

** Tennessee Fall: Beyond gorgeously colorful (visiting Tennessee in the fall should be on every single one of y’alls bucket lists), but still blazing hot and, yes, we absolutely make fun of those dumbasses who insist on wearing wool caps and jeans tucked into tall boots while marinating in giant pools of sweat. I mean, COME ON LADY, it’s 90* outside FFS! You aren’t fooling anyone!

One last thing – Giveaway Winner! Lucky number is…

winner1

winner2

Congratulations, Sue Martin! I love your method of sneaky inspiration by way of shop dressing rooms – something I’m too chicken to do myself (I got major stink-eye once while manhandling a rack of dresses in Buckle and I’m kind of traumatized now haha). As far as adding hours in the day – well, let me know when you figure it out! šŸ™‚ haha!

Thanks to everyone to entered the giveaway – and thanks to Laurence King for providing us with a copy to giveaway! Friends, if you’d like to buy your own copy of Casual Sweet Clothes, use the code LLADYBIRD35 to get 35% off! The code is good through 10/1/14 šŸ™‚

Completed: The Bronte Top

2 Jul

This is totally my new favorite outfit. I TOLD y’all I was gonna wear the hell of out this navy Hollyburn skirt! I love looking like an American Flag, ok.

Bronte Top

Today, though, let’s just focus on the top.

Bronte Top

This is the Bronte top, a new release from Jennifer Lauren Vintage. Sewn up in a knit fabric, this is obviously not your standard tshirt – the lapped shoulder/neckline detail almost make it look like you’re wearing a dainty shrug, and it’s a nice nod to the 40s without looking super costumey vintage. As soon as I saw this pattern, I knew I had to have it. Don’t get me wrong – I love plain, basic tshirts. I make and wear them all the time. But, let’s be real – there are only so many ways you can design a plain tshirt. This pattern gives a little extra oomph in an unexpected way, and I love it!

Bronte Top

Upfront disclaimer: I was given this pattern free of charge, in exchange for a review. Although, I’ll be honest – I was planning on buying it anyway, because it’s a really cute style that’s completely different from anything I’ve seen around the sewing world. I was also madly interested to learn how the neckline was finished. This review is going to sound completely biased because I really love the pattern and how the finished top turned out. Sorry! It’s just that good.

Bronte Top

Like I said, this pattern is designed for knits, and the first couple of pages are dedicated to helping you choose an appropriate fabric and set your machine up to handle sewing it (assuming you don’t have a serger). Pretty helpful stuff if you’re a knit n00b! One part even compares the appropriate fabric to feeling the same way as underwear fabric, which cracked me up to no end (seeing how much I talk about butts on this blog, I’d reckon y’all probably know how much I appreciated that reference ahaha). But, I mean, it makes sense! The same weight of knit fabric that’s used to make comfy undies would be PERFECT for this top. Plus, you could use the extra yardage left over to make, well, undies.

Bronte Top

I sewed up the size 6, and made no alterations. I’m pretty happy with the fit, although I think I got a little too stretch-happy with the binding and now it sort of gathers where it should lie flat. Oops. I’m so used to modifying my bindings for every top I make (I guess I just like them tighter than how they’re drafted), that I did it without even really thinking. Next time I make this, I’ll go with the binding length as written in the pattern, because as you can see in my photos vs everyone else’s – the binding should definitely sit more flat. Oh well, live and learn!

Speaking of the binding, if you’re curious – it’s sewn on the same way as I think most of us are familiar with. Folded in half, sewn to the right side and flipped back. Works pretty well, though!

Bronte Top

I did make a few changes to the construction, just because I like my knits sewn a certain way, which may not necessarily be the “easiest” way (but I think it looks the nicest!). I did not hem my sleeves until the side seams were sewn up – I like my hems to be a complete circle, don’t like a seam cutting them in half. I also only turned the bottom hem up once, instead of doubled-up. The instructions are very beginner-focused, but they’re easy to skip over if you don’t need the hand-holding.

Bronte Top

My fabric is this red and white striped cotton jersey from Mood Fabrics, with the white binding being some leftover cotton knit from Organic Cotton Plus. The jersey is a little lighter than the pattern suggests, but it works out very nicely. Getting the stripes to match wasn’t much of an ordeal as there are only a couple of pattern pieces to deal with. I sewed everything up on my serger, minus the topstitching, which I did with a twin needle.

Bronte Top

The pattern has you tack down the overlap at the very end – if you don’t attach it down somehow, it will flop open and look stupid. I just went back over my topstitching a second time in that one little section (for each side), but you can also use buttons or other trims to embellish the neckline.

Bronte Top

One surprising thing I really LOVED about this whole experience was the printing part. Ok, actually, I hate printing PDF patterns – like, I’ll go out of my way to avoid it. First I have to find a fucking printer (which I don’t have – well, not one that works – and yes I know it’s the 21st century), then I have to print a bunch of test pages to get the sizing right, then I have to take the thing home and tape it together before I can even start sewing! Argh! Taping together is the worst part, forreal. So, let me back up. I didn’t enjoy the actual printing of this pattern (which I’m pretty sure no one does, amirite), but the taping part was significantly less traumatizing than it normally is. The way the pages are taped together means that each piece gets it’s own set of taped pages – so, instead of ending up with a giant swath of tiled paper (that’s the part I hate – it’s always too big for my table, and takes up the entire floor and I have to crawl around it like a fucking insect. Whyyyy), you’ve got a little stack of smaller tiled papers, each one with one pattern piece to cut out. GENIUS. That shit is pure genius. Why doesn’t everyone tile their PDFs like this?

I also used a tape gun to stick the whole thing together, which made the whole process move a helluva lot faster. Mine’s not pink, though, I kind of wish it was now.

Bronte Top

So that’s it! Overall, I really like the pattern and I’ll definitely sew it again (I’d love to try the long sleeve version, but I’m going to wait until the temperature here is a little less like Hell). You can buy the pattern here, should you feel so inclined šŸ™‚

Also, just a fun fact – but my name is Jennifer Lauren too šŸ™‚ Obviously I go by my middle name, but HOW COOL IS THAT.

A couple more things!
– Say helloooo to my newest sponsor, Indie Sew! Indie Sew doesn’t just sell sewing patterns (but they do – they have lots of great PDFs from various designers); they are also a sewing community for sharing and discovering new blogs. I especially love how they have a gallery where you can upload your creations – and it shows up on the pattern sales page (which I find EXTREMELY helpful, since sometimes the pattern artwork doesn’t necessarily appeal to me for whatever reason). I just love what they’re doing and I’m super excited to watch this community grow and flourish. Check them out!
– This has been EXPLODING across the blogosphere last week, so sorry to cram this shit down your throats again – but have you heard about Capital Chic Patterns? Run by Sally of Charity Shop Chic, these patterns are a little different from what we currently have on the market. For one – the styles are very fashion-forward, runway-influenced. Don’t get me wrong, I love vintage styles, but Sally’s right in that we kind of already got the market cornered on that šŸ˜‰ For second – the patterns themselves are aimed for intermediate to advanced sewists, not beginners. Can I get a halleluiah?! MAN. I love me some quick’n’easy beginner patterns, and I know the beginners sure love them – but it sure is nice to have patterns that are aimed to flexing our sewing skills. If these two points haven’t convinced you, just take a lurk at the lookbook and drool away.
With all that being said – I actually tested the Cosmopolitan (but I only got as far as a muslin for fit and instructions, as my time was very limited during testing), and I can’t wait to get my hands on some nice wide lace so I can sew it up proper; it’s GORGEOUS. I’ve also got my hands on that White Russian, which I will be sewing up when, again, it’s not Hell Fahrenheit down here.
– We have a winner for the Fashionary Giveaway! Lucky number generator says….

wins1

wins2

Woohoo, congratulations, Trinity (and high-five for committing to a lifetime of crafty!)! Hope you love the book as much as I do šŸ˜€

Thanks so much for entering and playing along, y’all! It was EXTREMELY interesting to read what kind of crafty/artsy things everyone is into – seems like we have a lot of knitters, musicians, and scientists who hang out over here šŸ™‚ While I’m sorry to say that I only had one Fashionary to give away – otherwise I’d give all y’all one – you can still buy the red book if you want to join Team Matchy šŸ™‚ (go on, do it, you know you wanna~!)