Archive | sewalong RSS feed for this section

Now Offering Virtual Private Sewing Lessons!

19 Mar

cat in studio

Hey friends! As we navigate the situation with the COVID-19 pandemic, I know a lot of us are encouraged if not mandated to #staythefuckhome to slow down the spread of the virus and help flatten the curve. Which means lots of time for sewing – yay, silver lining – but not a lot of options for being social or getting help in the form of classes and workshops. I know I personally have had to cancel / reschedule 2 workshops so far and anticipate many more will meet the same fate (peep my workshops page for updates), which in addition to the loss of income is just a total bummer! I’m bummed!

While it is unfortunately not possible at this time for me to offer online workshops (logistically, I just can’t swing it – although I will continue to look into it so that may change in the future!), I do think one-on-one lessons can be managed via video platform. So, starting now – I am happy to announce that I am offering Virtual Private Sewing Lessons! Yay!

All information (including a FAQ because everyone loves a good FAQ) is on the Virtual Private Sewing Lessons page of my blog, but a quick rundown of how this works:

  • You will sign up for preferred lesson via the PayPal link ($18 for 30 minutes, $30 for 60 minutes, $45 for 90 minutes).
  • After payment has been completed, click the RETURN TO MERCHANT link to be redirected to my Calendly page to select your preferred time and date (availability is from 11a – 6p CST Monday -Saturday, although I can be flexible if your time zone does not work with these. Send me an email!).
  • To complete your request, you will be asked to tell me a little bit about what you would like to cover during the lesson – this will allow me time to do any necessary prep work so that we can go straight into the good stuff during your session! You can also email me pictures / confusing instructions, ask questions – whatever gets us best prepared!
  • Lessons will be held via Google Hangouts (which is free to use on your phone, tablet, or computer.

Since this is a new technological territory for me (let’s be real, there are gonna be some hiccups!), for a limited time I am offering these lessons at a discount of 40% off my standard hourly teaching rate. I know a lot of us are looking at an uncertain future in terms of the economy + our jobs, so I hope that these lower rates will also allow more people to take advantage of this new platform and strengthen their sewing knowledge!

So what can be covered in a Virtual Private Sewing Lesson? Well – just about anything, I reckon! Here are some ideas to get the juices going:

  • Deciphering confusing sewing instructions
  • Real-time demos for specific techniques
  • Help with fitting (I’m not sure how well this will work since I tend to fit very hands-on, but I am willing to try and see what happens!)
  • Basic clothing alterations
  • Flat pattern adjustments
  • General sewing advice (such as fabric and pattern recommendations, finishing techniques for certain projects, advice for handling tricky fabrics, troubleshooting)
  • Or we can just chat because chatting is fun!

Selfishly, I am also hoping this will allow me to be more social while still maintaining my self-isolation – so perhaps that will be the same for you! Shit is stressful enough right now without having to deal with long bouts of loneliness, amirite?

I have some new projects and tutorials that I’d like to share on this blog, so stay tuned for those! In the meantime, please check out my Virtual Private Sewing Lessons page if you are interested in booking at session with me! Share it with your friends! I think we could all use a little creative distraction right now 🙂

Stay safe, stay healthy, wash your hands, and STAY THE FUCK HOME! Love y’all!

cat

OAL2017: Assembling the Bodice

9 Jun

Hey everyone, and welcome back to the second week of the 2017 OAL! This post today is all about assembling the bodice of the dress – stabilizing the neckline, sewing French seams, and attaching the facing.

A few things before we jump in:

  • The pattern I using is the Kim Dress from By Hand London, but these method should apply to most any pattern that you are sewing!
  • If you missed the first post, you can find it here.
  • If you don’t give a shit about sewalongs and hate me right now (it’s cool, I don’t give a shit about anyone else’s sewalongs either haha), I promise it will be over soon! 😉 It is impossible to please everyone, but lord knows I try!

Your fabric should be cut, your markings all clipped and transferred to your pieces, and you should be ready to sew!

OAL2017: Stabilizing Neckline

OAL2017: Stabilizing Neckline

Before you drag your pieces over to the sewing machine, it’s a good idea to stabilize your neckline first. This will prevent it from stretching and distorting over time – which can happen both during the sewing, and over normal wear. They are multiple ways to stabilize a neckline – such a staystitching or using silk organza (here are 3 methods, all with their own tutorial!) – but for the purposes of this particular garment (considering how lightweight the fabric is, and also the overall casual-ness of the dress), I chose to use a lightweight fusible stay tape. This “extremely fine fusible knit stay tape” is the exact one I used – I bought it at my local Bernina dealer years ago, and it is especially helpful to stabilize shoulder seams on knits! Since it’s knit, it curves very easily, which makes it perfect for this pattern.

I fused my stay tape to the curved edges of both the front and back neckline, ending just before the tips of the strap ties. Since the seam allowances are 5/8″ and my stay tape is 1/2″, I made sure it was 1/4″ from the edge so I would be sure to catch it in my stitching. Since I am using stay tape, I did not staystitch these areas.

Now you’ll want to sew your front and back princess seams. Because my rayon is nice and lightweight, I using French seams, which I love because they conceal the raw edges beautifully. Pretty sure I don’t need to throw out another French seam tutorial into the WWW, but I was really having fun with this white piece of posterboard backdrop SO HERE YOU GET IT ANYWAY:

OAL2017: Sewing French Seams

I start by placing the pieces WRONG SIDES TOGETHER and sewing with a 3/8″ seam allowance. Lay the piece flat and trim the seam allowances down quite aggressively – to about 1/8″. You want them to be smaller than the second seam you sew, so they don’t peek out.

I should mention – this is assuming you are using a pattern with a 5/8″ seam allowance. If your seam allowance is larger or smaller, you’l want to adjust your math accordingly.

OAL2017: Sewing French Seams

Press the seam allowances open as best you can. They are tiny, so this won’t be the easiest thing – I’ve found I get the best luck if I use my fingernail to pry them open, and then the tip of the iron the whole way down. If you found you have cut them *too* small and simply cannot press them open, it’s acceptable to iron to one side.

At this point, your bodice is going to look at sorts of wrong. Just trust me here.

OAL2017: Sewing French Seams

Now flip your pieces so the right sides are facing, effectively sandwiching the seam you just created. I like to take this to the iron and press right around the seamline I just sewed, so everything lies flat. Then sew along the edge at a 1/4″ seam allowance.

OAL2017: Sewing French Seams

Press your seam allowances to one side, according to your pattern instructions. In the case of this pattern, we are pressing them toward the side seams.

OAL2017: Sewing French Seams

OAL2017: Sewing French Seams

Repeat for the remaining princess seams. Your front and back pieces should look like this.

OAL2017: Sewing French Seams

Finally, sew your front and back pieces together at the side seams. Again, I used French seams for this.

OAL2017: Attaching the Facing

Now to attach the facing! Start by fusing interfacing to the front and back facing pieces that you created. I used a very lightweight interfacing, and opted to cut it so that the interfacing does not extend all the way into the ties (I want those to stay soft and floppy!). To prevent a hard ridge from showing where the interfacing ends, I cut that with pinking shears.

OAL2017: Attaching the Facing

Attach the front and back facings at the side seams, and press the seam allowances open (don’t worry about using French seams for this, unless you wanna be super extra or some shit). You will also want to finish the lower edge of your facing – I serged mine, to prevent it from fraying and also from showing bulk from the outside. You can also using pinking shears here, or bind the seam allowance.

OAL2017: Attaching the Facing

Attach the facing to the bodice, all the way around the neckline and strap edges. Trim the seam allowances down, and then understitch to help turn the facing to the inside. You won’t be able to understitch all the way if you are doing tie straps – just go as far as you can.

Turn the facing to the inside of the bodice, and give it a good press. You’re done!

OAL2017: Attaching the Facing

OAL2017: Attaching the Facing

Ok, that’s all for this week! As always, let me know if you have any questions! 🙂

Announcing the 2017 OAL!

15 May

Hi friends! It’s about mid-May, which can only mean one thing…

The Outfit-Along is back for another year! Our 4th consecutive year, to be exact 😉 I’ve announced this annual challenge several times already (well, 3 to be exact haha), so it may not need introducing – but just in case you’re new here, I’ve got details!

I’m teaming up with knit designer extraordinaire, Andi Satterlund, to host a combination knit-along and sew-along. The idea behind the Outfit Along (OAL) is to make a complete outfit by sewing a garment and knitting a garment. This is a great opportunity to fill your wardrobe with more beautiful handmade pieces, and we’ll have two official patterns that will have additional blog support, should you need it.

The official sewing pattern will be the By Hand London Kim Dress, and the official knitting pattern will be Andi’s newest cardigan, Anaheim. I will be blogging about the official sewing pattern and Andi be blogging about the knitting pattern, so we can all sew and knit along together. If you don’t love the official patterns, you can still join in! The Outfit Along is about making an outfit you’ll actually wear, so to participate, all you need to do is to sew a garment and knit a garment to make an outfit. You’re more than welcome to pick projects that fit your own style and skills – after all, you’ll be the one wearing it 🙂 Make a pullover and shorts, make a dress and cardigan – doesn’t matter what the combination is, as long as it makes an outfit 🙂

You can read all the relevant details over at Untangling Knots – as well as a FAQ for common questions – but in a nutshell:

– We will be kicking off the OAL on June 1, 2017.
– The deadline for completion is July 31, 2017, which gives you two months to finish both garments.
– There IS incentive for finishing your garments within the deadline – PRIZES!!! This year, we are welcoming back sponsor Indie Stitches, who is donating 3 prize packages consisting of 2 patterns (winner’s choice), plus free shipping. Winners will also receive 2 patterns of their choice from the Untangling Knots Ravelry store.
– To be eligible for said prizes, you must finish BOTH garments by July 31, 2017 and post them in the OAL Finished Outfit thread in the Untangling Knots group on Ravelry. Prize winners will be randomly selected from those who finish both their knit and sewn garments and post pictures in the appropriate thread by the deadline.

The official knitting pattern, Anaheim, is a sweet cross-over front cardigan that buttons at each side and features and all-over lace pattern. The pattern is knit in one piece, top down, with DK weight yarn and includes sizes XS – 3X (bonus – you can easily move the placement of the buttons to adjust the fit at the waist, should you prefer it tighter or looser). If you’ve never knit a garment before, this pattern is a great one to start with – the sweater is simple (and small!) enough to easily finish during the allotted time, and I can personally vouch that Andi’s instructions are clear and easy to follow (one of her patterns was actually my first knitted garment, too!). Plus, top-down in one piece? YAY NO SEAMING, Y’ALL!

BTW, Anaheim will be 20% off until the OAL begins on June 1st when you you checkout on Ravelry using the coupon code OAL2017 – so yes, get you that discount!

The official sewing pattern, Kim, is one I’ve personally never sewn before (YET) but I think will be a great addition to my summer wardrobe! The pattern features a princess seamed, sleeveless bodice, two neckline options (straight and sweetheart), plus two skirt options (tulip and gathered).

For this year’s OAL, I will not be doing a series of super in-depth tutorials of making the dress from start to finish (I feel like there are PLENTY of these on the internet – including one for the Kim dress!), but I will post tutorials for the changes that I am making to my version of the pattern.

Again, if Kim ain’t your thing – you don’t have to commit! The OAL is about what YOU want to wear, and you can absolutely choose a different pattern! 🙂

As always, you can spread the word by using the hashtag #OAL2017 or use this fancy badge. And don’t forget to join the OAL2017 discussion thread in the Untangling Knots group on Ravelry, for all your OAL chatting needs. Questions? Be sure to read the FAQ on Andi’s official announcement post in case it’s already been covered, but if not… ask away! 🙂

YAY I’m so excited! Who is joining in this year? 😀

OAL2016: Part 2 (Zipper + Finishing)

15 Jun

Hey everyone! Welcome back for the second (and final!) sewing post of the Outfit Along 🙂

OAL_Banner

At this point, you should have your skirt mostly assembled (all seams except the center back seam) with the waistband partially attached (not finished). Today, we will insert the zipper and finish the waistband in one go! I  am making my skirt with this awesome rayon crepe from StyleMaker Fabrics (don’t forget that there is free US shipping/discounted international shipping on all orders through 6/30/16 when you use the code OAL2016 😉 ), using my Spiegel 60609 sewing machine. If you missed the previous posts, here is Part 1!

For this particular skirt, I am sewing an exposed metal zipper. If you hate exposed zippers, that’s ok! You have options! Check out my tutorial for sewing a lapped zipper, and also my tutorial for sewing an invisible zipper.

For sewing the exposed zipper:

OAL2016- Sewing an Exposed Zipper
Start by marking a rectangle where the zipper is to be inserted. For a 9″ exposed zipper on a garment with a 5/8″ seam allowance (if your measurements differ, you will need to adjust these accordingly!), make a rectangle that is 10″ long and 7/8″ across. I use a Chaco Pen liner, but again – anything works! Then go over your markings with a long basting stitch on your machine. Don’t be lazy and skip this step. I know it’s tempting, but trust me on this one. The stitches will make it visible from both sides, and also won’t rub off.

OAL2016- Sewing an Exposed Zipper
If your fabric is very lightweight and/or drapey, you will want to interface the area where the zipper is going, just to give it some extra support. I cut strips of lightweight fusible and applied them over my basting lines.

OAL2016- Sewing an Exposed Zipper
Clip into the bottom corner of the rectangle at a 45 degree angle, being careful not to snip into your basting lines.

OAL2016- Sewing an Exposed Zipper
Fold along the vertical basting stitches and press.

OAL2016- Sewing an Exposed Zipper

OAL2016- Sewing an Exposed Zipper
Starting at the horizontal basting stitches, sew the center back seam at 5/8″, ending at the hem.

OAL2016- Sewing an Exposed Zipper
Press the seam allowances open.

OAL2016- Sewing an Exposed Zipper
On the right side of the skirt, lay the zipper face down with the bottom facing toward the waistband. Line the horizontal basting stitching just below the zipper stop.

OAL2016- Sewing an Exposed Zipper

OAL2016- Sewing an Exposed Zipper
Sew along the horizontal basting ONLY, using a zipper foot. PROTIP: I just found this out, but you *can* move the needle of the Spiegel 60609. While the machine is on straight stitch (#1), increase the zigzag width to 7.0 and that will move the needle! So you can get RIGHT UP IN THERE to do that zipper!

OAL2016- Sewing an Exposed Zipper
Here is the bottom of my zipper after it is attached. You only need to sew along the basting stitches – not the entire width of the zipper tape.

OAL2016- Sewing an Exposed Zipper
Flip the zipper to the inside of the skirt and press the line you just sewed.

OAL2016- Sewing an Exposed Zipper

OAL2016- Sewing an Exposed Zipper
Now turn back the skirt pieces, one at a time, and sew the zipper tape to the skirt along the vertical basting stitches, starting at the zipper top stop and ending at the bottom stop (don’t sew all the way to the very end of the tape). Again, use a zipper foot and move your needle over to one side if you can.

OAL2016- Sewing an Exposed Zipper
Here is what things should look like after you’ve attached both sides. Note that the top of the zipper will NOT reach the top of the waistband – it should only go about halfway, since we are folding the waistband to the inside. On the Hollyburn, there is a notch to indicate where the waistband folds – so the zipper  stop should reach that notch.

OAL2016- Sewing an Exposed Zipper
Now we need to finish the waistband. Fold the seam allowance (5/8″) along the long raw edge to the inside, and press. You may trim this seam allowance down to 1/4″ if it’s bulky.

OAL2016- Sewing an Exposed Zipper
Fold the remaining bits of the top of the zipper tape toward the inside of the waistband, and pin to keep them out of the way (if you accidentally sewed down this part, you gotta unpick 😉 ).

OAL2016- Sewing an Exposed Zipper

OAL2016- Sewing an Exposed Zipper
Now fold the waistband down to meet right below (about 1/8″) the stitching line at the top of the skirt, making sure that the top zipper stop is even with the top of the waistband fold. Make sure the raw edges are tucked in around the zipper and pin everything into place.

OAL2016- Sewing an Exposed Zipper

OAL2016- Sewing an Exposed Zipper
Now to topstitch! Starting at the top of the zipper, topstitch 1/8″ from the edge down to the seamline where the skirt meets the waistband, lower your needle and pivot. Then continue around the entire waistband until you reach the other side of the zipper, pivot, and sew back up to the top.

Alternately, you can also topstitch around the entire exposed zipper – but you’ll need to sew down the waistband in a second pass 🙂

OAL2016- Sewing an Exposed Zipper

OAL2016- Sewing an Exposed Zipper
Now pat yourself on the back for sewing an AWESOME EXPOSED ZIPPER WTF.

Finally, just a couple more things to finish your skirt! If you want to add belt loops or the waistband tabs, you can do so now. Then you just need to hem. I ended up taking about 3″ off my skirt length to make it more of a mini, and then finished with a double turned hem (1/4″ on the first turn, 3/4″ on the second) that is simply topstitched. Here are my hemming tutorials if you need a refresher!

That’s all for today! As always, please let me know if you have any questions!! How is your sewing coming along? 🙂

OAL2016: Part 1 (Pockets + Piping)

8 Jun

Good morning, everyone! Time to get some sewin’ done for this OAL!

Before we get into the post, a few things I wanted to mention:
– Unlike previous years, I will not be doing a full step-by-step of sewing the pattern. Part of the reason is because this is a really easy pattern and the instructions are super straightforward and simple to understand on their own.
– Now, before you freak out – there IS a sewalong for the Hollyburn skirt! Not hosted on this blog, but a sewalong nonetheless! You can find it here on Lavender Lane. So if you reeeally need the help and the instructions just aren’t cutting it for some reason or another, there is that option!
– Instead of step-by-steps, I am splitting the OAL sewing stuff into 2 posts – today and next week – both with modification tutorials. I will also include links to relevant tutorials from older posts as they are needed. That way, those of you who are not following the OAL and/or don’t care about sewalong posts (I’ll be honest – I skip over them too!) – this is less for you to skip over 🙂 And for those who are here for the OAL and love reaching sewalong posts – they’re still here! 🙂
– And DUH, I’ve made like a zillion of these skirts – so feel free to ask me questions as well! Either in the comments, or you can email me! Don’t worry! I got ya covered!
– FINALLY, I should mention that I’m using my Spiegel 60609 sewing machine to construct my Hollyburn, so you’ll see it in the photos! I wanted to see how it handled my mega-shifty fabric 🙂

Ok, back to the OAL!

OAL_Banner

Before you do anything, it’s a good idea to prewash your fabric in the same manner you will be washing/drying it once the garment is complete. Some fabric reeeeally likes to shrink, so you want to get that out of the way before it’s cut! I am using this cool zigzag rayon crepe from Style Maker Fabrics and it certainly shrunk a LOT! It’s a bit shifty to work with, but I think the payoff will be pretty sweet – it has the dreamiest, swishiest drape! I found that my increasing my stitch length just a hair (the standard stitch length on the Spiegel 60609 is a little short for sewing really delicate and shifty fabrics, I’ve learned) and using lots of pins was enough to keep the fabric in check for the most part.

Some notes on cutting:
Here is a post I wrote for the 2014 OAL on cutting and marking. Different pattern, same concept.
– It is entirely possible to make this pattern with a striped or plaid fabric! You will need extra fabric to allow for matching and it may take longer to cut, but it can be done! Depending on your stripe/plaid, you may only be able to match 2 seams instead of 4 – if this is the case, match the center front and center back seam. Mismatched side seams are less noticeable 🙂 Here is my tutorial for matching plaids. Also relevant: my tutorial on matching the stripes at the pocket.
– This pattern calls for you to cut the waistband on the straight grain (parallel to the grain line). If your fabric has a bit of stretch, though, you may want to consider cutting on the cross grain (perpendicular to the grain line). This is what I did 🙂 Keep in mind that if you cut on the cross grain, you’ll want to interface the waistband with a tricot interfacing to retain that stretch. I personally love the PROtricot at Fashion Sewing Supply, but most fabric stores have something similar 🙂
– If your fabric is super drapey and you don’t want the pockets to bag out, you may consider eliminating them entirely (go ahead, gasp or whatever). This is what I did on my skirt, to allow for a smooth front. You can always add in-seam pockets if you’d like.

Eliminating the pockets is super easy:
OAL2016- Removing Pockets
You’ll need your pocket piece and your skirt front piece.

OAL2016- Removing Pockets
Fold the pocket piece in half along the foldline, matching the notches.

OAL2016- Removing Pockets
Lay the pocket piece behind the skirt front at the pocket opening, again matching the notches. Then just tape it down into place – I am using surgical tape because it peels off easily without tearing the paper (I can’t take credit for this – I got it in my goody bag at A Gathering of Stitches. Sam makes the BEST goody bags!), but you can also use regular tape, painter’s tape, pins, or even just trace off the pattern pieces. Whatever works!

Next steps are to construct the skirt as per the directions. Sew the pockets (if you still got ’em!). Sew the center front and side seams at 5/8″, but leave the center back seam open. If you would like to finish your seams, now is the time. I used my serger to overlock the seams after I sewed them, and then I pressed them open. Finally, staystitch the waist of your skirt (just a straight stitch about 1/2″ from the edge) to keep it from stretching out.

At this point, I decided to add flat piping to my waistband seam. So you get a tutorial!

OAL2016- Flat piping
I started with a strip of bias-cut silk crepe that was 1.5″ wide. The width of your piping will determine how wide to cut your bias – you’ll want 2x the finished width, plus 2x seam allowance. Cut enough bias to go all the way across the waist of your skirt. Fold the strip in half, length-wise, with the WRONG sides together, and press.

I promise I will get a new ironing board cover eventually. Ew, that yellow stain. haha.

If you don’t know how to cut bias, here are two really great tutorials: continuous bias (my favorite!) and bias strips.

OAL2016- Flat piping

Lay the folded bias along the waist edge of your skirt, matching raw edges at the top, and pin into place.

OAL2016- Flat piping

Sew the bias in place just within the seam allowance (I sewed at 3/8″) to hold it there. You can use a basting stitch for this step; it’ll get a second sewn pass in a minute!

OAL2016- Flat piping

Lay your interfaced waistband on top of your skirt, with right sides facing and raw edges matching. The bias strip should be sandwiched between the two.

OAL2016- Flat piping

Now sew your second pass to secure all the layers at 5/8″. Make sure to shorten your stitch back to it’s normal setting if you were basting 🙂 I ended up sewing another line a little more than the seam allowance, because I wanted the piping a little bit narrower.

OAL2016- Flat piping

Check the right side to make sure that everything looks good. I have no idea how I managed that unintentional perfect pattern matching, but hey, I’ll take it!

OAL2016- Flat piping

Press all the seam allowances up toward the waistband, using lots of steam so the piping lays nice and flat. If your fabric is bulky, you may want to trim down your seam allowances and/or grade them (trimming them in staggering layers) to prevent bulk from showing from the outside.

OAL2016- Flat piping

Now admire your pretty, flat piping! Isn’t that dainty? 🙂

Ok, that’s all for this week! Let me know if you have any questions about these steps 🙂 Next week, we sew in the zipper and finish the thing! Woohoo!

OAL2016: Choosing Your Fabric

1 Jun

What up, y’all! Welcome to the first official day of The Outfit Along! If you haven’t picked a fabric yet, don’t freak out – that’s what this post is about today 🙂 I’ve handed over the reins to Michelle of Style Maker Fabrics – one of our sponsors (who not only supplied my fabric, but is also offering prizes and a discount on the site – you’ll have to read to the bottom to get to it, though 😉 ) for this OAL. If you’re not familiar with Style Maker Fabrics, consider this your introduction 🙂 Style Maker Fabrics has a great selection of beautiful and on-trend dressmaking fabrics, and their website allows you to shop not only by fabric type, but also by garment type and color (which I think is pretty genius!). Style Maker Fabrics is also ready and willing to help you find that perfect fabric if you are having trouble with too many choices – tell them the garment you want to make and a few parameters (color, fiber, price, etc) and they’ll pull together some suggestions so you don’t have to weed through all they have to offer. Although, personally, I think that’s the fun part! 🙂

ANYWAY, enough about me – I’m going to give this over to Michelle now! As a side note, my chosen fabric and yarn are both in this post – can you guess which one they are? 🙂

————————————————————————————————————————————-

OAL_Banner

I am so excited to be participating in this year’s Outfit Along. I had the pleasure of working with Lauren earlier in the spring on a special project for my online shop, Style Maker Fabrics, and now I am happy to return the favor!
Favorites 5
Yarn Colors: Maize/Banyon/Hibiscus
Fabrics: Left- 1/2/3 Center- 1/2/3 Right- 1/2/3

To kick things off for the sewing portion of Outfit Along 2016, I wanted to share some tips and inspiration for selecting the perfect fabric for the Hollyburn skirt from Sewaholic patterns, the official OAL sewing pattern. You could apply most of these tips to just about any pattern, but I will look at the Hollyburn specifically. I have also paired some yummy skeins of Quince’s Sparrow yarn (recommended for Zinone, the official knit pattern) with some fabrics from our shop to hopefully inspire your own outfit!

Hollyburn

First and foremost, what type of fabric should you be looking for? The nice thing about the Hollyburn skirt is its versatility. The pattern calls for light to medium weight wovens, which translates to a fabric with little to no stretch in just about any weight/thickness (not a lot of help, right?). This is where you can really get creative. Think about how you want to wear your skirt, your personal style and maybe even what is missing from your closet. Here are three main fabric categories to think about and how they will translate in your finished skirt.

Structured Lines
The first category includes fabrics with a bit more weight- denim, twill, canvas, suiting, etc. These fabrics have very little drape, if really any at all, and they hold their shape giving you garment a clean A-line look. A great choice for a durable skirt, something to wear every day, year round- like a classic denim skirt. I would steer towards the lighter weights to maximize the movement of your skirt. I would also lean towards keeping the length on the shorter side, View B or C to keep it from feeling too heavy- both in looks and actual weight.

Structure 1
1/2/3

Form and Grace
The next category includes much lighter weight, structured wovens- lawn, shirting, linen, chambray, etc. These fabrics still provide some architecture to your skirt but will also have more movement, drape and body. Perfect for spring and summer, these fabrics are much lighter and airy resulting in a bit more feminine look. With some of these fabrics (especially the lighter colors), you may find that you need to add a lining- an extra step but totally worth it for the perfect fabric.

Form 2
1/2/3

Feminine Drape
Last but not least, the truly drapey, fluid wovens- rayon challis, crepe, chiffon, etc. Probably my favorite category, these fabrics will give your skirt the maximum amount of drape and movement. They will also give you the minimum volume as they will provide no added structure but the silky, flowy nature will soften the lines of this skirt giving you a beautiful feminine silhouette. This would be my preferred fabric choice for the longest length, View A, as the fluidity of the fabrics will give you an amazing lightness and feel that you won’t be able to resist taking a twirl in.

Drape 3

1/2/3

Ok, now that you have the style of skirt that you want to make in mind and what type of fabrics would be suitable, let’s talk about pattern and design. The pattern recommends staying away from plaids, stripes and directional designs, but Why? Having a structured pattern to the fabric does add another level of difficulty but I don’t think this it is something you should shy away from. It may take a little extra fabric and a bit more planning how you want the pattern to lay out but the results will be amazing. With a seam down the center front and back you will want to take some extra care to match up the pattern as best you can. Or throw caution to the wind and don’t worry about it! I would only recommend this approach for a more fluid fabric (category 3 above) as the drape will help hide the any mismatch.

Up next, color- my favorite part about picking fabrics! With the help of my local yarn shop, Apple Yarns, I was able to pick up a whole color range of Sparrow and play with how this yummy linen yarn looks with different colors and textures of fabric. Not a whole lot else to say about color other than that they are all stunning- I will just let the photos do the talking. Here are some favorite combinations for this summer!

Coral 4
Yarn Colors: Hibiscus/Pink Grapefruit/Paprika
Fabric: Top- 1/2/3/4/5 Bottom- 1/2/3/4/5

Aqua 1
Yarn Colors: Eleuthera/Banyon/Fundi
Fabric: Left- 1/2/3/4 Right- 1/2/3/4/5

Denim 2
Yarn Colors: Birch/Blue Spruce/Pigeon
Fabric: Top- 1/2/3/4 Bottom- 1/2/3/4

Neutrals 3
Yarn Colors: Maize/Little Fern/Citron/Sans/Fen
Fabric: Top- 1/2/3/4/5 Bottom- 1/2/3/4/5

Hopefully you have found this post helpful and inspiring. I know Lauren has lots of amazing tips for sewing the Hollyburn pattern to share over the next few weeks. I can’t wait to see everyone’s creations, both knit and sewn!

Happy stitching!
Michelle

Note: All of the fabrics shown are available in our online shop, Style Maker Fabrics. To help with your project, we are offering all OAL participants FREE US shipping (or discounted international shipping) on their orders through June 30th, 2016 with code OAL2016. We have also contributed a few special prizes for the three random winners of the OAL challenge. Read all of the details HERE.

Discount

————————————————————————————————————————————-

Thanks again for such a great – both in terms of info AND delicious fabric eye-candy – post, Michelle! Friends, let’s talk about our chosen fabric + yarn. What did you end up with? Can you guess which one in this post is mine? Are you second-guessing yourself after seeing these new options? It’s never too late to make two skirts, you know 😉

Announcing the 2016 Outfit Along!

15 May

It’s mid-May, so you know what that means…

OAL_Banner

The Outfit Along is officially back for 2016! Yay!!

Once again, I’m teaming up with knit designer extraordinaire, Andi Satterlund, to host a combination knit-along and sew-along. The idea behind the Outfit Along (OAL) is to make a complete outfit by sewing a garment and knitting a garment. This is a great opportunity to fill your wardrobe with more beautiful handmade pieces, and we’ll have two official patterns that we will hold your hand with should you need it.

Zinone_Both_Front_02

The official sewing pattern will be the Sewaholic Hollyburn skirt, and the official knitting pattern will be Andi’s newest summery top pattern, Zinone. I will be blogging about the official sewing pattern and Andi be blogging about the knitting pattern, so we can all sew and knit along together. If you don’t love the official patterns, you can still join in! The Outfit Along is about making an outfit you’ll really wear, so to participate, all you need to do is to sew a garment and knit a garment to make an outfit. You’re more than welcome to pick projects that fit your own style and skills – after all, you’ll be the one wearing it 🙂 Make a pull over and shorts, make a dress and cardigan – doesn’t matter what the combination is, as long as it makes an outfit 🙂

Paisley Hollyburn

You can read all the relevant details over at Untangling Knots – as well as a FAQ for common questions – but in a nutshell:

– We will be kicking off the OAL on June 1, 2016.
– The deadline for completion is July 31, 2016, which gives you two months to finish both garments.
– There IS incentive for finishing your garments within the deadline – PRIZES!!! This year, we have two sponsors who have donated prizes to the OAL: Each winner will receive the pattern of their choice from Indie Stitches, a $20 voucher to StyleMaker Fabrics, and two knitting patterns of their choice from Untangling Knots.
– To be eligible for said prizes, you must finish BOTH garments by July 31, 2016 and post them in the OAL Finished Outfit thread in the Untangling Knots group on Ravelry. Prize winners will be randomly selected from those who finish both their knit and sewn garments and post pictures in the appropriate thread by the deadline.

Zinone_Both_Back_medium2

The official knitting pattern, Zinone, is a casual summer top knit in sport weight linen yarn. You have the option to include either a partial or full lace back, and choose either a cropped length or full length to the hips. It’s a little different from our previous OALs – definitely not a cardigan this year! – but I think it’s a really fun switch (and, again, you can totally knit a cardigan if that’s what your little hear desires. Or crochet one! Ain’t no knitting police running around over here). The top is knit in one piece, in the round, so it goes pretty fast. And linen is so lovely to wear in the summer! You can read more about the pattern here. AND, To celebrate Zinone‘s launch, Andi is offering 20% off up until the official OAL start of June 1. Use the code OAL2016 to get you that discount!

Striped Cabernet Cardigan + Yellow Hollyburn

The official sewing pattern, the Hollyburn skirt, is a great little wardrobe staple that no doubt many of you have already made! It’s a simple, flared skirt, that works great in both a rigid and fluid fabric, depending on the look you are going for. The pattern is perfect for a beginner as it’s relatively simple (and the only fitting you need to worry about is the waist measurement), but it’s also a good canvas for a variety of customization to make it your own, should you require a little more of a challenge in your sewing 🙂 I will be covering basic construction of the pattern, as well as how to adjust the skirt to leave off the pockets, and installing an exposed zipper. And yes, I’ve already made like 5 of these babies (1 2 3 4 5), so you know it’s a good basic wardrobe staple!

Oh! And to help with your fabric buying needs – StyleMaker Fabrics is offering FREE SHIPPING to all US orders (and $8.95 off shipping to all international orders), through 6/30, using the code OAL2016! Definitely check them out if you’re not working from your stash – they have a fantastic selection of wonderful fabrics, and you can search by garment type and color! If you need help choosing your fabric, stick around – StyleMaker Fabrics will be guest posting on the start of the OAL as well 🙂

As always, you can spread the word by using the hashtag #OAL2016 or grab a little badge below (or over on the Untangling Knots blog, where the fancy html is already embedded for you, ooh la la). And don’t forget to join the OAL2016 discussion thread in the Untangling Knots group on Ravelry, for all your OAL chatting needs. Questions? Be sure to read the FAQ on Andi’s official announcement post in case it’s already been covered, but if not… ask away! 🙂

OALBadge3

OALtag_2016

I’m super excited to be running this awesome challenge for the third year in a row! 😀 Who’s in?

Announcing the 2015 OAL!

15 May

Happy Friday, everyone! I just wanted to pop in and let y’all know that the Outfit Along is back for a second year! WOOHOOO!!!

OAL_Banner

Once again, I’m joining forces with Andi Satterlund of Untangling Knots to combine a sew-along with a knit-along. The idea behind the Outfit Along (OAL) is to make a complete outfit by sewing a garment and knitting a garment. This is a great opportunity to stretch your crafting skills, and we’ll have two official patterns that we’ll help you with along the way.

The official sewing pattern will be McCall 6887, and the official knitting pattern will be Andi’s newest cardigan pattern, Vianne. I will be blogging about the official sewing pattern and Andi be blogging about the knitting pattern so we can all sew and knit along together. If you don’t love the official patterns, you can still join in! The Outfit Along is about making an outfit you’ll really wear, so to participate, all you need to do is to sew a garment and knit a garment to make an outfit. You’re more than welcome to pick projects that fit your own style and skills. You can look through the 2014 Outfit Along FO thread in the Untangling Knots group on Ravelry to see the variety of patterns people chose to use last year.

Vianne

McCall 6887 - Pineapple dress!

You can read all the juicy details over at Untangling Knots, but in a nutshell:

– We will be kicking off the OAL on June 1, 2015.
– The deadline for completion is July 31, 2015, which gives you two months to finish both garments.
– Did I mention that finishing within the deadline means you are eligible for PRIZES? Yes! We are cooking up some fun pattern giveaways to reward those of y’all who complete their outfit within the allotted deadline, so stay tuned for more information!
– To be eligible for said prizes, you must finish BOTH garments by July 31, 2015 and post them in the OAL Finished Outfit thread in the Untangling Knots group on Ravelry. Prize winners will be randomly selected from those who finish both their knit and sewn garments and post pictures in the appropriate thread by the deadline.

Vianne_Back
The official knitting pattern, Vianne, is a seamless, top-down cardigan, knit using DK weight yarn on US 8/5mm needles, which makes it a lovely lighter weight cardigan for the summer months. The v-neck cardigan features a set of mirrored lace panels that run along the front neckline and frame a large mesh panel on the back. To celebrate Vianne’s launch, Andi is offering 20% off up until the official OAL start of June 1. Use the code OAL2015 to snag the discount! You can read more details in the Untangling Knots shop or check Vianne out on Ravelry.

McCall 6887 - Pineapple dress!
The official sewing pattern, McCall 6887, is a fun little summer dress with a surprise cut out in the back! You probably remember my Pineapple Delight version from a few weeks ago – well, I’m dying to make more, and I want to drag all y’all down with me (mwahaha). The pattern features front princess seams, skirt variations (flared or fitted) and the optional open back (there is also an option for a non-open back if that’s your jam!). I will be covering basic construction of the dress, and including tips swapping out the lining for a clean bias facing, and adding pockets. The pattern is rated as “easy,” so y’all beginners should have no problem tackling this! Also, just a head’s up – I just checked my local Joann’s and it looks like all McCall’s patterns are on sale for 3/$5 through 5/16, so go save some dollaz!

Since I’ll be traveling around Peru during the first couple of weeks of the OAL, we won’t start the sewing portion until June 22nd. Of course, you are welcome to get a head start and begin sewing on June 1; there just won’t be any sew-along posts until the 22nd! Andi will be managing the knitting posts over on her blog starting on June 1. If you knit and sew along with us, you’ll get your projects done in plenty of time.

Help spread the word and grab one of the badges below or use the hashtag #OAL2015. If you want to hang out and chat about the OAL, come join the OAL2015 Discussion Thread in the Untangling Knots group on Ravelry. You do need a Ravelry account to view and post on the thread, but it’s totally free and totally worth it if you do any knitting at all 🙂

OALBadge3


OALtag_2015

Y’all, I am SO EXCITED. Who else is joining in the Outfit Along this year?

Completed: Vogue 1419 (At Last!)

18 Nov

Well, no that the V1419 Ralph Rucci Sewalong has officially wrapped, I guess I can finally show y’all my coat! For those who didn’t catch my post on the Mood Sewing Network yesterday to see my completed coat a day early – your patience is finally being rewarded, including some never-before-seen shots that weren’t included in the original post! How exciting!

Anyway, coat!

V1419 Ralph Rucci Coat - Completed!

Considering how much I went over the making of this coat at length (see all my posts tagged v1419 here), I won’t be going over the construction so much in this post. If you want more info, feel free to check the tag – or just holler out some questions in the comments (I don’t expect anyone who didn’t actually sew along with the sewalong to have actually read the posts – they were pretty intense, and I find sewalong posts kind of boring if I’m not part of the action, you know? Anyway, snaps to you if you did read the posts! I hope you learned some new coat-making tips and tricks 😉 ). Here’s a general rundown of the basic information, for those who are dropping in for the Big Reveal:
Pattern: Vogue 1419
Fabric: From the Mood Fabrics flagship NYC store – I enlisted the help of my favorite Mood dude, George, to assist me in finding my perfect red wool coating – and he knocked it out of the park! This coating is red virgin wool, it’s nice and thick with a great amount of body to give the coat it’s lovely shape. The wool itself is soft and easily malleable (very necessary for all the crazy intersecting seams of this pattern!), and the color is just PERFECT! The pattern itself does not call for lining, but I did add a layer of bright red silk taffeta as an underlining, to help the coat slide on and also as an additional layer of warmth. The contrast (inside binding, bound button holes, belt trim) is also silk taffeta, in a darker red that matches the wool coating. I think it gives a nice bit of textural interest and keeps the coat from being just straight up loud and red. Both silk taffetas were also purchased from the Mood Fabrics store in NYC, and the colors were chosen with the help of George.
Notions: Just thread and buttons! I had my buttons custom-made here in Nashville by a local lady who sells them through Textile Fabrics. Since my coating is SUPER thick (way too thick for those sad little button kits that you can buy), it needed some heavy-duty machinery to get the fabric on. I’ve used this service in the past for previous coat buttons, and the quality is excellent.
Sizing & Alterations: I cut the size 6 and sewed the coat exactly as drafted, except at the waistline where I used a 1/2″ seam allowance instead of the standard 5/8″ (just to give myself a tiny bit of eating room 😉 ). I only altered the length – removed 3″ from the hemline and 1″ from the sleeve length.

V1419 Ralph Rucci - Inspiration Watercolor

Here’s my original inspiration, in watercolor 🙂

V1419 Ralph Rucci Coat - Completed!

I think it turned out pretty close, if not better! 🙂

V1419 Ralph Rucci Coat - Completed!

Don’t you love the photos? These were taken by my friend and fellow knitter, Alannah Arnold, who was almost as excited about this coat as I was! Alannah and I meet with a group of ladies every Monday for a casual (and, um, booze-filled, haha!) knitting night at my favorite local bar. She’s listened to me talk about this coat for weeks at this point – and offered to take photos once it was done. Which is awesome, because they turned out WAY better than anything I could have shot in front of my shed!

I met with her in East Park, in East Nashville, to take these photos. That’s a feat in itself – anyone who knows me, knows I will kick and scream when it comes to crossing the river into East Nashville. Never mind that driving into East Nashville is like driving into Brooklyn – it’s actually not that bad (unless there’s a Titans game – if then, forget about it!), it’s just fun to complain about 🙂 Regardless, East Nashville has the prettiest fall trees, and this park is undeniably beautiful. So, I made some sacrifices (har har) and ended up with a pretty great set of pictures to match my pretty great coat! Yay!

V1419 Ralph Rucci Coat - Completed!

Ooh, and I even found a Porsche while I was at it 🙂 haha!

V1419 Ralph Rucci Coat - Completed!

V1419 Ralph Rucci Coat - Completed!

V1419 Ralph Rucci Coat - Completed!

V1419 Ralph Rucci Coat - Completed!

V1419 Ralph Rucci Coat - Completed!

V1419 Ralph Rucci Coat - Completed!

V1419 Ralph Rucci Coat - Completed!

V1419 Ralph Rucci Coat - Completed!

If I haven’t already made it completely obvious – I’m SO happy with my finished coat! Sewing it up was so satisfying, and absolutely worth it. It is very dramatic and theatrical – so it’s a bit excessive for daily wear. I don’t think I’ll be bringing this to London, unfortunately, as it’s definitely not very practical (it’s too fitted to really accommodation multiple layers, plus I could see those bell sleeves getting real annoying real fast after 2 weeks of daily wear). However, it is the PERFECT topper for all these upcoming holiday parties that are just around the corner 😉

Let’s also not forget how this is one of few instances where sewing can actually save you money – this coat cost less than $200 in materials, whereas the original designer version has been rumored to run closer to $10,000. Sure, making a little cotton sundress will probably set you back more than whatever you would paid from a mall retailer – but knocking off couture? That’s where the savings really start to show 😉

I will leave you with this photo of me, wearing my knock-off designer coat, throwing leaves in front of a rich person’s house. Probably the same person who owns that Porsche, to be honest:
V1419 Ralph Rucci Coat - Completed!

Be sure to check out the McCall Pattern Company blog to see Meg’s completed coat, if you haven’t already done so! Big thumbs up to everyone who participated in the sewalong – and big, huge thanks to Meg for agreeing to cohost this beast of a sewalong alongside me. Couldn’t have done it without you! 🙂 Don’t forget to use the hashtag #V1419sewalong so it will show up on this tagboard. We encourage you to upload your photos to the V1419 Flickr group, the Vogue Patterns Facebook page, and pin it to the Pinterest board

Didn’t join the sewalong but still want to make your own designer Ralph Rucci? Check out my V1419 tag and the McCall Pattern Company Blog for all the posts pertaining to this sewalong. I can’t wait to see everyone’s finished coats!

What do you think? Would you ever tackle a crazy long intense project like a coat? What about THIS coat? Man, I love making coats!

Disclaimer: My pattern was provided to me free of charge from the McCall Pattern Company, and the fabric was provided from Mood Fabrics as part of my monthly allowance for participating in the Mood Sewing Network. Still, I definitely made this entire coat myself – sooo, that should count for something 😉

V1419 Sewalong: Steps 64-86

10 Nov

Good morning, sewalongers! This is the week we finish up our coats – woohoo!! (and those of y’all who are not following the sewalong – this is the last week you have to skip a boring sewalong post! Woohoo!). Can you just feel the excitement radiating in the air? 😉

So, the good news is – this is the final construction post before we have our sharextravaganza next week. The bad news – it’s a HELLUVA post. Lots and lots of pictures (in advance: I’m soooo sorry! Tried to cull them down as much as possible. On the flip side, none of them are of me 😉 lolololol), lots of little fiddly steps here. On the flip side, this is all finishing – which means when it’s done, the coat is done – but expect this to take some time, especially since there is lots of hand sewing in this section.

Anyway, onto finishing!

The first thing you will want to do is sew the bias facing to both of the opening edges of the coat front, as well as along the neckline and across the hem. I’m not going to go into detail of how to do the facing – we’ve all done enough bias facing on this coat, I think most of us can do it in our sleep at this point 😉 – but I did want to mention a couple little tips that helped me.

V1419 Ralph Rucci Sewalong
Once I sewed the facing on and trimmed down the seam allowances, I pressed all the raw edges toward the facing, using lots of steam.

V1419 Ralph Rucci Sewalong
Then simply press the facing to the inside of the coat. You will want to hand baste this in place, which will give you greater control when top stitching (especially important at those coat front edges).

V1419 Ralph Rucci Sewalong
At the hem and neckline, you may find that where you are intersecting seams tends to be *very* bulky – like, so bulky that you can barely turn the facing to the inside. I used my scissors to chop out as much of the bulk as possible (being careful not to cut into the stitching line or outside of the seam allowances), and them hammered them down like crazy with my clapper, to make things very flat.

Actually, if you have a clapper – it’s a good idea to smack down those edges after you’ve top stitched them, to flatten them as much as possible and give them a nice sharp crease. This will make your coat look much more professional 🙂

Now, for the button holes! Fair warning – these took foreveeeeer to finish! Lots of fiddly pieces, lots of fiddly hand stitching. I know at this point, most of y’all are probably over this coat and just want to finish so it can be worn, but please take your time with these steps. The button holes are one of the most visible parts of the coat, and you don’t want them to look sloppy!

V1419 Ralph Rucci Sewalong
Remember when we sewed around the edges of where the button holes would go? Now you need to cut right in the middle of those stitches. I first used chalk to mark where the V would start, and then cut along the lines indicated. Cut right up to the stitching, but not through it.

V1419 Ralph Rucci Sewalong
You will have a little V flap at the inside end. Fold this to the inside and press.

V1419 Ralph Rucci Sewalong
To make the button hole binding, find those 4 bias pieces you cut, and press down one long edge about 1/4″. You will want to cut the binding into 20 pieces – 4 pieces will be 2.5″ long, and 16 pieces will be 2.75″ long. You should have enough binding to cut exactly the number of pieces needed (if for some reason you screw up and need more binding – just salvage a piece of leftover facing, and cut it in half at the fold. Y’all have lots of bias facing left over, right? I do hahaha). Fold in 1/4″ at short edges of each little piece and press. Yes, this part takes forever. Sorry.

V1419 Ralph Rucci Sewalong
On the bottom of your button hole, pin a piece of binding with the right sides facing and the raw edges matching. The edge that meets the front edge of the coat should be flush, the edge against the end of the button hole should extend a bit farther. Be aware of what binding goes on what button hole – the 2.5″ binding is for the top 2 button holes (on the left and right side of the coat front); the remaining binding is for the remaining button holes.

V1419 Ralph Rucci Sewalong
I went ahead and pinned the top binding as well, because I am impatient.

V1419 Ralph Rucci Sewalong
Sew the binding to the coat, stitching along your original stitching lines. I found it easier to do this from the inside, so I could make sure I was sewing in the correct place. When you get to the end of your stitching line – where the stitching pivots to the end of the button hole – stop and back stitch. Do not go any farther than the existing stitching line.

V1419 Ralph Rucci Sewalong
Your binding should look like this on the outside of your coat. Notice that the stitching does not go all the way across to the tip of the binding. This is good; it means we can pull the end of the binding to the inside.

V1419 Ralph Rucci Sewalong
Here it is from the inside.

V1419 Ralph Rucci Sewalong
Starting at the open end, fold the binding to the inside and pin into place. I pinned both top and bottom because – again, impatient. You could also work with one side at a time. Whatever is easier!

V1419 Ralph Rucci Sewalong
For the end of the binding that is by the V you clipped, pull all the binding to the inside of the coat and pin down. This should cover the V completely, but if not, you can always clip whatever is sticking out 🙂

V1419 Ralph Rucci Sewalong
Repeat for the bottom (or top). Your finished pinned button hole should look like this.

V1419 Ralph Rucci Sewalong
Here it is from the outside.

The next thing you nee to do is slipstitch alllllll those bindings invisibly to the inside of the coat. Yep! This part takes forever! I also stitched my bindings so the edges encased the edge of the coat front, as well as slip stitched the open ends together with a few stitches. When you get to where the binding covers the triangle, be sure to catch that in your stitches so the button hole is secure. Check from the front occasionally to make sure everything looks good, especially making sure that triangle is pushed all the way to the inside of the coat and not sticking out.

V1419 Ralph Rucci Sewalong
Once you’ve finished the torture that is slipstitching ALL THAT BINDING, give everything a good press (and maybe a smack with the clapper, too, if it needs it. Mine did!). We’re not done yet!

V1419 Ralph Rucci Sewalong
Next up is thread bartacks! Start by marking where the bartacks will go – you will have 4 total for each button hole – left and right (so a total of… 40. Woof.). There will be a bartack at each end of the button hole, plus another bartack 1/2″ from each end. I marked mind with chalk.

V1419 Ralph Rucci Sewalong
The bartacks will go faster/look better if you thread up with multiple strands. I used 3 strands of thread, and then doubled my needle, for a total of 6. You can also use embroidery floss – I just didn’t have any of the right color on hand.

V1419 Ralph Rucci Sewalong
Starting on the inside, make a small knot with your thread, or tack it in a couple spots to secure it. I made a small loop and then pulled the needle through it.

V1419 Ralph Rucci Sewalong
Pull the needle to the outside and stitch across the button hole to the other side, letting the thread connect the two sides. Make another knot on the inside (or, again, secure with a few stitches), and then pull the needle back to the outside.

V1419 Ralph Rucci Sewalong
To make the bartacks, loop your thread like so.

V1419 Ralph Rucci Sewalong
Then pull the needle through the loop to create a knot (same concept as a button hole stitch, or a blanket stitch).

V1419 Ralph Rucci Sewalong
Pull the loop until it knots at the end. Repeat this over and over until you have a chain of knots that completely covers the thread. This is your bartack. Do this 4 times for every button hole. Also, have a glass of wine while you’re doing this – you’ll be sitting for a hot minute 😉

V1419 Ralph Rucci Sewalong
Some bartack tips:
– You will get better as you do these! I recommend starting with the button side first, at the bottom button hole, so your practice attempts won’t be as easily seen 🙂 Of course, you could practice on scraps first – but, naw, not me!
– Don’t pull the knots too tight, or you will distort them and they won’t be as pretty 😦
– Try to make your knots in the same direction as you go – this will keep them uniform and hopefully prevent twisting!
– If at all possible, try to do these in one sitting. The repetition means you will get better as you do it, so if you complete them all in one sitting, you won’t need to go through multiple learning curves (than if you picked it up several times during the week).
– The original Rucci coat has the bartacks continue on the back side of the bound button holes as well. The instructions for this pattern only call for the bartacking in the front (which is what I did). If you want to mimic the original and bartack the back of the button holes – well, don’t let me stop you 🙂
– Don’t get too hung up on perfection – yes, you want these to look nice, but at the same time, most of them will be covered by the buttons. Not worth killing yourself over!

V1419 Ralph Rucci Sewalong
Once you’ve finished your loops, time to sew on those buttons! Sew the buttons in the middle of the binding on the left front, catching both bindings in the stitches. For the top button, sew it 1/2″ away from the edge (it won’t be quite in the middle).

V1419 Ralph Rucci Sewalong
You can also go ahead and sew those back buttons on the belt. The pattern actually has you make button holes first – which of course you can do, but I omitted mine.
One word of note about the belt – don’t try to cinch it in too tight, or you’ll create gathers on the coat sides. Pin the belt closed first, and try it on to make sure everything is smooth and flat.

Finally, all that’s left is the sleeves. Go ahead and hem them with the bias facing – same concept as the other hemming and facing we did in these steps.

V1419 Ralph Rucci Sewalong
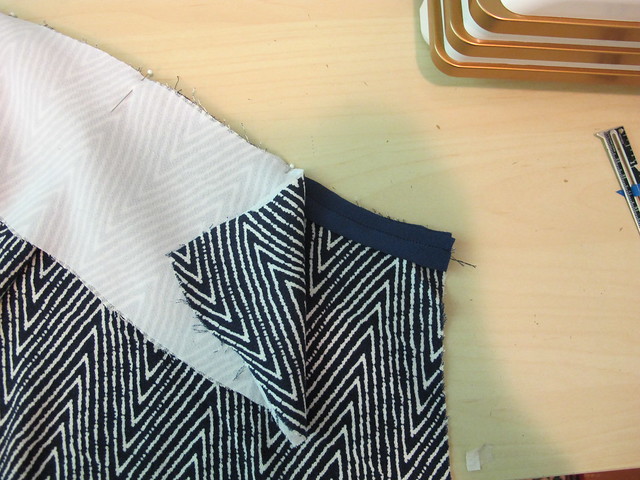
The last thing we will do is make these little sleeve binding pieces, to cover the edge where all the crazy sleeve seams intersect. Cut 2 pieces that are approximately 1.5″ long by 1″ tall (or possibly taller, if your fabric is very thick and bulky – I cut mine 2″x2″, because my fabric required the extra room!). Fold one long edge under 1/4″ and press, and both short edges as well.

V1419 Ralph Rucci Sewalong
Sew the binding to the outside of the sleeve, with the right sides facing, at the point where all the seams intersect. Sew right along your topstitching line. If your fabric is bulky, you may want to trim down the seam allowance of this binding piece.

V1419 Ralph Rucci Sewalong
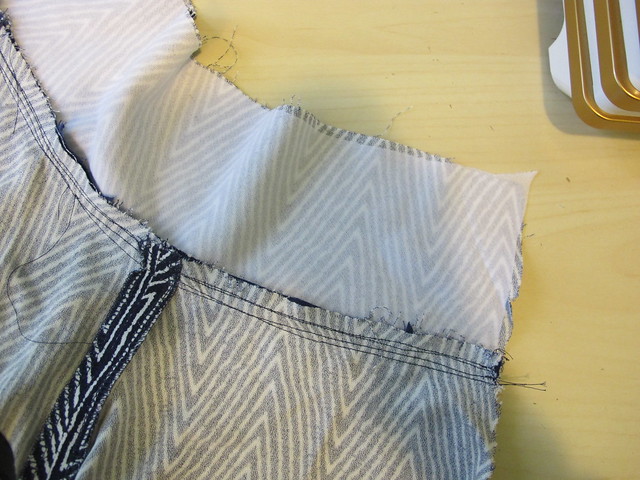
Turn the binding to the inside, wrapping around the sleeve hem and being sure that all folded edges are tucked under. Slipstitch around the 3 edges and press. Again, this is a good time to use your clapper to really flatten those seams. Gah, you guys must think I have stock in clappers at this point hahaha.

V1419 Ralph Rucci Sewalong
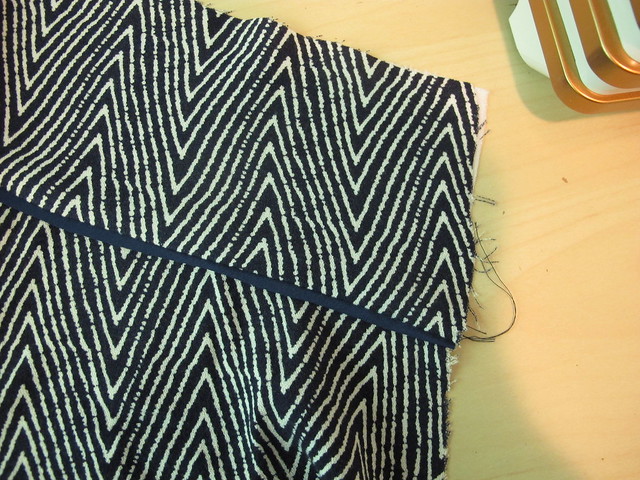
Your finished sleeve will look like this. Yes, some of my top stitching is wonky. Oh well!

Whew! That’s all for this post – AND THIS COAT! How’s everyone coming along with their coats? I’ve been loving all the progressing (and some completed!) coats that are popping up in the Flickr Group. You’re SO almost done!! If you want to show off your coat in our Parade of Coats next week (which, obvs, you should!), you have a few options – you can upload to the the Flickr Group, and you can also upload to the Pinterest Fan Gallery. Be sure to use the hashtag #v1419Sewalong so you’ll appear in our Tagboard, where we will also be pulling finished coat photos. Can’t wait to see everyone’s coats!! 😀