Tag Archives: giveaway

Completed: The Lil’ Bird Scout Tee + A Giveaway!

3 May

I’m not really sure what prompted this, but lately I’ve REALLY been loving these boxy loose shapes on me. Made in a super drapey fabric and cropped just so, I find them really flattering and even more comfortable. It’s funny – the older I get (ya know, this RIPE OLD AGE of 30 lol amirite), the more I find myself comfortable with my body – and the more I’m ok with nto wearing things that are incredibly skintight. Both of those statements seem to contradict each other, but, it is what it is!

Silk Bird Scout Tee

The Scout Tee is certainly not a new pattern – not even in my personal arsenal (I made a really fun one last year with some beautiful handwoven fabric, in case you missed it!). But hell, I have loved wearing it! My first version was made with a fabric that made it really boxy, which I liked a lot – but I wanted to see how it would feel in a drapey fabric. Spoiler alert: This is love. This is true love. I already have the next one planned.

Silk Bird Scout Tee

Silk Bird Scout Tee

Silk Bird Scout Tee

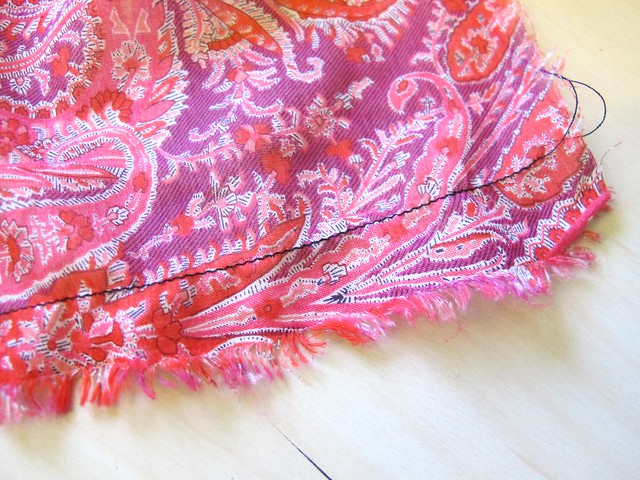
This tee is pretty similar to my last one, in terms of construction. I sewed the size 0, and the only modification I made was to deepen the hem to about 2″, which is a good slightly cropped length for me. All the seams are French seams, and the neckline is finished with self bias facing. Overall, this was really fast and easy to put together. Since there are so few pieces – just front, back, sleeve, and that bias piece – it was even quick to cut. Yay!

I love the subtle high-low hem and I think it really benefits from some extra fabric down there to give it more weight. Especially with a fabric this lightweight and floaty!

Silk Bird Scout Tee

Anyway, this post is less about the pattern and really about the fabric! What do you think of my AWESOME TROPICAL BIRD PRINTED SILK, huh?! 😀

Silk Bird Scout Tee

The fabric is from Contrado, which is a company in the UK that specializes in custom printing – including on fabric! They reached out to me several months ago about trying out some fabric design, and I’ve finally had a chance to make that happen! It was the designing part that tripped me up and slowed me down so much – I’m not much of a designer, and most of my “art” involves direct copies. Tell me that I can design literally any print that I want, and watch the fear fill my eyes haha.

It seriously took me a couple of months to even think of what kind of design to do, but I had seen a few tropical bird prints floating around on RTW stuff and I immediately knew that’s the direction I wanted to take it. I googled around for some images that I liked and played around with them in my image editing software (it’s not anything fancy like Photoshop, just so we’re clear here haha. You could probably use pickmonkey.com to do your edits) until the design looked right. Then it was a matter of uploading the file to the website, making a few more minor tweaks – and that’s it! It was actually really really easy. The hard part is definitely choosing the design.

Narrowing down a fabric choice was also difficult! Contrado offers a massive array of fabric choices – over 75, in fact. From basics (such as cottons, polys, and knits) to fancier stuff (like cashmere !!!). They sent me a swatch pack so I could see all the printed samples, which made things both easier and harder 🙂

Silk Bird Scout Tee

The fabric I chose to print on is a beautiful silk satin. It practically drapes like a liquid and it feels really incredible against the skin. I was initially a little worried about it being SO shiny – I generally use the “wrong” side of my silks, as I don’t like really shiny stuff. But since this fabric was printed, the wrong side looked.. well, wrong. I think the nature of this design works with a shiny fabric, although now I am wondering how practical it is to make a summery sleeved top out of white silk… I sweat a lot! Ha! Well I guess I can always yank the sleeves off if it comes down to it 😉

I will admit that this was not the easiest fabric to work with – the silk is quite slippery on the satin side, and there’s not much of a “grab” to the wrong side either (by “grab,” I mean like what you’d feel with a silk crepe). I chose a very simple pattern for this reason, which definitely worked in my favor. I didn’t do any sort of prepping before cutting – no stabilizers or using a rotary cutter or anything like that – and while cutting took a bit longer than it normally does, it wasn’t too terrible. I think when it comes to dealing with silks and other slippery fabrics, cutting is the worst part. Once you get past that point (assuming you cut everything correctly and on-grain), actually sewing the pieces together is relatively painless.

Silk Bird Scout Tee

Silk Bird Scout Tee

Silk Bird Scout Tee

I actually took these photos after wearing and washing the shirt, and you can see how well the colors have held up (as well as the back wrinkles – sorry about that!). Speaking of washing, I get this question ALL the time, so it bears repeating – I wash all my silk on cold in the washing machine, and hang it to dry (it’s safe in the drier as I pre-wash and use the drier, but I hate ironing so hanging to dry is the way to go!). As long as you pre-wash your silk before cutting into it, it’s safe to wash it in the machine!

One last thing – in case you were curious 🙂

Silk Bird Scout Tee

GIVEAWAY IS CLOSED.

Time to talk giveaway! The folks at Contrado are offering a whopping £100 voucher to use on their site, to print whateverrrrr your desires on your dream yardage! Further, this giveaway is open WORLDWIDE, so you don’t need to be a UK resident to enter! (My US folks – as of today’s currency exchange rates, that comes out to approximately $146.29, fyi!)

To enter the giveaway:
1. You need to LIKE the Contrado Facebook page. Show them your love and support!
2. Comment on this post and tell me what you’d design, and what you’d make out of said fabric.

As I said, this giveaway is open WORLDWIDE and the winner will be chosen by a random number generator. I will close the comments one week from today, on TUESDAY, MAY 10, 2016 8AM CST.

GIVEAWAY IS CLOSED.

Silk Bird Scout Tee

Good luck, everyone! ♥

Note: This fabric was provided to me by Contrado, in exchange for this giveaway post! Who’s gonna be the lucky winner? 😉

Giveaway + Review: Spiegel 60609 Sewing Machine

8 Feb

Spiegel 60609

A few months ago, I was contacted by Spiegel (yes, the catalog company!) about trying out a new machine that they were in the process of manufacturing. “Free sewing machine” is one of the quickest ways to grab my attention (don’t even lie, you’d do the exact same thing), and I was especially intrigued when they told me the price point was under $300. Y’all know I’m a diehard for my Bernina & Pfaff machines, but we all know that a budget is a very real and personal thing, and not everyone can afford to spend $2k+ on a piece of machinery – no matter how much you just looove sewing. I get that – I was in the same position myself for a very long time. That being said, it’s hard to recommend something at a lower price point when most stuff in that category is just pure awful. Even $500 is a lot of money for a lot of people, and that’s about the bare minimum that I could comfortably recommend for a new/non-vintage machine. Super bummer. Sewing should be for everyone, not just the people with bulging bank accounts.

All that being said, I am pretty excited about this Spiegel 60609 machine! I will admit that I was pretty apprehensive about it’s potential shortcomings before I had a chance to try it out for myself – yes, it is a beautiful machine, but it is a polished turd? I was lucky enough to see the machine before it hit the stores way back in November – I stopped by the Spiegel headquarters while I was in NYC and spent a couple of hours being wooed with sewing machines and chai lattes, yay – and I’ve had this particular machine taking up residence in my sewing room since December. We’ve had some time to really get to know each other, and things have been pretty awesome. Spiegel 60609 is good stuff, y’all.

Spiegel 60609

A quick overview of the machine – Spiegel 60609 is a computerized machine with over 350 built-in stitches, plus the option to download more stitches via iTunes and Google Play. It has plenty of standard and not-so-standard features – automatic start/stop technology (as in, you can sew with the press of a button instead of using the foot pedal), one-step button hole, speed control, twin needle capability, automatic needle threader, presser foot pressure dial, to name a few. It also has some very unusual, very cool features – it has a built-in Wifi station, which connects to the StitchCam located over the needle (!!!). The little gold shelf you see is designed to hold your cell phone or tablet, and there’s a Handy Hook that pops up to really secure things in place so they don’t bounce around while you’re sewing. Ideally, you’d have your phone up there to access tutorials on the Spiegel sewing app – but personally, I use it to watch Netflix while I’m sewing 😛 BECAUSE I CAN. Oh, yeah, and there’s a USB port in the side of the machine, which is super handy for recharging your phone after you’ve used up the battery on a bunch of X-Files episodes. Ahem. And the most important part – the stitch quality! It’s surprisingly good. Like, really really good. My only complaint is that the throat plate doesn’t have a lot of markings for seam allowances, but that can easily be rectified with strips of tape (or, in my case, Post-It notes).

Unlike most budget-friendly machines, the Spiegel 60609 actually has a heavy-duty metal frame (no plastic! Rejoice!) to keep it from bouncing around all over your table when you’ve pushed things to their highest speed. This metal frame extends all the way into the handle – so you can actually use it to carry the machine, instead of holding the whole thing like a baby (go ahead and laugh, but about a year ago, the plastic handle on my Bernina snapped in half and I dropped it on the ground. It’s fine now – it was fixed under warranty and the machine was not harmed, but MAN ALIVE that was a horrifying moment). It comes with an impressive array of included accessories – several feet (including a zipper foot, overcasting foot, blind hem foot, button hole foot, and non-stitch foot), extra needles and bobbins, screwdrivers, and quilting guides. It is my understanding that the machine was designed to be compatible with most standard low-shank feet (of course, neither of my machines have those kinds of feet – the Bernina is high-shank, and the Pfaff is one of the old German ones that *only* uses special Pfaff feet). I believe Spiegel is in the process of getting together a box o’feet that you can buy to use with the machine, though, if you’re in the same boat I am. I totally have a foot fetish when it comes to sewing machines, so I am pretty pumped about that!

The Spiegel 60609 retails for a hair under $300, and is available at Walmart (either in-house at your local store, or you can order online and ship free to your store) and also through Spiegel. While I do advocate supporting your local sewing machine store by purchasing through them, I understand that not everyone *has* a local sewing machine store, or can afford a $500 base model. Let’s be perfectly clear here – this is not a substitute for that high-end, several thousand dollar specialty machine. However, it is a great not-quite-so-basic machine that is perfect for a beginner, in a price range that works with a lot more budgets. Plus, it’s super pretty. Look at that fancy gold and white and tell me that’s not a beautiful machine. I dare you.

Spiegel 60609

Spiegel 60609

Spiegel 60609

Spiegel 60609

Spiegel 60609

This post would be pretty useless without some proof of stitch quality, right? Here are some quick tests I did. I realize now that I should have included some comparisons of Bernina vs Spiegel – I will next time!

Spiegel 60609
For this one, I lengthened the stitches by a couple mm and used a different color thread for the bobbin. The fabric is an old sheet, so it’s pretty sturdy.

Spiegel 60609
Here are the stitches on a much more delicate fabric – some *very* lightweight Liberty of London cotton/silk voile. Still no skipped stitches and no puckers.

Spiegel 60609
Finally, a sampling of some of the embroidery stitches and another shot of the straight stitch. Not too shabby!

Spiegel 60609

With all that being said – I’ve decided to partner with Spiegel, so expect more 60609 love throughout the year! I will be sharing monthly projects and tutorials, all of which are sewn on the Spiegel 60609, to show how versatile the machine is. That is, if I haven’t convinced you already 🙂 I will still be using my other machines as well for other projects (let’s be real, those are my babies and I ain’t planning on dumping them off!), so don’t expect this blog to turn into a giant sales pitch. But if you want to see more of what the machine is capable of doing – well, I have some plans in the works! 🙂

GIVEAWAY IS CLOSED

Ok! I think I’ve talked long enough – let’s have a giveaway! Spiegel has generously donated a second machine which will be sent to one lucky winner 😀 Woohooo, thank you, Spiegel!! To enter the giveaway, all you need to do is a leave a comment on this post and tell me the first project you’d sew on your new Spiegel 60609. You MUST leave a valid email contact to be eligible (please please please. You can comment as anon and hide the email address so that only I can see it – but I need that email! Otherwise I can’t contact you if you win), but that’s it! This giveaway is open WORLD-WIDE and I will close the comments a week from today, on MONDAY, FEBRUARY 15, 2016 AT 7:00 AM CST. Consider it a belated Valentine’s Day gift 😉

GIVEAWAY IS CLOSED

Spiegel 60609

Good luck, everyone! ♥

Completed: The Shutters & Shuttles Sway Dress (+ a Giveaway!!)

14 Dec

I’m so excited to finally be able to share this project with y’all!

Shutters & Shuttles Sway Dress - front

Over the summer, I’ve been in cahoots with Allison of Shutters & Shuttles to collaborate a fabric + dress design. She reached out to me after I made my Scout Tee using some of her fabric, and we thought it would be fun to match up a custom fabric with a pattern, as well as having a little giveaway too!

If you’re not familiar with Shuttles & Shuttles, they are a small company that produces handwoven and hand-dyed fabric, made entirely in Nashville, TN. Allison produces all the fabric herself using a 60″ AVL mechanical dobby loom, and makes all sorts of fabric goods – from rugs, to blankets, to yardage (some of which is produced into small batches of ready-to-wear clothing). Some of her fabrics appear in limited-edition Elizabeth Suzann collections, which is how I came to be familiar with the line (and spoiled rotten by getting to sew them!). Suffice to say, I’m a big fan of Shutters & Shuttles and I just love everything that comes out of Allison’s studio. It’s a bonus to be able to say that I literally know who made my fabric 🙂 So obviously I am pretty excited about this collaboration!

Shutters & Shuttles Sway Dress - front

The awesome part about working with a fabric designer is that you actually get to design the fabric. What a novel idea, amirite?! 😉 Allison has a swatch book showing all the designs and colors that she’s made – everything from intricate designs woven into the fabric, to a simple weave with a beautiful hand-dyed watercolor effect. You know how the first time you went into a fabric store, you were likely overwhelmed from all the sheer possibility staring at you from every direction? Well, I kind of had the same feeling – except multiplied! It was REALLY hard to choose a design; I wanted one of everything all at once! Ultimately, though, I knew this piece was pretty special and I wanted to do my garment the justice of allowing it to be worn frequently. We ended up with a fairly simple design, which I just think is absolutely gorgeous. A medium weight cotton yarn, dyed a deep rich navy blue, woven with a heavy slubbed texture. The fabric has a lot of dimension and texture, and the color is a perfect backdrop to show that off. It’s a warm, heavy fabric – it feels like I’m wearing a blanket. Sooo, obviously I made a blanket dress. Yes!

Shutters & Shuttles Sway Dress - side

Shutters & Shuttles Sway Dress - side

Wanting to stick with something tried and true (like, this NOT the project to allow for any mishaps!), I made another Papercut Patterns Sway dress. Yep – my second navy Sway dress in 2015. Hey, what can I say – at least I’m predictable 😉 This is definitely a winter-weight dress, as the fabric is so robust and heavy. It’s a great match for this pattern, as it hangs and drapes beautifully into an exaggerated tent shape. Since the pattern design is so simple, it really gives the fabric a chance to take center stage. BUT, since the fabric is also (relatively) simple, this is a good staple dress that can be worn different ways, like a good pair of jeans. It looks great with a collared shirt, with a simple long sleeved shirt, or with a turtleneck. I’m wearing it here with my grey wool Renfrew cowl, which I really love! Super cozy, y’all!

Shutters & Shuttles Sway Dress - pockets

This being a really simple dress that I’ve already made before, there’s not much new to talk about construction-wise. I serged all my seams independently, then pressed them open and catch-stitched each side down to keep them flat. That alone was the bulk of the time it took to make this – that’s a lot of hand-sewing! I also slip-stitched the hem for an invisible finish, and WHEW THAT TOOK FOREVER. Totally worth it for the finished effect, though. Since the fabric is really heavy and thus puts a lot of strain on the shoulders, I used a heavier fabric for the front and back facings, as well as interfaced them (using self-fabric would have been way too thick). Actually, the fabric I used is the same linen that I made my first Sway dress with – ha! It was a good color match 😉 I also made sure to add pockets – also out of the linen!

Fit-wise, the only change I made was to raise the armholes by about 1/2″ as I felt like they were too low on my first dress. This being a winter dress, I will likely always wear it with a top underneath – so low armholes aren’t much of a problem, but I’m glad I raised them anyway!

Shutters & Shuttles Sway Dress - back

As with my first Sway, this dress is designed to be worn forwards or backwards. I really like it with the v at the back, but wearing it with the v in the front + a vneck tshirt – that’s a nice look, too! The only issue this poses is when it comes to hemming – it’s hard to get a perfectly even hem all the way around, because once you flip the dress around, protruding boobs hike the hemline up a little! I straightened things out as best I could, but I’ve also come to terms with the fact that the hem will never be 100% perfectly even. Oh, who am I kidding – my hems are never even. WHATEVER.

Shutters & Shuttles Sway Dress - front

Shutters & Shuttles Sway Dress - back

Shutters & Shuttles Sway Dress - neckline

Working with this fabric was SUCH a joy! It’s so easy to cut and handle, and the cotton content means that it takes pressing like a champion. I do recommend catching down all your seam allowances, as it helps keep things nice and flat so you get a good sharp press on the outside. One thing that Allison and I discussed was whether or not this fabric is suitable to sew if you don’t have a serger for finishing the raw edges. Obviously, serging would be first choice – the fabric is prone to fraying, so serging that eliminates the possibility of unraveling and blends is really nicely with the fabric texture. That being said, the fraying isn’t super terrible – the fabric is a tight weave, so it hold it’s own pretty well. I do think finishing your raw edges is pretty important, but even just a simple pass with a zigzag stitch would work fine. Something gorgeous like a bound or Hong Kong seam finish would be perfect, although I didn’t take that extra step personally (I did consider it! But only consider it, ha!). For places that I didn’t serge – such as inside the all-in-one facing – I shortened my stitch length a couple mm’s to give the seam a little more strength.

All that being said, don’t let a lack of overlocker deter you from using this fabric! It’s a lot more durable than you think, like, it’s not going to completely unravel itself just from you looking at it. This isn’t some crazy bouclé, after all 😉 haha!

Shutters & Shuttles Sway Dress - inside

Shutters & Shuttles Sway Dress - fabric close up<

Here’s a close-up of the fabric’s color and texture. Isn’t it delicious?!

Oh! As a fun little bonus, when I came to pick up my fabric – there was this cool white border print taking up about the first 1/2 yard or so. Allison said she’d tied the navy threads onto the white that was already on the loom to start off (forgive me if I’m totally butchering this explanation – I’ve never woven fabric before!), and played around with a fun design before the white ran out and went into solid navy. She offered to cut it off, but I wanted to try to use it because it is SO cool looking! There wasn’t a lot of the design to play with – it’s about half a yard, going along the width of the fabric. I was able to eek out a simple scarf, though:

Shutters & Shuttles Scarf

aka A BLANKET FOR MY NECK.

Shutters & Shuttles Scarf

I really wanted to wear the two pieces together, but I have spared you.

Shutters & Shuttles Scarf

I really agonized over how to finish the raw edges of this scarf. The short edges are selvedge, so they are fine as-is. I thought about doing a rolled hem, but I realized that the fabric is so textured and cushy, it actually hides serging really well. Look at the blue edge – can you see the serging? Just barely! So yeah, I just serged my edges and called it a day! Insta-scarf!

Shutters & Shuttles Sway Dress - front

Ok, I think you guys have put up with my blabber long enough for one post – let me blab about this giveaway now! Allison wove some extra yardage of this lovely blue cotton, which means that one of you get a piece! Yay!

GIVEAWAY IS NOW CLOSED

The giveaway is for a piece of plain weave, hand-dyed, hand-woven blue cotton fabric from Shutters & Shuttles and made in Nashville, TN. The fabric is approximately 60″ wide, and you get 1.5 yards – which is plenty to do something fun with! Oh, and it’s pre-washed! (although you may want to wash it separately by itself the first few times, in case the dye decides to bleed) Wanna throw your name in the bucket? Just leave a comment on this post and tell me what you would make if you won the fabric! This is an awesome, warm, heavy cotton fabric that would do well for something like my Sway dress- it would also make a lovely circle skirt, or even a REALLY comfy pair of loose pants! Or maybe you want to be boring and make a bunch of scarves? 🙂 I won’t judge you! (note, the cool white border won’t come on your piece. That was a one-off that I selfishly kept for myself, not even gonna apologize for that!)

The giveaway is open WORLDWIDE and I will close the comments one week from today, on December 21, 2015 at 7:00 AM CST. In the meantime, you should check out the Shutters & Shuttles site, including all the inspirational things in the shop. Oh! Speaking of which – if you want to buy something, use the code LLADBIRD for a 15% discount – good through 12/25/15 (meaning, you can still totally buy yourself a great Christmas gift 😉 Including this exact yardage, YAY!).

GIVEAWAY IS NOW CLOSED

Shutters & Shuttles Sway Dress

MASSIVE thanks to Allison + Shutters & Shuttles for doing this collaboration with me, because this fabric is fucking awesome!! Now, which one of y’all is gonna be my fabric twinsie? 🙂 Good luck!!!

GIVEAWAY: Sewing for Fashion Designers

6 Apr

Well hello there, folks! Sorry about my sudden abrupt absence (I wouldn’t normally even mention it, but I got a few concerned emails over the week, so I thought I would clarify!) – we spent the last weekend of March moving house, and then the past week painting and unpacking and then throwing our first party in the new place. I actually haven’t been at my sewing machine since before I went to New York last month, and I’m kind of going crazy! The good news is, I’m pretty much completely unpacked and set up at this point (I told myself I wasn’t allowed to sew until the house was set up – talk about a good motivator!). The bad news is, I don’t have anything new to show y’all just yet. The awesome news is, I do have a giveaway! So there’s that! Bear with me here and regular posting will resume shortly, I promise.

Sewing For Fashion Designers_Front

Sewing for Fashion Designers is one of the newest titles from one of my favorite sewing book publishers, Laurence King. The beautiful hardcover book has over 300 pages of information, covering everything you need to know about sewing from a professional production standpoint.

I admit, when I received my copy in the mail – my first thought was, “For real? Another book on learning how to sew? How many more of these do we need, really?” And while I still agree with that to a certain extent, this particular title doesn’t necessarily fall into that category. This book won’t teach you how to thread your domestic machine and it doesn’t include any sewing patterns. What it is is a dictionary’s-worth of sewing knowledge, beautifully photographed and illustrated, giving you all the information you could possibly need to create clothing the same way it is done in the industry. To be honest, I found it really fascinating.

Sewing For Fashion Designers_Spread_01

The book is a bit textbook-like in how it’s laid out – the first chapter covers tools and equipment, working with patterns and cutting out your fabric. Chapter 2 is a comprehensive overview of fabric, notions, and supporting materials (such as interfacing for tailoring a jacket) and underpinnings. Chapter 3 covers stitches – both hand and machine – as well as finishing seams. Chapter 4 is for general techniques, such as setting in a sleeve or creating a welt pocket. Finally, chapter 5 explores fabric and cut-specific techniques, like working with sequined fabrics or fur. There’s a good mix of both illustration and photography, plus little tips scattered through the pages. There are also plenty of runway photos to illustrate the techniques and fabrics described in a particular section.

Sewing For Fashion Designers_Spread_07

As someone who has an aggressively edited sewing library (I can – and will – buy sewing books all day, but there comes a time in every sewer’s life when you realize you gotta let some of ’em go so they can be loved and appreciated by someone else, rather than gather dust on their shelves, you know?), I really like this book and I definitely made some space for it in my collection. I love that it covers an entire range of techniques and I love how the instructions are laid out and how easy they are to follow. It doesn’t cover fit – but I’m ok with that (I think fitting really belongs in its own book – that’s a whole world of knowledge that can’t possibly be covered in 20 pages). I love that it’s not necessarily geared toward the beginner female sewer – it speaks from a fashion industry standpoint, and holy shit there are actually photos of men sewing in this book. It’s also, like I said, just fascinating to flip through. I’ve been reading it, well… like a book. Ok, a novel. Whatever.

(psst – click the photos to enlarge)

Sewing For Fashion Designers_Spread_02

Sewing For Fashion Designers_Spread_03

Sewing For Fashion Designers_Spread_04

Sewing For Fashion Designers_Spread_05

Sewing For Fashion Designers_Spread_06

Sewing For Fashion Designers_Spread_08

GIVEAWAY IS NOW CLOSED
Like I said at the beginning of this post, there’s a giveaway here! Laurence King has been kind enough to offer a second copy to one lucky winner, yay! If you’d like to throw your name in the hat to win your own copy of Sewing for Fashion Designers, just leave a comment on this post. You don’t have to say anything in particular, unless you want to tell me your favorite joke! (please – I need some new jokes!) This giveaway is open to US READERS ONLY (sorry, my international friends! I love you!) and I will close the comments one week from today, Monday, April 13, 2015 at 6:30 AM CST.
GIVEAWAY IS NOW CLOSED

If giveaways aren’t your jam, you can also get a copy of the book on Laurence King’s website and, of course, good ol’ Amazon. Please be aware that the title has not been released yet, and is currently on pre-order.Sewing For Fashion Designers_3DGood luck, everyone! In the meantime, you can bet I’ll be back puttering around the new sewing room – now that I’m unpacked, I can finally start sewing! I even made a cardigan last night! Life is good 😀

Note: Sewing for Fashion Designers was given to me by Laurence King, in exchange for this review. All thoughts and opinions expressed are my own 🙂

Completed: Margot PJ Pants (+Love At First Stitch) (+GIVEAWAY)

31 Oct

Hey everyone! Today I’m joining the US masses to help promote Love at First Stitch: Demystifying Dressmaking by Tilly Walnes, my friend and fellow blogger.

51Nr-WjrMQL

Most of y’all probably alreaddddyyyy know all about this, but in case you haven’t – Tilly is a fabulous blogger whose clear instructions and gorgeous patterns are perfect for beginner sewers who feel overwhelmed by mysterious sewing jargon and confusing instructions. She’s done so well, in fact, that now she’s got a whole book deal out of it! Which is pretty awesome! I was contacted by Roost Books to see if I’d like to help promote the US launch of the book – it’s been out for a few months now, but we’re just now getting it here! As I’ve mentioned before, I’m kind of over book reviews – but I want to support my friends in their business endeavors, so today you get a non-review-review 😉

Margot PJs

For my non-review-review, I decided to try out one of the patterns in the book – the Margot Pajamas! For someone who loves pajamas as much as I do, it’s kind of surprising to know that I’ve never actually sewn a pair of pj pants (those Lakeside Pajamas don’t count :P). I think pajamas are kind of a rite of passage for most first-time sewers, but not me, I guess! So it’s a first for me as well 🙂

Anyway, before we go too much into the pattern, I did want to talk a little bit about the book.

Margot PJs

Margot PJs

MOSTLY THAT IT’S FREAKING ADORABLE!

Everything is laid out with bright and clear photos (LOTS of photos, I might add – it’s like reading a really good blog tutorial, except in book form), and the book progresses to build the skills you need to get into dressmaking. Starting with threading the machine, to understanding how to cut fabric, to choosing a size – it’s very well thought out, very beginner friendly, and shit, I wish this existed when I was learning how to sew. Probably would have ruined about half as much fabric if that had been the case 🙂

Margot PJs

Each included pattern comes with sections to “Make It Your Own,” for customizing and, well, making it your own.

Margot PJs

There are also blurbs for making sewing a lifestyle, including this one that is my favorite – How to Behave In A Fabric Store. Haha!

Anyway, the short: it’s adorable, it’s well-written, and it’s great for a beginner. For those of us who are not beginners, the patterns are still pretty cute (you can see all the patterns in the book here). The only drawback is that the patterns are printed double-sided, which means you have to trace them. Boo! I imagine this was done to save $ on printing costs. Also, I just hate tracing. That’s a fact of life.

That being said, I did muster up the tracing stamina to at least make some damn pajama pants. Wanna see?

Margot PJs

SUP, MARGOT. How YOU doin’?!

I hope you enjoy this new background that is my living room! To answer your questions: Yes, we love America here. And, yes, that’s a creepy-ass painting behind me, and no, I have no idea who painted it. I found it at Goodwill for $7 and it had to come home with me because reasons. It’s painted on plywood and literally drilled into the wall. My mom hates it.

Margot PJs

Margot PJs

I cannot believe how long it took me to finally make PJ pants! They are SO easy and satisfying to make – even with my construction modifications (more on that in a sec). I am between sizes in the book’s size chart, so I spliced between the 1 & the 2, and removed about 1/2″ of length from the crotch (just folded it out horizontally across the middle), as well as 1″ from the length. I also narrowed the legs a little – mostly because I was short on fabric (oops).

Margot PJs

I admit I didn’t much follow the instructions – mostly because they were way too hand-holdy for my needs. However, pj pants are pretty easy to throw together. To match the plaid, I cut everything on the single layer and used my walking foot to feed things evenly through the machine. All seams are serged to prevent unraveling.

Margot PJs

I made a couple modifications to increase the comfort level of these pants. For one, I’m not a fan of drawstring-only pj pants. I prefer a little elastic! To do this, I cut a length of elastic (1.5″ wide, because that’s what I had on hand – and it also is the same width as my ribbon) about 8″ smaller than my waist measurement (enough that it almost came around my hip bones) and sewed ribbon to either end. I threaded it through the drawstring opening as instructed, being careful not to twist the elastic.

Margot PJs

Once the elastic was in place – centered and flat – I sewed down the center back seam with a straight stitch. This keeps the elastic in place so it doesn’t shift (and I don’t accidentally pull the elastic/ribbon out!). Since the ribbon I used is polyester, I burned the edges to prevent them from fraying.

Margot PJs

The finished waistband is much more comfortable, and – bonus! I can actually pull these off without untying the ribbon. Haha!

Also, ribbon bonus: Pretty sure that stuff came from the bouquet I took home from my BFF’s sister’s wedding last year. How’s THAT for recycling? 😉 Even better – now every time I’m lounging on the couch in my comfy pjs, Landon will be reminded that I CAUGHT THE BOUQUET, HELLOOO??

Margot PJs

I ~made these my own~ by adding a pocket to the back – using my phone as a guide for the size (the pockets on most of my pj pants are too shallow, which I hate!). I cut the pocket on the bias for a little interest, and used my existing pj pants to determine the placement.

Margot PJs

The legs have a nice deep hem – partially because I love the way it looks, and also in case these shrink up more when they’re washed. The extra hem means I can let the length down if need be.

Speaking of which, isn’t that fabric glorious? It’s from Pink Chalk Fabrics, a lovely cotton flannel from Robert Kaufman (which appears to now be sold out – here are their other available flannels). When I say this stuff is lovely, I mean it’s AMAZING. It is SO SOFT AND SNUGGLY. I was seriously bummed when I finished these, because I wanted to put them on immediately but I knew I needed to wait to take photos (and have since not taken them off. They are the best!). Between this fabric & the polka dot chambray I used, Robert Kaufman is about to be my favorite fabric source, possibly. I kind of wish I’d bought more, especially now that I see they are sold out 😦

Anyway, I wanted to do something fun with these photos, but unlike Tilly – I don’t have a cool ~retro~ phone to pose with.

Margot PJs

WHAT I DO HAVE, THOUGH, IS A COMMODORE 64.

Margot PJs

“Aw hell yeah, mom, this is the best Christmas present ever!”

Margot PJs

Don’t mind us, we are just having a moment here.

GIVEAWAY IS NOW CLOSED

Anyway, if you read this far- congratulations! Let’s have a giveaway! Roost Books sent me two copies, which means I have one to mail to someone! If you’d like to enter the giveaway to win your very own copy of Love At First Stitch, leave a comment on this post and tell me which pattern you’re dying to make (again, you can see all the patterns here). That’s it! Because we are celebrating the US release of this book, this giveaway is open to US READERS ONLY (sorry, my international friends! I still love you! I’ll see some of y’all in London next month!). The entries will close one week from today, Friday, November 7, 2014 at 7:00 AM CST.

GIVEAWAY IS NOW CLOSED
If you’d like to go ahead and get a copy of the book anyway, you can either buy it on Amazon or directly from Miss Tilly herself (and unlike Amazon, she will even sign it for you!). Good luck, y’all!
GIVEAWAY IS NOW CLOSED

Disclaimer: I was given Love At First Stitch for free from Roost Books, in exchange for a review. All opinions in this post are my own.
From Love at First Stitch by Tilly Walnes, © 2014 by Tilly Walnes. Reprinted by arrangement with Roost Books, an imprint of Shambhala Publications Inc., Boston, MA.

TUTORIAL + GIVEAWAY: The Sewtionary (+ last week’s giveaway winner!)

22 Sep

Sorry, y’all, I’m in giveaway overload this month! Can’t help it if my friends are releasing awesome shit all at once, you know?

Adobe Photoshop PDF

I’m sure most of y’all have heard all about this fabulous little book by now – The Sewtionary, written by Tasia of Sewaholic (one of my FAVORITE sewing pattern companies! Seriously, some top 5 shit right there). A couple of months ago, Tasia reached out and asked if I’d like to be a part of her Sewtionary Blog Tour to help promote the book. While I do realize that blog tours can be a little redundant if you read the same blogs over and over (I know I can sometimes get jaded at looking at the same photos/reading the same gushing daily for 2 weeks or whatever), I really wanted to help promote this book because I really do give a shit about Tasia and her business. She’s one of my friends, and I like to do things for my friends. Plus, the book is beyond excellent- a great resource of 101 sewing techniques, written out like a dictionary. The photos are beautiful, each technique includes why it’s necessary (something my nerdy brain just loves), and it’s spiral-bound, so it’ll lay nice and flat on your sewing table. Lots of wins here!

Anyway, that’s about as much of a review as you’ll get from me (if you want a true review, definitely check out some of the tour stops that I’ll be linking at the bottom of this post!). Today, I wanted to do something different. I’m going to share a tutorial from the book with y’all .Everyone likes tutorials, right? 🙂

How to Make a Tailor's Ham & Seam Roll - Sewtionary Giveaway

Today’s tutorial: Making a Tailor’s Ham & Seam Roll.

First up – you’re probably thinking, “What the hell are these things and why the fuck would I spend my time making them?” Well, I’m so glad you asked! Both are used as pressing aids – the Tailor’s Ham is a big pillow-shaped tool that is used for pressing curved areas (such as darts and necklines), and the Seam Roll is a long, narrow stuffed tube that is used to press hard-to-reach seams (such as the inside of a sleeve), as well as a helpful way to avoid making seam allowance impressions on the right side of your garment. While I have a Tailor’s Ham that I’ve used for for years (and no lie, my cat literally uses that shit as a pillow when she naps on my ironing board), I’ve yet to get a Seam Roll. They are both great to have, but can easily cost you $20+ a pop when you buy them from the fabric store. So here’s where we learn to make our own – at the delightful price of FREE NINETY-NINE. You heard me!

You will need:
– Large scraps of wool fabric & cotton fabric. Try to choose something with a dense weave that does not stretch, that is 100% (aka – no poly blends!). I used leftover wool coating from my Vogue Coat and black quilting cotton.
– Something to stuff it with. Traditionally, these things use sawdust. You can also use cedar shavings (from a pet supply store), wool fabric scraps, or even old nylon stockings. For the purposes of this tutorial, I am using sawdust. It is *extremely* messy. It is also extremely free. No lie, I just waltzed right into my local Home Depot and asked for a bag of sawdust, back where they cut wood to spec. I can’t speak for other countries (Tasia tells me that you can’t sell sawdust in Canada, say whaaaat), but here in the good ol’ US of A, lots of hardware stores will give you free sawdust because they would otherwise throw it away. My sawdust man also informed me that it makes a nice mulch for the garden. Isn’t that handy!
– Sewing machine, thread, and hand sewing needles.
– Outdoor space, or a really really good broom. I told you, this shit was messy. You have been warned.

How to Make a Tailor's Ham & Seam Roll - Sewtionary Giveaway

Here are the instructions, Sewtionary-Style. Told y’all that book is just lovely.

Now here are my steps.

TO MAKE THE TAILOR’S HAM:

How to Make a Tailor's Ham & Seam Roll - Sewtionary Giveaway
I found it easiest to start with a paper pattern piece, since the shape is so weird. You’ll want to make your ham 14″ long; 10″ wide at the wide end and 8″ wide at the narrower end. This will result in a bit of an egg shape.

How to Make a Tailor's Ham & Seam Roll - Sewtionary Giveaway
Using your paper pattern piece, cut one egg from both the wool and the cotton.

How to Make a Tailor's Ham & Seam Roll - Sewtionary Giveaway
Pin the pieces, right sides together, leaving a nice 5″ gap at the wide end. PROTIP: Whenever I’m sewing something that requires an unsewn gap, I mark each end with a double pin. This reminds me to stop sewing when I get to the double pin! Otherwise, I’ll just keep going my merry way and complete the circle, which is exactly what we don’t want right now.

How to Make a Tailor's Ham & Seam Roll - Sewtionary Giveaway
Using a 1/2″ seam allowance, sew around the entire circumference of the ham, again leaving that 5″ gap at the wide end. Make sure it’s 5″, too – you’ll need the room for stuffing (don’t make it more than 5″, or you’ll hate yourself for it).

How to Make a Tailor's Ham & Seam Roll - Sewtionary Giveaway
Turn the ham right side out.

How to Make a Tailor's Ham & Seam Roll - Sewtionary Giveaway
Ok, time to get messy! Take that ham outside and start stuffing your stuffing in it! If you are using sawdust, expect a big mess that will get everywhere.

How to Make a Tailor's Ham & Seam Roll - Sewtionary Giveaway
Instead of just quickly trying to fill the ham with sawdust, take the time to pack down the sawdust with each handful. The narrow end of the ham especially needs to be packed pretty tight, or else it will collapse. Once you’ve packed it down, work on the next section and pack that. Again – this IS messy, and it will take longer than you think, because sawdust loves to pretend it’s tightly packed when it’s secretly not. You want the ham to be pretty hard so it will retain it’s shape. When you think it’s full – keep stuffing. Then stuff some more.

How to Make a Tailor's Ham & Seam Roll - Sewtionary Giveaway
In the meantime, here’s a photo of my cat glaring at me for daring to sit outside without her, haha.

How to Make a Tailor's Ham & Seam Roll - Sewtionary Giveaway
Once you are sure the ham is packed as tight as it can go (Are you sure? Are you sure you’re sure?), it’s time to sew it up!

How to Make a Tailor's Ham & Seam Roll - Sewtionary Giveaway
Holding the ham between your legs (do as I say, not as I do – don’t set it on the ground; you don’t want to push the narrow end back in!), turn under the seam allowance on one side and lap it over the opposite side. Using a tight whipstitch, sew the opening shut by hand.

Next, you’ll probably want to beat the shit out of your ham (if it’s covered in sawdust like mine, anyway). I just pounded mine against the porch railing until all the dust was knocked off.

This post is turning into one long “That’s What She Said” joke, isn’t it?

How to Make a Tailor's Ham & Seam Roll - Sewtionary Giveaway
End result: Completed Tailor’s Ham!

TO MAKE THE SEAM ROLL:
How to Make a Tailor's Ham & Seam Roll - Sewtionary Giveaway
Unlike the Tailor’s Ham, I didn’t bother making a pattern piece for this one – I just drew it directly on my cotton with a Chaco pen. Draw a 14″x5″ rectangle and round the four corners.

How to Make a Tailor's Ham & Seam Roll - Sewtionary Giveaway
Cut one of each of these rectangles from both your cotton & wool.

How to Make a Tailor's Ham & Seam Roll - Sewtionary Giveaway
Using a 1/2″ seam allowance, sew the two rectangles, right sides together, leaving a 5″ opening in the middle of one long side of the seam roll (I have no idea why I don’t have a photo of this, but I trust you can work this step out). Turn the roll right side out.

How to Make a Tailor's Ham & Seam Roll - Sewtionary Giveaway
Time to stuff that bad boy!

How to Make a Tailor's Ham & Seam Roll - Sewtionary Giveaway
As with the Tailor’s Ham, really stuff and pack each long narrow end before focusing on the middle of the roll. This will ensure that your roll is nice and tightly packed, and hard enough to hold it’s shape.

How to Make a Tailor's Ham & Seam Roll - Sewtionary Giveaway
Once you’ve packed the roll nice and tight with sawdust, turn one seam allowance under and lap it over the opposite side of the opening. Sew this closed by hand.

Again, you’ll probably want to beat the shit out of that thing to get all the dust off. Be aggressive! Honey Badger Seam Roll don’t care!

How to Make a Tailor's Ham & Seam Roll - Sewtionary Giveaway
And here’s the finished seam roll!

How to Make a Tailor's Ham & Seam Roll - Sewtionary Giveaway
And here’s my new pressing family! Yay!
BTW, be sure to save some of that remaining sawdust – once you use the ham or seam roll, you may find the sawdust settling and thus need to be repacked to firm up the shape. Unless you just really love having an excuse to go to Home Depot – in that case, don’t let me stop you.

GIVEAWAY IS CLOSED
All right, I promised y’all a giveaway so let’s get on that. To win your own copy of the Sewtionary, simply comment on this post and tell me your favorite sewing technique. Are you a freak about pressing (high five!) or is sewing patch pockets your thing, or…? You tell me! This giveaway is open WORLDWIDE and I will close the entries a week from today, on SEPTEMBER 29, 2014 AT 7:00 AM CST. Good luck!
GIVEAWAY IS CLOSED

If you’d like to buy your own copy of the Sewtionary, you can pick up a signed copy at the Sewaholic website (or a boring ol’ unsigned copy on Amazon). Thanks so much, Tasia, for letting me be part of this book tour & for generously donating a copy to giveaway!

How to Make a Tailor's Ham & Seam Roll - Sewtionary Giveaway

Want to read some more Sewtionary reviews and/or enter some more giveaways? Check out the full blog tour here:

ONE LAST THING – We have a giveaway winner to announce! Lucky number generator says:

winner1

winner2

Donna, you’re a winner! Is this now offically the second time I’ve made your Monday exciting? 🙂 Congratulations! Sending your email now!

Everyone else (and there were a lot of y’all – nearly 400 entries, wow!) – I’m not turning you away completely empty-handed. Kat has generously offered a coupon code, which is awesome! Use the code LLADYBIRD to get 15% off the purchase of the Jenna Cardi from Muse Patterns, good through 9/29. Thanks to everyone who entered the giveaway! Y’all are the best 😀

Completed: The Jenna Cardi (+GIVEAWAY)

15 Sep

In my wardrobe, I have a very small selection of RTW clothing that is quickly dwindling to nothing. Out of those pieces, the majority of them are lightweight knit cardigans. You know the kind I’m talking about – sewn, rather than knitted, lightweight enough to throw in a purse, wearable for all seasons (I dunno about y’all, but I wear my cardigans throughout the summer – air conditioning is tooooo cold for me!). As I’m quickly replacing all my clothes with handmades, the one major hole – other than undergarments (which I’m working on!) – has been those damn cardigans. I love knitting cardigans, don’t get me wrong – but those take loads of time, not to mention even the lightest fingering weight yarn can’t compete with how lightweight a knit fabric is, you know?

I’ve been on the lookout for a good cardigan pattern – not even really for the pattern itself, but rather, the instructions. Y’all, the one time I tried to sew button holes on a knit, it ended up being slightly traumatizing. Then there was that time recently that I tried to use an old RTW cardigan to copy into a handmade one (cutting it apart to use as a pattern – same concept as how I made my striped hoodie). Spoiler alert: it didn’t work out at all. Clearly I can’t hack this on my own. I need someone else to do it for me.

20121202-210149

Also, that cardigan I chopped up? As much as it wasn’t really my favorite – it was the one grey cardigan that went with basically everything. And here it was, chopped up into little bits and, uh, I kinda needed it back.

Jenna Cardi

Anyway, all that being said – right about the time I realized I was making a huge mistake (chopped up cardigan and all), Kat emailed me, saying she’d just launched her new pattern company, Muse Patterns, and would I like to try and review the Jenna Cardi?

UM. YES.

Jenna Cardi

HI GUYS, LOOK, DREAM CARDI PATTERN RIGHT OVER HERE.

Jenna Cardi

The Jenna Cardi comes with a few different options, so you mix and match to create the cardigan of your dreams (I’m not the only one who dreams about cardigans, am I?). You can choose a cropped or waist length version, sleeves ranging from full, to three quarter, to short, and then there’s also an option to include a beautiful curved yoke detail.

I’m a boring person with no imagination when it comes to wardrobe basics, so I chose something plain and simple for my first hurrah – cropped length, long sleeves. The thing about this cardigan that makes it so special, though (I mean, other than the fact that I SEWED IT MYSELF yaaaay for not buying RTW!), is the fabric I used! HOMEGIRL GOT HER HANDS ON SOME MERINO WOOL.

Jenna Cardi

Are we all still freaking out about merino wool or has that ship sailed? Whatever, *I’m* still freaking out over it! Ever since Katie started pushing it on me like an extraordinarily effective drug, I have been trying in vain to locate a US source. That stuff isn’t cheap, even in the best of times – and to ship it all the way from NZ obviously adds some dollarz to the cost.

So where did I find this golden merino ticket, you might ask? Surprise – Organic Cotton Plus, of all places! They are starting to branch out to include other natural fibers than just cotton, which is all kinds of awesome. When they asked me if I’d like to try a little piece of whatever caught my fancy from the website, I stumbled across the merino wool and, forreal you guys, my heart stopped for a nanosecond. There aren’t a whole lot of options on the site at the moment – just the black I have here, as well as a natural colorway (which I almost got, but then the idea of dying that shit seemed too overwhelming. Plus, black is so useful! Even if it photographs like crap). At $33 a yard, it is not cheap – but it’s worth it. That black merino is a whopping 61″ wide, plus, IT’S MACHINE WASHABLE WOOL. Oh, and you don’t pay NZ shipping prices! Win win!

Jenna Cardi

Having used both merino wool from Organic Cotton Plus, as well as the stuff straight from New Zealand – I can confidently say that this is pretty good stuff. It’s soft and lightweight without being see-through, it has a nice stretch and drape to it, and it cuts and sews like a dream. Wait till you see the topstitching on this baby – it’s ridiculously beautiful. Ahh I just love this fabric.

Jenna Cardi

The only downside I can think of is that it does wrinkle up a bit, as you can see in these photos (it’s not nearly as noticeable in real life – otherwise, I would’ve steamed things up before taking photos. Womp whomp, deal with it). Kind of the same thing as linen – just natural wear wrinkles. If that bothers you, you’ll want to stick to something with a poly blend. For me, though, wrinkles are an ok trade-off for natural fibers!

Jenna Cardi

Anyway, I loved my Jenna cardigan so much – I immediately made a second one!

This one is pretty boringly similar to the black merino one, except it’s longer. It’s not quite the longer version – I cropped some off for my proportions – but it does look better with the shirt I’m wearing underneath it, ha 🙂 Instead of using merino wool, I used some wool knit that I picked up at Mood Fabrics when I was recently in the store. This stuff is less drapey than the merino – it’s almost like sweatshirting, except without a fleecy side. It’s also not machine washable, so there’s that. I’ll have to handwash it like I do all my hand knits, oh well.

Jenna Cardi

Sewing both of these was ridiculously easy, by the way. My second version took me all of 2 hours – not bad! I made the bust 32″ and took in the sleeves a bit because they were a little wide. I also had to shorten the sleeves by a couple of inches.

As I mentioned, I was pretty apprehensive about the button bands – but surprisingly enough, the button holes were way less problematic than I was anticipating! I made some test button holes – experimenting with interfacing, tear-away stabilizer, no interfacing – but ultimately went with the instructions, as I figure Kat knows more than I do when it comes to knit button holes 🙂 The button band is stabilized with woven fusible interfacing, and it’s sewn on with a 1:1 ratio (meaning it’s not stretched at all). This gives the knit fabric enough heft to tolerate a button hole stitch without getting eaten into the bobbin area (my former experience with this sort of thing). For the black merino cardi, I also used tear-away stabilizer in addition to the interfacing. For the grey cardi, I skipped the tear-away stablizer and just kept things purely interfaced. Both worked out splendidly!

Jenna Cardi

Another thing I’ll point out is that, while these cardigans are somewhat fitted, there’s just enough ease included to keep the button bands from gaping open. Always a plus in my book!

Jenna Cardi

Jenna Cardi

I’m thrilled that they both look just as good unbuttoned as they do buttoned – which is important to me, as a cardigan-wearer. I usually button things up, but it’s nice to have unbutton options:)

Jenna Cardi

Jenna Cardi

Here are some ~extreme~ close-ups of the merino wool cardigan. Check out that topstitching! Ughhh it’s so beautiful! I did add a little more topstitching than called for in the pattern – I wanted to tie in the topstitched button bands and button holes, so I included it at the shoulder seams and along the bottom band. Plus, it’s just beautiful. Seriously.

Also, how bout them buttons? These are also from Organic Cotton Plus. I know black and brown is generally frowned upon as a color combination, but I like it 🙂

Jenna Cardi

Grey cardigan close-up 🙂 Boring buttons are from my boring stash.

So what do you think – are you team sew-your-own-cardi yet? I hope so, because Muse Patterns has hooked me up with an extra pattern to giveaway! 😀

Jenna Cardi

GIVEAWAY IS NOW CLOSED
To enter to win your very own Jenna Cardi, just leave a comment on this post and tell me what you plan on makin’! Which view? Any particular fabric? Do you have a wild card up your (cardigan)sleeve? Inquiring minds want to know! 🙂 This giveaway is open WORLDWIDE and I will close the comments a week from today, on MONDAY, SEPTEMBER 22, 2014 7:00 AM CST. Good luck, y’all!
GIVEAWAY IS NOW CLOSED

**Some disclosures now – I was given the Jenna cardi pattern from the patternmaker herself, for free, to try and review. I was *also* given the organic merino wool fabric & butons from Organic Cotton Plus, again, for free to try and review. The grey wool knit was purchased at Mood Fabrics NYC out of my own pocket. No one paid me for this post – I’m just doing it for the freebs! As always, all opinions are my own 🙂

GIVEAWAY: Casual Sweet Clothes

29 Aug

I’m still not quite back into my normal routine as of now (YET – the good news is, I can finally see the light at the end of the tunnel! Yay!), so today I wanna take it easy with some eye-candy of the Laurence King variety 🙂

Casual Sweet Clothes book

This is Casual Sweet Clothes by Noriko Sashara, a new Japanese pattern book from – you guessed it – Laurence King. This arrived as a nice little surprise at my door recently (which, speaking of LK and surprise book, I don’t know how they manage it but they have their send-Lauren-a-surprise-book-so-it-arrives-when-she’s-having-a-bad-day shit down to a SCIENCE. It’s almost creepy how much they are on my vibe brainwaves, haha), and I really enjoyed looking at the pictures so I thought y’all would too!

I generally don’t care for most of the patterns in these sorts of books – they are cute, but not always really my style – but I see a lot of things in this particular book that I would actually like wearing! The styling is especially great – it’s still pretty sweet, but it’s not so sweet that you’re giving it the side-eye and wondering who the hell would wear that shit out in public.

Casual Sweet Clothes book

FORREAL THO. What is it about this photo? Is it the styling? Is it that the shirt is actually pretty freaking fabulous? Is it the hat (I could never pull off a hat like that)? Is it the babely model herself? I don’t know, but I want everything about that outfit on my body right now (minus the model because, guys, I already have a boyfriend ok).

Casual Sweet Clothes book

Not sure if I would wear the jacket, but it’s ADORABLE. I love the camel wool with the black bow contrast! And on the opposite page – such a pretty tank top! I have a vintage RTW dress from Mexico that’s in a similar style, and I’ve worn it so much it’s basically deteriorating. I’d love to make another one to replace it.

Casual Sweet Clothes book

If those last 2 photos were still sweet enough to give you a toothache, just know that there are some good solid basics in this book as well – like this tiered pencil skirt.

Casual Sweet Clothes book

One thing that I love about these types of books is that they offer a lot of inspiration in ways other than just the pattern itself. This dress pattern in particular isn’t necessarily something I would wear – but I *would* wear that cool lace inset in the sleeves! The book gives great instructions for adding this design element, and it would be so easy to modify an existing pattern to allow for a little lace love 🙂

Casual Sweet Clothes book

I REALLYYYY love this blouse. Look at the cute little bows on the shoulders! Ahhh!!

Casual Sweet Clothes book

Also – this coat. See what I mean about the styling? It’s still pretty sweet (like, girl is wearing a tutu), but that coat would not look out of place in my closet.

Fun fact: this is the same pattern as the second photo (camel wool swing coat with the black bow). Just a couple small design changes – pocket, hood – plus the fabric choice make it a completely different garment! That’s another thing I love about these types of books – even if you don’t like the patterns offered, it’s pretty cool to see how the designer took the same pattern and reworked certain parts to make a completely different garment.

Casual Sweet Clothes book

My very VERY favorite part of these books are the instructions! Yesss! I LOVE the diagrams – those alone are basically artwork to me. I’m so tempted to rip them out and stick them directly on the wall, but I’m one of those people who is mortified to see books get torn apart haha.

Casual Sweet Clothes book

There are a couple small drawbacks to the patterns in this book- the sizing and the seam allowance (or, lack thereof). As with most Japanese sewing books (well, at least in my experience), the sizing is pretty limited – the largest size allows for a 36″ bust. That being said, the clothing is all very simple and relatively loose-fitting (and the finished measurements are printed for each pattern), so it wouldn’t be too hard to increase the size a little bit – or you could even find a similar shaped pattern and made adjustments (such as adding the shoulder ties to that tshirt). Or you could just use the book as inspiration, because there’s plenty of it in there! Ha! The patterns are all nested and crazy overlapped (so you gotta trace ’em if you wanna make ’em), and there are no seam allowances included, just fyi! Fortunately, the patterns don’t have a lot of pieces either, so there’s that!

GIVEAWAY IS NOW CLOSED
Ok, giveaway time! 😀 Laurence King has generously offered a copy of this book to one lucky reader! Yess!! If you’d like to enter to win your very own copy of Casual Sweet Clothes, just leave a comment on this entry and let me know where YOU like to go for eye-candy inspiration (I love eye-candy, need more in my life!). This giveaway is US ONLY and I will close the entries a week from today, FRIDAY, SEPTEMBER 5 2014 at 8:00 AM CST.
GIVEAWAY IS NOW CLOSED

If you are itching for your own copy RIGHT NOW, no worries, I got a discount code for ya! Use the code LLADYBIRD35 to get Casual Sweet Clothes for a whopping 35% off! This code is good through 10/1/14, so you have time after the giveaway ends if you want to make sure you didn’t win first 😉 Whoop whoop! Don’t say I never did anything for ya 😉

Good luck, guys! I promise I’ll try to be back to a more regular posting schedule next week 🙂 Also, international readers – I’ll make it up next month! Haven’t forgotten about you ♥

Review: Fashionary Sketchbook (+ a giveaway!)

25 Jun

Fun LT Fact: Back in high school, before I fell hard in love with sewing, I was a wannabe artist. Painting, sketching, doodling – I loved it all. I was moderately good at it (not enough to, like, make a career out of it or anything, ha!), and I churned out dozens of sketches and paintings (mostly oil and acrylic). Once I switched over to sewing, my love affair with art started to die down. This is why I love fashion sketching so much – it really appeals to the other artistic side of me, the one that likes to use paintbrushes and fancy drawing pencils.

One caveat to my art: I’m a fantastic copier, but I cannot draw or paint from memory. Can’t do it! So all my paintings were direct copies of whatever I was looking at (be it a photo from a magazine, or a real painting in my art book, or whatever).

Fashionary Sketchbook

So, this Fashionary Sketchbook really appeals to me, as it allows me to draw and doodle clothing to my little heart’s desire, without actually having to come up with drawings on my own accord (aka, copy that shit, dude!).

Fashionary Sketchbook

This little unassuming red book was sent to me by the folks at Fashionary to review. I’ve been carrying it around for about a month, and I gotta say – it’s pretty freaking cool! The small size (I’m using the red sketcbook, fyi) is small enough to carry around in my purse, but it’s big enough so I’m not drawing little 2″ figures. I love that there’s elastic to keep the book closed when you’re not using it, and a bookmark is attached to the binding so you can quickly find your place.

Fashionary Sketchbook

Oh, and the first 20% of the book is full of line drawing for various clothing and accessories! Remember what I said about being a copier? YEP, this shit is RIGHT up my alley!

Fashionary Sketchbook
There are so many little details in this book, I don’t even know where to begin. Lots of line drawings to copy for your figure sketches – and even the outline of pattern pieces at the top of the clothing pages.

Fashionary Sketchbook
Tables of measurements for anything you might need while designing.

Fashionary Sketchbook
Fabric patterns!

Fashionary Sketchbook
Care labeling instructions decoded, because why the fuck not?
(Note: I should probably learn these. I just wash everything on cold, is that terrible?)

Fashionary Sketchbook
Different poses, if you dare!

Fashionary Sketchbook
The last 80% of the book is for sketching. A first glance, it appears to be blank pages-

Fashionary Sketchbook
But if you look closely, you can see a faint outline of the figure, 3 per page. This is my favorite part of the book; the outline is visible enough so you can use it if you have problems with drawing proportions (well, we are talking ~fashion~ proportions here), but it’s faint enough to where you could ignore the template and doodle whatever the hell you want right over it.

Guys, I have fallen in LOVE with this book. I’m so sorry if this is like the gushiest review ever – yes, I got a free book out of it, but I’d buy this shit regardless. It’s so handy and well thought out, and it appeals to me on so many levels.

Want to see what I’ve been doodling? Don’t judge my mediocre drawing skills, now!

Fashionary Sketchbook

My only complaint is that I wish the paper was a little thicker so I could outline my pencil with ink – I started to, with my first drawing, but it bled through the back. Ugh. I reckon if the paper was any thicker, the book might have to have less pages, so I’m sure that’s why it is what it is. Alternately, I could probably try using an ink pen that didn’t bleed through so much, like a ballpoint. I was using a Sharpie in this case, ha.

As a side note, this book has inspired me to start painting again, so I signed up for a Watercolor Painting class this past month! It’s been really fun – I love learning new things as an adult – and hopefully I’ll have some cool ~fashun~ watercolors to show y’all in the future 🙂 Lord knows I spent enough on the paints 😛 I better get my money’s worth out of them!

Fashionary Tape
In my package, I also received this bonus little Fashion Tape Measure! While this is not something I will personally use for it’s intended, er, use (I don’t draft patterns, and I probably won’t ever start. Sorrrrrryyyyy!), I can’t hate on a good tape measure. Those things always come in handy 🙂

Fashionary Tape
Fashionary Tape
What makes this tape measure unique is that it is marked at key measurements for two standard sizes (men and women’s). The women’s standard US size 6 is marked on the white side in centimeters.

Fashionary Tape
The men’s US 38 is marked on the black side, in inches.

I can absolutely see how someone who designs and drafts patterns could find this useful! It’s pretty cool. Personally, though, I’ll just be using it for plain tape measure purposes. I love sewing gadgets haha 🙂

GIVEAWAY IS NOW CLOSED
Hey, ok, so now let’s have a giveaway! The folks at Fashionary were generous enough to offer up a free Red Fashionary Sketchbook for one lucky reader to win (and you can match me, yay!). To enter, just leave a comment on this post and tell me if you have any artistic talents beyond sewing. I’m curious! 🙂 This giveaway is open WORLDWIDE and I will close the entries one week from today, WEDNESDAY, JULY 2, 2014 8AM CST.

GIVEAWAY IS NOW CLOSED
Good luck!

Review: The Colette Guide to Sewing Knits (+ a giveaway!)

5 May

cover.indd

Y’all know how much I love sewing knits (just to reiterate: I LOVE that shit!). While knits tend to get a bad rap for being “tricky” to sew, I find them to be quite easy to fit and manipulate – not to mention, knits are worn more than any other fabric in my closet (and I’m sure most of y’all are the same way!). They’re just so comfy and easy to wear, you know?

Despite my never-ending campaigning to get people on board the Knits Boat, some of y’all are still a little scared to take the plunge. Whether you don’t know where to start when it comes to choosing a fabric, or if you think your standard machine can’t handle sewing on knits (spoiler: it totally can), or the techniques just seem completely foreign to your woven-trained brain – there is always room for more guidance.

Which is why I’m so excited for Colette’s newest book release – The Colette Guide to Sewing Knits. Written by Alyson Clair (a patternmaker with years of experience working in the knitwear industry) and then put together Colette-style with clear photographs and easy to understand descriptions, this book is a fantastic resource for tackling knits – taking you from the different types of fabrics, to what needles and threads to use, to the difference between sergers and coverstitch machines (and how to use them – from threading to tension to troubleshooting!), to how to sew knits on a regular ol’ sewing machine (for those of y’all who don’t have a serger ;)), to fitting, to different finishes. Whew!

Although I definitely have some experience with sewing knits, I can always use more tips and ideas for branching out and discovering new techniques. This book is pretty fabulous in the sense that it’s both helpful for knit newbies *and* those of us who have a few years under our belts – I even learned a thing or two in the first chapter. The chapter Stitching and Finishing totally blew my mind, though.

Want to take a little sneaky peek? Of course you do! (psst, you can click the photos to enlarge them :))

serger roadmap

When I said there was a full section on your serger (as well as the coverstitch and standard machine), I was not kidding! There are several pages dedicated to showing you the different parts of each machine, and what they do.

threading serger

There’s also a section on threading- for both the serger and coverstitch (ohhh, someday I will have a coverstitch ♥)! Yay! So much easier to read than those little manual diagrams, yeah? 🙂

serging a corner

Here’s a neat little tip on how to serge an inner corner.

elastic types

Like I said, though… the finishing section is my favorite part.

decorative elastic

Inserting decorative elastic – gah, I wish I’d had this resource when I was experimenting with making my own underwear a couple of months ago. I found the elastic really difficult to sew in, which is why I stopped after one pair 🙂 Turns out I was sewing it in the hard way, doh!

lace neckline

Stretch lace – isn’t this so pretty? I’d love to try this with the new Moneta pattern.

buying fabric

There’s also an entire section devoted to knit fabrics – how they’re made, what the different types are, what needles to use, what to look for while shopping.

Pretty cool, huh? I’m so glad I picked up this book – I’ve learned a lot just from flipping through the pages, and I can’t wait to try some of these new techniques with my next knit project.

GIVEAWAY IS NOW CLOSED
If you’ve made it all the way to the end- yay! Prize time! Sarai has generously offered a copy of the book to one lucky reader – it could be you! To enter the giveaway, just leave a comment on this post and tell me what you’d love to sew up in a knit – a dress? A swimsuit? Boring white tshirts? What’s your knit end goal? I’m curious 🙂 This giveaway is open WORLDWIDE and I will close the comments a week from today, Monday, 12 May 2014 at 7:00AM CST.
GIVEAWAY IS NOW CLOSED

For those of you who simply can’t wait and must have this book NOW, you can order The Colette Guide to Sewing Knits from Amazon or directly from the Colette website.

Good luck!