Tag Archives: top

Completed: Fleecy Fraser Sweatshirt

2 Mar

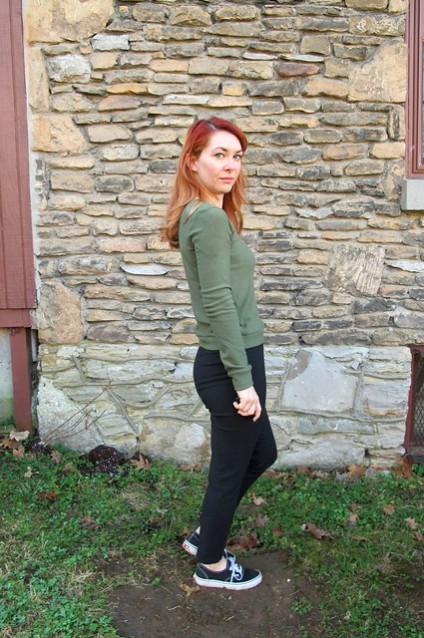
Ok, so, apologies in advance for posting a really boring sweatshirt today, but, I feel like this post is warranted for two reasons – really awesome fabric, and a previously overlooked version of a pattern.

Honestly, this might be my new favorite fabric at Mood (up there in the ranks with their Bamboo Jersey and Organic Cotton twill). AND they have plenty of colors still in stock (although as of this posting, currently sold out of this particular green – sorry!)! It’s a Christmas Miracle!

Sewaholic Fraser Sweatshirt made with stretch fleece from Mood Fabrics

In all seriousness, though, I wanted to really focus on the fabric for this post. I promise it’s a really good one and worth the praise! I found this Moss Bamboo and Cotton Stretch Fleece on the Mood Fabric’s website a few months ago, via swatch (I always take advantage of my free swatches and usually end up throwing random stuff in my cart before I place my order! I have discovered some REALLY cool fabrics that way that I might have otherwise overlooked). I’m not even kidding when I say it’s one of my new favorite fabrics – they have loads of colorways and it’s nice and wide (60″) so you need less yardage.

Sewaholic Fraser Sweatshirt made with stretch fleece from Mood Fabrics

Sewaholic Fraser Sweatshirt made with stretch fleece from Mood Fabrics

Sewaholic Fraser Sweatshirt made with stretch fleece from Mood Fabrics

Sewaholic Fraser Sweatshirt made with stretch fleece from Mood Fabrics

The fabric is comprised of 66% bamboo, 28% cotton, and 6% spandex. That little bit of spandex is essential for giving the fabric a great stretch with a fabulous recovery. Plus, I really love bamboo fabrics – they are soft, easy to wash and wear, and they are antimicrobial so they have fantastic stink-reducing properties!

This fabric is considered a sweatshirt fleece, meaning it is has one side that is nice and smooth and the opposite side is soft and brushed. Unlike your typical sweatshirt fleece, it’s a slightly lighter weight with a softer drape. It is also a 4 way stretch, which, WEIRDLY (don’t ask me why, I couldn’t tell you) has more stretch along the grain rather than the crossgrain (if I recall, 40% at the cross grain and something like 80% along the grain). It’s soft (did I mention that it’s soft? Because it is FUCKING SOFT), it snaps back into shape, and it comes in a nice array of colors – what isn’t there to love?

Sewaholic Fraser Sweatshirt made with stretch fleece from Mood Fabrics

Sewaholic Fraser Sweatshirt made with stretch fleece from Mood Fabrics

This sweatshirt is actually the second garment I made using this fleece – my first garment was a pair of black Virginia leggings. I don’t have any photos of those – let’s be real, they are black leggings and basically impossible to photograph – but I wear them ALL THE TIME (here is a photo on my Instagram – I’d already been wearing them for 3 days at that point haha). Think of your favorite fleece leggings or tights – and then just imagine them in bamboo instead of poly (so no stink and no pilling). Because of the spandex, the fabric doesn’t bag out – meaning no baggy knees or butts. Also, in retrospect – they look pretty much the same as the pants I am wearing (the Cecilia Pant from Elizabeth Suzann – aka my MAGIC PANTS seriously you guys these pants are magical), so maybe I should have just worn the leggings for this photo!

So anyway, about this project! After my success with the leggings, I bought 2 more yards of this hunter green colorway without a real idea of what I wanted to make with it. I knew I wanted a sweatshirt, but a plain sweatshirt seemed like such a cop-out. So I went with the Sewaholic Fraser Sweatshirt.

I will be completely honest – I did NOT like this particular view of the Fraser when I first saw it (or, to be even more honest – any subsequent versions that I’ve seen since). I dunno, the super contrast yoke just looks unflatteringly Western to me (and I typically love me some Western wear) – very costume-y, very Wonder Woman. I had no intentions of ever sewing up that version (I do like the other versions – you can see the one I made with a collar here), but weirdly, I thought of it when I was trying to decide what to do with this fleece. I thought it might look good with the contrast just being the wrong fuzzy side of the fabric, so the color still matched but there would be some subtle texture differences (again, just like my version with the collar).  I’m actually pretty pleased with the end result – it’s still a nice sweatshirt but with a little more interest… and it doesn’t look costume-y. And I have worn it every day this week, no lie, so obviously it’s a massive success in my book haha.

Sewaholic Fraser Sweatshirt made with stretch fleece from Mood Fabrics

Sewaholic Fraser Sweatshirt made with stretch fleece from Mood Fabrics

I made a size 0 and slimmed down the hips (Sewaholic Patterns are designed for pear-shaped women, and I’ve found I don’t need the extra room down there). I also cut this on the lengthwise grain, instead of the crossgrain – remember when I said the fabric had more stretch on the lengthwise grain? I think it would work either way, but I wanted a reeeeeally stretchy, comfy sweatshirt! Shortened the sleeves about 1″… they are still slightly long, but in my experience it’s better to keep them long and allow for a little more shrinkage, then re-hem if necessary. I have waaaay too much bracelet-length sleeves as a result of not being aware of this for the first half of my sewing career haha.

I did have to pay careful attention to the stitching at the center front V, as well as matching the sleeve contrast seam to the bodice contrast seam – for those, I based first on my sewing machine (much easier to take the stitches out if you mess it up) before using my serger. I used the single needle chainstitch on my coverstitch machine to topstitch the contrast, to give it a little more dimension. Other than that, a very quick and easy sew! I did notice the the fleece flattens when you press it, but it’s easy to fluff back up with your fingers.

Sewaholic Fraser Sweatshirt made with stretch fleece from Mood Fabrics

Anyway, that’s all for this one! A simple project, but also a big gushy heart-eyes love song about some amazing fabric! Now, quick, y’all need to buy it before I snap up the rest of this stuff! 🙂

** Note: The fabric used for this post was provided to me by Mood Fabrics, in exchange for my participation in the Mood Sewing Network. All opinions are my own!

Completed: Black + Grey Flannel Archer

3 Nov

IT’S FLANNEL SEASON AGAIN, Y’ALL.

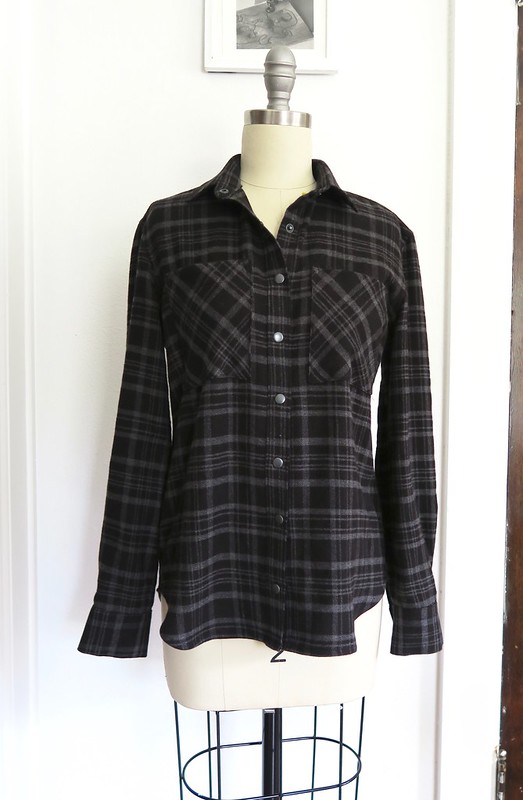
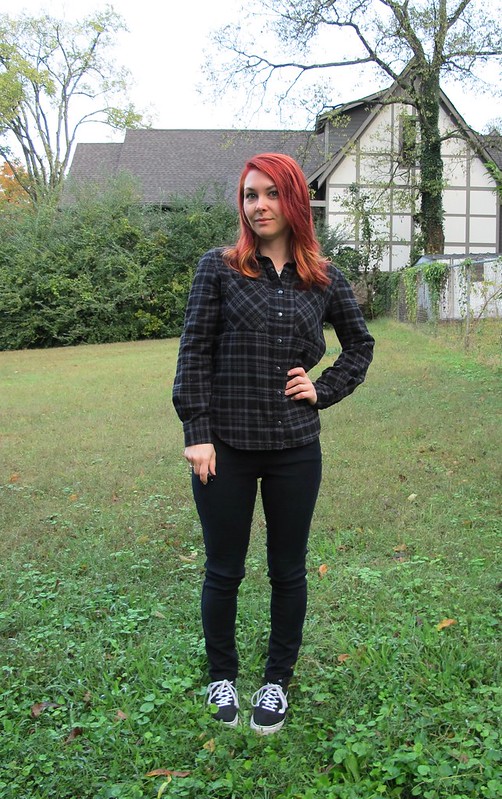
Plaid Cotton Flannel Archer

I don’t like the cold – like, at all – but I do love the clothes that are associated with this season. Layers, textured fabrics, WOOL, dark colors and jewel tones… gimmie all of it. Flannel button-ups are at the top of my list. I love that they can be worn solo and buttoned up, layered under a sweater, or layered over a tank or tshirt and left to swing free in the breeze. Snaps at the cuffs make it easy to roll the sleeves up, snaps at the button band make it possible to Hulk out at the end of the day (don’t pretend like you don’t do this with snap-up shirts, you liar).

Plaid Cotton Flannel Archer

I have a few handmade plaid flannel shirts, all of which I love to wear, so I put a short hold on adding to that stash. I finally allowed myself this year to make 2 more – both out of plaid cotton flannel from Mood Fabrics. This is the first of the two. I haven’t taken photos of the second one yet, but rest assured – it’s almost the exact same as this one, just a different colorway. Because if I am anything, I am consistent haha.

As I said, this is the Archer button up from Grainline Studio. I’ve made this shirt a lot, so there’s not a lot to elaborate on here, just a few small changes. I sewed view A with the angled cuffs, swapped out the included placket for a tower placket (I use the placket from the Negroni pattern, but this placket download from Threads is basically the same thing).

Sizing-wise, I cut a size 0 (which is the size I pretty much always sew with Grainline). One thing I did change with this pattern was to increase the seam allowances at the side and sleeve seams to 5/8″ – the included seam allowances are 1/2″, and I actually sew them at 5/8″ since I like to flat-fell those seams. I’ve noticed that my shirts are pulling ever-so-slightly at the bust now (told ya I’ve gained some weight. And also an entire cup size, ughhhhh), so I added in that extra 1/8″ and the fit is much better now!

Plaid Cotton Flannel Archer

Plaid Cotton Flannel Archer

Plaid Cotton Flannel Archer

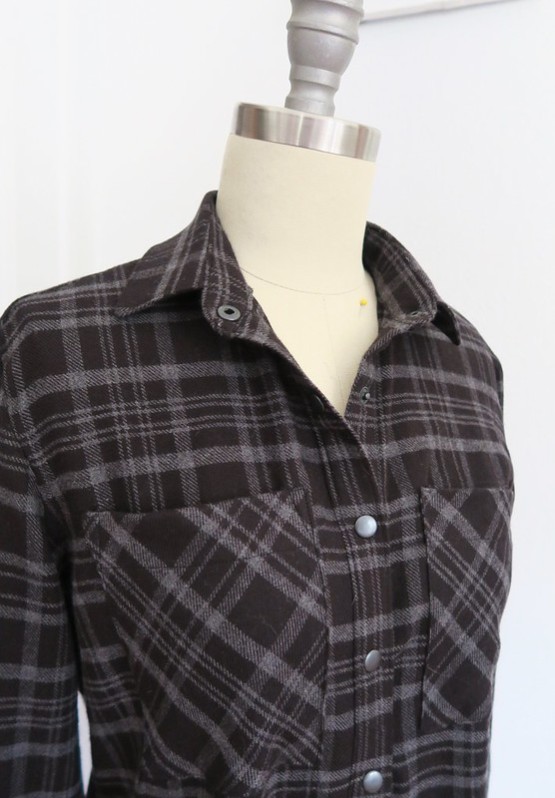
I cut my fabric on the single layer to get the plaid all matched up (see here for my plaid-matching tips!), and cut the outer yoke and pockets on the bias. I originally had the pockets cut to match the plaid at the front, but they matched so well they basically disappeared, and I wasn’t crazy about that look. So I re-cut them and I think they look much better!

As I mentioned, all seams are flat-felled so there is a nice clean finish on the inside. I used a super lightweight interfacing so that everything would stay nice and soft – I didn’t want a stiff button placket in contrast to the otherwise floppy fabric. Everything is topstitched in black, and I used black snaps for closures.

My cotton flannel was found at the Mood Fabrics store in NYC, back in August. I had a hankering for a new flannel, and I wanted one that was soft and lightweight, like it had already been worn to death. I found this and another similar flannel in a different colorway, both of which work perfectly with the color palette that my closet has ended up morphing into. Since flannel tends to shrink up quite a bit, I washed and dried my fabric three times before cutting into it. I kept the sleeves slightly on the long side, again, in case they decide to shrink up (my first flannel shirt has quite short sleeves now!).

Plaid Cotton Flannel Archer

Plaid Cotton Flannel Archer

Plaid Cotton Flannel Archer

Plaid Cotton Flannel Archer

Plaid Cotton Flannel Archer

Plaid Cotton Flannel Archer

I think that’s all I can say about this make! I’ve already worn it loads and I look forward to some hardcore layering here in the next few months 😀

A couple other things of note:
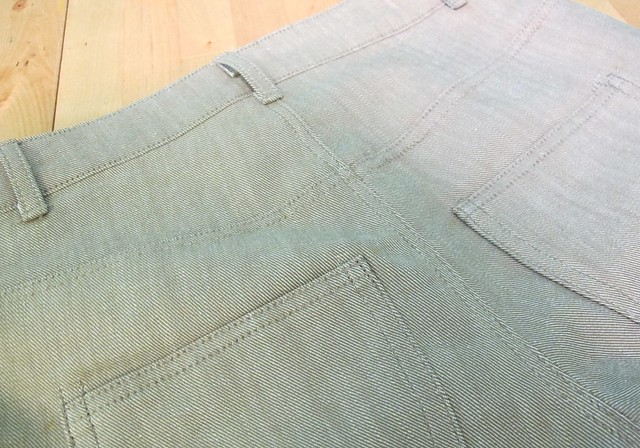
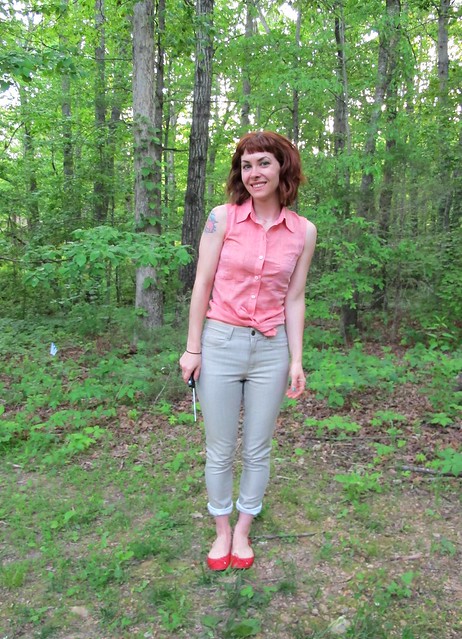
1. Yes, I made my jeans! They are Gingers that I made with veeeeery stretchy twill fabric (like, they are almost jeggings haha I love them). Just some basic black pants that don’t necessarily warrant a whole post. However, here’s a shot of the butt (and my new belt) (and this shirt, too, apparently lol)
2. Yes, that’s a new hair color! After a REALLY long time (for me anyway haha) with the same color, I decided I was ready for a change! I love the new color so much!

Plaid Cotton Flannel Archer

** Note: The fabrics used in this post were provided by Mood Fabrics, in exchange for participation in the Mood Sewing Network.

Completed: The Ebony Tee

4 Apr

Whoa, hello April! It seems like it was only last week that we were celebrating the New Year – and hiding from the cold – and now here we are firmly in the middle of spring. Blooming trees, longer days, and allergies (well, not for this native heh heh heh) everywhere! I thought I’d squeeze out one more sorta-cold-weather-mostly-transitional piece, but after this – I’m sewing for the HEAT, y’all!

Cropped Ebony Tee

The is the Ebony Tee from Closet Case Patterns. I will admit that I was not super crazy about this one when it was first released – just not really my style, and the pictures weren’t doing it for me. It wasn’t under I saw Heather’s structured version and Erin’s drapey green version (yes, I realize these two are complete opposites) that I thought, this could be for me.

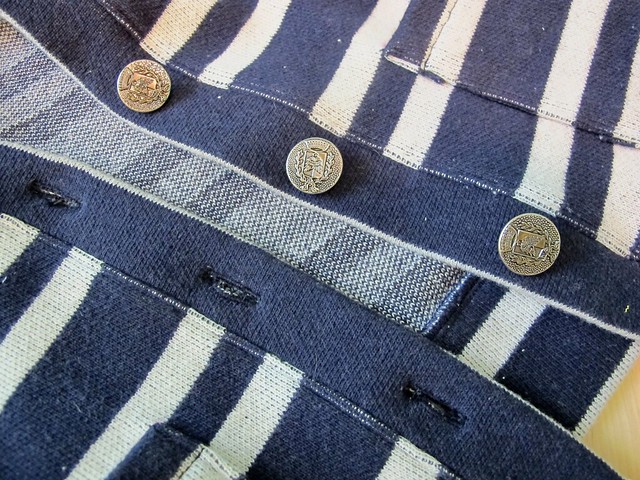
I got both the pattern and fabric while I was in Leesburg, VA for my workshop at Finch Sewing Studio. The pattern came directly from Heather herself – Isabelle and I met with her and Renee one evening after class, for pizza and (lots of) drinks. The fabric is from Finch – it’s a beautiful double knit, navy with grey pinstripes on one side, and grey on the other. I chose it specifically to make this pattern – I thought the body of the fabric would look great with the style of the top.

Cropped Ebony Tee

This pattern is a fun variation on the standard tshirt. It fits nice a slim through the upper bust and shoulders, and then shoots straight out into an exaggerated trapeze below the bust. The hem is longer in the back than in the front. I think you need to be careful with fabric choice and length as not to overpower yourself (especially if you are short, like I am!), but the end result is worth it when it does work out.

I made view B, with the scoop neckline, set-in sleeves, and cropped length. I made a size 2, which is my normal size with this company (and it is true to size; I’m about 1/2″ bigger than the suggested body measurements for that size). I did add about 2″to the bottom of the shirt, as it seemed like it would be REALLY cropped based on the pattern pieces. I figured I could always cut it off if it was too long, but the added length is pretty much perfect. I might actually consider adding a tiny bit more for my next shirt, but this length is great for super high-waisted pants. I chose to make elbow-length sleeves, because I didn’t want there to be too much stripe action going on, after learning that less with my Coco dress. With the length of the sleeves and weight of the fabric, this is a good mid-season top. Perfect for the weird weather that happens here in the Spring 🙂

Everything sewed together really easily – I used a serger for the main seams, and my regular sewing machine zigzag with a ballpoint needle for the hems. There are no bands on the sleeve hems, btw – that’s just the wrong side of the fabric (they are rolled up). The only thing I don’t like is that I didn’t pull the neck banding tight enough while I was attaching it, and the neckline is not exactly no-gape. It lies flat when I’m standing, but if I lean over… you can see straight to my bellybutton. I can just wear a tank (or super cute bra!) under this and call it a day, but I will shorten the neckband for future shirts. Neckline binding is so finicky about that – what may be the correct length for one fabric might not stretch enough for something else. In this case, I think my fabric was just a bit too stretchy. Lesson learned!

Cropped Ebony Tee

Cropped Ebony Tee

Cropped Ebony Tee

Since the shirt is so voluminous, I think it looks best with really slim, high-waisted pants. These pants are the Cecilia Pants from Elizabeth Suzann, btw. I think I’ve worn/mentioned these on my blog before, but they are like MAGIC PANTS. They seem to be universally flattering no matter who wears them. The stretch denim is super comfortable, and has a great recovery. The super high waist (up past my navel) looks awesome with a crop top, and the slim legs balance out really voluminous tops. I love these pants!

Also, I am not sure why I took so many pictures of myself for such a simple project. Oh wait, yes I do. My hair looked fucking fabulous that day haha. Can’t say the same about the quality of these photos, but, I’m trying! Really!

Cropped Ebony Tee

Cropped Ebony Tee

Cropped Ebony Tee

Cropped Ebony Tee

Cropped Ebony Tee

I think I’d like to make a version of this for summer, in a lighter fabric (maybe a bamboo knit) with the raglan short sleeves. Would be nice and cool when it gets super hot here!

Cropped Ebony Tee

I can’t think of anything else to say about this pattern. Short and sweet! (Well, about as short and sweet as you’ll get from my blabbermouth haha)

In other news, tell me your favorite interesting t-shirt patterns! I’m about up to my eyeballs in v-neck Renfrews; I think it’s time for something that’s a little more visual than a basic tshirt 🙂

Completed: The Mélilot shirt

5 Dec

Hey guys, New Favorite Outfit alert!

Mélilot shirt - front

This is the Mélilot shirt from Deer & Doe Patterns. I vaguely remember when this pattern came out – although I didn’t give it more than a second glance (the main version you see on their website is long sleeved, with dropped shoulders and a peter pant collar. It’s very nice, but it’s not really my style). Once I started googling around for the short sleeved version, though – I decided it was super cute and that I wanted to make it in a lovely drapey silk.

(It feels so redundant to talk about silk… I should just dub my 30s “The Silk Decade” because I feel like it’s ALL I sew now haha)

Mélilot shirt - front

Mélilot shirt - side

Mélilot shirt- back

Mélilot shirt- back

I sewed Version B, with the short sleeves, and used the hidden placket from Version A. My shirt is a size 34 (which is what I usually sew from this company) with no alterations to size or length. The instructions were reasonably easy to follow, although the hidden placket info was a bit sparse and took some head scratching before I really figured it out (and don’t ask me for a tutorial, bc I don’t remember exactly what I did haha)

My fabric is an olive green / brown (depending on the light you are in, ha) silk charmeuse with the slightest amount of stretch, from Mood Fabrics. I bought this at the store while I was in NYC in November, with the intention on making this pattern with it. I used the matte side for the body, and the shiny side for the collar stand, pockets, and sleeve bands. It’s a very subtle contrast, but I love the way it looks. I use a Spray Stabilizer on my fabric, which made it easier to cut and eventually sew. One thing I have learned with fabrics like this is to leave the pockets off until the garment is completed. I don’t know what it is – but every time I put the pockets on, the end up super crooked and I have to unpick them and re-sew. Maybe it’s how the garment hangs off my body, maybe I’m just an idiot WHO KNOWS. But I had the same crooked pocket problem with this top (I took a photo, but you couldn’t really tell… but trust me, it was bad in person. Even my mother, who thinks I’m the great sewer ever, laughed when she saw it), so next time I’m just going to wait till the end. No sense in doing things twice!

I will admit that the color of this shirt is kind of ugly… but it definitely works really well with my coloring. How awesome that the doo-doo colors suit me best. Ha.

Mélilot shirt - front

Mélilot shirt- back

Mélilot shirt - front

I just love the fluid drape of this fabric, and the way the little sleeve bands stick up. I am not normally a fan of these deep curved hems, but I think it works well with the style of the shirt. Same with the pockets – this shirt definitely needs the pockets, or else it looks really unbalanced in a bad way. I am thinking this will be a good shirt to take with me to Egypt – it covers my shoulders and butt, and I can button it up pretty high for modesty.

Mélilot shirt - on dressform

Mélilot shirt - on dressform

Mélilot shirt - sleeve detail

Mélilot shirt - hidden placket detail

Mélilot shirt- hidden placket detail

The pattern calls for lined pockets, which makes it easier to get identical, crisp curves on both pockets. For buttons, I actually used the wrong side of a bunch of those shell/mother of pearl buttons that I found in my stash. The back side is a little matted and kind of a taupe color, which went really well with the fabric. Due to the covered placket, you only see a couple of buttons anyway. Oh, and as always – the inside seams (you know, all 2 of them haha) are French seams. FYI, watch those seam allowances if you make this pattern and omit the French seams – because I’m pretty sure the side seams are only 1/2″. The pattern instructs you to sew French seams for these seams, with two passes at 1/4″, which doesn’t add up the standard 5/8″ seam allowance on the rest of the pieces. Just a thought! Also, I always trim down my first pass to like 1/8″ before sewing the second pass, as it ensures that the seam allowance it caught in that stitching. Ain’t nobody got time for hairy seams amirite.

Mélilot shirt - front

That’s all! A pretty simple shirt, but the silk makes it feel super fancy. I am wearing it with my Cecila Pants from Elizabeth Suzann. Y’all, these are magic pants. The denim is suuuuuper stretchy and comfy, and has a fantastic recovery – I can wear these several times before they need a wash to shrink back up. And while I didn’t personally make these pants – I can tell you exactly who did. Her name is Colette 😉

Completed: The Lil’ Bird Scout Tee + A Giveaway!

3 May

I’m not really sure what prompted this, but lately I’ve REALLY been loving these boxy loose shapes on me. Made in a super drapey fabric and cropped just so, I find them really flattering and even more comfortable. It’s funny – the older I get (ya know, this RIPE OLD AGE of 30 lol amirite), the more I find myself comfortable with my body – and the more I’m ok with nto wearing things that are incredibly skintight. Both of those statements seem to contradict each other, but, it is what it is!

Silk Bird Scout Tee

The Scout Tee is certainly not a new pattern – not even in my personal arsenal (I made a really fun one last year with some beautiful handwoven fabric, in case you missed it!). But hell, I have loved wearing it! My first version was made with a fabric that made it really boxy, which I liked a lot – but I wanted to see how it would feel in a drapey fabric. Spoiler alert: This is love. This is true love. I already have the next one planned.

Silk Bird Scout Tee

Silk Bird Scout Tee

Silk Bird Scout Tee

This tee is pretty similar to my last one, in terms of construction. I sewed the size 0, and the only modification I made was to deepen the hem to about 2″, which is a good slightly cropped length for me. All the seams are French seams, and the neckline is finished with self bias facing. Overall, this was really fast and easy to put together. Since there are so few pieces – just front, back, sleeve, and that bias piece – it was even quick to cut. Yay!

I love the subtle high-low hem and I think it really benefits from some extra fabric down there to give it more weight. Especially with a fabric this lightweight and floaty!

Silk Bird Scout Tee

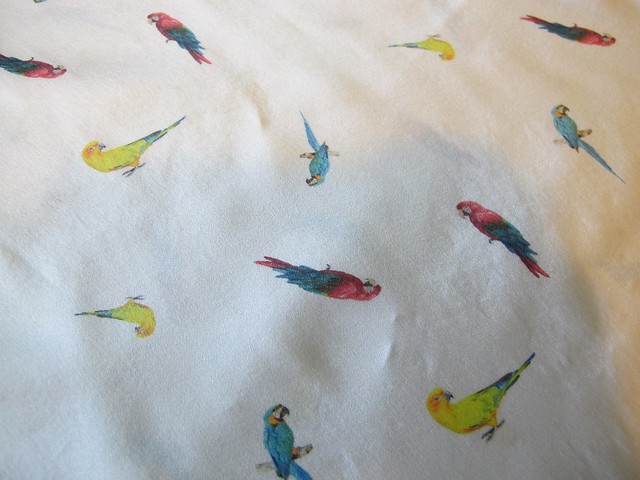
Anyway, this post is less about the pattern and really about the fabric! What do you think of my AWESOME TROPICAL BIRD PRINTED SILK, huh?! 😀

Silk Bird Scout Tee

The fabric is from Contrado, which is a company in the UK that specializes in custom printing – including on fabric! They reached out to me several months ago about trying out some fabric design, and I’ve finally had a chance to make that happen! It was the designing part that tripped me up and slowed me down so much – I’m not much of a designer, and most of my “art” involves direct copies. Tell me that I can design literally any print that I want, and watch the fear fill my eyes haha.

It seriously took me a couple of months to even think of what kind of design to do, but I had seen a few tropical bird prints floating around on RTW stuff and I immediately knew that’s the direction I wanted to take it. I googled around for some images that I liked and played around with them in my image editing software (it’s not anything fancy like Photoshop, just so we’re clear here haha. You could probably use pickmonkey.com to do your edits) until the design looked right. Then it was a matter of uploading the file to the website, making a few more minor tweaks – and that’s it! It was actually really really easy. The hard part is definitely choosing the design.

Narrowing down a fabric choice was also difficult! Contrado offers a massive array of fabric choices – over 75, in fact. From basics (such as cottons, polys, and knits) to fancier stuff (like cashmere !!!). They sent me a swatch pack so I could see all the printed samples, which made things both easier and harder 🙂

Silk Bird Scout Tee

The fabric I chose to print on is a beautiful silk satin. It practically drapes like a liquid and it feels really incredible against the skin. I was initially a little worried about it being SO shiny – I generally use the “wrong” side of my silks, as I don’t like really shiny stuff. But since this fabric was printed, the wrong side looked.. well, wrong. I think the nature of this design works with a shiny fabric, although now I am wondering how practical it is to make a summery sleeved top out of white silk… I sweat a lot! Ha! Well I guess I can always yank the sleeves off if it comes down to it 😉

I will admit that this was not the easiest fabric to work with – the silk is quite slippery on the satin side, and there’s not much of a “grab” to the wrong side either (by “grab,” I mean like what you’d feel with a silk crepe). I chose a very simple pattern for this reason, which definitely worked in my favor. I didn’t do any sort of prepping before cutting – no stabilizers or using a rotary cutter or anything like that – and while cutting took a bit longer than it normally does, it wasn’t too terrible. I think when it comes to dealing with silks and other slippery fabrics, cutting is the worst part. Once you get past that point (assuming you cut everything correctly and on-grain), actually sewing the pieces together is relatively painless.

Silk Bird Scout Tee

Silk Bird Scout Tee

Silk Bird Scout Tee

I actually took these photos after wearing and washing the shirt, and you can see how well the colors have held up (as well as the back wrinkles – sorry about that!). Speaking of washing, I get this question ALL the time, so it bears repeating – I wash all my silk on cold in the washing machine, and hang it to dry (it’s safe in the drier as I pre-wash and use the drier, but I hate ironing so hanging to dry is the way to go!). As long as you pre-wash your silk before cutting into it, it’s safe to wash it in the machine!

One last thing – in case you were curious 🙂

Silk Bird Scout Tee

GIVEAWAY IS CLOSED.

Time to talk giveaway! The folks at Contrado are offering a whopping £100 voucher to use on their site, to print whateverrrrr your desires on your dream yardage! Further, this giveaway is open WORLDWIDE, so you don’t need to be a UK resident to enter! (My US folks – as of today’s currency exchange rates, that comes out to approximately $146.29, fyi!)

To enter the giveaway:
1. You need to LIKE the Contrado Facebook page. Show them your love and support!
2. Comment on this post and tell me what you’d design, and what you’d make out of said fabric.

As I said, this giveaway is open WORLDWIDE and the winner will be chosen by a random number generator. I will close the comments one week from today, on TUESDAY, MAY 10, 2016 8AM CST.

GIVEAWAY IS CLOSED.

Silk Bird Scout Tee

Good luck, everyone! ♥

Note: This fabric was provided to me by Contrado, in exchange for this giveaway post! Who’s gonna be the lucky winner? 😉

Completed: Silk Polka Dot Blouse + Corduroy Skirt

29 Mar

Its time for the ~big reveal~ – my first completed outfit, sewn entirely on my new Spiegel 60609 sewing machine 😀

IMG_2438

I love that this machine is pretty enough to make even a subpar photo look great 🙂 Ha!

Silk Top & Corduroy Mini Skirt

I covered a lot of ground about the making of these garments in my previous posts, however, I’ll include some notes and highlights in this post in case you missed/skimmed/didn’t care then but suddenly care now 🙂

Silk Top & Corduroy Mini Skirt

The silk top was made using silk crepe from Mood Fabrics (purchased at the NYC store last year) and a combination of Butterick 5526 (my TNT button-up shirt pattern) for the body of the blouse, and vintage Simplicity 4676 for the tie neck. I used Sullivan’s Spray Stabilizer to wrangle the drapey silk into submission for ease of cutting and sewing, which worked great! The shirt is finished with French seams and self-bias facing at the arm holes and hem.

Full details on the silk top can be found in this blog post 🙂

Silk Top & Corduroy Mini Skirt

Silk Top & Corduroy Mini Skirt

I wanted my first project on the Spiegel 60609 to be something silk, because, honestly – I wanted to see how it could handle working with a notoriously difficult fabric. Of course, stabilizing the whole yardage first definitely helped, but that doesn’t solve all issues (such as when your sewing machine tries to eat delicate fabrics – not a problem with this one, I will add!). I’m really impressed with how the machine sewed through this fabric with absolutely no issues – it even did a great job on the button holes! I do wish that the measurements on the throat plate were marked differently, as it’s hard to get a narrow seam with what’s standard on this machine, but that’s a relative non-issue (I just use post-it notes to mark my seam allowance lines and it works fine). So yeah, Spiegel 60609 + silk gets a thumbs up from me!

Silk Top & Corduroy Mini Skirt

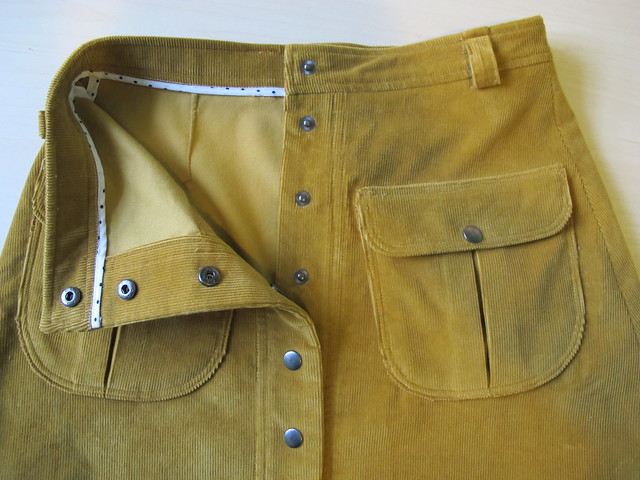
The mini skirt was made also on my Spiegel 60609! I used the Rosari skirt from Pauline Alice Patterns and some lightweight/stretch corduroy from Mood Fabrics. The skirt includes pockets, bound seams on the inside (for a bit of extra pretty cos why not?) and professionally set snaps down the front.

Full details on the corduroy mini can be found in this blog post!

Silk Top & Corduroy Mini Skirt//embedr.flickr.com/assets/client-code.js

I don’t necessarily find corduroy difficult to sew – most of the problem lies in making sure everything is cut and pressed correctly, as not to mess too much with the nap. Sometimes, depending on what machine I’m using, it’s a good idea to use a walking foot to help keep all layers feeding evenly, but I didn’t have any of these problems with the Spiegel 60609. The feed dogs were good enough on their own without any extra help. Always a plus! 🙂

Silk Top & Corduroy Mini Skirt

Silk Top & Corduroy Mini Skirt

Silk Top & Corduroy Mini Skirt

Corduroy Mini Skirt

Corduroy Mini Skirt

That’s all for this outfit! Stay tuned next month for that project – all I can say is, it’s gonna be FANCY 😀

Silk Top & Corduroy Mini Skirt

Note: The fabric used is part of my monthly allowance from Mood Fabrics, as part of my involvement with the Mood Sewing Network. The Spiegel 60609 was given to me by Spiegel, and it’s awesome!

Completed: Scout Tee + Gorts

10 Aug

Today’s post features a two-fer – a top AND shorts! Woohoo! Be prepared for a slight photo overload ahead.

Scout TeeI’ll start with the top. This is the Scout Tee from Grainline Studio. It’s your basic woven tshirt with a scoop neck and a relaxed, boxy fit below the bust. I know everyone and their mom has made this pattern already, and I’m only a few years behind on the bandwagon! Honestly, the pattern didn’t appeal much to me until recently – I generally prefer to wear more fitted shapes, especially at the waistline. This was a bigger deal in the past when I had a larger bust – but the girls have shrank over the years, which has made me feel a little bolder about experimenting with different shapes and silhouettes, since I don’t feel like my waist is being quite as swamped as it was in the past. Plus, loose styles are waaaay more comfortable in the summer heat, since they allow a better airflow (I know most of you are thinking, “No shit, Sherlock,” but I have ignored this for most of my adult life! Cut me some slack!). Scout Tee
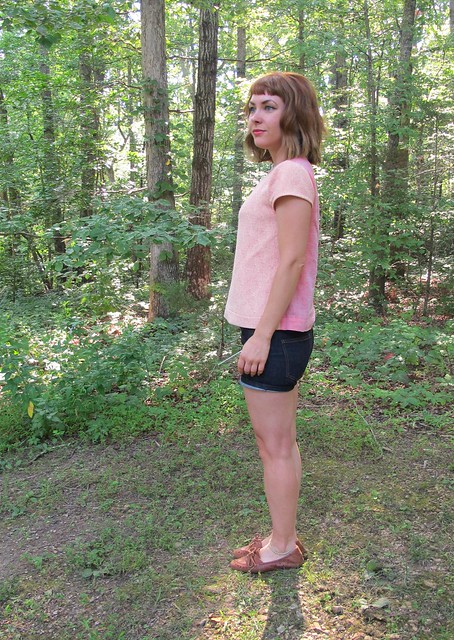
Anyway, I quite like this style on me! I guess it’s still not the most “flattering,” but I’m kind of getting to the point where I don’t care quite as much about flattering. That’s one major difference I’ve noticed about being 30 vs being 20 – I don’t really give a shit about looking ~sexy~ every time I leave the house. I’m also sure my long-term relationship has a stake in this as well, but I’ve been in long relationships in the past and my attitude was definitely the opposite. Wearing loose-fitting anything – especially around my waistline – is a pretty new style territory for me, one that I’m starting to slowly explore and actually wear out in public. Also, it’s damn comfy.

Scout TeeBack to the pattern! I cut the size 0 and shortened the hem by a couple of inches to give it a more cropped length (but long enough so that it still covers the waistband of my pants). The pattern was really easy to put together – it’s just a front and a back, little cap sleeves, and a neckline bound with a bias facing. I like that it fits through the shoulders and the bust, then falls straight down to the hem. Even though it’s loose, it doesn’t look sloppy. One thing I noticed is that the shoulders tend to pull toward the front – since I used a different fabric for the back, this is a lot more noticeable. It doesn’t bother me at all – I actually like the way it looks, to be honest – but I’m also not sure if it’s part of the pattern, or a fitting issue. Thoughts?

(ps, sorry about the wrinkles – like most of my makes lately, these were taken after a full day of wearing) Scout Tee

The fabric is what really makes this top shine, though! It is GORGEOUS, amirte?! This is a pretty special piece – it’s handwoven here in Nashville! The company who makes this beautiful cotton fabric is Shutters & Shuttles. I don’t know if they even sell yardage anymore, but they used to. I believe they sell yardage to local designers, which – ding ding ding! – is where I got my little piece from. Back when Elizabeth Suzann used to sell limited-edition tops made with this beautiful handwoven fabric (and other colors/styles of fabric as well), she had a whole stash of it. Eventually, the limited edition ended and Elizabeth’s line moved in a different direction. And then she destashed the studio, and this piece ended up in that stash bag I was telling y’all about. It was a very small piece, so it took me a while to figure out what to do with it. A lot of Georgia Tees were made using Shutters & Shuttles fabric, and they all looked awesome, so I followed that lead with my own boxy tee. Scout Tee it was! Except that I didn’t have *quite* enough fabric to cut both fronts and backs, so the fabric sat on my shelf for several months while I looked for a good color match.

Scout TeeWhen I made my coral B5526, the coral voile was stored right next to this fabric, and I realized that they were perfectly matched. Which was lucky enough in itself, because this is a really weird (albeit beautiful) coral to try to match. I bought another yard on my next Mood order, and used the voile to cut the back of this tee. I also used the voile for the bias facing at the neckline – it’s a much lighter weight with less bulk than the handwoven cotton, so it sits on the neckline a little better (plus it looks pretty on the inside!). Scout Tee

I got these little tags in an order from Grey’s Fabric awhile back, and I think they are so cute! I wanna be a crafty fox!

Scout TeeTo crop the hem, I just folded up an extra-deep hem allowance and topstitched it. One, because I like the way the shirt hangs with the extra weight at the hem, and two, because I wasn’t sure if this whole slightly-cropped-tshirt thing was going to be my jam next summer. I might change my mind and want it to be longer (or even shorter, I dunno), so I left the hem allowance there as a bit of a safety measure. And also a big ol’ dangly thread, it seems.

Now for the shorts! Ginger Gorts

I made Jorts – or Gorts, as I am calling these (jorts is a really annoying way to say jean shorts, in case you were wondering!)! Remember when I utterly failed at that shit last year? Man, those shorts look fucking stupid in retrospect. What was I thinking? And if you were wondering – I never wore them beyond that blog post. They were just tooo uncomfortable and I was terrified the zipper was going to bust. They sat guiltily in my dresser for a few months before I finally chucked them.

Anyway, I’m glad I failed at that shit because I learned some very important Sewing Life Lessons:
1. Don’t make jorts out of a pattern intended for trouser shorts. It looks fucking stupid. Better to start with a jeans (pants) pattern and cut it short accordingly.
2. Jorts need fancy jean topstitching, or they aren’t proper jorts. And, they look stupid.
3. Until you figure things out otherwise, jorts need some stretch in the fabric, else they won’t be comfortable.
4. For zipper security, there needs to be a bartack connecting the fly shield to the front of the pants. This is EXTREMELY important. That’s why my zipper kept breaking on the fail pair – pulling the shorts on and off was putting way too much stress on the bottom of the zipper, which caused it to break. I eventually figured this out by inspecting a pair of my jeans – the bartack that hits right at the curve of the fly topstitching is intended to take the stress off the zipper, so you can pull on and off your tight pants. I had left that bartack off, which made my pants weak right at the crotch (kind of like most men lololol amirite)(sorry).

So, with those lessons in mind, I re-attempted the jorts. These are way better! Not perfect, but better. I know they look pretty wrinkly in these photos, but again, those are wearing wrinkles – not fitting wrinkles. Well, maybe a couple of them are fitting wrinkles. I am human, after all.

Ginger GortsI call these Gorts because I used the Ginger jeans pattern to make them! Ahahaha aren’t I clever! I just love this pattern and I spent a solid chunk of my time in Peru dreaming about making more jeans because I just looove all the detail that goes into the topstitching – but knowing that I don’t need jeans right now, because it’s way too hot! So I was happy to compromise with shorts instead. To make the pattern shorts-appropriate, I just measured the inseam of my favorite shorts and cut that length + 1″ from the inseam of the pattern. In retrospect, I should have added a little more length so that I would have a proper cuff (I didn’t plan these to have a cuff, but they were too long once I’d already hemmed them and I didn’t feel like-rehemming). Maybe next time! Also, if I go with the future cuff, I need to widen the bottom of the shorts at the hemline, because they are a little tight at the thigh (cuffs need to be wider so that when they flip up, they are the right width. This is hard to explain without pictures, so here’s an example in this book I found. Thanks, Google Books!). Giving them a good stretch when I put them on helps, though. Ginger Gorts

For fabric, I used a stretch denim from Mood Fabrics. The weight was perfect, but the stretch was a little less than what the pattern calls for (which I determined the unscientific way by comparing it to the denim I used to make my first pair of Gingers). I added 1/4″ to the side seams to accommodate for this, but they are still a little bit stiff. The other bummer is that this fabric has a severe bleeding problem – the first time I wore these jeans, they rubbed indigo dye all over the inside of my purse. I was carrying the only nice purse I’ve ever owned, which HAPPENS to be white. Wah!! I was able to get the majority of the discoloration off with a stain remover, but now I’m afraid to sit on anything remotely light-colored. I washed the denim a second time with a cup of vinegar in the wash to set the dye, but they are still rubbing off a little.

All in all, though, I’d say these are a good practice run! When I finally make my fancy Ginger jeans with the Cone Mills denim kit that I bought earlier this year, I am hoping that I’ll have enough leftovers to make some solid Gorts. We’ll see! Pants first!

Anyway, photos:

Ginger GortsGinger Gorts

Ginger GortsGinger Gorts

Every time I make jeans, I want to experiment with different colored topstitching thread & serger thread – but I always punk out at the last minute. With these, I used bright blue thread for the button hole – baby steps! It also matches the lining and the serger thread.
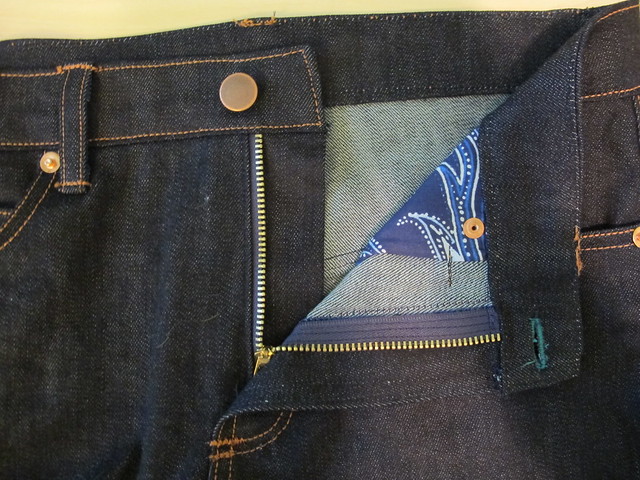
Ginger GortsOh, right, and the backside of the button hole is emerald green 🙂 Ginger Gorts

For the topstitching, I used my new 1/4″ foot. THAT THING IS AWESOME. There’s a dull blade that sits exactly 1/4″ from the needle, to help you align your stitching and ensures erfect parallel lines every time. Totally worth the $$$ I spent on it. Although I should probably focus on my bartacks next – those clearly need a bit more work. My machine doesn’t have a setting for bartacks, so I have to trial-and-error with experimental zigzagging.

Ginger GortsGinger Gorts

Ginger GortsYou can also see that I changed up the positioning of the rivets – they are only on the front pockets. The pattern has you put 2 rivets on the back pockets, which I did with my first pair, but I never really liked the way it looked. RTW jeans don’t typically have rivets on the back pockets – ok, ok, SOME DO, but not the majority! – and I thought it made them look sort of homemade. I also recall reading, like WAY back in the past, that the original Levi’s didn’t have rivets on the back pockets because they would get too hot when the gold miners sat next to a fire. Full disclosure, it was a research paper on the history of jeans/Levi’s that my cousin wrote for one of her classes in high school, and I found it because I was snooping in her room when she wasn’t home (what? She had a really cool Barbie Dream House that she wouldn’t let me play with). That one statement was really fascinating to me and has stuck with me through the years (although I don’t remember anything else about the paper). This would have been around 1992-1993, so yeah, a while ago (and yes, I realize we are talking about a paper written by a high schooler, back before you could use the internet for research – so obviously I can be completely off my mark here). A quick Google tells me that the rivets also scratched cowboy’s saddles, which might be another reason why the back pockets ones were eliminated. Either way, I think they look weird and out-of-place on the back pockets. So front pocket rivets only for me! Scout Tee

And that’s it for this outfit! Tell me – has your style relaxed as you aged? Do you find yourself experimenting with new silhouettes, or do you stick with the tried and true? How do you feel about rivets on the back pockets of jeans? Do you think the cowboys were onto something?

Completed: Another B5526 + Ginger Jeans Get-up

18 May

So sorry to dump this on y’all yet again – another collared shirt + jeans outfit combination. Yawn.

Gingers & B5526

Well, to backtrack – yawn for you, but 😀 😀 😀 😀 😀 for me hahahaha. I will never get tired of this outfit combination. Or, at least, not anytime soon. Maybe never is too strong of a word to use here.

Gingers & B5526

What’s mildly frustrating about writing a long-term blog (at the time of this posting, I’ve accumulated nearly 500 entries since I started waaaay back in 2009, WTF) is that you eventually reach a point when you’re just making the same thing over and over again (well… those of us who don’t make our blog our full-time income fall in this category. I’m sure if I was sponsored out the wazzoo and had all the time I spend at work to spend making content for my blog, it would be a different story, ha.). After re-assessing my wardrobe at the end of 2014 and realizing that I *still* had shitloads of clothing that I made simply for the new and shiny, I have made it a big point to really be honest with myself about whether or not I’ll actually wear something that I make. Like most people, I have a pretty predictable style. And like many sewers, I don’t want to spend a lot of time reinventing the wheel with new patterns if I can get the look I’m going for with an old TNT. So this translates to repeats upon repeats upon repeats.

So, while you might be yawning about the majority of the stuff that’s been posted in 2015… I gotta say, I am elated with the way my closet is looking these days!

Gingers & B5526

Gingers & B5526

With all that being said, there’s not much to report on either of these pieces since I’ve made them soooo many damn times. Jeans + collared shirt is totally my go-to when I want to feel comfortable but still look like I made an effort in the AM. I’ve found my TNT patterns and I feel good about the way they fit and the construction methods that I use.

Gingers & B5526

Gingers & B5526

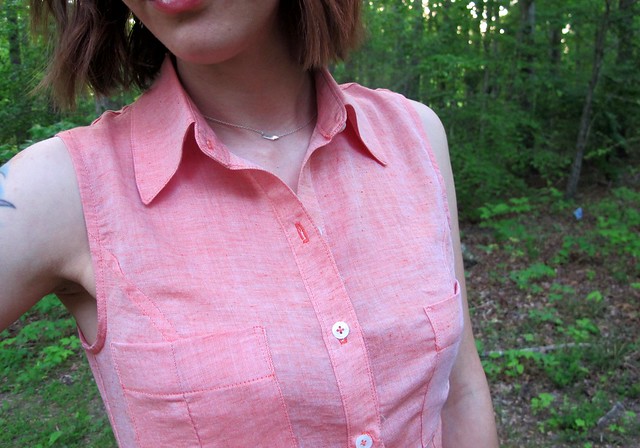
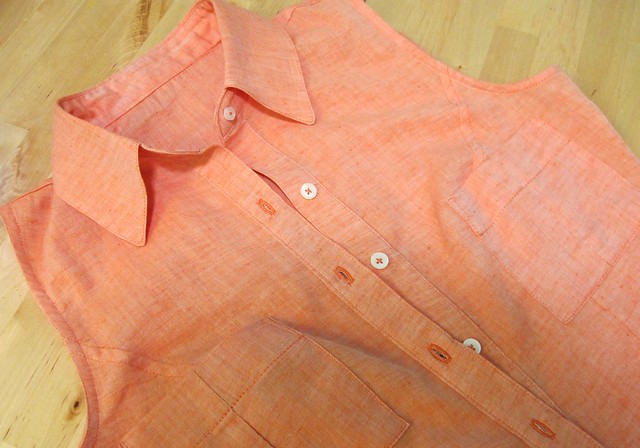
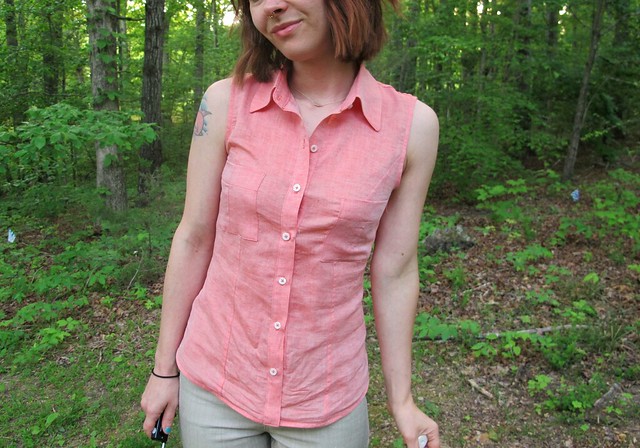
The top was made using my beloved Butterick 5526. Y’all, I don’t know if I’ll ever sew another button up pattern again! (we all know that’s a lie) I’ve gotten to the point with this one where I can bang one out in a couple of days, which is really nice when you’re coming up on a looming Mood Sewing Network deadline, ha. The fabric is this amazing tigerlily orange cotton voile from Theory, which is a bit more of a coral-y pink than it is orange in real life (I don’t know how the color translates on your screen, but on the Mood Fabrics website it’s definitely pretty muted. The real color is much closer to what you see in my photos. It’s BEAUTIFUL). It has a beautiful chambray weave, which gives the color lots of dimension. This fabric was so so nice to work with – ok, it was a shifty bitch to cut, but once I got past this point, it handled and pressed like a boss. It’s also super comfortable to wear on even the hottest day.

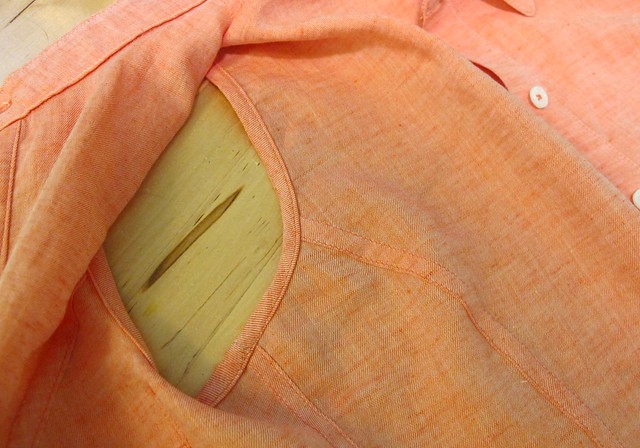
Since the fabric does have a tendency to fray, I used flat-felled seams every where in my shirt. I also left off the sleeves and finished the armhole with self bias binding – it makes the shirt really casual and, again, awesome for hot weather. The pockets are the same pockets that come with the pattern, but I made them slightly smaller because the original size was a little overwhelming on me. Buttons are from my stash; they’re just your standard white shirt buttons. Oh! And the matching thread also came from Mood Fabrics – I noticed that when I was ordering my fabric, there were thread suggestions at the bottom of the page. I figured I’d try out the service – you know, for science – and I’m super pleased with the color match. Even more pleased that I was saved a trip to the fabric store. Mostly because those tend to be very dangerous places for my wallet, ha.
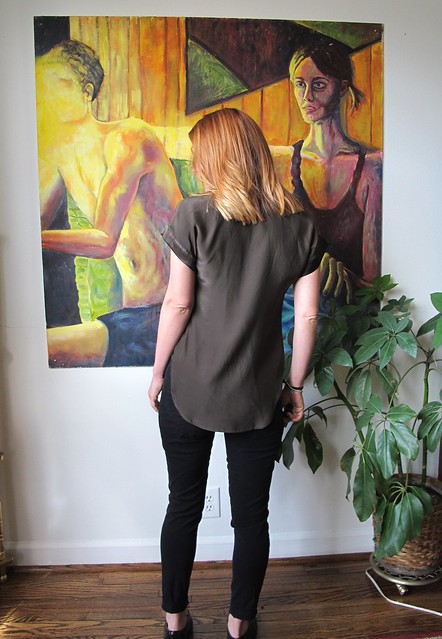
Gingers & B5526

Gingers & B5526

The good thing about running a long-term blog and making a bunch of pattern repeats is that you will eventually bore of just making things that are passable to wear in public, and start focusing on really honing your skills to the next level. Or, at least, that’s how it worked out for me. Look at those clean finished insides! I should wear this shit wrong-side out.

Gingers & B5526

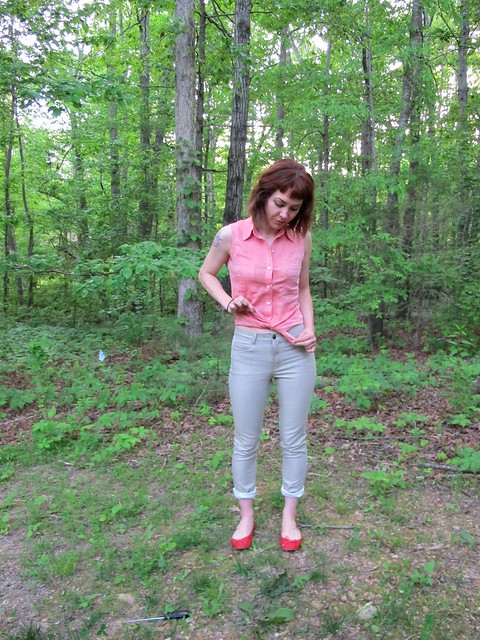
I did shorten the length of the shirt by about 2″ – I think the original length was just sliiiightly too long for my height. This way I can wear it untucked or tied at the waist. If I do a half tuck, it doesn’t pooch out all weird like some of my longer shirts tend to do. As always, I finish my shirt hems with self bias facing. I think it makes for a much cleaner finish, and it’s must easier to press and sew those curves with the bias tape instead of trying to wrangle the hem itself.

Gingers & B5526

Gingers & B5526

For my jeans, I used my now-favorite-ever-pants-pattern, the Ginger Jeans. I’ve made this a few times before (and I definitely don’t plan on stopping – I finally was able to invest in one of the denim kits because YAY) and I’m just really happy with the way this pattern fits my body. The fabric is a cool metallic gold stretch denim. I was actually looking for white denim to make this up, despite me being a stain magnet when it comes to white. At any rate, this denim’s wrong side actually is white flecked with very subtle bits of gold, and these very well almost became white jeans. I talked myself out of it because I was afraid the not-quite-pure-white would make the jeans look like they were dirty, plus again, stain magnet. So I stuck with the gold side. Also, this denim doesn’t have as much stretch as my other denims, so the jeans are a bit tight. I had to let the side seams out to 3/8″ or else I would have never gotten these things over my ass. They’re still a bit tight – mostly around the calves – but I’m hoping that they will loosen up a little with wear.

Gingers & B5526

Gingers & B5526

Gingers & B5526

Not much to report on construction. I used a combination of flat-felled and serged seams (as how most RTW jeans are made) and a triple stitch to really make the topstitching stand out. I would have loved to use topstitching thread, but I couldn’t find a good match with what is admittedly kind of a weird denim color. It’s gold, but it’s also kind of beige. Fortunately, Mood Fabrics REALLY came through with that thread match, as you can see in these close-ups.

What else? I did not interface the waistband (I like my jeans with an uninterfaced waistband; it’s much more comfortable. Not sure how that would work with a lower rise, but for the high rise version, it’s perfect). The jeans button is from Pacific Trimming, and the cotton pocket lining is left over from this crazy blue dress.

I will admit right now that this outfit inspiration came way of my boss’ closet. Since I do all her laundry for her (if you are new to this blog and that sounds REALLY WEIRD, I should probably point out that I’m a personal assistant 🙂 ha!), I’m always lurking on her clothes and I’m always finding inspiration in some of the strangest ways. She has a similar coral chambray shirt – hers has sleeves and a lace inset at the yoke, though – and white jeans. And I wanted that outfit for me. So I made it 😛

Gingers & B5526

So, hey, in other news that doesn’t involve me making my fifty billionth b5526 – I’ve got an article out in the current issue of Seamwork Magazine! If you haven’t heard of Seamwork, it’s a sewing magazine that is published online by the masterminds behind Colette Patterns. The magazine is free to read and there are optional pattern downloads with each issue (the patterns you pay for, however). ANYWAY, my article is all about visiting Nashville! I had so much fun writing a city guide about my favorite city in the entire world, and I hope you have fun reading it (and are inspired to come visit because, hey, Nashville is awesome! Really really awesome!). You can read The Seamworker’s Guide to Visiting Nashville at Seamwork. My first published article! Yay!

Completed: A Cardigan, a Skirt, and a Tshirt!

30 Apr

Woohoo y’all get a damn TRIFECTA of garments for today’s post! Lucky you!

Striped Cabernet Cardigan + Yellow Hollyburn

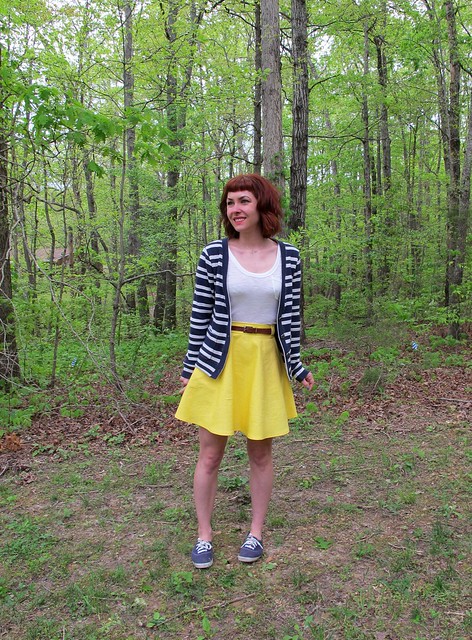
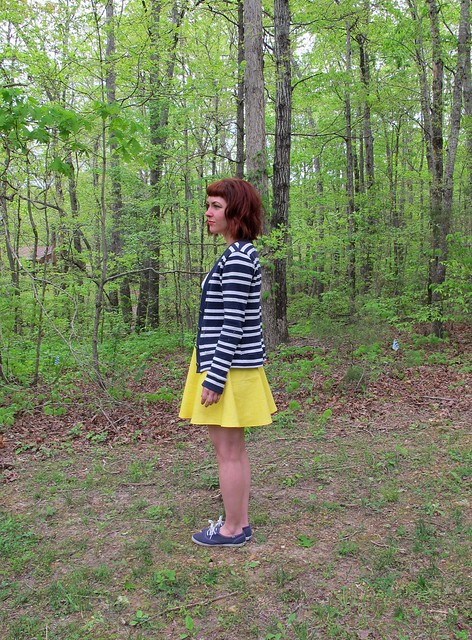
For my monthly Mood Sewing Network post, this month I wanted to focus on that amazing striped sweater knit that you’re probably staring at (you should be staring at it, it’s fucking awesome). But I felt really boring just making *a* sweater (a sweater that took maybe 2 hours, tops, to complete), so I overcompensated and made my entire outfit. Yay!

Striped Cabernet Cardigan + Yellow Hollyburn

We’ll start with the cardigan because it truly is the star of this outfit. It’s another SBCC Cabernet cardigan, this time with my minor adjustments made to the flat pattern (you can see my leopard Cabernet cardigan here, btw!). Since I’ve already made the pattern once, there’s not really anything new to report in terms of construction.

Striped Cabernet Cardigan + Yellow Hollyburn

Striped Cabernet Cardigan + Yellow Hollyburn

I bought the navy and white striped fabric while I was at the Mood Fabrics flagship store in NYC in March. I got soooo much good stuff while I was there, but this particular piece really takes the cake. I swear, if the bolt hadn’t been so heavy, it probably would have jumped off the shelf and fallen directly into my arms. We were like star-crossed lovers when we caught sight of one another.

ANYWAY, gushing aside – what we have here is a cotton double knit that works and feels like the perfect sweater knit. It’s wonderfully thick and squishy, and while it does drape a little bit, it also hold it’s shape quite well. It was really the perfect fabric for this pattern, as it responds really nicely to pressing and topstitching. I was careful in my cutting to not only match up the stripes at the side seams, but also the stripes blending into the sleeve cuffs and hem bands. The neckband is actually the same striped fabric – I just positioned the pattern piece so that the widest navy stripe was the only thing that showed when it’s folded in half. I knew I wanted a solid color at that neckband, but I didn’t want to try to color match, because nope.

Striped Cabernet Cardigan + Yellow Hollyburn

Because the striped knit is so thick, it was a bit of a beast to manhandle. Cutting it was painful (I REALLY need to get my scissors sharpened, dammit!) and the sewn seams were lumpy and wavy before I pressed them. It’s super important to press if you’re dealing with a fabric like this – the flatness is what makes the finished piece look so polished. Topstitching down the seam allowances also helped. As with my last cardigan, I used the straight stitch on my machine and a walking foot. The rest of the seams are serged.

Striped Cabernet Cardigan + Yellow Hollyburn

The skirt is another one of my beloved Hollyburn skirts. I cannot stress this enough, but I LOOVE this pattern. SO MUCH. As soon as I finished the denim polka dot Hollyburn, I started lurking hard for a yellow twill to make another one. I really love this neon delight of a yellow, but it’s hellish looking against my skin – so obviously, the next best thing is a skirt.

I found the fabric also while I was in NYC, also at the Mood Fabrics flagship store (sorryyyyy not sorry). I actually spent a good deal of time looking for this one – I knew I wanted yellow twill, but the stuff in the twill section wasn’t quite up to snuff. Too pale, too lightweight, too much of something. This particular fabric was actually located in the denim section – I imagine there is someone, somewhere, who has made an amazing pair of jeans with this fabric.

Striped Cabernet Cardigan + Yellow Hollyburn

This is a stretch cotton twill with lots of lycra in the content, giving it a super heavy stretch. Even though it’s on the lighter side (heavy enough to be considered a bottomweight, however), it has plenty of body that gives this skirt a great structure. The only downside to all that lycra is that it made the fabric really hard to get a good press. I ended up topstitching all the seams to keep them flat, about 1/4″ distance (as opposed to my usual 1/8″). The wider topstitching paired with this fabric really gives it a nice denim-y look, which I like. I thought about topstitching around the pocket bags to give those definition too, and “thought,” I mean I tried it and it looked absolutely terrible so I ripped it out. Don’t do that.
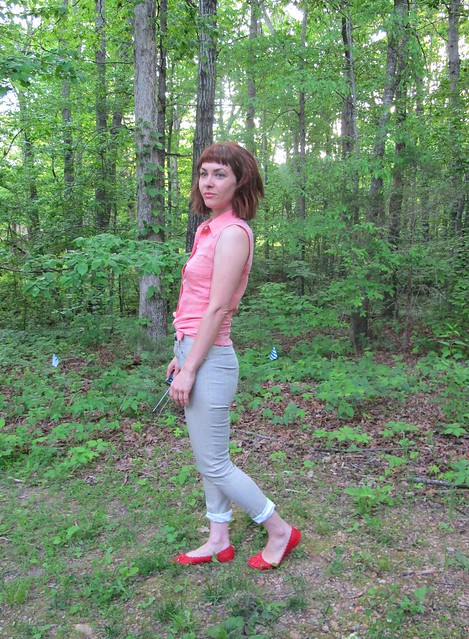
Striped Cabernet Cardigan + Yellow Hollyburn

The back closes with a simple lapped zipper, and all the inside seams are serged. Basic stuff!

Striped Cabernet Cardigan + Yellow Hollyburn

Finally, the most basic of the basics – my tshirt!

Striped Cabernet Cardigan + Yellow Hollyburn

This is SUCH a simple tshirt that it hardly bears a mention, however, we’re here and it’s here so let’s just roll with it. The fabric is this sheer white slubbed rayon jersey, which was WAY more sheer than I was expecting but it’s sort of awesome. It’s suuuuper soft, drapey, and the texture of the fabric makes it a tiny bit more interesting than your average plain white tshirt. I used my always-tweaking-almost-done-tweaking Frankenpattern’d tshirt to make this. The neckline is bound using Megan Nielsen’s bound neckline method, which is hands-down my FAVORITE way to finish a neckline on a slinky knit like this. It just looks really really good, and it’s nice and sturdy. I love the traditional method, of course, but some of the more drapey fabrics don’t do so hot with that method because you have to REALLY stretch them to keep them from being floppy, which ends up with a tight neckline that’s practically gathered.

Speaking of slinky knits, binding that neckline was about the only easy part of sewing this tshirt. Talk about the slinkiest knit ever! It was worth it, though, because I can always use more white tshirts. Even if they are see-through. And yes, the pocket is totally in the wrong place and I’m totally not picking it off because I don’t think the fabric can survive that kind of trama.
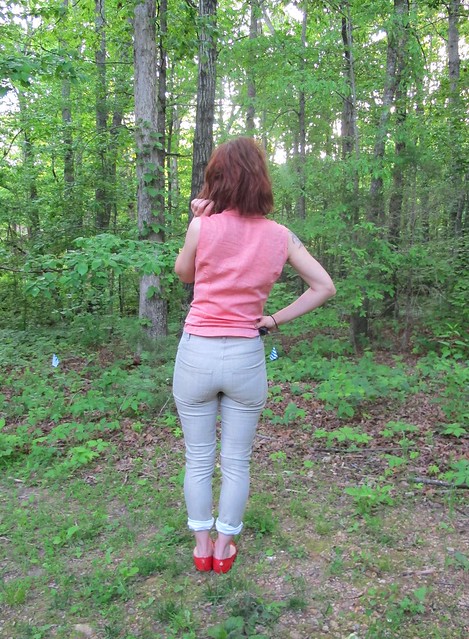
Detail shots:

Striped Cabernet Cardigan + Yellow Hollyburn

Striped Cabernet Cardigan + Yellow Hollyburn

Striped Cabernet Cardigan + Yellow Hollyburn

Striped Cabernet Cardigan + Yellow Hollyburn

Striped Cabernet Cardigan + Yellow Hollyburn

Striped Cabernet Cardigan + Yellow Hollyburn

Striped Cabernet Cardigan + Yellow Hollyburn

Striped Cabernet Cardigan + Yellow Hollyburn

(that’s a Sewn with Mood Fabrics tag, by the way! 🙂 )

Striped Cabernet Cardigan + Yellow Hollyburn

Striped Cabernet Cardigan + Yellow Hollyburn

PHEW.

Ok, one more picture:

Striped Cabernet Cardigan + Yellow Hollyburn

Only including this one because I look like I’m about to eat whatever is in my line of vision haha.

** Note: All fabrics for this project were provided to me in exchange for a review post as per my involvement with the Mood Sewing Network.