Tag Archives: chambray

Completed: Denim Centaurée Dress

25 Oct

Good morning, everyone! I am writing this from my local airport lounge, waiting for my flight this morning to San Francisco! Figured I’d take advantage of the downtime (and free WiFi!) and see if I could throw together a little post! I feel like a big part of the reason why I stopped posting as much was because there is so much EFFORT that goes into it – I have this weird need for them to be long and therefore “worth it,” (and a long post takes a really long time to write!) but really, short posts are better than no posts… right? I don’t want to let my blog die!

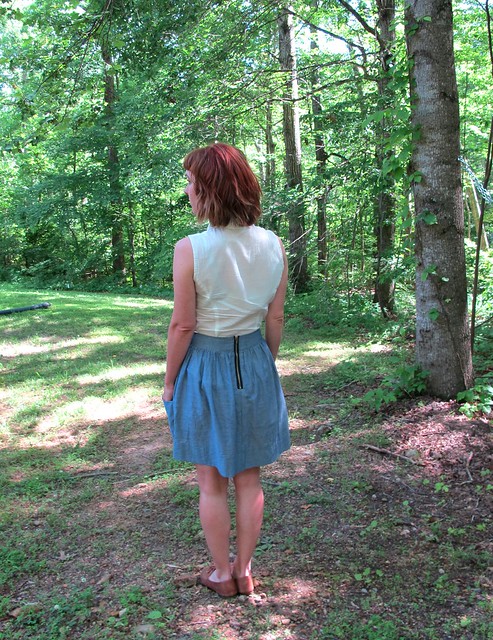
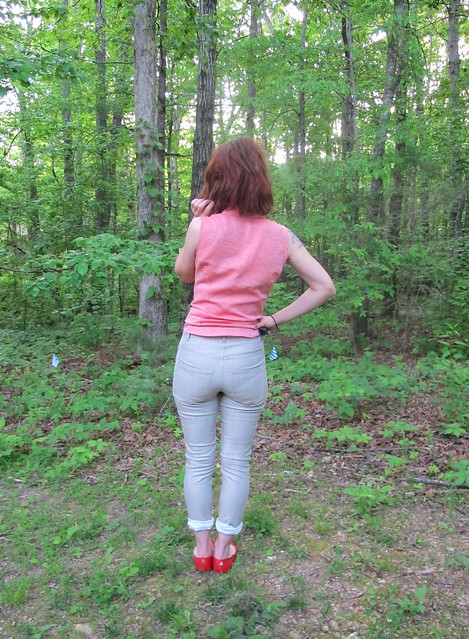
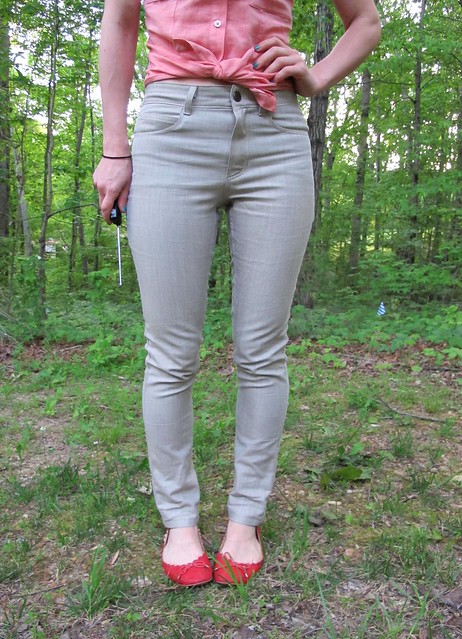
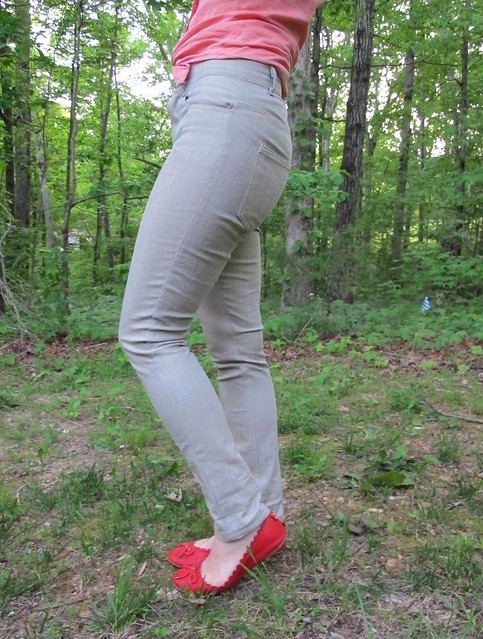
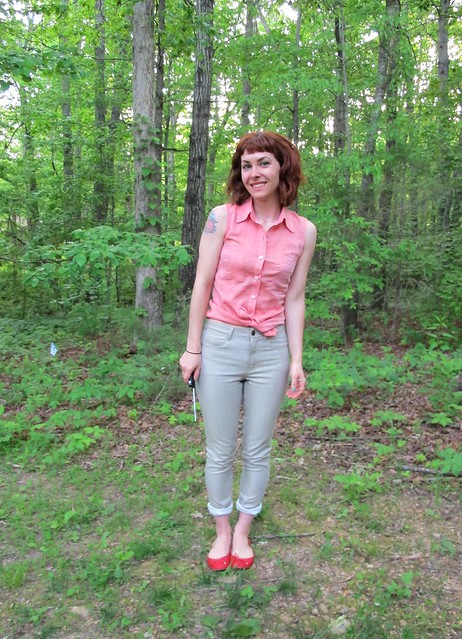
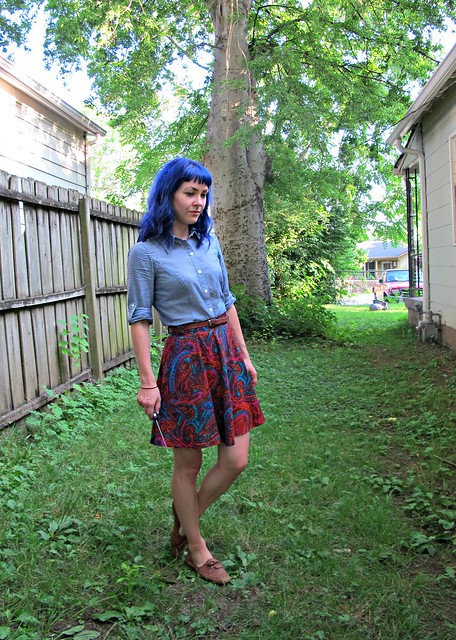
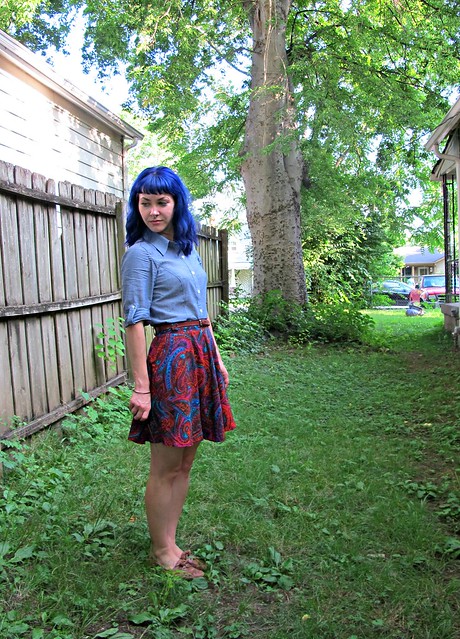
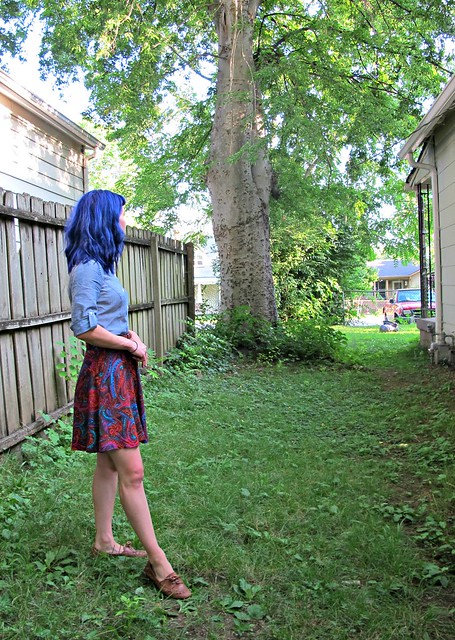
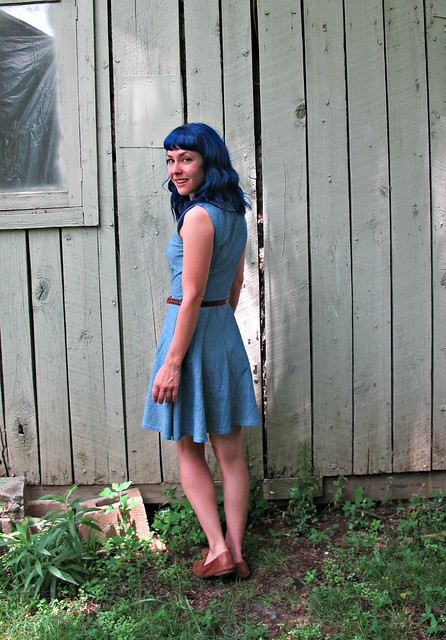
Another reason why I post less is because I really seem to have hit a hard rut with photos. I just really hate taking them, I feel like they always look shitty and I honestly don’t know how to improve them (one would think that standing in the same spot where I take my dressform photos would work, but nope, sadly not the case). I snapped these very quickly using the self-timer on my phone, right before I took a walk down the block to my local cookie shop (oh yeah). The lighting isn’t great and I have my shades on, but… whatever. It’ll do!

Deer & Doe Centaurée dress made with denim from Mood Fabrics

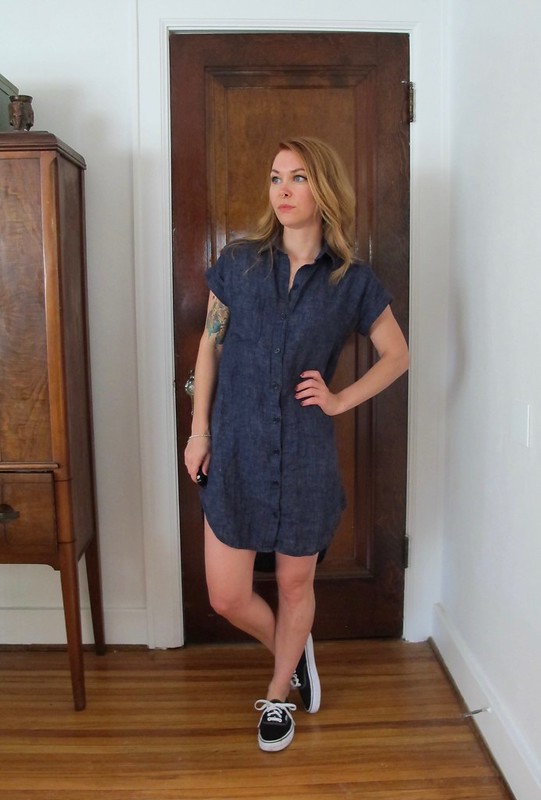
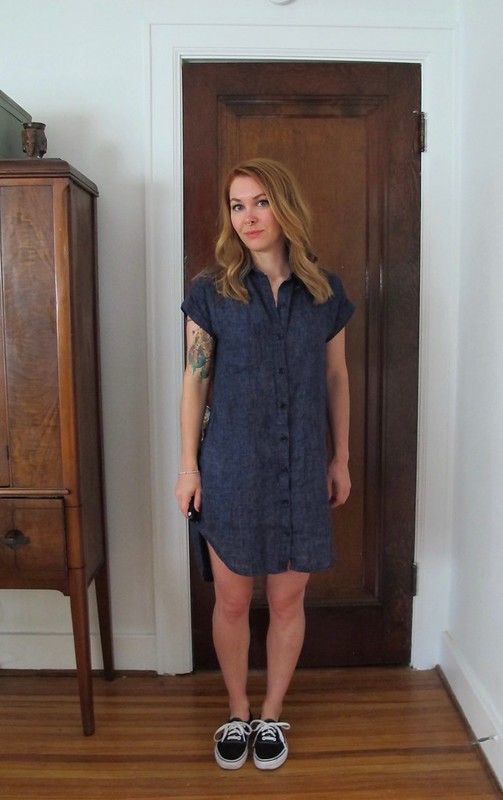
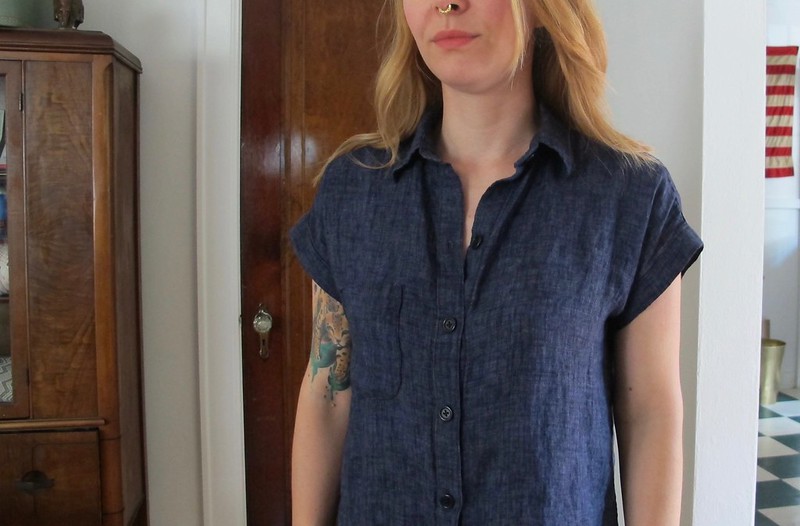
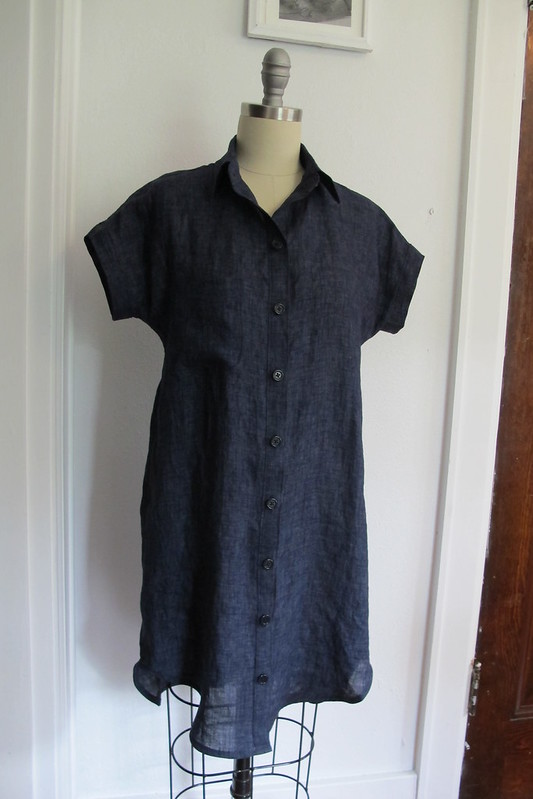
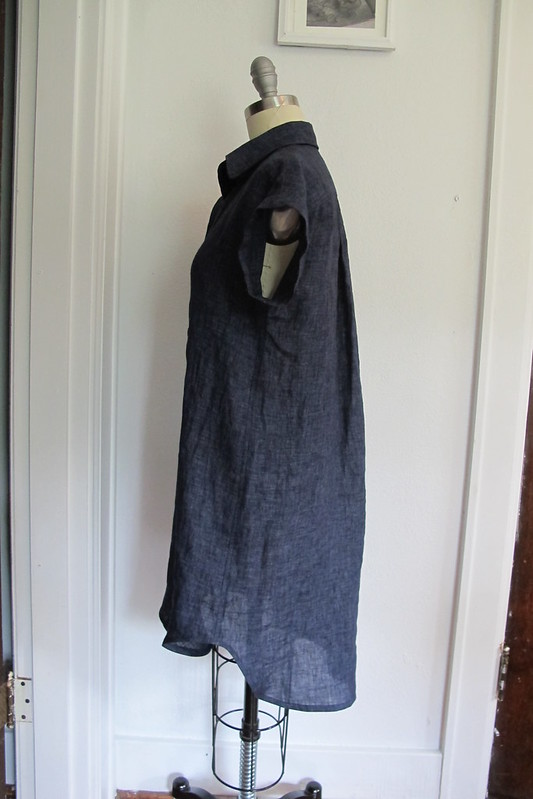
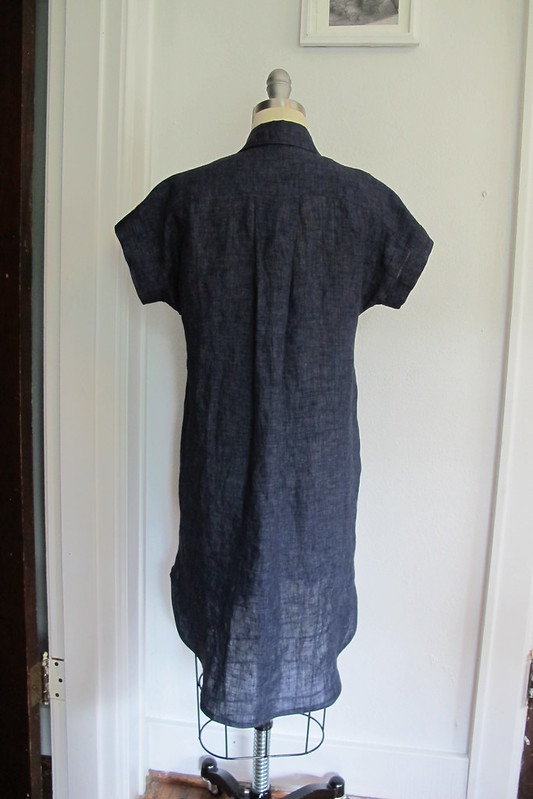
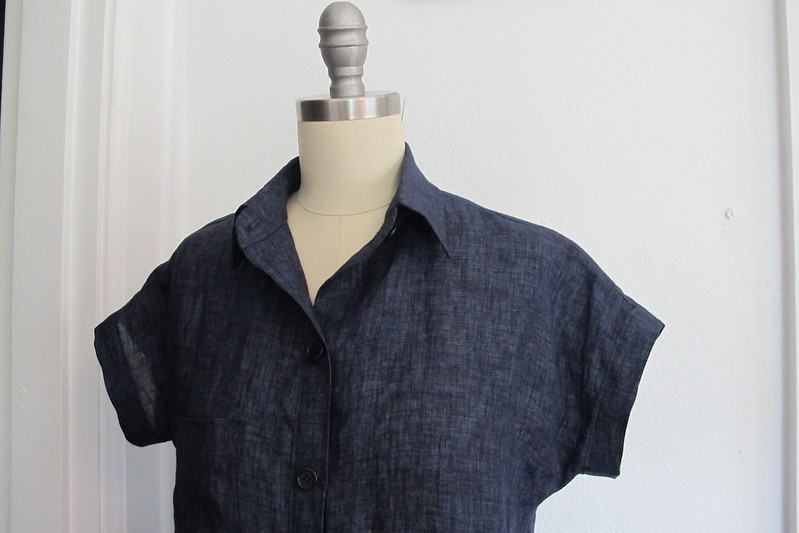
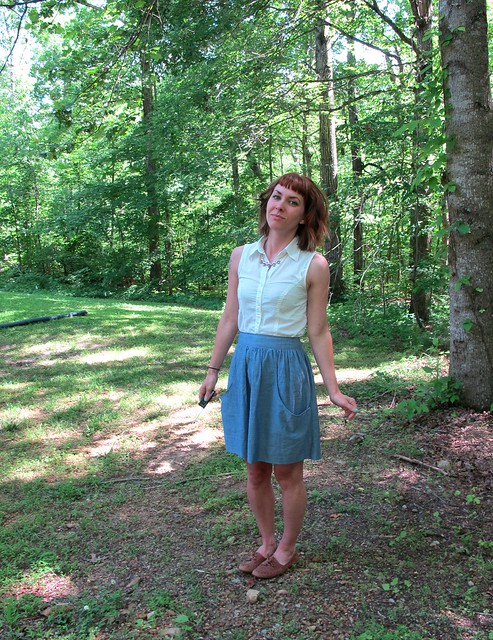
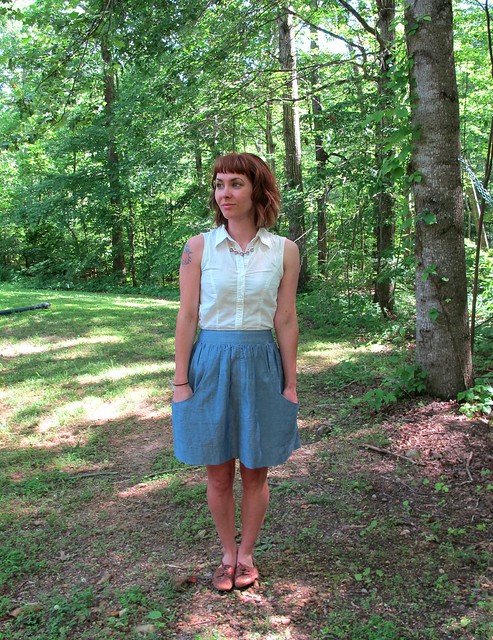
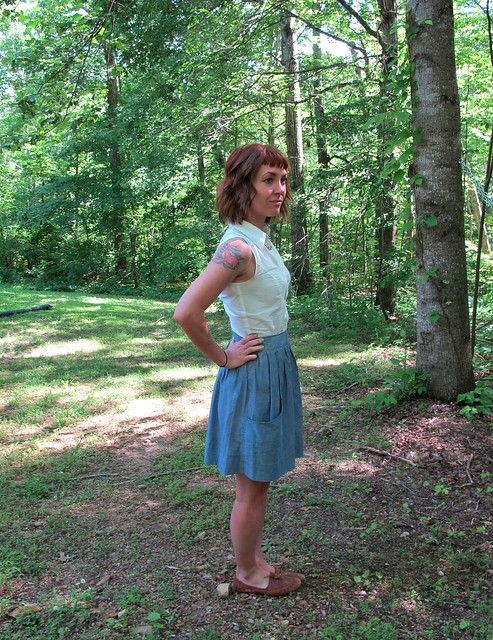
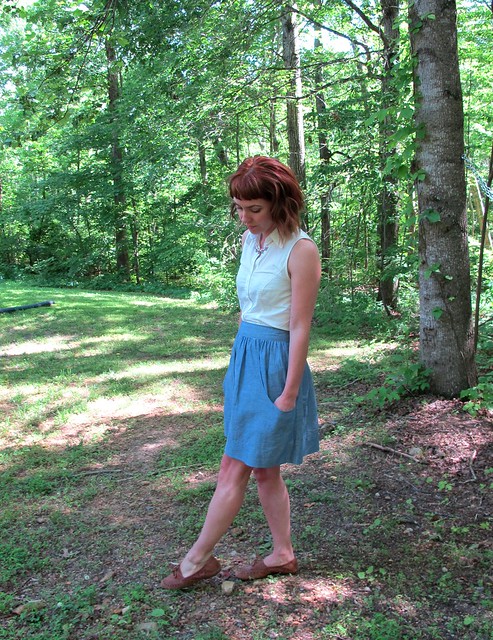
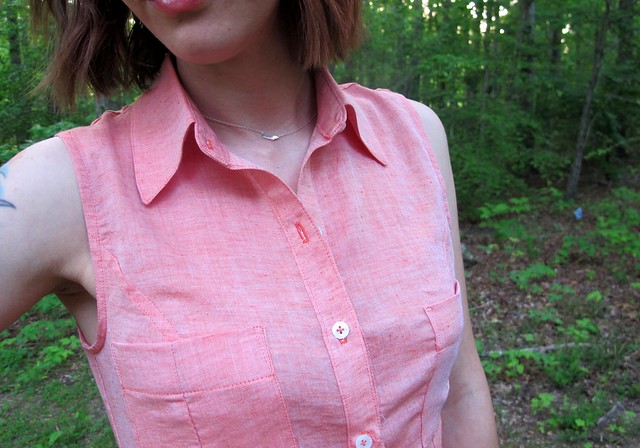
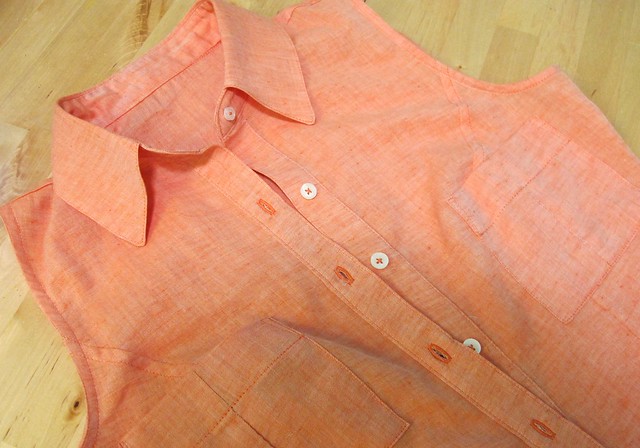
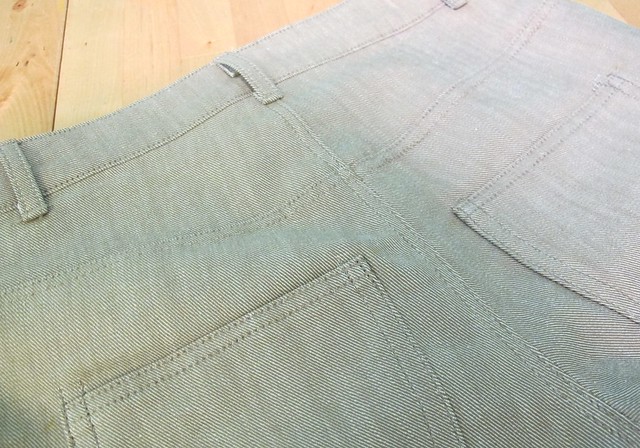
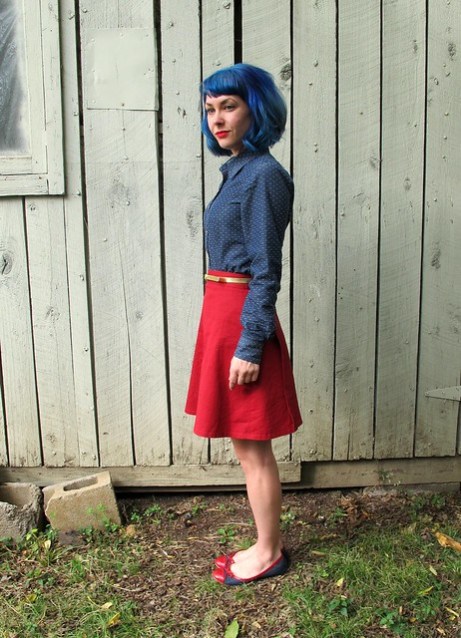
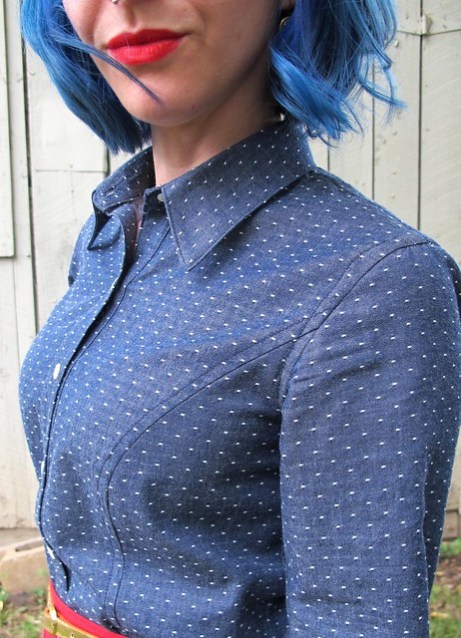
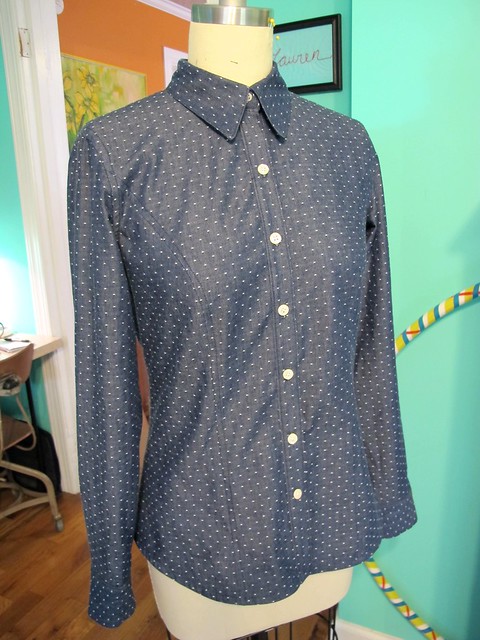
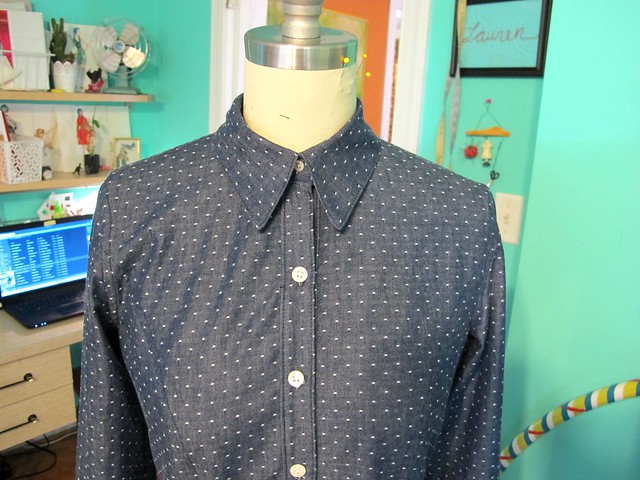
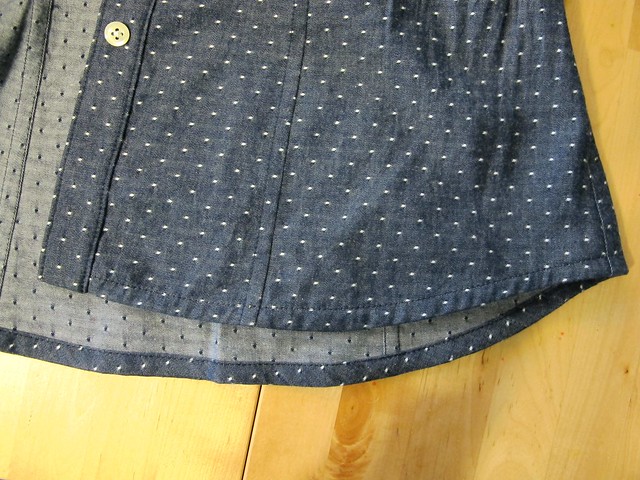
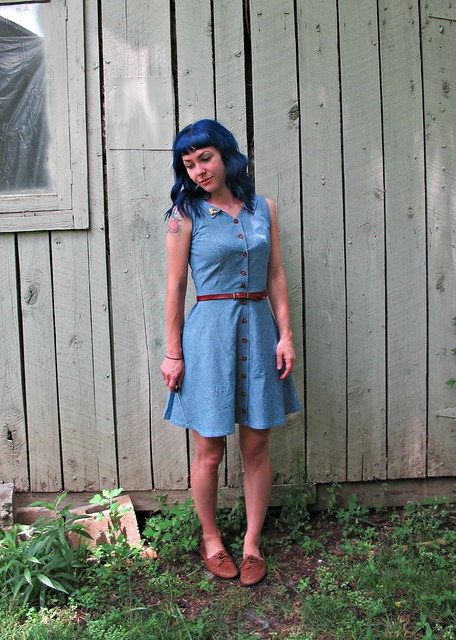
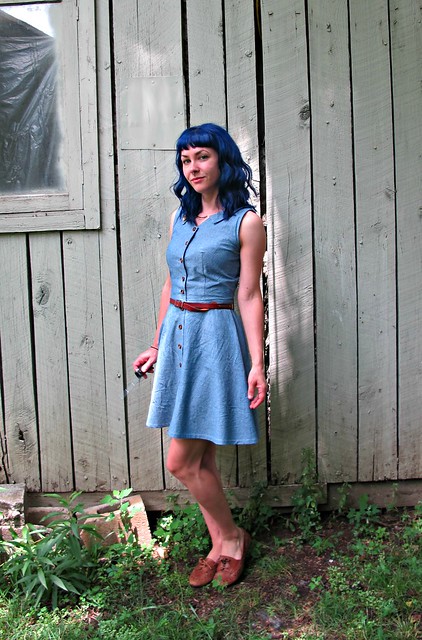
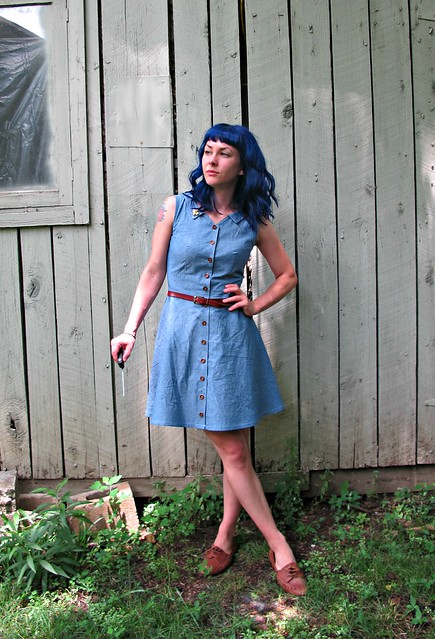
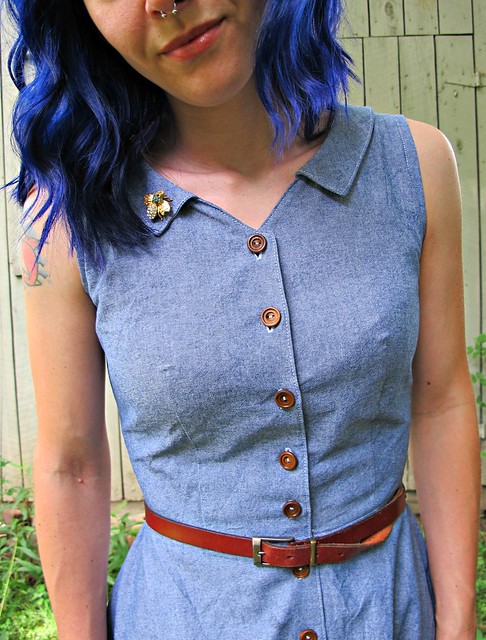
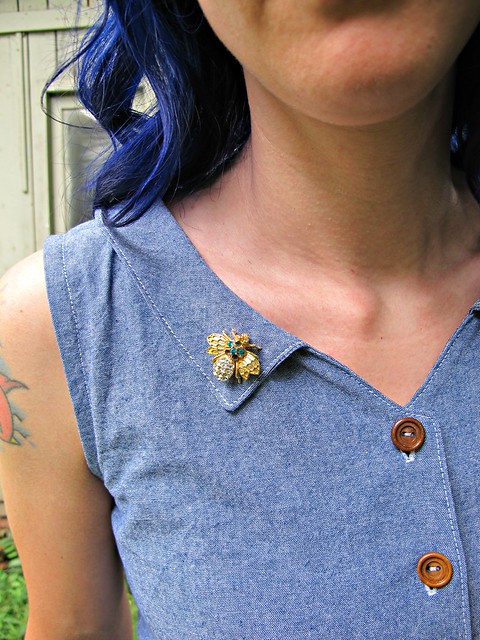
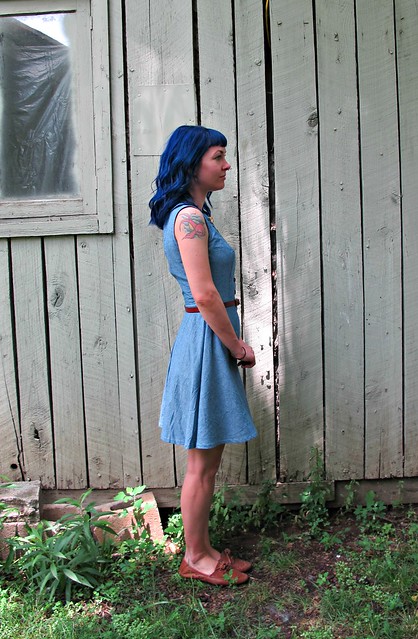
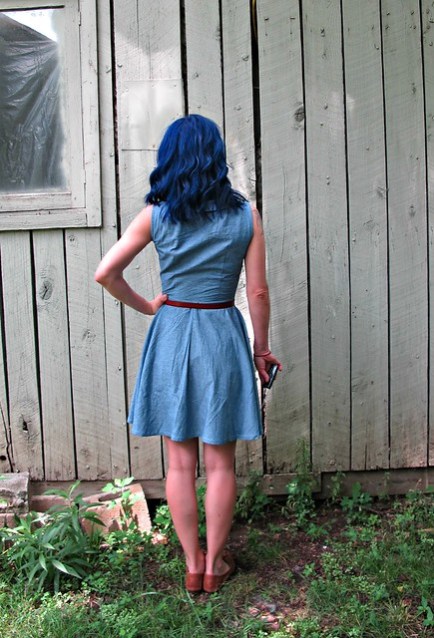
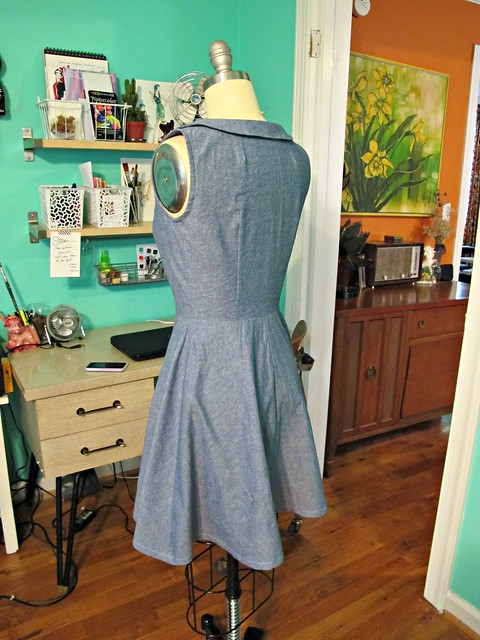
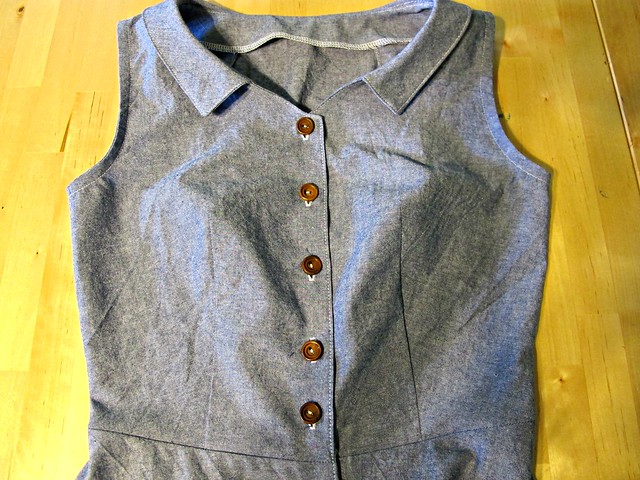
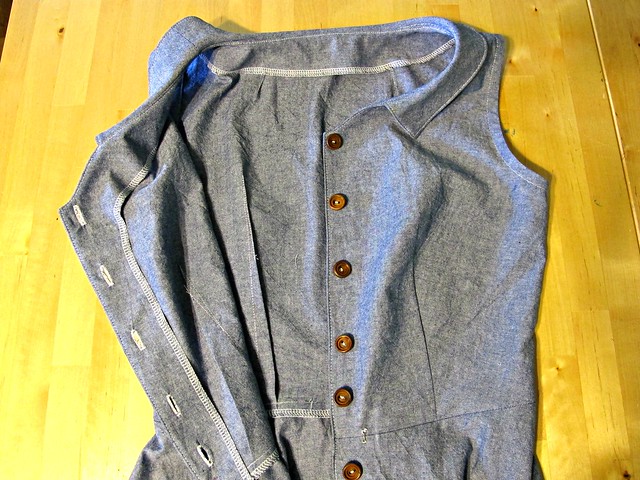
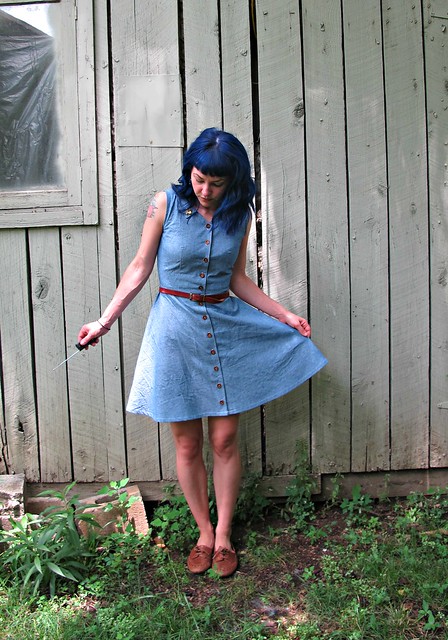
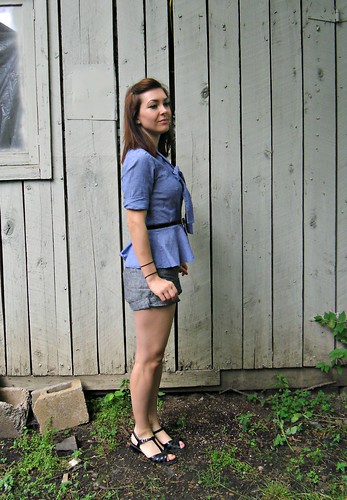
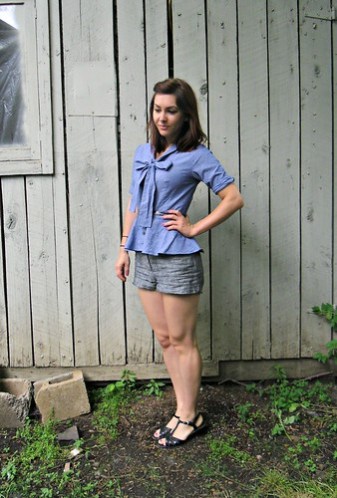
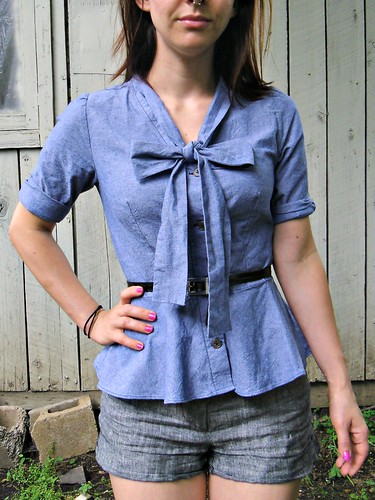
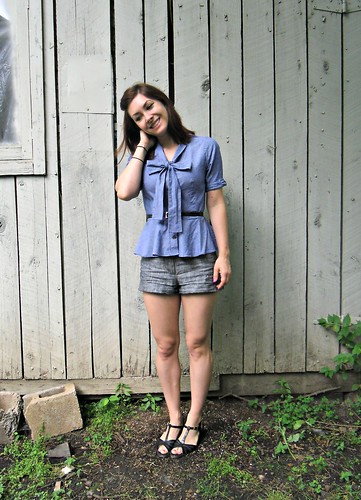
Anyway – the dress! I made this little denim sundress a few months ago, one last dress hurrah for summer. The pattern is the Deer & Doe Centaurée dress, which I loved when was first released – it’s a great little basic sundress with some fun details that make it a little more interesting. The bodice shaping is created with interesting seamlines that form a star (y’all know how I feel about a good star), and the edges are finished with a self bias binding that turns into double straps (a super cute detail IMHO but definitely requires no bra or a strapless bra to get the full effect – fwiw, I am bra-less in these photos). The skirt is a simple gathered skirt – no pockets, but I was able to easily add some simple patch pockets.

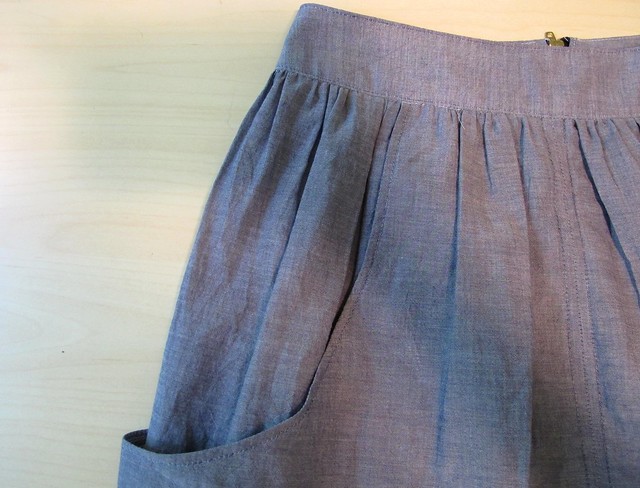
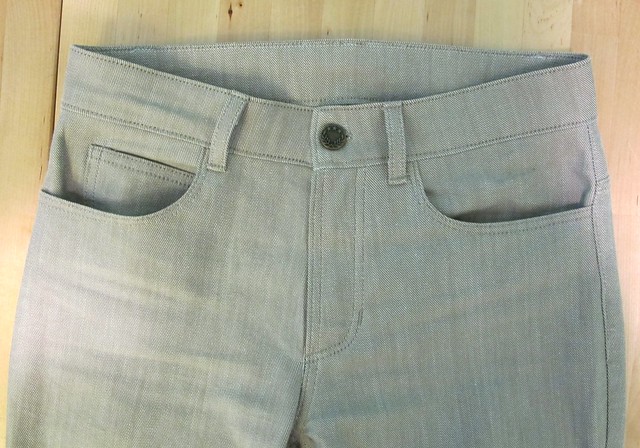
I cut a size 36 at the bust, grading out to a 38 at the waist and hip. No other alterations were necessary, which is good because I totally threw caution to the wind and make this up without first sewing a muslin o_O haha! Like I mentioned, I did add patch pockets – simple squares (I think I took the pattern piece off my Ariana Dress but they can easily be drafted if you don’t have a pattern to steal from), to bring a little more interest down to an otherwise plain skirt and to also incorporate more topstitching. Everything else about this dress is exactly as the pattern intended!

Deer & Doe Centaurée dress made with denim from Mood Fabrics

My fabric is a lightweight denim from Mood Fabrics. I found this in the store while I was in NYC – I was actually looking for bottomweight to make a pair of jeans with, but this was too good to pass up. It’s a fine, lightweight Japanese denim that is very narrow (like less than 45″). This denim on the Mood Fabrics website appears to be very similar, although it’s a little wider. I originally purchased this with the intention of making a shirtdress – I specifically had a Colette Hawthorn dress in mind, to replace my beloved denim Hawthorn that no longer fits – but decided to try something a little different than my norm SINCE I MAKE SO MANY DAMN SHIRTS.

Deer & Doe Centaurée dress made with denim from Mood Fabrics

Deer & Doe Centaurée dress made with denim from Mood Fabrics

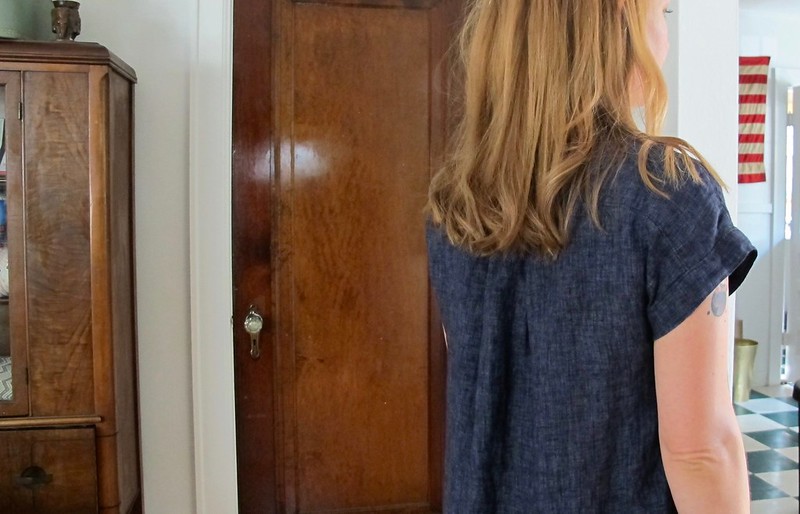
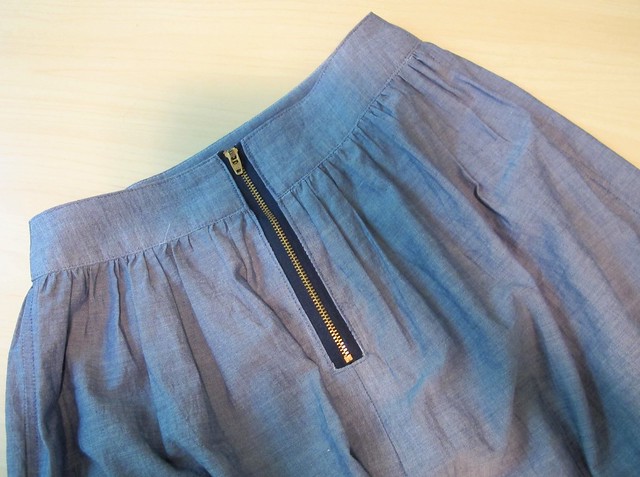
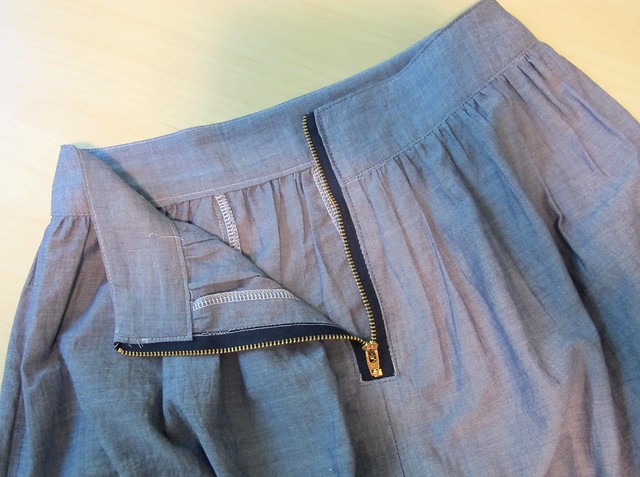
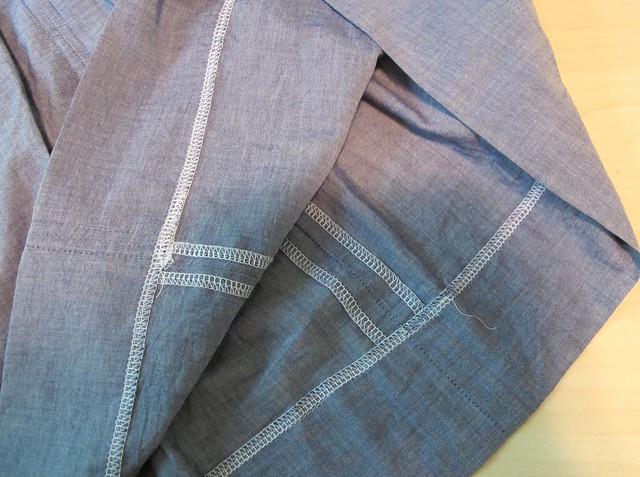
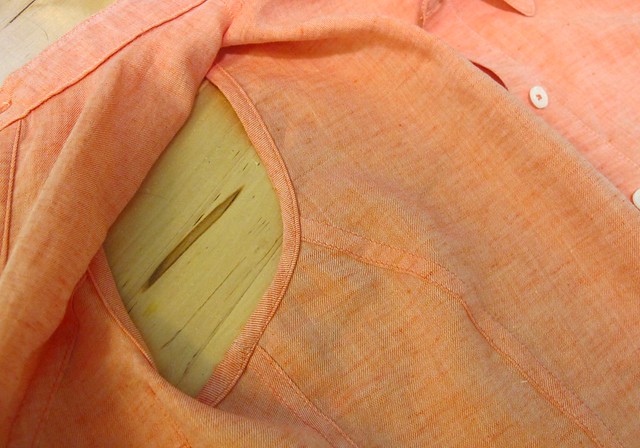
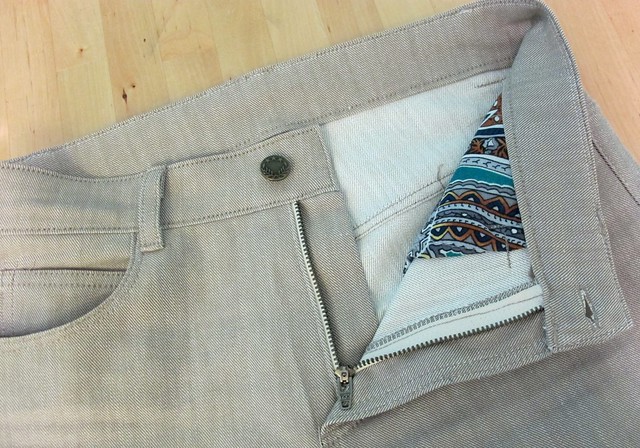
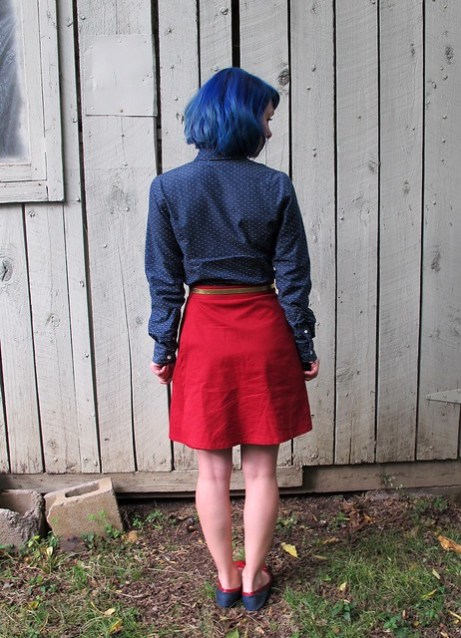
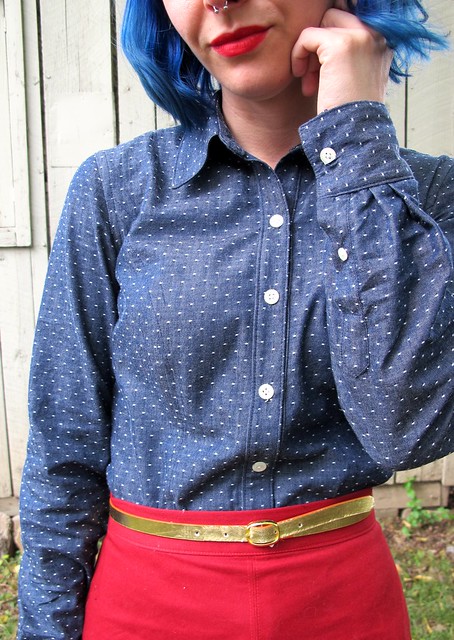
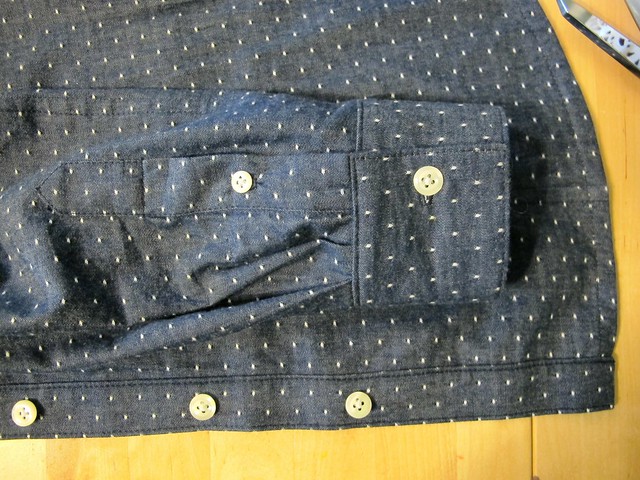
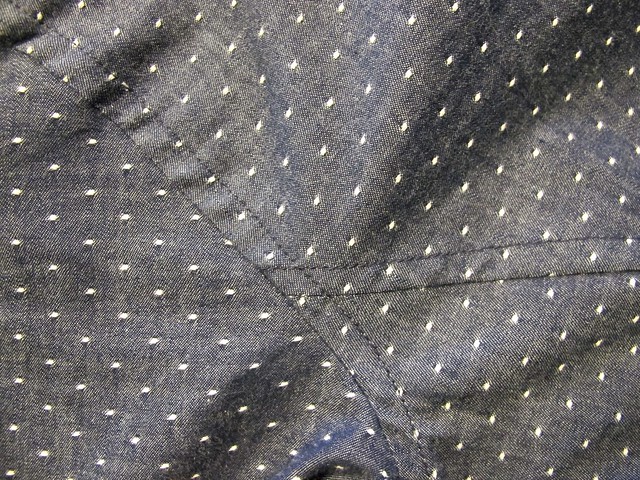
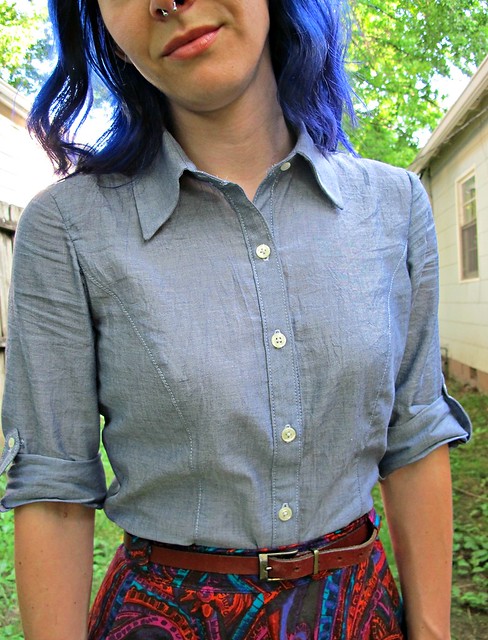
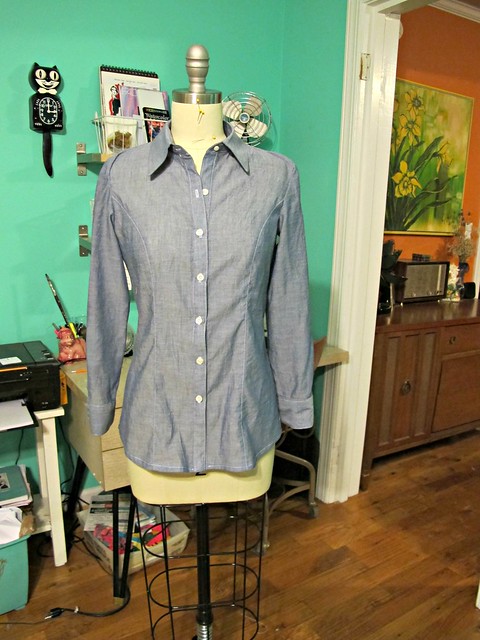
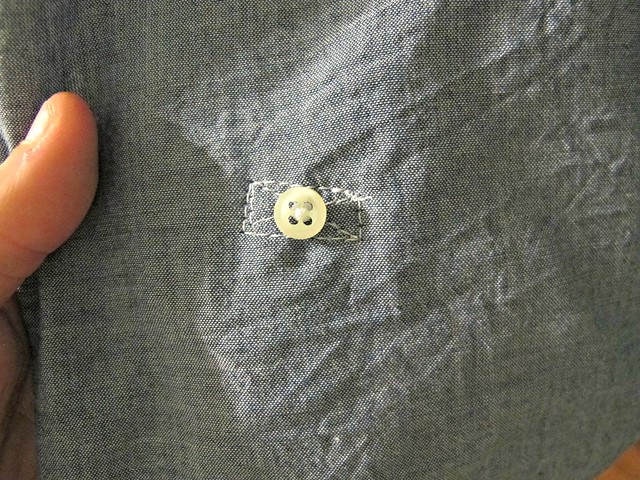
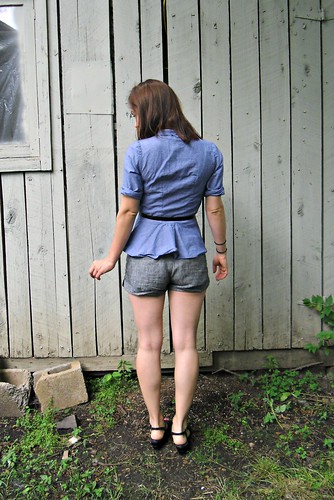
Sewing this fabric was super easy, as most denims are! I used two sewing machines to construct this – one threaded with regular polyester thread, and the second threaded with topstitching thread (you can totally do this one with machine if you don’t mind re-threading over and over!). I chose to highlight all those interesting seamlines with gold topstitching thread, which makes it look more like a pair of jeans, just reincarnated as a dress. All seams are finished with my serger (the multitude of intersecting seamlines on the bodice + the gathered skirt would have made it difficult to flat fell, plus, I wanted the option to be able to let out or take in areas since, again, I did not make a mock-up), and I used self-binding to finish the edges of the bodice as instructed by the pattern.

Deer & Doe Centaurée dress made with denim from Mood Fabrics

Deer & Doe Centaurée dress made with denim from Mood Fabrics

Deer & Doe Centaurée dress made with denim from Mood Fabrics

Deer & Doe Centaurée dress made with denim from Mood Fabrics

The dress closes with an invisible zipper on the side seam. Here’s a fun fact – the only zipper I had in my stash was off-white, and I didn’t feel like going to the shop to grab another one in the right color (another fun fact – I live 3 blocks from one fabric store, and less than a mile from a much bigger one so I absolutely have no valid excuse, #teamlazy)… so there is a off-white invisible zipper in this dress. You’d never guess it unless you see the zipper pull, which is located under my armpit, and I take a lot of pride in this. Not to toot my own horn, but hell yea my invisible zipper game is strong. You can’t even see that shit.

Deer & Doe Centaurée dress made with denim from Mood Fabrics

Deer & Doe Centaurée dress made with denim from Mood Fabrics

The skirt is finished with a wide hem – I wanted mine shorter than the pattern is drafted for, and I like the way the wide hem looks with the topstitching + pockets. Plus, it will be easy to let the hem out if I decide I want a longer skirt in the future (whether or not that will actually ever happen is up for debate, but at least I have options now!).

As a side note, the patch pockets on this dress are perfectly sized to hold a Christie Cookie… speaking from experience here. And! After I finished taking this photos and took my walk, I ran into the sweetest little cat:

neighborhood cat

That’s all for this make! Admittedly, we are a little late in the season now for a sundress (Tennessee appears to have completely skipped fall and jumped straight into early winter… wah!), but if I was a cooler person I could totally rock this with a white t-shirt underneath. Alas, my inner Cher Horowitz definitely won’t be making an appearance, but I do think this dress would look cool with a cropped sweater over it (like my Chuck!). So, sundress or not, this can definitely be a transitional garment!

Deer & Doe Centaurée dress made with denim from Mood Fabrics

Anyway, I’m out! Berkeley, I will see you soon! For those of y’all in the area – Stone Mountain & Daughter Fabrics is hosting a meet-up tonight at 5:30PM. Full details are on my IG 🙂

** Note: The fabrics used in this post were provided to me by Mood Fabrics, in exchange for my participation in the Mood Sewing Network. All opinions, as always, are my own!

Completed: The Kalle Shirtdress

18 Sep

I’ve still got a few more summer projects that I haven’t shared yet, so bear with me here! Although, to be fair – we should be well within the throes of summer heat for at least the next month here (yes, it did warm up again!).

Chambray Kalle Dress

I made this dress a couple of months ago, so what you are seeing a dress that has been worn, washed, and loved quite a bit before taking photos! As a result, it’s probably not as crisp and perfect as it would have looked fresh off the sewing machine – but on the flip, it’s definitely something that I’ve had time to move around in and really get to know fit-wise in ways that might not have been so apparent immediately after finishing it. Plus, you can really see how this fabric looks after several trips through the laundry. For ages, I was firmly in the camp of photos before I wore anything I made, but I’ve really softened up on that lately. This makes more of a delay in posting (since nothing is stopping me from putting that shit on RIGHT AWAY), but I think it can also create more of an honest post, in the sense of seeing how something feels after it’s been worn around a bit.

Also, about these photos – sorry about the dark door background? I did take my tripod outside, but I had one neighbor chopping tree limbs in one yard creepin on me, and another literally sitting on her front porch just straight-up staring at me and it made me way too anxious hahaha. I may need to get something to hang over that door when I take photos (this is the door that leads to the back half of my house – where the bedrooms are – from my living room), but at least the light is pretty!

Chambray Kalle Dress

ANYWAY, back to the dress!!!

This is the Kalle Shirtdress, from Closet Case Patterns. I made view C in a size 2, with no alterations. This one is straight out of the envelope! I was so excited when this pattern came out and my finished dress did not disappoint – I wear it as much as I think I can feasibly get away with! The good thing about dressing kind of bland (simple shapes, solid colors, etc) means that people are less likely to realize you’re repeating an outfit. Or maybe they do and they are too polite to say anything, I dunno and I also kind of don’t care.

Chambray Kalle Dress

Chambray Kalle Dress

I made my dress up in a beautiful, lightweight linen from Mood Fabrics (which apparently is sold out now, sorry!). This fabric is great – it’s light and airy, and almost translucent. It is perfect for those hot summer days when you don’t want anything touching your body. The deep indigo color means that it will also transition nicely into fall – it still looks a bit autumnal, but I won’t be sweating to death in it. Plus, it layers really nicely for those chilly mornings and evenings – it looks great with a cardigan and boots.

I washed my linen three times before cutting it, as I wanted to make sure that it wasn’t going to shrink at all post-sewing. I believe this also helps keep the linen from wrinkling so much – Carolyn, was it you who told me this? – and I think that may be accurate since this fabric doesn’t really wrinkle much at all now! I’ve worn this dress on all my travels since finishing and it looks great going from suitcase to hanger. I have found that I do need to lightly press the sleeve bands after washing, because they get slightly bunched (probably because the bands aren’t interfaced), but the rest of the dress is fine without any ironing. In these photos, that’s exactly what I did not do. Un-ironed linen dress, y’all!

I finished the insides of my dress with French seams, and topstitched with navy thread. For interfacing, I used this super lightweight fusible interfacing, and then only sparingly – on the button band, upper collar, and outer collar stand – to keep the fabric supported but still soft. The hem is finished with a bias facing, which is an easy way to work with that exaggerated curve. The navy shirt buttons are from Textile Fabrics – and in the true spirit of Textile Fabrics, they are fancy and imported from Italy and cost over $1 each. Ugh. Who knew it was so hard to find navy shirt buttons? Anyway, they look good!

Chambray Kalle Dress

One thing you should know about this dress – it’s not a short dress, but the upper curve of the hem is quite high. And the arm holes are quite low, which means that the dress moves upwards if you need to raise your arms. See how high the dress goes when I reach the sky? Ok, granted – I rarely need to raise my arms *that* high, but it is something to keep in mind! For comparison’s sake, I wear my shorts very very short and only the bottom rose of my leg tattoo sticks out of the hem. If the dress hiked up any higher, you would literally see my underwear. FYI!

Chambray Kalle Dress

Chambray Kalle Dress

Chambray Kalle Dress

Chambray Kalle Dress

See how sheer the fabric is? It’s not noticeable when I’m wearing the dress, and also, I wear nude undergarments (nothing patterned).

Chambray Kalle Dress

Chambray Kalle Dress

Chambray Kalle Dress

Chambray Kalle Dress

I think that’s about all I have to say about this dress! I really love this pattern and I am excited to try the other versions in different fabrics. I also realize that this is like, my fourth chambray/denim shirtdress – but you know what? I don’t care. At least I’ve figured out what I like, I guess 😛

Chambray Kalle Dress

** Note: The linen fabric used for this dress was provided to me by Mood Fabrics, in exchange for my participation with the Mood Sewing Network. As always, all opinions are my own!

Completed: Chambray Tencel Butterick 5526

3 Oct

Well, surprise surprise…. I am back again with – you guessed it! – another button-up shirt. Ha! Is this all I wear these days? Probably. I’ve been sewing – and making button-ups – for years at this point, but it still tickles me to no end that I can get them to fit every part of my body without bagginess or gaping. To hell with all those tiny safety pins and double-sided tape – I finally have buttons where the buttons need to go! Yay!

So now, my wardrobe is just slowly filling up with the button-ups of my dreams. Also, button-ups are really really really fun to make. You like making jeans and bras? You’ll love making button-ups. So many tiny pieces with lots of precise topstitching I LURVES IT ♥

B5526 Chambray Tencel

B5526 Chambray Tencel

When I was in NYC earlier this year, I made some time during my trip for a couple hours at Mood Fabrics flagship store in the Garment District. Since I live way way outside of NYC, I don’t generally get this opportunity except once or twice a year – so I try to make it count! I always come prepared with a list and a plan – and while I allow myself to veer off the list if I see something shiny that appeals to my magpie tendencies (very much like when I go grocery shopping, although that sort of veering usually involves chocolate :P), the list is helpful for keeping me on track so my purchases are a little more focused. I don’t know if you’ve had the pleasure of shopping in the physical Mood Fabrics store, but it is QUITE overwhelming if you’re not used to it! The aisles of fabric go on forever, piled to the ceiling – and there are 3 glorious floors of it!

One of the things on my list for this trip was to find a chambray Tencel shirting. I’ve seen this all over sewing blogs and even in RTW – chambray Tencel was apparently very hot last fall (whether or not it’s still hot this fall – whatever, I like it, that’s all that matters!). I wasn’t familiar with Tencel until a couple of years ago, when I was sewing for Elizabeth Suzann and she started using it for some of her designs. Tencel is very similar to rayon – it’s a wood cellulose fiber, so it breathes beautifully, and it has an incredible drape. Unlike most of the rayons I have sewn with, this is a bit thicker and easier to handle – it’s not quite so floaty. My brief internet research also tells me that Tencel is a very environmentally friendly, and the fibers are grown sustainably. Gooooo Tencel!

I found this particular Tencel in the depths of the shirting fabrics in Mood’s store, and it was exactly what I had been dreaming of when I wrote my list. It’s drapey and nearly as soft as a baby’s butt – just like rayon – but with a thicker hand and an incredible sheen. I am pretty sure this is the same stuff available on the website, actually (also FYI, Mood Fabrics now has tons of Tencel on their site – including flannel WUT). I bought enough yardage to make a long sleeved button up, prewashed that bad boy when I got home, and set it aside to allow summer to pass before I cut into it. And finally, here we are!

B5526 Chambray Tencel

B5526 Chambray Tencel

B5526 Chambray Tencel

B5526 Chambray Tencel

B5526 Chambray Tencel

I used my very favorite shirt pattern, Butterick 5526, to sew this up. I’ve made this pattern dozens of times at this point, so there’s not much I can say about it that I haven’t already said dozens of times. I’m so familiar with this pattern, I’m pretty sure it could sew itself if I gave it a chance. I decided to mix a couple things up to make my shirt look a little more like a workshirt – rugged, casual details, but with that pretty, slim fit that only princess seams can give you. And also to make it look less like I am just wearing the exact same shirt every day. Even though I totally am.

I redrafted the back to include a yoke (and by redrafted – I mean I just sliced off the top of the pattern piece and added seam allowances, ha!) and swapped out the simple bias plackets for a more manly tower placket. I also drafted pointed pockets with matching pointed flaps (again, I am using the term “drafted” VERY VERY loosely here!). Another big change was to topstitch everything at 1/4″, instead of my usual 1/8″ edgestitching. It’s a lot more bold and pronounced, like the RTW stuff I’ve been lurking on, and gives a completely different look! I imagine that over time, the edges will curl and wave a bit and make the whole shirt look more settled in. All the interior seams are flat-felled, with the exception of the yoke – which is faced with more Tencel. Oh, and I added button tabs to the sleeves, so I could roll them up if I wanted to!

B5526 Chambray Tencel

B5526 Chambray Tencel

B5526 Chambray Tencel

B5526 Chambray Tencel

Working with Tencel wasn’t much different than any other shirting fabric I’ve used, although it does have a tendency to stretch and slide if it things it can get away with it. I added lightweight fusible interfacing to all the normal shirting bits – collar, collar stand, button placket, etc – as well as the sleeve tabs and pocket flaps, just to give them a little more structure. This fabric responds really well to heat, so I was able to steam everything easily into submission, which is a must for shirt making.

I did have one pretty big unpicking session with this shirt – for some reason, the collar ended up too big (I don’t think it stretched out, as the top collar is cut on the straight grain and was also immediately interfaced after cutting – I am thinking maybe I skewed my seam allowances somewhere, somehow?) and went almost to the ends of the collar stand. I noticed it right before I started topstitching, and while I tried to convince myself it was ok – it wasn’t, and I knew deep in my heart of hearts that it looks absolutely fucking shitty. At this point, I had already aggressively trimmed down all those seam allowances and pressed the shit out of everything, and while I could still unpick things – it would going to be a giant PITA. I left the shirt on my dress form for a few days so I could get some space, and upon revisiting, I knew I wouldn’t be happy with the collar the way it was. Considering how much time I had already spent making this shirt (and the uncertainty of knowing whether or not I’d be able to get more of this fabric to cut another one), I ultimately decided it was worth the time to unpick everything, re-sew the collar with larger seam allowances, and then re-insert it. Not gonna lie – it took me about 2 weeks of leaving the shirt wadded up in the corner of my sewing room (so it could really think about what it had done) before I got up the energy to do all that unpicking, and another week or so before I re-sewed everything. But you know what? It looks SO SO SO much better now (it’s not perfect, but it is a 1000% improvement, no question) and it was worth the anguish! Sometimes you just gotta step away from whatever is frustrating you, to get another perspective.

B5526 Chambray Tencel

B5526 Chambray Tencel

B5526 Chambray Tencel

B5526 Chambray Tencel

B5526 Chambray Tencel

B5526 Chambray Tencel

Butterick 5526 is *my* personal go-to button-up pattern for sure – I’ve got my tweaks down to a science at this point, and there’s nothing this shirt pattern can’t do for me! I love a good button-up shirt and I’m so happy to see more of this sort of pattern emerging out of the wild these days! Cashmerette’s Harrison Shirt is drafted specifically for plus sizes all the way up to an H cup (like, seriously, the double princess seams with no gape is absolutely mind-blowing to me) and Tilly & The Button’s new Rosa Shirt & Shirtdress is a gorgeous little beginner-friendly piece that will walk you through every single step (stay tuned for my Rosa review, btw, bc OF COURSE I made one of those bad boys!). I also love the Grainline Studio Archer for a more rugged/boyfriend looking shirt (lack of princess seams on this one means less fitted, but also much more suitable for those cozy plaid flannels!) aaaand I just got my hands on a copy of Deer & Doe’s Mélilot shirt so that’s coming up next! What’s your favorite shirt pattern?

As a bonus, the skirt I am wearing in these photos was also made with fabric from Mood Fabrics! I used a cotton corduroy and you can read all about it in this post from earlier this year. This skirt has been on hold during the summer – it’s too hot here to wear cord, plus, it just looks silly in 100* weather – and I am excited to bring it back into wardrobe rotation with these dipping temperatures! Mustard and denim – is there a prettier color combination? I think not!

Note: The fabrics used in this post were provided to me by Mood Fabrics, as part of my participation with the Mood Sewing Network. That fabulous hat is all mine, though 😉

Completed: The Brumby Skirt

29 May

Raise your hand if you love Megan Nielsen and are excited about her return to printed patterns and the release of her new sewing app. All I can say is – YAAAAY!!!

Brumby Skirt

To celebrate these big launches, Megan also dropped a new pattern into the mix – the Brumby skirt. She asked me a few weeks ago if I’d like to try out/review the new pattern – as well as the app – and considering I’d been stalking this pattern for well over a year (it’s not too hard, since she kept posting teasers of it on Instagram!), I was all YAAASSS. I wasn’t sure if I’d be able to finish the skirt – let alone post about it – before I leave for my trip next week, but curiosity got the better of me and I found myself dedicating an afternoon to Brumby Heaven.

Brumby Skirt

Brumby is a simple little gathered skirt pattern, with a couple special details to make it stand a step above your basic DIY-drafted-dirndl. For one, there’s those pockets. How good are those pockets?! They are nice and deep, and what really pleases me about them is how they kind of stick out away from the skirt and give it this interesting shape. The instructions also include how to insert an exposed zipper – which, honestly, I didn’t realize there was actually a specific method on how to do this. These instructions give you a nice clean finish and a strong zipper.

The skirt has a curved waistband with side seams, as well as options for varying amounts of fullness in the gathers and different hem lengths.

Brumby Skirt

Brumby Skirt

What I’ve always loved about Megan’s patterns is that there isn’t necessarily anything ground-breaking about the designs – it’s clean and simple design, the building blocks of your wardrobe, to be made in a myriad of different fabrics. There are special details to make the pattern stand out above all the other similar ones available on the market – such as the curved hi-lo hem of the Briar tshirt, or the floaty circle skirt of the Tania culottes, or even the awesome pockets in this skirt. The directions are clearly laid out so that even the earliest beginner can manage them, but they also lend themselves well to customization so even an advanced sewer can find joy in making them up.

Brumby Skirt

Brumby Skirt

To make my Brumby, I cut the size XS and sewed up Version 1. This version has less gathers and is intended for heavier fabrics, however, I used a pretty lightweight fabric in it’s place. I’m not a huge fan of gathers at my waist – I think they add bulk in weird spots and just don’t look very good on me – but I thought the wide waistband combined with less gathers in a lighter fabric would probably work. And I think it does! My fabric is a total stash-bust, leftover chambray that I used to make this shirt last year. I bought it locally here in Nashville at The Fabric Studio, and I’ve been hanging onto the remaining yardage because I wanted to make a floaty little summer skirt with it. It’s *very* lightweight chambray – like, voile lightweight. It’s borderline sheer – with my button up, I have to wear a nude bra or you can see everything underneath haha. Anyway, it has a lovely sheen and a nice drape and it’s soooo good to sew. Making it up into this skirt was a good idea. Sorry if it’s a little wrinkled – these photos were taken after a day of wearing it.

Oh! And I also made that top – it’s my very first Butterick 5526. I hated the length of the sleeves and never wore it, so I finally just cut them off and finished the raw edges with bias facing. Much more wearable now!

Brumby Skirt

Brumby Skirt

Back to Brumby! I knew I wanted topstitching, but chambray is notoriously hard to thread-match, and I didn’t want my topstitching to be the first thing you noticed when you saw the skirt. I actually ended up using denim thread to topstitch this – a lightweight denim thread, but denim thread nonetheless. It’s that weird blue/navy Gutterman thread that they sell with the denim thread. The variances in color were good enough that they went well with the blues in the fabric, and they contrast nicely but they don’t really stand out. The thread is light enough so it doesn’t make the topstitched areas hang weird, so that is nice. I used white all-purposed thread in the bobbin which also probably helped.

The topstitching goes all over the skirt – down the center front, down the side seams, around the pockets, across the hem, all around the waistband, and of course, holding the zipper into place. I wanted to offset the delicate, floaty fabric with a some casual construction, and this is it! All seams are topstitched at 1/4″. I just eyeballed it on my machine, but I think I’m pretty certain I want a 1/4″ foot next time I go to the Bernina store. Feeeeeeet♥

Brumby Skirt

Brumby Skirt

I am really happy with how nicely the zipper went in! Like I said, there are directions in the pattern for getting a good exposed zip – and I totally didn’t realize there’s a method to doing this. I put an exposed zip in one of my tops last year (and I totally thought about wearing that top with this skirt, peplum tucked in, but ughh it won’t work because there are 2 exposed zippers and they’re different metals and wah), but that was really a matter of pressing seam allowances back and topstitching the zipper in. Poor peplum top, didn’t even have a damn chance.

Brumby Skirt

I will be totally honest here and tell you that I tried the skirt on about 3/4 of the way through construction (after attaching the waistband, but before I put in the zipper) and I was COMPLETELY underwhelmed with how it looked on me. In fact, underwhelmed is too nice of a word – I hated it! It was extremely unflattering and the length made me look dumpy. Part of that was because the waistband was a little bit too big – big enough to slide around and not sit into place, and make me look wider than I am. I did some quick waistband surgery to remove about 1/4″ total from the side seams, and then I took another 1/4″ out of the zipper seams when I was inserting it. That was enough to make the waistband fitted, but not so fitted that it’s uncomfortable.

The length was another issue – I just don’t do midis, and while I did cut the pattern for the mini, there’s a huge-ass hem included so it was really long before that got turned up. I know midis are ~in~ right now, and you can tell me all you want that they might even be flattering on me – but I’m all legs when it comes to skirt length and I just.can’t.do.it. Honestly, I didn’t really love this skirt on me until the hem was turned up and topstitched into place – and then I was twirling around my sewing room in excitement like a big dork. It’s funny how much the hem can affect how something looks. Anyway, that’s a big part of the reason why my hem is serged and topstitched – I wasn’t if I’d love the finished skirt, so didn’t want to spend tooo much time on the last steps. At any rate, the serging matches the rest of the guts so whatev.

Birthday Brumby!

Sooo in the end, I loved the finished skirt so much that I wore it for my last hurrah of my 20s. Notes about this picture:
– That’s not what you think it is in my hand. It’s hot chicken.
– I love Giorgia Tsoukalos.
– And America.
– And also aliens.
– My coworkers at Elizabth Suzann are awesome and know how to throw (me)the best parties.

Megan Nielsen app

Before I jump off here, let’s talk about the Megan Nielsen Patterns app!

I will admit – other than my love for sewing blogs, I’m a bit of a paper girl when it comes to sewing media. I like paper patterns and I like having hard copies of the instructions that I can scribble notes (and mustaches) all over. While I think this app is a completely brilliant idea and may very well be the future of sewing patterns – I wasn’t sure if it would actually be useful to me (I’m old-fashioned in that sense, and I’m ok with it). However, I was willing to try it. For science. Also, it’s a free app soooo it’s not like I had anything to lose if I ended up hating it.

Megan Nielsen app

Megan Nielsen app

The main drive behind the app is basically digitizing the instructions you get with your pattern (paper or PDF). Everything from the required materials, to the cutting layouts, to each step of the instructions (cataloged in a way that’s easy to get straight to the section you need, instead of relying on the Endless Scroll) is included in the app. There are also options within the app (and each individual pattern) to view other people’s makes of this pattern, customization suggestions, and links to the tutorials that may be useful while constructing the garment.

Megan Nielsen app

While I probably won’t switch out my paper instructions for digital (again, mustaches), I actually do find bits of this app useful! It’s SUPER handy to have when you’re shopping and need to reference a material’s list – in the past, I’d scribble everything down on paper (all right, I still do that. No shame!), but then you lose your paper, or you find that perfect fabric that doesn’t go with anything on your “make” list, or you forget that you also needed a zipper. I love the tutorial links, as I do use a computer to look up things while I’m sewing – but more often than not, I end up spiraling down this long internet rabbit hole, where I click on links on links on links and then I forget that I was sewing! Lame! So it’s nice to have a direct link in the app, where I can go straight to the tutorial, get the info I need, and get back to the task at hand. Another thing I love about the app is that you can access any tutorial/instructions for any pattern that you own – which is awesome for when I’m using a Megan Nielsen step in a different pattern, such as stealing her Briar neckline binding for my traced tshirts. In the past, I’d just pull the paper instructions out – but I’m always afraid I’m going to lazy out and forget to put them away and eventually lose them (I mean, it must happen – I think about all those vintage patterns we buy that have the wrong instructions or extra pattern pieces in them. Yep!). With the app, everything is in one place and I can quickly find it. So I like that!

And there are notes sections in the app, for scribbling, but no places that I see where you can doodle on the croquis faces.

Anyway, you can read more about the app in this post and download it in the iTunes store FOR FREE. Those of y’all on Andriods – it’s coming! Don’t worry!

Brumby Skirt

In other news, thanks for all your tips on dealing with my caffeine withdrawals! I am happy to report that I was feeling MUCH better yesterday – no more weird body aches, no more tiredness. I found some great uncaffeinated teas and I only miss coffee the tiniest bit now 🙂 To those of y’all who suggested that I drink decaf – I’m not opposed to decaf (and I drank about a cup a day while weaning off the hardcore stuff), but it does have trace amounts of caffeine in it, and my whole goal was to eliminate the stuff 100%. Mostly to see if I could 😛

*Note: Megan Nielsen provided this pattern to me free of charge, in exchange for a review. All opinions in this post are my own!

Completed: Another B5526 + Ginger Jeans Get-up

18 May

So sorry to dump this on y’all yet again – another collared shirt + jeans outfit combination. Yawn.

Gingers & B5526

Well, to backtrack – yawn for you, but 😀 😀 😀 😀 😀 for me hahahaha. I will never get tired of this outfit combination. Or, at least, not anytime soon. Maybe never is too strong of a word to use here.

Gingers & B5526

What’s mildly frustrating about writing a long-term blog (at the time of this posting, I’ve accumulated nearly 500 entries since I started waaaay back in 2009, WTF) is that you eventually reach a point when you’re just making the same thing over and over again (well… those of us who don’t make our blog our full-time income fall in this category. I’m sure if I was sponsored out the wazzoo and had all the time I spend at work to spend making content for my blog, it would be a different story, ha.). After re-assessing my wardrobe at the end of 2014 and realizing that I *still* had shitloads of clothing that I made simply for the new and shiny, I have made it a big point to really be honest with myself about whether or not I’ll actually wear something that I make. Like most people, I have a pretty predictable style. And like many sewers, I don’t want to spend a lot of time reinventing the wheel with new patterns if I can get the look I’m going for with an old TNT. So this translates to repeats upon repeats upon repeats.

So, while you might be yawning about the majority of the stuff that’s been posted in 2015… I gotta say, I am elated with the way my closet is looking these days!

Gingers & B5526

Gingers & B5526

With all that being said, there’s not much to report on either of these pieces since I’ve made them soooo many damn times. Jeans + collared shirt is totally my go-to when I want to feel comfortable but still look like I made an effort in the AM. I’ve found my TNT patterns and I feel good about the way they fit and the construction methods that I use.

Gingers & B5526

Gingers & B5526

The top was made using my beloved Butterick 5526. Y’all, I don’t know if I’ll ever sew another button up pattern again! (we all know that’s a lie) I’ve gotten to the point with this one where I can bang one out in a couple of days, which is really nice when you’re coming up on a looming Mood Sewing Network deadline, ha. The fabric is this amazing tigerlily orange cotton voile from Theory, which is a bit more of a coral-y pink than it is orange in real life (I don’t know how the color translates on your screen, but on the Mood Fabrics website it’s definitely pretty muted. The real color is much closer to what you see in my photos. It’s BEAUTIFUL). It has a beautiful chambray weave, which gives the color lots of dimension. This fabric was so so nice to work with – ok, it was a shifty bitch to cut, but once I got past this point, it handled and pressed like a boss. It’s also super comfortable to wear on even the hottest day.

Since the fabric does have a tendency to fray, I used flat-felled seams every where in my shirt. I also left off the sleeves and finished the armhole with self bias binding – it makes the shirt really casual and, again, awesome for hot weather. The pockets are the same pockets that come with the pattern, but I made them slightly smaller because the original size was a little overwhelming on me. Buttons are from my stash; they’re just your standard white shirt buttons. Oh! And the matching thread also came from Mood Fabrics – I noticed that when I was ordering my fabric, there were thread suggestions at the bottom of the page. I figured I’d try out the service – you know, for science – and I’m super pleased with the color match. Even more pleased that I was saved a trip to the fabric store. Mostly because those tend to be very dangerous places for my wallet, ha.

Gingers & B5526

Gingers & B5526

The good thing about running a long-term blog and making a bunch of pattern repeats is that you will eventually bore of just making things that are passable to wear in public, and start focusing on really honing your skills to the next level. Or, at least, that’s how it worked out for me. Look at those clean finished insides! I should wear this shit wrong-side out.

Gingers & B5526

I did shorten the length of the shirt by about 2″ – I think the original length was just sliiiightly too long for my height. This way I can wear it untucked or tied at the waist. If I do a half tuck, it doesn’t pooch out all weird like some of my longer shirts tend to do. As always, I finish my shirt hems with self bias facing. I think it makes for a much cleaner finish, and it’s must easier to press and sew those curves with the bias tape instead of trying to wrangle the hem itself.

Gingers & B5526

Gingers & B5526

For my jeans, I used my now-favorite-ever-pants-pattern, the Ginger Jeans. I’ve made this a few times before (and I definitely don’t plan on stopping – I finally was able to invest in one of the denim kits because YAY) and I’m just really happy with the way this pattern fits my body. The fabric is a cool metallic gold stretch denim. I was actually looking for white denim to make this up, despite me being a stain magnet when it comes to white. At any rate, this denim’s wrong side actually is white flecked with very subtle bits of gold, and these very well almost became white jeans. I talked myself out of it because I was afraid the not-quite-pure-white would make the jeans look like they were dirty, plus again, stain magnet. So I stuck with the gold side. Also, this denim doesn’t have as much stretch as my other denims, so the jeans are a bit tight. I had to let the side seams out to 3/8″ or else I would have never gotten these things over my ass. They’re still a bit tight – mostly around the calves – but I’m hoping that they will loosen up a little with wear.

Gingers & B5526

Gingers & B5526

Gingers & B5526

Not much to report on construction. I used a combination of flat-felled and serged seams (as how most RTW jeans are made) and a triple stitch to really make the topstitching stand out. I would have loved to use topstitching thread, but I couldn’t find a good match with what is admittedly kind of a weird denim color. It’s gold, but it’s also kind of beige. Fortunately, Mood Fabrics REALLY came through with that thread match, as you can see in these close-ups.

What else? I did not interface the waistband (I like my jeans with an uninterfaced waistband; it’s much more comfortable. Not sure how that would work with a lower rise, but for the high rise version, it’s perfect). The jeans button is from Pacific Trimming, and the cotton pocket lining is left over from this crazy blue dress.

I will admit right now that this outfit inspiration came way of my boss’ closet. Since I do all her laundry for her (if you are new to this blog and that sounds REALLY WEIRD, I should probably point out that I’m a personal assistant 🙂 ha!), I’m always lurking on her clothes and I’m always finding inspiration in some of the strangest ways. She has a similar coral chambray shirt – hers has sleeves and a lace inset at the yoke, though – and white jeans. And I wanted that outfit for me. So I made it 😛

Gingers & B5526

So, hey, in other news that doesn’t involve me making my fifty billionth b5526 – I’ve got an article out in the current issue of Seamwork Magazine! If you haven’t heard of Seamwork, it’s a sewing magazine that is published online by the masterminds behind Colette Patterns. The magazine is free to read and there are optional pattern downloads with each issue (the patterns you pay for, however). ANYWAY, my article is all about visiting Nashville! I had so much fun writing a city guide about my favorite city in the entire world, and I hope you have fun reading it (and are inspired to come visit because, hey, Nashville is awesome! Really really awesome!). You can read The Seamworker’s Guide to Visiting Nashville at Seamwork. My first published article! Yay!

Completed: Polka Dot Chambray Butterick 5526

21 Oct

HAHAHAHAHA I bet you guys are sooo sick of seeing me in renditions of this pattern, huh? 🙂

Polka Dot Chambray Button down

SUP Butterick 5526. My heart, my soul, my official tried’n’true button down pattern. I don’t know how many times it has to be before it’s considered “the charm,” but I’m pretty sure this is legit the nicest button down I have ever made. I am so pleased with myself right now!

Polka Dot Chambray Button down

Since I’ve made this pattern, um, a lot (see: 1 2 3)(ok that’s not a lot, but it sure feels like a lot!), I’m pretty well-versed in the fitting and construction of this dude. It’s practically an autopilot pattern for me – apart from selecting the fabric & buttons, I don’t really have to think much while I’m putting this together. It’s like my hands have repeated the process so much, they don’t need any instruction from my brain at this point.

Polka Dot Chambray Button down

So, I’m sorry if you’re bored with looking at this pattern. Deal with it.

Polka Dot Chambray Button down

Seriously, though, I did have to figure out those damn sleeves, because all my previous versions have some awkward lengthage going on. My last attempt at making them full-length ended up with them being some weird purgatory of not-quite-long-but-not-quite-short – like the highwaters of shirt sleeves (do we still make fun of highwaters, or is that the cool thing to wear now? I just looked down and realized the jeans I am wearing are cuffed to the length of highwaters, SHIT!!). Since I actually want to wear this top underneath sweaters – and hence why I made a second chambray button down when the first one is actually quite wonderful (spoiler: dem sleeves, tho) – I needed to figure that shit out once and for all. And, look ma! They’re the right length! Finally!

Polka Dot Chambray Button down

Although, now I can’t decide if they are… too long? They look bunched up when my arms are hanging. However, when I reach my arms out – they are exactly the right length (as in, any shorter, and they would ride up to be too short and expose too much wrist). Thoughts? This is why I always roll up my sleeves (and jeans, for that matter) – I can’t find a happy hem length! Anyway, what is the point of making all your clothes if you can’t even hem them correctly?

Also, I think the sleeves might be a bit loose? Or do they look ok? Thoughts on that?

Dammit, this totally isn’t a TNT pattern, is it? 😛

Polka Dot Chambray Button down

Anyway, whatever, let’s talk about the victories! Check out that sexy sexy sleeve placket. I used the placket for the Negroni (which, honestly, that pattern piece + instructions are alone worth the price of the pattern) instead of what was included with 5526. Lurrrrve it.

Polka Dot Chambray Button down

I also sucked it up big time and flat-felled every single seam on this shirt – the princess seams, the side seams, the arm holes (thanks to Negroni for those sweet instructions – see? Negroni, you rule!) – everything! What you see here is a beautiful and clean-finished top that doesn’t have ANY serging on the inside. Just miles and miles of flat-felled seams and gorgeous topstitching. Ugh, so good.

Polka Dot Chambray Button down

Don’t you love the fabric? I picked this up at one of our local fabric stores, Textile Fabrics. They were having a 40% off sale, so I treated myself to this and some soft fleecy knit. I was originally going to use this to make the Bruyere, until I realized I didn’t want to look exactly like the pattern cover (which is beautiful, don’t get me wrong!). I’m more of a plaid flannel kinda gal, for which I’m still stubbornly holding out for the perfect one to reveal itself to me. Textile Fabrics, unfortunately, couldn’t deliver on that front – but they did have polka dot chambray, so that’s ok enough in my book. Speaking of which, I think this is Robert Kaufman fabric. Don’t quote me on that, though!

Polka Dot Chambray Button down

Anyway, it’s a very lovely fabric – and it was soo nice to work with! Very soft and smooth, easy to cut and sew, SUPER easy to press (which is important with this style of shirt). The topstitching just sinks right in.

Polka Dot Chambray Button down

Again – placket! Sorry the cuff looks uneven. I promise it’s not. Buttons are these dress shirt buttons from Fashion Sewing Supply – part of my neverending stash.

Polka Dot Chambray Button down

I’m just including this because it looks so damn good – topstitched intersecting flat-felled seams (arm hole & princess seam). Also, if you were wondering – flat-felling princess seams really is not any more difficult than flat-felling straight seams. I don’t know why I put it off like it’s impossible to do. It’s not. It’s definitely more time consuming than just serging your raw edges, but the end result looks SO nice.

Polka Dot Chambray Button down

Finally – can we talk about how good this hem looks? Y’all, shirt hems have always been the bane of my sewing existence. I could never figure out how to get them to be straight and even with that giant curve. They ALWAYS look like shit. Not anymore, though! This time, I was inspired by Rochelle and tried using bias facing at the hem. I made self-bias strips with my fabric, and then applied it the same way I bias face sleeves & necklines (I did this before attaching the placket, as per the instructions). Since I used self-fabric for the bias, the end result looks like a simply turned up and stitched – except I didn’t, and this was SO MUCH EASIER. Plus, it give a nice bit of weight to the hem, which I like. Consider me a convert! Bias facing FTW!

Polka Dot Chambray Button down

So yay! I’ll consider this shirt a success – even if the sleeves are a little iffy. At any rate, I’m serious when I say it’s the best-made shirt I’ve ever constructed (if you see me in the wild and compliment it, there’s a good chance I’ll rip it off my body so I can show off the insides. TRUTH.). Little things like this make me happy! I think that’s the best part about sewing with a pattern you know and love – instead of focusing on new instructions and fit, you can zero all your attention on improving your technique.

Oh, and if you were wondering – that’s my Tie-less Miette I’m wearing in the photos. The shoes (because everyone always asks) are from the clearance rack at Nine West and no, I did not buy them to match this outfit. Ha! 😛

Two more things!

1. My lovely sponsor (and OG to the LLADYBIRD Sponsor Game), Sweet Little Chickadee, is closing up shop for the time being 😦 We will miss her (I will miss her! Where do I buy my patterns from now?! I got candy with those orders hahaha), but on the flip side – this means closeout saaaaale! 😀 From now till whenever the shop runs out, use the code SHOPCLOSING to get 25% off your entire purchase. Apparently there are also some sweet flat-rate shipping options at checkout, so you may save there, too! Please keep in mind that you are buying from a one-woman shop who is running a sweet freaking sale, so please be patient if your order takes a couple days to ship out. Not a bad payoff for 25% off, though, yeah? Now go forth and help Juli clear out that inventory!

2. Affiliate links. I wrote this blurb out in my last post, but realized after the fact that not everyone reads sewalong posts (I’m guilty of this too – those posts can be boring if you’re not following along). I definitely want y’all to be aware of my use of affiliate links, because I think it’s important, so I’m copying this verbatim into this post. Sorry if you’re reading this twice  🙂
Side note/disclaimer: Ok, so I decided to start occasionally using affiliate links on this blog. Sorry if you hate me! 🙂 I am currently only affiliated with Amazon, and I promise I will only be linking things that I personally use and recommend – such as those scissors & that clapper. Y’all will never ever ever see me link something just for the sake of linking it – that’s just crappy. However, please keep in mind that any purchases you make through these links will net a small kickback to me, which I will likely spend immediately on yarn & fabric (and thus pour back into this blog, in the form of content for y’all to read!). Also, no sneaky linkies – I will always describe the item I’m linking so you don’t have to click to see them, if affiliate links squick you out 🙂 I won’t be posting this disclaimer at the end of all my posts, as it seems a little redundant, but you can always view it in my About Me page. That’s all! Thanks for supporting my blog, dudes! ♥

Ok, that’s it! Have a lovely Tuesday, guys!

Fall/Winter Sewing Plans for 2014

10 Oct

It just occurred to me that I haven’t share any seasonal sewing plans in… well, a while. Which is lame, because these are some of my favorite types of posts (both to write *and* to read) – I mean, who doesn’t like lurking inside someone’s brain, even if it’s just to see what they plan on doing over the next couple of months? Too creepy? Naw.

Anyway, now that London/Paris is looming on the horizon (less than 2 months! Omg less than a month and a half! Eee!), it’s really time that I start figuring out what I’ll be bringing with me (and making, for that matter! Don’t want to end up with another frantic last-minute sewing disaster, ugh). Especially since my luggage space will be very limited – I’m only allowed to bring one suitcase with me overseas (well… I use the word “allowed” loosely here. I can bring two suitcases if I want to – but I get to pay $130 for the second one! LOL GURL NO.), and I want to fabric shop while I’m there! So, I will be packing a capsule wardrobe, one that mixes and matches with itself, for maximum outfit options, as well as warmth. This is much different than how I usually travel (as I fly Southwest, where you can bring 2 bags free – so why the hell not, you know?), but I’m up for the challenge! 🙂 Adulting and all that 🙂

I’ve already made/chosen a couple of pieces to base my capsule around, as well as chosen my theme (like Devon, I think all vacation wardrobes should have themes, because, duh) – Minimalist Parisian Chic. Mostly because my capsule will be very minimal – or, as minimal as I can get it down to, because I am still one of those people who delights in overpacking – with lots of black. Not much on the Parisian Chic side (I’m sure Parisian women will be horrified when they see what I wear to stomp around their city, ha!), but it has a nice ring to it 🙂

Anyway – to start – I have these black Jamie jeans that I made a couple of weeks ago:
Jamie Jeans + SJ Sweater Made with Mood Fabrics
I haven’t decided yet if I’ll be bringing the star sweater. It’s a little bulky! On the flip side, regarding the jeans – I just finished wearing them for the 5th time in a row (sans wash), and they’ve stayed very close to their original shape. No bagging out, woohoo! So that makes me feel good, because I’ll be wearing these a LOT come London.

Stripey Renfrew
I will also be bringing my Imogene + Willie slim jeans (pictured here), because they are basically the best jeans ever. Oh, and probably that stripey Renfrew top. Can’t have enough tshirts!

Now for the sewing plans! Sidenote: By the time of publishing this post, I’ve already finished more than half these makes. Whoops! Guess y’all see where my priorities lie when it comes to posting vs sewing hahaha. Oh well!

Ikat Lady Skater
The Cowl-Necked Skater Dress
I’ve had this idea in my head for a while now – a Lady Skater dress // Renfrew top mash-up! This cotton Ikat knit fabric (purchased at The Fabric Studio here in Nashville) will be the perfect match for this dress – like a giant, snuggly Christmas sweater! I actually don’t know if I’ll be bringing this one to London, due to bulk factor (my capsule really only allows for one dress, which I’m thinking will be the one below – but we’ll see!), but the plans were too good to keep to myself 🙂

DVF Wool wrap
The Wool Wrap dress
Another big mash-up – I’m starting with the DVF Wrap dress pattern, but adding long sleeves (stolen from the Lady Skater, naturally) and swapping out the gathered skirt for a wrap A-line (Miette Wrap skirt – I’m looking at you). The black wool knit fabric was picked up at Mood in NY a couple of months ago – it’s SO soft! Like, cashmere soft. I’m so in love ♥

Silk v neck
The Silk Button-down
I already have a nice white button-down – made from the same pattern, Butterick 5526 (my favorite!) – but it’s not really cold weather appropriate, due to the length of the sleeves. Since they are 3/4, they don’t really layer nicely with my long sleeve sweaters! I’d love to make another one, but up the ante with some beautiful silk double georgette, and modify the neckline to be more of a v shape (likely using this V-Neck variation tutorial by Jen!)

Chambray Button down
The Polka Dot Chambray Button-down
Another thing I already have one of, but need a winter version. This one will be made using a gorgeous cotton polka dot chambray, picked up here locally at Textile Fabrics.

SJ Sweater
The Wool Sweater
Button downs need a nice sweater, yeah? I want to try sewing a sweater, using the SJ Tee as a basis (with a higher neckline, and omitting all bindings). The fabric I have is a lovely camel-colored boiled wool, that I bought from Elizabeth Suzann (aka I totally jacked her wholesale order hahaha). I think it’ll look equally good over both those button down shirts I have planned!

rigel bomber
The Bomber Jacket
I know – I’m already planning a pretty sweet coat. However, the weather in London (and Tennessee, for that matter!) can be fickle, so I’d like to bring a lighter-weight jacket for days when the temperature isn’t as low. I’ve been meaning to make the Rigel Bomber for, well, months now. Just been waiting on the perfect fabric – and I think I found it! Check out this black wool coating – to be paired with gold china silk for the lining.

Other plans I have (no photos, sorry! Use that imagination of yours, ha!)
– Need some thin long sleeve shirts for layering – maybe just a couple out of wool knit, such as this textured black wool jersey (that’s apparently already sold out?! Wah!). I wear these pretty much daily in the winter – and sometimes I like to sleep in them if it’s really cold – so it’ll be nice to have a few to choose from.
– Speaking of sleeping – I need some new pajama pants! Currently lurking Margot pj pants in Tilly’s book, Love at First Stitch, since they seem to be a pretty quick/easy make (I really want to make the Tofino pants, but right now I need quick and easy!). I picked up some really fun orange plaid flannel to make them with – I know, that fabric is ridiculous, which is exactly why I chose it. It’s nothing like I already own! When it comes to pjs, why not, you know?
– I would like to make a flared A-line wool skirt to make as well – thinking about using the Delphine pattern (also from Love at First Stitch), because I love the shape. A little stuck on fabric selection, though! My go-to is usually wool crepe, but that will be too drapey for this shape. Thoughts? I need it to be 100% wool (pretty nitpicky about this, sorry!) and I’m looking for lipstick red. Budget is no more than $25 a yard (and obviously I’d be delighted if it was less than that!)
– Bras! I want to finish at least one bra before I leave – using the Marlborough pattern and one of my kits from Bra Maker’s Supply. Obviously I want new bras, but even more – Norma will be in Paris while I’m there, and you better believe I’m going to drag her into a bathroom and make her assess and critique my fit. Haha! Man, sewing people are weird 😛

I think that’s it for now! It feels good to get everything listed out in one place. I’m hoping I can get all this done before I leave – but if not, no worries. It’s not like I’m lacking clothing or anything as it is!

As a side note, I was just notified that one of my lovely sponsors, Indie Sew, is holding a pretty sweet contest where you can win a YEAR of free patterns! Fuck yes! You can read all about the contest and the reasoning behind it on this blog post, but the general gist is that Indie Sew wants to help you transform your entire wardrobe into handmade and end the cycle of cheap/fast fashion. And what better way to jump start a new handmade wardrobe than with some FREE FREAKING PATTERNS AMIRITE? Such a cool idea, and I really really hope the winner shares their journey via blog or social media so we can follow along! Anyway, soapbox rant over – go throw your name in the hat!

What’s on the table for your fall/winter sewing plans? Do you have any capsule wardrobe suggestions for me? Tips for packing light? Are you going to judge me if you see me wearing the same thing for 3 days in a row while I’m on my trip? 🙂

Completed: Butterick 5526, in Chambray

18 Jul

Good morning, everyone!

Sooo, anyway… remember when I said I was going to use that other chambray to make Butterick 5526 but ended up coaxing it into a Hawthorn instead? Well, I still wanted that damn chambray shirt – lucky for me, I had more in my stash! Check it out!

Chambray Buterick 5526

GOD, I JUST LOVE CHAMBRAY.

Chambray Buterick 5526

Seriously, tho, if you follow my Instagram, you probably noticed a couple weeks ago that it was Unofficial Chambray Week in my sewing room. Part of the reason for that is because I have been experimenting with starting multiple projects at once, then working through them all in succession. That probably makes no sense. What I mean is, I’ll prep 2-3 projects at once (cutting, interfacing, marking), pile them at the end of my table, and then complete each project by itself. I’m still working on one project at a time – but I’ve prepped multiples in the queue, so I don’t have to stop and cut the next one, thus losing my steam (oh, who the fuck am I kidding, I never lose steam. Not when it concerns sewing, anyway :P). This particular week, I was trying to stick with projects that use the same color thread/serger thread, because I dunno. Changing thread isn’t exactly difficult, as we all know.

But anyway, that shit’s fun – to get all the cutting out of the way at once, and then you have a glorious week to focus on dressmaking (or whatevermaking). I’ve blabbed on and on about taking advantage of short time chunks, and I’ve found it’s much easier to do that when you don’t have to set aside time and space every time you want to cut a new pattern (I don’t know about y’all, but I like to do it all in one fell swoop. So when it’s time to get my cut on, I need a long uninterrupted stretch of time to take care of business).

Chambray Buterick 5526

So anyway, I cut a Hawthorn AND a button down, and they were both chambray because they both used the same thread (and dammit, I want both of those chambray goodies in my closet by the end of the week, DAMMIT!) and there’s that.

Chambray Buterick 5526

Also, you probably noticed, but I’m wearing my Crazy Paisley Hollyburn AGAIN. That skirt with this top is just too good.

Chambray Buterick 5526

Chambray Buterick 5526

I’m still tweaking this pattern every time I sew it. Isn’t that what makes something TNT – you’ve used it enough to where you’ve ironed out every little kink in the fit and construction, so you just know it’ll work when you make it up? Butterick 5526 isn’t quite a TNT for me, yet, but it’s on it’s way! I’ve made it 3 times now (see versions one and two), and each version just gets a little better than the previous.

Chambray Buterick 5526

I tried to make the sleeves the correct length on this version. My first one – the white button down – used the 3/4 sleeves that were really more like 7/8 sleeves. Like, wtf, those things looked like they were just a couple inches too short! So, with that in mind, I knew I wanted long sleeves for this shirt (not for now, but maybe in the future, or when I complain about the cold if/when the night temperatures drop to 75 lolz), so I checked against a couple other long sleeved shirts in my closet and transferred that measurement (minus the cuff, of course) to my pattern piece. I double-checked every measurement, but still ended up with something slightly too short! DERP. So the sleeves on this shirt will just be perma-rolled up. And that’s ok! It’s all a trial and error at this point anyway 🙂

Chambray Buterick 5526

Chambray Buterick 5526

They do look good rolled up though, huh? I can’t even tell you how pleased I am with those sleeve tabs. BEYOND pleased!

Chambray Buterick 5526

Chambray Buterick 5526

This chambray is pretty freaking amazing. It’s from The Fabric Studio here in Nashville. Where my Hawthorn chambray has a crisp drape and loads of body, this one is so lightweight and soft that it’s a little bit see through. Which is why I thought it would make a great button down – even with the sleeves – since it’s like I’m wearing chambray colored air. The looseness of the shirt really compliments the drape of the fabric, and the color almost has a sheen. It also doesn’t wrinkle as much as you would think – I took these photos after a full day of wearing the shirt, and while it has some “wearing” wrinkles, they just look comfy and relaxed, you know? I. LOVE. IT.

Chambray Buterick 5526

It’s also, like, $8 a yard. So it’s affordable chambray perfection! (and before you ask – yes, The Fabric Studio will ship! Contact Nancy here!)

Chambray Buterick 5526

For a fabric as light as this stuff, it didn’t take a lot of extra effort when it came to sewing everything together (or cutting, for that matter). It is on the delicate side, so be aware of pin holes (or use fine silk pins, if you got ’em!) and be careful ripping out stitching because you will totally rip the fabric (ask me how I know about that…). But, just like the heavier chambray – it sews and presses like a dream. I enjoyed every single minute of working on this shirt, and it totally shows!

Chambray Buterick 5526

Look at that beautiful topstitched cuff! I only interfaced one side of the cuff (the pattern has you interface the entire cuff piece, so when it’s folded you will have two layers of interfacing), so the fabric would maintain it’s pretty lightweight drape. Too bad no one will ever seen the cuff since the sleeve is too short! Ha!

Chambray Buterick 5526

There’s another one of those sleeve tabs that I’m just stupidly proud of. I think they really make the shirt.

Chambray Buterick 5526

Oh yeah! The buttons are also from Fashion Sewing Supply – just classic white shirt buttons. Very simple, but they look so polished and clean with this chambray.

Chambray Buterick 5526

So, yeah. Another basic closet staple that should be boring (and y’all might be yawning, but oh well, my blog->my rules, aka sorry not sorry), but it’s pretty exciting to me! Chambray goes with everythingggg, so this is a great top to have to pair with all my skirts and pants. I would almost say this is the kind of shirt one could wear for a week straight without anyone noticing, except, I definitely did that as a preteen and someone definitely noticed*. Then again, do I really care? Naw.

Couple more things-
– Damn, y’all went crazy over my recent Vogue pattern review. There are a lot of good comments on that post – some defending some of the patterns (even comparing them to runway version, which is all kinds of awesome to see), some making their own hilarious jokes, oh, and some from The McCall Pattern Company themselves. Forreal! If you haven’t had a chance to read through the comments on that post, you should definitely give them a lurk – McCall’s (who owns the Vogue Patterns line) has proven themselves to have an amazing sense of humor, as well as a really graceful way of handling some not-so-nice feedback. They have been very active in the comments – not in a butthurt way, so sorry if you’re looking for dramz 😉 – and answering questions from readers. I, for one, had no idea that the designers actually choose the fabric that is used for the designer patterns. Vogue has nothing to do with that (although they do choose fabric for all other pattern categories, just not designer). So some of those awful fabric choices should have their blame shifted to the designer. The things you learn!
more u
– Omgg you guys – my Weekend Pants-Making Intensive class at Workroom Social has officially sold out! Cannot WAIT to meet, hang, and of course, sew with y’all who all signed up! It is going to be a fabulous weekend! Didn’t make the class and are regretting that decision? You can sign up for the wait list here and cross your fingers 🙂 Everyone else – I’ve got a free afternoon/evening on Friday, where I plan to destroy my bank account with fabric purchases. Anyone want to join me in the Garment District and/or possibly for drinks afterward (I hear there is an outdoor bar at Bryant Park nearby, which sounds amazing!)? Shoot me an email! lladybirdlauren at gmail dot com 🙂
– Lastly (and I know this has NOTHING to do with sewing but it’s my blog and duh I do what I want), have y’all ever heard of the ride service Lyft? It’s like a taxi service, except the drivers use their own cars and the costs are much much cheaper. Everything is run through the app, including payment – so you don’t have to deal with cash or credit cards, and you can pay up to 24 hours after the ride has ended. It’s really fun and a great way to get around if you don’t have a car/plan on drinking/hate driving. Anyway, the reason why I’m telling you this is because my best friend recently signed on to be a driver, and that means free Lyft rides for everyone! Really! If you’ve never used Lyft before, download the app and use the code MORGAN1407 for a free ride up to $25. No strings attached (unless you go over the $25 credit, but that would be a looong ride. One person I know here managed to hit $30 once, and that was for a 20+ mile ride), just free ride goodness! It does have to be active in your city, but the company is growing fast so definitely check! Just remember to input the code into your app (in the payment section) BEFORE you take your first ride, so you can actually use the credit. And, sorry babes, but this is first-time riders only (I know!!). But yeah! Go forth and get you some free rides!

*ok, it was a shiny blue polyester button down from Rave, and it was totally my favorite shirt. Also, when it was pointed out that I’d worn the same shirt for multiple weeks in a row (so not technically days in a row, but every Sunday to church. For at least a couple of months, haha), I was so mortified that I never wore it again. RIP, shiny blue shirt.

Completed: A Chambray Hawthorn

10 Jul

I know, like, everyone and their freakin’ MOM seems to have one of these dresses made up in chambray. I’m just following the crowd here, ain’t no shame in that. But there’s a pretty good reason why we all seem to gravitate toward the same fabric for the same pattern – it’s just such a perfect marriage of the two. Check it out:

Chambray Colette Hawthorn

If you haven’t been able to guess it yet, this is the Hawthorn from Colette Patterns. A simple and flattering style that I’ve loved ever since it came out – this is my third one, actually, although it’s been nearly a year since I last touched the pattern (see versions one and two here). I’ve been planning a few versions since, and chambray was one of them – although I had a helluva time trying to find a good chambray. But here it is! I found it!

Chambray Colette Hawthorn

My chambray actually came from the NYC Garment District – I picked up a couple of yards while Clare & I were chatting up Sam. I know Trice also bought some, because I totally talked her into it (no shame). At the time, I wasn’t exactly sure what I would make with the fabric – but I knew it would end up something button-down inspired. Either a shirt or a shirtwaist, but definitely something that would take advantage of the crisp hand and beautiful cotton goodness. I bought two yards, washed it when I got home, and it’s been sitting on my shelf ever since.

Chambray Colette Hawthorn

This particular fabric very nearly almost became a button down shirt instead of the Hawthorn it blossomed into. Like, much closer than you think – I actually had the fabric on my cutting table, with my beloved Butterick 5526 pattern, and decided at the very last minute to use this fabric to make the dress instead. I wanted a chambray button down as well (and I definitely ended up with one… out of a different chambray. More on that in another post, though!), but I realized that this fabric was simply too thick to wear as a shirt in the summer time. The chambray La Sylphide I made last year barely gets worn in the summer, as it’s just tooooooo freakin’ hot! But for the purposes of a dress, this particular fabric was perfect. So I swapped out the pattern for the Hawthorn, and got to making it happen.

Chambray Colette Hawthorn

There’s not much to say about the pattern itself – like I said, I’ve made the pattern before, so I don’t really have anything new to add to the table, in terms of reviewing. All fitting changes I made in my previous versions were used for this Hawthorn, and it was pretty straight forward sewing for the most part. However, my pictures turned out kinda nice (well, I think so! Good hair day!), so you have to look at all of them anyway. Sorry!

Chambray Colette Hawthorn

One thing I did that ended up being unintentionally hilarious was when I tried to lower the bust darts. I remembered from previous versions that they are a little high in this dress – and kind of look nipply if you catch the light right. So I redrew the point about 1″ below where they were marked on the pattern, and went about sewing as normal. Except, I dunno what happened exactly, but they ended up WAY too low! Which was a shame because they were the perfect little boob shape, just in an area where boobs (well, my boobs) don’t really belong. Before you start scrutinizing my boobs in these photos, I should mention that I fixed the dart issue. So there’s that. I don’t know where I was going with that story. Boobs.

Chambray Colette Hawthorn

Man, this fabric was SO MUCH FUN to work with! It’s a beautiful cotton chambray, so it presses like an angel (not sure how that would work exactly, but let’s just roll with it) and it takes well to topstitching. It’s also lovely to wear in the summer here – breathable, and a little lightweight (but still feels like a good weight for a dress). I feel like I say this with every make I, er, make, but this is totally my new favorite dress.

Chambray Colette Hawthorn

The collar is so good for all those tiny brooches I have that I never wear. Like this insect brooch.

Chambray Colette Hawthorn

Chambray Colette Hawthorn

The color also goes really nicely with my hair, yeah?

Chambray Colette Hawthorn

Chambray Colette Hawthorn

I think a dress like this would be good for traveling, as it’s one of those neutral-type pieces that provides a nice background to whatever other garb you are throwing on (cardigans, jewelry, shoes, etc), so you can wear it multiple times without people judging you. You know, like those ~travel articles~ in magazines that tell you to bring a classic black/white/denim/whatever solid-colored dress so you can mix up your jewelry and shoes and look like you actually brought 10 outfits? Except, I never really have a good neutral dress like this – almost everything I make has patterns, and those that are solid (such as my navy cotton sateen version of this) still feel like they really only have 1-2 pairs of shoes or whatever that ‘go’ with them. This dress, though, feels like the equivalent of blue jeans and a white tshirt. I kind of want to wear it for a week straight just to see how many different ways I could style it.

Chambray Colette Hawthorn

Chambray Colette Hawthorn

Chambray Colette Hawthorn

The wood buttons are from Fashion Sewing Supply, by the way! Last time I ordered interfacing from them, I ordered a couple of packets of buttons as well so I could play around with them in garments. All the buttons are shirt buttons, but they have some cool ones that aren’t so cool-looking they look kind of cheap (does that make sense? Main reason why I generally stick with plain white buttons. NOW YOU KNOW MY SECRET, I’m afraid of looking cheap!). I had no real plans for these when I ordered them, but they look beeeeautiful with this chambray!

Chambray Colette Hawthorn

Chambray Colette Hawthorn

The armholes are finished with bias binding. And check out that topstitching! I recently bought myself a topstitching foot for my Bernina, and I’ve been having a lot of fun using it to get super precise stitching. I mean, how good does that look? ALL IN THE FOOT, BABY!

Chambray Colette Hawthorn

As with my other two Hawthorns, I respaced my button holes so they didn’t interfere with the waist seam. There is a hook and eye at the seam to keep it closed invisibly; this way I can still wear belts with the dress.

Chambray Colette Hawthorn

I kept things simple with the construction and finishing and just used my serger to finish the raw edges.

Chambray Colette Hawthorn

And that’s it! I’d love to go through with my forever-planned other version of this dress – plaid with long sleeves. Wouldn’t that be so nice? Although it’s definitely too hot to think about sleeves right now (as Landon would say – “Sun’s out; guns out”), so I’ll stick with the sleeveless for now 🙂

Completed: A Chambray La Sylphide – AND THE BOMBSHELL WINNER

17 Jun

OMG you guys. I am so backed up with posting finished garments… this top is from TWO WEEKS ago. Woof.

Chambray La Sylphide

This is the La Sylphide from Papercut Patterns. I know, I keep meaning to make the dress version – it’s so pretty and floaty on the pattern picture, ahhh! – but this damn top keeps seducing me with it’s own version of awesome.

Chambray La Sylphide

This is pretty similar to my Dude’d Up La Sylphide – I sewed a size XS, took 1″ out of the back and no other alterations. The sleeves are just rolled up in these pictures, btw.

Chambray La Sylphide

The fabric is a chambray from – who else? – Mood Fabrics, which I bought while I was in New York. They have a lot of chambrays there and while I almost picked a gorgeous sateen-esque chambray that had just come in from some designer, I ended up with the more muted one because I wanted my shirt to be a little more rugged. Also, it was cheaper by like $2, ha.

Chambray La Sylphide

Ok, CONFESSION TIME: I TOTALLY stole this idea (for a chambray La Sylphide) from my friend Colleen, who suggested it first. Although, to be fair, she also voted pearl snaps – and this one just has grey buttons that I had in my stash. So, while not a 100% idea rip, it’s still an idea rip and I’m sorry.

Chambray La Sylphide

Also, I just realized I really need to repress the tips of those bust darts. HIIII.

Chambray La Sylphide

I wasn’t expecting to be able to wear this top with these linen shorts, but I actually quite like it.

Chambray La Sylphide

I really love this pattern because the top looks just as good with the peplum tucked, as you saw during Me Made May. As much as I love the peplum, sometimes an outfit just doesn’t work with it – like the Kelly skirt. Too much flare going on! And as much as I love making and hoarding clothes, I don’t need two chambray shirts… so I’m ok to let this one do double-duty.

Chambray La Sylphide

And I guess that’s it for this post.

OH WAIT NO IT’S NOT!!! We have a Bombshell winner! There were 354 total comments (my most commented-on post EVER, thanks guys haha), but I had to pull a few out for dupes/replies/no entries.

winner
It landed on my lucky number! GOOOOOO 7!!!!

… Which makes our winner Joanne!
Joanne
Joanne, I think this pattern will work out for you a lot better 🙂 And I want to see that neon floral fabric, because it sounds awesomeeee.

Thanks to everyone who entered! The pattern is available on Etsy for those who did not win. Don’t forget to join the Sewalong, it starts today! I can’t wait to see everyone’s Bombshells! 🙂