Tag Archives: stripes

Completed: A Striped Coco Dress

13 Oct

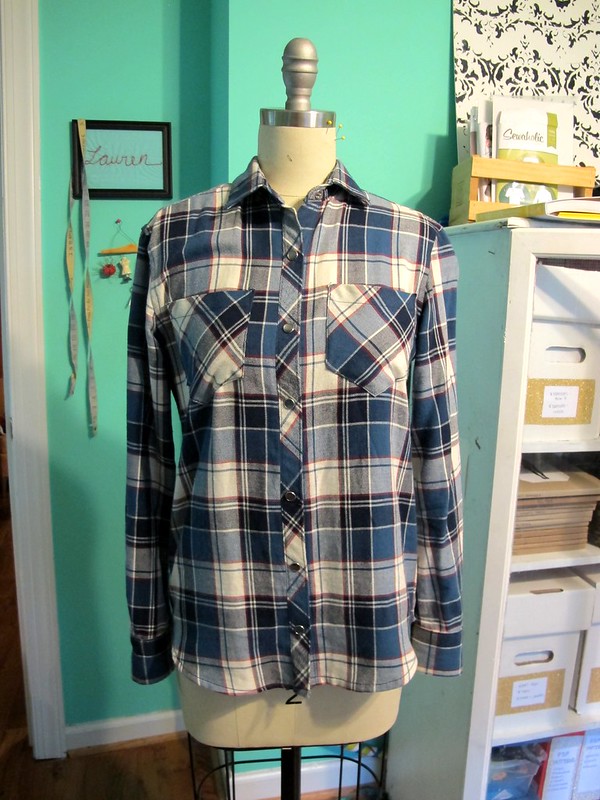
Coco is one of those patterns that I loved when I first saw it (and immediately made up), promised I would make dozens more, experienced feelings of jealousy whenever I saw other people wearing it… and yet left that damn pattern hanging for 2 1/2 years. Too long!

Coco Dress

I have been slowly going through my stash, uploading fabrics to my Cora app– which takes forever, since I have to pull each piece out, photograph it, measure it, and then fill in all the details. Individually, it’s not really a time suck – but I have a lot of fabric! It’s kind of fun, though – I feel like I’m rediscovering all this great fabric I forgot I had! (very similar to how I treat doing laundry – oooh, look at all these fun clothes I forgot about in the past few days! Yay!) I’m making an effort to sew more from my stash – at least, the pieces that are suitable for the current season, and the colors/prints that work best with my current wardrobe. It’s certainly not doing me any good just hanging out on my shelf!

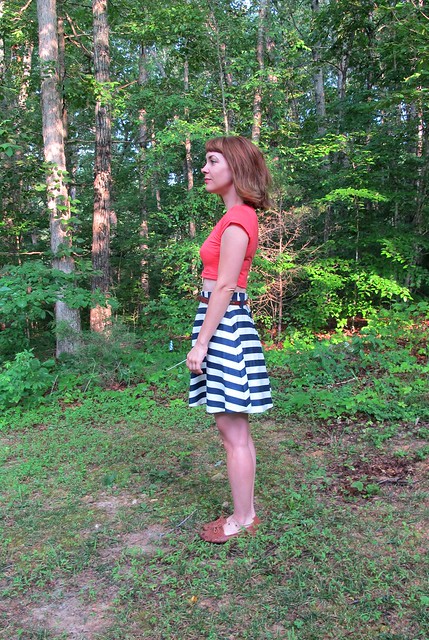
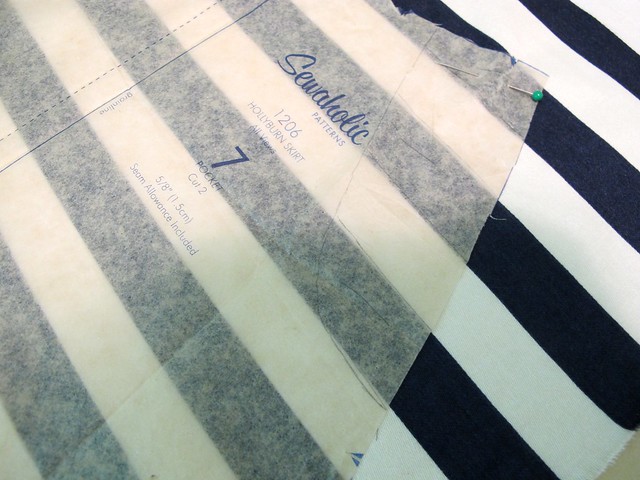
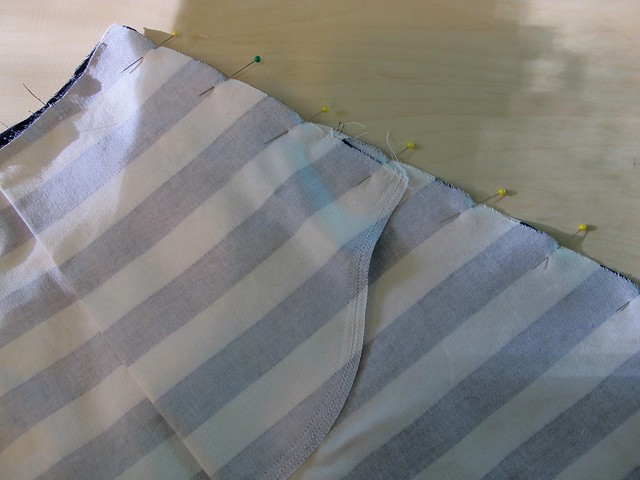
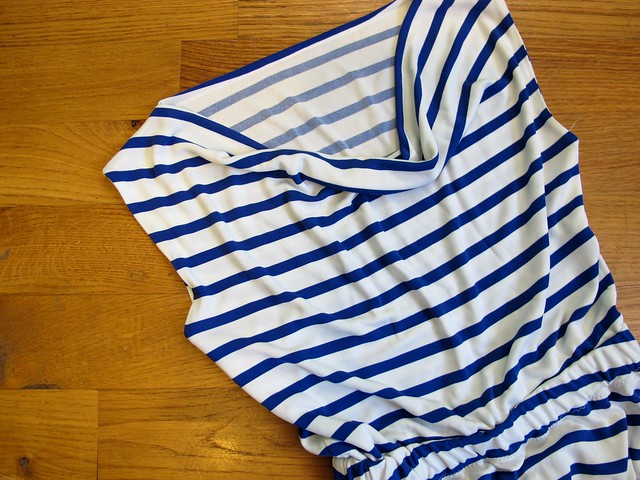
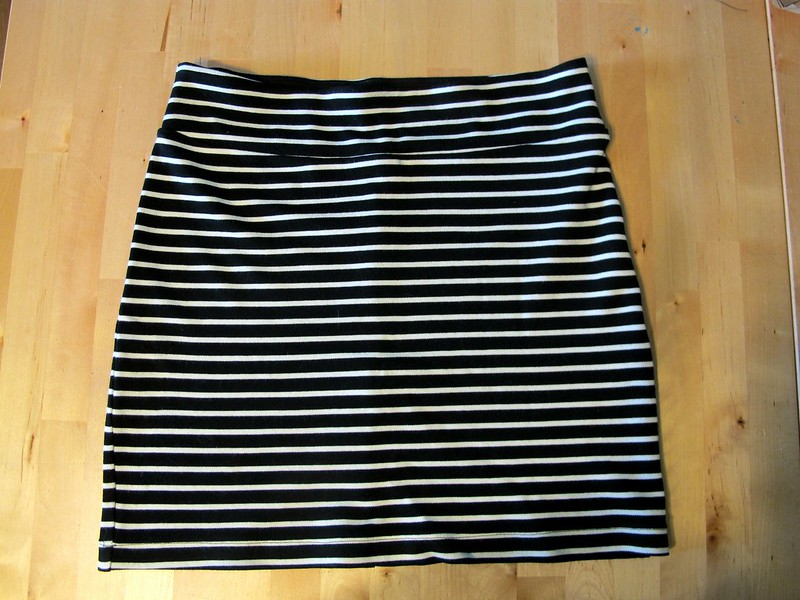
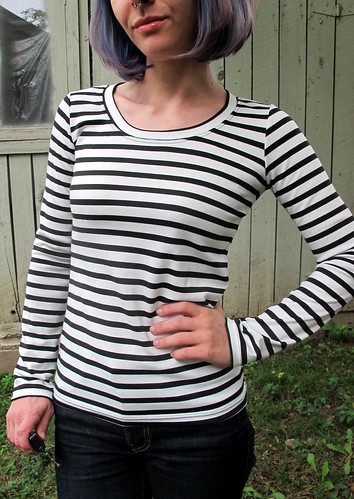
This navy/white striped ponte is one of those pieces that I unearthed. I bought a MASSIVE yardage of this shit when I was in Mood Fabrics… uhh, probably also in 2014. It’s a heavy, thick ponte with a very dense hand – and it was a pain in the butt to drag it all home, though of course I persisted because I am all about taking one for the (my)team. I made a couple tshirts out of the stuff, and quickly learned that I don’t like wearing tshirts out of such a heavy knit. It feels strange, like wearing a jacket you can’t take off. And while it’s a great weight for stuff like hoodies, blazers, jackets, skater dresses… I dunno, guys. I just wasn’t feeling it. So the remaining yardage has been hanging on my shelf until I managed to almost forget about it.

Coco Dress

Coco Dress

Coco Dress

So here we come right back around to Coco! I was desperately in need of a easy, mindless project that lent itself well to leaving unfinished for long periods of time in my sewing room – this was during the week that my dad was in the hospital, and while I spent most of that time sitting next to him (or camping out in the ICU waiting room, waiting my turn), I needed a day to be “normal.” I didn’t feel like sewing at all, but I knew it would calm and relax me – again, the key being something easy and mindless. So I took the pattern and fabric, both of which I’d been kind of avoiding, and channeled my energy into this project.

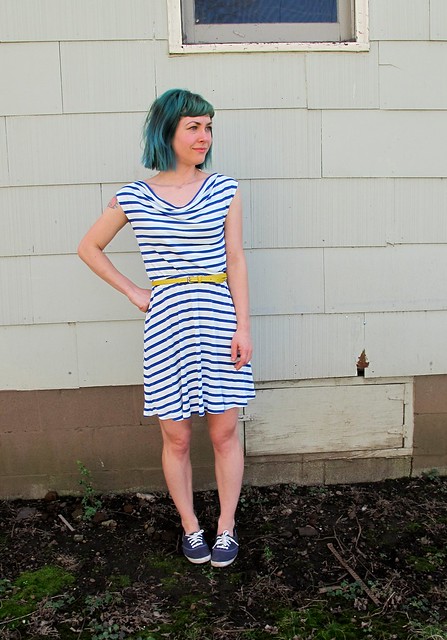
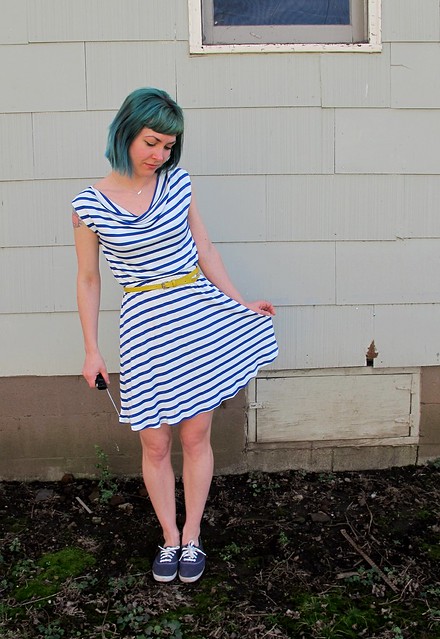
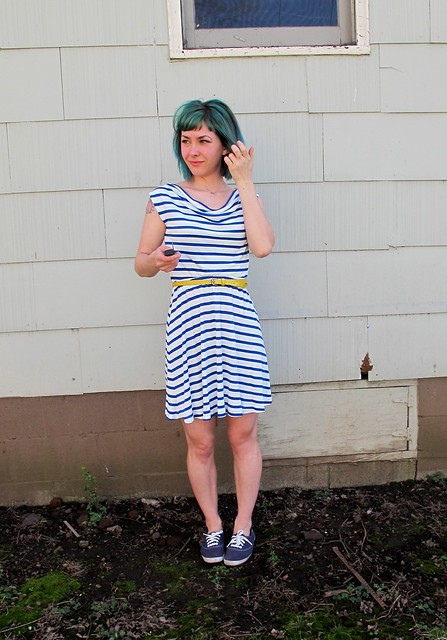
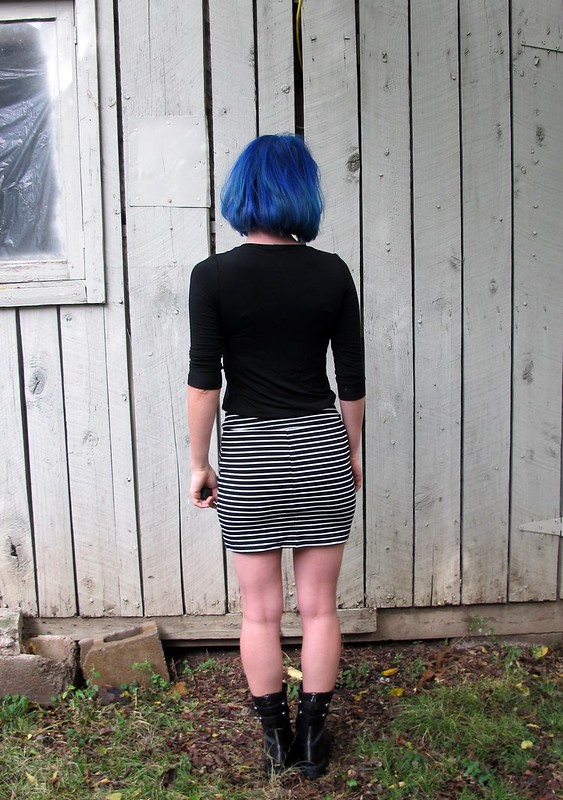
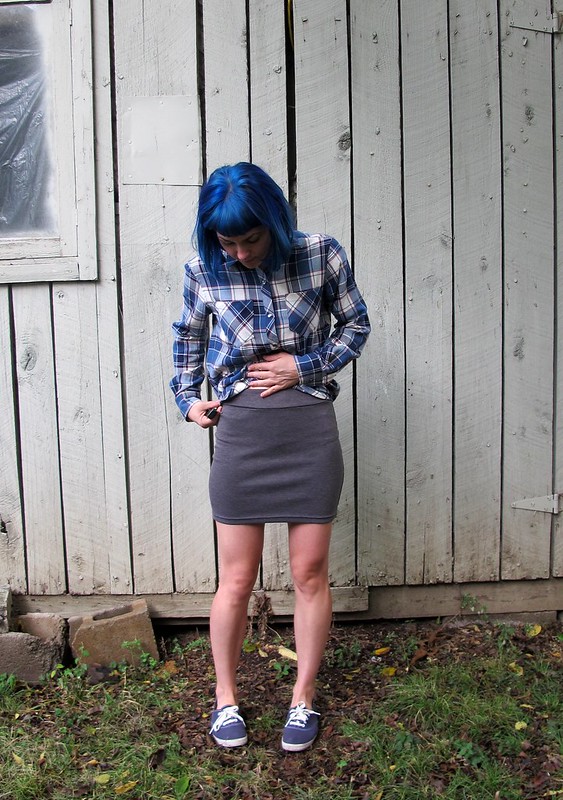
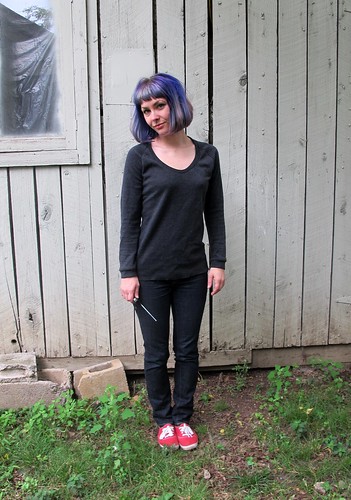
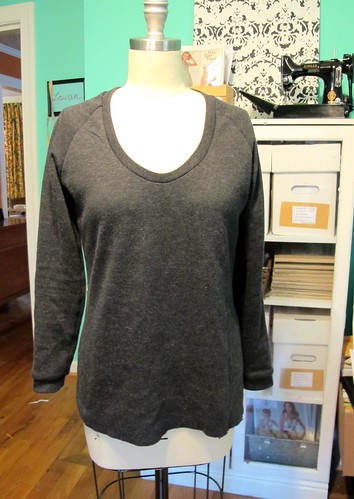
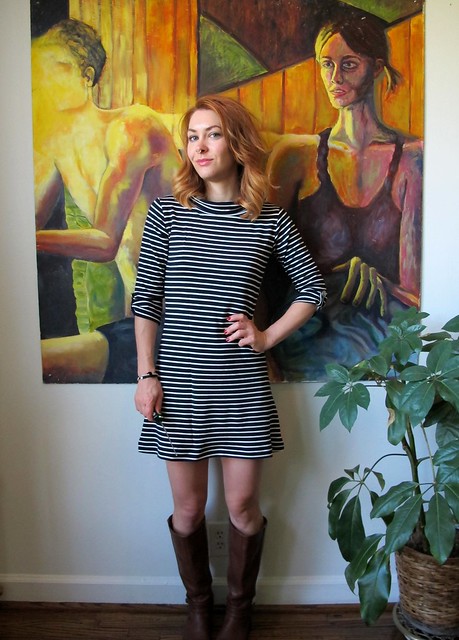
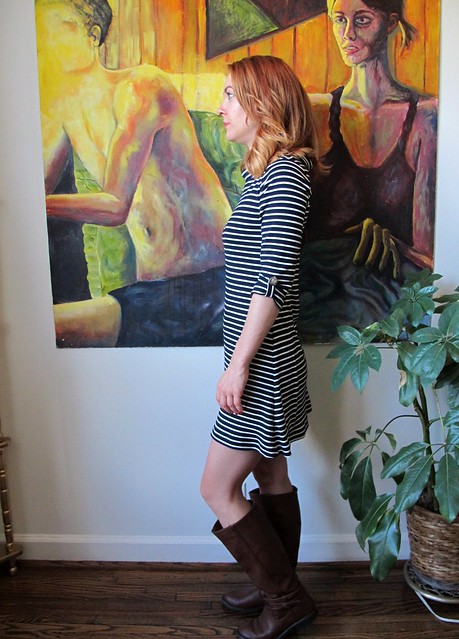
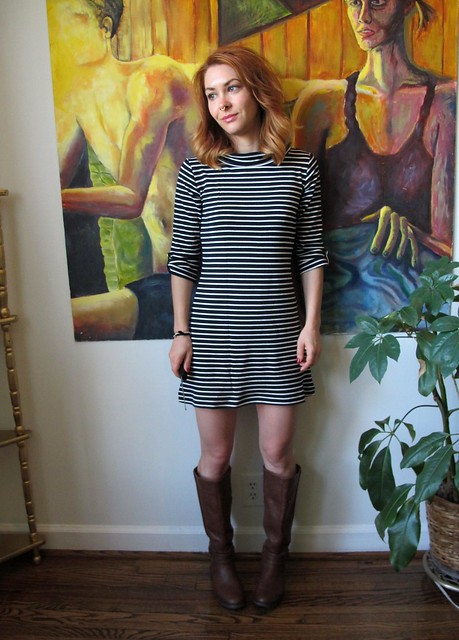
It’s not anything special, obviously. It’s a simple A-line knit dress with a funnel neck collar. I can – and have – made much more impressive pieces. But the simplicity was exactly what I needed – so I could turn my mind off, and just focus on making. That fact that I have a pretty great dress out of it is just a bonus 😉

Coco Dress

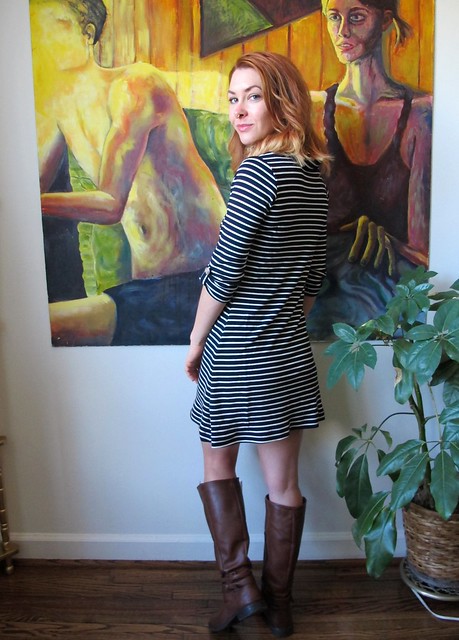
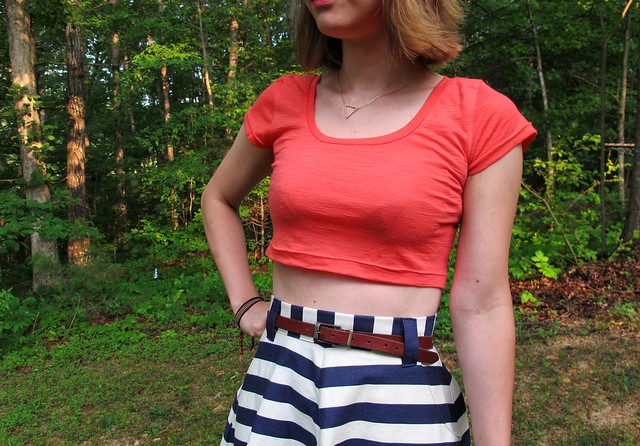
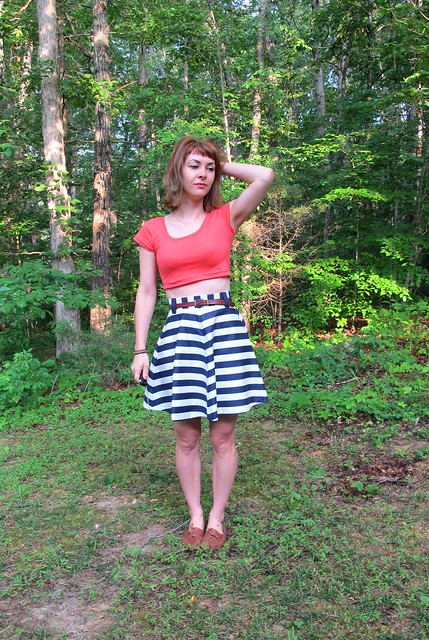
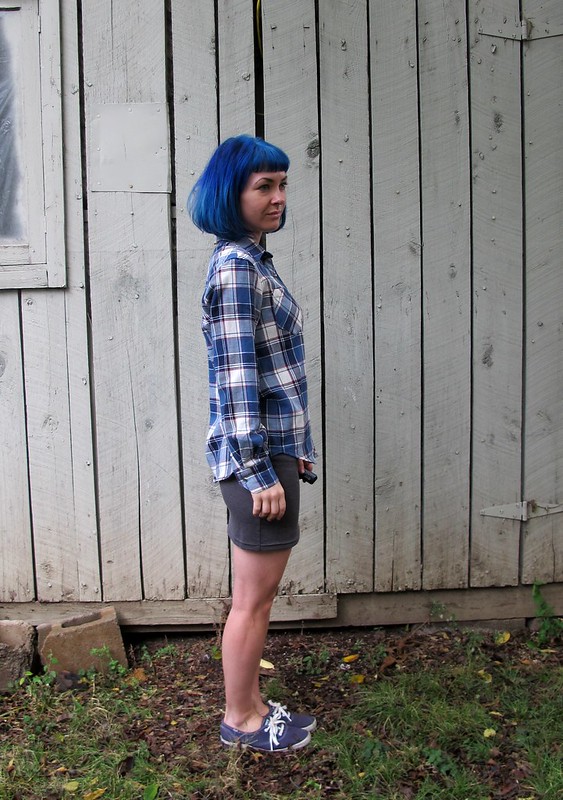
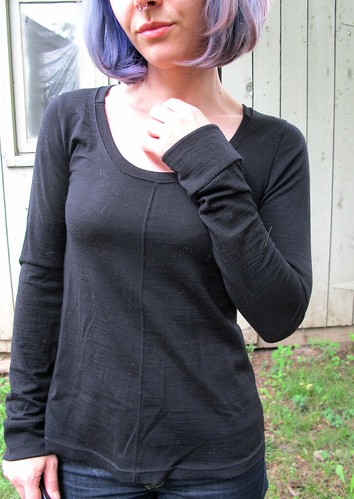
Since I’ve already made this pattern and it’s fairly simple to begin with, I don’t really have much to say about the construction. I sewed the size 1 so I’d get a close fit (my measurements hover right between 1 and 2 in Tilly’s patterns), but ended up taking out another 1/2″ or so from the side seams because it still wasn’t quite fitted enough to my liking. I originally sewed the long sleeves, thinking I’ve had a cozy little ponte winter dress – but y’all, I dunno, something about all those STRIPES with those SLEEVES was just really… awful.Maybe it’s because I’m so short, but it was really overwhelming on my frame. Pulling them up to 3/4″ solved that problem, as did removing a couple of inches from the hem (I know it’s REAL short in these photos; I had a fat 1.5″ hem that I ended up letting out before I wore it out for the first time and resewing again at about 1/2″. So it’s a tiny bit longer – as in, when I raise my arms you don’t see buttcheck anymore true story ok).

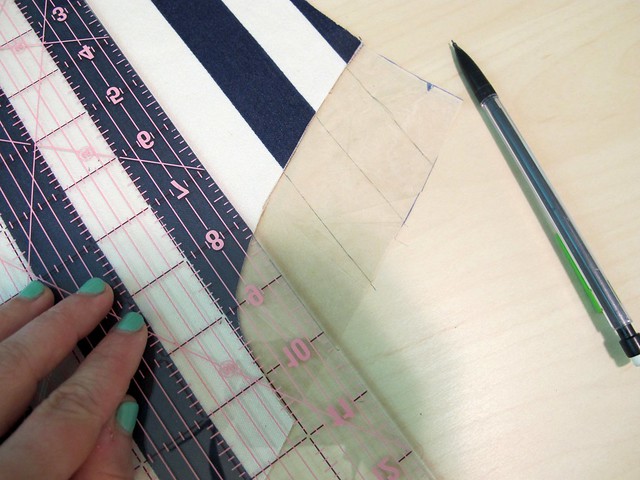
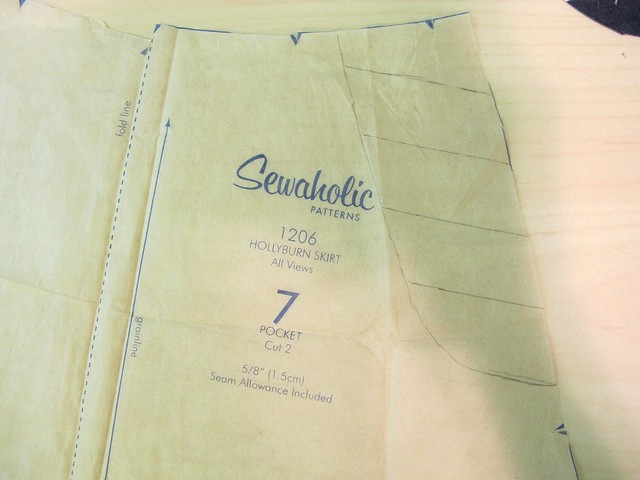
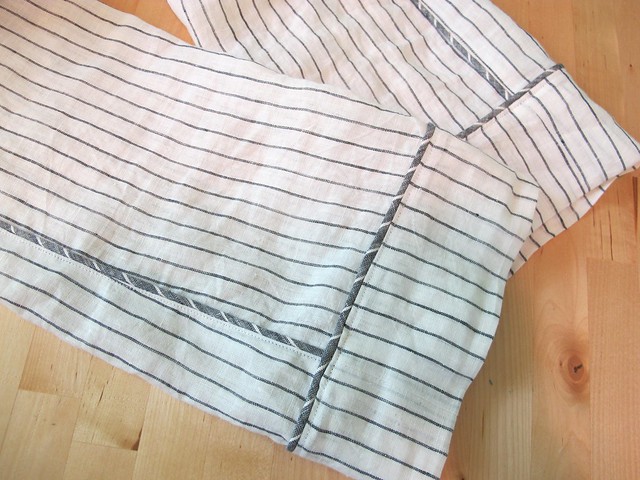
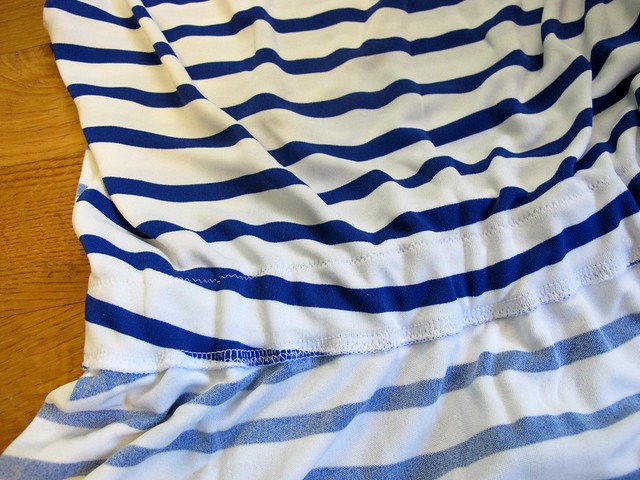
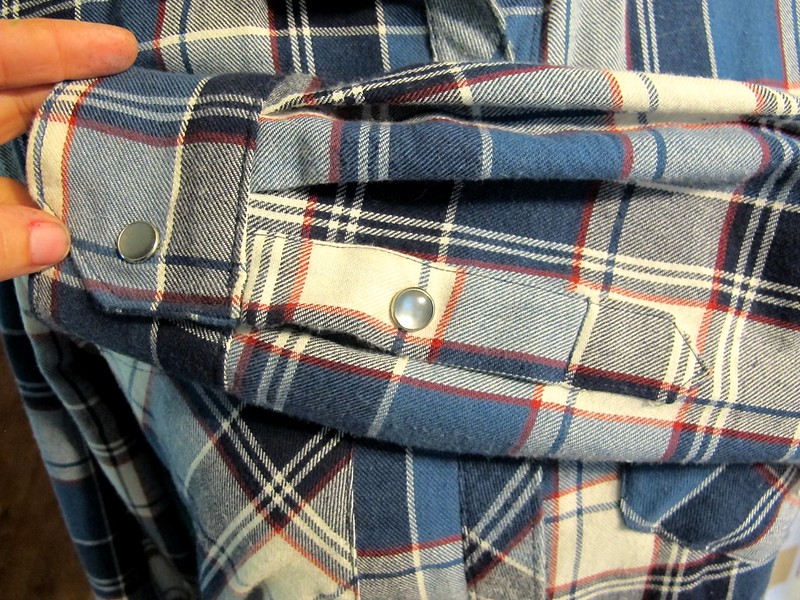
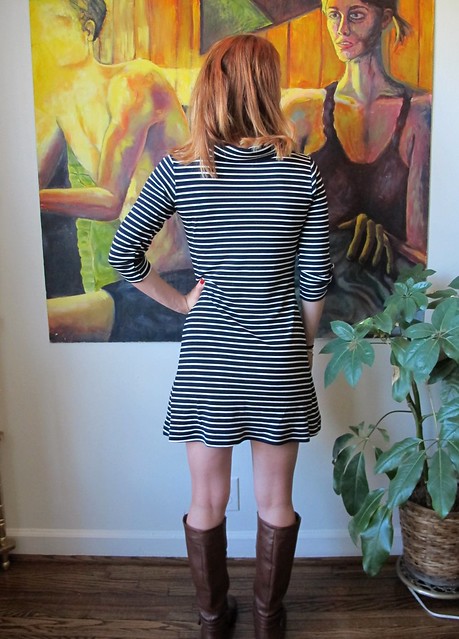
I added the sleeve tabs as an afterthought – I liked the way the sleeves looked when they weren’t totally smooth. To make the tabs, they are just rectangles that I sewed with the right sides facing and then turned right sides out, sewed to the inside of the sleeve and then tacked down the other end with a button from my stash. Actually, if I recall correctly – the measurements were determined by me cutting the small pocket (included in the pattern), deciding I didn’t want to add it, and then cutting it in half to use as my tabs haha.

I sewed all the seams on my serger, except the hem and sleeve hems – which I just used a zigzag stitch for. Easy! (except when I ended up ripping out that hem later to let out some length, ugh haha) And while the dress looks like it’s black and white, I promise it is actually navy. It’s just a really really dark navy.
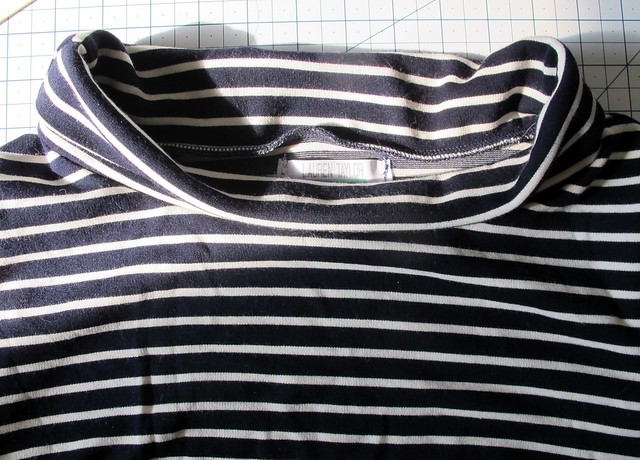
Coco Dress

See?! Navy! 🙂

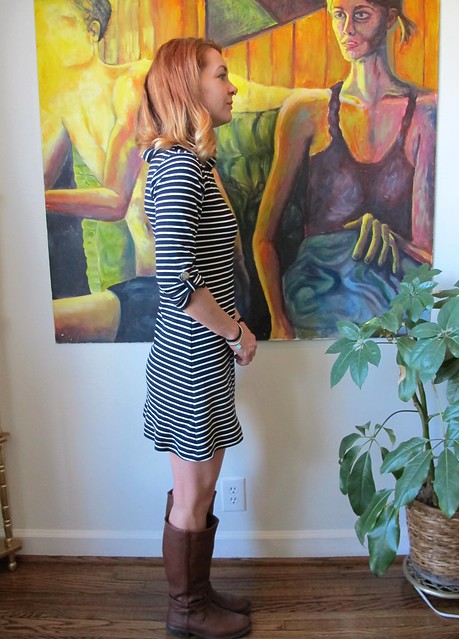
My fabric isn’t quite as beefy as what they use for the project photos – or what I used for my first Coco, even. As a result, the funnel neck is definitely a lot more floppy and slouchy. I like it, though!

Coco Dress

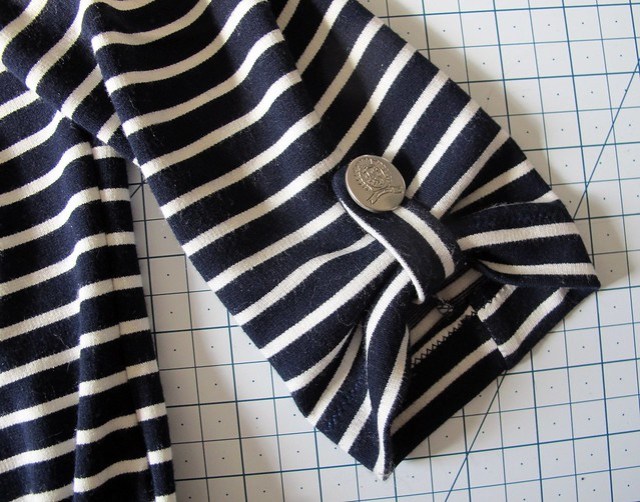
Sleeve tab and button. This button was seriously the closest thing I had to matchy in my stash.

Coco Dress

That’s all! I am heading out in a few hours to catch a plane to NYC – Camp Workroom Social is this weekend! 😀 I cannot WAIT to hang with all the campers and help my (well, Amy‘s 🙂 ) class make some beautiful bras!

And speaking of classes – I spent the last weekend at Pintuck & Purl in Exeter, NH, where we had a lovely 4 days of sewing, eating delicious food – and drinking whiskey, because of course we did. I had an AMAZING time with amazing company – great conversation, great food, and of course, great sewing! I love doing these sorts of retreats because it’s really fun to see what everyone is working on – for this class, we had jeans, a bra, a coat, an Archer, fitting help, and a shirt dress! The only downside is that when I get home, I REALLY miss everyone because we’ve been so close for the past few days! Which basically just means I am gonna have to go back 🙂 Exeter is so beautiful and Pintuck & Purl is the cutest little store with a beautiful selection. I definitely came home with some fabric and yarn, although my tiny suitcase meant that I had to restrain myself a bit 🙂

See y’all next week!

Completed: Smells Like Teen Spirit Sweater

26 Aug

I am SO happy to be finished with this sweater!

Smells Like Teen Spirit Sweater - front

Clocking in at nearly 6 months to knit, seam and finish – this sweater was definitely a labor of love to complete.

Smells Like Teen Spirit Sweater - front

Smells Like Teen Spirit Sweater - side

Smells Like Teen Spirit Sweater - back

Both the pattern and the yarn are from Wool and the Gang, which is pretty much the coolest yarn company I’ve ever heard of. WATG sells yarn, patterns, needles, and complete kits for their patterns (as well as RTW knit pieces, if you want to be completely lazy 😉 no judgement over here from me!). The company reached out to me earlier this year – well, 6 months ago – and asked if I’d like to try one of their kits for a review. Being the cheeky piece of shit I am, I choose the Teen Spirit Sweater, in the classic red/grey colorway.

Smells Like Teen Spirit Sweater - kit

Smells Like Teen Spirit Sweater - kit

The kit came beautifully packaged, and included 21 balls of their Wooly Bully alpaca yarn, the Teen Spirit Sweater pattern, at set of size 10.5 Rosewood needles, and a giant needle for weaving in all the ends.

Smells Like Teen Spirit Sweater - front

Smells Like Teen Spirit Sweater - back

The pattern is One Size, which I knew immediately off the bat was gonna be WAY too big for me – it has a 44″ chest measurement (compared to my measly 32″ – that’s a LOTTA ease!). So the first thing I did was knit a gauge swatch to figure how many stitches I knit per inch, and recalculate the pattern so it would work with my specific measurements. Since the pattern is basically 4 giant rectangles (the sleeves have very gradual increases but nothing crazy), this was not at all difficult to do. All I needed to change was the amount of stitches I cast on, and then just follow the pattern henceforth. I also shortened the body of the sweater, because I wanted mine to be slightly cropped to offset the boxiness.

All the pieces are knit separately – front, back, and two sleeves . The front and back are identical, and are literally just two big rectangles – there is no shaping for the neckline, arm holes or waist. As I mentioned, the sleeves have very gradual increases to make them slightly shaped, but they are still primarily just big ol’ rectangles. To make the tartan, you knit in stripes following the pattern, and then weave the vertical stripes in afterward using this technique from WATG. It looks a lot more complicated than it actually is – it’s just time-consuming! I spent MANY nights sitting on the couch, binge-watching Mad Men, with a tiny blanket o’ sweater in my lap, weaving tartan stripes. In fact, this was the main project I worked on in the last week before my move – as it was the only thing I hadn’t packed!

After I wove in all the tartan stripes, I then blocked the pieces (which seriously took like 2 days to dry completely) before seaming. You seam the shoulders first, then attach the sleeves at the sleeve cap, then seam up the side and sleeve seam in one go (same as you’d do when sewing a knit tshirt). Finally, you knit the neckline ribbing (the sleeve and hem ribbing are knit while you are knitting the pieces). The resulting sweater is MASSIVELY heavy – I wish I owned a scale, because I’d love to know how much it actually weighs! Honestly, I love throwing it at people and watching how surprised they are when they feel it’s heft hahaha. It’s surprisingly not that itchy – it’s a little bit itchy, but I think another wash with some lanolin will clear that right now – but it is super duper warm. Way too warm to wear right now, obviously, but I’m sure I’ll really appreciate it come winter 😉

Smells Like Teen Spirit Sweater - flat

Smells Like Teen Spirit Sweater - flat

Smells Like Teen Spirit Sweater - flat

As complicated at this sweater looks and as long as I spent working on it – it honestly was not difficult to knit at all. Even with rewriting the pattern to work with my measurements, the overall construction was very simple and straightforward. It was definitely time-consuming, but not hard – seriously, this is a great pattern for a beginner. Lots of knitting and purling, simple color changes for the stripes, and then seaming everything together (my seaming definitely needs some work, btw. Woof.).

Part of what took me so long to finish was simple mistakes I made on my end. I wasn’t happy with my first batch of tartan stripes – which I decided after I’d finished weaving the tartan for the entire front. I ripped everything out, recalculated, and wove it all in again. I could have stood to do a neater job with my weaving – all the other examples I see are much more even and precise and mine looks a bit sloppy in comparison – but I’m pretty happy with it regardless because I AM SO NOT RIPPING THAT SHIT OUT AGAIN. I also had some trouble with the neckline ribbing – I picked up too few stitches the first time, and wasn’t able to get the sweater over my head! So I got PISSED, ripped out the ripping, and put that fucker in time out for a solid month. Ha! Eventually, I got some liquid courage (aka wine) and tried again – this time picking up stitches at a 1:1 ratio and making sure it pulled over my head before binding off. It worked! Go me!

Check out my Ravelry page for the full low-down on this project – my stitch counts, measurements for the tartan weaving, etc. Didn’t want to clog up this post with all that, but it’s on the ‘Rav! BTW, I should mention – you can also buy this pattern individually, if you don’t need the yarn and needles. Teen Spirit sweaters for everyone! 😀

Smells Like Teen Spirit Sweater - front

When I started this sweater, I naively thought that I would have it finished before the weather started warming up – ha! Not even! On the flip side, it’s definitely ready and waiting for the next season! I’m actually pretty glad that I had an entire summer to fuss with this, because it made me not be in a hurry to finish it – I knew I’d have to wait months before that was even an option. Instead, I took my time and ripped out when needed, and I think the end result was worth it. Man, I cannot WAIT to wear this bad boy! I think it’ll look especially ace with my Elizabeth Suzann Cecilia Pants. Which, btw – if you are looking for the magic pants that look amazing on EVERYONE, that’s those. You’re welcome.

**Note: The kit for my Teen Spirit Sweater (which included the yarn, pattern and needles) was VERY generously given to me by Wool and the Gang, in exchange for a blog review. Thank you, WATG!

Completed: Um… another Hollyburn :]

17 Jul

Y’all, I don’t know how many times is too many to make the same damn pattern over and over again… but here’s Hollyburn #5. Hahaha.

Striped Hollyburn

I am pretty sure I don’t have anything else to say about the making of this pattern, considering I’ve sewn (and posted about) it soo many times. This particular rendition with the wide navy stripes has actually been in the plans since my very first Hollyburn skirt. Ever since I made my solid denim version, I’ve been on the hunt for a good striped fabric to make my dream striped flared skirt. Actually, I think I’ve been on the hunt for that fabric since way before this pattern was a little twinkle in Tasia’s eye. It’s been a couple of years, at least. And yet I’ve never been able to find what I’ve been looking for – medium weight cotton fabric with 1″ wide navy and white stripes – despite all odds being that that should be a common enough fabric. I’ve found similar stuff – but the stripes were too narrow, the wrong color, or the fabric was the wrong weight.

Striped Hollyburn

So let me tell you about where I found THIS fabric. Back when I still lived in the ‘burbs in West Nashville (ok, it wasn’t the suburbs because we were like 5 miles from the city, however, it’s more ‘burby than where I am now in the woods of Kingston Springs, so there’s that!), I went to a yard sale at the neighbor’s house 2 doors down. That whole experience was an adventure in itself – the woman living there was in her 90s and had lived in that house since she was 6. SIX!! Oh man, and she had the BEST neighborhood gossip. She also had this amazing little garden paradise of a backyard – all overgrown in the most beautiful way, and totally private and lush and green and dammit I was so jealous of that garden. AND she told me a bunch of ghost stories. Most awesome lady ever. Anyway, the yard sale was kind of like going to the flea market – lots of odds & ends and antiques and random stuff, all collected and resold for extra cash. I sniffed out the bag of fabric hidden in the shadows of the carport (I am telling you, I have a nose for this sort of thing) and found my dream fabric lurking at the bottom. Not just my dream fabric – but somewhere around 15 yards of it. Which I bought the whole lot of for $1. Apparently, this fabric lived a previous life as a kind of faux curtain/drape, arranged just so by some famous interior designer.

Striped Hollyburn

This is a really nice home decor weight cotton fabric. Unwashed, it has a little bit of a sheen to it and quite a bit of body. I tore off about 4 yards and washed it – just to see what would happen – which made is lose the sheen and gave it much more drape. It was really easy to sew and press. AND I still have over 10 yards of this stuff! Striped dresses in my future, yeah? I’m just ashamed that it’s taken me a year to get to sewing it. Too much ahead in the queue, I guess.

Striped Hollyburn

Check out how well those stripes line up at the pockets! Yeah buddy! In an effort to make this post at least somewhat useful, here is how I did that:

Striped Hollyburn

After cutting out the front skirt pieces, I laid them on top of the pocket/pocket facing piece (for this pattern, it’s all-in-one. If you’re using a pattern that has 2 separate pieces, choose accordingly) and traced along the pocket edge. Then I used a ruler to draw the pocket lines as they continue from the skirt front to the pocket facing, so that the lines were unbroken.

Striped Hollyburn

Here’s what my pattern piece looked like. Not shown but SUPER helpful – it’s a good idea to mark the colors of the lines as well, so you don’t end up with inverted stripes 🙂

Striped Hollyburn

Then just lay the pattern piece on your fabric and arrange it until the lines of the print match up with the lines you drew on the pattern piece 🙂 Easy!

Striped Hollyburn

I also made sure to pin each stripe before I sewed my pieces together, which made for very accurate stripe-matching.

Striped Hollyburn

I guess that’s it! Easily the cheapest garment I’ve ever made 🙂 Now tell me – what’s the sewing-related yard sale haul you’ve ever been lucky enough to experience? I think this $1 mass of fabric might go right up there with the $1 DVF Vogue Designer Original pattern (that happened to be in my size, no less) score.

Completed: A Cardigan, a Skirt, and a Tshirt!

30 Apr

Woohoo y’all get a damn TRIFECTA of garments for today’s post! Lucky you!

Striped Cabernet Cardigan + Yellow Hollyburn

For my monthly Mood Sewing Network post, this month I wanted to focus on that amazing striped sweater knit that you’re probably staring at (you should be staring at it, it’s fucking awesome). But I felt really boring just making *a* sweater (a sweater that took maybe 2 hours, tops, to complete), so I overcompensated and made my entire outfit. Yay!

Striped Cabernet Cardigan + Yellow Hollyburn

We’ll start with the cardigan because it truly is the star of this outfit. It’s another SBCC Cabernet cardigan, this time with my minor adjustments made to the flat pattern (you can see my leopard Cabernet cardigan here, btw!). Since I’ve already made the pattern once, there’s not really anything new to report in terms of construction.

Striped Cabernet Cardigan + Yellow Hollyburn

Striped Cabernet Cardigan + Yellow Hollyburn

I bought the navy and white striped fabric while I was at the Mood Fabrics flagship store in NYC in March. I got soooo much good stuff while I was there, but this particular piece really takes the cake. I swear, if the bolt hadn’t been so heavy, it probably would have jumped off the shelf and fallen directly into my arms. We were like star-crossed lovers when we caught sight of one another.

ANYWAY, gushing aside – what we have here is a cotton double knit that works and feels like the perfect sweater knit. It’s wonderfully thick and squishy, and while it does drape a little bit, it also hold it’s shape quite well. It was really the perfect fabric for this pattern, as it responds really nicely to pressing and topstitching. I was careful in my cutting to not only match up the stripes at the side seams, but also the stripes blending into the sleeve cuffs and hem bands. The neckband is actually the same striped fabric – I just positioned the pattern piece so that the widest navy stripe was the only thing that showed when it’s folded in half. I knew I wanted a solid color at that neckband, but I didn’t want to try to color match, because nope.

Striped Cabernet Cardigan + Yellow Hollyburn

Because the striped knit is so thick, it was a bit of a beast to manhandle. Cutting it was painful (I REALLY need to get my scissors sharpened, dammit!) and the sewn seams were lumpy and wavy before I pressed them. It’s super important to press if you’re dealing with a fabric like this – the flatness is what makes the finished piece look so polished. Topstitching down the seam allowances also helped. As with my last cardigan, I used the straight stitch on my machine and a walking foot. The rest of the seams are serged.

Striped Cabernet Cardigan + Yellow Hollyburn

The skirt is another one of my beloved Hollyburn skirts. I cannot stress this enough, but I LOOVE this pattern. SO MUCH. As soon as I finished the denim polka dot Hollyburn, I started lurking hard for a yellow twill to make another one. I really love this neon delight of a yellow, but it’s hellish looking against my skin – so obviously, the next best thing is a skirt.

I found the fabric also while I was in NYC, also at the Mood Fabrics flagship store (sorryyyyy not sorry). I actually spent a good deal of time looking for this one – I knew I wanted yellow twill, but the stuff in the twill section wasn’t quite up to snuff. Too pale, too lightweight, too much of something. This particular fabric was actually located in the denim section – I imagine there is someone, somewhere, who has made an amazing pair of jeans with this fabric.

Striped Cabernet Cardigan + Yellow Hollyburn

This is a stretch cotton twill with lots of lycra in the content, giving it a super heavy stretch. Even though it’s on the lighter side (heavy enough to be considered a bottomweight, however), it has plenty of body that gives this skirt a great structure. The only downside to all that lycra is that it made the fabric really hard to get a good press. I ended up topstitching all the seams to keep them flat, about 1/4″ distance (as opposed to my usual 1/8″). The wider topstitching paired with this fabric really gives it a nice denim-y look, which I like. I thought about topstitching around the pocket bags to give those definition too, and “thought,” I mean I tried it and it looked absolutely terrible so I ripped it out. Don’t do that.

Striped Cabernet Cardigan + Yellow Hollyburn

The back closes with a simple lapped zipper, and all the inside seams are serged. Basic stuff!

Striped Cabernet Cardigan + Yellow Hollyburn

Finally, the most basic of the basics – my tshirt!

Striped Cabernet Cardigan + Yellow Hollyburn

This is SUCH a simple tshirt that it hardly bears a mention, however, we’re here and it’s here so let’s just roll with it. The fabric is this sheer white slubbed rayon jersey, which was WAY more sheer than I was expecting but it’s sort of awesome. It’s suuuuper soft, drapey, and the texture of the fabric makes it a tiny bit more interesting than your average plain white tshirt. I used my always-tweaking-almost-done-tweaking Frankenpattern’d tshirt to make this. The neckline is bound using Megan Nielsen’s bound neckline method, which is hands-down my FAVORITE way to finish a neckline on a slinky knit like this. It just looks really really good, and it’s nice and sturdy. I love the traditional method, of course, but some of the more drapey fabrics don’t do so hot with that method because you have to REALLY stretch them to keep them from being floppy, which ends up with a tight neckline that’s practically gathered.

Speaking of slinky knits, binding that neckline was about the only easy part of sewing this tshirt. Talk about the slinkiest knit ever! It was worth it, though, because I can always use more white tshirts. Even if they are see-through. And yes, the pocket is totally in the wrong place and I’m totally not picking it off because I don’t think the fabric can survive that kind of trama.

Detail shots:

Striped Cabernet Cardigan + Yellow Hollyburn

Striped Cabernet Cardigan + Yellow Hollyburn

Striped Cabernet Cardigan + Yellow Hollyburn

Striped Cabernet Cardigan + Yellow Hollyburn

Striped Cabernet Cardigan + Yellow Hollyburn

Striped Cabernet Cardigan + Yellow Hollyburn

Striped Cabernet Cardigan + Yellow Hollyburn

Striped Cabernet Cardigan + Yellow Hollyburn

(that’s a Sewn with Mood Fabrics tag, by the way! 🙂 )

Striped Cabernet Cardigan + Yellow Hollyburn

Striped Cabernet Cardigan + Yellow Hollyburn

PHEW.

Ok, one more picture:

Striped Cabernet Cardigan + Yellow Hollyburn

Only including this one because I look like I’m about to eat whatever is in my line of vision haha.

** Note: All fabrics for this project were provided to me in exchange for a review post as per my involvement with the Mood Sewing Network.

Completed: Linen Carolyn Pajamas

27 Apr

Let’s start this post with the shocker: I don’t really care for linen.

Carolyn Pajamas

I know, I know. Linen is supposed to be a rite of passage for Southern gals – it’s cool and breathable, and the wrinkles are supposed to be there. Well, I HATE the wrinkles! Wrinkly fabric drives me insane, makes me feel rumply and unkempt. I just can’t get behind a fabric that wants to wrinkle the second I look at it, much less wear it around for a few hours. Nope nope nope.

nope

That being said – I really want to like linen. Seriously! I love the idea of a fabric that gets softer with every wash, and as someone who could probably work up a sweat in the middle of the Arctic (I don’t even know how that’s possible, considering that I’m ALWAYS cold, but leave it to my body to fuck up my heating and cooling system), I’m always on the hunt for light and breathable fabric to wear during the summer months. Linen was my nemesis, but I was willing to extend the olive branch and make an effort at friendship.

Also, I’ve been eyeballing that striped linen fabric for months now at the studio (and probably for more months to come, since stripes just launched at Elizabeth Suzann woohoo!), and I knew it needed to be in my life/on my body. Linen wrinkles be dammed.

Carolyn Pajamas

There are many, many, many important things I’ve learned through my sewing journey. One of the biggest ones (well, other than not sewing over your pins. STOP THAT RIGHT NOW) is not to fight against your fabric. If your fabric is drapey, don’t try to sew something form-fitting with it. Alternatively, fabric with a lot of body needs to be made into something that will work with the shape. And if you are sewing linen but still hating on the wrinkles… make pajamas. No one cares if your pajamas are wrinkled (and if they do – get out. Get out right now while you still can).

Also, have you slept in linen pajamas before? LORD HAVE MERCY.

Carolyn Pajamas

Making proper pajamas has been on my sewing to-do list for aaaages. I love wearing matching pajamas sets, even if Landon does think they are dorky (I did compromise and get rid of the hot pink cat pajamas though. Relationships, man!). My mom actually buys me a new pajama set from Victoria’s Secret every year for Christmas (not the hot pink cats, those came from my AWESOME Mamaw). Still, I’ve always wanted to make my own so I could have – what else? – complete control over every aspect of the design, color, and fit. But I’ve never really found a suitable pajama pattern that didn’t look like something more appropriate for an 8 year old boy, so I held off on that dream.

The winning pattern you see here is the newest pattern from Closet Case Files, the Carolyn Pajamas. I looooooved this pattern the second it graced my inbox – the slim, feminine cut of both the top and bottoms, as well as the inclusion of the piping (I mean, I know how to sew piping, but it’s pretty nice to have a pattern that was designed for optional piping, if you get my drift), were what really got my gears turning. Also, Heather Lou looks amazing in those product photos, doesn’t she? I could steal that hair right off her head. I won’t, but should it ever go missing, well…

Carolyn Pajamas

I really enjoyed sewing this pattern! While I wouldn’t exactly call the linen easy to work with (it was a shifty little bitch and was prone to constant fraying), it did respond beautifully to pressing and took all the piping and topstitching like a champ. I recall when Heather Lou first released this pattern, she mentioned how much she labored over the instructions – and it really shows. Everything is very clearly laid out with beautiful little diagrams and helpful tips, and it’s about as hand-holdy as you can get with a pattern without actually having it be part of a sewalong (there’s no sewalong for this pattern, however, there are a few posts on the CCF website to guide you through the trickier steps if you need it!). I’m especially impressed with how nice my collar turned out – piping and all!

Carolyn Pajamas

Carolyn Pajamas

I made the size 2, based on my measurements and following Heather Lou’s advice. I reeeeally wanted to make the 0 because the ease just seemed excessive, but I’m glad I followed along faithfully because this fit is pretty spot-on. It’s sleek and somewhat fitted (I mean, fitted as far as pajamas are concerned), but there’s juust enough ease to make them super comfy. I did trim about 2″ off the legs, but that’s about it. I feel like there could be some tweaking with the armhole – it seems a bit low and pulls when I reach forward – but that may just be because I’m used to wear shirts that are a lot more tailored. It’s not uncomfortable or restrictive by any means.

I chose to make the long pants with the short-sleeved top. I was originally just going to make shorts, but my new digs are in a basement (I mean, it’s a happy basement with windows and a door – but it’s still a basement, with basement chill), and it’s a bit chilly down here right now. I added piping to the pocket, cuffs, collar, and leg side seams. The piping is self-made – I used more of this glorious linen fabric in the opposite colorway, and cut bunches of bias strips and sewed it around yards of cording. I prefer self-made piping, not just for the color/print selection, but also because it tends to be a lot softer than the stuff you can buy (well, I’m sure you can get awesome soft and flexible piping at some place like in the Garment District, but here all we have is that Dritz stuff in the packages and that stuff is AWFUL if you try to sew it to a drapey fabric. Again – don’t fight the fabric!). I didn’t have wide enough elastic as was required by the pattern, so I sewed an extra line of stitching about 1/4″ away from the top of the pants edge and inserted the elastic below, resulting in a frilly little gathered edge (some of my RTW pjs have this feature and I’ve always loved it!). Here’s a post about elastic waistband finishes if that doesn’t make sense.

Carolyn Pajamas

As I mentioned, I got my fabric from Elizabeth Suzann, because I work there and I get awesome employee benefits like wholesale fabric prices (don’t be jealous). It’s striped 100% linen (I’ve seen similar fabrics to this rolling around on the internet, but most are referred to as a cotton/linen mix. The stuff I have here is definitely all linen) and it is GLORIOUS. It also wrinkles, frays, and shifts like crazy. It wasn’t the most amazing piece of fabric to work with, but I’m glad I powered through because it is pretty amazing to wear. I made sure to finish all my seam allowances with the serger to keep the fraying down (for the front facing, I just serged the edge instead of doing a rolled edge, since I thought the bulk would show through). I didn’t realize how sheer the fabric is, so some of the dark piping shows through on the right side. It’s super sheer and everyone is absolutely aware of the color of my underwear when I wear these pants, just so we’re clear (I’m wearing nude undies for these photos, to save your eyes). It’s also, like I said, super shifty – so my pocket is really wonky. I’m going to call it “charming.”

Detail shots:

Carolyn Pajamas

Carolyn Pajamas

Carolyn Pajamas

Carolyn Pajamas

Carolyn Pajamas

Pretty good stuff! I love my new pajamas and I definitely feel like a Classy Adult when I wear them, wrinkles and all. I definitely want to make a flannel pair when winter rolls around – finally, I won’t be at the mercy of whatever pink shit they’re selling at VS, woohoo! Too bad my mom is going to have to find a new Christmas gift to buy for me. Sorry, mom! Maybe I’ll make you pajamas instead 😛

One last thing – the giveaway winner from last week! Random number generator says…

winner1

winner2

Woohoo, congratulations Kayse! I’ll be in touch to get that gift certificate out to you ASAP. Can’t wait to see what you make with your fabric :DDD

Carolyn PajamasFinally, this would be my senior picture, if I was still in high school and did things like senior pictures. The end.

Completed: the Colette Myrtle Knit Dress

17 Mar

I am so excited that today’s post doesn’t involve sleeves or pants.

Myrtle knit dress

It does, however, involve a navy striped knit fabric. Sorry! Don’t fall asleep on your keyboard! Landon already told me I’m not allowed to buy anymore navy striped knit fabric haha. I guess we all have a type, and I have just announced mine to the internet.

Myrtle knit dress

This is the Myrtle from Colette patterns, a knit dress with a cowl neckline and an elasticized waist. You guys, I’m going to be straight up front and honest with you – I apparently bought this pattern, and then somehow COMPLETELY forgot about it until a couple of weeks ago when I was digging through my pattern stash in search of another pattern. So I’m a little late on the bandwagon with this one, however, it’s probably ok timing on my end since I don’t think this sleeveless style would have gotten much wear over the winter!

Anyway, discovering the pattern and then realizing that I had the perfect knit patiently waiting to be sewn up, meant that this project skipped straight to the top of the queue and everything else had to wait. Ha ha!

Myrtle knit dress

My past few experiences with Colette patterns have resulted in some questionable fitting (I think I’m about sized out of their patterns – at least the knits. Wah!), so I made a muslin of the bodice before I got to sewing my fabric. This ended up being a really good idea, because the bodice was all kinds of wrong on me! I knew the bust would be big – the finished measurements for the size 0 are still about 4″ bigger than my bust, and while I know a little bit of positive ease is good with this style, that seemed like too much to me. In the end, everything about the top portion of the dress was just toooooo big and not at all proportional to my body. The arm holes were also really low – like, you could see at least half of my bra band when I stood to the side.

I ended up shortening the shoulders by more than 1″ (I start with a 1/2″ adjustment by slashing the pattern about halfway across the armsyce, to shorten the depth, but that ended up being not enough so I took the rest out of the actual shoulders after the dress was sewn up. Hence why I can’t give you an exact measurement for that adjustment) and taking in the bust by about 1/2″ on either side. I didn’t make any adjustments to the waist – it needs to be a little big so you can add the elastic – but the bust needed to be somewhat tighter or else the entire world was gon’ get a side peep show. As it stands now, I think the bust could still be sized down more, but I didn’t want to overfit the dress so I left it as is.

Myrtle knit dress

The dress has a clever assembly – the front is self-lined (so you don’t see any ugly wrong side in the folds of the cowl) and the front arm holes are finished with all raw edges inside the lining. The back neck and arm holes are finished with a simple turned under hem – in my case, with the twin needle. The elastic has a channel sewn, and then wide elastic is inserted and topstitched down. This was the hardest part of making the dress – I found it a bit fiddly, and as a result, my stitches at the waist aren’t exactly straight (but, I mean, who’s looking? Right? RIGHT?). I think it might be easier to just feed the elastic through the channel once both sides are sewn down. There are supposed to be pockets, but I left those off bc I hate pockets in knit dresses (and freedom, too, apparently). There is a whole sewalong dedicated to this pattern if you are interested in seeing the construction, btw. It’s hosted by Devon, aka my favorite Disney Princess.

Myrtle knit dress

Even with the fitting adjustments, the muslin, and the manhandled elastic – this dress came together very quickly! Its a very easy make (4 pieces, not including the pockets) and I just zipped it all through my serger and used the aforementioned twin needle for all the turned hems. It’s also insanely comfortable, and I think the looser/breezy fit is going to be my gold standard with the blazes of Hell start blasting through Tennessee this summer.

Myrtle knit dress

I really love this fabric, especially with how the stripes look on the cowl! The knit is a Ralph Lauren ~dazzling blue~ striped viscose jersey (their words, not mine) from Mood Fabrics’ website. It’s a nice, slinky 2 way stretch knit with a gorgeous drape that feels wonderful to wear. Definitely bought this without any idea in mind of what I’d do with it, but I think I found a good match 🙂

I seem to have no pictures of this dress without the belt (I could have sworn I took some on the dressform, but they are gone. Or else they never happened, which is likely the case here), but here’s an shot I posted on Instagram last week. I think the encased elastic is a pretty touch (you will never EVER hear me say that again, by the way), but on this dress + stripes + lose bodice with cowl neck…. just didn’t look right on me. Hence why it’s covered with a belt. I’m still not completely convinced that this dress is very flattering on me, but, I like the fabric and it’s super comfy, so it stays.

Myrtle knit dress

Front bodice with self-lining.

Myrtle knit dress

Enclosed elastic on the inside. The elastic casing is created with a zigzag stitch, per the pattern instructions.

Myrtle knit dress

Anyway, I think it’s pretty cute! I like it with the yellow belt, and it also looks good with my tall brown boots and a cardigan (which is how I wore it last week). The only thing to keep in mind with this pattern is that it is NOT bend-over friendly. No photo evidence to be found here, but just trust me… leaning over is the best way to give the nearest stranger an eyeful. I haven’t found a way to rectify that (some of my other cowls can be pinned to my bra cup, or even have a little piece of elastic or a weight to hold it down, but the design of this cowl doesn’t allow for that), but I thought I’d point it out. One thing I might add later down the line is some little bra strap holders at the shoulders.

SO happy we finally had a warm week here! It’s been pushing over 70 the past couple of days, with loads of sunshine, and it just feels *amazing* outside. The season of bare legs is upon us, at least for this week! Kind of a bummer that I’m going to leave all this to go to cold ol’ NY this weekend (I classify everything under 70*F as “frigid” just fyi), but I’m pretty excited for this class this weekend! Plus, fabric shopping. Can’t visit NY without coming home with a suitcase full of pretty new fabrics, amirite 😉

Completed: Two Colette Mabels

8 Oct

I totally skipped all the hullabaloo that came out when the Colette Patterns Mabel skirt was released – but that’s ok! I’m here now, reporting for duty!

Colette Mabel & Sewaholic Renfrew

I actually made two – just to be safe!

Colette Mabel & Grainline Archer

Let’s start with a basic Mabel lowdown. I made the grey version first, out of some leftover ponte knit that I used to make a pair of Ooh La Leggings (not pictured – because neither photographed nor blogged, but they are basically the same thing as these black ponte leggings except, you know, grey). I actually have no idea why I bothered saving that little piece of fabric, because it was about half a yard and thus not enough to do anything with – and the ponte is pretty thick, which means it wouldn’t work for something like, say, colorblocking a tshirt (which can be a good use of leftover knit scraps, if you tend to get hoardy like I do). Anyway, it’s a good thing I did, because I had exactly enough to make a little Mabel mini! Yay! I love it when these things work out!

Colette Mabel & Grainline Archer

Colette Mabel & Grainline Archer

Mabel Mini 1 is view A, size XS. I sewed the pattern exactly as per the directions, except I opted to understitch the waistband lining (I used my machine’s lightning bolt stitch – kind of like a very short zig zag stitch), to keep it from sticking out. The seams of the skirt were sewn on my serger, and the hem is done with a twin needle. From cutting, to sewing, to hemming – this entire thing took… I dunno, maybe 30 minutes? It was VERY fast.

I didn’t really use the instructions – I mean, it’s a knit skirt, it doesn’t need much introduction – but they looked to be pretty good, based on my glance over. Like the Moneta pattern, they include lots of tips and info on how to sew knits with a regular machine, which is always nice. The only thing I did not like about this pattern was taping it together (I have the PDF). Holy shit, talk about too many pages! My disdain for PDFs is no secret (I get why other people like/need them… no defense necessary 🙂 But for me? Nope, no way! Can’t do it!), so maybe I’m biased – but this one seemed to be unnecessarily large & unwieldy. My advice: get the paper pattern. Ha!

Colette Mabel & Sewaholic Renfrew

Anyway, speedy instaskirt is the reason why I obviously needed to jump right into Mabel Mini 2 immediately after 😛

Colette Mabel & Sewaholic Renfrew

I made a couple very minor changes for this one – I took in the center back and side seams by about 3/8″ (in retrospect, I should have taken in more, because it’s still a little loose around the waist and thus rides down farther than I want the rise to sit), as well as the waistband by the same amount. I used the last of my black striped ponte from Mood Fabrics NYC store. Again – 30 minute skirt. Talk about fast fashion, amirite.

Colette Mabel
Colette Mabel
Colette Mabel

For both skirts, I used a lightweight black rayon jersey (the same jersey that my black tshirt is made out of, incidentally. That tshirt is a Renfrew, by the way!) to line the waistband. I considered using a self-lining – but decided the fabric was a smidge too bulky, so I went with a lighter weight lining, which ended up being a Good Decision.

Oh yeah! I made that plaid flannel button down too! SUP!

Grainline Archer

This was made using the Archer pattern. I actually finished it waaaay back in… March. Yep. I got it in my head that I needed to make a new plaid Archer to wear when I went to NY, so I nearly killed myself trying to finish the shirt in something crazy like 2 days. I did end up finishing it – and bringing it to NY to wear – and I learned two things about the experience:
1. My life did not suddenly become more fabulous because I had a new shirt to wear while on vacation; and
2. Pushing myself to the point of exhaustion to finish something for a self-imposed deadline is not fun at all. Seriously – it’s shitty, it makes me anxious for no reason, and I didn’t enjoy any part of sewing that shirt. Which is sad, because button downs are one of my favorite things to sew! I love how precise the stitching is, and all the little details that make it special. I unfortunately didn’t get to enjoy any of that because I was too rushed trying to hurry up and finish (when, realistically, I should have either started earlier, or accepted that I just wouldn’t finish before I left), and yeah, that’s just lame.

So, with that being said – no more unnecessary last-minute vacation sews with shitty deadlines! If I need clothing that quickly, I will buy it (lol jk I’LL NEVER BUY CLOTHES AGAIN)(ok, seriously, kidding with that last part… mostly.). So far, I’ve done a decent enough job of putting this into practice, so that’s good!

Grainline Archer

And, for what it’s worth – I do like the shirt. I could have done a better job with it – the topstitching is not my best, and the grain is all wonky because the plaid fabric was hideously off grain (like, to the point where I actually cut the entire shirt twice. Yes. I did that. And it’s still pretty bad) – but it is what it is. It’s snuggly, it’s warm, and I also just realized that I made it to match the leggings that I made with the rest of that grey ponte fabric hahaha omg my life is fabulous.

Grainline Archer

Anyway, I hope you liked my Archer story. Have some pearl snaps.

Grainline Archer

And a sleeve placket while we’re at it!

Ok, so here’s my dilemma – and I’m hoping y’all can help me. I HAVE NO IDEA WHAT TO WEAR WITH THESE SKIRTS. I feel like everything I put on just gives me weird proportions! The tops I’m wearing here are ok, I guess, but that’s about the extent of what my closet can offer. Most of my other tops just look… weird? I think the biggest problem is the waist line- it kind of hits at a strange place:

Colette Mabel & Grainline Archer

See what I mean? It’s about right at my belly button – which isn’t quite high waisted, and not quite low waisted. I can’t tuck anything in – partially because it’s very lumpy under the ponte, and partially because the waistline hits at a sort of wide point on my body. Untucked, most stuff just looks sloppy or gives me that weird long-abdomen proportion that we just loved soo much in the early 00s (y’all know what I’m talking about!). So yeah, can’t figure that one out. Any suggestions? Should I stick with more fitted, cropped sweaters (such as what the model is wearing on the website)? HELP ME I CAN’T ADULT.

Colette Mabel & Sewaholic Renfrew

Anyway, let’s talk! Answer one or more of the following:
– What shirts should I be wearing with these skirts?
– Have you ever made yourself sick by rushing to complete a garment before going somewhere?
– What happened when you finished it? Did a unicorn grant you 3 wishes or did you just realize that life was still doing life things and dammit is it Monday already?
– Seriously, though, what should I wear with these skirts?

** Necessary disclaimer: I received the Colette Mabel skirt from Sarai of Colette patterns, gratis. No review was requested – but as always, all opinions are my own. All fabrics in this post were purchased by me 🙂 I do get a monthly Mood allowance, but that doesn’t mean that I don’t also spend plenty of my own money there! Just wanted to clear that up 🙂

Completed: Some Tshirts!

26 Sep

Oh hey, head’s up – this post is all cake and no frosting. No apologies, though! Lord knows I can never have enough Tshirts.

Rather than bore y’all with a bunch of posts featuring patterns I’ve made before, though, I’ve compiled a trio of 3 different tshirt patterns – ranging from Free to You Gotta Pay For That Shit – for science and comparison purposes. Who doesn’t love a good Tshirt debate, amirite? Also, I took these pictures before I redyed my hair, fyi. Just in case you were curious, haha.

LET’S TALK ABOUT TSHIRTS NOW, GUYS.

Plantain Tee

First up is the Plantain Tshirt, from Deer & Doe Patterns. This is that free pattern I was telling y’all about. This is a great beginner tshirt pattern – there aren’t a lot of pieces, it includes some new techniques for beginners (such as sewing the neck binding), the instructions are very clear, and the fitting is quite loose at the bottom. I was initially afraid that I wouldn’t like this shape on me AT ALL, but I’m surprised at how much I love it!

Plantain Tee
Plantain Tee

Even though it’s a free pattern, I think it’s far from being a “crappy” pattern, if that makes sense. The sizing is perfect – I sewed up a straight 34, with no tweaks. I used the last scraps of my black merino wool from Organic Cotton Plus to sew this up – I like how the wool gives the bottom some structure (and the wrinkles? Not as much a fan of those, but I’ll live :P). And it’s SO COZY. Cozy tshirts, FTW!

Plantain Tee

I did make a couple of changes to the design of the pattern itself – the main one being that seam that runs down the front and back of the top. This was done out of necessity, as I didn’t have enough fabric to cut on the fold. I simply added a seam allowance and created a CF and CB seam. I topstitched the seams so they’d look more intentional, ha. I also added cuffs to the sleeves – because, I dunno, I like them! There’s a bit of piecing at the neckline binding as well. Since I was making this out of leftover scraps, I didn’t have a long enough piece to cut continuous binding. I don’t think it’s that noticeable, and hell, I’ll deal with some seams if that means I get a merino wool top out of it amirite.

Stripey Renfrew

Next up is my tried-and-true tshirt allstar – the Renfrew from Sewaholic Patterns! I LOVE this pattern, a fact that I believe is pretty well documented. Renfrew is favored by me because I think it most resembles what we think of when we think of a tshirt – slightly fitted, set-in sleeves, and 3 neckline options (in addition to the scoop, there’s also a cowl and a v-neck), as well as sleeve length options. The pattern is written to have a band of self-fabric at the sleeve cuffs and hem, in addition to the neckline. I’ve found that I prefer to hem my tshirts (rather than use the fabric band), and some of the more casual ones I like to hem the sleeves as well. One thing to keep in mind – should you decide to join me in my tshirt anarchy – is to add that length to the sleeves and hem before you cut them out. Otherwise, they might end up short! Ask me how I know about THAT 😉

Stripey Renfrew

Fitting-wise, this is a great pattern, although I did make a lot of tweaks to get to the point I am now. It’s been a long time since I tweaked, but if I recall – this is a size 0, with additional ease removed from the waist. I also shortened the shoulders a smidge and made them slightly narrower. All those tweaks paid off, because this is a pattern I reach for again and again when I need a tshirt. At any given time, if you see me in a tshirt – ask me if it’s a Renfrew, the answer will probably be yes! Seriously! Oh, and my fabric is a striped ponte from Mood Fabrics (the store, not online).

SJ Tee

The last top in this trifecta is the SJ Tee from Papercut Patterns. Another new-to-me top, and I admit this is more like a sweatshirt than a true tshirt (but mostly due to fabric choice). It’s kind of like a sexy sweatshirt, tbh – raglan sleeves and WHOA SCOOP NECK. Forreal, make this in something too stretchy and you’ll end up in boobie city. Again – want to ask me how I know about that? 🙂 haha!

SJ Tee

I’m surprised at how much I like the fit of this, considering that I don’t normally go for things so loose. I did end up taking the CB in by about 1″ – I’d already sewn the neck binding in at that point, so the seam runs clear from the bottom to the top of the binding, oops. But that made a HUGE difference in the fit, especially at the back. I used the size XXS and – other than the chunk taken out of the CB – it’s relatively unchanged. Oh, and I did shorten the cuffs so they’d look more like a sweatshirt. The fabric I used here is the last of my wool knit from Mood Fabrics (the same knit I used to make my grey Jenna cardi), and I had JUST ENOUGH. It’s amazing how much I love such a simple sweatshirt, by the way – I’ve been wearing it every night. It’s so cozy!

Here are the three patterns as modeled on my form:
Plantain Tee
Plantain Tee

Stripey Renfrew
Renfrew Top

SJ Tee
SJ Tee

I think it’s really interesting how something so simple as a damn tshirt can yield such different results, based on pattern and fabric choice. These are all pretty basic designs in the grand scheme of things, but they’re different to stand on their own. Obviously there are many, many more tshirt patterns out there (off the top of my head, these come to mind: Ensis, Briar, Bronte, Coco, and Lord, don’t get me started on dresses that can be hacked into tees), but I stuck with these three because I feel they’re the most basic/versatile. Also, let’s be real – if I fall down a tshirt rabbit hole, it might be months before this post sees the light! Ha!

Stripey Renfrew

Out of all these, I think my favorite is the Renfrew, just because it’s so damn versatile and I love how it fits (not to mention, the slim fit is ideal for layering). It might also have something to do with the Renfrew being my first love – can’t ever abandon her now 😉

I can’t stop thinking about that SJ tee too, though – I already have some future plans for her, including camel-colored boiled wool. Yum!

Plantain Tee

What’s your opinion on tshirt patterns? Do you have a favorite – and if so, dish please!

(psst! Don’t forget to enter the Sewtionary Giveaway, if you haven’t already done so! Entries close on Monday morning!)

Completed: The Colette Moneta

3 Jul

Sooo I definitely meant to make this dress to wear on my Florida vacation. You know, the one that happened over a month ago. Oh well – better late than never? At least I’ll be prepared for the next vacation!

Moneta Dress

This is the Moneta dress, from Colette patterns. Sarai sent me the pdf of this pattern right around the same time she asked if I’d like to review the Colette Guide to Sewing Knits. I had already purchased the book at that point, so she gave me the two newest Colette patterns as a freeb. Woohoo! So yeah, I’ve been waiting to make this up for a while, but I think it’s worth the wait – wouldn’t you agree?

Moneta Dress

Moneta is a very very simple dress. Sewn up in a knit, it’s a basic bodice with a slightly gathered skirt, pockets, and a few options as far as necklines/collars/sleeves. I went with the simplest version – no sleeves, no pockets – for my first test run.

Moneta Dress

I’ll admit, I wasn’t terribly keen on the gathered skirt as I tend to hate the way they look on me, especially when sewn up in a knit. However, I kept seeing Devon’s Monetas that she was plastering all over her blog, and they are all pretty freaking flattering on her – even with the gathering. My fabric is also lightweight and drapey, so that helps with keeping the gathering from getting too bulky. The lack of pockets also helps (am I the only one who thinks pockets in a knit are freaking useless? They’re useless.).

Moneta Dress

Cutting this fabric wasn’t necessarily tricky, but it did take some forethought to make sure the stripes all matched up right. After making the Out & About Dress, I was (and still am, to some extent) super butthurt about the way the stripes look on the skirt. These sorts of curved, gathered skirts don’t work too well with horizontal stripes, but I was bound and determined to make it happen this time. Plus, the match up on the side seams – all the way! Yeah! I love it when that happens.

Moneta Dress

Part of what made cutting tricky was that I wanted to self-line the bodice. I didn’t have anything on hand that would be a suitable lining, other than the main fabric I was using (and while I don’t really care much for lined knits, I certainly wanted to try it out!), so I decided to go with that. The one drawback to using my striped fabric is that it is slightly sheer, so the stripes would show through and look weird. I cut the bodice pieces so they 100% mirrored each other – with each stripe color matching what was underneath, so they wouldn’t show through. I think it worked out pretty well. Also, I’m totally a lined knit bodice convert, at least in fabric this lightweight – it’s a very clean finish (all seams are inside the lining, woohoo), and it gives this drapey fabric a good bit of heft so the skirt isn’t stretching it out over the course of the day.

Moneta Dress

I made the size XS, with no alterations – although I guess I did shorten the skirt. The back is a little wide, but it doesn’t look bad so I’m not bothered by it.

Moneta Dress

There were a few firsts for me while making this dress! One, the aforementioned lined bodice – which I’d never done before on a knit, but it’s kind of a neat party trick how everything ends up on the inside. The instructions don’t tell you how to finish the neckline – just the arm holes (this lined version is intended to be worn with a collar, which I omitted. The other versions aren’t lined and just have you turn the neckline under and hem). After a bit of thinking, I figured out that they can be finished the same way as the arm holes. It’s a little tricky, but it works out quite nicely!

Also, the skirt is gathered with clear elastic before it’s actually sewn to the bodice. I actually thought that trick was pretty cool, because it means you get the elastic and gathering done in one fell swoop (without using basting stitches to gather, blech) and the elastic adds a nice support to the waistline, which, again, is important if you’re using a lightweight fabric that might try to stretch out if you don’t set some clear boundaries first.

Moneta Dress

Here it is without the belt. Man, this fabric! I bought this stuff while I was in NYC earlier this year – I think it’s from Fabrics for Less (I think?). It was very very cheap – like $5 a yard cheap – and the quality isn’t so great. It’s very lightweight, feels like there’s a lot of polyester in it, and it looks like it’ll start pilling soon. But, you know, sometimes we make stuff that isn’t meant to be an heirloom. Sometimes you just want a stripey dress because you saw Taylor Swift wearing one and, while you can’t stand that woman, you gotta admit that she has some cuuuute dresses. So there’s that.

Moneta Dress

The only thing I didn’t like about this pattern is that taping the PDF together was a bit of a nightmare. There are a shitload of pages, which results in a pretty big taped-up piece once it’s all assembled. What really bothered me is that a significant chunk of the pages were for the plus size block – and I dunno, it just felt wasteful to print them out and then immediately throw them away (not to mention, I’m a freak who had to tape them together first WHY). I’m not sure what the solution is to this – maybe have an option for printing either of the bodice blocks separately, so you can choose which one you want? If they were nested together, it would make more sense, but they were two separate blocks – plus the collar pieces had their own block too. Of course, I could look at the layout and decide beforehand which pages to print, but I never think that far in advance. Also, don’t tell me what to do.

Moneta Dress

As you can see, at this point I started getting bored with taking photos. But hey, check out that stripe-matching!

Moneta Dress

I also really love how navy my hair looks in these photos! Right after I dyed it, it was definitely this strange and exciting shade of neon electrical purple – which was cool, but it wasn’t exactly what I wanted. After a wash, the color faded just a smidge and now it’s straddling the line between navy and dark purple. I love it!

Moneta Dress

I definitely want to make more of this dress – I want to try it with sleeves, I want to try some of the downloadable collar options, and I want to experiment with swapping out that skirt. Oh, and I want to make some bodices into cropped sweaters. So many options here, people.

Moneta Dress
Moneta Dress

Here’s the gathered elastic waistband. Not too shabby!

Moneta Dress

And the twin-needled hem, which my machine fought valiantly with this particular fabric. As you can see, though, I won.

Moneta Dress

Moneta Dress

So, I guess it should be said that this particular pattern isn’t necessarily anything mind-bendingly different from many of the other knit dress patterns out there. And that’s fine – it’s a bodice and a skirt (and sleeves, if you want them), there’s not a whole lot you can variate from. Of all the knit dresses I’ve sewn (this, the aforementioned Out & About, and my beloved Lady Skater), the differences are subtle – a change in neckline, a different skirt, etc. While I personally love trying new patterns every single time (which is obviously easier when someone, you know, sends you the pattern gratis), I can totally understand being on a budget and/or not wanting to reinvent the wheel fitting-wise and needing to stick with one pattern that you make changes to. For what it’s worth – compared to my other knit dresses – he neckline on Moneta is more of boat than a scoop neck, the skirt is gathered, and I think the bodice is a little more hourglass-shaped. Also, the techniques used to put this dress together make it slightly more complicated than other knit patterns I’ve personally tried (again, lining, clear elastic, etc).

Stripey Shirt

Oh, and I also made a Briar tshirt with the remaining yardage, complete with one of the most beautiful knit bindings I have ever done.

Moneta Dress

I’m so happy I finally have my striped dream dress, yay! Love this pattern and I can’t wait to experiment more with different variations. And just a head’s up to the rest of y’all – but there’s a whole Sewalong for this dress, if you need the hand-holding. It’s actually being taught by Devon, so you know that shit is gonna be ace.

Completed: The Bronte Top

2 Jul

This is totally my new favorite outfit. I TOLD y’all I was gonna wear the hell of out this navy Hollyburn skirt! I love looking like an American Flag, ok.

Bronte Top

Today, though, let’s just focus on the top.

Bronte Top

This is the Bronte top, a new release from Jennifer Lauren Vintage. Sewn up in a knit fabric, this is obviously not your standard tshirt – the lapped shoulder/neckline detail almost make it look like you’re wearing a dainty shrug, and it’s a nice nod to the 40s without looking super costumey vintage. As soon as I saw this pattern, I knew I had to have it. Don’t get me wrong – I love plain, basic tshirts. I make and wear them all the time. But, let’s be real – there are only so many ways you can design a plain tshirt. This pattern gives a little extra oomph in an unexpected way, and I love it!

Bronte Top

Upfront disclaimer: I was given this pattern free of charge, in exchange for a review. Although, I’ll be honest – I was planning on buying it anyway, because it’s a really cute style that’s completely different from anything I’ve seen around the sewing world. I was also madly interested to learn how the neckline was finished. This review is going to sound completely biased because I really love the pattern and how the finished top turned out. Sorry! It’s just that good.

Bronte Top

Like I said, this pattern is designed for knits, and the first couple of pages are dedicated to helping you choose an appropriate fabric and set your machine up to handle sewing it (assuming you don’t have a serger). Pretty helpful stuff if you’re a knit n00b! One part even compares the appropriate fabric to feeling the same way as underwear fabric, which cracked me up to no end (seeing how much I talk about butts on this blog, I’d reckon y’all probably know how much I appreciated that reference ahaha). But, I mean, it makes sense! The same weight of knit fabric that’s used to make comfy undies would be PERFECT for this top. Plus, you could use the extra yardage left over to make, well, undies.

Bronte Top

I sewed up the size 6, and made no alterations. I’m pretty happy with the fit, although I think I got a little too stretch-happy with the binding and now it sort of gathers where it should lie flat. Oops. I’m so used to modifying my bindings for every top I make (I guess I just like them tighter than how they’re drafted), that I did it without even really thinking. Next time I make this, I’ll go with the binding length as written in the pattern, because as you can see in my photos vs everyone else’s – the binding should definitely sit more flat. Oh well, live and learn!

Speaking of the binding, if you’re curious – it’s sewn on the same way as I think most of us are familiar with. Folded in half, sewn to the right side and flipped back. Works pretty well, though!

Bronte Top

I did make a few changes to the construction, just because I like my knits sewn a certain way, which may not necessarily be the “easiest” way (but I think it looks the nicest!). I did not hem my sleeves until the side seams were sewn up – I like my hems to be a complete circle, don’t like a seam cutting them in half. I also only turned the bottom hem up once, instead of doubled-up. The instructions are very beginner-focused, but they’re easy to skip over if you don’t need the hand-holding.

Bronte Top

My fabric is this red and white striped cotton jersey from Mood Fabrics, with the white binding being some leftover cotton knit from Organic Cotton Plus. The jersey is a little lighter than the pattern suggests, but it works out very nicely. Getting the stripes to match wasn’t much of an ordeal as there are only a couple of pattern pieces to deal with. I sewed everything up on my serger, minus the topstitching, which I did with a twin needle.

Bronte Top

The pattern has you tack down the overlap at the very end – if you don’t attach it down somehow, it will flop open and look stupid. I just went back over my topstitching a second time in that one little section (for each side), but you can also use buttons or other trims to embellish the neckline.

Bronte Top

One surprising thing I really LOVED about this whole experience was the printing part. Ok, actually, I hate printing PDF patterns – like, I’ll go out of my way to avoid it. First I have to find a fucking printer (which I don’t have – well, not one that works – and yes I know it’s the 21st century), then I have to print a bunch of test pages to get the sizing right, then I have to take the thing home and tape it together before I can even start sewing! Argh! Taping together is the worst part, forreal. So, let me back up. I didn’t enjoy the actual printing of this pattern (which I’m pretty sure no one does, amirite), but the taping part was significantly less traumatizing than it normally is. The way the pages are taped together means that each piece gets it’s own set of taped pages – so, instead of ending up with a giant swath of tiled paper (that’s the part I hate – it’s always too big for my table, and takes up the entire floor and I have to crawl around it like a fucking insect. Whyyyy), you’ve got a little stack of smaller tiled papers, each one with one pattern piece to cut out. GENIUS. That shit is pure genius. Why doesn’t everyone tile their PDFs like this?

I also used a tape gun to stick the whole thing together, which made the whole process move a helluva lot faster. Mine’s not pink, though, I kind of wish it was now.

Bronte Top

So that’s it! Overall, I really like the pattern and I’ll definitely sew it again (I’d love to try the long sleeve version, but I’m going to wait until the temperature here is a little less like Hell). You can buy the pattern here, should you feel so inclined 🙂

Also, just a fun fact – but my name is Jennifer Lauren too 🙂 Obviously I go by my middle name, but HOW COOL IS THAT.

A couple more things!
– Say helloooo to my newest sponsor, Indie Sew! Indie Sew doesn’t just sell sewing patterns (but they do – they have lots of great PDFs from various designers); they are also a sewing community for sharing and discovering new blogs. I especially love how they have a gallery where you can upload your creations – and it shows up on the pattern sales page (which I find EXTREMELY helpful, since sometimes the pattern artwork doesn’t necessarily appeal to me for whatever reason). I just love what they’re doing and I’m super excited to watch this community grow and flourish. Check them out!
– This has been EXPLODING across the blogosphere last week, so sorry to cram this shit down your throats again – but have you heard about Capital Chic Patterns? Run by Sally of Charity Shop Chic, these patterns are a little different from what we currently have on the market. For one – the styles are very fashion-forward, runway-influenced. Don’t get me wrong, I love vintage styles, but Sally’s right in that we kind of already got the market cornered on that 😉 For second – the patterns themselves are aimed for intermediate to advanced sewists, not beginners. Can I get a halleluiah?! MAN. I love me some quick’n’easy beginner patterns, and I know the beginners sure love them – but it sure is nice to have patterns that are aimed to flexing our sewing skills. If these two points haven’t convinced you, just take a lurk at the lookbook and drool away.
With all that being said – I actually tested the Cosmopolitan (but I only got as far as a muslin for fit and instructions, as my time was very limited during testing), and I can’t wait to get my hands on some nice wide lace so I can sew it up proper; it’s GORGEOUS. I’ve also got my hands on that White Russian, which I will be sewing up when, again, it’s not Hell Fahrenheit down here.
– We have a winner for the Fashionary Giveaway! Lucky number generator says….

wins1

wins2

Woohoo, congratulations, Trinity (and high-five for committing to a lifetime of crafty!)! Hope you love the book as much as I do 😀

Thanks so much for entering and playing along, y’all! It was EXTREMELY interesting to read what kind of crafty/artsy things everyone is into – seems like we have a lot of knitters, musicians, and scientists who hang out over here 🙂 While I’m sorry to say that I only had one Fashionary to give away – otherwise I’d give all y’all one – you can still buy the red book if you want to join Team Matchy 🙂 (go on, do it, you know you wanna~!)