Tag Archives: pattern testing

Completed: A Jumpsuit, of sorts

3 Sep

A couple of months ago, I was asked by the ladies at By Hand London if I’d like to test their new Holly Jumpsuit. I’m always a sucker for these gorgeous patterns, but then they went and threw in an offer of testing-fabric from Grey’s Fabric to really seal the deal. Consider me sold, name signed in blood and all (forreal, though, I’ll do anything for love free fabric).

Holly/Tania Mash-up

I finished with good time, sent my testing notes in, and took some photos (I could pretend my hair grew like that overnight, but in reality, these photos are just that old. Haha!). And then I waited. And waited. Right before the pattern was to be released, there was a design snafu that meant the pattern had to be reworked, which set things back by… well, a lot. Fortunately, the kinks have been worked out and the pattern is now officially for sale! Which means I can finally show you mine! Yay!

Holly/Tania Mash-up
Holly/Tania Mash-up

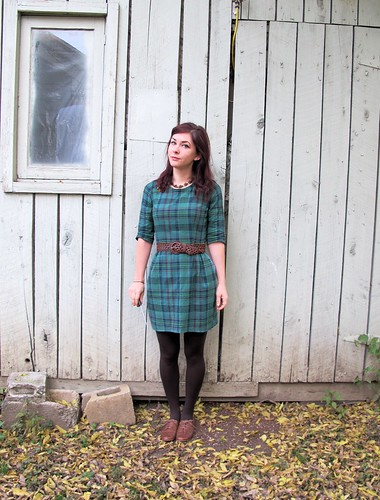
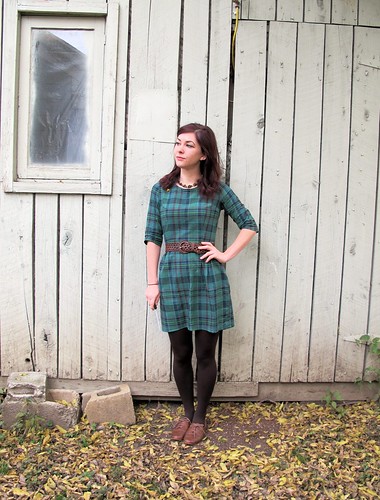
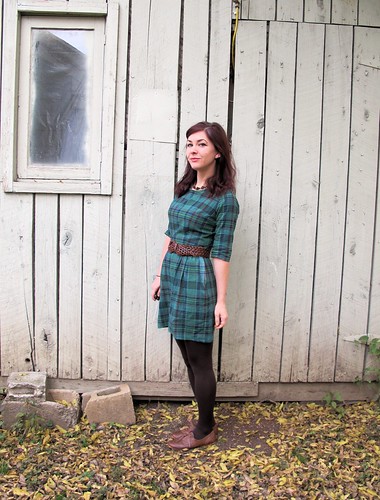
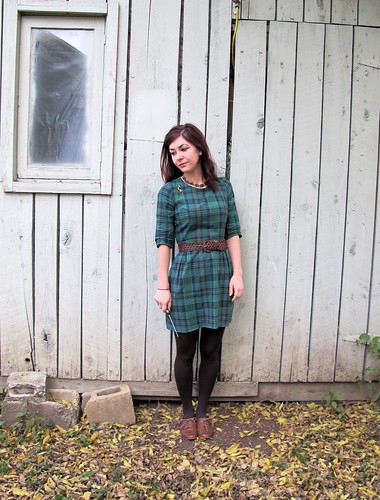
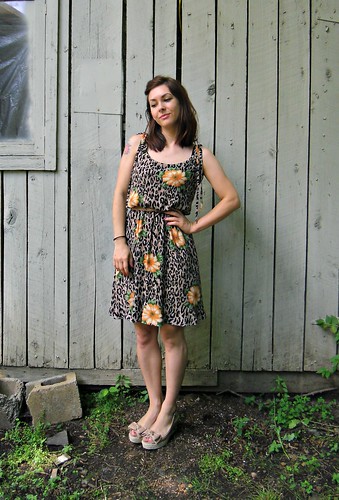
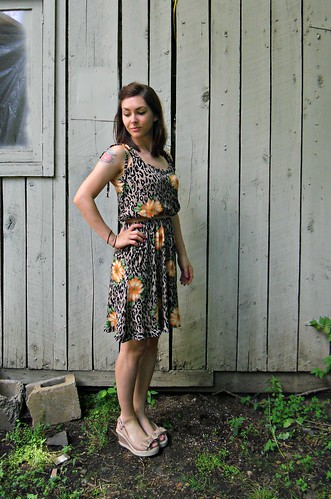
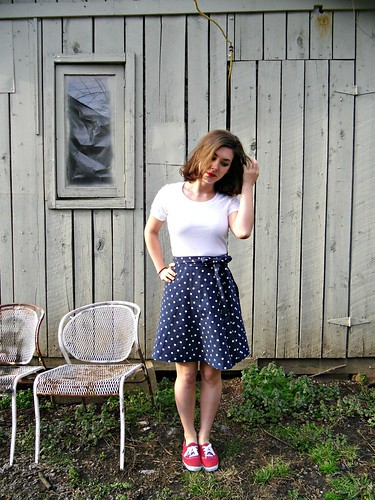
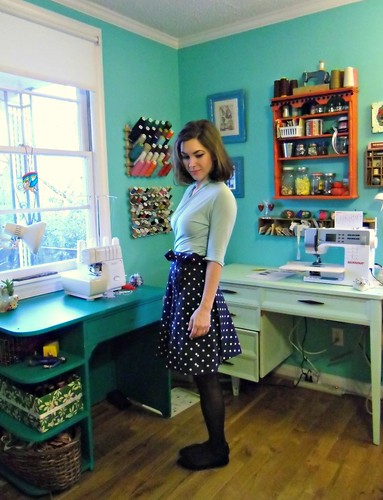
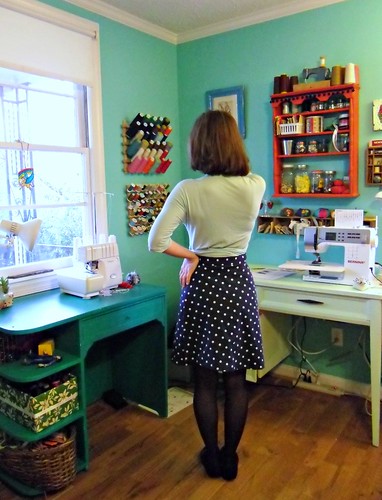
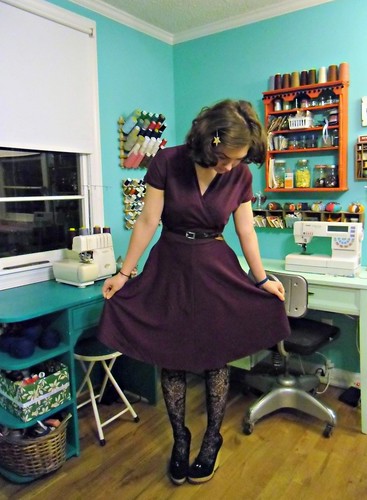
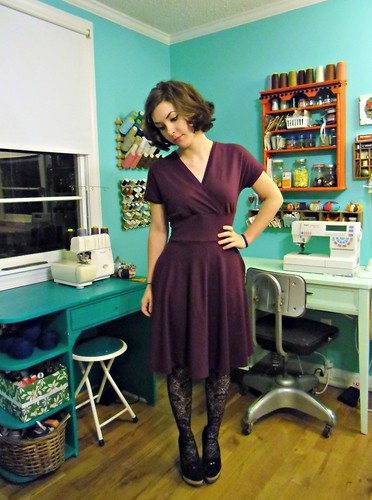
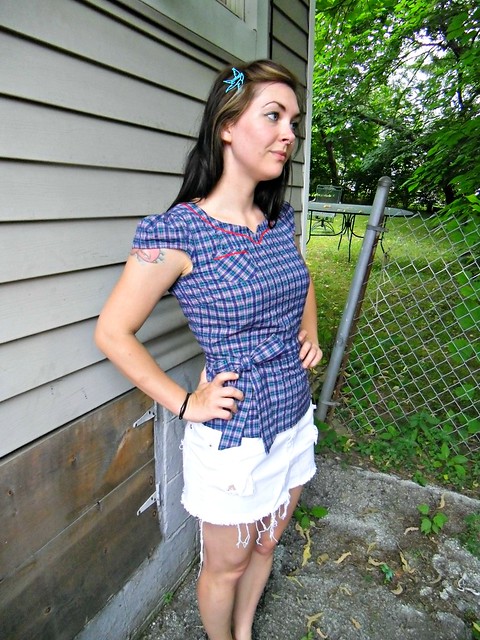
You may have noticed by now that my jumpsuit* looks nothing like the pattern – and you would be right. That’s because at this point, no part of my jumpsuit is actually part of the pattern! Whoops!

Holly/Tania Mash-up

However, it is still technically a jumpsuit (right? The two-separate-holes-for-each-leg dictate that… right?), so there’s that.

Holly/Tania Mash-up

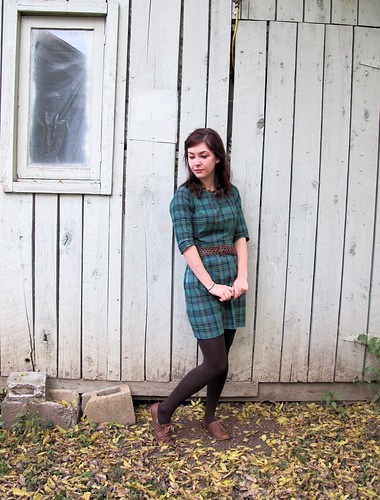
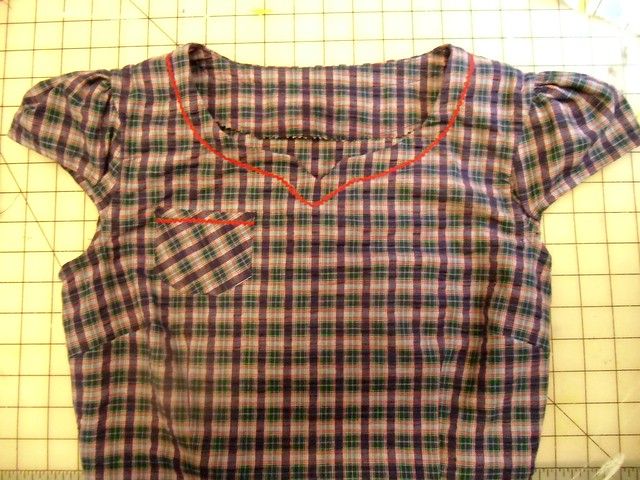
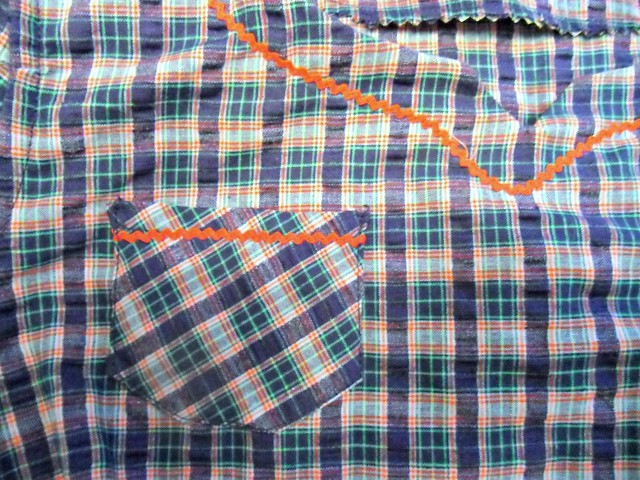
There’s a method to this madness, I promise. As a pattern tester, I always make my first version (usually a muslin), exactly as drafted and written by the pattern. After I have taken my (usually very unflattering)photos and made my fitting adjustments, I will transfer those adjustments to the pattern and make it up in my fashion fabric (if not a second muslin entirely). I started out with the shorts and Variation 2 bodice, which was surprisingly a pretty good fit straight out of the envelope. The butt of the shorts was a little tight (it is my understanding that this ended up being a grading error that has since been amended), and I needed to shorten the straps – but overall, things were looking good. It wasn’t until I had made this up in my beautiful rayon challis – i.e., the good stuff – that I realized the entire ensemble just made me look like a giant toddler. Especially when combined with this fabric – while beautiful, it’s pretty juvenile looking. Eep!

After some chatting with the BHL ladies, we ultimately decided that it would be a shame to sew something I’d never wear (and I know I occasionally wear some out-there ensembles, but again, looking like a giant toddler is NOT one of them) , so I was given the green light to swap out the bottoms for another pattern. Specifically, I chose the Tania Culottes because FUCK YES I DID.

After that, things went haywire in the design department and my tested version of the bodice ended up getting scrapped and redesigned. Which means my tested Holly jumpsuit is now basically anything BUT Holly! Oh well! I tried!

Holly/Tania Mash-up
Holly/Tania Mash-up

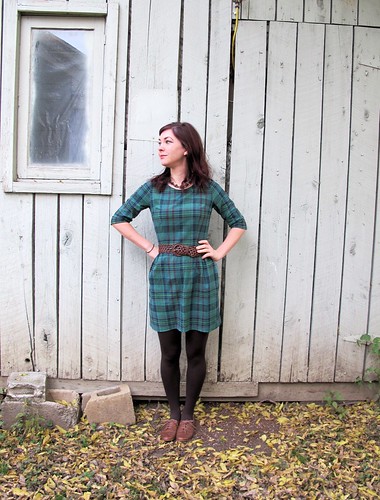
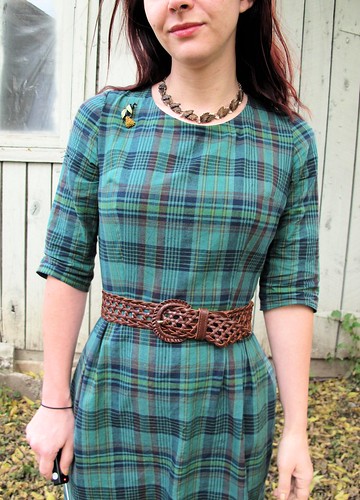
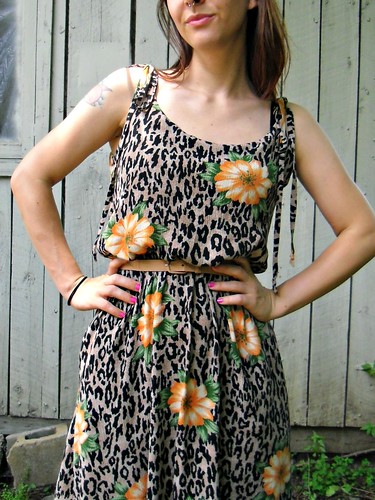
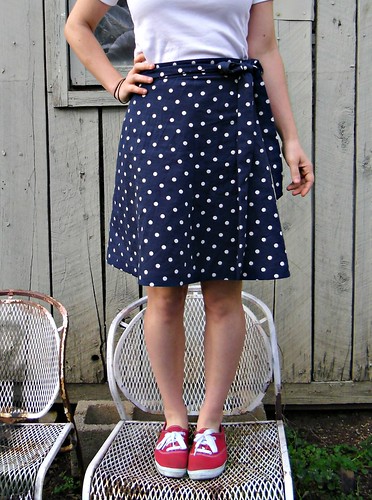
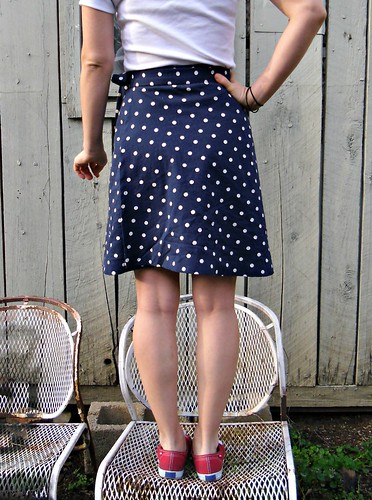
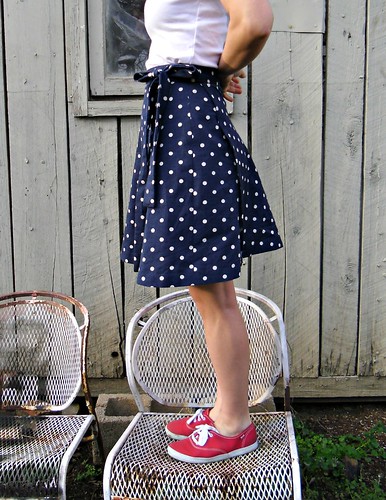
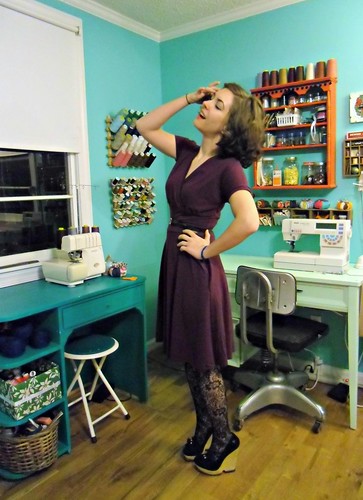
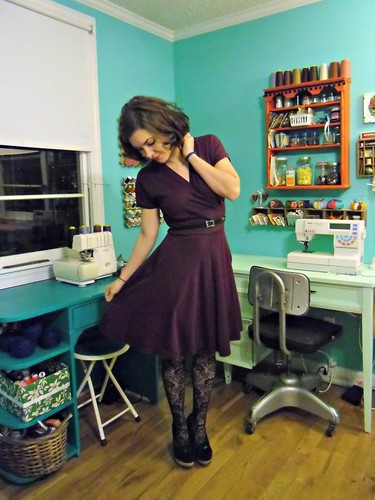
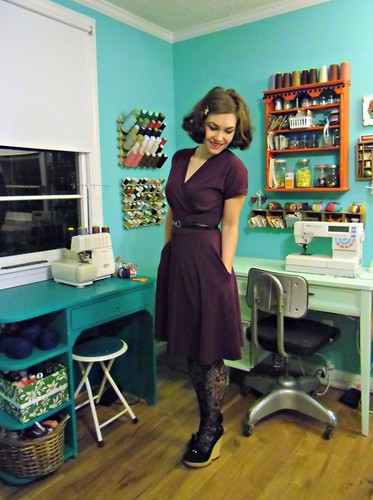
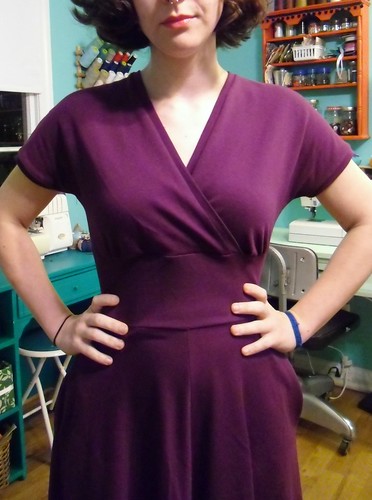
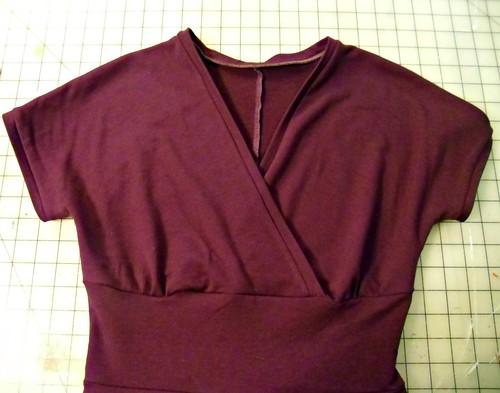
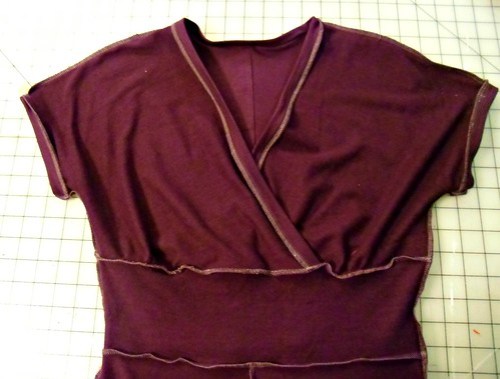
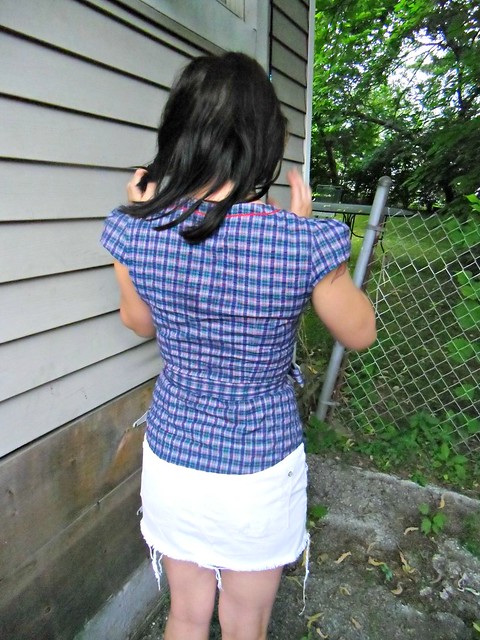
Anyway, let’s talk about the construction of this jumpsuit. To combine the bodice with the Tania culottes, I added a 2″ wide straight waistband (interfaced on one layer, and faced with self-fabric on the inside) that connects the bodice to the skirt. Ideally, I would have shortened the bodice and raised the rise of the culottes, as I think the waistband sits a little low, but that’s life. The Tanias are sewn as normal, just without a waistband.

Holly/Tania Mash-up

All edges were finished with my serger and I used my rolled hem foot to make the prettiest little baby hem.

Holly/Tania Mash-up

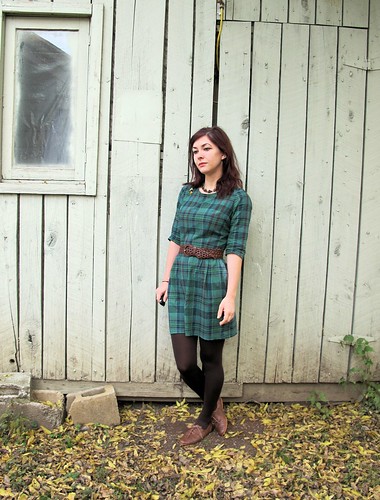
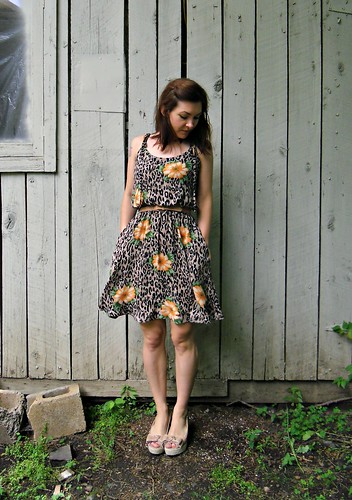
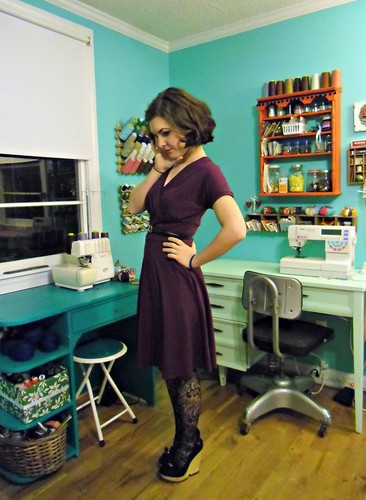
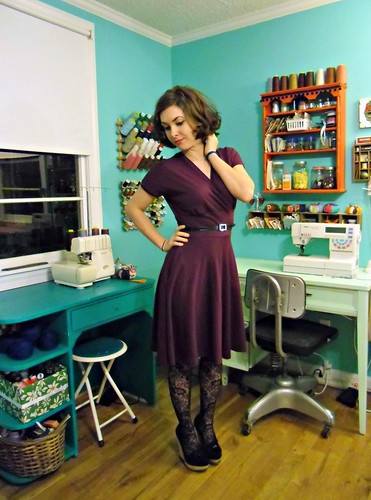
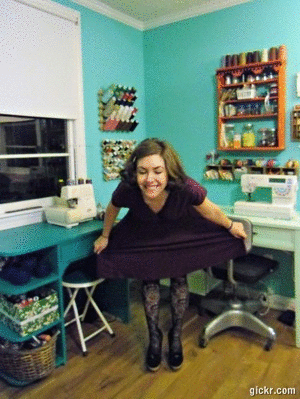
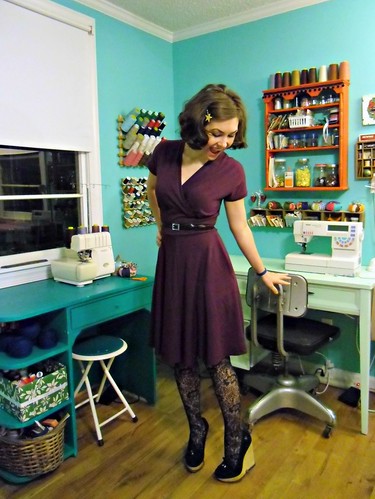
The end result is a sweet little flouncy tank dress that has an amazing twirl factor – and thanks to the culottes, is less likely to fly up and flash any innocent bystanders.

Holly/Tania Mash-up

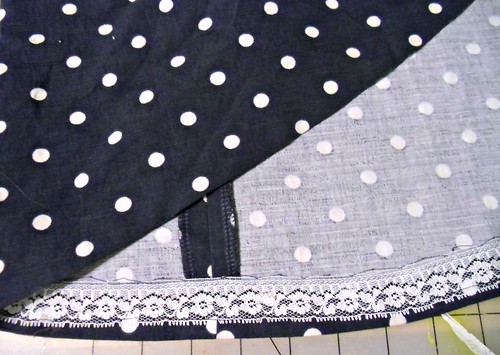
As I previously mentioned, my beautiful rayon challis came courtesy of Grey’s Fabric, specifically to be used to test this pattern. I just love the smooth silhouette and fluid drape that comes with rayon challis – not to mention, it’s ridiculously comfortable to wear in the heat. Rayon loves to wrinkle like crazy and this fabric is no exception, but at least the busy print and voluminous skirt hide most of that.

Holly/Tania Mash-up

Anyway, despite my design changes+unexpected pattern snafu changing things to the point that my tested pattern ended up being something completely different, I am happy with said end result – not to mention, it’s absolutely something I would wear (and have worn! Lots!). Again – if you plan on buying this pattern, please keep in mind that absolutely nothing about my version matches what is included in the final pattern – although it would be pretty easy to Frankenpattern this one with a couple indies.

What do you think of the Holly Jumpsuit? Are you Team Jumpsuit – craving dangly earrings, sparkly eyeshadow, and a Studio 54 vibe (I mean, ugh, that new Variation 2 bodice is KILLER, ain’t it?)? Or do you feel like an overgrown toddler who would prefer to stick with dresses and two pieces, thank you very much?

* I think the leg-shorts mean this thing is actually a romper or a playsuit, not a jumpsuit. However, the thought of saying that I’m wearing a playsuit makes me feel, again, like an overgrown toddler, so fuck that. I’m calling it a jumpsuit, as that sounds a lot more grown-up. My blog, my sewing, my rules 😛

In other news-
1. The new class schedule is up at The Fabric Studio! Lots of fun classes coming up – including an Open Sewing Lab hosted by yours truly! Those of y’all in Nashville can come hang out in the studio to sew and drink tea with other crafty peeps 🙂 I’ll be on hand to answer questions and assist as needed. This is a great alternative to a structured class since you can work on whatever you want, come whenever is convenient for you, and it’s a heck of a lot cheaper than a private lesson 🙂 Check out the classes page to sign up (my class is at the bottom). I am REALLY excited for this; I love sewing with company! Yay!

2. Don’t forget that the Casual Sweet Clothes giveaway ends on Friday! If you haven’t already entered, here’s your hint 🙂

Completed: The Flora Dress

5 Mar

Here’s a lovely, floaty warm-weather dress, just in time for another massive cold front! Ha! 🙂

Flora dress

Haha! In all seriousness, let’s welcome the newest member of the By Hand London family – Miss Flora!

Flora dress

Flora is a lovely dress with two bodice options and pleated circle skirt with a straight or hi-lo hem (or, as I like to call it, mullet-hem). I’ve dubbed this a floaty warm-weather dress because that’s specifically what my version is made for, but I imagine this could make a pretty sweet cold-weather dress, too, sewn up in the right fabric (preferably with some kind of crazy awesome contrast lining in the skirt, so it peeks out behind your legs and ooooh!).

Flora dress

My version is the the dipped hem skirt with mock wrap bodice. Man, I love me a good wrap bodice, mock or not.

Flora dress

I did have to make a few changes to get a good fit on the pattern, but nothing that runs outside my ordinary alterations. Let’s get them all out in a pretty list. I started with the size 2/6:
– 3/8″ rounded back adjustment + 5/8″ darts at the upper back
– Lowered the shoulder seams 1″ – also lowered the vertical waist darts 1″ (I also should have lowered those horizontal bust darts too, looking at all the wrinkles on mah side boobs. Oh well, hindsight is 20/20 blah blah)
– 3/8″ tuck out of the front neckline to keep it from gaping

The rounded back adjustment is a new thing for me – I’ve noticed on a lot of my old handmades, there is a weird gaping at the upper back, right under the nape of my neck. It looks STUPID AS SHIT. Apparently I have a ~rounded upper back~ or a Dowager’s Hump, which yes, sounds even worse. I am pretty certain this is in relation to a change in posture, which means I need to start doing yoga or something. Lord.

Flora dress

You know what, though? My upper back no longer has ANY gaping, at least not in this dress! Fuck yeah!

Flora dress

The rest of the dress came together without any additional alterations – even the skirt length is as-printed on the pattern. I know some people really hate this type of hem – that was me, for a long time, and still to some extent (on the really bad ones, YOU KNOW WHICH ONES I’M TALKING ABOUT), but I reeeeally love it on this dress. Combined with the circle skirt, it kind of makes me feel like a princess, without feeling like I look over-the-top. Does that make sense?

Flora dress

It should be noted that, since the back side of the fabric show behind your legs due to the hem line, you probably want to make sure that it doesn’t look totally hiddy. My fabric isn’t super gorgeous on the wrong side, but it’s passable. It looks fine.

Flora dress

Check out that hem sweep! Woohoo!!

Flora dress

I finished the skirt seams with a simple french seam – I think that just looks prettiest on exposed seams like the backside of a mullet skirt. The hem is just a tiny rolled hem, but wouldn’t it be pretty with a strip of lace so it show on the back? Yes, yes it would. Just be forwarned that this hem is looooong and goes on into forever, so if you handsew… you’ll be handsewing into forever, too.

Flora dress

Same with my Georgia dress, I stabilized the neck edges with twill tape to keep it from gaping. I really cannot recommend this step enough when it comes to necklines that have a tendency to droop and gape open – it pulls everything slightly in, and keeps it secure. I can move around all I want and there is no gaping! Yes!

Flora dress

At this point, I kind of feel like it’s my personal life mission to eliminate the gape.

Flora dress

This cotton voile fabric is equal parts weird and amazing, isn’t it? I picked it up from Mood Fabrics with this dress specifically in mind (I also grabbed this navy linen with View A in mind, but floaty won out. And now, the more I look at it, the more that linen might want to be a skirt. Thoughts?).

The Flora was designed to be made up in most any fabric (check out the other versions on the BHL blog if you don’t believe me… as a side note, MAN I am jealous of that cleavage! Dang! Haha!), so I chose to go on the lighter side – lightweight, floaty, almost see-through, you know the drill. What’s interesting about this fabric is that it has all the qualities on voile, with an extra kick of giant embroidered dots scattered everywhere. The dots are slightly thicker than the voile (not, super duper thick like you’d think when you think embroidery… more like the equivalent of a couple extra layers of the voile in thickness), but they don’t affect the drape of this fabric. Also, they’re cotton, so they didn’t do anything crazy when I hit them with my iron. Win!

Flora dress

One more shot of the upper back, bc I’m so proud of myself 🙂 Just a note – in most of these pictures, I’m wearing a strapless bra with my dress. You can see my black bra strap in this picture; that’s cos this came from the set I snapped and sent to BHL after I tested the pattern (just… be thankful I retook them, that’s all I have to say about that!). Anyway, my point is, the straps of the dress are not bra-friendly without a little bit of tweaking. You’ll either need to make bra strap carriers to hold the straps in, or go strapless.

Flora dress

I underlined my bodice in a lightweight cotton batiste, so the inside feels soft and breatheable and delicious. Also, no slippery lining fabric, yay!

Flora dress

Flora dress

And, of course, there’s a hot pink zip in there because why not?

Flora dress

Can’t wait for it to warm up out here so I can wear this bad boy out and about. I’m SO dying to get out of the house and just spend a day lounging around the park on a blanket, eating snoballs. God. Summer, won’t ya hurry up already??

Pattern Testing: The Sigma Dress

13 Nov

Umm, have you guys seen the new Constellation Collection from Papercut Patterns? Obviously, I’m biased here, but it’s pretty freaking amazing! Katie has really killed it this time, with the release of six fabulous new patterns – including a bomber jacket (which, duh, totally making that). I was lucky enough to test a pattern in this round, so I ended up making the Sigma Dress. Want to see? 🙂

Sigma Dress

The Sigma is a simple dress that can be made up in a variety of views/fabrics to create a different dress each time. What I love best about this pattern is the pure simplicity of it – it can be embellished however you please. Add a sweet detachable collar, sew it up in a fabulous brocade for the holidays, tough it up with an exposed zipper – it’s super versitale! And, I should point out, it’s a great pattern to sew up in a lovely plaid 😉

Sigma Dress

My Sigma has the skirt from variation 2 (small gathers at the waist; kind of hard to see in this fabric, ah!) and a weird mishmash of sleeves from both variations. I reeeeeally wanted this dress to have long sleeves, but I totally borked up the cutting, like, immediately (I blame it on the kidney stone), so I just made the sleeves as long as my fabric would allow me to. Soo, elbow-length it is!

Sigma Dress

I cut the size XXS, based on my measurements, and it was a near-perfect fit straight out of the envelope. I did have to add two small 1/4″ darts at the back neckline because it gaped a little, but that’s a pretty typical measurement for me. I also sewed in a lapped zipper at at 5/8″ seam allowance (these patterns use a 3/8″ seam allowance), to tighten the waist seam and also because I didn’t want to math.

Sigma Dress

Fair warning, this baby is SHORT! This is the actual length you see on me, and I’m 5’2″. Katie and I discussed the length, well, at length (hee, we’re like a mini-focus group), and she ultimately decided to keep the original short length because it’s cute as hell and add lengthen/shorten lines to the skirt so you can get on with your bad self and make it whatever length you want!

Sigma Dress
Sigma Dress

See that strange lightened area around the pocket? Yeeeah, that was where I applied interfacing to the wrong side of the skirt, sewed up the pocket, stuck it on the dressform and realized my stupid fabric was identical right/wrong side and I had used the wrong side as the right side. Meaning, my unbalanced plaid did not match at ALL at the waistline. After mulling over it for a couple of days, I carefully shredded off the interfacing and tried to wash the glue off, but as you can see – a little still remains. It’s not totally noticeable, but it *is* there. Something to keep in mind if you’re making this up in a plaid – make sure you’re using the correct side of the fabric 😉

Sigma Dress

“Wait, did someone say pockets? In this dress??”

Sigma Dress

Yep! Yay for pockets!

Sigma Dress

If you were wondering about my fabric choice, it’s really not anything special – some lightweight cotton plaid I got from a friend (who I think originally bought it at an estate sale). It’s actually a bit toooo lightweight for this dress, as it loves to wrinkle up whenever it has the opportunity. But, you know, that’s the beauty of this pattern – you can make it in practically anything. Anything!

Sigma Dress
Sigma Dress

I also think the neckline is just perfect for showcasing those little choker-esque necklaces that I can never figure out what to pair with.

This was my first experience testing for Katie (although not my first rodeo with her patterns, yeehaw!), and it was a very pleasant experience! I really liked that she had the patterns printed and shipped directly to us, as opposed to sending out PDFs to be printed and assembled at home. For one, I hate printing PDFs (and I don’t even have access to a printer anymore after quitting my office job, sooo it’s not like I could print even if I wanted to. Ok, I could go to a copy shop but you and I both know that’s not gonna happen), and for two, I’m not really sure how accurate they are when it comes to testing purposes. Seems like an easy way to fuck things up, size-wise, in my opinion.

Sooo, now that I’ve waxed poetic about this pattern for an entire post, who else is excited to get their hands on it? Or anything from the new collection? I think the next sewalong we have on the Papercut blog will be for this dress – just because I reeeeeally want to play around with different looks (which you can’t really do with a tester pattern, I mean, not the slicing and hacking type of playing :)). Speaking of which, we have a La Sylphide sewalong going on right now if anyone is keen to join!

Sigma Dress

Right now, through 11/15, you can get 15% off this pattern (or any pattern in the new collection) with free shipping! This is a great opportunity to try out a Papercut Pattern, if you’ve been on the fence before. Not to mention, Katie added a new size so they go up to XL now 🙂 What are you waiting for??

Pattern Testing: The Saltspring Dress

2 Aug

I looove pattern testing, but what I don’t love is the part where I have to keep my mouth shut about my project until the pattern becomes officially available to the rest of the world.

Well, Tasia just released the Saltspring Dress, so I guess I can talk now! YAY!!!

Saltspring Dress

Here’s another pattern that is quite a bit outside my ~personal style comfort zone~ – that blousey look is not something I normally go for – but I actually like it a lot, surprisingly! It’s very comfortable and cool for summer, while still managing to look pulled-together (or, eh, as pulled-together as one can look in FLORAL ANIMAL PRINT lolz).

Saltspring Dress

This is view A, size 2. I didn’t make any significant changes to the pattern – since I was testing it, I wanted to try it straight out of the envelope. I’m happy to say everything came out great, with no alterations, although I should probably trim down those tie straps a little 🙂

Saltspring Dress

The construction of this dress is very interesting, and Sewaholic’s pattern design chops really shine here. There are actually two layers to this dress- an smooth, semi-fitted underlayer, and the top blousey layer. The underlayer is shorter than the top layer, so that it “blouses” itself without needing to be tucked in. It’s kind of genius! There is elastic at the waistband, so this is the perfect dress to wear while eating a big meal 😉

Saltspring Dress

I’m wearing a belt with this dress because I personally don’t like the look of exposed elastic casing, but it’s not needed to get the bloused look. The dress does that by itself!

Saltspring Dress

Isn’t this fabric so fun? I’ve actually had this in my stash for a few years… Morgan’s grandmother gave it to me after a giant destashing effort on her part. I’m not completely sure of the content – based on a burn test, I believe it is rayon, but it also has a weird crinkly texture and a slight stretch – but what I can say is that woman has some FINE taste in fabric, so I’m fairly certain this is some nice stuff. It sure feels nice, anyway!

In retrospect, I don’t know if this fabric was truly my best choice, because it doesn’t drape as well as it needs to. The top of the dress doesn’t exactly look structured, but it’s not as flowy and drapey as it needs to be. But, you know, I think the print actually makes up for it a bit 🙂 Hard to be mad at the world when you’re wearing this kind of awesome island tiki type shit, yeah? 🙂

Saltspring Dress

The only “drawback” (if you can even call it that) to this pattern is that it does not look flattering AT ALL until you actually put in the zipper and the elastic. I don’t know how many of y’all try stuff on as you sew it (I do – constantly – which is why I mostly sew in my underwear 😉 haha), but I just thought I would point that out. Obviously it works out in the end, but I was a little terrified for a minute there 🙂

Saltspring Dress

Anyway, this is a great pattern – very easy to make up (perfect for beginners!), comfortable to wear in the summer, and I think you can really try a lot of different options with the design. Personally, I’d love to try this up without the overblouse, just a slim-fitting, spaghetti strap top with a flared skirt. Ah, that sounds so perfect right now!

Want a copy of your own? You can buy the Saltspring here!

Pattern Testing: The Miette Wrap Skirt

1 Apr

Ohhhh, I’m so excited to finally post this! Keep secrets is not exactly one of my strong points 🙂

Ladies and Gentlemen (… are you there??), may I introduce the Miette Wrap Skirt:
Miette Wrap Skirt

Our now-famous Tilly has released a new downloadable pattern – the Miette! Miette is a gently flared wraparound skirt that ties at the front in a delightful bow. The skirt has a wide back overlap (no danger of flashing!) and optional practical patch pockets. Guys, this is the perfect beginner pattern – wrap around ties (no fiddly closures!), simple to fit, and it’s actually cute and wearable… not to mention highly customizable. Can’t you see this with a contrasting waist tie, or even some embroidery or applique on the front pocket? Another bonus is that the simple shape works with a variety of fabrics – even the scary ones, like silk or plaid – and since there are only a few pieces, it’s a great pattern for testing the waters without a huge commitment. I love it!

Miette Wrap Skirt

I also love that it’s a non-flashing wrap skirt. I took these pictures on a windy day, wore it out on a windy day – even stood on the street corner and waited 15 minutes for my ride to pick me up – and things stayed exactly where they belonged. I haven’t had a chance to fully test this theory, but I very strongly suspect that this skirt will also work well for cycling.

Miette Wrap Skirt
In addition to being a simple skirt design, the instructions are also super easy for even the most amateur of beginners to comprehend – think full, in-depth tutorial, with scads of color pictures and lots of words to guide you along (there is also a set of basic instructions for those of us who don’t need quite so much hand-holding ;)). Consider it a sewing lesson with a bonus pattern!

Miette Wrap Skirt
I cut my pattern in a size 2, omitted the pocket (otherwise it would’ve gotten lost in the sea of dots) and shortened the length by about 4″. The fit turned out perfect; I couldn’t be happier!

Miette Wrap Skirt

Isn’t my fabric gorgeous!? It’s a lovely medium-weight linen by Marc Jacobs… from Mood, of course 😉 I actually chased the bolt around the store, which made me spend an extra long time cutting and thus made me late for the round-up at the end of our first shopping segment during my NY meet-up. Totally worth it, though – this stuff was a dream to sew, to wear, to just look at. And it goes with half the tops in my wardrobe! YUS.

Miette Wrap Skirt

Psst! It comes in other colorways as well… I have an entire fistful of swatches to prove it. Who wants to be twinsies with me?!

Miette Wrap Skirt

As you can see, here is an entirely different set of pictures. I didn’t like the way my first batch turned out! I was also super eager to try pairing this skirt up with a mint top, after seeing my homegirl Kaelah’s mint+navy outfit and being jealous of her color-matching skillz. This is my Pavlova Wrap top.

Miette Wrap Skirt
Since this is a wrap skirt paired with a wrap top, I will be calling this outfit the Wrapper’s Delight. Go ahead, groan.

Miette Wrap Skirt
Speaking of groaning, I know I shouldn’t be wearing black tights with this outfit. I promise I didn’t go out in public like this. Just ignore them, please and thanks.

Miette Wrap Skirt
I love my new skirt and I can’t wait to find new combinations to wear it with (as dorky as that sounds!). I also can’t wait to see all the different versions that are sure to start popping up – judging from the maker’s gallery, I think we’re all in for a treat 🙂

Want one for yourself? GET IT GET IT (you know you want it!!). And thank you, Tilly, for letting me be a pattern tester!

Pattern Testing: The Avocado Hoodie

18 Mar

Remember that little blurb last Thursday about the kickstarter campaign for this hoodie pattern? Well, it looks like in the time since then, Mari has 100%+ funded her goal! Yay, paper patterns! There’s still about 6 hours left until the campaign ends, so if you haven’t had an opportunity to contribute and you want to snag the pattern at a discount price, now’s your chance!

In the meantime, let’s talk about why I even brought this up today…

Avocado Hoodie
I got to test the pattern over the weekend, and now I’m the proud owner of my own Avocado hoodie! Woohoo!

Avocado Hoodie
I’m not normally a fan of pullover hoodies… which now that I think about, it’s kind of dumb since I *always* zip my hoodies up. I can’t stand that shit flapping around! But anyway, for whatever reason, I don’t normally spring for the pullovers. Maybe because they remind me too much of those oversized college hoodies, I dunno. This one is surprisingly nice, though – the princess seams give it a bit of shape, so it still looks nice even though it has way more ease than what I would normally prefer to wear. And it’s sooo comfy, forreal.

Avocado Hoodie
Confession: After I took these pictures on Saturday afternoon, I wore the hoodie for the rest of the day – to clean, cook dinner, and lounge-y LT time. I love that it’s comfortable and snuggly, but it’s not so huge I feel like I’m swimming in something that belongs to a dude 4 sizes bigger than me.

Avocado Hoodie
In addition to being a basic, princess-seamed pullover hoodie, this top has a few neat features that differentiate it from similar hoodies…

Avocado Hoodie
Thumb-holes in the cuffs!

Avocado Hoodie
Pockets in the back – so when you are walking with your arms around a loved one (or fling, or friend, or whatev. I ain’t here to judge you), they can put their hands in the pockets. GENIUS, amirite?!

Avocado Hoodie
The hood is a great size – not so big that it gets floppy and falls off (ew, I hate that), not so tight that it pushes down on the top of my head and makes it hard to move around (hate that, too). I feel like hood size is kind of a delicate balance, and this one is drafted exactly to the size that I find most comfortable.

Avocado Hoodie
As far as how the finished hoodie fits… I opted to sew it as close to the suggested measurements as possible, and I think the bottom hem ended up a bit loose. Of course, you don’t want something like this to little or negative ease, since tightness can cause the hem to ride up. I cut a 4 for the front bust/hips, tapered to a 2 at the waist, and cut the back at a 2. I think the ease in the bust, waist, and arms turned out great – yes, there is ease (more than I typically wear, even!), but I feel like it still looks pretty flattering. I may take it in just a bit around the hips, but even as it is now, I think it looks fine.

Avocado Hoodie
One thing I do think is worth mentioning is that the length was a bit too long on me after adding the hem band. Here is how it looks with the band folded up – I think it suits my proportions better this way. Keep in mind that I am petite (clocking in at about 5’2.5″ on a tall day ;)), so it should be the perfect length for an average height/torso.

Avocado Hoodie
Putting the hoodie together was quite easy – despite there being a bunch of little pieces. I did have a bit of trouble figuring out the pockets, but as I was testing the beta pattern and left lots of feedback, I think it will be much easier after Mari adds more clarification and diagrams. With that being said, after I finally trolled through the pockets and started really assembling the hoodie, that part went FAST. I think it took me maybe an hour and a half, tops. I sewed the entire thing on my serger, minus a couple areas of topstitching.

Avocado Hoodie
The fabric I used is from Mood in NY – my first completed post-NY project! It’s a cotton french terry, and the lining under the pocket is cotton jersey. I loooove this fabric, it’s so soft and warm, and I think it will feel really nice in the summer when I’m dealing with air conditioning 😉 The only downside to this stuff is that is sheds tiny terry pieces like it’s going out of style. You will definitely need to finish every single seam if you use this type of fabric… and make sure you do a thorough sweeping after!

Avocado Hoodie
Ooh just look at that lovely terry.

Avocado Hoodie
Here you can see inside the pocket on the back – the dark is my pocket lining (the cotton jersey). Wouldn’t this be fun with something super bright and contrasty, like teal with yellow polka dots?? Which I almost bought, btw. Hm maybe I should have.

Avocado Hoodie
All in all, I think this turned out pretty good! I may end up removing the band and just topstitching the bottom, to relieve some of the length, as well as shortening the sleeves – this climate doesn’t exactly dictate the need for sleeves that cover most of the hand 🙂 I’m also thinking about screen printing something on the front, since it’s so plain! What do you guys think??

Avocado Hoodie
I must say, I was a little nervous on Saturday while finishing this up, since it was 70* outside and I’d spent the whole morning doing garden and yard work (yay, Spring!), I was thinking I wouldn’t have a chance to wear this hoodie at all! But just in case you were wondering… it got all cold and rainy again. And by “cold,” I mean 50*. What can I say? I’m a delicate Southern Rose who wilts at any temperature below 65* 😉

Completed: The Tiramisu!

13 Dec

WHOOOOOOOOOOO LOVES CAKE? I’m talking about the new pattern line, the brainchild of our beloved StephC (although the food is all kinds of delicious too, mmm). Tiramisu is her first offering – a knit dress with a mock-wrap front (in cup sizes A-D), short kimono sleeves, and pockets.

I was actually part of the crew of ladiez who were initially chosen to test the pattern before it went to print. There was a small snafu with the tester printing (so it goes), which is why you see my dress at the same time you are (hopefully!)holding your own copy of the pattern. I’m still treating this like a test pattern, which is why I actually paid attention to the instructions and made notes as I sewed. I also made a muslin. I never make a muslin for knits – are you proud of me? ARE YOU?

Despite treating this like a test, I’m sorry to report that my pictures are still total shit. You know, winter, lack of light, I’m not getting up early, blah blah. Also, my hair looked REALLY good last night and I need to take advantage of that. Them’s the breaks!

Anyway, check out my new dress!

Purple Tiramisu
~So in love!

Purple Tiramisu
It looks totally different in a solid color, yes?

Purple Tiramisu
For this lil guy, I used a gorgeous purple bamboo knit that I bought at Vogue Fabrics while I was in Chicago. I actually bought it specifically to make this pattern; I’ve been holding it for a few months haha. I wish I had a big enough piece to send every single one of you a little swatch – it is the softest thing I have ever put on my body ahhhh!! And the color… none of these photos (mine or the ones from Vogue) do it justice. It is the most beautiful eggplant purple in the world.

Purple Tiramisu
Basically, I never want to buy another knit that isn’t bamboo again. Ever.

Purple Tiramisu
So let’s talk about the pattern! The sizing is pretty brilliant, and in fact my favorite part – you pick based on your high bust measurement, and then corresponding cup measurement (which is more of a measurement of proportion rather than the actual size bra that you would normally wear). The waist band is chosen based on your actual measurement (rather than the usual, “Well, if your bust is x, then your waist is y.”). It sounded confusing at first read, but once I actually got the pattern in my hands and looked over the sizing information, it was pretty easy to determine what size I should cut.

The size I ended up with was 30D, based on my measurements, and the waistband was cut for a 25″ measurement. I had to make a couple small changes to get my preferred fit, but even straight out of the envelope it was looking pretty good!

Purple Tiramisu
The changes I made were actually pretty mundane:
– I took about 1/2 off the bottom of the front bodice, as it stretched a little too low in the muslin (PROTIP: When making a muslin for this dress, you only mock-up the bodice & midriff. Since the skirt weighs down the whole top and thus affects the fit, it is pretty important to pull down the band to mimic this if your fabric is on the heavy side. Otherwise, you may end up with a longer bodice once you sew the skirt on!)
– I took at least 1″ off the side seams, for a much more snug fit
– I took 3.5″ off the hem, as below-the-knee doesn’t look so hot on me. The skirt is 20.5″ now.
Ok, looking back, I realize that those bust changes mean I actually ended up with a 30C. WHATEVA.

Things I love about this dress:
Purple Tiramisu
DAT SKIRT.

Purple Tiramisu
SOFT POCKETS.

dancin
NO GAPE.
Seriously, the bodice engineering on this thing is a thing of beauty and wonder.

Purple Tiramisu
One thing I did note with this particular dress is that the pockets do add a bit of bulk at the hips. I think this is unique to my particular fabric (it’s quite clingy due to the 4 way stretch), as it’s not apparent on Steph’s version (or the bonus version), but I think it bears mention if you are concerned about that kind of thing. I’m not, personally, so the pockets will stay.

Oh, here are some pictures without the belt, btw:
Purple Tiramisu

Purple Tiramisu
It’s still pretty! I just like to belt, well, everything 🙂

Purple Tiramisu
The only thing I would change next time I make this is to sew the sleeve binding on after the side seams are sewn. It’s a personal preference – I know why the pattern has you sew the binding on before (so you can test and tweak the fit – and yes, it comes in handy!), but I just like the way it looks as an, er, uninterrupted tube. It also may or may not have anything to do with the fact that I sewed the sleeve binding to the bottom of the midriff on my first go (and no, I’m not bitter or anything, why do you ask?).
Another thing I’ll mention is that the fabric estimates are generous. I only used 1.5 yards of my 60″ fabric. Even at $15 a yard, that’s a pretty cheap dress!

Purple Tiramisu
I know my threads look as white as I am, but I promise they are purple! Also, this picture is boring as hell.

Purple Tiramisu
Anyway, super happy with this one! I can see this in lots of different fabrics – it’s so comfortable, especially since you don’t have to worry about THE GAPE.

With that being said, if you haven’t already done so – you really need to pick up a copy! And OMG so excited about the upcoming Pavlova!!

Pattern Testing: The Alma Blouse

2 Aug

I actually finished this blouse almost 2 months ago ago & I have been DYING to share it with you guys! This is Sewaholic’s newest pattern, the Alma Blouse. I got to be one of the pattern tester’s for this. I LOVE being a pattern tester, by the way – something about being able to not only see a pattern before the rest of the world, but even sew it up?! Count me in! It doesn’t hurt when the pattern in question is something totally awesome that I absolutely would have bought anyway. Double yay!

Alma Blouse
Am I right, though? This blouse is totally cute – and I love that it’s a woven top that is *not* a button-up. Those kinds of options are few & far in between. This is version A, with the cap sleeves & notched neckline.

I did make a few changes to the pattern – you’ll notice that it is much more form-fitting than Tasia’s sample photos. I did originally cut it in a straight size 4, but the muslin was a bit more blousey than what I am comfortable wearing. The final piece is a size 4 at the bust, tapered to a 0 at the waist & a 2 at the shoulders & hips. I did not do any sort of FBA besides grading the pattern sizes. I did take about 1/4″ out of the center back seam, but the end result is a little snug so I’ll probably slap that back in for future Almas (and yes, there will be future Almas). I pinched about 1/4″ out of the sleeves because they originally stuck out too far – I have small shoulders, though, and this is a pretty typical alteration for me.

Alma Blouse
One thing that I love about this pattern is that it closes with a side invisible zipper – which makes it possible to be so form-fitting (yet still be able to get it on).

Alma Blouse
Man, I love those tiny cap sleeves. They are super flattering!

Alma Blouse
Also, I can personally vouch that this pattern is suitable for plaids – everything matched up beautifully! And since there aren’t a lot of pieces involved, the process of cutting/matching isn’t really much of a horror story.

Alma Blouse

Alma Blouse
Look at how much shorter my hair is in these pictures! Haha! I took these about 2 months ago 🙂

Alma Blouse
The only design changes I made were actually post-construction – I felt like the notched collar was getting lost in the plaid, so I added a row of rick-rack 1″ from the edge. I also cut a tiny pocket on the bias, because tiny pockets are adorable.

Alma Blouse
I love the waist tie! I think that might be what sets this blouse over the top – of course, it looks great without the tie, but one of my favorite ways to wear it is tucked in to a high-waisted skirt with the tie as a belt. Of course, it looks great untucked too!

Alma Blouse
Sorry the lighting in this picture is so bad! The fabric is a light cotton/poly plaid seersucker, one of the many that my mom picked up at a yard sale for me a few months ago 🙂 Thanks, mom!

Alma Blouse
The pocket is really simple to make – I sketched until I had a shape that I liked, then traced it onto a cardboard template. When I cut the fabric, I added my seam allowance & used the cardboard template to press the seam allowance back so everything would be crisp & even. I figured out the placement by putting the shirt on & holding the pocket up until I was happy with the way it looked. Easy!

Final words: I’m totally happy with this pattern, and I highly recommend it if you’re looking for a way to make tops with wovens that don’t involve a bunch of button holes front & center. There are several options in the pattern, which is great since that makes it work for all seasons 🙂 Thinking about making a long sleeved version next – with embroidery on the peter pan collar! Ooh la la!

Alma Blouse
Now run – don’t walk – over to the pattern store & pick up your own copy!

pattern testing: the minoru jacket

15 Nov

time to talk about the minoru! finally! for those of you who don’t follow (the… three of you? ever?), tasia of sewaholic patterns recently dropped her 4th pattern, a darling sporty jacket called the minoru. i was chosen to be a pattern tester (out of 600!! geez louise!), which was awesome, except for the part about dropping all my sewing fun-times for 2 weeks :). this was also during the dark month that my truck had died & i hadn’t replaced it yet… so i actually rode the bus to the fabric store. it took an hour (for maaaaybe a 14 mile drive?). that is some dedication, y’all!

anyway, a few of the pattern testers have already posted theirs, so i will follow suit and post mine.

i’d actually been toying with the idea of making a cycling jacket – something brightly colored, to increase visibility now that the sun is setting earlier & earlier. when i saw that the pattern we were testing was going to be a sporty jacket, it was like god himself had sent the pattern down to me from the heavens. i initially wanted to make my jacket in a bright yellow corduroy, but the fabric store was lacking (and i didn’t have the means to shop around), so i stuck with white. in retrospect, this was not the best idea i have ever had – it gets dirty faster (duh!), my patterned lining shows through, and it is hard as shit to photograph. btw, i think i took over 150 pictures of this jacket. it was that hard to photograph.

anyway, the pattern itself was a total breeze to work through! tasia has it labeled as intermediate, but i think an advanced beginner could easily tackle this. the instructions are great & the pieces lined up nicely! i did have to make a few changes to get the pattern to work for me – the big one was a full bust adjustment. since these patterns are for the pear-inclined, there is not a lot of room up there! i had a bit of trouble since this jacket doesn’t actually have any darts in the front, so i had to add my own dart & then slash and spread from there. i also shortened the jacket, as the original length overwhelmed my short frame.
one thing i wish i had done was interfaced the collar – it doesn’t call for it in the instructions, but it is also assumed that you are using a heavier fabric. my corduroy was very fine & lightweight (hence the see-thru), and my collar just flops. i considered interfacing it while i was making the thing up, but i wanted to stay as true to the pattern/directions as possible so i could offer better feedback. so there’s my feedback – use a sturdy fabric, or use interfacing!

anyway, i love my jacket and i love all the fun details that make it so special – the topstitching (btw – buy 2 spools of thread. you will need them!), the fine gathering, THAT ELASTIC WAISTBAND THAT IS BEAUTIFUL AND GENIUS (sorry, i got excited for a second there), the inside pockets, the collar. i will definitely make this again – in my preferred yellow, with an interfaced collar 🙂 and a hood. i think i missed out by not doing the hood.

anyway, pictures!

minoru jacket

minoru jacket - zipping

minoru jacket - collar

minoru jacket - back
lovelovelove the back

minoru jacket - unzipping

minoru jacket - unzipping

minoru jacket - ah-sneeze
i am including this picture bc it cracks me up. i was trying to show the lining & i sneezed!

minoru jacket - pocketssss!
pockets!

minoru jacket - open

and some detail shots…
minoru jacket - flat

minoru jacket lining

minoru jacket - elastic

minoru jacket - collar open

minoru jacket - zipped up

minoru jacket - open

ALSO one last thing…

minoru jacket & bikey
minoru & bike.
you jealous? 🙂