Tag Archives: sewaholic

Completed: Fleecy Fraser Sweatshirt

2 Mar

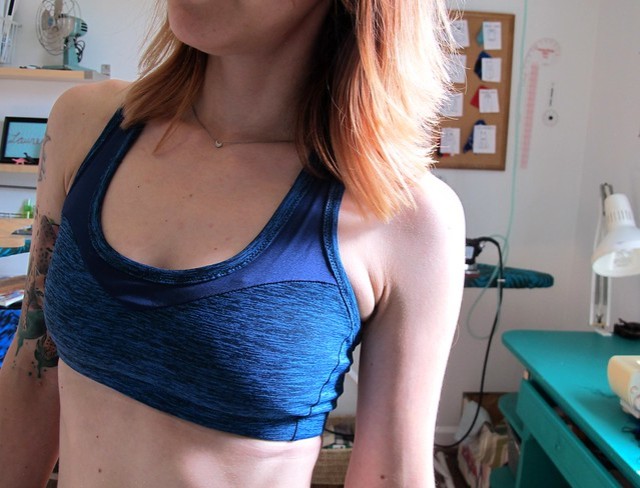
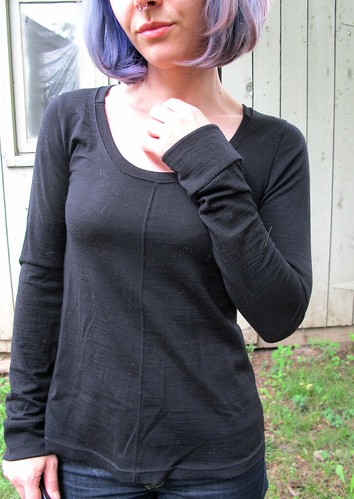
Ok, so, apologies in advance for posting a really boring sweatshirt today, but, I feel like this post is warranted for two reasons – really awesome fabric, and a previously overlooked version of a pattern.

Honestly, this might be my new favorite fabric at Mood (up there in the ranks with their Bamboo Jersey and Organic Cotton twill). AND they have plenty of colors still in stock (although as of this posting, currently sold out of this particular green – sorry!)! It’s a Christmas Miracle!

Sewaholic Fraser Sweatshirt made with stretch fleece from Mood Fabrics

In all seriousness, though, I wanted to really focus on the fabric for this post. I promise it’s a really good one and worth the praise! I found this Moss Bamboo and Cotton Stretch Fleece on the Mood Fabric’s website a few months ago, via swatch (I always take advantage of my free swatches and usually end up throwing random stuff in my cart before I place my order! I have discovered some REALLY cool fabrics that way that I might have otherwise overlooked). I’m not even kidding when I say it’s one of my new favorite fabrics – they have loads of colorways and it’s nice and wide (60″) so you need less yardage.

Sewaholic Fraser Sweatshirt made with stretch fleece from Mood Fabrics

Sewaholic Fraser Sweatshirt made with stretch fleece from Mood Fabrics

Sewaholic Fraser Sweatshirt made with stretch fleece from Mood Fabrics

Sewaholic Fraser Sweatshirt made with stretch fleece from Mood Fabrics

The fabric is comprised of 66% bamboo, 28% cotton, and 6% spandex. That little bit of spandex is essential for giving the fabric a great stretch with a fabulous recovery. Plus, I really love bamboo fabrics – they are soft, easy to wash and wear, and they are antimicrobial so they have fantastic stink-reducing properties!

This fabric is considered a sweatshirt fleece, meaning it is has one side that is nice and smooth and the opposite side is soft and brushed. Unlike your typical sweatshirt fleece, it’s a slightly lighter weight with a softer drape. It is also a 4 way stretch, which, WEIRDLY (don’t ask me why, I couldn’t tell you) has more stretch along the grain rather than the crossgrain (if I recall, 40% at the cross grain and something like 80% along the grain). It’s soft (did I mention that it’s soft? Because it is FUCKING SOFT), it snaps back into shape, and it comes in a nice array of colors – what isn’t there to love?

Sewaholic Fraser Sweatshirt made with stretch fleece from Mood Fabrics

Sewaholic Fraser Sweatshirt made with stretch fleece from Mood Fabrics

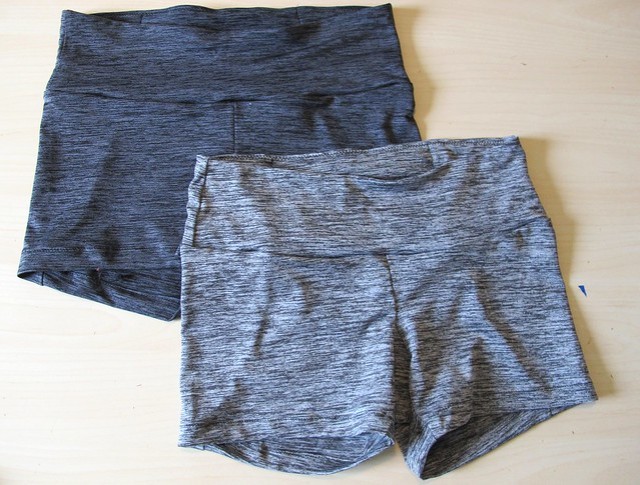
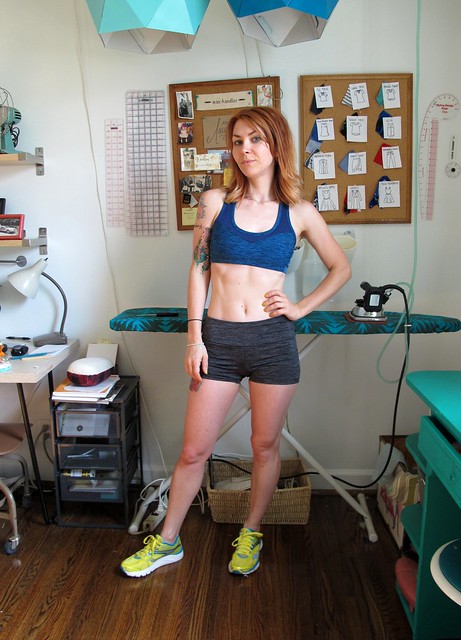
This sweatshirt is actually the second garment I made using this fleece – my first garment was a pair of black Virginia leggings. I don’t have any photos of those – let’s be real, they are black leggings and basically impossible to photograph – but I wear them ALL THE TIME (here is a photo on my Instagram – I’d already been wearing them for 3 days at that point haha). Think of your favorite fleece leggings or tights – and then just imagine them in bamboo instead of poly (so no stink and no pilling). Because of the spandex, the fabric doesn’t bag out – meaning no baggy knees or butts. Also, in retrospect – they look pretty much the same as the pants I am wearing (the Cecilia Pant from Elizabeth Suzann – aka my MAGIC PANTS seriously you guys these pants are magical), so maybe I should have just worn the leggings for this photo!

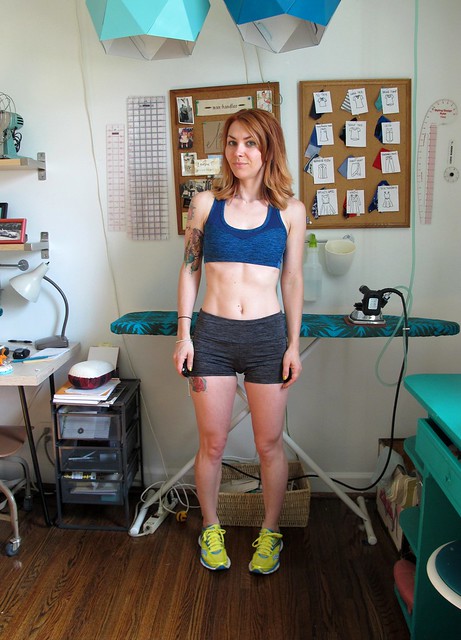
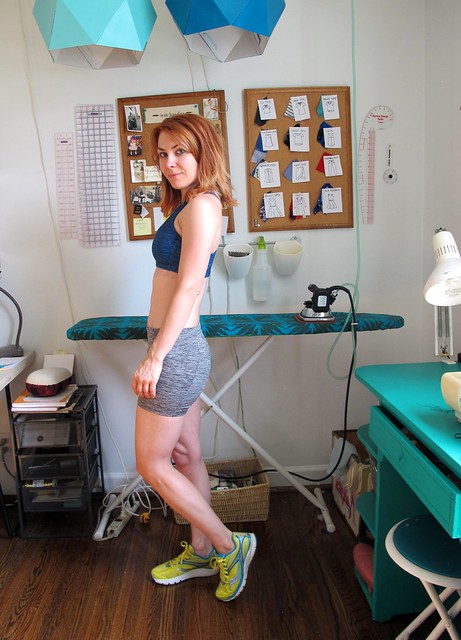
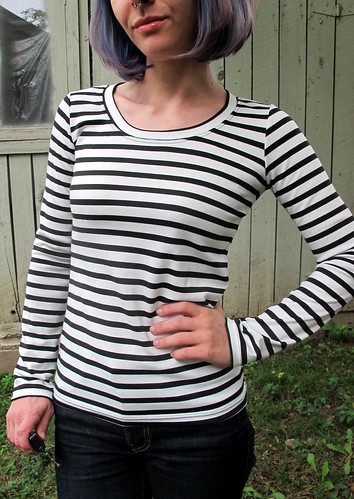
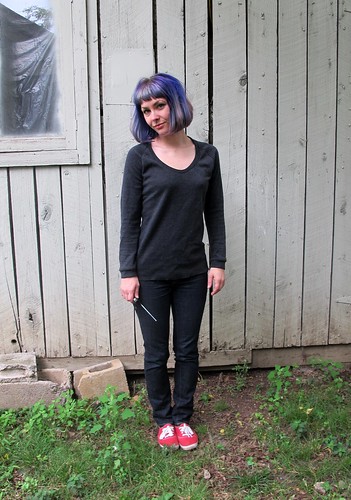
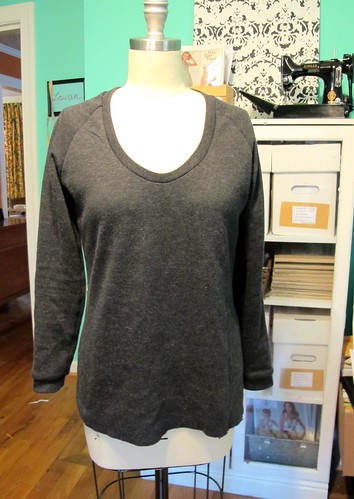
So anyway, about this project! After my success with the leggings, I bought 2 more yards of this hunter green colorway without a real idea of what I wanted to make with it. I knew I wanted a sweatshirt, but a plain sweatshirt seemed like such a cop-out. So I went with the Sewaholic Fraser Sweatshirt.

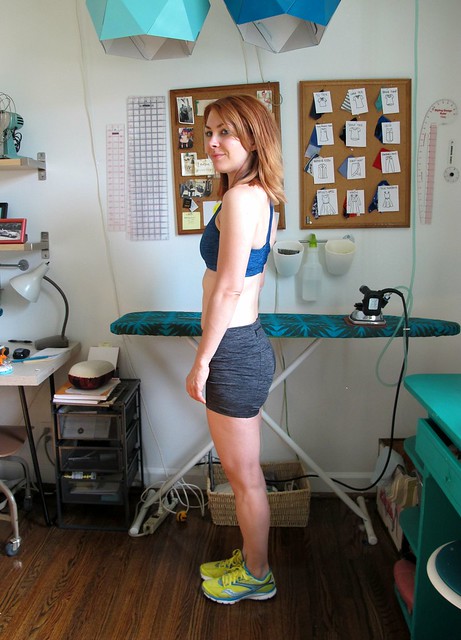
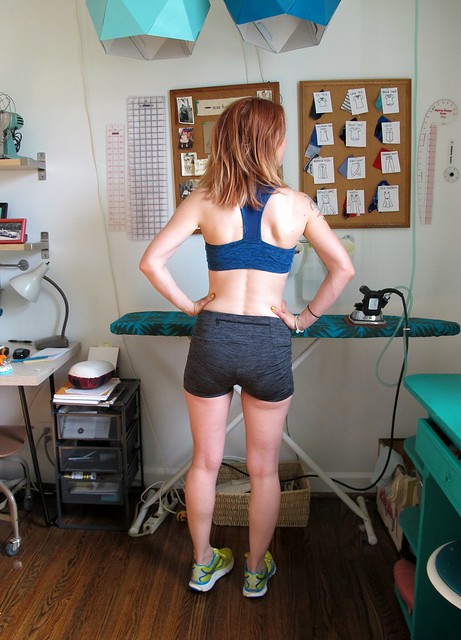
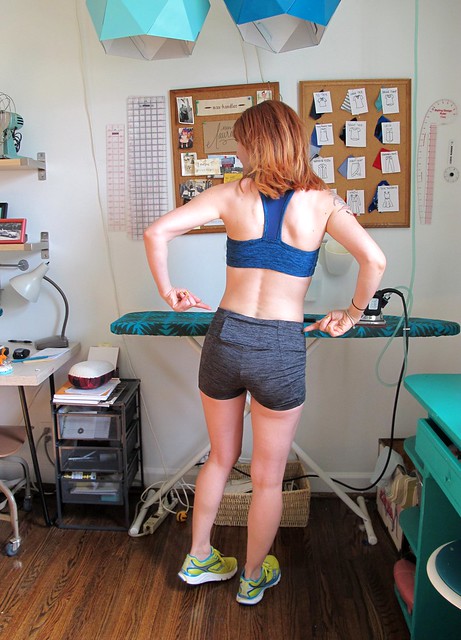
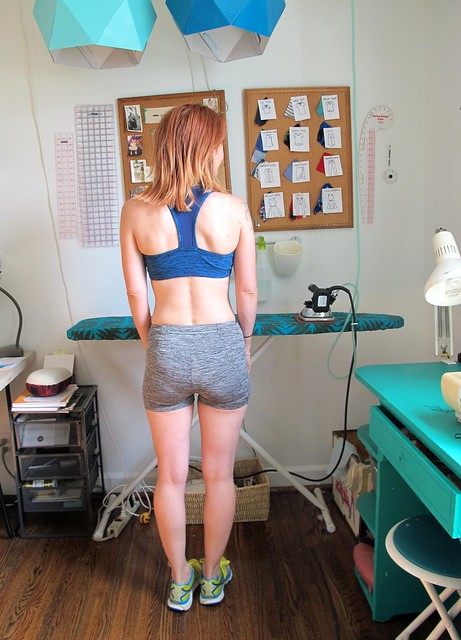
I will be completely honest – I did NOT like this particular view of the Fraser when I first saw it (or, to be even more honest – any subsequent versions that I’ve seen since). I dunno, the super contrast yoke just looks unflatteringly Western to me (and I typically love me some Western wear) – very costume-y, very Wonder Woman. I had no intentions of ever sewing up that version (I do like the other versions – you can see the one I made with a collar here), but weirdly, I thought of it when I was trying to decide what to do with this fleece. I thought it might look good with the contrast just being the wrong fuzzy side of the fabric, so the color still matched but there would be some subtle texture differences (again, just like my version with the collar).  I’m actually pretty pleased with the end result – it’s still a nice sweatshirt but with a little more interest… and it doesn’t look costume-y. And I have worn it every day this week, no lie, so obviously it’s a massive success in my book haha.

Sewaholic Fraser Sweatshirt made with stretch fleece from Mood Fabrics

Sewaholic Fraser Sweatshirt made with stretch fleece from Mood Fabrics

I made a size 0 and slimmed down the hips (Sewaholic Patterns are designed for pear-shaped women, and I’ve found I don’t need the extra room down there). I also cut this on the lengthwise grain, instead of the crossgrain – remember when I said the fabric had more stretch on the lengthwise grain? I think it would work either way, but I wanted a reeeeeally stretchy, comfy sweatshirt! Shortened the sleeves about 1″… they are still slightly long, but in my experience it’s better to keep them long and allow for a little more shrinkage, then re-hem if necessary. I have waaaay too much bracelet-length sleeves as a result of not being aware of this for the first half of my sewing career haha.

I did have to pay careful attention to the stitching at the center front V, as well as matching the sleeve contrast seam to the bodice contrast seam – for those, I based first on my sewing machine (much easier to take the stitches out if you mess it up) before using my serger. I used the single needle chainstitch on my coverstitch machine to topstitch the contrast, to give it a little more dimension. Other than that, a very quick and easy sew! I did notice the the fleece flattens when you press it, but it’s easy to fluff back up with your fingers.

Sewaholic Fraser Sweatshirt made with stretch fleece from Mood Fabrics

Anyway, that’s all for this one! A simple project, but also a big gushy heart-eyes love song about some amazing fabric! Now, quick, y’all need to buy it before I snap up the rest of this stuff! 🙂

** Note: The fabric used for this post was provided to me by Mood Fabrics, in exchange for my participation in the Mood Sewing Network. All opinions are my own!

Completed: New Workout Wear for 2018

6 Feb

I know. It’s a new year and my first finished project is workout wear. I actually meant to post this in January but I’ve fallen out of habit with blogging. And on that note… taking blog photos, apparently. Because, yikes. I’m sorry these are so bad, but not sorry enough to reshoot them haha.

In addition to being predictable and basic (lol workout gear in January amirite), making workout clothes isn’t necessarily my favorite thing to sew – but it sure beats buying them! I’ve found that I prefer my gear to be neutrals like grey and black (but really, anything but pink. ANYTHING. Why are all women’s workout clothes pink, anyway??) and I love having a zippered pocket to hold my phone while I run. Both of these can be difficult to find – and if you do find them, they can be quite expensive! I don’t think sewing necessarily saves you money, however, exercise gear can definitely be the exception to this.  Each of these pieces cost a fraction of what you would pay in a shop! And I had complete control of the fabric and fit – meaning, yes, I can wear all grey while I exercise mwahahaa

This post contains 3 pieces – a long sleeved, a tank with a built-in sports bra, and leggings for running and yoga.

Surf to Summit Top made with Mood Fabrics

Surf to Summit Top made with Mood Fabrics<

I’ll start with the long sleeved pullover! This was a desperate need in my closet – I have very few workout tops to begin with (I prefer to exercise in just bottoms + a sports bra, as I generally am either doing hot yoga or running in the heat!), and absolutely none with any sleeves! While I do have a fleece hoodie, I wanted something lightweight that would be good for exercising when it is too cold for sleeveless but too warm for the hoodie.

Surf to Summit Top made with Mood Fabrics

Surf to Summit Top made with Mood Fabrics

Surf to Summit Top made with Mood Fabrics

Surf to Summit Top made with Mood Fabrics

I fucking LOVE this fabric and I was so happy to find it (and buy the last of it… ha! Sorry, not sorry). This cool star print is a polyester/bamboo wicking fabric from Moodfabrics.com. The wrong side is white, and the whole thing has a texture that is really similar to a pique. It’s lightweight and breathable, and the perfect light layering piece.

The pattern I used is the Surf to Summit Top from Fehr Trade. I wanted something raglan with a half zip (so, like a cross between a tshirt and a hoodie), so this pattern was perfect! I made a size XXS based on my measurements, but I think I could have stood to go up a size as it is quite tight and there are a bunch of drag lines. Not sure if this was a sizing error on my part, or something I messed up with the construction – or perhaps my fabric wasn’t stretchy enough? The shirt is definitely still wearable but, yeah, notes for next time!

Construction-wise – I sewed this on my serger (save for the parts with the zipper, which were done on a regular sewing machine), and used my new coverstitch machine to mock flatlock all the seams and hems for a sporty look. Protip – don’t make the mistake I did and try to flatlock the underarm seams. Giant PITA and it doesn’t look great. On the flip, you can’t really see it and I’ve learned my lesson haha. This was one of the first projects I made with my coverstitch so there are sections where the tension is super wonky – I was learning as I went!

The teal zipper was unintentional – basically all I had in my stash – but I actually quite like the contrast! I still have a bit of this fabric left so I might make it into a tank. I fuckin love me some star prints, can you tell? ha!

Pneuma Tank made with Mood Fabrics

Pneuma Tank made with Mood Fabrics

Pneuma Tank made with Mood Fabrics

The second piece I made is the Pneuma Tank from Papercut Patterns, which is a sports bra with an attached tank top and cool strapping detail. I’ve made the bra version before, but not the tank. I used this heathered wicking and anti microbial performance jersey for the outer, and black max-dri anti microbial performance jersey for the sports bra. I also lined my sports bra with black power mesh, for additional support (I should note, I don’t require much support and tend to be fine with lightweight, single layer sports bras like this. If you need more support, this probably isn’t the pattern for you. At least not for something like running or jumping around). The elastic edges and black bra strapping were sourced from my stash.

I love this tank, but again, I have noted improvements for my next version. For one – I think I got a little overzealous with shortening the straps and now they are too short, making the neckline a bit too high. I am probably going to cut those off and replace them because the shortness makes them borderline uncomfortable. I also think my main fabric (the grey) has a little too much body for this design. The sides flare out at the bottom, which I’m not crazy about. According to the product photo on the website, they definitely used a softer, more drapey fabric so I will try that next time. I do like the design for yoga – there’s a lot of opportunity for airflow, and the shirt stays in place when you bend over. I also think it would be really awesome to wear as a regular tank top, but I might make the bra a little less flattening 😛

Pneuma Tank made with Mood Fabrics

Pneuma Tank made with Mood Fabrics

Again, I made this with my serger and hemmed with my coverstitch. I used my regular sewing machine to apply the elastic.

Pacific Leggings made with Mood Fabrics

Pacific Leggings made with Mood Fabrics

Pacific Leggings made with Mood Fabrics

Finally, I made some new leggings for running and yoga! These are my favorite; I love everything about them and have worn them for nearly every workout since I finished this (except when they are still in the wash haha). I used another max-dri performance fabric from Mood Fabrics for this – I bought several colorways for my stash, and I love it! I ESPECIALLY love that it’s not see-through when you stretch it. I added a zipper to the back so I can carry my phone when I’m running. The pattern is the Pacific Leggings from Sewaholic Patterns. I’ve made this pattern a few times before – both the full length leggings and shorts (only blogged about the shorts, though)- and they are so great for exercising. The zippered pocket is big enough to hold my phone, the fit is spot on, and I love the seaming details. There are options in this pattern for doing some cool colorblocking, but, in case you haven’t noticed – I am plain, plain, plain these days! (I like to say that my plain clothes provide a neutral backdrop for my ~colorful personality~ haha).

To highlight the seaming, I mock flatlocked the seams with my coverstitch (and, again, sewed the leggings on my serger except for the fiddly bits like inserting the zipper and elastic, which I did on my sewing machine). It took some trial and error with the tension and needle size – lots of imperfect parts to the stitching – so don’t look too close! They are totally wearable, though, and I love them! The mock flatlock adds a nice layer of strength without compromising stretchiness, and it keeps the seams really flat so you don’t get chafed (lol jk I definitely don’t run long/far enough for chafing to be an issue :P).

Surf to Summit Top made with Mood Fabrics

Anyway, that’s it for these pieces! Standard, basic pieces in boring-ass colors THAT MAKE MY HEART SING. Look! Even my running shoes are grey (do you have any idea how hard those were to find?? Ugh, seriously haha). Sometimes, making your own stuff doesn’t necessarily mean including all the colors and prints – and that’s ok!

For more activewear inspo, check out Cashmerette’s new plus-sized activewear, and the new book Sew Your Own Activewear from Fehr Trade!

*Note: The fabrics used in this post were provided to me by Mood Fabrics, in exchange for my participation in the Mood Sewing Network. All opinions are my own!

Completed: The Fraser Sweatshirt

26 Dec

Gonna keep this one short and sweet today!

Fraser Sweatshirt

Also, in case you were wondering – yes, I took these immediately after the photos from my last post. Just pulled the sweatshirt on over what I was already wearing! Haha!

This is the Fraser Sweatshirt from Sewaholic Patterns. I have actually made this top before – I used a beautiful marled French Terry from Metro Textiles and it’s soooo soft and cozy – but this is my first post about it. I don’t normally dedicate a post strictly to something as plain at a knit top, as I personally find it a little boring – but I do think this one deserves its own very short post. So there you go. I finished this way back in August and have worn it loads since.

Anyway, Fraser! I think this pattern got a bit overlooked – I certainly overlooked it at first. It’s pretty similar to the Renfrew Top – albeit with a higher neckline, a little more ease (to allow for sewing out of a bulkier fabric) and some style variations. I didn’t care much for the style variations, personally – not a fan of that western contrast yoke, and really falling out of love with twee collars on everything. I liked the plain version, and like I said – I made it up and really enjoy wearing it – but I don’t know if the plain version alone really justifies buying the pattern if you already have the Renfrew (FWIW, Tasia gifted me these patterns, although she did made it very clear she was not expecting a review post in exchange). With that being said, I loved Amanda’s collared version the second I saw it, and filed it away for future consideration.

For fabric, I used a grey sweatshirt knit that has been in my stash for a few years. I’m not 100% on where it’s from, but my best guess is that I bought it at Paron’s in NYC. It’s a little lighter and stretchier than a true sweatshirt fleece – it almost feels like scuba with fleece on one side.

Fraser Sweatshirt

Fraser Sweatshirt

I wanted my collar to be more subtle than straight-up color-blocking, so I simply used the wrong side of my main fabric. In theory, it seemed like a really cool idea – the wrong side is fuzzy, so there’d be some unexpected texture there. In practice, it looks very much the same as the right side, unless you’re actually touching it. So my inset collar is even less of a contrast than I was anticipating, although I don’t think this is a bad thing. I actually do like the way it turned out!

Anyway, I topstitched around the collar with a straight stitch to really bring out the seam lines and help everything lay flat. I love the effect, especially how it looks with another collared shirt peeking out from underneath, inception-style 😛

Fraser Sweatshirt

Fraser Sweatshirt

Pattern-wise, not much to report. I made a size 0, which is my usual Sewaholic size. I assembled the shirt with a serger, although I used my sewing machine to sew the collar in first so I could easily unpick if I messed something up (I just went over the seams again with my serger once I knew everything was good). Actually, the serged seams on the collar look REALLY cool and I almost let that be the right side… maybe for the next top. Who knows!

I did have to do a little tracing to get those long sleeves. The pattern comes with 3 sleeve options, but the long sleeves have that yoke on top of them. The yoke-less sleeves are 3/4 and short, both of which I feel are useless for a sweatshirt. I simply combined the top of the 3/4 sleeve with the bottom of the yoked sleeve, to make a plain long sleeve. Not difficult to do at all.

Interestingly, I found the hips to be too wide in the first version I made of this pattern – there were super A-line on me (not surprising, considering I’m not a pear shape and this pattern is drafted for someone who is) and I had to take in the sides quite a bit to make them more straight – but on this current version, they are fine. I am guessing my fabric choice had something to do with this, because I didn’t alter the actual pattern pieces. This knit is way softer and stretchier than the French terry I used for my first version, which makes the sides hang better.

Fraser Sweatshirt

Anyway, I don’t have anything else to say about this top sooooo I guess that’s it!

Completed: Sewaholic Pacific Shorts + Dunbar Sports Bra

12 Jul

Since moving into my new apartment last month, I have been busy discovering all the cool stuff in my area (bonus that it’s all pretty walkable/bikeable, unlike at my last place in the middle of nowhere :P). One major selling point for me was that I am now super close – about 2 blocks, and again, walkable – to a really great greenway. The multi-use paths are nice and wide, mostly shaded by the trees, and there is a big creek that runs through it which means lots of cool bridges to cross! It’s a fantastic area for both cycling *and* running, and I’ve been taking full advantage of it.

While I have my fair share of workout wear, it quickly became clear to me that what I had was lacking pretty badly, at least for running. My preferred workout of choice has traditionally been hot yoga – where I tend to wear leggings or capris (you know, for the sake of whoever is unfortunate enough to practice right behind me hahaha) and they don’t need any pockets because you are standing in one place. I find those long pant lengths to be way too hot and restrictive for running, at least in the summer time. And I definitely need a pocket to hold my phone and keys, so I can listen to music and/or podcasts and keep my hands free! I noticed that Mood Fabrics has added a lot of performance/activewear fabric to their site, so this seemed like a good excuse to stock up and try them out.

Sewaholic Pacific Shorts + Dunbar Sports Bra

Sewaholic Pacific Shorts + Dunbar Sports Bra

I ended up making 3 pairs of shorts and a sports bra. The first pair uses Midnight Black Max Dri Performance jersey, although you can see here that they are much closer to a darker grey. I love these mottled jerseys and bought them in several colors!

Also – hello from my new studio! I’m still trying to get the hang of taking photos indoors (not cool enough to lug a tripod down the greenway and take action shorts, sorry guys), so I’m sorry that these are subpar.

Sewaholic Pacific Shorts + Dunbar Sports Bra

The pattern I used is the Sewaholic Pacific Leggings – although, obviously, I made some changes to the pattern to turn them into little running shorts! This was as simple as drawing a line where I wanted the new hemline to be, making sure to include a 3/4″ seam allowance for hemming. I started out with a 4.5″ inseam, based on a pair of shorts I already had, but ended up taking another inch off before hemming. I like my shorts short enough for some buttcheek to peek out. Ain’t no shame in that.

I made this pattern before earlier this year, for a couple of full-length yoga pants (which I never posted about, ha). It’s pretty great in terms of fit. I sewed my usual Sewaholic size – a 0 – and even though the line is geared toward pear shapes, my un-pear-shaped ass fits in it just fine. The pattern has some cool seaming on the legs (which is awesome for color and pattern blocking), a nice snug waistband that stays in place, and a back zippered back pocket that is actually big enough to hold my iPhone 6 – check it out!

Sewaholic Pacific Shorts + Dunbar Sports Bra

Sewaholic Pacific Shorts + Dunbar Sports Bra

Now I can run to my heart’s content and know that my phone is safe and secure without worrying that it’s going to bounce out. This pocket is also big enough to hold my key and cash, should I need it (laugh all you want, but the greenway in question actually connects to a Target, soo… I’m just saying.).

Sewaholic Pacific Shorts + Dunbar Sports Bra

Sewaholic Pacific Shorts + Dunbar Sports Bra

The second pair of shorts is pretty much the same as the first pair, except I used the Husky Grey colorway instead. You can barely see the zipper in this picture – it’s pale blue (that was the closest match I had on hand in my stash).

As with the first pair, I used a combination of my serger + sewing machine to construct these. The zipper area gets stabilized with a piece of fusible stay tape (to keep the fabric from going haywire while you’re putting the zipper in), so it’s really easy to sew in. The waistband has clear elastic sewn inside the seam allowances at the top to keep things snug and in place. The only part I did not enjoy sewing was the gusset – that thing is super tricky! I found the only way to get it in even somewhat nicely was to baste with my sewing machine first (because you are gonna end up ripping it out multiple times, so you might as well make it easy on yourself) and then go over the basting with my serger. I am still not a huge fan of the gusset – it kind of gives me cameltoe, if we’re being completely honest here (aaand now that I’ve said THAT word, I’m gonna get some weirdos in here via Google search, lord). I just ignore it and figure – if someone is staring there hard enough to judge the ‘toe, I’ve got a much bigger problem on hand hahahah.

Sewaholic Pacific Shorts

Sewaholic Pacific Shorts

Last pair of shorts! These are a boring, basic black. The fabric is one that I have had in my stash for a couple of years – it’s a another dry-wicking activewear fabric, although I think it’s actually from Nike. My girl Lola sent me a yard of it way back in the day, so I’m not sure where it was purchased from. What I can tell you is that I put it in a really weird stash place and couldn’t find it for those 2 years, whoops. Imagine my delight when I unearthed it while packing for this recent move! Yay! In comparison to the stuff from Mood, this fabric is a lot thicker and more robust. It wears and dries about the same, but the heavier weight does make it feel like it’s a higher quality. It was a little more difficult to sew because it is more slippery, but not too bad. Even with adding a zipper and dealing with a tricky fabric, these shorts don’t take a lot of time – or fabric! – to make. And they are SO MUCH cheaper than buying some shitty Lululemon or whatever.

(In case you were curious, the yellow/grey sports bra is not a handmade – it’s RTW. I like the color combo though and would like to try something similar! Also, I have no idea what happened to the lighting in those photos! Took them at the same time as the others, wtf)

Sewaholic Dunbar Sports Bra

Finally, the sports bra! I’ll be honest – I am 100% a-ok with the stash of RTW sports bras in my drawer. I have a fairly small bust, don’t need a lot of support, and fit well within the size ranges that are available at the store. I tend to buy them on clearance, so they rarely cost me more than $15 a pop. I wasn’t totally interested in making a sports bra because what I already have works, but the Dunbar top pattern (also from Sewaholic) caught my attention enough where I figured I’d try it. I like the details and fabric combinations, and being able to use one of the cool printed Activewear fabrics that Mood Fabrics carries (or even just making a bra to match my shorts because I am SO that person) was a plus. So I tried it out, and I’m a fan! I spent a really long time debating what size to sew – and even traced the pattern just in case I chose the wrong one – but ultimately, went with my usual size 0 and the fit is pretty good. I ended up taking in the band elastic a LOT more than what the pattern calls for, but I have a small ribcage so that’s not surprising (I think the pattern calls for 26″ of elastic at the band, and my ribcage measures 27″. I needed more negative ease than that!). For the record, my full bust measures closer to the size 4, but the 0 was just the right amount negative ease for me.

I used – again! – the Max-Dri Performance Jersey, this time in Midnight Blue – for the main color of my top. For the dark blue contrast, I used navy nylon spandex. The top gets its support by compression – which is achieved with an underlayer of Powermesh . I can’t speak for every boob out there, but my experience with the support in this bra was great. Again, I ain’t rocking a huge cup size here and I don’t need much support to begin with, so take that as you will 🙂

Sewaholic Dunbar Sports Bra

Sewaholic Dunbar Sports Bra

Sewaholic Dunbar Sports Bra

Anyway, the sports bra was a bit fiddly with all the little pieces – but it was overall easy to make. I used my sewing machine for the majority of the construction and elastic application, just as you would with a regular bra. I think it turned out quite nice! I think the ability to have really cool patterned/colored sports bras (especially using some of my leftover swimwear spandex, which I am totally eyeballing now) negates the downside of how fiddly it was to sew. It wasn’t even difficult to make, just time consuming with a lot of tiny pieces. Sort of like, I dunno, a bra. lolz.

Sewaholic Pacific Shorts

Sewaholic Pacific Shorts

I’m feeling pretty good about these new additions to my drawers! I didn’t realize how much more fun it is to exercise when your clothes are fun too – even if you’re going to get all sweaty, it’s nice to feel like you look nice while you’re doing it. And speaking of sweaty – these performance fabrics have definitely lived up to their “Max-Dri” hype. I still sweat – a lot! – but they dry very quickly, which is awesome.

Sewaholic Pacific Shorts + Dunbar Sports Bra

I am pretty sure one of the things I said I would never make is activewear – so, I guess I take that back! Honestly, though, I’m running (lol) out of practical holes to fill in my closet, at least in terms of fun practical. Now I’m down to sewing things activewear, white tshirts, and panties. I really love the experience behind sewing and creating, but I don’t want to be wasteful and make things just to make them, you know? So this feels like a good compromise, even if it’s not a necessarily interesting end result.

Note: The fabrics used for some of these projects were supplied by Mood Fabrics, in exchange for my participation in the Mood Sewing Network. I should also point out that Tasia of Sewaholic sent me all the patterns in the Vancouver collection – which includes the Dunbar Top and Pacific Leggings – free of charge last year when the line launched. There was no stipulation that I needed to review the patterns, Tasia is just a nice person 🙂 And I have nice things to say about her patterns because they are fucking awesome. That is all.

Completed: Red Cotton Twill Thurlows

11 Sep

I’m pretty sure I’ve added “make red shorts” to my summer sewing list for at least the past couple of years. I had a really awesome high-waisted pair that I made a few years ago and wore the hell out of (red shorts go with everything, don’t ya know), but eventually they got too big and I sold them off. I’ve been meaning to replace them for years, but never got around to it – partly because I couldn’t find a good fabric that I liked, but mostly because I kept getting distracted by the new & shiny.

Sooo, this post is dedicated to those red shorts. I finally made some! Although they’re nothing like the OGs – no high waist, no pleats, none of those – but they’re red, and that’s the most important part.

Red cotton twill Thurlows

Red cotton twill Thurlows

I’m going to keep this (relatively, for me) brief, because nothing about this project is new information as far as my blog is concerned. I used the Sewaholic Thurlow trousers as my pattern. This is a really, really fantastic pants pattern and I’ve made it up numerous times – from jeans to red skinnies to shorts to more shorts to MORE SHORTS. (+ even more that I did not link because, well, that’ll be enough for now). I even had a Thurlow Sewalong on this here blog like, a thousand years ago! I loooveeeeeee me some Thurlows! They are beautifully drafted, have an awesome butt-fit, and they look really nice and professional when they are sewn up. Thurlows win.

That being said, I’ve talked about the Thurlows a LOT on this blog. It’s kind of hard to keep waxing poetic about something you’ve already publicly loved on to the point of it becoming embarrassing PDA, so I’m going to refrain in this post. Nothing new about this project. I made my usual size with my usual adjustments (for more details on that, see one of the many MANY posts I’ve written about this pattern hahaha) and followed the instructions. Yawn.

Red cotton twill Thurlows

Red cotton twill Thurlows

Even my fabric choice doesn’t really offer much in terms of exciting and new. I used an Organic Cotton twill from Mood Fabrics – it’s the same fabric I used last year to make my tie-less Miette skirt. I had just enough to squeeze out a lil’ pair of shorts, so, awesome! I love using this twill to make Thurlows (yeah, even fabric choice isn’t a first – I’ve made this pattern using the deep wine color before, too hahaha), as it holds it’s shape really well and is comfortable to wear. It also washes and wears beautifully, which is, well, pretty important too. The only thing that sucks about this fabric is that it tends to sell out pretty quickly on the website!

Red cotton twill Thurlows

Red cotton twill Thurlows

Red cotton twill Thurlows

To make up for an unexciting pattern review – here’s an ~exciting~ photoshoot! Well, this isn’t nearly so much exciting as it is just different from the mess of trees I usually have going on in my photos (which I ain’t complaining about one bit, because I can – and will – stare at those trees all day long. They are so beautiful!). Landon and I took a hike a couple of weeks ago, in search of this waterfall, and we ended up taking these photos just because the scenery was so awe-inspiring. My hair is a rat’s nest of a mess and these were taken with his phone – but I like them! I don’t normally go for photo-shooty type pictures on this blog (I personally don’t think artsy photos do a good job of showing details. Also, I abhor the idea of having to leave my house to take pictures for a blog haha), but I’ve posted about this pattern a zillion times, so I think it’s ok if you can’t see every little detail.

Red cotton twill Thurlows

What’s exciting about these pictures is that, even though we were hiking to get to this point – it’s not like we hiked very far, or even had to drive anywhere to begin the journey. We started out in our backyard and traveled through the neighbor’s yard to find this spot (I should add – our neighbor has repeatedly invited us to explore and enjoy his land. He’s the one who told us about the waterfall in the first place). So, while this isn’t literally in my backyard – it’s close enough! We only had to walk about 30 minutes. Yeah, neighbor has a LOT of land hahaha. Way more than our puny-by-comparison 5 acres!

Red cotton twill Thurlows

Red cotton twill Thurlows

God, I love living in the country 😀

And because this is still at sewing blog, here at Thurlow short gut photos:

Red cotton twill Thurlows

Red cotton twill Thurlows

Red cotton twill Thurlows

Red cotton twill Thurlows

Red cotton twill Thurlows

Oh, I did change up what pieces I cut from the lining. The waistband and fly facing are self-lined (instead of using contrasting lining fabric); only the pockets are cut with lining. I did this because I always felt like the lining showed from the right side, which I wasn’t a fan of. I guess this may not work for really heavyweight fabrics, but it was fine with the cotton twill. Everything else stayed pretty much the same. Also, I dunno why my fly shield doesn’t cover the bottom of my zipper, but, oh well. Finally, I have come to accept the fact that I use this striped cotton for pretty much all my pocket linings, and I will not apologize for that. It makes a really good pocket lining hahaha.

Red cotton twill Thurlows

That’s all for today! I have a few more projects that are patiently awaiting a post (I told y’all, I’m behind), and then it’s on to sewing for the next season! I’ve been writing out my plans and gathering supplies, and I’m really looking forward to switching gears for the cozy. Another thing I’m looking forward to is seeing what this area looks like when the leaves start changing. I am pretty sure it’s gonna be insanely gorgeous 😀

Completed: A (modified) Silk Crepe Saltspring

7 Aug

The Summer of the Silk Dress continues! Today’s offering is one that I’ve had rolling around in my head for… wow, almost 2 years now. Okay, Lauren!

Silk crepe SaltspringI also got REALLY bored with taking pictures in the back yard, and ventured into the garden for these. Our garden is adorable, not that you can tell much from this one little corner. I’m hanging out with my tomato plants and potatoes over here. And I helped build that fence! Drove in those fucking fence posts LIKE A BOSS. boss Anyway, I digress! Silk crepe Saltspring

The pattern I used is the Sewaholic Saltspring dress, with just a minor modification that makes for a major difference in the end result. Ever since I sewed this pattern as a tester, I’ve wanted to make a version without the bloused overlay. I think the overlay is pretty, but I never liked the way it looked on me. I do, however, like little spaghetti strap sundresses and y’all KNOW I love me some elastic waists, so I thought I could switch things up a little to get what I wanted. Too bad it took me 2 years to actually do it. Better late than never, anyway!

Silk crepe SaltspringSilk crepe Saltspring

All I did was use the bodice front & back lining pieces, and omitted the bodice overlay pieces. Because of this, I had to figure a different way to finish the edges and attach the straps – so I just used my ol’ fave, the self bias binding. For the straps, I sewed on enough bias to extend several inches past each end of the underarm, and then continued my stitching all the way to the tips of the bias after I folded it over (this means the raw edges of the bias are exposed on the straps, BUT, bias doesn’t fray so it’s not an issue). For the elastic casing, I just sewed the waistline with the normal 5/8″ seam allowance and folded it under itself a couple times and topstitched to make a casing.

Silk crepe SaltspringThis was a very easy dress to make. It’s SUPER casual (especially with my bright white bra straps hollering out, lolol), but it’s exactly what I wanted. And I personally think that it looks a lot better than the OG version! Silk crepe Saltspring

The fabric I used here is another silk crepe from my stash. Silk crepe is absolutely my favorite silk to sew and wear – it’s really easy to work with and the colors are always so beautiful and saturated. As long as you pre wash and dry that shit in the machine, it’s also really easy to care for. I just throw mine in the wash on cold and hang it to dry (mostly because I don’t like to iron wrinkles out haha. But I always pre-dry just in case it accidentally gets thrown in the dryer at some point!).

I mean, check out that beautiful fluid drape! Ughh it’s so good.

Silk crepe SaltspringThis is another silk crepe from the Elizabeth Fabric Grab Bag. I think this one was from her personal stash, and came dyed that color (as in, she didn’t dye it herself). It feels amaaaazing. I have a bunch left over and I MIGHT make pajamas out of it. Maybe. I kind of want to live in it forever. Silk crepe Saltspring

I think for a first-time make of this rendition, this one turned out really great (and exactly the way I wanted it to look!). There’s not anything that I would change about it, except that I did go back and add some thread belt loops at the side seams. My belt kept falling in these photos and it looks stupid. Now it stays in place!

Silk crepe SaltspringSilk crepe Saltspring

Silk crepe SaltspringSilk crepe Saltspring

Silk crepe SaltspringAs usual, the construction consists of a lot of French seams. I can’t get enough of those when it comes to silk! I wanted to add the pockets to this dress (considering that I always steal the pocket pattern piece to use for my other dresses, it seemed only fair to give it a shot with an actual Saltspring), so I had to figure out how to French seam those suckers in. Turns out it’s pretty much the same as French-seaming anything – just a little more fiddly to iron. But yay for it working out! Silk crepe Saltspring

I gotta say, these silk dresses have been a serious GODSEND for the past couple weeks that I’ve had to drive around without any a/c. Apparently I’m sweating straight through them, but, whatever. It’s not like I can see my back.

As a side note – NYC Fashion Week is next month! If you’re planning on going to the city during the events (oh please oh please take me with you) and want to try something a little different, definitely check out the Fashion Week tours at Seek NYC. This tour sounds massively interesting – learning the history of the NYC’s garment manufacturing & retail industries, visiting fashion landmarks and fabric/trim shops, touring with a professional designer, checking out a sample sale, and learning the evolution of Fashion Week, to name a few highlights. The group tour is $55, and you can take 15% off if you use the code BIRD (offered 9/10/15 – 9/17/15). Not in town during Fashion Week but want to check out a private tour of the Garment District? You can also use that code to take $15 off a private tour, and that’s good all the way through 12/1/15. If you’ve taken one of these tours, I want to hear all about it! I’ve wanted to take one for about a year now because they sound really cool, but each time I’m in the city the weather is either awful for a walking tour, or I’m too busy running around otherwise.

Completed: A Cardigan, a Skirt, and a Tshirt!

30 Apr

Woohoo y’all get a damn TRIFECTA of garments for today’s post! Lucky you!

Striped Cabernet Cardigan + Yellow Hollyburn

For my monthly Mood Sewing Network post, this month I wanted to focus on that amazing striped sweater knit that you’re probably staring at (you should be staring at it, it’s fucking awesome). But I felt really boring just making *a* sweater (a sweater that took maybe 2 hours, tops, to complete), so I overcompensated and made my entire outfit. Yay!

Striped Cabernet Cardigan + Yellow Hollyburn

We’ll start with the cardigan because it truly is the star of this outfit. It’s another SBCC Cabernet cardigan, this time with my minor adjustments made to the flat pattern (you can see my leopard Cabernet cardigan here, btw!). Since I’ve already made the pattern once, there’s not really anything new to report in terms of construction.

Striped Cabernet Cardigan + Yellow Hollyburn

Striped Cabernet Cardigan + Yellow Hollyburn

I bought the navy and white striped fabric while I was at the Mood Fabrics flagship store in NYC in March. I got soooo much good stuff while I was there, but this particular piece really takes the cake. I swear, if the bolt hadn’t been so heavy, it probably would have jumped off the shelf and fallen directly into my arms. We were like star-crossed lovers when we caught sight of one another.

ANYWAY, gushing aside – what we have here is a cotton double knit that works and feels like the perfect sweater knit. It’s wonderfully thick and squishy, and while it does drape a little bit, it also hold it’s shape quite well. It was really the perfect fabric for this pattern, as it responds really nicely to pressing and topstitching. I was careful in my cutting to not only match up the stripes at the side seams, but also the stripes blending into the sleeve cuffs and hem bands. The neckband is actually the same striped fabric – I just positioned the pattern piece so that the widest navy stripe was the only thing that showed when it’s folded in half. I knew I wanted a solid color at that neckband, but I didn’t want to try to color match, because nope.

Striped Cabernet Cardigan + Yellow Hollyburn

Because the striped knit is so thick, it was a bit of a beast to manhandle. Cutting it was painful (I REALLY need to get my scissors sharpened, dammit!) and the sewn seams were lumpy and wavy before I pressed them. It’s super important to press if you’re dealing with a fabric like this – the flatness is what makes the finished piece look so polished. Topstitching down the seam allowances also helped. As with my last cardigan, I used the straight stitch on my machine and a walking foot. The rest of the seams are serged.

Striped Cabernet Cardigan + Yellow Hollyburn

The skirt is another one of my beloved Hollyburn skirts. I cannot stress this enough, but I LOOVE this pattern. SO MUCH. As soon as I finished the denim polka dot Hollyburn, I started lurking hard for a yellow twill to make another one. I really love this neon delight of a yellow, but it’s hellish looking against my skin – so obviously, the next best thing is a skirt.

I found the fabric also while I was in NYC, also at the Mood Fabrics flagship store (sorryyyyy not sorry). I actually spent a good deal of time looking for this one – I knew I wanted yellow twill, but the stuff in the twill section wasn’t quite up to snuff. Too pale, too lightweight, too much of something. This particular fabric was actually located in the denim section – I imagine there is someone, somewhere, who has made an amazing pair of jeans with this fabric.

Striped Cabernet Cardigan + Yellow Hollyburn

This is a stretch cotton twill with lots of lycra in the content, giving it a super heavy stretch. Even though it’s on the lighter side (heavy enough to be considered a bottomweight, however), it has plenty of body that gives this skirt a great structure. The only downside to all that lycra is that it made the fabric really hard to get a good press. I ended up topstitching all the seams to keep them flat, about 1/4″ distance (as opposed to my usual 1/8″). The wider topstitching paired with this fabric really gives it a nice denim-y look, which I like. I thought about topstitching around the pocket bags to give those definition too, and “thought,” I mean I tried it and it looked absolutely terrible so I ripped it out. Don’t do that.

Striped Cabernet Cardigan + Yellow Hollyburn

The back closes with a simple lapped zipper, and all the inside seams are serged. Basic stuff!

Striped Cabernet Cardigan + Yellow Hollyburn

Finally, the most basic of the basics – my tshirt!

Striped Cabernet Cardigan + Yellow Hollyburn

This is SUCH a simple tshirt that it hardly bears a mention, however, we’re here and it’s here so let’s just roll with it. The fabric is this sheer white slubbed rayon jersey, which was WAY more sheer than I was expecting but it’s sort of awesome. It’s suuuuper soft, drapey, and the texture of the fabric makes it a tiny bit more interesting than your average plain white tshirt. I used my always-tweaking-almost-done-tweaking Frankenpattern’d tshirt to make this. The neckline is bound using Megan Nielsen’s bound neckline method, which is hands-down my FAVORITE way to finish a neckline on a slinky knit like this. It just looks really really good, and it’s nice and sturdy. I love the traditional method, of course, but some of the more drapey fabrics don’t do so hot with that method because you have to REALLY stretch them to keep them from being floppy, which ends up with a tight neckline that’s practically gathered.

Speaking of slinky knits, binding that neckline was about the only easy part of sewing this tshirt. Talk about the slinkiest knit ever! It was worth it, though, because I can always use more white tshirts. Even if they are see-through. And yes, the pocket is totally in the wrong place and I’m totally not picking it off because I don’t think the fabric can survive that kind of trama.

Detail shots:

Striped Cabernet Cardigan + Yellow Hollyburn

Striped Cabernet Cardigan + Yellow Hollyburn

Striped Cabernet Cardigan + Yellow Hollyburn

Striped Cabernet Cardigan + Yellow Hollyburn

Striped Cabernet Cardigan + Yellow Hollyburn

Striped Cabernet Cardigan + Yellow Hollyburn

Striped Cabernet Cardigan + Yellow Hollyburn

Striped Cabernet Cardigan + Yellow Hollyburn

(that’s a Sewn with Mood Fabrics tag, by the way! 🙂 )

Striped Cabernet Cardigan + Yellow Hollyburn

Striped Cabernet Cardigan + Yellow Hollyburn

PHEW.

Ok, one more picture:

Striped Cabernet Cardigan + Yellow Hollyburn

Only including this one because I look like I’m about to eat whatever is in my line of vision haha.

** Note: All fabrics for this project were provided to me in exchange for a review post as per my involvement with the Mood Sewing Network.

Completed: Polka Dot Denim Hollyburn Skirt

23 Mar

Hey y’all! I just got back from a fabulous weekend in New York – in addition to teaching a very successful Weekend Pants-Making Intensive at WORKROOM SOCIAL (seriously, my students were total rockstars and sooo much fun to chat and hang out with!), I also managed to take in a pretty good fabric haul. It was a very fun, very delicious weekend in the city, but I gotta say – I’m so happy to be home, back in the lovely 75* weather. Oh, Tennessee, how I have missed you! Today, we celebrate with my new favorite skirt, which is perfect for wearing with bare legs. Yay, no tights!

Denim Hollyburn skirt

I figured it was time to revisit the Sewaholic Hollyburn skirt, so here she is! I’ll confess that I actually finished this skirt a few weeks ago, but I haven’t actually worn it until the same day these photos were taken. It’s just been too dang cold here to wear skirts with bare legs, and I was bound and determined to wear the skirt without tights. Now that the season of bare legs is starting to creep in (watch, I bet I just jinxed it with that announcement), imma wear dis shit with PRIDE and JOY.

Also, you’ll notice in about half these pictures that the sun was sooo bright, I could barely hold my eyes open. Ain’t complaining.

Denim Hollyburn skirt

Anyway, right, Hollyburn! I love this pattern so so much (see previous versions: one and two), so naturally I had to make a new version for 2015. This skirt pattern is probably my favorite, at least for right now – nice flared shape (without being so flared that it looks costumey), separate waistband with belt loops, back zip, and those wonderful pockets. I think it’s a great, solid wardrobe basic, so it made sense to add a couple more to my summer wardrobe.

Denim Hollyburn skirt

Denim Hollyburn skirt

For this version, I changed up just a couple minor things – just enough to warrant a whole blog post about it (JK I’d post about this anyway because IT’S MY BLOG AND I DO WHAT I WANT lolz). The fabric I used is a medium weight stretch denim that is printed with thousands of tiny polka dots – if it looks familiar, it’s because I made a pair of Jamie jeans with it. I LOVE putting my leftover yardages to good use, and I really really loved this fabric, so double win! Since the fabric is a stretch denim, I changed up the cutting layout just a little and cut the waistband so the stretch ran the entire long length (aka, around my body when I’m wearing it). The waistband needs to be interfaced, so I used a fusible tricot interfacing, which gave the waistband a little bit of structure but didn’t compromise the stretch.

Denim Hollyburn skirt

Also, I wanted this spotted baby to be pretty short, so I cut a few inches off the length. Yeah buddy!

Denim Hollyburn skirt

Good thing I don’t work in an office anymore, because I could not see this length (or lack thereof) being suitable for work! Ha! But isn’t it cute? The structure of the fabric really works well with the shape, which is extra exaggerated the shorter it gets.

There’s not much else to say about this skirt, so have some flat shots:

Denim Hollyburn skirt

Denim Hollyburn skirt

Denim Hollyburn skirt

Denim Hollyburn skirt

Construction was plain and straight forward – all seams were serged and pressed open, and there’s a bit of topstitching at the hem and waistband (not that you can really see it against this fabric, but, know it’s there). And, I gotta say, I’m super pleased with how nicely that invisible zipper went in. Look at that beautiful seam match and the sharp corners at the top!

Denim Hollyburn skirt

I’ve been meaning to remake a new denim skirt for AGES (sadly, my Kelly and Hummingbird are both way too big at this point, and have thus been passed on to eager friends with grabby hands), as it’s a good wardrobe basic to have that goes with pretty much everything. Actually, prepare for me to sound like a broken record for the next few months because that’s where a lot of my sewing is headed – no, not more denim skirts, just more wearable basics to replace the pieces I had that don’t fit anymore and/or are due to retire. And maybe more denim skirts. I can’t make any promises here. I actually just bought a great yellow denim at Mood this past weekend, so you can at least expect a sunshine Hollyburn in the future 😉 yay for summer clothes and summer colors!

Oh, and in case you were wondering – my Merchant and Mills tshirt is from Uniqlo! You’ve no doubt already seen these aaaaall over Instagram, but I thought I’d point it out because we don’t have a store here and I didn’t even realize you could buy that shit online. You can see the entire collection of available goods here – and, ugh, now I’m kicking myself that I didn’t see those tote bags! Oh well! I bought 2 tshirts – which, considering that I don’t buy new clothes anymore (except for underwear, and a new pair of jeans in both 2013 & 2014), is a bit of a big step for me. I feel very strongly about fast fashion and knowing where my clothes come from and aaall that good stuff, however, I also tend to see things as very black and white with no grey area and I’m trying to get past that mental hurdle. Sometimes, you just gotta choose your battles and know when to compromise. Two little tshirts don’t make me a terrible consumer, especially since it’s not like I plan on dumping these when the season ends. For the most part, I try to shop locally and ethically, and be aware of where my food and goods come from. But every now and then, you just want to buy something mass produced from China. At the very least, at least it’s supporting (or advertising) Merchant and Mills, I guess, which makes me feel a bit better.

Anyway, that’s about it! I’ll be packing and moving for the rest of the week, and hopefully by this time next week I’ll be settling into my new house IN THE WOODS. Cannot wait! 😀

Completed: Some Tshirts!

26 Sep

Oh hey, head’s up – this post is all cake and no frosting. No apologies, though! Lord knows I can never have enough Tshirts.

Rather than bore y’all with a bunch of posts featuring patterns I’ve made before, though, I’ve compiled a trio of 3 different tshirt patterns – ranging from Free to You Gotta Pay For That Shit – for science and comparison purposes. Who doesn’t love a good Tshirt debate, amirite? Also, I took these pictures before I redyed my hair, fyi. Just in case you were curious, haha.

LET’S TALK ABOUT TSHIRTS NOW, GUYS.

Plantain Tee

First up is the Plantain Tshirt, from Deer & Doe Patterns. This is that free pattern I was telling y’all about. This is a great beginner tshirt pattern – there aren’t a lot of pieces, it includes some new techniques for beginners (such as sewing the neck binding), the instructions are very clear, and the fitting is quite loose at the bottom. I was initially afraid that I wouldn’t like this shape on me AT ALL, but I’m surprised at how much I love it!

Plantain Tee
Plantain Tee

Even though it’s a free pattern, I think it’s far from being a “crappy” pattern, if that makes sense. The sizing is perfect – I sewed up a straight 34, with no tweaks. I used the last scraps of my black merino wool from Organic Cotton Plus to sew this up – I like how the wool gives the bottom some structure (and the wrinkles? Not as much a fan of those, but I’ll live :P). And it’s SO COZY. Cozy tshirts, FTW!

Plantain Tee

I did make a couple of changes to the design of the pattern itself – the main one being that seam that runs down the front and back of the top. This was done out of necessity, as I didn’t have enough fabric to cut on the fold. I simply added a seam allowance and created a CF and CB seam. I topstitched the seams so they’d look more intentional, ha. I also added cuffs to the sleeves – because, I dunno, I like them! There’s a bit of piecing at the neckline binding as well. Since I was making this out of leftover scraps, I didn’t have a long enough piece to cut continuous binding. I don’t think it’s that noticeable, and hell, I’ll deal with some seams if that means I get a merino wool top out of it amirite.

Stripey Renfrew

Next up is my tried-and-true tshirt allstar – the Renfrew from Sewaholic Patterns! I LOVE this pattern, a fact that I believe is pretty well documented. Renfrew is favored by me because I think it most resembles what we think of when we think of a tshirt – slightly fitted, set-in sleeves, and 3 neckline options (in addition to the scoop, there’s also a cowl and a v-neck), as well as sleeve length options. The pattern is written to have a band of self-fabric at the sleeve cuffs and hem, in addition to the neckline. I’ve found that I prefer to hem my tshirts (rather than use the fabric band), and some of the more casual ones I like to hem the sleeves as well. One thing to keep in mind – should you decide to join me in my tshirt anarchy – is to add that length to the sleeves and hem before you cut them out. Otherwise, they might end up short! Ask me how I know about THAT 😉

Stripey Renfrew

Fitting-wise, this is a great pattern, although I did make a lot of tweaks to get to the point I am now. It’s been a long time since I tweaked, but if I recall – this is a size 0, with additional ease removed from the waist. I also shortened the shoulders a smidge and made them slightly narrower. All those tweaks paid off, because this is a pattern I reach for again and again when I need a tshirt. At any given time, if you see me in a tshirt – ask me if it’s a Renfrew, the answer will probably be yes! Seriously! Oh, and my fabric is a striped ponte from Mood Fabrics (the store, not online).

SJ Tee

The last top in this trifecta is the SJ Tee from Papercut Patterns. Another new-to-me top, and I admit this is more like a sweatshirt than a true tshirt (but mostly due to fabric choice). It’s kind of like a sexy sweatshirt, tbh – raglan sleeves and WHOA SCOOP NECK. Forreal, make this in something too stretchy and you’ll end up in boobie city. Again – want to ask me how I know about that? 🙂 haha!

SJ Tee

I’m surprised at how much I like the fit of this, considering that I don’t normally go for things so loose. I did end up taking the CB in by about 1″ – I’d already sewn the neck binding in at that point, so the seam runs clear from the bottom to the top of the binding, oops. But that made a HUGE difference in the fit, especially at the back. I used the size XXS and – other than the chunk taken out of the CB – it’s relatively unchanged. Oh, and I did shorten the cuffs so they’d look more like a sweatshirt. The fabric I used here is the last of my wool knit from Mood Fabrics (the same knit I used to make my grey Jenna cardi), and I had JUST ENOUGH. It’s amazing how much I love such a simple sweatshirt, by the way – I’ve been wearing it every night. It’s so cozy!

Here are the three patterns as modeled on my form:
Plantain Tee
Plantain Tee

Stripey Renfrew
Renfrew Top

SJ Tee
SJ Tee

I think it’s really interesting how something so simple as a damn tshirt can yield such different results, based on pattern and fabric choice. These are all pretty basic designs in the grand scheme of things, but they’re different to stand on their own. Obviously there are many, many more tshirt patterns out there (off the top of my head, these come to mind: Ensis, Briar, Bronte, Coco, and Lord, don’t get me started on dresses that can be hacked into tees), but I stuck with these three because I feel they’re the most basic/versatile. Also, let’s be real – if I fall down a tshirt rabbit hole, it might be months before this post sees the light! Ha!

Stripey Renfrew

Out of all these, I think my favorite is the Renfrew, just because it’s so damn versatile and I love how it fits (not to mention, the slim fit is ideal for layering). It might also have something to do with the Renfrew being my first love – can’t ever abandon her now 😉

I can’t stop thinking about that SJ tee too, though – I already have some future plans for her, including camel-colored boiled wool. Yum!

Plantain Tee

What’s your opinion on tshirt patterns? Do you have a favorite – and if so, dish please!

(psst! Don’t forget to enter the Sewtionary Giveaway, if you haven’t already done so! Entries close on Monday morning!)

TUTORIAL + GIVEAWAY: The Sewtionary (+ last week’s giveaway winner!)

22 Sep

Sorry, y’all, I’m in giveaway overload this month! Can’t help it if my friends are releasing awesome shit all at once, you know?

Adobe Photoshop PDF

I’m sure most of y’all have heard all about this fabulous little book by now – The Sewtionary, written by Tasia of Sewaholic (one of my FAVORITE sewing pattern companies! Seriously, some top 5 shit right there). A couple of months ago, Tasia reached out and asked if I’d like to be a part of her Sewtionary Blog Tour to help promote the book. While I do realize that blog tours can be a little redundant if you read the same blogs over and over (I know I can sometimes get jaded at looking at the same photos/reading the same gushing daily for 2 weeks or whatever), I really wanted to help promote this book because I really do give a shit about Tasia and her business. She’s one of my friends, and I like to do things for my friends. Plus, the book is beyond excellent- a great resource of 101 sewing techniques, written out like a dictionary. The photos are beautiful, each technique includes why it’s necessary (something my nerdy brain just loves), and it’s spiral-bound, so it’ll lay nice and flat on your sewing table. Lots of wins here!

Anyway, that’s about as much of a review as you’ll get from me (if you want a true review, definitely check out some of the tour stops that I’ll be linking at the bottom of this post!). Today, I wanted to do something different. I’m going to share a tutorial from the book with y’all .Everyone likes tutorials, right? 🙂

How to Make a Tailor's Ham & Seam Roll - Sewtionary Giveaway

Today’s tutorial: Making a Tailor’s Ham & Seam Roll.

First up – you’re probably thinking, “What the hell are these things and why the fuck would I spend my time making them?” Well, I’m so glad you asked! Both are used as pressing aids – the Tailor’s Ham is a big pillow-shaped tool that is used for pressing curved areas (such as darts and necklines), and the Seam Roll is a long, narrow stuffed tube that is used to press hard-to-reach seams (such as the inside of a sleeve), as well as a helpful way to avoid making seam allowance impressions on the right side of your garment. While I have a Tailor’s Ham that I’ve used for for years (and no lie, my cat literally uses that shit as a pillow when she naps on my ironing board), I’ve yet to get a Seam Roll. They are both great to have, but can easily cost you $20+ a pop when you buy them from the fabric store. So here’s where we learn to make our own – at the delightful price of FREE NINETY-NINE. You heard me!

You will need:
– Large scraps of wool fabric & cotton fabric. Try to choose something with a dense weave that does not stretch, that is 100% (aka – no poly blends!). I used leftover wool coating from my Vogue Coat and black quilting cotton.
– Something to stuff it with. Traditionally, these things use sawdust. You can also use cedar shavings (from a pet supply store), wool fabric scraps, or even old nylon stockings. For the purposes of this tutorial, I am using sawdust. It is *extremely* messy. It is also extremely free. No lie, I just waltzed right into my local Home Depot and asked for a bag of sawdust, back where they cut wood to spec. I can’t speak for other countries (Tasia tells me that you can’t sell sawdust in Canada, say whaaaat), but here in the good ol’ US of A, lots of hardware stores will give you free sawdust because they would otherwise throw it away. My sawdust man also informed me that it makes a nice mulch for the garden. Isn’t that handy!
– Sewing machine, thread, and hand sewing needles.
– Outdoor space, or a really really good broom. I told you, this shit was messy. You have been warned.

How to Make a Tailor's Ham & Seam Roll - Sewtionary Giveaway

Here are the instructions, Sewtionary-Style. Told y’all that book is just lovely.

Now here are my steps.

TO MAKE THE TAILOR’S HAM:

How to Make a Tailor's Ham & Seam Roll - Sewtionary Giveaway
I found it easiest to start with a paper pattern piece, since the shape is so weird. You’ll want to make your ham 14″ long; 10″ wide at the wide end and 8″ wide at the narrower end. This will result in a bit of an egg shape.

How to Make a Tailor's Ham & Seam Roll - Sewtionary Giveaway
Using your paper pattern piece, cut one egg from both the wool and the cotton.

How to Make a Tailor's Ham & Seam Roll - Sewtionary Giveaway
Pin the pieces, right sides together, leaving a nice 5″ gap at the wide end. PROTIP: Whenever I’m sewing something that requires an unsewn gap, I mark each end with a double pin. This reminds me to stop sewing when I get to the double pin! Otherwise, I’ll just keep going my merry way and complete the circle, which is exactly what we don’t want right now.

How to Make a Tailor's Ham & Seam Roll - Sewtionary Giveaway
Using a 1/2″ seam allowance, sew around the entire circumference of the ham, again leaving that 5″ gap at the wide end. Make sure it’s 5″, too – you’ll need the room for stuffing (don’t make it more than 5″, or you’ll hate yourself for it).

How to Make a Tailor's Ham & Seam Roll - Sewtionary Giveaway
Turn the ham right side out.

How to Make a Tailor's Ham & Seam Roll - Sewtionary Giveaway
Ok, time to get messy! Take that ham outside and start stuffing your stuffing in it! If you are using sawdust, expect a big mess that will get everywhere.

How to Make a Tailor's Ham & Seam Roll - Sewtionary Giveaway
Instead of just quickly trying to fill the ham with sawdust, take the time to pack down the sawdust with each handful. The narrow end of the ham especially needs to be packed pretty tight, or else it will collapse. Once you’ve packed it down, work on the next section and pack that. Again – this IS messy, and it will take longer than you think, because sawdust loves to pretend it’s tightly packed when it’s secretly not. You want the ham to be pretty hard so it will retain it’s shape. When you think it’s full – keep stuffing. Then stuff some more.

How to Make a Tailor's Ham & Seam Roll - Sewtionary Giveaway
In the meantime, here’s a photo of my cat glaring at me for daring to sit outside without her, haha.

How to Make a Tailor's Ham & Seam Roll - Sewtionary Giveaway
Once you are sure the ham is packed as tight as it can go (Are you sure? Are you sure you’re sure?), it’s time to sew it up!

How to Make a Tailor's Ham & Seam Roll - Sewtionary Giveaway
Holding the ham between your legs (do as I say, not as I do – don’t set it on the ground; you don’t want to push the narrow end back in!), turn under the seam allowance on one side and lap it over the opposite side. Using a tight whipstitch, sew the opening shut by hand.

Next, you’ll probably want to beat the shit out of your ham (if it’s covered in sawdust like mine, anyway). I just pounded mine against the porch railing until all the dust was knocked off.

This post is turning into one long “That’s What She Said” joke, isn’t it?

How to Make a Tailor's Ham & Seam Roll - Sewtionary Giveaway
End result: Completed Tailor’s Ham!

TO MAKE THE SEAM ROLL:
How to Make a Tailor's Ham & Seam Roll - Sewtionary Giveaway
Unlike the Tailor’s Ham, I didn’t bother making a pattern piece for this one – I just drew it directly on my cotton with a Chaco pen. Draw a 14″x5″ rectangle and round the four corners.

How to Make a Tailor's Ham & Seam Roll - Sewtionary Giveaway
Cut one of each of these rectangles from both your cotton & wool.

How to Make a Tailor's Ham & Seam Roll - Sewtionary Giveaway
Using a 1/2″ seam allowance, sew the two rectangles, right sides together, leaving a 5″ opening in the middle of one long side of the seam roll (I have no idea why I don’t have a photo of this, but I trust you can work this step out). Turn the roll right side out.

How to Make a Tailor's Ham & Seam Roll - Sewtionary Giveaway
Time to stuff that bad boy!

How to Make a Tailor's Ham & Seam Roll - Sewtionary Giveaway
As with the Tailor’s Ham, really stuff and pack each long narrow end before focusing on the middle of the roll. This will ensure that your roll is nice and tightly packed, and hard enough to hold it’s shape.

How to Make a Tailor's Ham & Seam Roll - Sewtionary Giveaway
Once you’ve packed the roll nice and tight with sawdust, turn one seam allowance under and lap it over the opposite side of the opening. Sew this closed by hand.

Again, you’ll probably want to beat the shit out of that thing to get all the dust off. Be aggressive! Honey Badger Seam Roll don’t care!

How to Make a Tailor's Ham & Seam Roll - Sewtionary Giveaway
And here’s the finished seam roll!

How to Make a Tailor's Ham & Seam Roll - Sewtionary Giveaway
And here’s my new pressing family! Yay!
BTW, be sure to save some of that remaining sawdust – once you use the ham or seam roll, you may find the sawdust settling and thus need to be repacked to firm up the shape. Unless you just really love having an excuse to go to Home Depot – in that case, don’t let me stop you.

GIVEAWAY IS CLOSED
All right, I promised y’all a giveaway so let’s get on that. To win your own copy of the Sewtionary, simply comment on this post and tell me your favorite sewing technique. Are you a freak about pressing (high five!) or is sewing patch pockets your thing, or…? You tell me! This giveaway is open WORLDWIDE and I will close the entries a week from today, on SEPTEMBER 29, 2014 AT 7:00 AM CST. Good luck!
GIVEAWAY IS CLOSED

If you’d like to buy your own copy of the Sewtionary, you can pick up a signed copy at the Sewaholic website (or a boring ol’ unsigned copy on Amazon). Thanks so much, Tasia, for letting me be part of this book tour & for generously donating a copy to giveaway!

How to Make a Tailor's Ham & Seam Roll - Sewtionary Giveaway

Want to read some more Sewtionary reviews and/or enter some more giveaways? Check out the full blog tour here:

ONE LAST THING – We have a giveaway winner to announce! Lucky number generator says:

winner1

winner2

Donna, you’re a winner! Is this now offically the second time I’ve made your Monday exciting? 🙂 Congratulations! Sending your email now!

Everyone else (and there were a lot of y’all – nearly 400 entries, wow!) – I’m not turning you away completely empty-handed. Kat has generously offered a coupon code, which is awesome! Use the code LLADYBIRD to get 15% off the purchase of the Jenna Cardi from Muse Patterns, good through 9/29. Thanks to everyone who entered the giveaway! Y’all are the best 😀