Tag Archives: my rad house

Sewing Studio Tour: 2023 Version

23 Mar

I just realized I’ve been in my house for 4 years now, and I never shared my studio space!

A little background before we dive in: I own my house, and it was built in 1958. It is considered a 3 bedroom, but the rooms are very small. My studio is about 10’x11′, so every square inch definitely counts. It’s not the smallest room I’ve worked in, but it is certainly a top 3 contender! Eventually, I plan on building out and moving my studio outside of the main house (whether I build an entirely separate/detached structure in the backyard, or simply add on to the existing house – I haven’t decided yet!), so this is technically “temporary.”

I’m not going to go into full detail about all the various pieces of furniture and storage in this room – I’ve talked about it extensively over the years on this blog, and you can find all that info in my last studio tour post. That post includes links to all my past studio tour posts, and a huge section of links that discusses all my furniture (including the cutting table). Short answer: Almost everything is from IKEA, and if it isn’t from IKEA, it’s likely from the Nashville Flea Market. Any questions you have about anything in this room that are not answered in this post, are answered in that post I linked so please check it out!

Anyway, I recently rearranged the room a little so I took some photos and I’m going to share them with y’all today!

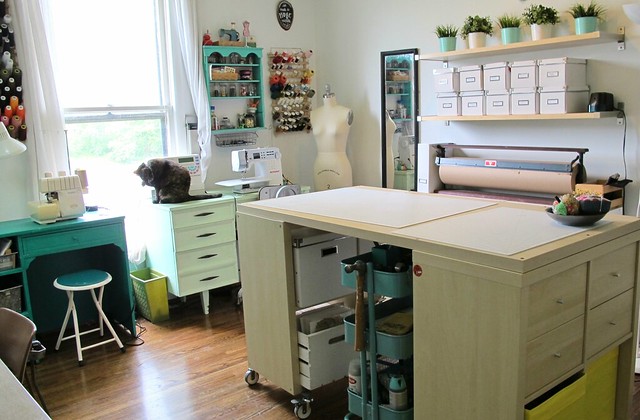
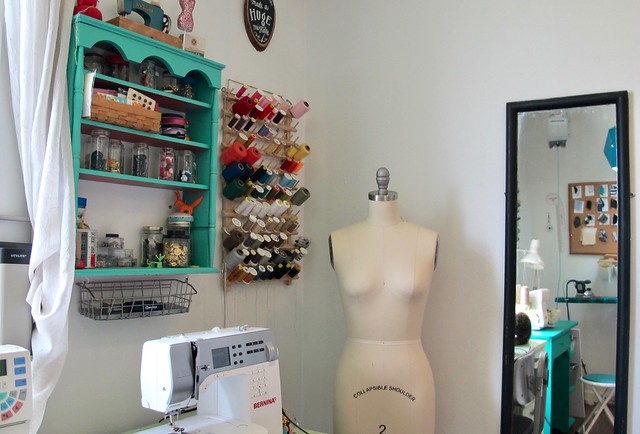
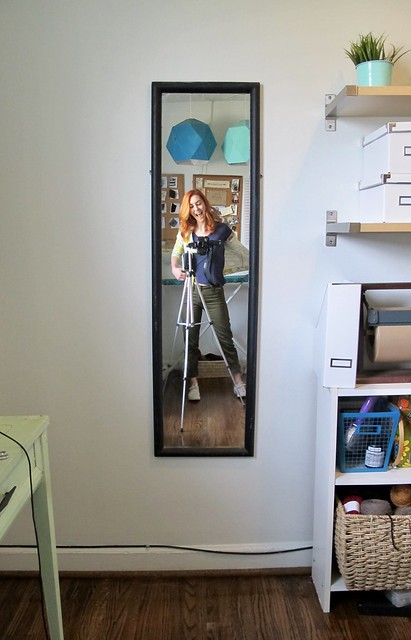
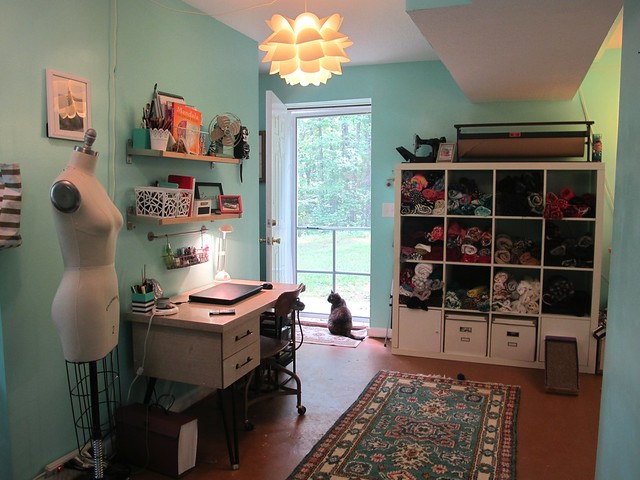
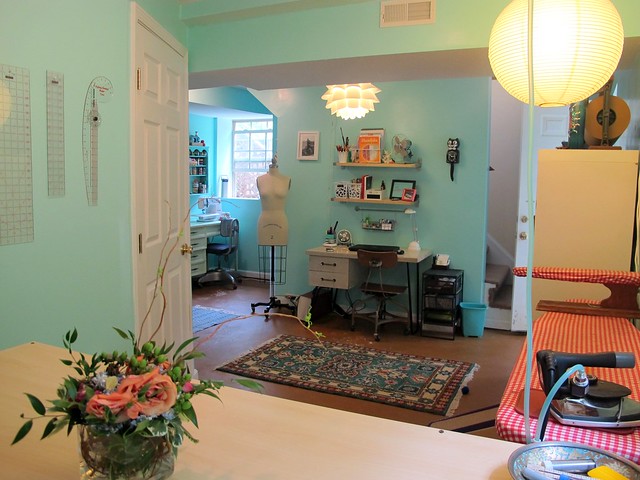
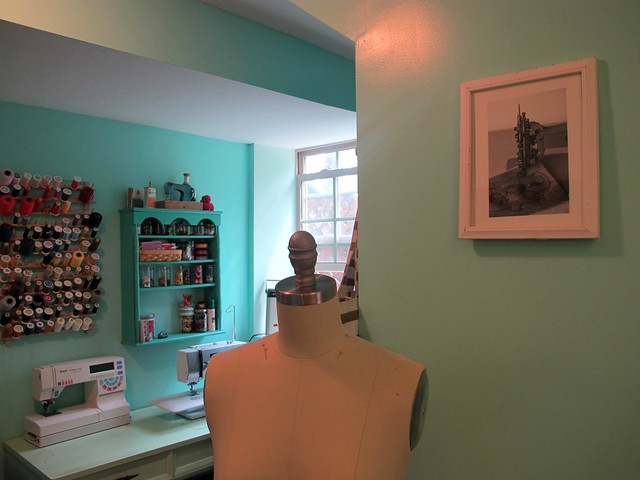
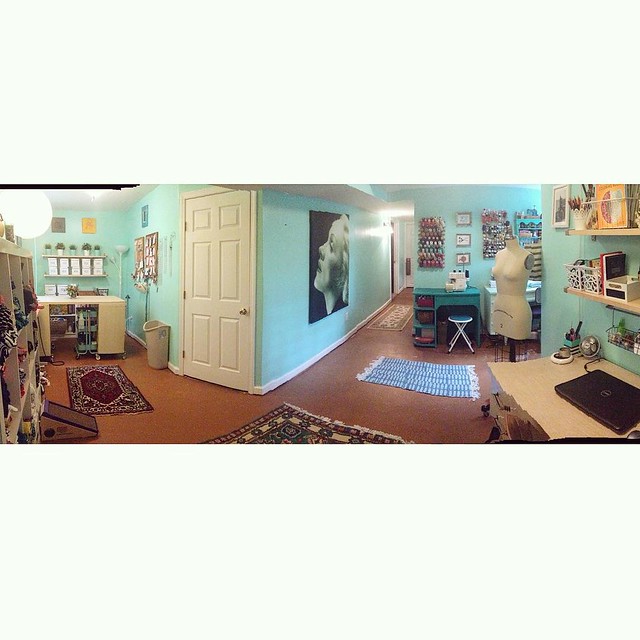
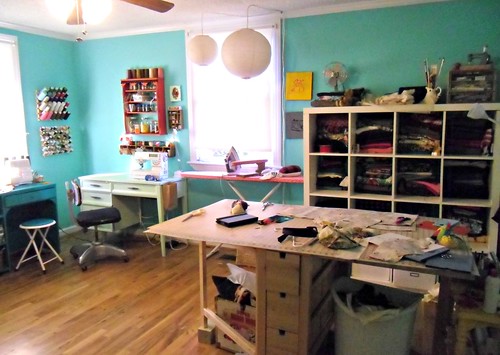
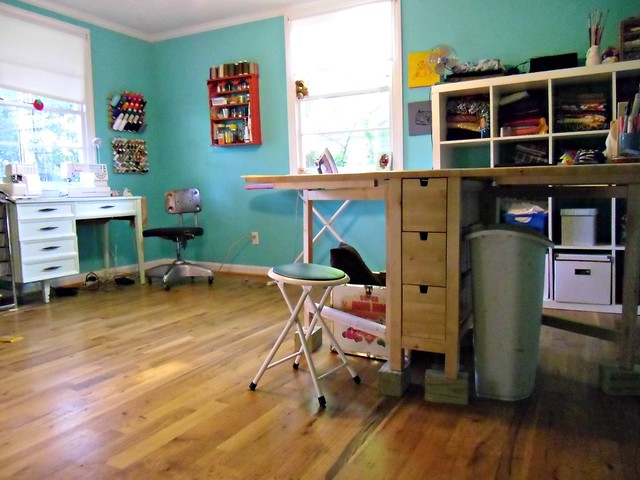
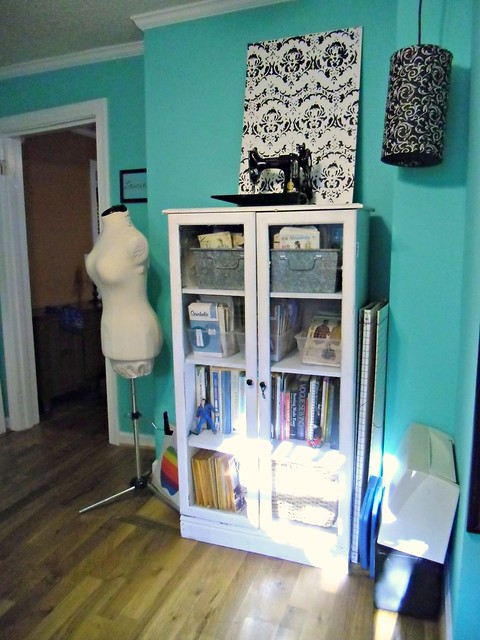
This is the view when you first walk into the doorway. Like I said, it is small! You can see almost the entire space from this viewpoint. To the left (the wall behind the shelf), there is a closet that is directly in front of the door when you walk in.

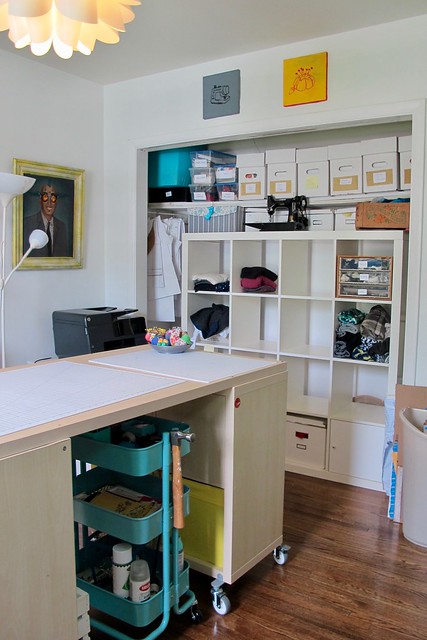
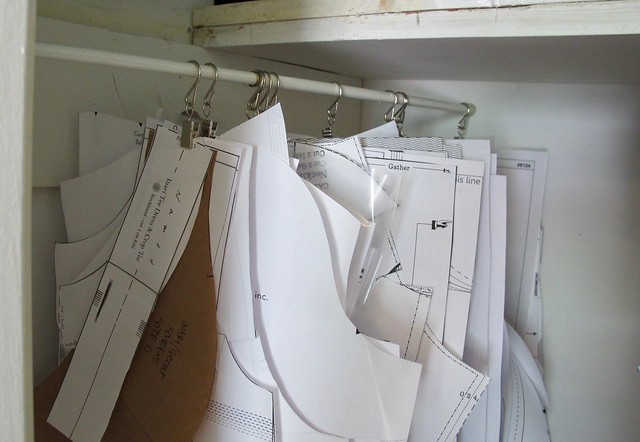
Here is the closet. You can see the entrance to the left (black door) and now the room is behind me. I’ll be honest – having a closet directly in front of the door is nice in terms of leaving lots of good available wall space in the main part of the room, but that closet shape sucks!! It runs super deep, and is hard to get to anything stored in the back. I can’t even imagine what it’s like when there are clothes hanging in it. I had a free standing shelf in here, but it was too hard to get to the back and that space ended up wasted. So earlier this month, I installed shelves in the deep part. I just used plywood and 2x4s from the hardware store, nothing fancy! The clothes rod is still up, so I can hang clothes in the empty side (useful for holding client’s pieces waiting to be altered or picked up). I also installed several hooks in the wall, to hang bags, etc. The top shelf holds sewing machine cases, my on-set tailor kit (basically a second set of sewing supplies so I don’t have to repack whenever I’m called on set), and my jeans samples. The empty space between the entrance and the closet has tension rods, and I use simple curtain hooks with a clip to hang the PDF patterns that I’m currently using. Eventually, I would like to move the closet entirely (knocking down some walls and adding to the laundry room – which is next to the back closet wall, etc) but this works for now!

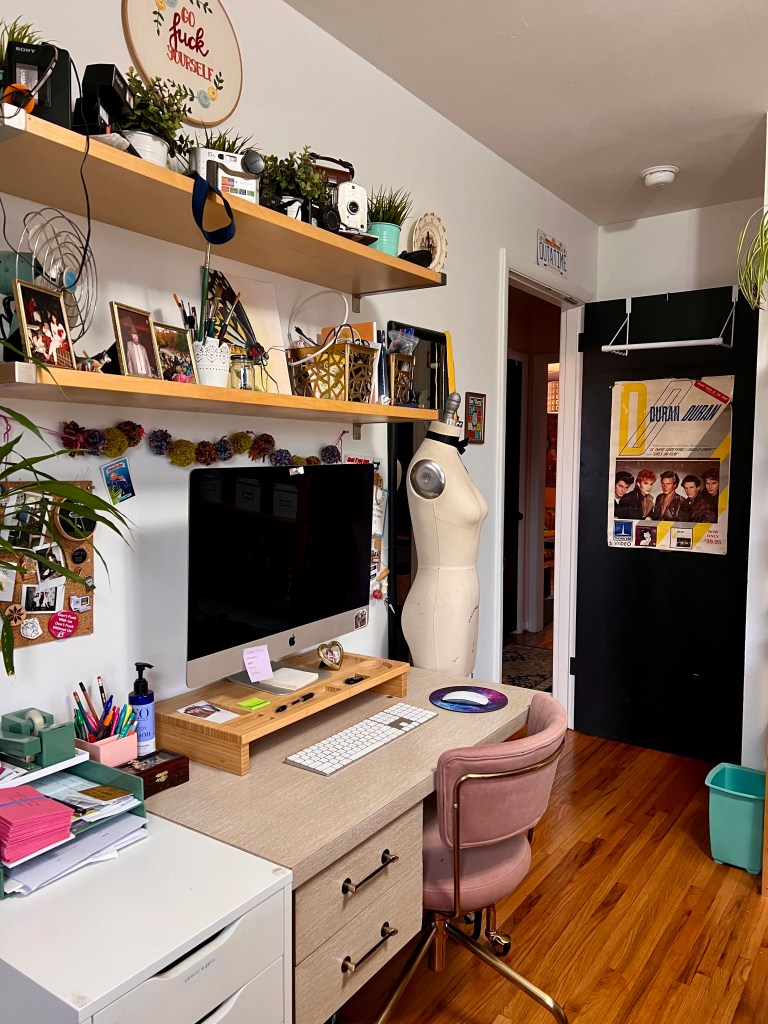
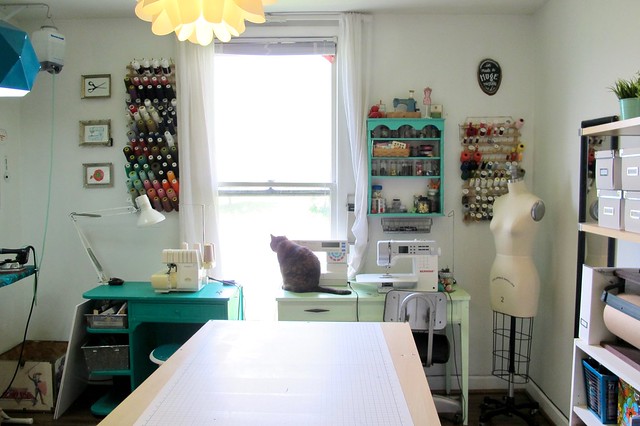
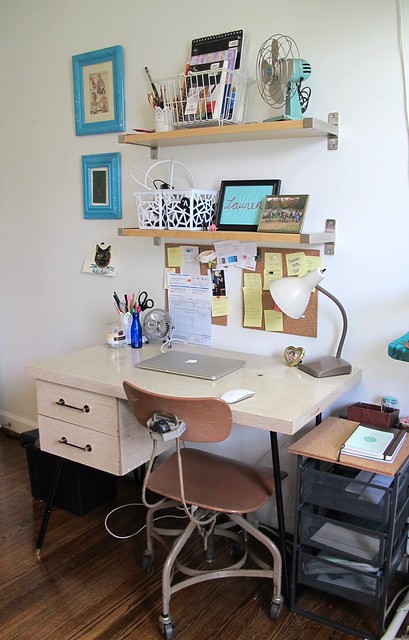
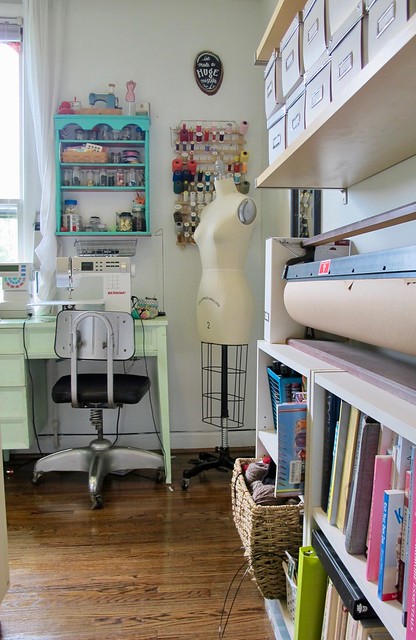
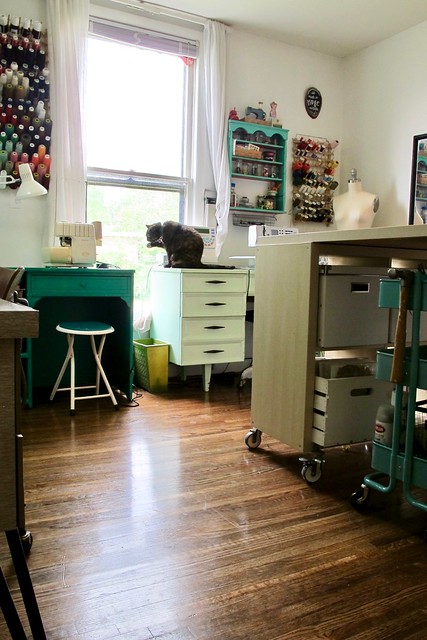
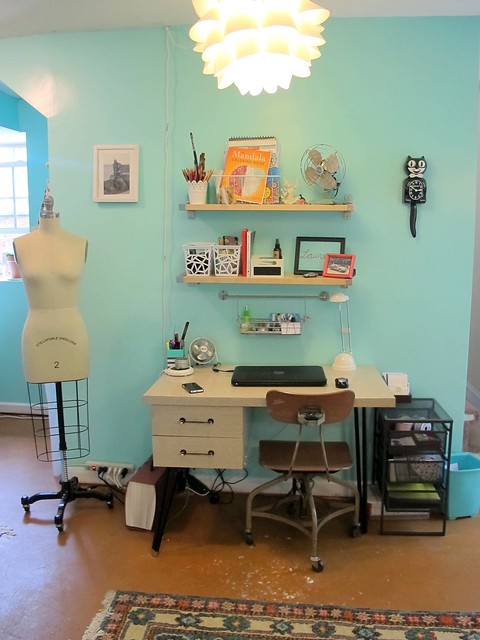
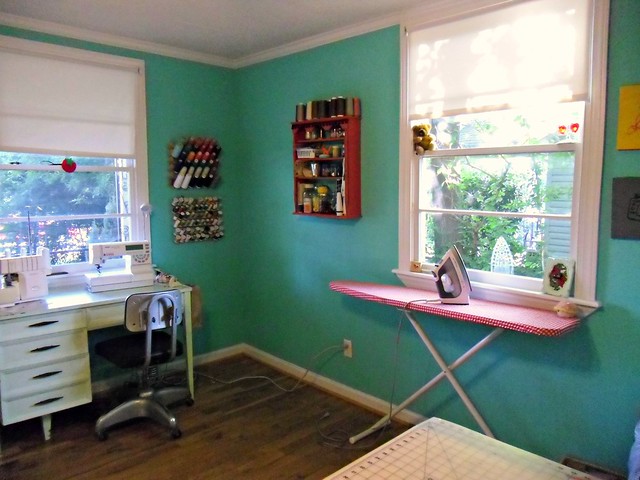
Here is the wall next to the entrance! Here I have my desk + computer (I finally upgraded to a desktop and WOW WOW WOW don’t think I can ever go back to a tiny laptop screen lol), and a small drawer unit that holds various office, art, and tech supplies.

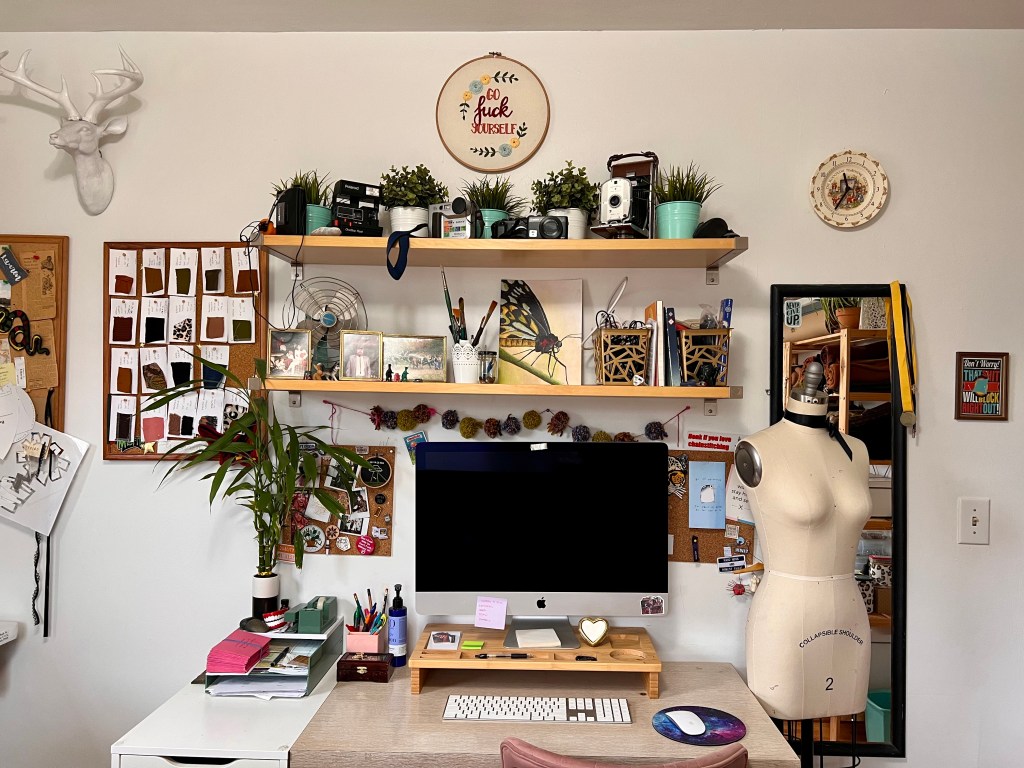
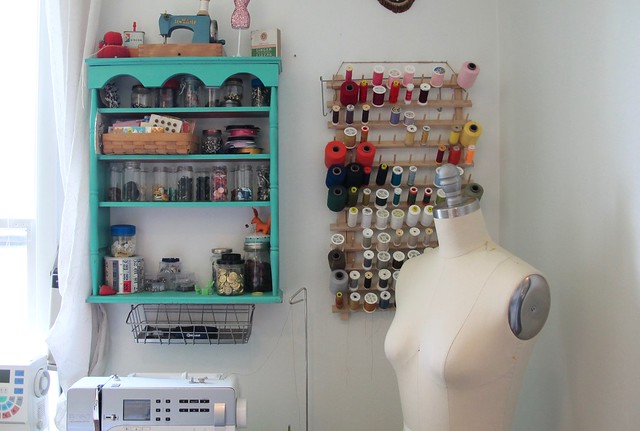
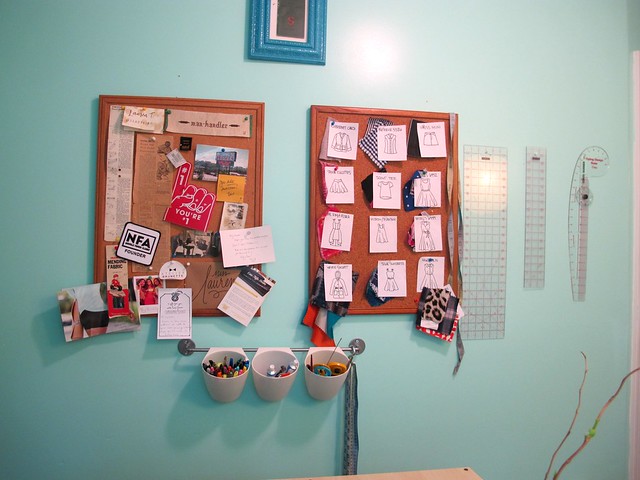
The corkboard to the left of the desk holds swatches of all the fabrics on my shelves, I swap these out based on what I plan on sewing for the current or upcoming season. And the dress form lives next to my desk now because there is literally nowhere else for her to go! I just roll her out of the way as needed. FYI that pink desk chair is from Wayfair.

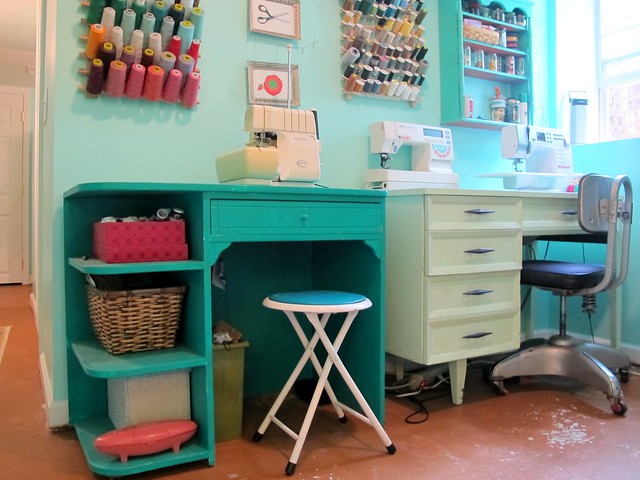
Next to my desk is my newest sewing machine (and the reason I had to rearrange this room)- a Consew chainstitch machine! This is new – I purchased it in January, and I’m deep in the throes of learning how to use it. The table is 48” long, so it took some creative maneuvering to figure out how it would fit in this space. Eventually I’ll hang spools of thread in that empty white wall behind it (or move that corkboard and put the spools there), but I gotta order them first 😇

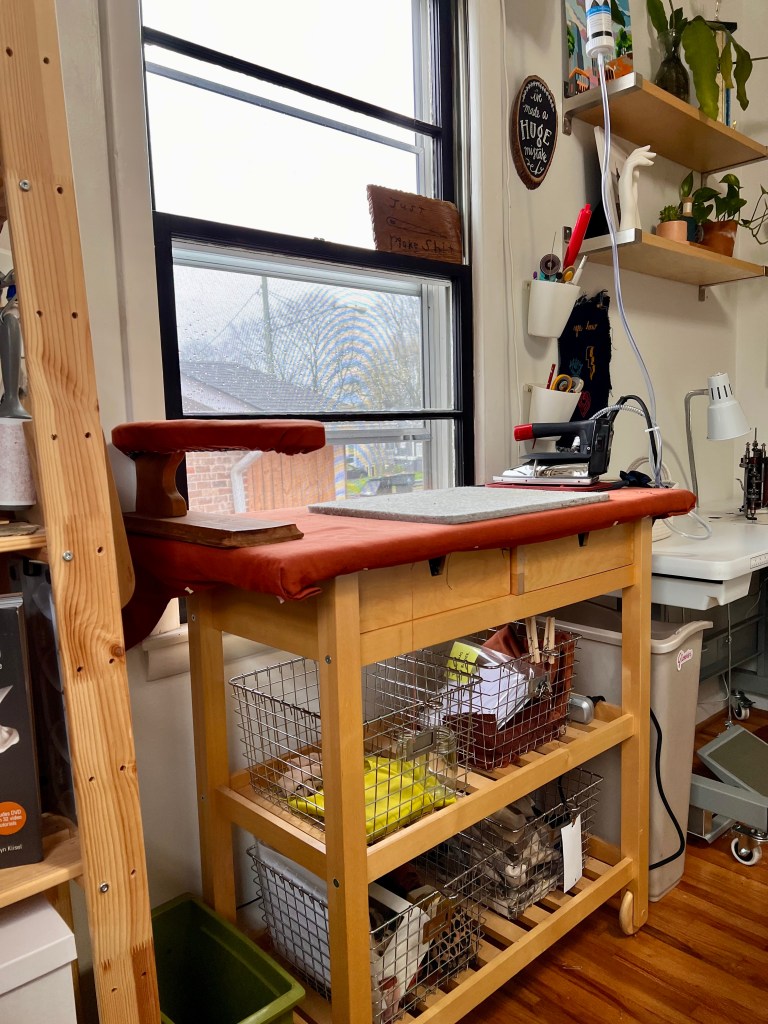
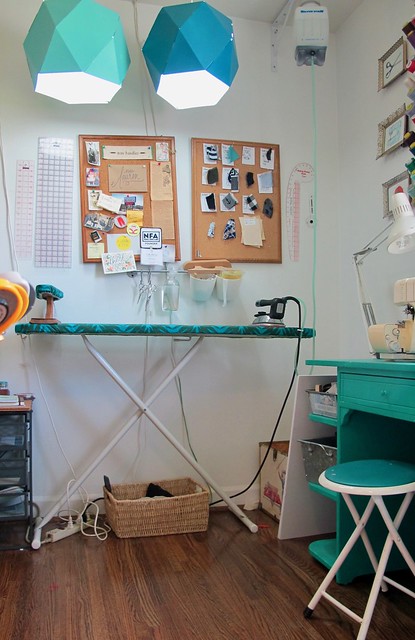
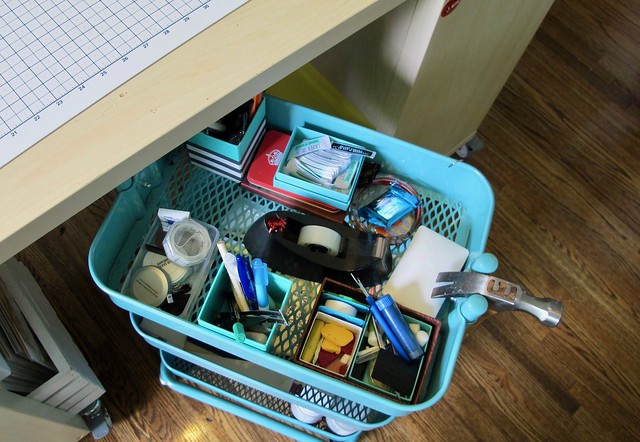
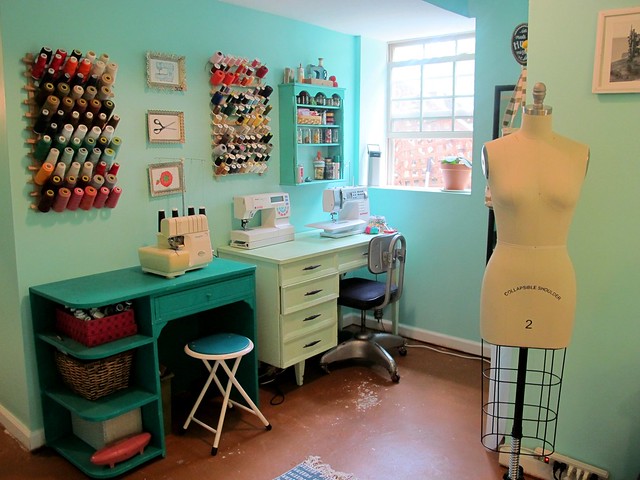
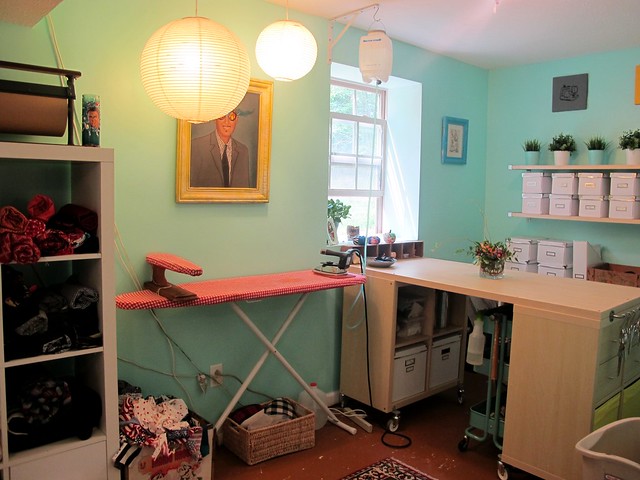
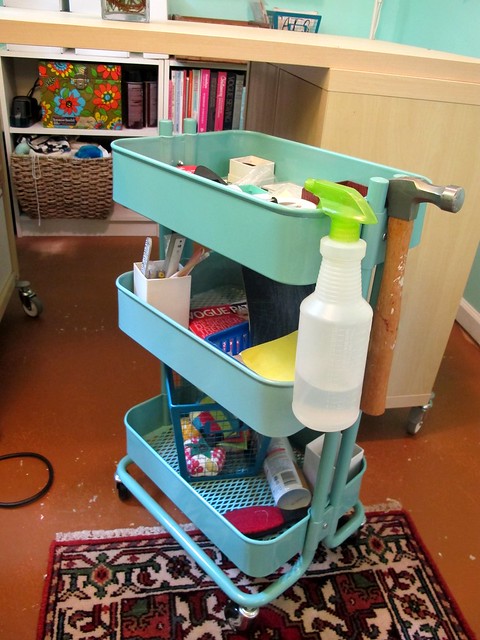
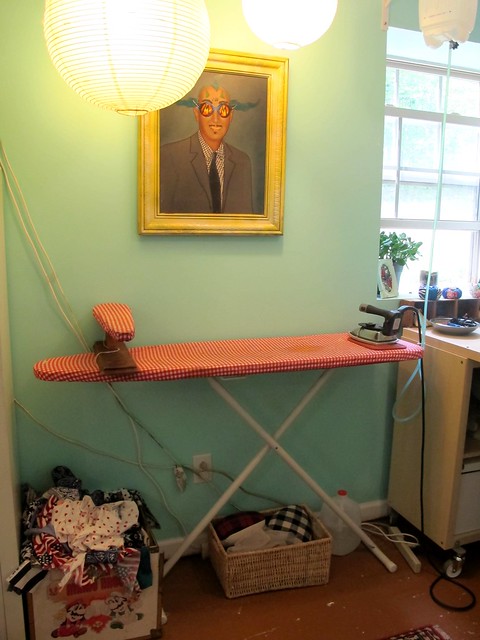
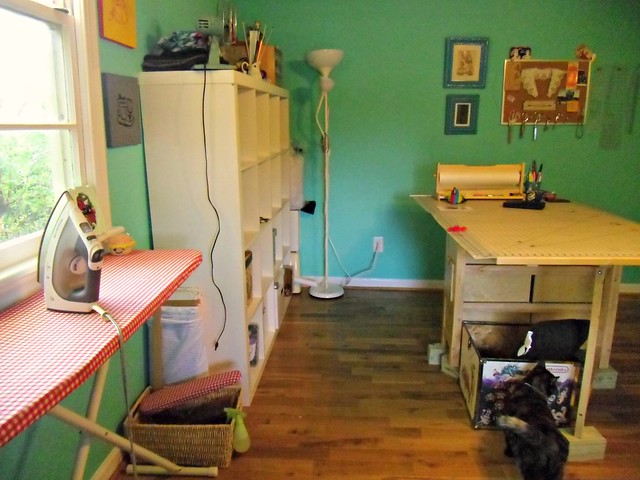
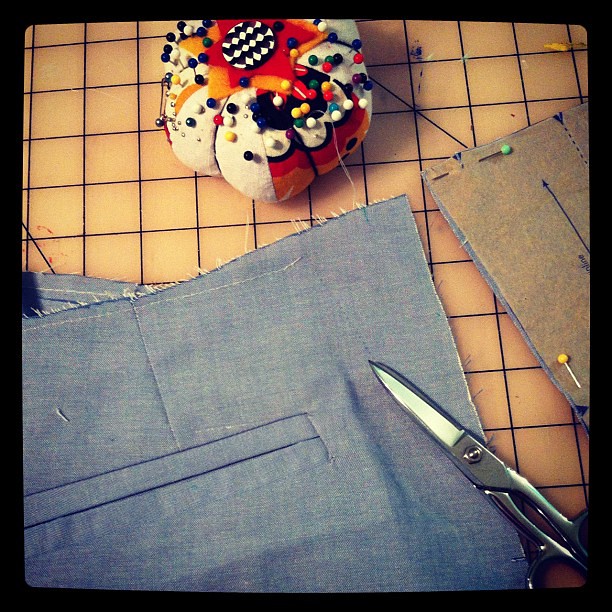
Next to the chainstitch is my ironing station. I use a kitchen cart, padded at the top to make an ironing board. The drawers hold interfacing and pressing tools, and the shelves hold baskets with cut projects. With a small space, it’s importantly to utilize what you can so I prefer this over a traditional ironing board, since it has shelves and drawers. My scissors and pressing supplies are hung from tension rods on the side of the shelf.

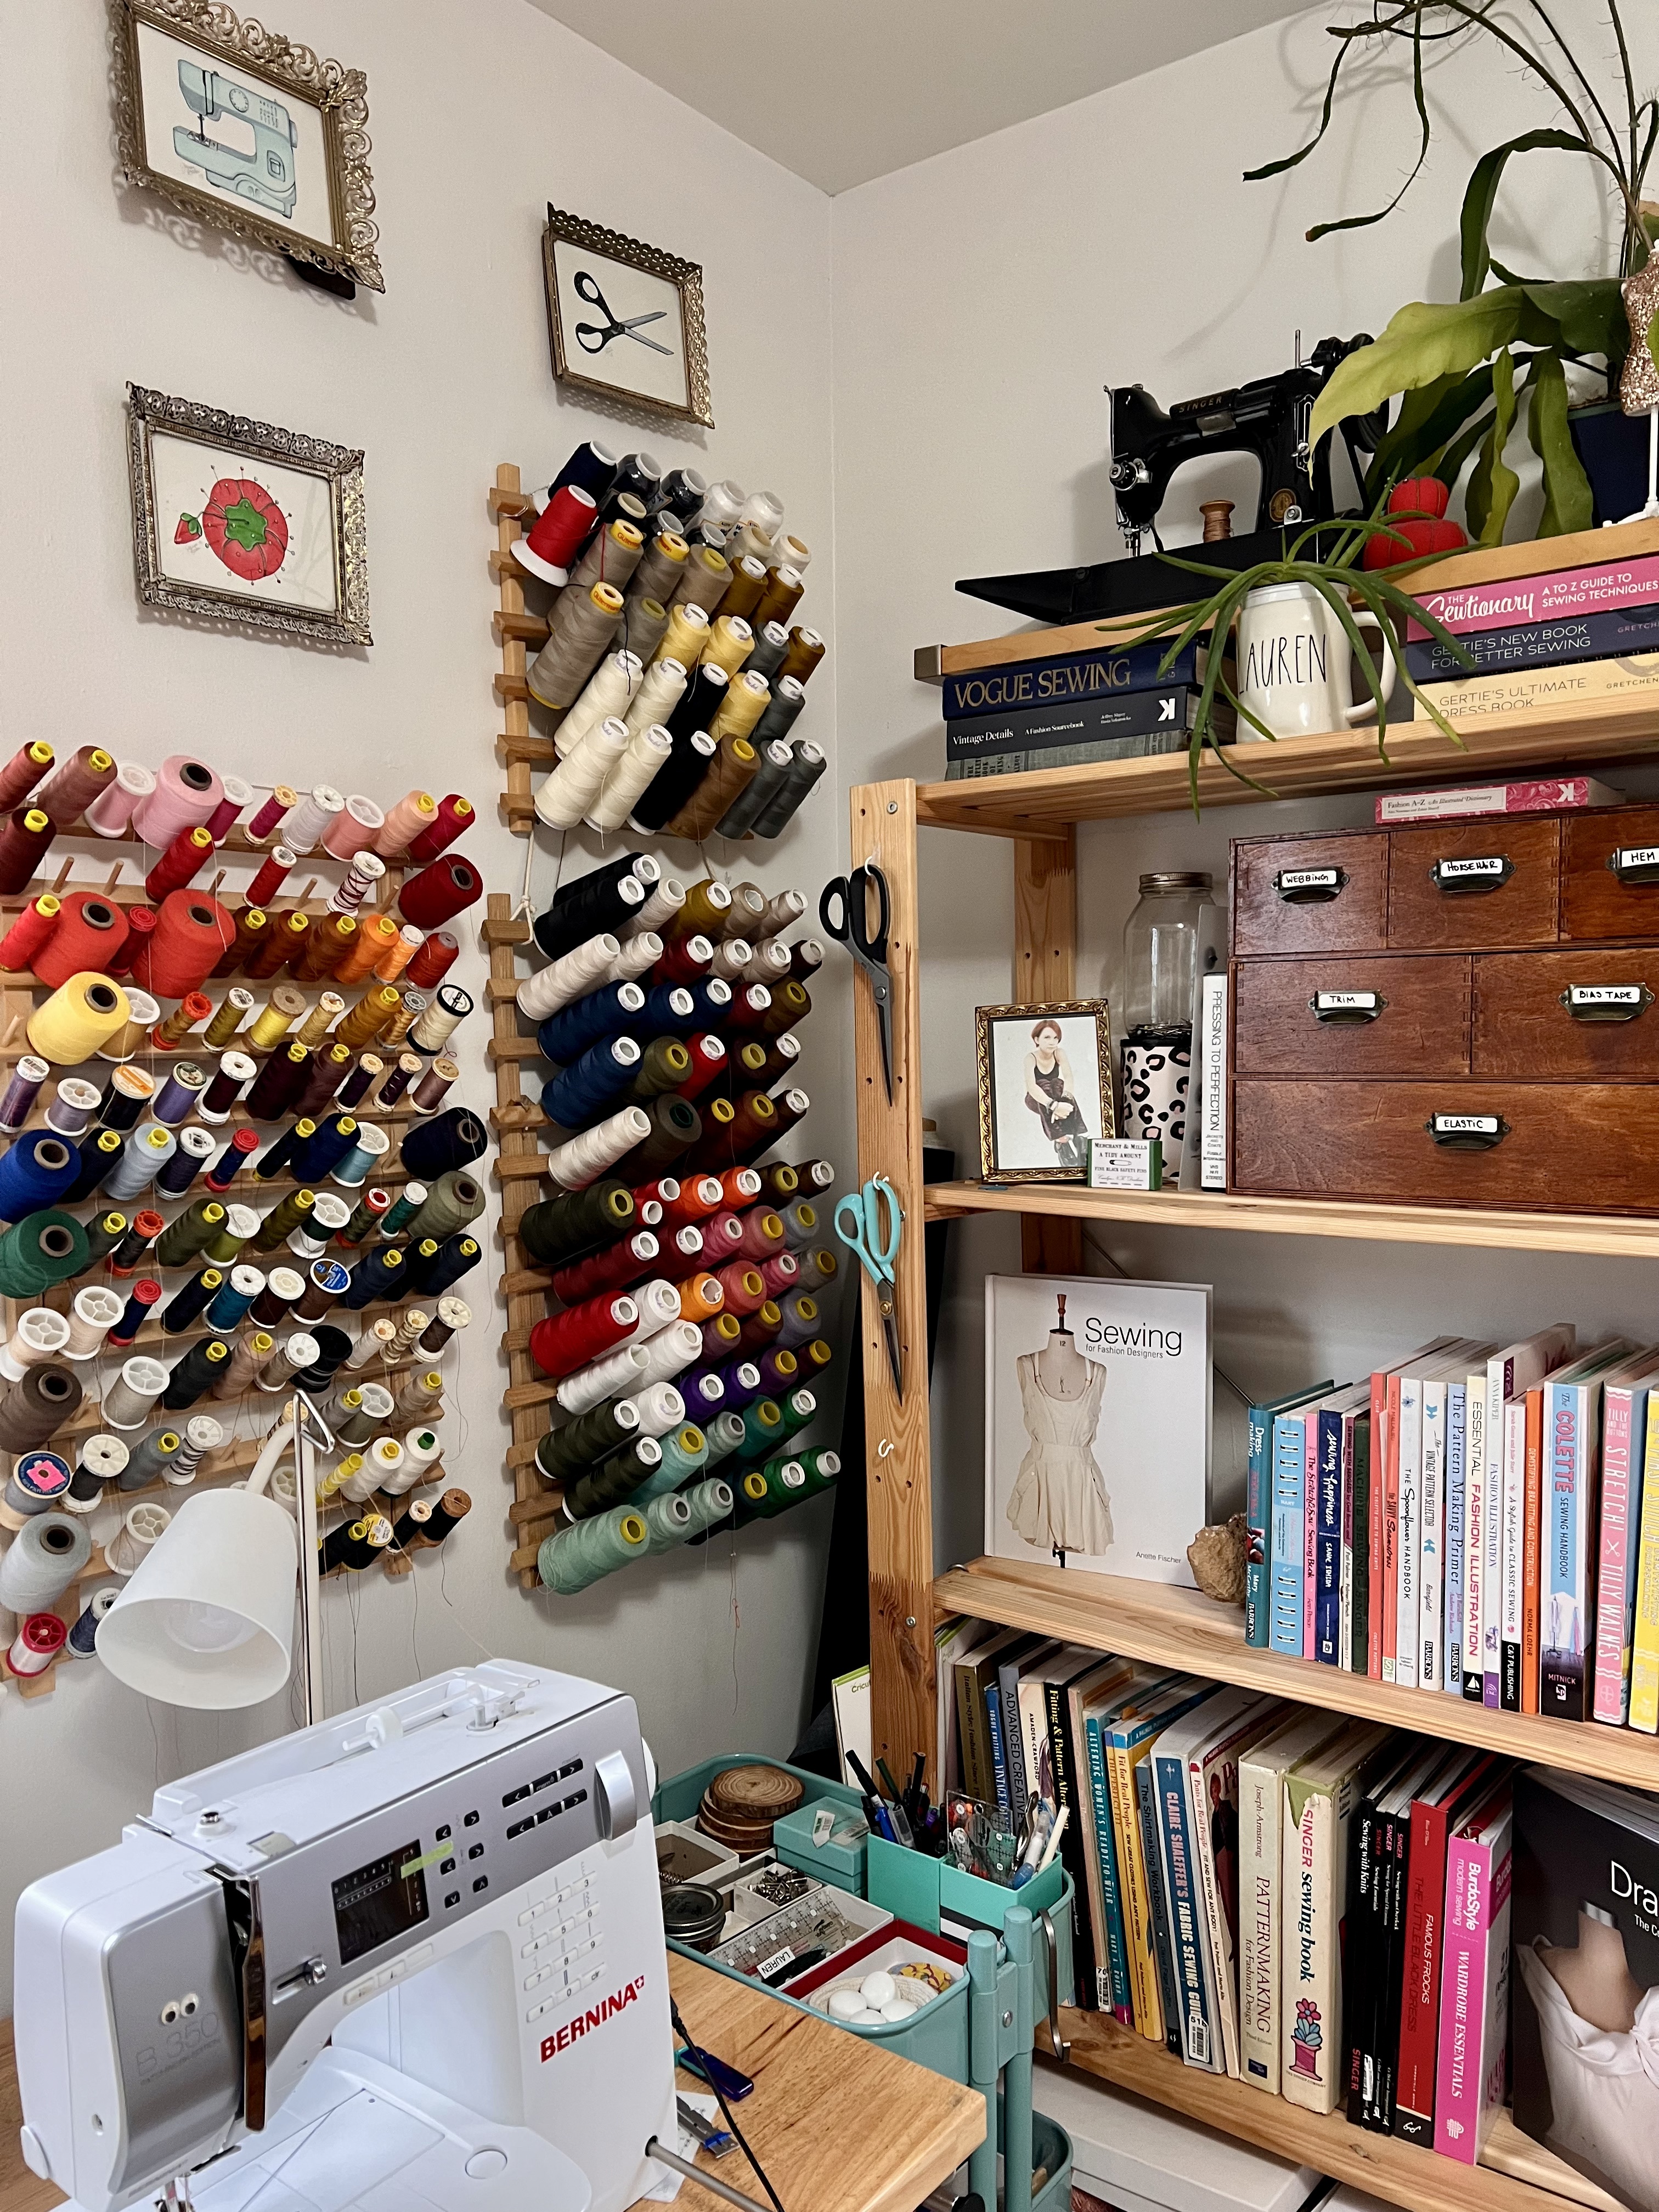
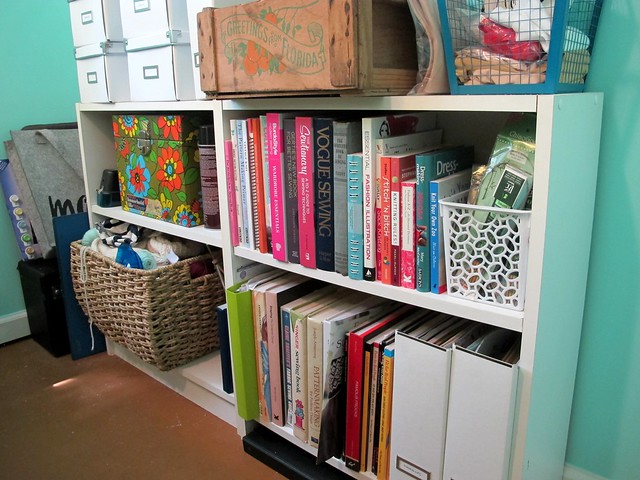
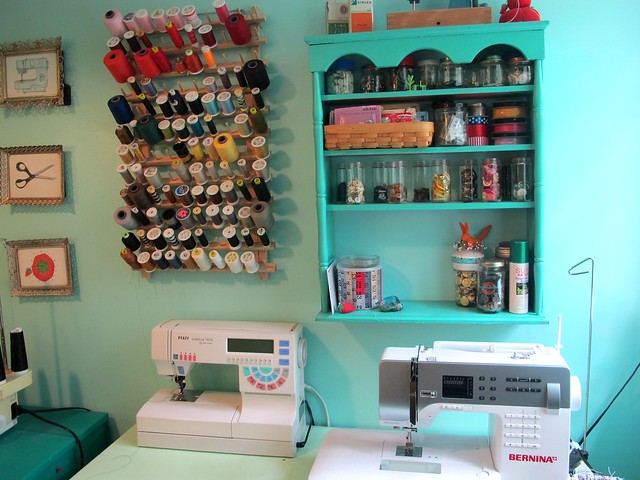
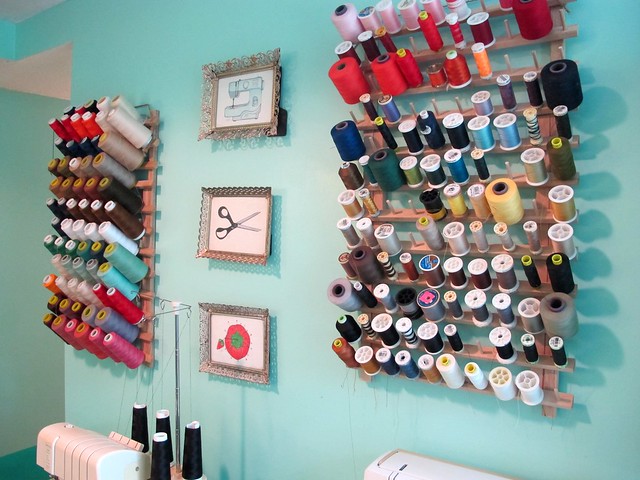
Next to the ironing station is a shelf, with all my sewing books and a drawer unit that holds trims and elastics. I also keep my thread here on racks. And one of those white boxes holds my entire yarn stash (yes, the entire thing! I don’t stash a lot of yarn!).

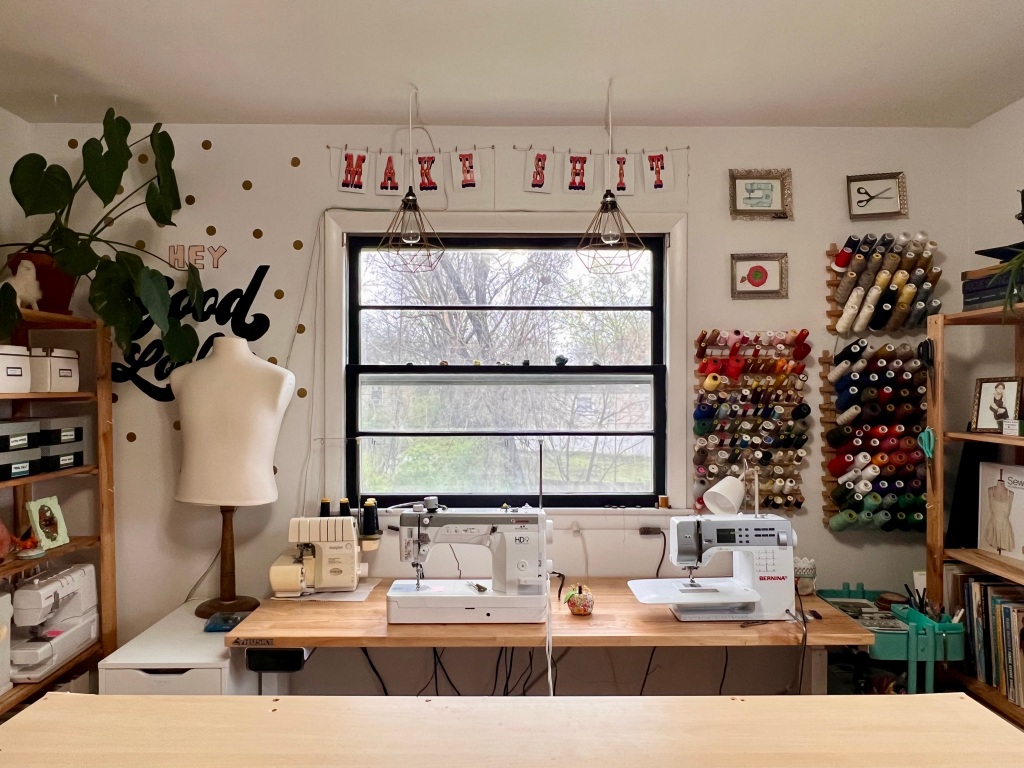
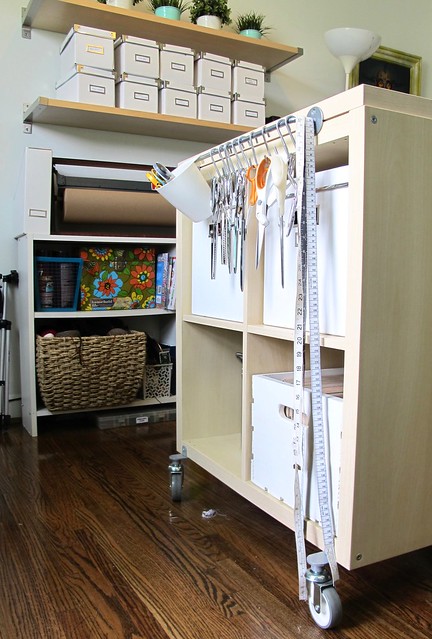
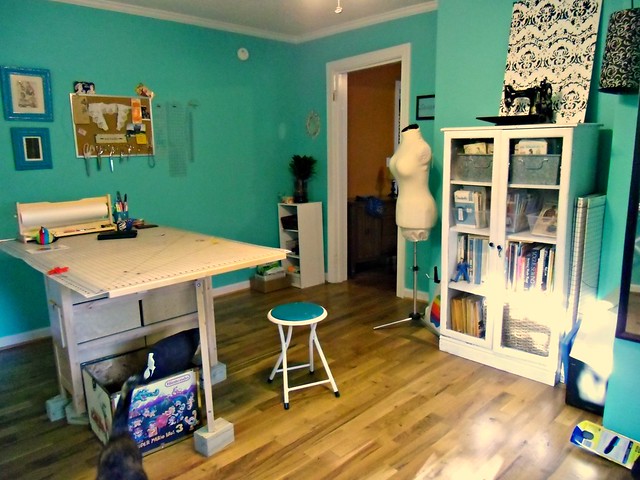
Then we have the main sewing table, which is about 5’ long. It’s the Husky Workbench from Home Depot; I swapped this out from my old tabletop (from IKEA). It is much sturdier (absolutely no bounce), the height can be raised or lowered, and the entire thing is on castors so it can be rolled around. If I need more cutting space, I can remove the machines, raise the height, and roll it next to my cutting table for a double space. I added the small drawer on the left (underside) – that’s from Amazon. The drawer unit next to the table holds all my sewing supplies – machine supplies, notions, specialty threads, snaps, buttons, etc. And the male dress form on top is actually a shop mannequin, I grabbed it when the shop I work at was changing their floor mannequins. It’s not a true dress form for fitting, but is useful for taking photos, measurements, or designing. I do a lot of sewing for male clients and this works way better than my lady form!

BTW you may have noticed my lack of chairs – I didn’t take any out of the room for these photos, I really just have one small stool! I realized I didn’t like having chairs with backs – I never sit back and use the back support, instead, it gets in the way when I’m doing a lot of moving around. I had this little folding stool that works great. I need to buy more, but I haven’t gotten around to it. I don’t even miss having wheels – they always got thread rolled up in them.

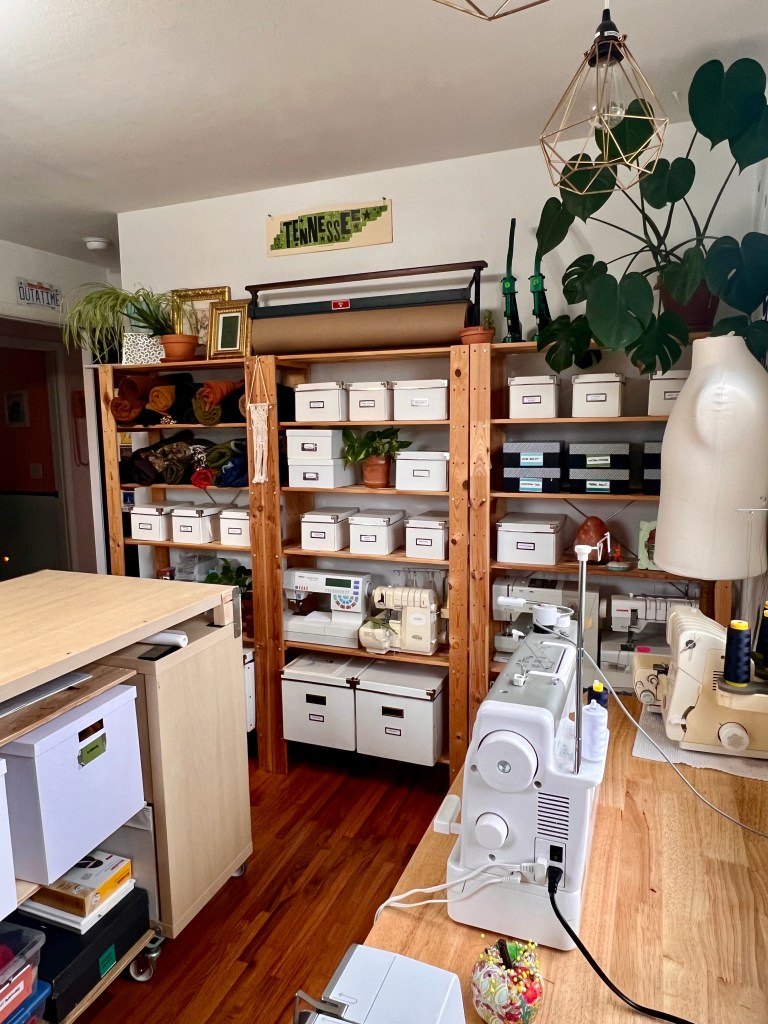
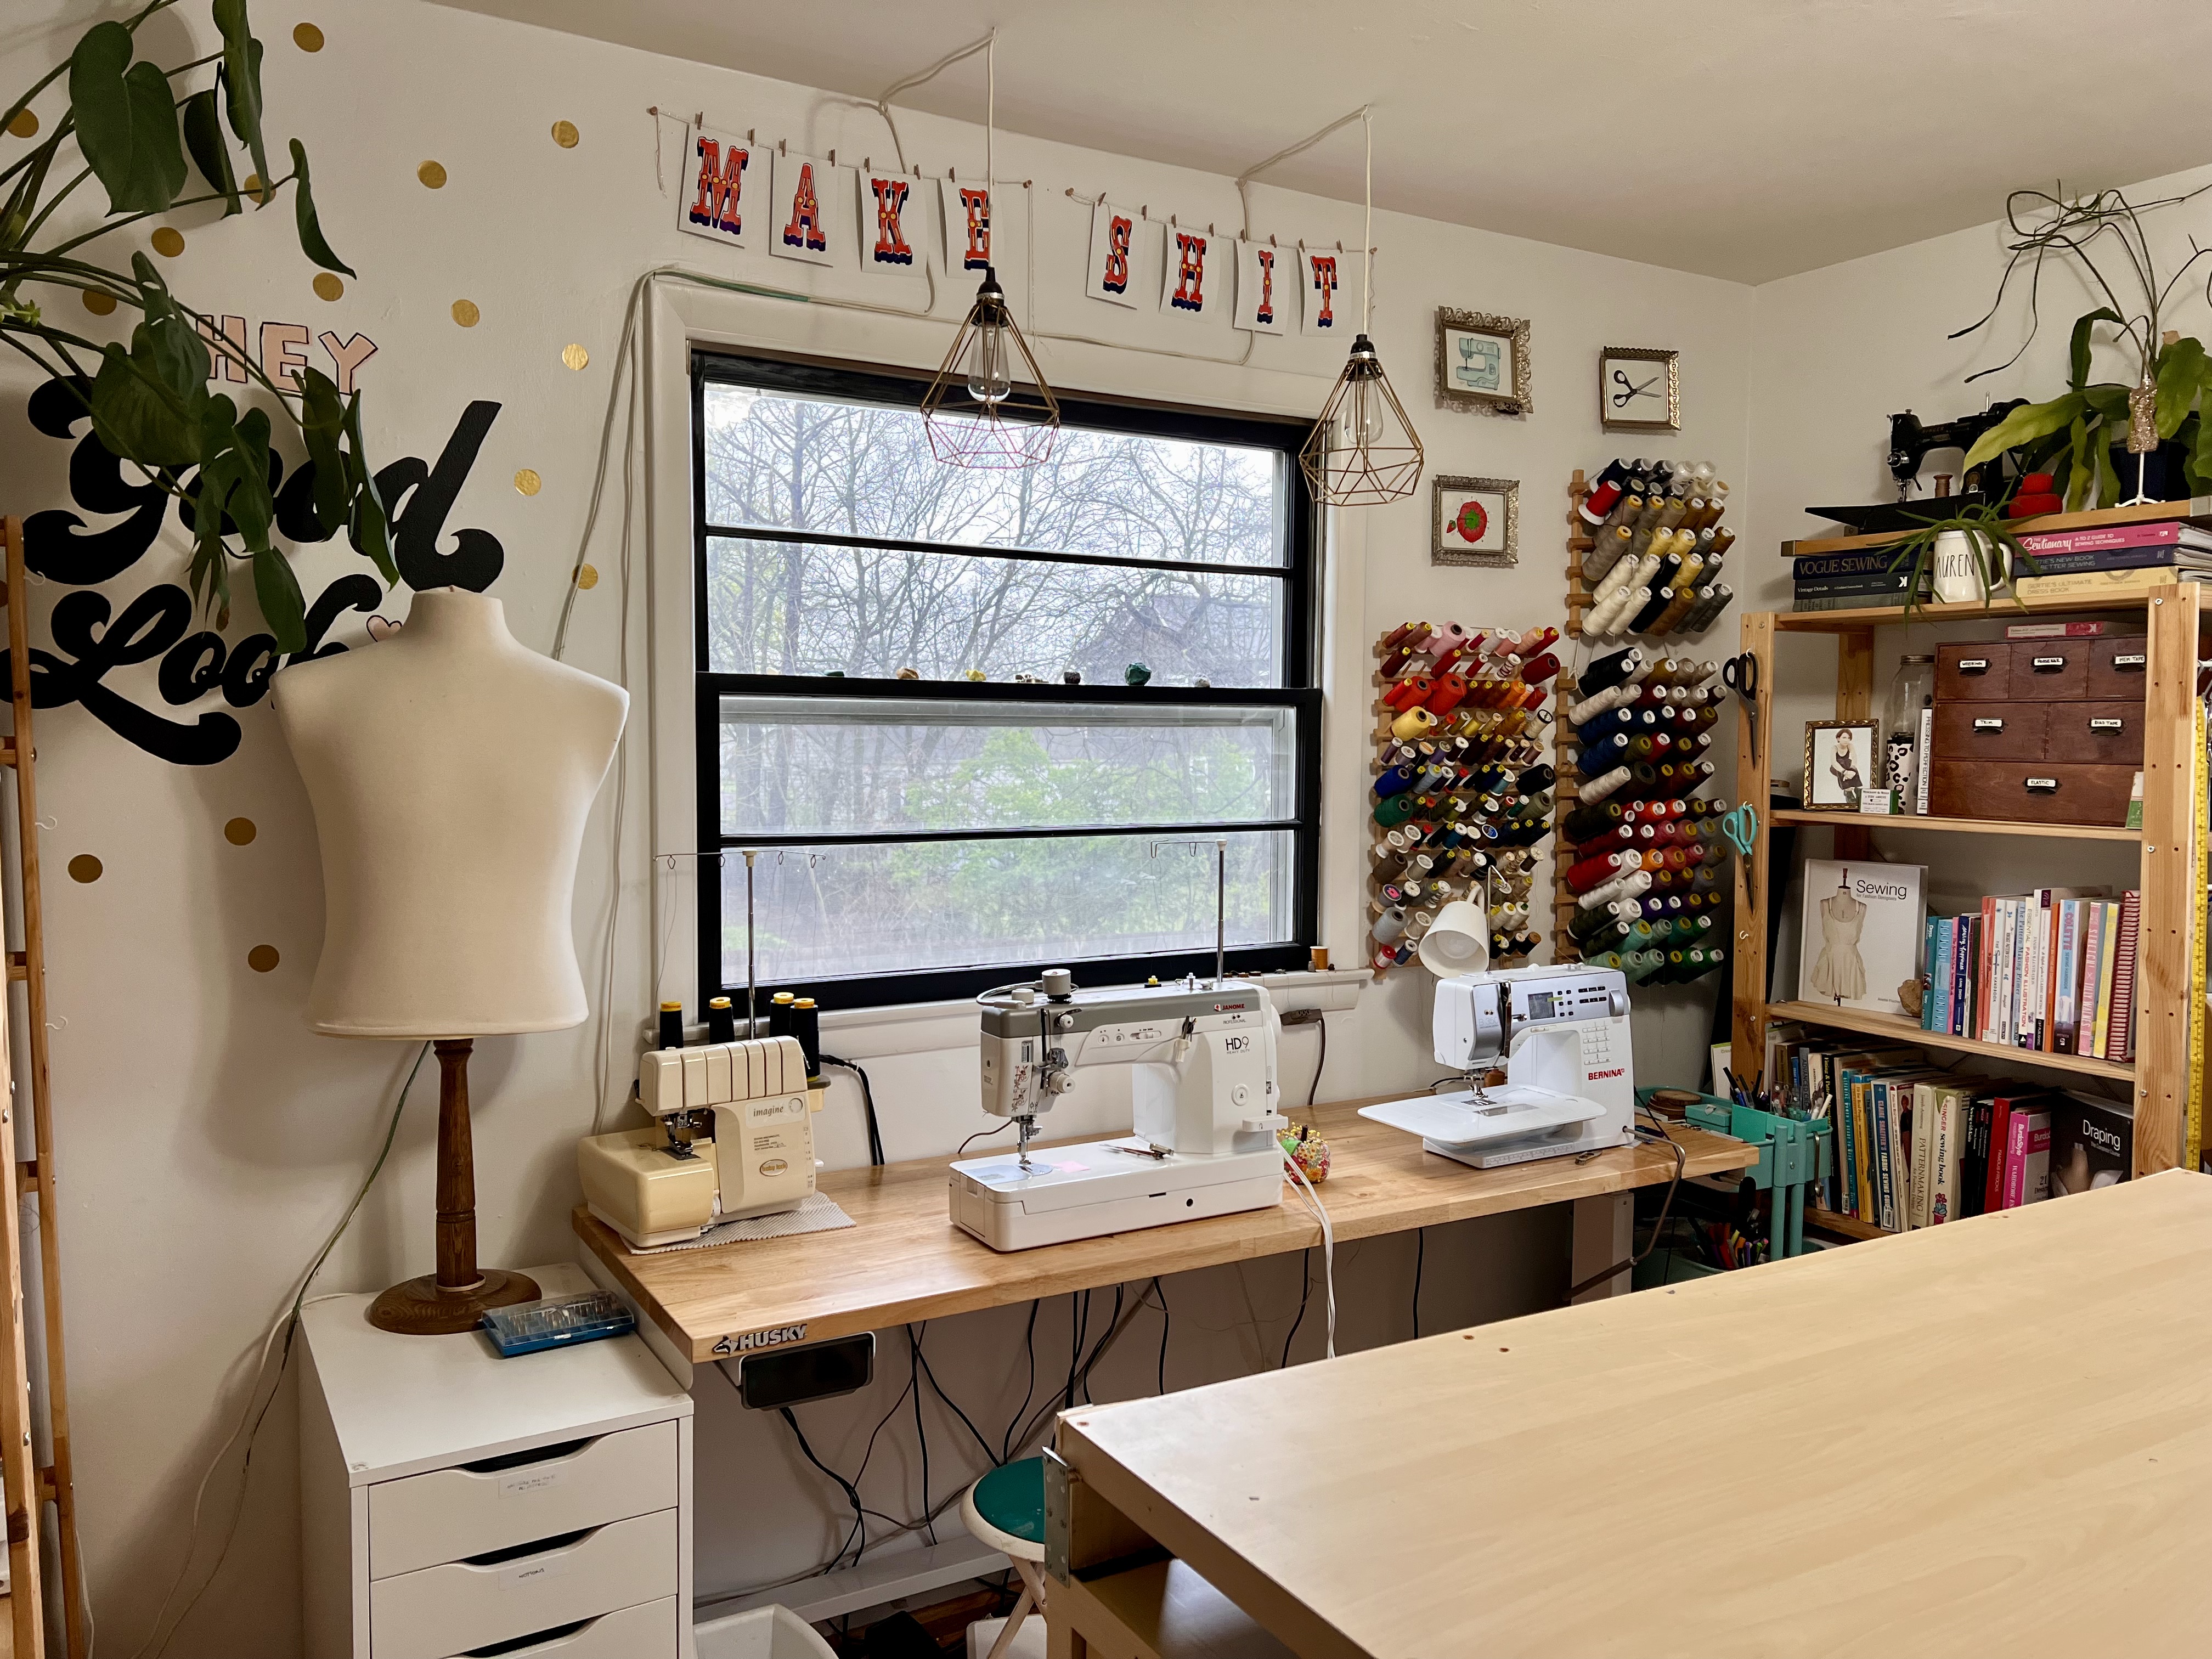
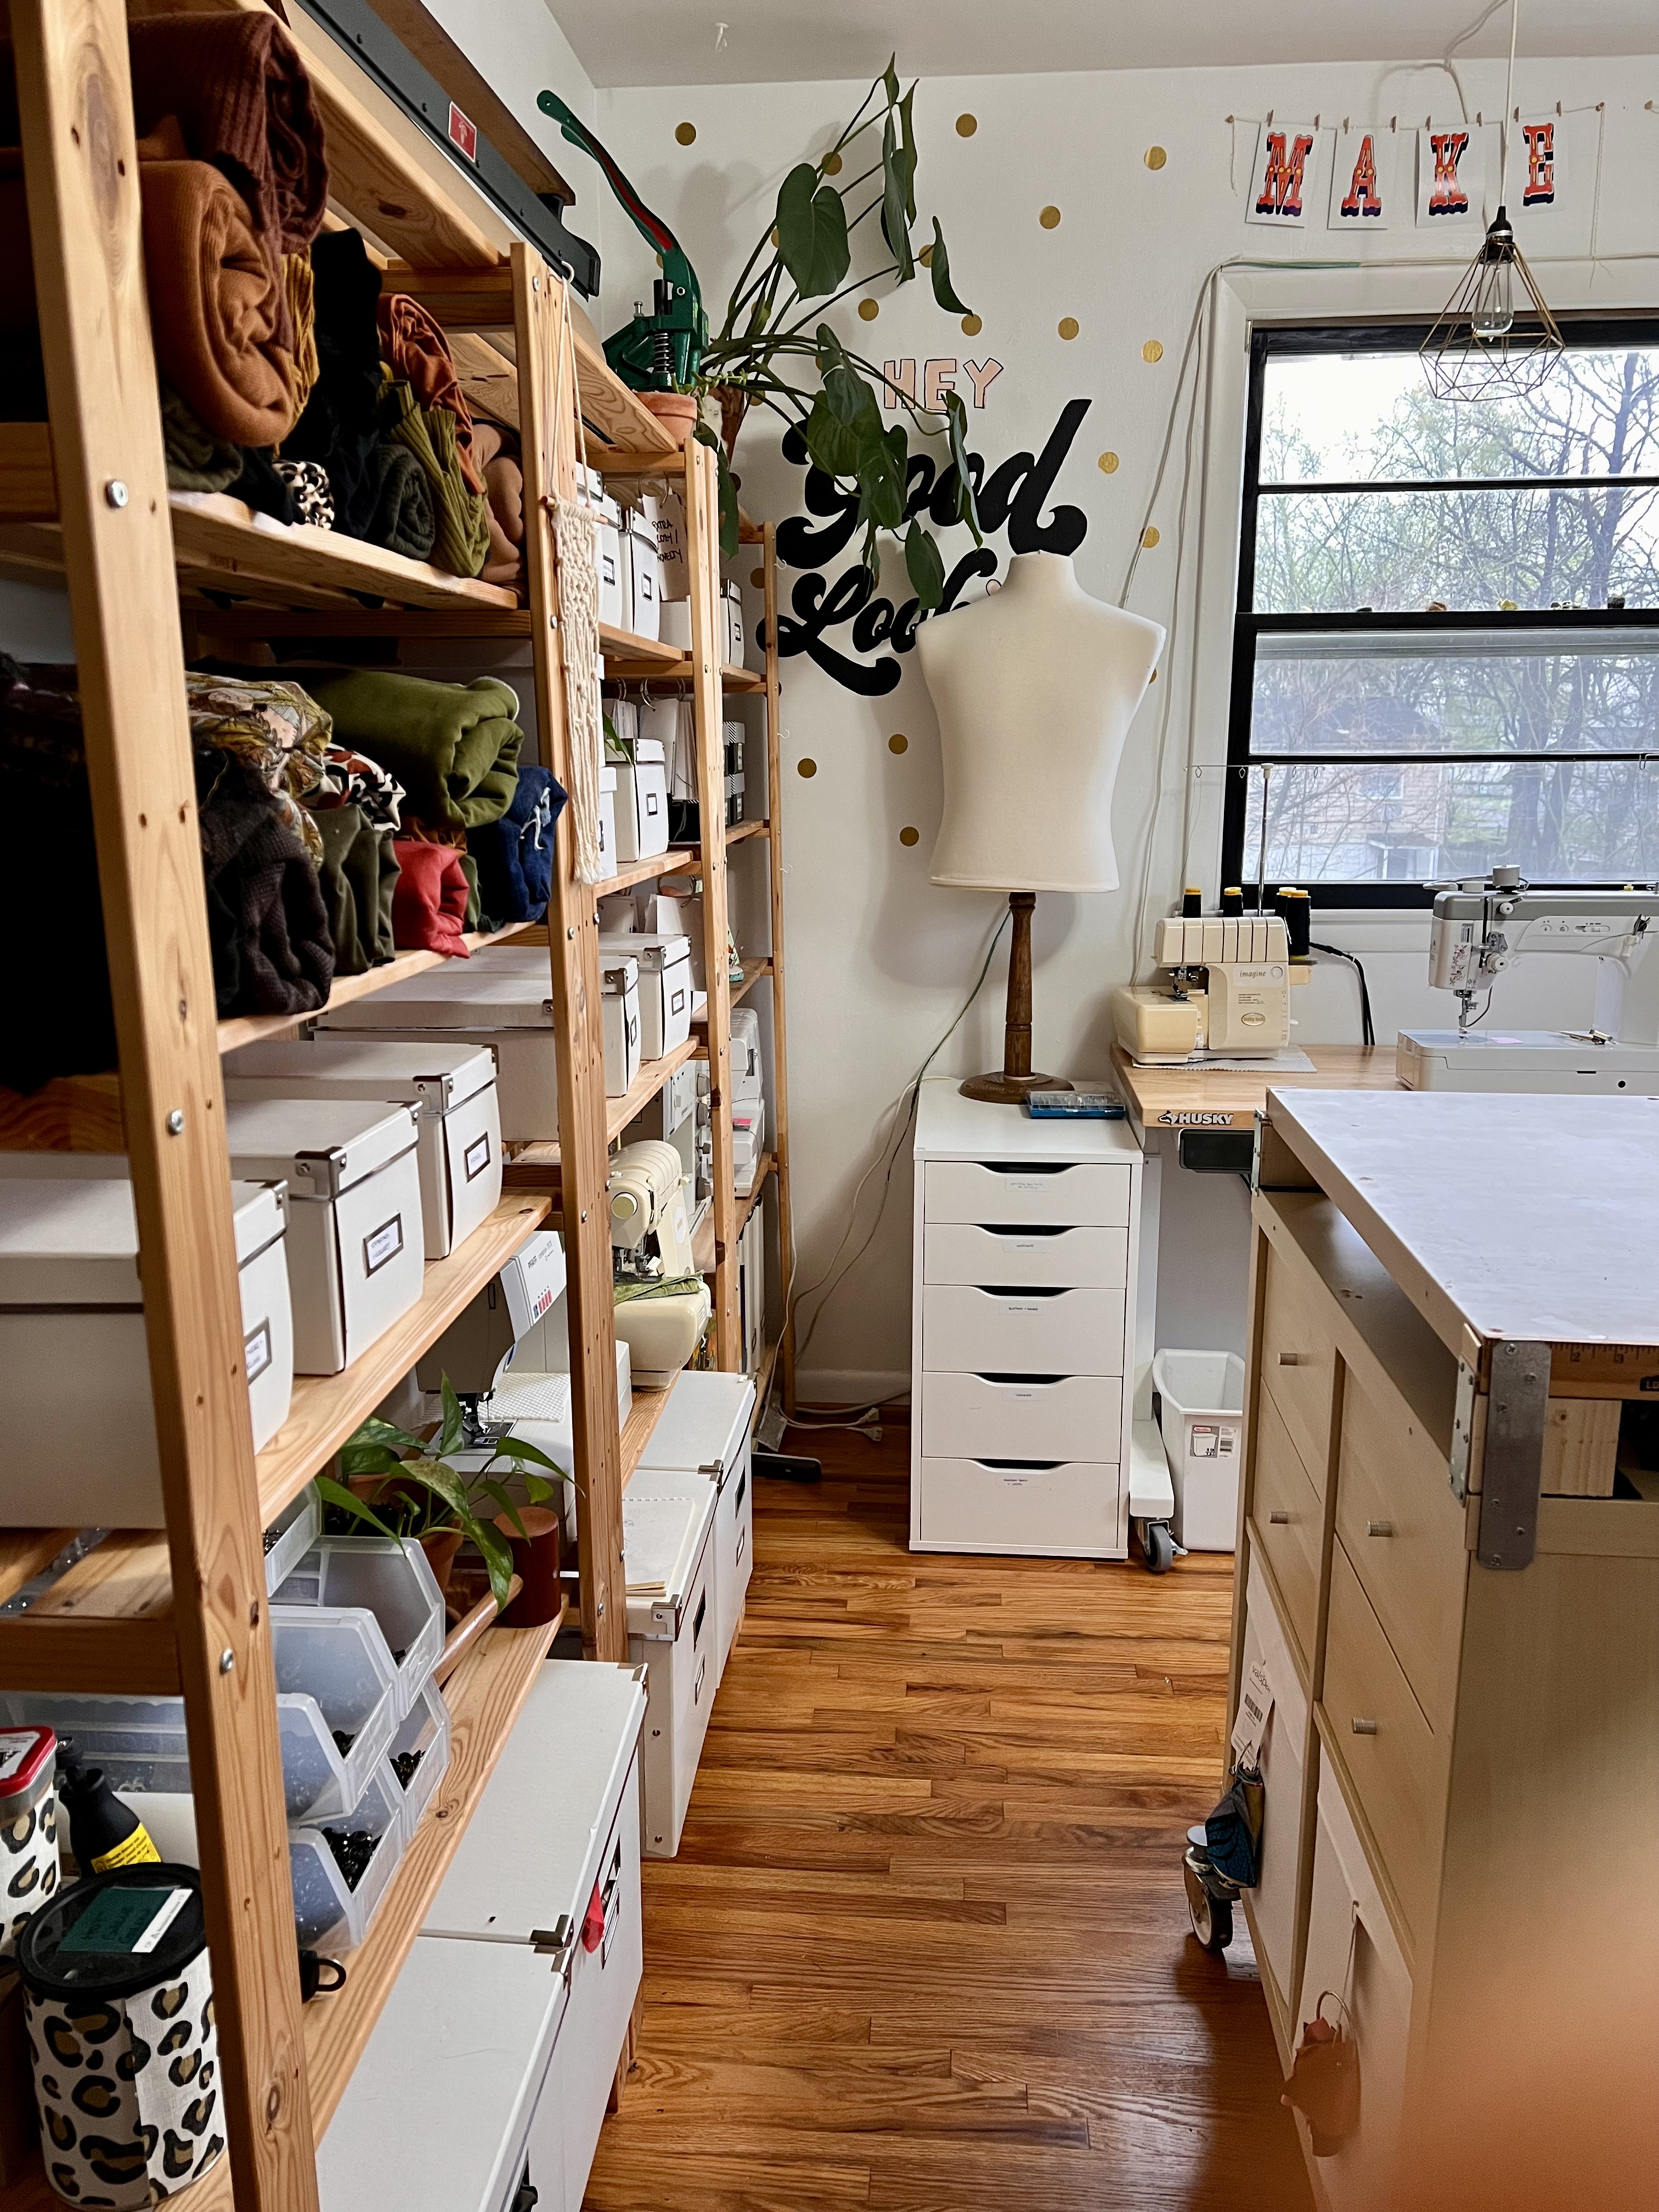
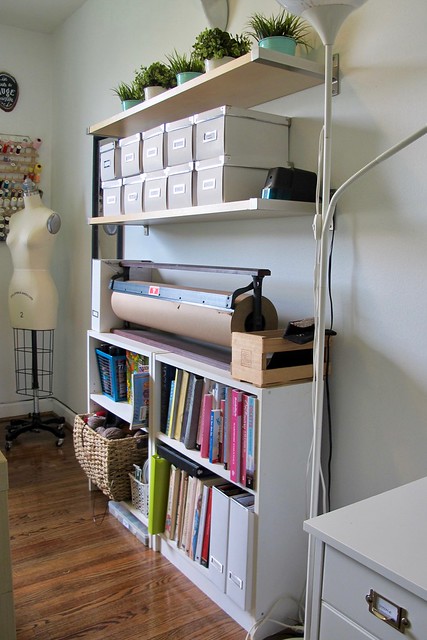
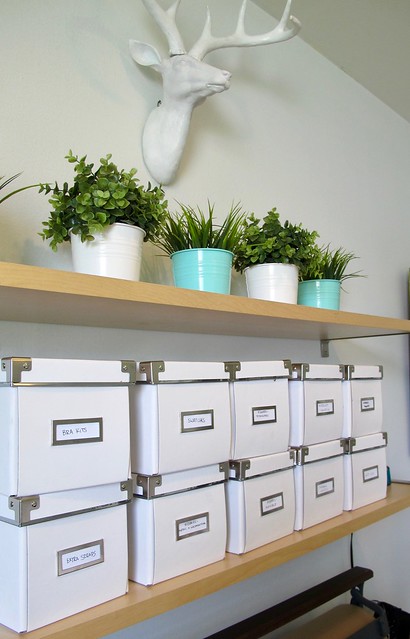
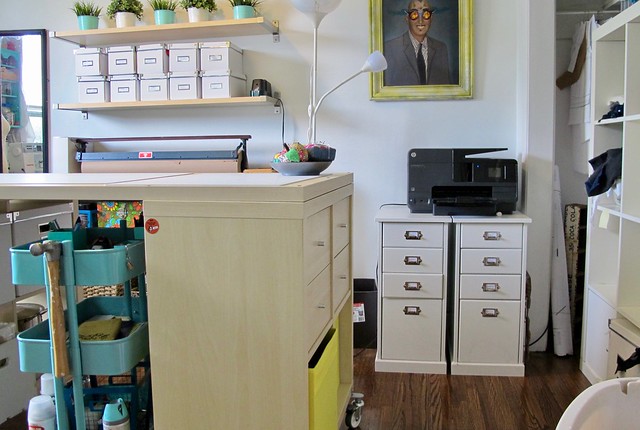
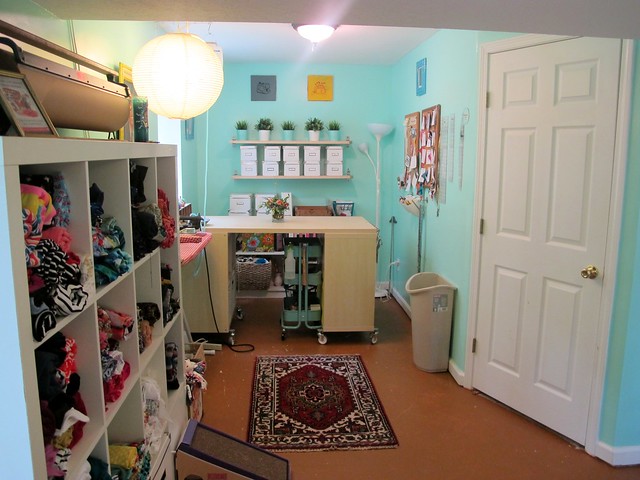
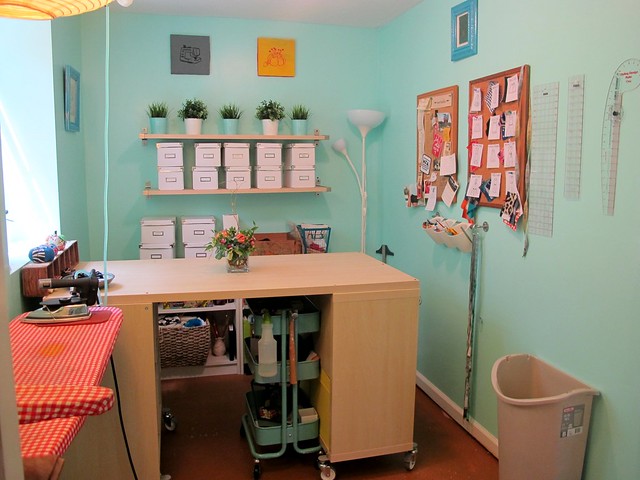
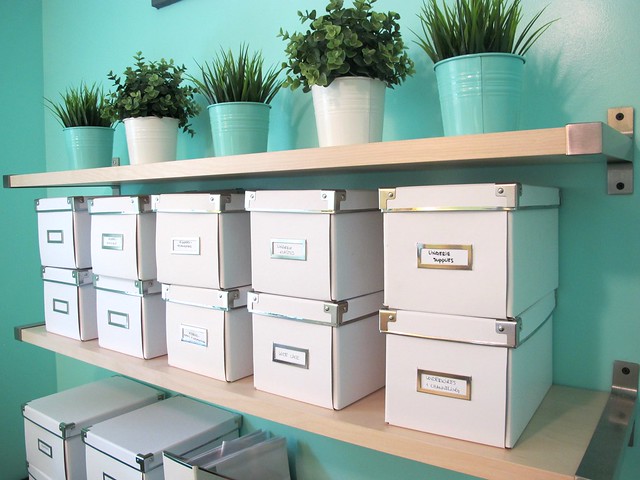
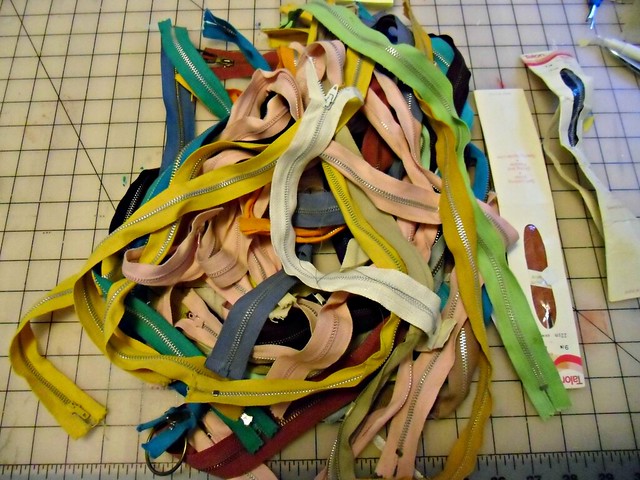
The wall next to the sewing table is just a long line of shelves! My fabric occupies a couple shelves (I keep the rest stored in my attic – check out this instagram post for the full run down), and the boxes hold specialty fabrics (lingerie, lining, scraps, etc) and notions (mainly bra making supplies). More info on that storage system can be found on this instagram post. Finally, I keep extra sewing machines on a couple of the shelves. I have a lot now and they don’t all fit on the table! I keep the plugs at the table (I installed cup hooks along the wall below the big window so they have somewhere to hang when they aren’t being used) and I store the pedals/knee lifts/and freearm tables in one of my white drawer units. This way, it’s really easy to swap the machines out. I will acknowledge that my cord system behind the table is GNARLY looking – and unfortunately, there isn’t a good way to hide them while also having regular access to them (I take my machines on set pretty frequently, so I need to be able to access the cords and hiding them would make that 10x harder!).

Speaking of machines – because I know someone will ask! – I have a Janome HD9 straight stitch, a Pfaff 7570, a Bernina 350PE, a Bernina 930 Record, a Janome coverpro 2000cpx cover stitch, a Babylock Imagine serger, a Babylock Evolve serger/cover stitch combo, plus my Singer Featherweight (on a wall shelf on the opposite wall) and the aforementioned chainstitch. It’s a lot! I don’t have a favorite – I love them all!

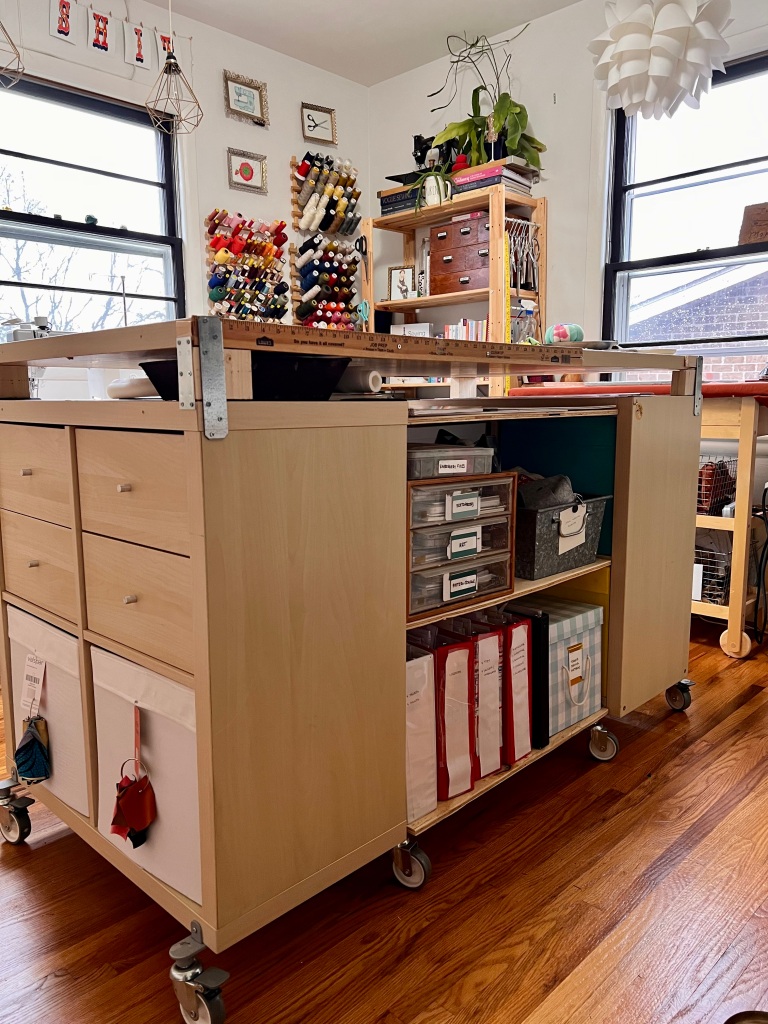
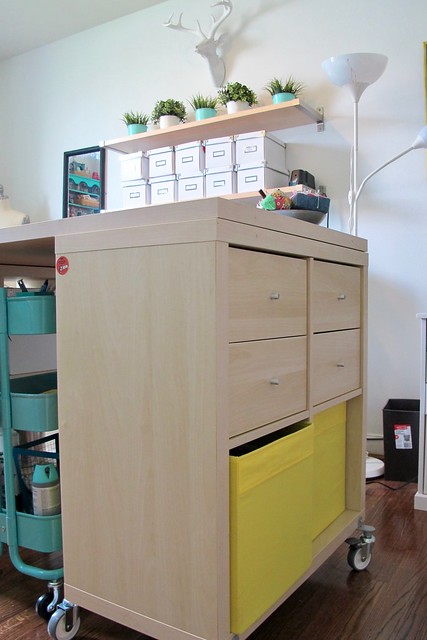
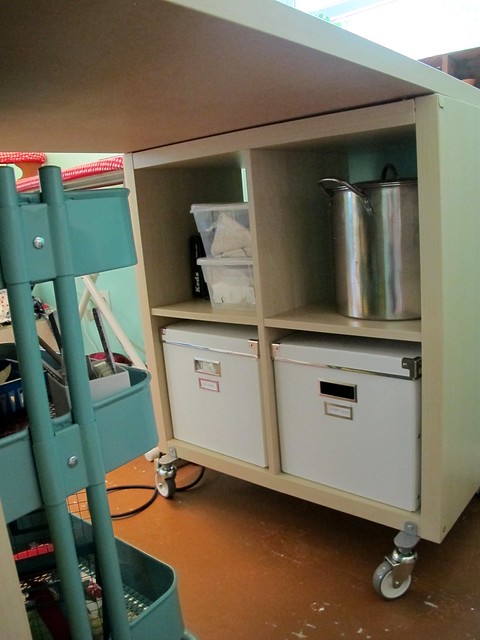
The last big piece in this room is my cutting table. I won’t go into detail about how I built it – it’s all IKEA pieces and again, I wrote about it extensively in the previously linked blog posts. But I recently filled in the empty center with more shelves (built with sanded plywood, and attached with metal brackets to the undersides), and I lifted the tabletop using wood blocks (2x4s that I cut and then glued 2 together to make a block, then attached to the top of the unit with metal brackets and some shims as needed). The narrow space is big enough to slide my cutting mats and rulers out of the way when I’m not using them, and just tall enough to hold the bowl of sewing tools I usually keep on top of the table. I wanted to be able to quickly move things out of the way when I need a big flat surface for cutting, without just moving them to another table area (where inevitably it’s still in the way!). I am REALLY happy with this edit! That short little shelf space is SO useful!

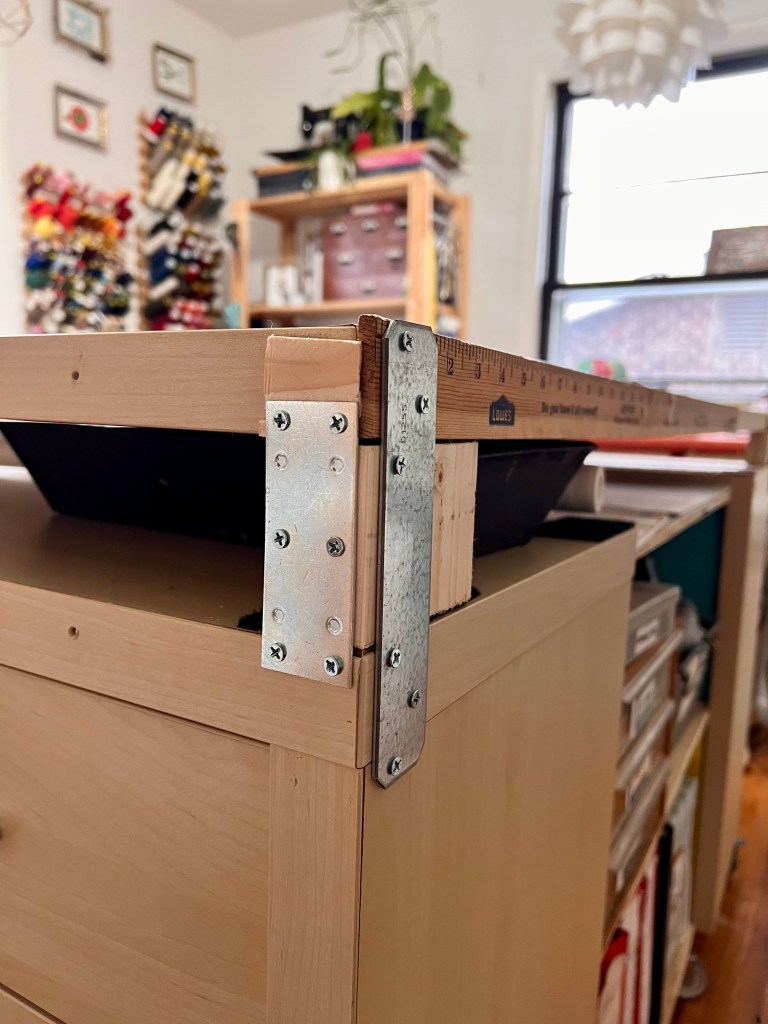
Here’s a close up of the block lifts. It took me a long time to figure out how to do this – I didn’t want to glue them to the table, because then they’d be permanent. So I used brackets to screw the blocks to the table and the tabletop. It is sturdy and – very important – can be taken down if I need to disassemble the table (it actually can’t leave the room without being disassembled, due to the angle at the entrance and the width of the hallway outside the door). It’s not very pretty, but I don’t care. I’m a seamstress, not a carpenter!

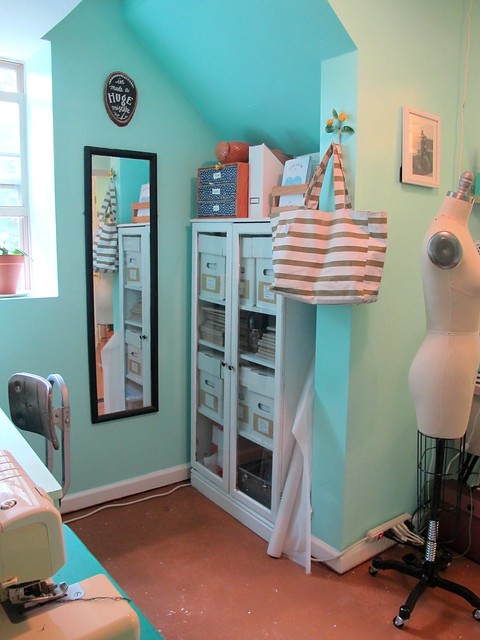
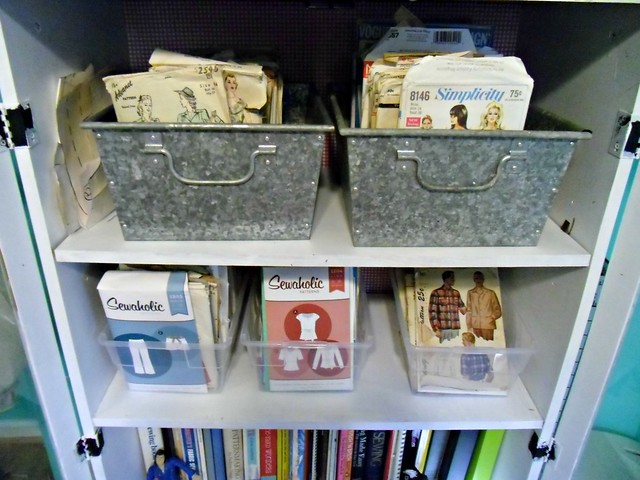
I don’t have a good photo of what I store under the table, but it’s basically everything I used to keep in the closet. Small boxes with craft and art supplies, sewing pattern storage supplies, boxes that hold big patterns (Vogue, Papercut) and binders to hold PDF patterns. I keep my other sewing patterns in boxes inside the closet, along with my printer. There’s more info in my pattern storage in a previous blog post, or check out this Instagram post.

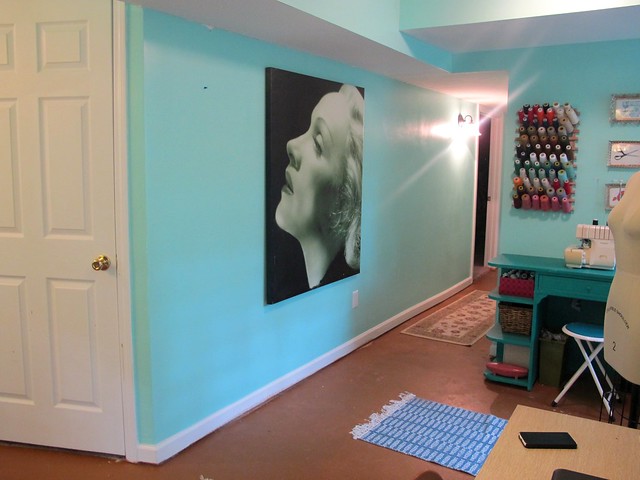
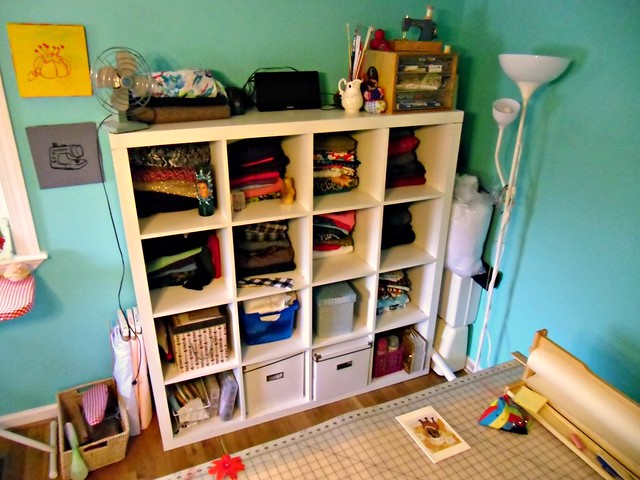
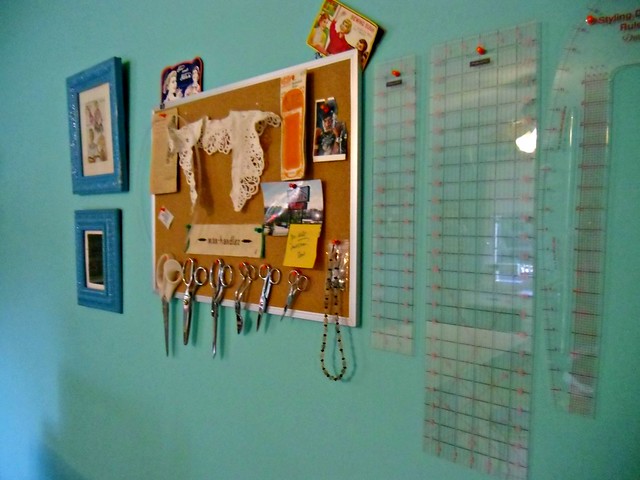
Here are some more photos of things in the room, just because!

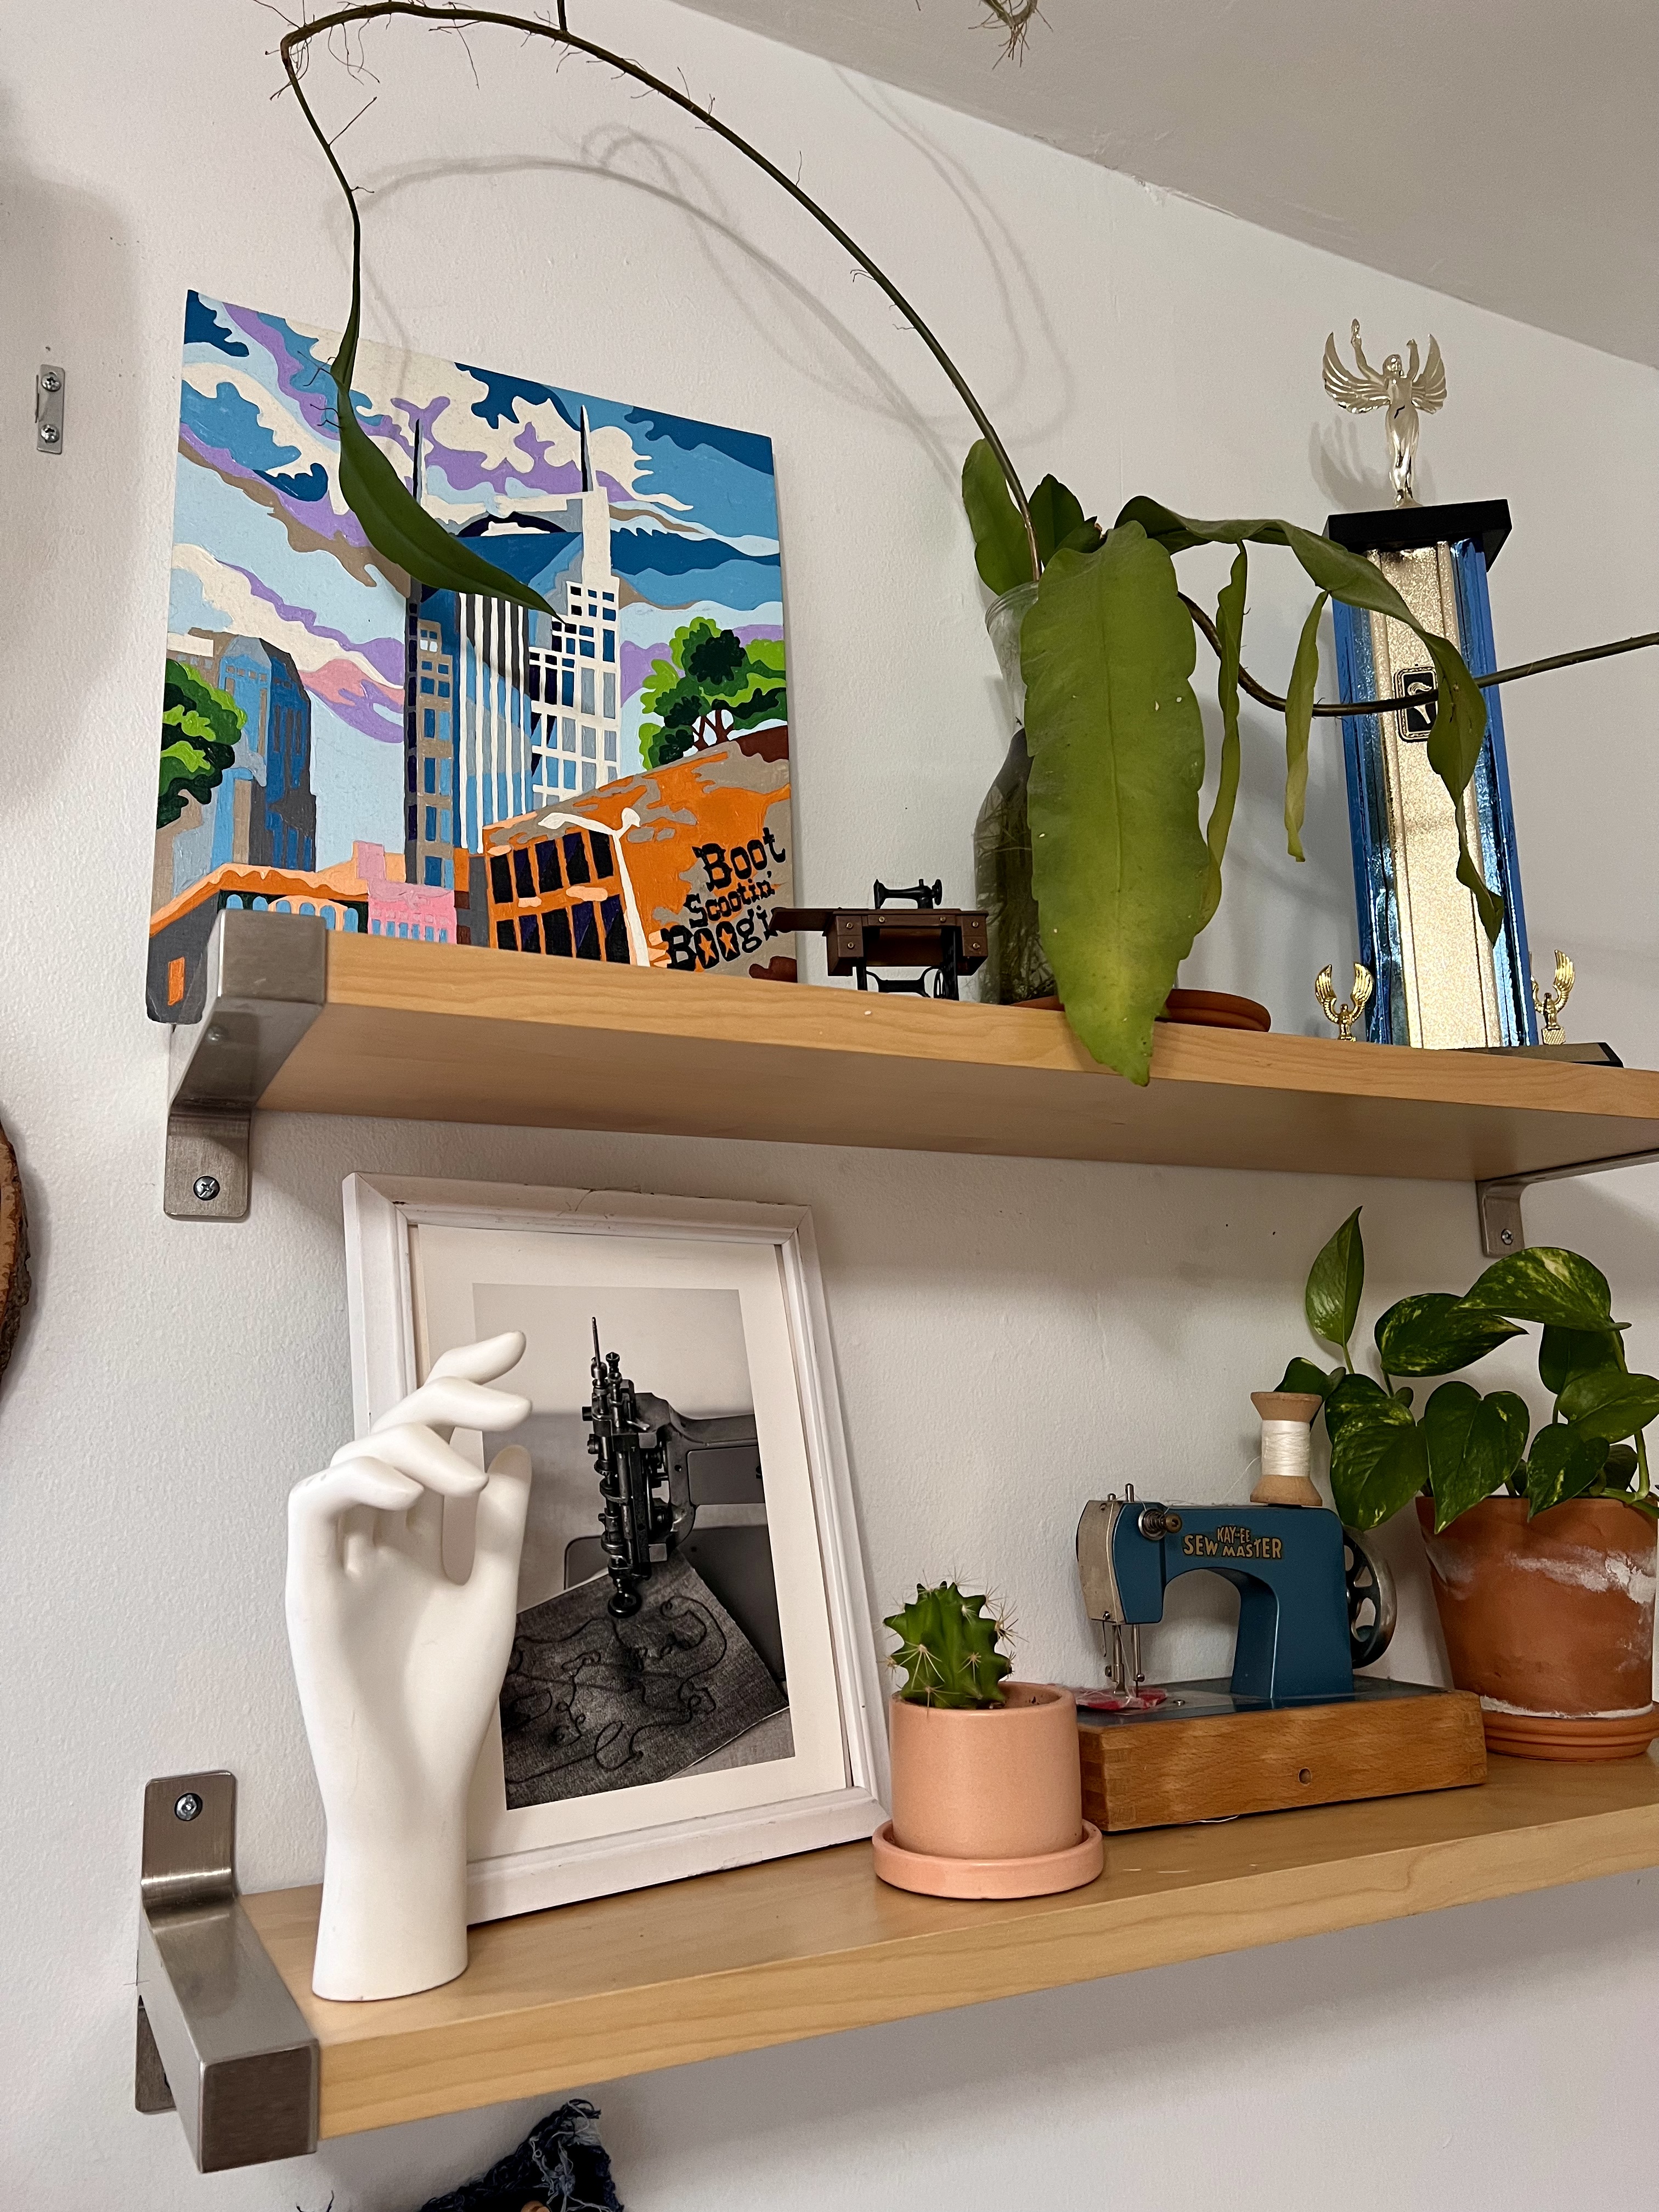
Fun fact – I won that big trophy in “beautiful baby” contest in 1985 LOL

Another fun fact – that framed photo is me at 14 and it’s just as hilarious up close as it is from far away. I have on fuzzy purple zebra pants and mismatched socks! Hoorary for the late 90s!

Anyway, that’s my studio tour! Like I said, it’s a small room – but I feel like I made a pretty good use to the space! Since the cutting table, sewing table, and chainstitch are all on castors, it’s also a little modular – I can roll things around as I need them (and also just *barely* fit a queen sized air mattress in the room for when I have guests over!). I really love this room – it gets beautiful light and honestly it just feels good in here. I’m excited for my future studios, but perfectly happy to sew in this one, too 🙂

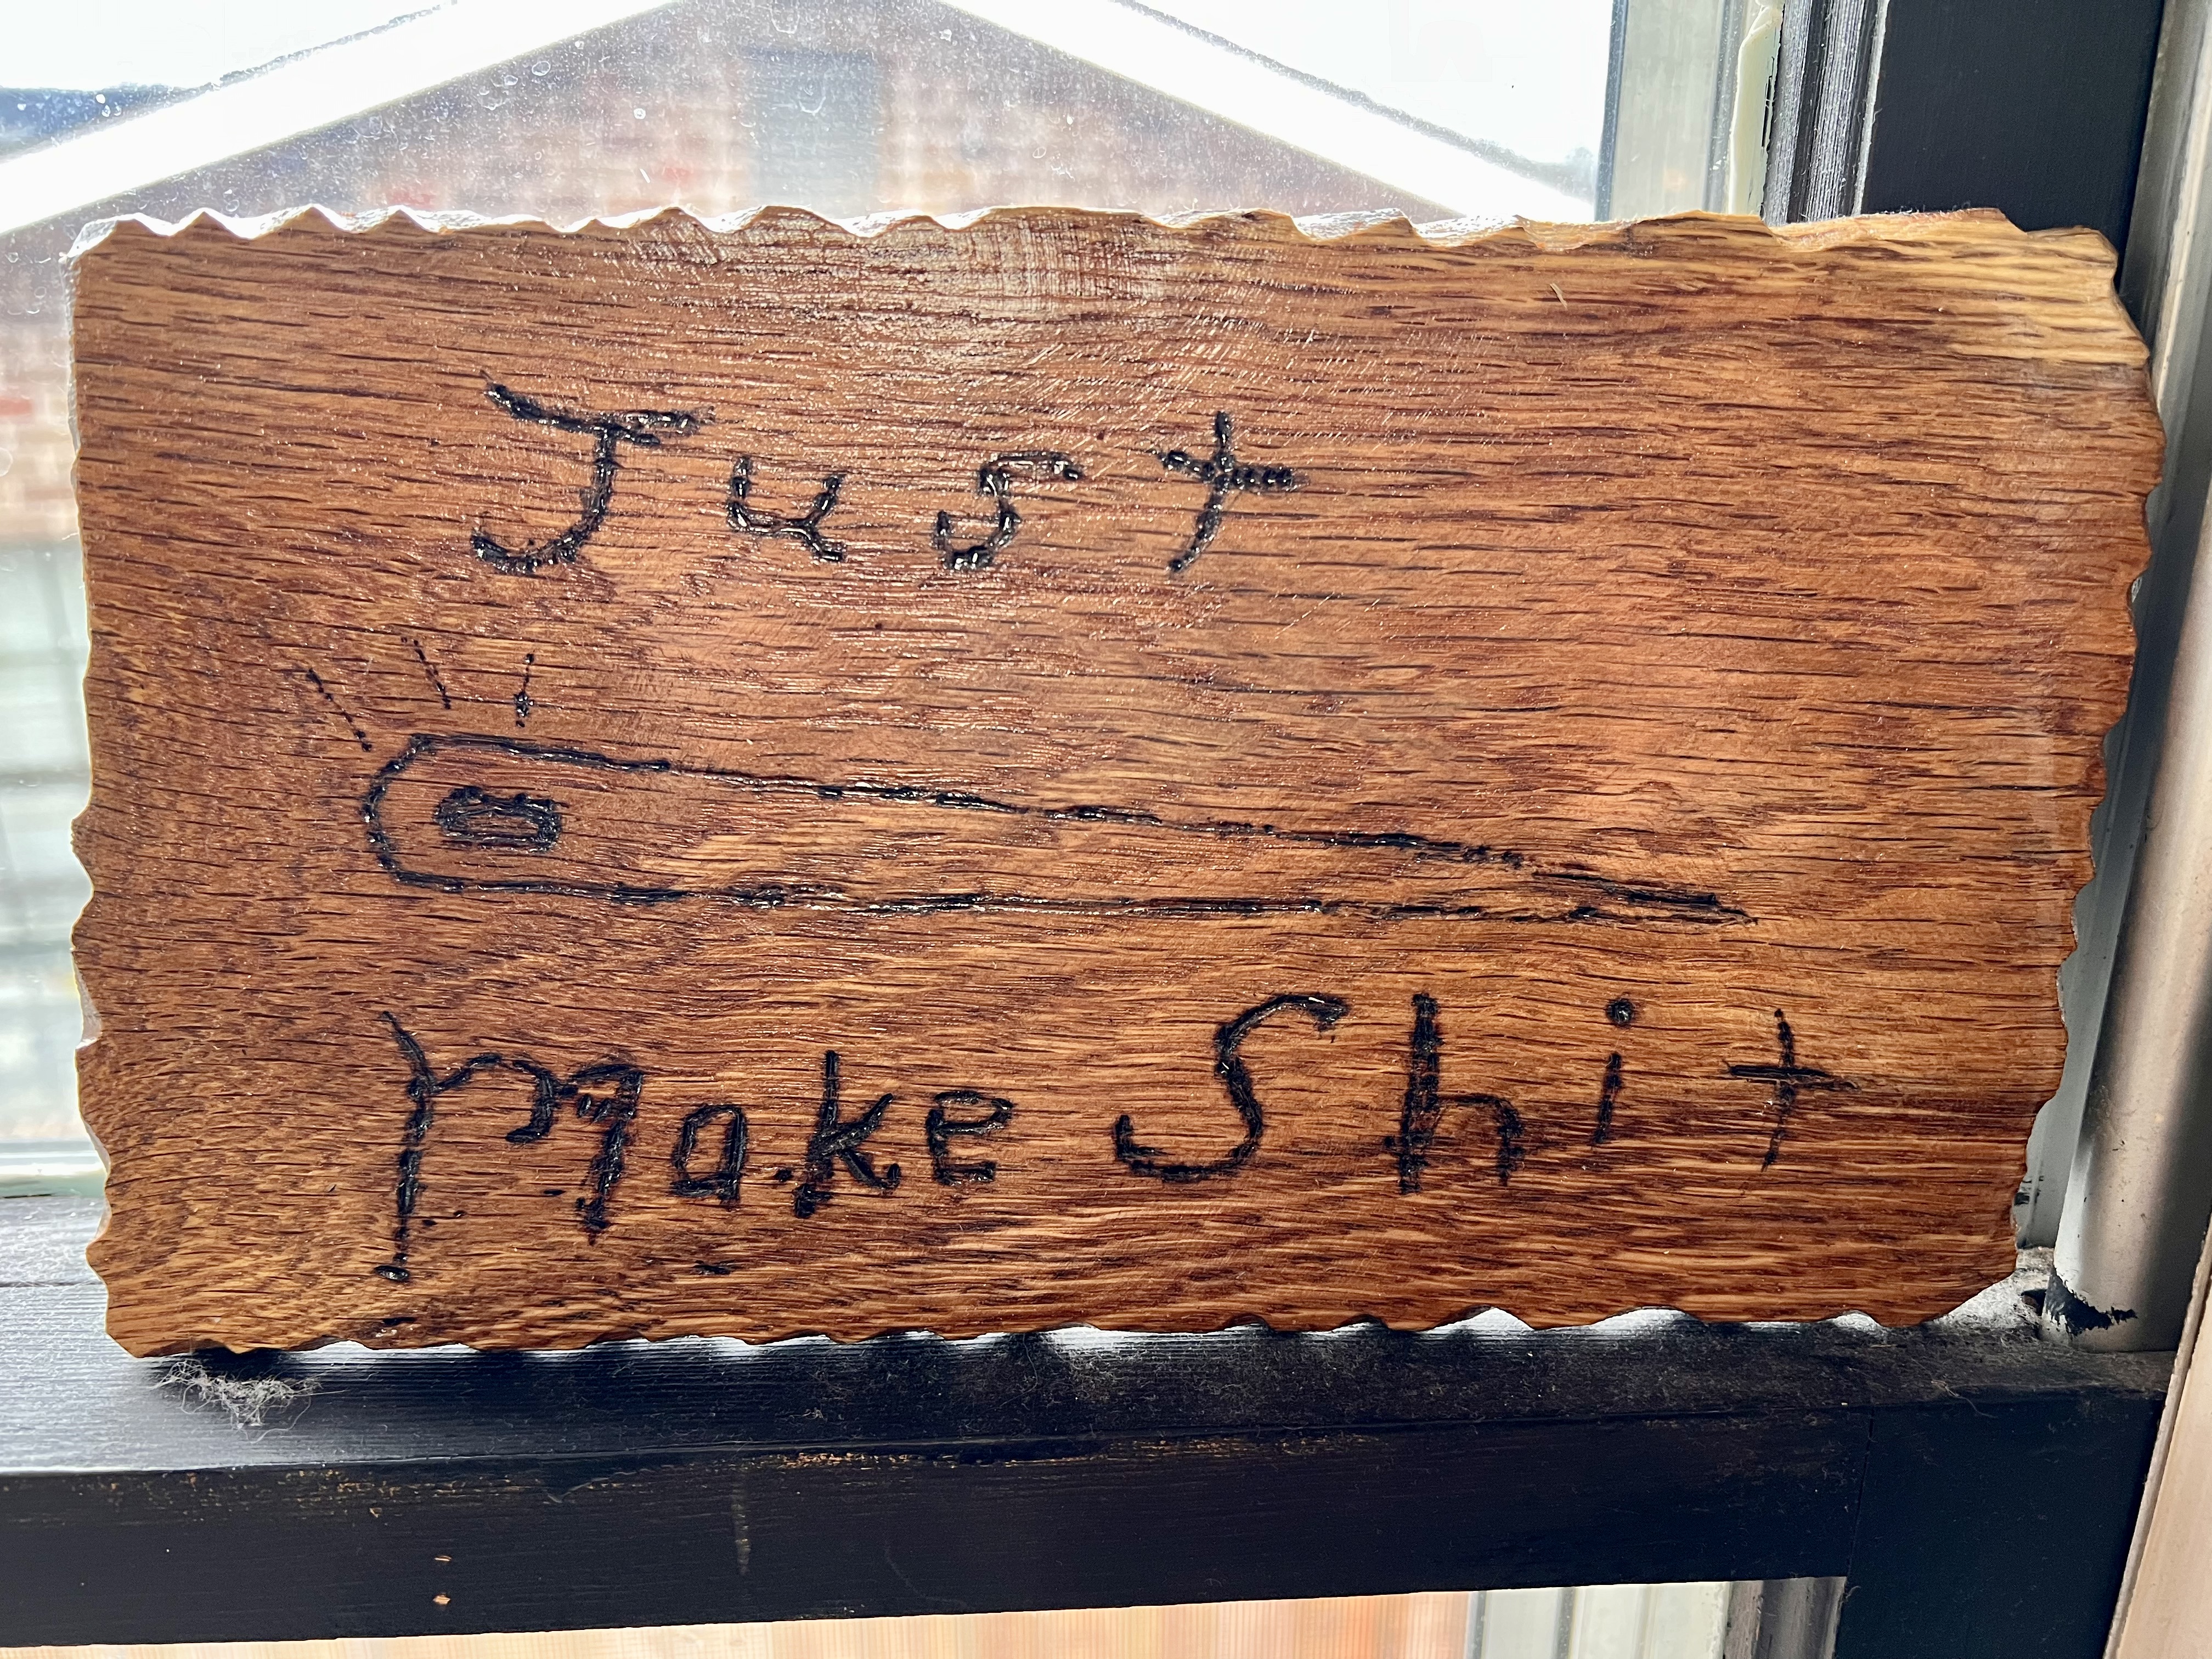
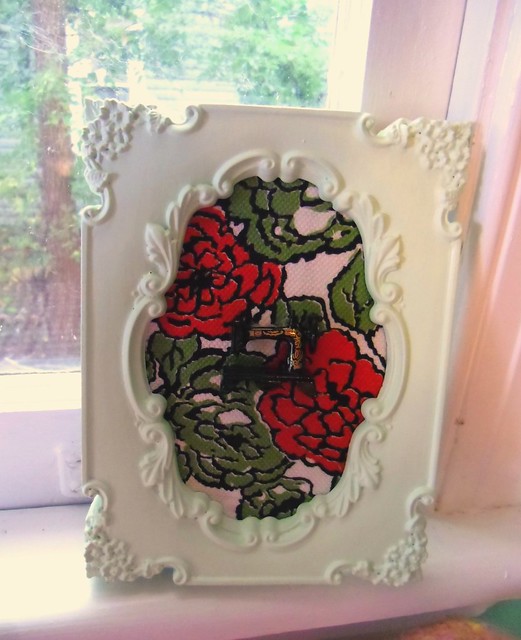
I’ll leave y’all with one last photo – my mom’s boyfriend made this for me for Christmas last year. He was inspired by the letters hanging above my sewing machines 🙂

A Very Belated Tour of My Sewing Room

3 May

Hey! Remember when I moved last year and promised I’d share photos of my new sewing room? Well, we’re almost a year overdue – but I’m finally making good on that promise! Truth be told, I kept putting off the ~big reveal~ because there was a never-ending list of things that I wanted to change about the space – first I wanted a new ironing board cover, then I needed new lights over said ironing board, then I thought I’d wait until I got new sewing tables… like I said, never-ending! I have since realized two things:

1. The list of changes is going to be never-ending. That’s the nature of decorating. Once you’re happy with one thing, you want to tweak something else. Ok, maybe you don’t decorate that way – but I do! Keeps me on my toes, keeps that DIY spirit alive or whatever.
2. I decided to move in June (more on that in a minute!), so I better document this room before it becomes a maze of boxes! Argh!

Anyway, better late that never! I always have a studio in every place that I live, and I like to document these snapshots of my life, so I wanted to include this one on the blog as well 🙂 If you’re interested in seeing my other sewing spaces from past homes, check out this tag 🙂

LLADYBIRD Studio

Here is what you see when you first walk in! It’s an average sized room (11′ x 12′, which isn’t super tiny – but it makes for a small studio, especially when you have a giant cutting table in the middle of it!), so it was hard to get good shots of everything, but I tried!

If you’ve followed my blog for a while and are familiar with my former sewing spaces, you probably noticed that this room is super white! In the past, I’ve always had lots of color on my walls – which I love, especially when it’s turquoise! – but I ended up keeping this room white. The landlord and I had a bit of miscommunication about the painting – he agreed to paint it turquoise, I sent him swatches, he said he didn’t get the swatches, I agreed to just go with white (it was originally that horrible beige-y rental color that no one loves), figuring I’d repaint it myself if it bothered me. But I’ve really grown to love it, it’s so fresh and bright!

LLADYBIRD Studio

The view from the door to the sewing station. I love having a window at my sewing station, even if the bright light makes my photos look awful 🙂

One of the things that I wanted to change about this room – and will change in my next studio – is to exchange those two sewing cabinets in favor of a long worktable that I can roll back and forth at in my chair. I love my cabinets, but they aren’t practical with multiple machines (plus, I can’t use the knee lever with my Bernina! Boo!).

LLADYBIRD Studio

Starting next to the door, on the right-hand side of the room – is my desk (or as they love to say on MTV Cribs “where the magic happens”). Since I primarily work from home, it’s great to have a dedicated desk space where I can keep my computer and all my office and art supplies. I also blog from this desk, and sometimes it holds fabric + pattern overflow when I’m on a giant cutting binge 😉

LLADYBIRD Studio

Next to the desk is my ironing station – yes, with a new ironing board cover (finally haha!). The lights over the ironing board are suspended on a cord that plugs into a power strip below. These lights provide two purposes: one, to give me more working light (despite how bright these photos are, the corners of the room are actually quite dark, so it needs a lot of light to be comfortable to work in!), and two, to let me know when the iron is on! I use a gravity feed iron that does not have auto shut off, so I keep it plugged into a power strip with lights above it. When the lights are on, I know the iron is also on!

The shades over the lights are Joxtorp shades from Ikea. They are cheap little cardboard things that I just spray painted a different color. Nothing fancy, but better than a bare bulb! I used paper lanterns in the past, but I lost one of them during the move and figured it was time for a change anyway!

LLADYBIRD Studio

Over the ironing boards, I keep my rulers and cork boards – one for inspiration and general things that make me happy, and one to plot out future projects.

LLADYBIRD Studio

LLADYBIRD Studio

My sewing machines and serger are against the wall opposite the doorway, right by that beautiful window! All my thread is on racks on the wall (serger thread by the serger, sewing machine thread by the sewing machine), and notions in the shelf above my sewing machine. Plus, my dressform!

LLADYBIRD Studio

LLADYBIRD Studio

LLADYBIRD Studio

Continuing toward the right, this wall has a full-length mirror and a few shelves. The floor shelves hold my sewing books and yarn stash (yeah, it all fits in ONE BASKET woohoo), and the wall shelves have bra making supplies and zippers. And also fake plants along the top, cos green stuff is pretty stuff. I also keep a big roll of craft paper on top of the floor shelves.

LLADYBIRD Studio

Next to the shelves is where I keep my printer (FYI there is nothing fun in those drawers – it’s all products and samples that I send out for my other job haha).

LLADYBIRD Studio

Finally, at the end of the room – next to the door – is the closet. Since this closet is really big (like 7′ wide) and didn’t have doors, I just stuck my entire fabric stash in there, shelf and all! The shelf fit in perfectly with some extra space on the sides, plus there is storage along the top closet shelf for all my sewing patterns. My apologies for the bare shelves – I’d already started packing my fabric at this point, and I wasn’t about to unpack it for one photo! Just imagine that those shelves are full of lovely, colorful fabric 🙂 hah!

LLADYBIRD Studio

Since that shelf is about 5′ wide, there’s at least a foot of space on either end to store things. One end has my sewing machine cases and tracing paper (boring), but this end I stuck a tension rod so I can hang my working PDF patterns from! I can clip all the pieces and then hang them from the rod, and that way they don’t get folds before I have a chance to use them (PDF patterns that I’m not currently using are stored in a binder system – which I keep behind one of those doors in the big shelf).

Speaking of printing PDFs – I have started using a local printer to print copyshop versions, instead of cutting + taping a million pages together. My research in the past showed that places like Kinko’s charge about $10/page, which just crazy (especially if you are unfortunate enough to have a pattern with multiple pages!). I found a local printer who will print them for $2.18 per page, and holy shit y’all they are amazing. If you are in Nashville, check out CCAD Reprographics, seriously! If you’re not local, I think they will ship 😉

LLADYBIRD Studio

This is on that time wall space between the door and the closet. The hook is good for hanging WIPs (or stuff that I need to do some alterations or repairs on), and I found that postcard at my local yarn store, Haus of Yarn!

LLADYBIRD Studio

LLADYBIRD Studio

The cutting table takes up the space in the middle of the room. On one end, I have a bar where I store my cutting tools. The boxes in the cubes hold silk scraps, leather scraps, Papercut Patterns + Vogue patterns (since they don’t fit in the comic book boxes with the rest of my patterns), and my dyeing stuff.

The opposite end of the table has some drawers where I keep a bunch of tools and interfacing scraps, and the bins at the bottom hold swimsuit fabric and an enormous stash of zippers.

I love this cutting table! I “built” it out of two shelves and a tabletop – all stuff from Ikea – and put it on casters so I can easily roll it around if I need to (the casters also lock, so that shit will also stay put if I need it to). It’s a great size and height for cutting! For more information on how I built this, check out my former sewing room post.

LLADYBIRD Studio

What’s rad about this table, is that the middle is open and tall enough for me to roll this cart underneath, so I can easily pull it out when I need supplies (or shove it under the table when it’s in the way).

hellooooo
Hi!

So that’s my sewing room! I have really loved creating in this room – it’s such a lovely, bright space and it is really the perfect size for my needs. I’m going to miss this room (not to mention THAT CLOSET), but I’m so excited about my new place!

Oh, and more about that! I really love this apartment, and I have enjoyed living here this past year. However, one of my friends got me a great hook-up on an AMAZING house (seriously, look at how cute it is!), which I jumped at the opportunity. I am excited to have yard access again, a private driveway – and I’ll be walking distance to my part time gig at Craft South (not to mention, all the other cool stuff in that area!). The house was built in 1935, which means it is incredibly charming and has really really small closets 🙂 I am seriously SO sick of moving (just thinking about my to-do list is giving me anxiety), but I know it will be worth it! My new sewing room is going to be a hair smaller than this one – it measured around 11′ x 11′ – which means I need a bit of an overhaul on my organization / storage (for example – taking advantage of all those drawers!). I am up for the challenge, though! I love decorating new studios haha 🙂

Side note to my Nashville friends – if you are looking for an apartment, this one is available! Send me an email if you want more info 🙂

LLADYBIRD Studio

Time For A Sewing Room Tour!

29 Jul

Finally, a tour of my new sewing room! This post has been a long time coming – honestly, this room has been set-up and fully functional since the first couple of weeks after we moved (because I have priorities), but I’ve put off sharing the big reveal until I felt that the room was “finished.” As always, I’ve realized that this room will never really be finished – I still want to hang some more lights, make a new ironing board cover, get a couple more rugs, etc etc – but it’s as finished as it’ll be for now. And now it’s time to share!

Soooo – welcome to my new sewing room, the Kingston Springs edition!

Sewing RoomThis room is funny shape, so getting photos was a little difficult. It’s basically an L shape – there are two little nooks off each end, and the corridor between is wide enough so that you can shove furniture against the wall and still be able to walk through. Here I have drawn you a shitty not-to-scale diagram to give you an idea of the layout. I used Comic Sans as my font choice to make it extra obnoxious. sewing room layout So, as you can see – two nooks with a bit of a walkway. The hallway going off the photo leads to our bedroom and bathroom, and the diagonal line off to the side of the cutting area is a doorway leading to our private living room/Landon’s office. The rectangles are windows and doors – one window in each the sewing and cutting nook, and the door is to the side of the desk. Our apartment is in the basement of the house, so the stairs lead up to the main floor. I’ll admit that when Morgan asked if I wanted to move into her BASEMENT, I was like, “lol no fucking way I ain’t your kid.” But, forreal, this is a pretty happy basement – it has windows and a door that leads outside, so it gets a good amount of light. Although it was a little scary when I first saw it, and it definitely took some TLC to get it to the point that it is now. The room is quite smaller than it looks – my rough measurements put it around 130 square feet. My old sewing room was about 200 square feet, so there was some downsizing and furniture Tetris in order to get everything to fit. It was a little brain-bending at times, but I think it turned out pretty awesome!

Before we moved in, we had to fix the basement up a little. We were really lucky that Morgan moved into the house a few weeks before we did, so we could do this at our leisure (and not live in the middle of a construction zone). The basement is finished and was fully carpeted. We tore out the carpet in the sewing room area – it was completely soaked with cat urine and was beyond saving. The carpet in the bedroom and living room, as well as the stairs, was ok, so that’s still there. Since the unfinished concrete floors were pretty beat-up looking (although thankfully not stained with pee odor! THANK GOD FOR THAT) and nobody wanted to invest in flooring right now, we simply stained them with.. um, some shit from the hardware store haha. We also installed the screen door outside; eventually I’d like to replace the door with one that has a window, but I ain’t got the budget for that now.

I painted the majority of the room by myself – the color is “Aquatic Mist” by Valspar, and the insides of the windows is some color called “Blanket” (I don’t recall the brand, but I will fully admit that I bought the color based solely on the name alone. Who names a paint color Blanket?? Michael Jackson?). Well, majority except for the long hallway leading to the back half – that stayed unpainted for like 2 months, because I wanted Landon to help me with rolling and we kept putting it off. He actually painted it for me as a surprise while I was in Peru, which might very well be the best welcome home gift I’ve ever been recipient of. Ok, I think I’ve talked enough! I’ll let the pictures tell the rest of the story 🙂 Sewing Room

Starting with general layout photos – here’s the desk area.

Sewing RoomThe hallway leading to the back of our living area. And that giant wall that Landon painted! Sewing Room

The top photo in this post is the sewing area – here’s a view of the wall behind the machines. That tiny nook under the stairs ended up being exactly the right size to fit my pattern cabinet.

Sewing RoomThe opposite nook is the cutting and pressing area, as well as my fabric stash along the wall. Sewing Room

The ironing station. I REALLY wish I’d been able to find a way to keep the ironing board closer to the sewing machines, but the room layout just wouldn’t work around it (and I wanted to keep my desk in the center of the room). It’s not so bad to walk to the ironing board, I guess – I tell myself that a little exercise won’t kill me haha.

Sewing RoomMore of the cutting area. Sewing Room

Standing behind the cutting table, looking back toward the desk.

Detail shots:

Sewing RoomThese bookshelves are below the wall shelves in the cutting area – I keep my collection of sewing books here, as well as my yarn stash (it’s ALL in that basket! I can’t keep my fabric stash under control, but I’ve managed ok with my yarn stash!) and embroidery supplies (in the 70s floral filing box). The blue metal basket up top is where I keep my lingerie sewing queue, and the wooden FL box is my regular sewing queue. I’ve found it’s easier for me to do all my cutting at once for a few projects, and then I can work through the bundles without having to stop and cut another project. Sewing Room

Over the bookshelf are these two wall shelves that I hung ALL BY MYSELF (like a boss). I wouldn’t normally get all riled up over hanging a wall shelf, however, these were heavy AF and I somehow even managed to get them level idk. Anyway, the boxes are for small notions/tools that I have masses of – mostly lingerie supplies and zippers. I haven’t filled all the boxes quite yet, but I figure that’ll happen in due time haha.

Oh, and the plants on top are fake. Obviously. They are the only fake plants in this room, though… for now.

Sewing RoomI love this pattern so much, I hung it in a frame so I could admire it all the time 🙂 Sewing Room

The wall at one end of my cutting table is where I have my cork boards and tools. One board is for general inspiration/love notes – just things that make me happy. The other board is my project board – I’ve found by having a visual running list with swatches and sketches out where I can actually see it (i.e., not in a book or lurking on the internet), I can more easily keep track of my make list. Sometimes I forget what patterns or fabric I have in my gigantic stashes, and this is really helpful!

Sewing RoomHere’s the other end of the cutting table, and one of two windows! That plant is totally alive and not fake, btw. Sewing Room

This is the view from the window. Ahh! We are totally ground-level and I look straight into the woods. Amelia loves to sit in this window and watch the birds, and sometimes Turtle (the beagle) will come sniffing around when she’s outside and it always freaks Amelia out because they are eye-level haha.

Sewing RoomA little more about the cutting table! I built this myself (well – I use the term “built” loosely; it’s IKEA furniture that I screwed together haha) and it’s pretty awesome! I used two Kallax shelves and a Linnmon table top (there is a whole list of links at the bottom of the post for the specific products I used), and 4 sets of Kallax casters to raise it to counter height/make it moveable. One end, I installed 2 drawers on top, and bought 2 little fabric boxes for extra storage (if you were wondering – one box holds swimsuit fabric, and the other holds a mass of vintage zippers still in their packages – too big for the cardboard boxes on the shelves). I also installed a rod to hold my scissor collection on S hooks. They do sit in front of the drawers, but it’s easy to slide them out of the way when I need to access the drawers (which isn’t terribly often). Due to the width of the rod where it screws in, I could only install it on that side.

Those of y’all who have seen previous sewing rooms of mine (we’re on #6 as of this writing… I’m a dedicated woman for sure. I also live in an area with a low cost of living. Yay!) will recall that I had a Norden Gateleg table as my old cutting table. It was ok for a cutting table – I liked the size and that it folded down to be very narrow. However, the height was always bad for me, even when raised on blocks (and, again, I’m 5’2″, so I don’t have extra height to deal with here). I also hated that I couldn’t fit anything under the table due to how the legs were arranged to raise the leaves. And the drawers were a funny shape that I never found useful. I like this table a lot better – it’s pretty much countertop-height with the casters, and I have lots of storage options with the shelves/drawers/boxes. Plus, if I ever give up on sewing (lol no), I can always disassemble it and use the pieces individually on their own. Or sell it – Nashville doesn’t have an IKEA (we have to drive 4 hours to Atlanta), so people here seem to think that shit is made of gold and will pay top dollar for it haha. Which is exactly what I did with the Norden. Bye, Felica!Sewing Room

The inner side of the cutting table has more storage boxes – silk scraps, leather scraps, craft supplies, knit swatches, and my dye pot.

Sewing RoomThis little cart fits perfectly under the table as well. I keep a bunch of weird stuff here – cutting and marking tools, pressing supplies, extra pincushions, my hammer and a spray bottle. Sewing Room

The ironing station is right next to the cutting table. My iron is a silver star ES-300, which is a gravity feed iron and it’s AWESOME. The one thing that seems to scare people the most about using a gravity feed (other than the sheer steam power behind it) is that it doesn’t have an auto shut-off, and they are afraid they’ll accidentally leave it on and burn the house down. I solved this issue by plugging my iron into a power strip that also has paper lantern lights running from it – so if the strip is on, the lights are also on (and, thus, the iron is on). It’s pretty easy to tell if the iron is on that way! That overflowing box of fabric houses all my scraps from cutting. I try to find homes for that shit as quickly as possible because the pile can quickly get overwhelming otherwise.

Sewing RoomNext to the ironing board is my fabric stash – organized somewhat by type/color (jerseys/knits on one side, wovens on the other). I installed little cabinet doors on the bottom, to hide unsightly stash (fabric scraps and linings) and boxes for the unfoldables (interfacings and lingerie fabrics). The roll of paper on top is super handy for pattern tracing or if I just want to make a giant doodle of something. As far as *how* I stash my fabric – I used to fold, but now I roll. Folding looks really pretty, but I could never seem to keep it neat (mostly because my attitude went somewhere along the lines of “ah, fuck it.”). Now I roll my fabric and just stack it in the little cubes. It much easier to keep everything organized this way!

As you can probably tell, this area is also Cat Central. Amelia likes to hang here – on the rug, in front of the screen, all up in my silks – so I keep her scratching pad here, and there’s always at least one toy lurking around.Sewing Room

I like having my desk in the middle of the room, so I can easily hear music/videos while I’m working. It’s also close to the door (which is open 99% of the time, bc fresh air lol yay). I work from home a couple days a week, so it was important for me to have a nice workspace to sit at. I also hung those shelves above the desk, also by myself. I really love shelving. And boxes, for that matter.

Sewing RoomTo the left of the desk is the sewing area. This is where I keep my machines, patterns, and a bunch of notions. Sewing Room

And here’s the view out of that window, in case you were curious 🙂

Sewing RoomOn one table, I keep both of my standard sewing machines – I have a Bernina 350PE and a Pfaff 7570. The Bernina is my main machine, but it’s really nice having 2 when you are working on a project that requires a lot of thread changes (such as jeans). For those, I use the Pfaff for construction and the Bernina for topstitching. Above the machines are buttons, notions, and thread racks. Sewing Room

More thread racks, plus my favorite sewing room art 😀

Sewing RoomThe dedicated serger table has additional storage, which is handy. My serger is a Babylock Imagine, FYI. Sewing Room

Behind the sewing machines, in the weird little nook under the stairwell, is where I keep my pattern stash. On top of the cabinet, I have storage for trims and elastics, plus a running queue of the patterns I want to make next (before I cut them and put them in the cut queue box by the cutting tables. Man! All these systems!). That bag hanging on the lemon hook is my knitting bag.

Taking photos of my sewing room is hard because it's such a funny shape! Here's a shitty panoramic to give you an idea of what I'm working with.

Finally, here’s an Instagram panorama of the room!

SHOPPING LIST:
Most of the stuff in this room is either thrifted or from IKEA. I’ve tried to compile everything here, but feel free to ask if you are curious as to where I got something! If it’s not on the list, chances are I bought it used (like from the thrift store or flea market). Like I said, I’ve had an on-going sewing room in every house I’ve lived in for nearly the past 10 years, so I’ve had a LOT of time to collect stuff and learn what works best for my set-up and organizational needs. Oh, and one more thing, because I’m always asked this – yes, it does always stay this clean! “Messy” for me is if there is a project on the cutting table. I never lets piles accumulate and I’m pretty good about putting stuff away when I’m done with it. I can’t stand to work in a messy room, plus, this area is the walk-through to get to the rest of our basement suite, so I have to be mindful of that for Landon’s sake.

Wall paint color: Aquatic Mist by Valspar

Sewing nook
Serger table: thrifted + painted
Sewing machine table: family hand-me-down + painted
Pattern cabinet: thrifted + painted (for info on the boxes inside the cabinet, check out this post!)
DMC thread organizer: thrifted
Thread racks: given to me by Elizabeth, but here are some similars on Amazon- thread rack + serger thread rack
Turquoise hanging shelf: thrifted + painted
Chairs: thrifted
Sewing room art: Joanna Baker, via Madalynne giveaway
“I’ve Made A Huge Mistake” chalkboard sign: Custom made by Kaelah
Rug: Old Time Pottery

Desk area
Desk: Nashville flea market
Chair: Nashville flea market
Ceiling light: KNAPPA
Wall shelves: EKBY JÄRPEN / EKBY BJÄRNUM
Mesh drawer unit: LENNART
Rail/basket (above desk): BYGEL RAIL + BYGEL BASKET
Dressform: Professional female dressform with collapsible shoulders (also: full review here!)
Rug: Nashville flea market
Sewing machine print: Madalynne
Kitty Cat clock: gift from Landon

Fabric // Cutting area
Fabric shelf: KALLAX with 2 doors
Industrial paper roll: Given to me when my old job (advertising) was downsizing and clearing out the art room!
Paper lanterns: IKEA, like 10+ years ago
Rug: Nashville flea market
Wall shelves: EKBY JÄRPEN / EKBY BJÄRNUM
Bookshelf: thrifted
Cutting table: 2 KALLAX shelves + LINNMON tabletop + 2 KALLAX drawers + 4 KALLAX casters. Scissor rail is BYGEL RAIL + s-hooks
Tool baskets (under the corkboards): BYGEL RAIL + BYGEL container
Turquoise utility cart: RÅSKOG
Yellow storage boxes: DRÖNA
Large white storage boxes: IKEA, discontinued (these are similar)
Small white storage boxes: IKEA, discontinued (these are similar)
Fake plants: FEJKA

Ok, I think that’s it! Let me know if you have any questions 🙂

Completed: Reupholstered Chairs

8 Aug

Soooo this is a little different from what I usually offer up here for my Mood Sewing Network posts – we are gonna talk about home decor fabric today! ::evil laugh:: No wait, come back, I promise it’s not all bad!

Forreal, though, I’ve known about Mood Fabric’s home fabric offerings since, well, the beginning of my Mood-time. And while I’ve never been one to futz much with home decor sewing (I mean, c’mon, wouldn’t we rather all sew clothes for ourselves?), I did have some chairs that needed to be recovered. Like, two years ago. When I bought them.

So, in celebration of Mood Fabric’s new home decor storefront opening (which I’m really excited to visit when I’m in NYC next week! Eep! Next week!), I bring you my chairs that are badly in need of a facelift.

Reupholstered Chairs - before

Lookit that bad boy!

Reupholstered Chairs - before

No, that’s not even the worst – look at THIS! Can you believe I sat on that rank-ass looking thing for over 2 years? Yeah. I blame it on not being able to commit to the perfect fabric. Either that, or laziness. Probably both.

So, finding a good home decor fabric is hard, y’all. The ~free spirited artist~ in me wants something with bright colors and textures and maybe peacocks… but the tiny adult in me knows I should pick something more subdued that will continue to work with my ever-changing decor. I think I found a nice middle ground, though, with this chartreuse geometric cut velvet fabric. Even though it’s chartreuse, it’s pretty mild by home-decor standards (the color doesn’t necessarily “match” my curtains, but it goes well enough), and the geometric design gives it a bit of fun texture and visual interest without assaulting your senses. I like it!

Soo, that brings us to the next step – the upholstering.

Well, first off, let me just say this – it’s really easy, at least with a simple chair like this. Those of you who are diehard professional re-upholsterers, please avert your eyes. I’m sure I’m doing everything wrong here, oh well!

Chairs reupholstered with fabric from Mood Fabrics
PART ONE: THE DESTRUCTION
First, we have to remove the chair pad from the chair frame. It should unscrew from the bottom. Take everything apart and stash the screws somewhere safe so you don’t lose them (I should note that I didn’t lose a screw from this chair – it only had 3 to begin with! Someone else’s problem!) (and DUH I only put 3 screws back in the chair. Like I have time to find a 4th screw lololol)

Chairs reupholstered with fabric from Mood Fabrics
Flip the pad over so you can see the staples, and start yanking them out. If you have a staple remover, that would be helpful. If not, you can use a flat head screw driver. Ideally, you want to remove all the staples – not just the ones holding the fabric down. Or you can just be sloppy and rip off the fabric, but seriously, dude, removing staples is kind of fun.

Chairs reupholstered with fabric from Mood Fabrics

Once you’ve completely dissembled your chair seat, you should have something like this. Wooden chair seat pad thing, fabric cover, and padding.

Chairs reupholstered with fabric from Mood Fabrics
PART 2: LAYING THE FOUNDATION
Using your fabric cover as a guide, cut out squares of the new upholstery fabric to size. If you don’t have the old fabric to use, then measure for a 4″ overlap on all sides (so my 16″ pads needed 20″ square covers). Padding can be cut to the same size as the chair seat. I initially cut off the selvedge of my fabric because I thought it looked nicest that way, but when I started ripping the rest of the seats I realized that the original upholsterer left the selvedges on. So my remaining 3 chairs have fabric selvedge, which helps with fraying.

While I did decide to add some new padding to my chairs, I did not completely replace the padding that was there. Upon inspection, it seemed to be in pretty good shape (apart from the whole falling-out-of-the-chair aspect, anyway), so I just added a layer to the top for some extra squish and called it a day. If you are completely replacing your padding, you may want to cut multiple layers.

Chairs reupholstered with fabric from Mood Fabrics
PART 3: THE REBIRTH
Now we get to staple! Stack your padding and fabric with the wooden seat base centered at the bottom. Starting in the middle of one side, staple the fabric to the seat. Now move to the side opposite where you just stapled, pull the fabric taunt, and staple in the center. Continue working around the base of the chair, opposite sides at a time, until all 4 sides are stapled down securely. I found it was easier to do one set of sides at a time (as opposed to working all the way around at once).

Chairs reupholstered with fabric from Mood Fabrics
To miter the corners, fold as shown and staple as you go.

Chairs reupholstered with fabric from Mood Fabrics

Your finished seat should look like this. Woohoo!

Chairs reupholstered with fabric from Mood Fabrics
Now screw it back on the chair frame and sit in that chair like the boss you are!

Chairs reupholstered with fabric from Mood Fabrics

THAT IS DAMN SEXY

Chairs reupholstered with fabric from Mood Fabrics

AMIRITE OR AMIRITE?

Chairs reupholstered with fabric from Mood Fabrics

For serious, though, I’m a little embarrassed at how stupidly easy this whole ordeal was. From disassembling, to cutting, to stapling, to screwing, heck – even sweeping the floor – this all took about an hour. That’s it! For four chairs!

Chairs reupholstered with fabric from Mood Fabrics

Chairs reupholstered with fabric from Mood Fabrics

I want to say I should have done it sooner, but damn – I don’t think I would have picked as good a fabric. Sometimes it does pay to wait! Also, this was a fairly inexpensive project – I only needed a yard and a half of fabric (again, my chair seats are 16″ square and I had 4 of ’em). My fabric was $45 a yard, which is stupid pricey, but the batting was only $8 a yard. All together, the cost of the fabric was less than $80 – I already had the staple gun, but it’s a cheap one that cost less than $10. You could obviously make this a much cheaper project with less luxe fabric or not buying batting, but considering I paid $100 for the table & chairs (plus a matching buffet in the living room – told ya our flea market was wonderful. Oh! My old lady dining room curtains are from there, too!), I don’t think that’s a very bad deal at all! Again, for full disclosure – I received credit for this fabric in exchange for my monthly contribution to the Mood Sewing Network. I got to pick the fabric and project on my own, though 🙂

What about y’all? Anyone have experience with upholstery or other home decor sewing – or is that something you’d prefer to leave to someone else to do? I made someone lined curtains once (for the 12ft ceilings in his swanky loft), and UGHHH NEVER AGAIN.

Skully Applique Pillow

24 Oct

Halloween Project

So, I have some pretty sweet furniture, at least in my living room. I’ve got this sexi velvet couch as well as this beautiful midcentury armchair (snagged from my friend and fellow blogger Lisa, after she herself snapped up the couch of her dreams). Oh, and that ace ottoman, which I got for a DOLLAR at the Goodwill Outlet. Score of the year right there!

I’m also, like, really really bad at decorating. Once I get shit on the walls, it’s over. I don’t really decorate for holidays, other than put up a Christmas tree, and I definitely don’t do decor crafts. Whyyy suck up that time when I could be making clothes, amirite?

Halloween Project

I’m taking a step toward my inner Martha Stewart and making at least one craft for the three major upcoming holidays – starting with Halloween. Rather than decorate the front of my house (which would be too easy; we already have enough spiders that the whole front is covered in spider webs. I wish I was kidding about that. Hey, I guess we don’t have other bugs at least), I decided to give my sweet yellow chair an update with a fresh new throw pillow featuring a skull. This also meant I got to try out applique, which is something I’ve been meaning to do for, oh, like a decade. Ha!

Want to make your own – pillow or otherwise? Good, because I wrote a tutorial on that too. I’m on a roll, guys.

This is actually pretty simple, the only time-consuming part is the machine applique, which can easily be left off since the Heat’N’Bond is pretty permanent. All my supplies are from Jo-ann Fabric and Craft stores – quilting cotton (my only excuse ever to peruse those aisles. Ahh, the colors!), Heat’N’Bond, and a 14″ pillow form. Oh, and embellishments! Can’t forget those 😉

You will need to cut 3 pieces for the pillow – one for the front and two for the envelope back. For a 14″ square pillow, I cut the front at 15.5″ square and the two back pieces are 15.5″ x 12″ and 15.5″ 6.5″.

Halloween Project 1

Start by drawing (or tracing, or photocopying, or whatever) the image that you want to applique on the pillow. Try to keep it simple, with the detail impact coming from the negative space, not a bunch of lines. Do you want to sew over a bunch of lines? Neither did I. Negative space!

I sketched out my skull’n’bonez based on a few images I saw on the internet, and then traced over it with a marker.

Halloween Project 2

Cut out your design and admire. Doesn’t he look sassy!

Halloween Project 3

Before you cut your appliques, you need to fuse the heat n bond to the back of the fabric (this makes it easier, and means less goo on your ironing board after the fact). Cut a piece big enough to catch all your pieces, and follow the directions on the package for best results – mine just had me iron it face-down for 10 seconds. Easy!

Halloween Project 4
Halloween Project 5

Trace your pattern on the fabric, cut, and peel off the paper layer. Arrange it on the pillow top as you like, and fuse it down. The Heat’N’Bond keeps everything from shifting, which means a much easier time appliquing. Of course, at this point, you could leave as-is and not bother with the stitching, but whyyy? It looks so good!

Halloween Project 6

Ok, this is the fun part – applique! This is really a trial and error saga, depending on your machine, but here are a few tips:
– Test your applique stitch on a few scraps of fabric (use leftover fused pieces if you wanna be real fancy) to make sure that you like your stitch. For my machine, I used a narrow width zigzag with a slight adjustment to make it longer.
– This stuff is gonna goo up your needle. Sorry, but them’s the breaks. Make sure you remember to change it out after you are finished, otherwise you’ll end up forgetting and gooing up the next garment you sew. Not that that’s happened to me or anything…
– Try to keep the stitch within the edge of your applique pieces – it looks neater.
– For curves, just go slowly. For corners, stop the machine at the end of the line, put the needle down and pivot the fabric, and then continue stitching.

Halloween Project 8
Halloween Project 9

Before you get all flustered trying to get the ~perfect stitch, remember – this is a Halloween project! It’s supposed to be a little messed up 😉

Halloween Project 10

From here, you can leave the applique as-is or add some more embellishment. I decided to add some sequins to my skull’s eyeballs and nose because SPARKLES. I used this Aleen’s glue pen to anchor everything down.

Halloween Project 11

We are going to make an envelope back for our pillow now. Take your two back pieces and press them flat.

Halloween Project 12

Turn under one long edge of each piece and hem.

Halloween Project 13

(Ack! Sorry these photos are so blurry, hopefully you get the idea)
Take the smaller piece and lay it over the top of front piece, right sides together, matching up the edges and the corners.

Halloween Project 14

Larger piece goes on the bottom half, again, right sides together with all sides matching.

Halloween Project 15

Sew around all four edges…

Halloween Project 16

Clip your corners…

Halloween Project 17

Flip right side out and stuff your pillow inside.

Halloween Project

You’re done!!

Time for a sexy skull pillow photoshoot!

Halloween Project

Halloween Project

Halloween Project

I know this is a ~craft~ project, but this method could also be used for clothing (like we could all applique CAT SWEATERS. Oh god, guys, let’s.). I was planning on making myself a matching skull sweatshirt so I could match my living room, but time slipped out of my fingers and well, maybe later. I say this pillow is for Halloween, but let’s be real – you’ll probably see it on the couch during Christmas, and beyond. Welcome to my life.

Want to make one for your own #spookyspaces? Have a coupon! I got ya back!
JF13_Halloween_Coupon
Don’t say I never did anything for ya 😉

SEXI COUCH TIME

19 Dec

I know! The title of this post is super misleading! We are not having sexi time so much as this is the time for the Sexi Couch to shine. Got it?

This blog is going to be a bit quiet over the next couple of weeks – I’m working on a dress right now, but let’s be real, I’ve got parties to make a drunk ass of myself at and therefore that shit won’t be finished before the weekend. My family is going to Gatlinburg on Friday – we’re staying in a cabin! Yeah! – and then I’m taking the entire week off after Christmas (and hopefully getting a LOT of sewing done! Yay!). So I’ll be taking a break from the blogworld for a bit 🙂
Speaking of Gatlinburg – anyone have suggestions for fun stuff to check out (or eat!) while we’re there? I know all about Ripley’s Believe It Or Not (and you best believe that I will be all up in that shit!), but I haven’t actually been in at least a decade so I’m not sure what kind of stuff there is to do anymore. Sadly, Dollywood parks are closed for the season, or else that would be my #1 choice, obviously.

Anyway, check out this babely babe-
SEXI COUCH
Green-gold 60s velvet, yeah! Looks quite different from the last time I showed you guys my living room, huh?

SEXI COUCH
I bought this beauty from Lauren Winter over the weekend. They were upgrading to a bigger couch in a more neutral color, and I about shat myself with delight when I realized that meant I could have the old couch. Aha! It *is* old – probably from the 60s, but they bought it from the original owners and it’s in very good shape. And it’s long enough for us to stretch out on 🙂 Plus: VELVET.

Living room
(Ignore that lamp; I have a really sweet gold 60s floor lamp that I’m going to replace it with, but it’s currently getting some new wiring :))

Living room
We finally mounted that beast of a tv, so I guess I can show y’all the other side of my living room!

New painting
I just picked up this painting at the flea market over the weekend… the market as a whole was pretty dead (December-April tends to be a little sad; only like a third of the vendors were there!), but hey, at least the painting matches my living room, eh? 🙂

Living room
This is a pretty shitty picture, but I just wanted to show the weird shape of the living room… and why we had to hang the tv. There really wasn’t anywhere to put it! I guess that’s what happens when you live in a house that was built before most families had a television 🙂

Christmas tree
My silver tree is one of the original tinsel ones (the kind you’re not supposed to put lights on) – it was my Great-Grandmother’s 🙂 I really love it and I’m so glad she took such good care of it.

I’d give you guys a list of where everything in this room came from, but honestly like 99% of it is from the flea market, the thrift store, a yard sale, or given to me by a friend/family member. What can I say – I’m a gatherer when it comes to decor 😉

As a side note, a lot of y’all were commenting on my sewing room corner and wondering if it usually stays that clean…
Sewing room
And here’s a shot I took this morning. So in general – yeah! I can’t work in a messy space. I’m not terribly organized, though, especially when I’m in the middle of a project 🙂

I guess that’s it! I’ll still be lurking Instagram and Twitter and checking emails if you need me! Have a happy winter holiday, whatever you celebrate 🙂 I’ll see y’all next year – I’ve got a couple pieces of exciting news that I’m just bursting to share 🙂

Introducing – My New Sewing Room!

24 Aug

I should really call this a sewing studio – it’s a HUGE room! Huge, I tell you!

Let’s back up a little. When I last left off – three freakin’ weeks ago, eeeewww! – I was still living in a sorry state of moving purgatory. You know what I’m talking about – everything is packed except one of each dish, getting anywhere requires maneuvering around piles of boxes & there are weird outlines on the wall where artwork used to hang. Pretty depressing living situation, if you ask me! We actually did not move until the end of that week, on the 10th. And lucky me – the power company refused to turn our power & water on until the following Monday, so we spent a couple of nights sleeping on the mattress in the middle of the old bedroom (I can handle living a couple of days without one or the other, but not both!). Then there was a full week of unpacking – and I refused to let myself do anything fun until the house was put together (mostly because I know me, and I know it’ll never get done otherwise. Hey, at least I’m honest haha).

Then my old landlord called & said the paint colors in the house were all wrong, and I needed to paint them back. Not wanting to spend $200+ on neutral paint, Landon & I went to Lowe’s & bought out all their OOPS paint, mixed it all together in a 5 gallon bucket & crossed our fingers. The end result was something that closely matches my flesh haha. So I had a painting party with a few awesome friends, PBR, pizza & 90s jams. We knocked out 3 rooms in about 2 hours and told ghost stories and yes, it was as fun as it sounds. And I just found out yesterday that I’m getting my full deposit back! Yay! Money!

So now let me show you my new sewing room!

Sewing Room
Standing in the doorway – aren’t the hardwoods gorgeous?! Unfortunately, this room doesn’t get as good natural light as the bedroom does. Pretty sure I’ll manage 😉

Sewing Room
Turning just a bit, my sewing & ironing stations.

Sewing Room

Sewing Room

Sewing Room
There is actually a closet & more wall that I’m not showing; Landon still hasn’t unpacked all his clothes so I’m not going to show that section because it’s a MESS. Instead – cabinet! Patterns & books & yarn, yay!

Sewing Room
I edited down my stash a bit before I moved, but I still have a metric shit ton of patterns. They are organized by garment type, fyi.

Sewing Room
Speaking of things I have a metric shit-ton of – fabric!!

I forgot to take detail shots, sorrrry! Here are a couple of close-ups:
Sewing Room
Hanging space for rulers & scissors & things that strike my fancy.

Sewing machine art
Have I posted this yet? I made this using an old frame (25¢, painted mint green), a fabric remnant & a sewing machine charm. It makes me so happy haha 🙂

Some notes on the sewing room, if anyone is curious.
– The cutting table is the Norden Gateleg (Ikea). It is on wood blocks because it’s a tad short for cutting. Eventually I’d like to buy castors, but those fuckers are expensive!
– The fabric shelf is the 4×4 Expedit (Ikea)
– Pretty much everything else (glass cabinet, sewing table, shelves, chairs, even the ironing board) was either thrifted, dumpstered, or a hand-me-down.
– The wall color is Behr Mint Majesty – my landlords painted it for me, but I got to pick the color woohooo!

Here are some other bits & pieces of my house, for those of you who want to be nosy without actually admitting to it (hey, no shame, I’m the same way :B)
Living Room
This is the living room (I’m standing by the front door). I am looooooving these hardwood floors, even if they do make my feet filthy at the end of the day.

Here is an Instagram pic of the other side of the plant:
This is the only part of the living room that is finished haha
Someone asked me the other day if the dude bust was Jesus with his hair blowing – I WISH!

His name is Saul.
His name is Saul, actually.

Living room
This is an ugly picture (I need to hang that mirror, haaa), but I’m including it so you can see the layout of the house. The turquoise doorway is my sewing room (!!), that’s the dining room straight through, and then the kitchen is farther back. The bedroom door is on the other side of the wall.

Dining Room
Here is the dining room! The table/chairs (their matching hutch is in the previous picture) & the curtains are from the flea market. There is a pile of stuff in the floor because Landon’s desk is out of the frame; he’s still organizing that mess so I cropped it out of the picture. Oh, and the lady on the wall is not Marilyn Monroe 🙂
I don’t really care for that wall color, but it does go well with my curtains.
Sorry about all the bandannas everywhere. Wtf is up with me & bandannas?

So that’s it! I’m really loving my new house – and new neighborhood!! – and I’m looking forward to actually being able to start sewing again. It’s been too long! I just started a new project last night, actually-
REUNITED AT LAST ❤
Good stuff!

A Day at the Flea – July 2012

31 Jul

The flea market hit Nashville again this past weekend, and OF COURSE I went (never mind that I’m moving & throwing stuff away left & right – FLEA!). Joining me was Lauren, new friend Allie and my super awesome sister-in-law, Sarah. Since I don’t have a lot of money to spend, I budgeted myself on a strict $20 and stayed within budget… well, sort of. More on that in a minute!

If we’re friends on Instagram, you probably saw my loot pile after I dumped it on the floor:
And the rest of my flea market loot. $20.
SO GOOD. $20!

Now I’m going to show you every piece of it!

Zippers!
That big pile of zippers was an entire bag that I snagged for $3. I KNOW! I counted them when I got home, and there are 39 zippers. 37 of them have metal teeth. My zipper stash was running on empty, so this was a good thing to come across!

Crewel Pillowcase
That picture-looking thing is actually a crewel pillowcase that I got for $2. I stuffed it with poly fiberfill (side note: I have like 3 bags of this stuff. Why?? I don’t use it for anything, yet it is somehow reproducing in my sewing room! Help!) so it is now a proper pillow. I actually have another embroidered pillow that I got last month for $1, so they’re like pillow buddies now. And that, my friends, is how I started my newest collection.

Wool-blend Maxi
This isn’t fabric – it’s actually a maxi skirt! A nice wool-blend, I think it’ll go well in the winter. It reminded me of Stevie Nicks, so I had to take it home with me. Also, it was $3.

30s Lace Collar
30s Lace Collar, $2
I obviously need a dress to sew this onto – taking pattern suggestions!

MAN-HANDLER
Haha, ok, this isn’t part of my $20 because Sarah actually bought this for me. Isn’t it awesome, though? I need to find a frame for it, and where to hang it! I’m thinking right at the front door, so people will know what they’re getting into >:) Hahahahahahahha

Yellow Buttons
These are the yellow buttons from yesterday’s dress. They were dirty as hell, but they cleaned up real good! $1

Lemon Hook
The very last thing I bought – I had exactly $1 left, and we were walking to our car when Lauren decided that she wanted a utensil holder. I found this lemon-y goodness hook for my last dollar (and yes, there was a utensil holder at the table as well… it even said UTENSILS on it lol)

Retro Tablecloth
Awesome bright tablecloth, $5

Advance 7055
Advance 7055, $1

Fabric Scraps
Dude also made me take these fabric scraps with that pattern. Free! They are pretty small, but I think I can eek out some facings with them. My soon-to-be brown wool old man Thurlow trousers are totally getting the brown/yellow floral facing treatment.

Simplicity 4697
Simplicity 4697, $1
Already have a fabric planned for this.

Simplicity pattern
Simplicity pattern, $1
I want to make a corduroy jacket! With elbow patches!

So that would have been it… except upon leaving, Lauren & I came across this magnificent china hutch that she just fell in love with. When she asked about the price, the guy said it was part of a set he was not willing to break up. The set included a buffet, table & 4 chairs. Jokingly, Lauren asked me if I wanted to split the furniture with her…

I bought furniture. OOPS.
And they were amazing, so of course I said FUCK YEAH.
Seriously! I wish I had better pictures to show y’all, because they are incredible. Definitely 60s, real wood, and they are going to look amazing in my house. I am going to need to reupholster the chairs, but the wood is just beautiful.

60s chair - part of the dining room set
Here’s a bad picture of the chair (you can also see the buffet behind it)
Unfortunately, there is absolutely no space for them in my current house, so there really isn’t any room to walk… I have to crawl over stuff lol. Totally worth it, though!

In case you were wondering – I got all that furniture for $100. SERIOUSLY. I told you our flea market was a good ‘un!

And now, for something completely different – here are a couple sneaky peeky pictures of my our new house 🙂 I stole them off the rental website so they’re a little outdated, but you get the idea!

Living Room
The living room! It’s not this color anymore; it’s actually a soft burnt orange (really pretty!). I just love the big picture window. There is a really great front porch, with a porch swing!

Sewing Room
This is going to be my sewing room 🙂 It is being repainted – I chose Behr Mint Majesty. I just love the windows & the hardwood floors! This picture is actually a little deceiving – the room is HUGE.

In the meantime, I started packing my sewing room yesterday, so I won’t be doing any sewing for at least a week or so. I’m already feeling a bit stir-crazy, augh!