Tag Archives: cotton

Completed: Charm Patterns Rita Blouse

13 Feb

I don’t think I need to introduce anyone to the sewing superstar Gertie, right? The sewing blogger, pattern writer, fabric designer, and workshop leader WHO LOOKS LIKE A LITERAL PORCELAIN DOLL (not even exaggerating… it would be maddening if she wasn’t also an incredibly delightful person to interact with!)? Yes. That one. If you don’t know who she is – well, welcome to the online sewing community! Now read up on the OG superstars!

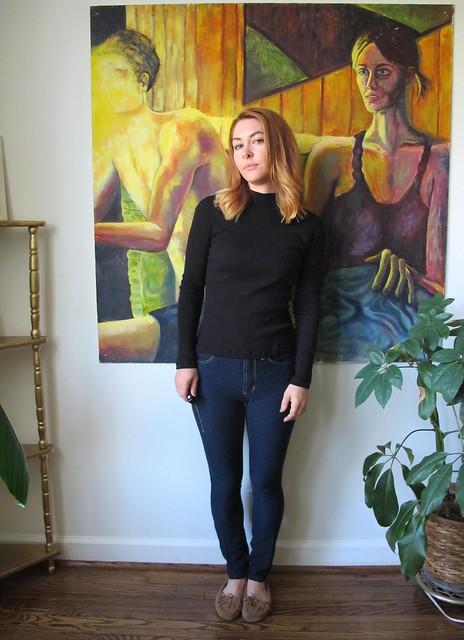
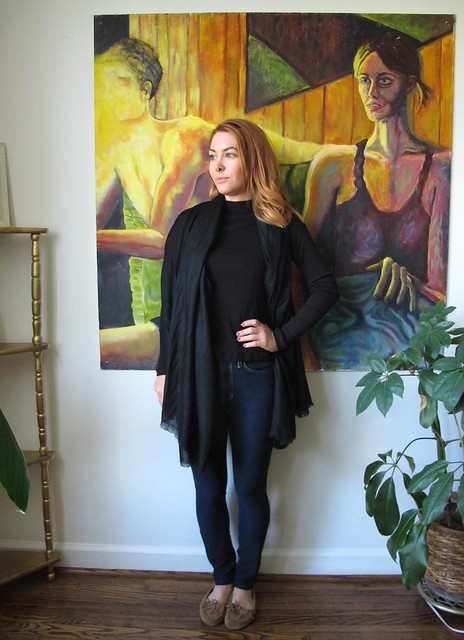
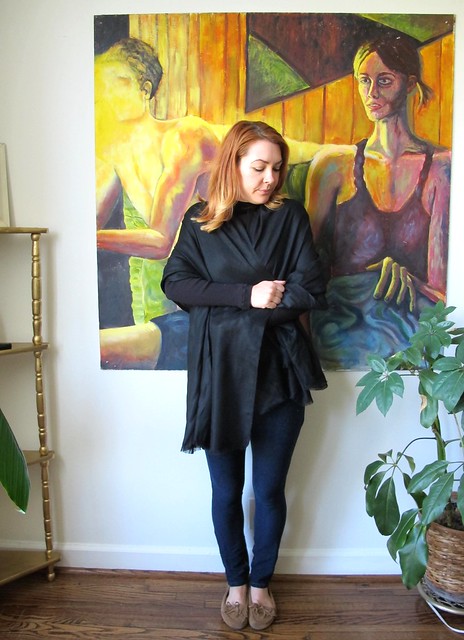
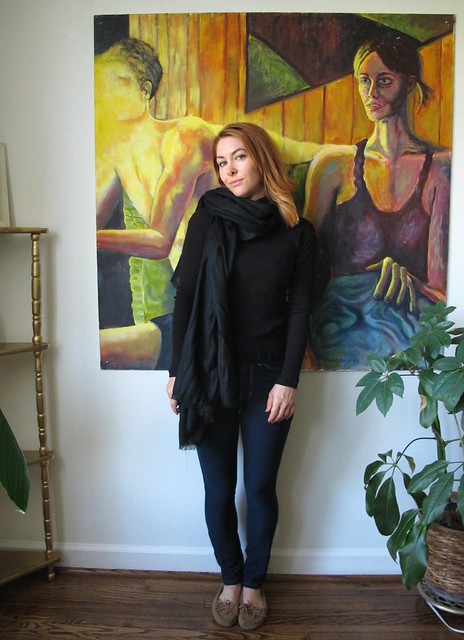
I’ve followed Gertie for years – she’s actually the reason why I started my blog! – and cheered her on with every new business venture. While my tastes have definitely skewed away from vintage style, I still really love to see the stuff that she puts out. When Gertie was in Nashville last year for a workshop, she brought a few patterns from her new line, Charm Patterns, and I picked up the Rita blouse to try out. I like this pattern that it does look vintage, but not quite so costumey (no hate on y’all who do the costumey vintage; I fucking LOVE it but it just really isn’t a style I like to wear these days).

Charm Patterns Rita Blouse

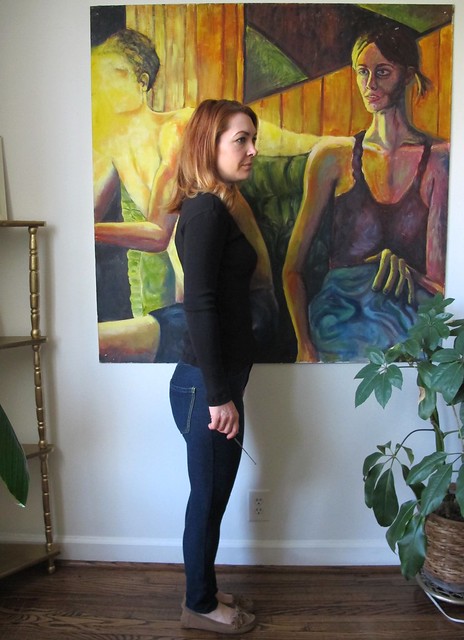
I always get bored with sewing winter stuff around this time of year – although I feel like this year it started a bit earlier. I’m also making a bigger effort to work my way through my stash, both patterns and fabric. I remembered this pattern a couple of weeks ago and decided to sew a test version. When I bought the pattern, I originally envisioned using a beautiful Dolce & Gabbana stretch silk with it, but I wanted to try the pattern with a less precious fabric before committing.

Charm Patterns Rita Blouse

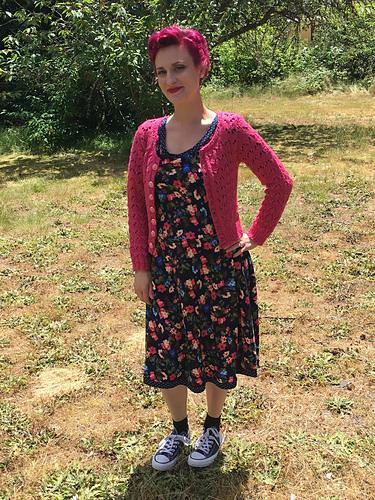
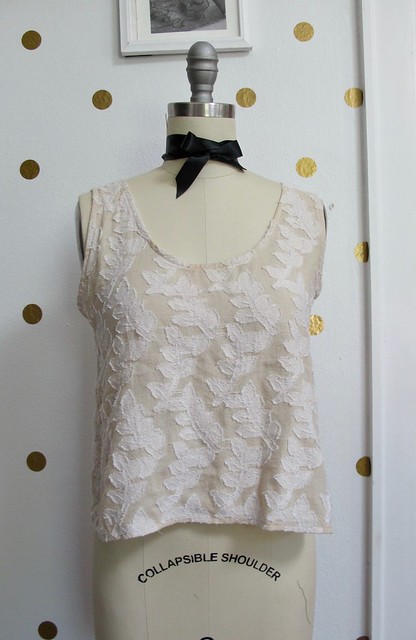
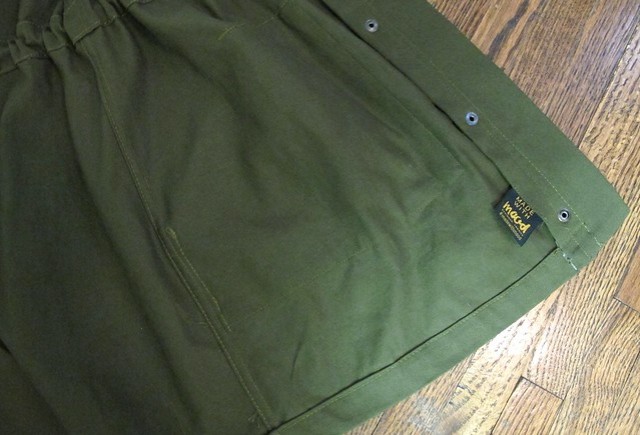
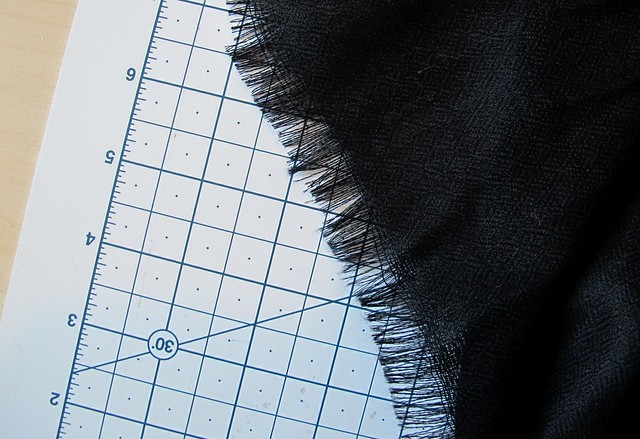
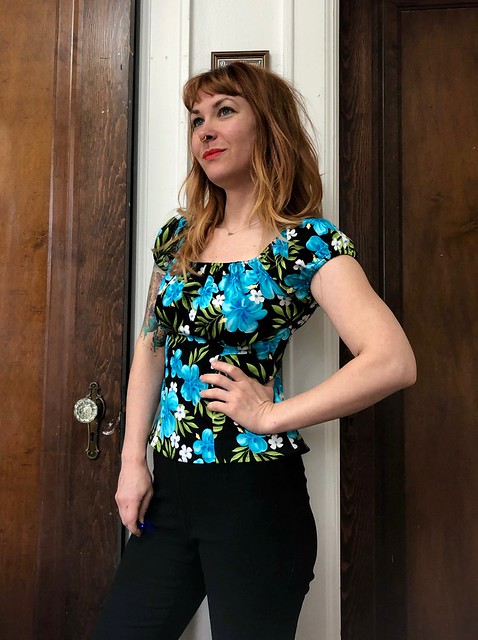
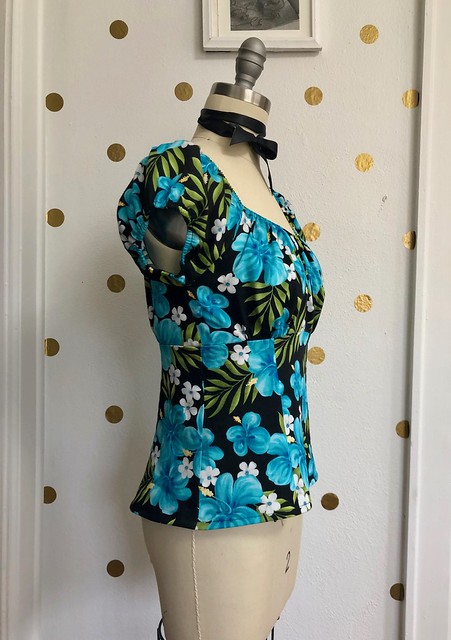
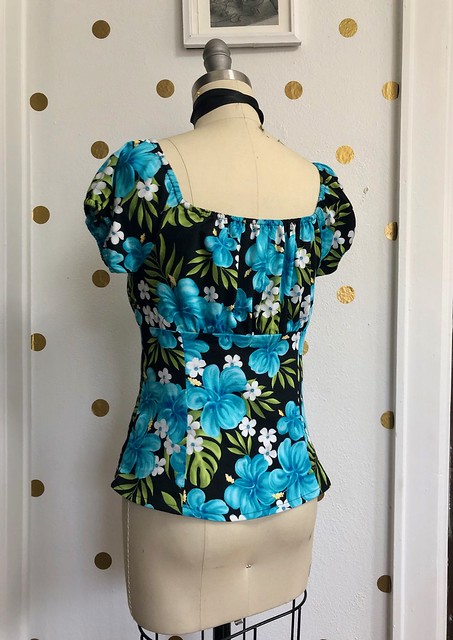
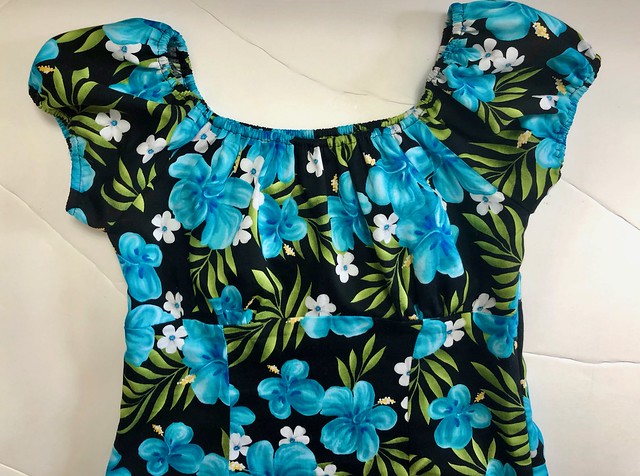
The test fabric is actually… wait for it… fabric from Gertie’s fabric line! Ha! I don’t see it available on her website now, but it’s a lightweight cotton with a really brilliant, colorful print. I received this fabric as the winner of a giveaway on Gertie’s old blog, back in like… 2015. Ouch. I actually got a few fabrics, as well Gertie’s Ultimate Dress Book. Truth be told, this fabric isn’t completely my style… I don’t wear lot of florals, I don’t wear much black in the summer (and to me, this is a summer print) and I also don’t wear this shade of blue. Don’t get me wrong, it’s a lovely fabric… it just doesn’t fit well with my wardrobe. And, of course, I got something crazy like 4 yards of it. So when I was looking for a fabric to use in a test Rita, I rediscovered this piece and thought – eh, why not? No huge loss if it doesn’t work out, but I’ll still prob wear it if it *does*.

Charm Patterns Rita Blouse

I’ve never sewn a Charm Pattern before, so I paid close attention to the size chart when choosing my size. There isn’t a lot of guidance on how to choose your size, so I just went with what my measurements are. The part I found most confusing was the underbust measurement – it seemed really tiny. And with a 27″ underbust, mine is already quite small! I was a little concerned about the amount of ease there, as I didn’t want it to be too tight if I take a deep breath. I ended up going with a size 4 and a C cup, again, this is based off my measurements.

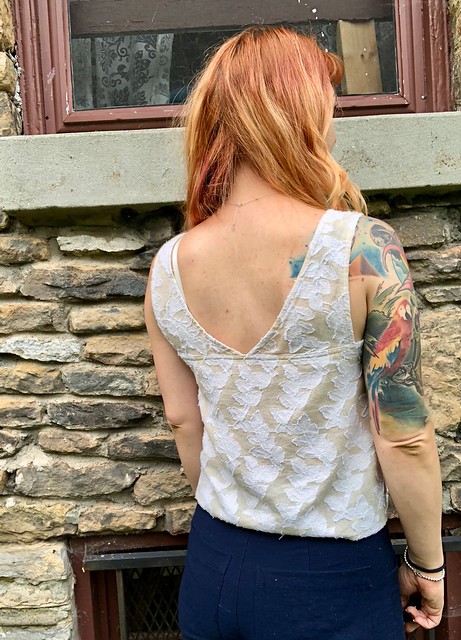
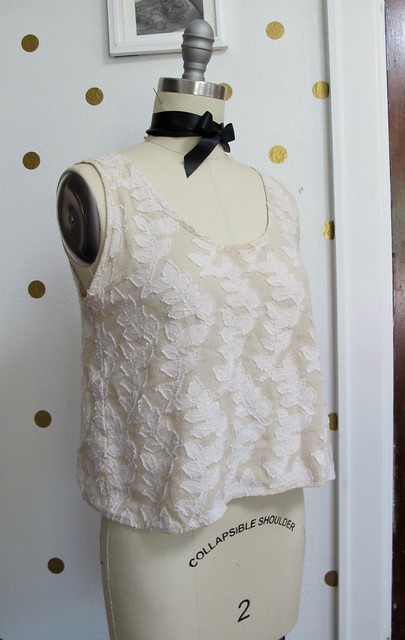
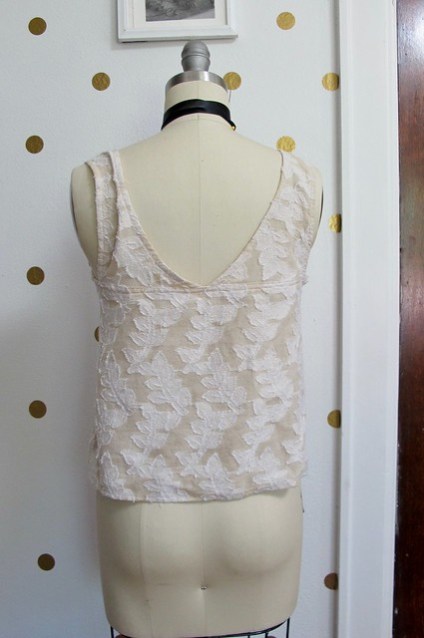
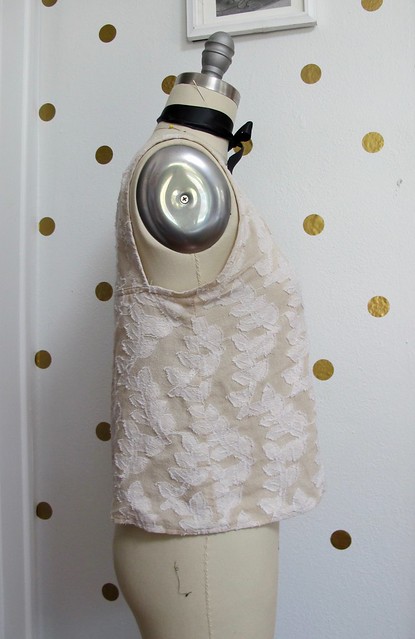
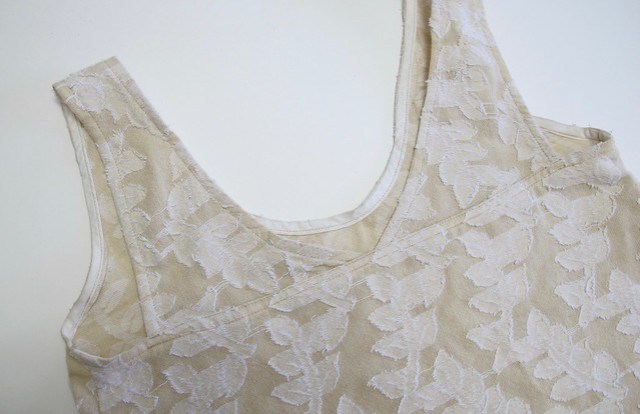
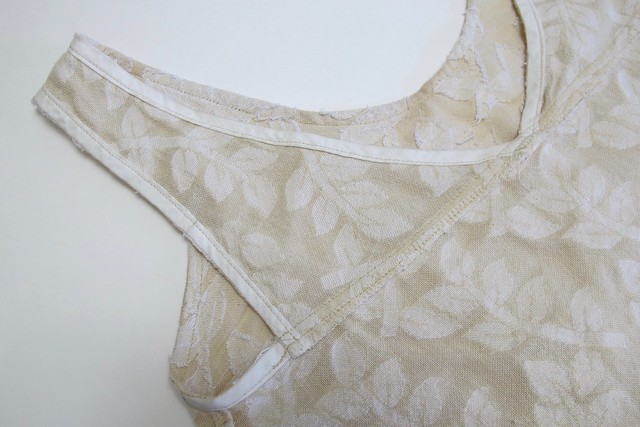
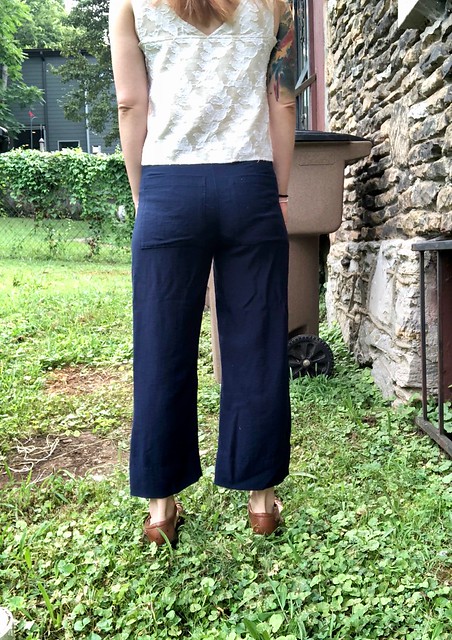
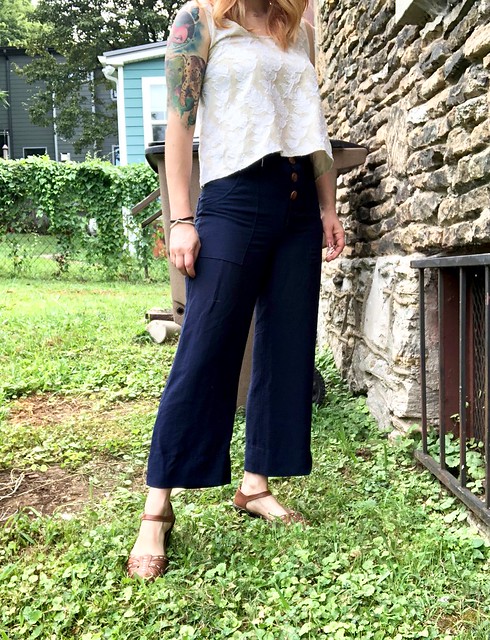
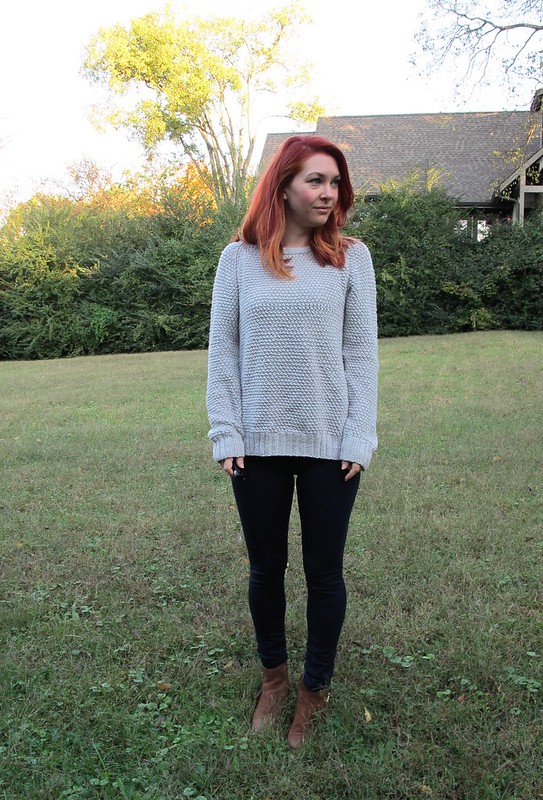
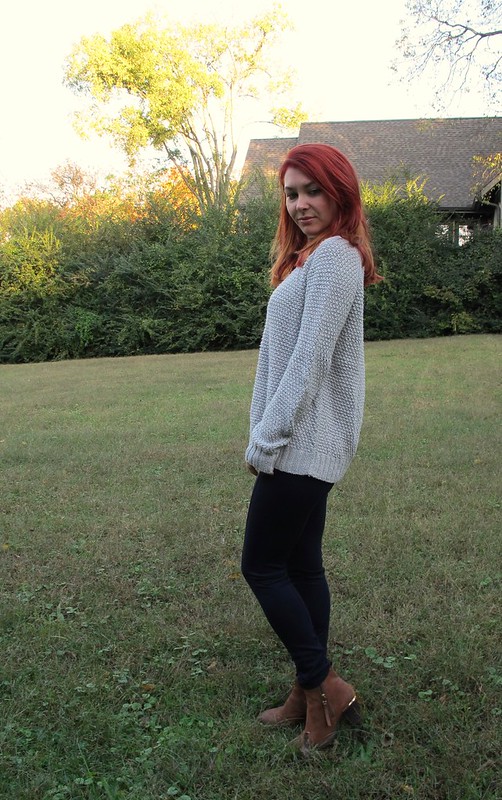
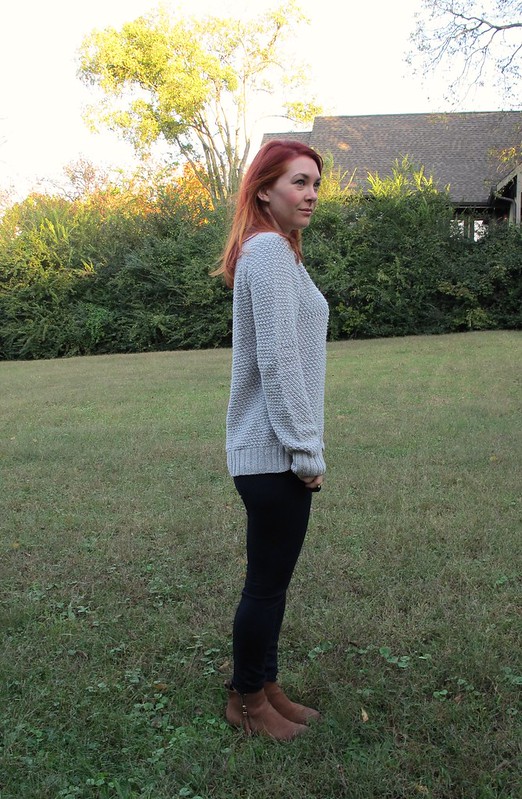
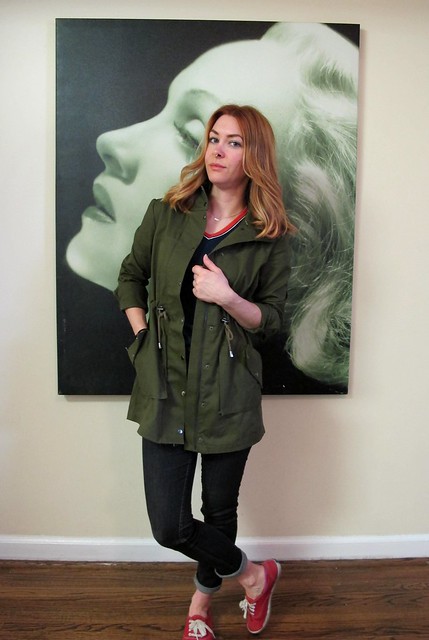
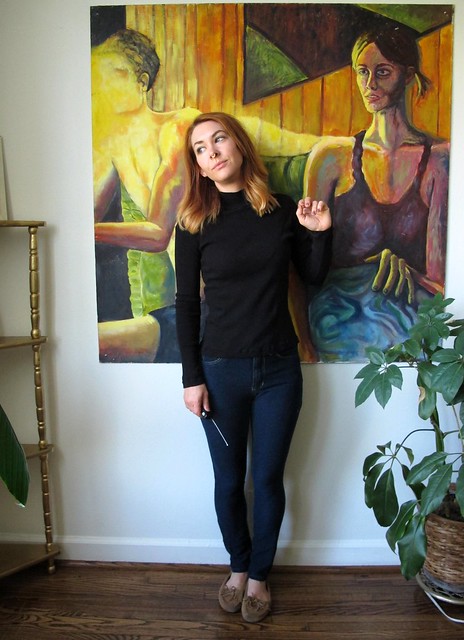
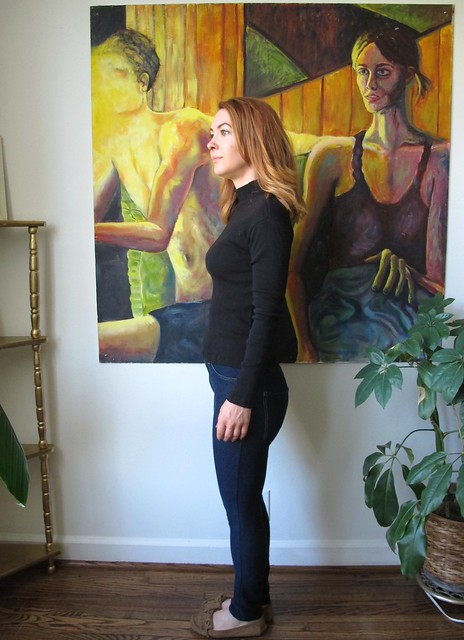
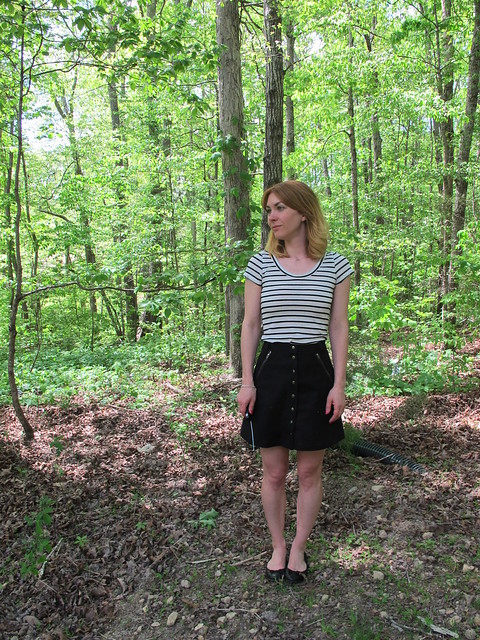
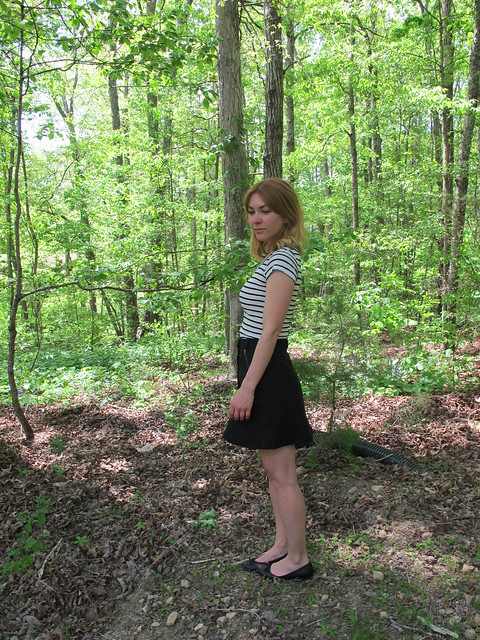
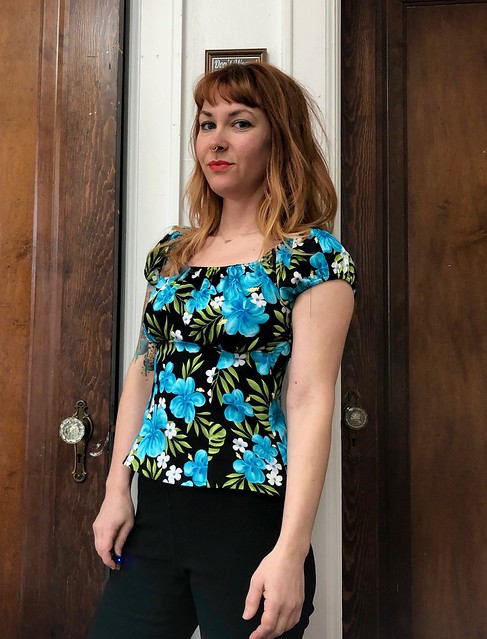
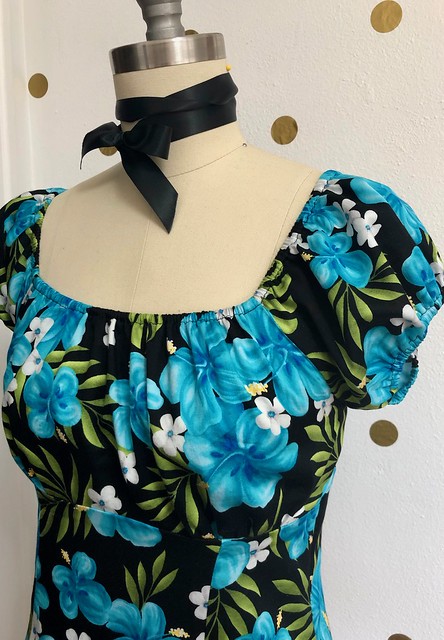
I think the fit is pretty much spot on. There’s a little bit of ease around the waist, a lot of ease at the bust for all those gathers, and the bottom flares out a little for your hips. I think the pattern looks and fits exactly as it was intended to. And as far as the underbust – it’s perfectly comfortable. So yay for that!

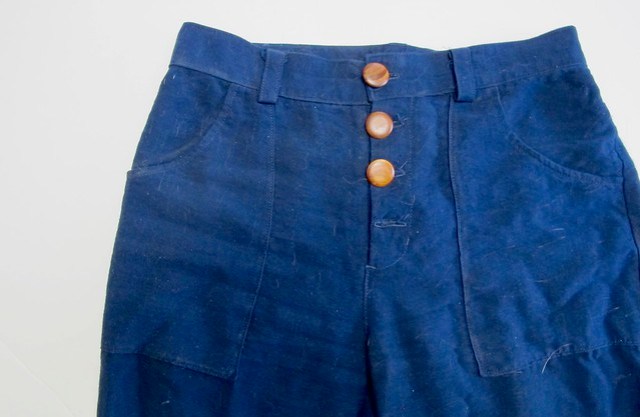
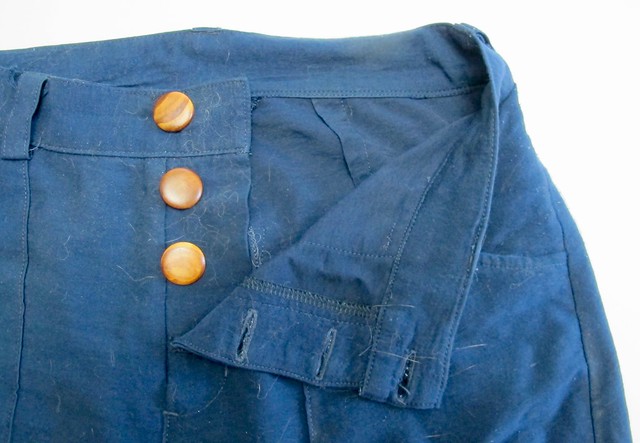
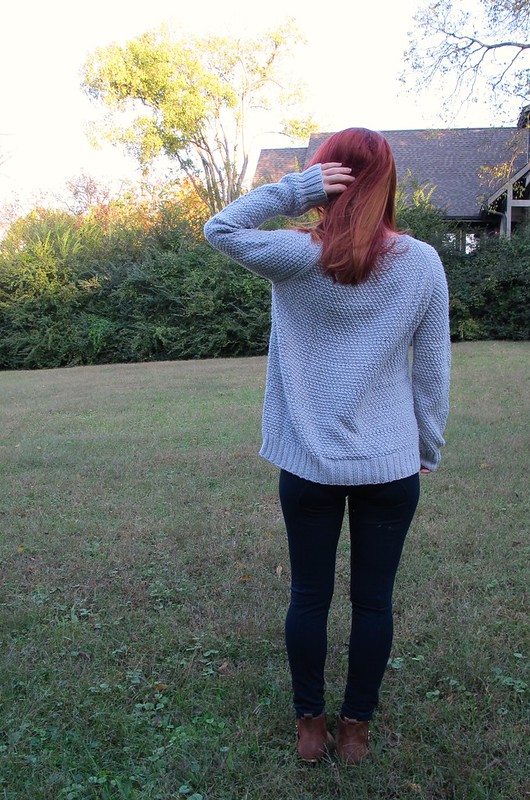
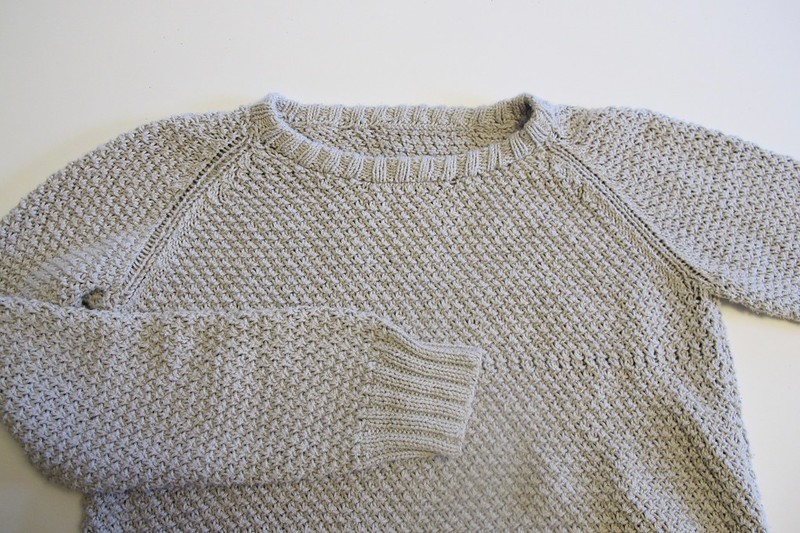
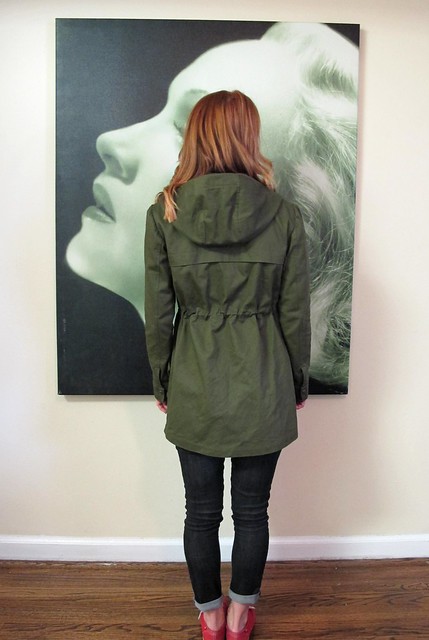
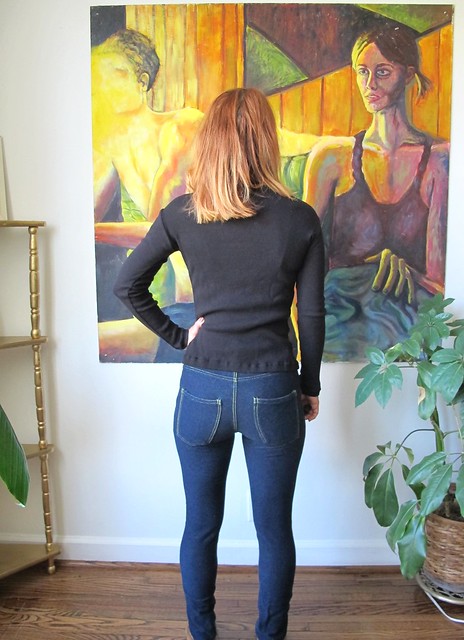
Construction-wise, this was easy to sew. The hardest part was feeding the elastic through the channeling – the pattern has you create a 3/8″ wide channel for the 1/4″ elastic, and I must have made mine a bit smaller than that as I had a really hard time getting my elastic to relax out completely despite lots and lots of effort. I ended up shortening the elastic around the arms by about 1″ and the neckline something like 4″. I feel the arms are ok, but the neckline is slightly tighter than I’d like and it feels like it wants to pull up at the bust.

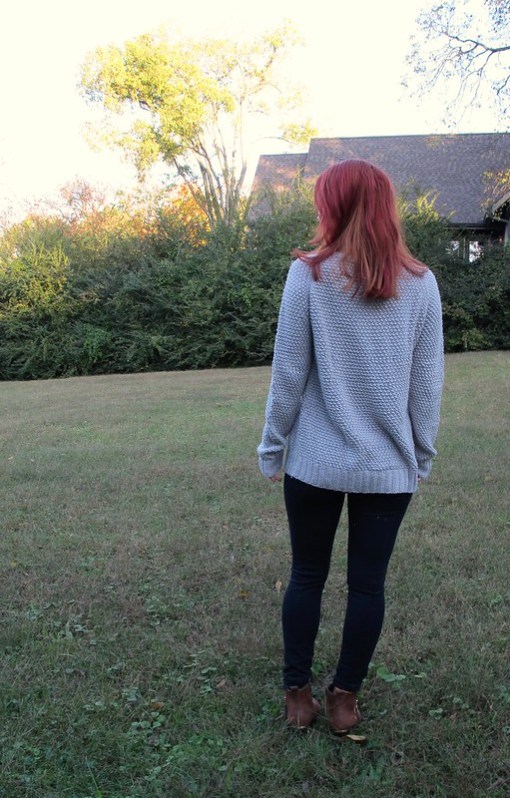
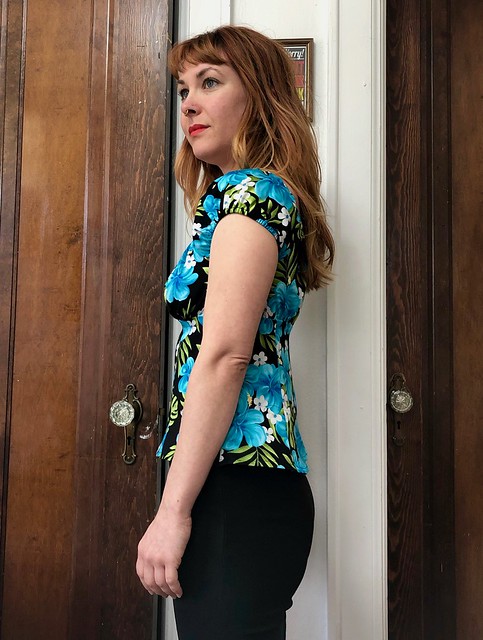
I serged all the seams as a sewed them (together, not pressed open like the pattern suggests. This is a test blouse, ain’t nobody got time for that!). There is an invisible zipper at the side; mine is a little shorter than the pattern calls for as it was all I had in my stash, but I don’t have any problem getting in or out of the shirt.

This was a quick project; I had everything traced and cut in about an hour, then the blouse sewn up the next afternoon minus the hems. Hemmed it the next morning and wore it out to see a friend that afternoon. Not too bad!

Charm Patterns Rita Blouse

Charm Patterns Rita Blouse

Charm Patterns Rita Blouse

Charm Patterns Rita Blouse

Charm Patterns Rita Blouse

Charm Patterns Rita Blouse

Charm Patterns Rita Blouse

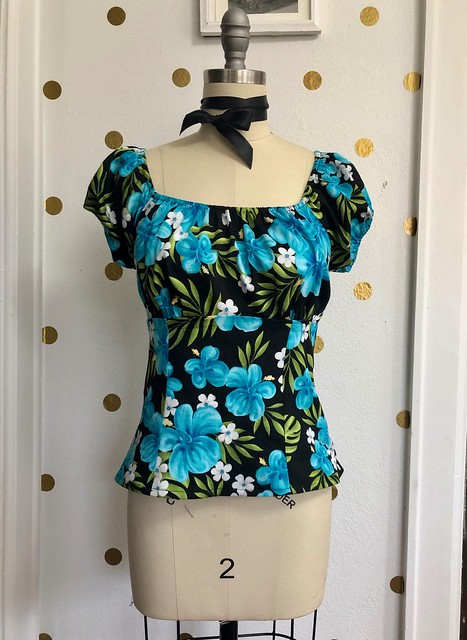
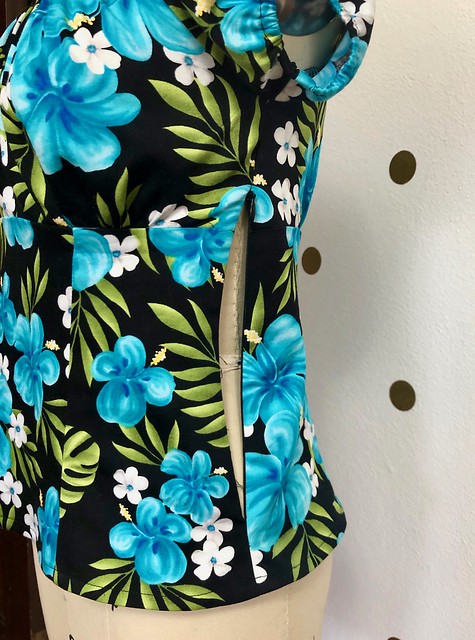
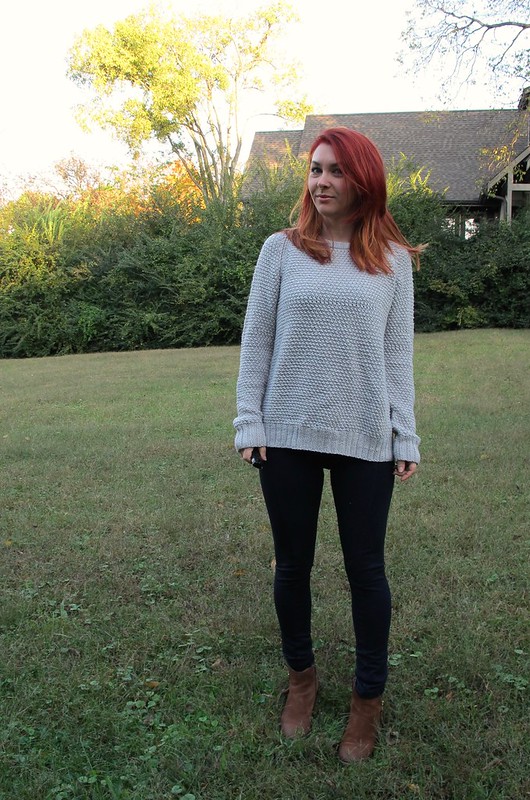
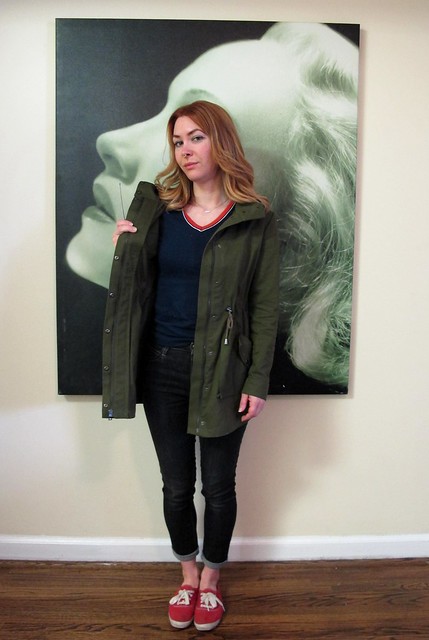
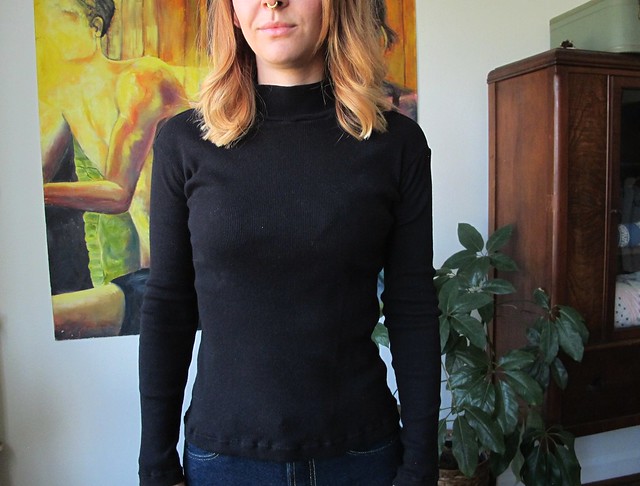
So… I think the blouse does look cute, and I like the way it looks in photos. I’m still not totally convinced that it is something I want to wear, though, both in style and due to fabric choice. It feels a little dressier than what I’m accustomed to. I originally envisioned wearing this tucked into my black pants, but the side invisible zipper makes a weird lump when I tuck it (this may not be an issue with something that is a true high waist – like, over the belly button). It doesn’t look bad untucked, but I’m not crazy about it. I like it, but I don’t LOVE it. And I have decided that there isn’t space in my wardrobe for things that I don’t actually love. I have enough clothes as it is!

I think I may actually remove part of the bottom and attach a skirt to it, and just turn the entire thing into a dress. I think that might be a better use of this fabric (especially since I have so much more of it leftover!) and I would enjoy wearing that more than the top. It would certainly be fun to wear in the summer, and lord knows I won’t wear pants when it’s hot out! And yeah it’s gonna be costumey AF, but I’m kind of loving that idea.

Charm Patterns Rita Blouse

Anyway, just thinking out loud! In hindsight, I’m glad I didn’t use my special D&G fabric to make this as, like I said, I’m not 100% on the style. I am interested to see if that opinion changes when I swap out for a skirt. I need to dig through my patterns and see if I have something suitable, and I will return with an update!

Completed: Popover Tank & Lander Pants (Plus: OAL Winners!)

10 Aug

Heeeey everyone!!

Before I dive into garment details, I want to congratulate our OAL 2018 Winners!


Dizzy Erica made a Lady Skater dress + Hetty Cardigan! Interestingly, I was just rediscovering my love for both these patterns the other day! I am happy to see that the Lady Skater in particular is still going strong and living up to it’s awesomeness 😀
Wendy made a Waters tee + an A Frame skirt. I love the colors she choose – perfect summer outfit!


lsorenson7208 made the Rabbitbrush cardigan & Lander Pants! I am really digging this monochromatic look – I always find black and white to be so chic.

Big congratulations to our winners – and thank you to everyone who participated! You can see all the finished outfits in the OAL 2018 Finished Outfits thread on Ravelry. Also, a massive thank you to our sponsors The Confident Stitch & Indie Stitches for supplying prizes! And thank you, Andi Satterlund, for hosting this with me again!

*

You’ll notice that I didn’t share my OAL project – and it’s not in this post, either (surprise!). I did finish my Lander shorts and have worn them loads, but sadly my Waters tee is still on my needles as of this posting. Can’t even finish my own outfit in time for the OAL I am hosting, I am the worst! In all seriousness, I started to fall out of love with the project – I’m not happy with my stripe sequence, and honestly, I need to frog it and start over! Rather than force myself to finish something that I likely wouldn’t want to wear, it’s sitting in time-out until I can be sure that I need to either frog it or finish it. I don’t like keeping UFOs, but sometimes you need a breather to think about your options and next steps.

*

Ok so anyway, on to this post! Featuring a DIFFERENT pair of Lander pants, mwahahaha!

AMH Popover Tank

But first, I want to share my tank with you because it’s super cute!

AMH Popover Tank

No lie – every single time I wear this top, I get people practically foaming at the mouth to ask what pattern is that! Here’s your answer – it’s the Anna Maria Horner Popover Tank! This is a pattern that Anna released to be used specifically for garment classes at Craft South. I’ve taught this class a LOT – it’s a great first project, easy to sew and looks super cute! And it can be sewn in 3 hours (YES, SERIOUSLY). But I’ve never made one for myself – just loads of samples. When Anna released it as a paper pattern and included a cropped version, I was ready to give it a try.

AMH Popover Tank

This is a super, super simple pattern. Two pattern pieces, then 1″ strips of knit fabric to be used as facings around the neck and arms. No darts, no closures, barely any pattern markings, and an easy fit. Students learn how to sew French seams, apply knit facings, and sew a 1/4″ rolled hem.

One tip I will give if you want to make this pattern is to check the finished measurements, and possibly consider sizing down. I find the recommended sizes to be a bit loose-fitting, especially around the arms, but you can go for it if that is your jam! I made the size XXS, although my measurements put me at the cusp of XS. I like the size of the armholes and the fit of the bust. My fabric is also lightweight with more give than your typical quilting cotton, so that helped.

The only change I made was to swap out the knit facings for actual woven bias facings. I didn’t have any knit fabric that remotely matched my fabric, and I prefer the bias facings anyway. Knit facings are wonderful to keep the class at 3 hours, but when I’m sewing at home on my own time I do what I want! I used some beautiful lightweight cotton voile and applied the bias facings the same way I always do. No need to trim seam allowances, either – the knit strips are also sewn on a 1/4″.

AMH Popover Tank

I love the back – the shoulders wrap around and make a v at the center back, which is then topstitched. I told you, this pattern is easy!

AMH Popover Tank

I should mention my fabric – it’s a beautiful lightweight cotton that I bought at Nagada while I was in Egypt! I only bought a yard – it was expensive, even by American standards – and waited a loooong time to find a good pattern to match it with. The raw applique reminds me of Alabama Chanin, and I love the soft neutrals.

Since the fabric has some texture that makes the thickness a bit uneven, I didn’t do the French side seams and instead just serged them. This is also why I used lightweight voile for my woven bias facings, instead of self-fabric.

Just a head’s up – the cropped version is SHORT. Like, it will expose your belly button. I wanted to lengthen mine… but I forgot and just cut shit out. Oops. Soooo my hem is the tiniest thing ever, serged and rolled under as little as possible. It’s still short, but I like it with high-waisted pants. FYI for your Popover Project, tho.

Here, have some more photos. I don’t know why I took so many.

AMH Popover Tank

AMH Popover Tank

AMH Popover Tank

AMH Popover Tank

AMH Popover Tank

AMH Popover Tank

Whew.

BUT WAIT, THERE’S MORE!

True Bias Lander pants

True Bias Lander pants

My second pair of Lander pants! Sorry these photos are basically useless, navy is super hard to photograph.

I didn’t make too many changes on these vs my red pair… according to my notes (that I now take in a little notebook whenever I sew, specifically for this reason haha), I made a size 2 but used the size 4 at the side seams. I made the pockets slightly smaller, although I still think they are a little big. I also shortened the legs by 1″ at the shorten line, and interfaced the fly shield. I’m sure I had to take a little out of the center back, but I don’t remember how much, sorry!

I definitely like these even more than my red ones. I think the proportions and length are a little more flattering, and the fabric is super swishy so they are fun to wear!

True Bias Lander pants

The fabric is a navy tencel twill that I bought at Mulberry Silks when I was in North Carolina earlier this year! It’s a beautiful weight with a soft drape, making my ideal pants! I found this fabric easier to work with than silk, but it was still a little wiggly… like using a heavier weight rayon challis.

I lined the pockets with silk crepe (from my stash), and the buttons are also from Mulberry Silks! Look closely, you can see that I already lost one 😦 This is what I get for wearing my shit before I photograph it! The button stayed intact for months, and I literally lost it on a flight home (I think) the day before I took these photos. I’m sad because I really loved these buttons, but I’m also mad at myself for not buying an extra. As for how I lost it… well, they are wooden shank buttons, and that one button had a tiny crack in the shank that caused it to fly off. I found it the first time, repaired the crack (or so I thought) and decided to just sew the bottom button hole shut so there would be less stress on the button. It worked for a while, but not anymore! I will replace them when I find a suitable button that fits the holes (::sob::), but in the meantime… I’m just gonna wear them with 3 buttons. Who the fuck cares? Did you see that missing button in my photos above? Are you looking now? ZOOM IN, I DARE YOU.

True Bias Lander pants

True Bias Lander pants

Anyway, big thumbs up for these pants! I especially love them for traveling – they are my summer flying pants. I always get cold on planes and in airports, but I hate wearing skinny jeans and then sweating to death when I step in 90 degree heat once I reach my destination. These are perfect because they keep my legs covered, but they are breezy in the heat. The color goes with everything, and the high waist looks great with a cropped something or with a loose tshirt tucked in!

True Bias Lander pants

I feel like this post has gotten out of hand long, so I’m going to stop now. Have a great weekend, everyone!

Completed: The Martine Sweater

13 Nov

It’s been a minute since I posted a knitting project, but that doesn’t mean I ever stopped knitting!

Martine Sweater - front

I took some time off from knitting sweaters (other than my yearly OAL makes!) and have spent a couple of months furiously knitting socks. I love handknit socks – I love making them, I love traveling with them (so portable!), I love wearing them, and I love buying yarn for them (way more economical than buying sweater yarn – even if you end up splurging haha). But then I started to get a little sock’d out, so I turned my focus back to sweaters.

Part of the reason why I stopped knitting sweaters as much is because I couldn’t really find patterns that stood out to me. There are TONS of patterns on Ravelry, but the selection dwindles down quite a bit when you factor in personal style and taste. I simply don’t wear very complicated looking clothes these days – which is what seems to be most available on the market (along with variegated, hand-painted, and bright yarns. Pretty, but again – not my style!). While I used to love cardigans, I really don’t wear them so much anymore (blame it on my lack of working in an office these days!). And I live in an area with a reasonably mild climate, so bulky sweaters are a bit unnecessary. TBH, even worsted weight sweaters are more than I need.

What I really like are plain, uncomplicated sweaters knit with fingering weight yarn in a very small color palette consisting of mostly greys and blacks. Ha! I know that sounds boring as hell, but I’d rather make something boring that’s going to get a ton of wear, than something crazy looking that doesn’t go with anything I own. I know a lot of us have fallen in the camp of “I love this pattern, I need to make one in every color!” whether it’s with sewing or knitting (or whatever craft’s ass you’re stuck up at the moment), but I’m realizing now that it’s ok to have one thing in one color and call it a day. And that color can be grey and that’s fine too.

Martine Sweater - front

Let me tell you – I’m SO HAPPY I reached this conclusion and stuck with it! This grey sweater hits all my needs – it’s cozy, it’s cotton (see: mild climate), it’s a great color for my wardrobe, and I actually really really enjoyed knitting it!

Martine Sweater - front

The pattern I used for this sweater is the Martine by Julie Hoover. Let’s just get this out of the way first and foremost – yes, its the same color as both the pattern photographs *and* Jen Beeman’s version. Specifically, I 100% ripped off Jen’s sweater after seeing it first and I’m not ashamed to admit it haha.

Things that I like about this sweater:
1. It’s knit in a cotton yarn, which is ideal for Tennessee weather – it’s great in the fall, early winter, and I reckon it’ll be ace in the spring as well. I love knitting and wearing wool, but sometimes it’s not always practical.
2. The design is simple and understated, but has a beautiful texture that I knew would be fun to knit.
3. That raglan shaping! Jen waxed poetic about how much she loved the raglan shaping and I was INTRIGUED. I wanted in on some of that action, too!
4. The sweater is knit in pieces and then seamed. In the past, I only ever knit seamless sweaters – and I’ve definitely announced this publicly numerous times. But as I’ve gotten more into knitting, I’ve heeded the advice of more seasoned knitters that a seamed sweater is truly the way to go, in terms of longevity and the sweater keeping it’s shape. This is especially important with a cotton sweater, since it’s already destined to stretch out of shape and really needs all the help it can get. Further, I figured knitting in pieces would make this a much more portable project – it’s annoying to schlep around an entire sweater on your needles, but just the front? Sure, why not! Finally, I wanted to learn how to properly seam (I’ve seamed before, but it was.. uhhh, well, the pieces were held together, and that’s about it haha), and this would be a great project to start with.

Knitting this pattern definitely stretched my comfort level, and I picked up some new skills as well! The pattern is loooong, but well-written – I didn’t have any problem following any of the steps or learning any of the techniques. I did make it a point to follow every single instruction in this pattern as written, in order to get the best results (this is not something I have generally done in the past, but I have changed my ways and have chosen to trust the pattern writer now!), which definitely paid off. This sweater is one of my best makes yet!

I made the size 35 3/4, and as you can see the sweater is quite loose on me (my bust is 32″) but not overwhelming.

Martine Sweater - back

Martine Sweater - back

Martine Sweater - side

Martine Sweater - side

The only part of the pattern that I did not follow was the suggested yarn – I stuck with a cotton, but used Quince & Co. Willet. This was mainly due to cost – the suggested yarn (Shibui knits) is expensive, while Quince is much more economical. Add in that I work at a shop that carries Quince & Co., which means I get a discount – and not only that, but I took advantage of our “employee layaway plan” (meaning I grabbed all the skeins I required and put them in my box in the back room, then just paid for each skein as I needed it haha). So yeah, I went with Quince! My coworker Hannah, who is as big a yarn snob as I am a fabric snob, assured me it was a suitable substitute for the Shibui. I haven’t seen the Shibui in person, but man, I LOVE this Willet!

I knit a few test swatches before casting on – surprisingly, I got gauge with the suggested needle size (this NEVER happens with me, I always have to go down at least 2 needle sizes because I tend to knit so loose), but my row gauge was way, way off. Going down a needle size only messed up my width gauge, and barely budged the row. Row gauge isn’t always super critical, but it is when dealing with raglans – and as someone who already has a pretty small armscye, I don’t want any extra room there! So I math’d that shit out, and took a few rows off the raglan shaping to compensate for a larger row gauge. I wasn’t sure if it would even totally worth until I was finished with the front piece – but it totally did, thank god! Unfortunately, I didn’t think to adjust the row gauge for the rest of my sweater, so it’s a bit longer than it should be. Which is fine, we are gonna call that “cozy.”

Martine Sweater - front

I named my sweater “Carrie” because I knit the majority of this while watching Sex and the City. I don’t remember why I started watching that show this year, but once I did – I was hooked. Ugh y’all it’s embarrassing how relevant every character and situation is to a single woman in her 30s haha. I recall trying to watch it as a 20 year old, and thinking I identified the most with Samantha (no, 20 year old Lauren, you don’t) but also really not getting it. I get it now. And also, I definitely identify the most with Miranda these days, who is arguably both the most annoying and boring of all those women. Oh well. Welcome to your 30s I guess haha.

Anyway, I blasted through the entire series while happily knitting away at this sweater. I knit the front and back separately, blocking each one after it was finished. For the sleeves, I cast those both on at the same time and knit them 2 at a time until I got to the raglan shaping, then transferred one sleeve to waste yarn so I could knit them separately (the raglan shaping differs on the front vs the back, so the sleeves are not identical – they are mirror images). I didn’t want to risk Second Sleeve Syndrome, and I’m glad I did this! After I finished the first sleeve, there was only raglan shaping remaining for the second sleeve – not the whole thing 🙂 Finally, blocked the sleeves, seamed the whole thing together, and knit the neckband.

Martine Sweater - neckband

The neckband on this sweater is funny – it’s knit in the round after the sweater is assembled, and you don’t actually bind it off. Instead, the band is folded to the inside and the live stitches are sewn down. I’ve never seen a neckband like this, but I admit that it looked polished as fuck and feels nice and sturdy. I like that!

Martine Sweater - texture

Here’s a close-up of the texture! It’s not a moss stitch (which is what everyone asks), it’s a double knotted stitch. You purl 2 stitches together, then knit the same two stitches together. It’s easy enough so that you can do other things (like talk, or watch Sex and the City) while knitting, but interesting enough so that I didn’t feel like passing out or anything.

Martine Sweater- seaming!

Here’s my seaming! My finger is pointing to the seamline – it’s barely visible from the outside! The pieces are worked with a 1 stitch selvedge, which made seaming sooo much easier. My coworker Amanda (yes, I knit a lot of this while sitting behind the counter at Craft South haha) taught me how to seam, and I was surprised at how much I loved doing it! I always thought I’d hate it since that’s something a lot of knitters complain about, but man, I like hand sewing too so it shouldn’t surprise me that I would love seaming as well. I actually had to seam this twice – when I got to the last raglan, I realized I had seamed them on the wrong sides somehow. Whoops! So I just consider the second round more practice, ha 🙂

Martine Sweater - front

The ONE downside to this sweater is the fact that is it cotton – so it stretches and grows when I wear it! Which means it is basically a very short dress by the end of the day. Kind of a bummer, but the good news is that it snaps right back into shape when I throw it in the washer and dryer. I don’t even block it out – the dryer shrinks it up perfectly. It’s super easy care, but not really ideal for traveling as I basically have to wash it every single time I wear it. These photos were taken after a couple months of wearing + washing, so you can see how the yarn has held up. Cotton is pretty sturdy!

While I did say this sweater is one of my best makes, it’s certainly not perfect – there are visible inconsistencies with the row gauge, and I need to fix one of the raglan seams because it appears to have stretched out a bit, oh, and there’s a tiny hole between the collar and body of the sweater where I forgot to pick up a stitch (but TBH I probably won’t fix that one because I use it to determine which side is the front lol), but you know what? I gave this one my best efforts, I ripped out all my mistakes, I learned SO MUCH new shit, and I had a blast knitting it. If that doesn’t count as one of the best, I don’t know what does.

That’s all for this one! Full Ravelry notes are here.

Completed: Black + Grey Flannel Archer

3 Nov

IT’S FLANNEL SEASON AGAIN, Y’ALL.

Plaid Cotton Flannel Archer

I don’t like the cold – like, at all – but I do love the clothes that are associated with this season. Layers, textured fabrics, WOOL, dark colors and jewel tones… gimmie all of it. Flannel button-ups are at the top of my list. I love that they can be worn solo and buttoned up, layered under a sweater, or layered over a tank or tshirt and left to swing free in the breeze. Snaps at the cuffs make it easy to roll the sleeves up, snaps at the button band make it possible to Hulk out at the end of the day (don’t pretend like you don’t do this with snap-up shirts, you liar).

Plaid Cotton Flannel Archer

I have a few handmade plaid flannel shirts, all of which I love to wear, so I put a short hold on adding to that stash. I finally allowed myself this year to make 2 more – both out of plaid cotton flannel from Mood Fabrics. This is the first of the two. I haven’t taken photos of the second one yet, but rest assured – it’s almost the exact same as this one, just a different colorway. Because if I am anything, I am consistent haha.

As I said, this is the Archer button up from Grainline Studio. I’ve made this shirt a lot, so there’s not a lot to elaborate on here, just a few small changes. I sewed view A with the angled cuffs, swapped out the included placket for a tower placket (I use the placket from the Negroni pattern, but this placket download from Threads is basically the same thing).

Sizing-wise, I cut a size 0 (which is the size I pretty much always sew with Grainline). One thing I did change with this pattern was to increase the seam allowances at the side and sleeve seams to 5/8″ – the included seam allowances are 1/2″, and I actually sew them at 5/8″ since I like to flat-fell those seams. I’ve noticed that my shirts are pulling ever-so-slightly at the bust now (told ya I’ve gained some weight. And also an entire cup size, ughhhhh), so I added in that extra 1/8″ and the fit is much better now!

Plaid Cotton Flannel Archer

Plaid Cotton Flannel Archer

Plaid Cotton Flannel Archer

I cut my fabric on the single layer to get the plaid all matched up (see here for my plaid-matching tips!), and cut the outer yoke and pockets on the bias. I originally had the pockets cut to match the plaid at the front, but they matched so well they basically disappeared, and I wasn’t crazy about that look. So I re-cut them and I think they look much better!

As I mentioned, all seams are flat-felled so there is a nice clean finish on the inside. I used a super lightweight interfacing so that everything would stay nice and soft – I didn’t want a stiff button placket in contrast to the otherwise floppy fabric. Everything is topstitched in black, and I used black snaps for closures.

My cotton flannel was found at the Mood Fabrics store in NYC, back in August. I had a hankering for a new flannel, and I wanted one that was soft and lightweight, like it had already been worn to death. I found this and another similar flannel in a different colorway, both of which work perfectly with the color palette that my closet has ended up morphing into. Since flannel tends to shrink up quite a bit, I washed and dried my fabric three times before cutting into it. I kept the sleeves slightly on the long side, again, in case they decide to shrink up (my first flannel shirt has quite short sleeves now!).

Plaid Cotton Flannel Archer

Plaid Cotton Flannel Archer

Plaid Cotton Flannel Archer

Plaid Cotton Flannel Archer

Plaid Cotton Flannel Archer

Plaid Cotton Flannel Archer

I think that’s all I can say about this make! I’ve already worn it loads and I look forward to some hardcore layering here in the next few months 😀

A couple other things of note:
1. Yes, I made my jeans! They are Gingers that I made with veeeeery stretchy twill fabric (like, they are almost jeggings haha I love them). Just some basic black pants that don’t necessarily warrant a whole post. However, here’s a shot of the butt (and my new belt) (and this shirt, too, apparently lol)
2. Yes, that’s a new hair color! After a REALLY long time (for me anyway haha) with the same color, I decided I was ready for a change! I love the new color so much!

Plaid Cotton Flannel Archer

** Note: The fabrics used in this post were provided by Mood Fabrics, in exchange for participation in the Mood Sewing Network.

Completed: Deer & Doe Réglisse Dress

23 May

I feel like it’s been a long time since I’ve made a pretty dress. To be fair, it’s also been a long time since I’ve felt like wearing a pretty dress – something about the cold and winter just makes me want to dress in head-to-toe black, and only wear pants (very, very stretchy pants, I should add). Once the sun starts heating up our side of the world, though, I’m ready for pretty dresses, bright colors, and fun shoes!

Deer & Doe Réglisse dress

I was anticipating this a few months ago while still stuck in a winter spiral, so I planned for this one early. I knew I wanted to make the Deer & Doe Réglisse dress – it’s a pretty design, without being toooo frou-frou (I admire everyone who can stick to that look, but my style has really evolved to that point where that is totally not me anymore).

The original plan was to make this out of a traditional white/blue striped cotton seersucker, which I bought several yards at Metro Textile while I was in NYC. Unfortunately, my fabric – ok, actually the entire load of laundry – was victim to a laundry mishap, and now I have a bunch of indigo-dyed stuffed that was not supposed to be indigo dyed (and as of now, indigo dying and myself are NOT FRIENDS and don’t try to get us to kiss and make up, it won’t happen). I can probably salvage some of that yardage by cutting around the spots – or even re-dye the whole thing – but I was feeling a little over that particular piece of fabric so I decided to make the pattern out of something else entirely.

Deer & Doe Réglisse dress

Anyway, it ended up working out in the best way possible because I am super happy with the end result! The Réglisse can run the risk of looking very juvenile if you’re not too careful – which, again, isn’t a bad thing, but it’s definitely not my style these days. Using a solid fabric really toned down the sweetness of the design, and also makes the dress a little more versatile. I’m trying to make myself be better about repeating outfits, and it’s easier to repeat an outfit when you know it’s not an entire statement piece on it’s own, you know? This solid navy is a great neutral for me, and goes with pretty much all of the rest of my wardrobe. Including all my shoes 🙂

Deer & Doe Réglisse dress

Deer & Doe Réglisse dress

The fabric I used for this dress is just a simple lightweight woven cotton, but it’s quite special to me because I bought it when I went to Egypt! It’s very soft and a little translucent, so I knew it would be really lovely to wear in the heat. Again, the deep navy color is a color that I wear a LOT, so it goes with most of my wardrobe. I only bought 2 yards, so I had to be a little creative with my cutting layouts – like, the undercollar is pieced, instead of cut in one piece – but I was able to eek it out!

I sewed this dress over the course of a few days. It was a nice, relaxing sew, which I really enjoyed. I cut a size 34, which is a little bit smaller than my measurements. I decided to do this because some of versions of this dress I googled seemed to run a little large, and I didn’t want it to be too blouse-y on me. As it stands, I think the arm holes are a little too deep – any lower and they would definitely show my bra – but the overall fit is good, and I am happy with it. I chose the elastic length by putting it around my waist to determine what was comfortable. My experience with using elastic is that I tend to pull it too tight, and it ends up being so uncomfortable that I never wear the dress (which means that, right now, I am in the middle of Operation Remove All Elastic And Replace With Longer in my wardrobe). So I left this one a little loose, which ended up being sooo much more comfortable.

All the seams are finished with my serger – I used 3 threads instead of my usual 4, since it’s a little narrower and worked better with the delicate fabric – I serged them individually and pressed the seams open as instructed. The bodice and skirt are cut on the bias, so I made sure to really stabilize the neckline with staystitching before handling it, to prevent it from stretching. The skirt needed to hang on my dressform for about 48 hours before I could hem it, and it was super uneven after all the bias settled and dropped. I did make a couple of changes to the construction – added some topstitching where it wasn’t required (mostly because I thought it looked better that way) and I sewed the elastic waistband casing so that there are no raw edges. I don’t have any pictures of the inner construction, so, sorry, you’ll have to trust me on that one haha.

Deer & Doe Réglisse dress

Deer & Doe Réglisse dress

Deer & Doe Réglisse dress

I was a little afraid up until the very end that I wasn’t going to like this dress – the sweet little collar and bow were making me a bit nervous. But I am happy with how it turned out, and I think the solid dark color helps with that! I experimented with tying the neck ties so that it’s more like a necktie, but I actually like it as a bow. I knotted the ends because, I dunno, I like the way it looks haha.

I see that Deer & Doe have updated their pattern to include an option without the bow – which I may try in the future. I’ll have to draft it myself, though, since I have one of the older paper copies, before the rebranding.

Deer & Doe Réglisse dress

I think that’s all for this dress! BTW, as a side note – I have some more workshops coming up! And don’t forget about the OAL, which is kicking off very soon! 😀

Garment Sewing Weekend July 14-16, 2017
Three Little Birds Sewing Co., Hyattsville, MD
Come spend a weekend working through a sewing project of your choosing with meeee as your guide! For 2 glorious days, work on the project of your choice in the Three Little Birds Sewing Co. space. The beauty of this workshop is that each students get to choose their own project. Do you need help with fitting? With construction? Interested in bra making? Perhaps you’ve had your eye on a garment you don’t feel comfortable tackling on your own.  I will guide you through all of these and more!

Jeans Making Sewing Intensive August 11-12, 2017
Workroom Social, Brooklyn, NY
Let me show you how fun and fulfilling it is to make your own jeans! In this class, we will work out way through the Ginger Jeans pattern (my personal favorite!), learning the basics of fitting and construction for making your own jeans. We will also go over all the fun extras that separate jeans from mere pants – topstitching, fancy seam finishes, and installing hardware. Yay!

What are your sewing plans for this summer?

Completed: The Kelly Anorak

14 Feb

Hey guys! Thank you for all your great comments, suggestions, and feedback on my last post! I’m so happy to hear that y’all enjoyed reading it as much as I enjoyed writing it 🙂 With that being said, my stint as a ~travel blogger~ is now officially over (well, until I save up money for my next trip – the verdict is still out on where exactly!) – back to regular sewing posts!

BUT before we get into the project – some class-related stuff!

  • I’ve got two classes at Workroom Social in March that both still have a couple of spots left, if you’ve been on the fence and are looking for a reason to treat yo’self 😉 (it IS Valentine’sDay, after all! ;)) The Jeans Making Intensive is March 2-3, and the always-popular Pants Making Intensive is March 4-5! The jeans class primarily focuses on construction and finishing a pair of jeans (we use the Ginger Jeans pattern – which, btw, I’m wearing in these photos haha), while the pants class has a little more fitting involved and sews a classic pair of trousers. Both are going to be super fun and I am so excited to be back in NYC in a couple of weeks! ♥
  • Speaking of Workroom Social – Camp Workroom Social is coming back, and I’ll be back as an assistant to Amy of Cloth Habit’s Bra Making class! Registration is currently open only to alumni, but will be open to the public soon. I cannot WAIT for another round at camp – last year was freaking amazing (and so, so, so beautiful!) and it will be so fun to reconnect with old friends and make new ones!
  • Finally, speaking of Amy and bras -she’s coming to Nashville to teach a bra making workshop at Craft South! Having worked with her at camp last year, I knew we had to have her at the shop for a workshop – she’s a fantastic teacher and so knowledgeable about bra fit! Amy will be in Nashville September 22-23 to teach her Bra Making Weekend Workshop at Craft South. The class will make Amy’s newest pattern, Harriet, as well as learn basic fitting and finishing methods. Oh, and I’ll be assisting the class 🙂 I know a lot of people have been asking when we’d do a bra workshop in Nashville – so there ya go! You can sign up for the workshop here. It’s gonna be amazing!

Ok, back to sewing!

Kelly Anorak in Organic Cotton Twill from Mood Fabrics

Today’s project is actually last month’s project that I am just now getting around to posting – the Kelly Anorak from Closet Case Patterns!

While I am not typically a fan of “vacation preparation sewing” – mainly in the sense that I get really stressed with those sorts of deadlines and thus sewing doesn’t even up being very fun – I did make this jacket specifically for my trip to Egypt. I thought it would be a useful thing to bring with me – a nice light layer to ward off the morning chill in the desert, yet breathable for when the sun got all crazy in the afternoon. I also liked that it had those big, roomy pockets and was long enough to cover my butt. My orange Minoru fills most of these slots, but I’ve worn it to death over the years and it’s starting to look ratty – plus, that poly lining isn’t exactly the most breathable thing. Also, I just really love sewing jackets. Sue me 😛

Kelly Anorak in Organic Cotton Twill from Mood Fabrics

Kelly Anorak in Organic Cotton Twill from Mood Fabrics

As I said, the Kelly Anorak is a lightweight and unlined jacket – meant to be worn between seasons, not necessarily your crazy winter coat. I’ve seen some people make it out of waterproof fabric, but in my experience I usually carry an umbrella when it rains anyway (and I also own an actual rain jacket – although I still prefer the umbrella, as I don’t like getting my shoes and pants wet!), so this is good enough for a super light drizzle. The pattern features a zippered front with a snap closure placket, a 3 piece hood (which stays on your head much better than the 2 piece kind – it also doesn’t flatten one’s hair as much), big ol’ gusseted pockets, a drawstring waist, and a sleeve placket so you can roll up the sleeves. I actually saw something real similar in JCrew while I was out holiday shopping one afternoon, so I got the added bonus of being able to try the thing on before making it!

The fabric I used for this jacket is an old favorite that’s shown up in tons of my past makes – solid organic cotton twill from Mood Fabrics. The color I used specifically is Olive, and yes, I realize the color on their website photo is way off and no, I don’t know why that is. If you are picky about color, you will definitely want to order a swatch of this stuff. Anyway, I love this fabric because it is easy to work with, has a nice brilliant color, washes/wears well, and is reasonably priced (at least in my opinion!). And it comes in so many colors! Mood pretty much always carries this fabric, FYI, so even if it’s sold out on the website – either hang tight and wait for it to get restocked (I promise it will) or just call the store and have it shipped from there.

Kelly Anorak in Organic Cotton Twill from Mood Fabrics

Kelly Anorak in Organic Cotton Twill from Mood Fabrics

Kelly Anorak in Organic Cotton Twill from Mood Fabrics

Kelly Anorak in Organic Cotton Twill from Mood Fabrics

Most of the little hardware bits and pieces were picked up in the NYC Garment District when I was there in November. I knew I was going to be nitpicky about everything matching just so, so I wanted to check out the goods in person. The drawstring, grommets, cord stoppers, metal tassel ends, and zipper are all from Pacific Trimming (I knowww there are other places in the GD to buy this stuff – and maybe even for cheaper – but I just love Pacific Trimming, esp their zipper room!). The zipper is actually a Riri zipper, cos I wanted that shit to be extra fancy. I think I paid around $20 for just the zipper – so it’s not necessarily cheap at all – but it’s really nice, both in terms of how it looks and how smooth it zips! It was also nice to have it cut to the correct size, and also be able to choose both the finish of the metal teeth and the color of the zipper tape, cos again, I was feeling nitpicky about that shit! 🙂 I knew this jacket was going to be a time commitment to make, and for that reason, I’m ok with spending extra money on nicer materials.

The only notion that I did not buy in NYC was the snaps – I just went to Elizabeth Suzann‘s studio during their lunch break and used their industrial snap setter, ha! That thing is really cool and I kiiind of wish I had one, but honestly I am always looking for an excuse to drop by and chat with my old coworkers so for that reason, I’ll continue mooching off theirs!

Since the jacket is unlined (and, for me, primarily worn wide open), I took extra care to finish all the seams for a neat interior. Most every seam is flat-felled, with the exception of the arm holes (only because I didn’t feel like futzing with that shit. I just serged them). I used two different threads to assemble the jacket – a polyester thread for the seams, and then a cotton thread for all the topstitching. I would have just sewn the entire thing with the poly thread, but the color I had on hand was off enough to where the topstitching didn’t look right – and the only thread I had in a suitable color was cotton. In my experience, cotton thread simply does not hold up as well as polyester thread, which is basically indestructible. Considering all the work that I put into this jacket, I didn’t want my threads to fail! So I just used cotton for topstitching – and used a triple stitch, partially for added durability and also because it results in a more visible stitch.

Kelly Anorak in Organic Cotton Twill from Mood Fabrics

Kelly Anorak in Organic Cotton Twill from Mood Fabrics

I will be completely honest with y’all – I didn’t exactly enjoy the process of sewing this jacket. A big part of the reason was because I was under a pretty tight deadline to finish it before my trip (even though I promised myself it was ok to take the Minoru if I didn’t finish, and that everything would be fine – I still rushed!), but I also found some of the directions to be a bit confusing. The Closet Case Patterns blog has some tutorials on the trickier steps, but some of the information actually contradicts itself in online tutorial vs pattern instructions. The zipper placket specifically was really head-scratching to me, and I had to walk away a few times. There’s a discrepancy with the seam allowances written in the pattern instructions vs the blog tutorial, which I found really confusing. I believe the version on the blog is the correct one, though, if I recall correctly! Another thing that really threw me off was that my zipper pull was on the opposite side of the tape, than what you see on the blog. Finally, I was not a fan of how wide the finished facings are – they are really really wide (too wide, in my opinion). I ended up turning them under additionally and sewing another line to make them more narrow. At the width they were as drafted, I felt like they would just end up flapping around with wear and showing my ugly white interfacing. Nope, not doing that.

Anyway, minor complaints – and may also just be personal, because all the reviews I read just gush about how clear the instructions are. So it could just be me!

As far as sizing and fit, I made a size 2 – which is my normal size for this pattern company. I actually did make a muslin, so I could double check the fit, length, and drawstring placement. The length and drawstring were perfect, and the fit was pretty good. The only thing I changed was the shape of the arm hole – it was a little too big, which made the entire jacket move along with my arms when I lifted them. I raised the bottom by about 1/2″, as well as added to the back of the arm hole, and then took a bit (maybe 3/8″) off the front of the arm hole as it was pulling. This is a pretty standard adjustment that I make to most patterns that involve sleeves. I think I just have really weird-shaped and/or small armscyes haha who knows.

One thing I wish I could have found a way to change was to make the snap on the pocket functional. It’s just there for show and to hold the flap in place – the pocket doesn’t actually snap shut. I considered adding the other side of the snap, but it would have shown on the inside of the jacket (and since you need to interface it, would not have made the inside look as nice). One idea is to interface a scrap of the twill and sew it to where the snap gets inserted, so all you see is a square of twill on the inside. I may do that in the future. It’s not a dealbreaker not being able to snap the pockets closed, but it sure would be handy.

At any rate, this jacket was TOTALLY worth the effort – I think the finished result looks pretty damn good! There’s definitely something to be said about using nice materials, as they really elevate the garment into something that looks extra nice. But I am also really happy with the craftsmanship that went into it – I’m glad I took the time to do the flat-felled seams, rip out mistakes and fix them (even though we all know that shit can be agonizing haha), and even deal with making a muslin first. All totally worth it in the end. And while I made this for Egypt and our upcoming spring weather, it’s actually been handy for the majority of January & what we’ve experienced so far in February. I realize everyone is getting pummeled by snow right now, but y’all, it’s been 70 degrees in Tennessee this past week. I am starting to wonder if we are going to skip winter entirely! I had plans to make an actual winter coat this year, but I may put it on hold until the next cold season because I’m not really feeling super motivated with the weather as it is currently!

Kelly Anorak in Organic Cotton Twill from Mood Fabrics

Kelly Anorak in Organic Cotton Twill from Mood Fabrics

Kelly Anorak in Organic Cotton Twill from Mood Fabrics

Kelly Anorak in Organic Cotton Twill from Mood Fabrics

Kelly Anorak in Organic Cotton Twill from Mood Fabrics

Kelly Anorak in Organic Cotton Twill from Mood Fabrics

Kelly Anorak in Organic Cotton Twill from Mood Fabrics

Kelly Anorak in Organic Cotton Twill from Mood Fabrics

Kelly Anorak in Organic Cotton Twill from Mood Fabrics

Kelly Anorak in Organic Cotton Twill from Mood Fabrics

Kelly Anorak in Organic Cotton Twill from Mood Fabrics

Kelly Anorak in Organic Cotton Twill from Mood Fabrics

Kelly Anorak in Organic Cotton Twill from Mood Fabrics

I used twill tape to finish the neckline (as suggested in the pattern instructions). If I’d thought about it while I was buying my supplies, I would have tried to find a tape that matched my olive fabric. Oh well! For the label, I serged around all 4 sides of a scrap of twill, then sewed my label (which is from Dutch Label Shop) on top of that before attaching it to the jacket. The hanging loop is a small piece of leather that I cut to shape and sewed on by hand.

Kelly Anorak in Organic Cotton Twill from Mood Fabrics

Kelly Anorak in Organic Cotton Twill from Mood Fabrics

Kelly Anorak in Organic Cotton Twill from Mood Fabrics

Whew! Sorry about that photo dump – I guess while I’ve gotten better at editing down and posting less photos of myself, I can’t say the same about detail shots 😉 haha.

I leave you with one last photo of me. Sorry, not sorry:

Kelly Anorak in Organic Cotton Twill from Mood FabricsNote: The fabrics used for this project was provided to me by Mood Fabrics, in exchange for my participation in the Mood Sewing Network.

Save

Completed: Rise Turtleneck

26 Oct

Hello everyone, from the other side! I’m back from my weekend at Camp Workroom Social, which was incredible and full of wonderful friendships with hilarious and awe-inspiring women. I got to room with Devon, who I have missed terribly since she moved away to Atlanta, so it was great to see her again! I had such an amazing weekend, full of awesome memories and SO MANY BOOBS (this is what happens when you assist a bra making class, y’all). Get excited for Amy’s new pattern, btw. Based on what was sewed up in our class, it makes everyone’s boobs happy and beautiful and bouncy.
Anyway, as soon as I got home – I crashed real hard and got real sick. Bummer! I am just really thankful that this didn’t happen while I on either of my trips! I guess my body just needed a serious rest. At some point during my sick week (I’m a huge baby when I get sick, and tend to sleep for a couple days straight until it clears up, no shame), I did something weird to my neck and I guess pinched a nerve… I’ve had a migraine since Friday! Needless to say, I have not felt like doing ANYTHING and have been pretty mopey/miserable since then. I have an appointment with a chiropractor later today – I am literally counting down the hours at this point, it’s that bad – which will hopefully get me fixed up, or at least started down the right path!

So I guess the theme for this post is comfy clothes. Because that’s about all I have been able to handle for the past week… super comfy clothes that double as secret pajamas.

( Also, I took these photos a couple weeks ago, so hold back on your comments of “oh you look nice even when you’re sick!” I wasn’t sick when I took these pictures 😛 haha )

Rise Turtleneck

Rise Turtleneck

It’s still not quite cold here in Nashville… we are in those wonderful in-between days where it’s chilly in the morning, very warm in the afternoon (the high today is 83*, yay!), and only a little chilly in the evening. I haven’t turned my air or heat in weeks… my last electric bill was $60 😛 But I know the cold weather is coming, and I’m trying to prep in advance by filling any major wardrobe holes. I know at least when I get cold, I want to be as comfy as possible, in secret pajamas. I won’t go as far as to leave my house in actual pajamas – it’s just not a thing I do, unless I’m super sick (and even then, I can usually muster up the energy to pull on a pair of ponte leggins and a sweatshirt so I’m not rolling up to the Kroger in my flannel pjs or some shit) – but I am all about wearing clothes that feel comfy like pjs while looking much more pulled-together from an outsider perspective. Stretch fabrics are the key here, y’all. I think we all already know that, but I just said it again anyway.

Rise Turtleneck

Rise Turtleneck

Rise Turtleneck

One thing I was thinking I needed in my closet was a fitted black turtleneck… to wear with high-waisted skirts, jeans, or as an additional layer of warmth. I remember owning a ribbed black turtleneck back in the 90s and wearing the everloving shit out of that thing because it made me feel like I looked sophisticated. I don’t think sophisticated is a word that anyone would ever use to describe my style, but whatever. I can still have these goals.

Anyway, I used the Rise and Fall Turtleneck from Papercut Patterns, which I’ve had my eye on since it was released last year. There are two versions in this pattern – I made the “Rise,” which is more fitted with a mock turtleneck, the sleek look I was going for. I cut an XXS to start, but it was still a bit more loose than what I was envisioning. I kept taking in the side and sleeve seams until it was more fitted, which probably brought it down to – my guess – about an XXXS (if that was even a size option). I think the shoulder seams are still a bit more dropped than what was comfortable, so after I took these photos I ended up taking the sleeves off, cutting back the shoulder, and then reattaching them (sorry, I don’t have any photos of this and I am not able to take any of my sick ass so you can just believe me here, ha). When I make this pattern again, I will double check the shoulder/armscye seams against another pattern that fits me and make adjustments before I cut my fabric. For my on-the-fly alterations, this was fine.

Rise Turtleneck

Rise Turtleneck

I used light rib knit fabric from Organic Cotton Plus for my turtleneck, in a classic black. This stuff is traditionally used to make ribbed cuffs and necklines, but like I said, I wanted a whole 90s-eqsue turtleneck out of that shit. It’s super soft and laundered up beautifully. It did stretch out a bit when I stitched the hem with a twin needle – it actually got really flared and crazy looking, to be honest – so I threw it in the wash and it shrunk up to what you see now. Still a little wavy, but it’s not terrible. I am guessing this particular fabric won’t have a fantastic recovery since it’s 100% cotton – and cotton tends to grow over the course of the day, it needs a little bit of Lycra to snap it back into shape – but it should shrink up after it’s washed. I haven’t had a chance to wear it properly yet as it’s still a bit too hot for full-on neck coverage, but we’ll see how that works out. I may like it a little more loose. Maybe.

Rise Turtleneck + pashmina

Rise Turtleneck + pashmina

Aaaaaand while we’re talking about comfy – I also made a Pashmina! I LOVE Pashminas; they are one of my go-to souvenirs when I’m traveling. Not to mention, they are handy to have while you’re traveling, especially if you’re on a chilly airplane. Wearing it as a regular scarf definitely keeps me warm, but it can also double as a lightweight blanket without actually looking like… well, a blanket (you can also wad it up and use it as a pillow if you’re lucky enough to get the window seat). It’s also a nice alternative to a sweater or cardigan when you’re wearing fancy dress – again, draped over the shoulders like a cape looks really lovely.

Ok, “made” is a very very loose term here 😉 I got 2 yards of wool cashmere Pashmina fabric (also from Organic Cotton Plus) and frayed the edges with a pin. So there’s not really so much making here – I didn’t even sew a thing, the selvedge edges were finished as they were – but not even project needs a mess of sewing to be proud of, you know? At $26 a yard, this fabric is far from cheap – but a total of $46 (and maybe an hour of fraying) but it is organic wool, and certainly less expensive than the questionable-origins Pashminas I see at Nordstrom. So there’s that.

It’s hard to get a good photo of this fabric, but it’s very light and floaty with a loose weave that has a bit of a design in it-

Organic pashmina

Organic pashmina

It’s also pretty translucent. I originally considered using it to make a full-on lined wool skirt, but it’s just too loosely woven and lightweight, like, well, a scarf 😉

Organic pashmina

Here is a close-up of my fraying. I pulled one cross grain thread to make a straight line (same as you’d do when tugging your fabric to be on-grain) and then gently pulled the threads below to make a fringe, using a pin. It probably took about an hour, and wasn’t too bad once I got into the swing of things. I did not secure my fraying with a line of stitching or anything – upon examining all my other scarves, they don’t have any stitching at the end and they have held up fine.

Rise Turtleneck + pashmina

Finally, I should mention – those jeans are secret pajamas too, y’all! They are actually JEGGINGS, made with cotton stretch denim knit, which is like a really awesome ponte that looks like jeans. You can read the post about them here. I’ve worn them steadily for about a year and a half and they’ve held up nicely – washed and worn well, and are still sooo comfy. See! Secret pajamas. These were totally in regular rotation while my dad was in the hospital, btw. I had to wear pants because they keep that ICU freeeeeezing, so it was nice to have something knit that was comfortable enough to wear for hours of sitting. Should you be lucky enough to not have to spend a week in an ICU waiting room, I can also vouch that these pants/this fabric is great for traveling 😉

Speaking of traveling – I have one more workshop (well, two back to back) before I’m done for the year! I’ll be in NYC next weekend for jeans making (which is sold out!) and the ever-popular Weekend Pants Making Intensive (which I think still has a couple of open spots if you’ve been on the fence! TREAT YO SELF), both at Workroom Social! Can’t wait 😀

**Note: The fabrics in this post were provided to me by Organic Cotton Plus, in exchange for a blog post review. All opinions are my own, however, all links to said fabrics *are* affiliate links (which all funds will divert to my Coverstitch Savings Account). The Papercut pattern was purchased with my own dollars, though! ♥
EDIT: I can’t believe I didn’t notice that this is totally a Steve Jobs outfit hahahahaha

Completed: 2 More Scout Tees

8 Aug

Apologies in advance for the big Grainline kick I’ve been on lately. Nothing intentional, no ulterior motives – I am just really loving the patterns these days! Brace yourselves for more where this came from (oh ho ho ho wait till you see my backlog of finished projects), but first – some Scout Tees!

I made 2 Scout Tees, both of which I will be sharing in this post because I think splitting it into separate posts is a bit of an overload – especially since I’ve already made and posted about this pattern twice (see: handwoven cotton and birds). What can I say – I love this pattern and it’s been a hardworking staple in my summer wardrobe this year.

Gauze Scout Tee

First Scout is this one that I made out of a cool (both literally and figuratively) cotton gauze. The best part about this particular project is that the fabric didn’t start out as a yardage – it was actually a scarf! See?:

Gauze Scout Tee

I don’t know the true origins of the scarf; it was given to me by the one guy in my knitting group (btw, every knitting group should have a Token Dude. It really makes you feel like you made it as a knitting group coordinator haha). He was in the process of helping his mother downsize and move, and thus ended up with a big stack of fabrics that needed to be rehomed – most of which ended up in the trunk of my car. This scarf was part of that loot bag. I originally wanted to keep it as a scarf and just wear it like that, cos I looove those gorgeous gauzy scarves and yes I wear them in the summer don’t you dare judge me, but the fact is I never ever come across fabric in this weight/print and I felt like I needed to take advantage of that surprise yardage. Once I realized that I could squeeze a little woven top out of it, my game plan immediately changed.

Since Scout is intended for wovens, it was a good pattern for this project. It’s also fairly small (at least in the size that I cut, which was a 0), doesn’t have a bunch of pieces, and is narrow enough to fit on this scarf. The scarf was also fairly wide – not quite as wide as true fabric yardage, but wide enough to accommodate the pattern pieces on the fold. I had enough length so that I was able to place the print where I wanted it, as well as match it across the seams. I decided the pattern would look best with the paisley design across the hem (which I made sure to account for the hem allowance while cutting), and the white/blue scattered paisleys at the top and on the sleeves. Having a large cutting surface is ideal for this, as I was able to lay everything out and make sure I had enough fabric to match everything before I started cutting.

Gauze Scout Tee

Gauze Scout Tee

Cotton gauze is super lightweight, as well as borderline sheer, so I used French seams throughout for a neat and delicate finish. The hem is 2″ deep, to slightly crop the tee as well as give the bottom some extra weight. The sleeve hems are a simple rolled 1/4″ hem. And I used silk crepe as the neckline bias facing, instead of self-fabric (I don’t even want to think about trying to do a bias facing with this gauze – that shit would have been a nightmare!).

The finished top is definitely a bit see-through if you look very closely, but the busy print helps camouflage things. I also make sure to wear a light or flesh-colored bra underneath (I’m wearing my yellow lace Marlborough in these photos) so there’s not too much of a contrast. The only downside is that the fabric – despite being pre-washed by me, as well as whatever washing it may or may not have gotten in it’s previous life – tends to transfer blue dye on anything it constantly rubs against. Learned this one the hard way after getting home from the flea market last month and discovering that my bra straps were blue, as well as the back side (the part that goes against my body) of my mostly white purse. LAME. Thankfully, most of it washed off with some dish soap and a bit of patient scrubbing. As a side note, if anyone has a good recommendation on how to get a white canvas purse cleaned – yeah, I think I’m gonna need that. I have put that poor Kate Spade through hell and back at this point haha.

All right, second Scout Tee!

Birdy Scout Tee

Recognize this fabric?! I made a fantastic bird dress out of most of it (which is still one of my favorite things I’ve ever made to date, and I still wear it whenever I need to impress someone), but I had about 1 yard left over that I’ve been hoarding ever since, just waiting for the right project. Silk Scout Tee it is, then! And you can go ahead and laugh that I now have 2 bird print Scout Tees. It’s ok, I just really like birds 😛

Birdy Scout Tee

Birdy Scout Tee

As with the gauze Scout, this pattern is really great for letting the fabric take center stage. And same as with the gauze version, it doesn’t require a lot of fabric, so I was able to eek it out of my tiny yardage remains. Notice how completely different the shape is, though, since this georgette has a lot more drape an less body than the gauze. I think both look awesome, but this one is definitely a bit more flattering since it’s not so boxy.

Not much to say about this one that wasn’t already said about the gauze one (and hence why I’m slapping both into one post). It was sewn pretty much the exact same way – French seams, 2″ hem, etc etc. I did use self-fabric as the bias facing for this one, which I’m not entirely happy with how it lays and probably should have used silk or cotton voile instead, but whatever. I just don’t think the georgette behaves as well as a silk crepe would have. Too late now, though, cos I ain’t about to rip it out! It’s fine. IT’S FINE.

I don’t know why I got dressform and flat shots of this one and not the other, but here you go:

Birdy Scout Tee

Birdy Scout Tee

Birdy Scout Tee

Birdy Scout Tee

I’m trying really hard not to get all weird and hoardy with my favorite fabrics, because they don’t do me a lot of good just sitting on the shelf. I want to make them into things that I love so I can wear them and love them every day! It can be a little stressful when it’s fabric you know you can’t get more of in case you done goof it up (this bird stuff sold out REALLY fast!), but I’m working on trusting myself and my best judgement. Again – it’s not doing me any good sitting on the shelf! Gotta take that shit out and actually give it the use and love that it deserves!

Gauze Scout Tee

I think I’m done with Scouts for now, but that doesn’t mean I’m over the woven tshirt! Right after I finished cutting these two, Megan Nielsen released her Sudley pattern, and the blouse is giving me all kinds of heart eyes. I’d love to make a version with the back keyhole!

As a side note – hi, welcome to my living room. I think I like these pictures better than the ones in my sewing room (the only good lighting in my sewing room has some wretched boring background action), although the changing light is a bit of a challenge. I dunno. Taking photos indoors in general is a bit of a challenge, to be honest, but it sure beats standing outside with a tripod while all my neighbors snoop on me through their windows haha (which is what I imagine is happening, and more than likely actually not the case at all).

Completed: Black Twill Rosarí Skirt

23 May

I’m really behind on posting my projects – I finished this skirt almost two months ago, LOL WHOOPS. To add insult, I took these photos around that time as well – and have since changed my hair color :3 (spoiler: it’s still red). But these will do for now! Let’s just appreciate Past Lauren in this post, yeah?

Black Stretch Twill Rosari Skirt

Another Rosarí skirt! How predictable of me. What can I say – when I like a pattern, I like it enough to make it over and over and over until everyone gets sick of it (everyone except meeeee, that is). This is my second version (you can see my first version in mustard corduroy here), and I’ll just go ahead and admit that there is a third version that’s currently waiting to be posted. Don’t look at me like that. I wanted to try all the views offered in the pattern. ha!

Black Stretch Twill Rosari Skirt

This version is the same size as my previous – 34 – with the D pockets. I am not normally drawn to things like pockets with exposed zippers, but I saw a really cool version during my daily Instagram lurking and that shit immediately moved to the top of my sewing queue. Made in black fabric (which, honestly, a black summer-weight skirt is missing from my wardrobe. Well, not anymore!) with matching snaps down the front, it kind of has a cool rocker vibe… as long as you don’t look at the person wearing it :B

Black Stretch Twill Rosari Skirt

Black Stretch Twill Rosari Skirt

I found the fabric while I was in NYC at Mood Fabrics. It is a bottom weight black cotton twill with a really generous stretch. I actually bought a lot of twill while I was there because I’ve found that I don’t like ordering stretch fabrics (for bottoms, anyway) online. I find it really unpredictable in terms with what I end up receiving (I like my pants fabric to have a LOT of stretch), and nine times out of ten I can’t be arsed to wait on a swatch and/or that shit sells out way too fast. My new strategy is to wait until I get into the Garment District (which at this point has morphed into twice a year, yay) and then just stock up my suitcases. And then fly Southwest cos, 2 free checked bags woohoo.

ANYWAY, I am all about this stretch twill! It’s nice and heavy and it has enough stretch so that the skirt can be fitted but still super comfortable. The only downside is that is shows cat hair REAL fucking bad. I think that tends to be the case with all black fabrics, but this one seems to have a special cat hair magnet. I am not the kind of person who stresses over lint and cat hair, but I actually bought a lint remover specifically for this skirt. It is that bad. And, yet, there is still fuzz all over the skirt in these photos. Oh well.

Black Stretch Twill Rosari Skirt

Black Stretch Twill Rosari Skirt

I kept the style of the skirt fairly simple because I wanted the focus to be on those pockets! The zippers are from Sil Thread in NYC, which is my favorite place to buy zippers… they cost around $1 each (more or less, depending on length) and come in a nice range of colors and metal finishes. They didn’t have quite the right length, so I just shortened them at the bottom (basically catching the zipper teeth in my topstitching and *then* cutting the excess of). Even with shortening the zipper, doing that exposed zipper pocket thing was super easy. The pocketing is used to make a facing for the cutout, and then you just slap in the zipper and topstitch it down.

Black Stretch Twill Rosari Skirt

Black Stretch Twill Rosari Skirt

Black Stretch Twill Rosari Skirt

Same as with my corduroy version, I used a professional snap setter (courtesy of Elizabeth Suzann studios) to set the snaps down the center front. I’ve used the Dritz kits before (both the hand held one that looks like a hold punch and also the little metal thing you use with a hammer) and they work ok for what they are. That being said, I have access to one of those honkin’ big cast iron ones that they use in factories, so obviously I am gonna take advantage of that haha.

The only downside to these big industrial snap setters is that they mean BUSINESS. As in, you better be real sure of your placement because that shit ain’t going nowhere once it’s set. My coworkers warned me of this, and I smugly went ahead and set the first snap at the waistband… upside down. Whoops. Thankfully, I was able to pry it out with the help of a flathead screwdriver and seam ripper, but believe me when I say that I was really sweating for a minute there.

Black Stretch Twill Rosari Skirt

Oh hey, I didn’t even show y’all the cool POCKET LINING!

Black Stretch Twill Rosari Skirt

This lil’ piece of awesome is also from Mood Fabrics – you can find it here. It’s labeled a stretch twill, so I bought a yard of it last year to make some cRaZy shorts. Unfortunately, I wasn’t thrilled with the weight (it’s a bit on the light side) and the fact that it was printed off grain and thus hard to match the print. I gave up and stashed it, and have only now found a use for it. It makes REALLY FUN pocket lining! And since it’s stretch, it stretches with the outer fabric. I thought I would be real clever and sew it wrong side facing out, so that the inside of my skirt looked super fun. The only downside is that now the inside of my pockets don’t look super fun… they’re just kind of, fabric wrong side white. Oh well. It’s not like I walk around with my pocket zippers flapping open.

If you can see in the picture, I also used the same fabric to make a bound edge for the waistband facing. I really love the way that looks, and it’s so much easier than trying to fold up the seam allowance of the facing and get everything all even when you topstitch it down.

Black Stretch Twill Rosari Skirt

I guess that’s about all the Rosarí chat I have in me today! How about those zippered pockets, tho? 😉

Completed: The Shutters & Shuttles Sway Dress (+ a Giveaway!!)

14 Dec

I’m so excited to finally be able to share this project with y’all!

Shutters & Shuttles Sway Dress - front

Over the summer, I’ve been in cahoots with Allison of Shutters & Shuttles to collaborate a fabric + dress design. She reached out to me after I made my Scout Tee using some of her fabric, and we thought it would be fun to match up a custom fabric with a pattern, as well as having a little giveaway too!

If you’re not familiar with Shuttles & Shuttles, they are a small company that produces handwoven and hand-dyed fabric, made entirely in Nashville, TN. Allison produces all the fabric herself using a 60″ AVL mechanical dobby loom, and makes all sorts of fabric goods – from rugs, to blankets, to yardage (some of which is produced into small batches of ready-to-wear clothing). Some of her fabrics appear in limited-edition Elizabeth Suzann collections, which is how I came to be familiar with the line (and spoiled rotten by getting to sew them!). Suffice to say, I’m a big fan of Shutters & Shuttles and I just love everything that comes out of Allison’s studio. It’s a bonus to be able to say that I literally know who made my fabric 🙂 So obviously I am pretty excited about this collaboration!

Shutters & Shuttles Sway Dress - front

The awesome part about working with a fabric designer is that you actually get to design the fabric. What a novel idea, amirite?! 😉 Allison has a swatch book showing all the designs and colors that she’s made – everything from intricate designs woven into the fabric, to a simple weave with a beautiful hand-dyed watercolor effect. You know how the first time you went into a fabric store, you were likely overwhelmed from all the sheer possibility staring at you from every direction? Well, I kind of had the same feeling – except multiplied! It was REALLY hard to choose a design; I wanted one of everything all at once! Ultimately, though, I knew this piece was pretty special and I wanted to do my garment the justice of allowing it to be worn frequently. We ended up with a fairly simple design, which I just think is absolutely gorgeous. A medium weight cotton yarn, dyed a deep rich navy blue, woven with a heavy slubbed texture. The fabric has a lot of dimension and texture, and the color is a perfect backdrop to show that off. It’s a warm, heavy fabric – it feels like I’m wearing a blanket. Sooo, obviously I made a blanket dress. Yes!

Shutters & Shuttles Sway Dress - side

Shutters & Shuttles Sway Dress - side

Wanting to stick with something tried and true (like, this NOT the project to allow for any mishaps!), I made another Papercut Patterns Sway dress. Yep – my second navy Sway dress in 2015. Hey, what can I say – at least I’m predictable 😉 This is definitely a winter-weight dress, as the fabric is so robust and heavy. It’s a great match for this pattern, as it hangs and drapes beautifully into an exaggerated tent shape. Since the pattern design is so simple, it really gives the fabric a chance to take center stage. BUT, since the fabric is also (relatively) simple, this is a good staple dress that can be worn different ways, like a good pair of jeans. It looks great with a collared shirt, with a simple long sleeved shirt, or with a turtleneck. I’m wearing it here with my grey wool Renfrew cowl, which I really love! Super cozy, y’all!

Shutters & Shuttles Sway Dress - pockets

This being a really simple dress that I’ve already made before, there’s not much new to talk about construction-wise. I serged all my seams independently, then pressed them open and catch-stitched each side down to keep them flat. That alone was the bulk of the time it took to make this – that’s a lot of hand-sewing! I also slip-stitched the hem for an invisible finish, and WHEW THAT TOOK FOREVER. Totally worth it for the finished effect, though. Since the fabric is really heavy and thus puts a lot of strain on the shoulders, I used a heavier fabric for the front and back facings, as well as interfaced them (using self-fabric would have been way too thick). Actually, the fabric I used is the same linen that I made my first Sway dress with – ha! It was a good color match 😉 I also made sure to add pockets – also out of the linen!

Fit-wise, the only change I made was to raise the armholes by about 1/2″ as I felt like they were too low on my first dress. This being a winter dress, I will likely always wear it with a top underneath – so low armholes aren’t much of a problem, but I’m glad I raised them anyway!

Shutters & Shuttles Sway Dress - back

As with my first Sway, this dress is designed to be worn forwards or backwards. I really like it with the v at the back, but wearing it with the v in the front + a vneck tshirt – that’s a nice look, too! The only issue this poses is when it comes to hemming – it’s hard to get a perfectly even hem all the way around, because once you flip the dress around, protruding boobs hike the hemline up a little! I straightened things out as best I could, but I’ve also come to terms with the fact that the hem will never be 100% perfectly even. Oh, who am I kidding – my hems are never even. WHATEVER.

Shutters & Shuttles Sway Dress - front

Shutters & Shuttles Sway Dress - back

Shutters & Shuttles Sway Dress - neckline

Working with this fabric was SUCH a joy! It’s so easy to cut and handle, and the cotton content means that it takes pressing like a champion. I do recommend catching down all your seam allowances, as it helps keep things nice and flat so you get a good sharp press on the outside. One thing that Allison and I discussed was whether or not this fabric is suitable to sew if you don’t have a serger for finishing the raw edges. Obviously, serging would be first choice – the fabric is prone to fraying, so serging that eliminates the possibility of unraveling and blends is really nicely with the fabric texture. That being said, the fraying isn’t super terrible – the fabric is a tight weave, so it hold it’s own pretty well. I do think finishing your raw edges is pretty important, but even just a simple pass with a zigzag stitch would work fine. Something gorgeous like a bound or Hong Kong seam finish would be perfect, although I didn’t take that extra step personally (I did consider it! But only consider it, ha!). For places that I didn’t serge – such as inside the all-in-one facing – I shortened my stitch length a couple mm’s to give the seam a little more strength.

All that being said, don’t let a lack of overlocker deter you from using this fabric! It’s a lot more durable than you think, like, it’s not going to completely unravel itself just from you looking at it. This isn’t some crazy bouclé, after all 😉 haha!

Shutters & Shuttles Sway Dress - inside

Shutters & Shuttles Sway Dress - fabric close up<

Here’s a close-up of the fabric’s color and texture. Isn’t it delicious?!

Oh! As a fun little bonus, when I came to pick up my fabric – there was this cool white border print taking up about the first 1/2 yard or so. Allison said she’d tied the navy threads onto the white that was already on the loom to start off (forgive me if I’m totally butchering this explanation – I’ve never woven fabric before!), and played around with a fun design before the white ran out and went into solid navy. She offered to cut it off, but I wanted to try to use it because it is SO cool looking! There wasn’t a lot of the design to play with – it’s about half a yard, going along the width of the fabric. I was able to eek out a simple scarf, though:

Shutters & Shuttles Scarf

aka A BLANKET FOR MY NECK.

Shutters & Shuttles Scarf

I really wanted to wear the two pieces together, but I have spared you.

Shutters & Shuttles Scarf

I really agonized over how to finish the raw edges of this scarf. The short edges are selvedge, so they are fine as-is. I thought about doing a rolled hem, but I realized that the fabric is so textured and cushy, it actually hides serging really well. Look at the blue edge – can you see the serging? Just barely! So yeah, I just serged my edges and called it a day! Insta-scarf!

Shutters & Shuttles Sway Dress - front

Ok, I think you guys have put up with my blabber long enough for one post – let me blab about this giveaway now! Allison wove some extra yardage of this lovely blue cotton, which means that one of you get a piece! Yay!

GIVEAWAY IS NOW CLOSED

The giveaway is for a piece of plain weave, hand-dyed, hand-woven blue cotton fabric from Shutters & Shuttles and made in Nashville, TN. The fabric is approximately 60″ wide, and you get 1.5 yards – which is plenty to do something fun with! Oh, and it’s pre-washed! (although you may want to wash it separately by itself the first few times, in case the dye decides to bleed) Wanna throw your name in the bucket? Just leave a comment on this post and tell me what you would make if you won the fabric! This is an awesome, warm, heavy cotton fabric that would do well for something like my Sway dress- it would also make a lovely circle skirt, or even a REALLY comfy pair of loose pants! Or maybe you want to be boring and make a bunch of scarves? 🙂 I won’t judge you! (note, the cool white border won’t come on your piece. That was a one-off that I selfishly kept for myself, not even gonna apologize for that!)

The giveaway is open WORLDWIDE and I will close the comments one week from today, on December 21, 2015 at 7:00 AM CST. In the meantime, you should check out the Shutters & Shuttles site, including all the inspirational things in the shop. Oh! Speaking of which – if you want to buy something, use the code LLADBIRD for a 15% discount – good through 12/25/15 (meaning, you can still totally buy yourself a great Christmas gift 😉 Including this exact yardage, YAY!).

GIVEAWAY IS NOW CLOSED

Shutters & Shuttles Sway Dress

MASSIVE thanks to Allison + Shutters & Shuttles for doing this collaboration with me, because this fabric is fucking awesome!! Now, which one of y’all is gonna be my fabric twinsie? 🙂 Good luck!!!