Tag Archives: Thurlow Sewalong

Thurlow Sew-Along: My Completed Thurlows!

12 Nov

Also known as “The Brown Old Man Pants I’ve Been Pining Over For The Past 10 Years” – here they are! The end result of the Thurlow Sew-Along 🙂

CIMG0081
I probably could have done a better job of getting those creases down the front leg centered better, but… nope. Idgaf right now.

CIMG0110
Shit, I forgot to tell you guys that I cut my hair!

CIMG0106
Well… I did. I should have whipped out my measuring tape & gotten a proper inch length, but we ended up cutting off something in the realm of 8″. 8″! That’s like a perfect… Jimmy John’s sub.

CIMG0119
Anyway, I’m pretty thrilled with how these fit. Just the way I like it!

CIMG0125
A good rear-view is always important.

CIMG0120
Bonus: They go perfectly with my Mustard sweater! Like a match made in Heaven or some shit.

For those of you who sewed along and have pants or almost-pants – link share, please! We all want to see (but especially me, because I am nosy as hell).

For those of you who hate pants and sew-alongs (and fun, I guess) – sorry for not being sorry! I’m back to regularly not-scheduled posting this week, though 🙂

For those of you lurking on the sidelines – just do it! Take the plunge!
Muslin Fitting
Choosing a Fabric
Adjusting the Back Pockets
Sewing the Front Pockets
Welt Pockets
Sewing the Fly Zipper
Attaching the Waistband
Belt Loops and Finishing

b1
See? Even Amelia approves.

CIMG0101
FUCK IT ALL, I LOVE THESE PANTS.

BYE.

Thurlow Sew-Along: Belt Loops & Finishing

9 Nov

This is the last post in our sew-along, folks. We are about to finish up these bad boys once and for all!


Today we will be sewing steps 20-22 – making and attaching the belt loops, adding a button and hook and eye, and hemming the pants. That’s it! That’s all that’s left!

b2
Belt loops first! If you don’t want to add belt loops to your pants, that’s fine – you can skip this part and scroll down. If you are adding belt loops, I hope you can see this picture. It should enlarge through Flickr if you are having trouble.
Finish one long edge of the belt loop piece – preferably with something that won’t add much bulk, as this fabric will be triple folded onto itself. Mine is serged. Fold the piece into thirds – start by folding the unfinished long edge about 5/8″, press, then fold the finished edge over that, and press again. Topstitch on either side of the folded piece, making sure to catch all layers through both rows of stitching.

b3
Cut the belt loops into 6 equal pieces. The instructions call for 4 1/2″ length, but I find that to be a bit too long for the width of the waistband, so mine are 3 1/4″.

b5
This step is totally optional, but I like to finish the raw edges of my belt loops so they don’t unravel over time. If you have a serger, just shove them under the presser foot one after the other and serge in one long line. If you don’t have a serger, you can zig-zag with your sewing machine. Repeat on the other side.

b6
You will end up with something like this.

b7
Then cut all the little pieces apart.
Again, this step is optional. If you don’t finish the edges of your belt loops, I’m pretty sure the sewing police won’t arrest you for fraud or anything :B

b8
Take your first belt loop and fold one end back about 1/2″ or so (however little you can get away with, due to the bulk). If your belt loops are closer to 4″, you may need to fold more back.

b9
Pin the belt loop to the pants waistband, right along the top edge. The belt loops are centered over the back darts, side seams, and front pockets. The diagram in the pattern is very helpful if you need more placement guidance.

b10
Fold the bottom of the belt loop back approximately the same amount as the top (in my case, 1/2″) and pin along the bottom of the waistband.

b11
The belt loops are not intended to lay perfectly flat along the waistband – there should be a little bit of room. You know, so you can fit a belt in there 🙂

b12
Continue all the way around the waistband until all the belt loops are pinned down.

b13
To sew them down, stitch as close as possible to the top edge of the waistband. I like to go over this stitching line a few times – forward, backward, forward again, and then a small back stitch to secure. Don’t want those belt loops going anywhere!

b14
Sew the bottom of the loops down in the same manner, getting as close to the seam as possible.

b15
Here is what my sewn on belt loops are looking like. Shnazzy!

b16
All belt loops should be sewn on at this point.

The next step is hemming, but I like to save that for last and I find the fit of my pants is slightly affected without a proper closure at the top. So I’m going to skip 21 and jump straight to step 22.

b17
Button hole goes on the left front – it should be placed right at the edge before the triangle point starts.
Sew your button on the inside of the right front, being careful not to stitch on the outside of the pants.

b18
Hook goes on the right front – butt it as close to the edge as you possibly can, without it actually showing from the outside. I like to sew mine on using a blanket stitch, as it tends to be a bit more secure.
To locate the exact placement of the eye, zip the zipper closed and rub the edge of the hook (where the eye would sit if it was closed) with a soft piece of chalk until it is coated in powder.

b19
Close your pants up and press firmly over the hook.

b20
When you open them again, there should be a little chalk print where the hook was.

b21
Sew your eye right over it! EASY.

You can go ahead and hem your pants at this point. The pattern allows for a 1 3/4″ seam allowance, which can either be turned and topstitched or hemmed invisibly with a slip stitch. Tasia has a great tutorial on invisible hemming with seam binding – hers is shown on a dress, but it would work just as well with pants.

And that wraps it up for the sew along! If you’re still catching up or have only been watching from the sidelines, don’t worry – these posts will be here indefinitely, as long as you need them. If you have any questions that were not covered, I’m always happy to answer via comments and/or emails. Hopefully these pictures & word vomit made you feel much more confident about tackling pants. Because, dude, pants are awesome. Especially when they have cowboys inside them 🙂

I’ll post a reveal of my finished pair on Monday. PANTSSSSS.

(thanks, Andi, for reminding me that this exists!!)

Thurlow Sew-Along: Attaching the Waistband

7 Nov

Holy shit, do y’all even realize what is going on today.


FINAL COUNTDOWN PANTS PARTY TIME.

Ha! But in all seriousness… we’re just a few steps away from being finished! Let’s get excited, yeah? 🙂


Today we are attaching the waistband, steps 15-19. You should have a semi-finished pair of pants at this point, all major seams sewn except the back extension. We will get to that today!

wb1
You should have two waistband pieces – a right side (with one square end) and a left side (with one pointed end) – cut in both your regular fabric and your lining fabric, and one set should be interfaced (I opted to interface the side with my fashion fabric, as it needed a bit more structure. Do what works best with your particular fabric, though!). Stack both left pieces together and both right pieces together, and sew along the top edge – the un-notched, concave curve – and the center front (the aforementioned square/pointed ends).

wb2
Trim, grade, and understitch the seam allowance.

wb3
You won’t be able to understitch all the way into the center front sections – that’s ok! Just understitch as far as you can 🙂

wb4
Open up your waistband pieces, and start pinning the main fabric side to the top of your pants, right sides together. Don’t worry about the lining at this point. Go all the way around, center front to center back (and yep, back extension is still open. We’re getting there!). Sew this seam.

wb5
Trim your seam allowances.

wb6
And press everything up toward the waistband.

wb7
Now for that pesky back extension! See my pretty, bright pattern markings? We are going to sew right over that. Pin along the marked line, all the way up through the waistband. I know, the marking doesn’t extend that far but do the best you can. The instructions indicate that you should baste first, check the fit, and then sew your permanent seam. However, if you already made a muslin, you don’t need to worry about basting first – unless you really want to fine-tune the fit. Personally, I always baste first. Even after multiple muslins 🙂
Be very careful to ensure that all your seams are aligned when you sew up the center back seam! If one side of your waistband is wider than the other, it will result in one side that has a little peek of lining popping out. So double-check before and after you sew!

wb8
Press open the center back extension. Those giant seam allowances are supposed to hang around – later, you can adjust the waist of your pants, making it bigger or smaller as needed 🙂

Sooo… pinning the waistband. Fair warning: this part is a bit fiddly and you will probably end up hating me for making you slog through it. I know, it sucks! But it’s better than unpicking a bunch of stitches, or having a janky looking waistband. Spend a little extra time up front making sure everything is lined up, and it will save you hours of banging your head against the wall when you realize that your third waistband attempt looks even worse than the first one.

wb9
Start with your lining all spread out and hogging the spotlight inside your pants.

wb10
Fold the lining under to the inside until the fold is covering the stitching underneath by about 1/8″-1/4″.

wb11
Now flip the waistband over and pin through the front, right in the middle of the ditch between your pants and your waistband.

wb12
When you flip the waistband back over to the lining side, the pin should just be catching the lining. The fold underneath the pin should be no more than 1/4″ – anything more than that will just look sloppy.

wb14
Repeat all the way around the pants, skipping the 3″ or so section of lining that covers the back extension. We aren’t going to stitch that part down, so just leave it open.

wb13
STOP PRESS. Are those chickens?? SHUT THE FUCK UP.

ahem.

wb15
With your sewing machine, stitch all the way around the lining, exactly in the little waistband/pants ditch that you pinned into. This is called stitching in the ditch. Yes, I know. It’s so clever.
Again, don’t worry about the section with the back extension is. Just skip over it and continue stitching in the ditch.

wb16
Afterwards, you can tack down the lining over the extension. The instructions call for just a few stitches worth of tacks, but I like to slipstitch mine down all the way so I know it’s not going anywhere. And also, I used yellow thread, because yellow is delightful.

wb17
Give the waistband a good steam press, both inside and out.

That’s all! That wasn’t so hard, huh? 🙂
Expect a wrap-up post in a couple of days – belt loops, buttons, and hemming. And then PANTS PARTY 2012, YO.

Thurlow Sew-Along: Sewing the Fly Zipper

5 Nov


Today, we are inserting the zipper into our pants and making the fanciest of flys – with a facing and a fly extension! FANCY Y’ALL. This is my personal favorite part of the pants-process – when they actually turn into pants, and not just 4 giant pieces of fabric flapping around the sewing room 🙂

We will be sewing steps 9-13. I know it sounds like a lot of ground to cover, but this should actually go a bit faster than the welt pockets – plus, you only have to sew one zipper, not two!

Here is your background music for this task. It seems fitting, although I’m guessing Danzig’s fly isn’t exactly the same fly we are dealing with today 😛

Steps 7-8 should already be completed at this point, FYI!

f1
Take your interfaced fly facing (piece 11) and finish the curved edge.
Sidenote: The pattern placement wasn’t intentional when I cut this piece out, but HAHAHAHA dude is totally going to be lurking the inside of my pants!

f2
Sew the facing to the right front, right sides together, stopping at the notch.

f3
Trim & grade the seam allowances, understitch, and press the facing to the wrong side.

f4
Get your fly extension (piece 10) and fold in half along the fold line, right sides together, and sew along the bottom. Trim seam allowances, turn right side out and press. Sew and finish the long side.

f5
Place your zipper over the long finished edge of the fly extension, face up, with the zipper stop matching the notch. Sew. If your zipper is longer than 4″ (and really – where the hell does one find a 4″ zipper?), go ahead and match up the end with the notch and let the zipper excess hang off the top. We’ll cut it off when we get to the waistband attachment.
Sorry that the left side of my zipper tape looks all chewed up, it is. We got in a fight.

f6
Sew the zipper to the left pants front, face down, stopping at the notch. You can sew directly over your previous stitching line, to make things a little easier!

f7
Turn the facing to the back and edgestitch close to the zipper teeth.

f8
Now this might be a little hard to see, so bear with me here! Zip the whole thing closed, and then pull your right front over to the left from until the fly facing seamline is matched up with the second notch on the left front. At this point, I like to pin the whole thing closed so it doesn’t try to get sneaky when I push everything under the sewing machine.

f9
Flip your pants over; the right (un-attached) side of the zipper should be lined up with the fly facing. Pin the two of them together as shown, being careful not to catch anything else in your pins – no pants front, no fly extension. Just the facing and the zipper tape! As you can see, the zipper tape won’t go all the way to the edge – that’s ok! It’ll end up somewhere in the middle.

Go ahead and sew the zipper tape to the fly facing, using two lines of stitching.

f10
Flip the pants back over – it’s time to draw the stitching line for your fly! Yeeeeahh!!
Keeping the pants pinned close, locate the zipper stop and mark it (I used a pin, but you can also use chalk or whatev). This isn’t totally necessary, but you do want to be careful that you don’t try to sew through the stop – it could break a needle (“Wah” you say) or throw off the timing of your machine (“FUCK” you say). So watch out!

f11
I like to start at the top and work my way down when marking my fly line (I know Tasia’s is the opposite, so do whatever you want, yo!). Measure 1.5″ from the center in a straight line, curving the line as you reach your marking for the zipper stop. Bring the line under the zipper stop to ensure that you don’t sew over it.

f12
Here is my fly all marked up.
Don’t you love my BRIGHT ASS NEON YELLOW marking!? Liz sent me a couple pieces of this marking wax and a brand new box of hook&eyes, after I lameted about accidentally throwing mine away right after I bought them in Chicago. It was completely unexpected and totally amazing of her to do, but what else do you expect from someone who brings macarons to a sewing meet-up? 🙂 Thank you again, Liz!

ANYWAY, topstitch right over your markings, directly through the pants front and fly facing. Leave the fly extension out of this – you do want the zipper to actually work, no? 🙂

f13
Since the poor extension feels lonely, give her a couple of tacks to the facing so they can still hang out. You can do this by hand, or the lazy way like me – with a tiny zigzag on your machine 🙂 This picture was surprisingly hard to take; look at the diagram in the instructions if you need more elaboration on where to stitch.

f14
And that’s it! You should have a beautiful fly zipper, with a gorgeous fly facing and an outstanding fly extension.

f15
Doesn’t that look professional as fuck?

Go ahead and sew up your side seams as indicated in step 14. We only have a few more steps left!

Thurlow Sew-Along: Welt Pockets

2 Nov

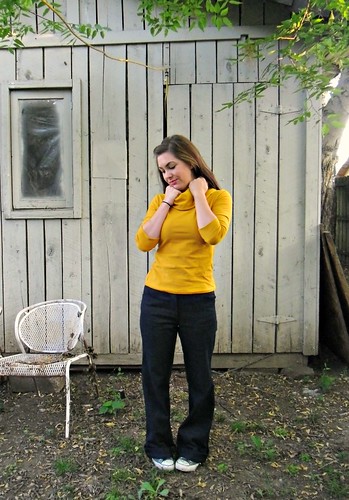
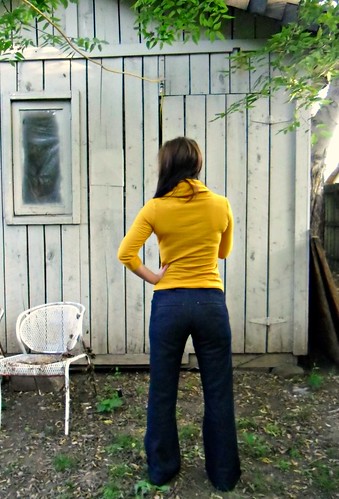
Moving on to the next part of our sew-along – the Dreaded Double-Welt Pockets

\
AHHHHHHHHHHH!!!

I will admit, this part gave me some serious hair-pulling when I first attempted it because the instructions run on the sparse side. Don’t worry, though – I took LOTS of pictures and even ran a few through my beloved Microsoft Paint, so hopefully y’alls first attempts will be a much smoother process 🙂 The procedure itself it fairly simple, it’s just very precise. If the idea of welts is still terrifying – make a test welt pocket on some of your leftover scraps! No shame!!


Today we will be sewing steps 4-6.

Before you do ANYTHING with these pieces, take a moment to ensure that you have transferred all your pattern markings and notches to the fabric pieces. Like I said, welts are very precise, so the markings for this step are pretty critical. With that being said, the slash lines for the welt pocket should be transferred to the right side of your pieces; everything else should go on the wrong side.

If you have not already done so, go ahead and sew up your back darts and press them toward the center back (or, as Tasia writes: “centre.” Ehhheheehehe how cute, I wish I was Canadian sometimes lol)

WP2
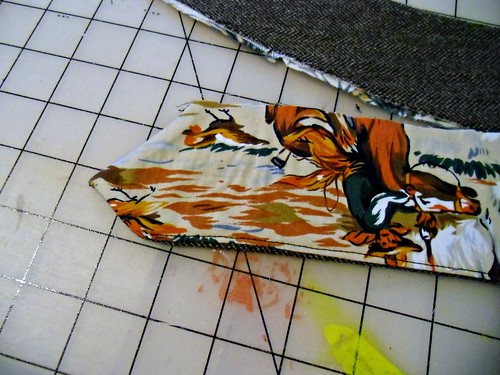
Take your back pocket facing (piece 13) and finish the long edges with your preferred method of seam finishing.

WP3
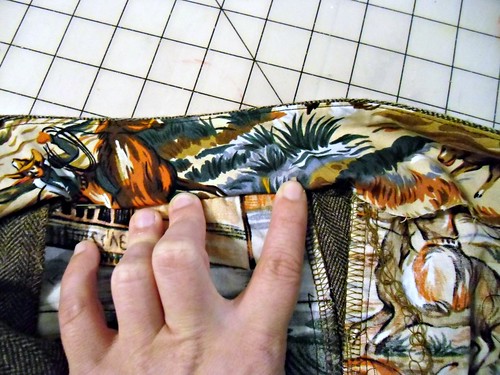
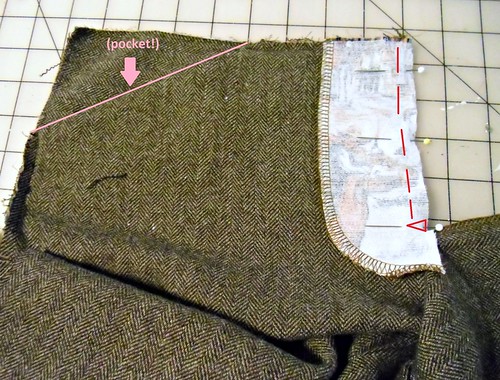
Place the facing on the back pocket lining (14), both with right sides up, matching the notches. It took me a bit of head-scratching to figure this part out – see how the notches aren’t exactly centered on the sides of the facing, but rather creep up in one direction? The notches should be closest to the top of the lining (the end with the single notch). It’s hard to explain this without the ability to flail my arms around, so hopefully this picture makes a bit of sense!
You are going to edgestitch this piece down, in the same manner that you edgestitched the front pocket facings. Again, this piece’s job is to act as a little curtain for your welt pocket windows.

WP4
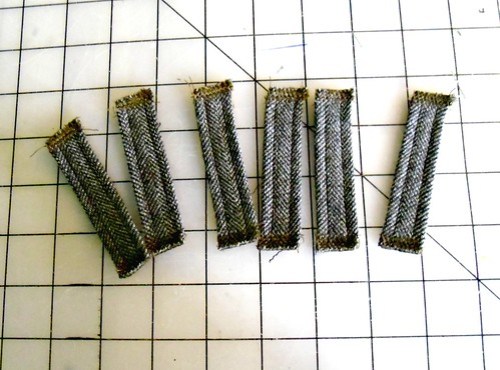
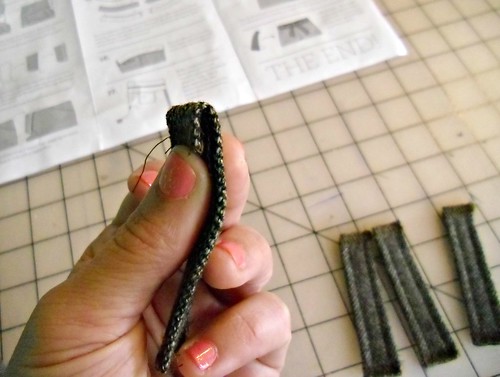
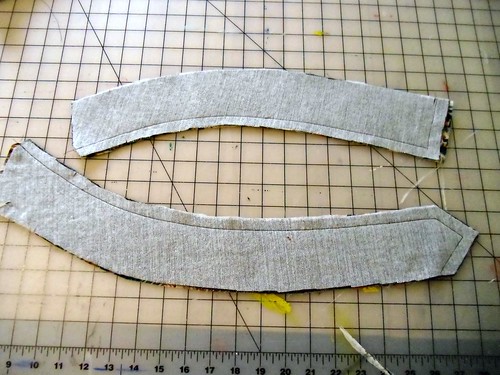
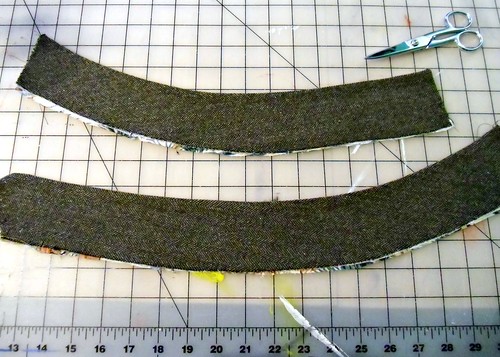
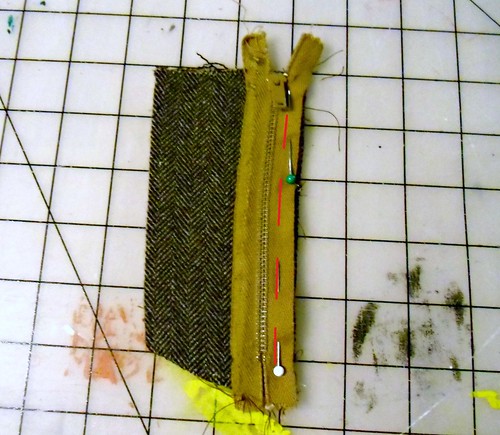
Speaking of welts… take your interfaced welt pieces and fold them in half, wrong sides together. Press and baste the long edges closed.

IT IS TIME.

WP5
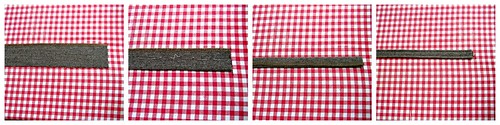
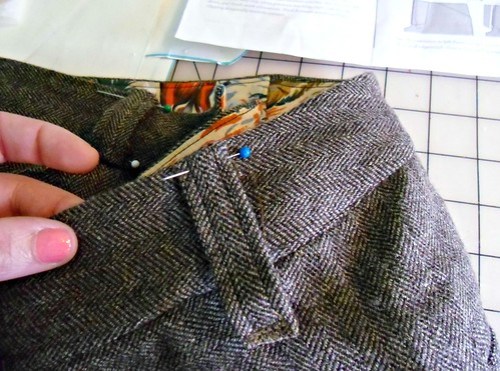
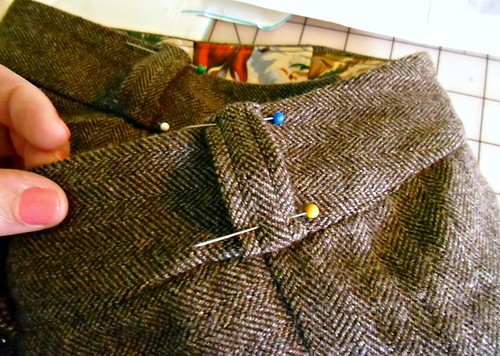
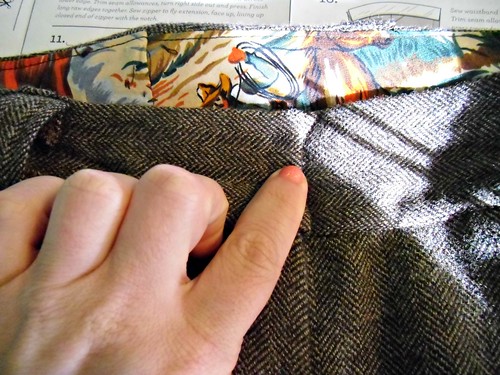
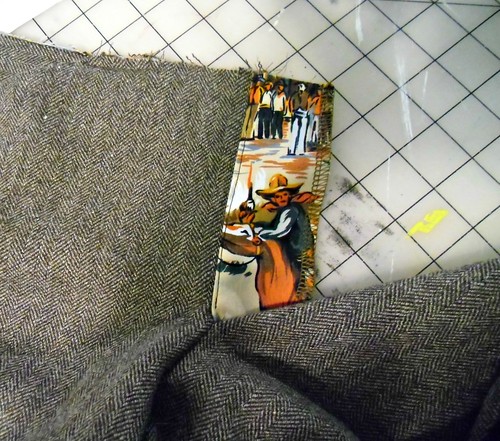
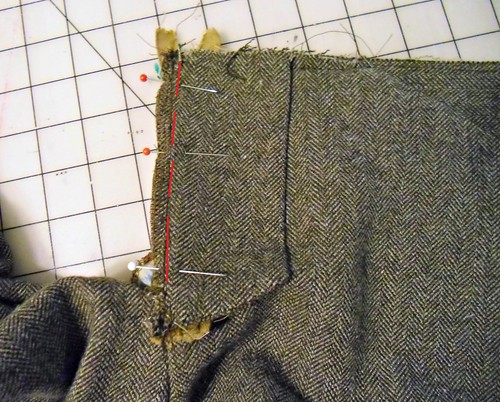
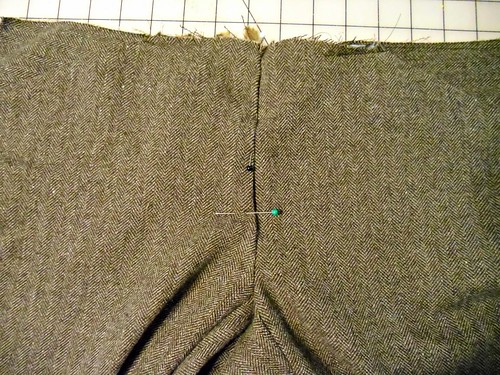
The welts start out on the right side of your back trouser pieces (so yeah, I sure hope you transferred that marking to the right side!). The welt gets placed along the pocket line, with the raw (ie, non-folded) edge just exactly butting up against it.

WP6
Here it is with both welts pinned down. I highlighted my pocket line in pink so you can see exactly where it is.

WP7
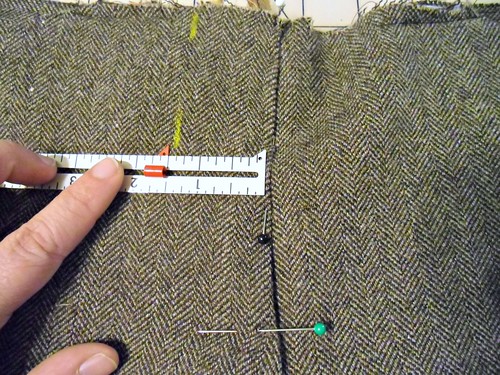
There should be a notch at either end of both welt pieces. These indicate where you will start and stop stitching.

WP8
Stitch down the center(e) of each welt, starting at one notch and ending at the second. Don’t forget to backstitch!

WP9
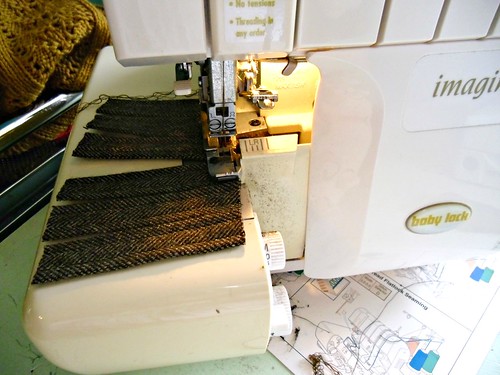
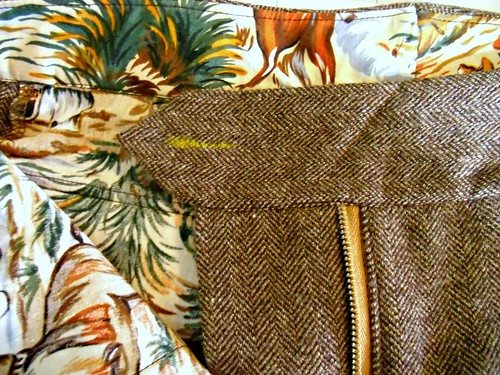
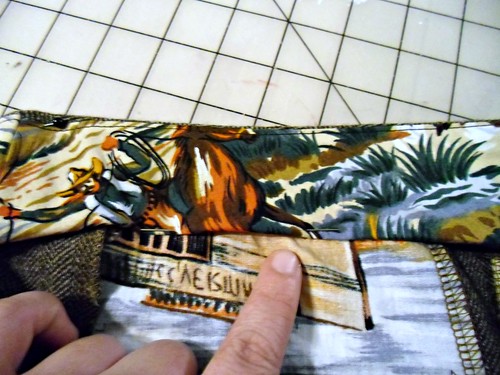
Grab your pocket lining, and place it face down, upside-down over the bottom welt, matching the raw edges. Sew the lining to the welt only, being careful not to catch the pants back in your stitches.

WP10
Finish the raw edge.

WP11
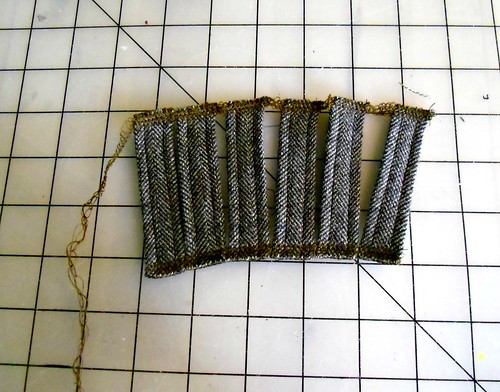
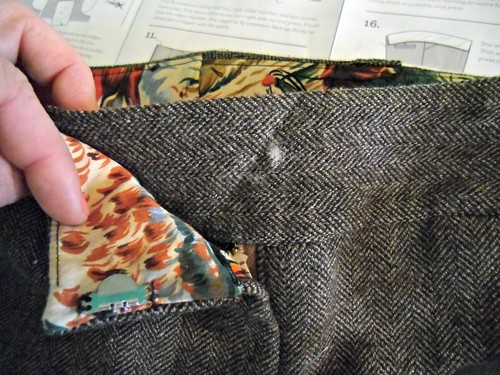
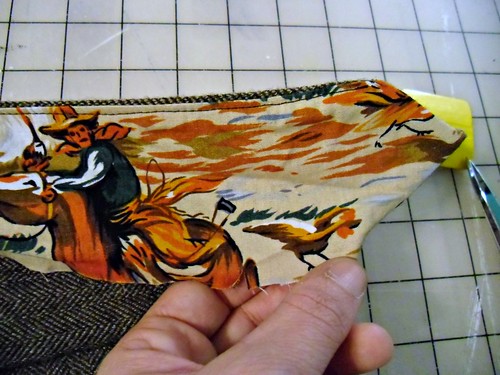
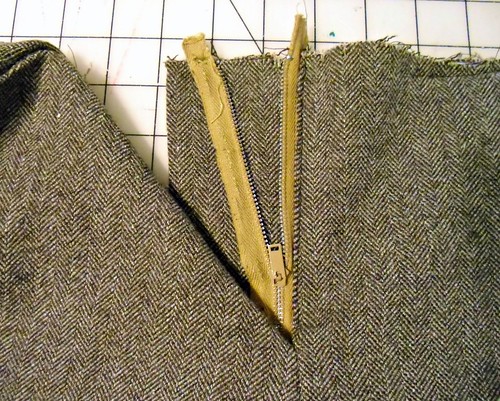
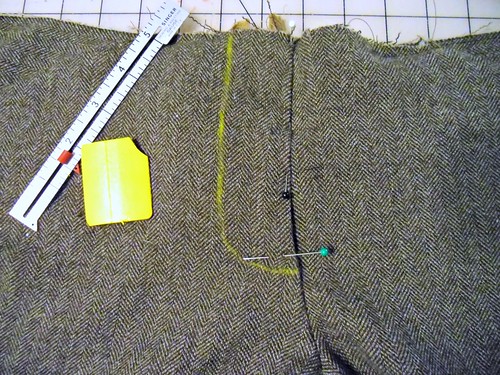
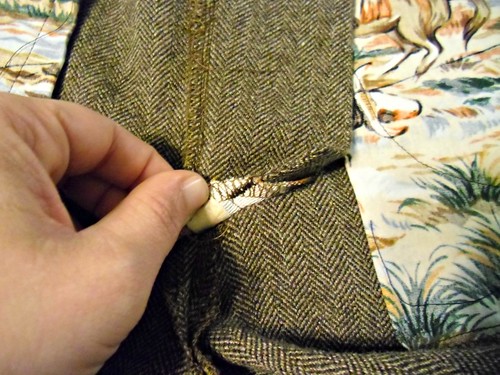
Ok, time to cut into those pants and set the welts free! Cut straight down your slash line (disregard that it looks like someone chewed on mine!), stopping about 1/4″ from the end of your stitching lines. From the end of your cutting line (the marked X) to the end of your stitching line (circled), you want to cut at an angle, connecting the two.

WP12
Here is a better picture. Be careful not to cut too far, but don’t be timid and not cut deep enough – you want to end exactly at the stitching line. This would be a good time to practice on those scraps 🙂
Do this to both welt pockets, top and bottom, on either end.

WP13
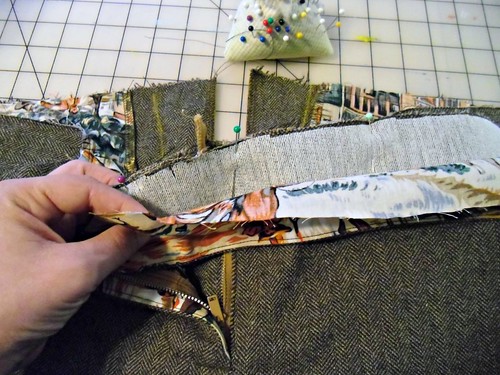
Grab your pocket lining and pull it through the hole until it’s on the wrong side of your pants back.

WP14
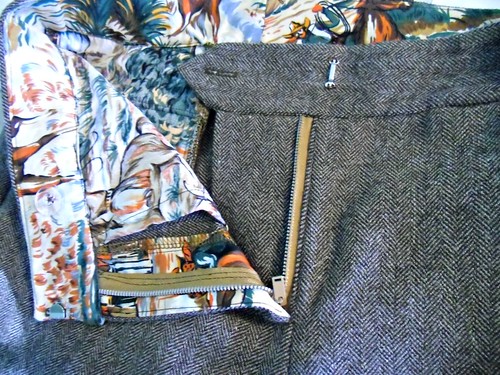
I like to give my welts a quick press at this point, just to make sure I’ve clipped far enough and that everything is looking good so far.

WP15
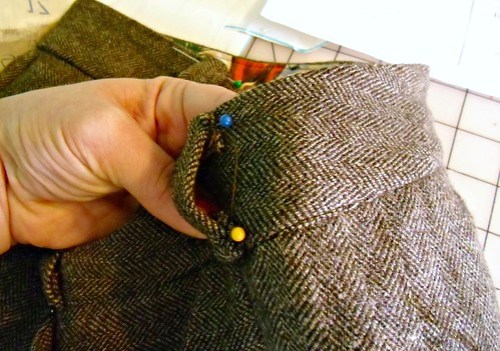
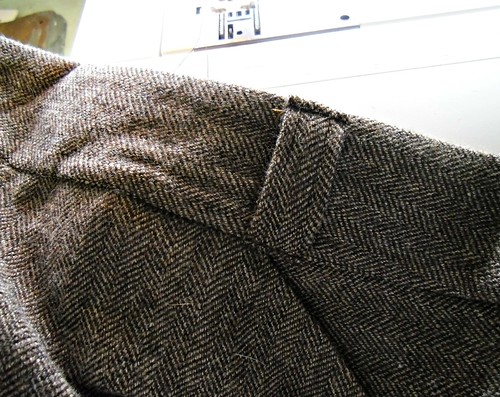
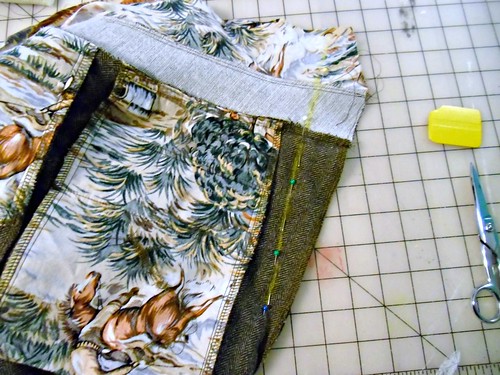
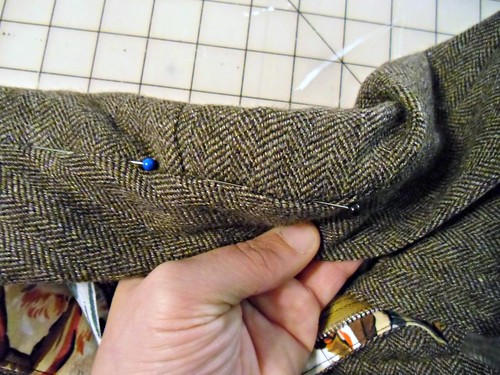
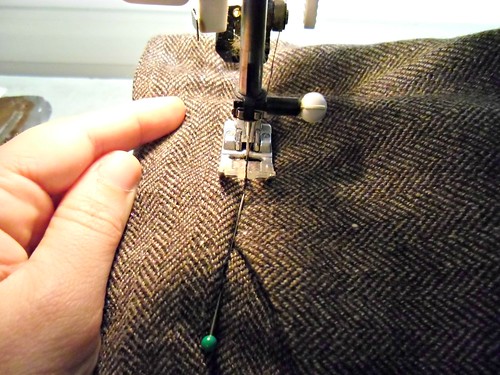
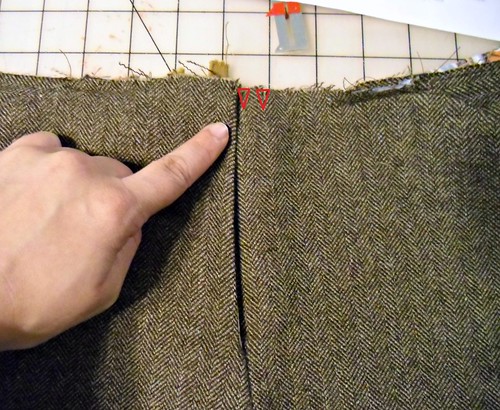
Flip the pants back over, right side facing up. Fold over one side to expose the end of the welts. See the little triangle there? We are going to stitch that down to the welts, exactly on the indicated stitching line.

WP16
When sewing the triangle down, a few things to keep in mind: keep the welts butted together. You can hand-baste the welts closed if you are having trouble with this. Also, you want to get as close to the edge as possible, without actually catching non-triangle fabric. Use a zipper foot, and hand-baste the triangle in place before you start sewing, to ensure that it won’t move when you’re at the machine.

WP17

WP18
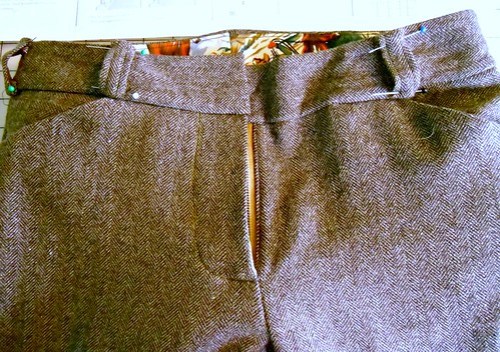
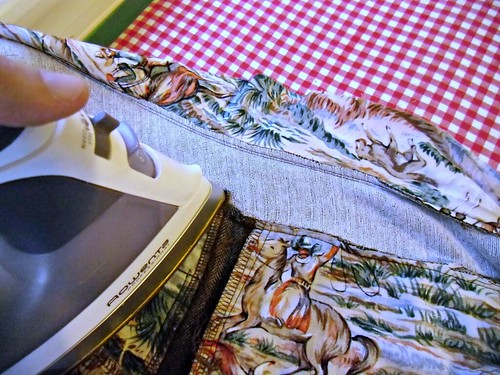
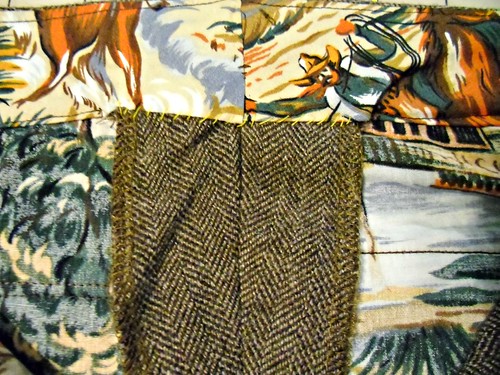
Now take that bad boy over to the iron & give ‘er a good press!!

See? Hard part over! Now to turn those welts into pockets and not ass-windows.

WP19
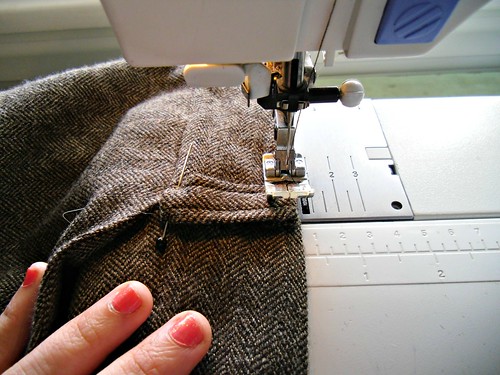
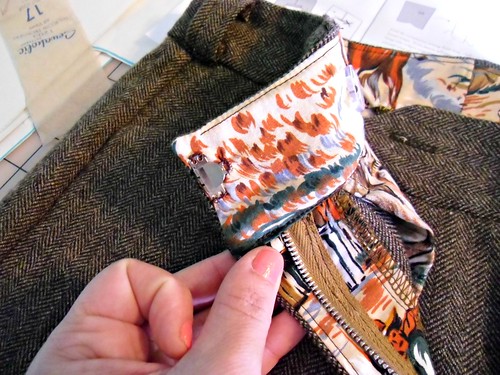
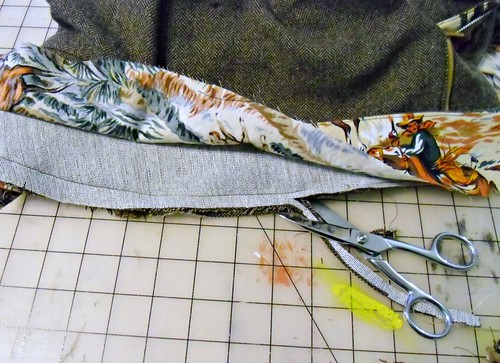
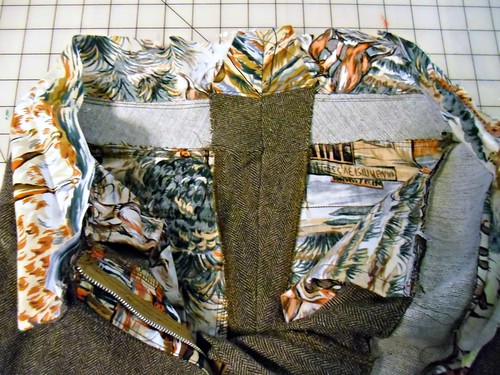
Pull the top (aka, notched end) of the lining toward the top of your pants back, folding at the fold line. All the right sides should be encased in the pocket and you should be looking at the wrong side of the fabric.

WP20
See the top welt stitching line? We are going to sew right on top of the welt only, to make sure that our pocket doesn’t have secret back fat pocket space.

WP21
Be sure to catch only the welt & the lining. Again – the pants back isn’t invited to this party! SORRY.

WP22
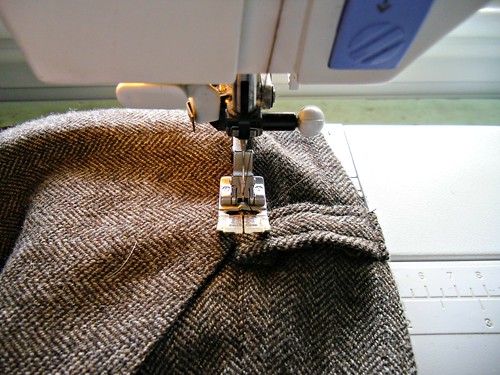
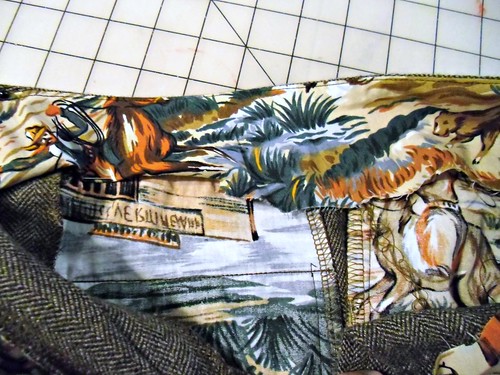
Now sew up the sides of your pocket, and finish the edges.

WP23
Then baste the top of the pocket lining to the pants back.

WP24
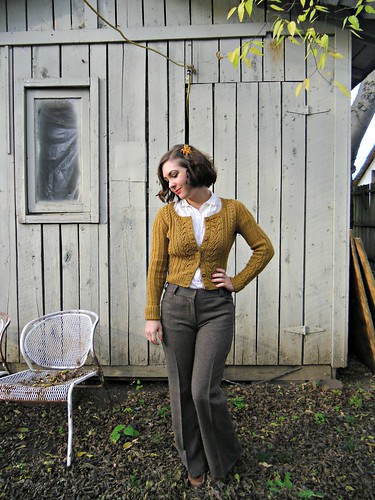
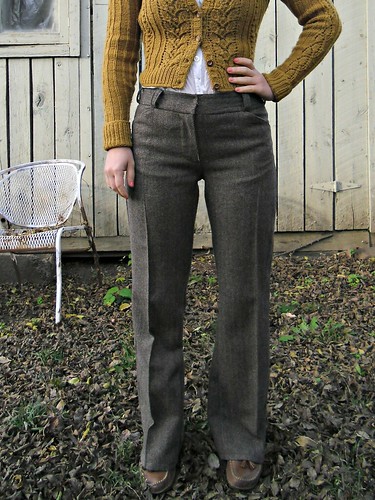
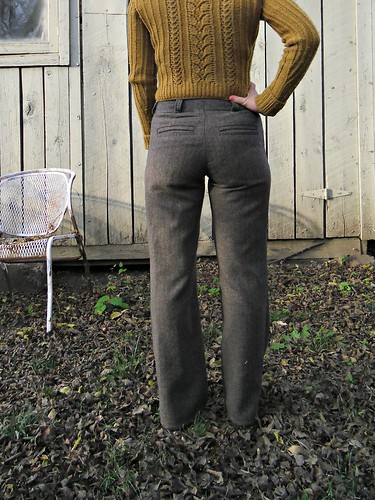
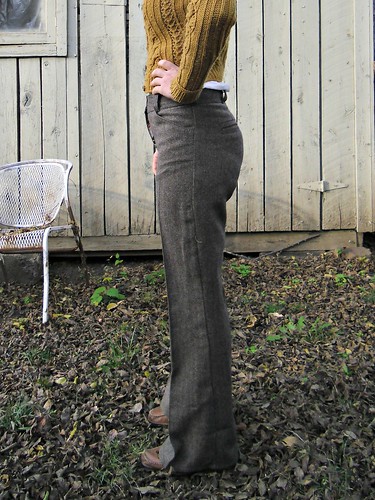
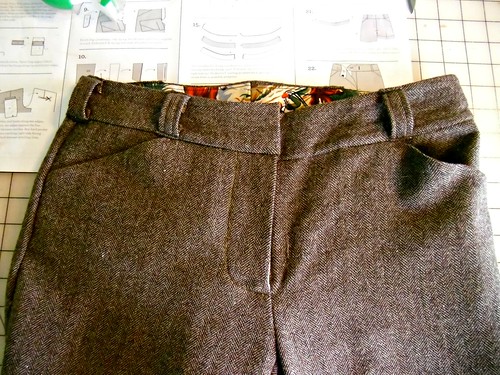
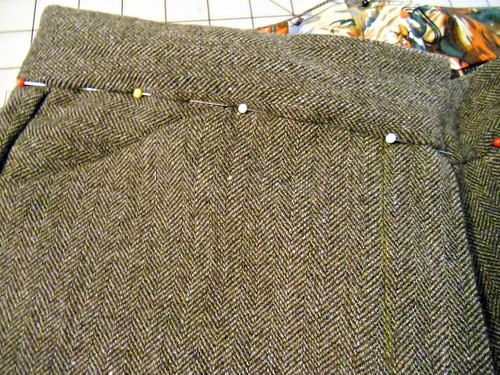
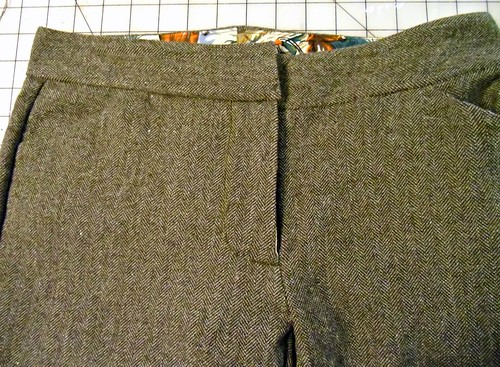
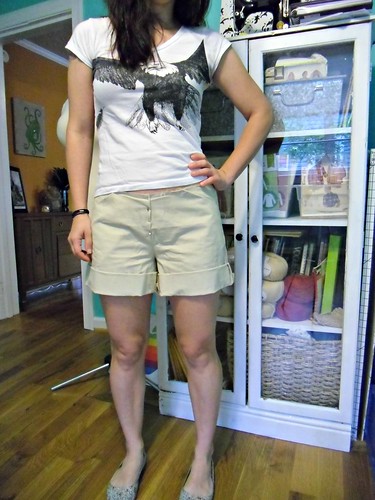
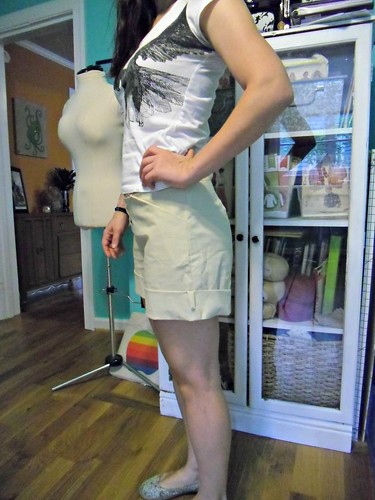
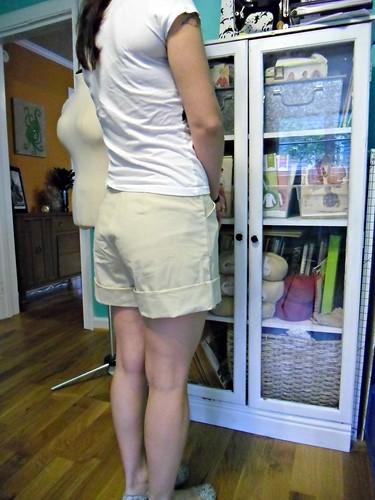
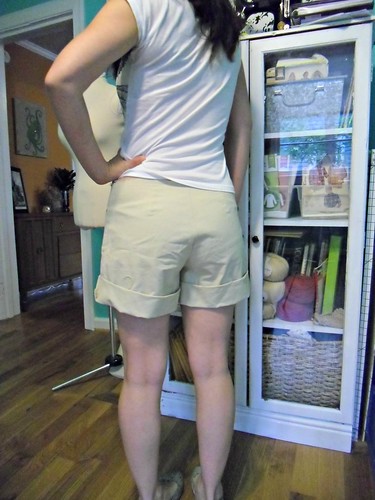
Ta da! Beautiful, functional, double-welt pockets!

Now that wasn’t so hard, was it? 🙂
If you’re caught up to speed, go ahead & complete steps 7 & 8. Next week: the fly & all it’s fly-glory, woohoo.

Thurlow Sew-Along: Sewing the Front Pockets

29 Oct

Ok folks! D-Day has arrived, time to get workin’ on some trousers!

A quick note: You’ll notice that I didn’t post a sew-along schedule. This is because I am not sure how frequent (or infrequent) the posts need to be! I plan on working each full step per post, with a few days thrown in between so everyone can get their pants rolling, but do let me know if you’re feeling like everything is moving too fast and you need a minute to catch your breath 🙂 Of course, these posts will always be here for future sew-alongers! So please don’t feel like you have to rush through to appease the Thurlow Gods 🙂


Today we are sewing the front pockets of our trousers, sections 2-3.

We start with the pocket facing and pocket piece – 7 & 8.
FP1
Finish the curved edges of both pieces, as shown.
If you have not already decided how you would like to finish your raw edges, consider this your kick in the butt! As you can see, I serged mine (what can I say – I’m a lazy seamstress at heart), but no worries if you don’t have a serger. Sunni has a whole mess of seam finishes right here and any of these will work. Personally, I think those bound seams look super yummy. Do what you want, though!

FP2
Grab your front pocket lining – piece 9 – and lay your pocket piece & facing on top, with the right sides all facing up and the weird notches & crannies all matching.

FP3
We are going to stitch these pieces down to the pocket lining, veryyyy close to the edge, as indicated by the dashed lines. The whole point of this is so when we put the pocket lining in the pants, you will only see the facing pieces from the outside.
Also: horse butt.

FP4
Grab a trouser front and lay it out, right side facing up.

FP5
Place your pocket lining over the trouser front, right sides together, matching the diagonal line. Stitch all the way across with a regular 5/8″ seam allowance.

FP6
Trim, grade, and understitch this seam.

FP7
Flip the whole thing back and give is a good press. If you would like, you can topstitch the pocket at this point.
What we are looking at now is the WRONG side of the trouser front, with the right side of the pocket lining facing up.

FP8
Pick up the loose end of the pocket lining…

FP9
And fold it along the fold line (this should be indicated by notches), matching the edges at the opposite side.

FP10
Sew the bottom of the pocket lining only, as indicated by the red dashes. Finish this seam.

FP11

FP12
Baste pocket edges along the top and side.

If your pocket has a little bit of ~body to it, that’s ok! It’s not supposed to lie completely flat 🙂

You should end up with something like this.
FP13
Yay! A pocket!

FP14
Yay! A pocket facing!

Now that wasn’t so hard, eh? 🙂

We’ll start on the welt pockets in a few days (dun dun DUN!). If you have any questions, do let me know & I’ll do my best to answer 🙂

Thurlow Sew-Along: Adjusting the Pockets

23 Oct

This is gonna be short & sweet!

When I sewed up my first pair of Thurlows, the only complaint was that the back pockets weren’t deep enough to accomodate my phone or wallet. Which, I mean, back pockets pretty much ONLY exist for a phone or wallet as far as I’m concerned.

Original Thurlow pocket
Can we all just step back for a second and have a moment of silence for this tragedy that is unfolding.

Original Thurlow pocket
Measuring the pockets shows that they are only about 2.5″ deep. If this is all gravy in your world, do solider on with the unaltered pattern. If not, I hope you saved a bit of tissue because we have pattern pieces to slash and tape!

Modified Thurlow pocket
Here is my modified pattern piece. What you want to do is add length both above and below the fold line, to ensure that the pocket still folds up properly once we stick in the pants (hurr durrr). This is pretty easy – just slash a straight line above the fold line, tape in a gob of tissue paper (or you can use regular paper, IDGAF. I use tissue since I have tons on hand & it makes everything easy to fold back up!) and then repeat below the aforementioned fold line. To fit my iPhone, I added 2.5″ to each slash.

Modified Thurlow pocket
When you’re done hacking, fold the tissue on the fold line (notice that the bottom matches up to the top notch – not the top of the tissue). This is how deep your pocket will be. My phone fits, yay!

Modified Thurlow pocket
And here is an action shot, courtesy of my second pair of Thurlows.

If your muslins are ready, go ahead and cut your fabric – you did prewash… right?! 😉 If you are planning on making your trousers in a plaid or striped fabric and fancy a bit of bias-cut on the welts & waistband (because YAY for not having to match those parts!), Liz has a great tutorial on altering pattern pieces for a bias grainline. For the actual matching at the side seams and everywhere else, Check out Tasia’s tutorial for matching plaids. If you are smart & opted for a solid, non-directional fabric – lucky you! You can just follow the cutting layout included in the pattern 🙂

We will start sewing on Monday!

Thurlow Sew-Along: Choosing Your Fabric

8 Oct

I just love this part of the sewing process – choosing fabric! If there’s anything that gets me super pumped about my upcoming project, it’s after I’ve found ~the fabric~ (and possibly rolled myself up in it like a burrito). What I like about this pattern is that it can be made in a multitude of fabrics to cover every season – not to mention that every pair has the potential to look completely different.

The back of the Thurlow envelope gives some suggestions for fabric choices – woolens, suitings, cotton twill, etc. You will want to stick with something light to medium weight. Be careful that you don’t go too thick, as the welt pockets can get a little bulky if you’re not careful. This is a great pattern for playing with wooly textures & saturated colors (my favorite!). We will be doing a lot of pressing, so I definitely recommend sticking with natural fibers to make this easier.

Still overwhelmed? Here are some LT-approved choices-


Black/Grey Herringbone Suiting
I LOVE herringbone! This is actually pretty similar to the suiting my pants will be made with, except mine is brown 🙂


Camel/Chocolate Plaid Suiting
This is another fairly “safe” option, but there is plenty of texture in the fabric to keep it from being too boring.


Black/White Plaid Suiting
Or, if you want to go all out & have some loud pants – try a balanced plaid! This one is pretty small-scale, so it wouldn’t be too hard to match up.


Plum Wool Crepe
Wool crepe is another great choice if you are looking for something with a bit more drape. I love the spongey, slightly stretchy texture – and all the saturated colors! Ahh!


Dark Emerald Wool Crepe
I mean… really. Wool crepe totally has the best colors.


Mustard Boiled Wool
I think we all need a pair of mustard pants.


Solid Navy Stretch Denim
Denim works quite well with this pattern, so fancy trouser jeans are absolutely doable! A few things I should point out: stick with a medium weight – too light won’t have enough body, and too heavy will give you hell when you try to sew those pockets & belt loops – and try to get a denim that doesn’t have more than a subtle amount of stretch (otherwise, you may end up needing to size down to get it to fit!). Also, take note when you’re prewashing this stuff – I wash & dry my denim at least 3 times before I cut it. It shrinks up a LOT and this is not something you want to discover in the form of high-waters, ok.


Chili Petter Cotton Twill
If wool makes you feel inexplicably itchy & denim bores you to tears, there is always a cotton twill option.


Mink Solid Rich Italian Velvet
Fancy velvet shorts? This velvet is totally luxe & only costs $10 a yard!

Of course, if you’re on the other side of the world, all these nubby tweeds & deep jewel tones are probably causing you to break out into a sweat. Don’t worry – there’s a fabric for that 😉


White/Blue Striped Seersucker
Seersucker is a summer staple as far as I’m concerned – why not embrace your inner Southern Gentleman with a pair of seersucker shorts?


Dark Blue Solid Linen
Or, if shorts aren’t your bag, linen makes a base for a summery pair or trousers *or* shorts. If you are super concerned about the natural wrinkles that come with the linen territory, get one that has a bit of poly blended in.

In addition to the fashion fabric, you will also need to buy lining for the inside waistband, pockets & fly facing. This is the fun part! We won’t actually be using “lining” fabric – so nothing slippery & devilish, yay! Lightweight cottons are perfect for this. Voiles, batistes, poplins, even light weight quilting cottons if you want the inside to be real cray.


Aqua and Brown Plaid Cotton
I love this! An easy way to inject some plaid into your pants, without the hassle of agonizing over matching up all those little lines 🙂


Yellow/White Polka Dot Cotton Poplin
You can play it safe with a subtle print or even a solid color


Floral Double Sided Cotton
… or go all out with some mega crazy granny print because holy shit.

If you made it this far, I’ve got a little consolation prize for ya 🙂 Mood Fabrics is offering a 10% discount for all online fashion fabric purchases between now and 10/22/12! Enter the code LLADYBIRD at checkout to get your discount! Note that this does not apply to home decor stuff, dressforms, or any code that starts with PV. Mood is one of my favorite places to shop fabric, so I’m pretty excited about this! Thank you, Mood!! ♥

As a side note, a few people mentioned that they do not have their pattern yet or aren’t quite at the point of making the muslin. That’s ok! We aren’t starting our actual pant-sewing until the week of 10/29, I just wanted to make sure everyone has enough time to get their fit situation figured out 🙂

Thurlow Sew-Along: Muslin Party!

4 Oct


It’s time to get crackin’ on some muslins! Whoooohooo… who’s excited!? Anyone? Anyone?

I will admit – making a muslin isn’t exactly the most exciting way to spend your precious sewing time. However, it is pretty necessary to ensure that you get a good fit, especially with something like trousers or shorts where you can’t just sew a wider seam allowance to get rid of the problem. Lots of pattern alterations involve the flat pattern before the fabric is cut, and it is crucial that you figure this out before you cut into your real fabric & then despair that the crotch is too long. Long crotches are pretty tragic, imo. So let’s get muslinin’, y’all.

First, figure out what size you are going to be sewing up. Here is the back of the Thurlow envelope. These pants don’t have too much ease in them, but it IS there. If you like that, that’s totally fine – just cut the size recommended. If you want something a little more form-fitting, I recommend checking out the finished measurements & basing your size off of those. PROTIP: the finished waist measurement doesn’t actually hit your high waist, as in the smallest part of your torso. These actually hit right at the belly button, so that would be where you need to measure if you are going by the finished dimensions. My measurements put me between a 4 and a 6, but I cut a 0 (since right at my belly button is 29″) and added some room at the butt and I got a great fit. Trace your pattern if you are unsure what size to cut, you can always make another muslin!

Thurlow Muslin - necessary pattern pieces
The Thurlow has a lot of pattern pieces, but let’s not get ahead of ourselves – we only need a few for a proper muslin! I have circled the ones you’ll need to cut out. The pocket lining pieces ARE necessary (since they fill the void where the pocket slash is on the front pieces), but don’t worry about the facings. If you are making trousers, you can go all out & muslin the full lengths, or you can be lazy like me & just make shorts 😉

It is a good idea to mark on your muslin where the welt pockets will sit – you don’t have to sew the actual pockets, unless you are just REALLY feeling it – in case you determine you need to move them. Don’t worry about the zipper, you can just pin the front closed.

I was going to compile a list of pants-fitting resources, but it looks like Tasia beat me to it. So, just to reiterate (and mostly because I don’t feel like I’m doing anything if I just direct you to her blog), here are some of my personal faves:
Pants fitting basics, via the Coletterie
Pants fitting cheat-sheet, via the Coletterie
Common pants alterations, via Sunni of A Fashionable Stitch
Crotch depth via Sunni of A Fashionable Stitch
Crotch length via Sunni of A Fashionable Stitch
Knee & hem adjustments via Sunni of A Fashionable Stitch
Fullness & waistlines via Sunni of A Fashionable Stitch
Special alterations for pants via Texas A&Ms Extension program
The Anatomy of a camel toe via the Fashion Incubator
Colette Clover pants via meeee. Haha! The comments in this post are actually quite great, lots of helpful info & resources.

Books:
The Perfect Fit (actually, I think all of y’all should buy this book – regardless of whether or not you are making pants)
Pants for Real People

WHEW that’s a lot of links! Don’t tell me you don’t suddenly feel armed & prepared!

So here’s the fun part… I’m going to show you *my* Thurlow muslin! This is actually the muslin I made in the ‘way beginning, and no, I have no idea why I still had it stashed (I even moved across town during this time!). But, whatever, I guess it came in handy :B Also, fair warning: these are pretty unflattering.

Thurlow Muslin
Here you can see I’ve got some weird excess fabric in the front of my shorts. This is the crotch depth, and it clearly needs to be shortened (I’m petite, so it makes sense that I have a short crotch, I guess haha).

Thurlow Muslin
Side view is ok, apart from that itty bitty FUPA the shorts give me.

Thurlow Muslin
Oh god, what is going ON in the back!?

Thurlow Muslin
As my ass appears to be eating directly into my shorts, it would seem I need to add some room back there.

Thurlow Muslin
To fix the crotch depth, I simply pinned out the excess fabric & tapered it to the sides. Doesn’t it look much better?

Thurlow Muslin
Here’s a side view

To fix my butt issue, I extended the back crotch length on my pattern piece to a size 4, tapering down the leg.

Thurlow Jeans
And here’s the finished result of that. No more perma-wedgie, yay!

Well, that turned into a super heavy post! Do let me know if you have any questions & I’ll do my best to answer. Feel free to post your muslins in the Flickr Group and let’s help each other!

Next week, we are gonna talk fabric. FUCK YES.

Completed: The Mustard Renfrew (plus some announcements!)

26 Sep

Let’s get down to business, shall we?

First of all, you guys definitely want a sew-along. And I aim to please! So let me introduce my first sew-along (ahhh!!), for the Thurlow trousers:


Feel free to snag this button for your blog, so everyone will know how cool you are BECAUSE YOU ARE MAKING PANTS.

As it is, I am a bit swamped right now, and I know a lot of you guys are working on jackets & coats with other sew-alongs, so we won’t actually start sewing until the end of October. I am aiming for a start date of Monday 10/29, so there will be plenty of time for everyone to work on their muslins, choose fabric (but maybe hold up a week or two, I’ve got a fabric post cooking right now :)) and of course finish your coat if you’re working on one!

I also opened a Thurlow Sew-Along Flickr Group, so please join so we can all share pictures 😀 We will be posting our muslins for advice on fit, and since I’m not a muslin-master, I’m really hoping y’all can pitch in and help when you see something you know the answer to. Open discussion!

A few people asked if they could join with a different trouser pattern – and the answer is OF COURSE! We will be focusing on the Thurlow pattern specifically, but these techniques should work with any ol’ pants pattern, including the gorgeous new Juniper. However, you may need to draft pieces if your pattern doesn’t have all the cool welts & fly facings & shit.

Also, this specific pattern includes an option for shorts, so if you’d rather make shorts… make shorts! All the construction techniques will still be the same 🙂

Ok, for those of you who dgaf about a sew-along… I have something for you too. But you still have to look at my Thurlows. HEH HEH HEH.

Renfrew & Thurlows
Thought I’d whip up a little tshirt last night 🙂

Renfrew & Thurlows
This is the Renfrew top by Sewaholic patterns. I know what you’re thinking – and I promise I’m not getting paid to wax poetic about Tasia’s patterns every day lol. I just really love them and I want everyone to get excited about them too!

Renfrew & Thurlows
Anyway, I wanted to try the cowl in view C, but I was holding off for the right fabric (and weather conditions). This fabric actually came from the flea market last week – this lady was trying to dump off the remainder of her late mother’s fabric stash and this was in it. It was actually really scratchy & smelled awful, like a moldy basement in the 60s, but I took a chance. Especially since I got a big stack of fabrics for $1 lolz. Anyway, it softened up quite nicely with a wash – and the smell is gone. I just think the color is so perfect!

Renfrew & Thurlows
Here’s a back view. BACK FAT ALERT, BRO.

Renfrew & Thurlows
I feel like it also bears mentioning that this is a perfect every day wardrobe ensemble. Sure, it’s a boring concept – jeans & a tshirt. Who the fuck makes jeans & a tshirt? Actually – I think that’s the beauty of it. Instead of focusing all my sewing power on stuff that rarely gets worn, this is some straight-up cake. I am going to snuggle into this outfit all the time – I would be wearing it right now, if I didn’t work in an office with a dress code 🙂 – and it just tickles me that the entire thing is handmade by meeeee.

Oh, speaking of cake – StephC of 3hourspast just kicked off a presale for her new pattern line, Cake! And it’s a casual knit dress – designed to be worn as every day wear, or, the aforementioned cake. Mmmm, cake.

One thing I hear people mention when they discuss not wanting to sew “every day” items is that they are boring to sew. Boring fabrics (not as many pretty prints!), boring patterns, boring boring. And I get that – I really love digging my teeth into something deliciously challenging. But there are ways to make your plain garments more fun – like making the inside a party:
Renfrew - HAPPY SHIRT
GOD, what a happy shirt!

At any rate, stick around for Thurlow Extravaganza! I’ll be back next week to start muslin’ing, and we also need to talk FABRIC!!

Renfrew & Thurlows