Tag Archives: knitting

Completed: Tongue-Tied Sweater

26 Feb

It’s been a minute since I shared a knitting project! I actually *have* been knitting – I always have at least 1 project on my needles at any given time (usually two – one for the couch, and a smaller/simpler one for the road!), and I always keep my Ravelry account updated! But for whatever reason, I never feel super compelled to share them on my blog. Anyway, here’s one today!Tongue-Tied Sweater + Dawn Cords

This is the Tongue Tied sweater by Poison Grrls. I actually chose the yarn before the sweater pattern – a very uncharacteristic knitting move for me (usually I have my pattern selected before I start shopping for yarn). To be completely honest – I wasn’t in the mindset for planning a new sweater when all this happened, as I was still steadily working my way through my last sweater (see! There’s one I knit and never shared here lmao). But this yarn caught my eye at Pintuck & Purl and once I got my hands on it, it was all I could think about.

Tongue-Tied Sweater + Dawn Cords

The yarn is CashLuxe Spark by Sweet Georgia Yarns, a gloriously soft and cushiony fingering-weight yarn with this incredibly rich color and the cutest subtle sparkle! I’m not a super duper yarn snob (I love natural fibers, blah blah, but I don’t typically buy *really* expensive yarn. Although. That may now change haha) but I really, really, really wanted this yarn on my body. I initially considered socks – I mean, who doesn’t want to wrap their toes in cashmere? – but at $38/skein, that was a little rich even for my blood. So obviously it made sense to buy two skeins and turn it into a sweater, because that’s totally fiscally responsible.

Tongue-Tied Sweater + Dawn Cords

Tongue-Tied Sweater + Dawn Cords

I started this sweater right after I finished my last one, toward the end of December last year. It knitted up really fast – partially because, well, it’s a tiny fucking sweater, but also I just really enjoyed every part of the process. I LOVED touching that yarn, so so much. I actually would have finished this quite a bit sooner, except once I got to the point of picking up the sleeves I let it sit dormant for a couple of weeks while I worked on other stuff.

Not a lot to say about this pattern, but here are some notes:
– I knit the size Small, based on my bust measurement. My gauge called for size 2 needles (body) and 1 needles (ribbing).
– This is a really fitted sweater! I mean, I knew that going in – but trying it on, yeah, it’s basically painted on. Aggressively blocking the entire thing really well helped a lot, and now it skims my body perfectly.
– Because it was so tight, I did have some issues with getting a stretchy enough bind off (I actually had to re-do my bind off at the bottom AND the neckline twice!). I ended up using size 3 needles and a super stretchy bind off. With the neckline, that was mainly my fault for being an idiot. I thought I’d be super clever and do a fold-over neckband, but quickly discovered (while unsuccessfully trying to pull it over my head) that those don’t stretch at all. LMAO.
– Mod-wise, I added 1″ of length to the body, since I wanted to be able to wear this with high-waisted jeans (it’s pretty short!).
– If you think you see a yarn tail in the back, you’re right. I haven’t woven it in yet. I don’t know why.

Tongue-Tied Sweater + Dawn Cords

I loved knitting this pattern! It was easy to follow, simple to knit (but not boring), and the proportions are just lovely. I’ve already got a few more Poison Grrls patterns in my radar for my next sweater. I love Amy’s aesthetic and I love that she uses fingering weight yarn – perfect for our mild winters!

Tongue-Tied Sweater + Dawn Cords

Tongue-Tied Sweater + Dawn Cords

Oh, I also made my pants, too! These are more Dawn Jeans, made in Robert Kaufman non-stretch corduroy from Pintuck & Purl! (I picked it out the same time I was fantasizing about that yarn haha). Not much to say about these that I haven’t already said – I made my normal size, this time with the wide legs and the cropped length. The cropped length isn’t actually that cropped – I ended up having to take off another 3″ or so (but I also have a 28″ inseam sooo take that as you will). I’m also not super thrilled about how the back fits, but I believe that’s just what you get with wide leg pants. The wrinkles are there because there is too much fabric at the inner thigh (the issue I had with my Calvin Klein jeans), but for true wide-leg pants you really don’t want to remove width there. Whatever, I’m not the one looking at my own butt so I don’t care.

Tongue-Tied Sweater + Dawn Cords

So anyway, that’s my new sweater! Fun to knit, fun to wear, and the sparkles make me happy 🙂 Oh! And I still have some of this yarn leftover – so you better believe I’ll be making a tiny pair of socks 🙂 If anyone has suggestions for short-cuff sock patterns – preferably one with bobbles (I don’t know why but I’m feeling like I want bobbles on these), let me know!

Completed: Professor Meow Sweater

31 Oct

I can’t believe it’s taken me this long to knit an official cat lady sweater, but, here we are.

Professor Meow sweater

The sweater in question was actually knit much earlier this year – I finished it way back in April – but barely had time to wear it, let alone photograph it, before the weather warmed up too much. I’ve really enjoyed rotating it back into my regular wardrobe now that the temperatures have cooled down a bit, so here it is! Never too late for a blog post!

Professor Meow sweater

Also, if my surroundings look different – well, they are! I’m currently on the other side of the US, a little more than halfway through my 10 day stint in Berkeley, CA while I teach some workshops at Hello Stitch! This adorable AirBNB is probably the cutest place I’ve ever “lived” (other than my own house, OBVIOUSLY) and I couldn’t pass up an opportunity to take some photos while I’m here!

Professor Meow sweater

Professor Meow sweater

Professor Meow sweater

Professor Meow sweater

So what is this magical garment of Peak Cat Lady, you ask? The pattern is Professor Meow from KnitPicks. I found this pattern entirely by chance – I wasn’t necessarily looking to make a cat sweater (although, clearly, I think I should have been), but once I saw it I knew that was going to be my next project. I stuck with the suggested yarn, Knit Picks Wonderfluff, which really is pretty wonderful and fluffy. I don’t typically knit with acrylic blends, but this one has some additional alpaca and merino which makes it super soft with a nice fuzzy halo. Since it’s a bulky yarn, it knits up really quickly. A quick swatch had me go down a needle size to a #10 , which is typical for me.

The sweater is knit flat in 2 pieces, with the cat design achieved by some basic intarsia. This actually isn’t my first intarsia project – I have another sweater that I finished right before this one that that I’ve yet to actually photograph/share (in my defense… it’s even warmer than this one, so the weather hasn’t really cooperated YET haha) – but it was good for practice! After the front and back are knit, the pieces are seamed, then the little sleeve ribbing is knit in the round, as well as the neckline. I did change how the neckline was knit, as I didn’t like the way it was written in the pattern (a basic ribbing with a bind off at the end). Since knitting my last couple of sweaters, I’ve really come to love and appreciate a nice knit neckband that is folded over with the live stitches secured down, like with my Martine Sweater. So that’s what I did with this one, and I think it looks much nicer. I *generally* try to follow knitting instructions as they are written, but sometimes a girl’s gotta go her own way!

Professor Meow sweater<

Professor Meow sweater

After blocking the sweater (which, even if you normally skip blocking I do HIGHLY recommend blocking this yarn, as it really softens and relaxes with a good block!), I used yarn to stitch the whiskers on as directed by the pattern. I left off the kitty pupils because I like the way the cat looks without them.

Hmmm what else? I knit a size 37, so that the sweater would have a little bit of relaxed ease but not be quite as loose as it is on the pattern images. I went boring with the yarn colorway and just got grey on grey, which OF COURSE goes with everything in my closet so I’m pretty pleased with that. Full Ravelry notes are here!Professor Meow sweater

I always love the sweaters that I knit, but this one may be my favorite! It’s pretty silly and quirky, but not so much that I feel ridiculous wearing it in public. Despite being short sleeved, it is quite warm, and the yarn is super soft and fuzzy. It’s definitely pretty attention-getting, and in all honesty I typically prefer to wear this bad boy on first dates. What is it they say – if you can’t handle me in my cat sweater… ? I don’t know.

As a side note – my jeans in this photo deserve a shout out! These are, of course, jeans made by me. But wait, there’s more! These are my ORIGINAL Ginger jeans, the first pair I ever made! I can’t believe they still fit (I’ve gained weight since I made them, but I guess the fabric has stretched along with me, ha!); they’ve been going strong since 2014! If you look closely at the butt, you can see where I have patched them a few times – the fabric is getting thin, and there was one unfortunate incident where I actually tore a hole in the butt immediately at the end of a jeans workshop (hm good thing I had access to a sewing machine to patch it, yet?), but amazingly they are still holding up! Yeah for handmade jeans!

Completed: The Martine Sweater

13 Nov

It’s been a minute since I posted a knitting project, but that doesn’t mean I ever stopped knitting!

Martine Sweater - front

I took some time off from knitting sweaters (other than my yearly OAL makes!) and have spent a couple of months furiously knitting socks. I love handknit socks – I love making them, I love traveling with them (so portable!), I love wearing them, and I love buying yarn for them (way more economical than buying sweater yarn – even if you end up splurging haha). But then I started to get a little sock’d out, so I turned my focus back to sweaters.

Part of the reason why I stopped knitting sweaters as much is because I couldn’t really find patterns that stood out to me. There are TONS of patterns on Ravelry, but the selection dwindles down quite a bit when you factor in personal style and taste. I simply don’t wear very complicated looking clothes these days – which is what seems to be most available on the market (along with variegated, hand-painted, and bright yarns. Pretty, but again – not my style!). While I used to love cardigans, I really don’t wear them so much anymore (blame it on my lack of working in an office these days!). And I live in an area with a reasonably mild climate, so bulky sweaters are a bit unnecessary. TBH, even worsted weight sweaters are more than I need.

What I really like are plain, uncomplicated sweaters knit with fingering weight yarn in a very small color palette consisting of mostly greys and blacks. Ha! I know that sounds boring as hell, but I’d rather make something boring that’s going to get a ton of wear, than something crazy looking that doesn’t go with anything I own. I know a lot of us have fallen in the camp of “I love this pattern, I need to make one in every color!” whether it’s with sewing or knitting (or whatever craft’s ass you’re stuck up at the moment), but I’m realizing now that it’s ok to have one thing in one color and call it a day. And that color can be grey and that’s fine too.

Martine Sweater - front

Let me tell you – I’m SO HAPPY I reached this conclusion and stuck with it! This grey sweater hits all my needs – it’s cozy, it’s cotton (see: mild climate), it’s a great color for my wardrobe, and I actually really really enjoyed knitting it!

Martine Sweater - front

The pattern I used for this sweater is the Martine by Julie Hoover. Let’s just get this out of the way first and foremost – yes, its the same color as both the pattern photographs *and* Jen Beeman’s version. Specifically, I 100% ripped off Jen’s sweater after seeing it first and I’m not ashamed to admit it haha.

Things that I like about this sweater:
1. It’s knit in a cotton yarn, which is ideal for Tennessee weather – it’s great in the fall, early winter, and I reckon it’ll be ace in the spring as well. I love knitting and wearing wool, but sometimes it’s not always practical.
2. The design is simple and understated, but has a beautiful texture that I knew would be fun to knit.
3. That raglan shaping! Jen waxed poetic about how much she loved the raglan shaping and I was INTRIGUED. I wanted in on some of that action, too!
4. The sweater is knit in pieces and then seamed. In the past, I only ever knit seamless sweaters – and I’ve definitely announced this publicly numerous times. But as I’ve gotten more into knitting, I’ve heeded the advice of more seasoned knitters that a seamed sweater is truly the way to go, in terms of longevity and the sweater keeping it’s shape. This is especially important with a cotton sweater, since it’s already destined to stretch out of shape and really needs all the help it can get. Further, I figured knitting in pieces would make this a much more portable project – it’s annoying to schlep around an entire sweater on your needles, but just the front? Sure, why not! Finally, I wanted to learn how to properly seam (I’ve seamed before, but it was.. uhhh, well, the pieces were held together, and that’s about it haha), and this would be a great project to start with.

Knitting this pattern definitely stretched my comfort level, and I picked up some new skills as well! The pattern is loooong, but well-written – I didn’t have any problem following any of the steps or learning any of the techniques. I did make it a point to follow every single instruction in this pattern as written, in order to get the best results (this is not something I have generally done in the past, but I have changed my ways and have chosen to trust the pattern writer now!), which definitely paid off. This sweater is one of my best makes yet!

I made the size 35 3/4, and as you can see the sweater is quite loose on me (my bust is 32″) but not overwhelming.

Martine Sweater - back

Martine Sweater - back

Martine Sweater - side

Martine Sweater - side

The only part of the pattern that I did not follow was the suggested yarn – I stuck with a cotton, but used Quince & Co. Willet. This was mainly due to cost – the suggested yarn (Shibui knits) is expensive, while Quince is much more economical. Add in that I work at a shop that carries Quince & Co., which means I get a discount – and not only that, but I took advantage of our “employee layaway plan” (meaning I grabbed all the skeins I required and put them in my box in the back room, then just paid for each skein as I needed it haha). So yeah, I went with Quince! My coworker Hannah, who is as big a yarn snob as I am a fabric snob, assured me it was a suitable substitute for the Shibui. I haven’t seen the Shibui in person, but man, I LOVE this Willet!

I knit a few test swatches before casting on – surprisingly, I got gauge with the suggested needle size (this NEVER happens with me, I always have to go down at least 2 needle sizes because I tend to knit so loose), but my row gauge was way, way off. Going down a needle size only messed up my width gauge, and barely budged the row. Row gauge isn’t always super critical, but it is when dealing with raglans – and as someone who already has a pretty small armscye, I don’t want any extra room there! So I math’d that shit out, and took a few rows off the raglan shaping to compensate for a larger row gauge. I wasn’t sure if it would even totally worth until I was finished with the front piece – but it totally did, thank god! Unfortunately, I didn’t think to adjust the row gauge for the rest of my sweater, so it’s a bit longer than it should be. Which is fine, we are gonna call that “cozy.”

Martine Sweater - front

I named my sweater “Carrie” because I knit the majority of this while watching Sex and the City. I don’t remember why I started watching that show this year, but once I did – I was hooked. Ugh y’all it’s embarrassing how relevant every character and situation is to a single woman in her 30s haha. I recall trying to watch it as a 20 year old, and thinking I identified the most with Samantha (no, 20 year old Lauren, you don’t) but also really not getting it. I get it now. And also, I definitely identify the most with Miranda these days, who is arguably both the most annoying and boring of all those women. Oh well. Welcome to your 30s I guess haha.

Anyway, I blasted through the entire series while happily knitting away at this sweater. I knit the front and back separately, blocking each one after it was finished. For the sleeves, I cast those both on at the same time and knit them 2 at a time until I got to the raglan shaping, then transferred one sleeve to waste yarn so I could knit them separately (the raglan shaping differs on the front vs the back, so the sleeves are not identical – they are mirror images). I didn’t want to risk Second Sleeve Syndrome, and I’m glad I did this! After I finished the first sleeve, there was only raglan shaping remaining for the second sleeve – not the whole thing 🙂 Finally, blocked the sleeves, seamed the whole thing together, and knit the neckband.

Martine Sweater - neckband

The neckband on this sweater is funny – it’s knit in the round after the sweater is assembled, and you don’t actually bind it off. Instead, the band is folded to the inside and the live stitches are sewn down. I’ve never seen a neckband like this, but I admit that it looked polished as fuck and feels nice and sturdy. I like that!

Martine Sweater - texture

Here’s a close-up of the texture! It’s not a moss stitch (which is what everyone asks), it’s a double knotted stitch. You purl 2 stitches together, then knit the same two stitches together. It’s easy enough so that you can do other things (like talk, or watch Sex and the City) while knitting, but interesting enough so that I didn’t feel like passing out or anything.

Martine Sweater- seaming!

Here’s my seaming! My finger is pointing to the seamline – it’s barely visible from the outside! The pieces are worked with a 1 stitch selvedge, which made seaming sooo much easier. My coworker Amanda (yes, I knit a lot of this while sitting behind the counter at Craft South haha) taught me how to seam, and I was surprised at how much I loved doing it! I always thought I’d hate it since that’s something a lot of knitters complain about, but man, I like hand sewing too so it shouldn’t surprise me that I would love seaming as well. I actually had to seam this twice – when I got to the last raglan, I realized I had seamed them on the wrong sides somehow. Whoops! So I just consider the second round more practice, ha 🙂

Martine Sweater - front

The ONE downside to this sweater is the fact that is it cotton – so it stretches and grows when I wear it! Which means it is basically a very short dress by the end of the day. Kind of a bummer, but the good news is that it snaps right back into shape when I throw it in the washer and dryer. I don’t even block it out – the dryer shrinks it up perfectly. It’s super easy care, but not really ideal for traveling as I basically have to wash it every single time I wear it. These photos were taken after a couple months of wearing + washing, so you can see how the yarn has held up. Cotton is pretty sturdy!

While I did say this sweater is one of my best makes, it’s certainly not perfect – there are visible inconsistencies with the row gauge, and I need to fix one of the raglan seams because it appears to have stretched out a bit, oh, and there’s a tiny hole between the collar and body of the sweater where I forgot to pick up a stitch (but TBH I probably won’t fix that one because I use it to determine which side is the front lol), but you know what? I gave this one my best efforts, I ripped out all my mistakes, I learned SO MUCH new shit, and I had a blast knitting it. If that doesn’t count as one of the best, I don’t know what does.

That’s all for this one! Full Ravelry notes are here.

OAL2017: My Completed Anaheim Sweater / OAL Winners / Updates

4 Aug

Hello hello! A bit of a long post ahead – including my finished OAL sweater (yes! I finished it!) and the randomly selected winner for this year. A few updates/housekeeping before I get into everything-

  • I love Kickstarter, and I love funding new projects and ideas from brilliant people. MyBodyModel is a new one that sounds really incredible – a web app that creates a croquis based on your specific measurements (no more 9-heads-tall fashion sketches amirite)! You can then print the images or edit them from a tablet. I am actually a tester for this service – which I’m pretty excited about! – but they need quite a bit of funding to get it started. You can see all the details on their Kickstarter page (they do a way better job of describing the service than I am doing, ha), as well as back the project. No amount is too small!
  • Totally forgot to mention this, like, AT ALL – but I’m going back to Finch Knitting + Sewing Studio for another weekend garment sewing workshop! The dates are 9/29 – 10/1, and the project is WHATEVER THE HELL YOU WANT IT TO BE. Seriously! Whether you need a cheerleader to encourage you to start a scary project, a little help whenever you get stuck, or just want to be surrounded by other people who are also doing amazing creative things – this is a great place to do it! Finch is located in download Leesburg, VA; the cutest little sewing shop in the cutest little historic town. We had an amazing time when I was there earlier this year, and I am so excited to come back! You can see more details, as well as sign up for the workshop here 😀
  • OAL winners! I used the handy Random Number Generator to draw our 3 winners this year – and here they are!


First up is Helen, who actually made TWO dresses this year, in addition to her incredible cardigan. I can’t even tell you how much I love that cardigan, y’all. Everything about it – from the color, to the fit, to the beautiful lace work – is perfect. I am bummed that there is not a pattern for it, bc I’d knit that shit up in a heartbeat!


Our second winner is Linda, who also made a cardigan + dress combo! I have had my eye on that Blaster cardigan for a while now, and Linda’s outfit is making me want to add that pattern to my queue! It’s wonderful!


The third winner is Lycaenid, who took things in a completely different direction by crocheting a skirt! I never would have considered a crocheted skirt, but man, it looks pretty great – especially paired with a crisp white shirt. We get a lot of questions every year about if people can crochet instead of knit, or make something other than the standard knitted top/sewn bottom (or dress) – and here’s a perfect example of that working out beautifully!

Congratulations to our 3 OAL winners – please check your emails and/or Ravelry accounts for a note from me about claiming your prize! Each winner receives 2 patterns+shipping of their choice from Indie Stitches, plus 2 patterns of their choice from Untangling Knots. Woohoo!!

Ok, now let’s talk about MY finished sweater!

OAL2017 Anaheim Sweater

I actually finished knitting this the day that I wrote my post on the OAL dress – I was feeling inspired to get it done so I could move onto other things. There wasn’t too much left to do – I think I had maybe a total of 50 rounds for one sleeve, and then blocking. Not bad! I’m so glad it’s done – partly because it opens up my queue to whatever else I want to work on, and also because it’s a pretty sweater that goes with a lot of stuff in my closet! I’m especially happy with how good it looks paired with my Kim dress.

OAL2017 Anaheim Sweater

OAL2017 Anaheim Sweater

In case you missed it, the pattern I used is Anaheim, which is the official knitting pattern for the OAL2017. This is a relatively simple garment, knitted top-down in one piece with an easy to memorize lace pattern (which I say easy to memorize, I mean that even my dumbass could handle remembering it! Ha!). It’s pretty mindless – so you can work on it while doing something else, such as watching tv or working in a craft shop (guilty!), but it’s also interesting to knit so you don’t get bored. I really enjoyed working on this pattern, although I did have a bit of trouble with the icord edging – I simply could not wrap my head around the instructions. I chatted with Andi about and she wrote a blog post that goes into a lot more detail, which was immensely helpful. Unfortunately for me, I stalled waaaay too long with even starting the icord edging, which is a huge reason why I didn’t finish my sweater in time. Oh well! It’s done now, and that’s really what matters!

For yarn, I used Quince + Co Phoebe, which is a DK weight merino wool yarn, purchased from Craft South. This yarn is incredibly soft and just lovely to touch – and it’s so beautiful! I really enjoyed knitting it and it’s a great color for my personal wardrobe palette.

I knit the size XS – which is my usual size for Andi’s patterns – and was able to get gauge with my yarn, so I didn’t need to change needle sizes. Besides the icord edging drama, this knit up easily and quickly. I will be honest – I wasn’t sure if I’d ever wear this sweater because it didn’t seem like really my ~style~, but I am really really happy with how it’s turned out, and how it looks with other pieces in my wardrobe! I think it’ll be great for the transitional weather in spring and fall, and again, the color is spot-on to pair with basically everything I already own. I am even scheming ways to wear it without a shirt underneath – just a pretty bralette! We’ll see how brave I get when the time comes, though, ha!

OAL2017 Anaheim Sweater

The sweater is intended to be worn with the fronts crossed over and buttoned at the side – can I just say how happy I am that there are NO ties involved?! – but you can also wear it open. I’m not really a fan of the open look – I don’t think it looks quite right, as much yarn doesn’t have very much drape. But I love how it looks buttoned up! I just used buttons that were in my stash, although I think I need to reposition them slightly.

OAL2017 Anaheim Sweater

OAL2017 Anaheim Sweater

OAL2017 Anaheim Sweater

OAL2017 Anaheim Sweater

OAL2017 Anaheim Sweater

OAL2017 Anaheim Sweater

OAL2017 Anaheim Sweater

OAL2017 Anaheim Sweater

I do want to touch on something I brought up in my last post – about not having any creative energy. Since losing my dad in February, it has been a strange and very sad year. I think that’s to be understood- losing anyone is hard, losing a parent is absolutely traumatizing. After the shock of the first week and then immediately trying to dive back into “normal life,” I thought I was ok. I thought, oh, I’ve dealt with my grief and I have survived this. You know what though? That’s not how grief works. Grief is sneaky, and it will creep up on you when you are not expecting it. It will affect your life in ways that you don’t even realize it is doing, and you won’t know why. At least, that was what I found myself dealing with when May rolled around. All of a sudden, I just felt sad all the time and I didn’t know why. I slowly lost the ability and desire to do anything – I didn’t want to be active, I didn’t want to see anyone, I didn’t want to leave my house, and I didn’t want to spend any time in my studio. All of this is stressful, but my lack of creativity was stressing me out the most and just making it so much worse. I make things because I find it therapeutic and calming – so losing that outlet was very worrying to me. I had a lot of trouble making any sort of emotional connection with people, and I was just sad all the time. This is NOT how I normally am, and I didn’t know what to do about it. I ended up having a meltdown while with a group of friends, and I realized that shit was not normal and I needed to do something about it if I ever wanted to feel like myself again.

So, I started seeing a grief counselor, which has been immensely helpful. I’ve slowly incorporated exercise back into my routine (running and yoga), which makes me feel good both mentally and physically, as well as helps my sleep. The creative energy has taken the longest to return – I had to stop trying to force it. I have been gentle and kind to myself, and patient. I really had no interest in sewing whatsoever during the OAL – it just felt like a chore. It wasn’t until the very end that I could feel my creativity reigniting, and I started getting excited about future projects. Knitting wasn’t as much of a struggle, as you can do that pretty mindlessly (I just like keeping my hands busy, really). I actually got a lot of knitting done during this time because it was the only thing I could really bring myself to do, in those weird weeks where I was so incredibly lonely but also completely isolating myself from everyone. For those who have reached out to me in the past months – whether it was to offer condolences, or to see how I was holding up – thank you. I really appreciate every single message I received, even if I couldn’t necessarily bring myself to reply to all of them.

I’m happy to say that my creativity has come back with a vengeance – it was hard for me to sit down and write this post, because I really want to go back in my studio and make some stuff! 🙂 I feel inspired again, and that’s such a good feeling. More importantly – I feel happy. I still have a ways to go – and I know that the grief will never truly go away. But I am learning how to deal with it when it rears its ugly head, and I know now when to give myself kindness and grace.

Completed: Static Sweater

11 Jan

This was my last finished knitted project of 2016, and my first *blogged* knitted project for 2017!

Static Sweater

I finished it just in time, too – Tennessee has finally decided that it is indeed winter, and dropped the temperatures to match!

Static Sweater

I haven’t knit as many sweaters this year (or, in 2016) as I did in the past – when I started knitting, I was on a huuuuuge cardigan kick. I knit SO MANY FUCKING CARDIGANS. I still love cardigans, but I rarely wear those OG knits from my first couple of years as a knitter. Most of them were great for my lifestyle at the time – I worked in an office and I needed to cover up my shoulders to make my dresses more appropriate for work. Now that I’m not stuck in a dress code, I rarely wear cardigans in the summer, unless I’m anticipating some crazy A/C abuse (Tennesseans looove their A/C). I have found that I prefer to knit and wear full-on sweaters – when I knit in the round, there’s no purling (woohoo), so it’s faster, and I find them more versatile and easier to wear than cardigans. Again, I don’t live in a climate that really needs a million sweaters – so I focus my knitting attention primarily on socks these days haha. But it’s fun to knit a sweater every once in a while!

Static Sweater

Static Sweater

Static Sweater

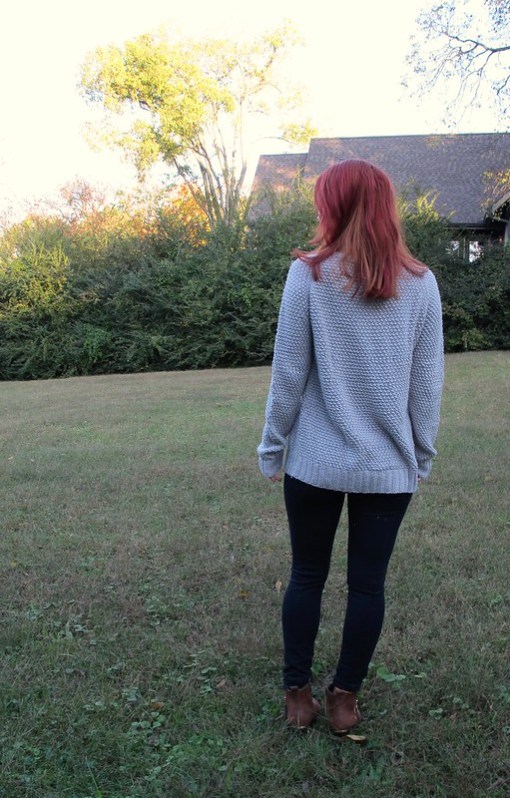
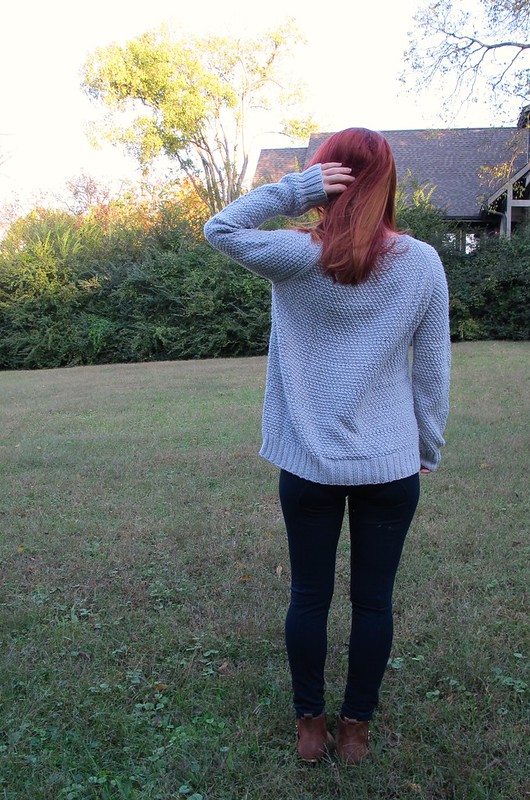
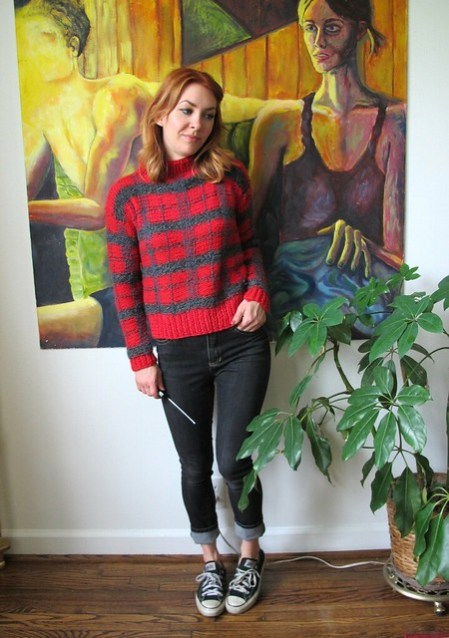
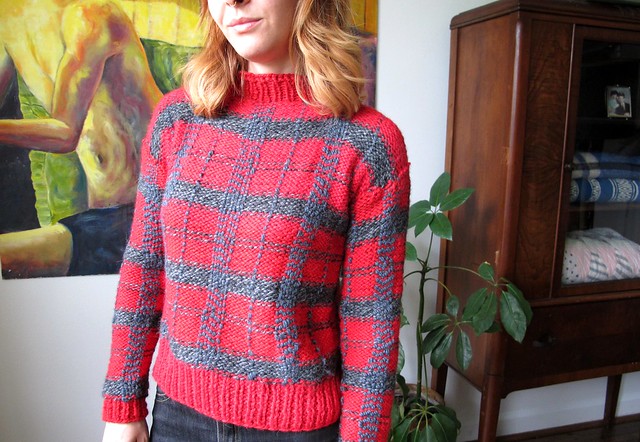
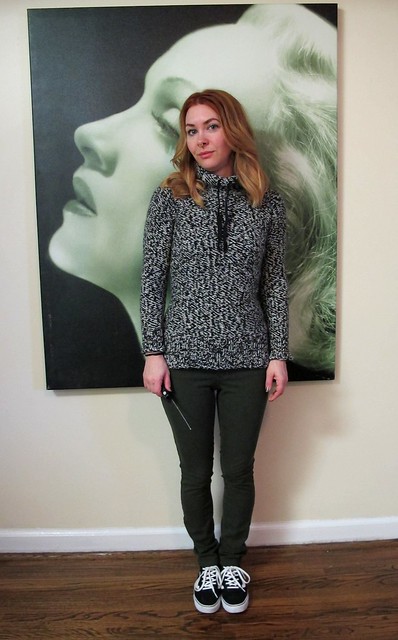
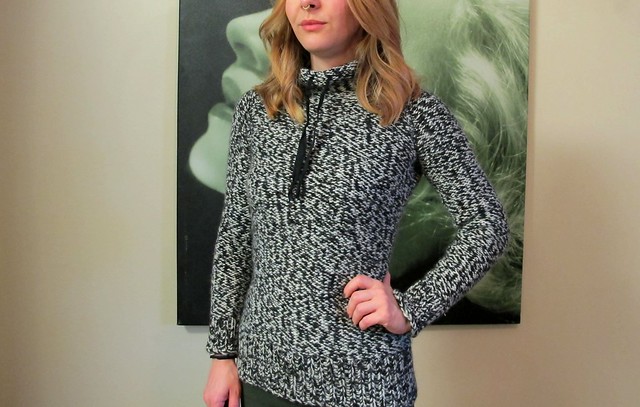
I have been loving these marled yarns that seemingly EVERYONE is knitting right now, and I wanted a nice cozy turtleneck to add to my (tiny) sweater collection. Something with minimal shaping – but not overly loose – and long enough to cover my butt (I feel like the older I get, the more my butt gets cold. What gives with that? Do I have a sensitive butt now?). Finding the yarn was really really easy. Finding the pattern was another challenge in itself.

First, the yarn. I was given an opportunity to review some yarn from We Are Knitters, which I totally agreed to do because 1. Yarn is really expensive; and 2. We sell some of these kits at Craft South, so I thought it would be nice to actually see what they were about. Of course, I’m super cheeky so I asked for an entire kit to make my sweater – specifically, I had my eye on the Kide Sweater. I love that loose, slouchy shape, the not-too-tight turtleneck, and I thought it would look great in that Petite Wool spotted black colorway.

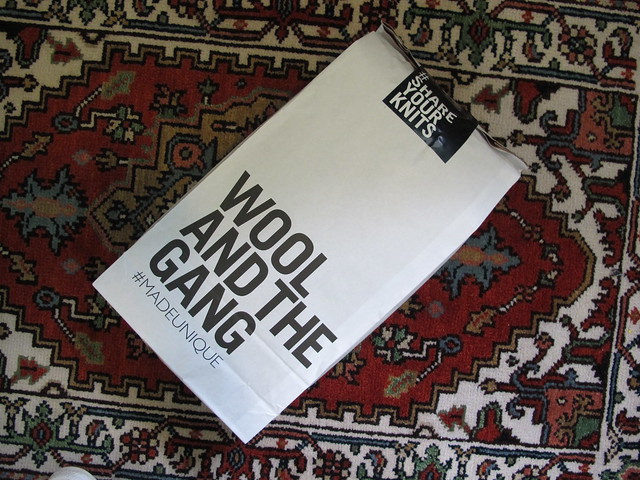
Similar to Wool and the Gang kits, the We Are Knitters kit includes everything you need to make and finish the project – in this case, I got the pattern, 6 balls of the Petite Wool (which is basically a bulky yarn), a set of US 11 straight wooden needles, a WAK tag to sew inside my sweater, and a plastic needle to weave in the ends. It came in a recyclable paper bag. The pricing structure is similar to Wool and the Gang, maybe a little bit cheaper. I think the stuff that comes with WATG is a little bit nicer, though – for example, the WATG needle (for weaving in the ends) is metal, and the WAK needle is plastic. The WATG knitting needles are rosewood, and they are suuuper nice. I was not very impressed with the WAK knitting needles – they are also wood (beechwood), but they just feel a bit cheap. Very lightweight and the tips are not smooth. They were the wrong size for my gauge, so I did not use them for this project. I also preferred the WATG yarn over the WAK yarn, but they aren’t exactly the same thing so I don’t know if that’s really a fair comparison.

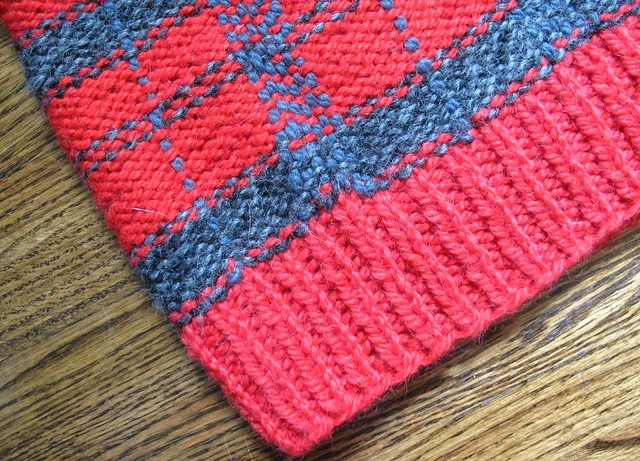
The WAK Petite Wool yarn is really pretty, but it’s not the easiest to knit with as it is spun very loosely. It’s almost like a thin roving – it’s twisted just enough to get the two colors together, but because it’s not twisted very tightly, it’s prone to pulling apart or getting split with your needle when you knit into it. It’s quite lofty, which makes it a HUGE PAIN IN THE BUTT to unknit, since it really just wants to cling to itself forever. That being said – it feels good in the hands, knits up gorgeously, and is incredibly warm to wear. I have worn this sweater several times – including a 20 degree day in NYC this past weekend – and the cold couldn’t penetrate that barrier. It’s not super itchy to begin with, but I washed it in a Wrapture (which is a no-rinse wool wash with lanolin) and it got even softer. Love love love wearing this yarn.

My real beef with this kit was the pattern itself. The images on the website are really nice, which is what initially drew me in. However… it’s a pretty terrible pattern. It’s definitely very beginner-based, but I don’t think you’d end up with a nice sweater if you followed these instructions. The sweater is essentially knit in two giant pieces that get connected at the side seams. This includes the sleeves. So you start out really small, gradually increase until the piece is torso-sized, and then gradually decrease to the wrist of the second sleeve… then you sew the two pieces together all the way up the side and sleeve seams. I am not crazy about batwing sleeves on a bulky sweater (which is basically what this will end up being), and I feel like something knit out of yarn this heavy needs more structure to keep it from getting weighed down. I also don’t like the way this yarn looks sideways – which is how the stitches will end up, based on the pattern shape. Had I known this, I would have only asked for yarn, not a full kit – but unfortunately you don’t get to see the pattern schematics until it’s in your hands. So I scrapped the pattern and picked a different one, because at the end of the day – I’m the one knitting and wearing this sweater, and I want it to be something I actually truly love.

Static Sweater

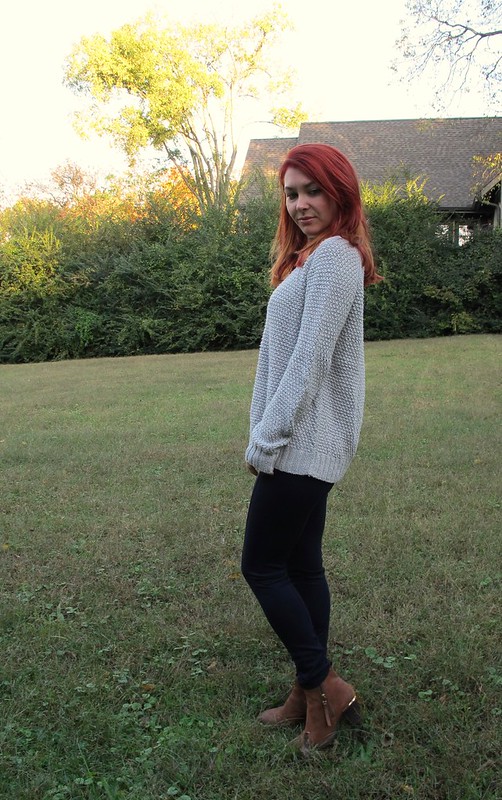
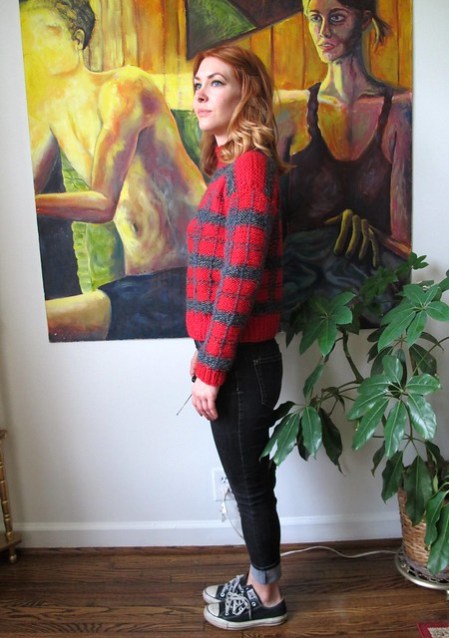
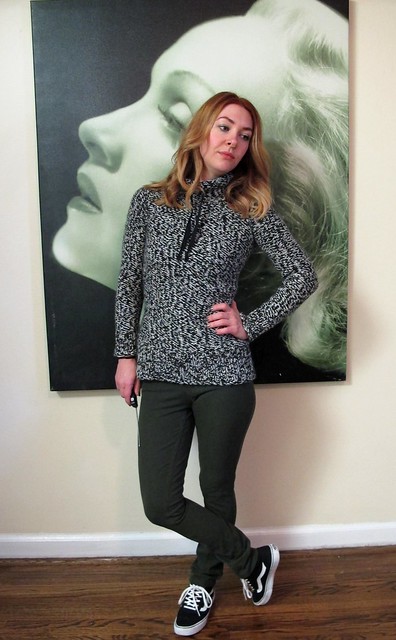
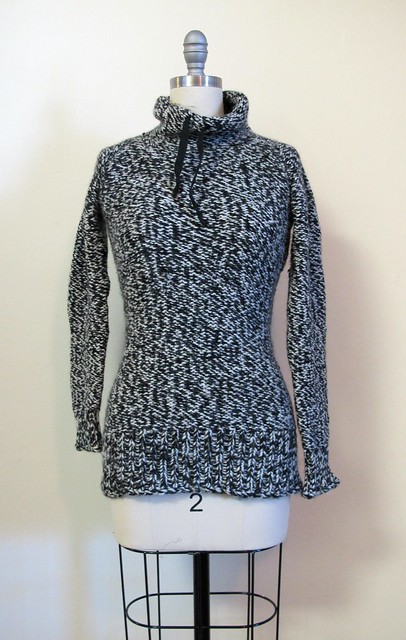
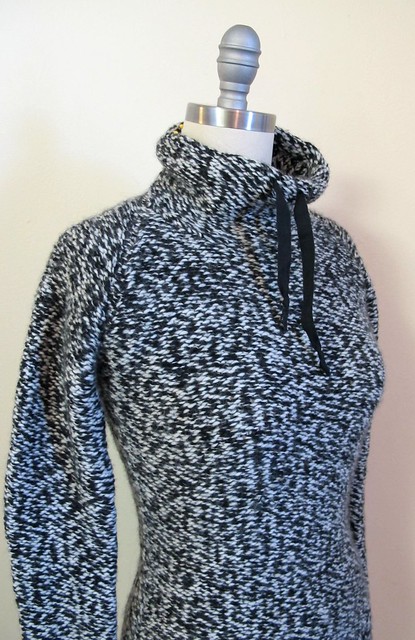
Sooo, looking for another pattern ended up taking me WAY too long. It is apparently quite difficult to find a semi-fitted, turtleneck sweater knit out of a bulky yarn that does not have cables or lacework. I started with Caribou Trails, bc it had everything I wanted and I figured I could omit the side cable without any problems – but after downloading, I realized the instructions don’t include any neckline shaping. You basically knit the tube for the turtleneck and just go straight down. My WATG Teen Spirit Sweater is shaped like this, and it’s not the worst, but I don’t want to knit any other sweaters like that. Actual neckline shaping means the front dips a little lower than the back, and it doesn’t push against your collarbone. Caribou Trails got scrapped (bummer that I had to pay for it to learn this, but I’m not going to argue with a knitwear designer over $5, I mean, come on haha) and I resumed my search until I found Eased, which was WAY more up my alley! Good fit, good length, and the turtleneck almost looks like a hoodie without a hood. And it had that neckline shaping I wanted, so, sold 🙂 The pattern I used is the version for bulky yarn, but I may go back and knit the version in the lighter weight yarn as well.

Static Sweater

Static Sweater

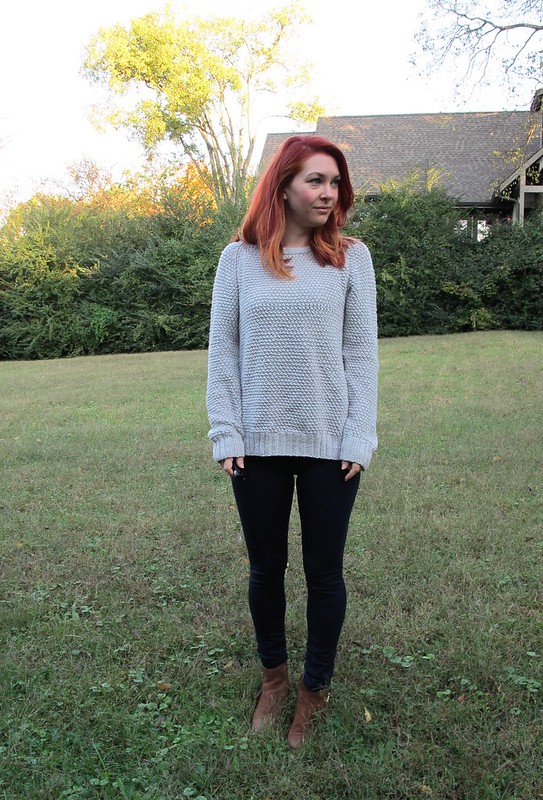
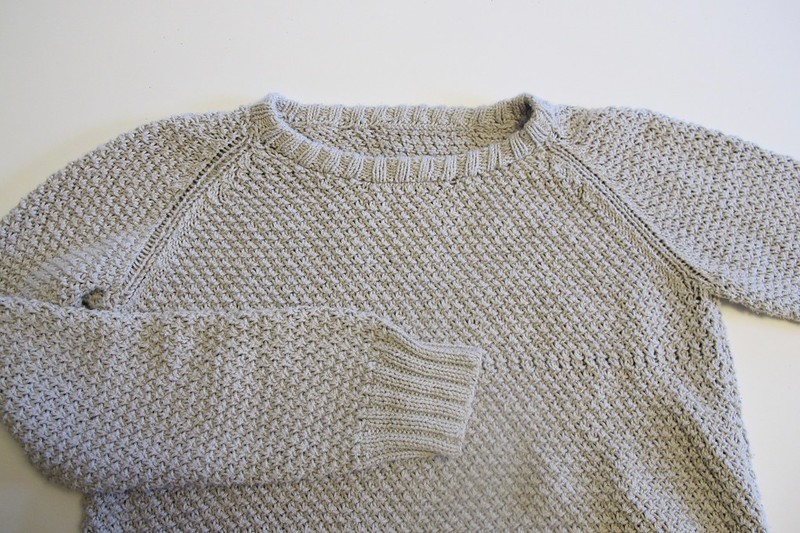
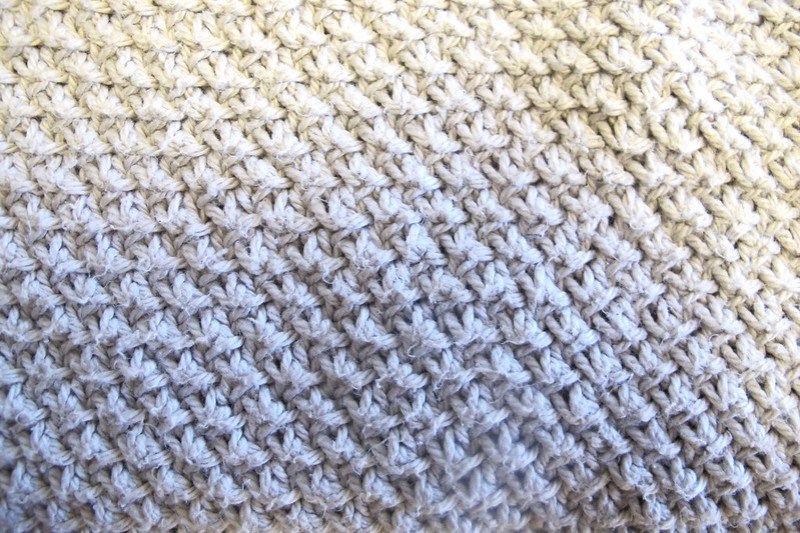
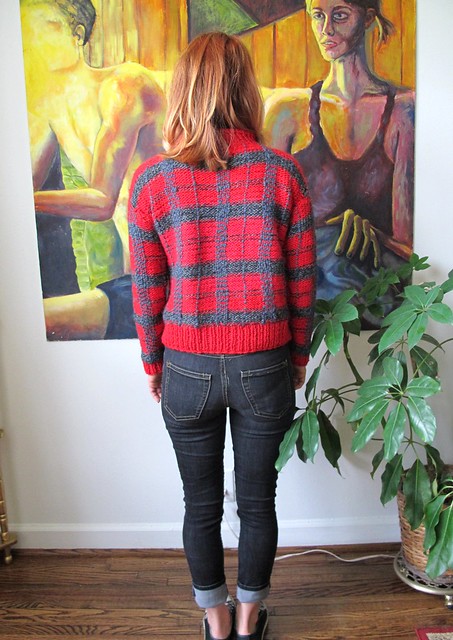
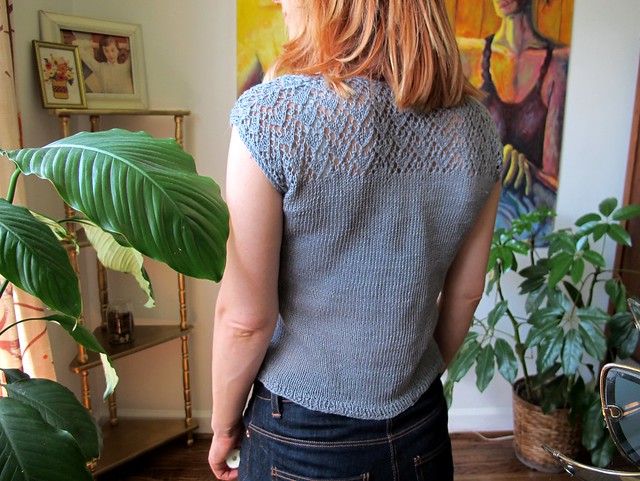
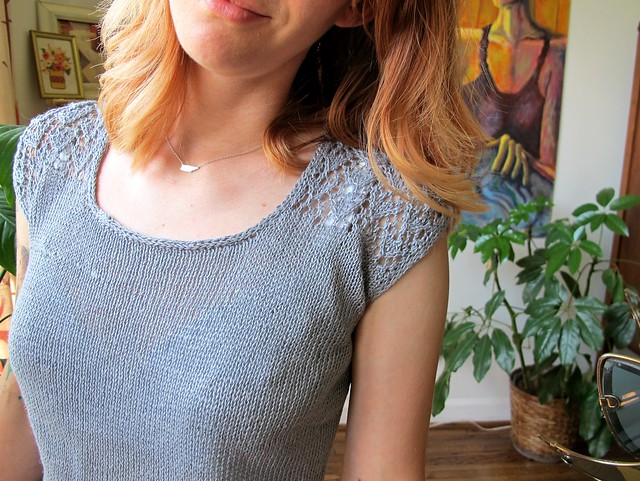
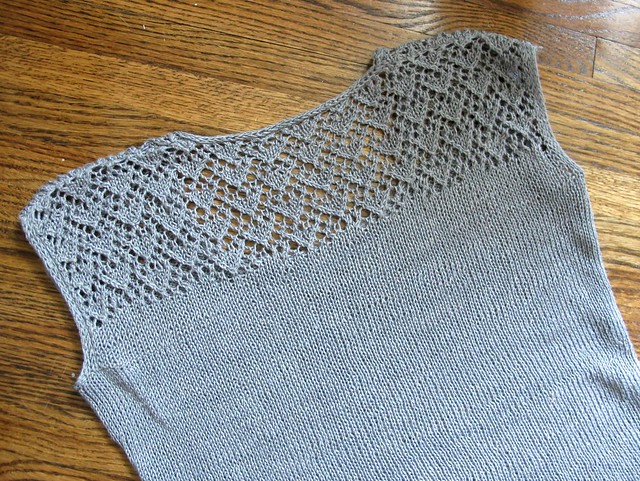
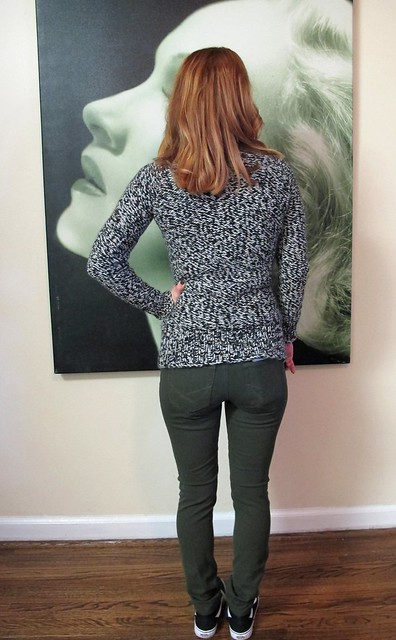
The pattern was super easy to follow, so not a lot to report there. I knit and washed a couple of gauge swatches until I settled on size 10 needles, which gave me a lovely feeling knit fabric. After washing, I figured that the back (purl) side looked much nicer than the front (knit) side, so I just knit the sweater as instructed and then turned it inside out after I finished it haha. I love the effect – the sweater looks like old-school TV static 😉 As a side note, this Misfits song was stuck in my head pretty much the entire time I was knitting it haha

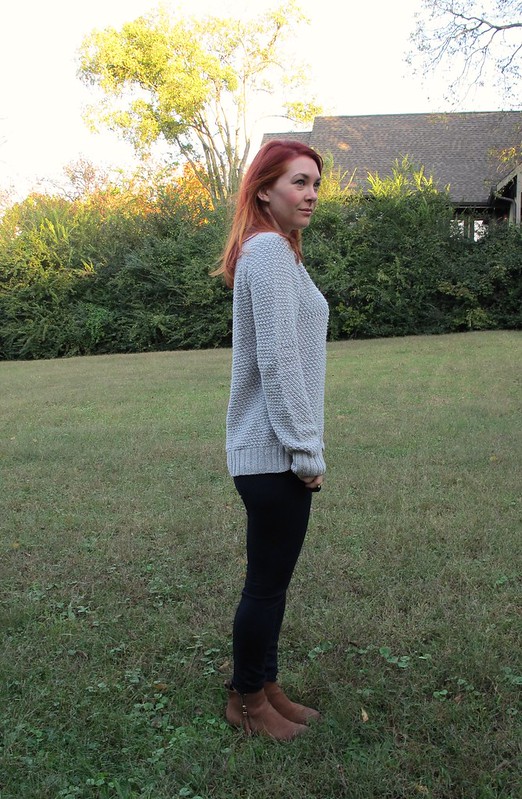
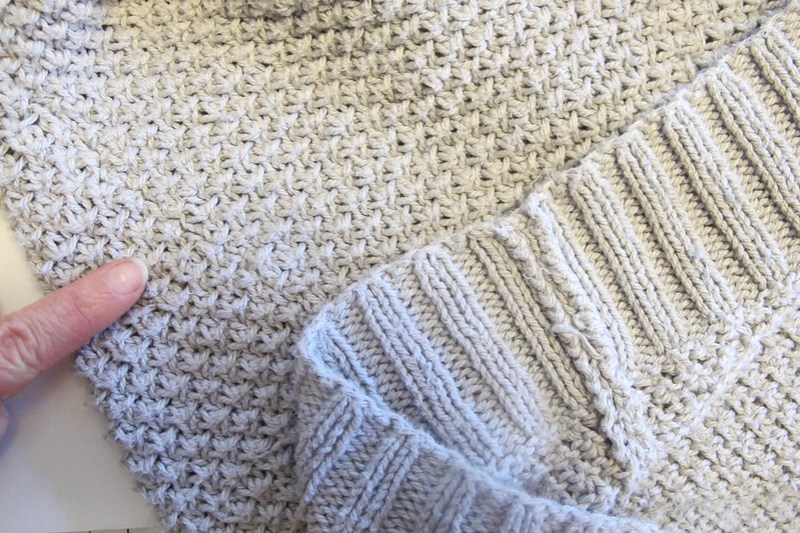
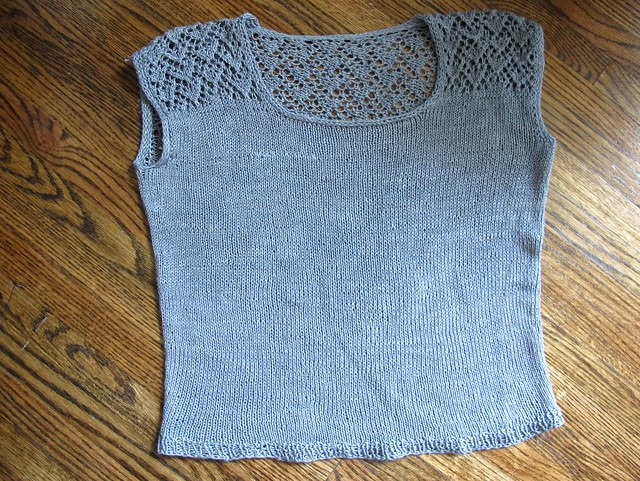
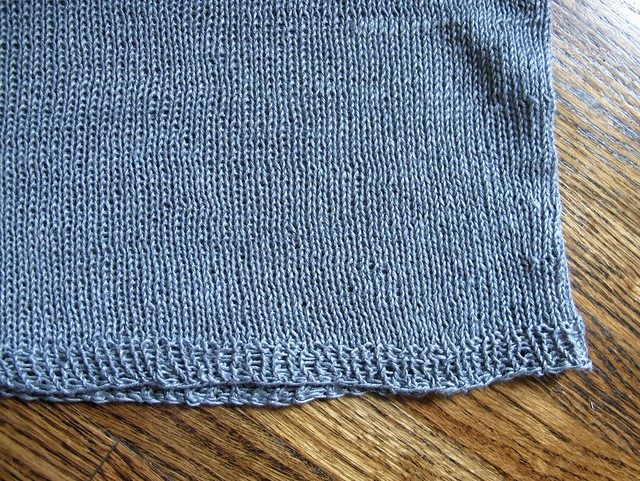
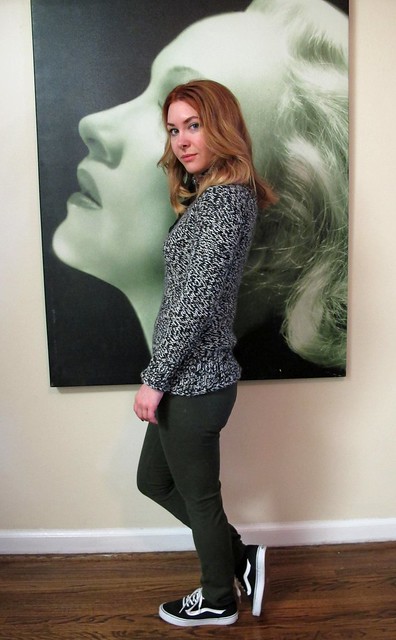
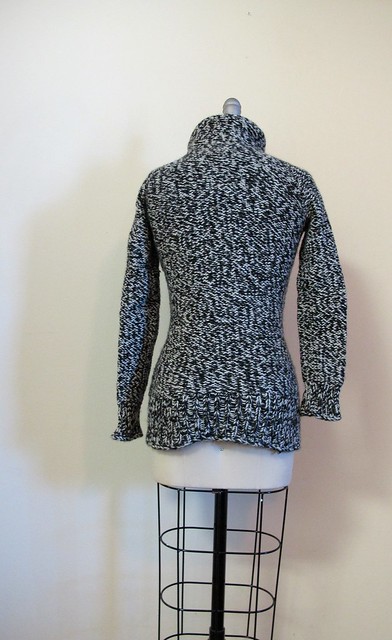
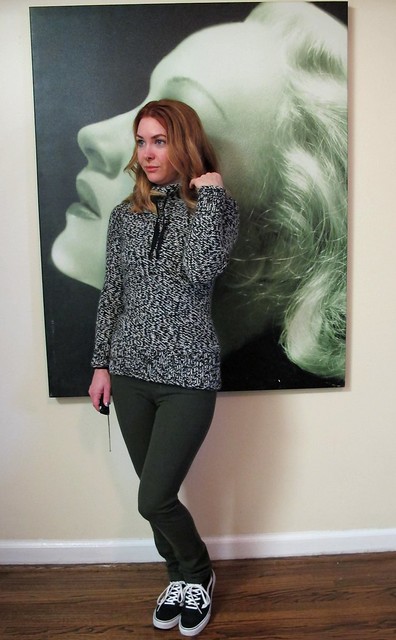
I knit the size 33 and the only fitting adjustment I made was to add another round of decreases to the sleeve so they’d be more fitted at the wrist. Something went haywire with my row gauge, btw – I calculated it in my gauge swatch, and measured carefully to ensure that the sleeves would be long enough (after measuring some of my other sweaters and deciding that 19″ was a good sleeve length for a sweater like this), but they still ended up too short. I didn’t realize it until after I wore it for a day and moved around a bit. That was pretty easy to fix – I just undid my cast-off, put the stitches back on the needles, and knit another 16 rounds (4″ with my gauge) in rib knit. I need to re-block the sweater as you can see a slight difference between the original rib knit ending and the new rib knit beginning, but I did this right before I left for NYC and I wanted to take the sweater with me. These photos are the original shorter length sleeves, fyi.

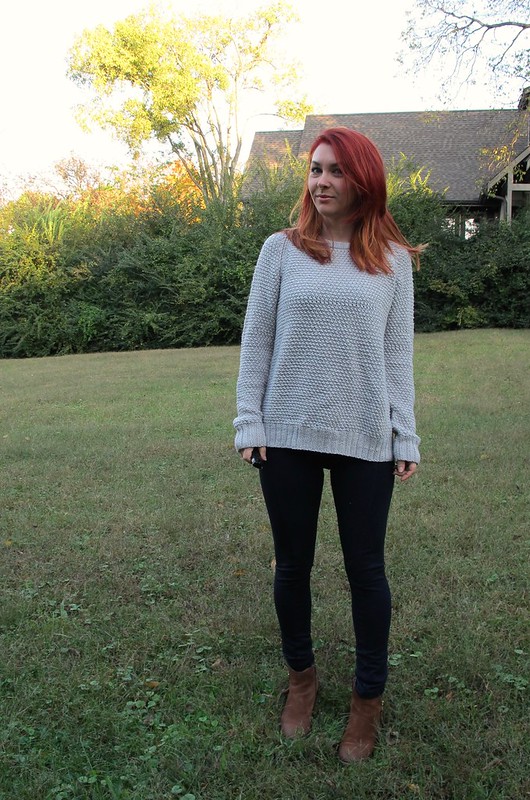
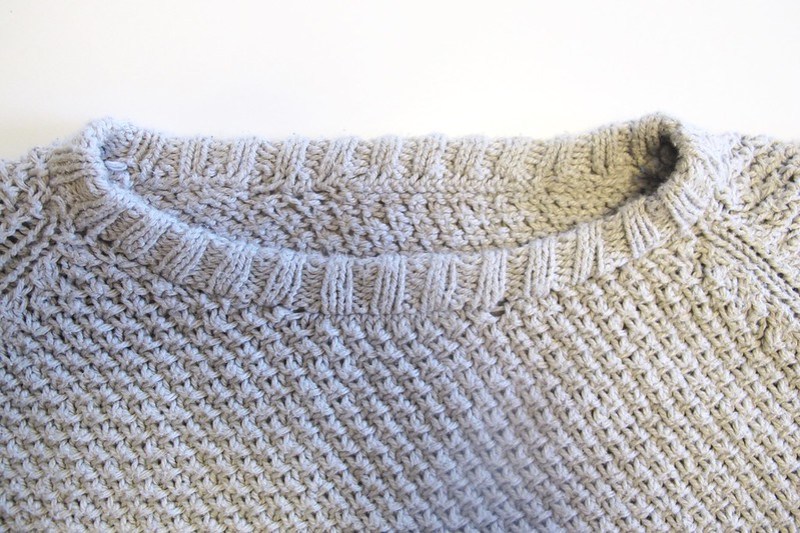
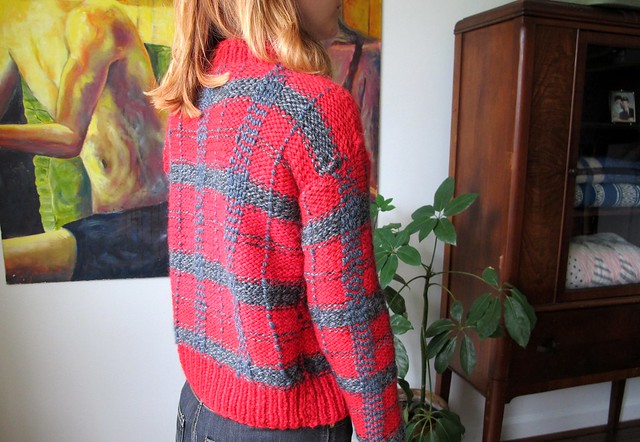
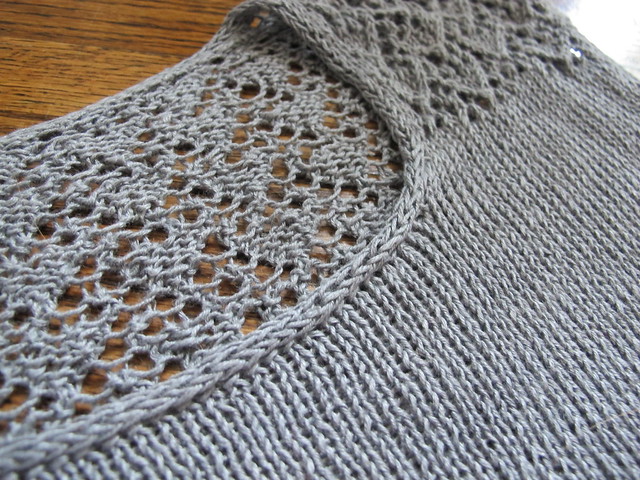
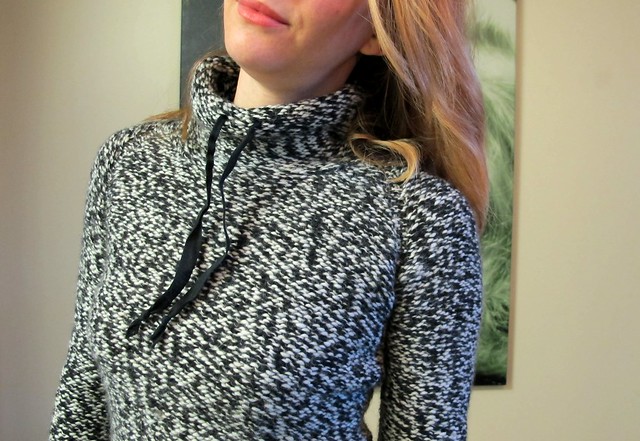
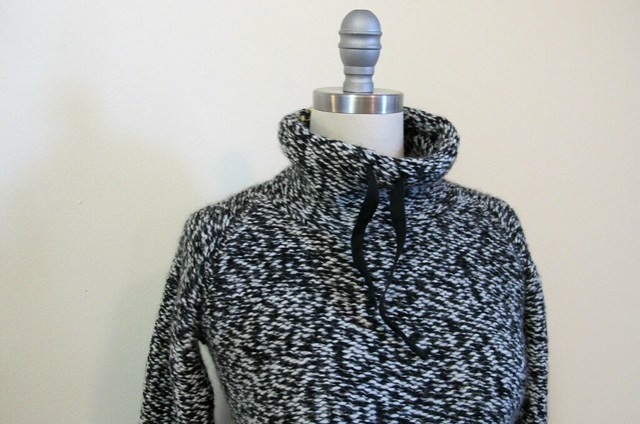
The collar is my favorite part, but man, those instructions are weird! You knit in the round, add yarn-over button holes (so far, so normal)… then instead of binding off, you whipstitch all the live stitches to the inside of the collar. I am guessing that the bind-off would make the collar lay weird, or maybe not be as stretchy, so I followed the instructions with a blind trust, but I was definitely a little concerned about just sewing down live stitches. It did turn out nice, though! The only thing I don’t like is how thick the top of the collar is, so I am going to focus on flattening that more when I re-block the sweater. I may also try a steam iron, we’ll see. One last thing – instead of doing a crochet chain drawstring, I just used black twill tape. I think it looks nicer, that is all.

Static Sweater

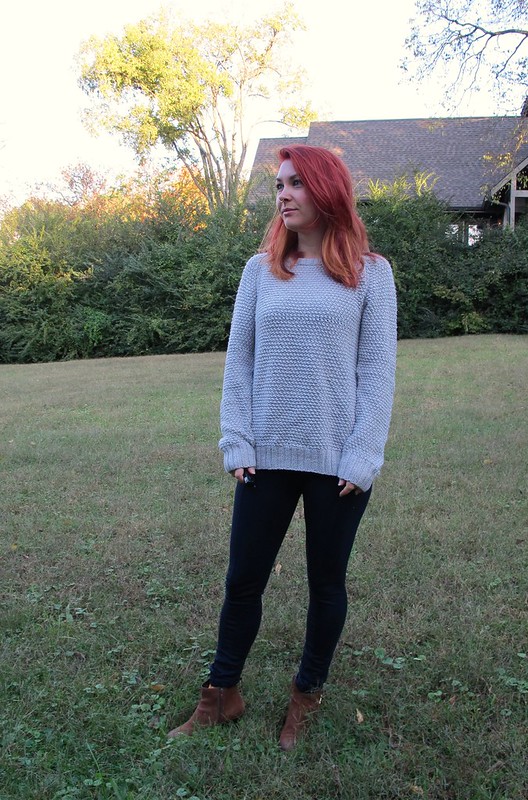
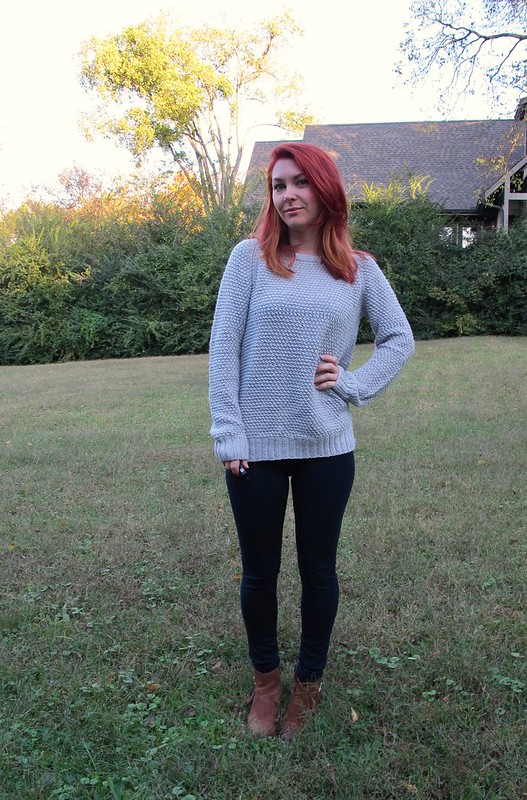
I do NOT know why the left sleeve looks so much shorter, ignore that! I promise they are the same length HAHA

Static Sweater

Static Sweater

Overall, I do love the yarn and the finished sweater. Not especially impressed with the pattern itself, although I think it’s probably fine for a super beginner who just wants to finish a sweater and not necessarily fuss over fine details. I think it is the same for the supplies that were included in the kit – they aren’t terrible, but they’re not the best quality I’ve used. A beginner who’s working on their first project wouldn’t know the difference, and wouldn’t have a problem with using them. But the yarn itself is fabulous to wear and I definitely recommend that, whether or not you decide to get the kit as well (you can buy yarn in bulk lots of 5 or 10, and it’s a little more discounted than buying the balls individually).

Speaking of balls of yarn, I only used about 4.5 to knit this sweater… so I still have another ball and a half to knit something else with. Probably a hat! If you have a good/plain beanie pattern suggestion (bulky weight yarn, approx 250~ yards), holler!

Static Sweater

On an unrelated note – I just got back from a full-on tourist weekend in NYC and, omg you guys, so amazing. I stayed in the Kimberly Hotel, which is way different from my normal housing – it’s not the cheapest hotel (rates start around $150/night), but it is really well-priced for the area it is in. It’s very central, and an easy 10-15 minute walk to lots of cool things -including the Garment District (YEP!), Central Park, the Natural History Museum – not to mention there are tons of great restaurants just in the surrounding blocks. In addition, there’s a sweet rooftop lounge with really good food and drinks, the rooms are quite nice (I think I might have had a spiritual moment every morning in that WATERFALL SHOWER) and the people who work there are incredibly good at what they do and incredibly intent on not letting you open your own door or hail your own cab 😉 Not an experience I’ve ever personally had before, but now I see why people opt for those fancy hotels!

Since this was a fun / non-work trip for me, I did a lot more touristy-type stuff – although I did nip in the Garment District to grab a couple things (really, I got out of there with the smallest bag ever haha). If you haven’t checked out the Tenement Museum, PUT THAT ON YOUR LIST. It’s not really sewing related (I guess the workers were in the garment industry, but that’s about it), but it’s an AMAZING museum. One of my top 10 for sure. Another thing I really enjoyed doing was walking to Bergdorf Goodman and creeping on all the designer clothes. I only had an hour before I had to catch my flight home, but OH MY GOD I could have stayed there all day. I have never ever understood the appeal of designer clothes – but that stuff is so impeccably made, and it’s fascinating to look at. Some of the pieces made me want to cry over how beautiful they were, as cheesy as that sounds haha. And while I have always found designer stuff to be really over-the-top and kind of goofy looking, seeing it in person really makes you appreciate the artistic side of it. I never thought I would say that I love Gucci, but, their 2017 Resort collection is killer. And the Valentino 2017 Resort collection literally brought a tear to my eye when I was oogling over it. I NEED TO FIND THAT TROPICAL SILK ASAP.

Static Sweater

In other news, I’m heading out again this Saturday for my trip to Egypt! I won’t be posting on this blog during that time, so expect some silence. If you want to keep up with me via social media, I will be posting on Instagram (assuming I can get some internet signal over there haha), so you can follow that if you feel so inclined! Otherwise, I’ll see y’all later! ♥

*Note* The yarn was provided to me by We Are Knitters, in exchange for a post review. Although they also supplied a pattern and needles, I used ones that I purchased on my own. All opinions in this review are 100% mine!

Save

Completed: Sea Wall Socks (Also, dad update â™¥)

15 Sep

As much as sewing is my very first love, I’m really glad that I learned how to knit. The repetition is extremely therapeutic when I’m stressed and need to calm down – on me, it has almost the same effect as doing an hour of yoga. It’s very meditative, giving me something to focus on with my hands while allowing my mind to quiet down. Even just sneaking in a couple of rounds at opportune times – before I’m rushing out the door, while I’m sitting in my car in the parking lot trying to work up some nerve to go inside (tbh, usually because I’m about to walk into a first date, ughh), at the end of the night after a class when I’m having trouble turning my brain off. I’m not a crazy enough knitter to where I can manage it during a walk (yet!), but I do drag my little Field Bag with me everywhere, because you never know when you need to bust out those needles for a moment of zen. Really, the only place I’ve found so far that you can’t take your needles is in a courthouse (that was a sad moment for me – literally, I shed a tear when they told me I had to put my project + needles back in my car… at least they didn’t make me throw it away!).

Seawall Socks

Socks are my #1 project of choice for de-stress knitting, as they are small enough to carry around and work on somewhat discreetly. I love knitting sweaters, but they get large and unwieldy quite quickly and they tend to require multiple balls of yarn to complete. Socks are a lot easier when it comes to portability. I’ve mentioned this before, but I try find the local yarn store with each new city that I visit, and pick up a skein of sock yarn as my souvenir. Sometimes it’s from a local yarn dyer (the best!), sometimes it’s something I can’t find here in Nashville, and sometimes it’s just something pretty that reminds me of the city I’m in.

My latest sock project is the Sea Wall Socks pattern from Tin Can Knits, which was offered for free last year as their 12 Days of Christmas celebration. I actually don’t mind paying for knitting patterns – seriously, people who complain about a $5 pattern drive me mad – but I extra extra don’t mind free patterns 😉 I love the interesting cables on this pattern and I think it looks especially nice with a variegated yarn. I knit a size 6 using size 0 needles with sock weight yarn.

Seawall Socks

Speaking of sock yarn, isn’t this one super pretty? I bought at Gather Here last year, while I was visiting Jenny in Boston after my retreat at A Gathering of Stitches in Portland (which I just realized was almost exactly a year ago from this posting, wow!). This is my Boston yarn (ok, Cambridge – whatever.). The yarn is Knittink, which I can’t seem to find any info about online but they had a ton of it in the store! The colorway is actually called “Unicorn Snuggles,” which is admittedly a big part of the reason why I chose it 🙂 There are sparkly silver threads running throughout, and the yarn is extremely soft and easy to work with. I had such a wonderful week up in New England last year, and I think about it every time I look at this yarn. I love that.

Seawall Socks

Seawall Socks

Seawall Socks

I knit these socks as instructed by the pattern, however, I did not block them after knitting as you can probably tell. In the past, I have dutifully blocked all my socks after they were finished (using sock blockers and everything)- but I really don’t like the way the yarn feels after blocking. The fibers tend to relax, the stitches flatten and spread, and then the socks just feel loose on my feet and don’t stay up. So now, I don’t block them at all. To wash, they get a cold wash in the machine (along with the rest of my clothes) and thrown right in the dryer. I’m sure some people hand wash their socks, but not me. Not anymore. Yolo, etc.

Seawall Socks

Anyway, this post isn’t really about the socks. I’ve been absent the past couple weeks for a few reasons – first, I was in Rhode Island for work (which was WONDERFUL – seriously, I could not have asked for a better week). I came home on Labor Day, and then on Wednesday, my dad had to go to the ER with a bout of pneumonia. Long story short, he was admitted to the ICU that night due to several problems, and he’s been on a ventilator since Saturday morning. For those who don’t know, my dad was diagnosed with cancer almost exactly 3 years ago, and so while this shouldn’t be a surprise – it’s still a big, huge shock. My entire family is basically living at the hospital at this point, and while I’m so grateful for their support, it’s been really scary and just downright shitty. I don’t know what is going to happen, as we are just stuck in this awful limbo state of waiting.

I wasn’t planning to write about any of this – I felt like it was too personal and sad for an otherwise pretty fluffy blog. And posting finished projects seems downright silly and trite when you’re dealing with much bigger issues at hand. However, I’ve started getting emails from people wondering why I haven’t posted in 2 weeks, and while I don’t think I owe anyone any sort of explanation about my personal life – it doesn’t seem right to just ignore this, since it’s impacting me pretty hard. Also, I really need this escape. My entire week has revolved about a hospital at this point, and it’s downright depressing.

Anyway, I’m not trying to turn this into a sob story/woe is me sort of post – yes, everything is real shitty right now, I won’t deny that – this is just currently what we are dealing with at the moment. My dad is fighting the fight of his life right now, but I know that he lived his life exactly the way he wanted to, and he has 0 regrets for anything. After his first bout of chemo, he swore it off completely and has been treating himself holistically, which has really made him feel incredible this past year. He actually ran 55 miles the weekend before he went to the hospital, right after tearing up a bunch of carpet and laying new hardwood floors. I look up to him in so many ways, and could not have asked for a better role model – he’s taught me so much about life and love, and this year especially has really strengthened the bond we have. I have a lot to be thankful for, which is what I am choosing to focus on right now.

Positive thoughts and prayers for all of us are appreciated. Much love to all of you ♥

Completed: Smells Like Teen Spirit Sweater

26 Aug

I am SO happy to be finished with this sweater!

Smells Like Teen Spirit Sweater - front

Clocking in at nearly 6 months to knit, seam and finish – this sweater was definitely a labor of love to complete.

Smells Like Teen Spirit Sweater - front

Smells Like Teen Spirit Sweater - side

Smells Like Teen Spirit Sweater - back

Both the pattern and the yarn are from Wool and the Gang, which is pretty much the coolest yarn company I’ve ever heard of. WATG sells yarn, patterns, needles, and complete kits for their patterns (as well as RTW knit pieces, if you want to be completely lazy 😉 no judgement over here from me!). The company reached out to me earlier this year – well, 6 months ago – and asked if I’d like to try one of their kits for a review. Being the cheeky piece of shit I am, I choose the Teen Spirit Sweater, in the classic red/grey colorway.

Smells Like Teen Spirit Sweater - kit

Smells Like Teen Spirit Sweater - kit

The kit came beautifully packaged, and included 21 balls of their Wooly Bully alpaca yarn, the Teen Spirit Sweater pattern, at set of size 10.5 Rosewood needles, and a giant needle for weaving in all the ends.

Smells Like Teen Spirit Sweater - front

Smells Like Teen Spirit Sweater - back

The pattern is One Size, which I knew immediately off the bat was gonna be WAY too big for me – it has a 44″ chest measurement (compared to my measly 32″ – that’s a LOTTA ease!). So the first thing I did was knit a gauge swatch to figure how many stitches I knit per inch, and recalculate the pattern so it would work with my specific measurements. Since the pattern is basically 4 giant rectangles (the sleeves have very gradual increases but nothing crazy), this was not at all difficult to do. All I needed to change was the amount of stitches I cast on, and then just follow the pattern henceforth. I also shortened the body of the sweater, because I wanted mine to be slightly cropped to offset the boxiness.

All the pieces are knit separately – front, back, and two sleeves . The front and back are identical, and are literally just two big rectangles – there is no shaping for the neckline, arm holes or waist. As I mentioned, the sleeves have very gradual increases to make them slightly shaped, but they are still primarily just big ol’ rectangles. To make the tartan, you knit in stripes following the pattern, and then weave the vertical stripes in afterward using this technique from WATG. It looks a lot more complicated than it actually is – it’s just time-consuming! I spent MANY nights sitting on the couch, binge-watching Mad Men, with a tiny blanket o’ sweater in my lap, weaving tartan stripes. In fact, this was the main project I worked on in the last week before my move – as it was the only thing I hadn’t packed!

After I wove in all the tartan stripes, I then blocked the pieces (which seriously took like 2 days to dry completely) before seaming. You seam the shoulders first, then attach the sleeves at the sleeve cap, then seam up the side and sleeve seam in one go (same as you’d do when sewing a knit tshirt). Finally, you knit the neckline ribbing (the sleeve and hem ribbing are knit while you are knitting the pieces). The resulting sweater is MASSIVELY heavy – I wish I owned a scale, because I’d love to know how much it actually weighs! Honestly, I love throwing it at people and watching how surprised they are when they feel it’s heft hahaha. It’s surprisingly not that itchy – it’s a little bit itchy, but I think another wash with some lanolin will clear that right now – but it is super duper warm. Way too warm to wear right now, obviously, but I’m sure I’ll really appreciate it come winter 😉

Smells Like Teen Spirit Sweater - flat

Smells Like Teen Spirit Sweater - flat

Smells Like Teen Spirit Sweater - flat

As complicated at this sweater looks and as long as I spent working on it – it honestly was not difficult to knit at all. Even with rewriting the pattern to work with my measurements, the overall construction was very simple and straightforward. It was definitely time-consuming, but not hard – seriously, this is a great pattern for a beginner. Lots of knitting and purling, simple color changes for the stripes, and then seaming everything together (my seaming definitely needs some work, btw. Woof.).

Part of what took me so long to finish was simple mistakes I made on my end. I wasn’t happy with my first batch of tartan stripes – which I decided after I’d finished weaving the tartan for the entire front. I ripped everything out, recalculated, and wove it all in again. I could have stood to do a neater job with my weaving – all the other examples I see are much more even and precise and mine looks a bit sloppy in comparison – but I’m pretty happy with it regardless because I AM SO NOT RIPPING THAT SHIT OUT AGAIN. I also had some trouble with the neckline ribbing – I picked up too few stitches the first time, and wasn’t able to get the sweater over my head! So I got PISSED, ripped out the ripping, and put that fucker in time out for a solid month. Ha! Eventually, I got some liquid courage (aka wine) and tried again – this time picking up stitches at a 1:1 ratio and making sure it pulled over my head before binding off. It worked! Go me!

Check out my Ravelry page for the full low-down on this project – my stitch counts, measurements for the tartan weaving, etc. Didn’t want to clog up this post with all that, but it’s on the ‘Rav! BTW, I should mention – you can also buy this pattern individually, if you don’t need the yarn and needles. Teen Spirit sweaters for everyone! 😀

Smells Like Teen Spirit Sweater - front

When I started this sweater, I naively thought that I would have it finished before the weather started warming up – ha! Not even! On the flip side, it’s definitely ready and waiting for the next season! I’m actually pretty glad that I had an entire summer to fuss with this, because it made me not be in a hurry to finish it – I knew I’d have to wait months before that was even an option. Instead, I took my time and ripped out when needed, and I think the end result was worth it. Man, I cannot WAIT to wear this bad boy! I think it’ll look especially ace with my Elizabeth Suzann Cecilia Pants. Which, btw – if you are looking for the magic pants that look amazing on EVERYONE, that’s those. You’re welcome.

**Note: The kit for my Teen Spirit Sweater (which included the yarn, pattern and needles) was VERY generously given to me by Wool and the Gang, in exchange for a blog review. Thank you, WATG!

OAL2016: My Finished Outfit!

29 Jul

What up, everyone! It’s practically the end of the July – two days left to go! – which means one thing ’round these parts… The Outfit-Along is nearly over!

OAL_Banner

I’ve had a lot of fun with the pieces this year – both making and wearing them! – and I’m excited to finally show you guys my finished sweater + skirt!

OAL2016: Zinone Sweater + Hollyburn Skirt

Here is the complete outfit!

The sweater is Zinone by Andi Satterlund, and the skirt is a Hollyburn from Sewaholic Patterns.

OAL2016: Zinone Sweater + Hollyburn Skirt

OAL2016: Zinone Sweater + Hollyburn Skirt

OAL2016: Zinone Sweater + Hollyburn Skirt

OAL2016: Zinone Sweater

Zinone was made using the suggested yarn, Quince + Co Sparrow (the color is Moon), which is a fingering weight linen yarn. This was my first time working with linen and OMG TRUE LOVE Y’ALL. Very easy to work with and felt so good on my hands! My gauge swatch put me at size 2 needles, and I knitted the size XS (which is my usual size for Andi’s patterns and corresponds with my bust measurement). I chose to knit the version with the partial lace back, and slightly cropped. I was originally going to do the full lace version, but I guess I’m way out of lace-knittin’ practice because I had a helluva time working this one out. Fortunately, the directions for the partial and full lace back at the same for a bit at the beginning of the pattern, which gave me plenty of time to change my mind 😛 I also completely frogged the entire thing and started over after finishing the lace section, because I realized way too late that I had read the pattern wrong (which is why I was having issues in the first place). I was trying to be clever and separate my repeats with stitch markers – you can’t do that with this pattern, as some of the stitches borrow from previous repeats. Whoops. Once I realized I’d done goofed, let me tell you… it was hard to rip everything out and start over. But I’m glad I did, because my second attempt at the lace looks pretty bomb-ass, if I do say so myself 😉

I made some slight sizing and length modifications to the sweater as well – I knitted the correct number of rows for the cropped version, but somehow it ended up really short (I am thinking I read the pattern wrong). I just continued knitting until I got to the length that I wanted, and did a couple more rounds of decreases as well. Speaking of length, this sweater is only about an inch shorter than the schematics – it’s 16.5″ long from the shoulder, which hits me right about at the belly button. The cropped version on Andi appears to be a lot shorter than mine, even though it says it’s an inch longer.

Anyway, this was a very easy and satisfying knit. I did nearly run out of yarn at the end – I bought enough for the cropped version, and ended up frogging about 3 rows of my gauge swatch. Actually, I had an extra skein but I was trying really hard not to use it so I could be cheap and return it to the store 😉

OAL2016: Zinone Sweater

OAL2016: Zinone Sweater

I LOVE how this linen feels in the summer heat – finally, an excuse to wear my handknits even in July! 😀 And it’s pretty awesome that it’s machine washable. I haven’t done the recommend 3 washing cycles yet, though – I did one Soak wash (this is how I wash all my knits… and my lingerie for that matter. Soak is AMAZING, cannot recommend enough) and then one wash in the washing machine. My new place has me doing laundry at the ‘mat, so running 3 loads back to back to back isn’t exactly doable for me! (well, it is. But I’m not about to pay for that haha) So far, though, it has softened up considerably after even 2 washes. Can’t wait to see how it softens even more with additional wear and washing 😀

OAL2016: Zinone Sweater

OAL2016: Zinone Sweater

OAL2016: Zinone Sweater

OAL2016: Zinone Sweater

OAL2016: Zinone Sweater

Sorry, loads of photos!

OAL2016: Hollyburn Skirt

OAL2016: Hollyburn Skirt

Now for the Hollyburn!

I already wrote a couple posts about the modifications to make this particular skirt (see: Choosing Your Fabric, Flat Piping, and Installing an Exposed Zipper), so I’ll just brief over the key details here.

The navy rayon crepe is from StyleMaker Fabrics (who is one of our sponsors for this year’s OAL!). I added flat piping at the waistband (sewn with silk crepe – from my stash) and an exposed metal zipper to the back. I also shortened the length considerably, omitted the pockets, and used stretch interfacing on the waistband.

I sewed the entire skirt on my Spiegel 60609, and it did pretty well overall! While I don’t want to say I was concerned to see how it would handle that shifty fabric (I have sewn straight-up silk and a bra on the 60609, and it hasn’t given me any problems thus far with my fabric choices), I was still pleasantly surprised at the entire experience. I didn’t use any special stitches, and only feet that came with the machine. The zipper foot in particular was great for both applying the piping and the invisible zipper, as well as making sure the topstitching was nice and straight and close to the edge. I did find that I needed to increase the stitch length just a smidge for this fabric, as it wanted to bunch a little bit otherwise, but overall I’m pretty happy with it! I am glad that moving the needle over is an option with this machine (you just increase the zigzag width while on a straight stitch), however, I’d love to see some new feet released to use with this machine. Maybe a 1/4″ foot or an edgestitching foot? 😉 HINT HINT.

OAL2016: Hollyburn Skirt

OAL2016: Hollyburn Skirt

OAL2016: Hollyburn Skirt

For me, the most fun part about this challenge is ending up with TWO pieces that I can mix with other garments in my wardrobe. I love this top + skirt together… but honestly, I like them even more with different things from my closet! They are definitely wearable with a bunch of what I already have (which is part of the reason why I got a little boring with the colors 😉 I wanted the versatility!); here are a couple of examples:

OAL2016: Zinone Sweater

Zinone top + Ginger jean shorts
I don’t know about y’all, but I am LOVING the cropped trend! Slightly cropped with a slightly high-waisted bottom is my new favorite thing right now (not your cup of tea? This is the beauty of knitting your own – you get to decide the length!). I love the way this top looks tucked into a skirt, but the combination with my high-waisted Ginger shorts really makes my heart sing the most.

OAL2016: Hollyburn Skirt

Hollyburn skirt + sleeveless coral B5526 button up
I did not realize when I made this shirt that it was going to be one of my top 10 handmade garments of all time, but it is. It goes with everything. The sleeveless option + lightweight cotton fabric make it a great option for summer, and it layers beautifully under sweaters in the winter. The color is perfection and looks especially great with navy (my go-to summer dark neutral). It’s as easy to wear as a knit tshirt, but looks a helluva lot more refined and classy.

OAL2016: Zinone Sweater + Hollyburn Skirt

Anyway, I guess that’s it for this post! Those of you still scrambling to finish your outfits – you have 2 days before the deadline! Make sure you upload your finished outfit to the Official OAL2016 Finished Outfit Thread on Ravelry before 7/31/16 Midnight PDT if you wanna win one of those sweet prizes! Andi and I will be drawing 3 winners at random, who will win fabric, sewing pattern, and knitting pattern vouchers! Even if you’re not participating, do take a look at that thread! There are some amazing outfits to drool over 🙂

Completed: Skyp Socks

29 Jan

Mmmm handkit wool socks. I don’t want to say there’s nothing better, but… handknit wool socks are pretty dang good.

Skyp socks

This is my most recent sock project, and I really mean recent – I just finished these a couple of days ago! Fresh off the needles and all that!

I’ve mentioned numerous times that I love sock knitting because it’s SO good for traveling – the project itself is super portable, relatively mindless (well, depending on the pattern I suppose haha), and you can always squeeze a little ball of sock yarn in your bag as a souvenir! This is my latest sock-travel project, and the first of my sock-yarn souvenirs.

Skyp socks

Is this not the coolest yarn? It’s a Crazy Zauberball, which I picked up at Knitwit Yarn Shop in Portland, Maine, when I was there for my sewing retreat in September. I was looking for a unique yarn and this is definitely unique. I’ve never seen anything like it – the colors gradually fade into a new color at random intervals, and the color combinations themselves are a bit of a surprise. I almost left with a grey/black/white gradient, but my shopping buddies convinced me to get the orange/blue combo because it was a lot more unexpected. I’m glad I did, because it was pretty fun to watch the colors change as I knit each round!

Skyp socks

The pattern is the Skyp Rib socks, which I’ve seen get rave reviews on Ravelry. I like that the socks look like they have a bunch of tiny cables, but there’s actually no cabling in this pattern – it’s just a series of passed-over stitches. The name of the pattern is the name of the stitch – a “skyp” stitch is slip 1, knit 1, yarn over, pass slipped stitch over. You do these in alternating rows of 3 and it looks like cables 🙂 It’s also fairly mindless – except if you are unlucky enough to drop a stitch. That shit was a nightmare and I can’t even tell you how many times I unknit these things to try to correct my stitch counts. The rest of the pattern is relatively easy – top down, knit in the round on DPNs (I used circulars via Magic Loop cos that’s how I roll) with a size 0 needle. Honestly, the Skyp pattern probably wasn’t the best for this yarn as it gets a little lost in the color gradients, but that’s ok!

I don’t have a lot of pictures because it’s surprisingly hard to get good photos of your feet when you’re flying solo! Especially if you don’t want them to look like giant paddles (which is an accomplishment in itself, because I actually have pretty small feet – like, I can wear kid’s shoes. They looked HUGE in some of those photos, though, ha!). So here’s some detail shots. How many photos of socks do you really want to see, anyway? Right? Right. Don’t answer that if you err on the side of a foot fetish. Let me keep my innocence.

Skyp socks

Skyp socks

Skyp socks

Skyp socks

That’s all! Short and sweet 🙂 I would absolutely consider knitting this pattern again, because it was just interesting enough to not be boring and the Skyp stitch is so pretty, but I have a few more patterns in my arsenal that I want to try first 🙂 And I DEFINITELY want to knit with more Zauberballs! Every single one of the colorways is just fantastic.

I think I’ve asked this question before – but it bears repeating. What you’re favorite sock pattern? What’s your favorite crazy sock yarn? What you’re favorite ~normal~ sock yarn? What is a horse shoe? What does a horse shoe do? Are there any horse socks? Is anybody listening to me?

Completed: Little Cable Knee Highs

13 Nov

Ugh. I know, I know – two sock posts in a row. I hate to do this to y’all because I know it’s boring AF for the non-knitters (and to be honest, I’m almost borderline boring myself at this point haha), but this is what I got as far as photos! I’ve been back for a couple of days, but shit’s been hectic and I haven’t had time to fix my hair and stand in front of a camera. So, you get socks! Merry Christmas!

Grey Little Cable Knee Highs

Anyway, the truth is – even though they are socks, these totally aren’t boring because I made them and I endlessly entertain myself. So there’s that! 🙂

Grey Little Cable Knee Highs

Grey Little Cable Knee Highs

The pattern here is Little Cable Knee Highs, which is a free pattern from Purl Soho. Hey, yo, my knitters – who else looooves the Purl Bee? Favorite online knitting tutorials, hands-down. When I’m looking up a new technique – not just for knitting, but with anything, really – I find that I can’t really follow a video. I prefer a well-photographed tutorial with lots of words! In my experience, Purl Soho has some of the best – I especially love (and revisit, and revisit, and revisit) the ones for Kitchener Stitch and short rows. I find the new layout of the website really hard to navigate, btw, but that ain’t nothing Dr. Google can’t work around.

Anyway, Purl Soho has lots of beautiful, *free* patterns, and these Little Cable Knee Highs are pretty cute! I first saw the pattern when Michelle made a pair, and I decided that I needed a pair as well. Never mind that we are talking TALL-ASS socks knit in FINGERING WEIGHT yarn. Spoiler alert: these things took foreeeeever to finish.

Grey Little Cable Knee Highs

I started these waaay back when I left for Peru in June, 6/4/15 to be exact. I cast on the first sock while waiting at the airport. I knew I wanted to bring a knitting project with me while we were traveling, but since I was just packing a carry-on (a backpack carry-on, nonetheless – for two weeks of travel! Whyyy), I didn’t have a lot of room for a big project. Socks seemed like a great idea because they are so tiny, and knee-high socks would keep me entertained for a really, really long time. So I took my sock project to Peru, where they were knitted all over Lima and Iquitos – even in the rainforest! These socks are so cultured now.

Still, two weeks later – I’d finished about half a foot. Then I put the entire project on hold in order to finish my Vianne project, since that one had a deadline. Once I picked them back up again, it was an endless circle of knitting and tiny cables until I finally finished back in September – just in time to wear them while I was in Portland, Maine! So, again – traveling socks!

Grey Little Cable Knee Highs

Length of time aside, the project itself was fairly easy and mindless. These socks are knit toe-up, and the pattern is written for DPNs. I followed the DPN instructions for the foot, but once I got to the leg I switched to circulars for Magic Loop, which made things soooo much easier and faster. The little cable is really fun to knit and breaks up the monotony of knitting endless circles. Knitting 5″ of ribbing was not very fun, but I managed. I used a Jenny’s Surprisingly Stretchy Bind-Off for the BO, which ended up being a little too stretchy and I think doesn’t look as good. It doesn’t bother me enough to rip out and re-knit, though, but I did keep that in mind for the second sock. I also did a poor job with knitting the heel on the first sock, so it’s kind of sloppy – but again, I was able to do a better job on the second sock. That’s one good thing about having two socks to knit; it gives you a chance to improve the second go!

This was my first toe-up sock project, and I don’t think I like it very much – joining 8 stitches in the round is really, really hard! Those stitches are left live and grafted together after you finish the sock, which I somehow managed to mess up on my first sock – and as a result, there’s a strange little bump at the toe (I don’t even remember how I messed it up. I think I dropped a couple stitches and then tried to pick them up and just created a disaster. My knitting group meets at a bar, and while I probably should not drink and knit – I do, and drinking makes dropped stitches ok. Right?!). I was able to mostly block it out, though, so it’s no thing! For the second top, I grafted the toe closed as soon as I had enough knitted yardage to grab onto, which worked out quite well and meant that I was finished when it came time to bind off.

Grey Little Cable Knee Highs

I bought the yarn at my local yarn store, Ewe & Company, in Kingston Springs TN. It’s Dream in Color Everlasting Sock Yarn and it was soooo nice to knit. I think the color is a bit too variegated for cables, so they don’t show up that great, but I’m ok with that because I think the socks turned out lovely regardless! This yarn was a major splurge for me – I needed 2 skeins, and they were $25/skein. So yeah, a pretty expensive pair of socks! It was part birthday gift to myself (don’t you buy yourself birthday gifts? Because you should, it’s the best), but I don’t think I’ll spend $50 on another pair of socks anytime soon hahaha.

That being said – the amount of money I dropped on these socks did make me more inclined to actually finish them, rather than let them sit in UFO purgatory once I started to get bored with how long they were taking, especially when I got to the second sock. I always consider my entertainment part of the price of anything I make as well (since I’m not spending that money going to, say, a movie or the bar. Bars other than knitting night, I mean :B), which I think is important. For me, sewing and knitting is just as much as entertaining/relaxing hobby as it is a way to clothe myself, so that is part of my consideration when it comes to my budget.

Grey Little Cable Knee Highs

When it comes to buying the materials for these sorts of projects, I try not to cheap out too much. For ME (and I’m only speaking for myself – I know that budgets and the like can be a very sensitive subject for people, so I’m not trying to preach at anyone here!), I value quality over quantity. Rather than buy a bunch of cheap yarn and fabric for a dozen projects, I’d rather spend that whole wad on ONE really nice project. I know I’m going to value the time I spend working on the project, and I’m going to really put my best effort in with fit and ripping out mistakes. With cheaper materials, it’s easy for me to give up and get sloppy since shit was so inexpensive to begin with. But you better believe – if I’m spending $30 a yard on a nice piece of fabric or $80+ on a single sweater, I’m going to really do my best work so that I get my money’s worth out of it. Not to mention, the enjoyment I get from working with really nice materials! I’ve noticed that a lot of people who start with really cheap yarn or fabric are more likely to abandon a project (or leave mistakes because they don’t want to take the time to fix it) before it’s finished, because they didn’t invest a lot of money into it. Even if the materials were super cheap to begin with, that can add up over time!

This is not to say that the most expensive projects are always destined to be the best ones, or that it’s impossible to make something nice with cheaper materials. I know that budgets differ wildly, and while $20 might seem inexpensive to me, that might be a lot for someone else! But I do think there’s some value in spending as much as your budget can comfortably afford (whether it’s $10, $20, or $100 – enough that you have to really think about what you’re spending that money on, enough to make you sweat just a little bit) for a single project, and then giving that project your best effort so that you really get your money’s worth out of the end result. It makes you more conscious of what you’re buying, which means spending less in the long run. Especially at the rate that I plow through my projects – this makes me slow down and appreciate what I’m doing. All good things, in my book!

Grey Little Cable Knee Highs

Anyway, I know everyone has a different perspective when it comes to budgeting for your crafts, and that’s just mine! I’d love to hear yours! Do you choose quality or quantity when you’re shopping for yarn or fabric? Does a more expensive material make you super careful with what you’re making, or do you get paralyzed at the thought of using it? Do you value inexpensive materials or not? You know my thoughts, now tell me yours!