Tag Archives: McCall Pattern Company

Completed: Pink Flamingo B5526

27 Mar

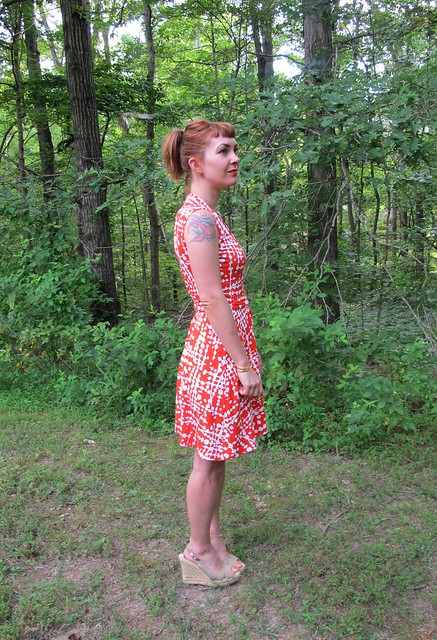
Another sleeveless B5526! Betcha didn’t see that one coming :B

B5526 Flamingo

I am pretty certain I’ve shared this pattern enough times that it definitely absolutely does not warrant another blog post, but, oh well. My blog, my rules, my pink flamingo shirt haha.

Some very brief info for anyone who is just dropping in for the first time:

  • The pattern is Butterick 5526. Yes, it is my favorite shirt pattern. I’ve made it over and over and over again. It’s a great, versatile pattern that is easy to fit and easy to modify. I lurvs it.
  • I originally cut a size 6, but have made several additional modifications – including shortening the length of the body and making the sleeves full-length (that is, when I add sleeves. Ha).
  • I have only made view D, which has the princess seams. I am sure the other versions are nice, but view D is the only one I have experience with!
  • I have finished my shirts with both flat-felled and French seams. Yes, you can do both on sleeves. Totally possible. I am living proof right here.
  • In other news, I think my sewing machine could sew this thing SOLO at this point.

For those of you who have seen every version of this shirt I’ve made over the years, here’s another one for you to enjoy!

B5526 Flamingo

Isn’t this pink flamingo lawn the cutest? I bought it ages at Craft South, aka where I work a couple of days a week. It’s from the Cotton+Steel Les Fleurs Collection, one of the pieces from their Rifle Paper Co collaboration. I had actually put myself on a fabric-buying ban just that morning (thinking I had enough beautiful fabric that I needed to actually use without buying more) and then this shipment came in. What do you do when you are presented with pink flamingo lawn? YOU BUY THAT SHIT. I got 1.5 yards and I’m glad I did, because it sold out quite quickly!

I’m not generally a fan of Cotton+Steel designs – I appreciate what they do, and I think their fabrics are lovely for quilting – but even the rayons and lawns tend to look, well, quilt-ty (except that cherry print rayon I got a couple of years ago, which is equally gorgeous and ooh I can’t wait until it warms up to wear again!). I think the collaboration with Rifle Paper Co was incredibly brilliant – pretty much all the pieces sold out as soon as they hit the shops – but again, too quilt-y/floral for my tastes. But these flamingos totally appealed to me. They’re kitchsy and novelty without looking too much like I made the shirt myself.

B5526 Flamingo

B5526 Flamingo

When I buy fabric, it’s about a 50/50 even split on whether or not I have a pattern in mind. I try to always have a plan, but sometimes you end up seeing something fabulous that just needs to go home with you RIGHT THEN and you will figure out the logistics later! But for this piece, I knew it would be a great button-up shirt. I actually prefer my button-ups to be in a drapier fabric – soft chambrays and silks are tooootally my jam – but a crisp lawn is also wonderful to make and wear them with. Since I knew I would be making this shirt for summer – aka without sleeves – the 1.5 yards I bought was plenty. I actually cut the pieces within a week or so of bringing the fabric home… and then it just sat for months. ha!

I eventually finished the shirt in February (seriously, months… according to Instagram, I bought that shit back in AUGUST hahahaahaha), when we were having this weird warm spell of 70-80 degree days. I figured if it was gonna feel like summer, I might as well dress the part! Of course, it immediately went back to frigid here, but after that Freak Snow we got at the beginning of March, we are creeping back toward warmer days. Which means I’ll be prepared now!

Part of the reason why I waited so long to finish this shirt is because I was stuck on a few details. I had considered adding piping (Rosa had just been released and I was feeling mad inspired by the black piping detail), but I wasn’t sure what fabric to use to make my self-piping – silk crepe in my stash, or go buy something? How big should the piping be? Where exactly do I want to put it? What should I use to finish the arm holes? Also, I had just finished 2 other button-up shirts and was feeling really shirted-out at that point (that’s totally a thing). So I shoved it in my not-technically-a-UFO-because-I-haven’t-actually-started-it box for a few months. I am glad I waited because I am quite happy with all the design decisions I made!

B5526 Flamingo

I did end up using piping – just around the collar and outsides of both button bands. I made my own self-piping, using 1″ bias strips of silk crepe (ultimately, it was the right color/weight and what I had on hand, so I went with that. I prewashed the silk ages ago, so the shirt should launder up in the machine fine). For the cording, I found a thick cord in my stash that was made with big twists and untwisted it to get 3 narrower cords. I had originally experimented with flat piping, but it looked a hot mess so I unpicked everything and added the cord.

Sewing piping in was very easy – here’s a tutorial from Tilly that goes over it. I can’t remember the last time I sewed piping into a collar (if… ever?) but it went in flawlessly the second time (first time being flat piping… yaaaaah, don’t do that you guys haha). Piping the button bands was really easy because they are separate pieces, so you’re basically just piping a seam. I topstitched 1/8″ away from the piping with black thread, to keep it in place and also cos it looks cool. I also topstitched all my flat-felled seams with black thread as well, to keep the look cohesive.

B5526 Flamingo

B5526 Flamingo

The arm holes and hem are finished with the same 1″ bias silk crepe, to make bias facings. The black buttons are just from Craft South. I bought an extra one so I could sew it on the inside of the button band as a spare, because I am a huge nerd and am delighted by details like that.

B5526 Flamingo

B5526 Flamingo

B5526 Flamingo

I don’t think there’s much else to say about this shirt. This was a fun little project and it layers nicely under a sweater, and will look awesome with shorts in the summer.

B5526 Flamingo

In other news, I know my pictures here aren’t that great. I feel like I am experiencing growing pains with my photo situation. I can’t go outside (ok, I can, but I live in a busy apartment building and I’m not gonna. Sorry.), and the lighting is really lacking inside. I just keep moving around my apartment in search of good light. It’s hard to tell how bad it is from the camera screen, and by the time I upload the pictures, I’m like “fuck it, I’m not taking those again” soo this is what you end up with. In the meantime, I guess it gives prime Lurk opportunities in my living space. That’s my living room! The creepy bust staring at me is named Saul, if you were wondering.

New Vogue Sewing Patterns! (+ a survey)

31 Jan

Hey everyone! I’m finally home from Egypt and nearly settled back to normal life. I will be writing a post about my trip after I finish sorting through the photos – in short, it was AMAZING and I had the best time!!! – and I also have my monthly MSN project to share! But in the meantime, I wanted to give a shoutout on behalf of my friends at the McCall Pattern Company.

MPC Logo

As you likely already know, MCP is responsible for McCall’s, Butterick, Vogue, and Kwik Sew sewing patterns. They are a small-ish company (smaller than you’d think, especially considering the massive number of patterns they publish each year) headquartered in NYC (which I visited a couple of years ago and it was pretty freaking awesome!), and make up 3 of what we consider the Big 4 when it comes to sewing patterns. I’ve sewn on their patterns for a long time – the majority of my sewing career, which spans a couple of decades – and the Vogue patterns especially are a key part to getting me where I am now in my craft. I learned so much from those designer instructions, and have made some really cool stuff! I know we – well, I, anyway haha – looove to poke fun at the ridiculous and awful Vogue offerings. It became a regular thing on my blog for a while there, and the only reason why I stopped writing those posts was because the patterns stopped being really terrible for the most part haha. It’s like, I dunno, they actually listened to us or some shit :P. Anyway, two things for this post today.

First, the McCall Pattern Company is currently on the manhunt for some feedback, for their on-going efforts to better support the sewing community. They want to know what you love, what you hate, and how they can better serve the people who are purchasing (or stopped purchasing, for whatever reason) their product. They reached out to me to see if I would share their survey with y’all, my readers, in order to expand their reach to a more diverse audience (and thus give them more data to work with that will result in – we should hope, anyway – a better product that delights all of us!). As much as I like to pick on them for the lols, I do truly love and respect this company, and I appreciate everything they do to keep those sewing patterns in rotation every season (and give us something to laugh at if said sewing patterns are terrible). I want to see them succeed and I selfishly want those products to get even better bc, duh, that absolutely benefits me (and you!). So with that being said – if you have 5-10 minutes and feel like talking about yourself, do us all a solid and fill out this survey. We all love talking about ourselves, this should be easy 😉 Click here to take the survey, and we all thank you in advance! ♥

On a second note – how about we talk about those new Vogue sewing patterns? Because they just released a new batch, woohoo! As I mentioned before, I stopped writing these posts because honestly the patterns stopped being really terrible. Which is great for us – and the company, ha – but not really conductive to those quarterly bouts of entertainment. Fair warning, the majority of the stuff in this collection is actually quite nice, but there are a few wtf ones thrown in there for good measure. Ah, Vogue, always keeping us on our toes.

V1537 1

V1537 2
Vogue 1537 / Kay Unger
LOVE this cocktail dress / jacket combo. It’s like a modern version of those vintage ones that I’m always drooling over. I love dresses’ shape – fitted, high neckline, interesting back view. And I like that the jacket is a slightly more modern shape than being straight-up vintage. The whole ensemble is just beautiful.

V1536
Vogue 1536 / Tom & Linda Platt
Love this one too. Simple dress, somewhat of a statement jacket (looks normal from the front, with a party in the back. Wait. Did I just describe a mullet?). Although I’m not sure if that jacket would look fucking stupid with anything other than that dress, but, it looks AWESOME with that dress so let’s just enjoy that small victory.

V1539
Vogue 1539 / Nicola Finetti
I want to like this, I do, but I also want to hate it. I think it’s the print on the print, which is a good idea in theory (I’ve always loved a sheer layer atop a solid layer of the same print, its interesting, dimensional, and beautiful), but not with that particular print. Also, those shoes are just awful. Go ahead and fight me over that.

V1535
Vogue 1535 / Badgley Mischka
I LOVE THIS AND I NEED AN EXCUSE TO MAKE AND WEAR IT ASAP OMG. I’d be the most elegant superhero in the entire fucking ballroom, y’all.

V1533
Vogue 1533 / Bellville Sassoon
I almost hyperventilated when I saw this dress, holyyyy shit. It is absolutely breathtaking. Ever since I crept hardcore on all the designer clothes at Bergdorf Goodman earlier this month, I’ve a brand-new appreciation for really interesting and artistic garments. This dress falls square into that category, and is exactly why I love Vogue Sewing Patterns.  I wish I was fancy enough to justify an excuse to make and wear this. Hell, I might do it anyway, and figure out the event later haha. I don’t use this term often, but homegirl looks fierce.

V1534
Vogue 1534 / Badgley Mischka
Ok, so the pattern for this dress is reasonably simple – it’s just a lined halterneck bodice with a contrast waistband, and a floor-length skirt. There’s nothing really spectacular about it. But I do love the fabrics that were used for this garment – its an absolutely beautiful dress. This is a great example of fabric choice making or breaking a garment. The sparkles are really appealing to my magpie tendencies.

V9241
Vogue 9241 / Kathryn Brenne
Katheryn. What the fuck is this shit. What the fuck are you doing.

V1531 1
Vogue 1531 / Julia Alarcon
I came here all riled up to hate this dress, but honestly, I really love it. It can definitely go terribly, horribly wrong depending on how that cowl gets worn – but when it’s good, it is real good. I love that giant collar and all the ways you can drape it around your neck to make the dress look completely different.

And while we’re talking about horribly wrong things…
V1531 3

SORRY, PALATE CLEANSER:
v1531 2

V1530
Vogue 1530 / Sandra Betzina
Ok, who’s brilliant idea was it to use auto upholstery fabrics to make this dress?

V9239
Vogue 9239
Hey look, another example of fabric choice making or breaking a garment. In this case, broke as fuck. Those bell sleeves look absolutely stupid when sewn up in a fabric that has that much body.

V9238
Vogue 9238
I just hate this so much.

V9246
Vogue 9246
GUYS WHY ARE THESE SHOES BACK IN STYLE, DID WE NOT LEARN OUR LESSON THE FIRST TIME AROUND?

V1540
Vogue 1540 / Sandra Betzina
Ok, Sandra, fine. You win this one. This one is nice. I’ll give you that.

V9245
Vogue 9245
Yikes.

V9243
Vogue 9243
I call this one, ‘Birthday Cake Couture.’

V9249
Vogue 9249 / Ta Fa
Is… this a pattern for a rectangle of fabric? Really? We’re doing that now?

V9248
Vogue 9248
Finally, a version of Trump with hands that are proportional in size to the rest of his body 😛


What did you think of the new Vogue patterns? Anything grab your eye and skip to the front of your queue? Anything make you cower in fear? Did you remember to take the survey? Let’s talk about it!

Save

Save

Save

Save

Completed: The Summer DVF Wrap Dress

17 Aug

What? Did you think I was going to make it an entire year without busting out this pattern? Ha ha! Forget about it!

Vogue 1610 // DVF(No idea why I’m standing pigeon-toed in this photo, eh.)

ANYWAY. If you’ve been following my blog for a while now, you’ll know that I loveeeee me some knit wrap dress action. Specifically, some Diane Von Fürstenberg knit wrap dress action. I just think she makes the prettiest dresses and I can’t get enough of them (and by “them,” I mean “knock-offs”) in my closet! I have a few that I made last year – The Wearable Muslin, The Silk Jersey and The Chic Black Wool. And now, here’s #4: The Bold Graphic Print. Just in time for the last few weeks of summer! Vogue 1610 // DVF

I have an original copy of Vogue 1610, which is a (vintage) Vogue American Designer pattern (this one featuring Diane Von Fürstenberg, obviously). I found it – in my size, no less – at an estate sale for around $1 a few years ago. It’s a beautiful pattern that really lends itself well to all the hacking and modifying I’ve put it through. It’s certainly a bummer that Vogue won’t re-release this pattern for the modern sewist – and before you start pointing fingers, this has nothing to do with Vogue and everything to do with DVF not renewing the license. I’m pretty sure the McCall Pattern Company wants to re-release some DVF love just as much as you want to buy it (I mean, can you imagine how much $$ they’d make? Who can say no to that?), but it’s not really up to them to decide. Seems like the designer just doesn’t want her name on sewing patterns anymore 😦 DIANE, WHYYYY.

Anyway, back to my dress!

Vogue 1610 // DVFVogue 1610 // DVF

Taking a cue from the black wool version, I kept the original bodice from the pattern and changed out the skirt for a simple wrap skirt (specifically, I used Tilly’s Miette skirt and just made it so the wrap is in the front). I added 1″ to the overlap, so I’d have a little bit of fabric to fold back and topstitch. I like the gathered skirt that the pattern is drafted for, but I wanted this version to be a little more sleek. I originally planned this dress to include small cap sleeves – I was going to take them off my Lady Skater dress pattern – but when I tried the dress on sans sleeves, I really liked the way it looked so I kept it as-is.

Vogue 1610 // DVFI also kept a slightly longer skirt length (I know, I know… nothing about “practically knee-length” qualifies as “long,” but considering I’ve basically been exposing ass cheeks all summer, this is long for me), again, something I liked when I tried it on during construction. Vogue 1610 // DVF

Vogue 1610 // DVFI also tried something different with the front band. Normally, I sew it on like how you finish the neckline of a tshirt – stretching the band so that it fits snugly against the bust when worn. However, I lurked in on some actual DVF wrap dresses while I was in Harrod’s last year in London, and noticed that they finish their necklines a little differently. No knit bands to be found anywhere – most of them use a binding or a facing. I was keen to try this myself, so that’s what I did. I cut the band as usual and interfaced it with a lightweight knit fusible (so it has a little bit of structure, but it’s still quite stretchy). I finished one edge, sewed the facing to the outside of the garment, flipped it to the inside and understitched, and then topstitched 1″ away from the edge on the outside. I was 100% certain that I’d fucked up the dress beyond repair at that point – the back had some puckers and everything just looked kind of strange – but it all sorted itself out once I put it on and my body stretched it into shape. The addition of the interfacing gives the neckline a little bit of height, almost – especially around the neck itself. The facing is much smoother and sleeker than any band. And I can pull the dress apart a little and show some 1970s ~natural cleavage~ if I feel so inclined. Yeehaw! Vogue 1610 // DVF

Vogue 1610 // DVFNot really much else to report on construction – much of the same old, same old. I used my serger to construct, my Bernina (+ walking foot // ballpoint needle) to topstitch. For the arm holes, I just serged them and turned the hem under and topstitched with a straight stitch. So easy! I think I finished this whole thing in less than 3 hours. Vogue 1610 // DVF

Isn’t the fabric so good? When I saw it on Mood Fabrics recently, it immediately screamed WRAP DRESS and it knew it had to be mine. Sometimes, I find buying knit fabric online to be a bit of a gamble – you can’t really tell weight/hand/stretch recovery (not to mention color) from a photo and description, and occasionally I end up with stuff that wasn’t at all what I was expecting. This fabric definitely exceeded my expectations – it’s so beautiful! Very dense with a good stretch (and an awesome recovery; I wore this all day last week and it didn’t bag out at all), and the color is super saturated. It’s a little on the heavy side – but not bulky. It feels very fluid and luxurious. I wish all knits were like this. This stuff is awesome! Also, the color is “poppy” which I kept seeing as “poppy,” so, like, there’s that.

Vogue 1610 // DVFHere’s a shot of the inside. Super clean finish, yay! Vogue 1610 // DVFI think the color and style of this dress will be good for transitioning into the fall months here – where we want to pretend like it’s tall boot and wool hat weather, but it’s actually still 90+ degrees. Which means I can wear this and look cool, but still be cool. Also, I am not ready for summer to end just yet – I have a few more projects left to finish!

Note: The fabric for this dress was purchased with my allowance for the Mood Sewing Network. All comments on this blog post are just, like, my opinion, man.

OAL2015: The Winners!

3 Aug

Hey everyone! One more OAL post for this year 🙂

OAL_Banner

This was my second year co-hosting the OAL with Andi Satterlund, and I think it’s safe to say that we both had a most excellent time! There was a great turnout of participants (61 outfits in the official Ravelry thread!) and I really enjoyed following along with everyone’s progress and lurking all those beautiful finished outfits! Thanks so much to everyone who joined in – whether you made a whole outfit, just sewed or knit one piece, or watched and cheered along from the sidelines. Y’all are the best! ♥

While making an outfit is a pretty sweet deal in itself, Andi & I wanted to draw out the fun even more by offering prizes to 4 random winners who posted completed outfits in the thread. This year, we doubled up and have two sponsors who have generously donated prizes, so I’d like to take a minute and acknowledge them! The first sponsor is Indie Stitches, who you might remember also donated prizes last year. Based in Australia, Indie Stitches sells both paper patterns and downloads, and offers selections from a huge plethora of indie designers, all of which are super good! Our other sponsor is The McCall Pattern Company, who owns and manages 3 of the famous Big 4 pattern companies (McCall’s, Vogue and Butterick, as well as Kwik Sew). I absolutely adore the McCall Pattern Company, even when I’m poking fun at them (and adore them even more for being basically the best sports ever about it!), so I’m pretty thrilled to have them on as a sponsor for OAL2015!

Both Indie Stitches and The McCall Pattern Company have offered to donate one pattern to each of the 4 winners. The winners will also get two patterns of their choosing from the Untangling Knots shop. So you will get to keep on making outfits! Yay!

Now for the winners! These were pulled from the official Ravelry thread and drawn by random number generator.

kari1276
Kari // Vianne cardigan + Carolina Mae dress

Can you believe that this is Kari’s second sewing project?? That dress fits beautifully and I just love the fabric! Also loving the idea of a black Vianne – that’s definitely a sweater you can wear with anything 🙂

feminizzle
Ann Marie // Vianne cardigan + self-drafted dress

I love the colors in Ann Marie’s outfit! That orange Vianne is especially beautiful with all the subtle color gradation. The addition of a waistband on the dress is a really nice touch!

egwene2211
Angela // Myrna cardigan + V8726

Another first-timer here – this is Angela’s first cardigan! I think it turned out awesome and, again, love that orange! The colors of her cardigan & dress remind me of sherbert 🙂 Yum!

irish1970
Jeri // Cancun Lacy Box top + Angie dress

Love everything about Jeri’s outfit, but ESPECIALLY that little lacy top! Ahh!! I never realized how much I needed a lace-knit crop top until right this second. It looks great on Jeri, both with and without the dress. The whole outfit looks so cool and comfortable, perfect for summer!

Congratulations, OAL winners! Expect some emails to get those prizes out 🙂 I’m so happy to wrap up another successful OAL, and even happier to have a few new knitting and sewing patterns to add to my never-ending queue! Starting with that lace crop top. haha!

Thanks again to everyone who participated! Thanks to Andi for hosting along with me this second year, and big thanks to our sponsors Indie Stitches & The McCall Pattern Company for the great prizes! If you’d like to see more OAL garments, check out the official Ravelry thread, as well as the hashtag #OAL2015 on Twitter & Instagram 🙂

Completed: McCall’s 7119

22 Jul

Allow me to introduce you to my ridiculous summer sundress for 2015.

McCall's 7119I guess it’s not really that ridiculous, but it feels a little over-the-top (for me, that’s a good thing haha). This is totally the time of year for getting away with this sort of loud dressing, but I haven’t really taken advantage of it until now! McCall's 7119

McCall's 7119I used McCall’s 7119 to make this, which was originally sent to me by the McCall Pattern Company (contrary to popular belief, I usually buy my Big 4 patterns because I live in the mystical land of $1 Joann sales, but I’ll take free, too haha). I really love the photo on the envelope and was dying to make my own. I was not, however, dying to plunk down $$ for the 3 yards of fabric necessary to make this sucker up. Damn wrap dresses and long maxi-lengths! As if! McCall's 7119

Anyway, I noticed that this blue cotton poplin paisley went on massive sale at Mood Fabrics for all of $4.99 a yard, and I realized that it was perfect – both in weight and cost – for the dress I was wanting to make. I’ve never been a huge fan of paisley – I’ve made a couple garments in the past with beautiful pieces of paisley fabric, yes (and I have a couple more pieces in my stash as of this writing), but for the most part, I’ve always considered it to be kind of an ugly print. Mostly because it reminds me of the horrible ties that my dad used to work to work in the early 90s haha. Sorry, dad! This paisley, though, is definitely much prettier (or that could be the $5 price tag talking to me, I dunno!). I think it’s due to the monochromatic color scheme, which tones down the tack and lets you focus on the pretty design. Or, again, could be that $5 price tag. Whatever.

McCall's 7119Despite this fabric being inexpensive, it’s not cheap. It has a really nice hand and drape, the colors are beautiful and saturated, and it’s opaque enough to not warrant a lining. The right and wrong side are almost identical, which is good for this sort of dress – as you can see the wrong side through the back hem dip. The fabric cut & sewed like a dream, and it is fairly good at resisting wrinkling (see: these photos after a day of wearing). It also feels reeeeeal nice in this heat, a bonus! McCall's 7119

McCall's 7119The pattern was easy enough to make up – I finished it over a long marathon sewing weekend. I started with a size 6 at the bust and an 8 at the waist/hip, based on the finished measurements. I did make a quick little muslin mock-up of just the bodice, to see how the fit was before I cut into my fabric. The bodice fit well enough, except that the center front gaped like crazy! Surprisingly, the easiest fix was also the most efficient fix – I raised the shoulders by 3/8″, and then took 1/4″ off the side seams starting at the underarm and tapering into the existing seamline below the bust dart. I do think the bust darts are a little high – I should have lowered them after raising the shoulders – but the fit is pretty nice as-is, and the print is busy enough to where you can’t see it. Also, I don’t know what the horizontal fold/wrinkle is doing over my boob. I think it’s from how I’m standing, because it’s normally not there. Except, of course, in these pictures, and it’s making my eye twitch. Argh!

The last fitting alteration I made was right at the end – where I took off a massive amount of skirt length. I don’t even know how much, because I kept chopping and chopping. I started with about 4″ off the pattern tissue itself – because the measurements on the back showed that the back dip would drag the floor on me (I’m 5’2″, so, yeah). Upon finishing the dress – well, apart from the hem and closing up the facings – I realized it was still waaaay too long and the whole thing – print+style combo – was totally overwhelming on me. I just kept cutting that hem, and curving into the front wrap (definitely don’t cut too much off the front wrap or you’ll end up with something very indecent!) until the length looked good. McCall's 7119

To sew this up, I used a brand new 70/10 Microtex needle and navy thread. The seams are all French seams – except where the hole is in the side seam (to feed the waist tie through), that one is just turned under and topstitched. I finished the neckline facing with tiny little invisible hand stitches, and the bottom hem is machine rolled. I think that’s it? Pretty straightforward pattern if you ask me!

McCall's 7119McCall's 7119

McCall's 7119McCall's 7119

McCall's 7119I don’t know what possessed me to drag the dressform outside for these photos. I mean, they look really nice, but holy hell that thing is heavy! Never doing that again lolol McCall's 7119

McCall's 7119Here’s the inside – look where my fingers are pointing, you can see the hole for the waist tie. There is also a tiny snap right at the bust where the wrap crosses over, to prevent any northern wardrobe malfunctions. Due to the  wrap, a big gust of wind will definitely show some leg at the skirt. I’m ok with this, though. Legggsssssss. Also, see how similar the right and wrong side look? Because of my finishing, it’s actually hard to tell when the dress is inside-out! I have to look for the French seams 🙂 haha! McCall's 7119

Overall, I enjoyed working with this pattern and I’m definitely not opposed to making it up again – although probably a different view, because this particular one is a little fancy for my daily use. I’d like to try the shorter, mullet-less skirt with some contrast on the facings. Maybe in a silk? Fancy without really being fancy, yeah?

Note: Every month, Mood Fabrics gives me an allowance to purchase fabric with, in exchange for writing a post on the Mood Sewing Network. This fabric was purchased with that allowance. The pattern was also given to me by the McCall Pattern Company. I like to think it’s because they love me, because I am forever an optimist 🙂

Announcing the 2015 OAL!

15 May

Happy Friday, everyone! I just wanted to pop in and let y’all know that the Outfit Along is back for a second year! WOOHOOO!!!

OAL_Banner

Once again, I’m joining forces with Andi Satterlund of Untangling Knots to combine a sew-along with a knit-along. The idea behind the Outfit Along (OAL) is to make a complete outfit by sewing a garment and knitting a garment. This is a great opportunity to stretch your crafting skills, and we’ll have two official patterns that we’ll help you with along the way.

The official sewing pattern will be McCall 6887, and the official knitting pattern will be Andi’s newest cardigan pattern, Vianne. I will be blogging about the official sewing pattern and Andi be blogging about the knitting pattern so we can all sew and knit along together. If you don’t love the official patterns, you can still join in! The Outfit Along is about making an outfit you’ll really wear, so to participate, all you need to do is to sew a garment and knit a garment to make an outfit. You’re more than welcome to pick projects that fit your own style and skills. You can look through the 2014 Outfit Along FO thread in the Untangling Knots group on Ravelry to see the variety of patterns people chose to use last year.

Vianne

McCall 6887 - Pineapple dress!

You can read all the juicy details over at Untangling Knots, but in a nutshell:

– We will be kicking off the OAL on June 1, 2015.
– The deadline for completion is July 31, 2015, which gives you two months to finish both garments.
– Did I mention that finishing within the deadline means you are eligible for PRIZES? Yes! We are cooking up some fun pattern giveaways to reward those of y’all who complete their outfit within the allotted deadline, so stay tuned for more information!
– To be eligible for said prizes, you must finish BOTH garments by July 31, 2015 and post them in the OAL Finished Outfit thread in the Untangling Knots group on Ravelry. Prize winners will be randomly selected from those who finish both their knit and sewn garments and post pictures in the appropriate thread by the deadline.

Vianne_Back
The official knitting pattern, Vianne, is a seamless, top-down cardigan, knit using DK weight yarn on US 8/5mm needles, which makes it a lovely lighter weight cardigan for the summer months. The v-neck cardigan features a set of mirrored lace panels that run along the front neckline and frame a large mesh panel on the back. To celebrate Vianne’s launch, Andi is offering 20% off up until the official OAL start of June 1. Use the code OAL2015 to snag the discount! You can read more details in the Untangling Knots shop or check Vianne out on Ravelry.

McCall 6887 - Pineapple dress!
The official sewing pattern, McCall 6887, is a fun little summer dress with a surprise cut out in the back! You probably remember my Pineapple Delight version from a few weeks ago – well, I’m dying to make more, and I want to drag all y’all down with me (mwahaha). The pattern features front princess seams, skirt variations (flared or fitted) and the optional open back (there is also an option for a non-open back if that’s your jam!). I will be covering basic construction of the dress, and including tips swapping out the lining for a clean bias facing, and adding pockets. The pattern is rated as “easy,” so y’all beginners should have no problem tackling this! Also, just a head’s up – I just checked my local Joann’s and it looks like all McCall’s patterns are on sale for 3/$5 through 5/16, so go save some dollaz!

Since I’ll be traveling around Peru during the first couple of weeks of the OAL, we won’t start the sewing portion until June 22nd. Of course, you are welcome to get a head start and begin sewing on June 1; there just won’t be any sew-along posts until the 22nd! Andi will be managing the knitting posts over on her blog starting on June 1. If you knit and sew along with us, you’ll get your projects done in plenty of time.

Help spread the word and grab one of the badges below or use the hashtag #OAL2015. If you want to hang out and chat about the OAL, come join the OAL2015 Discussion Thread in the Untangling Knots group on Ravelry. You do need a Ravelry account to view and post on the thread, but it’s totally free and totally worth it if you do any knitting at all 🙂

OALBadge3


OALtag_2015

Y’all, I am SO EXCITED. Who else is joining in the Outfit Along this year?

Completed: Vogue 1419 (At Last!)

18 Nov

Well, no that the V1419 Ralph Rucci Sewalong has officially wrapped, I guess I can finally show y’all my coat! For those who didn’t catch my post on the Mood Sewing Network yesterday to see my completed coat a day early – your patience is finally being rewarded, including some never-before-seen shots that weren’t included in the original post! How exciting!

Anyway, coat!

V1419 Ralph Rucci Coat - Completed!

Considering how much I went over the making of this coat at length (see all my posts tagged v1419 here), I won’t be going over the construction so much in this post. If you want more info, feel free to check the tag – or just holler out some questions in the comments (I don’t expect anyone who didn’t actually sew along with the sewalong to have actually read the posts – they were pretty intense, and I find sewalong posts kind of boring if I’m not part of the action, you know? Anyway, snaps to you if you did read the posts! I hope you learned some new coat-making tips and tricks 😉 ). Here’s a general rundown of the basic information, for those who are dropping in for the Big Reveal:
Pattern: Vogue 1419
Fabric: From the Mood Fabrics flagship NYC store – I enlisted the help of my favorite Mood dude, George, to assist me in finding my perfect red wool coating – and he knocked it out of the park! This coating is red virgin wool, it’s nice and thick with a great amount of body to give the coat it’s lovely shape. The wool itself is soft and easily malleable (very necessary for all the crazy intersecting seams of this pattern!), and the color is just PERFECT! The pattern itself does not call for lining, but I did add a layer of bright red silk taffeta as an underlining, to help the coat slide on and also as an additional layer of warmth. The contrast (inside binding, bound button holes, belt trim) is also silk taffeta, in a darker red that matches the wool coating. I think it gives a nice bit of textural interest and keeps the coat from being just straight up loud and red. Both silk taffetas were also purchased from the Mood Fabrics store in NYC, and the colors were chosen with the help of George.
Notions: Just thread and buttons! I had my buttons custom-made here in Nashville by a local lady who sells them through Textile Fabrics. Since my coating is SUPER thick (way too thick for those sad little button kits that you can buy), it needed some heavy-duty machinery to get the fabric on. I’ve used this service in the past for previous coat buttons, and the quality is excellent.
Sizing & Alterations: I cut the size 6 and sewed the coat exactly as drafted, except at the waistline where I used a 1/2″ seam allowance instead of the standard 5/8″ (just to give myself a tiny bit of eating room 😉 ). I only altered the length – removed 3″ from the hemline and 1″ from the sleeve length.

V1419 Ralph Rucci - Inspiration Watercolor

Here’s my original inspiration, in watercolor 🙂

V1419 Ralph Rucci Coat - Completed!

I think it turned out pretty close, if not better! 🙂

V1419 Ralph Rucci Coat - Completed!

Don’t you love the photos? These were taken by my friend and fellow knitter, Alannah Arnold, who was almost as excited about this coat as I was! Alannah and I meet with a group of ladies every Monday for a casual (and, um, booze-filled, haha!) knitting night at my favorite local bar. She’s listened to me talk about this coat for weeks at this point – and offered to take photos once it was done. Which is awesome, because they turned out WAY better than anything I could have shot in front of my shed!

I met with her in East Park, in East Nashville, to take these photos. That’s a feat in itself – anyone who knows me, knows I will kick and scream when it comes to crossing the river into East Nashville. Never mind that driving into East Nashville is like driving into Brooklyn – it’s actually not that bad (unless there’s a Titans game – if then, forget about it!), it’s just fun to complain about 🙂 Regardless, East Nashville has the prettiest fall trees, and this park is undeniably beautiful. So, I made some sacrifices (har har) and ended up with a pretty great set of pictures to match my pretty great coat! Yay!

V1419 Ralph Rucci Coat - Completed!

Ooh, and I even found a Porsche while I was at it 🙂 haha!

V1419 Ralph Rucci Coat - Completed!

V1419 Ralph Rucci Coat - Completed!

V1419 Ralph Rucci Coat - Completed!

V1419 Ralph Rucci Coat - Completed!

V1419 Ralph Rucci Coat - Completed!

V1419 Ralph Rucci Coat - Completed!

V1419 Ralph Rucci Coat - Completed!

V1419 Ralph Rucci Coat - Completed!

If I haven’t already made it completely obvious – I’m SO happy with my finished coat! Sewing it up was so satisfying, and absolutely worth it. It is very dramatic and theatrical – so it’s a bit excessive for daily wear. I don’t think I’ll be bringing this to London, unfortunately, as it’s definitely not very practical (it’s too fitted to really accommodation multiple layers, plus I could see those bell sleeves getting real annoying real fast after 2 weeks of daily wear). However, it is the PERFECT topper for all these upcoming holiday parties that are just around the corner 😉

Let’s also not forget how this is one of few instances where sewing can actually save you money – this coat cost less than $200 in materials, whereas the original designer version has been rumored to run closer to $10,000. Sure, making a little cotton sundress will probably set you back more than whatever you would paid from a mall retailer – but knocking off couture? That’s where the savings really start to show 😉

I will leave you with this photo of me, wearing my knock-off designer coat, throwing leaves in front of a rich person’s house. Probably the same person who owns that Porsche, to be honest:
V1419 Ralph Rucci Coat - Completed!

Be sure to check out the McCall Pattern Company blog to see Meg’s completed coat, if you haven’t already done so! Big thumbs up to everyone who participated in the sewalong – and big, huge thanks to Meg for agreeing to cohost this beast of a sewalong alongside me. Couldn’t have done it without you! 🙂 Don’t forget to use the hashtag #V1419sewalong so it will show up on this tagboard. We encourage you to upload your photos to the V1419 Flickr group, the Vogue Patterns Facebook page, and pin it to the Pinterest board

Didn’t join the sewalong but still want to make your own designer Ralph Rucci? Check out my V1419 tag and the McCall Pattern Company Blog for all the posts pertaining to this sewalong. I can’t wait to see everyone’s finished coats!

What do you think? Would you ever tackle a crazy long intense project like a coat? What about THIS coat? Man, I love making coats!

Disclaimer: My pattern was provided to me free of charge from the McCall Pattern Company, and the fabric was provided from Mood Fabrics as part of my monthly allowance for participating in the Mood Sewing Network. Still, I definitely made this entire coat myself – sooo, that should count for something 😉

V1419 Sewalong: Steps 64-86

10 Nov

Good morning, sewalongers! This is the week we finish up our coats – woohoo!! (and those of y’all who are not following the sewalong – this is the last week you have to skip a boring sewalong post! Woohoo!). Can you just feel the excitement radiating in the air? 😉

So, the good news is – this is the final construction post before we have our sharextravaganza next week. The bad news – it’s a HELLUVA post. Lots and lots of pictures (in advance: I’m soooo sorry! Tried to cull them down as much as possible. On the flip side, none of them are of me 😉 lolololol), lots of little fiddly steps here. On the flip side, this is all finishing – which means when it’s done, the coat is done – but expect this to take some time, especially since there is lots of hand sewing in this section.

Anyway, onto finishing!

The first thing you will want to do is sew the bias facing to both of the opening edges of the coat front, as well as along the neckline and across the hem. I’m not going to go into detail of how to do the facing – we’ve all done enough bias facing on this coat, I think most of us can do it in our sleep at this point 😉 – but I did want to mention a couple little tips that helped me.

V1419 Ralph Rucci Sewalong
Once I sewed the facing on and trimmed down the seam allowances, I pressed all the raw edges toward the facing, using lots of steam.

V1419 Ralph Rucci Sewalong
Then simply press the facing to the inside of the coat. You will want to hand baste this in place, which will give you greater control when top stitching (especially important at those coat front edges).

V1419 Ralph Rucci Sewalong
At the hem and neckline, you may find that where you are intersecting seams tends to be *very* bulky – like, so bulky that you can barely turn the facing to the inside. I used my scissors to chop out as much of the bulk as possible (being careful not to cut into the stitching line or outside of the seam allowances), and them hammered them down like crazy with my clapper, to make things very flat.

Actually, if you have a clapper – it’s a good idea to smack down those edges after you’ve top stitched them, to flatten them as much as possible and give them a nice sharp crease. This will make your coat look much more professional 🙂

Now, for the button holes! Fair warning – these took foreveeeeer to finish! Lots of fiddly pieces, lots of fiddly hand stitching. I know at this point, most of y’all are probably over this coat and just want to finish so it can be worn, but please take your time with these steps. The button holes are one of the most visible parts of the coat, and you don’t want them to look sloppy!

V1419 Ralph Rucci Sewalong
Remember when we sewed around the edges of where the button holes would go? Now you need to cut right in the middle of those stitches. I first used chalk to mark where the V would start, and then cut along the lines indicated. Cut right up to the stitching, but not through it.

V1419 Ralph Rucci Sewalong
You will have a little V flap at the inside end. Fold this to the inside and press.

V1419 Ralph Rucci Sewalong
To make the button hole binding, find those 4 bias pieces you cut, and press down one long edge about 1/4″. You will want to cut the binding into 20 pieces – 4 pieces will be 2.5″ long, and 16 pieces will be 2.75″ long. You should have enough binding to cut exactly the number of pieces needed (if for some reason you screw up and need more binding – just salvage a piece of leftover facing, and cut it in half at the fold. Y’all have lots of bias facing left over, right? I do hahaha). Fold in 1/4″ at short edges of each little piece and press. Yes, this part takes forever. Sorry.

V1419 Ralph Rucci Sewalong
On the bottom of your button hole, pin a piece of binding with the right sides facing and the raw edges matching. The edge that meets the front edge of the coat should be flush, the edge against the end of the button hole should extend a bit farther. Be aware of what binding goes on what button hole – the 2.5″ binding is for the top 2 button holes (on the left and right side of the coat front); the remaining binding is for the remaining button holes.

V1419 Ralph Rucci Sewalong
I went ahead and pinned the top binding as well, because I am impatient.

V1419 Ralph Rucci Sewalong
Sew the binding to the coat, stitching along your original stitching lines. I found it easier to do this from the inside, so I could make sure I was sewing in the correct place. When you get to the end of your stitching line – where the stitching pivots to the end of the button hole – stop and back stitch. Do not go any farther than the existing stitching line.

V1419 Ralph Rucci Sewalong
Your binding should look like this on the outside of your coat. Notice that the stitching does not go all the way across to the tip of the binding. This is good; it means we can pull the end of the binding to the inside.

V1419 Ralph Rucci Sewalong
Here it is from the inside.

V1419 Ralph Rucci Sewalong
Starting at the open end, fold the binding to the inside and pin into place. I pinned both top and bottom because – again, impatient. You could also work with one side at a time. Whatever is easier!

V1419 Ralph Rucci Sewalong
For the end of the binding that is by the V you clipped, pull all the binding to the inside of the coat and pin down. This should cover the V completely, but if not, you can always clip whatever is sticking out 🙂

V1419 Ralph Rucci Sewalong
Repeat for the bottom (or top). Your finished pinned button hole should look like this.

V1419 Ralph Rucci Sewalong
Here it is from the outside.

The next thing you nee to do is slipstitch alllllll those bindings invisibly to the inside of the coat. Yep! This part takes forever! I also stitched my bindings so the edges encased the edge of the coat front, as well as slip stitched the open ends together with a few stitches. When you get to where the binding covers the triangle, be sure to catch that in your stitches so the button hole is secure. Check from the front occasionally to make sure everything looks good, especially making sure that triangle is pushed all the way to the inside of the coat and not sticking out.

V1419 Ralph Rucci Sewalong
Once you’ve finished the torture that is slipstitching ALL THAT BINDING, give everything a good press (and maybe a smack with the clapper, too, if it needs it. Mine did!). We’re not done yet!

V1419 Ralph Rucci Sewalong
Next up is thread bartacks! Start by marking where the bartacks will go – you will have 4 total for each button hole – left and right (so a total of… 40. Woof.). There will be a bartack at each end of the button hole, plus another bartack 1/2″ from each end. I marked mind with chalk.

V1419 Ralph Rucci Sewalong
The bartacks will go faster/look better if you thread up with multiple strands. I used 3 strands of thread, and then doubled my needle, for a total of 6. You can also use embroidery floss – I just didn’t have any of the right color on hand.

V1419 Ralph Rucci Sewalong
Starting on the inside, make a small knot with your thread, or tack it in a couple spots to secure it. I made a small loop and then pulled the needle through it.

V1419 Ralph Rucci Sewalong
Pull the needle to the outside and stitch across the button hole to the other side, letting the thread connect the two sides. Make another knot on the inside (or, again, secure with a few stitches), and then pull the needle back to the outside.

V1419 Ralph Rucci Sewalong
To make the bartacks, loop your thread like so.

V1419 Ralph Rucci Sewalong
Then pull the needle through the loop to create a knot (same concept as a button hole stitch, or a blanket stitch).

V1419 Ralph Rucci Sewalong
Pull the loop until it knots at the end. Repeat this over and over until you have a chain of knots that completely covers the thread. This is your bartack. Do this 4 times for every button hole. Also, have a glass of wine while you’re doing this – you’ll be sitting for a hot minute 😉

V1419 Ralph Rucci Sewalong
Some bartack tips:
– You will get better as you do these! I recommend starting with the button side first, at the bottom button hole, so your practice attempts won’t be as easily seen 🙂 Of course, you could practice on scraps first – but, naw, not me!
– Don’t pull the knots too tight, or you will distort them and they won’t be as pretty 😦
– Try to make your knots in the same direction as you go – this will keep them uniform and hopefully prevent twisting!
– If at all possible, try to do these in one sitting. The repetition means you will get better as you do it, so if you complete them all in one sitting, you won’t need to go through multiple learning curves (than if you picked it up several times during the week).
– The original Rucci coat has the bartacks continue on the back side of the bound button holes as well. The instructions for this pattern only call for the bartacking in the front (which is what I did). If you want to mimic the original and bartack the back of the button holes – well, don’t let me stop you 🙂
– Don’t get too hung up on perfection – yes, you want these to look nice, but at the same time, most of them will be covered by the buttons. Not worth killing yourself over!

V1419 Ralph Rucci Sewalong
Once you’ve finished your loops, time to sew on those buttons! Sew the buttons in the middle of the binding on the left front, catching both bindings in the stitches. For the top button, sew it 1/2″ away from the edge (it won’t be quite in the middle).

V1419 Ralph Rucci Sewalong
You can also go ahead and sew those back buttons on the belt. The pattern actually has you make button holes first – which of course you can do, but I omitted mine.
One word of note about the belt – don’t try to cinch it in too tight, or you’ll create gathers on the coat sides. Pin the belt closed first, and try it on to make sure everything is smooth and flat.

Finally, all that’s left is the sleeves. Go ahead and hem them with the bias facing – same concept as the other hemming and facing we did in these steps.

V1419 Ralph Rucci Sewalong
The last thing we will do is make these little sleeve binding pieces, to cover the edge where all the crazy sleeve seams intersect. Cut 2 pieces that are approximately 1.5″ long by 1″ tall (or possibly taller, if your fabric is very thick and bulky – I cut mine 2″x2″, because my fabric required the extra room!). Fold one long edge under 1/4″ and press, and both short edges as well.

V1419 Ralph Rucci Sewalong
Sew the binding to the outside of the sleeve, with the right sides facing, at the point where all the seams intersect. Sew right along your topstitching line. If your fabric is bulky, you may want to trim down the seam allowance of this binding piece.

V1419 Ralph Rucci Sewalong
Turn the binding to the inside, wrapping around the sleeve hem and being sure that all folded edges are tucked under. Slipstitch around the 3 edges and press. Again, this is a good time to use your clapper to really flatten those seams. Gah, you guys must think I have stock in clappers at this point hahaha.

V1419 Ralph Rucci Sewalong
Your finished sleeve will look like this. Yes, some of my top stitching is wonky. Oh well!

Whew! That’s all for this post – AND THIS COAT! How’s everyone coming along with their coats? I’ve been loving all the progressing (and some completed!) coats that are popping up in the Flickr Group. You’re SO almost done!! If you want to show off your coat in our Parade of Coats next week (which, obvs, you should!), you have a few options – you can upload to the the Flickr Group, and you can also upload to the Pinterest Fan Gallery. Be sure to use the hashtag #v1419Sewalong so you’ll appear in our Tagboard, where we will also be pulling finished coat photos. Can’t wait to see everyone’s coats!! 😀

V1419 Sewalong: Steps 51-63

3 Nov

Good morning, Sewalongers! We only have a couple weeks left before the sewalong is complete – are you feeling excited? You should! Especially since this week is all about the welt pockets 😀

Meg will be covering the steps this week for creating your own beautiful welt pockets, so be sure to check out The McCall Blog for tutorials. Again, I’m just here to cheerlead and give some tips this week. I spent pretty much my entire Sunday wrestling with these pockets, but the good news is that they turned out quite lovely! And I have some advice to share, so listen up!

V1419 Ralph Rucci Sewalong
First and foremost, whether this is your first welt or your 50th welt, you absolutely need to practice making a welt pocket using your coat fabrics before you start hacking into the coat. It’s important to do this with your coating fabrics in particular, as they may act differently than other fabrics you’ve used in the past for welts. My wool coating fabric is pretty bulky, so I was able to sort out issues in my practice rounds, instead of on the coat itself.

I know, making practice welts kind of sucks! I’m SO glad I did it, though, because I don’t think my welts would have turned out nearly as nice if I hadn’t practiced a few times first. You don’t need much for the practice – I used a piece of coating that was about 8″x4″, a similarly sized piece of my contrast taffeta (for the pocket facing – don’t worry about cutting a pocket out of your fabric for the other side – unless you just reaaally think you need to practice sewing pockets), and one fabric welt. After my third practice welt, I felt confident enough to do the real thing on the coat.

V1419 Ralph Rucci Sewalong
For marking your coat pieces – here are a couple of tips. First of all, I wouldn’t necessarily rely on tracing the markings off the pattern. You can trace them to get a general *idea* of where the pockets need to hit, but for doing the actual marking (or cleaning up your markings, or re-adding them if they mostly rubbed off during the coat construction), just use a ruler and a piece of chalk. The welt is a rectangle, after all 🙂 The welt is 6″ long by 1/2″ wide, and the circle marking is approximately 2″ from the corner on the bottom line (please re-check these measurements against your pattern before marking – I’m going based on my size, which may be different than yours!). I used a straight ruler and this Clover chaco liner (well, mine is white, but same difference) for my markings. I like this particular liner because it doesn’t pull the fabric when it marks, and the chalk dust comes out very easily. I also like how fine the line comes out. Just a preference!

Once you’ve marked your rectangles (I don’t bother marking the center line or the v’s – but go ahead and mark those if you wish), it’s a good idea to thread-trace the markings with long basting stitches. I use silk thread for this purpose – I like how easy it is to remove, and I love that it doesn’t show a marking when you press over it. You may also use cotton thread if you don’t want to spring for silk (a spool is about $4, so not terribly expensive but also not really cheap!) – or even regular polyester, but definitely check that it doesn’t leave marks when it’s pressed. I also mark my dots with simple tailor’s tacks – just loop the thread over the marking a couple of times. Thread-tracing these markings means that they’ll be visible from *both* sides of the coat, and that they won’t rub off as you handle them. Thread trace the rectangles on both the coat and the pocket facing (the contrast).

One more thing: once you’ve thread-traced the welts on your coat, it’s a good idea to try the coat on and make sure they are an even height. Mine were ever-so-slightly off, but I was able to catch it before sewing on uneven welts. That would have been lame!

V1419 Ralph Rucci Sewalong
When making your welts, if your fabric is thick – try trimming the seam allowances with your scissors at an angle. This will make one seam allowance slightly longer than the other, which will prevent a ridge from showing when it’s turned right side out. Position the welts so that the shorter trimmed side faces the outside of the coat.

Also, with the welts – don’t aggressively trim and clip the seam allowances to nothing! You need a little bit there so the corner will have some structure when it’s turned right side out. I trim mine to a little less than 3/8″.

V1419 Ralph Rucci Sewalong
When turning the welts right side out, push the seam allowance to one side, like so.

V1419 Ralph Rucci Sewalong
Carefully turn the entire thing right side out, and gently use a point presser (or a knitting needle, or a butter knife, or whatever you have on hand) to push the corner out to a sharp angle. Then press, being careful not to drag the iron around – you don’t want to distort your welt.

V1419 Ralph Rucci Sewalong
Yay, sharp corners! As a side note – this was one of the practice welts that did not have the edges trimmed at an angle. See the ridge showing through? Yuck.

V1419 Ralph Rucci Sewalong
When it’s time to sew the pocket facing to the welt+coat, you’ll be glad you did those thread tracings. I checked both sides constantly to be sure that I was exactly on the lines for both coat & pocket facing. I also went the extra mile and hand-basted the facing on, using a different color of silk basting thread. This took foreeeeever, but it’s super precise and I think it’s a big reason why my pockets turned out so nice. Then you can just sew right on top of the basting lines and not have to worry about pins getting in the way (or, in my case – distorting the fabric because of the sheer amount of bulk in that area).

Once you’ve sewn everything down for reals, remove all the basting and thread tracing. Cut and clip as indicated in the pattern – and don’t be afraid to get VERY close to the stitching line when clipping those v’s for the welt. This will prevent the coat from having a crease or fold at the corners where the welt intersects. Then just press the hell out of everything. It can be a little tricky, just because there is so much coat going on – just use lots of steam and take your time. I found that I got the best press when I used the top edge (the handle part) of my clapper and laid whatever section I was pressing over it. The narrow surface meant that the iron was pressing only the parts I wanted to press, and not pressing wrinkles into the rest of the coat.

V1419 Ralph Rucci Sewalong
Once I had everything pressed and done, I basted the welts shut while I finished the pockets, so they wouldn’t gape and flap and potentially stretch out.

V1419 Ralph Rucci Sewalong
Sewing the pocket and binding is pretty easy. The only thing I changed was that I stitched in the ditch to attach the binding, rather than slip-stitching by hand. Just a personal preference! Bonus for those of us who are using underlining – when it’s time to invisibly sew the pocket to the coat, you can just grab the underlining and not worry about your stitches being invisible from the outside. Yay!

V1419 Ralph Rucci Sewalong
Here’s the finished pocket on the inside. Doesn’t it look luxe?

V1419 Ralph Rucci Sewalong
And, of course, my beautiful welts. I am so happy with how they turned out! Definitely worth the effort!

Don’t forget to check out The McCall Blog for Meg’s tutorial on sewing the welts! My biggest tip? TAKE YOUR TIME. Don’t try to rush this section and expect pristine welts. That in mind, you also should not be too scared to actually do this part! They’re just welts – practice a few times, follow the directions, utilize hand-basting, and you’ll be fine 🙂 If all else fails, you can always throw a patch pocket over the mess 😛 haha! (no, seriously, I tell myself this EVERY TIME I make welt pockets!)

How is everyone doing this week with the coat? Any questions?

V1419 Sewalong: Steps 23-50

27 Oct

Good morning & happy Monday, sewalongers! This week, we’ll be sewing up a large chunk of the coat – finishing the main construction, in fact! By the time you are done with step 50, you will be able to actually try on your coat 😀 Woohoo!! I know a post with 27 steps seems ridiculously long, and it sort of is – but keep in mind that at least a third of those steps are just instructing you how to sew on the bias binding. So it’s really not that bad! Although, I will be the first to warn you – this part can be a little time-consuming. You can do it, though! Just take your time and definitely take a nice break if you feel yourself getting overwhelmed/frustrated 🙂

This week, for my sewalong post, I’ll be doing the same sort of post as from last week and just giving some general tips and cheerleading. I don’t think this part of the sewing really requires step-by-step directions – which, due to the sheer size of the coat, is kind of difficult to do as it is – and the directions on this pattern are insanely good anyway. Seriously, they’ve really restored my faith in Vogue patterns with this coat.

That being said, let’s jump in!

As with last week, you will need to follow the steps outlined in the pattern for constructing the coat. Don’t try to skip a step, or jump ahead – the instructions are written in a way to give you the best result with as little hair-pulling as possible (hair-pulling will still probably happen, though, just fyi). Be sure that you have clearly marked your pattern pieces with all notches and symbols – it is critical with this pattern that everything is marked to give you the very best results. Trust me! Also, pay attention to the side that you are sewing the bias binding (and thus which side you will end up topstitching), as we want our topstitching and everything to be symmetrical on the finished coat.

The sleeve dart will be bound with the bias tape, just as all the seams are. If you are having issues keeping the seam allowance at the bottom (where the tip of the dart just kind of wanders off the edge of the fabric), try sewing with the bias binding on the bottom, with the raw edge at your 5/8″ mark. You can also mark the bias tape at 5/8″ in that area, but I found just using the guidelines on the machine’s throat plate was good enough for me 🙂

V1419 Ralph Rucci Sewalong

Don’t forget to staystitch your sleeve where directed (the blue lines in that photo… hopefully your sewing is straighter than my computer drawing skills 😉 ). This is essential for attaching the sleeve to the coat.

V1419 Ralph Rucci Sewalong
For attaching the coat front and back to the sleeves, here are a few tips I have picked up:

  • Use a basting stitch to attach the pieces together first. When you sew the binding, you will use a normal stitch length, so basting is fine for this part. The basting will come in handy if you need to unpick anything (either because you didn’t sew over the basting, or you got a pucker, or whatever).
  • Some of this pieces have GIGANTIC curves and require some crazy easing. Feel free to clip as much as you need to get everything to lie flat. I personally didn’t clip at all – I just put the bigger side on the bottom when I sewed and let the feed dogs ease everything. Absolutely make sure you check for puckers before moving on to the next step.
  • When attaching the binding, I found it easiest to sew with the binding on the bottom, so I could be sure I was sewing over my basting line (and thus have less to unpick).
  • Clip those seam allowances aggressively – like 1/8″. This will not only give you enough room to fold over the binding for topstitching, but it will also allow those curved areas to lie flat without needing to clip (obviously, if you clipped the seam allowances to attach the pieces together, you’ll probably cut most of that off. That’s ok! 🙂 ).
  • As I have mentioned before, I found the topstitching much easier if the binding was basted down by hand first. If you baste right along the edge of the binding, you can sew inside the stitching line and be sure that you caught the fold. Further, it means you don’t have to worry about pins 🙂
  • Again, do NOT be afraid to beat those seams into submission if they are feeling bulky.

20121202-210149

At some point during this section, you will find yourself wrangling a whole lotta coat and you might feel a little overwhelmed. Stay with it! You can do this!

V1419 Ralph Rucci Sewalong

Once you’ve attached the front and back at the top of the sleeve, you will end up with something like this.

V1419 Ralph Rucci Sewalong

Make sure you spread it out on the floor so you can really appreciate how completely ridiculous everything looks.

The next few steps are going to seem REALLY weird, but just roll with it-

V1419 Ralph Rucci Sewalong

First, you will attach your coat front to coat back at the side and skirt seams. Once finished, you will end up with something that resembles a coat with armpit vents. This is actually a great time to try the coat on, BTW – I pin basted a few seams together just to be sure things were rolling smoothly along (what can I say – even with a muslin, I’m paranoid). I ended up sewing this seam at 1/2″ seam allowance instead of 5/8″, just to give myself a tiny bit more waist room.

V1419 Ralph Rucci Sewalong

The next step will have you sew up the section right above the waist and below the gusset, and then apply the binding.

V1419 Ralph Rucci Sewalong

Finally, you get to close up the sleeves! Yay!

Ok, so Laura tweeted me about step 50 being impossible.

images

It’s definitely not impossible – but is DOES require some finesse! If you’ve ever flat-felled a sleeve seam (while it was attached to the rest of the shirt), you are probably familiar with this kind of sewing wrangling. Basically, you will sew very slowly – like an inch or two at a time – being sure to lower the needle every time you stop to readjust (lowering the needle is pretty important, else your coat may shift which will result in a wonky line), so you can be sure you’re sewing through one layer of coat. It *is* possible to sew this seam, you just need patience 🙂 I basted my binding into place by hand (if you’ve been pinning up to this point, you may want to consider basting for just this one seam – it’ll make things a LOT easier if you don’t have to deal with pins) and sewed from the wrong side, so I could keep an eye on my binding and make sure I was catching it. This doesn’t result in the prettiest topstitching ever, but, you know what? It’s an underarm seam. Ain’t nobody gonna be looking at that anyway.

Anyway, here’s my coat up to this point:

V1419 Ralph Rucci Sewalong

V1419 Ralph Rucci Sewalong

We are getting there!

As a side note, it was brought to my attention last week that I sewed the binding on my belt incorrectly. WHOOPS! The binding should actually all face to the inside – there are photos on the McCall blog for clarification. I decided to leave mine because I like the way it looks, but just fyi if you are going for something that is closer to the original!

How are y’all feeling about your coats this week? Any burning questions about this set of steps? Holler at me in the comments!