Tag Archives: ikat

Completed: OAL2015 (M6887 dress + Vianne sweater)

31 Jul

MY GOD, you guys. I am so happy I got this finished in time for the OAL deadline! I’ve had the dress finished for a couple of weeks now, but I worried about that sweater as the time drew closer! I ended up needing to take a couple marathon days in order to finish, but I did finish! And now I’ve got an outfit to show y’all!

OAL2015 - M6887
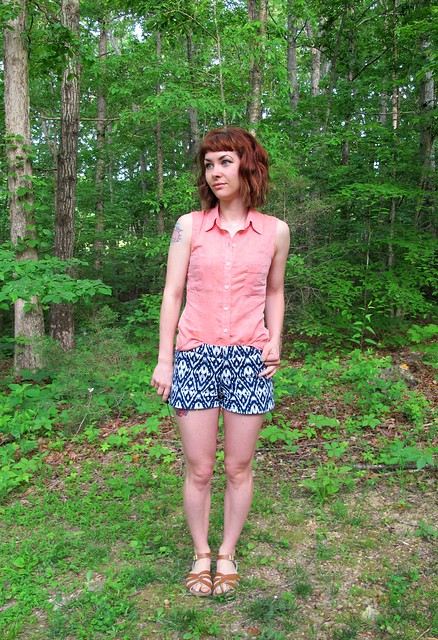
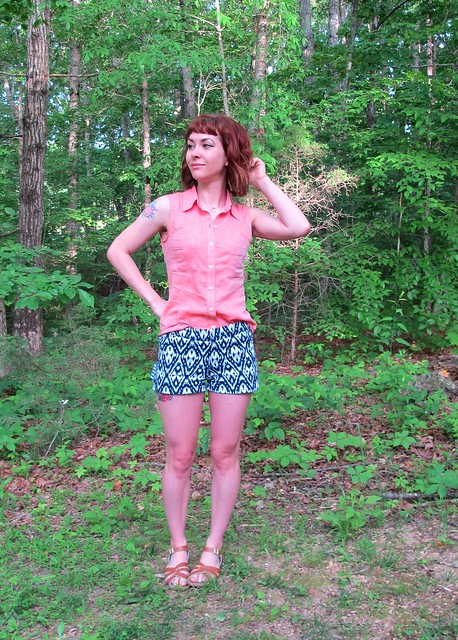
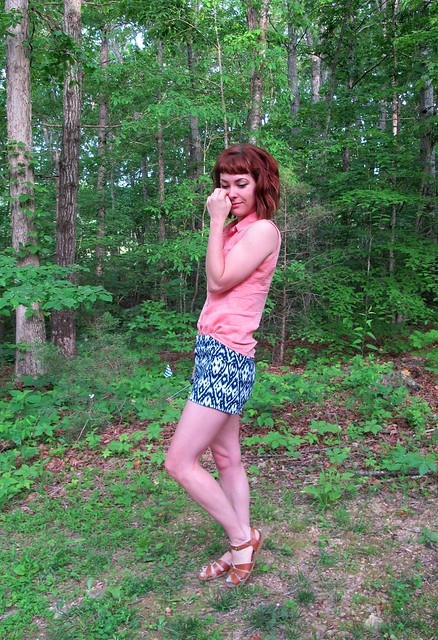
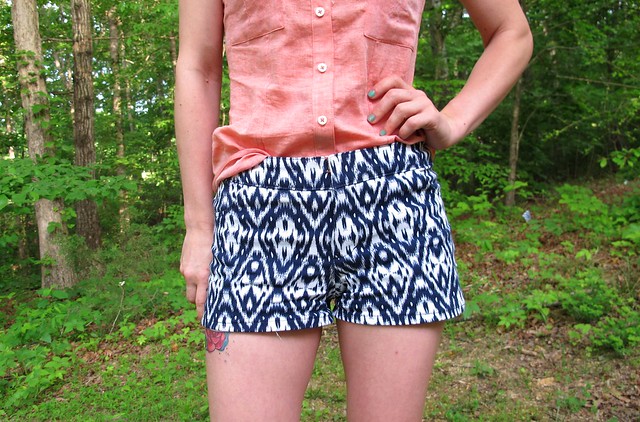
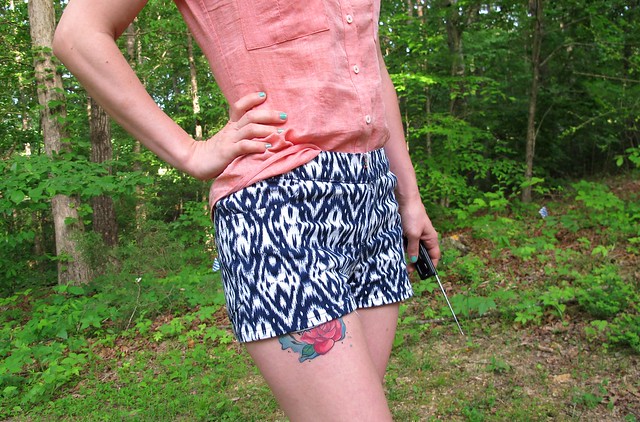
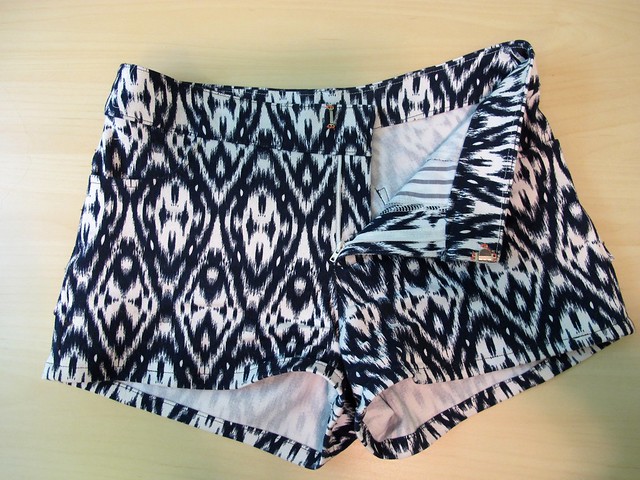
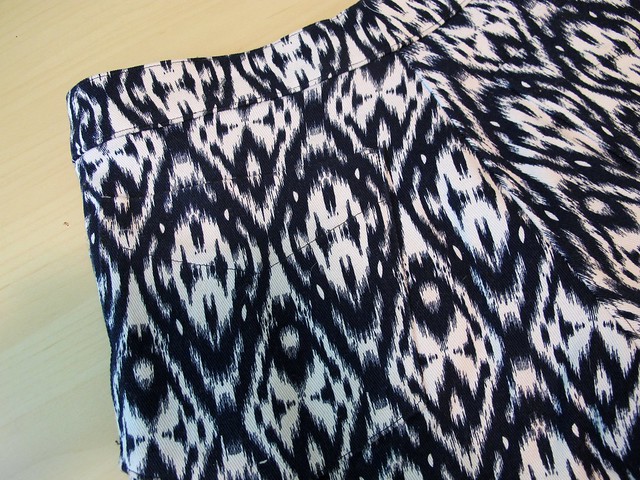
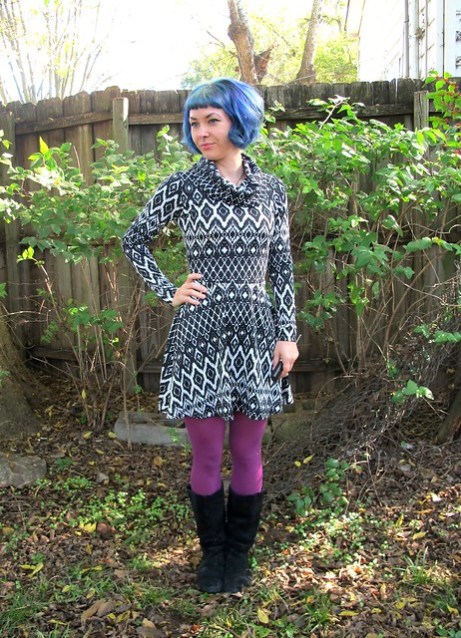
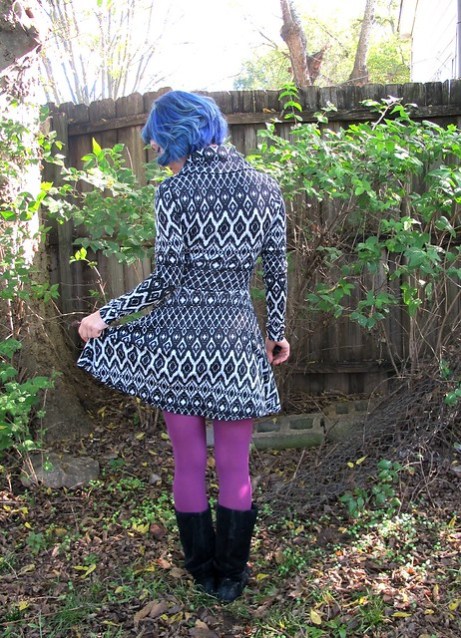
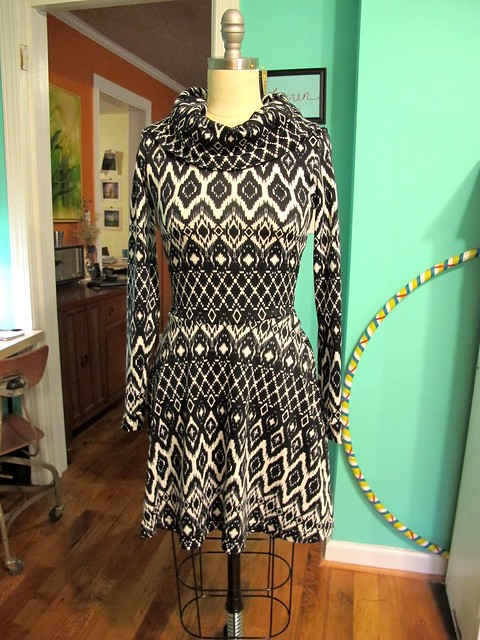
I’ll start with the dress. Again, this is McCall’s 6887, which I used cotton ikat fabric from Mood Fabrics to make it up with (this isn’t a Mood Fabrics allowances fabric; I bought this on my own dime while I was in NY last year). I used the version with the back cut-out, as well as the cap sleeves, omitted the lining in favor of bias facing, and added pockets. I’m not going to go into detail about the construction, since there’s a whole series of blog posts on the making of this dress! You can see them all here:

We are just gonna look at pictures instead. Btw, I walked through a lot of spiderwebs to take these. Appreciate me, dammit. OAL2015 - M6887

OAL2015 - M6887OAL2015 - M6887

OAL2015 - M6887OAL2015 - M6887

OAL2015 - M6887
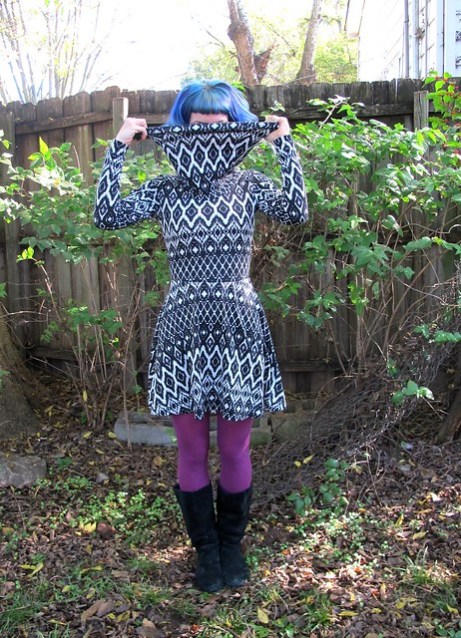
Now for the sweater part! OAL2015 - Vianne

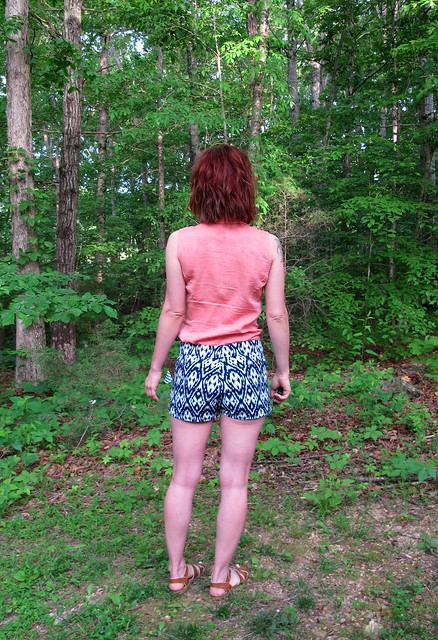
Vianne is a sweet little top-down cardigan with lace details and a open mesh back. It’s supposed to be knitted up in DK weight yarn, but I used Cascade 220 worsted weight and was able to get gauge using size 6 needles. I knit the size XS, and the only modification I made to the pattern was to knit full-length sleeves. As in, I followed the sleeve directions and just kept knitting/decreasing until they were long enough. I’ve found that I don’t have much need for 3/4 sleeves – if I’m cold enough to wear a sweater, I am cold enough to need the full sleeve – so I went with long sleeves. I did keep the mesh back, though. The mesh back is awesome. I found the mesh+lace a little confusing to follow, so I used a bunch of stitch markers to stay on track and that helped a lot.

While I normally finish my buttonbands with a strip of petersham ribbon for stability, I did not do that with this cardigan. Vianne is a looser fit on me, and the button bands are so wide that they don’t really stretch when they are buttoned. So I left off the petersham and just sewed the buttons directly on the ribbing. One thing I will say about using a stabilizer with your button band – it makes sewing on the buttons a helluva a lot easier! Oh well! Anyway, the buttons are vintage glass from my stash – I’ve had them for YEARS and been hoarding them for a special project, which I’m happy to have finally found! I only had 4 buttons, so I left off one of the button holes. And by “left off,” I mean I originally knit it and then later closed it up with a slipstitch haha.

OAL2015 - VianneOAL2015 - Vianne

OAL2015 - VianneOAL2015 - Vianne

OAL2015 - VianneOAL2015 - Vianne

OAL2015 - VianneOAL2015 - Vianne

OAL2015 - VianneOAL2015 - Vianne

OAL2015 - VianneAs with all of Andi’s patterns, I REALLY enjoyed knitting this sweater! The yarn was so nice to work with (after a long Cascade 220 hiatus, I’m happy to be home! And I’m really happy to find a local source that is still selling it – Ewe & Company, who happen to be located here in Kingston Springs! What are the odds?) and the color is my favorite. The only thing I didn’t like was feeling rushed at the end, but that’s my own damn fault for not pacing myself earlier during the OAL. I’m glad I got it finished in time, at any rate!

As a side note, wrangling the last sleeve of the sweater got me really wanting to start doing seamed knitting. I’ve always been a fan of in-the-round, because it’s so easy, but I’m starting to feel a little comfortable and I’m kind of craving a bit of a challenge. It would be fun to learn how to properly seam a sweater. Not to mention all the pattern possibilities that open up when you’re not hung up on just one particular construction style!OAL2015 - M6887

Anyway, that’s it! Here is Vianne on Ravelry (spoiler: not any more info than what you see here!). Don’t forget to post your finished outfit in the OAL 2015 FO Thread on Ravelry for a chance to win prizes! We have prize donations from Indie Stitches andย The McCall Pattern Company, as well as from Andi Satterlund herself (winner’s choice with all of these, so you won’t get stuck with something you don’t want!), and there will be 4 winners. Also, if you have blog posts to share with your FO, post them here so I can see! I need to get my lurk on ๐Ÿ˜‰

Completed: Ikat Maritime Shorts

26 May

Good morning, everyone! I hope y’all had a nice weekend – we spent the holiday driving back from the beach, which was AWESOME – well, the beach I mean, not the drive, ha – but I’m soo happy to be home! Apparently, my cat spent the entire time sulking downstairs and trying to attack my roommate when she would try to feed her. Great job, cat. And you wonder why no one wants to be your friend ๐Ÿ˜

ANYWAY, now that the summer heat is in full swing round these parts, I’ve really started rolling with my warm-weather wardrobe. Beginning with shorts, obviously, because ain’t no way I’m trying to wear pants in this humidity.

Ikat Maritime Shorts

Ikat Maritime Shorts

The pattern I used is the Maritime Shorts from Grainline Studio. I have a long history with this pattern – having made shorts with crazy colors, home decor weight fabric, bicycles, and even some failed jorts. This is a good little workhorse of a pattern, and I love the modern, clean cut (which kind of reminds me of something you’d pull from a JCrew catalog, especially in a printed fabric like those bikes!). They’re also REALLY easy to whip up, Ikat fabric notwithstanding, and can be squeezed out of a fairly paltry yardage. All good things, in my book!

Ikat Maritime Shorts

Ikat Maritime Shorts

Since I’ve made these so many times before, there’s not too much to comment on construction or fit. I made my usual size, although it needed a bit of pulling in due to my fabric choice (more on that in a sec). I used stretch interfacing for the waistband and fly pieces and shortened the hem as much as I could before the pockets threatened to poke out. Most seams are serged, although there are a few flat-felled seams in where I could manage it. Oh! I also used both of my machines to make this – one threaded with white, one with navy. This meant that I didn’t have to change out the thread over and over, as I did with the skirt. Made sewing these shorts go a LOT faster!

When it came time to sew the fly zipper, I skipped over Jen’s instructions and followed the ones for the Thurlow pants (you can see my sewalong post for those steps here). I don’t know what it is, but the included fly instructions don’t make a lick of sense to me. This seems to be the case for about 50% of sewers who make these shorts – some people think the instructions are awesome, and some of us are just sitting there scratching our butts, confused as shit. Obviously I fall into the latter. Anyway, it’s easy to swap out the directions with something that makes a little more sense to you, so in my case, it’s Thurlow. All good!

Ikat Maritime Shorts

If this fabric looks familiar, it’s because I’ve used it before – on another Grainline pattern, no less. This is a stretch cotton twill that I bought from Mood Fabrics aaaaages ago – and have been hanging onto ever since, mostly because I had to work up the courage before I attempted pattern matching again! As with the Moss Mini, pattern matching these shorts was a total and complete bitch. I cut everything on the single layer, but even then it was really really difficult. Matching plaids and stripes is pretty easy – I could do that shit in my sleep at this point – but I had it in my head that I needed to match the print like freaking wallpaper for this piece, so the Ikat pattern runs seamlessly all the way around. I actually did manage to do just that, but not without wasting a shit load of fabric – seriously, I think I started out without about 2 yards, and I just barely had enough to match the back pockets by the time I was done. I kept mis-cutting and it was extremely frustrating. Of course, I have more Ikat lurking in my stash and I’m just side-eyeing it with terror now. I don’t know if I can deal anymore. I just don’t know.

Ikat Maritime Shorts

Ikat Maritime Shorts

Ikat Maritime Shorts

Anyway, I’m happy with how everything turned out – it was totally worth the effort. You’ll notice that my print-matching is not 100% – especially at the center back. This is because I used a twill with a heavy stretch, which rendered the shorts waaaay too big when I sewed them with the normal 1/2″ seam allowance included in the pattern. I tried them on before attaching the waistband, so it was easy to nip in the sides until I got a closer fit, but that meant I had to sacrifice some of my perfect print-matching. The Ikat still runs in a straight line, which is good – it’s just a little interrupted at the sides. The center back looks like a vortex leading straight to hell, but there’s really not much I can do about that, so whatever. At least the back pockets are good, ha.

All in all, I think I pinched out about 1″ off each side before the shorts were finally the right size. Again, this is due to the stretch in the fabric. I’d normally size down for this sort of thing, but I sewed the smallest size so that wasn’t really an option.

I don’t have much else to say about this project, so here are some pictures.

Ikat Maritime Shorts

Ikat Maritime Shorts

(I totally sewed the hook & eye on with pink thread – I am pretending like it’s a design feature, but in all honesty it’s because I already had a needle threaded with pink thread and I didn’t feel like changing out to white. Ha!)

Ikat Maritime Shorts

Ikat Maritime Shorts

Ikat Maritime Shorts

Ikat Maritime Shorts

Notice that the bottom of the fly shield is unfinished – I sewed it in upside-down on accident. This seems to be a running theme for fly shields+me, as it certainly isn’t the first time I’ve made this mistake. Oh well.

Ikat Maritime Shorts

Ok, I guess that’s it! So happy to finally bite the bullet and put that Ikat to good use. These shorts turned out really awesome, and they’re much more wearable than the mini skirt was (it’s hard for me to justify wearing something if I can’t comfortably sit on the floor with it on). And they look great with my new coral button-up, so bonus!

In other news, I recently decided to quit drinking coffee for the next couple of weeks – I felt like my caffeine dependency was getting out of hand, so I wanted to try to 0 out and start new. Omg you guys, it is REALLY hard! I am fortunate not to have any withdrawal headaches, but instead I’m just tired and listless and feel a little depressed, which is weird. I’ve also taken way too many naps over the weekend. I’m hoping things will balance out soon and I’ll feel back to my normal self but – ugh. So pardon me if I seem irritable – I’m just under-caffeinated! In the meantime, if you have any tips to help me ease out of this ~trying time~ in my life, I’m open to suggestions! I mostly just miss the taste of coffee. It was like getting a warm hug in the morning.

Completed: The Lady Renfrew

12 Nov

Question: What do you get when you combine the Lady Skater with the Renfrew??

Lady Renfrew

Answer: The awesomest, snuggliest, Lady Renfrew dress, of course!

Lady Renfrew
Lady Renfrew

There’s not much to say about this dress – I basically just summed it up in the first sentence. This will be a relatively short post, ha (is that even possible for me to accomplish? Time will tell). Anyway, I used a combination of the two patterns to create this Frankenpatterned dress. The bodice, skirt and sleeves came from the Lady Skater, which after much careful testing, I’ve decided is my favorite favorite favorite knit dress pattern. The bodice fits me really well, the sleeves are a good fit/length (all sleeve length options, I mean), and I love the flared-but-not-costumey-looking skirt. Everything about this pattern is exactly what I like in a knit dress, so it was the obvious choice for the base of this dress. To get the cowl neck, I left off the neck binding and instead used the cowl from view C of the Renfrew tshirt. I compared the two patterns to see if I’d need to make any modifications, and the necklines were surprisingly similar (fwiw, I use the size 2 Lady Skater and the size 0 in the Renfrew). So similar, that all I did was just sew the pieces together and that was it. I don’t remember what seam allowance I used to attach the two (Lady Skater is drafted for 3/8″, and Renfrew is 5/8″), knowing me – probably 1/2″ because it’s in the ~middle~. Or something dumb like that. Whatever, it worked out regardless! ๐Ÿ˜€

Lady Renfrew

The real bitch part of making this dress was cutting the dang fabric. I had 3 things to pay attention to while I was cutting this – matching the print horizontally across the seams; being mindful of fabric usage (I barely had enough!); and actual print placement. I cut it so the darker stripes cross my waist, and the lighter stripes cross my bust. I think that’s a flattering look for me, plus, I love the way the white print kind of frames my head (that’s a bonus, because I totally cut it that way with the intention of it making my boobs look slightly bigger hahaha). I didn’t do any print matching on the cowl. I ran out of fabric and actually had to cut the underlayer with a seam. It worked out, though!

Lady Renfrew

AND NOW I HAVE THIS BIG SNUGGLY COWLLLLLL WOOHOO!

Lady Renfrew

I think the fabric is what really makes this dress! And by makes, I mean it’s slightly over-the-top – I’m almost afraid to wear it before Christmas season, ha. It’s like a giant, awesome black and white Ikat Christmas sweater. I bought it from The Fabric Studio here in Nashville; it’s the same fabric I used to make my Ooh La Yoga Pants. While it wasn’t 100% ideal for yoga pants, it’s pretty freaking fabulously good for this sort of dress. The fabric is nice and stable, cozy, and works really well for this sort of pattern.

Lady Renfrew

I especially love how the cowl looks. Yay cowls!

Lady Renfrew

So, what do you think? Lady Skater+Renfrew – do we have a perfect partnership here, or what?

Two more things:
1. Giant thanks to everyone who attended my class at The Sewing Party on Saturday! I had so much fun chatting with y’all (although I’ll admit – I kept my video on mute! Can’t handle the sound of my own voice blaring at me ahaha) and I’d love to do more video-related stuff if the opportunity ever arises again ๐Ÿ™‚ Y’all are the best! Just wanted to give all my students (and future students, for those of you who will be watching the class sometime during the next 90 days) a head’s up – I forgot to remind you to download the handout for my class! I know, bad teacher! Anyway, it’s a little PDF document with all the class info written out – along with photo tutorials for each zipper insertion. You can find it to the left of the video, under handouts and chats.

2. The big closing sale at Sweet Little Chickadee is still going strong! Juli has upped the ante a little bit – now use the code SHOPCLOSINGSALE to get 35% off your entire order! This code is good until all the stock runs out!

3. I recently found out that I was named one of the top 50 sewing blogs in Budrastyle‘s Best of Blogging contest. COOL! I’ll be honest – I had no idea I was even nominated (or that this contest was even a thing) until I got the congratulatory email. Big huge thank you to whoever nominated me, and even bigger huger thank you to everyone who voted for me! Y’all are seriously the best! I’m not worthy! ๐Ÿ˜‰

Completed: Ikat Moss Mini

21 Apr

Since I announced my pledge for Me-Made-May, I realized I better get crackin’ on making some summer-appropriate handmades if I want to actually get through the month as planned. One thing my closet has been missing for a few years is a good, basic mini skirt. I used to wear these things aaalll the time, but all my old ones either disintegrated over time or plain don’t fit anymore. I really wanted to try Grainline’s Moss Mini, but I wanted to hold off on pulling the trigger until I came across the perfect fabric.

Moss Mini

That perfect fabric being Ikat. Ow ow!

Moss Mini

OMG I love this skirt way more than I should. It’s a new silhouette for me for sure – despite having worn this style a LOT in the past (no lie you guys, I had them in every shade of denim, from white to dark blue. My dreams of being in a Poison video were, unfortunately, never recognized. Perhaps it’s because I only have a pick-up truck to lounge across, instead of a sweet 80s sports car? Dammit, I knew there was a reason why I needed a Delorean.), it’s not something I wear a lot of these days, so the style takes some re-getting used to. I’m liking it so far, though!

Moss Mini

Let’s talk about the pattern. The Moss Mini is a cute little mini skirt that includes slash front pockets, a back yoke, and a front fly with a button closure. It sits a little lower than my other skirts – the waistband is right below my navel. The length is pretty short! I didn’t remove any and it’s good for me – but I’m a petite lady, so as always, check those measurements.

Moss Mini

Moss Mini

I cut a size 0, but I had to take quite a bit out of the waist and hip to get it to fit without straight falling off. Next time I make this, I will probably cut a wedge out of the center back yoke as well – it’s gapes a little, since I curve more there than the pattern was drafted for. Other than that, the fit is pretty good!

Moss Mini

I debated adding back pockets (lord knows I’d use ’em), but ultimately decided that the skirt was busy enough without extra pocket baggage also demanding attention. Plus, the thought of additional pattern matching made me want to cry. Print-matching this bitch was rough, but totally worth it.

Moss Mini

“Wait a second, Lauren, didn’t I hear you say something earlier about there already being pockets on the skirt?” Yep! Check out those front-slash pockets, so cunningly camouflaged RIGHT IN FRONT OF YOUR EYES.

Moss Mini

Like I said, pattern-matching this skirt was way rough. I used my single layer method, which always does the trick. The hard part was getting the pattern to seamlessly continue, so you don’t notice any interruptions in the skirt (as opposed to a plaid or stripe, where you just follow the line). It’s like hanging freaking wallpaper, I guess. I think I ended up doing a pretty damn fine job if I do say so myself, though – do you see the center back seam? No? Good.

Moss Mini

Apart from the pattern-matching-hell, the fabric was lovely to work with. This is a stretch cotton twill from Mood Fabrics, emphasis on the stretch. Like I said, I had to take a bit out of the side seams to get this baby to fit close (a close fit is important when you are working with a stretch – negative ease is needed!), but the resulting skirt is also really comfortable and not at all constricted. Be warned that it does like to fray and shed, though. I used flat-felled seams throughout my skirt and it’s held together pretty nicely, although pressing got a little fiddly (tip: use a reeeeally hot iron and smack the shit outta that bad boy with a clapper. Ha!).

Moss Mini

Moss Mini

As far as how I’m gonna wear this skirt? I dunno. I like the way it looks with my white button-down, but the combo feels a little fussy for a breezy summer. The lower rise is also throwing me off, as tucked in shirts just don’t look nearly as good (and this shirt is long enough to where it needs it; it looks sloppy otherwise). I’m thinking I’ll just make a bunch of plain tshirts that hit right at the waistband seam, and just swap out the colors according to my mood.

Moss Mini

Now let’s plaid “find that seam!”

Moss Mini

I debated how to cut the back yoke. Originally, I planned on matching it with the back of the skirt, so the pattern wasn’t broken up – but then I realized you wouldn’t be able to tell there was a yoke there. I stand by my mis-matched yoke (and slightly mis-matched waistband, ah well), but I still think a close match would have looked good too.

Moss Mini

There’s the flat-felled seam! Omg you guys, I changed out soooo much thread to make this stupid skirt. All interior seams are white, all topstitched seams are navy. Since every seam gets sewn twice (first the inside, then the topstitching for the flat fell), you can imagine how much I was changing thread to make this. Of course, I have 3 more machines that I could have set up to speed things along. Did I bother? Naw.

Moss Mini

I made a couple of changes to the waistband. I kept the extra length that was left (from me taking in the side seams) and used it to create an underlap for a flat button. I’ve found that I prefer this kind of waistband finish, as a non-underlap waistband – on me, anyway – tends to pull funny. I also used a hook and eye to close the front, instead of a button. I dunno, I just like the clean finish of no button!

Moss Mini

And here’s the inside! I serged the pocket edges and the fly front/facing, but everything else is flat-felled (with the white thread on the inside – see how good it looks??). I’m really really happy with how the inside of this skirt looks. So clean!

Moss Mini

I guess that’s it! Question: What color tshirts should I be making to wear with this skirt? I’m filling up my Mood cart right now…