Tag Archives: closet case files

Completed: Navy Cotton Twill Ginger Pants

1 Nov

Gah, it has been WAY too long since I made a pair of pants – according to my blog, that last pair was published in a February! LAME, TIME TO RECTIFY IMMEDIATELY.

Also, damn, my hair has gotten long since then. It seems to grow soo slowly until you look back and realize you’ve really gained some inches over the months, yay.

Navy Cotton twill Ginger Pants - front

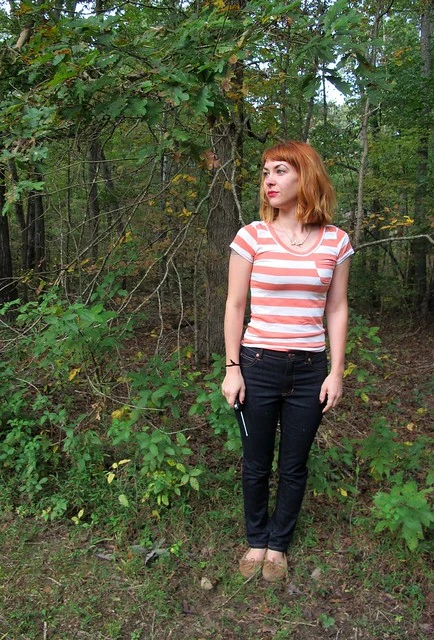
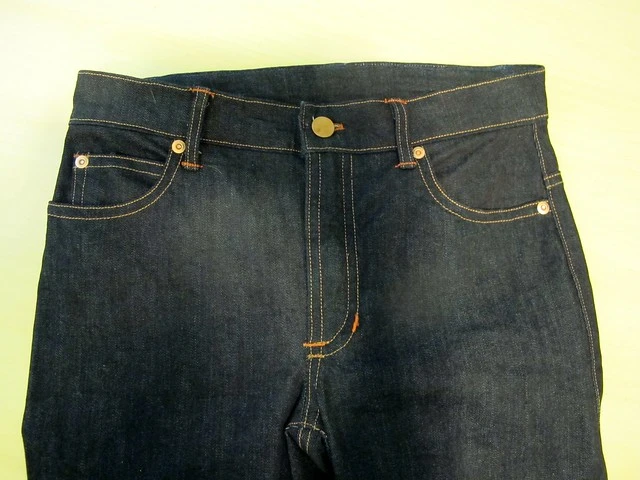
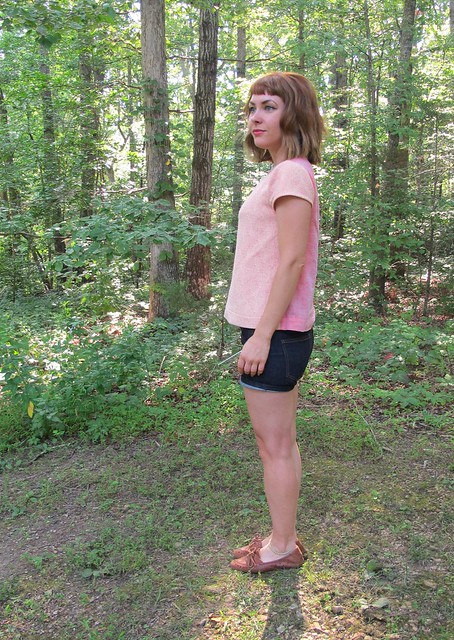
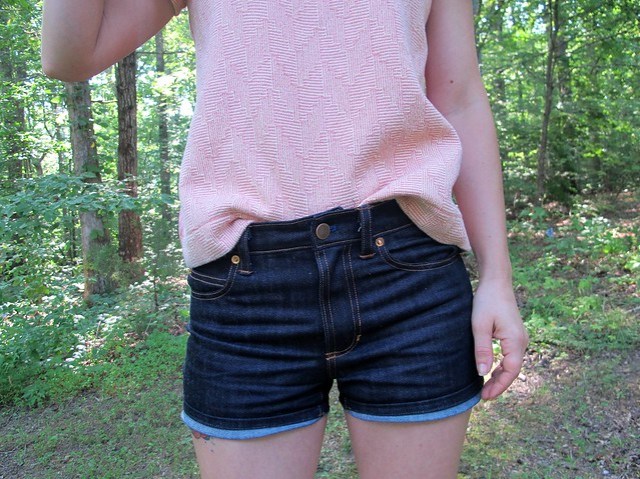
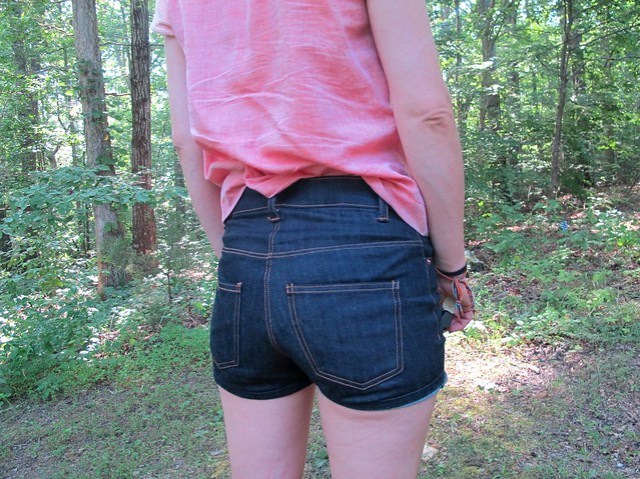
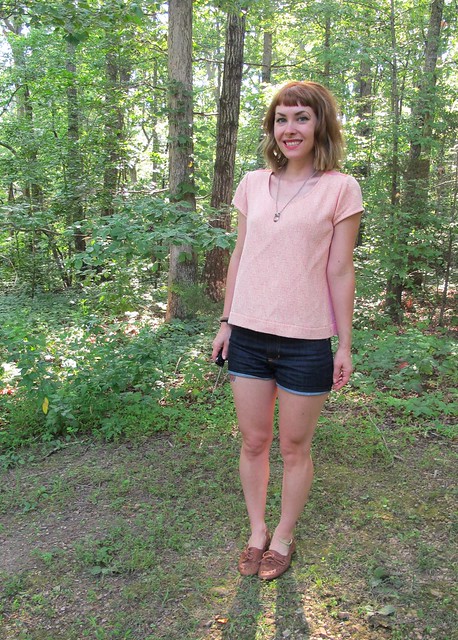
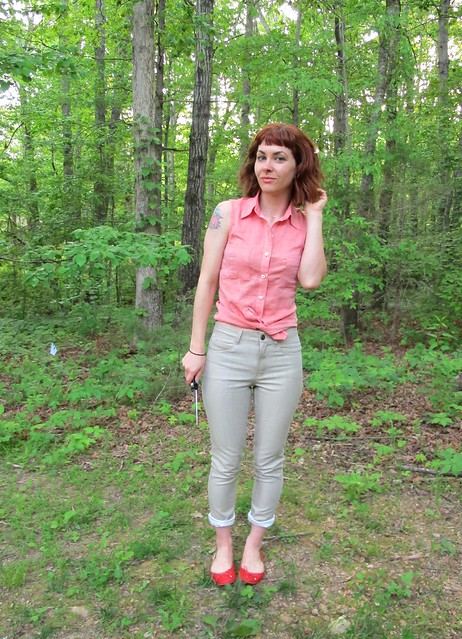
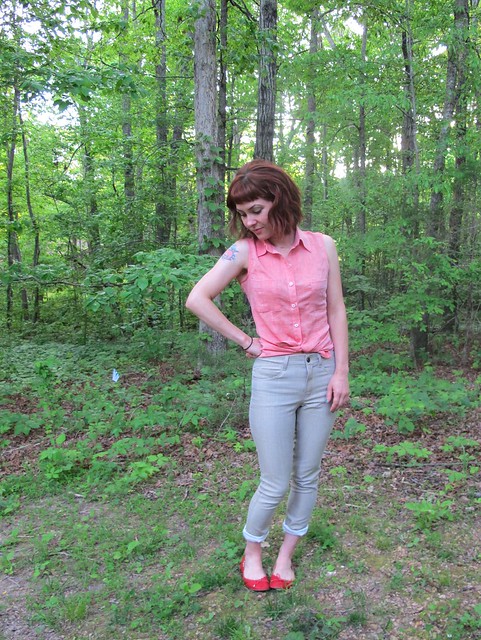
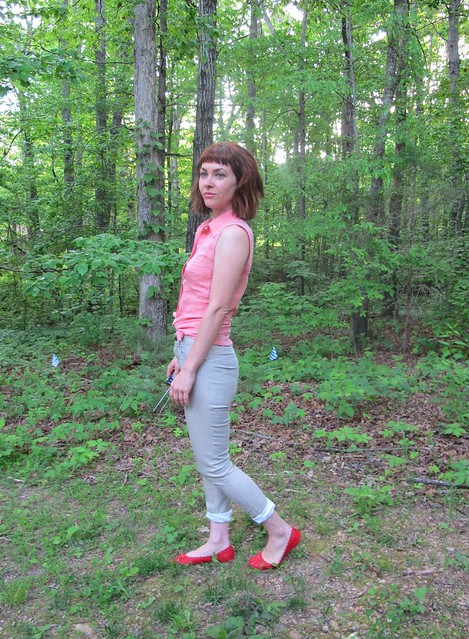
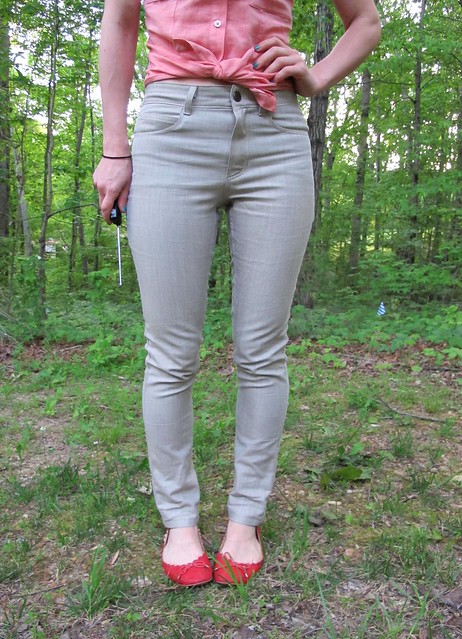
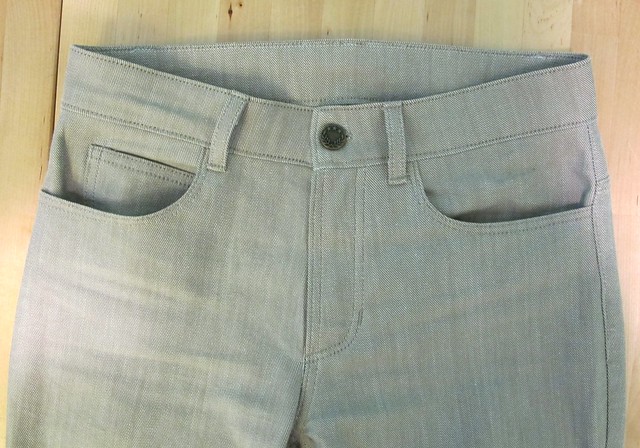
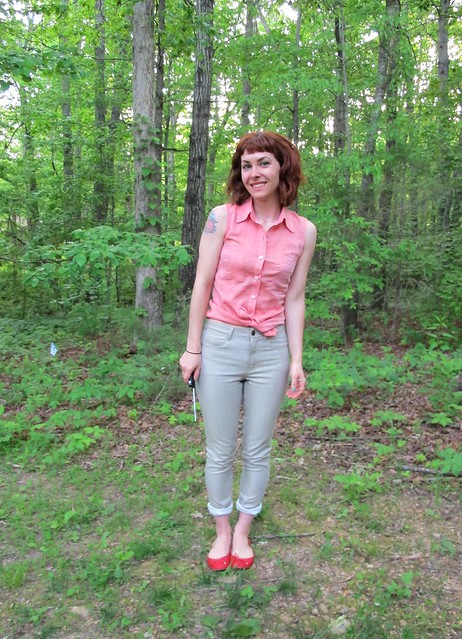
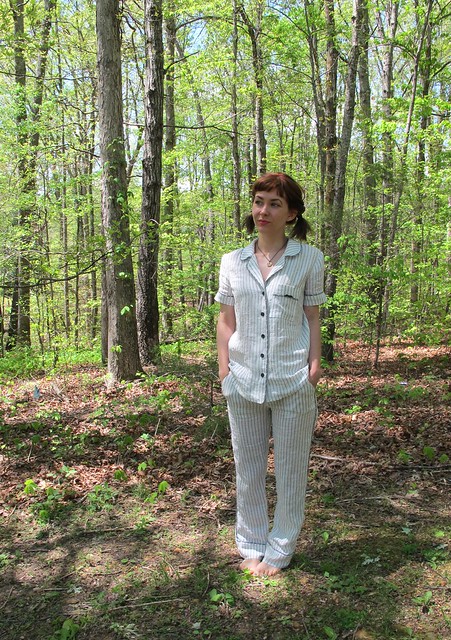
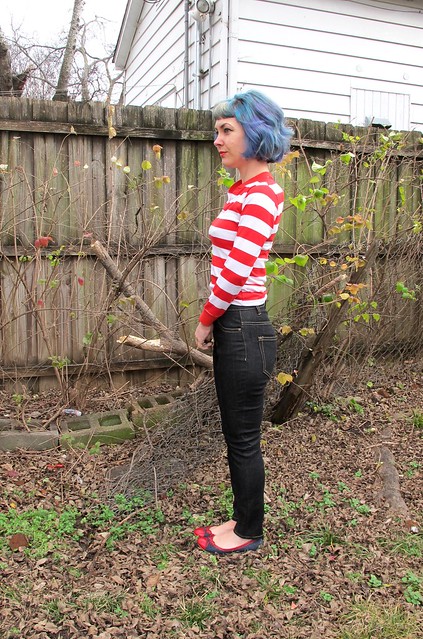
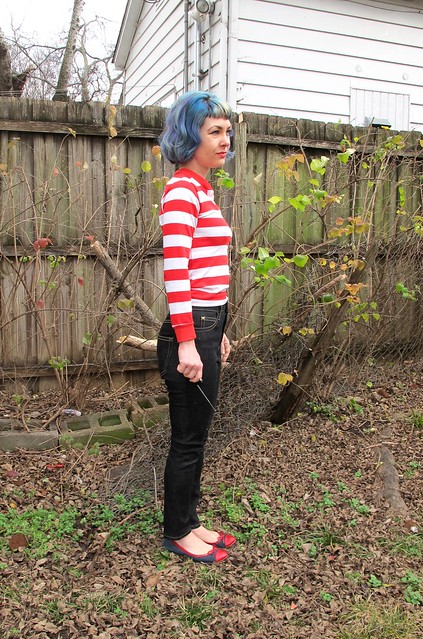
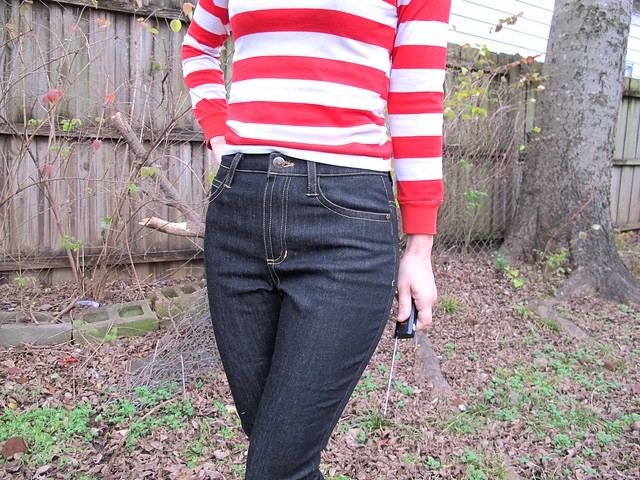
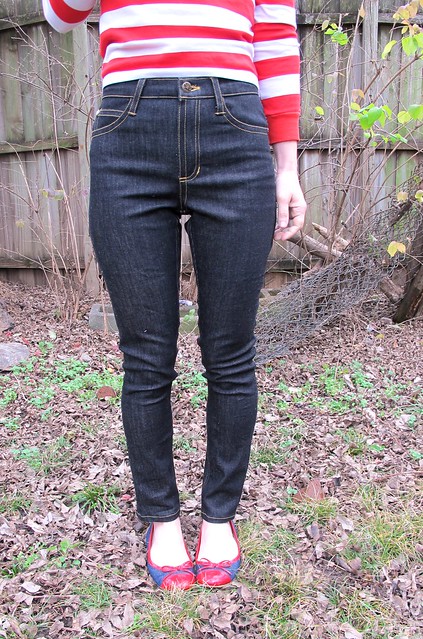
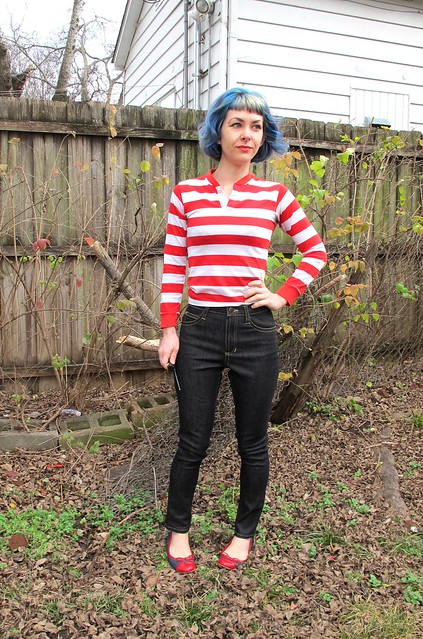
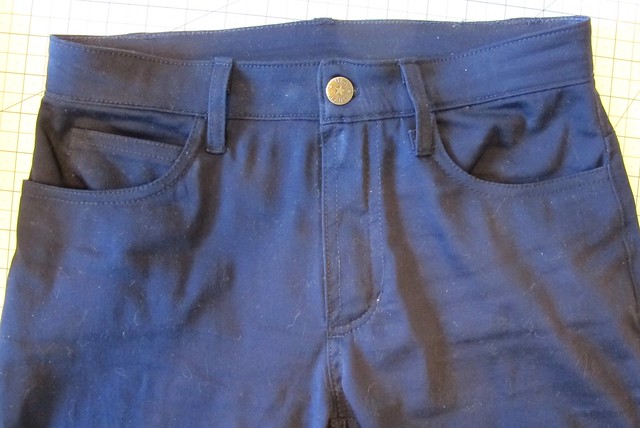
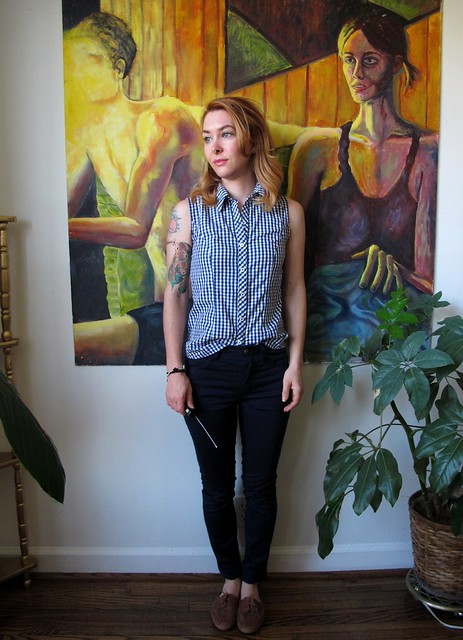
Anyway, Ginger Jeans! Again! I love this pattern so much, it’s definitely my pants TNT. The style is so classic, I can make a million pairs and have no one be the wiser that I’ve been wearing the same pattern for 6 months straight. I’m still tweaking the leg fit, but I really think the waist/hip fit is nailed down solid. And I love how it looks in different fabrics. While I primarily make this pattern up in denim, I’ve really wanted to try more colorful stretch twills. And here we are with that!

Sorry in advance for the terribly quality of these photos. Navy is almost as difficult to shoot as black, who would have thought!?

Navy Cotton twill Ginger Pants - front

Navy Cotton twill Ginger Pants - back

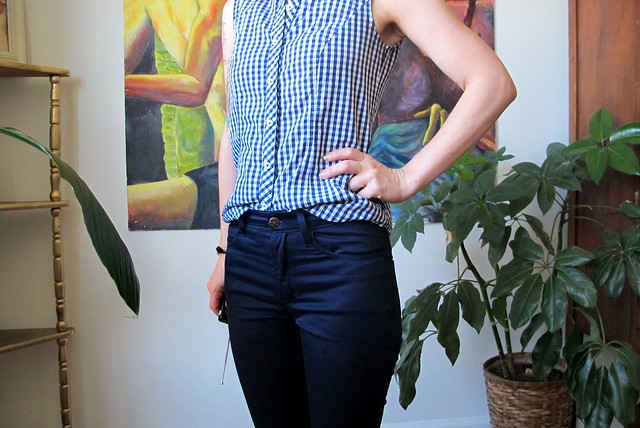
Anyway, I bought this navy stretch cotton twill from Mood Fabrics, back when I was in the NYC storefront in March – specifically with the intention of making myself some sweet pants out of the yardage. It’s a good stretch bottomweight for the kind of pants I like to wear – a lighter bottom weight (it’s still technically bottom weight, however, it’s about the lightest you can get away with – if that makes sense!) with a really good, solid amount of stretch. I have learned that I don’t like wearing really heavy fabric as pants – just don’t care at all for the way it feels. Maybe I’m sliding quickly into knit-fabrics-for-every-garment fabric territory, but I really like lightweight, super stretchy fabrics on my booty. Since that’s so freaking DIFFICULT to find with denim (get the right weight, and you lose out on recovery. Get the good recovery, and it’s like wearing raw denim in terms of stiffness, ew), cotton twill is where it’s AT. Bonus if that shit is colorful. I like colorful things.

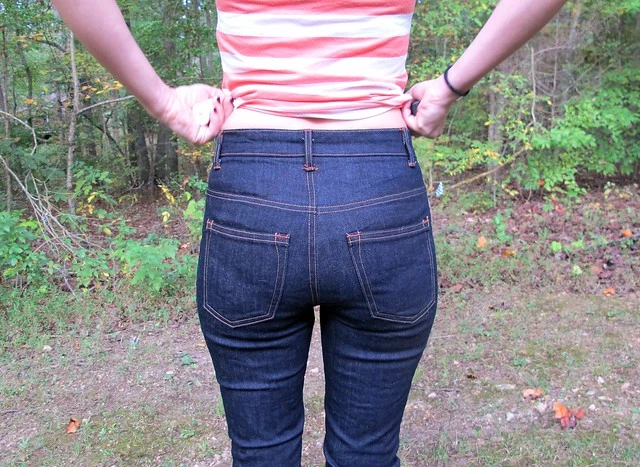
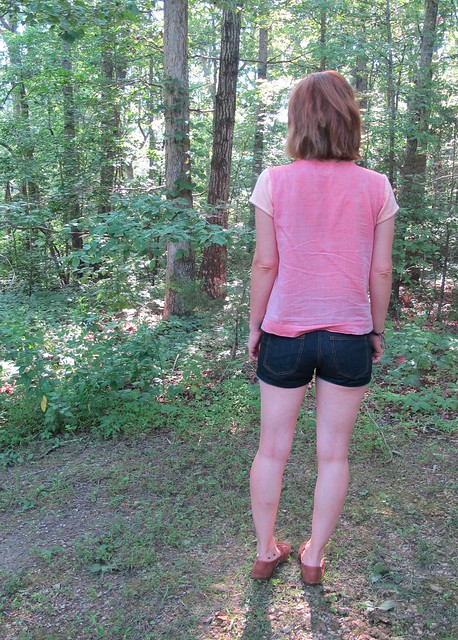
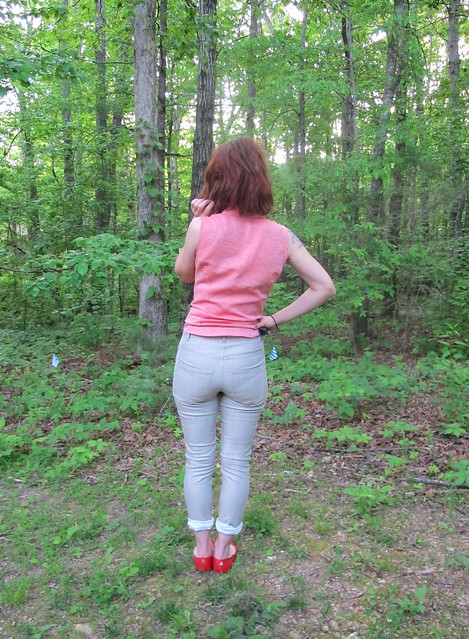
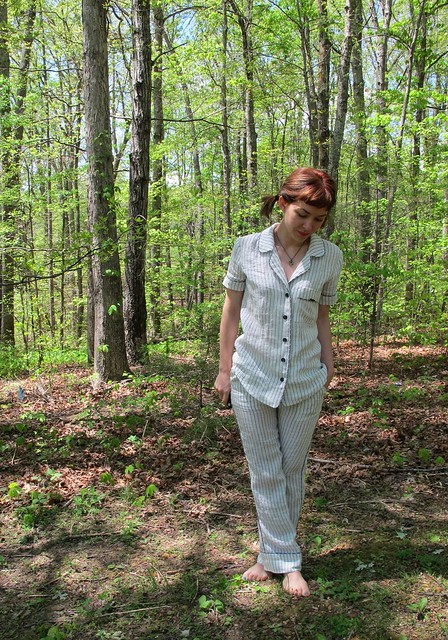
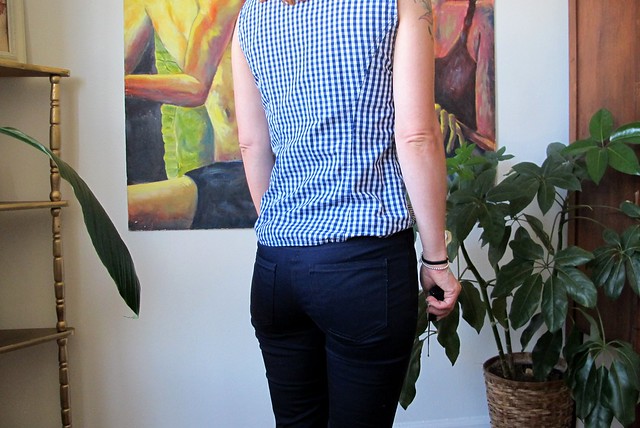
This cotton twill seems to be a lot more along the lines of a cotton sateen, to be honest -it’s pretty shiny, for one. I rather like the effect – I think it looks a little more luxe than just a normal pair of pants – but as you can see, it highlights EVERY SINGLE wrinkle that shows up. It makes these pants look a lot more ill-fitting than they actually are… not that anyone would notice, except someone else who sews/fits, but it is what it is. I ain’t worried about it. Coupled with the fact that I like to wear my pants as skintight as if they are basically painted on, it’s pretty much wrinkle-city up in here. That’s ok, though. I will live.

Navy Cotton twill Ginger Pants - front

Navy Cotton twill Ginger Pants - side

Navy Cotton twill Ginger Pants - back

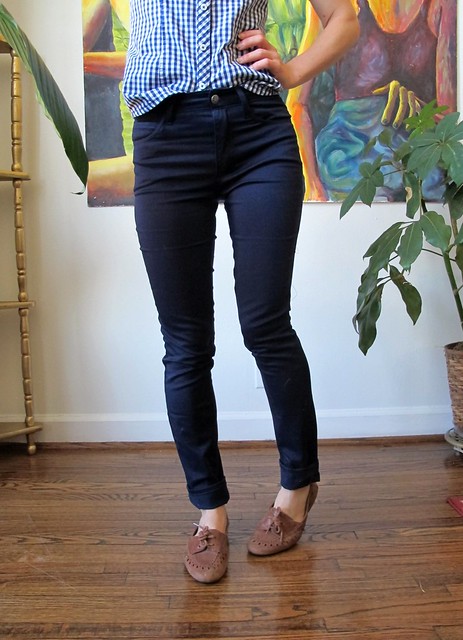
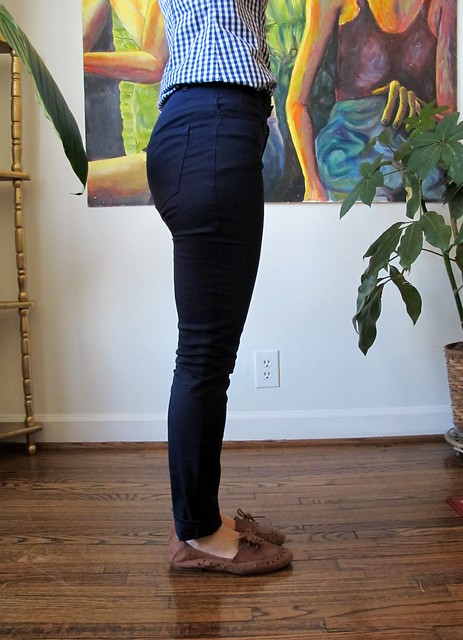
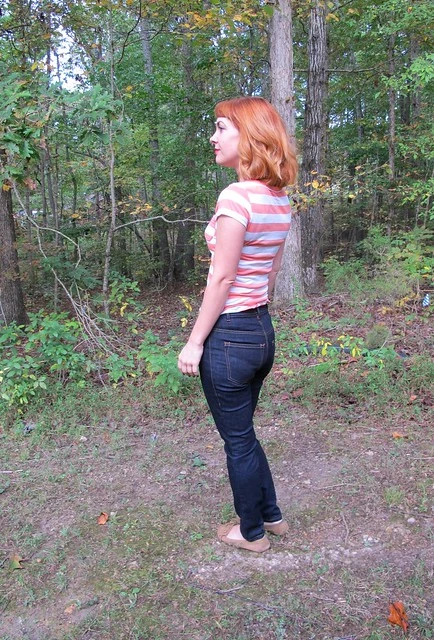
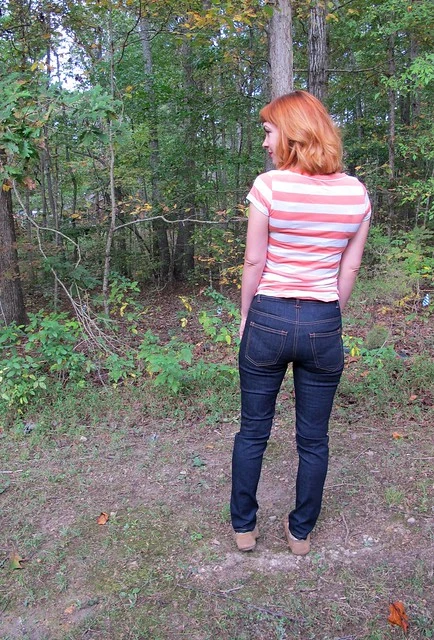
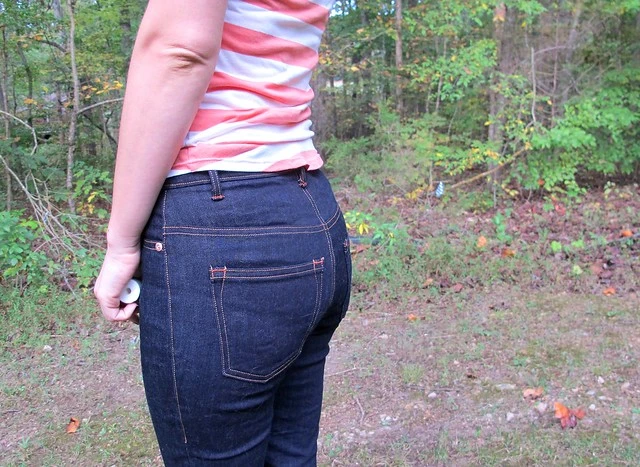
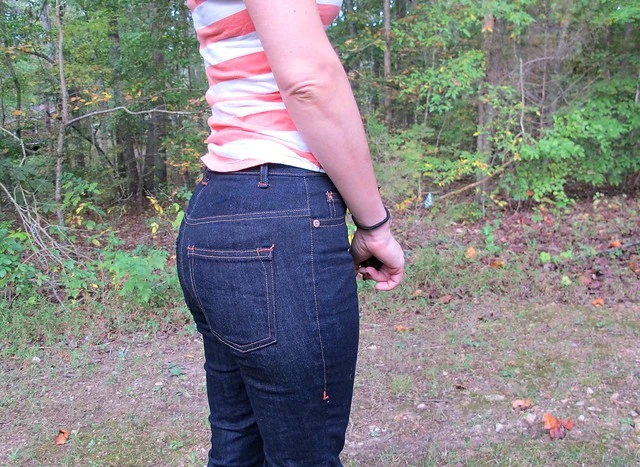
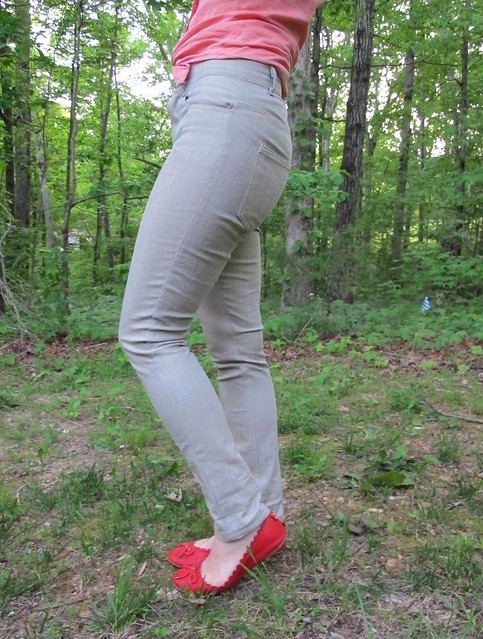
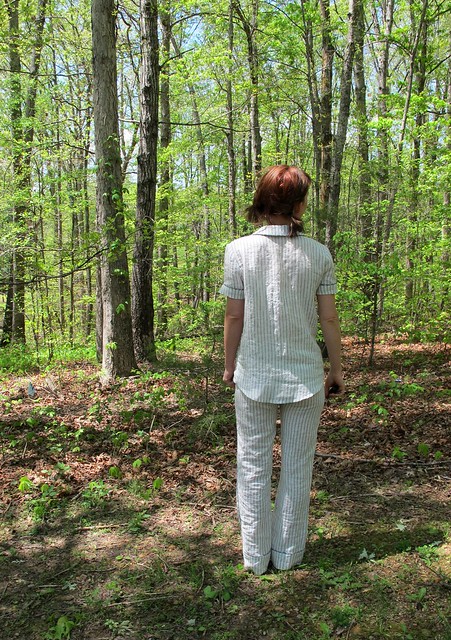
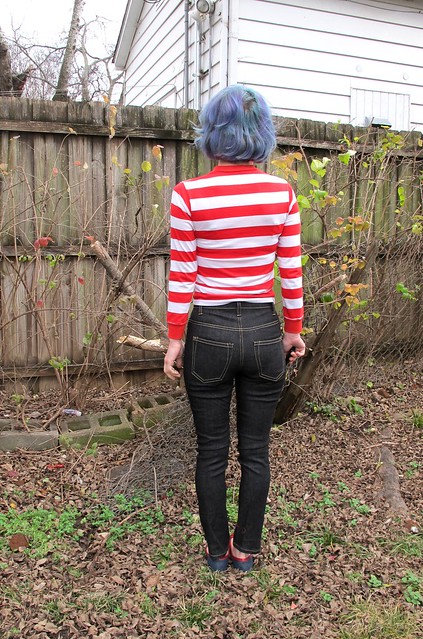
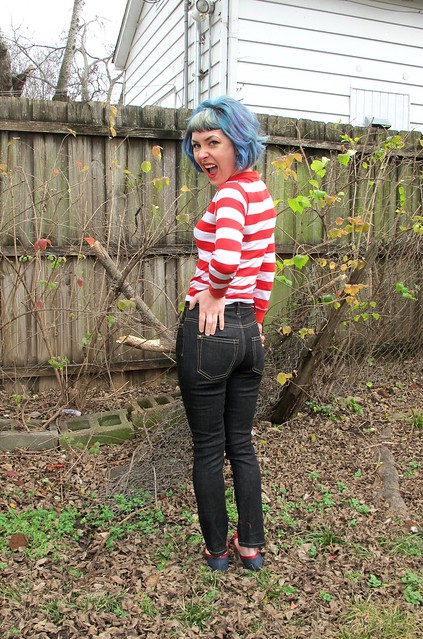
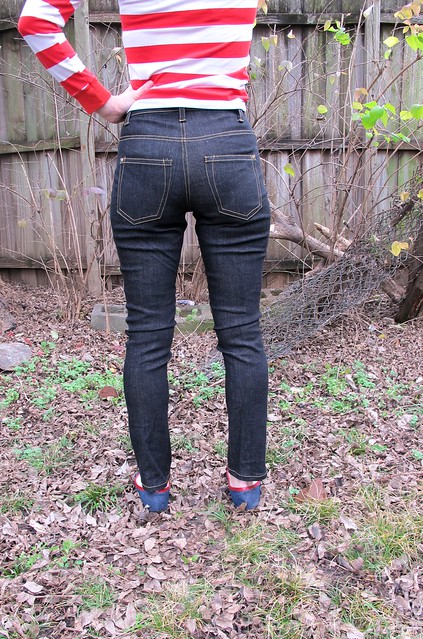
I wanted to improve on the fit of my last pair – the full calf adjustment has been good in terms of allowing room for my calves and reducing the amount of knee wrinkles, however, I wasn’t happy with how wide the ankle ended up as a result. This is part of the reason why I’ve been reluctant to make this pattern again until now – that, and it’s been way too hot to wear pants for the past few months 🙂 Anyway, I have that Ginger Jeans Intensive at Workroom Social this week, so I wanted to make the pattern before I left just to brush on the construction. Which meant that I also had to figure out the leg situation. Boo.

Ultimately, I figured that since the full calf adjustment was kind of the same concept as a full bust adjustment – i.e., you slash and spread to add width to a certain part of your pattern – then reducing the circumference of the ankle would basically be the opposite of that, like a small bust adjustment.

Navy Cotton twill Ginger Pants - full calf adjustment

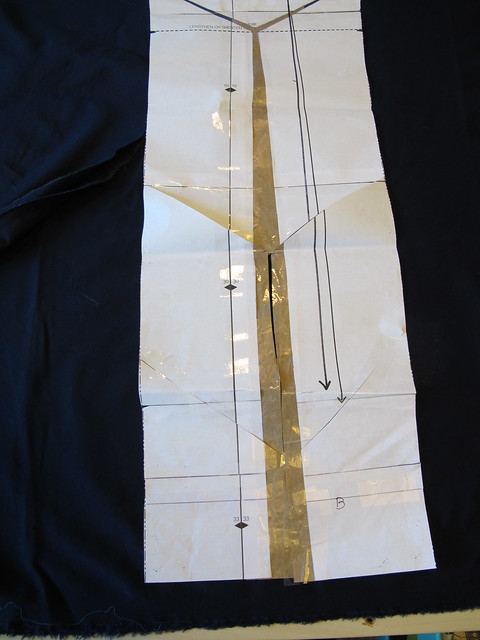
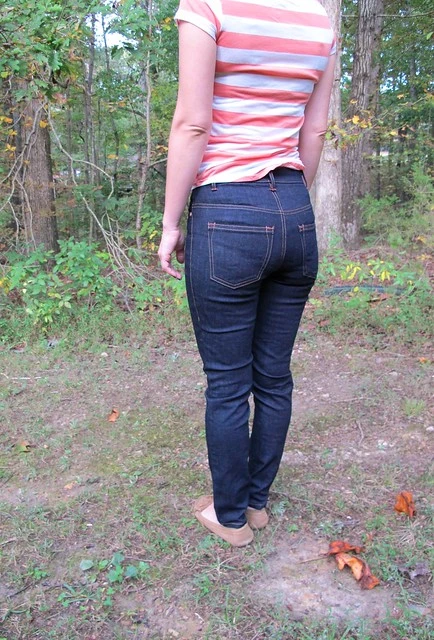
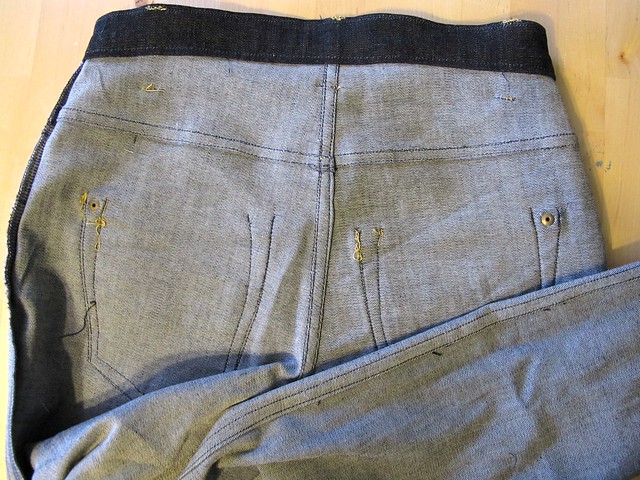
Here is my pattern piece after adding that extra room for my calves. As you can see, quite a bit of width was added at the ankle – 1 1/8″, to be exact. I wanted to reduce that amount without actually reducing the calf width, and also maintain the grainline of the pattern so the fabric wouldn’t twist and go all haywire (this is why you can’t just… shave down the side seams to remove the width. I tried that on the jeans with a basting stitch and it was just AWFUL. Did not work at all).

Navy Cotton twill Ginger Pants - full calf adjustment

My Y-shaped slash and spread worked to add that width, so I did another Y-shaped slash right around where my calf starts to taper back into “normal width” category, using the super scientific method of holding the pattern piece up to my body and drawing wild lines on the paper with a pencil. (btw, that second slash line was my first try – and I realized it was way too low, so I taped it back together haha)

Navy Cotton twill Ginger Pants - full calf adjustment

Navy Cotton twill Ginger Pants - full calf adjustment

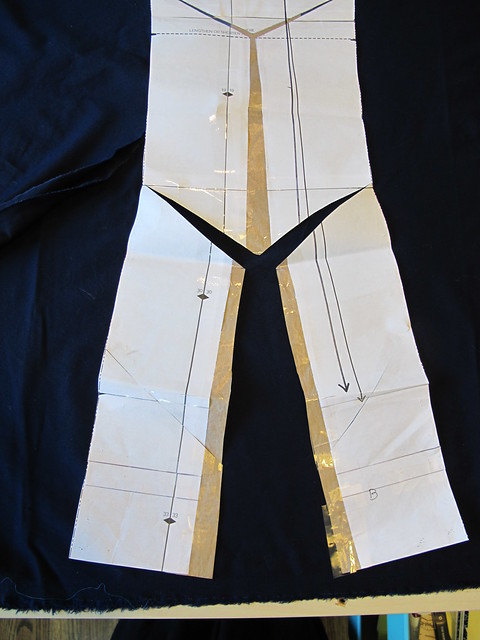
Instead of spreading, I overlapped the pieces together so that the original pattern paper (without my brown craft paper addition) butted up as normal right at the ankle. As you can see, it makes a very gradual curve to the side seams – they bellow out a little where the extra width is needed, and then gently curve back to their normal width tapering to nothing at the ankle. I also straightened the grainline, after I took the photo. Sorry bout that.

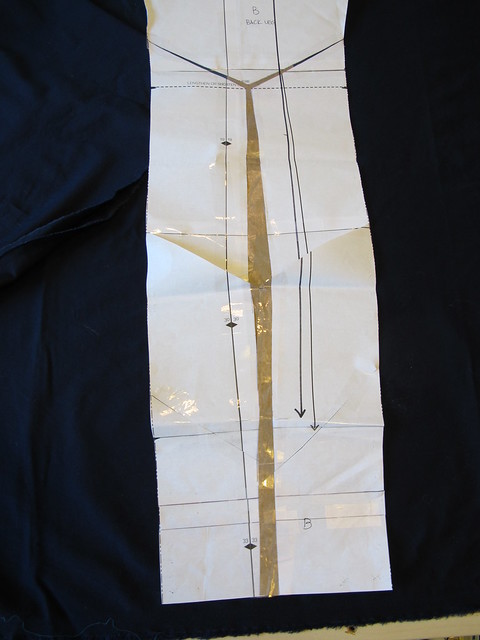
I had no idea if this was going to work – this is how I do my pattern adjustments (if I can’t find the answer in a book, anyway): mulling over the issue for a few months, doing some wild slashing that seems legit, and then cutting them off into shorts if it doesn’t work 🙂 Fortunately, it worked! I still have the room I need for my calves, but the ankle is fitted as it should be. And I ended up with pants instead of having to cut them into shorts, so woohoo me:)

Navy Cotton twill Ginger Pants - flat

Navy Cotton twill Ginger Pants - flat

Navy Cotton twill Ginger Pants - flat

Navy Cotton twill Ginger Pants - flat

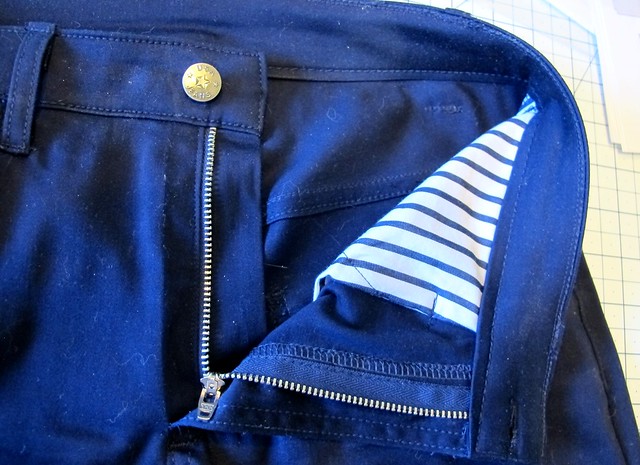
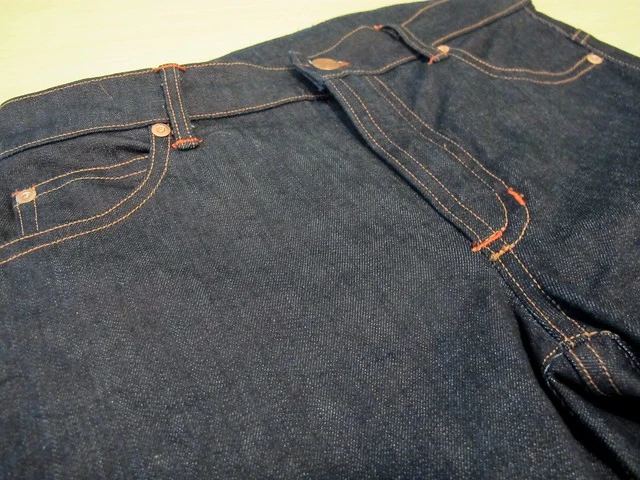
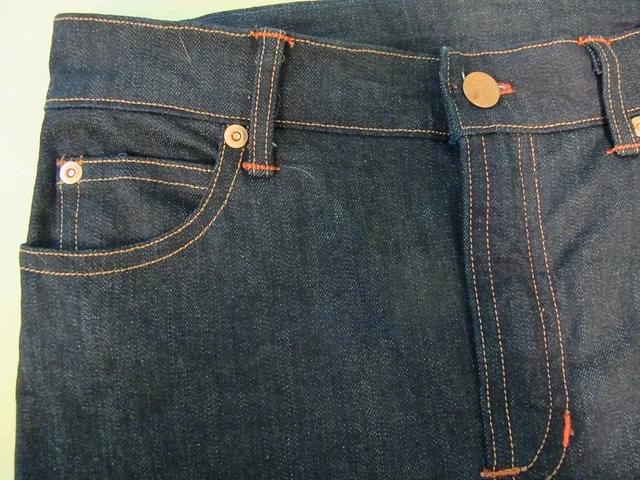
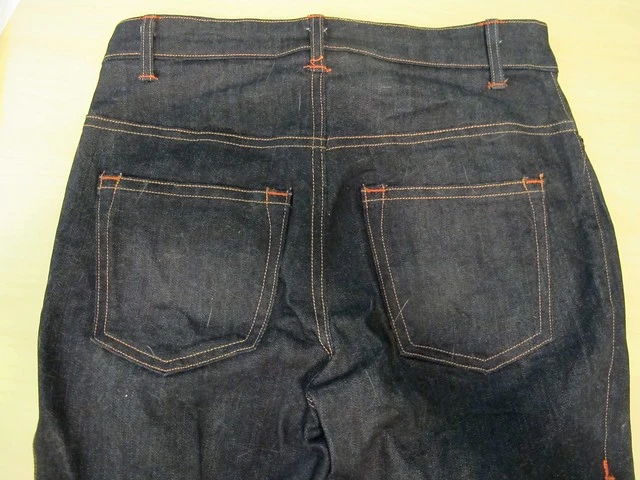
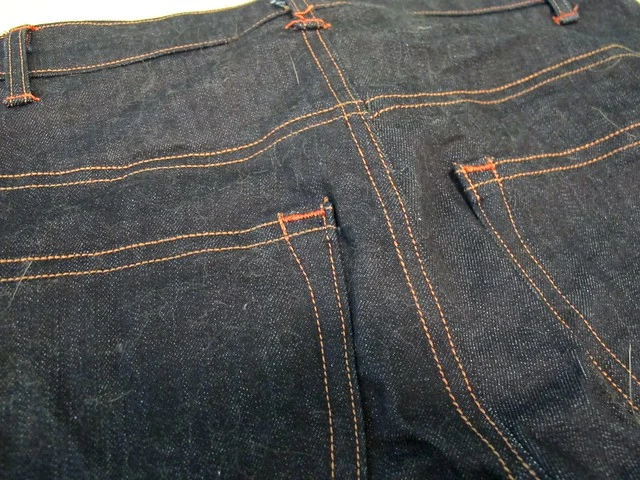
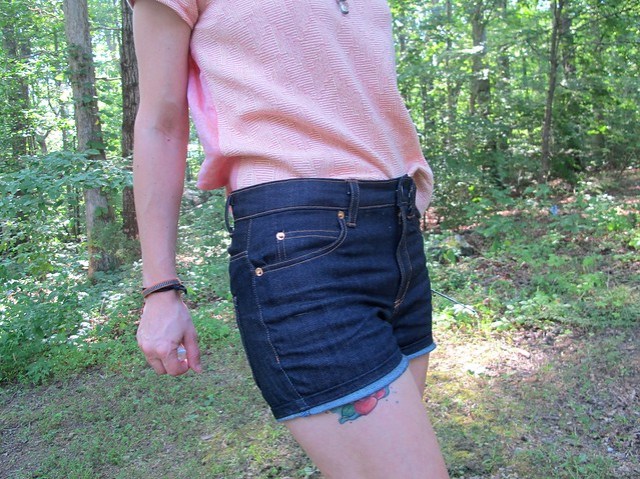
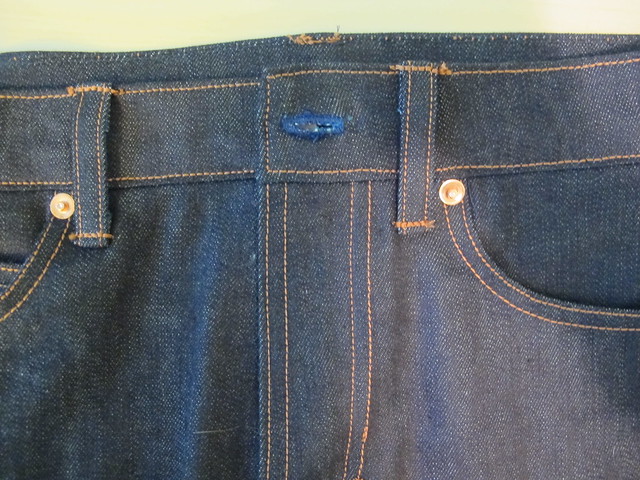
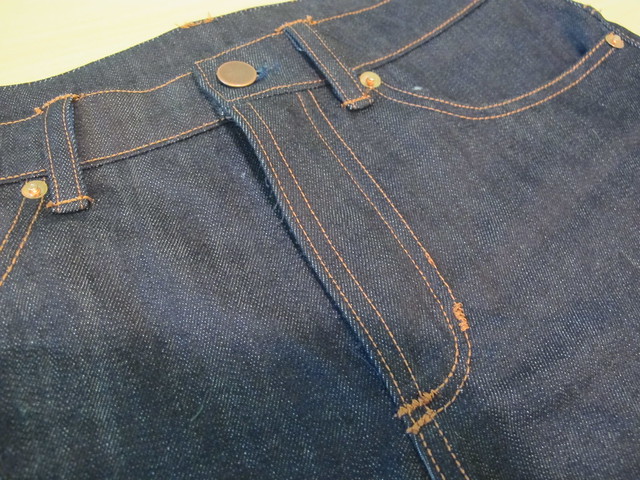
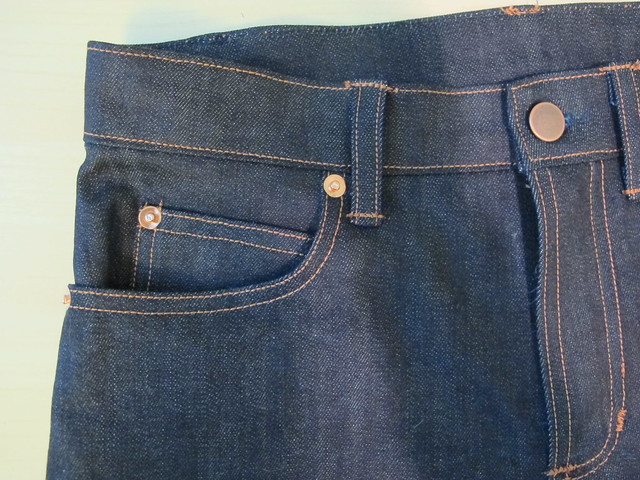
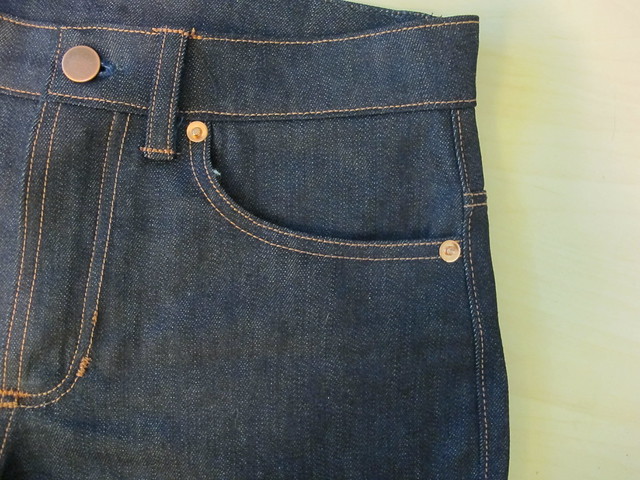
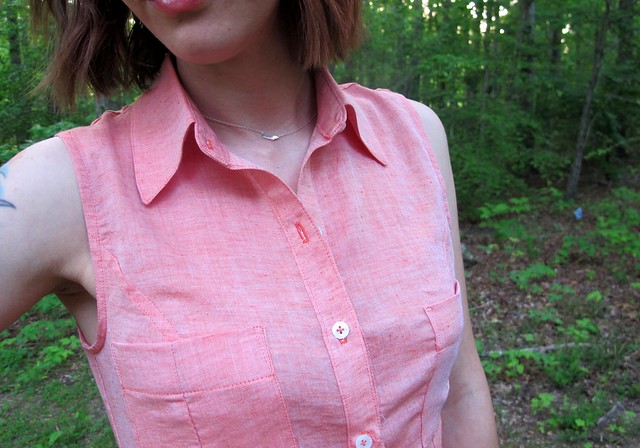
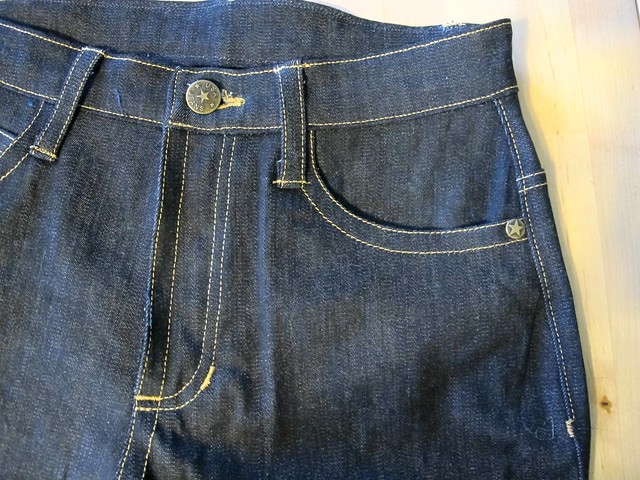
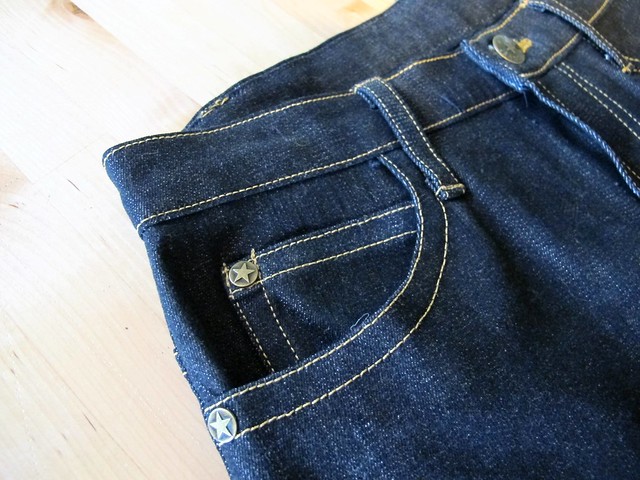
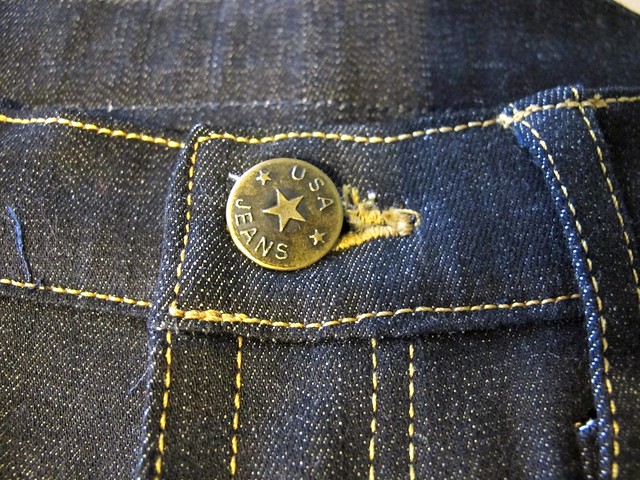
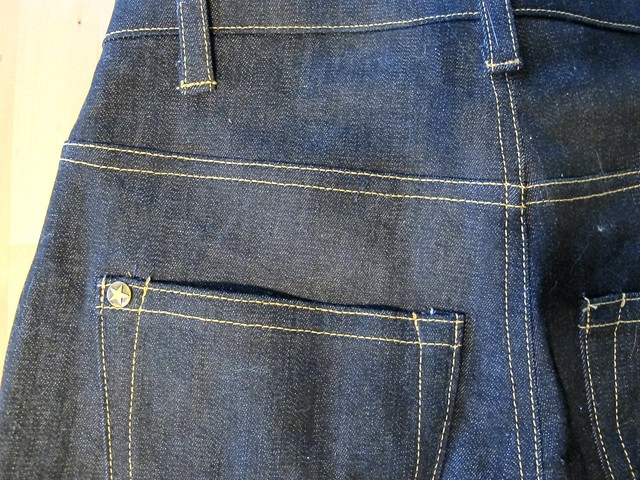
The only other change I made to these pants, in terms of construction, was how I applied the topstitching. I usually use topstitching thread – whether matching or in a contrast color – but I didn’t have any of that on hand when I made these pants (to be frank, I barely had ANY navy thread at all during this phase. I did have a bunch of bobbins filled with navy thread, which is what I used as my main thread hahaha AND MIRACULOUSLY HAD ENOUGH YAY). Instead, I used normal polyester thread – just whatever you’d use to, I dunno, assemble a garment – and set my machine to sew on the Triple Stitch. The Triple Stitch automatically lengthens your stitch just a few mm, and then sews over the same stitch a couple of times – which results in a nice, thick, dense stitch. It looks great for topstiching and solves the problem of not having the proper thread. I actually like it better than using topstitching thread, as you are less likely to get thread nests on the underside of your fabric! The only downside is that it is a giant ass bitch to unpick, so definitely be really really sure of what you’re sewing 🙂

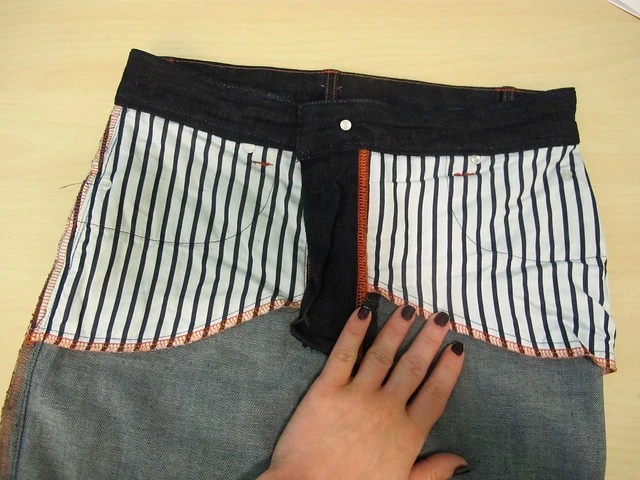
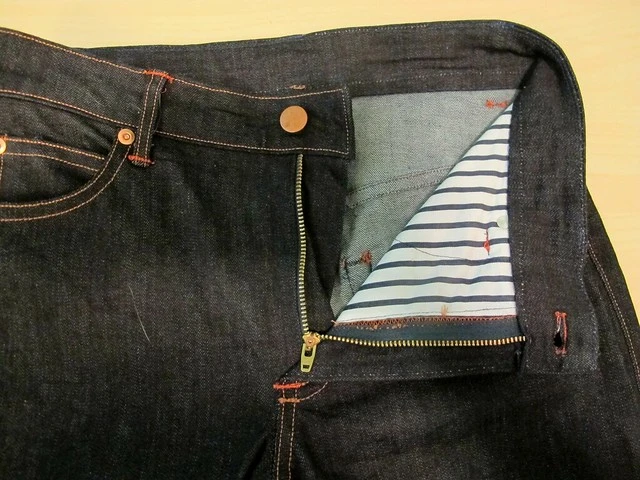
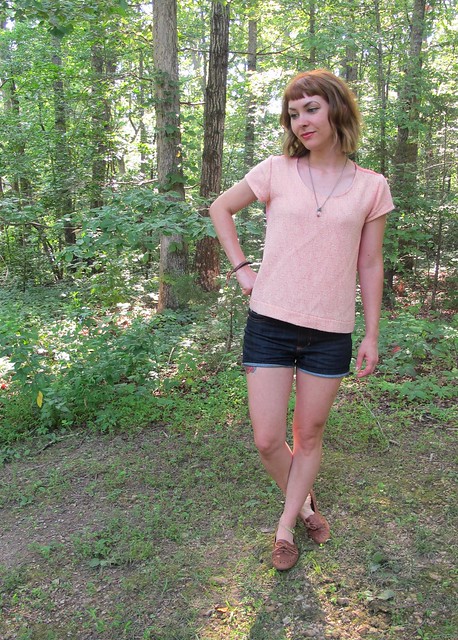
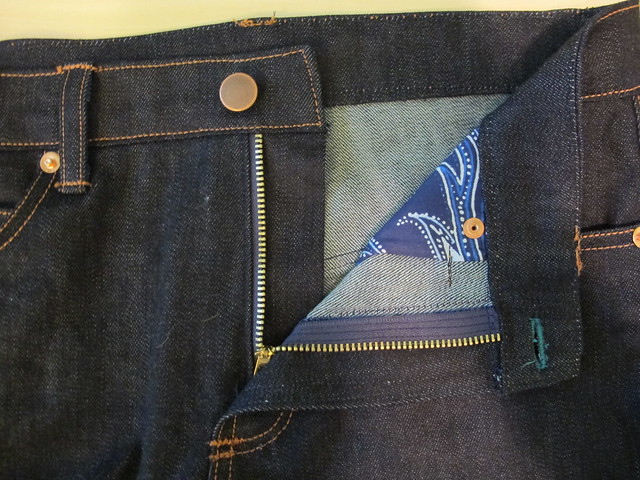
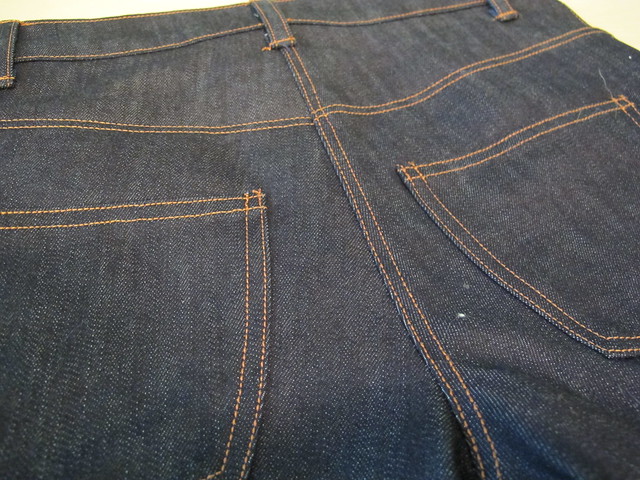
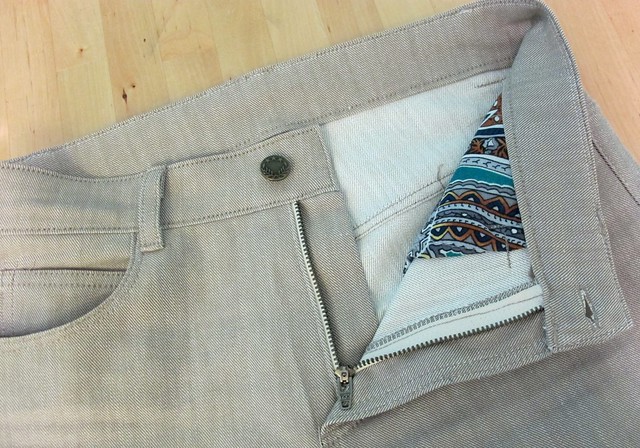
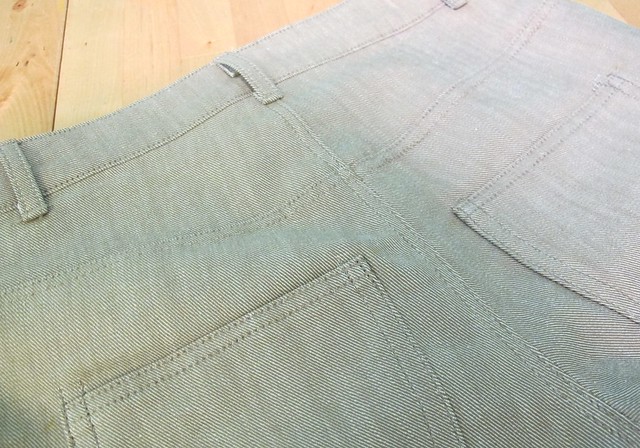
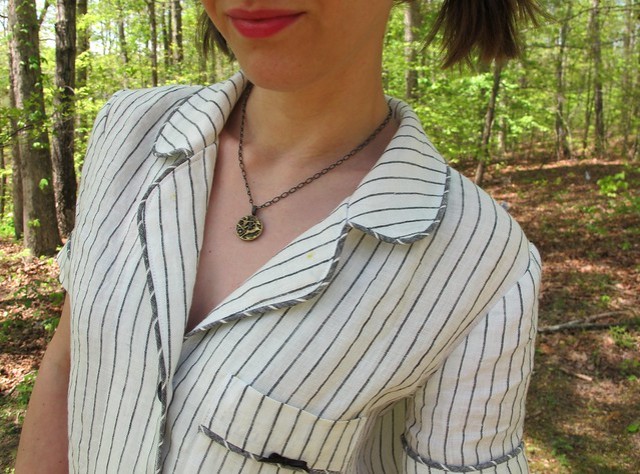
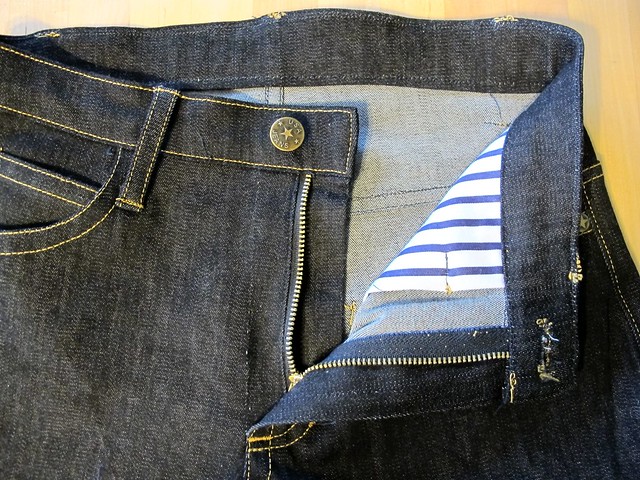
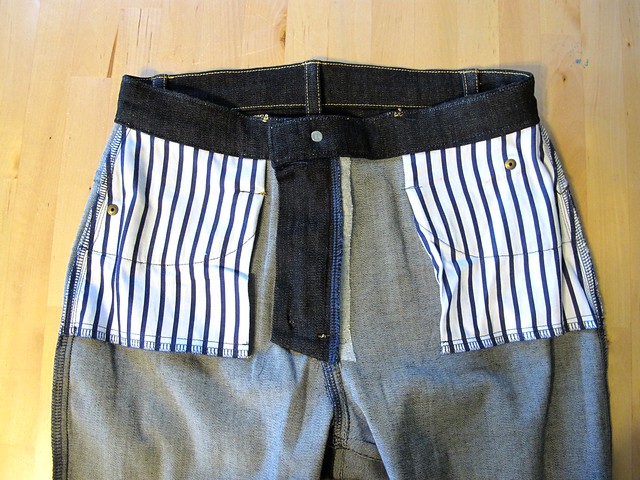
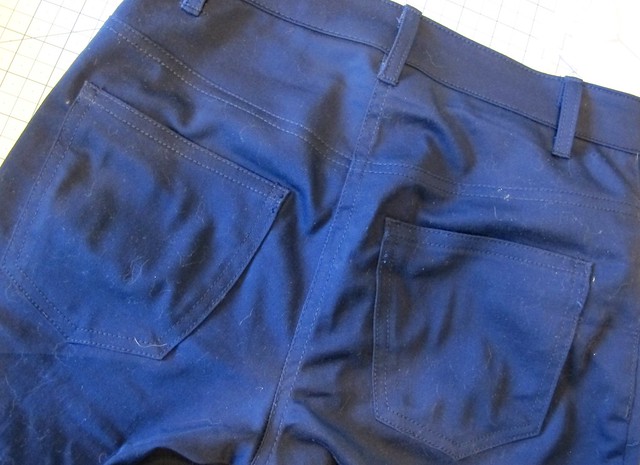
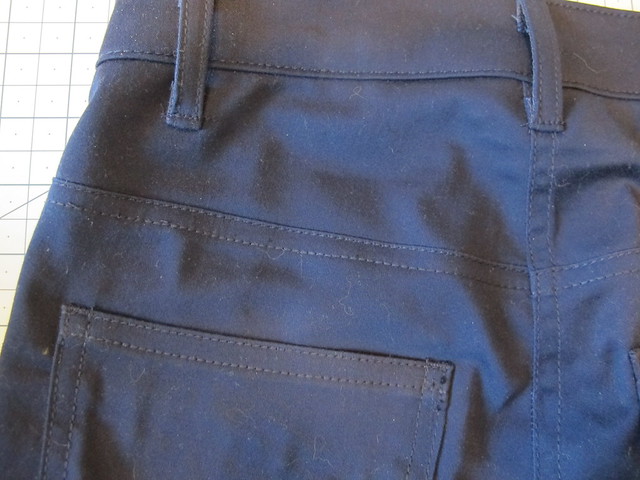
Anyway, I used the Triple Stitch to topstitch all my seams – including the flat-felled seams. To keep my lines even and consistent, I used my edgestitching foot to get that 1/8″ from the seamline, and then my 1/4″ foot for the second pass. The bartacks are just teensy little zigzag/satin stitch blobs, using the same navy as the topstitching. I didn’t add any rivets or contrasty anything to these pants – I wanted them to be plain and a little sleek. The pocketing is the same striped cotton I use for pretty much all my pocketing – I bought a shitload of that yardage ages ago at Mood Fabrics, and it’s like the gift that keeps on giving forever haha 🙂 I kept the longer length, just so these don’t end up being super high-waters after a couple of washes, but they look good cuffed, too 🙂

Navy Cotton twill Ginger Pants - front

I have only had a chance to wear these once since finishing them, so I can’t 100% comment on the recovery of the stretch fabric – but at the end of the day on their inaugural wear, they stayed pretty tight and did not bag out. I’m interested to see how long they keep their shape before bagging happens, but so far so good, I think!

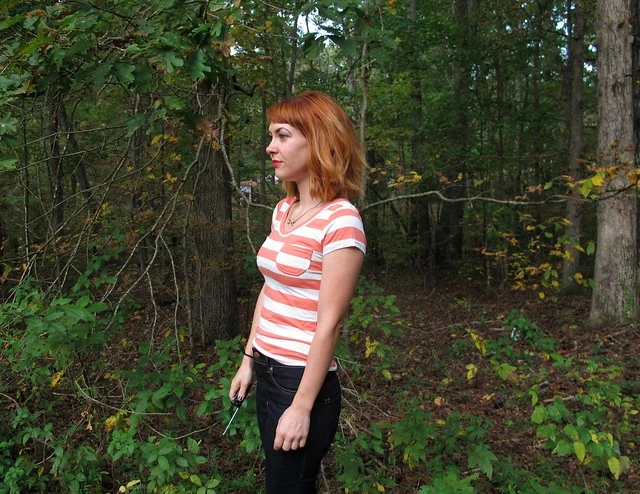
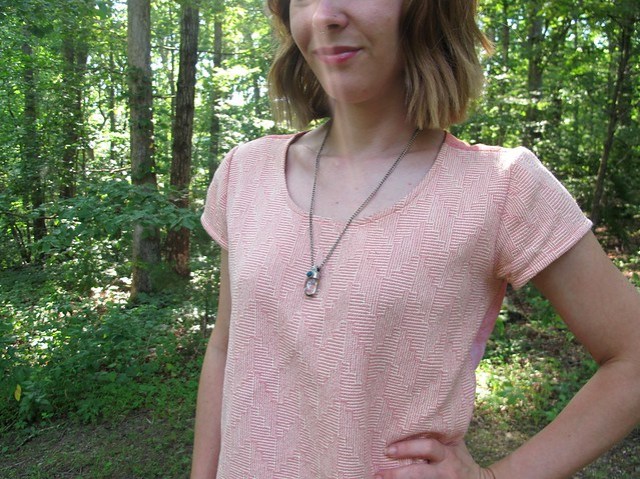
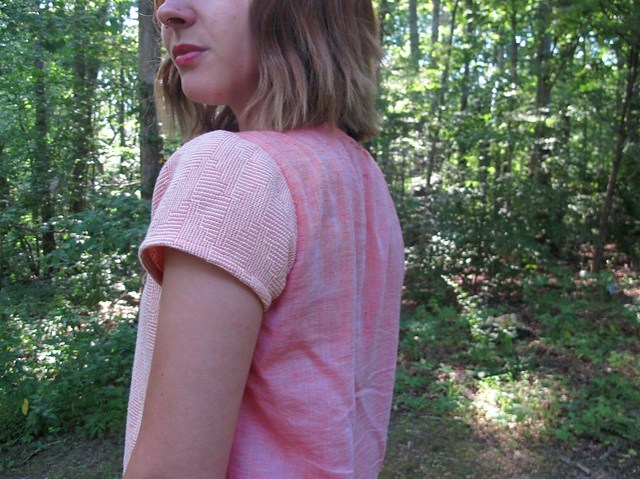
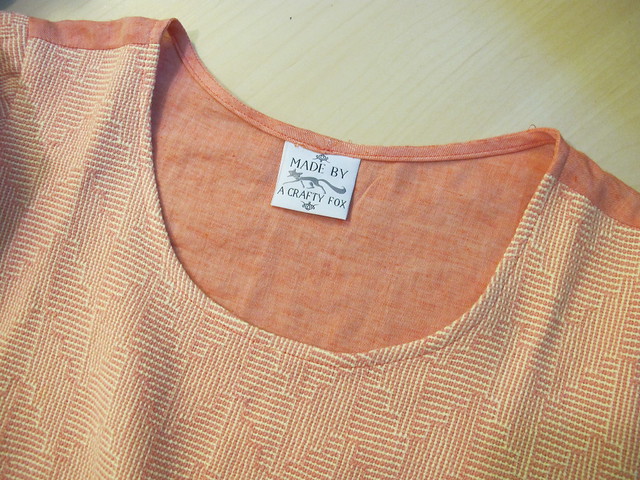
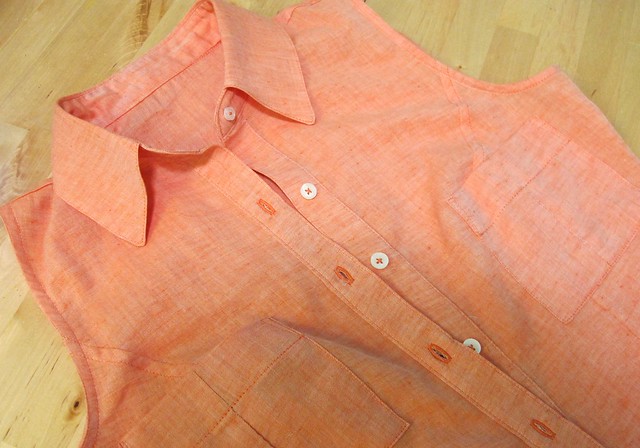
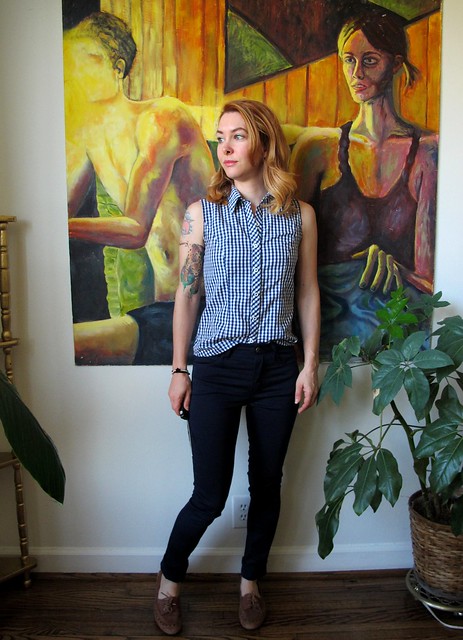
** Note: The fabrics used to make these pants were provided to me by Mood Fabrics, as part of my participation in the Mood Sewing Network. In case you were curious, the gingham for that shirt is also from Mood Fabrics 🙂 it’s Butterick 5526 !

Completed: Fancy Cone Mills Ginger Jeans

9 Oct

I’ve been swimming through muslin hell this whole week (crazy me decided to even make a SECOND MUSLIN to verify all my changes, wtf who am I turning into amirite), but fortunately, I have an old make from pre-Maine that I can share with y’all! Jeans! Yay!

Cone Mills Ginger Jeans - frontCone Mills Ginger Jeans - front

Cone Mills Ginger Jeans - front

Remember when we were all scrambling around to buy those fancy Cone Mills Denim kits with our Ginger Jeans earlier this year (and last year too, for that matter)? I’m so happy that I made space in my budget for one, because Cone Mills denim is awesome. It’s the same denim they used to make Imogene + Willie jeans (which I can personally vouch for as I own 2 pairs – they wear really well and hold their shape beautifully, which means I never need to wash them in order to shrink ’em back down at the end of the day), and although the kit wasn’t cheap – it is certainly cheaper than buying the actual jeans. By the way, if you’re thinking, “Where the hell is this kit so I can buy one???” I’m sorry to be the one to tell you that they were on limited pre-order, and have been sold out for a while now 😦 Hopefully there will be more where that came from!

EDIT I have just been informed that Threadbare Fabrics sells Cone Mills Denim! Yay!! I apologize in advance for those who end up emptying their bank accounts after reading this post 🙂

Anyway, the point of that somewhat sales-y sounding paragraph was to say that I finally used one of the pieces of my denim for this pair of pants. I received the kit way back in April and have been anxious to sew it up, but I wanted to wait until it was actually something closer to pants-season before I got too excited.

Also, just a head’s up before we delve too far into this post – sorry in advance for all the weird bobble-head shots. I didn’t realize my camera was tilted so much, and I don’t care enough to retake the photos. Also, there be VPL in most of these pictures. Not sorry about that! Deal with it!

deal with it

Cone Mills Ginger Jeans - side

The denim itself is what really counts when it comes to a good pair of jeans. You want a material that is a good medium weight (not too light, but also not too heavy) and if it has stretch, an awesome recovery. The single thing that’s plagued me the most when it comes to making my own pants is finding material with a good recovery! I hate having my pants bag out by the end of the day – it’s annoying enough for every day life, and utterly useless if you’re traveling and don’t have access for a quick wash (or just plain don’t own a washer and dryer, which was totally my situation up until we moved this year!). Plus, washing denim too much can fade out the color and cause the fibers to break down faster. I like my jeans to be a really deep, dark indigo blue, so fading isn’t my first choice. Figuring out fabric recovery is really difficult to do without actually wearing the fabric – which means you have to sew it first. So whenever someone gives me a head’s up on some good stretch bottomweight, I tend to snap it up without hesitation. I knew the Cone Mills denim was good stuff, so I’m glad I was able to get my hands on some before it sold out.

Cone Mills Ginger Jeans - back

This certainly is not my first pair of Ginger Jeans – I’ve made a classic indigo denim pair, a red cotton twill pair, a gold denim pair, a version of jeggings and shorts version. What can I say – when I like a pattern, I tend to stick with it 🙂 And I REALLY like this pattern – it’s a nice, classic jeans pattern with all the good details you see in store-bought jeans, minus the shitty denim and strange fitting issues.

Having made this pattern numerous times made me feel confident enough to break into my mega-expensive denim for the pair you see here. I knew I already had the fit pretty good, so I could focus more on visual details with this version. That being said, there are a few changes to this pair that aren’t evident in my previous makes.

Cone Mills Ginger Jeans - front

The biggest change is that I went up one size, to a 4. While I like the fit of the 2 (all my other Gingers are 2s, fyi!), I’ve gained a little bit of weight over the summer and I got this weird paranoia that I was in denial about my size. Those 2s are great and super comfortable, but the legs are so tight that they look painted on. I was horrified at the thought of people thinking I was trying to squeeze into a too-small size, so I went up to the next size. I think the 4 definitely fits better, but the are a little different. Namely – those wrinkles at the knee. What is the deal with those? The calves aren’t too tight (they are looser than the tightness on my 2s, and my 2s don’t wrinkle like that), so that’s not the issue. Maybe they’re too loose at the knee and need to be taken in a bit? Thoughts? Btw, the wrinkles look worse in photos than they do in real life!

Cone Mills Ginger Jeans - side

Cone Mills Ginger Jeans - back

Since I was going up one size and I don’t trace, I had to reprint the pattern. I know Heather updated the Ginger jeans pattern at some point last year, and I had both an original version (that I got when it was first released) and an updated version (that came with my purchased denim kit). I printed the new version so I could try it and compare to the original one. I don’t recall exactly what changes were made to the jeans, but there are some slight differences in the rise and the shaping around the crotch and hips. The waist is definitely a lot higher than it is in the original version – and this was after I shortened the crotch. The major difference in the updated version is the pocket bags – instead of normal jeans pocket bags, there is a drafted pocket stay (also called an instant tummy tuck).

Cone Mills Ginger Jeans

With a pocket stay, the pocket bags go all the way across the front into the fly. This helps pull everything in and give you a smooth line in the front (hence the tummy tuck name). I wasn’t sure if it would be comfortable, but I tried it anyway and I’m glad that I did! I don’t care about smooth lines or whatever (I mean, c’mon, I’m basically always rocking dem VPLs. Death to thongs!), but what I do love is that the pockets stay in place when you pull your pants on. You know how tight pants always have to get the pockets shoved back down after you go to the bathroom? Not with these babies! Plus, since the pocketing isn’t folded over anywhere, there isn’t a weird bump at the coin pocket. I never was a fan of that.

Damn, shoulda pressed those insides before taking the photo. That fly shield wrinkle looks awful.

Cone Mills Ginger Jeans - front

Cone Mills Ginger Jeans - side

Cone Mills Ginger Jeans - side

Cone Mills Ginger Jeans - back

All the topstitching and jeans-y details are what really made these fun to sew up! I just love the way jeans topstitching thread looks when sewn up against denim, so good. I kept my I+W jeans on hand and used their stitching colors as inspiration for this pair (here’s an old post where I took close-ups of the jeans right after I bought them, if you’re curious). The kits came with the zipper, button, rivets, copper topstitching thread and denim needles. However, you can buy all that stuff individually as well – Taylor Tailor has most of it in his supply shop for really reasonable prices. I did buy the orange topstitching thread from Taylor Tailor, which I think looks awesome next to the gold topstitching.

Now that I’ve overloaded you with pictures of my butt and crotch, here are some flat jeans shots.

Cone Mills Ginger Jeans

Cone Mills Ginger Jeans

As you can see, I used the orange topstitching thread pretty sparingly – just for the bartacks and belt loops. I can’t say I thought of this myself, as I pulled the inspo straight from my I+W jeans. They also use a third topstitching color in the second line of stitching, which is not something I did with this pair. Also note that the I+W jeans don’t use rivets, but I did use them here. I love hammering those things in and I think they really finish off the jeans nicely. I just kept them on the front pockets and coin pocket – I don’t like the look of rivets on the back pockets.

Cone Mills Ginger Jeans

Cone Mills Ginger Jeans

Cone Mills Ginger Jeans

Again, using my I+W jeans as inspiration – I flat-felled only the back yoke seam, and serged + topstiched the leg seams (this will make it way easier to take in the legs if I need to, so yay!). I used orange thread in my serger, which mimics the orange bartacks. I LOVE the way it looks!

Cone Mills Ginger Jeans

Cone Mills Ginger Jeans

Whew! Sorry about all that cat hair!

Cone Mills Ginger Jeans

This is my absolute favorite little detail of these pants – the side leg bartack is a little L for Lauren 🙂 On my I+W jeans, they have a little + sign on one leg in place of a bartack, and I thought, hey I can do that with an L. It’s only on one side, and it’s quite subtle unless you already know it’s there.

Cone Mills Ginger Jeans - side

Welp, that ended up being a super long post! Do you see now why I love making jeans so much? All the little details are so fun and make the end result look extremely professional. Not to mention, all the customization options – from fit, to denim, to topstitching details. I’m so glad Heather released the Ginger pattern and I’m even happier than we were able to get some of that fancy-ass denim to make it up with! I still have one more piece for one more pair of jeans – and I’m thinking I might do the low-rise version next. Could be fun!

Completed: Scout Tee + Gorts

10 Aug

Today’s post features a two-fer – a top AND shorts! Woohoo! Be prepared for a slight photo overload ahead.

Scout TeeI’ll start with the top. This is the Scout Tee from Grainline Studio. It’s your basic woven tshirt with a scoop neck and a relaxed, boxy fit below the bust. I know everyone and their mom has made this pattern already, and I’m only a few years behind on the bandwagon! Honestly, the pattern didn’t appeal much to me until recently – I generally prefer to wear more fitted shapes, especially at the waistline. This was a bigger deal in the past when I had a larger bust – but the girls have shrank over the years, which has made me feel a little bolder about experimenting with different shapes and silhouettes, since I don’t feel like my waist is being quite as swamped as it was in the past. Plus, loose styles are waaaay more comfortable in the summer heat, since they allow a better airflow (I know most of you are thinking, “No shit, Sherlock,” but I have ignored this for most of my adult life! Cut me some slack!). Scout Tee

Anyway, I quite like this style on me! I guess it’s still not the most “flattering,” but I’m kind of getting to the point where I don’t care quite as much about flattering. That’s one major difference I’ve noticed about being 30 vs being 20 – I don’t really give a shit about looking ~sexy~ every time I leave the house. I’m also sure my long-term relationship has a stake in this as well, but I’ve been in long relationships in the past and my attitude was definitely the opposite. Wearing loose-fitting anything – especially around my waistline – is a pretty new style territory for me, one that I’m starting to slowly explore and actually wear out in public. Also, it’s damn comfy.

Scout TeeBack to the pattern! I cut the size 0 and shortened the hem by a couple of inches to give it a more cropped length (but long enough so that it still covers the waistband of my pants). The pattern was really easy to put together – it’s just a front and a back, little cap sleeves, and a neckline bound with a bias facing. I like that it fits through the shoulders and the bust, then falls straight down to the hem. Even though it’s loose, it doesn’t look sloppy. One thing I noticed is that the shoulders tend to pull toward the front – since I used a different fabric for the back, this is a lot more noticeable. It doesn’t bother me at all – I actually like the way it looks, to be honest – but I’m also not sure if it’s part of the pattern, or a fitting issue. Thoughts?

(ps, sorry about the wrinkles – like most of my makes lately, these were taken after a full day of wearing) Scout Tee

The fabric is what really makes this top shine, though! It is GORGEOUS, amirte?! This is a pretty special piece – it’s handwoven here in Nashville! The company who makes this beautiful cotton fabric is Shutters & Shuttles. I don’t know if they even sell yardage anymore, but they used to. I believe they sell yardage to local designers, which – ding ding ding! – is where I got my little piece from. Back when Elizabeth Suzann used to sell limited-edition tops made with this beautiful handwoven fabric (and other colors/styles of fabric as well), she had a whole stash of it. Eventually, the limited edition ended and Elizabeth’s line moved in a different direction. And then she destashed the studio, and this piece ended up in that stash bag I was telling y’all about. It was a very small piece, so it took me a while to figure out what to do with it. A lot of Georgia Tees were made using Shutters & Shuttles fabric, and they all looked awesome, so I followed that lead with my own boxy tee. Scout Tee it was! Except that I didn’t have *quite* enough fabric to cut both fronts and backs, so the fabric sat on my shelf for several months while I looked for a good color match.

Scout TeeWhen I made my coral B5526, the coral voile was stored right next to this fabric, and I realized that they were perfectly matched. Which was lucky enough in itself, because this is a really weird (albeit beautiful) coral to try to match. I bought another yard on my next Mood order, and used the voile to cut the back of this tee. I also used the voile for the bias facing at the neckline – it’s a much lighter weight with less bulk than the handwoven cotton, so it sits on the neckline a little better (plus it looks pretty on the inside!). Scout Tee

I got these little tags in an order from Grey’s Fabric awhile back, and I think they are so cute! I wanna be a crafty fox!

Scout TeeTo crop the hem, I just folded up an extra-deep hem allowance and topstitched it. One, because I like the way the shirt hangs with the extra weight at the hem, and two, because I wasn’t sure if this whole slightly-cropped-tshirt thing was going to be my jam next summer. I might change my mind and want it to be longer (or even shorter, I dunno), so I left the hem allowance there as a bit of a safety measure. And also a big ol’ dangly thread, it seems.

Now for the shorts! Ginger Gorts

I made Jorts – or Gorts, as I am calling these (jorts is a really annoying way to say jean shorts, in case you were wondering!)! Remember when I utterly failed at that shit last year? Man, those shorts look fucking stupid in retrospect. What was I thinking? And if you were wondering – I never wore them beyond that blog post. They were just tooo uncomfortable and I was terrified the zipper was going to bust. They sat guiltily in my dresser for a few months before I finally chucked them.

Anyway, I’m glad I failed at that shit because I learned some very important Sewing Life Lessons:
1. Don’t make jorts out of a pattern intended for trouser shorts. It looks fucking stupid. Better to start with a jeans (pants) pattern and cut it short accordingly.
2. Jorts need fancy jean topstitching, or they aren’t proper jorts. And, they look stupid.
3. Until you figure things out otherwise, jorts need some stretch in the fabric, else they won’t be comfortable.
4. For zipper security, there needs to be a bartack connecting the fly shield to the front of the pants. This is EXTREMELY important. That’s why my zipper kept breaking on the fail pair – pulling the shorts on and off was putting way too much stress on the bottom of the zipper, which caused it to break. I eventually figured this out by inspecting a pair of my jeans – the bartack that hits right at the curve of the fly topstitching is intended to take the stress off the zipper, so you can pull on and off your tight pants. I had left that bartack off, which made my pants weak right at the crotch (kind of like most men lololol amirite)(sorry).

So, with those lessons in mind, I re-attempted the jorts. These are way better! Not perfect, but better. I know they look pretty wrinkly in these photos, but again, those are wearing wrinkles – not fitting wrinkles. Well, maybe a couple of them are fitting wrinkles. I am human, after all.

Ginger GortsI call these Gorts because I used the Ginger jeans pattern to make them! Ahahaha aren’t I clever! I just love this pattern and I spent a solid chunk of my time in Peru dreaming about making more jeans because I just looove all the detail that goes into the topstitching – but knowing that I don’t need jeans right now, because it’s way too hot! So I was happy to compromise with shorts instead. To make the pattern shorts-appropriate, I just measured the inseam of my favorite shorts and cut that length + 1″ from the inseam of the pattern. In retrospect, I should have added a little more length so that I would have a proper cuff (I didn’t plan these to have a cuff, but they were too long once I’d already hemmed them and I didn’t feel like-rehemming). Maybe next time! Also, if I go with the future cuff, I need to widen the bottom of the shorts at the hemline, because they are a little tight at the thigh (cuffs need to be wider so that when they flip up, they are the right width. This is hard to explain without pictures, so here’s an example in this book I found. Thanks, Google Books!). Giving them a good stretch when I put them on helps, though. Ginger Gorts

For fabric, I used a stretch denim from Mood Fabrics. The weight was perfect, but the stretch was a little less than what the pattern calls for (which I determined the unscientific way by comparing it to the denim I used to make my first pair of Gingers). I added 1/4″ to the side seams to accommodate for this, but they are still a little bit stiff. The other bummer is that this fabric has a severe bleeding problem – the first time I wore these jeans, they rubbed indigo dye all over the inside of my purse. I was carrying the only nice purse I’ve ever owned, which HAPPENS to be white. Wah!! I was able to get the majority of the discoloration off with a stain remover, but now I’m afraid to sit on anything remotely light-colored. I washed the denim a second time with a cup of vinegar in the wash to set the dye, but they are still rubbing off a little.

All in all, though, I’d say these are a good practice run! When I finally make my fancy Ginger jeans with the Cone Mills denim kit that I bought earlier this year, I am hoping that I’ll have enough leftovers to make some solid Gorts. We’ll see! Pants first!

Anyway, photos:

Ginger GortsGinger Gorts

Ginger GortsGinger Gorts

Every time I make jeans, I want to experiment with different colored topstitching thread & serger thread – but I always punk out at the last minute. With these, I used bright blue thread for the button hole – baby steps! It also matches the lining and the serger thread.

Ginger GortsOh, right, and the backside of the button hole is emerald green 🙂 Ginger Gorts

For the topstitching, I used my new 1/4″ foot. THAT THING IS AWESOME. There’s a dull blade that sits exactly 1/4″ from the needle, to help you align your stitching and ensures erfect parallel lines every time. Totally worth the $$$ I spent on it. Although I should probably focus on my bartacks next – those clearly need a bit more work. My machine doesn’t have a setting for bartacks, so I have to trial-and-error with experimental zigzagging.

Ginger GortsGinger Gorts

Ginger GortsYou can also see that I changed up the positioning of the rivets – they are only on the front pockets. The pattern has you put 2 rivets on the back pockets, which I did with my first pair, but I never really liked the way it looked. RTW jeans don’t typically have rivets on the back pockets – ok, ok, SOME DO, but not the majority! – and I thought it made them look sort of homemade. I also recall reading, like WAY back in the past, that the original Levi’s didn’t have rivets on the back pockets because they would get too hot when the gold miners sat next to a fire. Full disclosure, it was a research paper on the history of jeans/Levi’s that my cousin wrote for one of her classes in high school, and I found it because I was snooping in her room when she wasn’t home (what? She had a really cool Barbie Dream House that she wouldn’t let me play with). That one statement was really fascinating to me and has stuck with me through the years (although I don’t remember anything else about the paper). This would have been around 1992-1993, so yeah, a while ago (and yes, I realize we are talking about a paper written by a high schooler, back before you could use the internet for research – so obviously I can be completely off my mark here). A quick Google tells me that the rivets also scratched cowboy’s saddles, which might be another reason why the back pockets ones were eliminated. Either way, I think they look weird and out-of-place on the back pockets. So front pocket rivets only for me! Scout Tee

And that’s it for this outfit! Tell me – has your style relaxed as you aged? Do you find yourself experimenting with new silhouettes, or do you stick with the tried and true? How do you feel about rivets on the back pockets of jeans? Do you think the cowboys were onto something?

Completed: Another B5526 + Ginger Jeans Get-up

18 May

So sorry to dump this on y’all yet again – another collared shirt + jeans outfit combination. Yawn.

Gingers & B5526

Well, to backtrack – yawn for you, but 😀 😀 😀 😀 😀 for me hahahaha. I will never get tired of this outfit combination. Or, at least, not anytime soon. Maybe never is too strong of a word to use here.

Gingers & B5526

What’s mildly frustrating about writing a long-term blog (at the time of this posting, I’ve accumulated nearly 500 entries since I started waaaay back in 2009, WTF) is that you eventually reach a point when you’re just making the same thing over and over again (well… those of us who don’t make our blog our full-time income fall in this category. I’m sure if I was sponsored out the wazzoo and had all the time I spend at work to spend making content for my blog, it would be a different story, ha.). After re-assessing my wardrobe at the end of 2014 and realizing that I *still* had shitloads of clothing that I made simply for the new and shiny, I have made it a big point to really be honest with myself about whether or not I’ll actually wear something that I make. Like most people, I have a pretty predictable style. And like many sewers, I don’t want to spend a lot of time reinventing the wheel with new patterns if I can get the look I’m going for with an old TNT. So this translates to repeats upon repeats upon repeats.

So, while you might be yawning about the majority of the stuff that’s been posted in 2015… I gotta say, I am elated with the way my closet is looking these days!

Gingers & B5526

Gingers & B5526

With all that being said, there’s not much to report on either of these pieces since I’ve made them soooo many damn times. Jeans + collared shirt is totally my go-to when I want to feel comfortable but still look like I made an effort in the AM. I’ve found my TNT patterns and I feel good about the way they fit and the construction methods that I use.

Gingers & B5526

Gingers & B5526

The top was made using my beloved Butterick 5526. Y’all, I don’t know if I’ll ever sew another button up pattern again! (we all know that’s a lie) I’ve gotten to the point with this one where I can bang one out in a couple of days, which is really nice when you’re coming up on a looming Mood Sewing Network deadline, ha. The fabric is this amazing tigerlily orange cotton voile from Theory, which is a bit more of a coral-y pink than it is orange in real life (I don’t know how the color translates on your screen, but on the Mood Fabrics website it’s definitely pretty muted. The real color is much closer to what you see in my photos. It’s BEAUTIFUL). It has a beautiful chambray weave, which gives the color lots of dimension. This fabric was so so nice to work with – ok, it was a shifty bitch to cut, but once I got past this point, it handled and pressed like a boss. It’s also super comfortable to wear on even the hottest day.

Since the fabric does have a tendency to fray, I used flat-felled seams every where in my shirt. I also left off the sleeves and finished the armhole with self bias binding – it makes the shirt really casual and, again, awesome for hot weather. The pockets are the same pockets that come with the pattern, but I made them slightly smaller because the original size was a little overwhelming on me. Buttons are from my stash; they’re just your standard white shirt buttons. Oh! And the matching thread also came from Mood Fabrics – I noticed that when I was ordering my fabric, there were thread suggestions at the bottom of the page. I figured I’d try out the service – you know, for science – and I’m super pleased with the color match. Even more pleased that I was saved a trip to the fabric store. Mostly because those tend to be very dangerous places for my wallet, ha.

Gingers & B5526

Gingers & B5526

The good thing about running a long-term blog and making a bunch of pattern repeats is that you will eventually bore of just making things that are passable to wear in public, and start focusing on really honing your skills to the next level. Or, at least, that’s how it worked out for me. Look at those clean finished insides! I should wear this shit wrong-side out.

Gingers & B5526

I did shorten the length of the shirt by about 2″ – I think the original length was just sliiiightly too long for my height. This way I can wear it untucked or tied at the waist. If I do a half tuck, it doesn’t pooch out all weird like some of my longer shirts tend to do. As always, I finish my shirt hems with self bias facing. I think it makes for a much cleaner finish, and it’s must easier to press and sew those curves with the bias tape instead of trying to wrangle the hem itself.

Gingers & B5526

Gingers & B5526

For my jeans, I used my now-favorite-ever-pants-pattern, the Ginger Jeans. I’ve made this a few times before (and I definitely don’t plan on stopping – I finally was able to invest in one of the denim kits because YAY) and I’m just really happy with the way this pattern fits my body. The fabric is a cool metallic gold stretch denim. I was actually looking for white denim to make this up, despite me being a stain magnet when it comes to white. At any rate, this denim’s wrong side actually is white flecked with very subtle bits of gold, and these very well almost became white jeans. I talked myself out of it because I was afraid the not-quite-pure-white would make the jeans look like they were dirty, plus again, stain magnet. So I stuck with the gold side. Also, this denim doesn’t have as much stretch as my other denims, so the jeans are a bit tight. I had to let the side seams out to 3/8″ or else I would have never gotten these things over my ass. They’re still a bit tight – mostly around the calves – but I’m hoping that they will loosen up a little with wear.

Gingers & B5526

Gingers & B5526

Gingers & B5526

Not much to report on construction. I used a combination of flat-felled and serged seams (as how most RTW jeans are made) and a triple stitch to really make the topstitching stand out. I would have loved to use topstitching thread, but I couldn’t find a good match with what is admittedly kind of a weird denim color. It’s gold, but it’s also kind of beige. Fortunately, Mood Fabrics REALLY came through with that thread match, as you can see in these close-ups.

What else? I did not interface the waistband (I like my jeans with an uninterfaced waistband; it’s much more comfortable. Not sure how that would work with a lower rise, but for the high rise version, it’s perfect). The jeans button is from Pacific Trimming, and the cotton pocket lining is left over from this crazy blue dress.

I will admit right now that this outfit inspiration came way of my boss’ closet. Since I do all her laundry for her (if you are new to this blog and that sounds REALLY WEIRD, I should probably point out that I’m a personal assistant 🙂 ha!), I’m always lurking on her clothes and I’m always finding inspiration in some of the strangest ways. She has a similar coral chambray shirt – hers has sleeves and a lace inset at the yoke, though – and white jeans. And I wanted that outfit for me. So I made it 😛

Gingers & B5526

So, hey, in other news that doesn’t involve me making my fifty billionth b5526 – I’ve got an article out in the current issue of Seamwork Magazine! If you haven’t heard of Seamwork, it’s a sewing magazine that is published online by the masterminds behind Colette Patterns. The magazine is free to read and there are optional pattern downloads with each issue (the patterns you pay for, however). ANYWAY, my article is all about visiting Nashville! I had so much fun writing a city guide about my favorite city in the entire world, and I hope you have fun reading it (and are inspired to come visit because, hey, Nashville is awesome! Really really awesome!). You can read The Seamworker’s Guide to Visiting Nashville at Seamwork. My first published article! Yay!

Completed: Linen Carolyn Pajamas

27 Apr

Let’s start this post with the shocker: I don’t really care for linen.

Carolyn Pajamas

I know, I know. Linen is supposed to be a rite of passage for Southern gals – it’s cool and breathable, and the wrinkles are supposed to be there. Well, I HATE the wrinkles! Wrinkly fabric drives me insane, makes me feel rumply and unkempt. I just can’t get behind a fabric that wants to wrinkle the second I look at it, much less wear it around for a few hours. Nope nope nope.

nope

That being said – I really want to like linen. Seriously! I love the idea of a fabric that gets softer with every wash, and as someone who could probably work up a sweat in the middle of the Arctic (I don’t even know how that’s possible, considering that I’m ALWAYS cold, but leave it to my body to fuck up my heating and cooling system), I’m always on the hunt for light and breathable fabric to wear during the summer months. Linen was my nemesis, but I was willing to extend the olive branch and make an effort at friendship.

Also, I’ve been eyeballing that striped linen fabric for months now at the studio (and probably for more months to come, since stripes just launched at Elizabeth Suzann woohoo!), and I knew it needed to be in my life/on my body. Linen wrinkles be dammed.

Carolyn Pajamas

There are many, many, many important things I’ve learned through my sewing journey. One of the biggest ones (well, other than not sewing over your pins. STOP THAT RIGHT NOW) is not to fight against your fabric. If your fabric is drapey, don’t try to sew something form-fitting with it. Alternatively, fabric with a lot of body needs to be made into something that will work with the shape. And if you are sewing linen but still hating on the wrinkles… make pajamas. No one cares if your pajamas are wrinkled (and if they do – get out. Get out right now while you still can).

Also, have you slept in linen pajamas before? LORD HAVE MERCY.

Carolyn Pajamas

Making proper pajamas has been on my sewing to-do list for aaaages. I love wearing matching pajamas sets, even if Landon does think they are dorky (I did compromise and get rid of the hot pink cat pajamas though. Relationships, man!). My mom actually buys me a new pajama set from Victoria’s Secret every year for Christmas (not the hot pink cats, those came from my AWESOME Mamaw). Still, I’ve always wanted to make my own so I could have – what else? – complete control over every aspect of the design, color, and fit. But I’ve never really found a suitable pajama pattern that didn’t look like something more appropriate for an 8 year old boy, so I held off on that dream.

The winning pattern you see here is the newest pattern from Closet Case Files, the Carolyn Pajamas. I looooooved this pattern the second it graced my inbox – the slim, feminine cut of both the top and bottoms, as well as the inclusion of the piping (I mean, I know how to sew piping, but it’s pretty nice to have a pattern that was designed for optional piping, if you get my drift), were what really got my gears turning. Also, Heather Lou looks amazing in those product photos, doesn’t she? I could steal that hair right off her head. I won’t, but should it ever go missing, well…

Carolyn Pajamas

I really enjoyed sewing this pattern! While I wouldn’t exactly call the linen easy to work with (it was a shifty little bitch and was prone to constant fraying), it did respond beautifully to pressing and took all the piping and topstitching like a champ. I recall when Heather Lou first released this pattern, she mentioned how much she labored over the instructions – and it really shows. Everything is very clearly laid out with beautiful little diagrams and helpful tips, and it’s about as hand-holdy as you can get with a pattern without actually having it be part of a sewalong (there’s no sewalong for this pattern, however, there are a few posts on the CCF website to guide you through the trickier steps if you need it!). I’m especially impressed with how nice my collar turned out – piping and all!

Carolyn Pajamas

Carolyn Pajamas

I made the size 2, based on my measurements and following Heather Lou’s advice. I reeeeally wanted to make the 0 because the ease just seemed excessive, but I’m glad I followed along faithfully because this fit is pretty spot-on. It’s sleek and somewhat fitted (I mean, fitted as far as pajamas are concerned), but there’s juust enough ease to make them super comfy. I did trim about 2″ off the legs, but that’s about it. I feel like there could be some tweaking with the armhole – it seems a bit low and pulls when I reach forward – but that may just be because I’m used to wear shirts that are a lot more tailored. It’s not uncomfortable or restrictive by any means.

I chose to make the long pants with the short-sleeved top. I was originally just going to make shorts, but my new digs are in a basement (I mean, it’s a happy basement with windows and a door – but it’s still a basement, with basement chill), and it’s a bit chilly down here right now. I added piping to the pocket, cuffs, collar, and leg side seams. The piping is self-made – I used more of this glorious linen fabric in the opposite colorway, and cut bunches of bias strips and sewed it around yards of cording. I prefer self-made piping, not just for the color/print selection, but also because it tends to be a lot softer than the stuff you can buy (well, I’m sure you can get awesome soft and flexible piping at some place like in the Garment District, but here all we have is that Dritz stuff in the packages and that stuff is AWFUL if you try to sew it to a drapey fabric. Again – don’t fight the fabric!). I didn’t have wide enough elastic as was required by the pattern, so I sewed an extra line of stitching about 1/4″ away from the top of the pants edge and inserted the elastic below, resulting in a frilly little gathered edge (some of my RTW pjs have this feature and I’ve always loved it!). Here’s a post about elastic waistband finishes if that doesn’t make sense.

Carolyn Pajamas

As I mentioned, I got my fabric from Elizabeth Suzann, because I work there and I get awesome employee benefits like wholesale fabric prices (don’t be jealous). It’s striped 100% linen (I’ve seen similar fabrics to this rolling around on the internet, but most are referred to as a cotton/linen mix. The stuff I have here is definitely all linen) and it is GLORIOUS. It also wrinkles, frays, and shifts like crazy. It wasn’t the most amazing piece of fabric to work with, but I’m glad I powered through because it is pretty amazing to wear. I made sure to finish all my seam allowances with the serger to keep the fraying down (for the front facing, I just serged the edge instead of doing a rolled edge, since I thought the bulk would show through). I didn’t realize how sheer the fabric is, so some of the dark piping shows through on the right side. It’s super sheer and everyone is absolutely aware of the color of my underwear when I wear these pants, just so we’re clear (I’m wearing nude undies for these photos, to save your eyes). It’s also, like I said, super shifty – so my pocket is really wonky. I’m going to call it “charming.”

Detail shots:

Carolyn Pajamas

Carolyn Pajamas

Carolyn Pajamas

Carolyn Pajamas

Carolyn Pajamas

Pretty good stuff! I love my new pajamas and I definitely feel like a Classy Adult when I wear them, wrinkles and all. I definitely want to make a flannel pair when winter rolls around – finally, I won’t be at the mercy of whatever pink shit they’re selling at VS, woohoo! Too bad my mom is going to have to find a new Christmas gift to buy for me. Sorry, mom! Maybe I’ll make you pajamas instead 😛

One last thing – the giveaway winner from last week! Random number generator says…

winner1

winner2

Woohoo, congratulations Kayse! I’ll be in touch to get that gift certificate out to you ASAP. Can’t wait to see what you make with your fabric :DDD

Carolyn PajamasFinally, this would be my senior picture, if I was still in high school and did things like senior pictures. The end.

Completed: Ginger Jeans!

8 Jan

Ok, now for the forreal first finished project of 2015 – jeans!!

Ginger Jeans

Damn straight I made jeans! And pretty good-looking jeans, if I do say so myself 🙂

These are the Ginger Jeans, by Closet Case Files. Full disclosure right here – Heather sent me this pattern, gratis, as a friend-gift with no strings/review requests attached. While I did not pattern test for this particular pattern, I was involved with fitting tweak email chains waaay back before this shit went into testing (because you know me, and I love talking about crotches).

Anyway, I was excited to try this pattern because – one, JEANS!; and two, JEANSSSS!!!

Ginger Jeans

Ginger Jeans

Y’all, this is a really really good pattern. I know I sound biased – and maybe I am, because I lurve me some Heather, and ESPECIALLY because I had a really good almost-out-of-the-envelope experience with making these. It can be hard – if not impossible – to design a pants pattern that is going to fit and flatter every single body it comes in contact with, considering how wildly different everyone’s bodies are. I think the fit of these seems pretty good across the board – I’ve been watching everyone’s finished Gingers popping up all over the place, and most are great right out of the envelope (or with very minor changes). Personally, I had to make a few small tweaks, but they’re not any different than what I do to *all* the pants I make.

Ginger Jeans

I started with the size 2, which corresponds closely with my measurements, and made view B with the high waist. Having participated in this rodeo before, I went ahead and adding my personal ~Lauren~ fitting changes directly to the pattern pieces – which means, I scooped out some of the crotch to give it more of a J shape (more info on that in this post) and added a 1/2″ wedge to the back crotch for some extra bum room. I compared the pattern pieces to some well-fitting patterns and RTW jeans to make sure the crotch lengths and depths were good, then I cut straight into my denim. No muslin this time – which was risky, but I feel pretty confident in my fitting at this point, so I was willing to take one for the team if necessary.

Ginger Jeans

SPOILER: It worked out just fine! Yeehaw!

Ginger Jeans

There are a couple more things I’d like to improve on for my next pair – all up in dat crotch (sorry that you have to look at it). I think this photo illustrates that pretty well – see how the front is just a little too long when I stand a certain way? You can also see it in the photo below – what looks like a really really poorly photoshopped thigh gap is actually just excess fabric bending all weird. I need to pull some excess out of the inseam, maybe about 1/2″ (like, maybe what I added to the back crotch haha!). Honestly, that’s something I could do to this existing pair of jeans as it is – but I also flat-felled that damn inseam, and realistically, I know I probably won’t unpick and fix unless it starts annoying me way more than it does right now. I also need to take a small wedge out of the center back of the waistband – it’s a one-piece curved waistband, but I’m starting to notice that two-piece darted waistbands fit my backside much better. This one isn’t bad, it’s just a little loose. Something to fix for the next pair! The calves are also prettttttyyyy tight – like, these are not the pants that I will be wearing knee socks underneath! I guess I have big calves, though, because that’s an issue I have with all pants (sewing patterns and RTW). Overall, though, I’m really happy with the fit of these. I didn’t have to do ANY changes to the legs, and I think they look pretty good!

Ginger Jeans

Ginger Jeans

Construction on these was pretty straightforward and not at all difficult, although it was time-consuming to do all that topstitching. I followed the instructions on the pattern, as well as the sewalong for places where I needed a little extra clarification. I decided to go balls to the wall with this make and treat them like a real pair of jeans – contrast gold topstitching, flat-felled seams (everywhere except the side seams), proper rivets, the works. Doing all these extras definitely added time to how long it look to make them, but I still finished over the weekend 😛 Go me!

For fabric, I used a denim/lycra blend that was purchased a Paron’s Fabrics in NYC last year. Heather actually helped me pick this one out, and I am surprised at how much I like it. The recovery is okkkk – it’s not the very best, like my RTW jeans (which are from Imogene + Willie, and WHEW that denim is – as my dad would say – THE BOMB DOT COM) – but it’s better than some stuff I’ve used in the past! The photos you see here were taken before I’d worn them for a day, so they’re at their tightest. As of this posting, I’ve worn the jeans twice and they haven’t bagged out much at all, which is a pleasant surprise. That being said, I really really really want to get my hands on one of Heather’s denim kits, because the Cone Mill denim included in those is basically the same shit as my $200+ I+W jeans. I missed the last sale due to financial restraints, but I’m saving my dollars and waited with bated breath for the next shipment, because you best believe imma be all over that shit like white on rice. NEEDS MORE JEANS.

At Heather’s advice, I did not interface the waistband of my pants. I think I might actually be a convert to this method – the waistband is still stretchy (so it’s super comfy), but the denim is thick enough to give it some structure. I did interface my button and button hole area, as well as the parts noted in the instructions (the fly, the tops of the pockets… I think that’s it?).

Ginger Jeans

For the topstitching, I used Gutterman jeans thread (the gold color, obviously) in my needle and regular ol’ navy polyester thread in the bobbin. At the suggestion of my sewing machine mechanic, I revved up the needle tension to a 7 and lengthened the stitch length to a little over a 3 to get a nice stitch. I used my #10 edgestitching foot (favorite foot ever, holla) to create even lines, and a 90/14 denim needle to pierce through all the layers. Since the guts of the jeans are assembled with the standard navy thread, this meant that I did a LOT of thread-changing to make this pair of pants. For future pants, I’ve lugged out my old Pfaff so I can keep both machines threaded and just switch back and forth, but the changing was ok for this first go-round.

Also, speaking of topstitching – I loved all the bartacks involved with making jeans. So much fun and SO satisfying! My machine actually doesn’t have a setting for bartacks, but I just reduced the zigzag stitch length and width until it looked good.

Ginger Jeans

If you have super eagle eyes, you may notice that the double topstitching is slightly different at the pockets vs the yoke/crotch seam. I had to widen the lines to properly catch where I folded the pockets under, but I really don’t think the wide-set stitching looks as good as the narrower set on the back. Oh well, just something to change for the next pair 🙂

Ginger Jeans

Ginger Jeans

I looove the star rivets, though! And check out my cool jeans button! All the hardware (including the zipper) was purchased at Pacific Trimming in NYC, same time as when I got my denim. All that stuff was sooo cheap (I want to say the rivets were, like, $0.10 a piece of something crazy like that. I bought a whole bagful HAHAHA), wish I had better access to it on the regular! To set my rivets and my button, I used the good ol’ hammer-and-cast-iron-skillet combination. Worked like a charm!

Ginger Jeans

Ginger Jeans

Fun pocket lining! Also, I think I cut the fly interfacing too wide – bummer that it peeks out. Oh well, again – something to change for the next pair 😛

Ginger Jeans

Proof of flat-felled seams, and also machine thread snarls. Whoops.

Ginger Jeans

I’m pretty happy to have officially made LEGIT jeans (I have made “denim trousers” in the past, but nothing with topstitching and rivets and all that fun stuff!), and even more happy that they are super wearable! Now I just need to bang them out in all the colors my wardrobe requires and I’ll be set for life, at least as far as my denim is concerned 🙂 I really want to try some different topstitching colors and details – looking at my I+W jeans, I really love the multiple colors of thread they used, and the little plus shaped bartacks. I also want some wacky insides – printed pocket fabric and colorful serger thread, anyone?

Would you ever make jeans for yourself, or does this fall in the camp of things you’d rather buy? Have you made this pattern before (if so, lemme see dem jeans, ladies)? As someone who’s literally worn the same pair of jeans for a solid year, how many pairs is too many?

Completed: Vogue 8664

27 Jun

Remember the Sew Bossy Initiative? This is a fun little sewing challenge where you get paired up with a fellow blogger and basically tell them what to sew next – complete with you sending them the fabric, pattern, and anything needed to finish the garment in question. Your sewing buddy will do the same for you.

Vogue 8664 - Birthday Dress

Well, I got paired up with Rachel Pinheiro, and while we were fairly quick about getting the patterns and fabric to each other, it’s taken an entire year for me to actually sew my dress (and poor Rachel, I sent her a pattern that ended up being a no-go, so she’s still trying to decide what to sub in!). On top of that, I’ve actually had this dress completed for over a month! Oops! Well, better late than never, I guess 🙂

Vogue 8664 - Birthday Dress

Rachel sent me Vogue 8664 as my pattern for the Sew Bossy. While it’s a gorgeous design, part of the reason why I dragged my feet on sewing it up is because I simply did not like the skirt included. Don’t get me wrong – it’s a pretty, fitted skirt. But I don’t do fitted skirts, they just don’t work with my lifestyle these days (and by “lifestyle,” I mean, I sit on the floor a lot. Ha!). So I sat and considered it, and debated if changing up the skirt would ruin the whole fun of Sew Bossy (since I’m not really letting Rachel boss me at this point). Fortunately (well, unfortunately for Rachel hahah booo), Rachel ended up scrapping the pattern *I* sent her, so we decided it would be fine for me to change out the skirt to make something more suitable for my daily life. As fun at this challenge is – it’s not very fun if I end up with a garment I’m not actually ever going to wear!

Vogue 8664 - Birthday Dress
This actually ended up being my birthday dress- which I decided to do about 10 days before I needed it. I don’t even go out for my birthday these days, but man, sometimes it’s nice to just wear a new dress that makes you feel good, you know? And I feel pretty good in this dress!

Vogue 8664 - Birthday Dress
Anyway – back to the Vogue pattern! I cut the size 6, with the B cup pieces (I don’t wear anywhere near a B cup, fyi, that’s just the pattern piece that had the closest finished measurement to my body), and made a muslin of the bodice to check the fit. My fabric is a cotton sateen with a heavy stretch – Rachel bought it in Brazil, isn’t it amaaaazing?! – so I used some old stashed stretch fabric for my muslin. Out of the envelope, everything fit mostly well, except that I did take about 1″ out of the center back (not an uncommon adjustment for me). I debated on whether or not to sew the sleeves, but I’m glad I did in the end, because they’re pretty awesome! They get their shape from two giant darts at the sleeve head; the body of this particular fabric I used also helps 🙂

Vogue 8664 - Birthday Dress
The other major change I made to the pattern was to swap out the skirt for an A-line. I used the skirt from my Belladone pattern – pockets and all – and I think they matched up pretty well. Plus, you know, it’s wearable. For me, anyway 🙂

Vogue 8664 - Birthday Dress
Construction-wise, I made a few changes. The main one was that I did not line the bodice as called for. Rachel sent me enough fabric so I could self-line, but I used up pretty much all that while cutting the skirt and pockets. Anyway, I don’t think I’d like this fabric as self-lining – it’s pretty thick and heavy for a summer dress, two layers would be crazy! Instead, I drafted a facing for the neckline (this was as easy as tracing the edge of the neckline and extending it to 1″ wide for a narrow facing piece, then adding seam allowances). I debated with what to do about the arm holes, since the sleeve doesn’t go all the way around (and thus, this is where that lining really helps). In the end, I bound the arm hole edges with flat bias facing, which covers all the raw edges and also makes the insides look pretty 🙂 You do see topstitching from the outside, but it’s not very noticeable with this fabric.

Vogue 8664 - Birthday Dress
I also changed the midriff to be a contrasting solid color. I actually cut the dress to be all the same self-fabric, but after I sewed everything together… it just looked like a hot mess! Too much pattern being broken up in too many places. Yuck! So I painstakingly ripped out the midriff (which had already been topstiched at this point, ugh) and replaced it with a solid navy sateen that I had in my stash. You probably recognize this fabric because I’ve used it multiple times on multiple garments (including my lace trench, these Maritime shorts and this Belladone. And I STILL have more of this fabric! Man, that shit is awesome).

Vogue 8664 - Birthday Dress
So here’s the major glaring flaw with this dress – the damn waistband seam allowances show from the outside! This happened for a multitude of reasons – mainly, I didn’t interface the outside waistband (i.e., the navy solid). I had already interfaced the feathered waistband, which after I ripped out I put on the inside of the garment, and I didn’t want to re-interface because, fuck you, that shit is expensive. Don’t look at me like that. It might have been ok, except I also didn’t trim my seam allowances, or even attempt to grade them. Why? I don’t know. I have no idea. Anyway, they’re totally visible from the outside and it doesn’t look the greatest, but, whatever. I’m not ripping that shit out again, I can live with it.

Vogue 8664 - Birthday Dress
Speaking of interfacing, I have discovered a most brilliant solution for interfacing fabric with a high stretch content – stretch interfacing! Whowouldathunk?! I used this tricoat interfacing from Fashion Sewing Supply (the only place I buy interfacing from; srsly, it’s all amazing). It gives a bit of interfaced support to your fabric without actually compromising the stretch! Which means my waistband still stretches, despite being interfaced. It’s fucking awesome. I used this stuff on the neckline facing as well.

Vogue 8664 - Birthday Dress
As I mentioned before, I made my neckline facing 1″ wide. Generally, facings are closer to 2″-3″ wide. Why so narrow? I wanted to topstitch it down (partially to keep it on the inside of the garment, and partially because of all the topstitching already on the dress), and didn’t need a giant flap of interfacing beyond my topstitching. Even though I topstitched the facing, I also understitched it first – it helps everything roll to the inside and press flat before that final line of stitching.

Vogue 8664 - Birthday Dress
Also topstitched: the lapped zipper, both edges of the midriff band, around the arms (where I sewed down the bias facing), the pocket edges, and the sleeve and skirt hems.

Vogue 8664 - Birthday Dress
I just love the way the neckline facing looks! It’s so dainty!

Vogue 8664 - Birthday Dress
Here is the arm hole facing. It is sewn in the exact same way as I sew bias facing for a sleeveless dress.

Vogue 8664 - Birthday Dress
For garments with very visible seams that need to be matched up across a zipper, you can’t beat a lapped zipper. It makes things sooo much easier to match, as you can see it while you’re sewing (as opposed to an invisible zipper, which is sewn on the wrong side).

Vogue 8664 - Birthday Dress
And that’s it! A bossy birthday dress 🙂 I’m happy to report that I did finish this in time for my birthday – woohoo! Also, these are the last photos I have of my hair this color, fyi. I actually dyed it over the weekend (right after I took these pictures, of course, ugh), and now it’s purple! Stay tuned for that 😉

Consider this a Sew Bossy success! I can’t wait to see what Rachel dreams up for her fabric, because I know whatever she makes is going to be amazing (like everything else she makes, gah). Thanks to Heather Lou for dreaming up this fun challenge, and to Rachel for agreeing to pair up with me!

How bout you? Ever participate (or would you participate) in Sew Bossy? Does it give you a mini heart attack to imagine someone else telling you what to make? Spill!