Tag Archives: embroidery

Completed: 40s Wool Crepe Wrap Dress

12 Jun

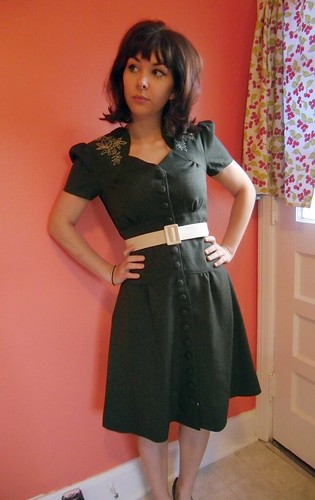
I know, this dress looks strikingly similar to the 40s wrap dress that Peter made for his identical cousin Cathy earlier this month, not to mention I’ve already dabbled in wool crepe for summer wear, as well as a full 40s wool crepe dress. Yeesh. Ya think it’s possible for me to branch out a little here? Nuh uh, no way. Not me.

Red Wool Crepe 40s Dress

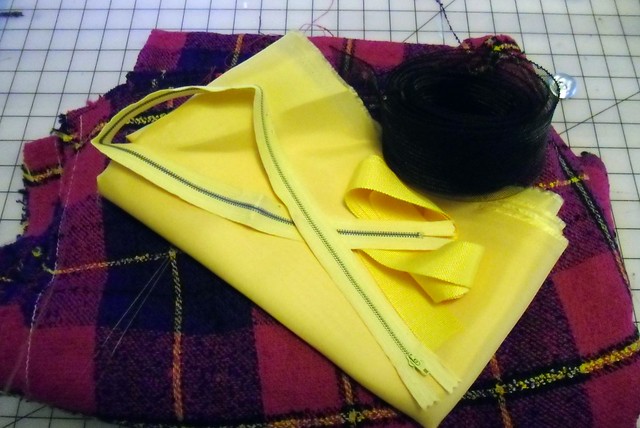
I actually bought this fabric ‘way back when I was visiting Mood Fabrics in NY. I’m sure y’all are sick of hearing about it at this point, but heyyyy I’ll be working through that stash for at least the next couple of months. Just so we’re clear.

Anyway, fabric. As I mentioned before, I wasn’t planning on buying any wool crepe – but again, Carolyn talked me into it. She’s SUCH a good enabler! This wool crepe is actually a bit thinner and drapier than most wool crepes I’ve come across, making it a good weight for a smart summer dress (oh god, did I really just describe a dress as “smart”? I am totally stuck on this 40s thing…). With Carolyn’s advice, I underlined the entire dress in a lightweight cotton batiste, to combat the slight sheerness and make the dress more comfortable to wear in the heat.

McCall 6113

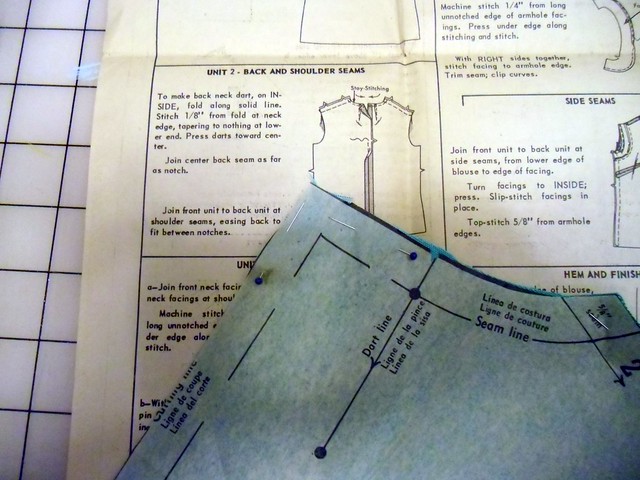
I used McCall’s 6113 to make this dress up. Isn’t the pattern gorgeous!? A friend found it (along with an entire paper grocery bag full of patterns – ranging from the 40s to the 80s, all in my size. I MEAN COME ON, WHAT ARE THE ODDS) in her attic, and gifted the whole stash to meee! Yes!! The pieces are intact, but unfortunately… the instructions are not. Wah wah. Thankfully, I’ve made a few wrap dresses in my day, not to mention I feel fairly confident in my assemblage skills, so I decided to give it a go.

McCall 6113 - pattern piece

… this is what I found when I pulled the pieces out. Not only is everything labeled (thank you, printed patterns!), but there are construction notes printed ON the pattern sheet, AND the notches are numbered in the order that things go together. PRAISE THE LORD. Although, in all honesty… I probably could have put this together without the help. But MAN, it was nice to eliminate most of the guesswork!

Red Wool Crepe 40s Dress

Despite the pattern being in my size, I did have to make a few adjustments to get everything to fit nicely (I generally like to go down a size or two – sometimes more – since I find most patterns tend to have more ease than I prefer to wear. Yep, even vintage patterns. What gives; am I just in denial of my size or something??), mainly in the form of taking in the side seams and shortening the shoulders, as well as hacking about 5″ off the length. I made a muslin for fit, but it ended up also giving me a great idea of how the pattern was put together so I had less guesswork with my wool crepe. Which is good, since wool crepe can be a sneaky little bitch when it comes to ripping out stitches.

Red Wool Crepe 40s Dress

In hindsight, wool crepe is definitely a little on the bulky side for the gathers in this dress. I’m afraid I look a bit boxy at the waistline here 😦 Oh well!

Red Wool Crepe 40s Dress

I do love the little tucks in the back 🙂

Red Wool Crepe 40s Dress

And the curved hem at the overlap.

Red Wool Crepe 40s Dress

I don’t know what’s going on with this picture, I just thought it was funny. ~Maybe she’s born with it, maybe it’s Maybelline~

Red Wool Crepe 40s Dress

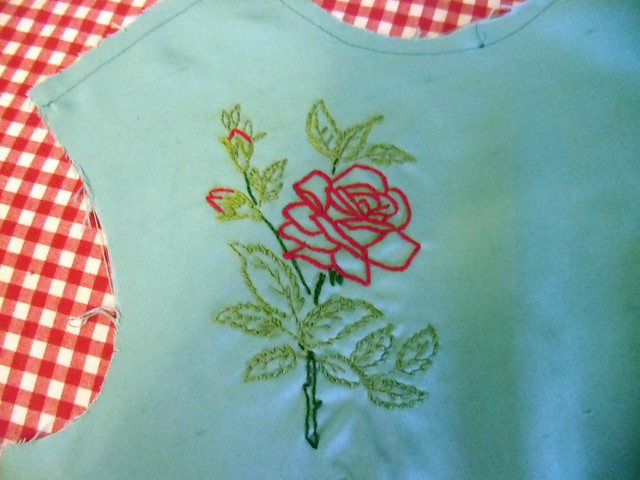
Oh, did you notice my pretty embroidery? This all happened entirely on a whim – I finished the dress, put it on and looked in the mirror, and it just looked… red. Overwhelmingly red, and plain! I decided to add a small punch of (neutral)color by embroidering the shoulder detail. The embroidery is from the Hoop Love Vintage Transfers Flickr Group, and it’s all just a basic back stitch with french knots in the middle of the flowers. Ha, that sound so easy but it seriously took me about 6 hours to do. Embroidery is definitely a time-suck!

Red Wool Crepe 40s Dress

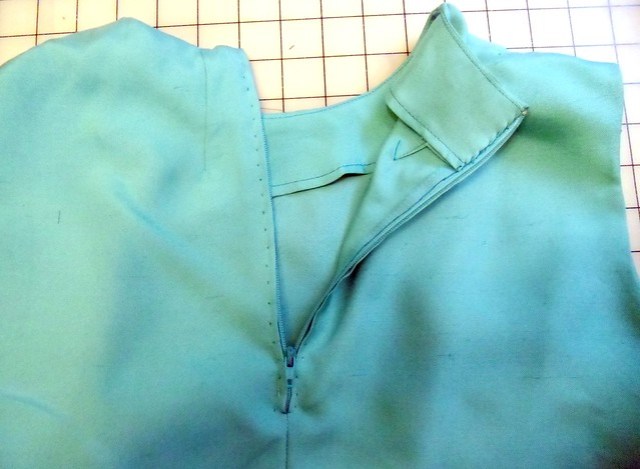
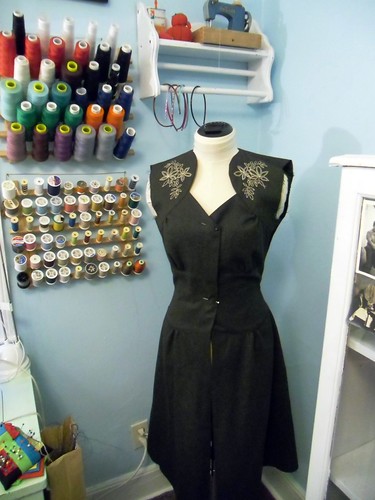
Here you can see the underlined inside, as well as the series of snaps and hooks that hold the dress together.

Red Wool Crepe 40s Dress

And there it is closed!

Red Wool Crepe 40s Dress

How many of you will groan if I finish this post with something like, “WELL I GUESS THAT WRAPS IT UP!!”

Sorry.
Not sorry.

Completed: Embroidered Silk Shell Top

22 Mar

shell top

And another one down!

I don’t remember if I mentioned this or not, but I picked up this silk turquoise skirt at my favorite thrift store about a month ago – at half off, it was $2. And it was plus size, and long, which meant lots of fabric for me to play with. Silk for $2? I’ll take it! I was able to salvage some giant pieces of fabric, plus the lining. And the zipper, for about 5 minutes (until I forgot that there wasn’t a zipper stop and I immediately pulled the zipper off the teeth. DERP.). I know the tag says ‘dry clean only,’ but I washed a little swatch of the fabric in the sink & it didn’t seem to be an issue at all – no water spotting, no weird shrinkage. Anyway, I had enough fabric to make the little top in Simplicity 4400 (which, I might point out, is the very first vintage pattern I ever bought – at the same thrift store, no less!). I was even able to finagle the pieces so that I kept the original skirt hem intact. Yeah!

A word about this pattern (and every other vintage pattern I’ve ever sewn up) – there is still ease in vintage patterns. Lot and lots of ease. Notice the size on that pattern is for a 32″ bust? My bust is actually 36″ – and the top fits me perfectly. I have noticed this a lot with vintage patterns, so do what you will & make a muslin (or tissue fit, like lazy me :3).

To keep this top from being *too* simple, I embroidered a rose by the right shoulder:
Silk Shell Top - embroidery
I got the design from Hoop Love Vintage Transfers on Flickr – a GREAT embroidery pattern resource! To transfer the design, I laid it over a sheet of wax transfer paper and traced with a pencil. The stitches here are split stitch (on the rose) and back stitch (on the leaves & stems). Oh, and if you are apt to try this – make sure you staystitch those curved seams before you start! It’ll keep them from stretching out with all that extra handling 🙂 I probably should have serged my edges too, since this silk frays like nobodies business, but you know me… livin’ on the edge & shit.

As a side note, can we discuss these wtf directions?
Silk Shell Top
I’ve never seen this before – it’s a dart, but without the dart legs. I have to make my own dart legs. How intriguing!

Ok, anyway, back to my top.

Construction was fairly simple & straight forward. I opted to hand-pick a center zipper (instead of the machine-stitched lapped zip in the directions) and did not topstitch the facings, as I wanted the top to be simple so the focus would be on that embroidery. The top sewn as-is ended up being too billowy for my tastes, so I added vertical darts below the bust for a little shape. I originally planned to wear it tucked but I think I prefer it untucked now! Unfortunately, the arm holes are a little on the tight side but, eh, I think I can deal.

Silk Shell Top
(huh, I really need to re-press those dart tips!)

Silk Shell Top

Silk Shell Top

BONUS: Tucked!

Silk Shell Top

Silk Shell Top

Silk Shell Top

Silk Shell Top

Silk Shell Top - handpicked zipper
Hand picked zipper – I got a little obsessive & tried to match the stitches up on both sides hahaha

Silk Shell Top
Remember when I said I broke the zipper that came with the skirt? Well I found this one in my stash – and it matches perfectly! Talk about a happy accident!

Pretty pleased with this little top – I think I’ll get a lot of wear out of it this summer. The silk is so deliciously soft, and I just love the color!

Silk Shell Top

New Projects!

26 Jan

Since my coat will not be ready for it’s unveiling this week, I embroidered a little L tag to make me feel better:
Coat tag
I just love putting these tags in my garments (and making them, too!). I think they really pull the piece together and give it a nice little personalized touch – you know, since sewing/hand-tailoring/fitting the damn thing wasn’t personalized enough. (this is where I roll my eyes)

Also, I love embroidery! I don’t get to do it enough, but I just find it so relaxing & free-flowing. This particular monogram is from Hoop Love Vintage Transfers – I use transfer paper to draw the design directly onto muslin, and then fill it with pretty embroidery stitches 🙂 This piece has satin stitch, back stitch around the satin stitch, and split stitch swirlies. Yay! I DO feel better, thanks for asking!

During coat downtime, I’ve been cooking up some sewing schemes to keep my occupied ’till then.
next sewing project
A croquis for your viewing pleasure. Also, shoe fail.

sheer white dotted swiss
I will be making the Colette Violet out of some nice sheer white dotted swiss – I barely had enough to cut my pattern out (the under collar is actually pieced – whoops), but I managed 🙂 This fabric is SUPER sheer, though, so the body is underlined with cotton batiste, and I replaced the interfacing with a sturdy muslin (collar, facings). Debating on whether or not to underline the sleeves – what do you think? The fabric is still pretty sheer even with the underlining. Mostly I don’t feel like hand-basting anymore but I’ll totally take one for the team if need be. Opinions, please!

next project
The skirt fabric – some poly blend plaid that I picked up at Denver Fabrics a year or so ago. I love how bright it is, but yeesh that plaid repeat is GIANT! I think it translates nicely into a circle skirt. I let myself buy a couple yards of bright yellow rayon lining… and a piece of matching petersham ribbon to stabilize the waistband. That creepy black blob in the corner is 3″ horsehair braid for the hem. Oh yuck, I just noticed that you can see part of a broken button in that picture too. Ew quit haunting my dreams.

These are all cut out and ready to be sewn up – the skirt has been hanging for about 2 days now, and I just finished basting all the underlining for the shirt. First non-coat of 2012, yo!

What have y’all been working on?

completed: ceylon v2.0

1 Nov

picking up where we left off…
green wool ceylon - progress

this turned out to be one of those “add-on” projects. you know – the kind that start out relatively simple (TNT pattern, easy fabric, no embellishment, etc) until you begin to branch with a bunch of “oooh, let’s add THAT to it!” i decided i didn’t like the way the fusible interfacing acted when i used it last time, so i used muslin as a stabilizer (basting it to the facing pieces, then trimming it out of the seam allowances). i decided to hand-embroider the yokes – this was actually really really easy, just time-consuming (done during my lunch hour over the course of a week or so. and yes, my coworkers are used to me doing this kind of stuff in the lunchroom :B). then i decided that i didn’t like the way the facings looked serged, so i trimmed all the edges in straight lace. i hand-hemmed the sleeves & skirt bottom. and i covered all 16 buttons, using the shittiest coverable buttons i could find (aka in my stash), without a tool. my fingers hurt and i should have learned my lesson from my last ceylon, but nope. at least i used all the buttons up – and i won’t be buying them again. at least, i don’t think so. ha.

i made one small adjustment to the pattern fit – tapered in the waist & hips to a size 0. i kept the bodice at a 4. i love the fit & i didn’t have to make any further modifications after cutting! yay! i also narrowed the skirt a little, to get it to fit on my piece of fabric. i had 2 3/8 yd of 44″ fabric (which is more than a yard less than the requirements on the envelope), but i managed to get everything cut, on-grain (!!), using some very creative cutting layouts & narrowing the skirt side seams.

wool ceylon

wool ceylon

wool ceylon

wool ceylon

wool ceylon

wool ceylon - tag & embroidery
i put a tag in… makes me happy 🙂

wool ceylon - buttons
OH GOD THOSE COVERED BUTTONS

wool ceylon - lace facings
lace-trimmed facing 🙂 you can see it in the sleeves, too – look closely.

green wool ceylon - embroidery detail
embroidery detail – forgot to take a close-up on the finished dress, whoops
here is the embroidery pattern i used – it’s free! i used 2 strands of cream-colored embroidery floss & outlined everything in a backstitch. there are a few french knots, those used all 6 strands.

wool ceylon - lace hem
lace hem

oh! i also made a covered belt to wear. it is the same shade of cream as the embroidery. i used muslin and a self-covered kit. i had high hopes of putting in cute eyelets & making the whole thing super jazzy & special, but i didn’t realize i needed a tool & those eyelets were shitty 1-piece eyelets anyway and now i’m pissed off. so have a slidey belt:
wool ceylon
what do you think? can’t decide if i like it or not. i wanted a green belt but i definitely did not have enough green wool left over after cutting out the pieces.

overall, i’m very pleased with my new dress. the fit is perfect & the wool is very warm – which is great for a southerner like me who thinks anything below 60*F should be against the law :P. the only thing that bothers me is the lace is white, and my embroidery is off-white. i considered tea-dying the lace, but it’s polyester & also i’m lazy.

special thanks to my kitchen wall for being such a gorgeous & colorful backdrop xoxo

wool ceylon

clover muslin #3

28 Oct

continuing my saga with the clover, here is muslin #3. yes, i made a second muslin and no, there are no pictures because i made them in brown fabric & you couldn’t see ANYTHING except the fact that i was wearing shorts (shorts muslin ftw!).

i have stopped hyperventilating about using up my stretch fabric in a thousand muslins, as i had a fabric epiphany the other morning & realized i had an entire stack of this awful polyester that i can’t seem to get rid of for some reason. there is just the right amount of stretch, and several yards of it – which, if i remember correctly, cost me something like $5 for the whole stack at a thrift store. why i have kept it for so long, i can’t tell you, except that obviously fabric hoarding *does* have it’s benefits 🙂 so anyway, i’ve got plenty of fabric to keep making muslins. yay!

to be frank, the only thing keeping me cranking these out is knowing that once i get it perfect, i can use this pattern over & over… and also as a block for other pants-fitting needs.

i don’t think i’ve quite reached the wearing point yet, but i know i’m close. what do y’all think? so far i have shorted the front crotch by 1 1/4″ (I KNOW. and it looks like i need to shorten it more!), added approx 3/8″ FBA, and lengthed the back crotch an extra 1/2″. oh, and i tapered the legs about 1/4″ down the sides. excuse the lumps at the hips – that will be smoothed out in the final pattern.

clover muslin #3 - front
i may take the waist in a smidge more as it’s the smallest bit too loose

clover muslin #3 - front
i still get a little excess when i stand a certain way… not sure if that’s something that can be adjusted out, or if it’s just the nature of wearing tight-fitting pants like these.

clover muslin #3 - side

clover muslin #3 - back
excuse the panty lines, but hey – the fit looks good back here, no? can i also add that i think it’s hilarious that i need a FBA top & bottom? hahahaha

these were originally going to be a ~wearable muslin~ but i don’t think i’m quite there yet. i do see a light at the end of the tunnel, though!

in other news, here’s a sneak peak at another project i’m working on:
green wool ceylon
ceylon in green wool. it’s been on the backburner for a week or so because i decided to hand embroider the yoke on a whim. i like the way it’s looking, though!

lining the lady grey, part 1

22 Nov

i was able to get a good bit of sewing in over the weekend… we are in for the home stretch at this point! yay!

i would have started the lining sooner, but i am highly intelligent and managed to cut my weft interfacing for the wrong side of the jacket facing 😡 so i had to go back to the fabric store and buy more weft. now i just realized i also should have bought more thread. i can’t believe how much thread i’ve gone through at this point – an entire spool of silk, nearly 2 spools of the blue, and almost a full spool of the silver. it’s not like i’m sitting here sewing and ripping out seams over and over, either. ugh!

anyway, i’m about halfway done with the lining. it is in, so pretty much all that’s left at this point is a bunch of handsewing and working on the details.

Continue reading

help me choose a tag for my coat

17 Nov

as if i didn’t already have enough handsewing on my plate (and sewing in general, ew those christmas gifts ain’t gonna sew themselves), i decided yesterday that my coat needed a pretty embroidered tag for the inside, where i will put the tiny chain you use to hang one’s coat on a hook (speaking of which, where do you buy those things, anyway? the hardware store? the jewelry crafting aisle? i don’t think i’ve ever seen them at my fabric store). my pfaff actually has an embroidery unit – like, not those dinky little monograms you can make that are all of 1/2″ tall, but a legit hooks-onto-your-machine-and-you-buy-embroidery-cards kinda deal – but i don’t really care for machine embroidery. i like the texture of hand embroidery. so pretty!

here were the designs i found at needle’n’thread:
Photobucket

Photobucket

more under the cut!
Continue reading