Tag Archives: collar

Completed: The Kalle Shirtdress

18 Sep

I’ve still got a few more summer projects that I haven’t shared yet, so bear with me here! Although, to be fair – we should be well within the throes of summer heat for at least the next month here (yes, it did warm up again!).

Chambray Kalle Dress

I made this dress a couple of months ago, so what you are seeing a dress that has been worn, washed, and loved quite a bit before taking photos! As a result, it’s probably not as crisp and perfect as it would have looked fresh off the sewing machine – but on the flip, it’s definitely something that I’ve had time to move around in and really get to know fit-wise in ways that might not have been so apparent immediately after finishing it. Plus, you can really see how this fabric looks after several trips through the laundry. For ages, I was firmly in the camp of photos before I wore anything I made, but I’ve really softened up on that lately. This makes more of a delay in posting (since nothing is stopping me from putting that shit on RIGHT AWAY), but I think it can also create more of an honest post, in the sense of seeing how something feels after it’s been worn around a bit.

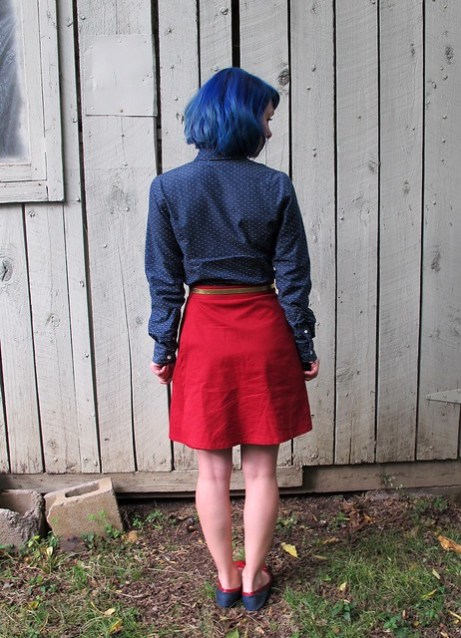
Also, about these photos – sorry about the dark door background? I did take my tripod outside, but I had one neighbor chopping tree limbs in one yard creepin on me, and another literally sitting on her front porch just straight-up staring at me and it made me way too anxious hahaha. I may need to get something to hang over that door when I take photos (this is the door that leads to the back half of my house – where the bedrooms are – from my living room), but at least the light is pretty!

Chambray Kalle Dress

ANYWAY, back to the dress!!!

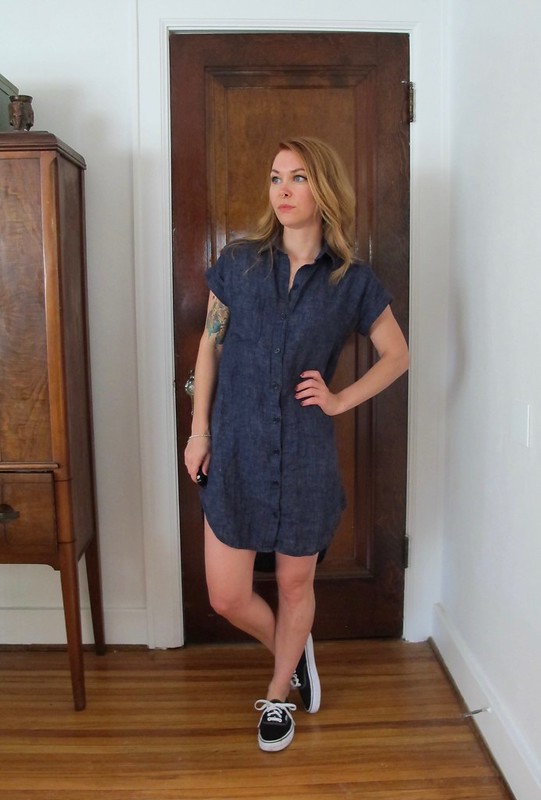
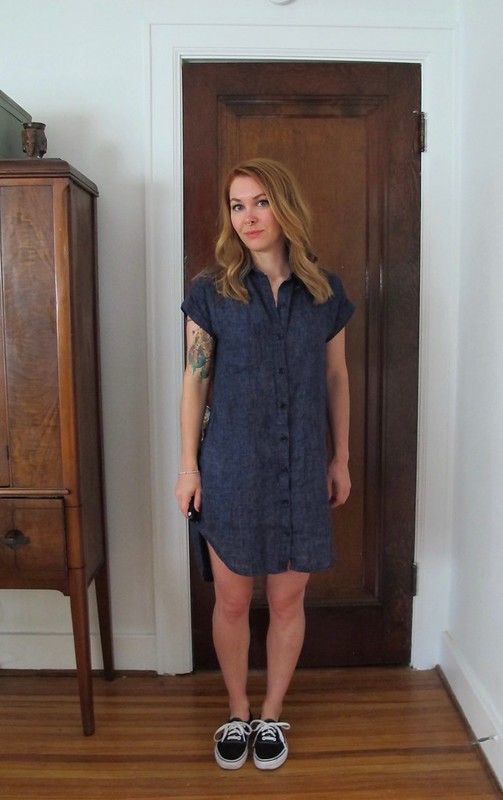
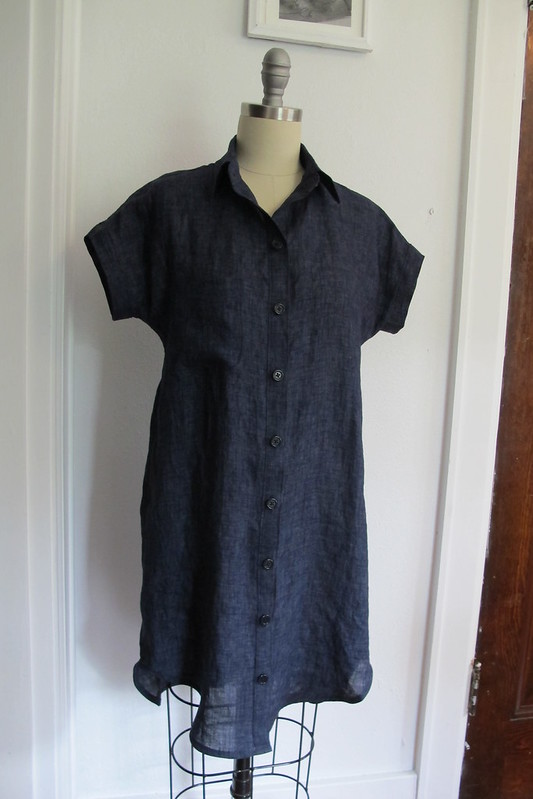
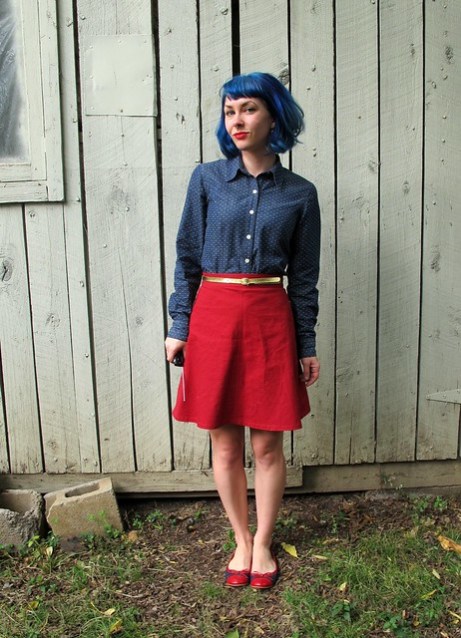
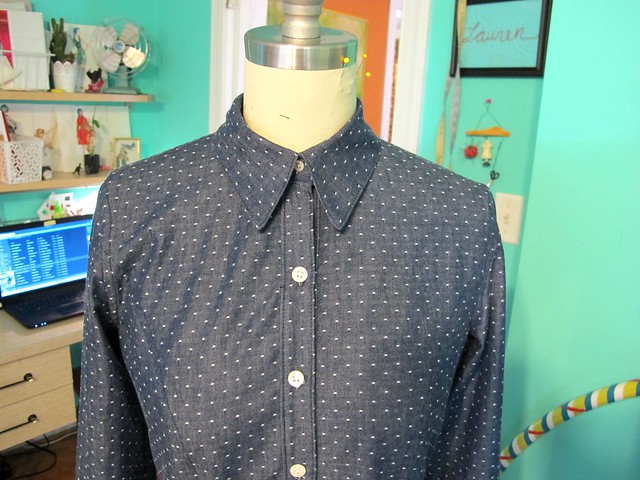
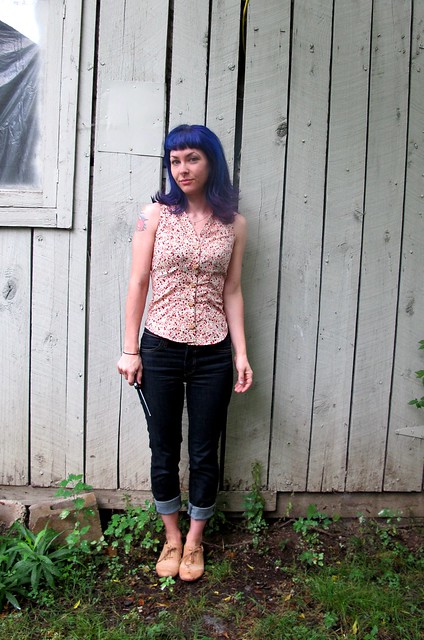
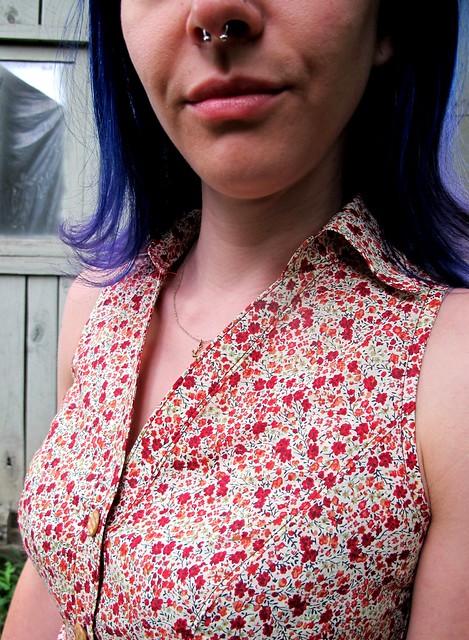
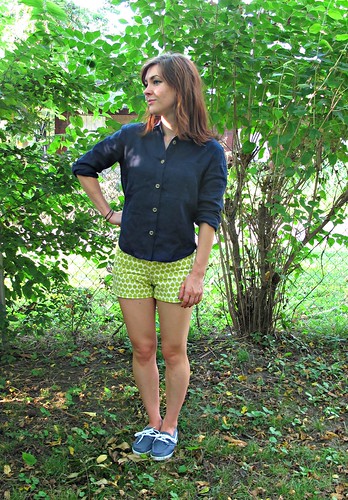
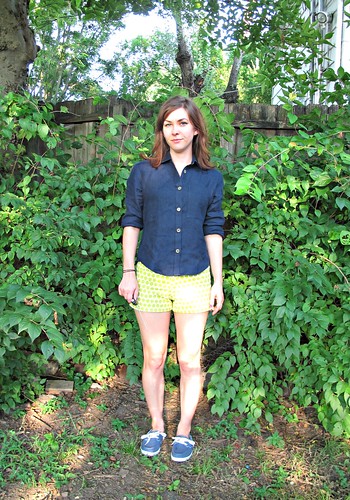
This is the Kalle Shirtdress, from Closet Case Patterns. I made view C in a size 2, with no alterations. This one is straight out of the envelope! I was so excited when this pattern came out and my finished dress did not disappoint – I wear it as much as I think I can feasibly get away with! The good thing about dressing kind of bland (simple shapes, solid colors, etc) means that people are less likely to realize you’re repeating an outfit. Or maybe they do and they are too polite to say anything, I dunno and I also kind of don’t care.

Chambray Kalle Dress

Chambray Kalle Dress

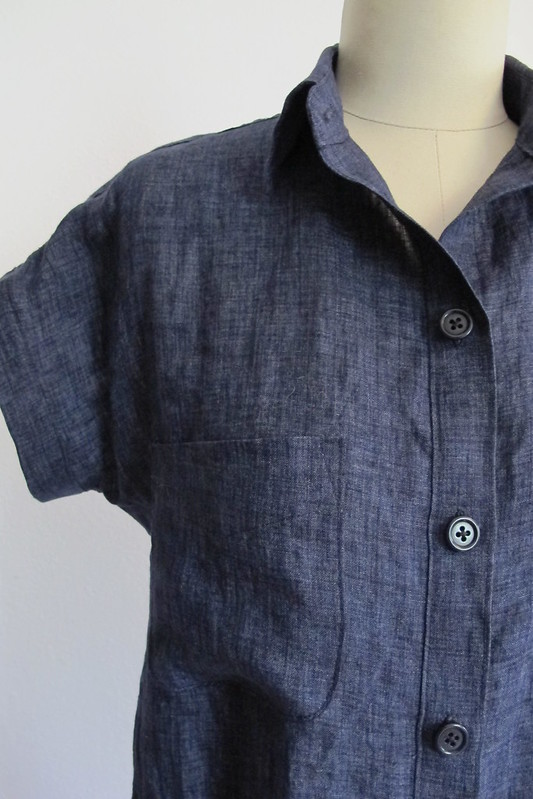
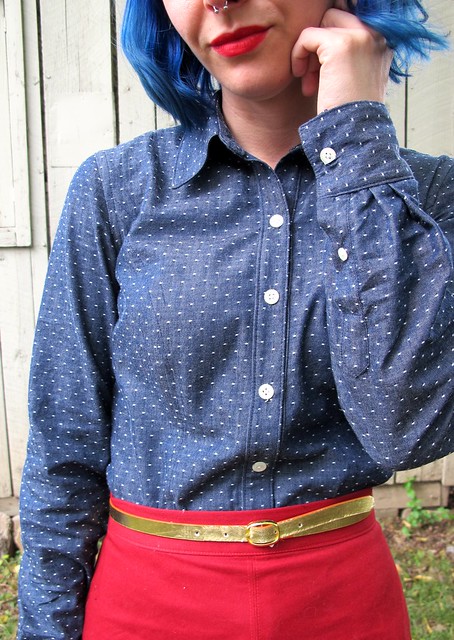
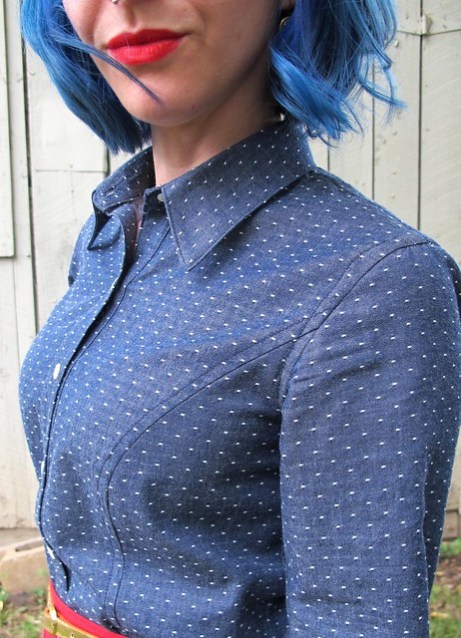
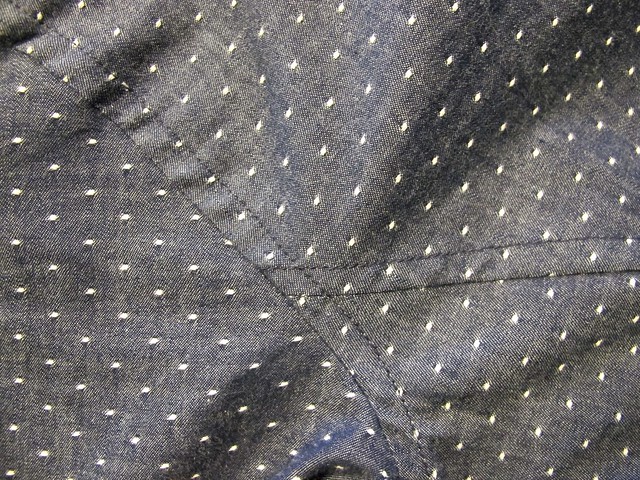
I made my dress up in a beautiful, lightweight linen from Mood Fabrics (which apparently is sold out now, sorry!). This fabric is great – it’s light and airy, and almost translucent. It is perfect for those hot summer days when you don’t want anything touching your body. The deep indigo color means that it will also transition nicely into fall – it still looks a bit autumnal, but I won’t be sweating to death in it. Plus, it layers really nicely for those chilly mornings and evenings – it looks great with a cardigan and boots.

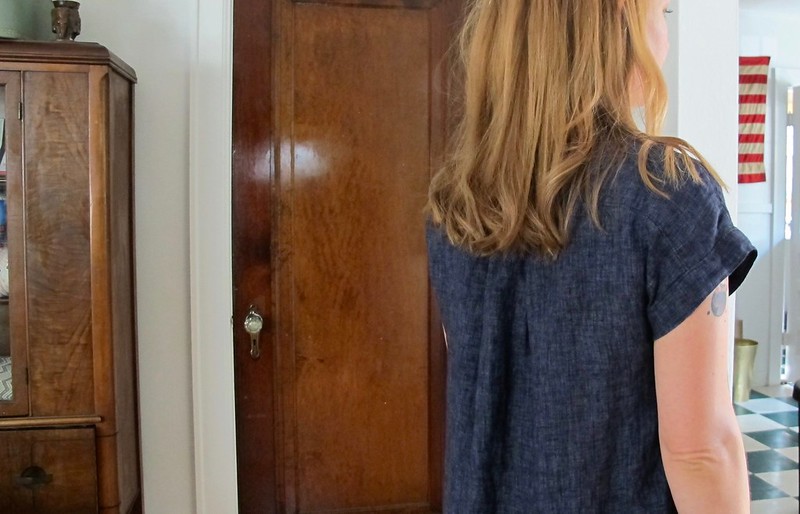
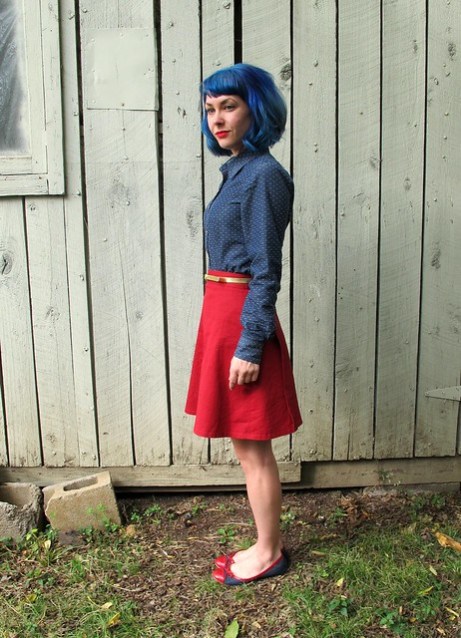
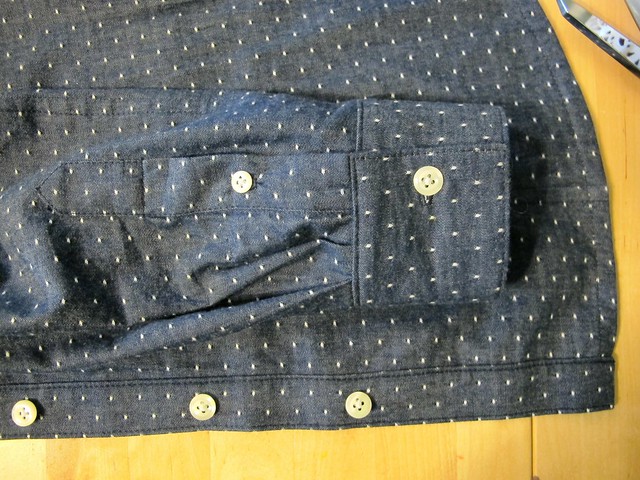
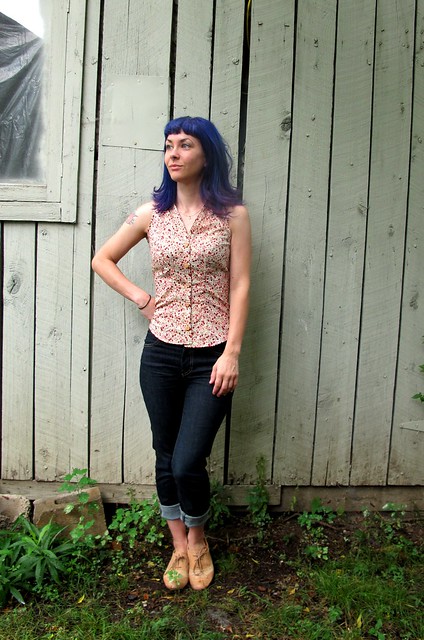
I washed my linen three times before cutting it, as I wanted to make sure that it wasn’t going to shrink at all post-sewing. I believe this also helps keep the linen from wrinkling so much – Carolyn, was it you who told me this? – and I think that may be accurate since this fabric doesn’t really wrinkle much at all now! I’ve worn this dress on all my travels since finishing and it looks great going from suitcase to hanger. I have found that I do need to lightly press the sleeve bands after washing, because they get slightly bunched (probably because the bands aren’t interfaced), but the rest of the dress is fine without any ironing. In these photos, that’s exactly what I did not do. Un-ironed linen dress, y’all!

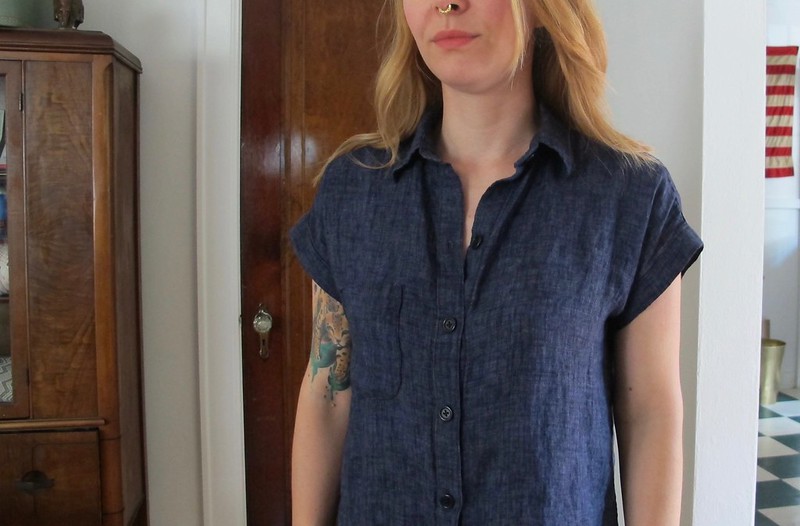
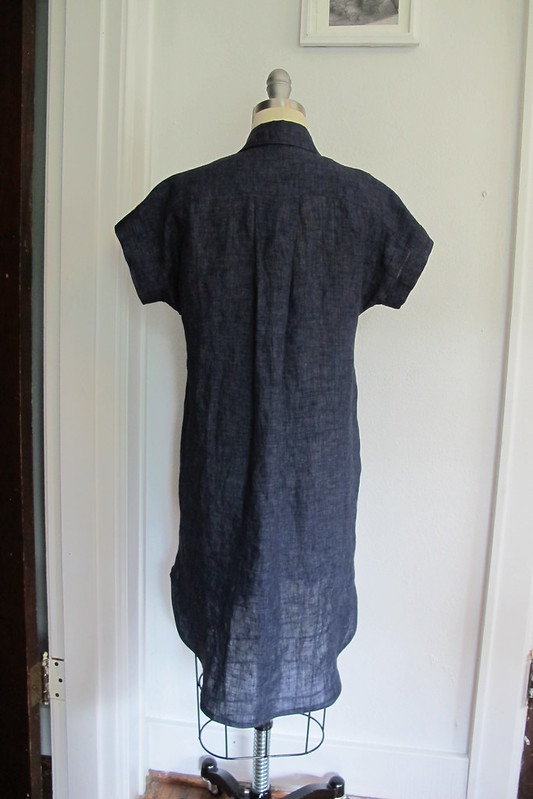
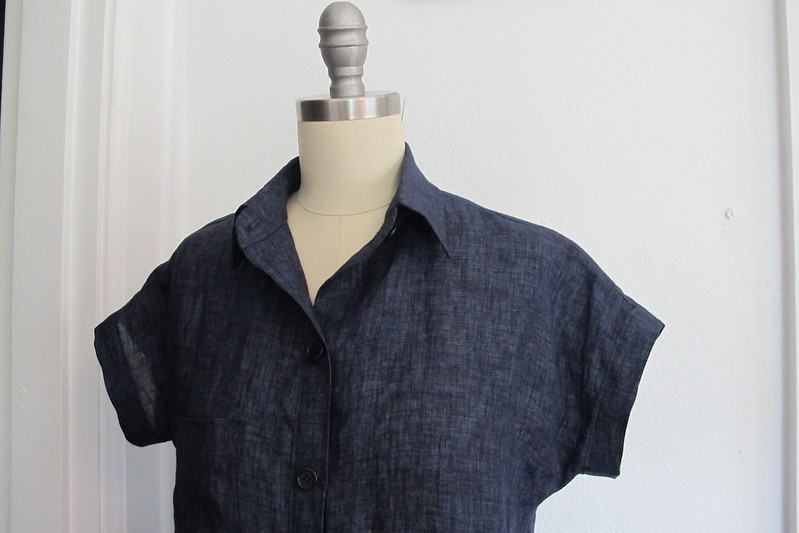
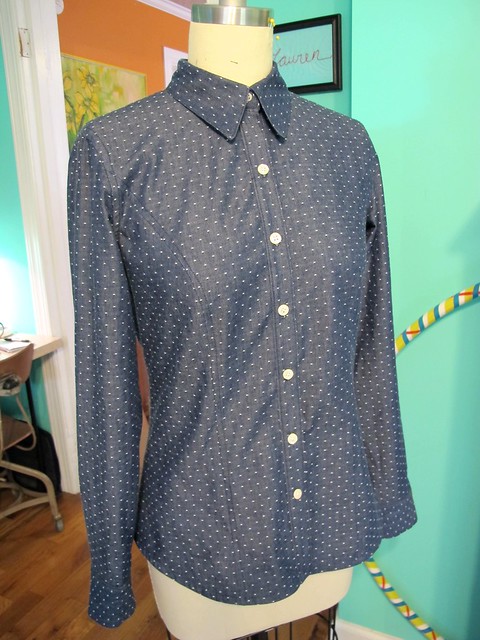
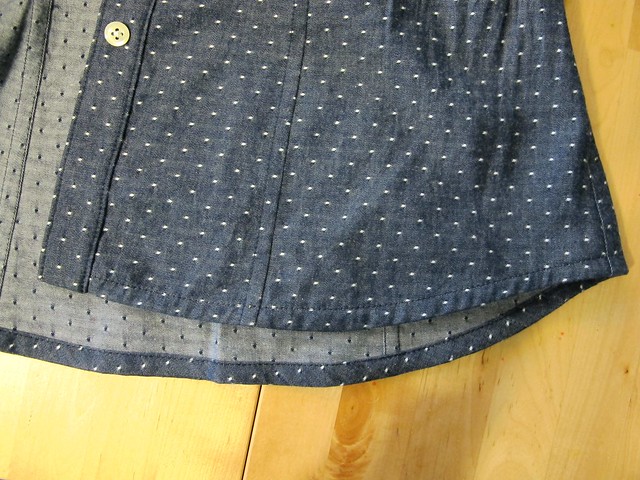
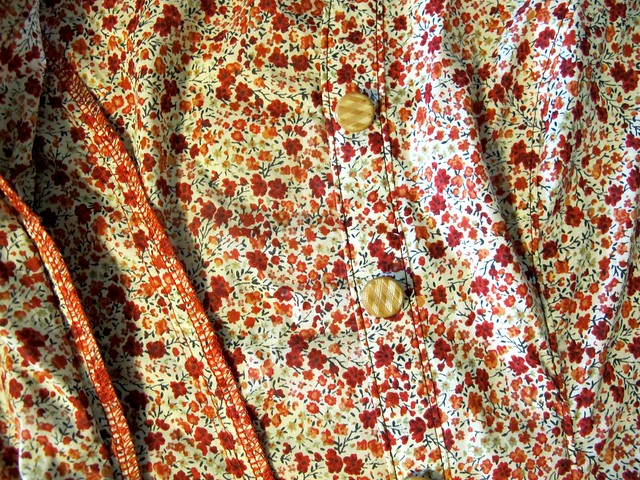
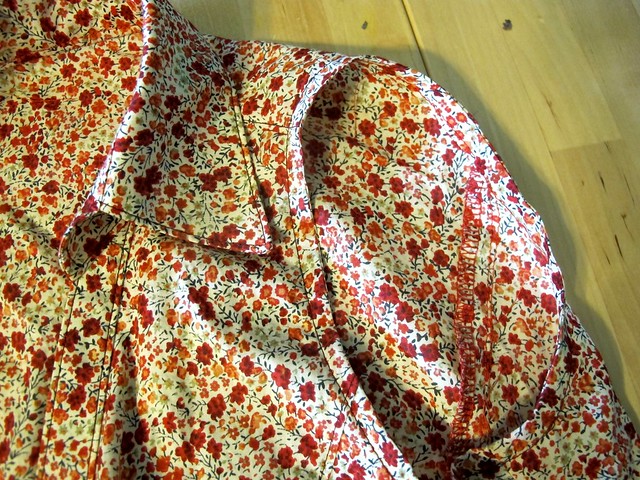
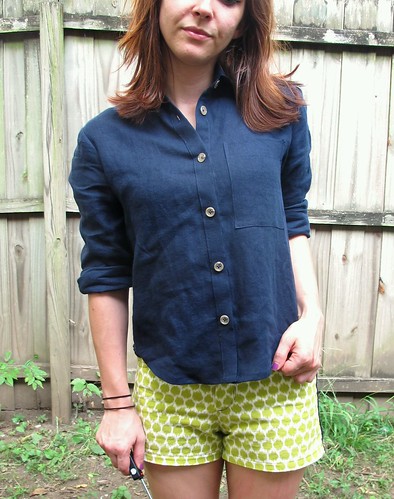
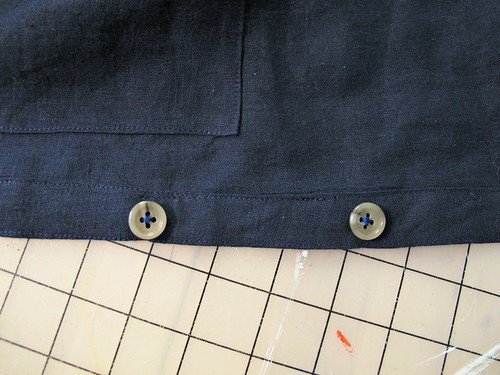
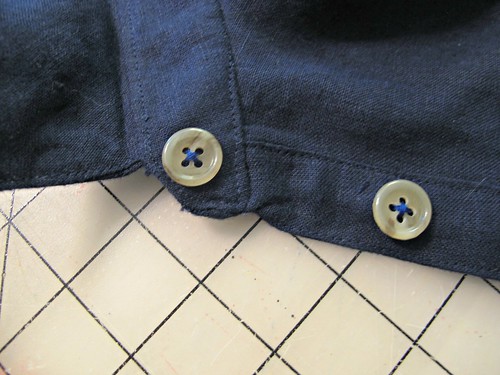
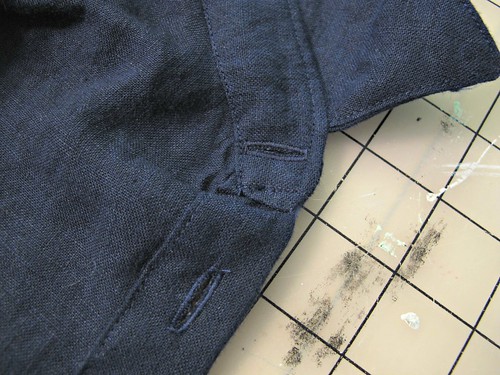
I finished the insides of my dress with French seams, and topstitched with navy thread. For interfacing, I used this super lightweight fusible interfacing, and then only sparingly – on the button band, upper collar, and outer collar stand – to keep the fabric supported but still soft. The hem is finished with a bias facing, which is an easy way to work with that exaggerated curve. The navy shirt buttons are from Textile Fabrics – and in the true spirit of Textile Fabrics, they are fancy and imported from Italy and cost over $1 each. Ugh. Who knew it was so hard to find navy shirt buttons? Anyway, they look good!

Chambray Kalle Dress

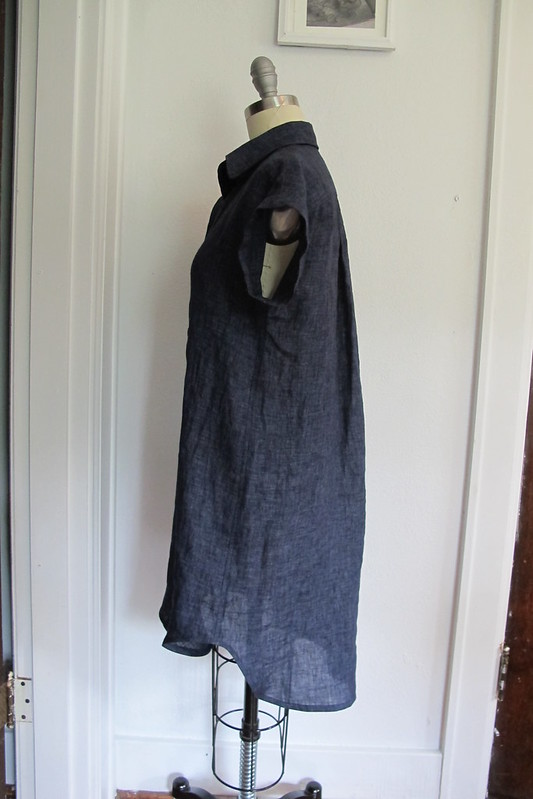
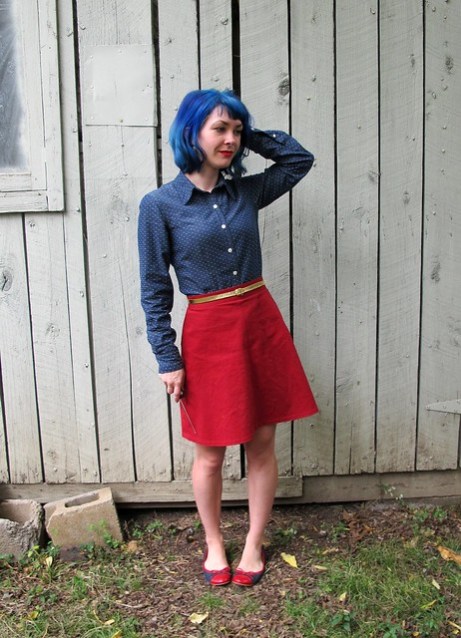
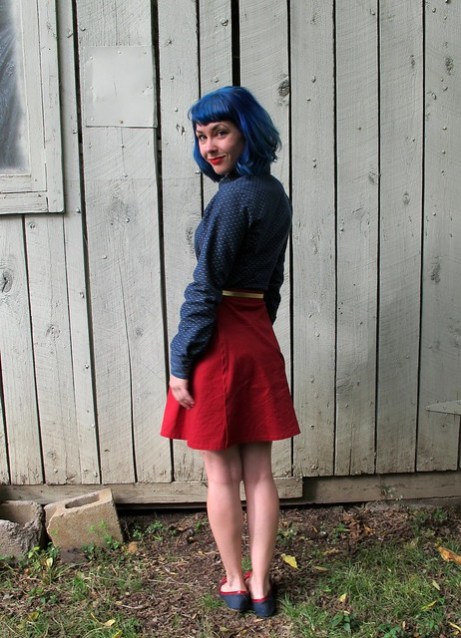
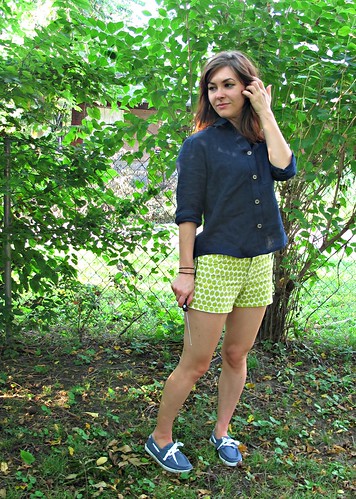
One thing you should know about this dress – it’s not a short dress, but the upper curve of the hem is quite high. And the arm holes are quite low, which means that the dress moves upwards if you need to raise your arms. See how high the dress goes when I reach the sky? Ok, granted – I rarely need to raise my arms *that* high, but it is something to keep in mind! For comparison’s sake, I wear my shorts very very short and only the bottom rose of my leg tattoo sticks out of the hem. If the dress hiked up any higher, you would literally see my underwear. FYI!

Chambray Kalle Dress

Chambray Kalle Dress

Chambray Kalle Dress

Chambray Kalle Dress

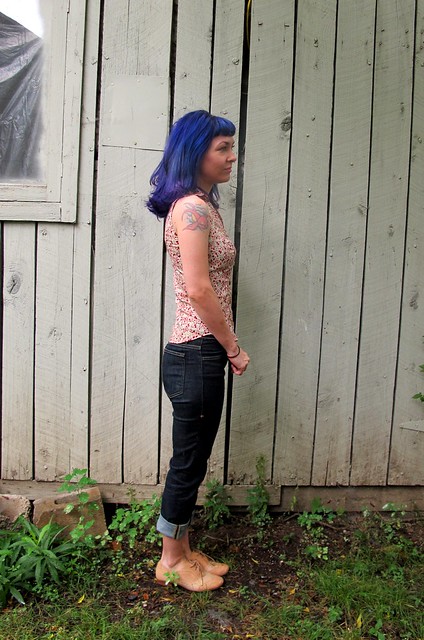
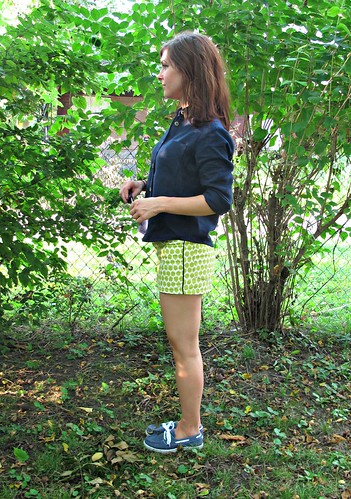
See how sheer the fabric is? It’s not noticeable when I’m wearing the dress, and also, I wear nude undergarments (nothing patterned).

Chambray Kalle Dress

Chambray Kalle Dress

Chambray Kalle Dress

Chambray Kalle Dress

I think that’s about all I have to say about this dress! I really love this pattern and I am excited to try the other versions in different fabrics. I also realize that this is like, my fourth chambray/denim shirtdress – but you know what? I don’t care. At least I’ve figured out what I like, I guess 😛

Chambray Kalle Dress

** Note: The linen fabric used for this dress was provided to me by Mood Fabrics, in exchange for my participation with the Mood Sewing Network. As always, all opinions are my own!

Completed: Polka Dot Chambray Butterick 5526

21 Oct

HAHAHAHAHA I bet you guys are sooo sick of seeing me in renditions of this pattern, huh? 🙂

Polka Dot Chambray Button down

SUP Butterick 5526. My heart, my soul, my official tried’n’true button down pattern. I don’t know how many times it has to be before it’s considered “the charm,” but I’m pretty sure this is legit the nicest button down I have ever made. I am so pleased with myself right now!

Polka Dot Chambray Button down

Since I’ve made this pattern, um, a lot (see: 1 2 3)(ok that’s not a lot, but it sure feels like a lot!), I’m pretty well-versed in the fitting and construction of this dude. It’s practically an autopilot pattern for me – apart from selecting the fabric & buttons, I don’t really have to think much while I’m putting this together. It’s like my hands have repeated the process so much, they don’t need any instruction from my brain at this point.

Polka Dot Chambray Button down

So, I’m sorry if you’re bored with looking at this pattern. Deal with it.

Polka Dot Chambray Button down

Seriously, though, I did have to figure out those damn sleeves, because all my previous versions have some awkward lengthage going on. My last attempt at making them full-length ended up with them being some weird purgatory of not-quite-long-but-not-quite-short – like the highwaters of shirt sleeves (do we still make fun of highwaters, or is that the cool thing to wear now? I just looked down and realized the jeans I am wearing are cuffed to the length of highwaters, SHIT!!). Since I actually want to wear this top underneath sweaters – and hence why I made a second chambray button down when the first one is actually quite wonderful (spoiler: dem sleeves, tho) – I needed to figure that shit out once and for all. And, look ma! They’re the right length! Finally!

Polka Dot Chambray Button down

Although, now I can’t decide if they are… too long? They look bunched up when my arms are hanging. However, when I reach my arms out – they are exactly the right length (as in, any shorter, and they would ride up to be too short and expose too much wrist). Thoughts? This is why I always roll up my sleeves (and jeans, for that matter) – I can’t find a happy hem length! Anyway, what is the point of making all your clothes if you can’t even hem them correctly?

Also, I think the sleeves might be a bit loose? Or do they look ok? Thoughts on that?

Dammit, this totally isn’t a TNT pattern, is it? 😛

Polka Dot Chambray Button down

Anyway, whatever, let’s talk about the victories! Check out that sexy sexy sleeve placket. I used the placket for the Negroni (which, honestly, that pattern piece + instructions are alone worth the price of the pattern) instead of what was included with 5526. Lurrrrve it.

Polka Dot Chambray Button down

I also sucked it up big time and flat-felled every single seam on this shirt – the princess seams, the side seams, the arm holes (thanks to Negroni for those sweet instructions – see? Negroni, you rule!) – everything! What you see here is a beautiful and clean-finished top that doesn’t have ANY serging on the inside. Just miles and miles of flat-felled seams and gorgeous topstitching. Ugh, so good.

Polka Dot Chambray Button down

Don’t you love the fabric? I picked this up at one of our local fabric stores, Textile Fabrics. They were having a 40% off sale, so I treated myself to this and some soft fleecy knit. I was originally going to use this to make the Bruyere, until I realized I didn’t want to look exactly like the pattern cover (which is beautiful, don’t get me wrong!). I’m more of a plaid flannel kinda gal, for which I’m still stubbornly holding out for the perfect one to reveal itself to me. Textile Fabrics, unfortunately, couldn’t deliver on that front – but they did have polka dot chambray, so that’s ok enough in my book. Speaking of which, I think this is Robert Kaufman fabric. Don’t quote me on that, though!

Polka Dot Chambray Button down

Anyway, it’s a very lovely fabric – and it was soo nice to work with! Very soft and smooth, easy to cut and sew, SUPER easy to press (which is important with this style of shirt). The topstitching just sinks right in.

Polka Dot Chambray Button down

Again – placket! Sorry the cuff looks uneven. I promise it’s not. Buttons are these dress shirt buttons from Fashion Sewing Supply – part of my neverending stash.

Polka Dot Chambray Button down

I’m just including this because it looks so damn good – topstitched intersecting flat-felled seams (arm hole & princess seam). Also, if you were wondering – flat-felling princess seams really is not any more difficult than flat-felling straight seams. I don’t know why I put it off like it’s impossible to do. It’s not. It’s definitely more time consuming than just serging your raw edges, but the end result looks SO nice.

Polka Dot Chambray Button down

Finally – can we talk about how good this hem looks? Y’all, shirt hems have always been the bane of my sewing existence. I could never figure out how to get them to be straight and even with that giant curve. They ALWAYS look like shit. Not anymore, though! This time, I was inspired by Rochelle and tried using bias facing at the hem. I made self-bias strips with my fabric, and then applied it the same way I bias face sleeves & necklines (I did this before attaching the placket, as per the instructions). Since I used self-fabric for the bias, the end result looks like a simply turned up and stitched – except I didn’t, and this was SO MUCH EASIER. Plus, it give a nice bit of weight to the hem, which I like. Consider me a convert! Bias facing FTW!

Polka Dot Chambray Button down

So yay! I’ll consider this shirt a success – even if the sleeves are a little iffy. At any rate, I’m serious when I say it’s the best-made shirt I’ve ever constructed (if you see me in the wild and compliment it, there’s a good chance I’ll rip it off my body so I can show off the insides. TRUTH.). Little things like this make me happy! I think that’s the best part about sewing with a pattern you know and love – instead of focusing on new instructions and fit, you can zero all your attention on improving your technique.

Oh, and if you were wondering – that’s my Tie-less Miette I’m wearing in the photos. The shoes (because everyone always asks) are from the clearance rack at Nine West and no, I did not buy them to match this outfit. Ha! 😛

Two more things!

1. My lovely sponsor (and OG to the LLADYBIRD Sponsor Game), Sweet Little Chickadee, is closing up shop for the time being 😦 We will miss her (I will miss her! Where do I buy my patterns from now?! I got candy with those orders hahaha), but on the flip side – this means closeout saaaaale! 😀 From now till whenever the shop runs out, use the code SHOPCLOSING to get 25% off your entire purchase. Apparently there are also some sweet flat-rate shipping options at checkout, so you may save there, too! Please keep in mind that you are buying from a one-woman shop who is running a sweet freaking sale, so please be patient if your order takes a couple days to ship out. Not a bad payoff for 25% off, though, yeah? Now go forth and help Juli clear out that inventory!

2. Affiliate links. I wrote this blurb out in my last post, but realized after the fact that not everyone reads sewalong posts (I’m guilty of this too – those posts can be boring if you’re not following along). I definitely want y’all to be aware of my use of affiliate links, because I think it’s important, so I’m copying this verbatim into this post. Sorry if you’re reading this twice  🙂
Side note/disclaimer: Ok, so I decided to start occasionally using affiliate links on this blog. Sorry if you hate me! 🙂 I am currently only affiliated with Amazon, and I promise I will only be linking things that I personally use and recommend – such as those scissors & that clapper. Y’all will never ever ever see me link something just for the sake of linking it – that’s just crappy. However, please keep in mind that any purchases you make through these links will net a small kickback to me, which I will likely spend immediately on yarn & fabric (and thus pour back into this blog, in the form of content for y’all to read!). Also, no sneaky linkies – I will always describe the item I’m linking so you don’t have to click to see them, if affiliate links squick you out 🙂 I won’t be posting this disclaimer at the end of all my posts, as it seems a little redundant, but you can always view it in my About Me page. That’s all! Thanks for supporting my blog, dudes! ♥

Ok, that’s it! Have a lovely Tuesday, guys!

Completed: The Sureau Dress

8 Sep

You know what rules? When you have a brilliant strike of inspiration that comes together perfectly – from fabric, to pattern, to completed project.

Deer & Doe Sureau dress

AKA this dress.

Deer & Doe Sureau dress

I’ve been holding onto this silk cotton voile from Mood Fabrics since the beginning of this year (it’s sadly long gone from the site now, but they have lots of other options – including this gorgeousness. Ok, that doesn’t have silk, but it belongs in my fabric stash nonetheless). I had originally planned to make an Aubepine dress with it – but changed my mind at the last minute and ordered the Sureau instead, also from Deer & Doe (I still have the Aubepine & still plan to make it, but I’m thinking I would like it better in a dark/solid color, possibly even a lightweight knit. We’ll see!)

Deer & Doe Sureau dress

I LOVED sewing this dress! Too bad the pictures are kind of shitty. I promise it’s much prettier in real life – the voile is floaty, slightly sheer, and fucking ethereal. The colors are amazing and very fall-like, but the lightweight fabric keeps things from getting too sweaty.

Deer & Doe Sureau dress

You’ll notice that my version differs quite a bit from Deer & Doe’s – I had to make a few changes – both fitting and design – to get the look I wanted.

For fitting changes, I made a muslin and made the following adjustments:
– The front neckline was slightly gaping, so I removed a 3/8″ wedge (similar to this method)
– The upper back was a little loose, so I removed about 3/8″ from the center back, starting at the top and tapering to nothing at the bottom.
– Shortened the shoulders 1/2″
– Added 1/4″ to the side seams

Deer & Doe Sureau dress

I also made a couple of major design changes! The main one was that I lengthened the sleeves to be full length, and added a cuff and placket (stolen from Archer pattern). Unfortunately, I didn’t correctly measure the sleeve length – which seems to be a common mistake that I ALWAYS ALWAYS make, argh! – so they’re a tiny bit on the short side 😦 Bummer! Fortunately, the sleeve placket means I can roll them up, so there’s that.

The other ridiculously hilarious issue with the sleeves is that they are sewn on backwards – and I did that shit on purpose! Let me back up a little. When I altered the sleeve pattern to include the placket, I used my Grainline pattern as a guide. I didn’t think to make sure that I was tracing the placket to the correct side of the sleeve, so – you guessed it – the placket ended up on the front of the sleeve. Didn’t realize this until I’d already attached the cuffs and everything, derp (and didn’t have enough fabric to recut because, come on, that would make too much sense). I weighed out the options, and decided that a backwards sleeve cap was easier to forgive than a placket in the wrong place, so the back of the sleeve is now at the front, and vice versa. Fortunately, the sleeves are fairly loose & the cap is slightly gathered, so it’s not obvious that I inserted them incorrectly, and I still have plenty of room for movement. That being said, y’all all know my secret now. Don’t tell anyone.

Deer & Doe Sureau dress

The other design change was adding that cute little half collar! I used this tutorial to draft my little collar, and interfaced one layer of the fabric before sewing them together. I hemmed and hawwed over whether or not to include it – but ultimately, Landon & I both agreed that the dress looked weirdly unfinished without the collar at the neckline, at least with this particular fabric.

Deer & Doe Sureau dress

Because the fabric is so lightweight, I took extra care with the construction. All seams – including the waistline and sleeves – are sewn with a French seam, for a durable and elegant finish. The facings are finished with pinking – any other finishing would result in showing through the fabric. The instructions don’t have you interface any part of the dress, but I added interfacing to the facings, sleeve cuff, collar, and both front placket pieces (both the front and the placket facing). Again, the fabric is super lightweight, so it needed a little more support from the interfacing. Specifically, I used the Pro Sheer Elegance Couture fusible interfacing from Fashion Sewing Supply. I like that is gives a little needed support, but it doesn’t actually change the drape of the fabric. I had black on hand, which was perfect for my emerald fabric as white would have slightly shown through.

Also, ugh, guys, I know it’s REALLY short. Wasn’t planning on that! My fabric shortages meant that I couldn’t lengthen anything, and once I got the dress sewn up – I realized it would look way better with a deep 2″ hem. Which means the dress is now rill short (again, didn’t have enough fabric left to face the hem, which is how I would have normally solved that issue), but I plan on mostly wearing it with tights and/or boots sooo it’s not too bad.

Deer & Doe Sureau dress

Deer & Doe Sureau dress

Pretty much everything to do with this dress – other than my frantic last-minute pattern ordering – came out of my stash! Fabric, buttons, interfacing, even the thread – I love it when that happens!

Deer & Doe Sureau dress

Deer & Doe Sureau dress

There’s a cute little lapped zipper in the side of the dress 🙂

Deer & Doe Sureau dress

And that damn deep hem! Ha! I topstitched it because, I figured the rest of the dress has lots of topstitching, so it woudn’t look out of place 🙂

Deer & Doe Sureau dress

And that’s it! I like to wear the dress with a belt – I’m still not sold on how I look with gathered skirts (even slightly gathered, like this one), but I think the belt breaks things up nicely 🙂 I also wear it with the sleeves rolled up, because, again – they are too short (even if they look ok in the photos, trust me, once I start moving around, it’s evident that they are too short)(maybe someday I’ll have sleeves the right length. Sigh.). It’s pretty short, but not so short that I flash cheek when I bend over (as several people have been kind enough to observe and report on).

I’ll count this one as a success! 🙂 Next question – whyyy have I not been sewing Deer & Doe patterns? They are SO GOOD. I actually just ordered the Bruyere and am anxiously awaiting it’s arrival (as is apparently most of the sewing world :P). I have plaid flannel dreams for that bad boy. Man, I love sewing ♥

Completed: McCall’s 5803

21 Jul

For the past couple of weeks, I’ve been slowing reorganizing my pattern stash. You guys, I had no idea how much shit I had stuffed in those boxes until I really started culling through them. Let’s just say I’ve made 3 trips to my local comic book store to buy more packs of 100 backing boards and clear sleeves. It’s kind of disgusting when I think about how many patterns I have (although, to be fair, most of them are old vintage ones I picked up at our flea market for next to nothing because they would have gotten thrown away otherwise oh god), and even more so when I realize I have so many that I haven’t even thought about since I took them home. On the flip side, I’ve been rediscovering a lot of cool ones!

McCall 5803 - Liberty

This is McCall’s 5803 – it’s an old OOP Lizzy McGuire (lol yep) pattern that I’ve had for god knows how long. I’ve actually made this one before – in the form of a Plaid Clusterfuck – and I’ve always (well, when I remembered about it hahahahaha) wanted to made a more demure version, since I love the shape of the arm holes and button placket (and I’d love one with a proper collar and not just the stand). I swear, every time I wore that Plaid shit, I would think, “Man, I wish this didn’t have the ruffles.” So as soon as I rediscovered it, I knew I could make it happen.

McCall 5803 - Liberty

My original version of this top included a big ol’ 1.5″ FBA, which was no longer needed to get a good fit (I don’t even have the original one; I sold it last year when I realized it didn’t fit me at all anymore). Since I’m too much of a stubborn ass to trace my patterns and preserve the original, that meant I had to remove the FBA by carefully peeling up tape and carefully repiecing tissue together. It worked, for the most part I guess, but something tragic happened at the waist because this baby is apparently painted on. Despite a tissue fit (and my stubborn ass thinking, “noooooo I don’t need a muslin, I’ve made this before lololol) and everything. Argh.

I also didn’t bother to staystitch the neckline (whyyy), so it stretched out a little on one side. To remedy this, I pulled that side lower while marking the button spacing, which is why it’s not even at the bottom (you probably didn’t even notice that until I said something, oh well). These types of shirts are generally hemmed during the beginning of construction, so I couldn’t fix the unevenness when I was doing the buttons, if that makes sense. I should probably unpick the hem and fix it now, but eh. It doesn’t bother me as much as it should.

McCall 5803 - Liberty

McCall 5803 - Liberty

I know these pictures make it hard to see what’s going on. I’m sorry 😦 You can click on them to make them bigger through Flickr, if that helps.

McCall 5803 - Liberty

I let out some of the side seams to try to add a little more tummy room, and that helped a little. I’ve also just recovered from a couple weekends of eating some of the worst shit for me ever – I don’t necessarily diet, but I try to maintain regular exercise and eat things that are beneficial to my health/body and that seems to work well enough for me. After a couple of weekends of eating cupcakes and cookies and fried deliciousness in a to-go box, though, I was feeling tired and bloated and definitely like a stuffed sausage when I put this damn shirt on. I put the shirt aside for a week (wadded up in the corner, because that’s how I roll), I think it looks a bit better now that my body is back to normal. It’s definitely still pretty tight, but at least the busy print hides most of the wrinkles! Ha!

McCall 5803 - Liberty

Speaking of this busy print – isn’t it beeeeeautiful!? Ahh!! It was a gift from Sunni, who sent me a box of some of the most lovely fabrics earlier this year. I guess I never blogged about that, but we decided during Project Sewn that we both deserved a little treat and decided to have a fabric trade! She sent me all kinds of amazing shit – stuff that I’m now just sitting on because it’s almost too good to cut (and I’m waiting for divine inspiration)! That woman has some fabulous taste – and this is the first piece I actually made something with.

McCall 5803 - Liberty
The goodness you are looking at right now is actually Liberty of London shirting cotton (I told you, that woman has some fabulous taste!) from Sunni’s personal stash. Ahh!!! I’ll admit – and y’all can chase me with pitchforks if you’d like – but I’ve never really cared much for Liberty fabrics. Sorry! I think the prints are lovely, but they also remind me way too much of my Laura Ashley bedroom from my childhood. Too girly and floraly and, well, y’all look pretty in them but I’d rather not. I’d rather be clothed in NEON! But anyway, I’ve always been curious to try it because sewists don’t only rave about the prints – they rave about the quality of the cotton as well. You know I love trying new things for science, so I was pretty excited to have my own piece to play with when I got Sunni’s package. And I do think this print is super beautiful – it’s floral, sure, but it’s not all ditzy and super pastel girly like the Liberty I always see. It’s much more along the lines of my style, and I knew it would make a fabulous top.

McCall 5803 - Liberty

I’m so glad I made this work, because I would have been really really angry at myself if it had ended up being a wadder! I could probably stand to let out a couple more seams, but everything is topstitched, so it’s really a matter of me getting the energy to go through all that unpicking and retopstitching. Argh! Anyway, at least I left off the ruffles this time 😉

McCall 5803 - Liberty

Anyway, here she is in all her glory! Beautiful print, topstitching (that will be the end of me), and those gorgeous buttons. If those look familiar, it’s because I used them on my Audrey in Unst cardigan. Not the same ones – my cardigan still has buttons – but from the same batch. My sister-in-law helped me pick them out for the cardigan, and I bought them from a vendor at our flea market. He had all kinds of cool vintage buttons – I think he said these are vegetable protein from the 20s? – and she actually went back afterwards and bought up the rest for me for Christmas. So awesome 🙂 So obviously, they were perfect for this shirt – both in specialness and general matchy-ness 🙂

McCall 5803 - Liberty

Construction-wise, nothing new to report here. I finished the arm holes with self bias facing and topstitched with a slightly longer stitch length so the stitches would be more defined.

McCall 5803 - Liberty

So, what’s the verdict on Liberty of London? Well – y’all sewists are right, this shit is a JOY to sew up! It presses well, it doesn’t show pin holes, it’s easy to cut, and the fraying is minimum. It also just feels absolutely luscious. I totally understand the rabid fangirling over this shit. I don’t know if there is much Liberty in my future – after all, it’s still hideously expensive – but considering this shirt barely took any yardage, I could probably squeeze out a special piece for another special top 🙂

So, THANK YOU, Sunni, for the amazing gift of this gorgeous fabric (not to mention the chance to get to sew on it!)! Have any of y’all ever sewn with Liberty? Are there any cool non-floral prints that I’m blindly overlooking?

Completed: My First Archer, A Linen Disaster

5 Sep

Remember that Monet of an Archer I posted with my lime green Maritime shorts the other day (which turned out totally awesome, and yes, that’s me tooting my own horn, toot toot)? Remember when I said I was too traumatized to talk about it any further? Well, I think I feel like dishing today. Let’s dish!

Archer Shirt
(I took these pictures at the same time as my last batch – hence the exact same outfit – but I moved to a different side of the yard so they’d look a little different. That’s how much I love y’all. Also, this is pre-skeeter attack, fyi).

Ok! This is the Archer from Grainline Studio. I cut the smallest size and shortened the hem (too much, it looks). I think my relationship with this pattern has definitely gotten off to a rocky start, but I’m willing to give her a second chance. Funny, I thought this style looked horrible on me when I checked myself out in the mirror, but it’s not so bad in pictures!

Archer Shirt

I made this using some scrumptious Ralph Lauren linen from Mood Fabrics – doesn’t the idea of a floaty linen button-up in September sound so luxe? Nice and airy for the AM, but you can roll the sleeves down with the sun sets. Also, I just really love navy and I needed a shirt to go with my new aforementioned shorts, so I was feeling pretty confident about myself. So confident, I sliced directly into the linen without the benefit of a muslin or even reading the directions carefully. Oops.

Archer Shirt

Now, don’t get me wrong here – I don’t think a shirt like this necessarily requires a muslin, so to speak. It’s fairly loose-fitting and very forgiving in that sense. However, I do think a shirt like this requires the correct length when it comes to the body and the sleeves, and I think it is kind of a bad idea to dive into something so precise as shirtmaking without giving yourself a few test runs before you get into the good stuff. These were my mistakes. Had I made a little mock-up, I might have had the chance to try out that collar deal before I done goofed it up, ripped it out, realized that the linen was fraying at an alarming rate and oh god what have I done.

Also, the sleeves are way too long and the body is a bit on the short side (the latter isn’t the pattern’s fault, I just got a little too slash-happy with the scissors).

Archer Shirt

With all that being said, I actually really enjoyed sewing this pattern – it’s very precise, with all the top-stitching and perfect pressing, the kind of thing that I find SO relaxing to sew. Rather than get bummed that I made a shirt that isn’t up to my personal sewing standards, I consider this a muslin and I can’t wait to start my ~real~ version. The instructions are clear, albeit brief (if you get stuck, there is an entire sew-along with plenty of words and pictures), and every piece fits together nicely.

I know. The shirt looks fine in the pictures.

Which is why I took close-ups of the bad parts. You know you wanna see!

Archer Shirt

My first fuck-up was the top stitching on the button band. True, it’s not tooooo bad, but it’s definitely crooked. I’m not even sure how I managed to get that seam so crooked, but a crooked seam means crooked top stitching which means sad button band.

If you zoom in, you can even see an errant line of stitching running straight into a button. What is this I don’t even.

Then I tried to attach the collar stand.

Archer Shirt

And this is what happened. The fuck is that bump sticking out there? What the hell is going on?

Archer Shirt

And here is the crowning glory, which I obviously saved for last. This is what happens when you sew the collar stand wrong, then try to unpick it, then realize that the fabric is unraveling and now you have no seam allowances so you just sew haphazardly across a few points and hope for the best. It’s wonky and terrible and I can’t even button the top button. OOPS.

Speaking of buttons, the button holes *do* look nice. Thanks, Bernina!

If you were wondering, here is what I plan on changing for my next version:
– Shorten the length (although maybe not quite as much as this one!)
– Shorten the sleeves – they are WAY too long on me, like, the cuff starts below my wrist. I actually did not even bother sewing the buttons on the cuff here because they are so laughably long, I figured I’d just roll these up 4evs. But for my next version, I need to get the sleeves the proper length.
– Change the placket to a more traditional sleeve placket (such as the ones on the Negroni pattern). The ones on this shirt are much more simple – just a little binding, which isn’t bad, but I like the fancier look of the Negroni.
– I think I need to take out some of the width of the back, it’s super blousey on me.
– Draft smaller pockets; these are a little overwhelming on my frame.
– Get that god-forsaken collar stand under control, I mean, WOOF.

If you were also wondering, here are my suggestions should you decide to tackle this pattern yourself:
– MUSLIN IT. If you feel confident in your fitting skills, you may skip this, but I strongly encourage you to at least make a mock collar/collar stand so you can get an idea of how this shirt gets put together. You may also want to consider measuring the sleeves against some sleeves that fit you, unless you prefer the perma-roll.
– Don’t make your first version in linen. Just… don’t.

Archer Shirt

Despite an iffy start with this pattern (which I’m chalking up to user error), I think it’s a keeper and I will be making this shirt again. It’s a lovely design and a fun pattern, and I’ve already sourced my dream plaid flannel. I have an entire outfit planned around this pattern in that fabric, ain’t no one gonna stop me.