Tag Archives: mccalls

Completed: McCall’s 7351 // Style Maker Fabrics Spring Canvas Blog Tour

1 Apr

Hey guys! I’m excited to be the final wrap-up stop for the Spring Canvas Blog Tour with Style Maker Fabrics!

McCall's 7351

It’s always really flattering to get asked to participate in a blog tour – although I typically send my regrets, as I think they can be a little exhausting if you’ve got a dozen people talking about, say, the same book or whatever. Kind of boring and personally I skip right over those posts! I found the idea of this particular blog tour a little more intriguing, though, as it is all about spring fabrics and spring fashions and all the fun stuff that comes with that! I’ll be the first to admit that I’m not a necessarily fashionable person – I like the way I dress, of course, but I don’t exactly go out of my way to follow trends as they come into fashion. So this might not be a very “on-trend” outfit for me to make, but it is something that I will wear! So there’s that!

For this tour, I was given free range to choose whatever fabric I wanted from the new spring arrivals available at Style Maker Fabrics. Surprise surprise – I went with this navy rayon challis printed with cherries from Cotton + Steel, because I am nothing if I’m not predictable (I don’t even like cherries, but this is my third cherry print dress. See one and two. Hey, at least this one isn’t black hahaha!). It was a bit of a crunch to get this finished in time for my ~tour date~ – what’s with being out of town, getting sick, and then playing mad catch-up at work. But, spoiler, I finished it just in time to wear for Easter Sunday! Yay!

McCall's 7351

I used McCall’s 7351 to make my cherry dream dress, which is a new pattern from the McCall’s spring collection. It’s a classic shirt dress with a few extra options. I liked the idea of the straight skirt with the curved hemline that looks like, well, a shirttail, so I went with that option. Originally, I considered adding sleeves – but upon making my muslin, they were weirdly restrictive and I didn’t feel like going through the drama of figuring out how to fix it. Sleeveless dress it is! I actually prefer it this way; I think it’ll be more comfortable in the summer without sleeves.

McCall's 7351

McCall's 7351

McCall's 7351

I cut the size 6, based on the finished measurements, and didn’t make any pattern adjustments except the shorten the hem quite a bit at the end. The waist is a bit bigger than what I’m used to wearing – hence the belt – but I’m going to leave it like this for now because I suspect I will looove that loose waist come 95* weather 😉 I experimented with moving the placement of the buttons at the apex of my chest to eliminate button placket gap – but as you can see in the photos below, there’s still a tiny bit of pulling as it’s not *quite* in the right place. Whatever, I’ll figure it out with the next dress haha 🙂

Construction-wise, this is a really easy pattern. It has all the pieces of a proper button-up – separate button placket, collar stand, self-lined yoke – and I’ve made so many of those, I could do that in my sleep at this point. I used a very lightweight interfacing as not to interfere with the drape of the fabric, and finished all the seams with French seams and bias facing for the arm holes and hem. I used navy thread for the construction, and red thread for the topstitching and button holes. The buttons are from Mood Fabrics in NYC. I had to bring a swatch of fabric with me to get a good match – the cherries are more of an orange red than a true red – but this looks pretty good to me!

McCall's 7351

McCall's 7351

I LOVED working with this fabric! Rayon challis is one of my favorite things to wear – not necessarily to sew, as it’s pretty shifty and hard to wrangle (honesty, I’d rather sew silk crepe – I think it’s easier to work with!), but it’s worth the effort because it feels SO GOOD in hot weather. This rayon is a little heavier than most of the challis (challises? challis’? challi?) that I’ve worked with in the past. It’s almost the same weight of a poplin, so it’s not sheer at all and has a nice heft to it. It’s also easier to work with and not as shifty (but still feels really good!). This was my first experience using fabric from Cotton + Steel and I get why people love this stuff so much. It’s really luxurious feeling, wears and washes well. And cherries! 🙂 I still can’t get behind their quilting cotton (well, not as garment fabric. Sorry. Old habits die hard), but they can continue to make this rayon and I will continue to sew it 😀

McCall's 7351

Here it is on the form. I prefer it with the belt – I definitely need the waist definition (and the fact that the waist is already too big is also a factor here).

McCall's 7351

McCall's 7351

McCall's 7351

McCall's 7351

McCall's 7351

I always put a hook and eye at the waistline of dresses like this – it keeps things from gaping, but still allows me to wear a belt (buttons are too bulky under a belt, ew).

McCall's 7351

I know my photos don’t look very springy! It’s all green and flowering here in Tennessee, but not in my yard apparently haha. And while my neighbor has a beautiful cherry blossom tree that is in FULL GORGEOUS BLOOM right now, I do not have those kinds of guts to stand under it for photos! This is who was watching me take these photos – which is nerve-wracking enough:

McCall's 7351

Kevin & Wilbur! Did I mention that my roommate bought a second pig as a companion for Kevin? Well. Kevin has a boyfriend now. Also, we are pretty sure she’s pregnant now with his babies. Her stomach is massive – like about to drag on the ground because it hangs so low. Hopefully there will be piglet pictures in a future post! 🙂

blog tour

Hey, so that’s all for this part of the Spring Canvas blog tour – but be sure to check out all the other participants if you haven’t done so already! Lots of really amazing stuff to see 🙂 ALSO, just an FYI – but all domestic orders, regardless of size, ship for $5 from Style Maker Fabrics (and discounted international shipping, yo!). Cheap shipping is good through 4/3/16, so you’ve still got a couple days 🙂

Thanks again to Style Maker Fabrics for letting me be a part of this blog tour! 😀

McCall's 7351

Note: The fabric was provided to me by Style Maker Fabrics so that I could participate in their blog tour!

Announcing the 2015 OAL!

15 May

Happy Friday, everyone! I just wanted to pop in and let y’all know that the Outfit Along is back for a second year! WOOHOOO!!!

OAL_Banner

Once again, I’m joining forces with Andi Satterlund of Untangling Knots to combine a sew-along with a knit-along. The idea behind the Outfit Along (OAL) is to make a complete outfit by sewing a garment and knitting a garment. This is a great opportunity to stretch your crafting skills, and we’ll have two official patterns that we’ll help you with along the way.

The official sewing pattern will be McCall 6887, and the official knitting pattern will be Andi’s newest cardigan pattern, Vianne. I will be blogging about the official sewing pattern and Andi be blogging about the knitting pattern so we can all sew and knit along together. If you don’t love the official patterns, you can still join in! The Outfit Along is about making an outfit you’ll really wear, so to participate, all you need to do is to sew a garment and knit a garment to make an outfit. You’re more than welcome to pick projects that fit your own style and skills. You can look through the 2014 Outfit Along FO thread in the Untangling Knots group on Ravelry to see the variety of patterns people chose to use last year.

Vianne

McCall 6887 - Pineapple dress!

You can read all the juicy details over at Untangling Knots, but in a nutshell:

– We will be kicking off the OAL on June 1, 2015.
– The deadline for completion is July 31, 2015, which gives you two months to finish both garments.
– Did I mention that finishing within the deadline means you are eligible for PRIZES? Yes! We are cooking up some fun pattern giveaways to reward those of y’all who complete their outfit within the allotted deadline, so stay tuned for more information!
– To be eligible for said prizes, you must finish BOTH garments by July 31, 2015 and post them in the OAL Finished Outfit thread in the Untangling Knots group on Ravelry. Prize winners will be randomly selected from those who finish both their knit and sewn garments and post pictures in the appropriate thread by the deadline.

Vianne_Back
The official knitting pattern, Vianne, is a seamless, top-down cardigan, knit using DK weight yarn on US 8/5mm needles, which makes it a lovely lighter weight cardigan for the summer months. The v-neck cardigan features a set of mirrored lace panels that run along the front neckline and frame a large mesh panel on the back. To celebrate Vianne’s launch, Andi is offering 20% off up until the official OAL start of June 1. Use the code OAL2015 to snag the discount! You can read more details in the Untangling Knots shop or check Vianne out on Ravelry.

McCall 6887 - Pineapple dress!
The official sewing pattern, McCall 6887, is a fun little summer dress with a surprise cut out in the back! You probably remember my Pineapple Delight version from a few weeks ago – well, I’m dying to make more, and I want to drag all y’all down with me (mwahaha). The pattern features front princess seams, skirt variations (flared or fitted) and the optional open back (there is also an option for a non-open back if that’s your jam!). I will be covering basic construction of the dress, and including tips swapping out the lining for a clean bias facing, and adding pockets. The pattern is rated as “easy,” so y’all beginners should have no problem tackling this! Also, just a head’s up – I just checked my local Joann’s and it looks like all McCall’s patterns are on sale for 3/$5 through 5/16, so go save some dollaz!

Since I’ll be traveling around Peru during the first couple of weeks of the OAL, we won’t start the sewing portion until June 22nd. Of course, you are welcome to get a head start and begin sewing on June 1; there just won’t be any sew-along posts until the 22nd! Andi will be managing the knitting posts over on her blog starting on June 1. If you knit and sew along with us, you’ll get your projects done in plenty of time.

Help spread the word and grab one of the badges below or use the hashtag #OAL2015. If you want to hang out and chat about the OAL, come join the OAL2015 Discussion Thread in the Untangling Knots group on Ravelry. You do need a Ravelry account to view and post on the thread, but it’s totally free and totally worth it if you do any knitting at all 🙂

OALBadge3


OALtag_2015

Y’all, I am SO EXCITED. Who else is joining in the Outfit Along this year?

Completed: Be-Zazzle’d McCall’s 6887 (+ a GIVEAWAY!)

20 Apr

I shared a little sneak peek of this dress in my last post (which, by the way – if you haven’t browsed through the comments, you absolutely should! I LOVED reading everyone’s stories!), and I had quite a few comments and emails from people asking what the pattern was and where I got the fabric. I’m sorry that I had to hold out on y’all – photography was just NOT happening that day – but I’m happy to be able to share the whole shebang with you today! Hopefully you’ll think it was worth the wait 😉

McCall 6887 - Pineapple dress!

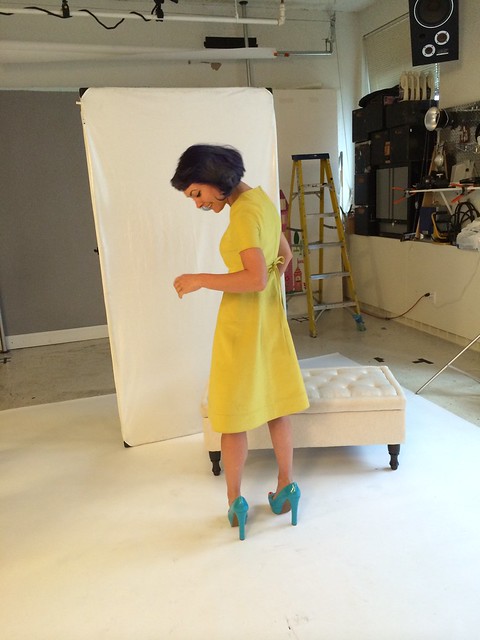
Introducing – my first make for Summer 2015, the Be-Zazzle’d Pineapple dress 😀 I don’t ever name my makes (partially because that would be a LOT of names to come up with, and partially because, well, as you can clearly see – I’m not very good at naming things hahaha), but naming this one was just toooo easy. Sorry if it made you groan. DGAF.

McCall 6887 - Pineapple dress!

I guess we should talk about the fabric first, because it’s slightly more of a focal point than the pattern (tho I promise we will get to the pattern soon!). It’s hard to see from these far-out pictures, but my dress is covered in tiny pineapples! Cartoon-y pineapples, to be exact, since we all know those are the cutest pineapples. And, unlike cherries, I actually really really really love pineapples. I have been known to eat an entire pineapple in one sitting, and I have no regrets. Well, maybe my mouth does, but it has learned to deal.

McCall 6887 - Pineapple dress!

Here’s a close-up of the fabric. Isn’t it so awesome? It’s definitely a cutesy little novelty print, but it’s not quite so in-your-face as some of the novelty prints you find on quilting cottons. It’s a little more subtle (well, as subtle as you can get with cartoon-y pineapples on a watercolor turquoise blue background), and it’s just pretty. I love it so much!

The fabric is called “Tropical Summertime Watercolor Pineapple,” and it from Zazzle. Did you know that Zazzle prints custom, on-demand fabric? Neither did I! This is a new venture that they’ve recently rolled out, and they offered me a few yards to try out and see if I liked it. Um, you guys. IT IS AMAZING. Granted, most of the fabrics offered are Home Decor weight, but they do have a classic combed cotton (similar to quilting cotton) and a Pima cotton, which are both suitable for apparel. I decided to go with the Pima cotton, and I chose an existing design. You can absolutely design your own print – I just didn’t want to go that route personally because I don’t really have a good eye for things like fabric design! I’d rather let someone else handle that part and let me make the dress 😉

McCall 6887 - Pineapple dress!

Pima cotton is very easy to work with – it’s similar to quilting cotton, just lighter (but not quite as light as, say, voile). It doesn’t fray much and it cuts and sews like a dream. It doesn’t press quite as well as some other cottons – I just used my clapper to hold the seams down while they cooled, and that worked fine (your hand also works in place of a clapper, but don’t burn yourself! Ask me how I know. Also, ask me why I ended up getting a clapper, haha). The only minor downside is that, since the fabric is printed, the design only shows on one side – so the wrong side is white. This isn’t necessarily a deal-breaker, but it’s certainly something to be aware of when choosing a pattern. You don’t want to use one that will show the wrong side of the fabric, unless that’s part of your ~design inspiration.

I pre-washed my fabric before sewing it, and I definitely got a little bit of color fading. Not as much as you’d think – the colors of the fabric upon arrival weren’t quite as neon as they are in that product photo! – but they are a little muted. I actually like them better this way, so I’m ok with that! I washed the fabric on cold and dried it on low, same as I pre-treat all of my fabric. Going forward, I plan on washing this as infrequently as I can get away with (I mean, short of stinking up a 5 foot radius around me or anything like that) and when I do wash it, I will turn it inside-out and hang it to dry on the line. I imagine if this was hand-washed and hung to dry, it would probably retain it’s colors a bit better, but I’m a woman who ain’t got time to hand-wash her clothes (and, tbh, I only line-dry because then it means I don’t have to iron hahahahahaha), so I can live with a little fading.

McCall 6887 - Pineapple dress!

McCall 6887 - Pineapple dress!

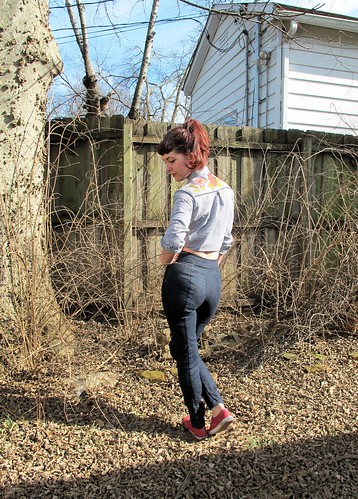
Now for the pattern! Since the fabric has a good amount of body, I wanted to use that to it’s advantage and make something with a bit of sleek structure. I used Mccall 6887, which has front princess seams, a scoop neck, a flared skirt – and this awesome back detail:

McCall 6887 - Pineapple dress!

WHICH IS BASICALLY MY FAVORITE THING EVER AT THE MOMENT.

McCall 6887 - Pineapple dress!

For sizing, I cut the bodice in a size 6 with an A/B cup (I don’t 100% understand these cup sizes because I definitely don’t wear anything close to an A/B cup in real life, but whatever. The sewing pattern fits and that’s all that matters, I guess.) and graded out the waist and hips to the size 8. I chose these sizes based off the finished measurements, and I’m really happy with how the dress ended up fitting (my measurements put me in a “suggested” size 10, which as you could see here would have ended up way too big. Use the finished measurements, y’all! Trust me!). It’s actually pretty perfect straight out of the envelope – I didn’t have to do anything! Even the straps are a good length, which is really surprising to me as I usually have to shorten them. I cut about 3″ off the skirt length because it was otherwise unflatteringly long, but that’s typical for me.

In the future, I am going to re-draw the curve at the bottom of the back cut out, because it’s not quite in the right place. My bra tends to poke out just slightly from the bottom 😦 It’s not the worst deal – honestly, I’ll probably just make a cute bra to wear with this dress bc that’s how I roll – but it’s annoying nonetheless. I tucked it out of the way for these photos, which is why you don’t see it, but I’m pretty sure it’s just gonna hang low and be free when I’m actually wearing it.

McCall 6887 - Pineapple dress!

McCall 6887 - Pineapple dress!

I love the style of this dress, but I don’t completely agree with the construction methods presented in the pattern – some of them seemed needlessly complicated. The dress is designed to be worn with a lining, which finishes the neckline, arm holes and back all in one swoop. Awesome, I guess, but I definitely want to be wearing as few layers as possible during the summer! Instead of lining this dress, I finished all the openings with self bias facing. It was a slight puzzle to figure out the bottom of the back opening and dealing with that zipper, but it turned out pretty nice!

I also did not actually sew button holes to the back – I just lapped those two pieces over each other and sewed them down. The buttons are there strictly for decoration. I had every intention of adding the buttons- there is interfacing there and everything – but I realized that the buttons would gape open and look stupid, and also, they’re hard to close by myself because they’re in that weird spot in the middle of my back that I can hardly wash, let alone button. So this dress just slips right over my head. It’s a little bit of a wiggle, but it’s not too bad.

Oh, and I added pockets! The pattern doesn’t come with them, so I stole a pocket piece from another dress pattern in my stash.

McCall 6887 - Pineapple dress!

There’s an invisible zipper at the center back of the skirt, which helps with getting everything on. I actually had this zipper in my stash – it’s one of those dumb metal invisible zippers (seems like a good idea, until you try sewing one and realize that it’s basically impossible for it to be concealed, which is the WHOLE FUCKING POINT of a concealed zipper. And now we all know why these zippers don’t exist anymore), which I hate, but it was the perfect color, so I took one for the team and made it happen. Also, check out my matching serger thread – also from the stash! I love it when that happens 😀

McCall 6887 - Pineapple dress!

Here is the bias binding. There are two lines of stitching because I understitched the facing instead of pressing it with the first pass (here is my method for adding bias facing, if you missed that post!). Also, I cut a metric shit-ton of the bias tape and only used a fraction of it, so expect more pineapple bias facing in future blog posts.

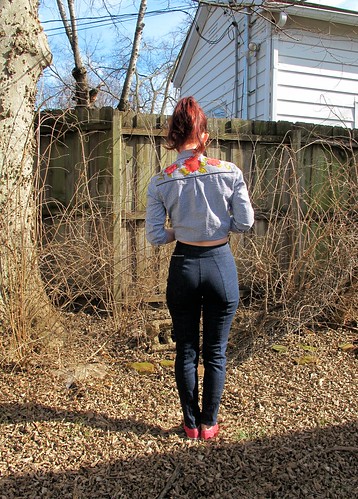
I don’t really have anything else to say about this pattern, so have another photo of the back:

McCall 6887 - Pineapple dress!

OH YEA.I definitely love this dress and I definitely plan on making more – I don’t even care if the open back is super one of a kind and that it’ll be obvious that I have several of the same dress. Whatever!

Ok everyone! So, as I mentioned in the title of this post – it’s time for another giveaway! Yay! Zazzle has generously offered to give one lucky reader a $75 gift certificate to spend on the ~custom fabric of your dreams~. You can design your own, or choose from the thousands of designs that they have available, and $75 is enough to get at least 2 yards out of most of the available designs. Below are some of my favorites (I seriously spent about 2 weeks agonizing before I finally settled on the watercolor pineapples), you can also see my entire wishlist here.

Citrus Lemon fabric

Citrus Lemon fabric

And, my personal favorite: this is what I found when I searched for “Butthurt” (look – I was waiting on car repairs and I was bored, and the Zazzle app is really entertaining, ok?):

All right! To enter this giveaway, just leave a comment on this post (PLEASE include an email address where I can reach you – you don’t have to enter it in the comment box, but it needs to be at least viewable to me from an admin end or I can’t count your entry 😦 ) and let me know what fabric you would choose if you won. If you want to tell me what you’d make with your amazing fabric, do that too! You know I like to be nosy 🙂 This contest is open WORLDWIDE, but you must be 18 or older to enter. Winners will receive the equivalent of $75 USD and are bound by the T&C of the Zazzle gift certificate. Entries will close one week from today, MONDAY, APRIL 27, 2015 at 6:30 AM and the winner will be drawn at random.

McCall 6887 - Pineapple dress!

Good luck, everyone!

** Disclosure: Zazzle provided me with this fabric free of charge, in exchange for a review. All opinions expressed in this blog post are my own, though! Also, I am an affiliate with Zazzle, so any purchases you make at Zazzle by clicking the links in this post will net me a small percentage of the sale. Which I will likely use to buy more custom-printed fabric from Zazzle. The end! 🙂

NYC Part 2: Touring the McCall Pattern Company

25 Aug

Ok, y’all, time for part 2 of my NYC journey – touring the offices of the McCall Pattern Company! Whoop whoop!

McCall Pattern Company Tour

Before I get too far into this post, there are a couple of things I’d like to address, as I’ve had some emails and comments about this:
– The McCall Pattern Company did NOT fly me into NY to visit their offices. Umm… I wish? I paid for my plane ticket all by myself, sorry!
– I did not come to NY specifically to visit The McCall Pattern Company – I was here to teach a workshop at Workroom Social. As soon as I announced my impending visit, I was emailed by Meg from McCall’s and offered an invite to tour the offices while I was there.
– Meg is the new Social Media Pro at McCall’s. If you’ve talked to anyone from McCall via Twitter, Instagram, their blog, etc – you were likely talking to Meg. I personally have known Meg for a couple of years now – well before she went into working for McCall’s – which is why she reached out to me to visit while I was in the city. Much to some the butthurt anonymous commentary on my blog, McCall doesn’t have a grand scheme of shutting me down (I mean, let’s be real you guys – I’m not hurting their sales when I post commentaries. There are a WHOLE lot of other sewists out there who don’t read my blog/don’t read blogs/don’t care about my opinion on Koos Van Den Akker. They still buy the patterns – some of the traffic coming directly from my blog. So there’s that.). They simply wanted to reach out and let me see the company, so, (in their own words) that when I’m talking my shit, at least I’m getting the facts straight 😉
– I’m sure there are people who are thinking about what a sellout I am right now. That’s totally fine. You do you! I got over that whole ~sooo underground anti-coporation~ shit when I was like 17. DGAF.

With all that being said – OMG! Longtime dream – accomplished! I’ve ALWAYS wanted to lurk around the offices of this pattern company (as much as I poke fun at them, it doesn’t excuse the fact that we are still talking about dream job territory here. Nevermind that I’m not a patternmaker in any sense of the imagination, nor do I plan to become one), so this was an absolute treat for me! Full disclosure – I went into the offices with every intention of taking lots of photos (hence my phone in my hand in, well, every picture haha. Wish that dress had some pockets!), but since I never end up doing what I planned, all the photos you see in this post were taking by Meg. Thanks, Meg!

McCall Pattern Company Tour

I got the grand tour, you guys – I saw every department, met sooo many people (except the CEO, who was unfortunately in a meeting when I arrived. Oh well! Next time!), and a few of them even knew who I was! So crazy!

One of the biggest things I learned was just how freakin’ small this company is! Sure, they had a hell of a lot more employees than any of the indie designers we know and love – but it’s not like there are thousands of them, scattered across the world in giant corporate offices, with a big fat CEO smoking a cigar in his silk bed jacket and laughing all the way to the bank (I mean, I know I just said I never actually met the CEO but I’m just gonna ASSUME here, you guys). Everything is done in-house in NYC – they produce the patterns for McCall’s, Butterick, Vogue, Kwik Sew, and even do Vogue Pattern Magazine. Each individual department is very small – some only having a couple of employees at most. It’s also one of those companies where everyone is basically family, which I just think is really nice and feels good to be around. Everyone was extremely friendly and clearly very happy to be there.

There are a LOT of rooms and departments – the fabric library (where they keep zillions of swatches, plus buttons and trims and notions and, oh god, it was heaven in there), drafting, dressmaking, customer service, in-house photography (complete with racks of clothing and even more racks of shoes aieeee), etc etc. All in all, I think I was there for about 3 hours – flitting around, chatting everyone up, getting all grabby hands on the various fabrics (and apologizing every few minutes. Forreal, my mom hates shopping with me because I’m incapable of not touching things. This is why I hate museums and love flea markets, haha).

McCall Pattern Company Tour
Checking out the fabric room and perusing the samples was one of my favorite parts. Sooo much eye-candy!

McCall Pattern Company Tour

This look of wide-eyed wonderment was pretty much plastered to my face the entire time I was in there, ha!

Another highlight of my tour was getting to finally meet the famed Vogue Pattern Designer, Carlos Correa (I didn’t get a photo with him, but you can see him chatting about some of the designer pieces in this McCall blog post). The very first thing he said to me was, “I LOVE YOUR BLOG!” hahahahaa!! Apparently, he reads it and loves the pattern round-ups (and I reckon he’s reading it right now, so HI CARLOS!). I spent a long time in his office, talking about the pattern and their styling vs how they look in real life, and saw some of the new designs for next season as well. I can’t say much about those, but what I can say is I kept going, “Oooh! I want one of those!” haha!

McCall Pattern Company Tour

I also stopped in the Vogue Pattern Magazine offices, to chat with the Editor and LURK THOSE DESIGNER DRESSES.

Did you know that the outfits on the Vogue American Designer pattern envelopes are actual designer garments? That was news to me! Take Vogue 1409, the Saber-Toothed Tiger dress, for instance. This dress literally came from the Donna Karan Collection – and McCall’s based the pattern off it, then used the actual dress in the photoshoot. It wasn’t sewn by them, nor did they choose the fabric (since it’s from Donna Karan). If you look inside, you’ll see all the tags – including the original price tag. This is much better explained on the McCall Pattern Blog, but that’s the general gist.

McCall Pattern Company Tour

With that being said, the next order of business was to try on the $10,000 Ralph Rucci coat.

Me: If it fits, that means I get to keep it, right?
Everyone else: lolololololol

Damn, that thing was a work of ART! I know I hated on the arm holes at one point (that’s such a random thing to hate on, ha), but seeing it in person absolutely made me change my mind (and I still think it looks weird on the envelope photo, maybe it’s just the way the model is standing?). The inside is amazing – all bound seams and even some hand stitches! Apparently there’s a whole Pinterest board for lurking the inside of the designer garments, so we can all drool from far away.

After that, it was obviously time to play dress-up. Because, duh.

McCall Pattern Company Tour

In another Ralph Rucci original (pattern is Vogue 1404), featuring the wind machine 😉 Also, those shoes are like 4 sizes too big.

McCall Pattern Company Tour

Obviously I had to try on the Guy Laroche purple nightmare (that is actually silk chaurmeuse) (pattern is Vogue 1416. The sleeves were cracking me up to no end.

McCall Pattern Company Tour

Hahaha!
(side note: holy shit I need to touch up my hair color)

McCall Pattern Company Tour

Ughhh WANT THIS COAT (pattern is Vogue 1419)

I had an amazing time visiting the offices and meeting all the wonderful people who work so hard to produce all these patterns (whether you personally love them or not, I think we can all agree that the sheer amount of patterns they put out every year is quite impressive!). I did bring up some personal beefs – the excessive ease, the styling situation – as I feel like these are areas that do need some improvement. My opinions were definitely heard, and some things were already in the process of being addressed before I even brought them up, thanks to customer feedback. The McCall Pattern Company is absolutely interested in what the consumer has to say, and they’re making a huge effort to reach out to the online sewing community and bridge that gap. I know it’s really easy to hate on the ~big guy~ for just being there (especially when it’s a faceless corporation), but at the end of the day – I want to support the sewing community and it’s future! I’m absolutely invested in doing whatever I can to bring home sewists more options, and that includes supporting the Big 4. It was such a treat to visit the offices and get to know the people who make things happen there.

If you have a question or a complaint about a pattern from the McCall Pattern Company – contact them! They don’t know there is a problem unless you tell them, and their customer service department is extremely dedicated when it comes to helping. Follow their blog to learn more about the company, Like their Facebook page, lurk their Pinterest. Don’t be afraid to reach out and chat them up if you have a comment or concern. I’d love to see the gap close between the Big 4 and Indie pattern companies – I mean, we’re all in this for the love of sewing, right?

McCall Pattern Company Tour
(me hanging in the styling room. I was told to pretend I was fixing my hair – I promise I don’t sit at every available mirror and preen, haha! Although my hair did look really good that day. Minus the whole I need-to-redye-it situation)

Now, I can’t stop thinking about that Ralph Rucci coat…
So, like, if I paint it... I have to sew it, right? ❤️
I am definitely going to sew the shit out of that pattern. Just need to find my perfect red wool.

Project Sewn: Hello, Dolly!

4 Feb

All right, dudes and dudettes – Project Sewn is up and running! This first week, the theme is Style Icon.

I’m just gonna be real with y’all – as soon as I saw that challenge, my personal motto started rolling through my head. The thing is – I don’t have a style icon. I honestly don’t have a person (or designer, or whatever) who I use as inspiration for my outfits. I mean, I like the way lots of celebrities dress and I’m no stranger to the siren song of a good Joan Holloway outfit, but as far as picking a particular person… naw. I don’t even know, y’all. In the end, I decided to go with someone who I admire as a person who just happens to have amazing style….

Project Sewn, Week 1: Style Icon

Project Sewn, Week 1: Style Icon

Dolly Parton!

Project Sewn, Week 1: Style Icon

I mean, who doesn’t love Dolly, amirite? She’s such an incredibly smart, funny, generous – and not to mention talented as HELL – woman… a true icon in my book. Speaking of books, have you ever read her memoir, My Life and Other Unfinished Business? Or heard about her program Imagination Library, which sends free books to kids to get them excited about reading? Or, hell, have you been to Dollywood?? This woman, she is amazing. She’s not just a style icon for me – she’s a real life icon, the kind of person I want to emulate.

Project Sewn, Week 1: Style Icon

Plus, Dolly (specifically circa 60s-70s) was no stranger to an overly decorated/borderline tacky western shirt. And, dammit, I wanted a western shirt! I’ve actually been looking for an excuse to sew one for years.

Project Sewn, Week 1: Style Icon

I made my entire outfit, obviously, but let’s talk about the shirt first. My fabric is a tiny check gingham seersucker from Mood. I used the Archer as my base pattern (lol, poor Jen, probably never thought her pattern would get used to make this sort of monstrosity SORRY JEN I LOVE YOUR PATTERN THO), and made a few modifications, beyond my normal ones of changing the sleeve placket, narrowing the side seams, and a different method for attaching the collar and collar stand. There’s quite a bit of piping, since we all know it’s not a real western shirt without gratuitous amounts of piping.

Project Sewn, Week 1: Style Icon

Adding the piping was really fun, and definitely adds some pizazz to an otherwise plain shirt. The piping at the back yoke and top of the sleeve cuffs was easy – I just sewed it along the seam allowance before attaching the other pieces. For the front yoke, I had to do a little bit of drafting and figuring out – I ended up tracing the front piece and cutting off where I wanted the yoke to hit (right above the pockets) and then drew my scallops with a french curve. To attach the piping, I first sewed it to the bottom of the yoke, clipped and trimmed and pressed and it toward the wrong side, and then laid the yokes on top of the front piece and topstitched along the piping. The raw edges of the piping are enclosed inside the yoke, so the inside of the front of the shirt is perfectly clean except for a line of topstitching. I think it worked out pretty well, if I do say so myself!

Project Sewn, Week 1: Style Icon

Once I had the shirt entirely assembled, less the pearl snaps and hem, I hung it on a hanger and stared at it for over a month. What to do next? I liked the way the effect was going, but it clearly needed some embroidery at the yokes to give it that western flair. I realized at the point that the tiny gingham check was working against me – any embroidery was going to get lost in all that action.

Project Sewn, Week 1: Style Icon

I had my epiphany right before I fell asleep one night – APPLIQUE! That would show up against the check, and it would still allow me to involve some of the embroidery I so desperately wanted. I knew I still had a piece of vintage barkcloth in my stash that would be perfect (I used the majority of it for my birthday dress a few years back, and have been hoarding the remaining yardage ever since!). I painstakingly cut around each rose and leaf, arranging the pieces so they would be mostly mirrored at the front, and attached them with fusible web to the yokes. Then I hand-embroidered around every piece – partially to keep them attached to the start, but mostly because I just loove the texture of hand embroidery!

Project Sewn, Week 1: Style Icon

I am pretty freaking THRILLED with how it turned out, what do you think??

Project Sewn, Week 1: Style Icon

The last thing my shirt needed was a little bit of pearl snap action! I got mine from Cowgirl Snaps on Etsy, and I couldn’t be more pleased with the overall experience. I actually bought both red and black pearl snaps, but once I got the shirt finished, black was the clear winner. Also, I just really love hammering shit in my sewing room, ok.

Project Sewn, Week 1: Style Icon

Ok, now let’s talk about the pants! I used a Theory stretch denim from Mood and my pattern is McCall’s 6440. This is my first version of this pattern (you’ve already seen my leopard pair, ooh la la), and I went through a BIG fitting curve with these. I initially cut the size 8, based on the finished measurements – and they were huuuuge! Pretty much every thing about them sucked except the crotch curve, basically. I spent an entire evening trying on, pinning, basting, trying on, repinning, basting, trying on… ad nauseam. I’m happy that they worked out in the end – they are SO fun to wear, and look super pin-up, yay! – but getting there was a process, plus the insides are full of thread tails from all that basting. Oh well!

Project Sewn, Week 1: Style Icon

Some gratuitous butt shots for ya. You’re welcome.

Project Sewn, Week 1: Style Icon

Oh, yeah, and in case you were wondering – I can also wear this shirt untied with the sleeves rolled down, like a proper Archer, which makes it much more wearable in day-to-day life 🙂

Project Sewn, Week 1: Style Icon

Now at this point, I’m sure you’re thinking, “Ok, fine, but where the hell are you going to wear that thing, anyway??” Guys. Guys. I live in Nashville. I’m not so stuck up my own butt that I’m not above rolling down to the tourist district and getting my Honky Tonk on. Let’s be real – Honky Tonkin’ is the best part about living in Nashville, as far as I’m concerned. OF COURSE you can go dancin’ in normal people clothes, but why the hell not throw on your best western digs and cowboy boots and dress the part? This being made of seersucker is even better – it’ll be much more comfortable come summer, compared to my RTW black cotton western shirt, especially with the looser style.

I’m also going to wear it just for the heck of it because, well, it’s awesome 😉

Project Sewn, Week 1: Style Icon

Also, in case you were wondering – I DO have cowboy boots! I just thought this outfit needed a little tone down from the ~country~, hence the Keds 🙂

Ok, hope you’re ready for some detail shots… I took a million :\….

Project Sewn, Week 1: Style Icon

The waistband of the pants is faced with more gingham seersucker. I love when my pants match my top, even if it’s only on the inside!

Project Sewn, Week 1: Style Icon

Don’t look too closely, but the embroidery on the front yokes is actually not a perfect mirror. Since the flowers weren’t printed to mirror, I had to get super creative with my cutting and appliqueing on one side, but I think it worked out quite nicely!

Project Sewn, Week 1: Style Icon

Sleeve placket + pearl snaps + piping = ♥

Project Sewn, Week 1: Style Icon

Yokes

Project Sewn, Week 1: Style Icon

Embroidery – the flowers are outlined in a 4 thread split stitch, and the leaves are outlined in a 2 thread chainstitch. I love the effect and textures with the applique and embroidery – it’s just a little bit Alabama Chanin.

Project Sewn, Week 1: Style Icon

Snaps to anyone who sat through this entire post! I have one gift for you, which I found while I was trolling the nets for Dolly inspiration (click for source):

dolly parton style inspo

NOW do you see why I chose her as my inspiration? God, I love that woman.

Project Sewn, Week 1: Style Icon

Now head on over to Project Sewn and see what everyone else has been up to! Don’t forget to vote for your favorite!

Completed: Some Fabulous Silk Birds

17 Jul

I am just going to preface this post with a warning: This is my VERY favorite thing I’ve ever made. Forget everything else up to this point. This here, this is the winner.

Also, I tried REALLY hard to cull down the number of pictures, but there are still a lot. Sorry, not sorry.

Marc Jacobs Birds

I initially saw this fabric on the Mood Fabrics Instagram (which, if you’re not lurking that – WHY NOT, THEY POST THE BEST FABRICS!!). Isn’t it fabulous? I immediately called the store and had them set aside 4 yards for me. When I finally had it shipped all the way to Nashville, I was amazed at just how wonderful it was in person. The designer is Marc Jacobs, and it’s a soft silk Georgette with a gorgeous drape and some incredibly saturated color.

Of course, I had no idea what I was going to do with 4 yards of bird silk Georgette. I hoarded it for about 2 months, while plotting and planning.

Marc Jacobs Birds

I had a Sewing Epiphany while on the way to work one morning (does anyone else have those? Aren’t they so awesome?) and realized that the print would work perfectly with a 40s style dress – and the drapiness of the silk would be a 100% match for McCall’s 6113. Yes, the same pattern I used for last month’s Mood dress. What can I say – I love this pattern, and I want to make a million of it’s babies.

Marc Jacobs Birds

Since this was my first time sewing with silk Georgette, I spent a few weeks devising a game plan and learning all I could about this fabric before slicing into my yardage. Georgette – or, at least, this Georgette – is on the sheer side, so it was going to need some sort of underlayer to keep things opaque. I didn’t want to underline the dress and compromise the flow of the fabric, so I decided to make a slip to wear underneath. Bonus: this is quite handy on a windy day! Already tested that theory 😛

Marc Jacobs Birds

I used french seams to construct the entire dress, except at a few sections where it was impossible to sew them – such as the curved yokes. For those parts, I pinked the seams to keep them from fraying. I also stabilized the fabric underneath the yokes with a piece of black silk organza. Since the Georgette is so lightweight and that area gets so much stress, I wanted to give it as much support as possible. I also found the use of my walking foot quite helpful while assembling the dress – it kept the layers from shifting (and me from crying tears of frustration).

Marc Jacobs Birds

Despite having made this dress twice already (my red wool crepe version, plus a boring ol’ muslin), I still encountered some construction challenges unrelated to the fabric. For one, the sleeves gave me HELL when I was trying to set them in. I don’t even understand how it happened – they eased in perfectly with the crepe, but for some reason, it just didn’t work with the Georgette without including a lot of unwanted puckers. I was stumped and let the dress simmer for a few days on my dressform. I even considered leaving it sleeveless, no lie.

Marc Jacobs Birds

Fortunately, I remembered that Casey posted a tutorial on excess sleeve ease on her blog a couple years ago, so I followed the instructions for redrawing the sleeve cap and crossed my fingers.

Marc Jacobs Birds

I am happy to say that it worked! I’m so glad I was able to figure it out – the sleeves really make the dress!!

Marc Jacobs Birds

Marc Jacobs Birds

Marc Jacobs Birds

I just think this pattern is SO PERFECT for such a bright print! Isn’t it beautiful?

Marc Jacobs Birds

I even got super fancy and put a (non-functional) fancy button where the front of the dress fastens.

Marc Jacobs Birds

Marc Jacobs Birds

Marc Jacobs Birds

Marc Jacobs Birds

Now, let’s talk about my slip! I am going to post pictures which I realize is essentially me in my underwear, so bear with me here.

Silk Slip

I’m not going to lie – like 99.9% of the reason why I decided to go with the matching slip was so I’d have a chance to get my hands on some 4-ply Silk Crepe. I’ve heard some amazing stories about the stuff, but never had a chance to try it for myself. It tends to run on the expensive side (truth, this silk crepe cost more than the silk Georgette!), but a slip doesn’t require a whoooole lot of yardage, so I sucked it up and put in my order. I didn’t know what to expect when the package arrived at my door.

Silk Slip

People. This stuff is INCREDIBLE. Throw out any mean thoughts you had about silk and focus on the 4-ply. It’s not at all slippery – even when I was cutting bias pieces, the fabric stayed put. It’s nice and robust and opaque, and it feels amazing against the skin. It presses beautifully and sews like a dream. I was extremely skeptical before I properly introduced myself, but I really think it deserves the hype.

Silk Slip

To make the slip, I used the free Ruby Slip pattern. I spent a lot of time redrafting shit to get it to fit right, and it was kind of a nightmare and I kind of almost gave up (no hate on the pattern itself – I’m just VERY particular about how my slips fit!). I started with the size 8, made a lot a lot a lot of changes, and I’m just going to list them here:
– The original bodice was very small, so I added a 1/2″ FBA using the sew-along tutorial. Truth, I tried to get away with not doing this (I wear a DD cup, but let’s be real here – the only thing “big” about my boobs is the proportion, not the actual size, kwim? I could totally fit into like a C cup if the band was small enough), but my first muslin informed me otherwise.
– I then redrafted the bodice to include a center front seam and underbust gathers, following this tutorial.
– My second muslin showed that now the bodice was too big at the center front, and the gathers were sitting in such a weird place… I looked like I had puffy nipples. So awesome, except not. I wish I could tell y’all I did some mathematical pattern drafting magic and fixed it, but honestly I pinned that fucker to my dress form and manipulated it until I had a decent fit. I pinned out a chunk of the center front seam, redistributed the gathers, and chopped about 1″ width off the back midriff. I readjusted the side seams of the skirt (that shit fit almost perfect with no adjustments, thank god) and crossed my fingers.
– Since the new back midriff was slightly (I’m talking 1/2″ or less) smaller than the skirt, I cut that piece on the bias and carefully eased the two pieces together. I think the result is pretty good – it fits my small back, and the bias makes it easy to pull on and off!
– I also cut about 5 1/2″ off the hem of the skirt. It was long, and I need this slip to be shorter than my skirts!

Silk Slip

Silk Slip

Finally, I added some beautiful lace around the top and the hem, and a little self-made bow in the middle of the bodice. The straps are just satin ribbon outfitted with strap adjusters and rings – very easy to put together.

Marc Jacobs Birds

Now, here’s the real question: I still have like a yard (maybe more) of this bird fabric left. WHAT SHOULD I DO WITH IT?

Completed: 40s Wool Crepe Wrap Dress

12 Jun

I know, this dress looks strikingly similar to the 40s wrap dress that Peter made for his identical cousin Cathy earlier this month, not to mention I’ve already dabbled in wool crepe for summer wear, as well as a full 40s wool crepe dress. Yeesh. Ya think it’s possible for me to branch out a little here? Nuh uh, no way. Not me.

Red Wool Crepe 40s Dress

I actually bought this fabric ‘way back when I was visiting Mood Fabrics in NY. I’m sure y’all are sick of hearing about it at this point, but heyyyy I’ll be working through that stash for at least the next couple of months. Just so we’re clear.

Anyway, fabric. As I mentioned before, I wasn’t planning on buying any wool crepe – but again, Carolyn talked me into it. She’s SUCH a good enabler! This wool crepe is actually a bit thinner and drapier than most wool crepes I’ve come across, making it a good weight for a smart summer dress (oh god, did I really just describe a dress as “smart”? I am totally stuck on this 40s thing…). With Carolyn’s advice, I underlined the entire dress in a lightweight cotton batiste, to combat the slight sheerness and make the dress more comfortable to wear in the heat.

McCall 6113

I used McCall’s 6113 to make this dress up. Isn’t the pattern gorgeous!? A friend found it (along with an entire paper grocery bag full of patterns – ranging from the 40s to the 80s, all in my size. I MEAN COME ON, WHAT ARE THE ODDS) in her attic, and gifted the whole stash to meee! Yes!! The pieces are intact, but unfortunately… the instructions are not. Wah wah. Thankfully, I’ve made a few wrap dresses in my day, not to mention I feel fairly confident in my assemblage skills, so I decided to give it a go.

McCall 6113 - pattern piece

… this is what I found when I pulled the pieces out. Not only is everything labeled (thank you, printed patterns!), but there are construction notes printed ON the pattern sheet, AND the notches are numbered in the order that things go together. PRAISE THE LORD. Although, in all honesty… I probably could have put this together without the help. But MAN, it was nice to eliminate most of the guesswork!

Red Wool Crepe 40s Dress

Despite the pattern being in my size, I did have to make a few adjustments to get everything to fit nicely (I generally like to go down a size or two – sometimes more – since I find most patterns tend to have more ease than I prefer to wear. Yep, even vintage patterns. What gives; am I just in denial of my size or something??), mainly in the form of taking in the side seams and shortening the shoulders, as well as hacking about 5″ off the length. I made a muslin for fit, but it ended up also giving me a great idea of how the pattern was put together so I had less guesswork with my wool crepe. Which is good, since wool crepe can be a sneaky little bitch when it comes to ripping out stitches.

Red Wool Crepe 40s Dress

In hindsight, wool crepe is definitely a little on the bulky side for the gathers in this dress. I’m afraid I look a bit boxy at the waistline here 😦 Oh well!

Red Wool Crepe 40s Dress

I do love the little tucks in the back 🙂

Red Wool Crepe 40s Dress

And the curved hem at the overlap.

Red Wool Crepe 40s Dress

I don’t know what’s going on with this picture, I just thought it was funny. ~Maybe she’s born with it, maybe it’s Maybelline~

Red Wool Crepe 40s Dress

Oh, did you notice my pretty embroidery? This all happened entirely on a whim – I finished the dress, put it on and looked in the mirror, and it just looked… red. Overwhelmingly red, and plain! I decided to add a small punch of (neutral)color by embroidering the shoulder detail. The embroidery is from the Hoop Love Vintage Transfers Flickr Group, and it’s all just a basic back stitch with french knots in the middle of the flowers. Ha, that sound so easy but it seriously took me about 6 hours to do. Embroidery is definitely a time-suck!

Red Wool Crepe 40s Dress

Here you can see the underlined inside, as well as the series of snaps and hooks that hold the dress together.

Red Wool Crepe 40s Dress

And there it is closed!

Red Wool Crepe 40s Dress

How many of you will groan if I finish this post with something like, “WELL I GUESS THAT WRAPS IT UP!!”

Sorry.
Not sorry.

Completed: Red Thurlows & McCall’s 4488

22 Feb

I know it’s only February, but try telling that to my spring fever! GAH can it go ahead and get warm here already!? Since I can’t control the weather (something I’m still waiting patiently for, as well as for my own Hoverboard and Jaws 19), I can at least get a head start on pulling my warm-weather wardrobe together, yeah?

Red & Seafoam
I said I wanted red pants… and I got my red pants! This is my second incarnation of the Thinlows, btw. Those are totally Thurlows hiding within those skinny legs.

Red & Seafoam
Since the red cotton twill I used does not have any stretch, I was very careful about how much I tapered down these legs. As much as I love the super-duper skinny legs, I think I’d need a little bit of stretch to get my foot in there!

Red & Seafoam
Thinning these down was… interesting. I scrapped my original pattern mash-up and properly retraced each pattern piece. Then, I straightened the line of the flare with a long ruler. I made a quick muslin using some thick denim I had lurking in my stash – I wanted to make sure these would be wearable, as I’ve only made Thurlows with fabric that had some give. I was also able to pin out a little more excess from the sides, and transfer that to my pattern pieces. Sewed them up, and everything fits. Yay!

Red & Seafoam
There’s a bit of pulling at the crotch, as you can see – the pants themselves feel fine (not too tight, not too loose), so I’m not sure if many this has something to do with the lack of stretch? Hm.

Red & Seafoam
The only other pattern adjustment I made was to shift the pockets about 1″ toward the side seams. I noticed in my muslin that I needed to sew inside the back extension line to prevent gappage, and this was making the pockets come close to touching. Now they sit in the right place, however, I think next time I need to shorten them. The proportions look a little off. Not that you can tell from this picture at all, but eh.

Red & Seafoam
I’ve also got a little wrinkling under the butt. Not too bad, but it’s there.

Red & Seafoam
To complete my ~come hither spring~ outfit, I used this amazing seafoam rayon jersey to make McCall’s 4488 (a pattern from the 70s). It’s hard to capture this exact color in my photos (look at the picture Mood has on the site, it’s much more accurate), but I LOVE IT. Pretty sure this shade of seafoam goes with every color I own.
Also, that top was a bitch to make. I have no idea why – I made the crop top before and it turned out fine (and BEFORE YOU SAY ANYTHING, they use the same pattern pieces up top, ok!) – but this lil shit was out to get me from the get-go. After a lot of cutting and cussing, I think I fixed it. I just have to be careful about those gathers over the boobs. If I’m not careful, things can get a bit… nipply.

Red Thurlows

Red Thurlows
Check out that floral cotton print lining! Oooh, fancy!

Red Thurlows
God, I just want to take my pants off and show everyone. The lining, I mean.

Red Thurlows
This is only slightly related, but check out the gorgeous button hole my machine makes! FUCK.

Red Thurlows
I think this might be the best-looking welt pocket I’ve ever made.

Seafoam top

Seafoam top
I really love that I got to dig into my stash of weird colors when it came time for serging everything. True happiness is having seafoam green thread, guys.

Red & Seafoam

Come on, spring!