Tag Archives: trousers

Completed: Dotty Jamie Jeans

12 Jan

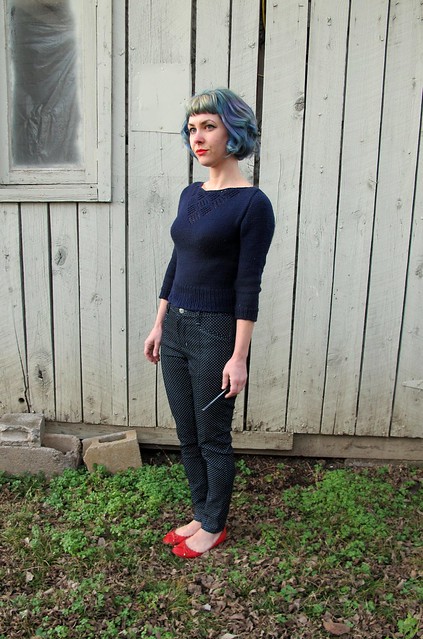
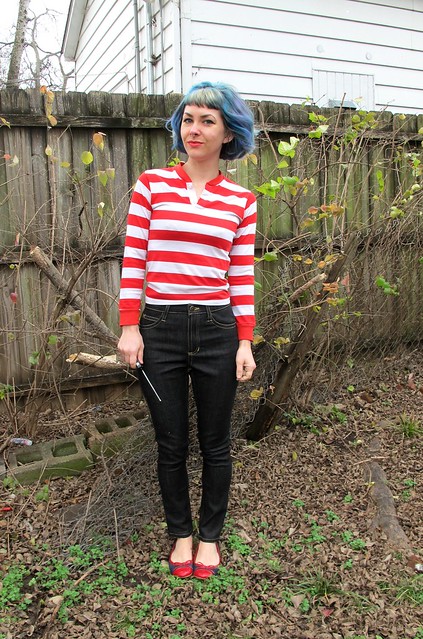
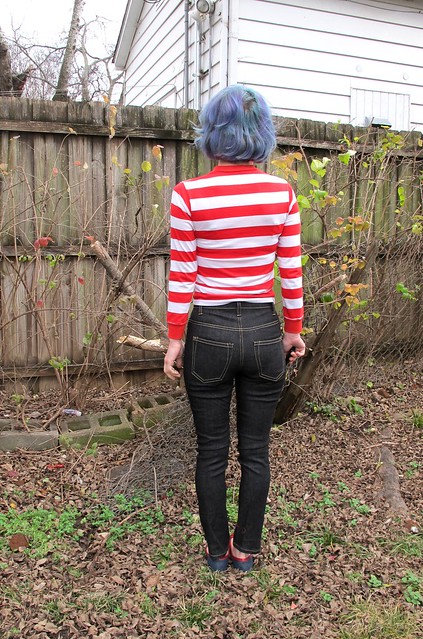
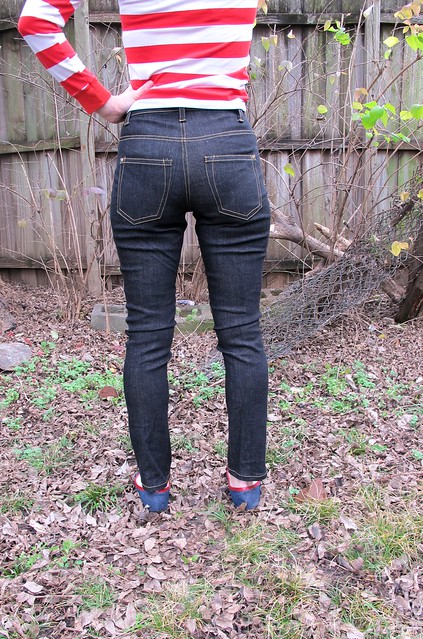
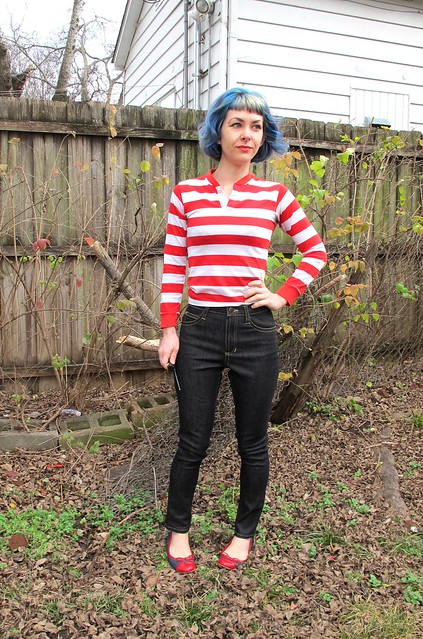
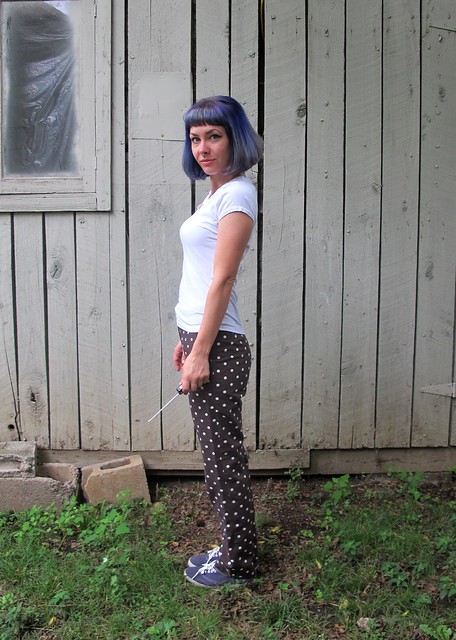
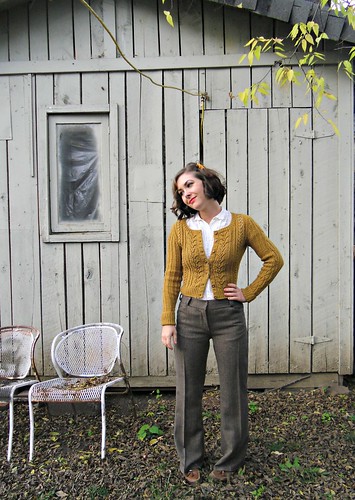
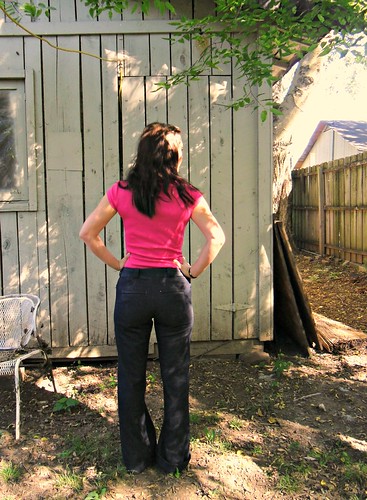
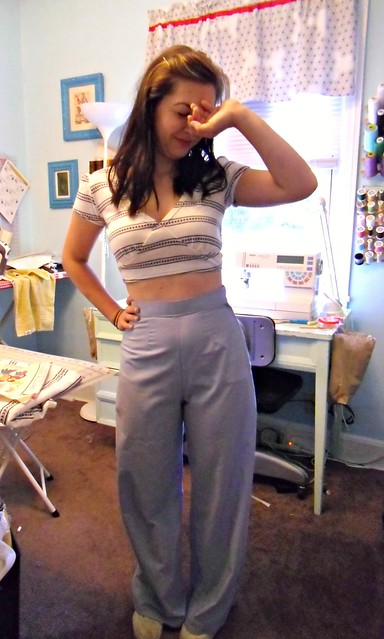
In case you couldn’t tell, I spent the first weekend of 2015 making pants. You already saw my Ginger Jeans – now let’s revisit an old favorite! My beloved Jamie Jeans, I knew we’d meet again! ♥

Dotty Jamie Jeans

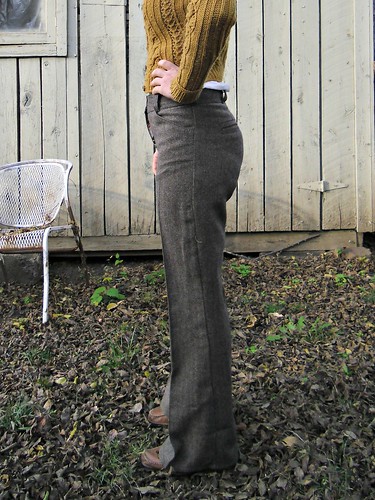
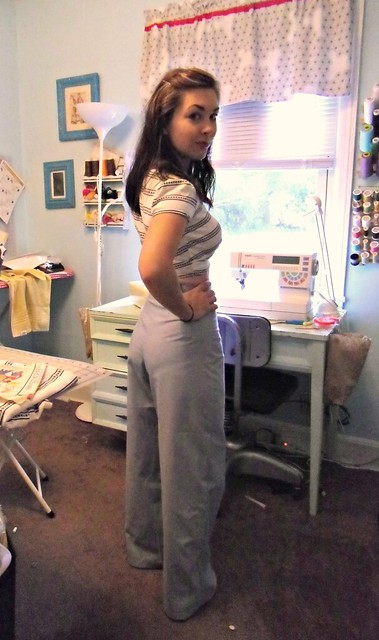
Ever since I made my first pair of Jamies in black stretch twill, I knew I wanted to make this pattern up again. I had a couple fitting changes that needed to be addressed – mostly reshaping the crotch (which I did on my original pair after they were sewn up, so it wasn’t reflected on the flat pattern) and pinching out some excess from the inseam. Knowing that the fabric I was using had considerably less stretch than the twill I used for the first pair, I decided not to remove any additional sizing/width, as that can be fairly easy to tweak during final fitting.

Dotty Jamie Jeans

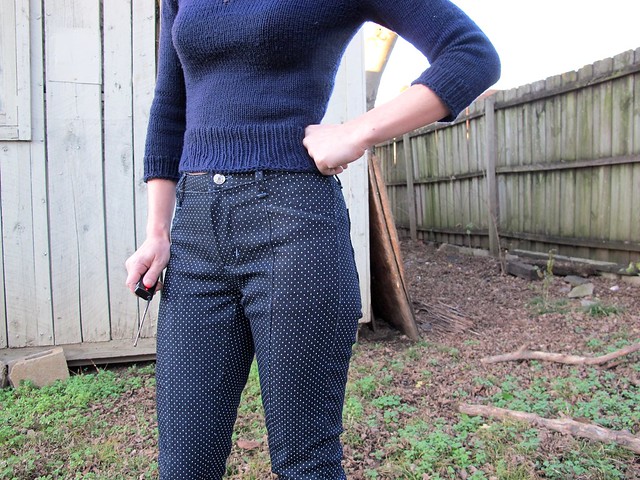
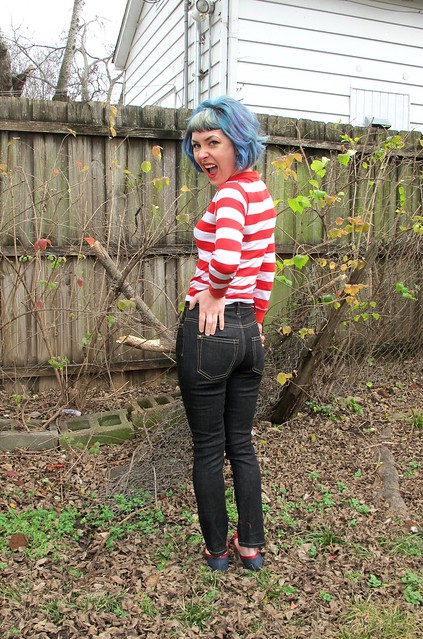
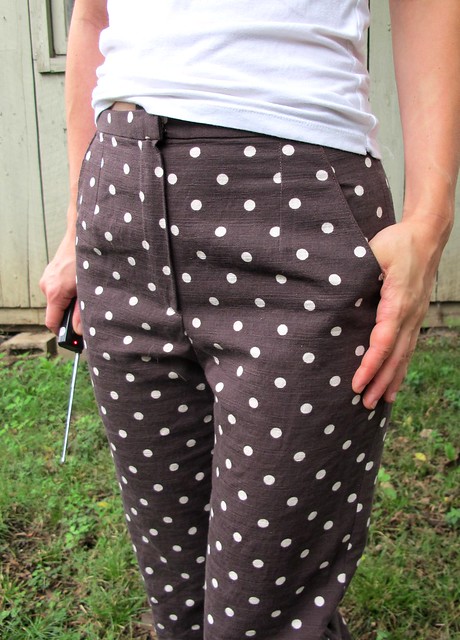
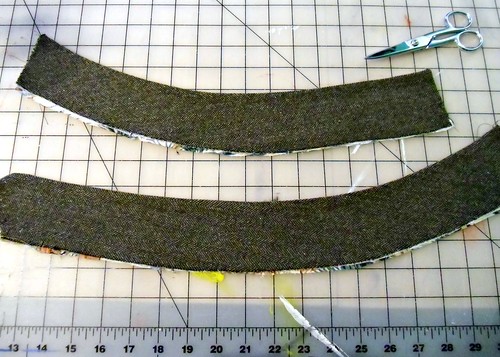
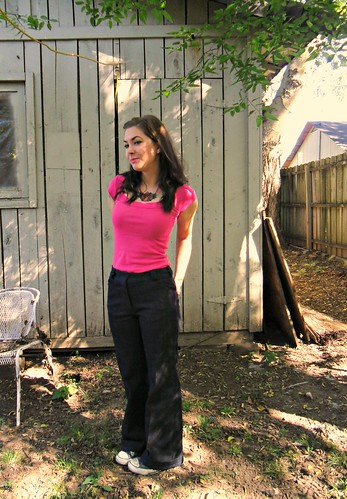
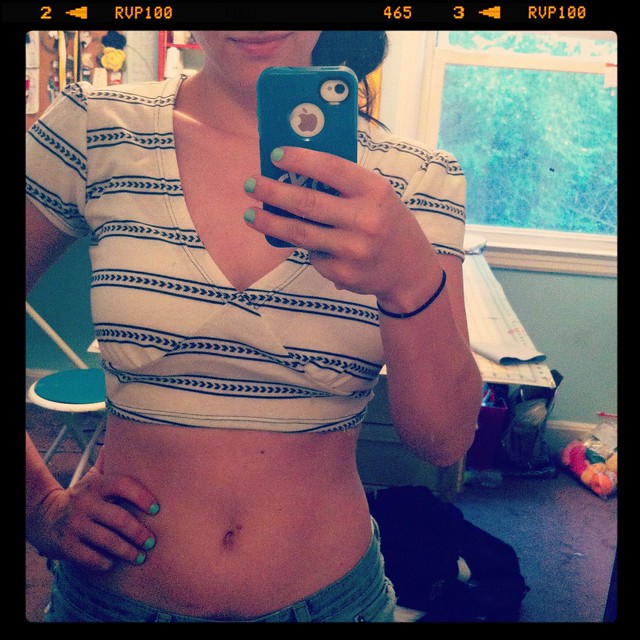
I love this dotty fabric! You can’t see it too well (wait for the close-ups), but it’s a dark navy denim with tiny white pindots all over. LOVE IT. Been looking for something similar to this for yeeears. I actually found this magical piece of beauty all the way in Paris – it’s one of the fabrics from my coupon haul. I can’t remember exactly how much I paid for it, but I think it was around 10€ for 3 meters, give or take. A few other fellow meet-up-ers were also lurking on this shit, but thankfully there were quite a few pieces to go around, so everyone who wanted some went home with one 🙂 Yay!

Dotty Jamie Jeans

Dotty Jamie Jeans

Dotty Jamie Jeans

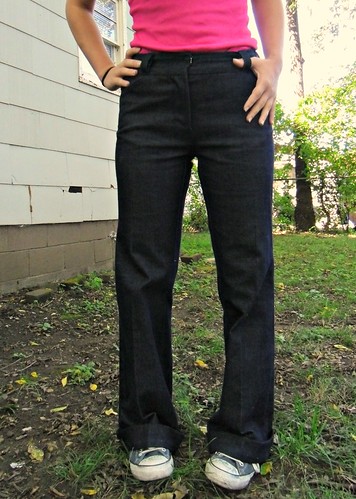
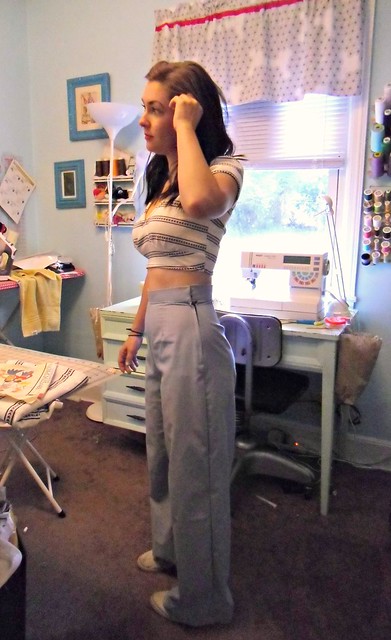
It’s kind of a peculiar fabric – a medium weight denim twill, and the dots are painted on (not printed). I can’t be 100% certain, but this may be the piece of fabric I accidentally dyed all of Landon’s undershirts with (sorry, Landon!). The back side does look like it bled a lot, but I also threw some black silk into that load – so who knows? Anyway. The fabric does have stretch, but not nearly as much as the twill – so I’m really glad I left off my additional sizing changes from the original pair (I believe I took out 1/2″ at the side seams, and even more at the center back and down the legs), because these are pretty snug as is! The denim is very stiff, but I’m hoping it relaxes a little more as I wear them. As of this posting, the only time I’ve worn them was during a really cold day, and I had on tights underneath to stay warm. Tights don’t make these pants super comfortable, but, then again – no pants are comfortable with tights underneath. So there’s that.

(Don’t look too closely, but I accidentally gave myself a weenie in one of those pictures lololol. Y’all are just lucky that I have no idea how to photoshpo that shit out haha)

Dotty Jamie Jeans

Dotty Jamie Jeans

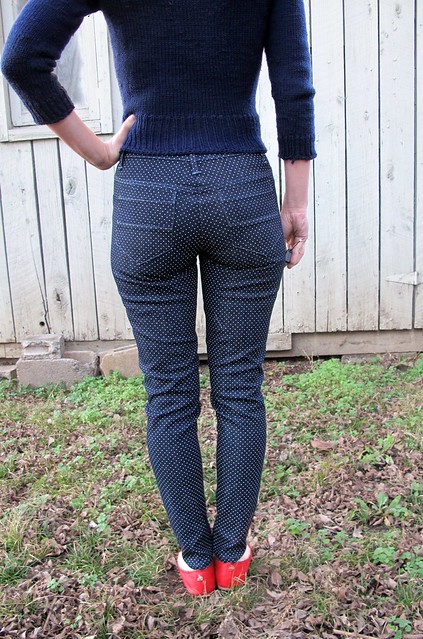
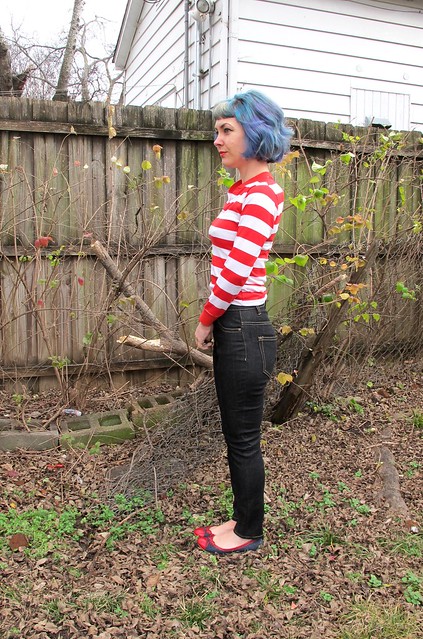
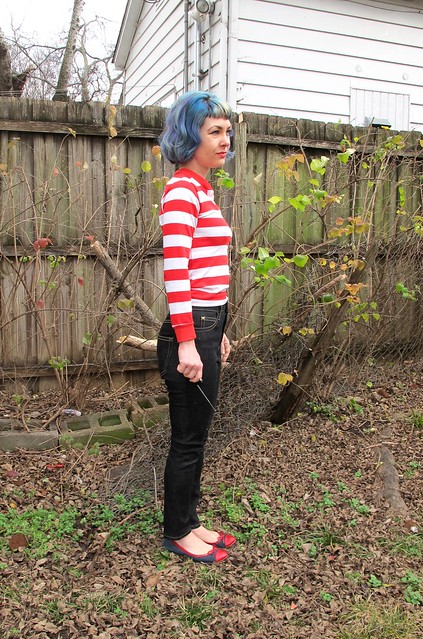
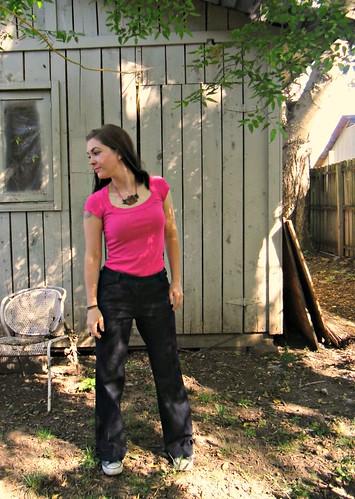
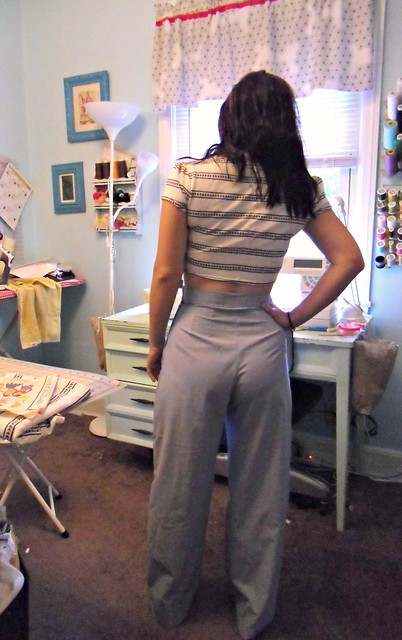
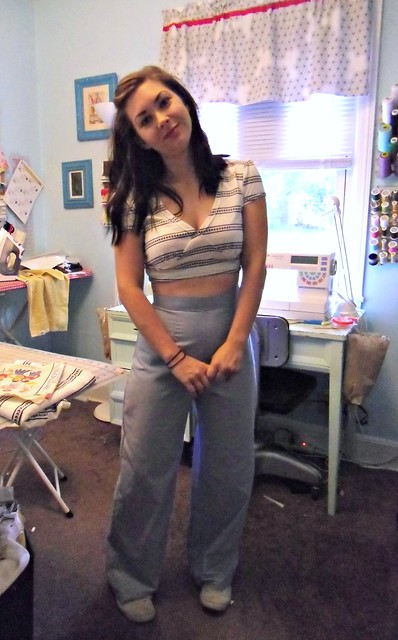
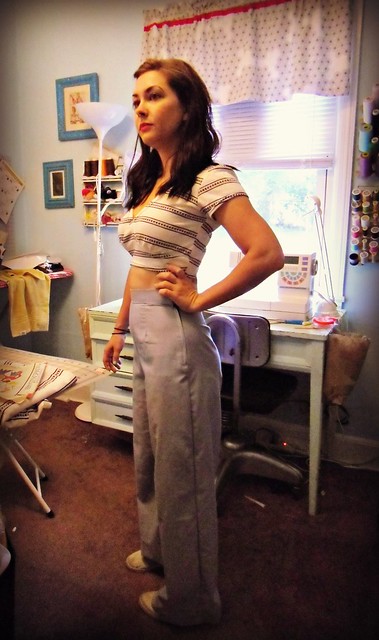
I think they fit quite a bit better than the black pair I made, but there’s still definitely room for some improvement. Need to shorten the crotch length just a little more, and also remove some more width from the upper inseam. I also need to add some width to the calves – they are REALLY tight, like painted-on tight. It’s not uncomfortable, and I don’t think it looks bad – but I also can’t wear tall socks with these pants haha. Which I guess doesn’t matter for this particular pair, bc I think they look best with ballet flats, but, you know. Future Jamies. Fuck. I’ll get it eventually!

Dotty Jamie Jeans

Dotty Jamie Jeans

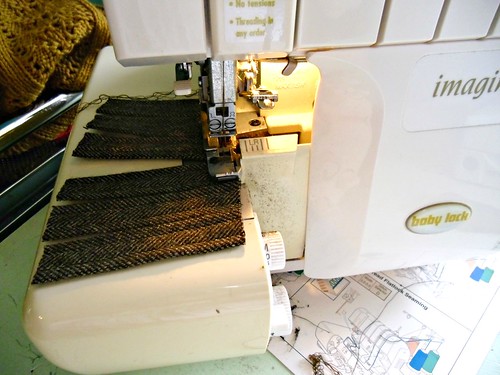
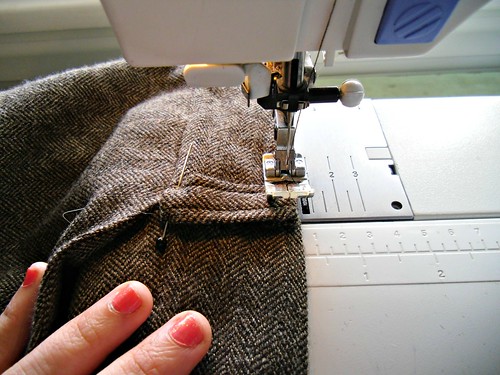
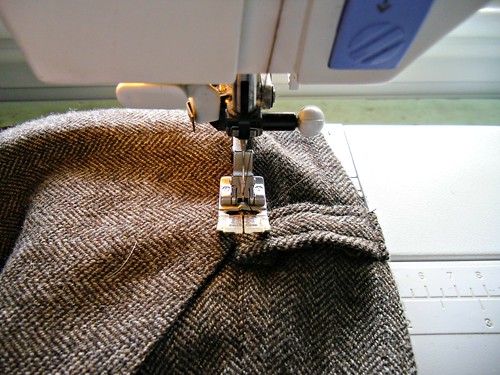
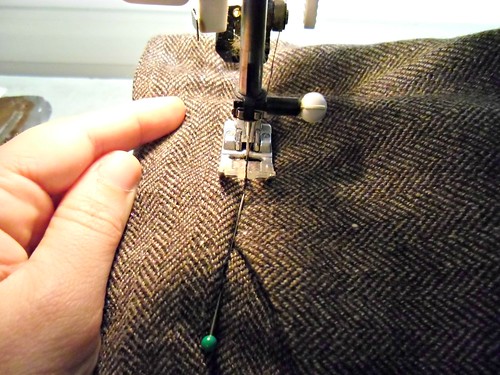
Having made these before and writing such a long post about the construction and fitting process, I don’t think there’s much else to add. I guess it bears noting that I didn’t bother with flat-felling the seams like I did on my jeans – I just serged and topstitched and called it a day.

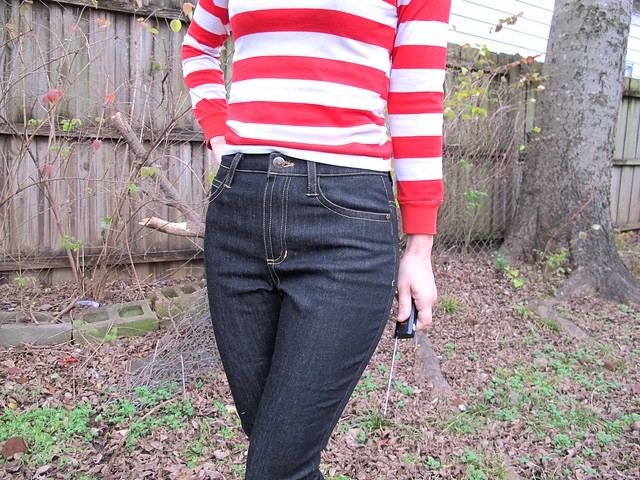
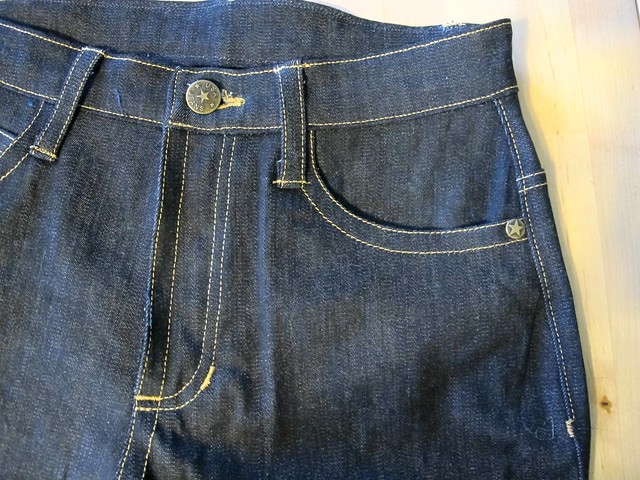
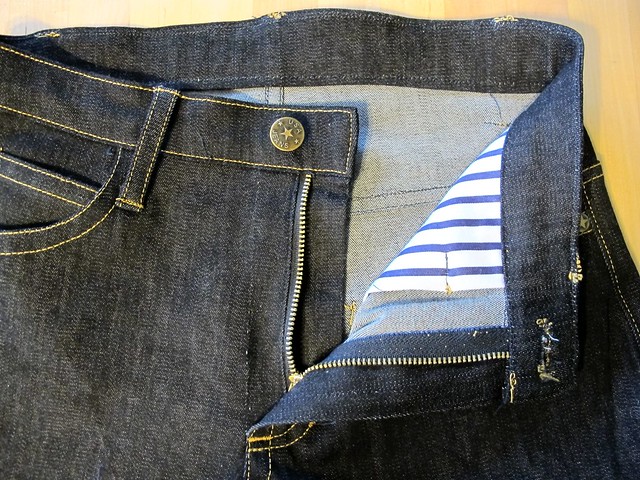
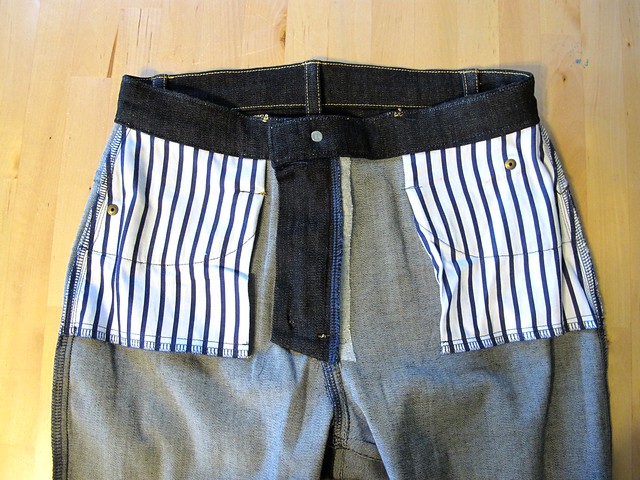
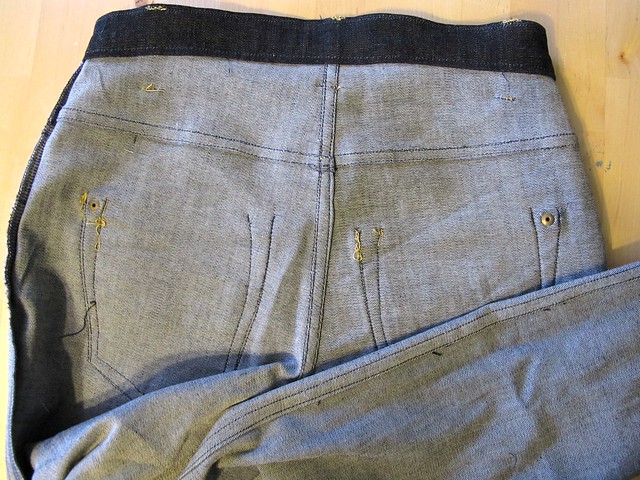
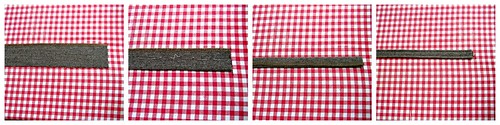
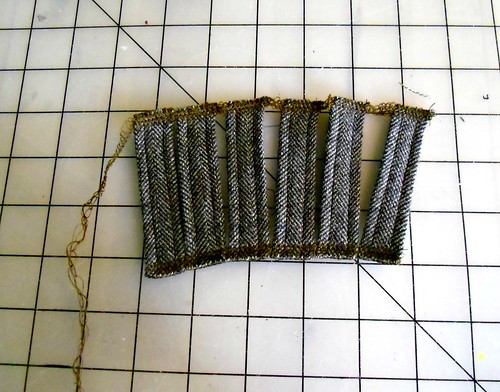
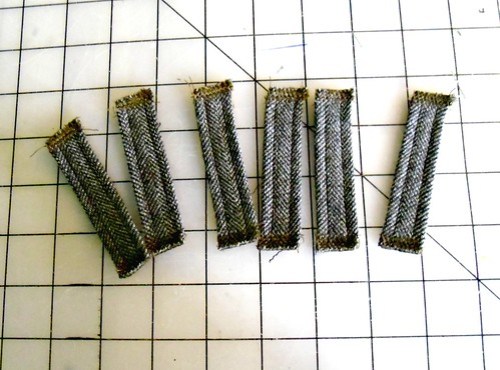
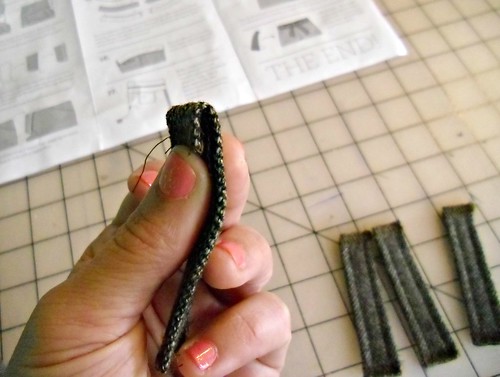
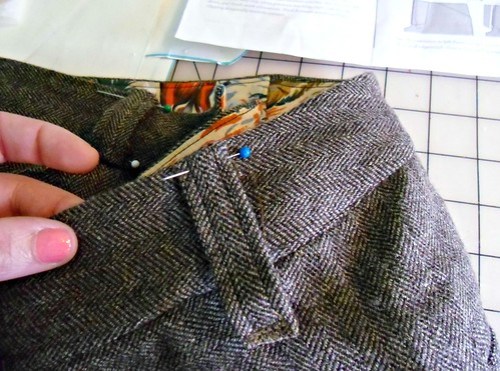
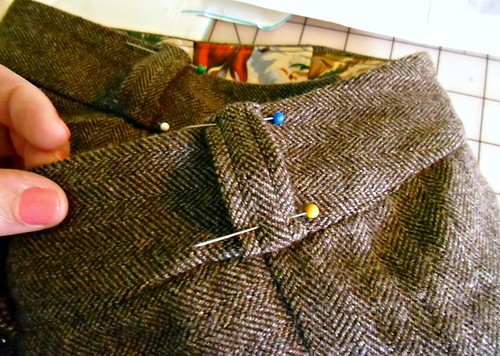
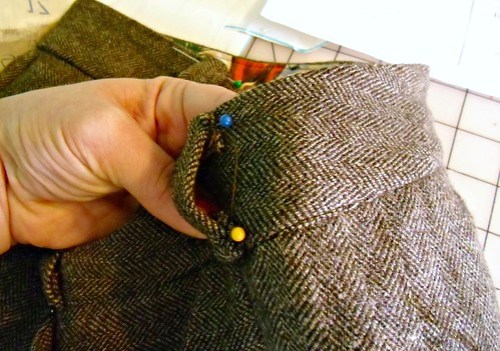
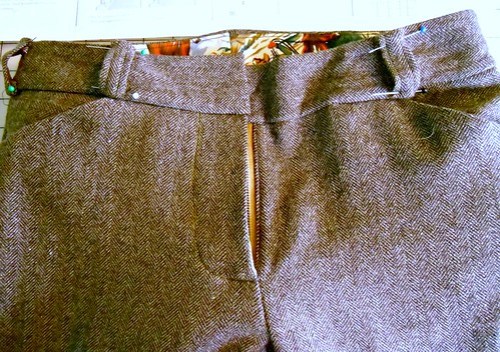
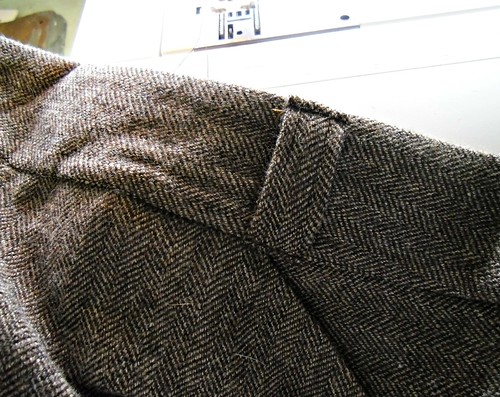
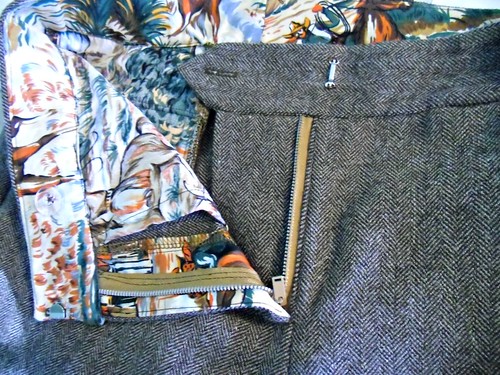
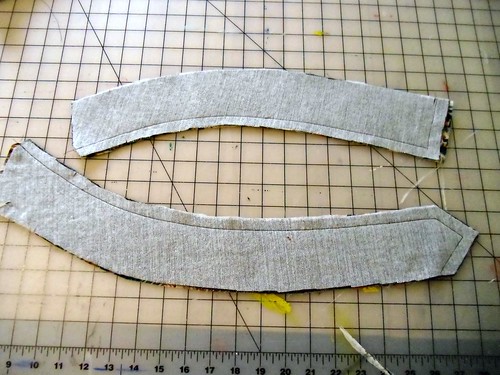
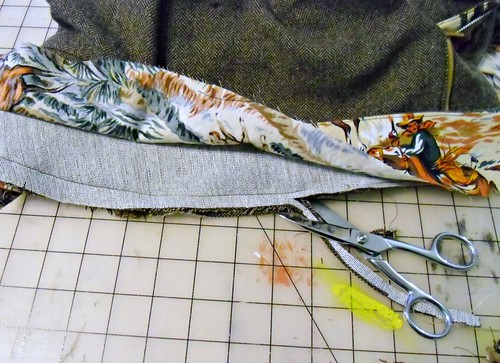
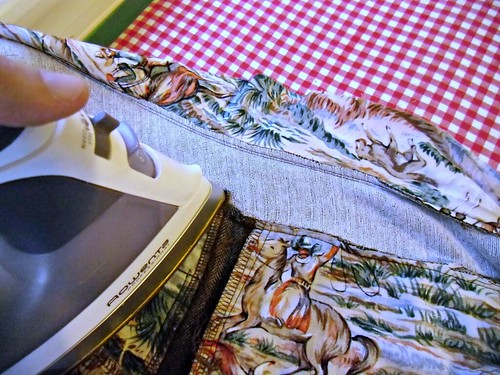
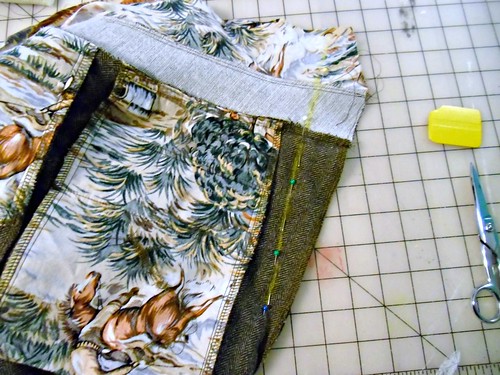
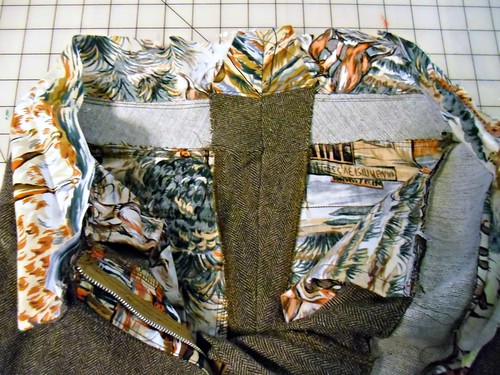
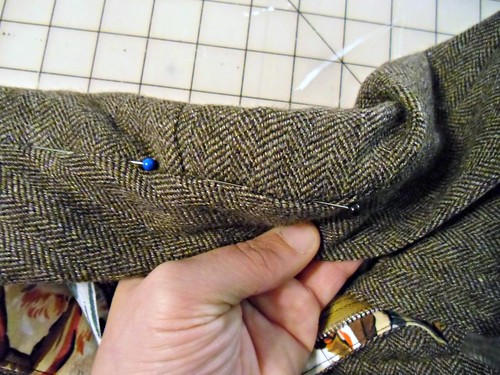
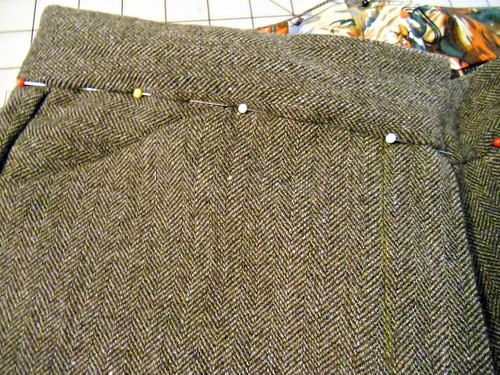
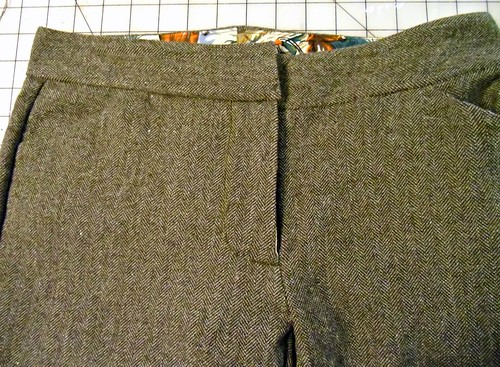
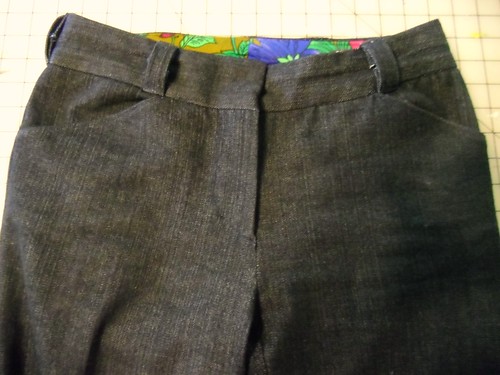
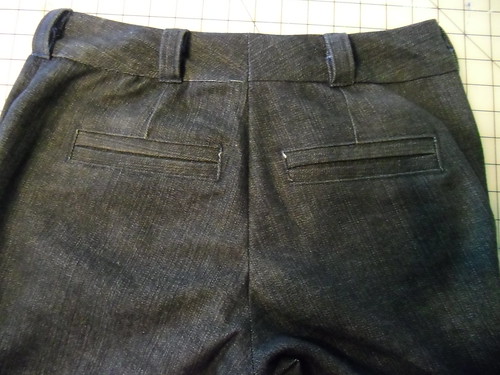
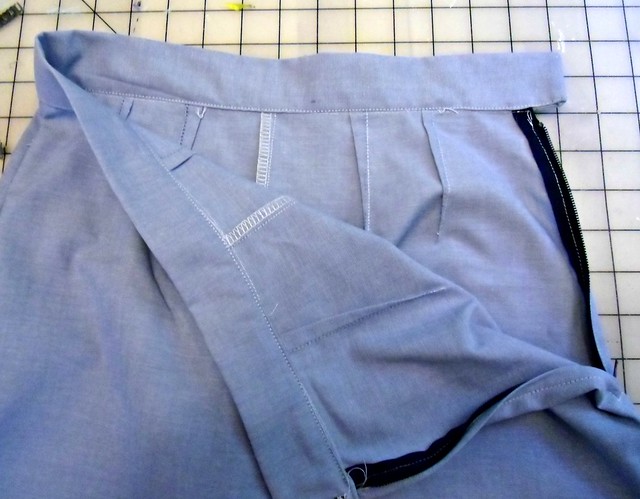
Oh! I can talk a little about the waistband. Since the denim wasn’t as beefy as the denim for my Ginger Jeans, I did interface the waistband. I used lightweight knit fusible for the facing side. I love this interfacing because it gives a minor amount of support (enough to keep the waistband from collapsing on itself), but it doesn’t affect the stretch factor. Which means they’re still comfy, woohoo! Also, one fitting change I made for this pant – and possibly future pants, maybe – was to cut the one piece waistband into two pieces, so they can angle right at the center of my lower back (pretty much the same waistband as is on the Thurlows). This produces a much better fit than the single piece waistband does for me. There is a seam there now, but it’s covered by the back belt loop.

Dotty Jamie Jeans

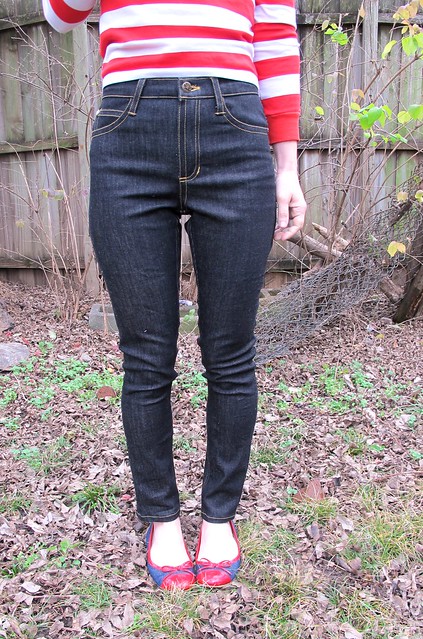
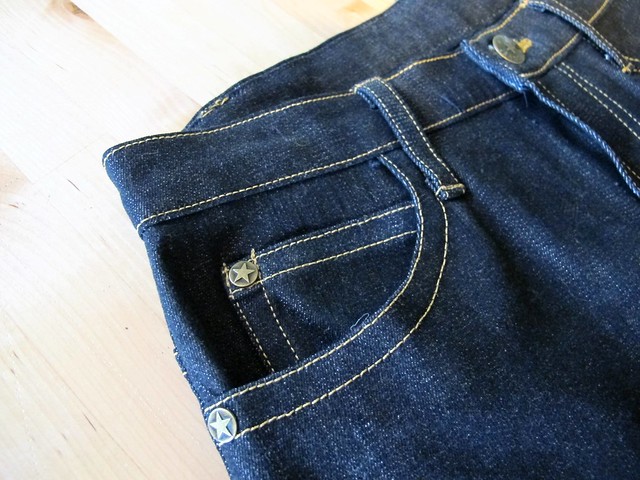
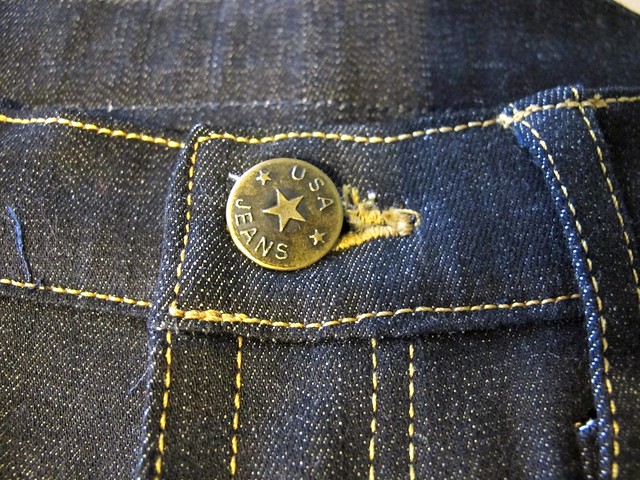
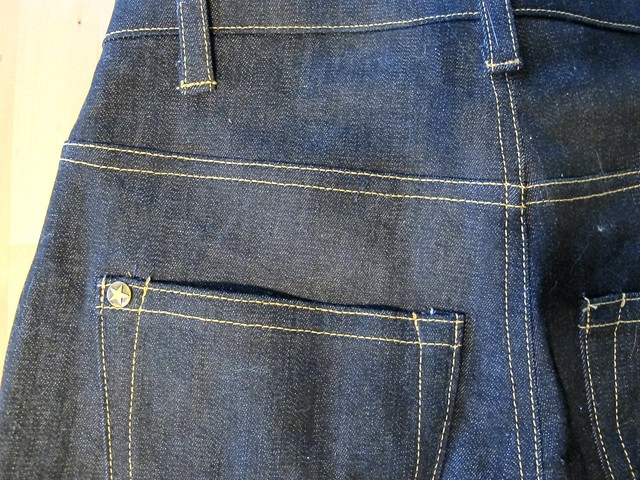
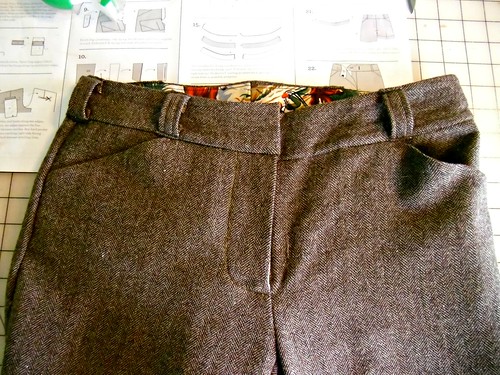
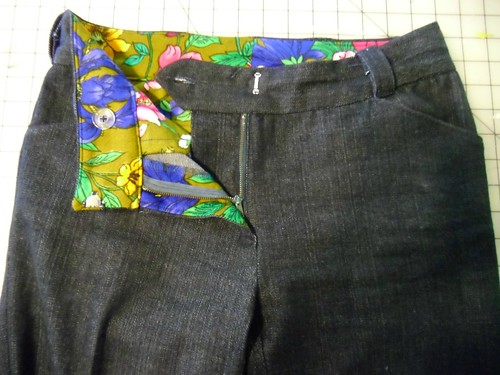
NOW you can see the dots! And isn’t the topstitching pretty? I used light blue denim topstitching thread (it ain’t anything fancy – just a spool of Gutterman that I picked up from Joann’s), which gives an interesting contrast to the dark blue fabric. The silver jeans button is also from some class of big box fabric/craft store (either Joann’s or Hobby Lobby, I don’t recall) – I bought a pack after the button on Landon’s Gap jeans wore a hole through the waistband and fell out. You know what, after typing that, I don’t feel bad about dyeing his tshirts now. Who do you think sewed a patch on those jeans and hammered in a new button? ME, that’s who. Just don’t tell him how much I secretly enjoyed it hahahahaha

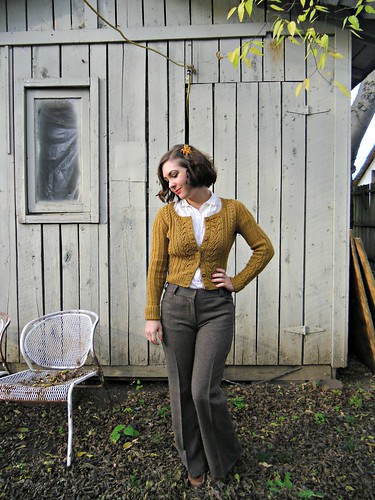
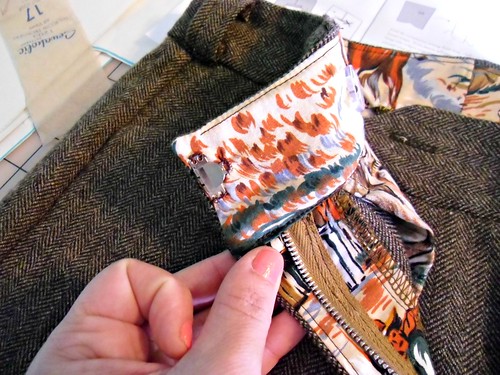
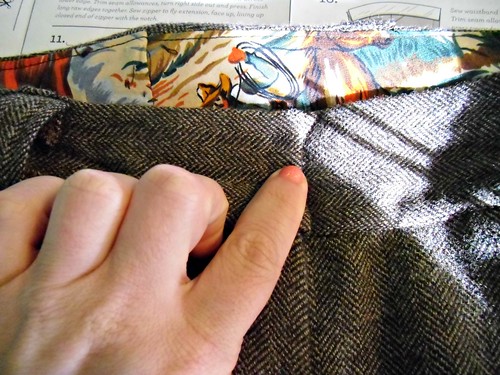
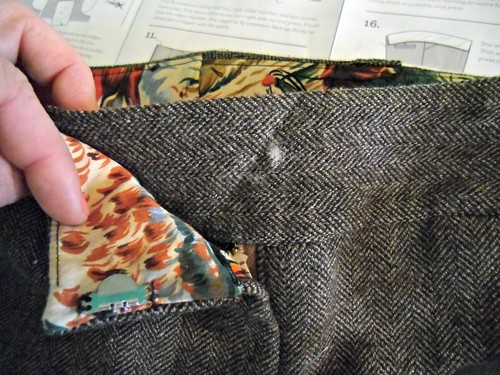
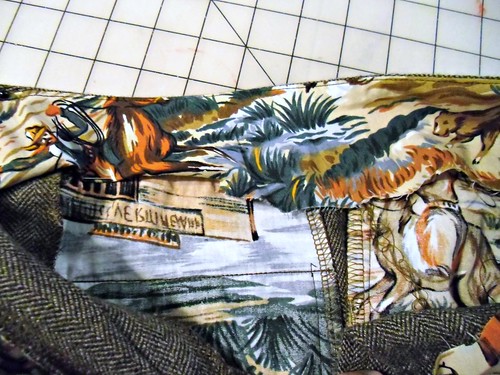
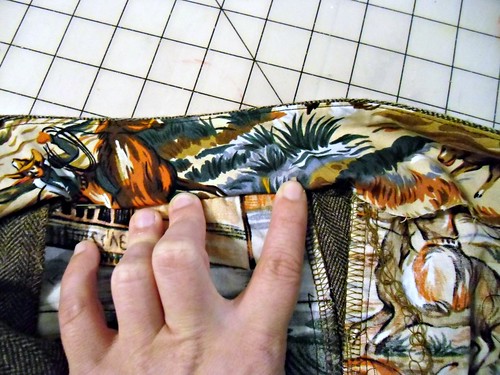
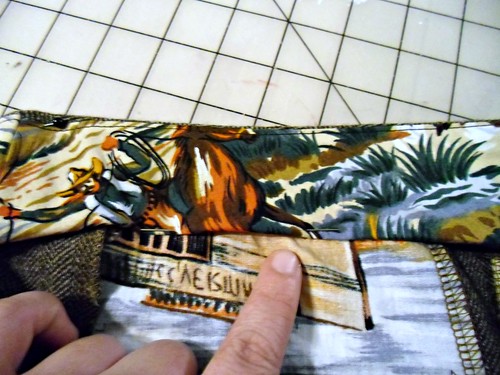
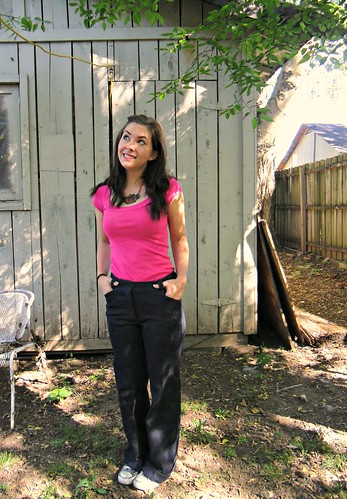
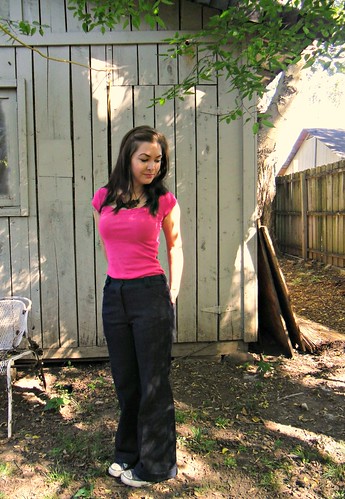
More gut pictures for your perusal~

Dotty Jamie Jeans

Dotty Jamie Jeans

Dotty Jamie Jeans

Dotty Jamie Jeans

Dotty Jamie Jeans

Dotty Jamie Jeans

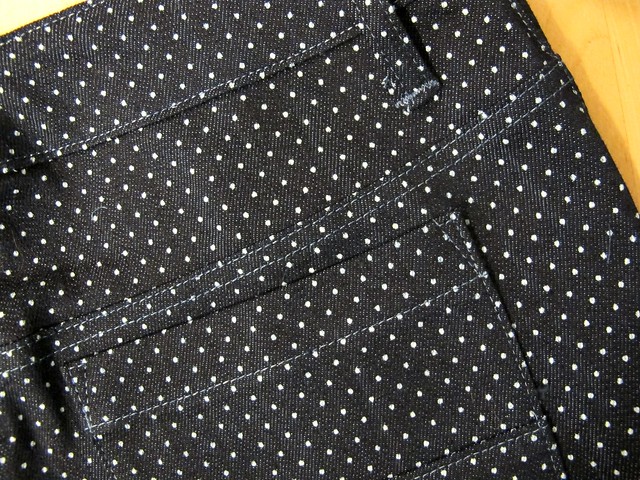
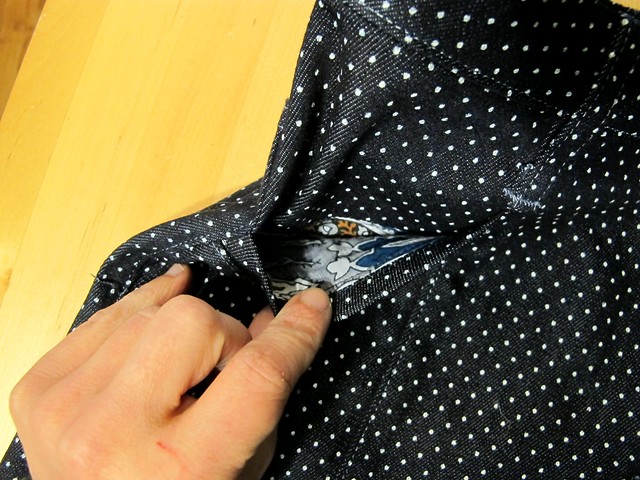
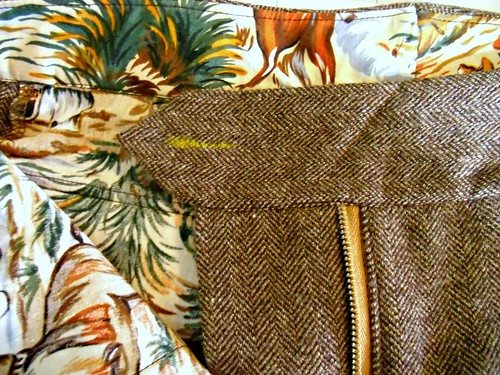
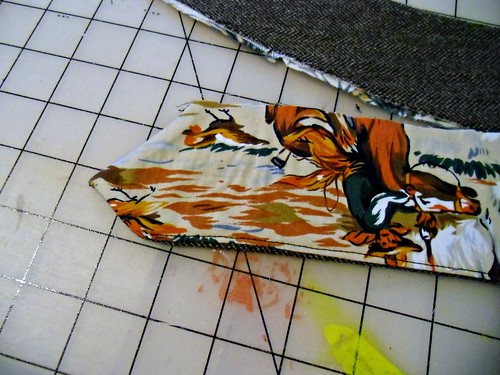
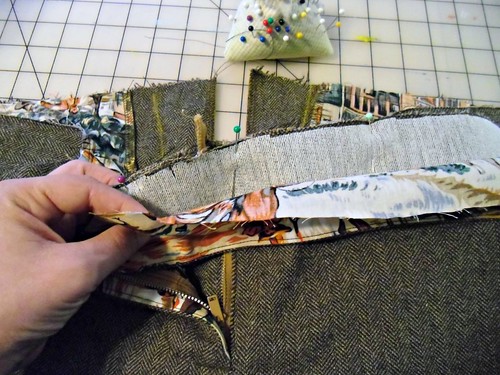
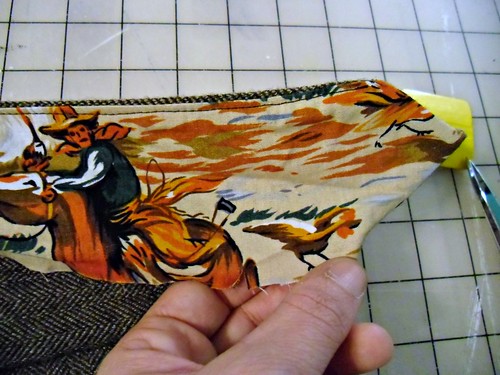
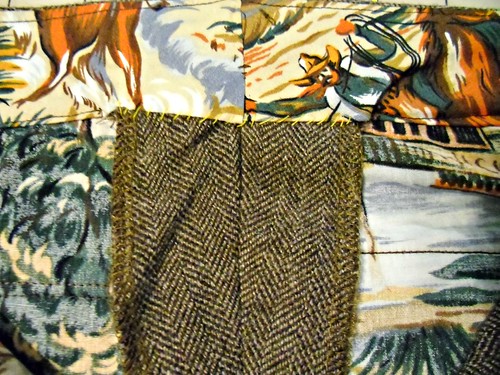
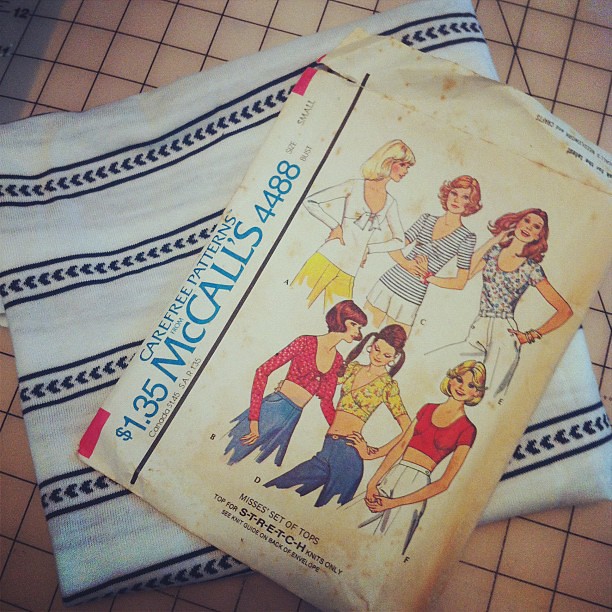
This is me trying to show you the cool pocket fabric haha. Leftover from one of these dress, by the way!

Dotty Jamie Jeans

I think I’m about pants’d-out for the next couple of weeks (until I get my hands on some red twill, anyway, heh heh heh), but I feel pretty good about the two I’ve accomplished! Big ol’ snaps for ringing in 2015 with two successful projects! Hopefully that’ll be a recurring theme for the rest of this year 🙂

As a side note – WOOF, my hair color is faded. Can you believe the photos were taken maybe 2 days after I shot the Ginger photos? I didn’t do anything to my hair during that time (I only wash it once a week), other than style it – the only thing different is the lighting. Kind of crazy how much of a difference it makes!

Completed: Ginger Jeans!

8 Jan

Ok, now for the forreal first finished project of 2015 – jeans!!

Ginger Jeans

Damn straight I made jeans! And pretty good-looking jeans, if I do say so myself 🙂

These are the Ginger Jeans, by Closet Case Files. Full disclosure right here – Heather sent me this pattern, gratis, as a friend-gift with no strings/review requests attached. While I did not pattern test for this particular pattern, I was involved with fitting tweak email chains waaay back before this shit went into testing (because you know me, and I love talking about crotches).

Anyway, I was excited to try this pattern because – one, JEANS!; and two, JEANSSSS!!!

Ginger Jeans

Ginger Jeans

Y’all, this is a really really good pattern. I know I sound biased – and maybe I am, because I lurve me some Heather, and ESPECIALLY because I had a really good almost-out-of-the-envelope experience with making these. It can be hard – if not impossible – to design a pants pattern that is going to fit and flatter every single body it comes in contact with, considering how wildly different everyone’s bodies are. I think the fit of these seems pretty good across the board – I’ve been watching everyone’s finished Gingers popping up all over the place, and most are great right out of the envelope (or with very minor changes). Personally, I had to make a few small tweaks, but they’re not any different than what I do to *all* the pants I make.

Ginger Jeans

I started with the size 2, which corresponds closely with my measurements, and made view B with the high waist. Having participated in this rodeo before, I went ahead and adding my personal ~Lauren~ fitting changes directly to the pattern pieces – which means, I scooped out some of the crotch to give it more of a J shape (more info on that in this post) and added a 1/2″ wedge to the back crotch for some extra bum room. I compared the pattern pieces to some well-fitting patterns and RTW jeans to make sure the crotch lengths and depths were good, then I cut straight into my denim. No muslin this time – which was risky, but I feel pretty confident in my fitting at this point, so I was willing to take one for the team if necessary.

Ginger Jeans

SPOILER: It worked out just fine! Yeehaw!

Ginger Jeans

There are a couple more things I’d like to improve on for my next pair – all up in dat crotch (sorry that you have to look at it). I think this photo illustrates that pretty well – see how the front is just a little too long when I stand a certain way? You can also see it in the photo below – what looks like a really really poorly photoshopped thigh gap is actually just excess fabric bending all weird. I need to pull some excess out of the inseam, maybe about 1/2″ (like, maybe what I added to the back crotch haha!). Honestly, that’s something I could do to this existing pair of jeans as it is – but I also flat-felled that damn inseam, and realistically, I know I probably won’t unpick and fix unless it starts annoying me way more than it does right now. I also need to take a small wedge out of the center back of the waistband – it’s a one-piece curved waistband, but I’m starting to notice that two-piece darted waistbands fit my backside much better. This one isn’t bad, it’s just a little loose. Something to fix for the next pair! The calves are also prettttttyyyy tight – like, these are not the pants that I will be wearing knee socks underneath! I guess I have big calves, though, because that’s an issue I have with all pants (sewing patterns and RTW). Overall, though, I’m really happy with the fit of these. I didn’t have to do ANY changes to the legs, and I think they look pretty good!

Ginger Jeans

Ginger Jeans

Construction on these was pretty straightforward and not at all difficult, although it was time-consuming to do all that topstitching. I followed the instructions on the pattern, as well as the sewalong for places where I needed a little extra clarification. I decided to go balls to the wall with this make and treat them like a real pair of jeans – contrast gold topstitching, flat-felled seams (everywhere except the side seams), proper rivets, the works. Doing all these extras definitely added time to how long it look to make them, but I still finished over the weekend 😛 Go me!

For fabric, I used a denim/lycra blend that was purchased a Paron’s Fabrics in NYC last year. Heather actually helped me pick this one out, and I am surprised at how much I like it. The recovery is okkkk – it’s not the very best, like my RTW jeans (which are from Imogene + Willie, and WHEW that denim is – as my dad would say – THE BOMB DOT COM) – but it’s better than some stuff I’ve used in the past! The photos you see here were taken before I’d worn them for a day, so they’re at their tightest. As of this posting, I’ve worn the jeans twice and they haven’t bagged out much at all, which is a pleasant surprise. That being said, I really really really want to get my hands on one of Heather’s denim kits, because the Cone Mill denim included in those is basically the same shit as my $200+ I+W jeans. I missed the last sale due to financial restraints, but I’m saving my dollars and waited with bated breath for the next shipment, because you best believe imma be all over that shit like white on rice. NEEDS MORE JEANS.

At Heather’s advice, I did not interface the waistband of my pants. I think I might actually be a convert to this method – the waistband is still stretchy (so it’s super comfy), but the denim is thick enough to give it some structure. I did interface my button and button hole area, as well as the parts noted in the instructions (the fly, the tops of the pockets… I think that’s it?).

Ginger Jeans

For the topstitching, I used Gutterman jeans thread (the gold color, obviously) in my needle and regular ol’ navy polyester thread in the bobbin. At the suggestion of my sewing machine mechanic, I revved up the needle tension to a 7 and lengthened the stitch length to a little over a 3 to get a nice stitch. I used my #10 edgestitching foot (favorite foot ever, holla) to create even lines, and a 90/14 denim needle to pierce through all the layers. Since the guts of the jeans are assembled with the standard navy thread, this meant that I did a LOT of thread-changing to make this pair of pants. For future pants, I’ve lugged out my old Pfaff so I can keep both machines threaded and just switch back and forth, but the changing was ok for this first go-round.

Also, speaking of topstitching – I loved all the bartacks involved with making jeans. So much fun and SO satisfying! My machine actually doesn’t have a setting for bartacks, but I just reduced the zigzag stitch length and width until it looked good.

Ginger Jeans

If you have super eagle eyes, you may notice that the double topstitching is slightly different at the pockets vs the yoke/crotch seam. I had to widen the lines to properly catch where I folded the pockets under, but I really don’t think the wide-set stitching looks as good as the narrower set on the back. Oh well, just something to change for the next pair 🙂

Ginger Jeans

Ginger Jeans

I looove the star rivets, though! And check out my cool jeans button! All the hardware (including the zipper) was purchased at Pacific Trimming in NYC, same time as when I got my denim. All that stuff was sooo cheap (I want to say the rivets were, like, $0.10 a piece of something crazy like that. I bought a whole bagful HAHAHA), wish I had better access to it on the regular! To set my rivets and my button, I used the good ol’ hammer-and-cast-iron-skillet combination. Worked like a charm!

Ginger Jeans

Ginger Jeans

Fun pocket lining! Also, I think I cut the fly interfacing too wide – bummer that it peeks out. Oh well, again – something to change for the next pair 😛

Ginger Jeans

Proof of flat-felled seams, and also machine thread snarls. Whoops.

Ginger Jeans

I’m pretty happy to have officially made LEGIT jeans (I have made “denim trousers” in the past, but nothing with topstitching and rivets and all that fun stuff!), and even more happy that they are super wearable! Now I just need to bang them out in all the colors my wardrobe requires and I’ll be set for life, at least as far as my denim is concerned 🙂 I really want to try some different topstitching colors and details – looking at my I+W jeans, I really love the multiple colors of thread they used, and the little plus shaped bartacks. I also want some wacky insides – printed pocket fabric and colorful serger thread, anyone?

Would you ever make jeans for yourself, or does this fall in the camp of things you’d rather buy? Have you made this pattern before (if so, lemme see dem jeans, ladies)? As someone who’s literally worn the same pair of jeans for a solid year, how many pairs is too many?

Completed: Ultimate Trousers

14 Aug

Hey look, here I am again – with another pair of polka dotted trousers! Are you surprised? Would you be surprised to know that I have another pair of dotty trousers sitting on my sewing table as we type speak? Do you think I have a problem? I’ve never considered myself a polka dot trouser kind of girl, but these sewing numbers don’t lie!

Sew Over It Ultimate Trousers

This polka dot cotton sateen is actually an old spoil from the Mood Fabrics flagship store in NYC, which I bought while I was there in March. I knew I wanted to make pants with it – what pattern specifically, I couldn’t tell you, but pants for sure! I love using cotton sateen for pants as it’s usually a good weight with a nice, heavy stretch, and the colors are always so lovely and saturated. Plus – polka dots! Yesss!!

Sew Over It Ultimate Trousers

The pattern I eventually ended up using is the Ultimate Trousers from Sew Over it. I actually tested this pattern ‘way back when earlier this year, to help get it ready for it’s print debut. I was on a pretty tight deadline during testing, which meant that I didn’t end up with a finished garment – just a muslin and a loooot of notes. This is actually pretty typical for me as a tester; I don’t always finish the pattern to the effect that it warrants a blog post! Once I got everything back to Lisa, I put the pattern on the backburner since the summer heat was starting to ramp up and I couldn’t handle the thought of wearing pants in this kind of humidity.

Anyway, we’ve got promises of cooler weather lurking on the horizon, which means it’s PANTSSS TIMEEEEE! Yay!

Sew Over It Ultimate Trousers

I did make a few changes to the pattern, both for fitting and general style. Let’s go over the fitting stuff first. Every time I make trousers, I end up doing the same adjustments across the board, especially if the pattern doesn’t include a front zip fly. I realize that trousers are kind of a scary subject for a lot of sewers, so I’m going to show y’all what I do in my fitting and hopefully that’ll shed some light on the whole matter (and even more hopefully – prove that they really aren’t so scary to fit!).

I don’t have muslin photos of this particular pattern, but I do have muslin photos from my archives (super unflattering muslin photos, I might add! Ha!) back when I made the Colette Clovers. Different patterns, but the concept is similar.

 photo CIMG0016.jpg
See all those horizontal wrinkles allll over my damn crotch? This is an indication that the crotch is way too long for me – so it’s wrinkling. The easiest way to fix this is to pinch out the excess into a long horizontal line, and transfer that to your pattern piece with slashing and taping. I’m petite, and while my torso is a pretty standard length, my crotch length is on the short side. So this is an adjustment that I have to make with *most* trouser/pant patterns. The amount can vary depending on the pattern – obviously the Clovers needed a lot taken out, and the Ultimate Trousers didn’t take much (and I just made a pattern the other day that I had to remove 2″ from!) But it’s a common adjustment for me, and this is what it looks like.

 photo CIMG0006-1.jpg
Same muslin, back view – see how tight the ass is? Like, not even flattering tight, just imma-bust-outta-here-like-a-jailbreak tight. This is fixed by adding a wedge to the back crotch depth pattern piece. How much you add will depend on how much room you need (the Ultimate Trousers didn’t need any, but the Clovers clearly needed a lot), but you can easily hack this alteration by just cutting a bigger size right there at the back crotch (this picture from Sunni’s Trouser Sewalong shows where to add length – right in that blue circle).

clover close-up
Here’s a pair of Clovers where I fixed the length issue, but now there’s some weird puffiness around, well, my crotch. Isn’t that flattering! You guys, this particular fit issue took me a LONG time to figure out because it seemed so weird – but it’s really not. Basically, my crotch requires a different shaped crotch curve than what is drafted for most patterns. I’m a J shape, and the majority of patterns I sew are an L shape. This is a stupid easy adjustment – you literally just redraw the curve, and once you’ve done it on one pattern, you can trace that curve to every pattern thereafter. For the first pattern, you’ll have to eyeball it (or find a pair of pants that fits and copy that crotch curve) and adjust until you get it right, which might take a couple tries. Once I figured that out – what it looked like, how to fix it – that really opened the floodgates of trouser making for me. Also, you should read this post on the Fashion Incubator.

Sew Over It Ultimate Trousers
Here is my front pattern piece with the adjusted crotch shape – I’ve already redrawn and cut my piece out, but I put it back on the table so you could see the difference in the curves. For whatever reason, I don’t need quite as aggressive a crotch curve when I’m making pants that have a front fly – it’s just trousers with a smooth front (especially if it’s sewn in a stretch woven).

You can also see where I tucked out the length horizontally. I didn’t take a photo of the back piece, but I sliced that length to hinge, and the side front has the same removal of length with it tapering to nothing at the center back/crotch, if that makes sense.

So yep, those are my pants adjustments! I know they might seem confusing, and to be honest – I learned all this when I was going through my Clover saga a few years ago (never got those pants to fit right, but I sure learned a lot in the process!). It was a LOT of trial and error, but hopefully my notes will help a least a few people go through less trial and error 🙂 As you can see, there aren’t a whole lot of adjustments needed to get a good fit on pants – but they all work together, and each one affects the other (and they are all adjustments that need to be made BEFORE cutting your fabric, which is why a muslin is SO essential when making pants!). For more fitting help, I strongly recommend investing in a copy of Pants for Real People, which is basically a pants-fitting Bible. So much good information in there, I use that book often!

Ok, now that THAT’S out of the way – let’s go back to talking about this pattern, and the style adjustments I made!

Sew Over It Ultimate Trousers

This pattern is designed to be worn cropped (or as shorts), with a faced waistline. I have learned that I really don’t care for faced waistlines, so I decided to add a waistband to my pants. I didn’t draft a waistband – I just used the facing pieces and flipped them to the top as waistband pieces (and cut two, so I could face the waistband, as you do). I think, for me, these are a little more wearable with a proper waistband. For interfacing, I used tricot fusible, which I looove because it stabilizes the fabric but doesn’t compromise the stretch of the fabric (which is what makes the darn pants so comfy to begin with!).

Sew Over It Ultimate Trousers

I also kept the length on the longer side, which means I can wear them full-length in the winter (with cool socks!) or fold them up to make them cropped. This length is straight out of the pattern, by the way – I didn’t shorten anything, and I’m 5’2″. Just fyi!

Sew Over It Ultimate Trousers

The one major design change I made to this pattern was to sew it in a stretch woven, as opposed to the firm woven (non-stretch) that the pattern calls for. For one, my muslin was a firm woven and I plain just didn’t like the way they felt! They were too restrictive! I like wearing stretch woven pants, ok. Also, it’s hard to find a good pants-weight print that isn’t a stretch woven, so there’s that. I think these are fine in the stretch fabric, although I should probably go back and size them down a little because I think the legs look kind of loose. I was trying to avoid the stovepipe legs look, just to try something different, but I think these do need a little less ease. These are a size 8, by the way!

Sew Over It Ultimate Trousers

So that’s it! Thanks Lisa (and the Sew Over It team!) for letting me test this pattern, and being so patient with me taking months to make a finished wearable garment 🙂 Londoners, if you’re still afraid to tackle the trousers, there is a whole class for making these (with tea and cakes, omg I wish I was in London) if you still wanna try them!

Those of y’all scared to try trousers – what are your thoughts? Do you think the process looks any easier? Are you going to throw caution to the wind and try anyway? Y’all – pants are fun!

* Oh yeah, and I cut my hair! I hope you like it! Well, I guess it doesn’t matter if you don’t like it – it’s not like I can stick it back on my head lololol

Thurlow Sew-Along: My Completed Thurlows!

12 Nov

Also known as “The Brown Old Man Pants I’ve Been Pining Over For The Past 10 Years” – here they are! The end result of the Thurlow Sew-Along 🙂

CIMG0081
I probably could have done a better job of getting those creases down the front leg centered better, but… nope. Idgaf right now.

CIMG0110
Shit, I forgot to tell you guys that I cut my hair!

CIMG0106
Well… I did. I should have whipped out my measuring tape & gotten a proper inch length, but we ended up cutting off something in the realm of 8″. 8″! That’s like a perfect… Jimmy John’s sub.

CIMG0119
Anyway, I’m pretty thrilled with how these fit. Just the way I like it!

CIMG0125
A good rear-view is always important.

CIMG0120
Bonus: They go perfectly with my Mustard sweater! Like a match made in Heaven or some shit.

For those of you who sewed along and have pants or almost-pants – link share, please! We all want to see (but especially me, because I am nosy as hell).

For those of you who hate pants and sew-alongs (and fun, I guess) – sorry for not being sorry! I’m back to regularly not-scheduled posting this week, though 🙂

For those of you lurking on the sidelines – just do it! Take the plunge!
Muslin Fitting
Choosing a Fabric
Adjusting the Back Pockets
Sewing the Front Pockets
Welt Pockets
Sewing the Fly Zipper
Attaching the Waistband
Belt Loops and Finishing

b1
See? Even Amelia approves.

CIMG0101
FUCK IT ALL, I LOVE THESE PANTS.

BYE.

Thurlow Sew-Along: Belt Loops & Finishing

9 Nov

This is the last post in our sew-along, folks. We are about to finish up these bad boys once and for all!


Today we will be sewing steps 20-22 – making and attaching the belt loops, adding a button and hook and eye, and hemming the pants. That’s it! That’s all that’s left!

b2
Belt loops first! If you don’t want to add belt loops to your pants, that’s fine – you can skip this part and scroll down. If you are adding belt loops, I hope you can see this picture. It should enlarge through Flickr if you are having trouble.
Finish one long edge of the belt loop piece – preferably with something that won’t add much bulk, as this fabric will be triple folded onto itself. Mine is serged. Fold the piece into thirds – start by folding the unfinished long edge about 5/8″, press, then fold the finished edge over that, and press again. Topstitch on either side of the folded piece, making sure to catch all layers through both rows of stitching.

b3
Cut the belt loops into 6 equal pieces. The instructions call for 4 1/2″ length, but I find that to be a bit too long for the width of the waistband, so mine are 3 1/4″.

b5
This step is totally optional, but I like to finish the raw edges of my belt loops so they don’t unravel over time. If you have a serger, just shove them under the presser foot one after the other and serge in one long line. If you don’t have a serger, you can zig-zag with your sewing machine. Repeat on the other side.

b6
You will end up with something like this.

b7
Then cut all the little pieces apart.
Again, this step is optional. If you don’t finish the edges of your belt loops, I’m pretty sure the sewing police won’t arrest you for fraud or anything :B

b8
Take your first belt loop and fold one end back about 1/2″ or so (however little you can get away with, due to the bulk). If your belt loops are closer to 4″, you may need to fold more back.

b9
Pin the belt loop to the pants waistband, right along the top edge. The belt loops are centered over the back darts, side seams, and front pockets. The diagram in the pattern is very helpful if you need more placement guidance.

b10
Fold the bottom of the belt loop back approximately the same amount as the top (in my case, 1/2″) and pin along the bottom of the waistband.

b11
The belt loops are not intended to lay perfectly flat along the waistband – there should be a little bit of room. You know, so you can fit a belt in there 🙂

b12
Continue all the way around the waistband until all the belt loops are pinned down.

b13
To sew them down, stitch as close as possible to the top edge of the waistband. I like to go over this stitching line a few times – forward, backward, forward again, and then a small back stitch to secure. Don’t want those belt loops going anywhere!

b14
Sew the bottom of the loops down in the same manner, getting as close to the seam as possible.

b15
Here is what my sewn on belt loops are looking like. Shnazzy!

b16
All belt loops should be sewn on at this point.

The next step is hemming, but I like to save that for last and I find the fit of my pants is slightly affected without a proper closure at the top. So I’m going to skip 21 and jump straight to step 22.

b17
Button hole goes on the left front – it should be placed right at the edge before the triangle point starts.
Sew your button on the inside of the right front, being careful not to stitch on the outside of the pants.

b18
Hook goes on the right front – butt it as close to the edge as you possibly can, without it actually showing from the outside. I like to sew mine on using a blanket stitch, as it tends to be a bit more secure.
To locate the exact placement of the eye, zip the zipper closed and rub the edge of the hook (where the eye would sit if it was closed) with a soft piece of chalk until it is coated in powder.

b19
Close your pants up and press firmly over the hook.

b20
When you open them again, there should be a little chalk print where the hook was.

b21
Sew your eye right over it! EASY.

You can go ahead and hem your pants at this point. The pattern allows for a 1 3/4″ seam allowance, which can either be turned and topstitched or hemmed invisibly with a slip stitch. Tasia has a great tutorial on invisible hemming with seam binding – hers is shown on a dress, but it would work just as well with pants.

And that wraps it up for the sew along! If you’re still catching up or have only been watching from the sidelines, don’t worry – these posts will be here indefinitely, as long as you need them. If you have any questions that were not covered, I’m always happy to answer via comments and/or emails. Hopefully these pictures & word vomit made you feel much more confident about tackling pants. Because, dude, pants are awesome. Especially when they have cowboys inside them 🙂

I’ll post a reveal of my finished pair on Monday. PANTSSSSS.

(thanks, Andi, for reminding me that this exists!!)

Thurlow Sew-Along: Attaching the Waistband

7 Nov

Holy shit, do y’all even realize what is going on today.


FINAL COUNTDOWN PANTS PARTY TIME.

Ha! But in all seriousness… we’re just a few steps away from being finished! Let’s get excited, yeah? 🙂


Today we are attaching the waistband, steps 15-19. You should have a semi-finished pair of pants at this point, all major seams sewn except the back extension. We will get to that today!

wb1
You should have two waistband pieces – a right side (with one square end) and a left side (with one pointed end) – cut in both your regular fabric and your lining fabric, and one set should be interfaced (I opted to interface the side with my fashion fabric, as it needed a bit more structure. Do what works best with your particular fabric, though!). Stack both left pieces together and both right pieces together, and sew along the top edge – the un-notched, concave curve – and the center front (the aforementioned square/pointed ends).

wb2
Trim, grade, and understitch the seam allowance.

wb3
You won’t be able to understitch all the way into the center front sections – that’s ok! Just understitch as far as you can 🙂

wb4
Open up your waistband pieces, and start pinning the main fabric side to the top of your pants, right sides together. Don’t worry about the lining at this point. Go all the way around, center front to center back (and yep, back extension is still open. We’re getting there!). Sew this seam.

wb5
Trim your seam allowances.

wb6
And press everything up toward the waistband.

wb7
Now for that pesky back extension! See my pretty, bright pattern markings? We are going to sew right over that. Pin along the marked line, all the way up through the waistband. I know, the marking doesn’t extend that far but do the best you can. The instructions indicate that you should baste first, check the fit, and then sew your permanent seam. However, if you already made a muslin, you don’t need to worry about basting first – unless you really want to fine-tune the fit. Personally, I always baste first. Even after multiple muslins 🙂
Be very careful to ensure that all your seams are aligned when you sew up the center back seam! If one side of your waistband is wider than the other, it will result in one side that has a little peek of lining popping out. So double-check before and after you sew!

wb8
Press open the center back extension. Those giant seam allowances are supposed to hang around – later, you can adjust the waist of your pants, making it bigger or smaller as needed 🙂

Sooo… pinning the waistband. Fair warning: this part is a bit fiddly and you will probably end up hating me for making you slog through it. I know, it sucks! But it’s better than unpicking a bunch of stitches, or having a janky looking waistband. Spend a little extra time up front making sure everything is lined up, and it will save you hours of banging your head against the wall when you realize that your third waistband attempt looks even worse than the first one.

wb9
Start with your lining all spread out and hogging the spotlight inside your pants.

wb10
Fold the lining under to the inside until the fold is covering the stitching underneath by about 1/8″-1/4″.

wb11
Now flip the waistband over and pin through the front, right in the middle of the ditch between your pants and your waistband.

wb12
When you flip the waistband back over to the lining side, the pin should just be catching the lining. The fold underneath the pin should be no more than 1/4″ – anything more than that will just look sloppy.

wb14
Repeat all the way around the pants, skipping the 3″ or so section of lining that covers the back extension. We aren’t going to stitch that part down, so just leave it open.

wb13
STOP PRESS. Are those chickens?? SHUT THE FUCK UP.

ahem.

wb15
With your sewing machine, stitch all the way around the lining, exactly in the little waistband/pants ditch that you pinned into. This is called stitching in the ditch. Yes, I know. It’s so clever.
Again, don’t worry about the section with the back extension is. Just skip over it and continue stitching in the ditch.

wb16
Afterwards, you can tack down the lining over the extension. The instructions call for just a few stitches worth of tacks, but I like to slipstitch mine down all the way so I know it’s not going anywhere. And also, I used yellow thread, because yellow is delightful.

wb17
Give the waistband a good steam press, both inside and out.

That’s all! That wasn’t so hard, huh? 🙂
Expect a wrap-up post in a couple of days – belt loops, buttons, and hemming. And then PANTS PARTY 2012, YO.

Completed: Thurlow Jeans

24 Sep

Well. I have some good news and I have some bad news.

The good news is that the trouser portion of the Thurlow pattern is just as good as the shorts portion. One would think that goes without saying, but occasionally I do see patterns that focus all their attention on one component and add the second as a “bonus” without properly testing it (see McCall’s 5971 – the cap sleeves are perfect, but the long sleeves were not properly drafted & cause some funky problems when you try to, you know, move your arms & shit). Anyway, that’s not the problem here. These parts are perfect.

Which brings me to the bad news… uhhh… I hope you like looking at pictures of me wearing Thurlows, because you are about to see a LOT of them. I have fabric picked for 2 more pairs of trousers & one more pair of shorts. And I have ideas for more. Lord help us.

At any rate, I guess I found my new TNT, desert-island pattern! Woohoo!

So, without further ado… let me introduce you to my newest pair of jeans (and also a deliciously trashy part of my back yard):

Thurlow Jeans
Don’t you luurve them!? Omgah, so comfy & flattering.

Thurlow Jeans

Thurlow Jeans

Thurlow Jeans
Check out the rear view!

A few fitting notes – these are a size 0, aka the smallest size. FWIW, my waist is 26.5″ & my hips are 37″. These are a PERFECT fit on me. I did pull the back crotch out to a size 4, because I noticed my shorts didn’t have as much butt room as I prefer (and occasionally hovered near the zones of Wedgie City, eeeew). I did not shorten the front crotch of these, there are a few wrinkles but that’s mostly because of the way I’m standing. LOVE the fit of these. LOVE LOVE LOVE.

Oh, they are a little long. What you see in the pictures is the natural length, with a shitty cuff job (sidenote: I have no idea how pants cuffs work, nor do I own any pants with cuffs that I can compare to. I am pretty sure I cuffed these wrong because they fall out often. Help?). I’m 5’3″ sooo take that as you will. Next time I will shorten these before cutting.

Thurlow Jeans
I mean, LOOK AT THEM.

Thurlow Jeans
LOOK AT THOSE WELTS.

Thurlow Jeans
I did minimal topstitching with these (just around the welt pockets, top of the slash pockets, and the zipper – all in navy) as I wanted them to be very sleek and, er, trouser-like. Also, these are one hundred thousand times better than my previous denim trousers, fyi.

Thurlow Jeans
The insides are the best part! I had plans on using a piece of floral cotton I had floating around my stash, but the lining for these pants actually take a fair amount of fabric. So I went to the flea market on Saturday morning in hopes of finding something suitable… and welllll, look what I found! Had exactly enough, too!

Thurlow Jeans
I mean, are these like the happiest jeans or what.

Thurlow Jeans
Another rear view. These are probably my best welt pockets yet.

On a slightly frustrating note, it would seem that I’m not capable of keeping pants hooks & eyes in my possession. I lost my first pack in the move, somehow. So when I found them at Vogue Fabrics while I was in Chicago, I rejoiced & bought the biggest pack they sold. Come Saturday evening (*ahem*, yeah, I sewed these up in a day…), they were nowhere to be found! I KNOW I bought some because they are in my gloat picture of all the goodies I brought home. I’m fairly certain I threw them away with the plastic bags. Along with the sweet marking wax stuff that I also bought… ::sob::. So these hooks & eyes come from Walmart. And they are just as terrible as you would guess, but hey at least they were cheap!

But, whatever, I have new jeans so I guess it all evens out…

Thurlow Jeans

In closing, a few questions for y’all:
1. Since I’m planning on making a few more of these anyway, is anyone interested in a little sew-along? Might be closer to the end of the October before I can start, but I’d be happy to take pictures of the more confusing steps & hand-hold if necessary! C’mon! It’ll be FUN! And the pattern includes both pants & shorts, so those of you in warmer climates don’t have an excuse to back out, nyah nyah nyah.
2. What is your TNT pattern? Is it a Sewaholic pattern? Is this some kind of conspiracy?

Completed: Simplicity 3688 Trousers (with bonus crop top)

5 Jul

I just realized I should probably call this ensemble the ’88 or something of that nature, since both pattern numbers end in 88. What are the odds, eh?

Anyway, new outfit! I’m not even going to both separating these into 2 posts since they are pretty simple on their own. Both pieces were SO quick & simple to make – that crop top took maybe 2 hours. Amazing!

Simplicity 3688; McCall's 4488

I made the trousers first, so we will start with those. They are Simplicity 3688, you know, the incredibly-famous-incredibly-flattering-incredibly-EASY pattern that everyone has been raving about? I was mildly curious (and also interested in making some high-waisted trousers that didn’t involve a front-fly zip), so I picked it up at the most recent $1.99 sale. This pattern is pretty sweet, I must say! I only made a couple of very simple adjustments – tapered the waist in to fit, and added a little bit of room at the back for teh heiny – and the fit is pretty spot-on. I didn’t even have to adjust the crotch length like I normally do. SWEET. SO SWEET.

Simplicity 3688
Here they are with my very favorite crop top, a sweet little embroidered Hungarian piece from the 60s. I love this top, but unfortunately it is old as shit & totally falling apart (it’s made out of some class of sheer cheesecloth-type fabric). So I have to be careful with it when I do wear it – otherwise, it is restricted to wall art haha.

My only beef with this pattern is the available sizing – it only goes down to a 10. I really should have graded down the waist to an 8 or maybe a 6, but it doesn’t go any smaller than the 10. Sadly, I don’t think I will be making the blouse or the jacket from this pattern – as darling as they are – because they are simply too big. BOO. Why not offer all sizes, Simplicity? I’ve seen you try to do this with the bigger sizes too. Sneaky sneaky.

Simplicity 3688; McCall's 4488
The fabric is a *very* lightweight denim chambray – it might even be too light for pants, these kind of looks like pajamas. Perfect for summer, though 🙂 The waistband has a bit of horsehair interfacing for stability.

Simplicity 3688; McCall's 4488

Simplicity 3688; McCall's 4488

Simplicity 3688
I finished these as simply as possible – serged seams, topstitched waistband, side lapped zipper. They close with 2 hooks & eyes.

Now for the crop top, McCall’s 4488…
I just love sewing skanky crop tops!
Ahahah, I bought this pattern at the flea market a couple of months ago. It’s so ridiculous! Honestly, I thought the seaming was kind of tacky, but it actually looks a lot better made up. The fabric is some weird stretch knit that I bought at the thrift store for $2.

Simplicity 3688; McCall's 4488
There’s not much to say about this shirt. It’s very simple, and actually kind of flattering. I’d like to make it in a longer version, maybe even with long sleeves for winter.

Simplicity 3688; McCall's 4488
The side stripes did originally match up, but I had to take quite a bit in to get it to fit, so now they don’t match. Wah wah. They actually look quite good, considering that I did not take the stripes into account AT ALL when cutting this.

Simplicity 3688; McCall's 4488

McCalls 4488
Here’s a scandalous mirror shot of how it looks without the high-waisted – HAHA. Ummmm I don’t think I’ll be wearing it out like this!

McCall's 4488

McCall's 4488
The finishing was pretty interesting for this – there is a very narrow facing at the neckline, which is folded back & then top stitched according to the instructions. It looks very similar to ribbing, actually. The sleeves & hem are just stitched down with a twin needle.

On a side note, yesterday we celebrated America by eating hot chicken. In 100*+ degree heat.

Hot Chicken Festival
At the Music City Hot Chicken Festival – we waited in line for over an hour!

Oh yes, this was painful.
Hurts so good.
If you’ve never had hot chicken… uhhh I don’t exactly know how to properly describe it. It’s not necessarily spicy. It just sets your mouth on fire. Definitely an experience if you like to inflict pain yourself haha.

So there ya go. AMERICUHHHH.

Simplicity 3688; McCall's 4488