Tag Archives: jacket

Completed: Reworking A Vintage Blazer

7 Oct

Here’s a big ol’ project I worked on for a couple months this summer that I believe warrants a whole ass blog post!

Fair warning – there are a LOT of photos in this post. I tried to narrow them down and include some collages, but… don’t say I didn’t warn you!

This project started with me wanting to make a blazer – but after months of looking and just not feeling any of the fabrics I was seeing, I decided I would try altering one instead. I’ve altered plenty of blazers, jackets, and coats for lots of clients + photoshoots over the years, but I’ve yet to really tackle complicated alterations beyond sleeve shortening and taking in the body (since, understandably, most people don’t need those kind of crazy alterations!). Over the summer, I worked closely on a photoshoot set with a master tailor here in Nashville, Loretta, who was delighted to share a lot of her trips and tricks with me. I spent some time looking for the perfect blazer for this project, and eventually found this 70s gem at the Southern Thrift in West Nashville, for a grand $5.99-

The before – click to zoom a lil’

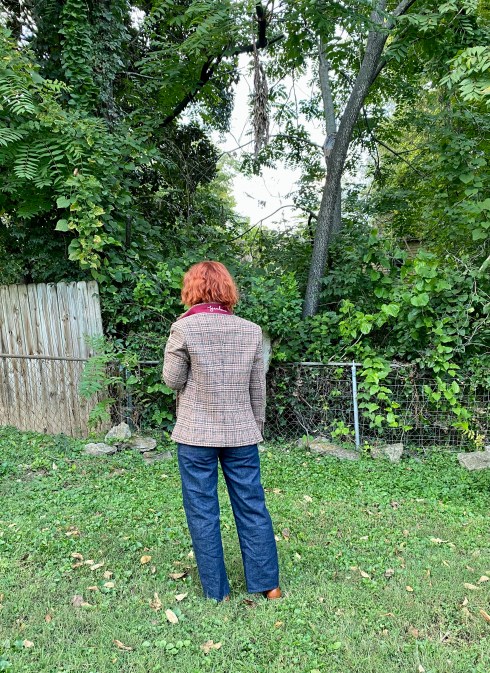
As you can see, the before wasn’t super terrible! Obviously the sleeves were a little long and the back a bit saggy (there was no size tag in this jacket but I suspect it was probably 1-2 sizes too big for me). I also felt like the shoulders were a touch wide, and the length a little too long. But I loved the fabric and knew I could work some magic to get this bad boy to fit the way I liked!

I started with pulling off the buttons, the back belt, the cheesy patch pockets (I’m sorry, but they are SO cheesy lol and were also poorly sewn on!). I removed the entire lining from the shell and set about my alterations first. Here is what I ended up doing:

  • Narrowed the shoulders by 1/2″
  • Added shoulder pads (the original ones had disintegrated into the jacket hem! I am STILL finding old shoulder pad dust in my studio, despite regular vacuuming!)
  • Took in back arm seams 3/8″
  • Took in side back seams 1/8″
  • Took in center back seam 1/2″
  • Shortened body length 2″
  • Shortened sleeve length 3/4″

This was accomplished by lots of pinning, basting, trying on, and taking photos (so I could see what the back looked like). Usually when I do these alterations, I work with a client who is already wearing the jacket – so it’s quick and easy to pin where needed. It’s a little harder when you are doing it yourself, but still totally doable!

Adding pockets and plackets!

After finishing the alterations, I could work on the fun stuff – adding design elements to the shell! I knew I wanted to change those patch pockets out for double welt pockets. I also wanted to include sleeve vents with functioning (!!!) button holes, a single welt breast pocket, and an interior “Barcelona” pocket.

Since I had removed the patch pockets and back belt from the original jacket, I was able to carefully disassemble them which gave me some fairly good-sized pieces of fabric to work with. Adding the double and single welt pockets was pretty straightforward and easy – it’s the exact same as sewing on a piece of fabric, you just have to contend with, well, an entire jacket getting in your way haha. I used the instructions + pattern pieces from the Closet Core Patterns Jasika Blazer for the two exterior pockets, and a beloved In-House Patterns tutorial for the inner pocket. Honestly, the hardest part about this endeavor was figuring out where exactly to put the pocket! For the outside pockets, I drew chalk lines directly on the blazer and checked the proportions in the mirror until I was happy. For the interior pocket, I went a little lower than my chest after looking at loads and loads and LOADS of blazers online with interior pockets – consensus seems to be that it starts right below the welt of the outer breast pocket. Which makes sense, as you don’t want whatever you put in that pocket to sit right on top of your breast. Well, I don’t want that anyway haha.

For the sleeve placket – well, that was a fun experience! The original jacket had no placket – just buttons sewn straight on a plain sleeve. Loretta had shown me how to shorten a jacket sleeve with a working button placket, which is the same process as adding a placket. You just sew fabric to the edge to create a placket extension; all the seams are hidden when it is finished. I had no idea shit would be that simple. I think the scraps I used came from the back belt. For a step by step, I followed these directions for sewing a back vent (a back vent and button placket on a jacket are essentially the same – except there is no exposed line of diagonal stitching) from Waffle Patterns. The hardest part of that was getting the corners to miter correctly haha. Wish I could give y’all some tips for that but TBH I just used a lot of trial and error and unpicking until it was right.

I also decided to change out the lining, after determining the original lining – while a really beautiful soft pinkish beige – was just too smelly and discolored. I took the lining apart and used the pieces to cut a new lining from a piece of silk charmeuse that I already had in my stash (here is a blog post I wrote a few years ago about replacing a lining in a coat, which is the same process I used!). I made sure to add my alteration adjustments and sleeve plackets to the pieces, then sewed the whole thing together and bagged it in. I did hand sew at the sleeve button plackets and near the front facing (you can sort of see the pins in the above photos), but the rest was done by machine.

After THAT was done (whew!), I added some fun finishing touches 🙂 I sewed buttons + button holes on the sleeve plackets (using the original buttons, cos, well, I like them!), added a leather hanging tab + label to the back facing – oh, and I made a sweet wool felt embroidered undercollar!

To make the undercollar piece, I cut some Swedish tracing paper and traced it around the undercollar, trimming and refining until it was the exact same size. Then I cut it from wool felt (which I ordered the The Felt Pod); my piece was wider than the felt so there is a seam in the center. Then I embroidered it by hand with a simple chain stitch, and attached it directly over the existing undercollar using embroidery floss + a blanket stitch. It’s not visible when the collar is down, but it is a fun surprise when flipped up!

I actually finished the whole thing about a month or so ago, but didn’t get around to taking photos until this last weekend. I’ve said it before, and I’ll say it again – taking photos is the part I hate most! So, like, enjoy or something 😛 I’m pretty sure my neighbors did considering that came outside RIGHT WHILE I WAS SHOOTING THESE dear lord can you see the fear in my eyes?

And if you don’t want to look at my mug (it’s cool, I don’t want to look at it either), here are some dressform shots:
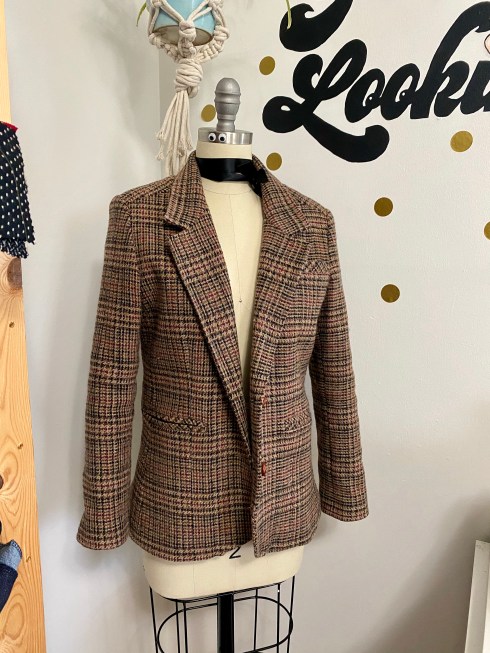
I think that’s about it for this project! I had a lot of fun digging into this one and feel extra confident in my alteration skills as a result. Funnily, the original jacket isn’t very fancy – it’s actually pretty cheaply made as far as jackets go. The wool is a blend, and there wasn’t much tailoring inside the shell apart from a bunch of interfacing. Spending so much time + effort (and silk lining lol) was basically the equivalent of polishing a turd – but, you know what? I love how it turned out, and I learned a lot during the process. I don’t know if such an involved reconstruction would be worth it if you were paying someone else to do it – but for me and my sewing practice? It was perfect. I was only out about $10 for this project (the jacket + wool felt, as I already had the lining in my stash) which we can all agree is WAY cheaper (and faster!) than making the dang thing from scratch!

I will always love making garments from their humble fabric beginnings, but truly, you can’t beat a solid reconstruction (or even just a couple simple alterations to an otherwise great + previously-loved garment!). This might be the most sustainable I get when it comes to sewing, ha! How about you? Does this inspire you to give it a try?

Competed: Wiksten Unfolding Jacket

14 Mar

Good morning, everyone! I started this post a couple of weeks ago while I was waiting in the airport, and I’m just now finding time to revisit (naturally, while in the airport AGAIN. Yes, class season is ramping back up woohoo!). My February has been weirdly busy – I worked on two massive photoshoots, and also represented the Craft South booth at Quilt Con here in Nashville! On a more personal note, February was the 2 year anniversary of my dad’s passing, and, as it did last year, shit hit me like a ton of bricks. And finally, I bought a house! I closed last week and have been tackling my to-do list like crazy to get everything ready before I move in.

The bad news is – there has been very little time for sewing (to be honest – I haven’t touched my sewing machine since, well, February!). But the good news is – a new studio is a-coming 😉 I took some photos of a couple of completed projects so I have something to share here, now the challenge is finding the time to sit down and type everything up!

Wiksten Haori made with Mood Fabrics

Today’s offering is something that has been finished since January, which means it has gotten a lot of use during recent months. My current house (the rental that I’m fixin to move out of), is a beautiful 1935 stone Tudor. Built before central a/c (which has been retrofitted in this house now, thank god!), and located in a very hot part of the country – this is a house that was designed to stay cool. It’s quite lovely in the summer, but LORD it stays chilly in the winter! And due to the old windows, plaster walls, and overall poor insulation – there’s not really much of a point in trying to keep the place warm, as the (really expensive, I should add) gas heat just slips right out. So I spend most of my winters wrapped in robes, electric blankets, and rolling a space heater around each room. Not gonna lie – as much as I love this house, the chill is one thing I will NOT miss! I’ve been wearing the robe I made when I first moved in, but it’s always made me feel like… well, like I’m wearing pajamas. Don’t get me wrong – it is warm and cozy and certainly serves its purpose, but I don’t even like to answer the door in this thing because I know it straight-up looks like I rolled out of bed when I have it on. I do work from home, but I still put on “real” clothes and style my hair. Wearing PJs makes me feel like I am having a sick day, and that’s exactly the vibes this robe was giving me. I wanted to make something that would serve a purpose of keeping me warm while inside my house, but still look pulled together enough to wear outside the house should I choose to do so.

So, anyway – that was an unnecessarily long intro to tell you that I made a Wiksten Unfolding Jacket, which is sort of like a literal house coat as far as I’m concerned.

Wiksten Haori made with Mood Fabrics

This plaid flannel from Mood Fabrics has been rolling around in my stash for about 2 years now. I originally bought it to make an Archer button-up, but upon receiving I realized it was a bit too heavy for a shirt – and also a bit too light to be a proper coat. I’ve hung onto it since, and while some pattern contenders have certainly caught my eye, it has remained uncut this entire time. Once I acknowledged my need for a house coat, I remembered this fabric and decided to give it a go. Being a nice thick wool flannel, it is perfect for this application – it is warm and cozy, but still reasonably lightweight. And the colors just make so me happy (even if they don’t necessarily coordinate well with my all-black-tragic-goth look that I typically wear in the winter). I bought this fabric long ago enough that it is no longer available, but Mood Fabrics has tons of other lovely wool flannels to choose from should you want to make your own!

Wiksten Haori made with Mood Fabrics

Wiksten Haori made with Mood Fabrics

This jacket is fully lined, and rather than go with a traditional slippery lining, I kept things casual with a matching lightweight cotton voile. This jacket is oversized enough that it’s easy to put on (including the sleeves), and the nature of how this is sewn means that it is completely reversible. Also, cotton voile is incredibly easy to handle, which made the sewing on this jacket a total breeze.

For the pattern, I sewed a size XS based on my measurements, although in retrospect I think the XXS might have been a little better. This is a nice oversized fit that works over multiple layers, but the sleeves are a bit wide and they get in the way when I’m trying to wash the dishes (or even my hands, for that matter). I usually wear them slightly rolled up to bracelet length, so they are out of the way but can easily be rolled down if I need the extra warmth. I waffled on which length to sew (there are 3 lengths included in the pattern) but ultimately decided on the happy medium of the mid-length. I’m pretty satisfied with this decision, and I had just enough fabric to make everything work.

Wiksten Haori made with Mood Fabrics

Wiksten Haori made with Mood Fabrics

I used the main fabric for the neckband, rather than the lining contrast, as the pattern calls for. I also opted to not interface the neckband pieces, since my wool flannel is so thick and didn’t really need the extra support. This also gives the jacket a bit of a softer structure, which I think is nice for a house robe. For visual interest, I cut the pockets on the bias. Since they are lined with che cotton voile cut on the straight grain, they should stay supported and not stretch out.

Wiksten Haori made with Mood Fabrics

So. About this fabric. It was super easy to sew + press (it is, after all, wool flannel), but in retrospect this pattern really isn’t suited for a plaid design. I promise I actually did try to match the plaid lines – which was reasonably successful at the side seams, but failed miserably anywhere the sleeves were involved. OH WELL. I figure – this is a house coat, I don’t give a shit if it’s less than perfect. Even with mismatched plaid lines, it is still lightyears ahead of of the old fuzzy robes I used to wear.

Wiksten Haori made with Mood Fabrics

I made this jacket out of a pretty desperate need (it was quickly getting cold and I couldn’t face another winter of wearing my old robe around the house), which means the sewing was a little rushed. The pattern is super easy – it’s just a series of rectangles, for the most part – but I always find rushed sewing to be kind of unpleasant. To be completely honest with y’all, I did not really enjoy sewing this jacket at all specifically for that reason. Plus, when I finished it and put it on for the first time, I was pretty underwhelmed with how it looked on me. It is REALLY oversized and boxy, which isn’t necessarily a look that I tend to gravitate to. It is, however, very comfortable – and very warm – and as far as the type of garment I was aiming to make, it pretty much fit the bill perfectly.

I will say – despite my initial reaction after finishing, this jacket has really grown on me! Like I said, it is warm and comfortable – like being wrapped in a cozy blanket. The pockets are absolutely enormous, too – like, big enough to hide a kitten in (I think. Does anyone have a kitten I can borrow to test this theory?). I’ve taken to wearing this when I need to pop out to the grocery store or to check the mail, and the pockets are really useful for replacing my need to carry a purse. So, this is basically a blanket with storage. Like, what more do you need in life?

** Note: The fabrics used in this post were provided to me by Mood Fabrics, in exchange for my participation in the Mood Sewing Network. All opinions are my own!

Completed: The Hampton Jean Jacket

27 Mar

I actually finished this project months ago – like, as in, 2017. Took the photos in mid-November, and then started this blog draft at the end of that month. I have no idea why I never finished writing it up, but… better late than never, I suppose?

Hampto Jean Jacket

At any rate, despite my apparent reluctance to post this project, I am actually pretty happy and excited about it! I love me a good denim jacket, and have always considered it a wardrobe staple for the way I dress. My style has changed a lot over the years – in my teens I was ~punk rock~ (insert hysterical laughter in hindsight yere), in my 20s I was really into vintage, and now I tend to dress just pretty boring overall (I like to think I look “classic,” but let’s be real – it’s boring AF, whatever, don’t care). With all those style changes, the humble denim jacket has always held a special place in my heart and a leading role in my wardrobe.

Hampto Jean Jacket

Hampto Jean Jacket

Hampto Jean Jacket

I think it’s safe to say that there are lots of people who feel the same way as I do about the versatility of a denim jacket, however, it’s been hard to find a sewing pattern that includes all the features you see in one (such as the welt pockets, or a sleeve placket). I have made the Staci Jean jacket in the past, but it wasn’t quite up to par – the fit was more generous than what I prefer, and it really bothered me that it didn’t have actual pockets. I ended up not getting a lot of wear out of that jacket and later donating it.

The Hampton Jean Jacket is a great pattern that includes all the features I like in a jean jacket – those welt pockets, functional in-panel pockets with a top flap, a two-piece sleeve with a placket and cuff, and front and back yokes. Sewn up in a denim fabric with contrast topstitching and metal jeans buttons, it’s almost indistinguishable from the RTW versions you see in stores (almost, but just a little bit better – because it’s handmade by meeeee 🙂 haha). I love that someone took the time to create this pattern, and y’all, it’s a good one. Not that the Style Arc Staci jacket is a bad one, but it’s very basic and lacking compared to this one. This was exactly the type of pattern I have been looking for to fill this hole in my wardrobe.

I bought my denim at Mood Fabrics when I was in NYC last year – specifically for this jacket (sometimes I buy for specific projects, sometimes I just stash… but in this case, it was indeed for this pattern). I wanted something that was a good weight for a jacket, although not too heavy, and with little to no stretch. I found this piece in the denim section of Mood (on the bottom floor) and I just love the dark indigo wash. I originally thought about distressing and bleaching the fabric, but ended up just sticking with what you see here (apparently you are supposed to distress before topstitching… so yeah, that wasn’t happening). As with all denims, this fabric should soften and fade as it is washed and worn, which I’m looking forward to seeing. In the meantime, I do like the way it looks now, too!

The pattern looks complicated, but it’s pretty easy to follow. Sewing a jean jacket is pretty similar to sewing jeans – minus the obvious difference between the two articles of clothing (like, you don’t sew a fly front in the jacket and you don’t set a sleeve in jeans.. or maybe you do, I ain’t here to judge your life), just a lot of flat felled seams and topstitching. Y’all know I fucking LOVE making jeans, but I also have way too many pairs as it is, so this was a nice way to get that jeans-making experience without adding yet another pair to my wardrobe. Instead, I managed to fill a gap at the same time! I love it when that happens!

Hampto Jean Jacket

Hampto Jean Jacket

I waffled for a bit on what size to cut – my measurements are closer to a 2, but I ended up making the size 0 after comparing the finished measurements to an existing RTW denim jacket I own and like the fit of. I wanted this one to be a slim fit that looks great both opened and closed (I rarely ever wear my denim jacket buttoned unless I’m like, actually cold or something, however, I needed to make sure there was enough space to close it if it came down to it!). My only complaint about the sizing is how the sleeve length is measured – for whatever reason, it’s measured from the top of the shoulder to the bottom, instead of at the underarm. This led me to originally believe that the sleeve was something crazy like 5″ too long, and I actually altered the pattern and nearly cut it before I thought to actually compare the pattern piece to a different sleeve pattern piece. I was under the impression that the standard is to measure from the underarm to wrist (like what is basically your arm inseam), but now I’m second-guessing myself and thinking maybe I’m the nutty one? Thoughts?

Anyway, like I said – this pattern is really easy to follow. It’s obvious that a lot of thought when into the instructions; they are clear, easy to understand and follow, and the diagrams are beautifully done. There is also a sewalong on the blog if you do happen to get stuck, although it seems like it’s basically a photographed copy of the instructions (i.e., no additional information or tips, just the exact same instructions except with photographs to guide you). I found the sizing to be accurate and the pieces fit well together. I don’t know much about Alina Design Company, however, this was a very pleasant first experience so I am happy about that!

Hampto Jean Jacket

Hampto Jean Jacket

Hampto Jean Jacket

For sewing, not much different than sewing jeans. I used a 90/14 denim needle, navy all purpose polyester thread to construct, and a lightweight topstitching thread for all the topstitching – Mara 70 from Wawak, which Jennifer introduced me to a couple years ago during one of our jeans workshops. It’s heavier than regular all-purpose thread – which is 100wt – but not as heavy as traditional topstitching thread – which is typically around 30wt. It still looks nice and thick so your stitches really stand out, but it’s not so thick that it causes your machine to jam or nest, and it is very easy to thread through a standard needle. If you’ve been having issues with topstitching thread, I really recommend trying this weight!

I tried to finish most of my seams with flat-felled seams, but a few (such as the front yoke seam and the armscye seam) had to be serged and topstitched for a mock flat-fell. My RTW denim jacket is like this – a combination of flat-felled and mock flat-felled, and this is all explained in the instructions as well. I washed and dried the denim on the hottest setting a few times before cutting, and have washed it more than necessary since finishing to get it to soften up a little bit more. I know it’ll fade with time, I just want to speed that time up 🙂

Hampto Jean Jacket

Hampto Jean Jacket

Hampto Jean Jacket

Hampto Jean Jacket

Hampto Jean Jacket

My only complaint with the pattern is that I think it is lacking some necessary interfacing. There is interfacing at the button placket, sleeve cuff, and bottom band – and that’s it. No interfacing at the in-panel pockets or flaps (which have buttons and button holes, so they *should* be interfaced – at least with a little square where the aforementioned buttons and button holes are), or on the back tabs where, again, there are button holes. I was able to add these in before closing up those areas, but I am a little surprised that they were included with the instructions, especially considering how in-depth the entire pattern is as a whole. One thing I did like was that the collar is not interfaced – you might need to do that if you are using a lighter weight fabric, but for this denim, the weight of the 2 layers of fabric was plenty. I love the way the collar sits!

Hampto Jean Jacket
Anyway, the jacket turned out pretty fucking awesome – if I do say so myself. I think the sleeves could stand to be shortened about 1″, but I usually wear my jacket sleeves rolled up anyway so I’m not terribly concerned about it. The length is perfect for wearing with pants, not so much dresses and skirts (perhaps with something that has a lower waist, but I think the long length paired with a high waist looks unbalanced and a little sloppy – at least on me!). That being said, I already made a second version that is cropped – specifically to wear with dresses and skirts – so watch this space for that!

*Note: The fabrics used in this project were provided to me by Mood Fabrics, in exchange for my participation in the Mood Sewing Network. 

Giving New Life (+ Lining) to An Old Coat

14 Mar

Hi everyone!

Wow. It’s been a minute, huh? Many, many thanks/hugs/appreciation for everyone who reached out regarding my dad. Every single comment, email, text message, card – I read every single one of them. While I can’t possibly reply to every single one of them, I do want to thank all of you, as I found them all so comforting. I feel like I am saying this way too much lately, but y’all truly all are the best.

As it is, it’s time to jump back into real life. Actually, I did that pretty much the day after the funeral – I went to Leesburg, VA to teach a workshop at Finch Knitting and Sewing Studio, which was really wonderful and a very welcome distraction from what I had been dealing with the week prior. The next weekend, I flew to Brooklyn, NY to teach my Jeans Making Intensive and Pants Making Intensive classes at Workroom Social. I just got home about a week ago, and have spent this time trying to catch up all the things I’d set aside while I was gone- boring adult-y things, like work and cleaning my much-neglected apartment. I’ve finally gotten a chance to get back into my normal life indulgences – like sewing! – and man, it feels good to be back!

Before I get into the post, I did want to announce my next upcoming workshop in May! I will be traveling to Hyattsville, MD to teach another workshop at Three Little Birds Sewing Company May 13th and 14th (and also a meet and greet / project gossip the evening of May 12th, because wine). This is like all the other workshops I do (other than the pants-specific ones in Brooklyn, which are also Workroom Social specific ;)) – you get to choose whatever project you want to work on that weekend! Whether you want to make a lined dress, a fabulous pair of jeans, a new winter coat, your first bra, whatever – I’ll be there to support ya! And if you don’t have a particular project that is screaming for support, can I just say that this is also a great excuse to make your sewing a little more social for the weekend 😉 I always have such a great time running these workshops, and I’m so excited to do it again!! You can read more about the workshop here, and also sign up! It’s going to be an awesome weekend 😀

Ok, now for the post!

Re-Lining a Coat - before

This is a bit different that what I usually post about – it involves repairing an existing garment, rather than making a new one from the start. I think most of us have announced at some point or another that we’d rather make a new piece than alter or repair one that needed it. I know I’m guilty of it! But lately, I’ve been making a bigger effort to reduce waste whenever I can, and repairing garments that need it is a great place to do this!

I bought this coat at Banana Republic when I was 19. I remember being super proud of the purchase – it was one of the first “nice” things I ever bought with my own money (well, and the help of some gift cards). It’s not the nicest thing I own – and I can certainly produce better garments out of my own sewing room today – but it’s followed me around for the past 12 years regardless. I love the color and I love the way it fits me. It has certainly seen it’s share of wear over the last decade, though – the lining was shredding in several places (I can specifically vouch that the lining at the hip was probably torn by my studded belt – YES, THAT’S HOW LONG I’VE HAD THIS DAMN COAT), and I recently ripped a huge hole in the sleeve lining while trying to put it on. I realized that I would either need to replace the lining entirely, or just get rid of the coat. Y’all all know that I am pretty much always up for a challenge, so I decided to give it a shot! Worst thing that could happen was that I’d ruin a coat – which, admittedly, was already kind of halfway ruined anyway.

Re-Lining a Coat

Re-Lining a Coat - before

Re-Lining a Coat - before

Here you can see some of the places the lining was tearing. The lining was also discolored, especially under the arms, and wearing very thin in several places.

I actually planned this project last year, in December. I waited until I could go to Mood Fabrics in NYC and pick my replacement lining fabric in person – the green wool is a really unique shade, and I wanted to try to match or coordinate with it as much as possible. Spoiler, I never did find a perfect match to the green (not surprised), but I found a print that I adore, so there’s that!

Re-Lining a Coat - process

This is the silk that I went home with me – it was with the rest of the silk prints on the 2nd floor. I am not sure what type of silk it is specifically – it has a heavy, fluid hand just like silk charmeuse, but it is slightly textured, almost like a twill. I suspect it may also be a blend, because it didn’t take to pressing as well as I would have liked. I bought 2 yards (after consulting with the guy who cut my fabric and going by his suggestion), which ended up being plenty. I actually have leftovers – matching silk top, anyone? 🙂

After I bought the lining fabric, this project had to sit on hold for about 3 weeks while I went to Egypt. I haaate leaving stuff half-finished if I’m going to be gone for longer than a weekend, and this project I especially didn’t want to have a lapse in, since I was kind of winging it. So I didn’t actually start until the end of January, but fortunately it did not take very long!

I should confess: I had every intention of turning this post into a tutorial on how to re-line a coat. I started with a bunch of photos, but as soon as I got to the sewing part – guys, it’s pretty much impossible to photograph these steps. Plus, every coat is a little bit different in how it’s constructed. So this post is more of a loose guide if you’re considering doing this yourself, and I have linked to the resources that I found useful when I was in the throes of my repair. Also, I should point out that I have made several lined coats at this point, so the process isn’t really that different from sewing a coat and then adding the lining. If you have sewn a lined coat, you can totally handle this. If you have yet to hit this milestone in your sewing practice, maybe wait before you tackle this project 🙂

Re-Lining a Coat - lining removed

The first step is removing the lining from the coat entirely. This part wasn’t difficult, but it was annoyingly tedious. I knew I didn’t want to deal with the drama of drafting a lining, so I needed to keep the lining pieces as intact as possible in order to use them as my pattern pieces. I removed the lining from all the way around the facing of the coat, being sure to take notes and photos of anything that I might need to know when I was putting it back in – such as the seam allowances used, how the back pleat was sewn in, stuff like that. This was the #1 reason why I waited to start this project – I knew I’d forget everything while I was in Egypt!

Re-Lining a Coat - lining removed

Pulling out lining can be kind of interesting though – you get to look into the guts of the coat and see how it was put together! I’m always fascinated to see how RTW does things, as opposed to what the home sewer does. For example, they sewed small rectangles of the lining into the seam allowances where one traditionally puts thread chains (such as under the arms). Then, the rectangles were sewn directly to the seam allowances of the outer, eliminately the time it takes to make a thread chain and attach it. I thought that was pretty cool!

Re-Lining a Coat - lining removed

Another thing I found interesting was the tailoring done on the coat. It’s actually pretty nicely tailored (with fusible interfacing), considering its just a coat from Banana Republic.

Re-Lining a Coat - process

After I had the lining out of the coat, I carefully separated all the pieces and marked which one was which. I flattened them with an iron and marked grainlines. I will be honest here – I used a similarly-styled jacket pattern I had in my stash to figure out where the grainlines were. They might be slightly off, but eh, it’s a lining. I could NOT for the life of me see where the grain was on the actually pattern pieces, and the fabric was so delicate that is just kind of disintegrated when I tried to rip it.

One thing I will point out when you are marking your pattern pieces – it is really important to mark the sleeve front and back, and also where the sleeve cap hits the shoulder seam. You can snip directly into the seam allowances before taking the pieces apart – presto, notches 😉

From there, you just lay your pattern pieces on the fabric and cut them out. Remember, they already have seam allowances – no need to add those.

I should also point out that I did not pre-wash my silk before cutting it. Since the jacket outer is wool/polyester, it is dry clean only. Which means this silk will never hit a washing machine, so I didn’t bother to wash it! I DID wash the leftover piece after I finished the coat, and it changed the texture of the silk a bit. More on that if I ever get around to sewing that piece up haha.

Re-Lining a Coat - process

Next, you assemble the lining to make a lining-coat. Easy stuff!

Ummmm so here’s where I stopped taking pictures haha. I had to figure out how to get the lining into the coat shell, and not a single one of those steps was remotely photogenic 😉

You have two options when putting the lining in- One, you can do it the old school couture way, and hand sew it around the entire perimeter of the facing. This is definitely the easier of the two options, but it’s more time-consuming. The second option is bagging the lining into the coat – sewing everything together at the hems and pulling the coat through a hole in the lining. This step is much more fiddly – you have to set everything up properly so you don’t twist the sleeves or whatever, and it totally looks like a hot mess until the very end. Also, I realized this a bit late in the game – but it’s reaaaally finicky to sew the lining to the facing at the neck (where the collar is). The layers are super bulky and you don’t have much of a seam allowance to work with. I made it work, obviously, but I did end up un-picking out my stitches a few times.

If you need help bagging a lining, this tutorial on bagging a lining from Grainline Studio is great. For the back vent, I watched this YouTube video from FashionSewingBlogTV on sewing a lining to a vent.

Re-Lining a Coat - process

So, I bagged my lining, pulled everything from a hole in the sleeve, and then went back on the inside and attached the lining to the shell with thread chains (I wasn’t even gonna try those weird lining rectangle things haha). Then I pressed everything really well, and attached new buttons. Oh, and I sewed the labels back on too – the original BR one, and one from Mood Fabrics (the sizing and fiber info tag is underneath the Mood tag, fyi). It’s kind of a collab coat now, you know?

Sooooo, drumroll pls…

Re-Lining a Coat - after

Yay!!! I just love it so much 🙂

Re-Lining a Coat - after

Due to the new layer of silk, the jacket is actually much warmer now (the old lining was polyester). Always a plus!

Re-Lining a Coat - after

Re-Lining a Coat - after

The colorful new lining makes me so happy!

Re-Lining a Coat - after

Re-Lining a Coat - after

Re-Lining a Coat - after

Re-Lining a Coat - after

Re-Lining a Coat - after

I also replaced the buttons, with something similar but a little more refined. These buttons are from Pacific Trimming, which I also picked up while I was lining shopping. I reallllly wanted to do self-covered buttons, but I could not find anything that remotely matched this green. So I went with tortoiseshell, although these are shank buttons (the original buttons are flat).

Re-Lining a Coat - after

I really enjoyed the challenge of working on this project – in fact, taking things apart and putting them back together was how I originally taught myself how to sew, so it was a cool throwback to revisit those roots. I like doing things that force me to slow down (and/or walk away) and think, and this was definitely one of those. And hell yeah, this coat is finally back in rotation! Feels good!

Note: The silk fabric used in this post were purchased with my monthly Mood Fabrics allowance, in exchange for my participation in the Mood Sewing Network.

Completed: The Kelly Anorak

14 Feb

Hey guys! Thank you for all your great comments, suggestions, and feedback on my last post! I’m so happy to hear that y’all enjoyed reading it as much as I enjoyed writing it 🙂 With that being said, my stint as a ~travel blogger~ is now officially over (well, until I save up money for my next trip – the verdict is still out on where exactly!) – back to regular sewing posts!

BUT before we get into the project – some class-related stuff!

  • I’ve got two classes at Workroom Social in March that both still have a couple of spots left, if you’ve been on the fence and are looking for a reason to treat yo’self 😉 (it IS Valentine’sDay, after all! ;)) The Jeans Making Intensive is March 2-3, and the always-popular Pants Making Intensive is March 4-5! The jeans class primarily focuses on construction and finishing a pair of jeans (we use the Ginger Jeans pattern – which, btw, I’m wearing in these photos haha), while the pants class has a little more fitting involved and sews a classic pair of trousers. Both are going to be super fun and I am so excited to be back in NYC in a couple of weeks! ♥
  • Speaking of Workroom Social – Camp Workroom Social is coming back, and I’ll be back as an assistant to Amy of Cloth Habit’s Bra Making class! Registration is currently open only to alumni, but will be open to the public soon. I cannot WAIT for another round at camp – last year was freaking amazing (and so, so, so beautiful!) and it will be so fun to reconnect with old friends and make new ones!
  • Finally, speaking of Amy and bras -she’s coming to Nashville to teach a bra making workshop at Craft South! Having worked with her at camp last year, I knew we had to have her at the shop for a workshop – she’s a fantastic teacher and so knowledgeable about bra fit! Amy will be in Nashville September 22-23 to teach her Bra Making Weekend Workshop at Craft South. The class will make Amy’s newest pattern, Harriet, as well as learn basic fitting and finishing methods. Oh, and I’ll be assisting the class 🙂 I know a lot of people have been asking when we’d do a bra workshop in Nashville – so there ya go! You can sign up for the workshop here. It’s gonna be amazing!

Ok, back to sewing!

Kelly Anorak in Organic Cotton Twill from Mood Fabrics

Today’s project is actually last month’s project that I am just now getting around to posting – the Kelly Anorak from Closet Case Patterns!

While I am not typically a fan of “vacation preparation sewing” – mainly in the sense that I get really stressed with those sorts of deadlines and thus sewing doesn’t even up being very fun – I did make this jacket specifically for my trip to Egypt. I thought it would be a useful thing to bring with me – a nice light layer to ward off the morning chill in the desert, yet breathable for when the sun got all crazy in the afternoon. I also liked that it had those big, roomy pockets and was long enough to cover my butt. My orange Minoru fills most of these slots, but I’ve worn it to death over the years and it’s starting to look ratty – plus, that poly lining isn’t exactly the most breathable thing. Also, I just really love sewing jackets. Sue me 😛

Kelly Anorak in Organic Cotton Twill from Mood Fabrics

Kelly Anorak in Organic Cotton Twill from Mood Fabrics

As I said, the Kelly Anorak is a lightweight and unlined jacket – meant to be worn between seasons, not necessarily your crazy winter coat. I’ve seen some people make it out of waterproof fabric, but in my experience I usually carry an umbrella when it rains anyway (and I also own an actual rain jacket – although I still prefer the umbrella, as I don’t like getting my shoes and pants wet!), so this is good enough for a super light drizzle. The pattern features a zippered front with a snap closure placket, a 3 piece hood (which stays on your head much better than the 2 piece kind – it also doesn’t flatten one’s hair as much), big ol’ gusseted pockets, a drawstring waist, and a sleeve placket so you can roll up the sleeves. I actually saw something real similar in JCrew while I was out holiday shopping one afternoon, so I got the added bonus of being able to try the thing on before making it!

The fabric I used for this jacket is an old favorite that’s shown up in tons of my past makes – solid organic cotton twill from Mood Fabrics. The color I used specifically is Olive, and yes, I realize the color on their website photo is way off and no, I don’t know why that is. If you are picky about color, you will definitely want to order a swatch of this stuff. Anyway, I love this fabric because it is easy to work with, has a nice brilliant color, washes/wears well, and is reasonably priced (at least in my opinion!). And it comes in so many colors! Mood pretty much always carries this fabric, FYI, so even if it’s sold out on the website – either hang tight and wait for it to get restocked (I promise it will) or just call the store and have it shipped from there.

Kelly Anorak in Organic Cotton Twill from Mood Fabrics

Kelly Anorak in Organic Cotton Twill from Mood Fabrics

Kelly Anorak in Organic Cotton Twill from Mood Fabrics

Kelly Anorak in Organic Cotton Twill from Mood Fabrics

Most of the little hardware bits and pieces were picked up in the NYC Garment District when I was there in November. I knew I was going to be nitpicky about everything matching just so, so I wanted to check out the goods in person. The drawstring, grommets, cord stoppers, metal tassel ends, and zipper are all from Pacific Trimming (I knowww there are other places in the GD to buy this stuff – and maybe even for cheaper – but I just love Pacific Trimming, esp their zipper room!). The zipper is actually a Riri zipper, cos I wanted that shit to be extra fancy. I think I paid around $20 for just the zipper – so it’s not necessarily cheap at all – but it’s really nice, both in terms of how it looks and how smooth it zips! It was also nice to have it cut to the correct size, and also be able to choose both the finish of the metal teeth and the color of the zipper tape, cos again, I was feeling nitpicky about that shit! 🙂 I knew this jacket was going to be a time commitment to make, and for that reason, I’m ok with spending extra money on nicer materials.

The only notion that I did not buy in NYC was the snaps – I just went to Elizabeth Suzann‘s studio during their lunch break and used their industrial snap setter, ha! That thing is really cool and I kiiind of wish I had one, but honestly I am always looking for an excuse to drop by and chat with my old coworkers so for that reason, I’ll continue mooching off theirs!

Since the jacket is unlined (and, for me, primarily worn wide open), I took extra care to finish all the seams for a neat interior. Most every seam is flat-felled, with the exception of the arm holes (only because I didn’t feel like futzing with that shit. I just serged them). I used two different threads to assemble the jacket – a polyester thread for the seams, and then a cotton thread for all the topstitching. I would have just sewn the entire thing with the poly thread, but the color I had on hand was off enough to where the topstitching didn’t look right – and the only thread I had in a suitable color was cotton. In my experience, cotton thread simply does not hold up as well as polyester thread, which is basically indestructible. Considering all the work that I put into this jacket, I didn’t want my threads to fail! So I just used cotton for topstitching – and used a triple stitch, partially for added durability and also because it results in a more visible stitch.

Kelly Anorak in Organic Cotton Twill from Mood Fabrics

Kelly Anorak in Organic Cotton Twill from Mood Fabrics

I will be completely honest with y’all – I didn’t exactly enjoy the process of sewing this jacket. A big part of the reason was because I was under a pretty tight deadline to finish it before my trip (even though I promised myself it was ok to take the Minoru if I didn’t finish, and that everything would be fine – I still rushed!), but I also found some of the directions to be a bit confusing. The Closet Case Patterns blog has some tutorials on the trickier steps, but some of the information actually contradicts itself in online tutorial vs pattern instructions. The zipper placket specifically was really head-scratching to me, and I had to walk away a few times. There’s a discrepancy with the seam allowances written in the pattern instructions vs the blog tutorial, which I found really confusing. I believe the version on the blog is the correct one, though, if I recall correctly! Another thing that really threw me off was that my zipper pull was on the opposite side of the tape, than what you see on the blog. Finally, I was not a fan of how wide the finished facings are – they are really really wide (too wide, in my opinion). I ended up turning them under additionally and sewing another line to make them more narrow. At the width they were as drafted, I felt like they would just end up flapping around with wear and showing my ugly white interfacing. Nope, not doing that.

Anyway, minor complaints – and may also just be personal, because all the reviews I read just gush about how clear the instructions are. So it could just be me!

As far as sizing and fit, I made a size 2 – which is my normal size for this pattern company. I actually did make a muslin, so I could double check the fit, length, and drawstring placement. The length and drawstring were perfect, and the fit was pretty good. The only thing I changed was the shape of the arm hole – it was a little too big, which made the entire jacket move along with my arms when I lifted them. I raised the bottom by about 1/2″, as well as added to the back of the arm hole, and then took a bit (maybe 3/8″) off the front of the arm hole as it was pulling. This is a pretty standard adjustment that I make to most patterns that involve sleeves. I think I just have really weird-shaped and/or small armscyes haha who knows.

One thing I wish I could have found a way to change was to make the snap on the pocket functional. It’s just there for show and to hold the flap in place – the pocket doesn’t actually snap shut. I considered adding the other side of the snap, but it would have shown on the inside of the jacket (and since you need to interface it, would not have made the inside look as nice). One idea is to interface a scrap of the twill and sew it to where the snap gets inserted, so all you see is a square of twill on the inside. I may do that in the future. It’s not a dealbreaker not being able to snap the pockets closed, but it sure would be handy.

At any rate, this jacket was TOTALLY worth the effort – I think the finished result looks pretty damn good! There’s definitely something to be said about using nice materials, as they really elevate the garment into something that looks extra nice. But I am also really happy with the craftsmanship that went into it – I’m glad I took the time to do the flat-felled seams, rip out mistakes and fix them (even though we all know that shit can be agonizing haha), and even deal with making a muslin first. All totally worth it in the end. And while I made this for Egypt and our upcoming spring weather, it’s actually been handy for the majority of January & what we’ve experienced so far in February. I realize everyone is getting pummeled by snow right now, but y’all, it’s been 70 degrees in Tennessee this past week. I am starting to wonder if we are going to skip winter entirely! I had plans to make an actual winter coat this year, but I may put it on hold until the next cold season because I’m not really feeling super motivated with the weather as it is currently!

Kelly Anorak in Organic Cotton Twill from Mood Fabrics

Kelly Anorak in Organic Cotton Twill from Mood Fabrics

Kelly Anorak in Organic Cotton Twill from Mood Fabrics

Kelly Anorak in Organic Cotton Twill from Mood Fabrics

Kelly Anorak in Organic Cotton Twill from Mood Fabrics

Kelly Anorak in Organic Cotton Twill from Mood Fabrics

Kelly Anorak in Organic Cotton Twill from Mood Fabrics

Kelly Anorak in Organic Cotton Twill from Mood Fabrics

Kelly Anorak in Organic Cotton Twill from Mood Fabrics

Kelly Anorak in Organic Cotton Twill from Mood Fabrics

Kelly Anorak in Organic Cotton Twill from Mood Fabrics

Kelly Anorak in Organic Cotton Twill from Mood Fabrics

Kelly Anorak in Organic Cotton Twill from Mood Fabrics

I used twill tape to finish the neckline (as suggested in the pattern instructions). If I’d thought about it while I was buying my supplies, I would have tried to find a tape that matched my olive fabric. Oh well! For the label, I serged around all 4 sides of a scrap of twill, then sewed my label (which is from Dutch Label Shop) on top of that before attaching it to the jacket. The hanging loop is a small piece of leather that I cut to shape and sewed on by hand.

Kelly Anorak in Organic Cotton Twill from Mood Fabrics

Kelly Anorak in Organic Cotton Twill from Mood Fabrics

Kelly Anorak in Organic Cotton Twill from Mood Fabrics

Whew! Sorry about that photo dump – I guess while I’ve gotten better at editing down and posting less photos of myself, I can’t say the same about detail shots 😉 haha.

I leave you with one last photo of me. Sorry, not sorry:

Kelly Anorak in Organic Cotton Twill from Mood FabricsNote: The fabrics used for this project was provided to me by Mood Fabrics, in exchange for my participation in the Mood Sewing Network.

Save

Completed: Augusta Hoodie // Anima Pants

22 Aug

I know it’s still like 8000 degrees here in the South, but I’m already thinking ahead to the next season! This year, I want to be ready when the cold starts creeping in – even though you & I both know that won’t realistically happen here until, like, December (if not later!).

With that being said, I started this project WAY THE FUCK back in May – you know, when summer was the creeper. Took me this long to finish it, but whatever!

Prepare yourselves. This is a two-part project, so there are a bunch of pictures.

Organic French Terry Augusta Hoodie

First part – the one I started in May (or was it April? omg.) is this sweet-ass track jacket hoodie combo! The pattern is the Augusta Hoodie from Named. I don’t tend to sew a lot of patterns from this company – I find most of the styles a bit outside of my personal style preferences (like the Inari dress that everyone is going apeshit over and I JUST CAN’T GET BEHIND THAT SORRY), but occasionally I’ll come across something that makes *me* go apeshit (see: my beloved Jamie Jeans LOVE U). As was the case with this jacket! The pattern was given to me as a gift by my lovely friend Carla; it has taken me over a year to decide what to make it up with, but I think it was worth the wait!

Organic French Terry Augusta Hoodie

Organic French Terry Augusta Hoodie

Organic French Terry Augusta Hoodie

Organic French Terry Augusta Hoodie

The Augusta Hoodie is a combo track jacket/hoodie with welt pockets, front snaps, and seaming that is perfect for some crazy colorblocking (even though I totally went the boring route). I made a size 32, and adjusted the sleeve length as I found them a bit long (a normal alteration for me).

Pattern construction wasn’t too terribly difficult – Named has gotten much better with their pattern instructions (they used to be quite sparse) and I had no problems with any of the steps, including the welt pocket. The jacket is unlined, but there is a facing so you get a nice clean edge at the front. The hood is lined, which I left off because my fabric was so thick. I also added a drawstring to the hood, cos I liked the way it looked. Ideally, I would have done this before finishing the hood – and used my machine to sew grommets around where the drawstring goes. Instead, I decided to do it after the hoodie was completely finished, and thus just popped a couple holes in the hood with my scissors and hoped for the best, ha.

Organic French Terry Augusta Hoodie

Organic French Terry Augusta Hoodie

Organic French Terry Augusta Hoodie

The fabric is a super thick, super heavy cotton French Terry from Organic Cotton Plus. I went with the Cranberry color, although they have tons of other color options for French Terry. This fabric is amazingly thick and soft and will be wonderful to wear when the temperatures start dropping. The piped sleeve seams are done with strips of rib knit fabric, just flat – there is no piping in there (only cos I didn’t have any on hand and I didn’t feel like waiting for any to ship). The ribbing at the bottom and cuffs is actually two different kinds of fabric – I originally planned to use the aforementioned rib fabric from OCP, to keep everything consistent, but it was way way WAY too lightweight to work with this thick fabric. I ended up painstakingly ripping off the bottom band (which was serged on) and replacing it with a sturdy rib knit from Mood Fabrics, which holds up much better with the thick French terry. Of course, I fucked up my measurements and didn’t buy enough, so the cuffs is an entirely different rib knit that is a lighter weight (but heavier than the rib fabric from OCP). I don’t remember where that rib came from as it was in my stash, but I’m sure it was also from Mood. If you look closely, you can see that they are two slightly different shades of white, but I am choosing to ignore that. Also, rib is a weird word when you type it over and over. RIB.

Sewing with this fabric wasn’t necessarily difficult, but it did require some finesse because it is SO THICK. Cutting was kind of awful – my scissors are still pretty dull (yup, haven’t gotten them sharpened yet. How long have I been meaning to do this? 2 years?), and they didn’t have the easiest time chopping through all that thickness. It actually hurt my hand to cut through double layers, but also I am a huge baby. I sewed the majority of this on my serger – French Terry sheds like crazy, and serging helps keep that at minimum – and there were a few sections of massively thick layers where I had to coax the handwheel to get things to keep moving. My snaps are set using an industrial snap-setter – again, I have access to this from my old job (in sewing production) – I have NO idea how you’d set snaps in this otherwise! I guess the pattern calls for a lighter fabric, which would certainly be easier to work with. Overall, I wouldn’t say it was hard – it just required being slower and more patient. Which is infinitely easier when you are sewing something way the fuck out of season and know you won’t be able to wear it for months regardless 🙂

Organic French Terry Augusta Hoodie

Organic French Terry Augusta Hoodie

Organic French Terry Augusta Hoodie

Organic French Terry Tracksuit

Organic French Terry Tracksuit

This track jacket reminds me of the stuff we used to wear back in the early 2000s, which I was still super active in the Nashville Hardcore scene. We were ALL ABOUT track jackets and hoodies, which looked real good with our tight jeans and Saucony Jazz shoes 😉 I definitely had a baby blue track jacket for years, which I loved everything about except that the fit was just a little boxier than what I wanted. So, here I am reverting back to my 16 year old self. Maybe should buy some Sauconys and relive the memories of the mosh pit or some shit.

Organic French Terry Anima Pants

Organic French Terry Anima Pants

Organic French Terry Anima Pants

Anywayyyy, after I finished the jacket, I realized I had enough French terry left over to make a pair of pants. Sweet! Like I said, this fabric is really thick and cushy, and I figured it would make a nice and warm pair of pants for lounging around the house.

I used the Anima Pants pattern from Papercut Patterns, sewn in a size XXS with about 2″ of length taken off. This was a very easy and straightforward pattern – basically just a knit pant with pockets, cuffs at the hem, and an elastic waistband with a drawstring. I did have minor troubles getting the elastic waistband sewn in – I think mostly due to fabric choice, as again, SO THICK OMG – but it’s fine, just a bit wonky looking. Whatever! For the white ribbing, I used a white cotton interlock knit, also from Organic Cotton Plus, which I so happened to have in my stash (the knits I used on the hoodie didn’t have enough yardage for these pants). It is leftover from these tshirts, btw. I can’t believe that shit was still hanging around my stash, but I ain’t gonna argue with that!

I am quite happy with how the pants fit, as well as how comfy and cozy they are. I am not especially happy to see that I have basically made an unintentional pair of Santa pants, but, it is what it is. I wasn’t planning on wearing these out of the house anyway (sorry, the whole ~athleisure~ trend is another thing I just cannot get behind), so I’m not terribly concerned about it. At least I have the perfect outfit to wear this Christmas.

(Btw, in case you were wondering – I also made my top. It’s a Papercut Patterns SJ Tee, sewn in a lightweight jersey fabric and cropped.

Organic French Terry Anima Pants

Organic French Terry Anima Pants

I should add, another thing I had no intention of doing was actually wearing these two pieces together.

Organic French Terry Tracksuit

Because I definitely look more like a late 90s Puff Daddy in this ensemble HAHA

Organic French Terry Tracksuit

I will let y’all know when my rap album drops, ok? Holler.

**Note: The French terry was given to me by Organic Cotton Plus, in exchange for a review. All rap opportunities are 100% my own.

Completed: Crazy Aztec Waver Jacket

28 Oct

Well, my winter jacket is ready for this year! Guess I can cross that one off the list!

Papercut Waver Jacket

Before we get too deep into this post, I have to warn you – I took a LOT of photos of this jacket. It’s a big project and one that I’m especially proud of. I am not even sorry that you’ll have to look at like 40 pictures of it now. Yep.

Papercut Waver Jacket

As I mentioned in my Fall/Winter sewing plans, I’ve been collecting all the bits and pieces to make this jacket for a couple of months now (PROTIP: Making a coat can get expensive when you start buying all the crap that goes into it, but you can make the cost hurt a lot less by buying everything in phases 🙂 HAHA). I’m pretty set on the heavy winter coat front – my Vogue coat is still serving me well nearly 2 years later, and the Ralph Rucci knock-off is a wonderful piece to wear when I’m dressed up. My wardrobe does have a small gap in lightweight jackets – my black and gold bomber jacket, while awesome, is a bit short to really be cozy, and my orange Minoru jacket is really better suited for the super mild spring temperatures as it’s really not that warm (it’s just cotton with a poly lining, after all)! What I needed was a longer jacket, preferably one with a hood. I always miss having a hood.

Papercut Waver Jacket

Papercut Waver Jacket

The Papercut Patterns Waver Jacket was my pattern choice – it’s a really cool, casual style and I liked that it included a hood, as well as the waist-cinching drawstring. This pattern is pretty similar to the Sewaholic Minoru, although without all the additional gathering nor the hood-stashing wide collar. I think the style of the Minoru looks pretty good on me, so I knew the Waver would as well. I also found an eerily similar replica (with set-in sleeves rather than raglan) at the GAP a few months ago, so I was able to try it on and see what I thought before I started making muslins. I love it when things work out that way!

I cut the size XS, which is my usual size with Papercut. I like that the jacket has some shape, but there’s still enough room in there for me to pile a sweater on underneath (which is about the max layer of clothing I’d have on if the weather was appropriate for a jacket like this!). My muslin revealed that I didn’t need to make any fitting changes, other than shorten the sleeves about 1cm (ooh, look at me, sounding all international and shit).

Papercut Waver Jacket

Of course, the fabric really makes the jacket! This cool navy Aztec virgin wool is from Mood Fabrics, and I’ve had a big piece squirreled away in my stash for months. It’s a pretty lightweight wool, which is perfect for my needs, and suitable for this pattern. I love all the colors in the print! Trying to cut those pattern pieces to match all the bold, colorful lines was a little bit of a struggle, but I made it work. I lined the jacket with English blue silk charmeuse (the exact one that I used appears to be sold out at this point, sorry!). I really did agonize for a long time over what color lining to include – the fun side of me loves contrast linings, but the boring side of me thinks it makes things look a little cheap (except that red lining in my plaid Vogue coat; I have no regrets about that one!). I actually like a more subdued lining, and prefer the contrast in the form of texture, not color. So I went with English blue, which perfectly matches the navy in the wool.

I didn’t do a lot of crazy tailoring with this coat – it was actually a fairly simple project. I did add a back stay (made of medium-weight muslin and using this tutorial from Sewaholic) to the back to keep it from stretching out, and I catch-stitched all the wool seam allowances down so that they’d stay flat with wear (similar to this, but without any of that horsehair interfacing. This is a casual coat that doesn’t need heavy tailoring!). There’s no padstitching in this project, or bound button holes. While I LOVE big projects with lots of interior details, not every project has to be couture-worthy. Especially if it’s a simple jacket.

Papercut Waver Jacket

ha! Bet you didn’t notice those big patch pockets, did you? I cut those so they are hidden in plain sight right on the front of the coat. Good thing I have radar fingers, otherwise I’d never be able to find them when my hands get cold.

Papercut Waver Jacket

I also added inseam pockets (not included in the pattern, but as easy as stealing a pocket piece from another pattern and popping it into the side seams as you are sewing it up!), sewn in silk charmeuse, along the side seams. The wind blowing in my hair for this photo is an added bonus, and you are welcome for that.

Papercut Waver Jacket

Papercut Waver Jacket

Papercut Waver Jacket

The hood was a big selling point for this pattern! I love jackets with hoods, but I never really come across jacket patterns with hoods that I actually like. It’s nice to have a hood for rain and light snow, so I’m glad this pattern has a hood! It’s a nice 3 piece hood, too, so it stays on your head without squishing it, and stays put (and it’s big enough to cover my head even when my hair is pulled up in a bun!). The pattern calls for lining the hood with self lining (aka the jacket fabric), but I was afraid that wool would give me weird hat head, so I lined the hood with more silk charmeuse instead. I figured, they make pillowcases out of silk, so hood lining can’t be too far off… right?

As you can see, I also added faux fur around the hood. Yeehaw! I love this detail in coats, and I was keen to add it to this coat as well. This black and white faux fur from Mood is really nice stuff – it’s super soft and almost feels like real fur. It’s certainly way better quality than any other faux fur I’ve sewn. This doesn’t necessarily make it any easier to sew – I still had fur flying everywhere as I cut it, etc etc – but the payoff is worth it!

What you can’t see in these photos is that the fur is actually removable – just in case I change my mind and want it off, it won’t be difficult to remove it (I doubt that will happen, but I like having options!). I sewed the fur trim the same way you’d make a fur collar, loosely following this tutorial from Casey, although I did not add any interfacing as my fur has a pretty heavy backing as-is.

Papercut Waver Jacket

I sewed black twill tape around the edges and then folded it to the inside, catch-stitching everything down securely.

Papercut Waver Jacket

Then I laid my silk charmeuse lining on top, covering all the insides and attaching the folded edge of the lining to the twill tape on the fur, using teeny hand stitches. The fur trim was then attached to the perimeter of the hood, using invisible hand stitches. I briefly considered using snaps or buttons+loops, but decided that I didn’t want anything to show when the fur was removed. The stitches will be easy to pull out if I need to take the fur off, but you can’t see them when the fur is on, either. You can see what the jacket looks like without the fur here, if you’re interested!

Papercut Waver Jacket

Here’s that blue lining! You can see another change I made to the jacket – instead of using a drawstring to cinch the waist, I added wide elastic. This was mostly due to comfort – elastic isn’t constricting like a rigid draw string is – plus I think it looks better on me. I did have to change up the order of construction a bit to get this to work. First I bagged the lining as usual (per the pattern instructions). I left off the drawstring channel pattern piece and instead sewed through all the layers of the wool and lining to make a channel (similar to the construction of the Minoru), then fed the elastic through that and tacked down the ends.

Papercut Waver Jacket

I also added a little leather tab to the back of the neck, so I can hang the coat more easily (or from my finger haha).

Papercut Waver Jacket

I actually like this way this coat looks unbuttoned, which is a first for me!

Papercut Waver Jacket

Papercut Waver Jacket

Papercut Waver Jacket

I do wish that I had paid more attention to my pattern-matching on the front of the coat, so that the design would continue uninterrupted. Oh well! It still turned out pretty cool despite that mishap, and there are triangles down the center front instead. I’m ok with that!

Now for a buttload of dressform and flat pictures:

Papercut Waver Jacket

Papercut Waver Jacket

Papercut Waver Jacket

Papercut Waver Jacket

Papercut Waver Jacket

Papercut Waver Jacket

Papercut Waver Jacket

Papercut Waver Jacket

The buttons are antique glass buttons that I bought at the flea market earlier this summer. Love them so much! That guy has the best buttons.

Papercut Waver Jacket

Papercut Waver Jacket

Papercut Waver Jacket

Papercut Waver Jacket

My favorite part!! The leather tab was an idea I took from an old American Eagle coat – I just cut a strip of heavy leather, rounded the ends, and punched holes so I could run stitches through it. And the woven label is from Wunderlabel – isn’t that the best finishing touch? I had a hard time deciding what mine should say – I wanted it to say Made in Nashville, but I don’t really live in Nashville anymore (I mean, we are close enough but I’m a huge weirdo/stickler about that sort of thing!), so The South works 😉 Anyway, this was my first experience with Wunderlabel – I’ll have more of a review up in the future after I’ve used more of the labels. But in the meantime, I’m sewing them on everything!

Papercut Waver Jacket

While I certainly did not push myself to hurry and finish this project, I did wrap things up pretty quickly! I think it took about a week to get everything sewn up, after making the muslin and cutting the fabric. I’m glad I finished it, too, because I think it’ll come in handy when I’m in NYC in a couple of weeks. Hell, it’s already starting to get cold here – I will probably be able to wear it later this week! 🙂

Papercut Waver JacketNote: The fabric for this jacket was purchased with my allowance for the Mood Sewing Network (over a period of months, I might add! 🙂 ). Pattern was given to me as a gift. All comments on this blog post 100% mine, however!

Completed: The Stacie Jean Jacket

16 Oct

Hot on the heels of my 70s denim skirt and Cone Mills Ginger jeans, I have ONE MORE denim piece to share with y’all and then I swear I’m done (well, for now anyway haha). I made a jean jacket! Skirt, pants, jacket – my dreams of wearing a full Canadian Tuxedo are finally realized 😛

Stacie Jean Jacket - front

I have wanted a new jean jacket for several years now. I had a really ace one back when I was a teenager – it fit just the way I liked and the color was spot on. I covered it with patches, buttons and pyramid studs (again, I was a teenager) and wore it for nearly a decade. It even survived Hurricane Katrina – not without a few new mold-induced holes, but y’know, ~punk rock~ or whatevs. I actually still have it, but it’s pretty old, and I’m definitely not cool enough to wear it anymore. Anyway, that was the best denim jacket. Denim jacket #2, the desperate replacement, was fairly subpar and primarily bought out of necessity rather than because I actually liked it. It never fit right, and the wash is one of those weird faded green-indigos that always looks dirty. It’s gone through a couple of alterations to both size and length, which somehow made it look both better and worse at the same time. I’ve been wanting to replace it for years, but it seems like all the stuff I find in stores has a really odd fit or is pre-destroyed/ripped/faded, which I’m not a huge fan of. And while I’ve never been opposed to making one myself, I never came across a pattern for one. Well, until now, anyway!

The pattern is the Stacie Jean Jacket from Style Arc patterns. I’ve never sewn a Style Arc pattern before – although I’ve heard wonderful things about them. They’re a bit expensive to ship from Australia, and you only get one size with your pattern (and since it’s a new-to-me company, what if I get the wrong size arghh). All that being said, Style Arc now has an Etsy shop, where you can download PDFs that come in packs of 3 sizes. Praise! Not to mention, as someone who abhors taping together a bunch of pieces paper, the PDFs are pretty small and easy to manage. You can only print one size at a time (they aren’t nested), but it does make it easier to see what lines to cut and reduce the anguish of wasting a bunch of paper on sizes larger than you need.

Stacie Jean Jacket - front

ANYWAY, all that unnecessary backstory behind, I bought the 4/6/8 pattern and printed/cut the size 6, which was based on my measurements on the size chart (finished measurements aren’t given with this pattern, so that was a big ol’ element of trust right there! Well, not horribly because I did make a muslin!) I waffled a little bit before actually sewing it up – or even making a muslin – because the instructions are SO SPARSE. I don’t feel like I need a bunch of hand-holding in my sewing these days, and I rarely even look at the illustrations in an instruction book anymore, but man alive there is literally like, a paragraph, for making the whole coat. All the sentences are really brief, and there are no reminders for stuff like finishing seams or what direction to press them in. No diagrams at all, unless you count the topstitching guide on the second page. Seriously, the instructions are 3 pages long – the first page is the cover, and the last page is the topstitching guide. And half of the second page is a map of all the pattern pieces. So yeah, not a lot of hand-holding with this one! Do you ever look at a new pattern (sewing or knitting) before starting it and get overwhelmed with all the direction since it’s a bit out of context? That’s how I felt about this pattern. Woof. I knew a muslin would be totally necessary, not just for fit, but also to make sure I understood how to put the dang thing together. I was NOT about to spend my weekend ripping out topstitching.

Stacie Jean Jacket - side

It wasn’t until I was in Maine, teaching at the bomb-ass A Gathering of Stitches for my sewing retreat last month, that one of my students (appropriately named Staci 😉 ) showed me her Stacie Jean jacket. It was absolutely beautiful and I was immediately inspired. She reassured me that the jacket was easy to construct, and that the sizing was accurate. So, as soon as I got home, I started on my muslin.

I’m really glad that I took the time to make a muslin, because I ended up needing to make some changes around the armscye. I tried to take photos to share in this post, but you can’t really see the fitting issue. I could certainly feel it, though! The armscye was totally the wrong size and my arm movement was severely restricted. I could barely reach in front of me, and everything pulled at the bicep. I googled around and tried to figure out how to fix this issue, but that was hard since I wasn’t really sure what was causing the problem to begin with. Finally, I just sliced the sleeve out of the arm hole and re-pinned and sewed and added fabric scraps to the holes until things started to feel right. I also compared the pattern piece to my current denim jacket (which, although I’m not happy with it as a whole, I will say at the arm holes fit really well hahaha). Look at this!

Stacie Jean Jacket - pattern adjustments

So, clearly, the arm holes were WAY too big for me. Once I figured this out, I was able to adjust the pattern pieces to be the correct (smaller)size for me, plus reduce the height of the sleeve cap so that it would fit the new arm hole. Using a combination of my pinned/basted/pieced muslin pieces and the existing jacket, I added in paper to raise the underarm and add more so that the arm hole didn’t cut too far away from my actual underarm. I also added about 1/4″ to the shoulder, since it seemed a bit narrow on my muslin.

Also, totally wearing my muslin in that photo. Ha!

Stacie Jean Jacket - pattern adjustments

Stacie Jean Jacket - pattern adjustments

Stacie Jean Jacket - pattern adjustments

I wish I could give y’all specific directions or a link to a tutorial on how I figured all this out, but it was really a matter of pinning and basting and ripping and trying things on over and over until the fit felt right. I can’t even really share photos because this was a fitting issue that was more focused on the way the garment felt, rather than how it looked. Sorry! I will say that I used this post to figure out how to reduce the sleeve cap, but the arm hole itself was pure trial and error.

While I was rooting around in pattern malarkey and destroying arm holes, I also made a few more fitting changes based on the rest of the muslin. I removed 2″ from the length of the jacket, because I liked the length of my muslin without the bottom band added. I also removed a buuuuunch of length from the sleeves – as drafted, even with the turnback, they were a good 2″ too long. However, I also wanted to add a proper cuff (the pattern has a deep sleeve hem so you can turn it back, but I wanted an actual cuff with a button and placket), so I removed another 2″ at the bottom. I drafted a simple cuff (lol “drafted,” aka I drew a rectangle on some paper) and added a little bit of width at the bottom of the sleeve hem to accommodate the placket.

After all was said and done – I made a second muslin to verify that all my changes didn’t completely ruin the pattern. Everything worked! Yay!! Finally, time to cut into some denim!

Stacie Jean Jacket - back

My denim is a piece I’ve had squirreled away in my stash for a couple of years now. I bought it at one of the big Imogene + Willie yard sales, and it’s a beautiful heavy, high-quality selvage denim. I got about 4 yards for $5 (whoop!). I tried to make jorts with it last year (that was a big ol’ fail btw), then realized I like my bottoms to have a little bit of stretch, which this denim has none of. I’ve been hanging onto this yardage for way too long considering I didn’t know what I’d do with it, but a denim jacket is a pretty perfect project for this kind of fabric. Of course, I’m used to my old jacket being so soft now, so the stiffness of this new one feels really off. I may wash it a few times to try to soften it up.

Stacie Jean Jacket - front

Muslin horrors aside, sewing this jacket was super fun! Like I’ve mentioned before again and again, I really enjoy working with denim and I love all the detail that goes into sewing jeans (or denim jackets, for that matter 😉 ). It’s a good thing I like topstitching, because this jacket has a LOT of it. Fortunately, there is a topstitching guide included in the pattern, which shows you diagrams of where to put what. I also had my old jacket out for reference, which came in handy with that sleeve placket. There is no interfacing in this jacket, although I did put a narrow strip in the facing behind the button holes and buttons – just to stabilize it a bit. It’s not the entire width of the facing. The collar and everything are uninterfaced. Over time, everything should wear in and soften up really nicely.

Stacie Jean Jacket - front

I primarily added the cuffs + placket because I like to wear my sleeves rolled up. The sleeves on this pattern are certainly wide enough to do this without needed a cuff that opens, but I just didn’t like the way that felt. I’m glad that I made the changes to the sleeve, but now I kind of feel like the sleeves are a bit too loose-fitting. The sleeves on my RTW jacket are definitely a lot tighter. That being said, I also can hardly wear a long sleeve top under that jacket without some serious bunching, so I’m going to hold off and wear this jacket around a little before I decide whether or not to narrow the sleeve. I would kind of like to be able to wear a sweater under this. The jacket is sewn with the sleeves inserted flat, then sewn up the side seams like how you’d do a tshirt (interestingly, the sleeve head has no ease whatsoever), so reducing the sleeve width will be pretty simple if I decide to do that in the future. Well, I’ll have to remove the cuff and redo the placket, but I’m sure I can manage.

Stacie Jean Jacket - front

One thing I wish this jacket included is pockets for those pocket flaps! Alas, they are merely mock pocket flaps – they don’t open to anything (or, rather, they don’t open at all – that shit it nailed shut straight through the button ahahaha). My RTW jacket has little welt pockets under the flaps, which I wanted to copy, but trying to figure out those sewing steps – in addition to the sleeve changes and all that fitting drama – was making me feel dizzy so I opted to keep it pocket-less. Also, I’m pretty sure I’ve never used those pockets on my jacket. So it seemed kind of pointless to go crazy adding a pocket I didn’t even need.

Stacie Jean Jacket - front

Topstitching!! My favorite!! I used a denim needle and some lovely jeans topstitching thread for all the topstitching. I actually just used a single needle to get the double topstitching – one the first pass, I used my edgestitching foot with my needle moved all the way to one side, which made the stitching line 1/8″ from the edge. For the second pass, I used my 1/4″ foot and centered it on the first stitching line. I’m sure you could use a twin needle for this, but I don’t have any that could handle that heavy denim and thread. Plus, I don’t mind the extra work of sewing the same lines twice 🙂

Stacie Jean Jacket - front

Stacie Jean Jacket - back

Sorry these pictures are so blown out! Honestly, all the photos on this post are bad, but I don’t care enough to retake them 😛

Stacie Jean Jacket - cuff and placket

Stacie Jean Jacket - cuff and placket

Here is the sleeve placket. Based on the placket of my RTW jacket (and also, Landon’s denim jacket haha), it is just a little extension cut out at the bottom of the sleeve. Maybe 1/2″ wide and 2″-3″ high. You sew the sleeve closed up to wear the placket starts, then turn under the extension twice and topstitch it down. The cuff is literally just a rectangle.

Stacie Jean Jacket - inside

The inside of the jacket is sewn with black thread (I have two sewing machines so I can use both when I’m making anything with jeans – one is threaded for piecing, and the other is threaded for topstitching) and the seams are serged.

Stacie Jean Jacket - inside

More frustrating than the fitting conundrum was sewing these FUCKING button holes! LORD!!! I can’t even tell you how many I had to rip out – my machine just plain did NOT want to put button holes in this jacket! Working on those things legit drove me to drink that day. At least I finished, them! And then I got to hammer out my frustrations with the buttons, which is always a plus 🙂 The buttons are some of the bag of 25 that I bought from Taylor Tailor, btw!

Stacie Jean Jacket - inside

Finally, I added this little hanging loop to the center back neckline, to make the jacket easier to hang! It’s just a little strip of the selvage, folded and topstitched and crammed into the collar seam 🙂

Stacie Jean Jacket - back

Overall, I’m really pleased with how the jacket turned out (well, other than the width of the sleeves, but I’m gonna sit on that and see how I feel after I’ve worn some long-sleeve shirts under it. I might feel differently about it in a couple of months!)! Despite all my fit-bitching at the beginning of the post, I think this is a great pattern and I definitely recommend it if you’re looking to make your own denim jacket and can be adventurous about the lack of instructions. While I did indeed have problems with the arm hole fit, I googled the shit out of this pattern and haven’t come across anyone else with the same fit issues. This leads me to believe this is a fit issue specific to my particular body shape, and not an indication that the pattern is terrible. Just need to put that out there!

Will I make this pattern again? You bet! I’d love to do a shrunken version in white denim, maybe for next spring 🙂

Completed: Albion Jacket for Landon

5 Jan

Happy New Year, everyone, and welcome to 2015! I’d like to start ringing in the new year by showing you something that I made last year (lolz, sorry). It was for Landon, aka unselfish sewing, which makes for a delightful turn of events.

Albion Toggle Jacket for Landon

An Albion jacket! Yay!

Fair warning – we took a lot of photos (if you don’t recognize the background, that’s cos these were taken in the Smoky Mountains! FANCY!), and I had a really hard time narrowing them down. This dude is just so damn gorgeous looking. I’m sorry, but you’ll just have to deal.

Albion Toggle Jacket for Landon

Anyway, I initially planned this coat with Landon earlier in 2014 – according to my Mood orders, it was sometime in January/February. We ordered swatches, settled on fabric and design changes, and I made a muslin. That’s when things just stopped and stayed that way. The muslin was all kinds of wrong and I didn’t feel like dealing with it. I was afraid I might have even cut the wrong size. So, I did what seemed like the most logical solution – I shoved everything in a box and didn’t think about it until a couple of weeks ago, when Landon started asking me again about when he might get his coat. Bless his heart.

Albion Toggle Jacket for Landon

Albion Toggle Jacket for Landon

Enough time had passed to heal my wounds, so I dug out the old muslin and we tried again. The only thing I remembered being wrong was that the sleeves were all kind of haywire – super twisted all down his arm, and the hem went up near his elbow when he raised his arms. I wasn’t sure if the issues were because of how the sleeves were drafted, or if I had just somehow managed to cut the muslin off-grain (totally possible), but I ripped one sleeve off and cut another – on-grain – to test. It must have been a grain issue, because that solved the problem. Other than tweaking a little bit of sizing at various points, and adding some length, the rest of the jacket seemed to fit pretty well. I made one more muslin with all the changes to verify that we were good to go.

As I mentioned, this is the Albion by Colette Patterns. We chose to make the shorter jacket version in a size XS (based on Landon’s measurements and his personal preferences for ease), and added 1/2″ to the side seams for a little more wearing ease (I probably could have cut up one size – but I’d already shredded the remaining tissue, and this was easier. Actually, he says the arm holes fit really well so it’s probably best we stayed with the small size). I also added 1/4″ to the CB fold, just to give him a little more room back there. The sleeves were mostly fine – except I added 1/4″ to the seams below the elbow, and removed 1/8″ above the elbow. I also added 3.5″ to the sleeve length (NO idea why it was so short!). I think those are all the fitting changes I made. Pretty minor stuff.

Albion Toggle Jacket for Landon

Albion Toggle Jacket for Landon

The actual construction took almost no time at all! I had it done within about a week, working off and on as I had time. Since it’s not a proper coat, it doesn’t require any sort of crazy tailoring – really just the same techniques you’d use to make, say, a lined dress. I did add a back stay – I just used leftover muslin – to keep the back from stretching out from all those hugz Landon gives me (aw). I also added interfacing to the places where it made sense to include it – the plackets, the sleeve tabs. It seemed weird that the pattern didn’t mention it, but maybe that’s because it’s written for a heavier coating.

For fabric, I used cotton twill for the outer, and plaid wool flannel for the body lining. The sleeves are lined with silk charmeuse (to aid with getting the jacket on, and also for warmth – cotton isn’t very warm, but wool and silk are!).

Albion Toggle Jacket for Landon

Albion Toggle Jacket for Landon

I also added an interior patch pocket for his phone, as well as a hanging loop at the back neck. The interior pocket is cut on the bias, but it’s lined with silk cut on the straight grain (to keep it from bagging out as it gets used). For the hanging loop, I just used the pattern piece from the Minoru Jacket. Not trying to reinvent the wheel here!

Albion Toggle Jacket for Landon

Albion Toggle Jacket for Landon

Albion Toggle Jacket for Landon

I knew I didn’t want to buy toggles (they’re expensive and they never look quite right), so I made them. I started with these horn toggles from Mood Fabrics, and used scrap leather (given to me by Elizabeth) and cotton cording to make them. I just goggled ‘how to make your own toggles’ (I know, I’m so creative) until I found a tutorial I liked – this was the one I used. I attached the cording to the leather patches at both ends, just for additional strength.

To attach the toggles, I marked their placement on the jacket and then stuck them down with double-sided tape. I traced around the entire toggle – patch and all – with chalk (this is helpful so it’s easy to brush off – I like my chaco liner, personally!) to be really sure of the placement, but the tape mostly helped with keeping things in place while I topstitched. I used my #10 edgestitching foot and just sewed really slow, stopping with the needle down when I needed to turn. Didn’t even need to change my needle – the leather was thin enough for the 80/12. Done and done!

Albion Toggle Jacket for Landon

Albion Toggle Jacket for Landon

I like the 3 piece hood! I like that it stays put, and it has a nice shape (you know how some hoods just kind of suck in around your head? I hate that.). I cut the center piece on the bias to ~add interest~.

Albion Toggle Jacket for Landon

Albion Toggle Jacket for Landon

I REALLY love the lining! I was initially sad to not keep it for myself (that is one helluva a wool flannel, is all I have to say about that), but it’s really perfect for this coat – and those are totally Landon’s colors. When cutting, I just made sure the side seams were matched and that was good enough (and easy!). I’m also really glad we lined the sleeves in silk, because I can’t imagine how awful it would be to try to pull this thing on without slippery sleeves, yeesh. Plus, silk charmeuse. mmm 🙂

Albion Toggle Jacket for Landon

Anyway, I’m happy to report that Landon loves his coat! He has been wearing it nonstop (seriously put it on as soon as I finished it – to wear around the house hahaha), and been showing it off to all his friends. I’m just happy to make him happy (not to mention be off the hook for another year :P). Oh, and in case you’re wondering – that’s a me-made shirt Landon is wearing, too. Gah, I am the best girlfriend.

**Disclaimer: All fabrics were provided to be as per my involvement with the Mood Sewing Network. The Albion pattern was given to me as a gift from my sponsor, Indie Stitches.

Completed: The Rigel Bomber Jacket

14 Nov

This jacket has been a LONG time in the making. Totally worth the wait, tho.

Rigel Bomber Jacket

My dream bomber jacket! ♥

I swear, ever since Katie released the Rigel Bomber jacket for Papercut Patterns, I have noticed this style popping up EVERYWHERE. Talk about being on point with style trends! I knew I wanted to make the jacket when I first saw the pattern last winter – it’s a great, casual jacket and I love the short length (sometimes my Minoru just feels a touch too long, depending on what I’m wearing with it – not to mention, the cotton/poly fabrics mean it’s not the best choice for super cold temperatures!). It’s totally different from any other pattern I own, so obviously I wanted to make it. Once I saw Clare’s Rigel bomber making it’s rounds – and then saw the dang thing in person during our trip to NYC earlier this year – it became Very Important that I have one in time for this current winter. Especially since I tried hers on and it looked ace on me. As you do.

Rigel Bomber Jacket

Since I was in bomber-mode for the duration of that particular shopping trip, I made it a point to source the notions I knew I’d have the hardest time finding – rib knit and a separating zip. In the mecca that is the Garment District of New York City, these things are relatively easy to find (well, at least compared to the Limited Fabric Options of Nashville, ha!). I found both of these things at Pacific Trimming – the rib knit came from the very back corner of the store, and the zipper is a Riri zipper! I chose the colors, specified the custom length according to my pattern, and paid something insane like $20 for it. I don’t actually remember how much the zipper cost, because I mostly blocked it out of my mind – but suffice to say, it cost significantly more than the $5 zips you can pick up just about anywhere.

Rigel Bomber Jacket
Rigel Bomber Jacket

I do want to talk about the Rigel a little more before I start going on a tangent about my notions, though. I sewed up the XXS – one, because that’s my Papercut size, and two, it’s the same size as Clare’s and I liked the way hers fit on me. I did not make any length or fitting adjustments to the pattern, just sewed it straight out of the envelope. The instructions on this pattern are great – you are guided through the steps of adding a single welt pocket, attaching the ribbing, and inserting the open-ended zip. The only part of the instructions that leaves a bit to be desired is the lack of lining – which most blog posts I’ve read have mentioned. My assumption here is that Katie wanted the pattern to be as quick and simple as possible, and adding a lining to this sort of jacket is either going to be complicated (at least to write out the instructions for) or involve a lot of hand-sewing. It’s not terribly hard to add a lining, but it does require some brain aerobics before you start sewing.

Rigel Bomber Jacket

Part of what took this jacket so long to incubate was that I couldn’t decide on a fabric! I bought my zipper and ribbing before anything else, so matching a wool fabric (yes, it had to be wool) to all that gold was a little tricky. Not to mention, my notions were a bit special – if not expensive – so I wanted to make something that I’d love and actually wear. I hemmed and hawed for MONTHS over what fabric I wanted to use… this double-faced black wool coating was my #1 contender. I actually got a swatch of it back in the spring… and it’s been pinned to my bulletin board ever since (sometimes I just make myself look at a fabric for a long time, and if I don’t get sick of it – it’s mine!). I finally bought it last month, which is actually REALLY lucky because it’s sold out now! I like how the embroidered floral design gives the fabric some interest and texture, while still keeping it relatively plain (so it doesn’t compete with my trims).

Rigel Bomber Jacket

I will mention that the fabric description is a bit off. I guess it doesn’t matter at this point, since the fabric is sold out – but it definitely feels more like a light to medium weight fabric, NOT a heavy coating. The wrong side is brushed with long fuzzy strands of fabric fiber, and this fabric SHEDS LIKE A BITCH. Even though my jacket is lined, I serged every single seam of the wool because I couldn’t otherwise control the shedding. I really don’t recommend trying this fabric if you can’t serge the raw edges – a plain straight stitch won’t prevent it from eventually disintegrating.

Also, on a bit of a bummer-town note – this fabric doesn’t really wear well. It’s already starting to pill and look kind of old 😦 So this jacket might not have a super long lifespan as it is. Good thing I can always salvage that ridiculously expensive zipper! :DDD

Rigel Bomber Jacket

I don’t know why I’m winking in this photo (just imagine me taking my pictures with a remote and tripod and things get even creepier with the winking ahaha)? Anyway, here’s the lining! I lined the entire jacket with gold china silk, which goes really nicely with my gold accents. I love the warm combination of silk+wool – it’s lightweight, and while it probably won’t work well in the Arctic, it’s fine for our mild winters (or a mild spring up north).

I will deviate for a second here to talk about the lining. As I mentioned, the instructions don’t tell you how to do this. Further, while there are lots of posts scattered around the internet on how to line the Rigel, none of them were exactly what I wanted (NO raw edges, no hand sewing). I wanted to try bagging the lining – which, spoiler alert, that shit totally worked! I used to do this all the time when I worked for Muna last year, but my memory was a little spotty, especially since we never used written instructions for anything (I like instructions when I’m sewing – even if it’s just a checklist – so I don’t forget to do something important!). I used Jen’s tutorial on bagging a jacket lining to jolt my memory, which was extremely helpful. Here are the steps I took to get my lining in that dang jacket:
1. First, I drafted some lining pieces – using the facings as a guide, I removed that amount from the jacket pieces (the front, the back, and the sleeves), and added 3/8″ seam allowances. I also added an ease pleat to the back piece, but I haven’t ripped open the basting yet because I found that I don’t need it. Someday, it will pop open and scare me, probably.
2. I constructed the entire jacket – up to the ribbing and zipper. The lining was completely assembled, with the facings attached.
3. I sewed the two jackets together at the neckline and zipper, as instructed by the pattern (for attaching the facing), and pressed and understitched.
4. I sewed the bottom of the zipper and facing, as instructed by the pattern (some of the lining may later need to be unpicked to get it to turn correctly, this is ok!)
5. I sewed the lining to the seam allowance of the ribbing at the bottom, right sides together.
6. I attached the lining to the sleeve hems at the ribbing, right sides together.
7. At this point, I had a giant Möbius tube of jacket+lining with everything attached and no openings anywhere. It was slightly horrifying – and exactly on track. This is when you rip open a section of the underarm lining that’s already been stitched, and pull the entire jacket through the hole.
8. Press everything, and then sew up the hole. I actually close up my hole from the inside by machine as much as I can, and then sew the remaining inch or so shut on the outside (I tried to take pictures to show how I do this, but it’s really hard to understand if you’re not actually seeing it in action. Needless to say, my closed-up hole is only about an inch long, instead of the 4″ tear I had to make to get the jacket pulled through it).
9. The little sections at the bottom where the facing meets the ribbing will need to be sewn shut by hand.

Rigel Bomber Jacket
Rigel Bomber Jacket

AND JUST LIKE THAT – A COMPLETELY BAGGED LINING WITH NO VISIBLE SEAMS! Woohooo!

Rigel Bomber Jacket

Ok, now we can talk about all the fun trimmings!

Rigel Bomber Jacket
Rigel Bomber Jacket

What I neglected to tell you guys about this ribbing is that is actually has sparkly gold stripes. It is amazing! Pacific Trimming sells these in 1 yard pieces – and I needed two pieces. They’re about $8 a piece, if I recall correctly (they won’t cut them down, at least, they wouldn’t when I was there!). Also, when I pressed them, they smelled like a fart (I actually wrote this in my sewing notebook, so it must be important and worth mentioning, I guess). Must be all the polyester?

The Riri zipper looks really nice with the sparkly gold, I think! I still haven’t decided if it was worth the obscene price I paid. On one hand, it was really cool to be able to pick the zipper based exactly on my specifications – color, length, everything. It does feel solid and it is really satisfying to zip up (Riri zippers are referred to as the ~Rolls Royce~ of zippers, I’m told). That being said – $20 for a zipper? Yeah. I dunno. It sure is pretty, though!

Have a photo dump:

Rigel Bomber Jacket
Rigel Bomber Jacket
Rigel Bomber Jacket
Rigel Bomber Jacket
Rigel Bomber Jacket
Rigel Bomber Jacket
Rigel Bomber Jacket

God, I’m sorry about that.

Rigel Bomber Jacket

Anyway, I LOVE my new jacket and I’m so glad I took my time with choosing the right fabric (as well as figuring out that lining!) because the end result was so worth the wait. I’ve been wearing this thing constantly since I finished it – just in time for the weather to get cold, it seems. I’d love to make a patterned version of this one – either with some floral wool (LIBERTY?!), or something polka dotted! Can’t have too many bombers amirite. I even have a couple more pieces of rib knit that I apparently bought during that shopping trip that I completely forgot about. They are black with white stripes. Thanks, past Lauren! ♥

Oh! And my pants are those Jamie Jeans I made a couple of months ago. Just mentioning it because I ended up taking in the inseam a little bit more after that last post, so you can see what they look like now. I think the fit is much better! I’ve found I can usually go about 3-4 wearings between washings on these, before the knees bag out enough to drive me crazy.

Lastly, I will leave you with this outtake. Not sure what I was doing there, but it made me laugh, so hopefully it’ll make you laugh too! 😀

Rigel Bomber JacketHave a great weekend, y’all!