Tag Archives: leggings

Completed: Organic Cotton Jeggings

9 Mar

Good morning, friends! I hope this post finds you well – I have missed all of you! If you missed out on the drama last week (and/or were wondering why I suddenly fell silent and my website went poof into the night), I had a bit of an issue with an expired domain and transferring it back into my name. You can read the boring backstory about it in this post, but basically – everything should be fixed and up and running. If you’re still having problems getting to the site (I was until last night, thanks to my internet provider), try clearing your cache and cookies and see if that helps. Sorry for all the dramz! Shit should be back to normal from here on out!

Anyway, enough of that boring internet talk – let’s talk about why we’re all here! Sewing and fabric and actual fun happy stuff, yeah!

Ginger Jeggings

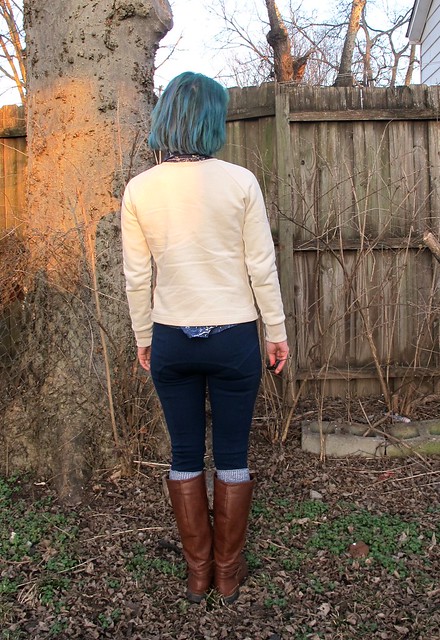
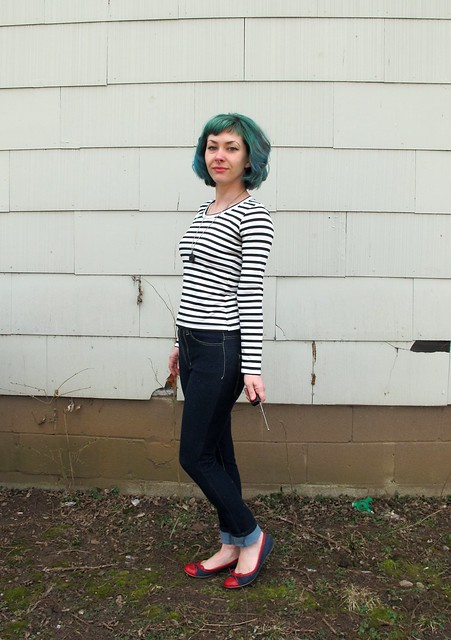
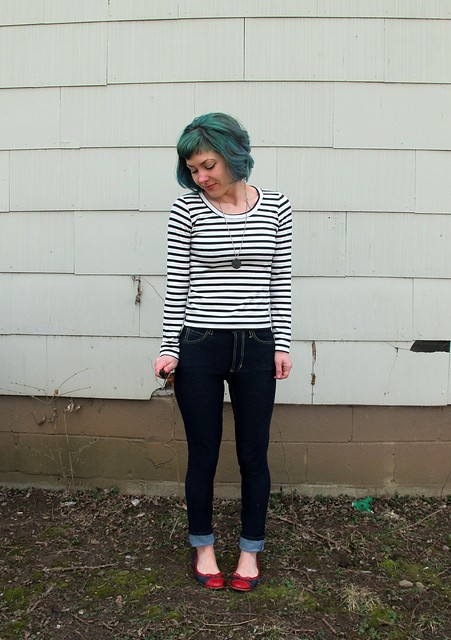
For this week’s project, I bring you: Jeggings. I’m not sure if this means I’ve cracked some kind of sewing power code with all the ridiculously normal/boring things I’ve made at this point, or if it means I’ve hit rock bottom (I mean, we are talking about the ultimate comfort clothing here. I am not above making fun of jeggings, just so we’re clear). You tell me. What I can tell you is that these are INSANELY comfortable and now I kind of get the hype.

Ginger Jeggings

I’m not really much of a comfort-clothes seeker/wearer – I’m ok with being a little pulled in for the sake of looking nice when I’m out in public. That being said, it’s not a very interesting story as to how I came about obtaining a pair of the ultimate comfort/secret pajama clothes. It started out as a fabric review for Organic Cotton Plus. I was prowling around on their website, looking for something to pick as my next project, when I came across their organic knit denim. The fact that it’s called “knit denim” should have raised some sort of warning flag, but I didn’t even notice it – I just saw denim and immediately got starry-eyed. I’m always on the lookout for a good denim source, and this sounded too good to be true. Organic cotton denim with 5% lycra? GET ON MY BODY. I submitted my order and anxiously waited for my shipment.

Ginger Jeggings

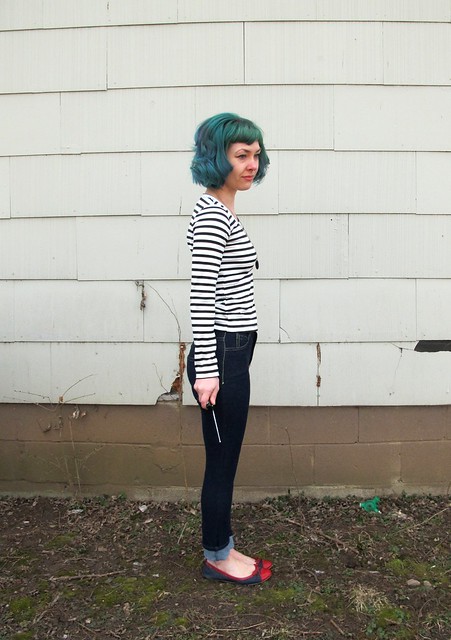
The spoiler here is that this definitely is not denim – not in the true sense of what you get when you buy a pair of jeans. It’s definitely a knit fabric – a very thick, stable ponte-ish type of fabric that looks exactly like denim. It’s the right color and has that twill weave look. It thick and squishy with a good, firm stretch. It’s like a marriage of a tshirt and a pair of jeans. I don’t really understand it, but I’m not going to argue with it. At any rate, I had a yard of this stuff and I realized I needed to make something with it. And that’s where jeggings came in. I wanted to see if I could actually make a pair of jeggings. I did, and now y’all get to see how they turned out.

First things first, I realize that these don’t technically classify as actual jeggings. The material does – it’s more of a knit than a denim, it’s very stretchy and it has a lot of spandex in it. However, these are constructed like an actual pair of jeans. They have working pockets (both front and back), they have an actual zip fly, and there is no elastic in the waistband. The only part about these things that makes them even remotely jeggings-like is the fabric they’re made from. However, I’m going to keep calling them jeggings because – well, I made them, and I get to call the shots. Them’s the rules.

Ginger Jeggings

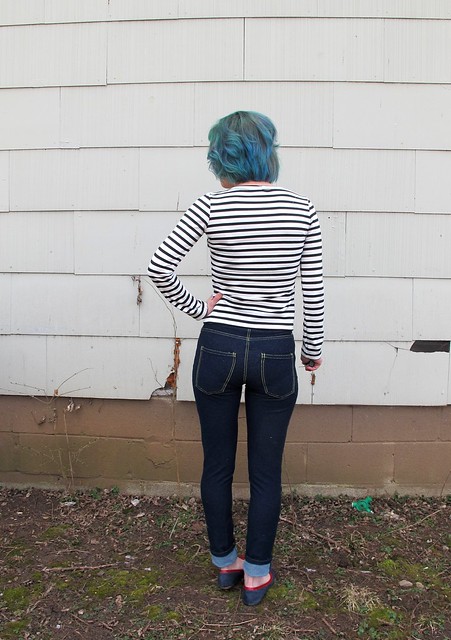
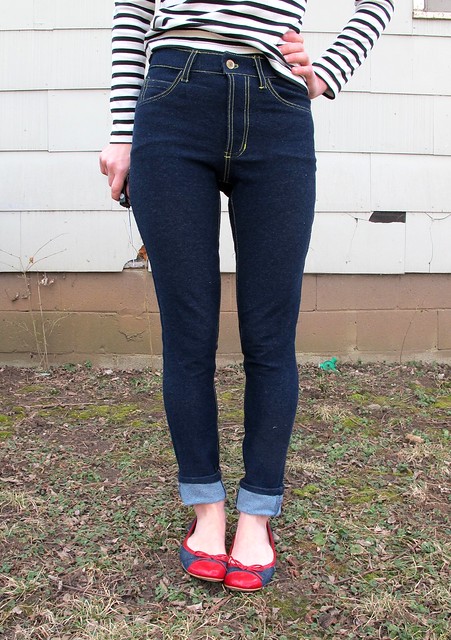
When I was planning these out (after receiving the fabric, but before cutting into it), I debated on whether to make these into jeans-looking pants – aka, true jeggings, with the pockets and fly simply suggested by lines of topstitching. I thought it would be interesting to see how the fabric works when it’s treated like a woven, so I decided to use an actual jeans pattern and follow it the same way I would if I was making these out of denim. I used the Ginger Jeans pattern and basically did not make any changes for the fabric. The size is the same size I used for my woven denim and stretch twill jeans, and all finishing and topstitching uses the same methods as those pairs do. The only difference is that I didn’t flat-fell any of my seams – I figured it was enough that I was making these out of stretch material, so I just serged and topstitched (like you would with leggings). I’m surprised at how well they fit, although I think the legs could be a little tighter around the ankle. Also – they turned out surprisingly long, due to the 4 way stretch. I actually cut 3″ off the pattern legs before cutting (that was the ONLY way I could make these out of a yard of fabric – short inseam!), which should make them the correct length – but they magically grew, and now they’re too long. I’ve cuffed them for now, because I want to wash them a couple more times and eliminate any additional shrinking before I re-hem them.

Ginger Jeggings

Making these was really fun, and surprisingly quick! Like I said, I made them the same way you’d make a pair of jeans, except I didn’t flat-fell any of the seams. Everything was sewn on my sewing machine with a stretch needle and the edges were finished with my serger. For the topstitching, I used a triple stitch (thanks to Emmie for showing me the stitch on my Bernina – I guess this means I should probably read the manual more often, ha!), which makes a nice defined topstitch that also stretches quite a bit. The waistband is interfaced with my favorite stretch interfacing (seriously – this stuff is AWESOME), which gives it enough structure to look nice, but doesn’t sacrifice any of that comfy stretch. There is an actual zipper and button installed, however, I did leave off the rivets.

Ginger Jeggings

Ginger Jeggings

Basically, these look & wear like jeans – BUT THEY FEEL LIKE PAJAMAS. If that doesn’t blow your mind with amazement, then I give up.

Ginger Jeggings

Sorry ’bout that VPL, story of my life. I do think the pockets are a bit low, which is likely due to the 4 way stretch. I don’t care enough to remove them and raise them, so it’s whatever.

Ginger Jeggings

Ginger Jeggings

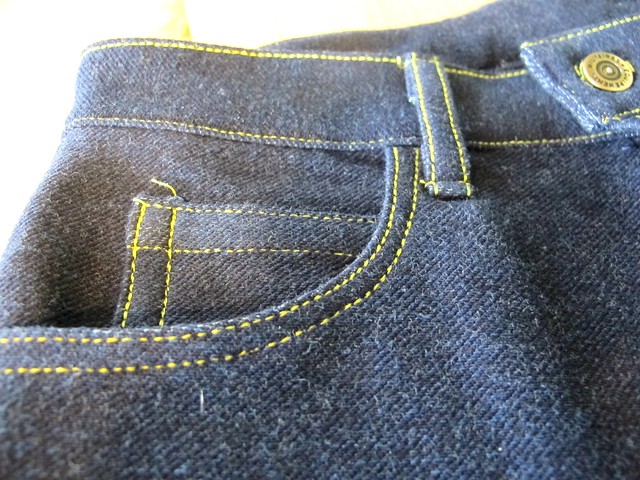
Here are some gut close-ups so you can better see what I was working with. The material really looks like denim! Everything handled pretty well, except attaching the belt loops did get a little difficult at the end, just because there were soo many layers (I ended up hammering them as flat as I could, which helped a little. Still broke a couple of needles in the process, argh.). All the topstitching was done with a single needle and a single piece of thread, sewn with the triple stitch. I used lemon yellow cotton thread, also from Organic Cotton Plus, which was nice and thick and worked out quite well with the triple stitch. It looks more gold than neon yellow when it’s against the dark indigo, which I really like.

Ginger Jeggings

Proof that there’s actually a zipper in there! The zipper is also from Organic Cotton Plus; it’s just a heavy brass jeans YKK zipper, but it works really nicely with this pattern. The 6″ length was just barely long enough for the high-waisted version of this pattern; I ended up cutting about 1/2″ off in excess when all was said and done. The pocket lining is just some stretch cotton sateen I had in my stash. I wanted to use something with a stretch, so it wouldn’t fight against the stretch of the exterior fabric.

Ginger Jeggings

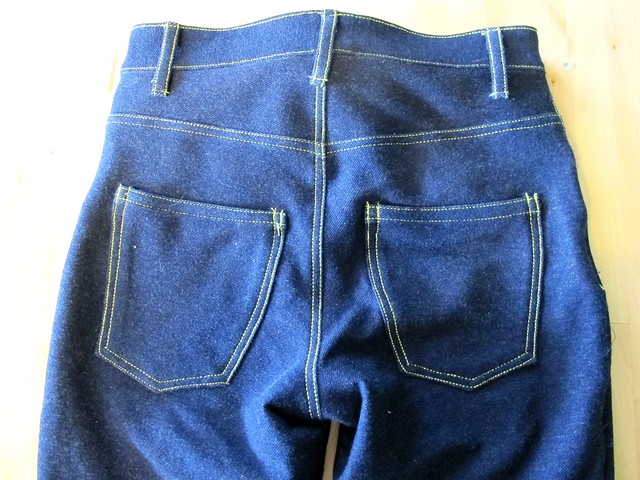
And here’s the back! Mock-flat felled seams (just serged and topstitched) and patch pockets! I had to cut the waistband in pieces, because I didn’t have enough fabric to cut it on the fold – but the seam is covered by the back belt loop, so it can just be our secret, ok.

Ginger Jeggings

So that’s my little sewing experiment! Turns out you *can* make jeans with jegging material – with all the look of jeans, but the comfort of leggings. Love it! And since there are back pockets, I don’t feel as compelled to cover my butt haha. What do you think? Is this a win or just the weirdest garment I’ve ever made? Have you – or do you – wear jeggings? I always made fun of them, but man, can’t deny how comfy they are!!

As a side note – I mentioned this on Instagram yesterday, but it bears mentioning here too. I’m moving soon! I was finally able to get hold of my landlord with the notice and vacate date (they require 60 days, but they’re gonna let us out in 30 days because they love us for being awesome tenants haha), so we’ll be out of this house by the end of March! My best friend/life partner/former roommate just bought a house in the woods in a small town outside of Nashville, and Landon & I will be moving into the lower level as her roommates! The house is cool as shit, the land is AMAZING (did I mention it’s in the woods? Gah I can’t wait to be a hippie and raise chickens in the forest lolol), and I so look forward to living with my two very best friends in one house. Plus – I get a new sewing room! How cool is that? 🙂


** Note: Organic Cotton Plus provided the materials (denim knit, zipper, thread) for this project in exchange for a review. All thoughts and options are my own.

Completed: Cozy Organic Sweatshirt (+ discount code!)

16 Feb

Nothing very exciting on the blog here today, I’m afraid. I spent my Valentine’s Day with whatever cold bug is currently being passed around (and, ugh, I’ve never been so tired in all my life MAKE IT STOP), and I don’t really feel like doing much of anything now, which is a huge bummer because we have been blessed with a pretty awesome snow day this morning (for real, my street is a literal sheet of ice and my gate is frozen shut. Couldn’t leave even if I wanted to). Still, have a small project that I finished before I came down with the Evil.

Undercover Sweatshirt + Ooh La Leggings

Yep, I made a sweatshirt (and ponte Ooh La Leggings, although the post isn’t focused on those. But I did make them, so there’s that!)! How boring! But, you know, when you make everything you wear (and have been doing so for more than a couple of years), you will end up sewing boring staple pieces. For the current me, that means cozy long-sleeved tops that I can wear with pants. This is a big gap in my wardrobe, as past me never wore pants quite as much as current me (probably something to do with the office job that I quit; I had a space heater under my desk! I MISS THAT!), but, it is what it is. And now I need some tops, dammit. The thin jersey ones I have just aren’t cutting it, no matter how many I layer.

I used the Undercover Hood pattern from Papercut Patterns as my base, size XS, just taking in the side seams ever so slightly to make it a little more fitted. I obviously omitted the hood and added a ~self drafted~ neckband (I use the term “self drafted” very loosely, as it’s really just a rectangle… but, whatever.). I also left off the bottom hem band; mainly because I ran out of ribbing, but I think the simple turned under and topstitched hem actually makes this sweatshirt look a little less casual, so that’s a win. I can’t decide if wearing it with a collared shirt (that’s another B5526 underneath, fyi) looks classy, or if that’s just the 80s child in me trying desperately to emerge. Thoughts?

Undercover Sweatshirt + Ooh La Leggings

The main fabric is some lovely brushed sweatshirting fabric from Only Organic, a company based out of France (let me tell you, I felt REALLY cool picking up that box at the post office when it arrive. No, seriously!). I was offered a meter of fabric to try out, and I immediately zeroed in on this stuff because it seemed like the perfect blank canvas to customize for my needs.

You’ll notice that I did no customizing whatsoever. This is a plain, cream-colored sweatshirt we have here. I will admit that I considered adding something to the front – a stenciled phrase, some gold pyramid studs, something – to give it a little more ~pizazz, but I ultimately realized that I’m not really one for wearing graphic tshirts (or sweatshirts), and it seemed kind of stupid to fancy up something just for blogging purposes. So, boring sweatshirt. Sorry, not sorry. At least I know it’s something I’ll actually wear now.

Undercover Sweatshirt + Ooh La Leggings

Anyway, half-asses apologies aside – this is a great marriage of pattern and fabric! I’ve made the Undercover Hood before a few times – but usually with a drapier fabric, and never as a straight up sweatshirt. I like the way this one fits; it’s comfortable and fitted but it’s not skin tight. The fabric is LUXURIOUSLY soft and fleecy – I’m actually wearing it as I type this, and it’s doing a damn fine job of keeping me warm in my cold ass, snowed-in house, so there’s that. I do question whether or not it’s a good idea to wear a white sweatshirt, knowing how clumsy I am – but, eh, I’ll cross that bridge when I come to it. At least I know it’s dyeable 🙂

Undercover Sweatshirt + Ooh La Leggings

Undercover Sweatshirt + Ooh La Leggings

You can see the fleecy goodness of the fabric better here. For ribbing, I used some cream ribbing that I had in my stash – it’s not a perfect match, but it’s close enough, and I love the subtle color changes.

Undercover Sweatshirt + Ooh La Leggings

If you’ve managed to stick it to the end of the post, I have a fabric discount code for ya! Use the code “lladybird” for 10% off your order at Only Organic. Like I mentioned, this company is based out of France, so all my organic-lovin’ pals on the other side of the pond – rejoice! Woot woot!

Now, answer me this – I know sweatshirts have recently had their moment in the spotlight for being ~cool~ and ~luxe~, but does a plain white sweatshirt even pretend to portray that or do I look I belong in a Kmart circa 1995? Also, who wants to take bets on how soon I spill coffee down the front of this thing? I’ve worn it three times since completion and at this point, I feel like I’m flirting with disaster.

** Note: I was given 1 meter of the cotton sweatshirt fleece from Only Organic, however, all thoughts and opinions are my own.

Tutorial: An Easy Elastic Waistband

29 Jan

Hey dudes! Real quick before I jump into tutorial-land this morning – New Vogue Sewing patterns are out! Over the past couple of weeks, I’ve had quite a few people ask me when I would be posting my review. Not gonna happen, guys – at least not for this set, and no, not because of anything to do with me+The McCall Pattern Company. Have you seen the new patterns? There’s really nothing to make fun of! Which is good, because it shows that Vogue is listening to our pleas, I guess, but no jokies for us this time around. The only pattern I see that I really don’t like at all is this Koos Van Den Akker monstrosity that calls itself V1441– but, again, it’s Koos Van Den Akker, which should explain everything. Kind of hard to poke fun at something that’s intentionally designed to look crazy, you know? 🙂 In the news of things I do like – there’s V9077, which is a dress I don’t completely understand, but I think I like it anyway. Aaaaand, that’s about all that warrants any mention from the new collection. Sorry if you were expecting more! Trust me, you don’t want to see a post of me trying to pull humor out of a humorless situation 🙂 Feel free to turn this into a debate on whether or not I’ve sold out to Vogue (the answer is no, but, I REALLY love a good conspiracy theory, and I’m sure some of y’all do too!)

Ok, so, onward to the tutorial!

wb

I’ve had a few requests for this, so here ya go – my tutorial for attaching an elastic waistband to your leggings (or skirt, or whatever. I ain’t here to judge your love for elasticized comfort!). While the usual method of leaving a hole in the seam and feeding the elastic through is definitely non-brainer easy, I prefer this particular method as it doesn’t allow the elastic to twist at all – not while you’re feeding it through the hole (that ALWAYS happens to me, ugh!), and not while you’re wearing and washing them. It stays in place and that’s pretty awesome! Also bonus is that you don’t have a tiny hole to close up afterwards. Whoop whoop!

Anyway, I learned this method from Katie of Papercut Patterns, and it’s definitely my favorite way to elastic the shit out of my waistbands. It is my understanding that she updated that the Ooh La Leggings pattern has been updated to include this method, so this is mainly for those of us who have an older copy of the pattern and/or want to elasticize something else. It does require a little bit of finesse while sewing, but it ain’t nothing you can’t handle 😉 This is also a great method if you are using an elastic that is too wide and thus needs to be cut down – I started with 3″ wide elastic, but I needed 1″, so I just cut right down the middle (well, ish). Since the elastic is going to be attached to the fabric by machine, it’s ok to cut is as the stitches will prevent it from unraveling over time 🙂 Just make sure your elastic has a very tight weave – if it’s a loose weave, it’s best to leave it uncut as there ain’t nothing that’ll keep that shit from unraveling!

Elastic Waistband Tutorial

Start by cutting your elastic to the desired size (I prefer about 4″ of negative ease at my waist, but it’s a matter of personal preference!), including an additional 1″-2″ for overlap. Pin the elastic with the inch overlap so it makes a circle.

Elastic Waistband Tutorial

Sew down all four edges where the elastic overlaps, making sure it’s secure. Ideally, you’d use a zigzag stitch for this – but my machine was already threaded with the double needle, so I used a double needle. I have yet to have a problem with this stitch, so there’s that! I like to stitch over each area twice to be really sure that it’s secure – you don’t want your elastic coming apart after you’ve sewn it into your pants!

Elastic Waistband Tutorial

Divide the elastic into 4 equal sections, either by using a ruler or just folding it in half and half again. Mark each point with a pin, making sure one section is in the center of the part you just overlapped and sewed. If your pattern does not include notches for dividing the waist into 4 equal sections, you’ll want to do so now as well on your garment.

Elastic Waistband Tutorial

On the INSIDE of your garment, match the 4 elastic sections with the 4 pants sections, keeping the overlapped elastic at the center back. If you trimmed down the width of your elastic, it is a good idea to match this area to the raw edge of your fabric, so it will be sewn and enclosed later. You will notice that the elastic is not quite as long as the garment in each section – that’s ok, we will stretch to fit in the next step 🙂

Elastic Waistband Tutorial

Using a serger (or a sewing machine with a zigzag stitch), attach the elastic to the garment. Go slowly and focus on one section at a time, stretching as much as you need to to get the pieces to fit. If you are using a serger, be careful not to trim off too much of your elastic edge – if at all possible, try not to trim off any. Keeping your elastic one uniform width will help with accurate topstitching later.

Elastic Waistband Tutorial

Your garment should look like this – on the inside, attached at the top, elastic loose at the bottom.

Elastic Waistband Tutorial

Now fold the elastic to the inside one time, which will completely encase it with fabric. Pin into place if needed – I like to pin again at the 4 equal sections (this part doesn’t have to be exact, you can just eyeball it).

Elastic Waistband Tutorial

Using a twin needle or a zigzag stitch, topstitch the elastic into place along the previously sewn edge. Gently stretch the elastic in each section, the same way you did when first attaching it. I’ve found that it’s easiest if I hold both the front and back with my hands, and gently guide the fabric as I sew. Stop with the needle down as you finish each section, readjust, and start the next section. Backstitch at the end.

If you’re using a twin needle, you’ll need to topstitch from the right side – this is where keeping the elastic a uniform width is handy. I mark my machine with a post-it note (I’m not adorable enough to use Washi tape, which I see everyone else using haha) to keep everything aligned so I catch the edge of the elastic as well as sew a straight line, but you can also feel it through all the layers. If you are using a zigzag stitch, you can get away with sewing on the wrong side so you can keep an eye on the elastic – but do try to sew a straight line, otherwise, it’ll be real obvious haha.

Elastic Waistband Tutorial

Elastic Waistband Tutorial

And that’s it! Not too hard, huh? Like I said, I really love this method because it keeps the elastic from twisting – it stays in place foreeeever! Also, the overlap at the center back is a handy way to quickly tell front from back just by feeling it – which, I don’t know about you, but I don’t sew tags in my clothes, so that’s pretty freaking useful! Only downside is that you’ll really have a lot of work to do once the elastic eventually wears out, but I personally think it’s worth it, if only to prevent elastic twist!

Let me know if you have any questions! Or if you just want to discuss those new Vogue patterns. Maybe you see something ridiculous that I overlooked??

Completed: Ooh La Leather Leggings

26 Jan

Ok, so, the title of this post is a tiny bit misleading – these aren’t leather leggings so much as they just have a panel of faux stretch pleather. BUT, it sounded catchy (as long as I ignore all the weird Google search terms that will likely lead people straight to this post, aiee), so it stays.

Leggings & Ensis Tee

Anyway, like, ~Ooh La La Leather~ or some shit, amirite?

Leggings & Ensis Tee

In all seriousness, I’ve mentioned before that this is my favorite leggings pattern. I have a couple more patterns in my stash that I haven’t even bothered to try because I JUST CANNOT QUIT me some Ooh La Leggings. I love the way they fit and I love the seaming detail. Made up in a thicker ponte, they almost pass for actual pants. Made up in a thinner material, they are great for lounging and sleepwear. Made up in some crazy lycra, they make amazing workout/yoga pants. Basically, they are my dream leggings and you will have to pry this pattern out of my cold, dead hands.

Because I love this pattern so so much, it goes without saying that I’ve made a metric Shit Ton of these leggings over the past two years. Obviously most of them haven’t made it to the blog – after sharing a couple pairs, they kind of get redundant. And y’all know how much I hate redundancy, at least when it comes to my own blog. So while you might occasionally see a pair pop up in a post (without needing to be the center of attention), they spend much more time in the real world than they do the blog world. And I do wear the shit out of all my pairs, so there’s that.

Leggings & Ensis Tee

With that being said, I think it’s ok/non-redundant to post about this pattern if I’ve done something ~unique with it. Which is exactly what I did. Check out my (faux)(p)leather (paneled) leggings, y’all!

Leggings & Ensis Tee

I found this stretch pleather on Goldhawk Rd while fabric shopping in London. It was one of the very few things I had on my list to buy, as I knew I’d need to be able to actually touch the fabric to make sure it stretched enough and wasn’t toooo shiny. Not that I’m against shiny pleather pants – I had a pair when I was in high school, back when I worked at Hot Topic and thought I was sOoOoOo punk rock (and no, I have no idea why my mom didn’t veto those things! HAHA! I must have looked like such a little baby hooker!) – but, being nearly 30 now, I’m an adult and I have to tone things down just the tiniest bit, at least when it comes to my pants. ANYWAY, this pleather is pretty good, I think – as far as pleather goes. It’s very stretchy, it’s not too shiny, and the wrong side has a nice fabric backing so it’s actually quite comfortable against the skin. Or, rather, as comfortable as pleather leggings can get.

Leggings & Ensis Tee

Since my pattern was nice enough to already have all the piecing done for me, I just cut the side panels in the stretch pleather, and the remaining pieces (front and back legs, as well as the yokes) in this black polyester Ponte de Roma. The Ponte de Roma was pretty shiny on one side – like, way more shiny than I was expecting – so I sewed it with the wrong side facing out, which looks a bit more polished. I sewed everything on my serger, as I do, and omitted the topstitching as I was afraid that piercing the pleather would cause it to wear holes that would eventually tear.

As far as actually sewing the pleather, that part was surprisingly easy! Keep in mind that stretch pleather (as well as non-stretch, as well as leather, etc) does show pin holes, so you need to be reeeeeally mindful of your pin usage (aka, don’t use ’em if you can’t pin inside the seam allowance!). I traced my side panel piece with a Chaco liner before cutting on a single layer. I did not pin my pieces together, except for one part at the hem just to hold it in place while I topstitched (I usually don’t pin my hems for knits, just press them – but you can’t press pleather! One little pin hole at the hem is ok with me, anyway). The sewing part did not require any special forethought or tools – due to the fabric backing of this material, it went through my machine just fine without the need for a Teflon foot. I used a regular stretch needle. Et voila!

Leggings & Ensis Tee

While I’ve got your attention, I guess I’ll also talk about my shirt – because y’all know I made that shit too!

Leggings & Ensis Tee

The pattern is the Ensis Tee, also from Papercut Patterns (ooh, I just heart me some Papercut!). I’ve made this before, albeit in a thicker/less drapey knit, so I think this version deserves a little bit of spotlight 🙂 It’s amazing how different it looks with a drapier fabric, yeah? Honestly, I like this version a lot better – I think it’s a lot more flattering (plus, it’s wool, so it’s pretty snuggly!). The top yoke is a piece of wool knit I bought in Paris, and the bottom is this cool steel grey sweater knit. I bought that knit on a whim, and it’s pretty cool – it has a lot of dimension to the color, and you can really see the knit stitches due to the somewhat loose gauge. It’s also wide and VERY stretchy in both directions – I might use the rest to make a pair of tights. Also, I need some kind of grey knit intervention. I keep buying pieces and this shit is getting out of handddd. Like, I really want that pewter grey but I’m gonna resist. I must resist.

Leggings & Ensis Tee

This is basically the same picture as above, just without my head.

Leggings & Ensis Tee

This tee whipped up fast! I had it cut and sewn within a couple of hours – and honestly, it took that long because of all the topstitching I added. I topstitched the colorblocking at the yokes and sleeves, as well as the neckline, using my stretch twin need and wooly nylon in the bobbin. I think it adds a little extra to an otherwise plain tshirt. Oh, and that yellow tab at the neckline is my laundry reminder not to wash this in the machine – because it’s wool 🙂

Leggings & Ensis Tee

I kept the curved hem, left off the hem band, but added cuffs to the sleeves. Happy sweater-hybrid-tshirt-thing!

Leggings & Ensis Tee

And here are my leggings again, because I know you’re just dying to see them one more time. As a side note – I used a different method to attach the elastic waistband (rather than feed it through a hole like the pattern instructs). I took some pictures while I was doing this, which I’m hoping to make into a tutorial at some point later this week.

Leggings & Ensis Tee

Anyway, that’s mah new threads! Basics with a lil’ twist! What do you think? Am I going to burn someone’s eyes out with my leather leggings? Should my mom have not let me leave the house in those pleather pants? Man, I wish I had pictures of that ensemble. Sooo glad the only social media platform we had back then was makeoutclub.com HAHAHA.

As a side note – if you think my hair looks green, it’s because it is! It was due for a redye, and I decided to go green 🙂 I’m using a new dye that I bought in London, at the suggestion of Nicole – we’ll see how it holds up! I gotta say, I’m not looking forward to the fading… green always fades so ugly. Also, these pictures are REALLY deceiving. It’s much brighter and more emerald in real life. I took these pictures on a grey and overcast day, so the color is kind of sludgy here. I don’t know how to color correct my photos, so this is what you get. Sorry, not sorry 🙂

Completed: Ooh La Yoga Pants

28 Oct

For the past 6 months or so, I’ve been practicing bikram yoga weekly. I’m a Hot Yoga kinda gal – I love the heat (seriously, I could nap in that damn room), and I love how it forces me to focus on breathing and not passing out (otherwise, I’m the kind of yogi who gets BORED AS SHIT about 10 minutes in). While I can only afford to go once a week to this place, it’s really done some amazing things for my mind and spirit – not to mention my flexibility (even at one practice a week!). But this post isn’t about yoga. This post is about my new yoga PANTS.

Ooh La Yoga Pants

My Ooh La Yoga Pants, if you will 😉

Ooh La Yoga Pants

Ooh La Yoga Pants

One thing I’ve never liked about workout wear – yoga gear or otherwise – is anything that involves wearing a shirt. Not because I want to look ~sexy~ while I’m jogging or whatev, but because I just like a breeze on my stomach (I guess). That being said, I’m also in the same camp as a lot of women who don’t necessarily want to be blaring their navel when they go outside. I don’t know why I draw the line at the navel, but it is what it is (I so wish I had the confidence to rock something midriff-baring like my girl Lola. I mean, damn girl!). Things I also hate when I’m working out: long pants, anything baggy (I know it’s supposed to be breezier, but it really just gets in the way), sleeves. This here – cropped pants with a sports bra – is my ideal workout outfit, for my ideal workouts (yoga and running). Honestly, I’d probably be most comfortable in some teensy little shorts, BUT I’m pretty sure no one wants to see asscheek when I bend over, so I compromise with a little bit of leg coverage. Y’ALL ARE WELCOME.

Ooh La Yoga Pants

Anyway, my favorite workout leggings pattern is the Ooh La Leggings pattern from Papercut Patterns. They fit quite nicely, with a high waist that covers my belly button (while still allowing some sports bra goodness!). There are interesting seam lines, which mean I have way more exciting pants than anyone else in my class. I’ve made soooo many pairs of these – in both full length and various stages of cropped – and they just rule. I don’t think I’ll ever be the kind of girl who wears crazy leggings as normal out-and-about clothing, but all bets are off when it comes to exercise gear.

Ooh La Yoga Pants

I have a few more pairs I’d like to show you, but let’s focus on this one specific pair first. This fabric came all the way from the UK, courtesy of Funki Fabrics. They reached out to me and asked if I’d like to try a piece of fabric, and I cheekily asked for two patterns (the second which you’ll be seeing in a future post!). So here’s the first one – galaxy-leggings!

Ooh La Yoga Pants

Funki Fabrics specializes in stretch knits for performance wear – such as exercise gear, swimwear, dance costumes, etc. Think lots of polyester and LOTS of 4 way stretch. I know we all love to hate on poly (well, I love to hate on poly haha), but to be frank – poly is ideal for your sweat gear. It dries quickly and has a good recovery, which is essential if you don’t want to feel like you’re wearing a wet and droopy diaper. I’ve tried making workout gear with cotton and rayon, and polyester is for sure the way to go. The 4 way stretch is also extremely important – you need them to stretch both vertically and horizontally, or else your leggings might end up lower-waisted than you prefer (plus, they’re not very comfortable with just a 2 way stretch!).

If you’re anything like me and find the available options overwhelming (seriously – SO MANY OPTIONS), you might want to consider checking out their new sample sheet, which includes swatches of a bunch of different designs, all printed and ready to ship.

Ooh La Yoga Pants

Anyway, the print quality on this stuff is GREAT. Very rich and bright colors that did not fade a bit in the wash (the verdict is still out on multiple washes, as I haven’t reached that point yet, but I will be sure to update if I notice a fade in the future). One thing to keep in mind when ordering (and cutting, for that matter!) is that the fabric is printed with a wide white border on all 4 sides, which reduces the printed width of the fabric. Also, as I mentioned with cutting – be careful that you don’t cut into the white border. I nearly had a disaster where one leg on the underside ended up being half white – whoops! Fortunately, I had enough leftovers to recut, but now my dreams of having a matching bra-and-leggings galaxy set have been shattered 😉

Ooh La Yoga Pants

Like I said, this is a great pattern that doesn’t require much tweaking to yogi-fy them. I did shorten the legs for cropped pants (on this particular pair, I added a small cuff because… I dunno, I liked it?), but that’s about it. Oh yeah, I also changed the way the waistband is sewn. The instructions have you fold over and then thread the elastic through, which works, but then you have a hole to close up (not to mention, sometimes the elastic can twist, which sucks). Katie actually clued me in to an easier way to sew the elastic – you close the elastic into a circle first, then sew the elastic to the top of the pants on the wrong side (mark it into quarters and stretch to fit, as you would a knit band), then fold everything once to the inside and topstitch along the edge of the elastic. It’s much easier and you don’t get twisted elastic! For all my other pairs, I topstitched with a twin needle – but for this pair, I tried the zigzag. I like the way it looks 🙂 Like underwear, ha!

Anyway, here are some action shots so you can see how comfy these dang leggings are:

Ooh La Yoga Pants

This is the closest thing you’ll get to a yoga post. Sorry! Excuse my dirty foot.

Ooh La Yoga Pants

This is less of an ‘action shot’ and more of me ‘falling out of an action shot’ haha.

Anyway, here are the rest of the leggings I made! Same pattern, fabric sourced from various whereabouts~

Ooh La Yoga Pants
Up until I made the galaxy leggings, these were my favorites. They’re a great 4 way stretch poly, and they are sooo comfy (and I love the colors!). Fabric was sent to me from Juli.

Ooh La Yoga Pants
These are ok – I love the pattern and they are fun to wear, but the cotton percentage and lack of a good 4 way stretch (there’s some stretch vertically, but not as much as there is horizontally) mean they’re not as comfy as the others. Check out that print-matching, though! Can you even SEE the center leg seams?! Neither can I 😛 Fabric is from The Fabric Studio here in Nashville!

Ooh La Yoga Pants
These are my least favorite, mostly because they are boring black (and the fabric is sort of weird). I actually topstitched all the seams on these, if you can see it. Fabric is this black solid knit from Mood Fabrics. It’s… ok. Kind of thick (aka kind of hot!) and the cotton/rayon blend means they tend to bag out. They are also strangely shiny, which I sort of like.

Ooh La Yoga Pants
Here are all my yoga leggings in all their spandex-y glory.

Ooh La Yoga Pants

That’s it! Love me some colorful yoga pants – especially when I MADE THEM MYSELF. I really want to try the Pneuma Tank next (either as a tank – which might solve my I-can’t-have-anything-touch-my-stomach-when-I-sweat problem, or just as a solo sport bra because THOSE STRAPS), but I acknowledge that I’ve also been saying that since it’s release and obviously haven’t gotten around to it yet. I also want to try some of the workout patterns made by Fehr Trade (and, ooh, just noticed that there’s a free pattern for an Armband Pocket! NICE!), but again, haven’t gotten around to it. So many things to make, so little time!

What about you? Do you ever sew your own workout gear? What sort of fabric do you prefer to sweat in? Do you yoga? What’s your favorite pose? Mine is Tree and Camel… ooh, and Eagle. Mostly because it’s called Eagle 😉

Disclaimer: The galaxy print was sent to me free from Funki Fabrics, in exchange for a review. All opinions are my own!

Completed: Plaid Flannel Archer (+ Draping winner!)

10 Oct

Finally, a successful Archer button-up – in my dream plaid flannel, no less (seriously, I keep eyeballing all the other colors… do I take the plunge and buy them all?? Because I want to!)

Lumberjack Archer; Ponte Leggings

I am pretty proud of this shirt, so let’s be honest – there are lots of pictures in this post.

Lumberjack Archer; Ponte Leggings

Although the more I look at these pictures, the more they appear to just be the same picture at a slightly different angle or pose. Oops 😦

Lumberjack Archer; Ponte Leggings

ALSO, please forgive my awful editing and how the color changes in every picture. I bought a new photo editing software with my new laptop (Corel Paintshop Pro, if you’re curious!) and I’m still trying to get used to it 🙂 BUT HEY, I can edit out zits and stuff now, so that’s pretty freaking awesome!

Lumberjack Archer; Ponte Leggings

Anyway, ok, let’s talk about this Archer I made! Using my failed linen Archer as a wearable muslin, I shortened the sleeves by about 1″ and left the body length intact (you’ll recall that the linen one I ended up cutting too short. Or maybe you don’t recall, see if I care). I think my sleeves are still a little long, but I also anticipate this shrinking more in the dryer (I only washed the flannel once before cutting, sorry, I was just excited!) so hopefully they won’t end up too short!

Lumberjack Archer; Ponte Leggings

I also made the pocket smaller! No rhyme or reason to how I did it, I just eyeballed until it looked “right.”

Lumberjack Archer; Ponte Leggings

Making this shirt was super fun, from cutting (what can I say… I love matching up plaids haha) all the way through sewing. I forgot how much I love sewing really precise things like button-down shirts. Makes me want to sew another shirt for Landon, maybe. What’s funny is I actually caught myself starting to rush through the construction of this – not because I was on a deadline, but because it’s starting to get cold and I wanted to wear this shit nooooooow – and I decided to force myself to slow down by sewing flat-felled seams instead of just serging the seam allowances off. Even the arms are flat-felled. I’m so glad I did, because the end result turned out pretty fabulous if I do say so myself.

Lumberjack Archer; Ponte Leggings

I cut the back yoke, pocket, and front button band on the bias. Everything else is straight and painstakingly matched. The only boo-boo I made was that I put the button band on the wrong side – oops! I originally chose the opposite side of the flannel as the right side, then changed my mind when I started sewing. Since the front pieces are not mirrored, this meant I had to compromise my button band side. Oh well, I am just pretending that it’s actually a men’s shirt, haha!

Lumberjack Archer; Ponte Leggings

At any rate, the side seams match up beautifully. Look at that shit!

Lumberjack Archer; Ponte Leggings

I changed out the buttons for pearl snaps, so I can hulk my way out of this shirt when the urge strikes. Funny thing about those pearl snaps – they actually started out white, and while it looked ooookay, it also just looked like I bought the wrong color pearl snap. I can’t get black snaps locally (and DAMMIT that I SAW them in Chicago and was like “nah I don’t need that” lol oh Lauren, hindsight is 20/20 or some shit) and I couldn’t wait sooo… I painted these with black nail polish. Black glitter nail polish, to be precise. Hey, it works!

Lumberjack Archer; Ponte Leggings

Lumberjack Archer; Ponte Leggings

I sewed the size 0, as I did last time, except the side seams are sewn at 5/8″ instead of the pattern’s 1/2″. This makes for a slightly (very slightly) smaller fit.

Lumberjack Archer; Ponte Leggings

The collar stand turned out fucking perfect, which I’m VERY proud of! I followed Andrea’s tutorial and I had no unpicking with that method. I’m sold, and Andrea, I owe ya a beer for that. Thanks bb♥

Lumberjack Archer; Ponte Leggings

I also changed out the sleeve plackets and used the ones from the Negroni pattern. I just think these look so much better with the flannel check, plus they are more conductive for rolling up sleeves. I also find this type of placket easier to sew. Man, I love sewing plackets.

Lumberjack Archer; Ponte Leggings

Oh, I also made my leggings! You can’t really see any detail because they are black, wah, but I did make them! I used the Ooh La Leggings pattern and a black ponte knit from Mood Fabrics. My take on ponte leggings – AWESOME. So so awesome!! I actually wore these when I traveled to/from Chicago (so, 18+ hours total) and they were SO comfortable – and they actually look like pants! Guys, I am so sold on these.

I don’t have much else to say, so have some pictures –

Lumberjack Archer; Ponte Leggings

Glitter buttons, yeah? 🙂

Lumberjack Archer; Ponte Leggings

Collar stand pride~

Lumberjack Archer; Ponte Leggings

Lumberjack Archer; Ponte Leggings

Placketz

Lumberjack Archer; Ponte Leggings

Flat-felled seam, curved hem

Lumberjack Archer; Ponte Leggings

Proof that these are actually leggings and not some black blob.

Lumberjack Archer; Ponte Leggings

This outfit has basically become my fall uniform. Seriously! The flannel is so warm and cozy – and easy to throw on if I’m chilly (which is always. Yes, I have worn this shirt every day since I finished it, don’t judge me). I am really happy with how both turned out, and definitely plan on making more. Question – is it really dorky to make me & Landon matching plaid flannel shirts? Because I’m totally about to go there.

One last thing – We have a winner for the Draping book! Random number generator, who do you choose?

random

yaywinner

Congratulations, Jennifer Stephenson! I can’t wait to see what vintage recreations you end up making!

Completed: Ooh La Leggings

23 Aug

Leggings are one of those types of clothing that have always mystified me. What is their appeal? Why do people insist on treating them as pants? Don’t they have enough decency to cover their asses, for fuck’s sake?

Ooh La Leggings & Coppelia Cardy

And yet, here I am, posing in leggings-as-pants, with a nice dose of cameltoe to boot. The things I do for you guys.

Ooh La Leggings & Coppelia Cardy

Haha in all seriousness, though, I don’t actually plan on wearing them out in public without my ass being covered – the fabric is too thin, it’s practically transparent as far as I’m concerned. I wasn’t sure how to treat these pictures – since, if I did cover the top of them, it would kind of cover everything and defeat the purpose of even taking the pictures, yeah? – so in the end, I took one for the team and here I am baring my ass on the internet. Don’t judge me.

Ooh La Leggings & Coppelia Cardy

Anyway, back to what I was saying. Leggings! I never got their appeal. Why not just wear… tights? I mean, if you’re gonna wear socks anyway (my feet are always cold, I like the multiple layers). But I gotta say, these Ooh La Leggings from Papercut Patterns were REALLY intriguing to me. They look so cozy and comfortable – and the model just looks super glamorous. Or maybe it’s because she’s gorgeous, I don’t know, either way, it got my attention.

Ooh La Leggings & Coppelia Cardy

The pattern is one of those deceptively simple patterns that offers a bit of a kick with the finished piece with all the interesting seaming – front and back yokes and seams down the front and backs of the legs. It’s very easy to put together – I can get these done in a couple of hours, from cutting to hemming – and it doesn’t require a lot of knit finesse or even fitting to get everything looking good. Only 5 pieces, a self-encased elastic waistband, and a quick pintuck of the front leg seams (or leave it off, see if I care) and you’ve got a pair of leggings that has a little somethin’ somethin’.

This is actually my second pair of Ooh La Leggings… I made another pair a couple of months ago, in red rayon knit. I never bothered to take photos (again, I wasn’t sure how to go about modeling them), but I can assure you that they get worn frequently. They are SUPER comfortable and they’re red!

Ooh La Leggings & Coppelia Cardy

I cut the smallest size – the XXS – and took about 4″ off the hem. I should point out that the waistband hits very high on these – above the belly button.

Ooh La Leggings & Coppelia Cardy

The grey fabric is a lovely merino wool, straight from New Zealand. Katie sent me a big, gorgeous stack of this shit earlier this summer, and I’ve been hesitant to cut into any of it because I didn’t know what to make with something so special! Leggings, I think, are a good choice – I can layer them in the winter when I’m biking, or wear them as loungewear.

Ooh La Leggings & Coppelia Cardy

If you’ve never used merino wool, let me be the first to tell you that this stuff is AWESOME. It’s soo soft and warm, and you can wash and dry it like normal in the machine! It doesn’t slip around while you’re cutting it, nor do the edges roll up when you’re sewing it. There is a good elasticity and stretch recovery as well. The fabric of the gods, basically!

Ooh La Leggings & Coppelia Cardy

The only drawback (which I don’t consider a drawback, since I don’t wear these as pants!) is that this stuff is a little thin. Thin enough where you can see everything under my leggings – including my panty lines (hey, at least you know I’m wearing undies amirite) and all the muscles in my legs. I was a little hesitant to post these pictures because I don’t think they’re terribly flattering – are my thighs really that big?! – but, you know, whatever. Them’s my legs and that’s just what they look like.

Ooh La Leggings & Coppelia Cardy

I also made my top, do you like it? The pattern is the Coppelia, and if you’re keeping track here you’ll know that it’s my third one (others are here and here). For this one, I sized down to the XXS and lengthened the bottom by 2″. I also shortened the neckband because it was gaping a bit, but I think that’s my fabric choice. Speaking of which, this is some type of rayon knit from Mood Fabrics, and it’s really weird. It feels like a cheap polyester, but it’s definitely rayon (I burned it and everything). Also, it’s kind of see through, despite being a bit thick. So weird!

Anyway, whatever, white wrap top/good layering basic.

I just realized you can totally see a mosquito on my chest in this picture. HAHA. Omg I hate mosquitoes.

Ooh La Leggings & Coppelia Cardy

Consider me a leggings convert! I still don’t know if I would willingly leave the house without something covering my ass (I say this as I have posted pictures of myself ON THE INTERNET with my ass out, and everyone knows the internet never forgets), but maybe with a thicker fabric, I could see it happening. I think these would be really wonderful in a ponte knit. You know I’m gonna try it!

Ooh La Leggings & Coppelia Cardy

Did I show you how good my ass looks in these? Because… look at how good my ass looks in these things.