Tag Archives: wool

Completed: Reworking A Vintage Blazer

7 Oct

Here’s a big ol’ project I worked on for a couple months this summer that I believe warrants a whole ass blog post!

Fair warning – there are a LOT of photos in this post. I tried to narrow them down and include some collages, but… don’t say I didn’t warn you!

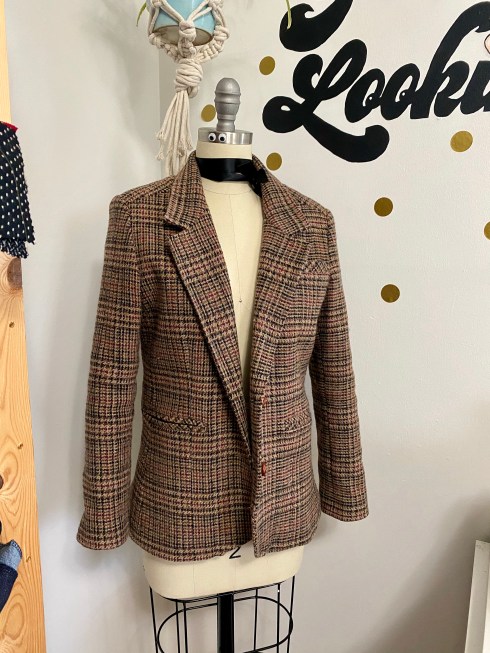
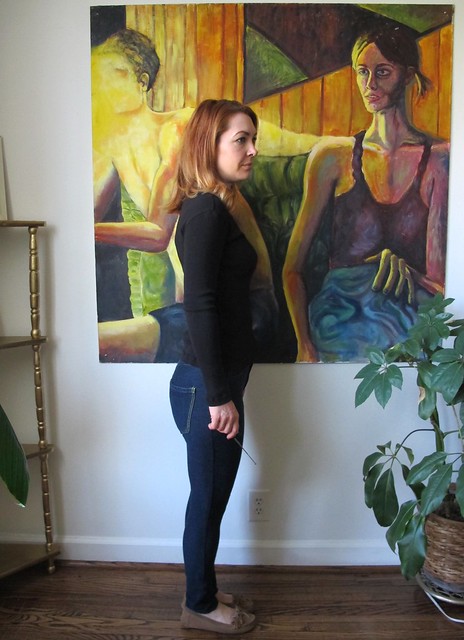
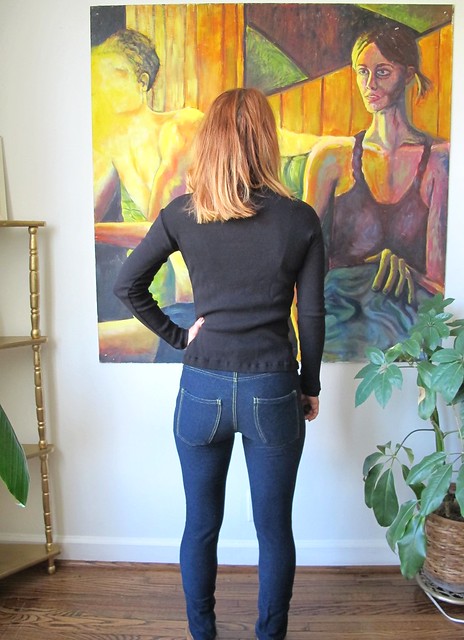
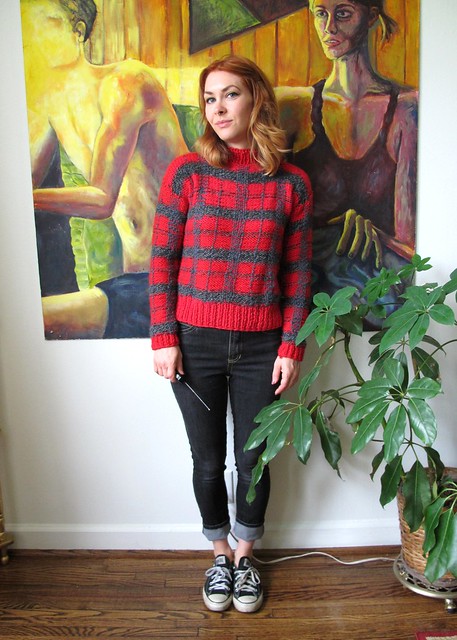
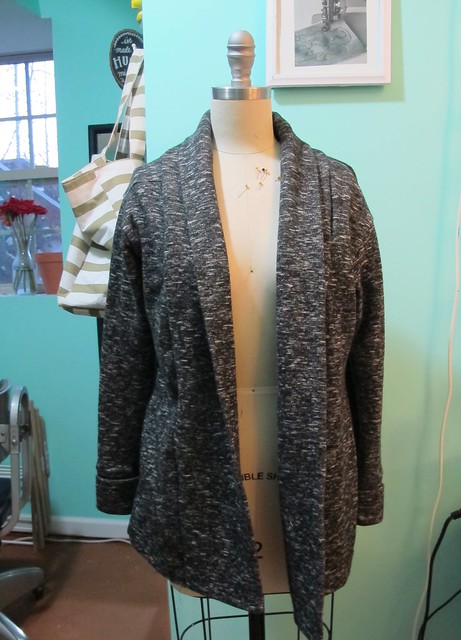
This project started with me wanting to make a blazer – but after months of looking and just not feeling any of the fabrics I was seeing, I decided I would try altering one instead. I’ve altered plenty of blazers, jackets, and coats for lots of clients + photoshoots over the years, but I’ve yet to really tackle complicated alterations beyond sleeve shortening and taking in the body (since, understandably, most people don’t need those kind of crazy alterations!). Over the summer, I worked closely on a photoshoot set with a master tailor here in Nashville, Loretta, who was delighted to share a lot of her trips and tricks with me. I spent some time looking for the perfect blazer for this project, and eventually found this 70s gem at the Southern Thrift in West Nashville, for a grand $5.99-

The before – click to zoom a lil’

As you can see, the before wasn’t super terrible! Obviously the sleeves were a little long and the back a bit saggy (there was no size tag in this jacket but I suspect it was probably 1-2 sizes too big for me). I also felt like the shoulders were a touch wide, and the length a little too long. But I loved the fabric and knew I could work some magic to get this bad boy to fit the way I liked!

I started with pulling off the buttons, the back belt, the cheesy patch pockets (I’m sorry, but they are SO cheesy lol and were also poorly sewn on!). I removed the entire lining from the shell and set about my alterations first. Here is what I ended up doing:

  • Narrowed the shoulders by 1/2″
  • Added shoulder pads (the original ones had disintegrated into the jacket hem! I am STILL finding old shoulder pad dust in my studio, despite regular vacuuming!)
  • Took in back arm seams 3/8″
  • Took in side back seams 1/8″
  • Took in center back seam 1/2″
  • Shortened body length 2″
  • Shortened sleeve length 3/4″

This was accomplished by lots of pinning, basting, trying on, and taking photos (so I could see what the back looked like). Usually when I do these alterations, I work with a client who is already wearing the jacket – so it’s quick and easy to pin where needed. It’s a little harder when you are doing it yourself, but still totally doable!

Adding pockets and plackets!

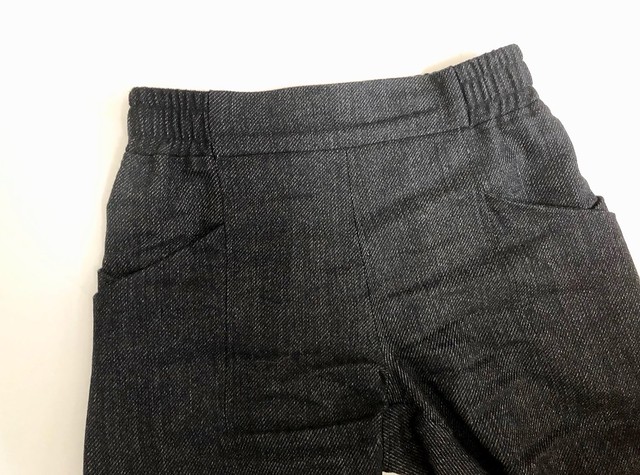
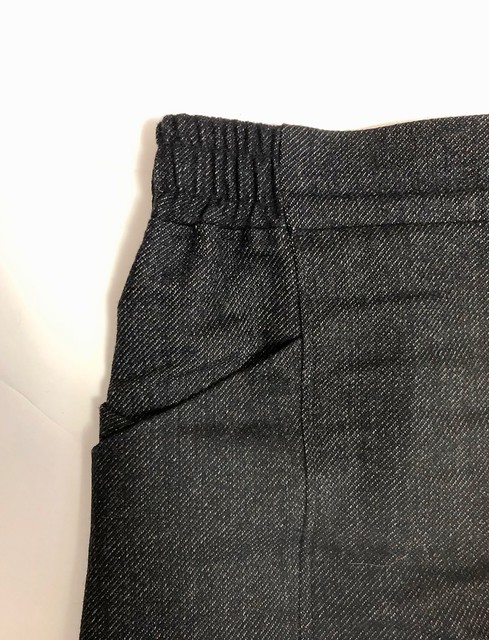
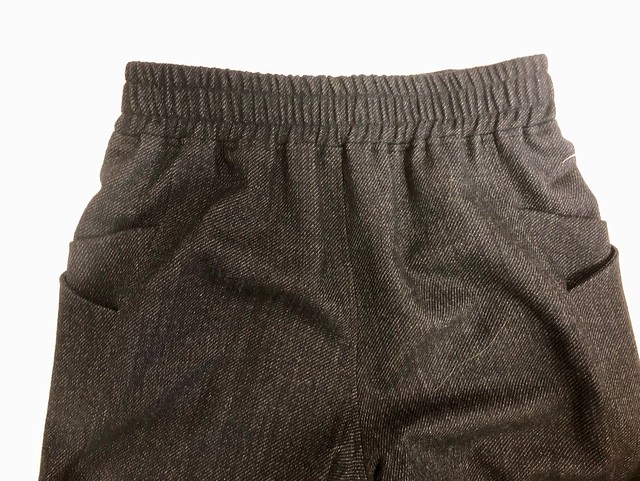
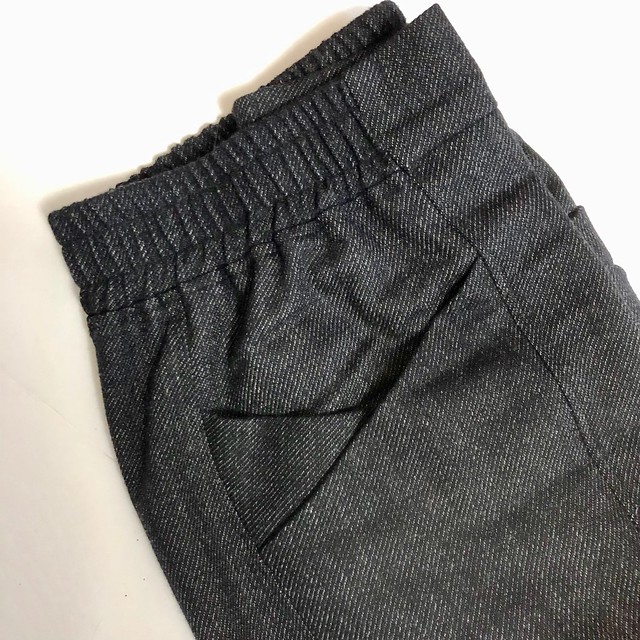
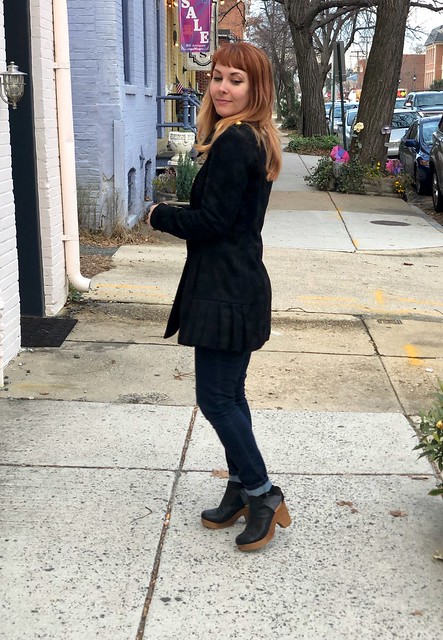
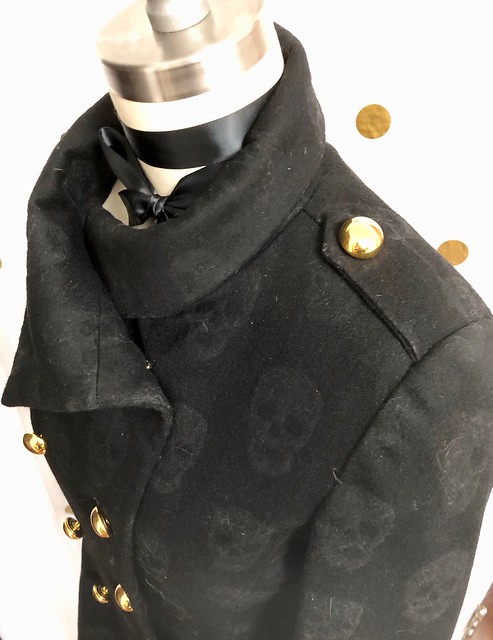
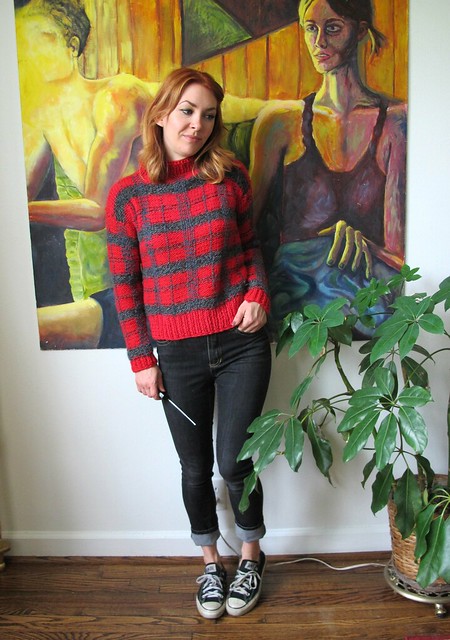
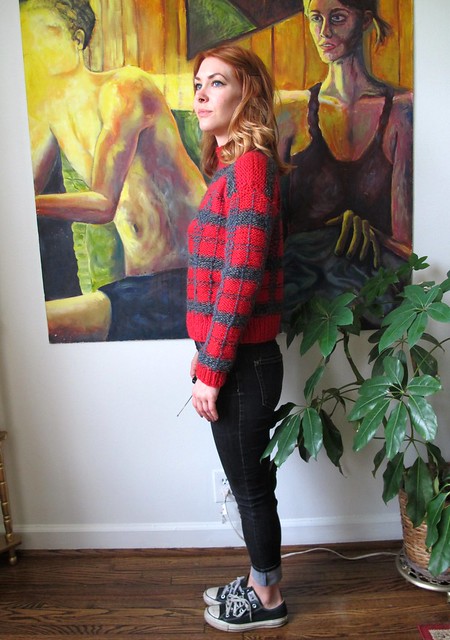
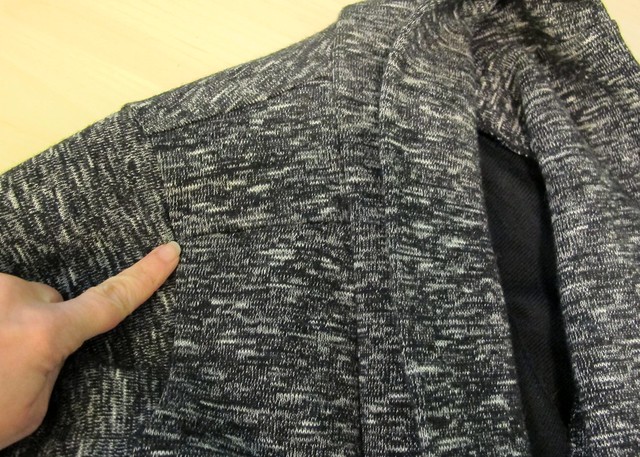
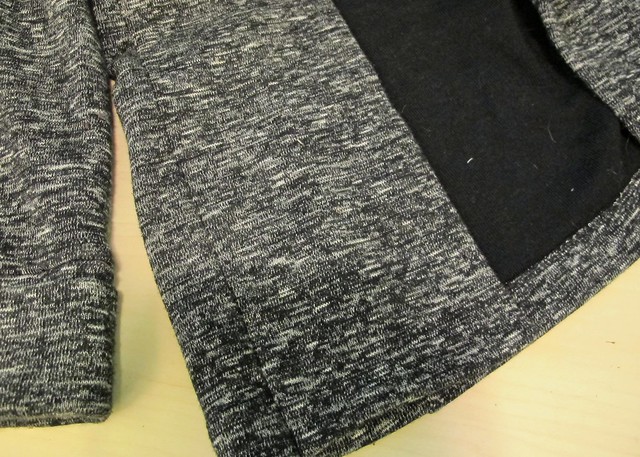
After finishing the alterations, I could work on the fun stuff – adding design elements to the shell! I knew I wanted to change those patch pockets out for double welt pockets. I also wanted to include sleeve vents with functioning (!!!) button holes, a single welt breast pocket, and an interior “Barcelona” pocket.

Since I had removed the patch pockets and back belt from the original jacket, I was able to carefully disassemble them which gave me some fairly good-sized pieces of fabric to work with. Adding the double and single welt pockets was pretty straightforward and easy – it’s the exact same as sewing on a piece of fabric, you just have to contend with, well, an entire jacket getting in your way haha. I used the instructions + pattern pieces from the Closet Core Patterns Jasika Blazer for the two exterior pockets, and a beloved In-House Patterns tutorial for the inner pocket. Honestly, the hardest part about this endeavor was figuring out where exactly to put the pocket! For the outside pockets, I drew chalk lines directly on the blazer and checked the proportions in the mirror until I was happy. For the interior pocket, I went a little lower than my chest after looking at loads and loads and LOADS of blazers online with interior pockets – consensus seems to be that it starts right below the welt of the outer breast pocket. Which makes sense, as you don’t want whatever you put in that pocket to sit right on top of your breast. Well, I don’t want that anyway haha.

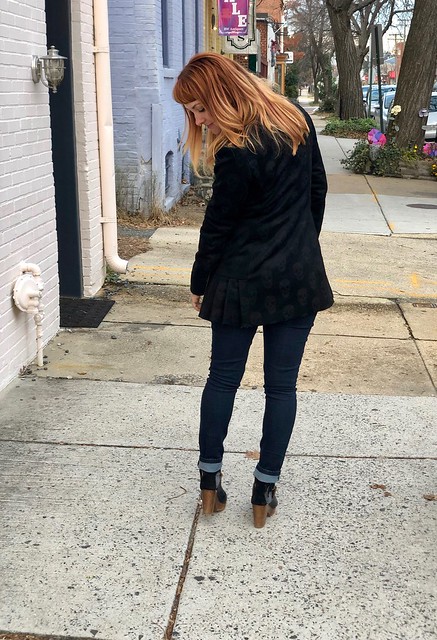
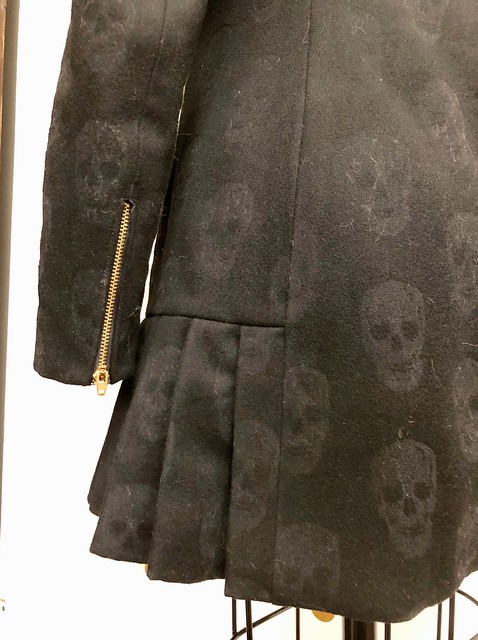
For the sleeve placket – well, that was a fun experience! The original jacket had no placket – just buttons sewn straight on a plain sleeve. Loretta had shown me how to shorten a jacket sleeve with a working button placket, which is the same process as adding a placket. You just sew fabric to the edge to create a placket extension; all the seams are hidden when it is finished. I had no idea shit would be that simple. I think the scraps I used came from the back belt. For a step by step, I followed these directions for sewing a back vent (a back vent and button placket on a jacket are essentially the same – except there is no exposed line of diagonal stitching) from Waffle Patterns. The hardest part of that was getting the corners to miter correctly haha. Wish I could give y’all some tips for that but TBH I just used a lot of trial and error and unpicking until it was right.

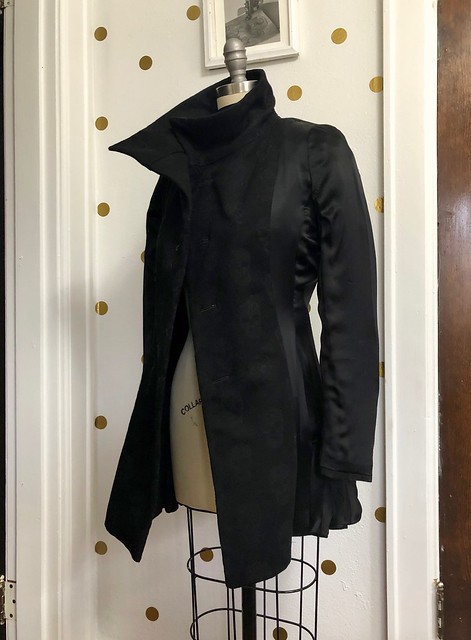
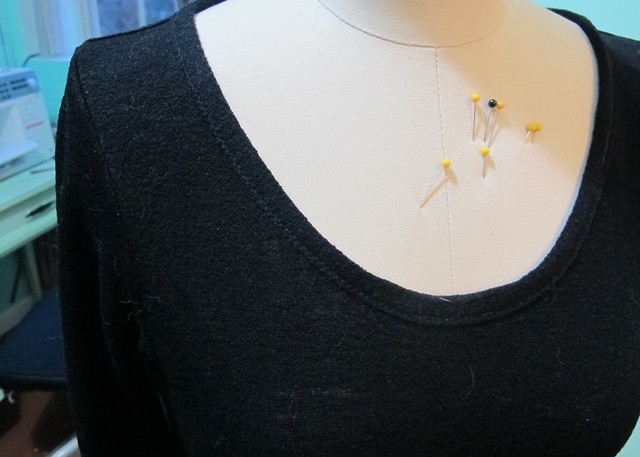
I also decided to change out the lining, after determining the original lining – while a really beautiful soft pinkish beige – was just too smelly and discolored. I took the lining apart and used the pieces to cut a new lining from a piece of silk charmeuse that I already had in my stash (here is a blog post I wrote a few years ago about replacing a lining in a coat, which is the same process I used!). I made sure to add my alteration adjustments and sleeve plackets to the pieces, then sewed the whole thing together and bagged it in. I did hand sew at the sleeve button plackets and near the front facing (you can sort of see the pins in the above photos), but the rest was done by machine.

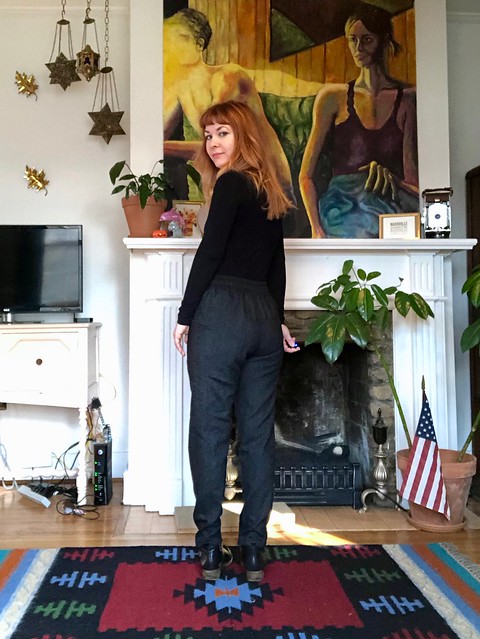
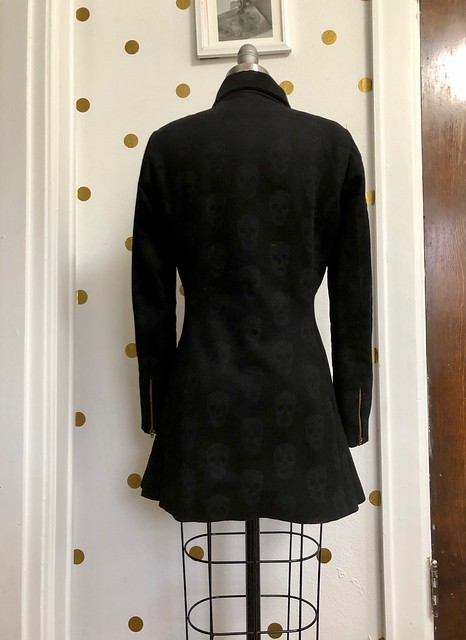
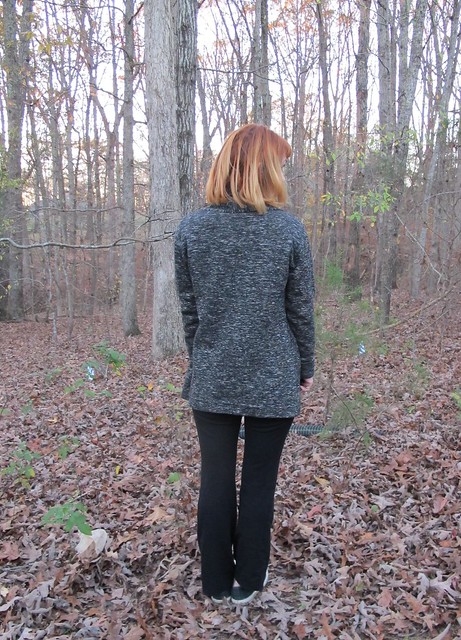
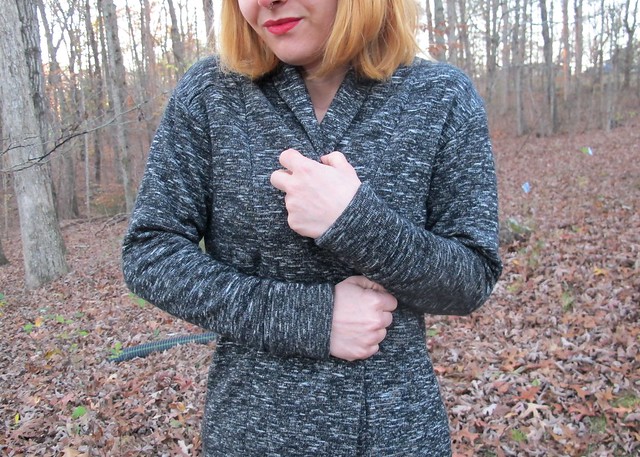
After THAT was done (whew!), I added some fun finishing touches 🙂 I sewed buttons + button holes on the sleeve plackets (using the original buttons, cos, well, I like them!), added a leather hanging tab + label to the back facing – oh, and I made a sweet wool felt embroidered undercollar!

To make the undercollar piece, I cut some Swedish tracing paper and traced it around the undercollar, trimming and refining until it was the exact same size. Then I cut it from wool felt (which I ordered the The Felt Pod); my piece was wider than the felt so there is a seam in the center. Then I embroidered it by hand with a simple chain stitch, and attached it directly over the existing undercollar using embroidery floss + a blanket stitch. It’s not visible when the collar is down, but it is a fun surprise when flipped up!

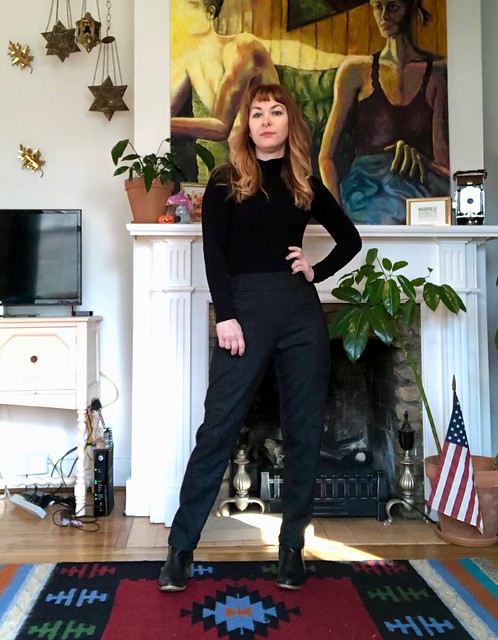
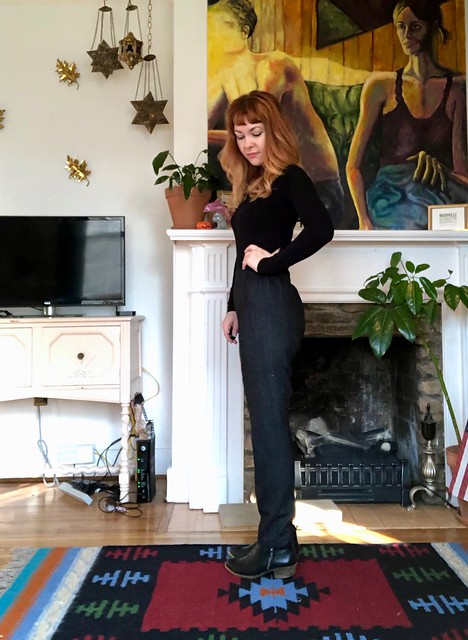
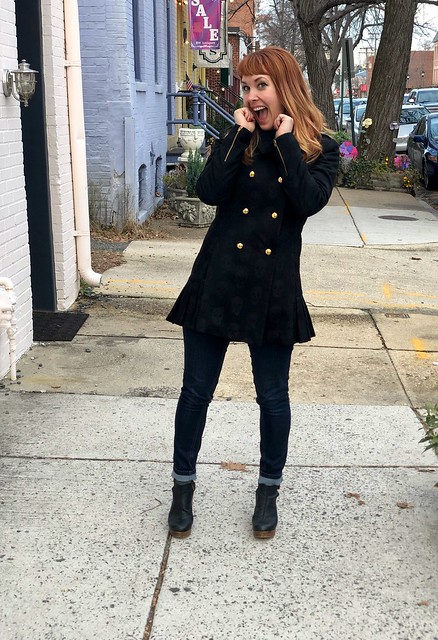
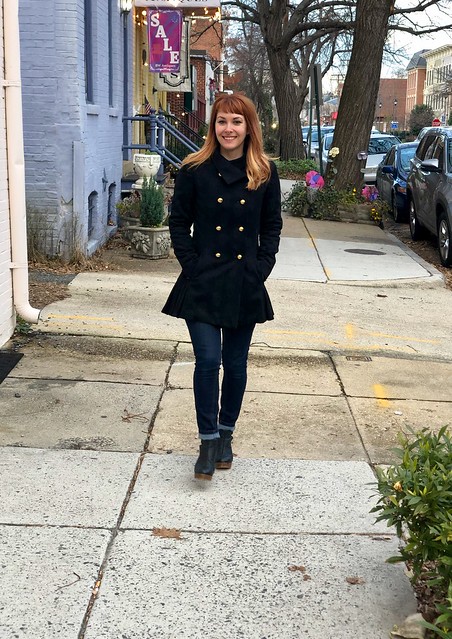
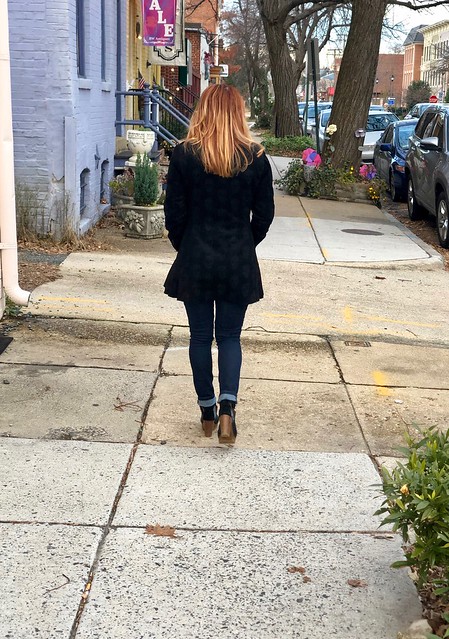
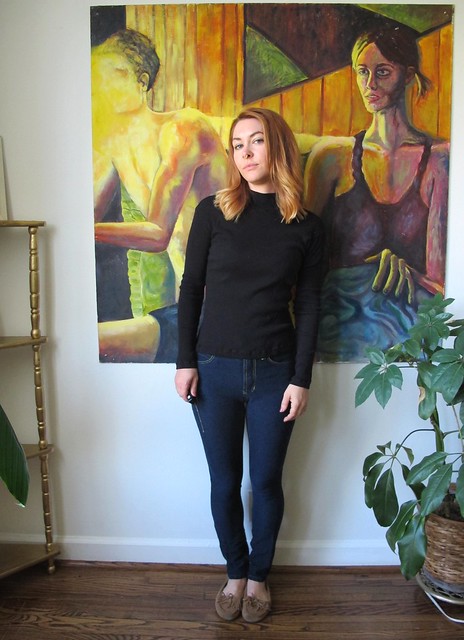
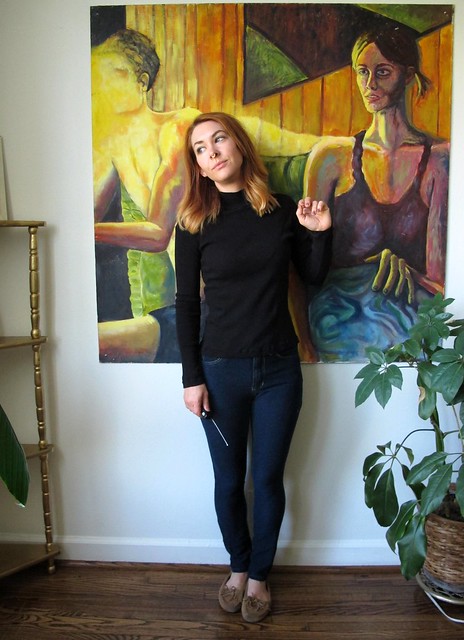
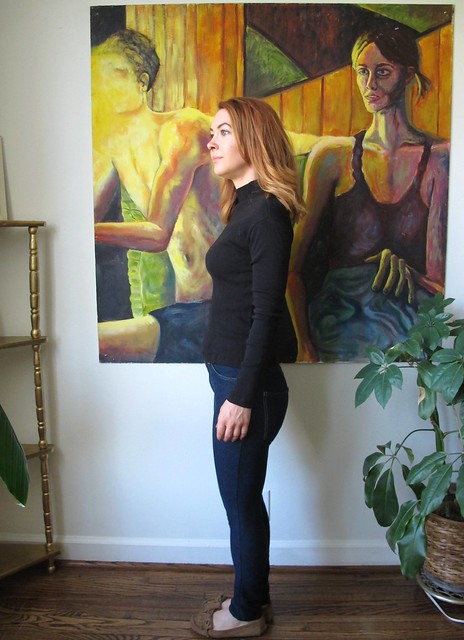
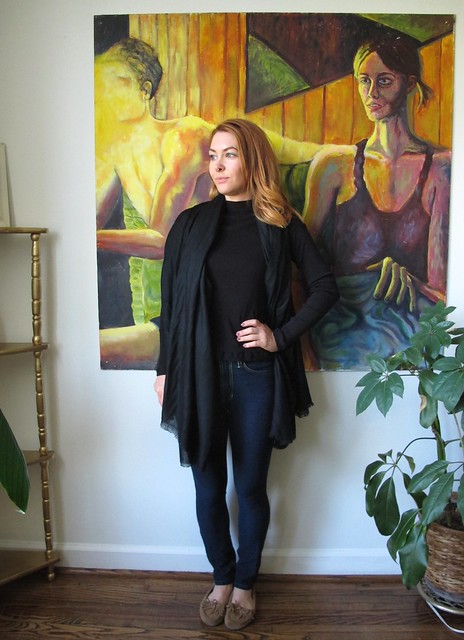
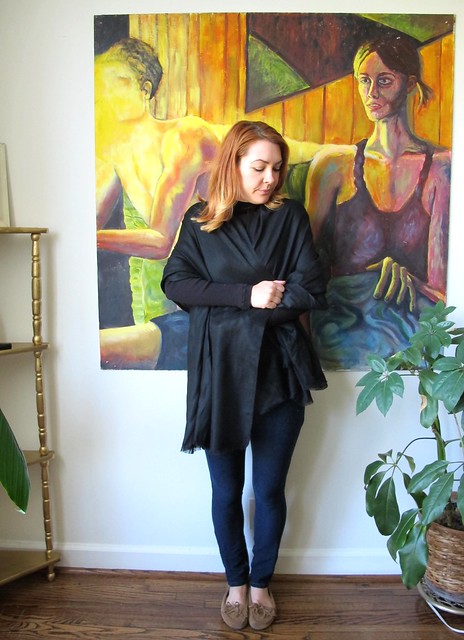
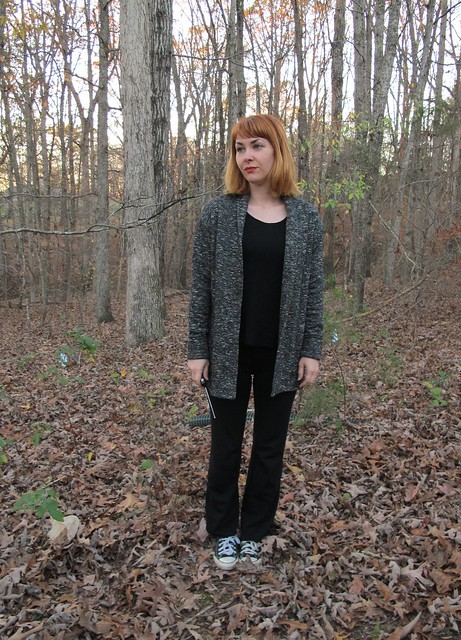
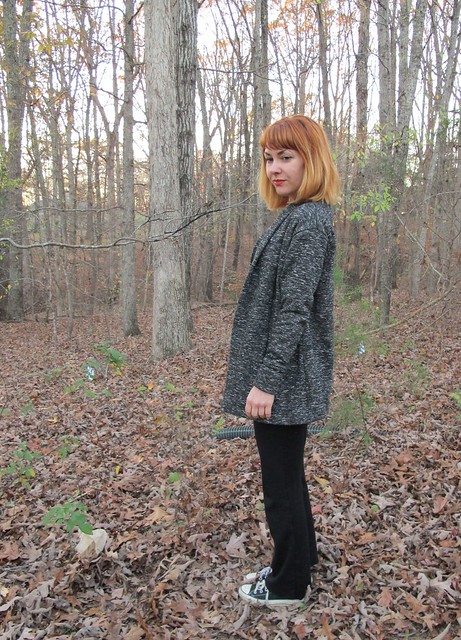
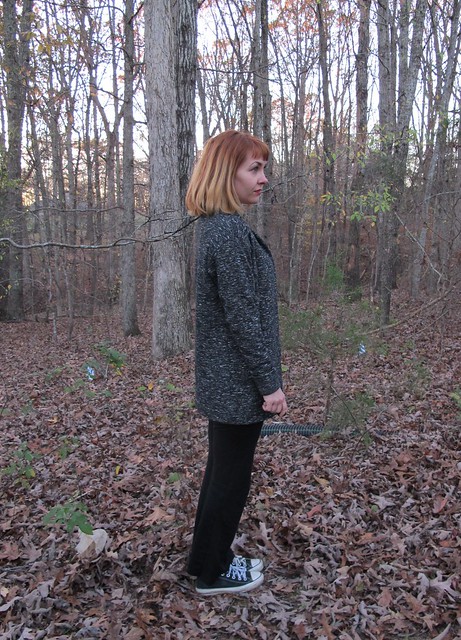
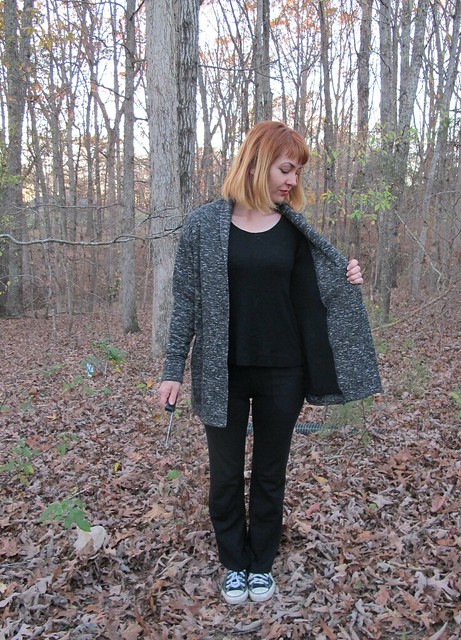
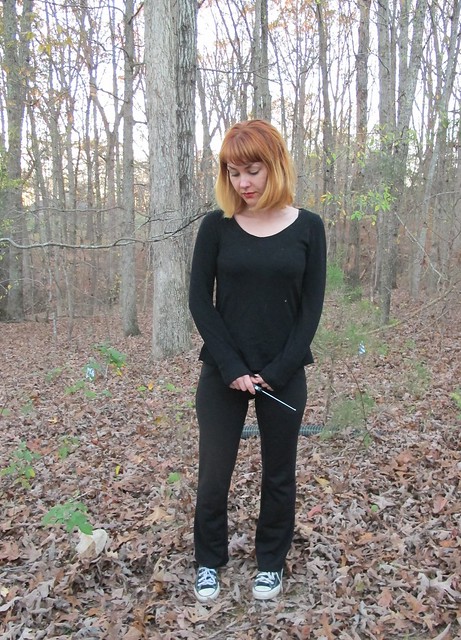
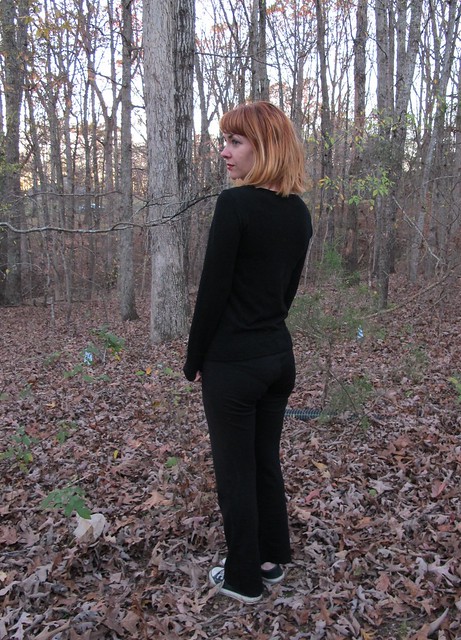
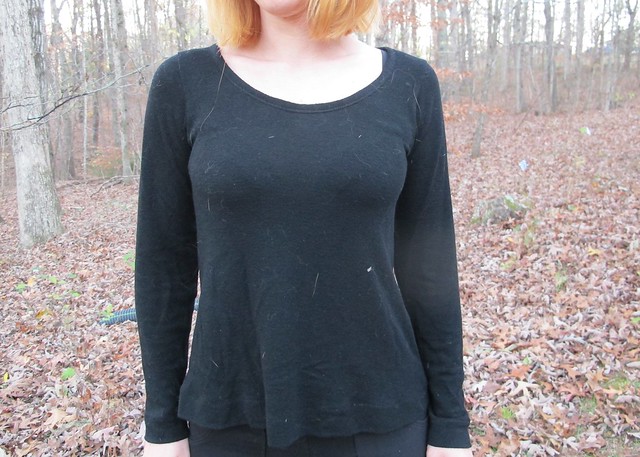
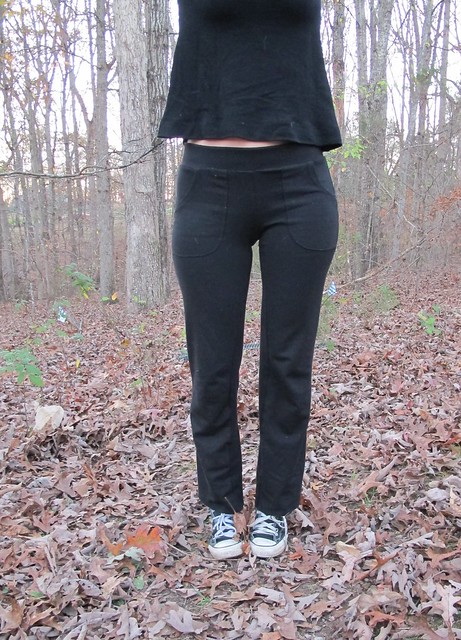
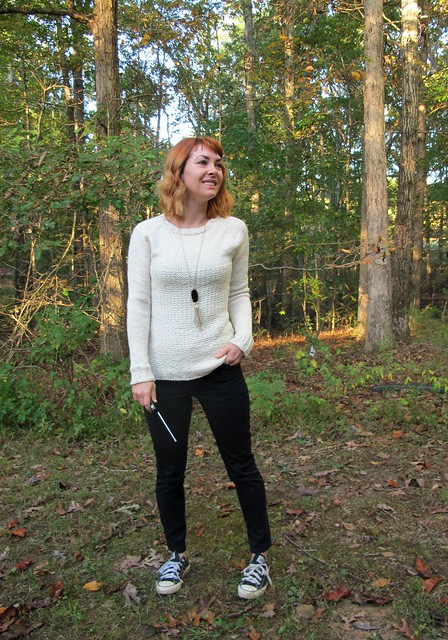
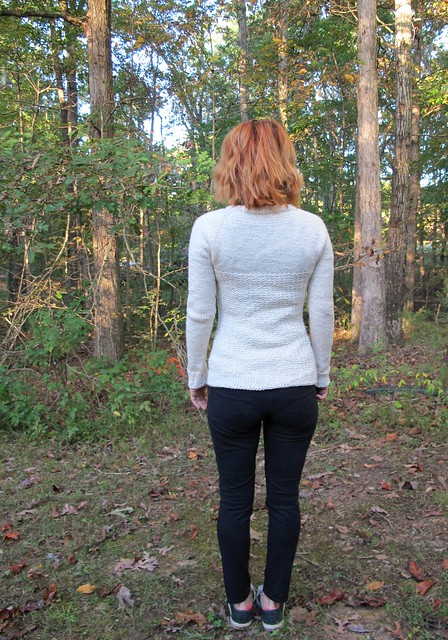
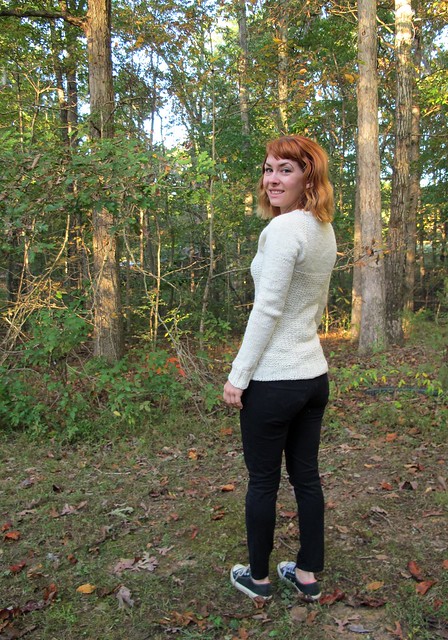
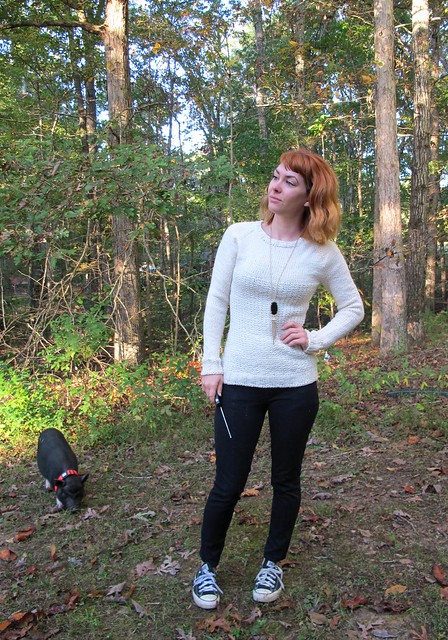
I actually finished the whole thing about a month or so ago, but didn’t get around to taking photos until this last weekend. I’ve said it before, and I’ll say it again – taking photos is the part I hate most! So, like, enjoy or something 😛 I’m pretty sure my neighbors did considering that came outside RIGHT WHILE I WAS SHOOTING THESE dear lord can you see the fear in my eyes?

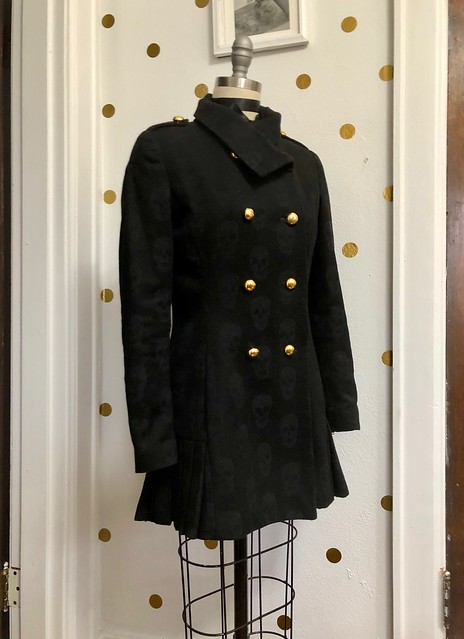
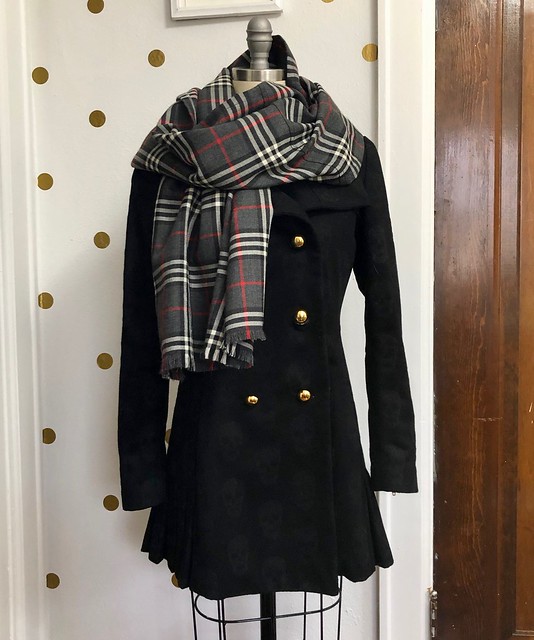
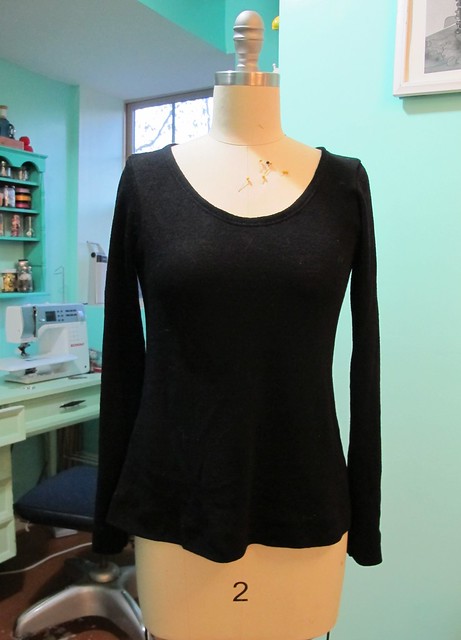
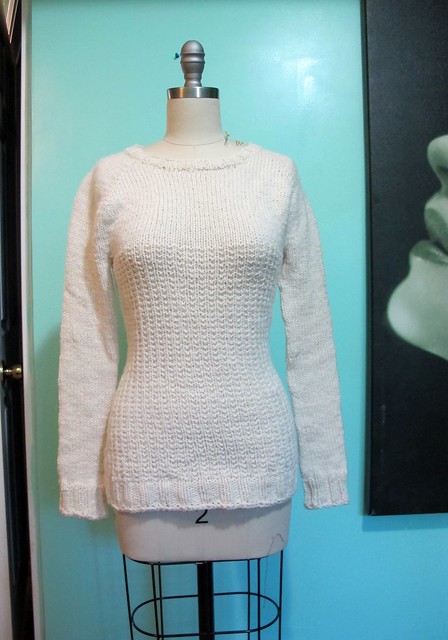
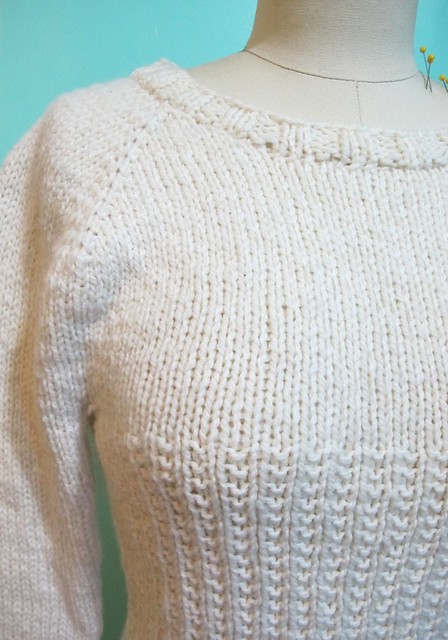
And if you don’t want to look at my mug (it’s cool, I don’t want to look at it either), here are some dressform shots:

I think that’s about it for this project! I had a lot of fun digging into this one and feel extra confident in my alteration skills as a result. Funnily, the original jacket isn’t very fancy – it’s actually pretty cheaply made as far as jackets go. The wool is a blend, and there wasn’t much tailoring inside the shell apart from a bunch of interfacing. Spending so much time + effort (and silk lining lol) was basically the equivalent of polishing a turd – but, you know what? I love how it turned out, and I learned a lot during the process. I don’t know if such an involved reconstruction would be worth it if you were paying someone else to do it – but for me and my sewing practice? It was perfect. I was only out about $10 for this project (the jacket + wool felt, as I already had the lining in my stash) which we can all agree is WAY cheaper (and faster!) than making the dang thing from scratch!

I will always love making garments from their humble fabric beginnings, but truly, you can’t beat a solid reconstruction (or even just a couple simple alterations to an otherwise great + previously-loved garment!). This might be the most sustainable I get when it comes to sewing, ha! How about you? Does this inspire you to give it a try?

Competed: Wiksten Unfolding Jacket

14 Mar

Good morning, everyone! I started this post a couple of weeks ago while I was waiting in the airport, and I’m just now finding time to revisit (naturally, while in the airport AGAIN. Yes, class season is ramping back up woohoo!). My February has been weirdly busy – I worked on two massive photoshoots, and also represented the Craft South booth at Quilt Con here in Nashville! On a more personal note, February was the 2 year anniversary of my dad’s passing, and, as it did last year, shit hit me like a ton of bricks. And finally, I bought a house! I closed last week and have been tackling my to-do list like crazy to get everything ready before I move in.

The bad news is – there has been very little time for sewing (to be honest – I haven’t touched my sewing machine since, well, February!). But the good news is – a new studio is a-coming 😉 I took some photos of a couple of completed projects so I have something to share here, now the challenge is finding the time to sit down and type everything up!

Wiksten Haori made with Mood Fabrics

Today’s offering is something that has been finished since January, which means it has gotten a lot of use during recent months. My current house (the rental that I’m fixin to move out of), is a beautiful 1935 stone Tudor. Built before central a/c (which has been retrofitted in this house now, thank god!), and located in a very hot part of the country – this is a house that was designed to stay cool. It’s quite lovely in the summer, but LORD it stays chilly in the winter! And due to the old windows, plaster walls, and overall poor insulation – there’s not really much of a point in trying to keep the place warm, as the (really expensive, I should add) gas heat just slips right out. So I spend most of my winters wrapped in robes, electric blankets, and rolling a space heater around each room. Not gonna lie – as much as I love this house, the chill is one thing I will NOT miss! I’ve been wearing the robe I made when I first moved in, but it’s always made me feel like… well, like I’m wearing pajamas. Don’t get me wrong – it is warm and cozy and certainly serves its purpose, but I don’t even like to answer the door in this thing because I know it straight-up looks like I rolled out of bed when I have it on. I do work from home, but I still put on “real” clothes and style my hair. Wearing PJs makes me feel like I am having a sick day, and that’s exactly the vibes this robe was giving me. I wanted to make something that would serve a purpose of keeping me warm while inside my house, but still look pulled together enough to wear outside the house should I choose to do so.

So, anyway – that was an unnecessarily long intro to tell you that I made a Wiksten Unfolding Jacket, which is sort of like a literal house coat as far as I’m concerned.

Wiksten Haori made with Mood Fabrics

This plaid flannel from Mood Fabrics has been rolling around in my stash for about 2 years now. I originally bought it to make an Archer button-up, but upon receiving I realized it was a bit too heavy for a shirt – and also a bit too light to be a proper coat. I’ve hung onto it since, and while some pattern contenders have certainly caught my eye, it has remained uncut this entire time. Once I acknowledged my need for a house coat, I remembered this fabric and decided to give it a go. Being a nice thick wool flannel, it is perfect for this application – it is warm and cozy, but still reasonably lightweight. And the colors just make so me happy (even if they don’t necessarily coordinate well with my all-black-tragic-goth look that I typically wear in the winter). I bought this fabric long ago enough that it is no longer available, but Mood Fabrics has tons of other lovely wool flannels to choose from should you want to make your own!

Wiksten Haori made with Mood Fabrics

Wiksten Haori made with Mood Fabrics

This jacket is fully lined, and rather than go with a traditional slippery lining, I kept things casual with a matching lightweight cotton voile. This jacket is oversized enough that it’s easy to put on (including the sleeves), and the nature of how this is sewn means that it is completely reversible. Also, cotton voile is incredibly easy to handle, which made the sewing on this jacket a total breeze.

For the pattern, I sewed a size XS based on my measurements, although in retrospect I think the XXS might have been a little better. This is a nice oversized fit that works over multiple layers, but the sleeves are a bit wide and they get in the way when I’m trying to wash the dishes (or even my hands, for that matter). I usually wear them slightly rolled up to bracelet length, so they are out of the way but can easily be rolled down if I need the extra warmth. I waffled on which length to sew (there are 3 lengths included in the pattern) but ultimately decided on the happy medium of the mid-length. I’m pretty satisfied with this decision, and I had just enough fabric to make everything work.

Wiksten Haori made with Mood Fabrics

Wiksten Haori made with Mood Fabrics

I used the main fabric for the neckband, rather than the lining contrast, as the pattern calls for. I also opted to not interface the neckband pieces, since my wool flannel is so thick and didn’t really need the extra support. This also gives the jacket a bit of a softer structure, which I think is nice for a house robe. For visual interest, I cut the pockets on the bias. Since they are lined with che cotton voile cut on the straight grain, they should stay supported and not stretch out.

Wiksten Haori made with Mood Fabrics

So. About this fabric. It was super easy to sew + press (it is, after all, wool flannel), but in retrospect this pattern really isn’t suited for a plaid design. I promise I actually did try to match the plaid lines – which was reasonably successful at the side seams, but failed miserably anywhere the sleeves were involved. OH WELL. I figure – this is a house coat, I don’t give a shit if it’s less than perfect. Even with mismatched plaid lines, it is still lightyears ahead of of the old fuzzy robes I used to wear.

Wiksten Haori made with Mood Fabrics

I made this jacket out of a pretty desperate need (it was quickly getting cold and I couldn’t face another winter of wearing my old robe around the house), which means the sewing was a little rushed. The pattern is super easy – it’s just a series of rectangles, for the most part – but I always find rushed sewing to be kind of unpleasant. To be completely honest with y’all, I did not really enjoy sewing this jacket at all specifically for that reason. Plus, when I finished it and put it on for the first time, I was pretty underwhelmed with how it looked on me. It is REALLY oversized and boxy, which isn’t necessarily a look that I tend to gravitate to. It is, however, very comfortable – and very warm – and as far as the type of garment I was aiming to make, it pretty much fit the bill perfectly.

I will say – despite my initial reaction after finishing, this jacket has really grown on me! Like I said, it is warm and comfortable – like being wrapped in a cozy blanket. The pockets are absolutely enormous, too – like, big enough to hide a kitten in (I think. Does anyone have a kitten I can borrow to test this theory?). I’ve taken to wearing this when I need to pop out to the grocery store or to check the mail, and the pockets are really useful for replacing my need to carry a purse. So, this is basically a blanket with storage. Like, what more do you need in life?

** Note: The fabrics used in this post were provided to me by Mood Fabrics, in exchange for my participation in the Mood Sewing Network. All opinions are my own!

Completed: Papercut Patterns Palisade Pants

31 Jan

I think I told y’all last year how much I love the new Geo Collection from Papercut Patterns. In case you missed it – I LOVE THE NEW GEO COLLECTION FROM PAPERCUT PATTERNS! As a shameless Papercut Fangirl, I am of course extremely biased regardless, but it is honestly a great collection. I’ve made the Pinnacle Top (twice, actually!), and the Fjord Cardigan (unblogged!), and now I’ve got some fresh new Palisade Pants to add to the mix!

Palisade Pants made with Mood Fabrics

I just think this pattern is so cool! I love the relaxed (but not oversized) shape, with the interesting pocket detail and elastic waist that doesn’t go all the way around (personally, I find a flat front to be more… well, flattering). These are very similar to the Elizabeth Suzann Clyde pants, with a different pocket shape and, again, a flat front with no elastic. Both pants have the same high waist and seams running down the front and back leg.

Palisade Pants made with Mood Fabrics

As much as I love a fitted pant, I didn’t want these to be too tight in the hip so I went with a size XS (based on my measurements). I ended up taking an additional 1/4″ out of the inseam to tighten up the legs ever so slightly (I don’t generally mess with the inseam, however, these pants do not have side seams), but I am very happy with how the hip and waist fits. FWIW, I did use the suggested elastic measurement and it fits perfectly without being too tight.

I made a muslin of the shorts before cutting into my fabric, because I wasn’t sure how these would fit on my body. I actually do own a pair of Clyde pants (from way back when I still worked at ES), and I always felt like the crotch was a little too long on me, so I went ahead and sewed up a test pair before committing. My test pair is actually a fully-finished wearable muslin – I used cotton bottomweight fabric, as well as the suggested interfacing, elastic, and topstitching details. So I also basically have a new pair of shorts when summer comes around haha. My sample showed that I did need to take some of the crotch length out – a full 1.5″ (crotch length refers to the measurement from front waist to back waist spanning the crotchal area, NOT the length from crotch to waist when you sit down, which is considered crotch depth. See this image for a visual) (also, every time I type crotch I accidentally type crochet instead what is wrong with me). Before you start wringing your hands on the mysteries of pants-fitting, please be aware that this is not an adjustment I see a lot of people make (and I touched a LOT of crotches last year during all my workshops). If you do need it, the explanation and process of how to fix are best outlined in Pants For Real People, which I recommend checking out for further questions!

ANYWAY, the amount that I took off the length was easily adjusted (albeit in a very hacky way) to my shorts, so yes, those are still wearable! One more adjustment I made to the pants was to change the crotch curve, as it was a little flat for my body (this is indicated by vertical folds in the fabric in a very unflattering spot). This was not necessary in my sample, but did show more prominently in my finished pants – probably because the fabric has more drape. The front still isn’t completely flat if I stand a certain way, but I think that’s pretty unavoidable with this soft fabric + pants shape combination.

Palisade Pants made with Mood Fabrics

Palisade Pants made with Mood Fabrics

Construction changes were minor. I wanted to keep the fabric soft, so I omitted about half of the interfacing (anywhere that there would be double layers of interfacing). This included the pockets and the center front waistband. In retrospect, I probably should have left the double layer of interfacing on the waistband as it does get a crease with wear, but, whatever. I used a lightweight fusible weft interfacing, which is pretty much my go-to for most fabrics.

I left off the mock fly (for aesthetic reasons), and just topstitched the center front and center back seams. I also added some topstitching to the back elastic, to keep it from twisting. And I also unintentionally shortened the pants when I shortened the crotch depth, so they are about 1.5″ shorter than the pattern – which thankfully is the perfect length for me haha.

Palisade Pants made with Mood Fabrics

Palisade Pants made with Mood Fabrics

Palisade Pants made with Mood Fabrics

Palisade Pants made with Mood Fabrics

My fabric is a gorgeous wool suiting that I bought from Mood Fabrics when I was in NY last month for Christmas. I only had one day in Manhattan, and my mom agreed to go with me while I did a quick little shop around the Garment District. Mood has tons of great wool suitings on their website, but I wanted to see the goods in person so I could get a nice feel for drape, weight, itchiness, and color. I knew I wanted something soft, lightweight, non-itchy (as I would not be lining these) and with a little bit of dimension and texture that didn’t look too suit-like. This stuff hit all those boxes, and only cost around $20/yard. It was wide, too, so the 2 yards I bought were more than enough for these pants – meaning I have leftovers to whip up something else if the mood strikes.

I actually pre-washed my wool – like, in the washing machine – because I wanted to see what would happen. Generally, wool felts due to heat combined with agitation, so I used cold water and low heat in the dryer. I didn’t measure before/after to see if anything shrunk, but this definitely isn’t felted so it worked out ok! When I wash the actual pants, I will use cold water in the washer and hang them to dry (how I treat most of my wool garments, except for handknit sweaters obviously).

The wool was really easy to sew, as wool tends to be. I suspect there is some poly blended in here, though, since it didn’t press as well as most wools do (this would also explain why the fabric was fine in the dryer when I pre-washed). I used high heat and a clapper to hold the seams down while they cooled, then for extra credit I topstitched as much as possible to keep the seams nice and flat. To sew, I used a universal 80/12 needle and finished all seams with my serger.

Palisade Pants made with Mood Fabrics

I think that about covers it! This was a fun project to make, and I really like how the pants turned out. I’m still undecided if these are really “me,” but I’ve worn them for the past 2 days while we’ve had a cold snap in Nashville and they are warm and comfortable. I do want to try this pattern with a fabric better suited for warmer weather – such as linen or tencel – and perhaps in a cropped length or even the shorts. The pocket detail just makes me so happy.

Oh! And in case you were curious – the shirt I am wearing is a mash-up of the Nikko Top and the Nettie Bodysuit. I basically just combined the bottom edge of the shirt with the lower half of the body suit, to make a Nikko Bodysuit. This piece has been really useful in my wardrobe – it looks great with high-waisted skirts and pants, and stays tucked in no matter which way I move. I made it with lightweight merino wool fabric, also from Mood Fabrics, and I love it so much!

**Note: The fabrics used in this post were provided to me by Mood Fabrics, in exchange for my participation in the Mood Sewing Network. All opinions are my own!

Completed: The Quart Coat, in Alexander McQueen Fabric

14 Dec

Well y’all. This post has been a LONG time coming – hopefully it was worth the wait!

Quart Coat made with Alexander McQueen fabric

I made a coat! Big whoop, amirite? It’s been a minute since I sewed a real coat – I just don’t live in a climate that warrants a serious need for multiple coats. Which is a bummer because I really LOVE sewing me some coats! And I actually sewed two this year – but I just want to talk about this one first. Like I said, it has been a long time in the making!

I received this fabric way back in May of 2016, actually! It took me a solid year to decide what I wanted to make with it, then nearly another year to actually start the project. And while I finished this earlier in 2018 (in February, it appears) – it has taken me this long to get some photographs of it! So yeah, this might be my longest project to date!

Quart Coat made with Alexander McQueen fabric

So – a little bit about the fabric! This fabric is actually Alexander McQueen coating from a prior collection. It is 100% wool, solid black, and has laser printed skulls all over that you really only see in certain lighting. I wasn’t able to find what this fabric was used for in AM’s collections, but it’s essentially a medium weight (on the lighter side of medium weight, to be specific) coating. It’s super, super amazing.

The coating was actually given to me – you know, back in 2016 – courtesy of my friend Anokhee. She originally bought it from Darrell Thomas Textiles in Ottawa, Canada (where she also teaches!). If you are thinking “wow Lauren that’s a really fucking generous gift” YOU WOULD BE ABSOLUTELY RIGHT. I was floored when I received the fabric, and am honestly still a bit dazzled every time I wear my coat. I didn’t really know Anokhee that well when she sent me the fabric – we were email/internet buddies, seeing as she lives in Canada and I’m in Nashville – but this year, I actually got to hang out with her several times when I was in Canada to teach my Jeans Workshops at Darrell Thomas Textiles! I’ve even sat in her hot tub, so, basically, yes she’s an amazing friend.

And speaking of Darrell Thomas Textiles – if you follow me on Instagram, you’ve probably seen this name pop up a few times. Darrell’s shop gets some of the BEST high-end designer fabric I’ve ever seen, and I’ve been really lucky to be the recipient of a few special pieces, as well as be able to shop there in person! In addition to this McQueen fabric, I’ve gotten some amazing Dolce & Gabbana prints (stay tuned for a blog post on one of them!), as well as pieces from Burberry, Louis Vuitton, and other gorgeous pieces that aren’t necessarily attributed to a specific designer but are still stunning as hell. While these pieces definitely, absolutely are not cheap – they are unique, special, and high-quality. I realize this post just sounds like a giant advertisement, so I’m gonna stop now, but – just wow. Check out his Instagram if you want some eye-candy to creep on.

Ok, back to my coat!

Quart Coat made with Alexander McQueen fabric

Quart Coat made with Alexander McQueen fabric

Quart Coat made with Alexander McQueen fabric

So, yes, I hemmed and hawed when it came to cutting this fabric! First, I couldn’t decide on a pattern. Then, I went through a lot of second-guessing with the fit, post-muslin. Once I powered through and cut all the (many, many) pieces, the actual construction of this garment went pretty quickly (according to my Instagram – it took about two weeks!). I don’t generally second-guess myself and I rarely treat my fabric like it is some kind of precious gold, but in this case, I am glad I took my time to figure out exactly what I wanted because the finished coat is basically perfect as far as I’m concerned!

The pattern I chose is the Quart Coat from Pauline Alice Patterns. I love the military look of this style, and I felt it would pair well with my McQueen fabric. Especially since my fabric can look either solid black or covered in skulls, depending on the light!

I cut a 36, and my preliminary muslin looked preeetty good except that there were some light pulls near the bust, which is usually indicative of needing a full bust adjustment. For the life of me, I could NOT find a way to add room at the bust with these particular pattern pieces! The princess seams come out of the arm hole, not over the bust, and every tutorial I found (or reference in my dozens of fit books) only covered the latter. And half of them wanted to add a dart – which I didn’t want in my coat. I tried several different things and agonized for months. I knew this fabric was expensive, hard to come by, and I wanted to do it right! But you know what? I ultimately decided, fuck it, and went ahead and cut the coat. Part of this was because the drag lines were indeed really subtle – super minor. The other part was me realizing that muslin doesn’t have the same “give” that regular garment fabrics do, and there was a good chance those minor fitting issues would be resolved by simply using a different fabric. I’m not always right, but I was right in this case. The wrinkles disappeared, the coat looks fabulous, and life goes on.

After getting past that and cutting aaaaalll those pieces, I was ready to sew! I actually started a little log to keep track of how long my progress was taking. JUST THE PREP ALONE (cutting, marking, underlining, etc) took 8.5 hours! I stopped keeping track after that (ha!) but I always tell this to people when they suggest I do some custom sewing for them. Bitch, u can’t afford me.

Quart Coat made with Alexander McQueen fabric

Quart Coat made with Alexander McQueen fabric

Since the coating is on the lighter weight side, I opted to underline all my pieces with a cotton flannel. This adds a layer of support (necessary as this is a quite structured coat) as well as additional warmth. I used a Robert Kaufman Mammoth Flannel for this purpose; I had purchased it with the intention of another project that I ended up scrapping. If you’re curious, this is the specific flannel I used inside my coat haha. While I find Mammoth Flannel to be really reasonably priced (and it is SO NICE!), it is a bit expensive to use as underlining. That said, I already had the fabric so I didn’t see any point in buying something else, even if it did cost less.

Underlining definitely took the longest. I like to underline by hand, which means a looong time of sitting at my cutting table, with endless hand-basting. I use cotton thread (silk is nice too, but cotton is what I had on hand!) and create long basting stitches, which are then removed as the pieces are sewn together. After the pieces are sewn by machine, I trimmed all the flannel from the seam allowances and then catchstitched the seam allowances down (again, by hand) to keep them nice and flat. It’s a lot of extra effort, but this fabric deserves that effort!

The lining is a solid black silk charmeuse, which I bought at Mood Fabrics on one of my many trips to NYC. I love, love LOVE using silk charmeuse for coat linings – it’s heavy and warm, and it looks expensive as hell. Just the way silk charmeuse catches the light when you wave it around delights me to no end. Why I chose black – well, I had considered using a fun lining color, like red or teal. But while shopping, nothing at the store really appealed to me. I also feel like most RTW (not all, but a lot of them) use coordinating and matching linings, rather than contrast. I wanted my coat to look like it could have come from the shop, and also, black on black just looks good.

Since my coat was all black, that gave me a little freedom to choose something more contrasting for the buttons and sleeve zippers – so I went with BRIGHT SHINY GOLD!!! I just love how this turned out, I think it really adds a luxurious touch that isn’t over-the-top. My buttons are from Mood Fabrics (they are actually Marc Jacobs hahahaah!), and my zippers are from Sil Thread (in the NYC Garment District). I spent a long time trying to find hardware that had the same tone and brightness, so they match well.

Quart Coat made with Alexander McQueen fabric

A few things about the construction – one, I definitely put the pleats in backwards. Whoops! It doesn’t bother me, but, if you noticed that – yes, I am aware. I did not do any traditional/heavy tailoring with this garment. Part of this is because I just wanted to finish the damn thing – and part of it is because I’ve learned I don’t really like wearing heavily tailored coats. I dunno, they just feel a little too precious to me, and I’m scared I’ll mess them up somehow! Also, my padstitching always ends up going wonky if the coat gets stored with the lapels in the wrong place, and I can’t ever seem to steam them back into submission. So while this coat has some basic tailoring – the fronts are interfaced (with a fusible weft, before I added the underlining), there is a back stay, and I added both shoulder pads and sleeve heads – I left off the fancy stuff like horsehair, padstitching, and bound button holes (just machine ones here!). Sacrilegious? Sure. Whatever you say.

I don’t know what else to say about this project, so just have a photo dump:

Quart Coat made with Alexander McQueen fabric

Quart Coat made with Alexander McQueen fabric

Quart Coat made with Alexander McQueen fabric

Quart Coat made with Alexander McQueen fabric

Quart Coat made with Alexander McQueen fabric

Quart Coat made with Alexander McQueen fabric

Oh! Here’s another piece from Darrell Thomas Textiles – one of my precious Burberry wools! I actually have two of these (the other one is the classic tan, which I believe they just got a new shipment in at the shop), both of which I made into simple blanket scarves. I started with a yard of fabric, which I cut in half lengthwise and then seamed together (with a flat-felled seam) to create a rectangle that is 28″ wide by 70″ long. I then hemmed the two long sides with a 1/2″ seam folded twice and edgestitched down. On the tan scarf, I also hemmed the short ends – and on this one, I teased out a little fringe! I have always wanted one of these Burberry scarves – and while the fabric was not cheap (I don’t remember the exact amount, I think it’s somewhere in the realm of $150-$170 CAD per yard), it is definitely cheaper than buying from Burberry! And it’s basically a giant blanket, which is the best thing ever 🙂

Quart Coat made with Alexander McQueen fabric

So, there’s the long story saga of my Alexander McQueen coat! Cheers to you if you’re still here reading 🙂 Big thanks to Anokhee for her incredibly generous gifts – both the fabric and for introducing me to the wonder that is Darrell Thomas Textiles! Another giant thanks to my student Elisa, who graciously took these photos for me during my workshop at Stitch Sew Shop earlier this month! In closing, I will leave you with this beautiful cheese plate that we destroyed immediately after:

and a cheese plate <3

Have a great day, everyone!

Completed: Rise Turtleneck

26 Oct

Hello everyone, from the other side! I’m back from my weekend at Camp Workroom Social, which was incredible and full of wonderful friendships with hilarious and awe-inspiring women. I got to room with Devon, who I have missed terribly since she moved away to Atlanta, so it was great to see her again! I had such an amazing weekend, full of awesome memories and SO MANY BOOBS (this is what happens when you assist a bra making class, y’all). Get excited for Amy’s new pattern, btw. Based on what was sewed up in our class, it makes everyone’s boobs happy and beautiful and bouncy.
Anyway, as soon as I got home – I crashed real hard and got real sick. Bummer! I am just really thankful that this didn’t happen while I on either of my trips! I guess my body just needed a serious rest. At some point during my sick week (I’m a huge baby when I get sick, and tend to sleep for a couple days straight until it clears up, no shame), I did something weird to my neck and I guess pinched a nerve… I’ve had a migraine since Friday! Needless to say, I have not felt like doing ANYTHING and have been pretty mopey/miserable since then. I have an appointment with a chiropractor later today – I am literally counting down the hours at this point, it’s that bad – which will hopefully get me fixed up, or at least started down the right path!

So I guess the theme for this post is comfy clothes. Because that’s about all I have been able to handle for the past week… super comfy clothes that double as secret pajamas.

( Also, I took these photos a couple weeks ago, so hold back on your comments of “oh you look nice even when you’re sick!” I wasn’t sick when I took these pictures 😛 haha )

Rise Turtleneck

Rise Turtleneck

It’s still not quite cold here in Nashville… we are in those wonderful in-between days where it’s chilly in the morning, very warm in the afternoon (the high today is 83*, yay!), and only a little chilly in the evening. I haven’t turned my air or heat in weeks… my last electric bill was $60 😛 But I know the cold weather is coming, and I’m trying to prep in advance by filling any major wardrobe holes. I know at least when I get cold, I want to be as comfy as possible, in secret pajamas. I won’t go as far as to leave my house in actual pajamas – it’s just not a thing I do, unless I’m super sick (and even then, I can usually muster up the energy to pull on a pair of ponte leggins and a sweatshirt so I’m not rolling up to the Kroger in my flannel pjs or some shit) – but I am all about wearing clothes that feel comfy like pjs while looking much more pulled-together from an outsider perspective. Stretch fabrics are the key here, y’all. I think we all already know that, but I just said it again anyway.

Rise Turtleneck

Rise Turtleneck

Rise Turtleneck

One thing I was thinking I needed in my closet was a fitted black turtleneck… to wear with high-waisted skirts, jeans, or as an additional layer of warmth. I remember owning a ribbed black turtleneck back in the 90s and wearing the everloving shit out of that thing because it made me feel like I looked sophisticated. I don’t think sophisticated is a word that anyone would ever use to describe my style, but whatever. I can still have these goals.

Anyway, I used the Rise and Fall Turtleneck from Papercut Patterns, which I’ve had my eye on since it was released last year. There are two versions in this pattern – I made the “Rise,” which is more fitted with a mock turtleneck, the sleek look I was going for. I cut an XXS to start, but it was still a bit more loose than what I was envisioning. I kept taking in the side and sleeve seams until it was more fitted, which probably brought it down to – my guess – about an XXXS (if that was even a size option). I think the shoulder seams are still a bit more dropped than what was comfortable, so after I took these photos I ended up taking the sleeves off, cutting back the shoulder, and then reattaching them (sorry, I don’t have any photos of this and I am not able to take any of my sick ass so you can just believe me here, ha). When I make this pattern again, I will double check the shoulder/armscye seams against another pattern that fits me and make adjustments before I cut my fabric. For my on-the-fly alterations, this was fine.

Rise Turtleneck

Rise Turtleneck

I used light rib knit fabric from Organic Cotton Plus for my turtleneck, in a classic black. This stuff is traditionally used to make ribbed cuffs and necklines, but like I said, I wanted a whole 90s-eqsue turtleneck out of that shit. It’s super soft and laundered up beautifully. It did stretch out a bit when I stitched the hem with a twin needle – it actually got really flared and crazy looking, to be honest – so I threw it in the wash and it shrunk up to what you see now. Still a little wavy, but it’s not terrible. I am guessing this particular fabric won’t have a fantastic recovery since it’s 100% cotton – and cotton tends to grow over the course of the day, it needs a little bit of Lycra to snap it back into shape – but it should shrink up after it’s washed. I haven’t had a chance to wear it properly yet as it’s still a bit too hot for full-on neck coverage, but we’ll see how that works out. I may like it a little more loose. Maybe.

Rise Turtleneck + pashmina

Rise Turtleneck + pashmina

Aaaaaand while we’re talking about comfy – I also made a Pashmina! I LOVE Pashminas; they are one of my go-to souvenirs when I’m traveling. Not to mention, they are handy to have while you’re traveling, especially if you’re on a chilly airplane. Wearing it as a regular scarf definitely keeps me warm, but it can also double as a lightweight blanket without actually looking like… well, a blanket (you can also wad it up and use it as a pillow if you’re lucky enough to get the window seat). It’s also a nice alternative to a sweater or cardigan when you’re wearing fancy dress – again, draped over the shoulders like a cape looks really lovely.

Ok, “made” is a very very loose term here 😉 I got 2 yards of wool cashmere Pashmina fabric (also from Organic Cotton Plus) and frayed the edges with a pin. So there’s not really so much making here – I didn’t even sew a thing, the selvedge edges were finished as they were – but not even project needs a mess of sewing to be proud of, you know? At $26 a yard, this fabric is far from cheap – but a total of $46 (and maybe an hour of fraying) but it is organic wool, and certainly less expensive than the questionable-origins Pashminas I see at Nordstrom. So there’s that.

It’s hard to get a good photo of this fabric, but it’s very light and floaty with a loose weave that has a bit of a design in it-

Organic pashmina

Organic pashmina

It’s also pretty translucent. I originally considered using it to make a full-on lined wool skirt, but it’s just too loosely woven and lightweight, like, well, a scarf 😉

Organic pashmina

Here is a close-up of my fraying. I pulled one cross grain thread to make a straight line (same as you’d do when tugging your fabric to be on-grain) and then gently pulled the threads below to make a fringe, using a pin. It probably took about an hour, and wasn’t too bad once I got into the swing of things. I did not secure my fraying with a line of stitching or anything – upon examining all my other scarves, they don’t have any stitching at the end and they have held up fine.

Rise Turtleneck + pashmina

Finally, I should mention – those jeans are secret pajamas too, y’all! They are actually JEGGINGS, made with cotton stretch denim knit, which is like a really awesome ponte that looks like jeans. You can read the post about them here. I’ve worn them steadily for about a year and a half and they’ve held up nicely – washed and worn well, and are still sooo comfy. See! Secret pajamas. These were totally in regular rotation while my dad was in the hospital, btw. I had to wear pants because they keep that ICU freeeeeezing, so it was nice to have something knit that was comfortable enough to wear for hours of sitting. Should you be lucky enough to not have to spend a week in an ICU waiting room, I can also vouch that these pants/this fabric is great for traveling 😉

Speaking of traveling – I have one more workshop (well, two back to back) before I’m done for the year! I’ll be in NYC next weekend for jeans making (which is sold out!) and the ever-popular Weekend Pants Making Intensive (which I think still has a couple of open spots if you’ve been on the fence! TREAT YO SELF), both at Workroom Social! Can’t wait 😀

**Note: The fabrics in this post were provided to me by Organic Cotton Plus, in exchange for a blog post review. All opinions are my own, however, all links to said fabrics *are* affiliate links (which all funds will divert to my Coverstitch Savings Account). The Papercut pattern was purchased with my own dollars, though! ♥
EDIT: I can’t believe I didn’t notice that this is totally a Steve Jobs outfit hahahahaha

Completed: Smells Like Teen Spirit Sweater

26 Aug

I am SO happy to be finished with this sweater!

Smells Like Teen Spirit Sweater - front

Clocking in at nearly 6 months to knit, seam and finish – this sweater was definitely a labor of love to complete.

Smells Like Teen Spirit Sweater - front

Smells Like Teen Spirit Sweater - side

Smells Like Teen Spirit Sweater - back

Both the pattern and the yarn are from Wool and the Gang, which is pretty much the coolest yarn company I’ve ever heard of. WATG sells yarn, patterns, needles, and complete kits for their patterns (as well as RTW knit pieces, if you want to be completely lazy 😉 no judgement over here from me!). The company reached out to me earlier this year – well, 6 months ago – and asked if I’d like to try one of their kits for a review. Being the cheeky piece of shit I am, I choose the Teen Spirit Sweater, in the classic red/grey colorway.

Smells Like Teen Spirit Sweater - kit

Smells Like Teen Spirit Sweater - kit

The kit came beautifully packaged, and included 21 balls of their Wooly Bully alpaca yarn, the Teen Spirit Sweater pattern, at set of size 10.5 Rosewood needles, and a giant needle for weaving in all the ends.

Smells Like Teen Spirit Sweater - front

Smells Like Teen Spirit Sweater - back

The pattern is One Size, which I knew immediately off the bat was gonna be WAY too big for me – it has a 44″ chest measurement (compared to my measly 32″ – that’s a LOTTA ease!). So the first thing I did was knit a gauge swatch to figure how many stitches I knit per inch, and recalculate the pattern so it would work with my specific measurements. Since the pattern is basically 4 giant rectangles (the sleeves have very gradual increases but nothing crazy), this was not at all difficult to do. All I needed to change was the amount of stitches I cast on, and then just follow the pattern henceforth. I also shortened the body of the sweater, because I wanted mine to be slightly cropped to offset the boxiness.

All the pieces are knit separately – front, back, and two sleeves . The front and back are identical, and are literally just two big rectangles – there is no shaping for the neckline, arm holes or waist. As I mentioned, the sleeves have very gradual increases to make them slightly shaped, but they are still primarily just big ol’ rectangles. To make the tartan, you knit in stripes following the pattern, and then weave the vertical stripes in afterward using this technique from WATG. It looks a lot more complicated than it actually is – it’s just time-consuming! I spent MANY nights sitting on the couch, binge-watching Mad Men, with a tiny blanket o’ sweater in my lap, weaving tartan stripes. In fact, this was the main project I worked on in the last week before my move – as it was the only thing I hadn’t packed!

After I wove in all the tartan stripes, I then blocked the pieces (which seriously took like 2 days to dry completely) before seaming. You seam the shoulders first, then attach the sleeves at the sleeve cap, then seam up the side and sleeve seam in one go (same as you’d do when sewing a knit tshirt). Finally, you knit the neckline ribbing (the sleeve and hem ribbing are knit while you are knitting the pieces). The resulting sweater is MASSIVELY heavy – I wish I owned a scale, because I’d love to know how much it actually weighs! Honestly, I love throwing it at people and watching how surprised they are when they feel it’s heft hahaha. It’s surprisingly not that itchy – it’s a little bit itchy, but I think another wash with some lanolin will clear that right now – but it is super duper warm. Way too warm to wear right now, obviously, but I’m sure I’ll really appreciate it come winter 😉

Smells Like Teen Spirit Sweater - flat

Smells Like Teen Spirit Sweater - flat

Smells Like Teen Spirit Sweater - flat

As complicated at this sweater looks and as long as I spent working on it – it honestly was not difficult to knit at all. Even with rewriting the pattern to work with my measurements, the overall construction was very simple and straightforward. It was definitely time-consuming, but not hard – seriously, this is a great pattern for a beginner. Lots of knitting and purling, simple color changes for the stripes, and then seaming everything together (my seaming definitely needs some work, btw. Woof.).

Part of what took me so long to finish was simple mistakes I made on my end. I wasn’t happy with my first batch of tartan stripes – which I decided after I’d finished weaving the tartan for the entire front. I ripped everything out, recalculated, and wove it all in again. I could have stood to do a neater job with my weaving – all the other examples I see are much more even and precise and mine looks a bit sloppy in comparison – but I’m pretty happy with it regardless because I AM SO NOT RIPPING THAT SHIT OUT AGAIN. I also had some trouble with the neckline ribbing – I picked up too few stitches the first time, and wasn’t able to get the sweater over my head! So I got PISSED, ripped out the ripping, and put that fucker in time out for a solid month. Ha! Eventually, I got some liquid courage (aka wine) and tried again – this time picking up stitches at a 1:1 ratio and making sure it pulled over my head before binding off. It worked! Go me!

Check out my Ravelry page for the full low-down on this project – my stitch counts, measurements for the tartan weaving, etc. Didn’t want to clog up this post with all that, but it’s on the ‘Rav! BTW, I should mention – you can also buy this pattern individually, if you don’t need the yarn and needles. Teen Spirit sweaters for everyone! 😀

Smells Like Teen Spirit Sweater - front

When I started this sweater, I naively thought that I would have it finished before the weather started warming up – ha! Not even! On the flip side, it’s definitely ready and waiting for the next season! I’m actually pretty glad that I had an entire summer to fuss with this, because it made me not be in a hurry to finish it – I knew I’d have to wait months before that was even an option. Instead, I took my time and ripped out when needed, and I think the end result was worth it. Man, I cannot WAIT to wear this bad boy! I think it’ll look especially ace with my Elizabeth Suzann Cecilia Pants. Which, btw – if you are looking for the magic pants that look amazing on EVERYONE, that’s those. You’re welcome.

**Note: The kit for my Teen Spirit Sweater (which included the yarn, pattern and needles) was VERY generously given to me by Wool and the Gang, in exchange for a blog review. Thank you, WATG!

Completed: Cozy Loungewear

7 Dec

It’s officially that time of year – black and grey layers from head to toe. My favorite!

Colette Oslo Cardigan - front

I feel like I spend the beginning of every winter on the prowl, looking for pieces that will keep my warm and comfortable, without looking like a complete slob (only, like, 30% slob. I have my limits, you know). Every year, I wear said pieces until they are ratty beyond repair, so each new season means new duds. Honestly, none of the pieces in this post are particularly earth-shattering, which is why you get a 3-fer post, ha.

Colette Oslo Cardigan - side

Colette Oslo Cardigan - side

The grey/black cardigan is hands-down the coziest cardigan I have ever made – it even works as a light coat! The pattern is the Oslo from Colette’s Seamwork Magazine. I didn’t care much for the pattern when it was first released, however, I kept noticing cool versions popping up and eventually became mildly obsessed with the idea of making my own. I love the long, butt-covering length, as well as the big shawl collar. In September, Oslo was granted the glory of being “Pattern of the Month,” which knocked the price down to $5 and thus justified my immediate purchase.

Colette Oslo Cardigan - back

Anyway, I can see why everyone and their mom has made an Oslo – it’s a great pattern! It’s a super simple, super quick make, and the resulting garment is a great layering piece that I find vaguely reminiscent of those knit duster cardigans we all wore back in the late 90s (I bought mine at Rave. SUP.). It works especially well with heavier knits – which is great, because I keep buying them but I never know what to make them into! I don’t want a super heavy tshirt. I’ll wear a super heavy cardigan/duster hybrid, though, hell yeah I will.

Colette Oslo Cardigan - inside

Speaking of heavy knits, this was certainly one of those! I bought this double-cloth Italian wool sweater knit months ago, and while it’s really awesome – it’s also super thick. It’s basically two layers of wool knit – black on one side, grey on the other – fused together to make one really heavy layer. It makes for the perfect Oslo, because it’s super warm, but I had no idea what to do with it when I originally bought it. Also, it was kind of expensive, so I only bought 1.5 yards. I BARELY had enough yardage to eek this out – I had to do some piecing at one shoulder, and cut everything on the single layer, but I managed!

Colette Oslo Cardigan - front

Tetris-ing the shit out the cutting layout took a long time, but the actual sewing part did not take long at all! I used my serger for everything – shit got REAL bulky when I was attaching the shawl collar, but other than that was smooth sailing. I cut the size XS and sewed the pattern as drafted with folded back cuffs, although I didn’t add the buttons. I wish I’d had enough fabric to add front patch pockets, as I feel like that’s the only thing this pattern is missing.
Vespa Patterns Grail tshirt - front

The next piece is a boring ol’ black tshirt! Haha! Well, I used a new pattern to make this – so that makes things a little less boring 🙂

Vespa Patterns Grail tshirt - front

This is the Grail tshirt from Vesta Patterns, a new company in the pattern world. These patterns are drafted and produced for 3 different body shapes, so that you don’t have to do so much futzing with the flat pattern for a good fit. I’ve been super interested in the idea but haven’t had a chance to try out the patterns, despite having them in my arsenal for a few months now. I have both the patterns for E & S (well, I had A too, but I gave it to an A-shaped friend 😉 ), so I started with the E in a size Small. The patterns are drafted to have a bit of ease, which I found to be too much for my personal fit preferences – I had a bit of excess from the underarm down to the waist, but that was easy to nip in before I hemmed the sleeves and bottom. Next time, I may go down a size for a closer fit, or use a more stable fabric like the pattern suggests. That being said, I am really impressed with how well and proportional the neckline and shoulders fit!

Vespa Patterns Grail tshirt - back

Like the cardigan, construction was straightforward and simple. The pattern doesn’t include a lot of information for construction – the steps are written out, but they are short, concise, and don’t include pictures or line drawings. Having made zillions of tshirts in my time, this does not phase me. I don’t need a full booklet with step-by-step instructions for sewing a shoulder seam, you know? But if you need the hand-holding, you may want to consider finding a tutorial online or consulting a book for further assistance.

The one construction element about this pattern that differs from most knits that I’ve sewn, is how the neckline was finished. Strips of fabric are sewn as a sort of binding around the neckline, wrapping the raw edges. It’s similar to how I did the binding on my Mission Skater dress, although without the serged edge. I think it makes a really nice, clean finish that looks really good from the outside. I hemmed the sleeves and bottom at 1″, and just used the zigzag on my sewing machine.

Vespa Patterns Grail tshirt - front

I stayed on the wool bandwagon with this top, and used another wool knit to make it up. I found this weird “black cozy knit” (their description, not mine) on the Mood website – appears to be sold out now. Y’all, this was a WEIRD fucking fabric! I don’t know what I was expecting to get, but what I received was what I would describe as a wool crepe knit. It has that crepey, spongey texture – but it’s a true knit, and stretches as so. I’ve never seen fabric like this before. It’s borderline semi-sheer, but works well for a tshirt. Because of the crepey texture, it has a fantastic drape – perfect for a loose-fitting shirt. It’s also surprisingly not itchy. Just, well, cozy 🙂 It also attracts cat hair like a magnet, sooo, sorry bout that!

SBCC Pinot pants - front

Finally, pants! These are the Pinot Pants from SBCC Patterns and they are my FAVORITE lounge pants ever ever. These are just basically yoga-style pants – not true yoga pants, as they don’t have a crotch gusset, but they do have the flared leg and elastic waistband. I have actually practiced yoga in these pants (not my preferred style of yoga pants – I like slim leggings – but I went to yoga with Jenny when I was in Boston, and hey, I actually had yoga pants in my suitcase!), and they worked just fine. Terrible fabric choice for hot yoga, but I had a great range of movement hahaha.

I made the size XS and cut a longer inseam so I’d have some length to play with (which I immediately cut off, and now they’re a smidge too short. Wah!). I added the free pocket add-on, which was the best decision ever! There aren’t any instructions for attaching these, but I just topstitched them on with a straight stitch (and left the edges raw – other than the top opening edge, which is finished with a self-fabric band). Leaving the edges raw is fine with this sort of fabric, as it’s not prone to unraveling or fraying (and, speaking of raw edges – these pants are unhemmed. Like I said, I cut them too short as it is and I couldn’t afford to lose any length! haha!). I also left off the elastic waistband, and instead used some heavy-duty power mesh in it’s place. Betsy had mentioned once that she preferred power mesh over elastic for a flat, yet stretchy, waistband, and I was immediately intrigued. I actually have some heavy power mesh that is way too heavy for general lingerie (I believe it’s probably good for shapewear, though), so I used that in the waistband. Just cut a waistband layer in the mesh, basted it to the wrong side of the fabric waistband, and sewed as normal. It holds as well as elastic does, but it’s flat like a traditional yoga waistband. I love it!

For fabric, I used black nylon/rayon ponte de roma, which is AWESOME and I wish I had more! It holds shape really nicely and doesn’t stretch out. Like I said, it’s not so great for shit like actual yoga – it retains heat a little too well – but for general lounge pants, it’s perfect.

Colette Oslo Cardigan - on dressform

Vespa Patterns Grail tshirt - on dressform

Vespa Patterns Grail tshirt - neckline detail

You can really see the texture of the knit here. And check out that bound neckline!

Colette Oslo Cardigan - flat

Here is where I had to piece the shoulder area of my Oslo, in order to get the pattern pieces to fit on my limited yardage. You can’t really tell it’s there when I’m wearing it.

Colette Oslo Cardigan - flat

SBCC Pinot pants - flat

Ok, that’s it! Sorry for the overwhelming amount of black + cat hair, ha.

Colette Oslo Cardigan - front

This is the kind of ensemble I reach for when I’m feeling crappy (sick, sad, hungover, etc) but still need to look somewhat presentable out of the house. As much as I love my plaid flannel Carolyn pajamas, they definitely look like pajamas! With these pieces – either all worn together, or individually with other garments – they keep the comfy factor without compromising the yes-i-put-on-pants-to-leave-the-house element. I consider that a win!

Completed: Crazy Aztec Waver Jacket

28 Oct

Well, my winter jacket is ready for this year! Guess I can cross that one off the list!

Papercut Waver Jacket

Before we get too deep into this post, I have to warn you – I took a LOT of photos of this jacket. It’s a big project and one that I’m especially proud of. I am not even sorry that you’ll have to look at like 40 pictures of it now. Yep.

Papercut Waver Jacket

As I mentioned in my Fall/Winter sewing plans, I’ve been collecting all the bits and pieces to make this jacket for a couple of months now (PROTIP: Making a coat can get expensive when you start buying all the crap that goes into it, but you can make the cost hurt a lot less by buying everything in phases 🙂 HAHA). I’m pretty set on the heavy winter coat front – my Vogue coat is still serving me well nearly 2 years later, and the Ralph Rucci knock-off is a wonderful piece to wear when I’m dressed up. My wardrobe does have a small gap in lightweight jackets – my black and gold bomber jacket, while awesome, is a bit short to really be cozy, and my orange Minoru jacket is really better suited for the super mild spring temperatures as it’s really not that warm (it’s just cotton with a poly lining, after all)! What I needed was a longer jacket, preferably one with a hood. I always miss having a hood.

Papercut Waver Jacket

Papercut Waver Jacket

The Papercut Patterns Waver Jacket was my pattern choice – it’s a really cool, casual style and I liked that it included a hood, as well as the waist-cinching drawstring. This pattern is pretty similar to the Sewaholic Minoru, although without all the additional gathering nor the hood-stashing wide collar. I think the style of the Minoru looks pretty good on me, so I knew the Waver would as well. I also found an eerily similar replica (with set-in sleeves rather than raglan) at the GAP a few months ago, so I was able to try it on and see what I thought before I started making muslins. I love it when things work out that way!

I cut the size XS, which is my usual size with Papercut. I like that the jacket has some shape, but there’s still enough room in there for me to pile a sweater on underneath (which is about the max layer of clothing I’d have on if the weather was appropriate for a jacket like this!). My muslin revealed that I didn’t need to make any fitting changes, other than shorten the sleeves about 1cm (ooh, look at me, sounding all international and shit).

Papercut Waver Jacket

Of course, the fabric really makes the jacket! This cool navy Aztec virgin wool is from Mood Fabrics, and I’ve had a big piece squirreled away in my stash for months. It’s a pretty lightweight wool, which is perfect for my needs, and suitable for this pattern. I love all the colors in the print! Trying to cut those pattern pieces to match all the bold, colorful lines was a little bit of a struggle, but I made it work. I lined the jacket with English blue silk charmeuse (the exact one that I used appears to be sold out at this point, sorry!). I really did agonize for a long time over what color lining to include – the fun side of me loves contrast linings, but the boring side of me thinks it makes things look a little cheap (except that red lining in my plaid Vogue coat; I have no regrets about that one!). I actually like a more subdued lining, and prefer the contrast in the form of texture, not color. So I went with English blue, which perfectly matches the navy in the wool.

I didn’t do a lot of crazy tailoring with this coat – it was actually a fairly simple project. I did add a back stay (made of medium-weight muslin and using this tutorial from Sewaholic) to the back to keep it from stretching out, and I catch-stitched all the wool seam allowances down so that they’d stay flat with wear (similar to this, but without any of that horsehair interfacing. This is a casual coat that doesn’t need heavy tailoring!). There’s no padstitching in this project, or bound button holes. While I LOVE big projects with lots of interior details, not every project has to be couture-worthy. Especially if it’s a simple jacket.

Papercut Waver Jacket

ha! Bet you didn’t notice those big patch pockets, did you? I cut those so they are hidden in plain sight right on the front of the coat. Good thing I have radar fingers, otherwise I’d never be able to find them when my hands get cold.

Papercut Waver Jacket

I also added inseam pockets (not included in the pattern, but as easy as stealing a pocket piece from another pattern and popping it into the side seams as you are sewing it up!), sewn in silk charmeuse, along the side seams. The wind blowing in my hair for this photo is an added bonus, and you are welcome for that.

Papercut Waver Jacket

Papercut Waver Jacket

Papercut Waver Jacket

The hood was a big selling point for this pattern! I love jackets with hoods, but I never really come across jacket patterns with hoods that I actually like. It’s nice to have a hood for rain and light snow, so I’m glad this pattern has a hood! It’s a nice 3 piece hood, too, so it stays on your head without squishing it, and stays put (and it’s big enough to cover my head even when my hair is pulled up in a bun!). The pattern calls for lining the hood with self lining (aka the jacket fabric), but I was afraid that wool would give me weird hat head, so I lined the hood with more silk charmeuse instead. I figured, they make pillowcases out of silk, so hood lining can’t be too far off… right?

As you can see, I also added faux fur around the hood. Yeehaw! I love this detail in coats, and I was keen to add it to this coat as well. This black and white faux fur from Mood is really nice stuff – it’s super soft and almost feels like real fur. It’s certainly way better quality than any other faux fur I’ve sewn. This doesn’t necessarily make it any easier to sew – I still had fur flying everywhere as I cut it, etc etc – but the payoff is worth it!

What you can’t see in these photos is that the fur is actually removable – just in case I change my mind and want it off, it won’t be difficult to remove it (I doubt that will happen, but I like having options!). I sewed the fur trim the same way you’d make a fur collar, loosely following this tutorial from Casey, although I did not add any interfacing as my fur has a pretty heavy backing as-is.

Papercut Waver Jacket

I sewed black twill tape around the edges and then folded it to the inside, catch-stitching everything down securely.

Papercut Waver Jacket

Then I laid my silk charmeuse lining on top, covering all the insides and attaching the folded edge of the lining to the twill tape on the fur, using teeny hand stitches. The fur trim was then attached to the perimeter of the hood, using invisible hand stitches. I briefly considered using snaps or buttons+loops, but decided that I didn’t want anything to show when the fur was removed. The stitches will be easy to pull out if I need to take the fur off, but you can’t see them when the fur is on, either. You can see what the jacket looks like without the fur here, if you’re interested!

Papercut Waver Jacket

Here’s that blue lining! You can see another change I made to the jacket – instead of using a drawstring to cinch the waist, I added wide elastic. This was mostly due to comfort – elastic isn’t constricting like a rigid draw string is – plus I think it looks better on me. I did have to change up the order of construction a bit to get this to work. First I bagged the lining as usual (per the pattern instructions). I left off the drawstring channel pattern piece and instead sewed through all the layers of the wool and lining to make a channel (similar to the construction of the Minoru), then fed the elastic through that and tacked down the ends.

Papercut Waver Jacket

I also added a little leather tab to the back of the neck, so I can hang the coat more easily (or from my finger haha).

Papercut Waver Jacket

I actually like this way this coat looks unbuttoned, which is a first for me!

Papercut Waver Jacket

Papercut Waver Jacket

Papercut Waver Jacket

I do wish that I had paid more attention to my pattern-matching on the front of the coat, so that the design would continue uninterrupted. Oh well! It still turned out pretty cool despite that mishap, and there are triangles down the center front instead. I’m ok with that!

Now for a buttload of dressform and flat pictures:

Papercut Waver Jacket

Papercut Waver Jacket

Papercut Waver Jacket

Papercut Waver Jacket

Papercut Waver Jacket

Papercut Waver Jacket

Papercut Waver Jacket

Papercut Waver Jacket

The buttons are antique glass buttons that I bought at the flea market earlier this summer. Love them so much! That guy has the best buttons.

Papercut Waver Jacket

Papercut Waver Jacket

Papercut Waver Jacket

Papercut Waver Jacket

My favorite part!! The leather tab was an idea I took from an old American Eagle coat – I just cut a strip of heavy leather, rounded the ends, and punched holes so I could run stitches through it. And the woven label is from Wunderlabel – isn’t that the best finishing touch? I had a hard time deciding what mine should say – I wanted it to say Made in Nashville, but I don’t really live in Nashville anymore (I mean, we are close enough but I’m a huge weirdo/stickler about that sort of thing!), so The South works 😉 Anyway, this was my first experience with Wunderlabel – I’ll have more of a review up in the future after I’ve used more of the labels. But in the meantime, I’m sewing them on everything!

Papercut Waver Jacket

While I certainly did not push myself to hurry and finish this project, I did wrap things up pretty quickly! I think it took about a week to get everything sewn up, after making the muslin and cutting the fabric. I’m glad I finished it, too, because I think it’ll come in handy when I’m in NYC in a couple of weeks. Hell, it’s already starting to get cold here – I will probably be able to wear it later this week! 🙂

Papercut Waver JacketNote: The fabric for this jacket was purchased with my allowance for the Mood Sewing Network (over a period of months, I might add! 🙂 ). Pattern was given to me as a gift. All comments on this blog post 100% mine, however!

Completed: White Graphite Sweater

20 Oct

I started this sweater back in Feburary, which gives it the title of Longest WIP Ever (for me, anyway). Not because it was complicated to knit, but rather because I put it on the backburner several times in order to work on new and shiny projects. Yep, I totally broke my own personal rule about UFOs! But I did finally complete this unfinished object, so I’d reckon that it’s all good 🙂

White Graphite Sweater - front

For this sweater, I used the Graphite pattern, and knitted up a size XS. Based on my gauge swatch (can you believe I’m still faithfully knitting these before starting a project?! Mostly because I told myself I would turn all those swatches into a blanket eventually. Despite all my swatches, it’s still a pretty tiny blanket haha), I went down a couple of needle sizes to an 8. The pattern has you knit the ribbing with an even smaller needle – in my case, that would be a 6 – but I didn’t do that with this sweater because I totally forgot. Oh well!

White Graphite Sweater - front

Oh, by the way – Kevin Pancho piggy is back in some of these pictures. Everyone say hi to Kevin! She’s currently in the process of invisible fence training, hence her collar. Kevin loooves rooting around in the woods a little too much (like, she disappeared for over 2 hours more than once!), so we had to take some measures to keep her safely in the yard. Training is going a lot more smoothly than it was at the beginning, but man, is that pig stubborn!

White Graphite Sweater - side

White Graphite Sweater - side

Anyway, enough about that pig! Back to my sweater!

I used Plymouth Yarn Homestead for this, purchased from my local yarn store, Haus of Yarn (actually, since I moved, I have a new local yarn store! More on that when I get around to posting projects from the stuff I’ve bought from there, though!). This yarn is 100% wool, Aran weight, and Haus of Yarn only had the natural colors. I don’t know why I gravitated to this off-white – it’s beaaaaautiful on the skein, but not really so much against my face. Ugh. Me and my visions of white sweaters, the endless mistake.

White Graphite Sweater - back

This sweater also gave me the stark realization that I need to pay more attention to suggested yarns for my patterns. I know this is a VERY obvious thing for me to admit, but I have never really given much thought to the suggested yarn, other than weight and ply. I just always stick with 100% wool, regardless of what the pattern tells me to use. Since I don’t really knit patterns that require a different fiber (for drape, or stitch definition, or what have you), this hasn’t posed a huge problem, but it does limit me. I think this sweater would look a lot better if I had used a yarn with a little more drape, like the suggested Debbie Bliss merino. Just something to keep in mind for my next sweater!

White Graphite Sweater - back

As for the pattern, I knit it exactly according to the instructions, with no further fitting adjustments. It has a nice fit, I think – form-fitting without being snug, and it skims over the body. I do think it’s a bit too long, though! It does not look bad in these pictures, but I prefer a little more of a crop with my sweaters, since I wear my pants so high-waisted (I think it looks weird to have high-waisted pants and a long sweater! Or maybe it doesn’t look weird, but it certainly feels weird!). But, the almost butt-skimming length will work in my wardrobe. I can totally wear it with leggings and pants with a lower rise.

White Graphite Sweater - front

Like I said, the pattern was super super easy. This would be an easy first sweater project – lots of endless stockinette in the round. It’s knit top-down, and you make increases for the raglan sleeves and then separate those stitches from the body. From there, you knit in an endless tube to make the cool broken rib knit pattern (which, again, SUPER easy. Just knits and purls!). After you knit the ribbing and bind off the bottom, you knit the sleeves (putting the live stitches on the needles, rather than picking up bound-off stitches as with traditional set-in sleeves). Since they are raglan, there’s no sleeve cap to knit – you just knit an endless circle. Finally, the neckline is picked up and knit with a rib pattern. Easy!

White Graphite Sweater

White Graphite Sweater

Blocking the thing (where you wash it and lay it flat to dry, pulling it into the desired shape and size) really made a difference in the finished sweater! Not only did it set the stitches and make them nice and flat/even, but it relaxed the yarn and gave it a nice drape. Where the raglan sleeve “seam” (really just a series of increases) ends, there was a poof right over my armpit when I put the sweater on. Totally not a good look. After blocking, though, that relaxed into a soft little fold, which I can live with.

Doesn’t that yarn look so delicious and swishy!? YAY.

Ok, I don’t have anything else to say about this project, so here are some pictures of me trying to make friends with Kevin. Whatever, I know y’all are just here for the pig.

KEVIN PANCHO

Holy shit, I look like I’m balding in these pictures hahahahah. I swear that’s just the flat spot I get from sleeping haha. Oh lord!

KEVIN PANCHO

I’m glad I finished this project and can finally put it to rest! While I’m not crazy about the color on me, I think I’ll like it with a colorful collared shirt underneath it 🙂 (I did consider dyeing it, but then decided… nah. Haha!). What’s on your knitting needles these days? What’s your favorite wool sweater yarn? I’m about to cast on for my next sweater, but I’m always looking for new projects to add to the queue!

Completed: Basic Ribbed Socks

1 Sep

I finished these socks a while back – at the end of May, to be specific – and I just realized that I never got around to posting them. Whoops! Better late than never!

Handknit red socksEver since I finished my first pair of socks, I knew I wanted to try again and improve on what I had learned. The biggest issue I had with the first pair was my yarn selection. Since I used an alpaca blend (and before you tell I should have asked the yarn store for yarn suggestions- I did! That was what they said was best for sock-making, for some ungodly reason), the socks tend to slouch and stretch out of shape, and I never liked the little fuzzy halo of fibers that is typical with alpaca. I wanted to try with an easier pattern – one without lace – and a better sock yarn. And here is the result! I think they turned out pretty nice 🙂 Handknit red socksOh, about that random pig in these photos. Ha! That is our pet piggy and her name is Kevin Pancho. Yes, Kevin is a girl (we were under the assumption that we had a boy pig, and then she ended up being a girl whoops hahaha). She’s a potbelly and still just a baby, but she will eventually get pretty big. Before you ask – we have no plans on eating her, she’s just a pet (I mean, unless doomsday comes around and we all start starving to death or some shit. Then, Kevin will be a Food.).

Handknit red socksAnyway, back to my socks (with some random piggy butt)! I used this Basic Ribbed Socks pattern, which is one of those free patterns on Ravelry that apparently everyone has tried (ok, not everyone, but 6k+ people can’t be wrong amirite). It’s a basic, easy sock pattern, knit with fingering weight yarn and constructed from the cuff down. The majority of the knitting is done with a 3×1 ribbing, which keeps the sock from slouching as much, and is a little more interesting than your standard 1×1 ribbing. Because the socks aren’t ridiculously tall, I was able to knit them out of a single ball of yarn. Which means they were quite economical to make! Handknit red socksI knit these for the size 6, which is pretty close to my shoe size (I generally wear a women’s 6.5). The socks fit perfectly, and they are super comfortable! They stay up pretty well, as promised, and the lightweight yarn means that they aren’t too thick to wear with shoes (which isn’t something I’m doing right now, but I’m sure I will be happy for that option come winter!).

For yarn, I used Cascade 220 Fingering. Again, I only had to buy one ball to knit both socks – and I still have a little yarn butt left over. I bought the yarn while I was in Philly for Maddie’s Bramaking class, ‘way back in January, on my evening ladydate with the wonderful Andrea. Andrea took me to her favorite yarn store, Loop Yarn, and this was my yarn souvenir for the trip. I chose this yarn based on the suggestion of the woman working there, and I am extremely happy with how it worked up. I use Cascade 220 worsted weight for a lot of my knitting projects, and while this was my first try with the fingering weight, it’s just as nice as the worsted. Easy to knit and looks good when finished. As you can see in these pictures, it does pill a little with frequent wear (I wear these socks a lot! I even brought them to Peru with me 🙂 ), but, they are socks. Whateverrrr.

I also bought metal DPNs to knit these socks; I was using bamboo before because I like how it grips, but those tiny little needles snapped like crazy on me. The metal ones don’t break (or, I guess, they haven’t broken yet haha), but I have bent them a little bit. As with my first pair of fingering weight socks, I used a size 0. So yeah, teeny little needles!

Handknit red socksHandknit red socksI really enjoyed working with this pattern. It is simple and relatively mindless (so, good for bringing to knitting night, or watching tv, or whatever), and the socks knit up pretty quickly. Turning the heel was fun and magical, and I didn’t feel like I was doing too much endless repetition with all that circular ribbing. I think it’s too soon to say that this will be my TNT sock pattern, however, it’s definitely a contender! I will totally knit this pattern again.

Handknit red socksHandknit red socksHandknit red socksI’m already working on my next pair of socks. Socks are great little portable projects that pack up small and are easy to bust out for a couple of rows at a time. They are especially awesome for traveling, since you aren’t lugging around a bunch of pieces or a big sack of yarn (and if you finish one sock, you can wear it! Yay!). That being said, I also love knitting sweaters, so don’t expect that to go away anytime soon. I haven’t knit as much as I used to in years past – not having a dedicated hour-long lunch break to commit to knitting will do that – but I’m making an effort to get at least a few rows done a couple times a week. Not even because I want to make progress (well, I do, but that’s not the #1 reason), but mostly because it’s an awesome stress-reliever. And it keeps me from falling asleep on the couch hahaha. Handknit red socksI’m including this last picture because Landon and I were arguing about which ~scenic~ spot to take photos. He said the cinderblock was stupid and ugly, I said the deck was even stupider and uglier (sorry, deck.). So you tell me – who was right? Personally, I think Kevin really made the pictures worth looking at 🙂