Tag Archives: petersham ribbon

Completed: My Finished OAL Dresses!

28 Jul

Good morning, everyone! I hope your AM is filled with lots of sunshine, like mine, and coffee, unlike mine (because, *ahem* someone forgot to mention we were out after he made a pot yesterday). Anyway, that’s neither here nor there – you came here to see finished dresses and sweaters, right? Let’s get to it!

OAL 2014: Completed Simplicity 1803 + Myrna Cardigan

Fair warning – this is a pretty picture-intensive post. I have two dresses to show plus a cardigan! (You’re so lucky that I don’t have two sweaters. I tried, but the second one is technically a vest right now soooo…). While I could theoretically stretch this out into 3 posts, I actually really hate it when people do that so I’m just dumping it all in one glorious picture-filled OAL extravaganza! Hope you don’t mind looking at my mug 😉

Speaking of which… you probably noticed the change in scenery, not to mention actual decent looking photos. That’s because I didn’t take them! Ha! All photo credit for this post goes to my lovely friend, Jenna, of Kitty Cat Stevens (you may recognize her photos from last year; she took those ace ones of my Lace trench). She really did an amazing job with these and I just love how they turned out!

OAL 2014: Completed Simplicity 1803 + Myrna Cardigan

Dress #1 was made with a lightweight cotton from Mood Fabrics (purchased at the NY location while I was there in March). The bodice is view C with cap sleeves, a softly pleated skirt and a lapped zipper.

OAL 2014: Completed Simplicity 1803 + Myrna Cardigan

OAL 2014: Completed Simplicity 1803 + Myrna Cardigan

OAL 2014: Completed Simplicity 1803 + Myrna Cardigan

LOOKS SO GOOD WITH MY HAIR.

OAL 2014: Completed Simplicity 1803 + Myrna Cardigan

OAL 2014: Completed Simplicity 1803 + Myrna Cardigan

Dress #2 was made with a gorgeous rayon challis from Grey’s Fabric. I used the same pattern, swapped out the bodice for view B with bias-faced arm holes, a softly gathered skirt and an invisible zipper.

OAL 2014: Completed Simplicity 1803 + Myrna Cardigan

OAL 2014: Completed Simplicity 1803 + Myrna Cardigan

OAL 2014: Completed Simplicity 1803 + Myrna Cardigan

OAL 2014: Completed Simplicity 1803 + Myrna Cardigan

OAL 2014: Completed Simplicity 1803 + Myrna Cardigan

OAL 2014: Completed Simplicity 1803 + Myrna Cardigan

The hem on this one is finished with rayon seam binding. So pretty!
OAL 2014: Completed Simplicity 1803 + Myrna Cardigan

OAL 2014: Completed Simplicity 1803 + Myrna Cardigan

Finally – here’s Myrna herself! I guess I can talk a little more about this part of the project since I haven’t really mentioned it much on my blog (unlike that entire OAL full of posts, ha).

OAL 2014: Completed Simplicity 1803 + Myrna Cardigan

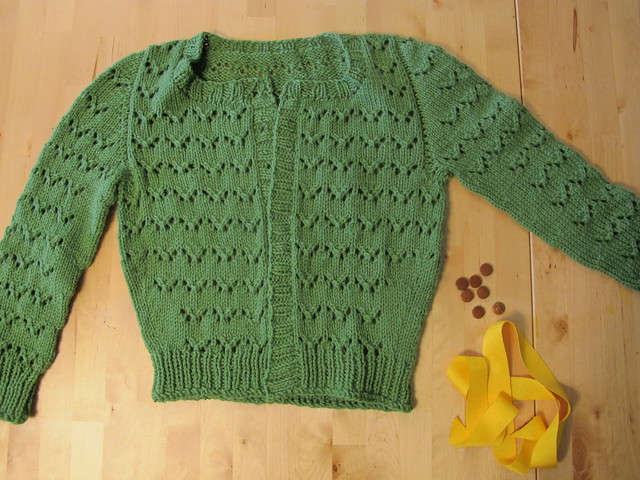
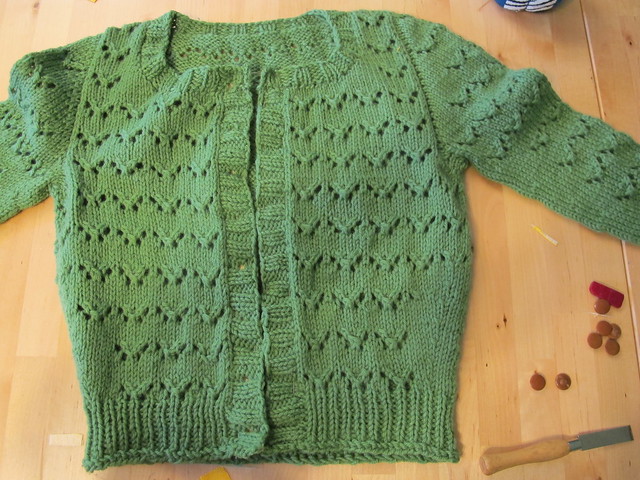
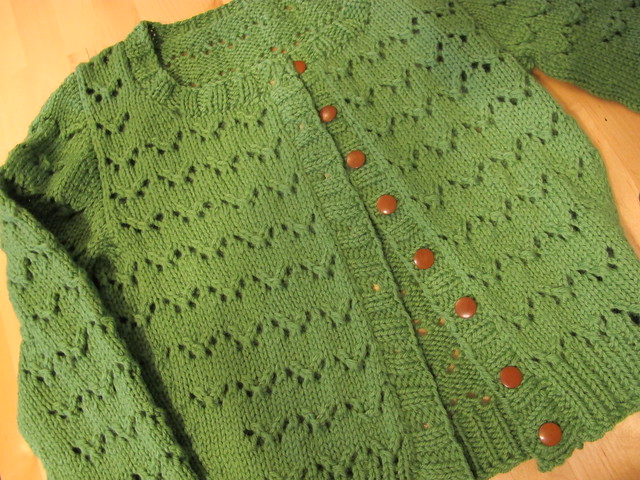
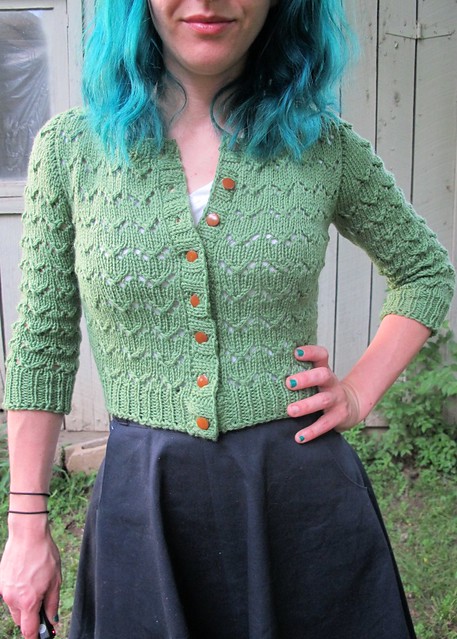
Can I just say – I LOVE THIS CARDIGAN. It was super fun and super easy to knit, not to mention super fast (how many more times can I say super in this post?). According to my Ravelry, I finished it in just under a month.

I went with the size XS, getting gauge with size 6 needles (which is typical for me + worsted weight yarn + Andi’s patterns).

OAL 2014: Completed Simplicity 1803 + Myrna Cardigan

The yarn is (super?)AMAZING, isn’t it? Something I picked up from my local yarn store, Haus of Yarn– I knew I wanted neon yellow to go with the fabric for dress #1, so I took a swatch with me and went lurkin’. Maybe it’s just my yarn store (granted, we have more in this city – actually, a surprising number of really good yarn stores – but this particular store is less than two miles from my house, so obviously I like shopping here best haha), but they never seem to have the color I want in the weight/fiber I prefer! In this case, they only had a couple options for neon yellow worsted weight wool. Because I am an adult, I picked the most expensive option – this is Jill Draper Makes Stuff, and the color is Daffodil. At $26.50 per skein, it was definitely a splurge, but I only needed 2 skeins for this sweater so I figured it was worth it 🙂 Spoiler: It totally was! This yarn was a dream to work with – so soft and squishy, with a beautiful saturated color gradient. I don’t know if this particular yellow looks any good on me, but I also don’t give a fuck because it makes me happy.

OAL 2014: Completed Simplicity 1803 + Myrna Cardigan

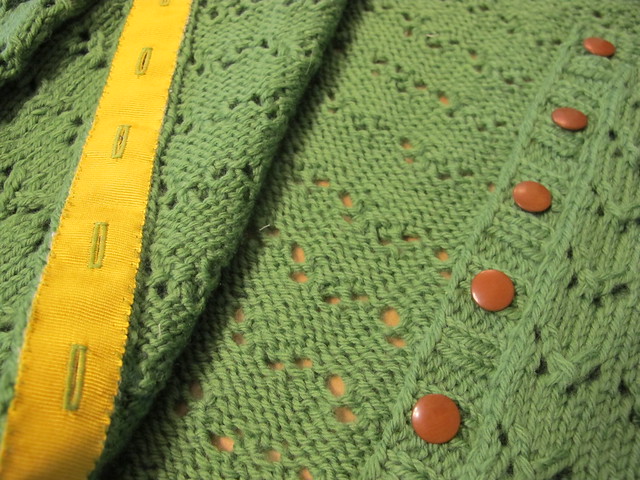
I knit the pattern 100% as written, and had no issues. Blocked it with a bit of gentle shampoo (I keep meaning to get that special wool washing/no rinse shit they sell at my LYS, but since I went over budget with the yarn I had to put it back. Maybe next time. Maybe never lolz). True story: I forgot to finish the keyhole until after I’d blocked the whole thing, so I had to go back and keep knitting. I’m glad I did, though – I was on the fence about the keyhole because it looks kind of wonky at first, but once it’s finished it really does make a world of difference!

OAL 2014: Completed Simplicity 1803 + Myrna Cardigan

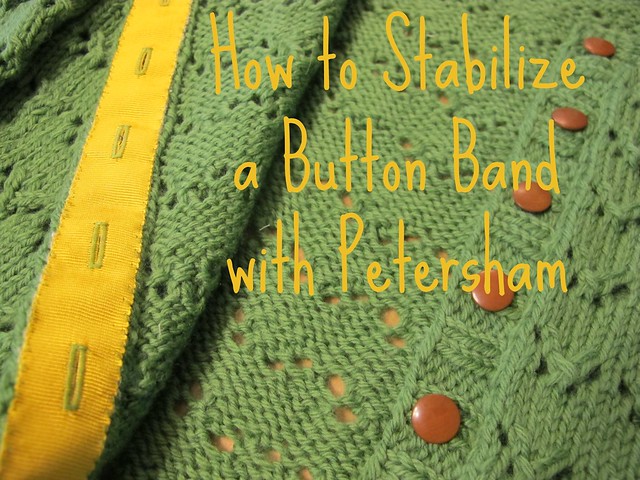
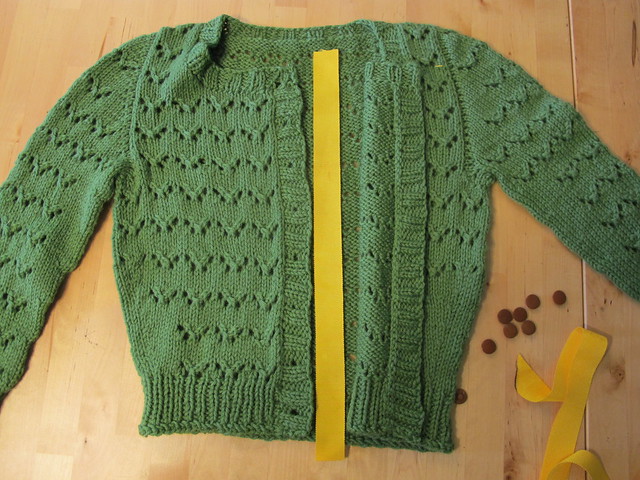
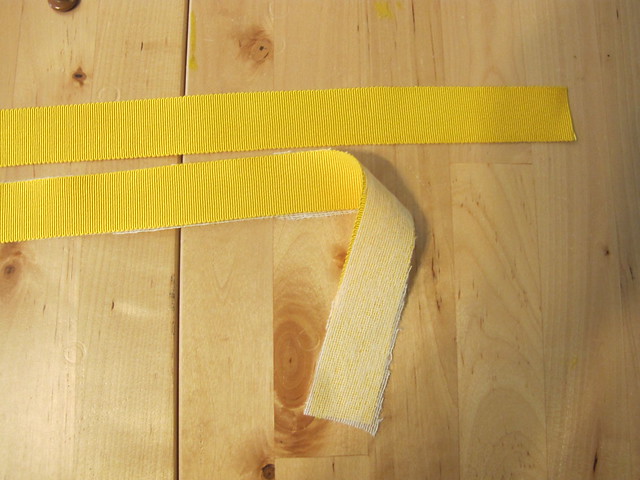
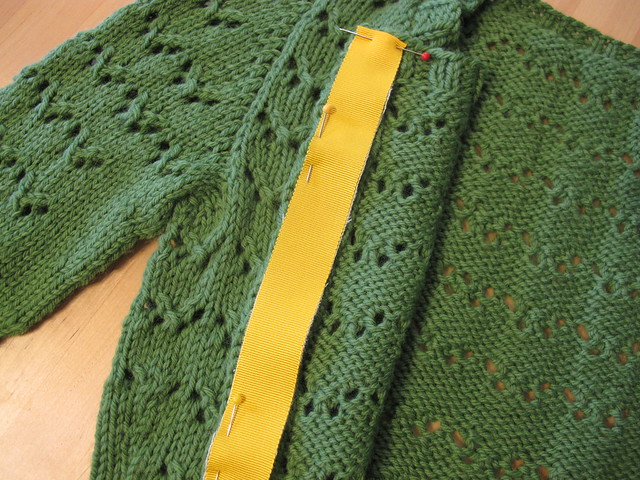
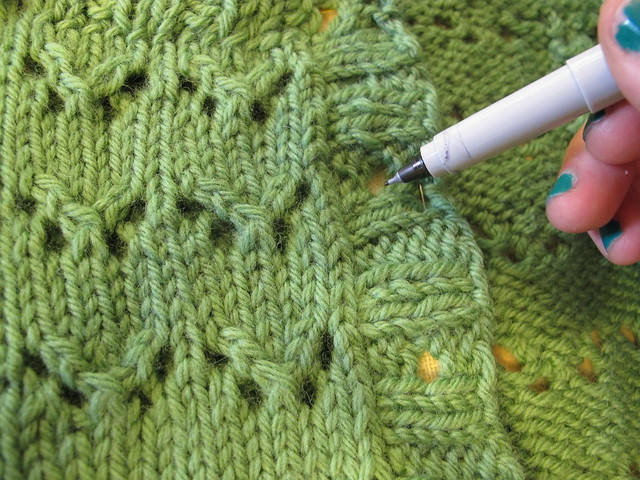
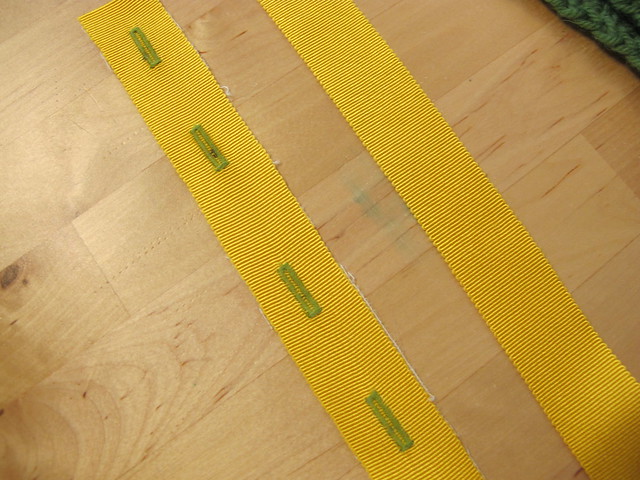
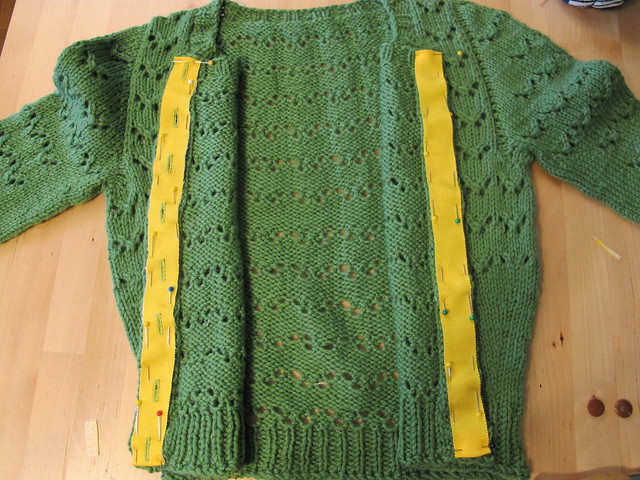
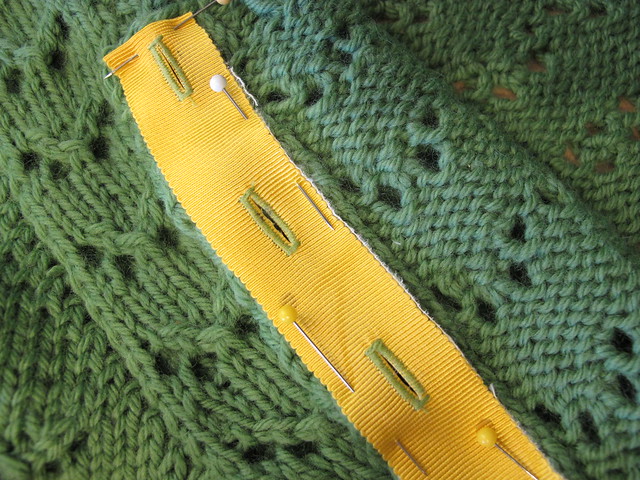
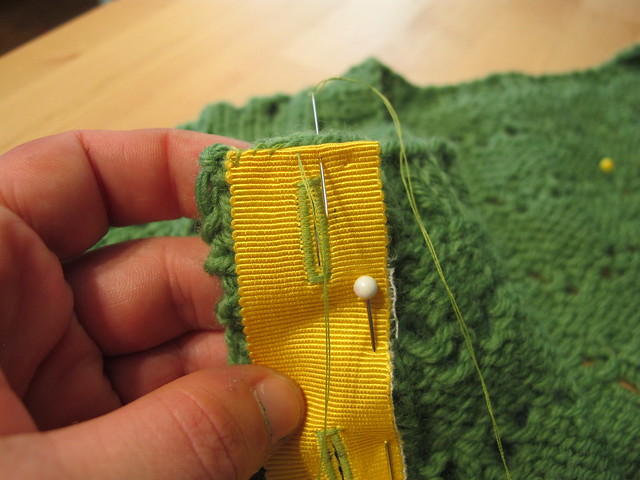
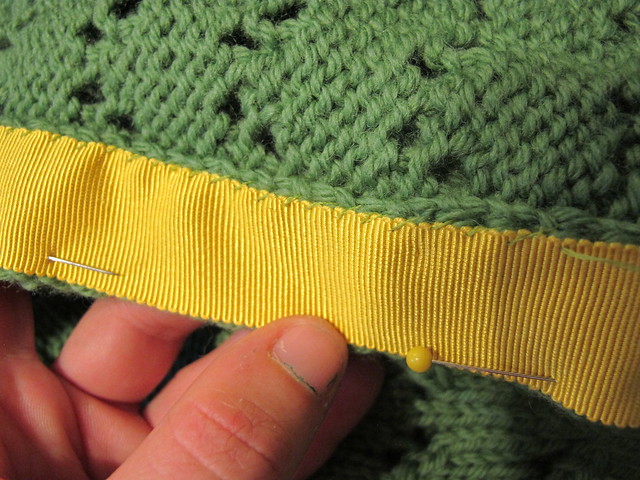
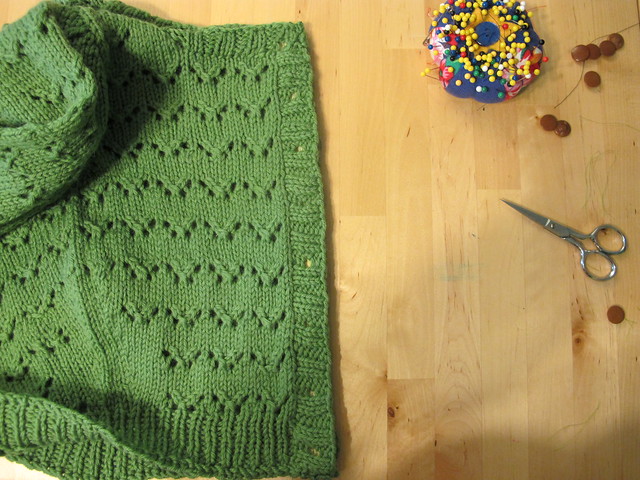
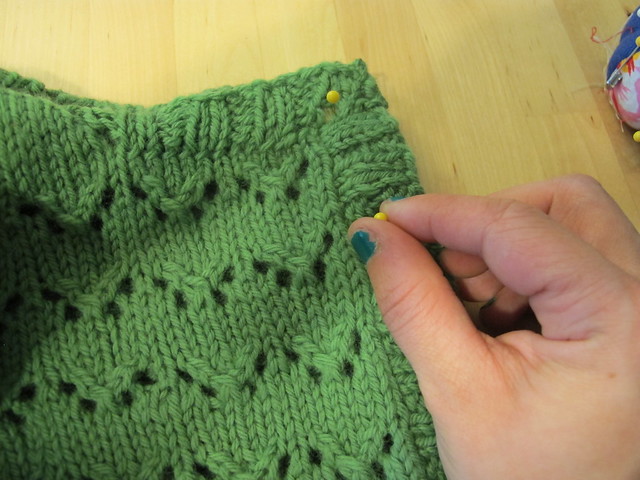
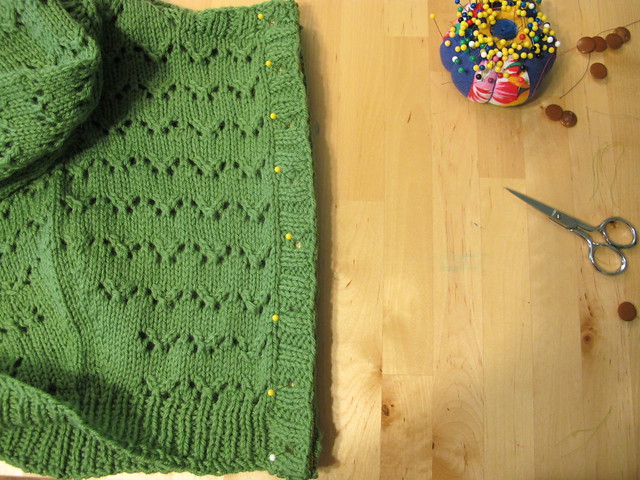
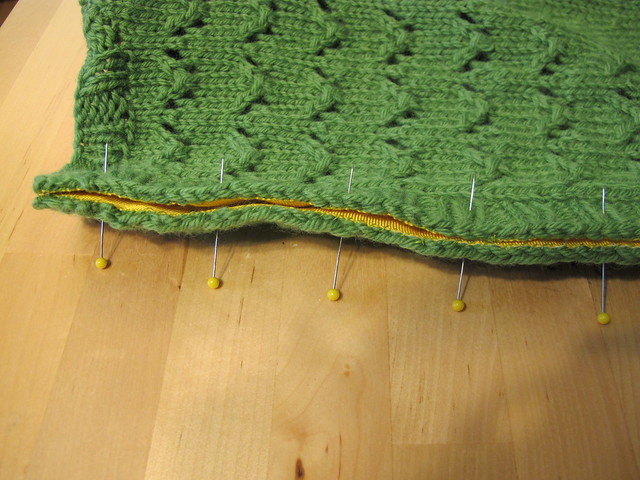
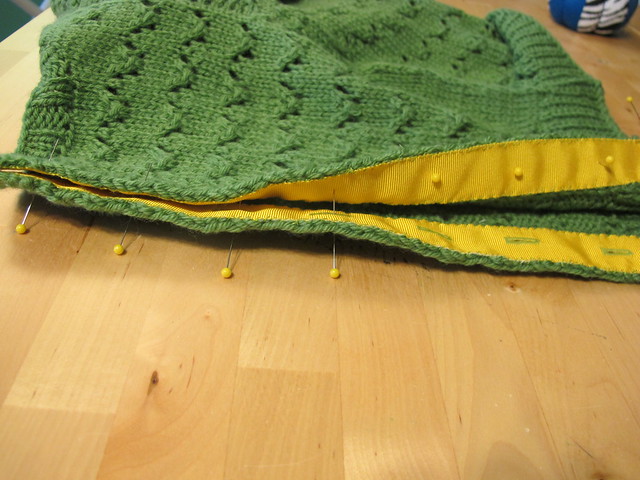
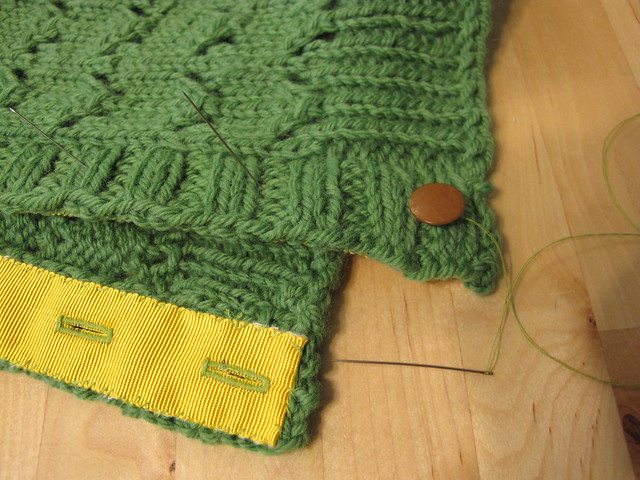
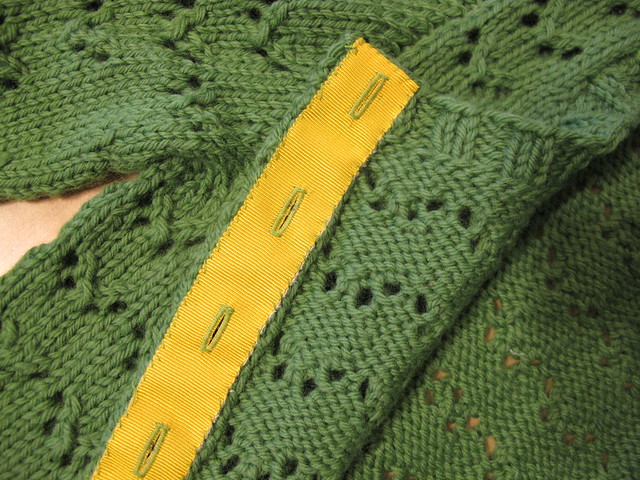
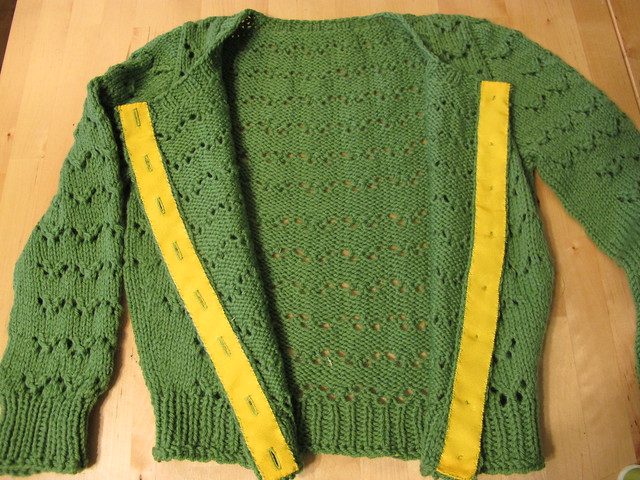
The button bands are stabilized with Petersham ribbon. Because this cardigan has a v-neck, I steamed the Petersham with a gentle curve to mimic the shape of the neckline, and stopped it a little above the top button hole (so, before you ask: no, it doesn’t go all the way around the neck). I used this tutorial from Sunni’s blog for guidance – she’s using it to hem a skirt, but it’s the same concept with the neckline, with a less aggressive curve. The vintage glass buttons are from my stash, previously purchased at the flea market.

OAL 2014: Completed Simplicity 1803 + Myrna Cardigan

I love how well the sweater goes with dress #2, because that was not planned at all! I didn’t decide to make a second dress until I’d already started the sewalong, and knit about half of the sweater. They do look good together, though. Yay for unintentional matching!

How are y’all doing with your OAL garments? Almost finished? Remember – the deadline to enter is this Thursday, July 31. Don’t forget to post your finished outfits in the Ravelry thread, which will give us all full lurking capabilities and also enter your ass to win some prizes. We also have the Offical Unoffical Flickr Group if you don’t use Ravelry/only finished a dress – but please be aware that your two pieces need to be uploaded to the Ravelry thread to be eligible for the contest 🙂 I’m loving all the dresses and sweaters I’ve seen so far, and I need to see MORE PLS.

Feeling inspired? Here’s a link to all the tutorials covered during the OAL:
1: Choosing Your Fabric and Size
2: Cutting and Marking Your Fabric
3: Sewing the Bodice
4: Sewing Sleeves or Bias Facing
5: Attaching the Skirt
6: Inserting a Lapped Zipper (see also: My Method for Invisible Zippers)
7: Hemming & Finishing
How to Stabilize a Buttonband with Petersham Ribbon (not part of the official OAL, but useful nonetheless!)
FINALLY, you can see my Myrna Ravelry notes here.

OAL 2014: Completed Simplicity 1803 + Myrna Cardigan

Whew! That’s a lotta post for a coffee-deprived Monday morning! 😉

Tutorial: How to Stablize a Buttonband with Petersham

20 Jun

Stablizing a buttonband with Petersham

A promised, here is the much-requested tutorial for adding Petersham ribbon to the button band of your handknits! This is a little trick I’ve done for nearly all my handknits since I started cranking ’em out… it’s not 100% necessary for finishing your knits (so please don’t be freaking out if you’ve never heard of this technique before!), but it is super handy if you wear knits with negative ease and have problems with the button band/button holes gaping open. We are basically going to take a firm woven ribbon and sew it to the inside of the button band, so it will stabilize the knit and prevent it from stretching and thus gaping open.

I know there are a million ways to do this particular technique; this is my personal favorite TNT. It involves hand sewing and machine-worked button holes (although they are not sewn through the sweater as done in (Tasha’s tutorial from a few years ago). I personally like to use Petersham ribbon as my stabilizer – it’s relatively inexpensive, wears well and feels luxurious. You can also use grosgrain ribbon, seam binding, firm lace, satin ribbon, or even fabric selvedge – whatever you want! I ain’t here to judge 🙂

Stabilizing a button band with petersham
You will need: your finished+blocked cardigan, a length of petersham ribbon (this will vary depending on the length of your sweater, but aim for approximately the length of your button band x2 plus a couple inches to fold under), and your buttons.
NOTE: I am using 1″ wide petersham for this particular sweater. The width of your petersham may vary, depending on how wide your button band is. Always measure to be sure!

Stabilizing a button band with petersham
Measure your ribbon to the length of your button bands plus about 1″ extra (for 1/2″ overhang at both the top and bottom of the button band), and cut two pieces to this length.

Stabilizing a button band with petersham
OPTIONAL: You may want to interface one piece of the petersham, so the button holes are reinforced. Just cut a strip of interfacing on the straight grain and fuse it to one side of one piece of ribbon. Set the non-interfaced ribbon aside for now.

** Yes, your interfacing will show slightly on the outside of your sweater, if your gauge is loose enough. If this is a concern (obviously it’s not a concern with this sweater; but I could see how using white interfacing+black sweater miiiight look a little weird!), you might consider making a Petersham sandwich and using two lengths of the ribbon with the interfacing in between. I haven’t personally tried this, but it makes sense in my head. Also, now I want a sandwich. I just ate breakfast. Fuck.

Stabilizing a button band with petersham
Pin the interfaced ribbon to wrong side of the button band with the button holes, interfacing side on the inside, and fold under the top and bottom edges by 1/2″. Try to center the ribbon so that there is about a stitch’s worth of overhang on the outside edge of the button band.

Stabilizing a button band with petersham
Use a marking tool to mark a small dot in the center of each button hole, on the interfaced side of the petersham. You may want to use chalk or disappearing ink; I used a sharpie because I’m a terrible person with no morals.

Stabilizing a button band with petersham
Take the petersham off the button band and, using your sewing machine, stitch button holes at each of the markings you made. Dab each button hole with a drop of Fray Check (this is optional, but I think it makes for a cleaner/non-hairy button hole) and allow to completely dry. Carefully cut all the button holes open.
PROTIP: Test your button hole size first on a scrap of interfaced petersham so you can be sure that your buttons fit the holes! Ain’t nobody got time for wrong size button holes.

Stabilizing a button band with petersham
Open your sweater up and pin the petersham to the inside of each button band. Match the petersham with the buttonholes to the button band with the button holes (being careful to make sure that each button hole is aligned so that they can be used!), and match the other petersham on the button side of the button band. On both bands, fold the petersham under 1/2″ at the top and bottom. Again, try to center the ribbon so that there is about a stitch’s worth of over hang on the outside edge of each button band (this is just so it looks nice 🙂 ).

Stabilizing a button band with petersham
Here’s a close-up of my ribbon pinned to the button band. You can see there is a little bit of button band overhang on either side of the ribbon.

Stabilizing a button band with petersham
Now is a good time to check and make sure that the button bands are the same length on your sweater. If one is longer than the other (which can totally happen if you stretched the button band while pinning everything down), unpin and readjust until they are the exact same length.

Stabilizing a button band with petersham
Now time to stitch! Using doubled-up thread, whipstitch all the way around all 4 sides of the petersham, starting at the top and working your way around. Do this to both button bands.

Stabilizing a button band with petersham
Here’s another photo of the handstitching. Try to keep your stitches evenly spaced (this will give them more strength, in addition to just looking nice!) and try not to gouge a big chunk your sweater yarn with each stitch.

Don’t worry about stitching around the edges of the button holes. I always leave mine loose, and I’ve never had a problem with the buttons getting stuck and/or not being stabilized enough. I imagine if you were using super huge buttons – like, 2″ big buttons – you might want to sew around the edges, but for buttons smaller than 3/4″ it’s fine to leave them unsecured.

Stabilizing a button band with petersham
Once your button bands are stabilized with ribbon, lay them petersham sides together and raw edges matching.

Stabilizing a button band with petersham
Stick a pin down the center of each button hole.

Stabilizing a button band with petersham
Gently pull the button bands apart, pulling the head of the pin through the button hole and leaving it sticking in the button side of the ribbon.

Stabilizing a button band with petersham
Now you can use the pins as a guideline for where to sew your buttons! This ensures that they are exactly centered in the button band and also aligned with the button holes.

Stabilizing a button band with petersham
And there you go! Stabilized button bands with NO GAPE!

Stabilizing a button band with petersham

Stabilizing a button band with petersham

Stabilizing a button band with petersham
God, is that just like, the sexiest button band or what.

Hetty
And here’s the sweater on me! (Hetty, in case you missed the post!) Notice that the lacework is nice and open, thanks to the negative ease – but the button band is strong and secure and there is no pulling at the button holes. Oh petersham, how I love you ♥

Aaaaaand, that’s it! Told y’all this was an easy technique 🙂 Now, go forth and conquer that button gape once and for all!