Tag Archives: silkkk

Completed: Vogue 1395

18 Jun

Confession: I don’t like cherries. Not for eating, anyway.

Vogue 1395

What I DO love are cherry prints, though (or any fruit, for that matter!). It probably makes me look like a total asshole wearing a fruit I won’t even eat (I’m currently having flashbacks to my high school days, back when I used to make fun of kids for wearing band tshirts of bands they’d never actually listened to. No, really, who does that?? High school kids, that’s who), but you know what? No fucks given. Go ahead and judge me.

Vogue 1395

Whatever, anyway, my point is – I like wearing cute prints. Cute prints can be hard to find though – and when you do find them, at lot of them tend to be printed on, like, quilting cotton. Or worse – silk chiffon (seriously, who the fuck is buying up all those crazy silk chiffon prints? I am so intrigued!). I feel like 3/4 of my sewing time is spent just trying to source cute prints that are printed on the type of fabric I actually like to sew and wear.

Vogue 1395

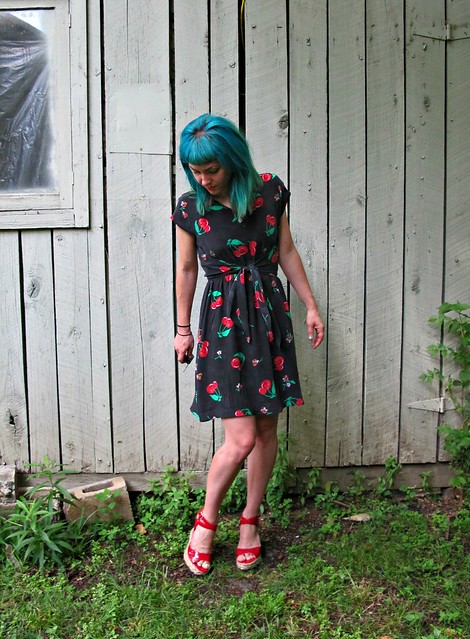
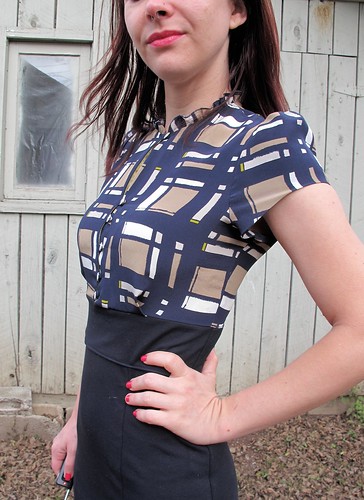
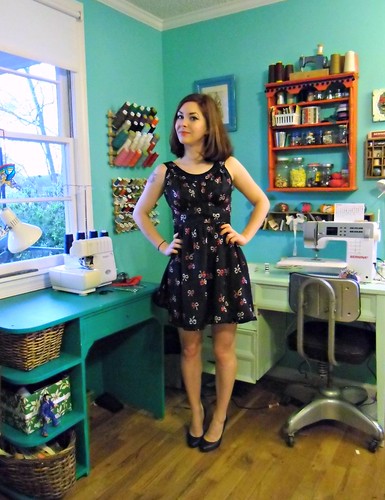
Sooo, with that being said – I was pretty excited to find this Anna Sui cherry print at Mood Fabrics. Not only is it basically the cutest fabric in the history of ever – it’s silk crepe! So glorious! Unfortunately for y’all, they are also completely sold out of it. Whomp whomp.

Vogue 1395

Immediately after securing a length of this stuff for my very own, I zeroed in on Vogue 1395 as my dream match pattern. Pretty cute, right? Vogue has really been stepping up their game with the last pattern release – as in, they had more than one wearable pattern this time (yay, Vogue!). Vogue 1395 intrigued me with it’s loose fit and strange overlay, and I thought the casual shape would look really nice with such a sweet fabric.

Vogue 1395

Sewing up this pattern (and fabric, for that matter) was pretty easy, although I did make some changes to the construction. The pattern calls for you to sew everything with a double-stitched seam – as in, literally two lines of stitching next to each other, and then finished. I couldn’t wrap my head around that one – why? for extra… strength? what? – so I compromised and used french seams for construction. I figured – hey, it’s technically a double-stitched seam, right? Plus, a french seam just looks way more elegant than a serged seam.

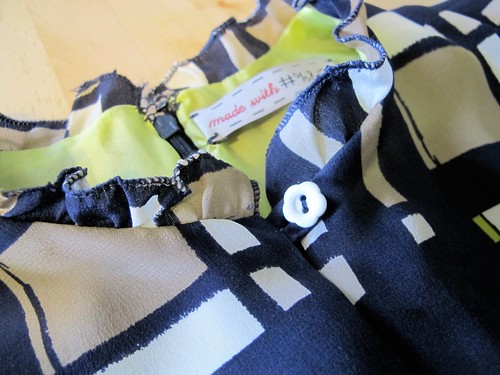
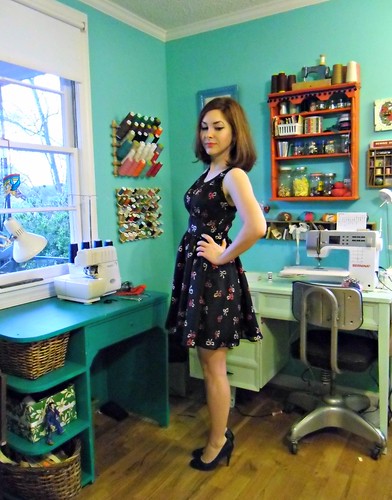
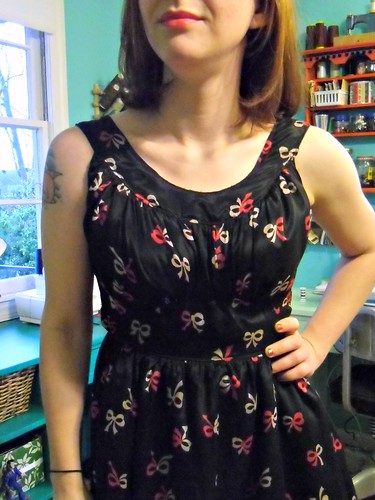
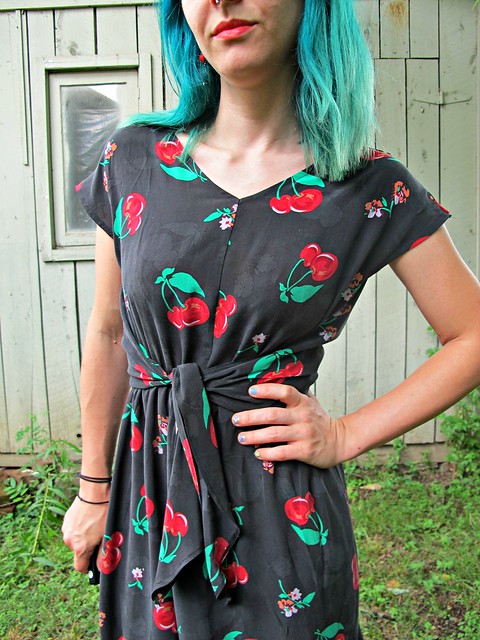
The armholes and neckline (sorry, didn’t take a photo, whoops) are finished with self-made bias binding (aka SILK CREPE bias binding). It looks really beautiful, if I do say so myself. It was also way less of a bitch to sew on than you’d think – despite the fact that we’re talking about bias silk crepe here. I used a lot of steam and manhandled that shit into submission. I also didn’t follow the directions on the pattern for adding the binding – they kind of had a weird method of construction, and I have a better one (sorry, but it’s true. Stay tuned for a photo tutorial during the OAL!). One big awesome plus is that the bias binding is applied flat, so you don’t have to worry about it stretching out and not fitting the area it’s binding – you can just cut the excess off! Hells yeah!

Vogue 1395

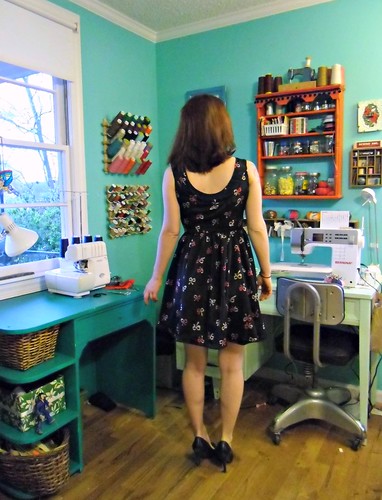
Size-wise, I cut the smallest size, which is an 8 in this design (anyone know why some patterns go all the way down to a 4 and some stop at 6 or 8? What’s up with that?). It fits ok – the arm holes, though. Whoa. Those arm holes were TERRIBLE. When I say they showed my bra, I don’t mean they just showed the very top edge. I mean they showed the ENTIRE SIDE of my bra (and a little bit below it!). Suffice to say, the arm holes were way too low! The back overlay does cover some of that, but it’s a moot point once you start moving around.

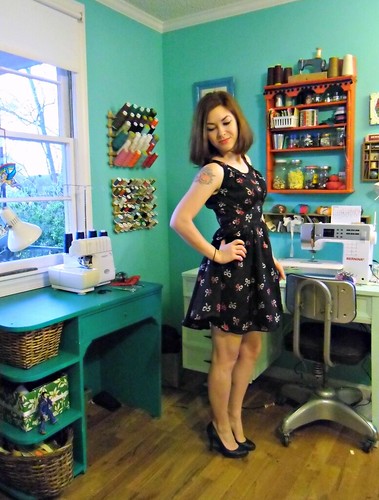
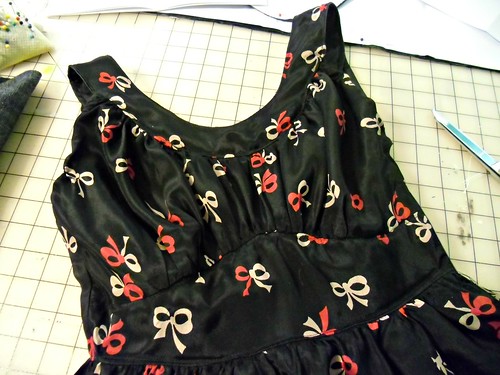
I fixed my dress in the most MacGyver way possible – I just pulled the shoulders up and gave them a new seamline. This was actually really easy thanks to my french seams, haha! I ended up pulling off about 1.5″ from the top of the shoulders – which yeah, that’s a lot! – and now the dress fits a hell of a lot better. The neckline obviously raised a lot too, but that’s ok – I kind of like it higher, I think it looks better with the shape/length. Plus, now I can bend over without fearing the gapeage.

Vogue 1395

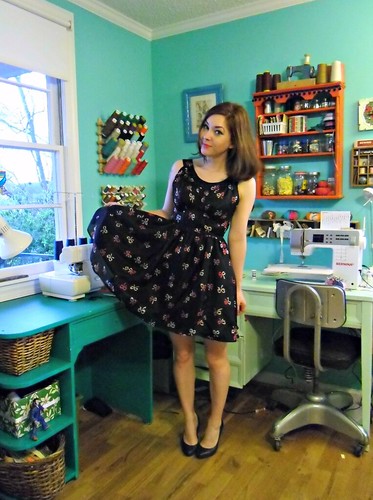
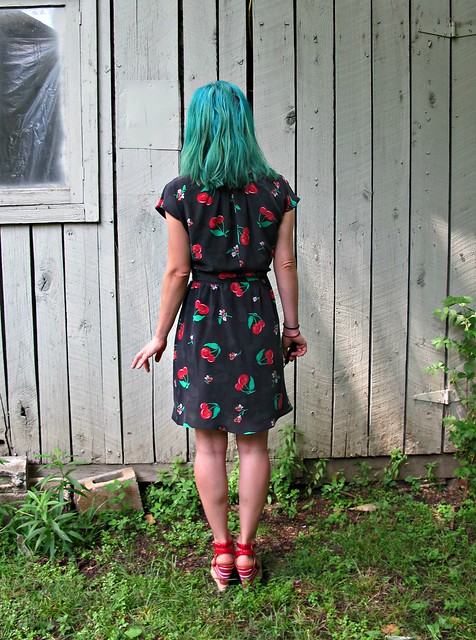
Trying to figure out how the dress is pieced together? It’s really simple – there’s a front and back bodice (unlined, so make sure your fabric is opaque!), and the back bodice has an overlay that is only stitched down about 4″ at the center back. The slightly curved skirt is lined (I used china silk), and there is an elastic waist.

Vogue 1395

The back overlay crosses the side seams and ties at the front, which gives the dress a little bit of shape (that you can totally loosen after you’ve eaten a bunch of cupcakes because, fuck yeah, elasticized waist). Keep in mind that the wrong side of the ties show – it’s just a rolled hem all the way around, no lining – so you want to make sure you use a fabric that is relatively the same on both sides. The wrong side of this fabric is a little lighter than the right side, but it’s hardly noticeable.

Vogue 1395

What else did I change about the instructions? Well, I hated the way they had you hem stuff – lots of basting, pressing, and trimming. BOOORING! I used my rolled hem foot and finished much faster (with better results to boot!). I also could not FOR THE LIFE OF ME figure out how they had you attach the shoulders of all 3 layers. It just plain didn’t make sense, and I was french seamin’ that shit anyway (this was before the Armhole Disaster), so I did it my way and used french seams. Best way, I think!

Vogue 1395

Vogue 1395

Per usual, I threw both silks in the washing machine on cold before cutting, so now I don’t have to dryclean this guy! Yay! Talk about a casual day dress. I did notice that the black faded quite a bit on this silk crepe – so it’s more like, I dunno, light black or dark grey – but I don’t even care. It’s worth it just to know that I don’t have to schlep out to the dry cleaner every time I want to wear this. Which, btw, I would never do, because dry cleaning is the worst. Not because it’s terrible for the environment (although I reckon that’s a factor), but because I actually have to GO somewhere and PAY for it. Ew! Nope!

Vogue 1395

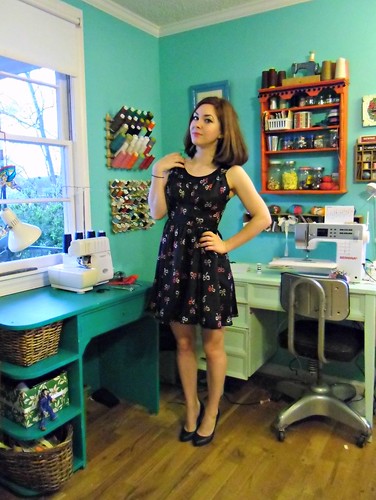
Anyway, cute new summer dress for meeee! I love it when my casual duds crossover into involving luxe fabrics. THIS, my friends, is why I sew.

As a sidenote – my pal Beth is gearing up to release her first pattern, and she needs testers! I know a lot of y’all were dying to dip your toes in to the tester pool, so here’s your chance to shine! Check out this blog post to see the skirt pattern in question (it’s super cute – I was actually on the list to test this, but my schedule this month has blown up all crazy so I had to bow out) and go ahead, throw your name in the hat 🙂 You know you wanna 🙂

Me-Made-May ’14: Week 2 Round-Up

9 May

Happy Friday, everyone! One week down into Me-Made-May – and time for another round-up!

5/3
5/3, Saturday
Dress: Fabulous Silk Birds
Slip: Ruby Slip
Shoes: Jessica Simpson

My baby brother graduated college on Saturday! Here I am with all my siblings – of course, I’m the shortest one (and this photo is a little misleading because I’m standing on an incline. I’m actually a good 7″ shorter than my sister, who in turn is shorter than my brothers, ha). I used the graduation as an excuse to pull out my favorite Me-Made to date – the Fabulous Silk Birds dress (I don’t name all my handmades, but I named this one! Because it’s fabulous!). I love love love this dress – I always feel so, well, fabulous in it 🙂 Plus, wearing this dress means I get to wear my equally amazing 4ply silk slip (note to self: sell organs and buy more 4ply silk asap), which is always a plus in my book 🙂

5/4
5/4, Sunday
Dress: Seersucker Anna
Shoes: Born
Belt: Thrifted
Sunglasses: Franco Sarto
Purse: Scarlett Begonia

Wore this to go plant shopping and ice cream eatin’ with Landon. I realize that I have this dress styled the exact same way I did in the original FO post – I guess I’m not very creative when it comes to pink seersucker! Anyway, love it and it’s great for hot weather. Also, if my hair looks brighter than it did the day before – that’s cos we redyed it 🙂 I slept in the dye so it’s SUPER bright now haha.

5/5
5/5, Monday
Tank: Target
Skirt: Cascade
Shoes: Jessica Simpson
Necklace: Handmade by me

Another favorite me-made! I LOVE this skirt, and everyone else seems to love it too – I’ve literally been followed around retail stores over it, multiple times. It’s the perfect marriage of pattern and fabric (and, before you ask – the fabric came aaaaall the way from Macedonia. My BFF picked it up for me while she was living there a few years ago. Wish I had more of it!), and it’s just so fun to wear. I feel like Shakira, and I mean that in the best way.

5/6
5/6, Tuesday
Dress: Emery
Belt: Thrifted
Shoes: Born

Can’t ever be sad when your hair matches your dress 🙂

5/7
5/7, Wednesday
Dress: Lady Skater
Belt: Thrifted
Shoes: xoxo

ESPECIALLY if that dress has tigers printed on it!

5/8
5/8, Thursday
Top: Briar
Skirt: Moss Mini
Necklace: Thrifted
Shoes: Keds

I took some advice on styling this skirt and went with a tshirt that has a looser fit – and I LOVE how it looks with this skirt! Especially the hemline on this Briar – hi-lo hem gives it the look as if it’s tucked in, without it actually being, you know, tucked. The whole outfit is totally comfy and I’m not gonna lie – I felt pretty good about it all day.

5/9
5/9, Friday (that’s today!)
Top: Advance 8511
Pants: Thurlows (but skinny!)
Shoes: Born

I actually had a different outfit planned today – I wanted to wear a skirt. But then I stepped outside, noticed the chill in the air, and decided to wear my red Thurlows instead. No regrets!

All in all, I think I had a pretty successful first (full)week of MMM! The changing weather has been a little tricky, but I’m working on a lightweight trench coat right now that will hopefully get me through the chilly mornings and occasional rain (actually, the trench is done – I’m just waiting on the buttons to be delivered!). How are y’all doing with your pledges? Find any fun outfit combinations or gaping holes in your closet yet?

Oh, just a few more announcements before I sign off for the weekend:
– If you haven’t already done so, don’t forget to enter in the Colette Guide to Sewing Knits Giveaway! I’ll be drawing the lucky winner on Monday morning, so you’ve still got time!
– My girl Elizabeth is looking for part time seamstresses to help her with some sewing work. If you’re in the Nashville area and would like to sew on an amazingly fun industrial machine in a gorgeous studio (I’m not even kidding about either of those – that’s me in her studio on 5/6!) for a lil’ extra cash, send her an email at hello@elizabethsuzann.com. I’m currently doing part time work for her on the side, and it’s super awesome because we listen to 80s music and watch Nicolas Cage movies. I have no intentions of quitting; her business is just growing very fast and she needs more help! All levels of experience are welcome – we’re not handbeading couture or anything here 🙂 – but you must already have a basic understanding of clothing construction and know how to operate a sewing machine. Bonus points if you’re a speedy sewer!
– My class at Watkins, Introduction to Fashion Sewing still has a couple of spots open, if you’ve been on the fence about signing up. DO IT NOW, GO!
– Aaaaaand, Nashville’s newest/cutest fabric store, The Fabric Studio, is finally open and just released the class schedule for June! I’ve got a few gigs there as well – Learn to Sew the Colette Ginger Skirt, All About Zippers Sewing Lab, and Apparel Patterns Demystified (seminar/info session)! I’m really excited about all these classes – excited to share my knowledge, excited to teach, excited to meet other sewers in the area! I think it’s gonna be fun! 🙂 Also, I promise to stop spamming y’all about my classes now 🙂

Have a great weekend!

Completed: The Sugar Plum Dress (+ a Giveaway!)

25 Nov

This dress is SO awesome and sneaky. Looks like two pieces, but wait- there’s more! It’s actually one dress! Sugar Plum dress made with Oscar de la Renta silk and ponte knit from Mood Fabrics I LOVE these kinds of dresses! Looks like a silk blouse with a high-waisted pencil skirt, without the bother of keeping a shirt tucked in all day and making sure things match in the morning (because, ew, all I wanna do is sleep right now). Extra bonus – the skirt is a ponte knit, so it’s actually a COMFY pencil skirt. Are y’all feeling my excitement right now?? Sugar Plum dress made with Oscar de la Renta silk and ponte knit from Mood Fabrics This is the Sugar Plum, from Lolita Patterns. Full disclosure: Amity sent me this pattern free to try it out and see how I liked it. I guess you probably gathered at this point my reaction to the finished dress – ummm, amazing! I love how it’s totally appropriate for a professional environment (not that I need clothes like that anymore, but, you know, I still like to dress up ;)), but it’s still beautiful and feminine and unique. The pattern is really fun to put together – lots of tiny pieces, clever seam finishes, the kind of stuff that makes me 😀 Since it doesn’t require a lot of fabric to make up the top half (less than a yard!), I splurged on this amazing Oscar de la Renta silk print from Mood Fabrics. I also bought this navy blue ponte knit for the skirt (omggg so comfy) and lime green china silk for the lining for a bit of a color pop. Sugar Plum dress made with Oscar de la Renta silk and ponte knit from Mood Fabrics This is view B, without the front flounces. I sewed up a size 2. The top fit with no alterations, although I did need to take the skirt in a bit to get it fitted (it’s actually a bit toooo fitted now, whoops. Good thing it’s a knit lol). I did use a much stretchier fabric than suggested by the pattern, so I’m not surprised. The pattern has you use a stretch woven, and pontes tend to be a little more like an actual knit. Based on the way the skirt fits, I suspect you could also use a non-stretch woven and just cut the panels on the bias for the same fitted/comfortable effect. I skipped the pockets and the sleeve gathering detail for a more simple look. Sugar Plum dress made with Oscar de la Renta silk and ponte knit from Mood Fabrics The more I sew with silks, the more I find myself not wanting to make up anything else. The most important thing I’ve learned when it comes to sewing lightweight/slippery/silky fabrics is to make sure that your cutting is super accurate, then the sewing is a piece of cake (or, at least, as much of a piece of cake as it can be!). I always rip my fabric along the cross grain first, to ensure that the edges are perfectly straight, and then pin the selvedges together before I lay down my pattern pieces. This prevents the silk from shifting as I cut it. When it’s time to cut, make sure your scissors are nice and sharp, and try to cut the entire length of the blades (instead of timid little snips). One thing I loove about ordering from Mood Fabrics is that I know the fabric is going to already be on-grain, so I don’t have to worry about straightening the grain before I cut. Just rip the cut edge, pin, and cut those pattern pieces! Sewing with the ponte was much easier than the silk, obviously. I used a serger for all the skirt seams, and my regular sewing machine (treating it like a woven) to attach the silk top to the ponte waistband. I love this ponte because it’s quite a bit more stretchy than other pontes I’ve tried, which means it’s extra extra comfortable. Just be careful when you press it – it definitely gets a shine, so use a press cloth. I keep a big square of silk organza specifically for this purpose. It absorbs the heat of the iron so my fabric underneath doesn’t shine, and it’s sheer so I can actually see what I’m doing 🙂 Sugar Plum dress made with Oscar de la Renta silk and ponte knit from Mood Fabrics Sugar Plum dress made with Oscar de la Renta silk and ponte knit from Mood Fabrics I really enjoyed working on this pattern – lots of tiny details to make me feel challenged as a seamstress, but not so much that I got overwhelmed with the process. A lot of indie patterns run on the easy/beginner side – which is fine, I know there are lots of people who want something simple to make up, and it’s easier to complicate a pattern than simplify it. But sometimes it’s nice to have something that I feel is aimed at a slightly higher level, without me having to run through the steps and find ways to make it harder for myself. Wow, I just made me sound like a total weirdo. What can I say, I like a challenge! Sugar Plum dress made with Oscar de la Renta silk and ponte knit from Mood Fabrics I did make a pretty crappy mistake toward the end of this dress. I was sewing in the invisible zipper and could not get the waistband seams to match up. I was tired, hungry, getting grouchy (you can see where this is going), and I thought, “One more try and then I’m outta here.” While picking out the zip, I somehow managed to detach the teeth from the zipper tape. WHYYYYY. I know I tell y’all that I have millions of zippers in my stash, and I do, but none of them are invisible. I actually have to go out of my way and buy one whenever I need it (because I’m too stubborn to keep those in stock, apparently), which usually ends up with me going to Walmart because they sell invisible zippers and they’re open at 3am when I suddenly need one. So I pretty pissed about destroying this zip, and trying to avoid another trip to Walmart. I ended up cutting the zipper right above where I sliced it open, and just finished the dress with a super duper short zipper – it ends about halfway down the waistband. Since the skirt is so stretchy, this works, kind of. It’s funny to watch me pull it on, ha! And you know the worst part? THE WAISTBAND PIECES STILL DON’T MATCH UP. Whatever, I’m over it! Sugar Plum dress made with Oscar de la Renta silk and ponte knit from Mood Fabrics Sugar Plum dress made with Oscar de la Renta silk and ponte knit from Mood Fabrics I love the little details on this dress that make it so special – the ruffled collar (hemmed using the rolled hem on my serger), the tiny buttons with the tiny button loops, and that BRIGHT LIME GREEN LINING. Really, it’s like a party when I take the dress off! Sugar Plum dress made with Oscar de la Renta silk and ponte knit from Mood Fabrics Sugar Plum dress made with Oscar de la Renta silk and ponte knit from Mood Fabrics Sugar Plum dress made with Oscar de la Renta silk and ponte knit from Mood Fabrics By the way, don’t ever search Oscar de la Renta on the Mood Fabrics site unless you plan on dropping some serious dough on some seriously incredible fabrics. I just fell down the rabbit hole – again! – and discovered violet boucle, boucle with sparkly lurex (!!!), silk floral and some freaking polka dot silk taffeta. I want, I want it all! Sugar Plum dress made with Oscar de la Renta silk and ponte knit from Mood Fabrics

Now time for the fun part – a giveaway! Amity has generously offered a copy of Sugar Plum to one lucky winner, yeeeah!! Still having reservations? Just know that the sizing goes aaaaall the way up to 24 (yes!) and there is an entire sew-along on the blog for anyone who needs some hand-holding. You have no excuses, people! To enter, just leave a comment on this post and let me know what you’d make your Sugar Plum up in (Personally, I’m lurking on a second version with a leopard blouse and a denim skirt, like, ahem, Leila’s. Yes. Exactly like that. Sorry boo!). This giveaway is open to WORLDWIDE and I will close the entries a week from today, Monday, December 2 8:00AM CST. Good luck!

GIVEAWAY IS NOW CLOSED.

Completed: Some Fabulous Silk Birds

17 Jul

I am just going to preface this post with a warning: This is my VERY favorite thing I’ve ever made. Forget everything else up to this point. This here, this is the winner.

Also, I tried REALLY hard to cull down the number of pictures, but there are still a lot. Sorry, not sorry.

Marc Jacobs Birds

I initially saw this fabric on the Mood Fabrics Instagram (which, if you’re not lurking that – WHY NOT, THEY POST THE BEST FABRICS!!). Isn’t it fabulous? I immediately called the store and had them set aside 4 yards for me. When I finally had it shipped all the way to Nashville, I was amazed at just how wonderful it was in person. The designer is Marc Jacobs, and it’s a soft silk Georgette with a gorgeous drape and some incredibly saturated color.

Of course, I had no idea what I was going to do with 4 yards of bird silk Georgette. I hoarded it for about 2 months, while plotting and planning.

Marc Jacobs Birds

I had a Sewing Epiphany while on the way to work one morning (does anyone else have those? Aren’t they so awesome?) and realized that the print would work perfectly with a 40s style dress – and the drapiness of the silk would be a 100% match for McCall’s 6113. Yes, the same pattern I used for last month’s Mood dress. What can I say – I love this pattern, and I want to make a million of it’s babies.

Marc Jacobs Birds

Since this was my first time sewing with silk Georgette, I spent a few weeks devising a game plan and learning all I could about this fabric before slicing into my yardage. Georgette – or, at least, this Georgette – is on the sheer side, so it was going to need some sort of underlayer to keep things opaque. I didn’t want to underline the dress and compromise the flow of the fabric, so I decided to make a slip to wear underneath. Bonus: this is quite handy on a windy day! Already tested that theory 😛

Marc Jacobs Birds

I used french seams to construct the entire dress, except at a few sections where it was impossible to sew them – such as the curved yokes. For those parts, I pinked the seams to keep them from fraying. I also stabilized the fabric underneath the yokes with a piece of black silk organza. Since the Georgette is so lightweight and that area gets so much stress, I wanted to give it as much support as possible. I also found the use of my walking foot quite helpful while assembling the dress – it kept the layers from shifting (and me from crying tears of frustration).

Marc Jacobs Birds

Despite having made this dress twice already (my red wool crepe version, plus a boring ol’ muslin), I still encountered some construction challenges unrelated to the fabric. For one, the sleeves gave me HELL when I was trying to set them in. I don’t even understand how it happened – they eased in perfectly with the crepe, but for some reason, it just didn’t work with the Georgette without including a lot of unwanted puckers. I was stumped and let the dress simmer for a few days on my dressform. I even considered leaving it sleeveless, no lie.

Marc Jacobs Birds

Fortunately, I remembered that Casey posted a tutorial on excess sleeve ease on her blog a couple years ago, so I followed the instructions for redrawing the sleeve cap and crossed my fingers.

Marc Jacobs Birds

I am happy to say that it worked! I’m so glad I was able to figure it out – the sleeves really make the dress!!

Marc Jacobs Birds

Marc Jacobs Birds

Marc Jacobs Birds

I just think this pattern is SO PERFECT for such a bright print! Isn’t it beautiful?

Marc Jacobs Birds

I even got super fancy and put a (non-functional) fancy button where the front of the dress fastens.

Marc Jacobs Birds

Marc Jacobs Birds

Marc Jacobs Birds

Marc Jacobs Birds

Now, let’s talk about my slip! I am going to post pictures which I realize is essentially me in my underwear, so bear with me here.

Silk Slip

I’m not going to lie – like 99.9% of the reason why I decided to go with the matching slip was so I’d have a chance to get my hands on some 4-ply Silk Crepe. I’ve heard some amazing stories about the stuff, but never had a chance to try it for myself. It tends to run on the expensive side (truth, this silk crepe cost more than the silk Georgette!), but a slip doesn’t require a whoooole lot of yardage, so I sucked it up and put in my order. I didn’t know what to expect when the package arrived at my door.

Silk Slip

People. This stuff is INCREDIBLE. Throw out any mean thoughts you had about silk and focus on the 4-ply. It’s not at all slippery – even when I was cutting bias pieces, the fabric stayed put. It’s nice and robust and opaque, and it feels amazing against the skin. It presses beautifully and sews like a dream. I was extremely skeptical before I properly introduced myself, but I really think it deserves the hype.

Silk Slip

To make the slip, I used the free Ruby Slip pattern. I spent a lot of time redrafting shit to get it to fit right, and it was kind of a nightmare and I kind of almost gave up (no hate on the pattern itself – I’m just VERY particular about how my slips fit!). I started with the size 8, made a lot a lot a lot of changes, and I’m just going to list them here:
– The original bodice was very small, so I added a 1/2″ FBA using the sew-along tutorial. Truth, I tried to get away with not doing this (I wear a DD cup, but let’s be real here – the only thing “big” about my boobs is the proportion, not the actual size, kwim? I could totally fit into like a C cup if the band was small enough), but my first muslin informed me otherwise.
– I then redrafted the bodice to include a center front seam and underbust gathers, following this tutorial.
– My second muslin showed that now the bodice was too big at the center front, and the gathers were sitting in such a weird place… I looked like I had puffy nipples. So awesome, except not. I wish I could tell y’all I did some mathematical pattern drafting magic and fixed it, but honestly I pinned that fucker to my dress form and manipulated it until I had a decent fit. I pinned out a chunk of the center front seam, redistributed the gathers, and chopped about 1″ width off the back midriff. I readjusted the side seams of the skirt (that shit fit almost perfect with no adjustments, thank god) and crossed my fingers.
– Since the new back midriff was slightly (I’m talking 1/2″ or less) smaller than the skirt, I cut that piece on the bias and carefully eased the two pieces together. I think the result is pretty good – it fits my small back, and the bias makes it easy to pull on and off!
– I also cut about 5 1/2″ off the hem of the skirt. It was long, and I need this slip to be shorter than my skirts!

Silk Slip

Silk Slip

Finally, I added some beautiful lace around the top and the hem, and a little self-made bow in the middle of the bodice. The straps are just satin ribbon outfitted with strap adjusters and rings – very easy to put together.

Marc Jacobs Birds

Now, here’s the real question: I still have like a yard (maybe more) of this bird fabric left. WHAT SHOULD I DO WITH IT?

Completed: A Bow-Print Silk Chantilly

11 Apr

Here you go, folks – the reason why I’ve been absent (well, completed-project-posts-wise) for like a week and a half:

Silk Chantilly

I made the mistake of sewing a silk dress. Can you say WOOF? Because… woof. So much woof.

Silk Chantilly

This is the Chantilly, by Colette Patterns. Secret time – I got this pattern as a birthday gift last year and this is the first time I’ve sewn up the dang thing. Honestly, I was a little put off by the amount of fabric needed (both fabric AND lining, mind you!), especially since this is the type of dress that really needs a floaty voile or silk to really work. As some of you may know, I was on a really really strict budget for almost all of last year, and my fabric buying options were *very* limited. So, hence, the reason this pattern sat for so long. Bc forreal – this is a gorgeous dress, and it needs to be made up a million times, y/y?

Silk Chantilly

Of course you can’t see the detail too well, because it’s black – sorry! That’s probably a good thing, because I really hacked this one up and some of the construction is a little embarrassing. Silk is hard to sew, yo – and it didn’t help that I didn’t even bother to give a muslin a chance, which would have solved some of my fitting issues before I was dealing with a fabric that floated away every time I sneezed.

Silk Chantilly

I sewed this up in a straight size 2, except the waist seam was sewn with a 3/4″ seam allowance instead of the standard 5/8″. This is version 1, without pockets. I actually started with version 2, put the neckline/shoulder yoke thing together… and realized that my silk was so sheer, you could see directly through it to the WHITE interfacing on the back of the lining. Of course, I didn’t notice this until after I’d already clipped, trimmed, graded and understitched the thing, UGH. I actually threw it in the corner of the sewing room (where the Bad pattern pieces go to sit in time-out until I can decide what to do with them) and finished the dress while I contemplated what to do. I didn’t have enough bow fabric to cut a second yoke, and the silk was so delicate, even the finest microtex needle left holes after unpicking. I ended up very very carefully unpicking all my stitching (srsly this took like an hour to do), cutting a new underlining with the seam allowances trimmed down to 1/4″ to match, and then putting everything back together.

Silk Chantilly

Fortunately, my mistake was spotted before I dealt with the midriff – since it is also interfaced, we could have had 2 disastuhs on hand. But I remembered to underline it, so yay me! I also just want to take a moment here to brag about my new interfacing revelation – I found a digital steam press at the flea market last month (similar to this one, although my model is slightly older) for $30. Did you click that link and see how much those fuckers cost? (don’t worry, I don’t have affiliate linking or anything like that, ok!) YEAH BUDDY. I bought the shit outta that thing. AND IT IS AMAZING. You just put your fabric and interfacing on the board, close it, and thirty seconds later it is PERFECTLY fused, without you fussing over it with a hot iron. Plus, the board is much bigger than an iron, so it covers much more fusing ground at once. I am in love, and I shall never go back.

Silk Chantilly

I should probably stop and talk about the fabric for a sec – this is the fancy bow print silk that I picked up from Fabrics for Less in NY. It’s Betsey Johnson! Actually, I don’t care much for her clothes – too much price for too much polyester, yeeck – but her fabric prints are always fun. And hey, since this is Betsey Johnson silk, does that mean I can now say I have a Betsey Johnson dress? Huh huh?

Silk Chantilly

Real talk, tho – this fabric was a BITCH to sew. It was exactly like what sewing butterfly wings must be like – just really really hard to get under control. It was worth it in the end, but oh god I need a silk break. My lining is a plain black rayon from Mood – it’s not Bemberg, it’s much heavier than that. Honestly, I was a little disappointed at first because I wanted the floaty bemberg to go with the floaty silk, but having dealt with the silk… I’m glad the rayon I ended up with had more body. It was MUCH easier to sew, and it gives the skirt some foof. Yay!

Silk Chantilly

Here’s another foofy skirt picture, because of reasons.

Silk Chantilly

Isn’t the bow print delightful, though? Ah, I just love it! I was rushing to finish this dress because I plan to wear it for my friend Colleen‘s wedding on Saturday, so I’m glad that’s done!

Silk Chantilly

I can’t even tell you how glad I am that I FINALLY finished this. Seriously, the agony of construction made me start to hate it toward the end. I seriously considered throwing the whole thing in The Corner and leaving it until I had my head back together, but I was too invested in the beautiful fabric. Which, by the way, going back to the yardage needed for this dress… I squeezed mine out of 3 yards of 45″ fabric. Check those layouts before you make a big silk splurge!

As a bonus – the skirt looks totally fabulous with my Chuck sweater, yeah? 🙂

Silk Chantilly

Silk Chantilly

Completed: Embroidered Silk Shell Top

22 Mar

shell top

And another one down!

I don’t remember if I mentioned this or not, but I picked up this silk turquoise skirt at my favorite thrift store about a month ago – at half off, it was $2. And it was plus size, and long, which meant lots of fabric for me to play with. Silk for $2? I’ll take it! I was able to salvage some giant pieces of fabric, plus the lining. And the zipper, for about 5 minutes (until I forgot that there wasn’t a zipper stop and I immediately pulled the zipper off the teeth. DERP.). I know the tag says ‘dry clean only,’ but I washed a little swatch of the fabric in the sink & it didn’t seem to be an issue at all – no water spotting, no weird shrinkage. Anyway, I had enough fabric to make the little top in Simplicity 4400 (which, I might point out, is the very first vintage pattern I ever bought – at the same thrift store, no less!). I was even able to finagle the pieces so that I kept the original skirt hem intact. Yeah!

A word about this pattern (and every other vintage pattern I’ve ever sewn up) – there is still ease in vintage patterns. Lot and lots of ease. Notice the size on that pattern is for a 32″ bust? My bust is actually 36″ – and the top fits me perfectly. I have noticed this a lot with vintage patterns, so do what you will & make a muslin (or tissue fit, like lazy me :3).

To keep this top from being *too* simple, I embroidered a rose by the right shoulder:
Silk Shell Top - embroidery
I got the design from Hoop Love Vintage Transfers on Flickr – a GREAT embroidery pattern resource! To transfer the design, I laid it over a sheet of wax transfer paper and traced with a pencil. The stitches here are split stitch (on the rose) and back stitch (on the leaves & stems). Oh, and if you are apt to try this – make sure you staystitch those curved seams before you start! It’ll keep them from stretching out with all that extra handling 🙂 I probably should have serged my edges too, since this silk frays like nobodies business, but you know me… livin’ on the edge & shit.

As a side note, can we discuss these wtf directions?
Silk Shell Top
I’ve never seen this before – it’s a dart, but without the dart legs. I have to make my own dart legs. How intriguing!

Ok, anyway, back to my top.

Construction was fairly simple & straight forward. I opted to hand-pick a center zipper (instead of the machine-stitched lapped zip in the directions) and did not topstitch the facings, as I wanted the top to be simple so the focus would be on that embroidery. The top sewn as-is ended up being too billowy for my tastes, so I added vertical darts below the bust for a little shape. I originally planned to wear it tucked but I think I prefer it untucked now! Unfortunately, the arm holes are a little on the tight side but, eh, I think I can deal.

Silk Shell Top
(huh, I really need to re-press those dart tips!)

Silk Shell Top

Silk Shell Top

BONUS: Tucked!

Silk Shell Top

Silk Shell Top

Silk Shell Top

Silk Shell Top

Silk Shell Top - handpicked zipper
Hand picked zipper – I got a little obsessive & tried to match the stitches up on both sides hahaha

Silk Shell Top
Remember when I said I broke the zipper that came with the skirt? Well I found this one in my stash – and it matches perfectly! Talk about a happy accident!

Pretty pleased with this little top – I think I’ll get a lot of wear out of it this summer. The silk is so deliciously soft, and I just love the color!

Silk Shell Top