Tag Archives: cotton sateen

Completed: The Francoise Dress

11 Mar

Y’ALL. It’s like, practically spring here. After our freak ice and snow storm last week (which was the SECOND one we had this year – never happens! The last big ice storm we had was 20 years ago), the sunshine came back with a vengeance and obliterated the piles of snow (ok, 3″ here. THAT IS A LOT FOR NASHVILLE, OK!) within a couple of days. Thanks to the combination of 60* afternoons and the return of Daylight Savings Time, it’s really starting to feel super good here. Yay for spring!

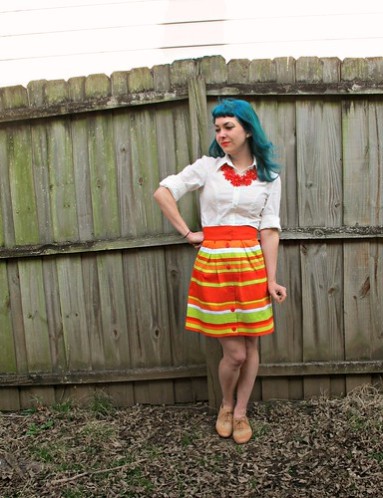
So, with all that being said – I give you my first official warm-weather make of 2015! Hey, Francoise, how you doin’?

Francoise Dress

Francoise is Tilly’s newest pattern release, and by “new” I mean it’s been around since November. Which is exactly how long I’ve been meaning to make it up. I got my hands on the pattern when I was in London (full disclosure – Tilly gave it to me when we met up and waved her hand when I offered to pay for it. It wasn’t given to me in exchange for a posted review or anything, but, I thought I’d point that out regardless! I know some people feel that a review can be biased if the reviewer didn’t personally pay for the pattern), I made a muslin while I was there, and I looked for my ~perfect~ Francoise fabric on every fabric shopping trip we made. The truth is, I was stunted on fabric choice, so the pattern had to wait while I figured my shit out.

Francoise Dress

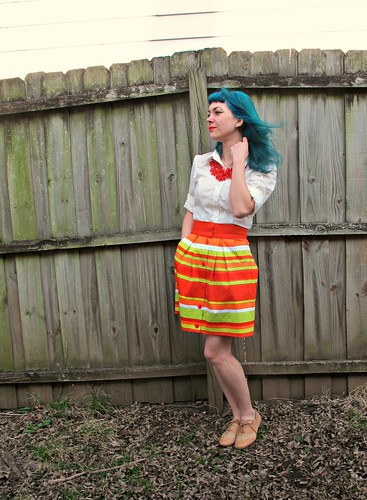
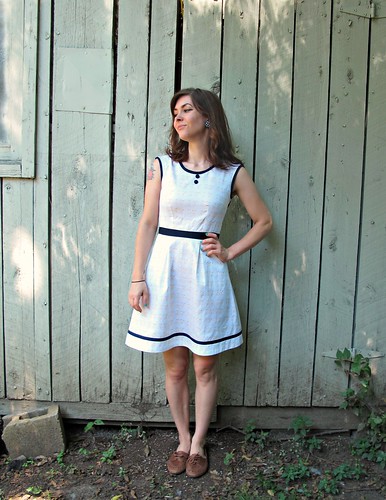
Anyway, I think the fabric I ended up with was a pretty PERFECT match, amirite? This gorgeous purple and pink floral cotton sateen is from Mood Fabrics, and it combined with the Francoise is basically a perfect marriage. The small amount of stretch and crisp drape make it perfect for the pattern, and the simple shape and exaggerated flare make the pattern perfect for the fabric. I love it when this shit happens!

Francoise Dress

Francoise Dress

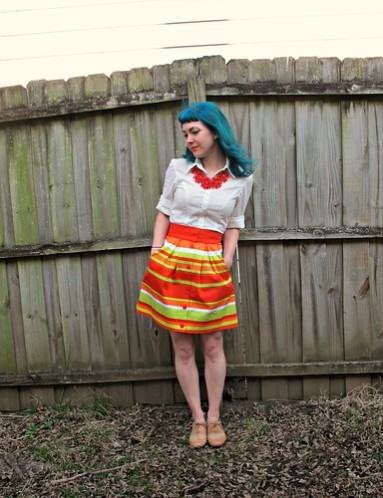
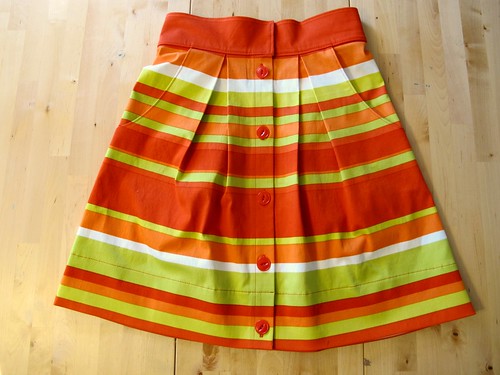
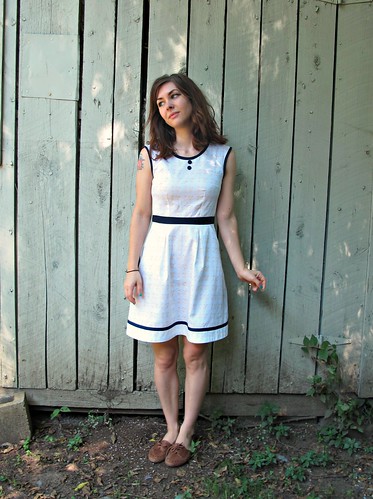
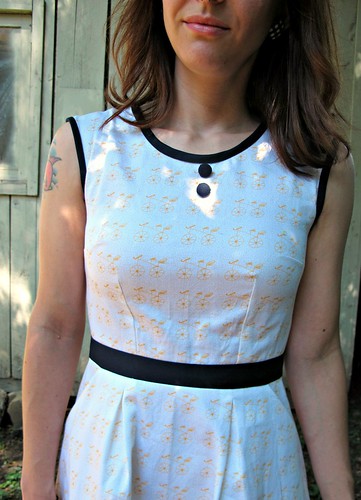
I made the size 1, based on the finished measurements. The only minor change I made was to take a slightly wider seam allowance at the top of the invisible zipper, just because it was gaping a little. I also removed about 3/4″ from the hem length. I’m 5’2″, so taller ladies may want to consider adding some length because it’s a pretty short skirt!

Francoise Dress

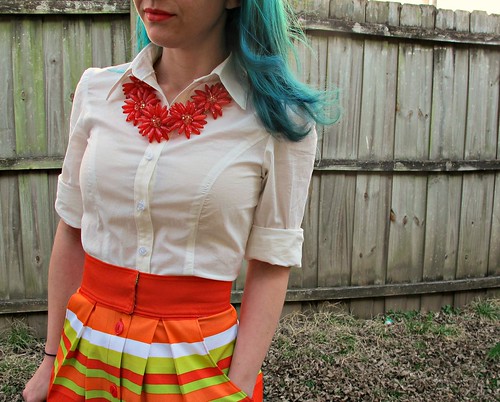
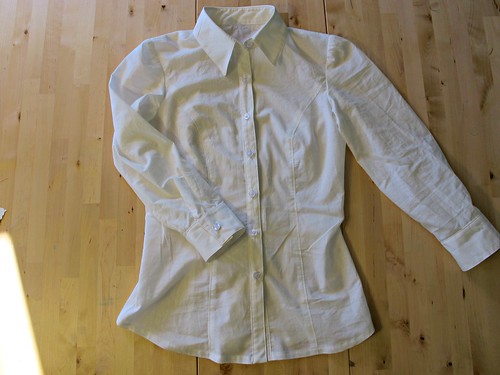
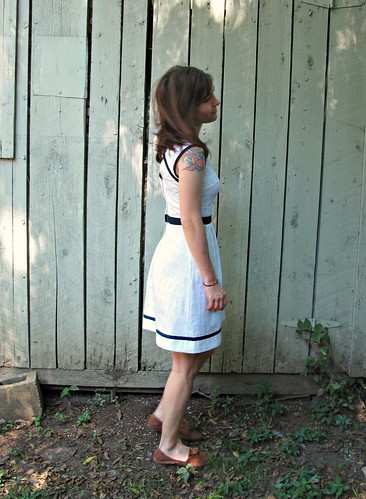
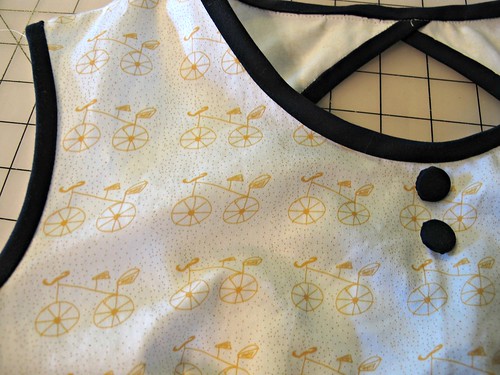
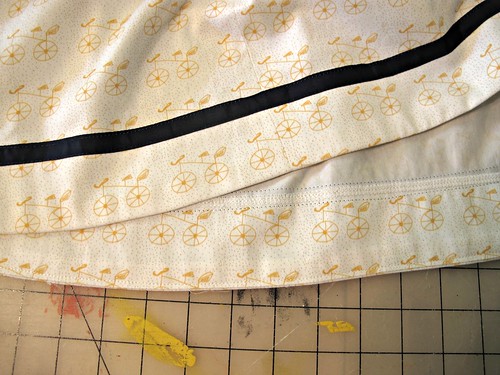
Cotton sateen is REALLY easy to work with – like, beginner-level easy (it doesn’t shift, doesn’t fray, presses well, etc) – so construction was super straightforward. You really just need a fresh needle and a hot iron to coax this fabric into submission. I finished all my seams with my serger, and topstitched the neckline, arm holes and hem. The neckline is finished with a facing, and the arm holes are finished with self bias facing. Both of these are covered in the pattern. I followed the pattern directions as they were written for the bias facing on the arm holes, and while they’re great – I prefer my method, as I think it’s a little easier/fool-proof.

Also, looking at that back view just made me realize that the two back prints are mirrored. HAHAHA uhh… oh, look, there’s a rouge thread, too. GOD, I need to get my shit together. Ok, moving on!

Francoise Dress

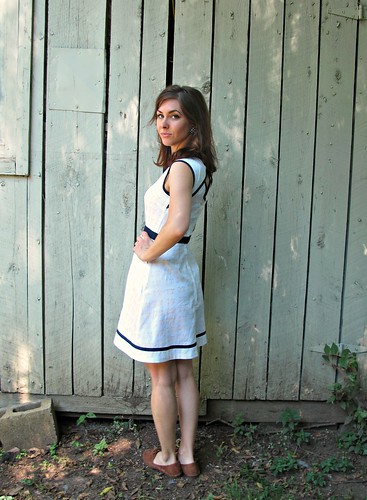
Because my print is all crazy awesome and takes all the attention, here’s a close-up of the design elements of the dress that actually make is super cute. I love the raglan seams, and the French darts are so pretty! Also – can we talk about how the floral pattern on the fabric looks like watercolors? YUM.

Francoise Dress

Now here is the dress without me or a belt. I will be honest – when I finally finished everything and put it on, I wasn’t crazy about how it looked at me. I think part of it is the color palette (I LOVE that freaking fabric, but I feel like I look like an ass every time I wear pink or purple. It’s not because of my hair color clashing or whatever. I’ve felt that way about pink and purple for a couple years now) and part of it is the fact that the dress doesn’t have a waist seam. I don’t know why, but I feel like a smooth shape with no waist seam doesn’t look right on me (is that weird?). Once I added black tights and a thin belt, I really started to see the cute factor in this dress. I think the black also tones down the overwhelming girly colors, and I like that too. Ideally, I would have loved to put a black collar on the dress, but I didn’t have any black fabric on hand. Maybe in the future I can make a detachable one, idk.

Francoise Dress

Francoise Dress

Believe it or not, I didn’t buy that zipper for this dress. No, I just *happened* to have a perfectly-matched lavender invisible zipper in my stash. Again, I don’t really wear purple (and especially not lavender), so I have no idea how that happened, but I’ve had it for a few years now. Glad I finally put that shit to good use lolol

Francoise Dress

Francoise Dress

Francoise Dress

That’s all for now! Let’s just cross our fingers that I didn’t inadvertently welcome another fucking 6 weeks of winter by announcing spring’s impending arrival. I did that a lot last year and it was way lame.

Francoise Dress

** Note: All fabrics for this project were provided to me in exchange for a review post as per my involvement with the Mood Sewing Network.

Completed: Ultimate Trousers

14 Aug

Hey look, here I am again – with another pair of polka dotted trousers! Are you surprised? Would you be surprised to know that I have another pair of dotty trousers sitting on my sewing table as we type speak? Do you think I have a problem? I’ve never considered myself a polka dot trouser kind of girl, but these sewing numbers don’t lie!

Sew Over It Ultimate Trousers

This polka dot cotton sateen is actually an old spoil from the Mood Fabrics flagship store in NYC, which I bought while I was there in March. I knew I wanted to make pants with it – what pattern specifically, I couldn’t tell you, but pants for sure! I love using cotton sateen for pants as it’s usually a good weight with a nice, heavy stretch, and the colors are always so lovely and saturated. Plus – polka dots! Yesss!!

Sew Over It Ultimate Trousers

The pattern I eventually ended up using is the Ultimate Trousers from Sew Over it. I actually tested this pattern ‘way back when earlier this year, to help get it ready for it’s print debut. I was on a pretty tight deadline during testing, which meant that I didn’t end up with a finished garment – just a muslin and a loooot of notes. This is actually pretty typical for me as a tester; I don’t always finish the pattern to the effect that it warrants a blog post! Once I got everything back to Lisa, I put the pattern on the backburner since the summer heat was starting to ramp up and I couldn’t handle the thought of wearing pants in this kind of humidity.

Anyway, we’ve got promises of cooler weather lurking on the horizon, which means it’s PANTSSS TIMEEEEE! Yay!

Sew Over It Ultimate Trousers

I did make a few changes to the pattern, both for fitting and general style. Let’s go over the fitting stuff first. Every time I make trousers, I end up doing the same adjustments across the board, especially if the pattern doesn’t include a front zip fly. I realize that trousers are kind of a scary subject for a lot of sewers, so I’m going to show y’all what I do in my fitting and hopefully that’ll shed some light on the whole matter (and even more hopefully – prove that they really aren’t so scary to fit!).

I don’t have muslin photos of this particular pattern, but I do have muslin photos from my archives (super unflattering muslin photos, I might add! Ha!) back when I made the Colette Clovers. Different patterns, but the concept is similar.

 photo CIMG0016.jpg
See all those horizontal wrinkles allll over my damn crotch? This is an indication that the crotch is way too long for me – so it’s wrinkling. The easiest way to fix this is to pinch out the excess into a long horizontal line, and transfer that to your pattern piece with slashing and taping. I’m petite, and while my torso is a pretty standard length, my crotch length is on the short side. So this is an adjustment that I have to make with *most* trouser/pant patterns. The amount can vary depending on the pattern – obviously the Clovers needed a lot taken out, and the Ultimate Trousers didn’t take much (and I just made a pattern the other day that I had to remove 2″ from!) But it’s a common adjustment for me, and this is what it looks like.

 photo CIMG0006-1.jpg
Same muslin, back view – see how tight the ass is? Like, not even flattering tight, just imma-bust-outta-here-like-a-jailbreak tight. This is fixed by adding a wedge to the back crotch depth pattern piece. How much you add will depend on how much room you need (the Ultimate Trousers didn’t need any, but the Clovers clearly needed a lot), but you can easily hack this alteration by just cutting a bigger size right there at the back crotch (this picture from Sunni’s Trouser Sewalong shows where to add length – right in that blue circle).

clover close-up
Here’s a pair of Clovers where I fixed the length issue, but now there’s some weird puffiness around, well, my crotch. Isn’t that flattering! You guys, this particular fit issue took me a LONG time to figure out because it seemed so weird – but it’s really not. Basically, my crotch requires a different shaped crotch curve than what is drafted for most patterns. I’m a J shape, and the majority of patterns I sew are an L shape. This is a stupid easy adjustment – you literally just redraw the curve, and once you’ve done it on one pattern, you can trace that curve to every pattern thereafter. For the first pattern, you’ll have to eyeball it (or find a pair of pants that fits and copy that crotch curve) and adjust until you get it right, which might take a couple tries. Once I figured that out – what it looked like, how to fix it – that really opened the floodgates of trouser making for me. Also, you should read this post on the Fashion Incubator.

Sew Over It Ultimate Trousers
Here is my front pattern piece with the adjusted crotch shape – I’ve already redrawn and cut my piece out, but I put it back on the table so you could see the difference in the curves. For whatever reason, I don’t need quite as aggressive a crotch curve when I’m making pants that have a front fly – it’s just trousers with a smooth front (especially if it’s sewn in a stretch woven).

You can also see where I tucked out the length horizontally. I didn’t take a photo of the back piece, but I sliced that length to hinge, and the side front has the same removal of length with it tapering to nothing at the center back/crotch, if that makes sense.

So yep, those are my pants adjustments! I know they might seem confusing, and to be honest – I learned all this when I was going through my Clover saga a few years ago (never got those pants to fit right, but I sure learned a lot in the process!). It was a LOT of trial and error, but hopefully my notes will help a least a few people go through less trial and error 🙂 As you can see, there aren’t a whole lot of adjustments needed to get a good fit on pants – but they all work together, and each one affects the other (and they are all adjustments that need to be made BEFORE cutting your fabric, which is why a muslin is SO essential when making pants!). For more fitting help, I strongly recommend investing in a copy of Pants for Real People, which is basically a pants-fitting Bible. So much good information in there, I use that book often!

Ok, now that THAT’S out of the way – let’s go back to talking about this pattern, and the style adjustments I made!

Sew Over It Ultimate Trousers

This pattern is designed to be worn cropped (or as shorts), with a faced waistline. I have learned that I really don’t care for faced waistlines, so I decided to add a waistband to my pants. I didn’t draft a waistband – I just used the facing pieces and flipped them to the top as waistband pieces (and cut two, so I could face the waistband, as you do). I think, for me, these are a little more wearable with a proper waistband. For interfacing, I used tricot fusible, which I looove because it stabilizes the fabric but doesn’t compromise the stretch of the fabric (which is what makes the darn pants so comfy to begin with!).

Sew Over It Ultimate Trousers

I also kept the length on the longer side, which means I can wear them full-length in the winter (with cool socks!) or fold them up to make them cropped. This length is straight out of the pattern, by the way – I didn’t shorten anything, and I’m 5’2″. Just fyi!

Sew Over It Ultimate Trousers

The one major design change I made to this pattern was to sew it in a stretch woven, as opposed to the firm woven (non-stretch) that the pattern calls for. For one, my muslin was a firm woven and I plain just didn’t like the way they felt! They were too restrictive! I like wearing stretch woven pants, ok. Also, it’s hard to find a good pants-weight print that isn’t a stretch woven, so there’s that. I think these are fine in the stretch fabric, although I should probably go back and size them down a little because I think the legs look kind of loose. I was trying to avoid the stovepipe legs look, just to try something different, but I think these do need a little less ease. These are a size 8, by the way!

Sew Over It Ultimate Trousers

So that’s it! Thanks Lisa (and the Sew Over It team!) for letting me test this pattern, and being so patient with me taking months to make a finished wearable garment 🙂 Londoners, if you’re still afraid to tackle the trousers, there is a whole class for making these (with tea and cakes, omg I wish I was in London) if you still wanna try them!

Those of y’all scared to try trousers – what are your thoughts? Do you think the process looks any easier? Are you going to throw caution to the wind and try anyway? Y’all – pants are fun!

* Oh yeah, and I cut my hair! I hope you like it! Well, I guess it doesn’t matter if you don’t like it – it’s not like I can stick it back on my head lololol

Completed: Vogue 8664

27 Jun

Remember the Sew Bossy Initiative? This is a fun little sewing challenge where you get paired up with a fellow blogger and basically tell them what to sew next – complete with you sending them the fabric, pattern, and anything needed to finish the garment in question. Your sewing buddy will do the same for you.

Vogue 8664 - Birthday Dress

Well, I got paired up with Rachel Pinheiro, and while we were fairly quick about getting the patterns and fabric to each other, it’s taken an entire year for me to actually sew my dress (and poor Rachel, I sent her a pattern that ended up being a no-go, so she’s still trying to decide what to sub in!). On top of that, I’ve actually had this dress completed for over a month! Oops! Well, better late than never, I guess 🙂

Vogue 8664 - Birthday Dress

Rachel sent me Vogue 8664 as my pattern for the Sew Bossy. While it’s a gorgeous design, part of the reason why I dragged my feet on sewing it up is because I simply did not like the skirt included. Don’t get me wrong – it’s a pretty, fitted skirt. But I don’t do fitted skirts, they just don’t work with my lifestyle these days (and by “lifestyle,” I mean, I sit on the floor a lot. Ha!). So I sat and considered it, and debated if changing up the skirt would ruin the whole fun of Sew Bossy (since I’m not really letting Rachel boss me at this point). Fortunately (well, unfortunately for Rachel hahah booo), Rachel ended up scrapping the pattern *I* sent her, so we decided it would be fine for me to change out the skirt to make something more suitable for my daily life. As fun at this challenge is – it’s not very fun if I end up with a garment I’m not actually ever going to wear!

Vogue 8664 - Birthday Dress
This actually ended up being my birthday dress- which I decided to do about 10 days before I needed it. I don’t even go out for my birthday these days, but man, sometimes it’s nice to just wear a new dress that makes you feel good, you know? And I feel pretty good in this dress!

Vogue 8664 - Birthday Dress
Anyway – back to the Vogue pattern! I cut the size 6, with the B cup pieces (I don’t wear anywhere near a B cup, fyi, that’s just the pattern piece that had the closest finished measurement to my body), and made a muslin of the bodice to check the fit. My fabric is a cotton sateen with a heavy stretch – Rachel bought it in Brazil, isn’t it amaaaazing?! – so I used some old stashed stretch fabric for my muslin. Out of the envelope, everything fit mostly well, except that I did take about 1″ out of the center back (not an uncommon adjustment for me). I debated on whether or not to sew the sleeves, but I’m glad I did in the end, because they’re pretty awesome! They get their shape from two giant darts at the sleeve head; the body of this particular fabric I used also helps 🙂

Vogue 8664 - Birthday Dress
The other major change I made to the pattern was to swap out the skirt for an A-line. I used the skirt from my Belladone pattern – pockets and all – and I think they matched up pretty well. Plus, you know, it’s wearable. For me, anyway 🙂

Vogue 8664 - Birthday Dress
Construction-wise, I made a few changes. The main one was that I did not line the bodice as called for. Rachel sent me enough fabric so I could self-line, but I used up pretty much all that while cutting the skirt and pockets. Anyway, I don’t think I’d like this fabric as self-lining – it’s pretty thick and heavy for a summer dress, two layers would be crazy! Instead, I drafted a facing for the neckline (this was as easy as tracing the edge of the neckline and extending it to 1″ wide for a narrow facing piece, then adding seam allowances). I debated with what to do about the arm holes, since the sleeve doesn’t go all the way around (and thus, this is where that lining really helps). In the end, I bound the arm hole edges with flat bias facing, which covers all the raw edges and also makes the insides look pretty 🙂 You do see topstitching from the outside, but it’s not very noticeable with this fabric.

Vogue 8664 - Birthday Dress
I also changed the midriff to be a contrasting solid color. I actually cut the dress to be all the same self-fabric, but after I sewed everything together… it just looked like a hot mess! Too much pattern being broken up in too many places. Yuck! So I painstakingly ripped out the midriff (which had already been topstiched at this point, ugh) and replaced it with a solid navy sateen that I had in my stash. You probably recognize this fabric because I’ve used it multiple times on multiple garments (including my lace trench, these Maritime shorts and this Belladone. And I STILL have more of this fabric! Man, that shit is awesome).

Vogue 8664 - Birthday Dress
So here’s the major glaring flaw with this dress – the damn waistband seam allowances show from the outside! This happened for a multitude of reasons – mainly, I didn’t interface the outside waistband (i.e., the navy solid). I had already interfaced the feathered waistband, which after I ripped out I put on the inside of the garment, and I didn’t want to re-interface because, fuck you, that shit is expensive. Don’t look at me like that. It might have been ok, except I also didn’t trim my seam allowances, or even attempt to grade them. Why? I don’t know. I have no idea. Anyway, they’re totally visible from the outside and it doesn’t look the greatest, but, whatever. I’m not ripping that shit out again, I can live with it.

Vogue 8664 - Birthday Dress
Speaking of interfacing, I have discovered a most brilliant solution for interfacing fabric with a high stretch content – stretch interfacing! Whowouldathunk?! I used this tricoat interfacing from Fashion Sewing Supply (the only place I buy interfacing from; srsly, it’s all amazing). It gives a bit of interfaced support to your fabric without actually compromising the stretch! Which means my waistband still stretches, despite being interfaced. It’s fucking awesome. I used this stuff on the neckline facing as well.

Vogue 8664 - Birthday Dress
As I mentioned before, I made my neckline facing 1″ wide. Generally, facings are closer to 2″-3″ wide. Why so narrow? I wanted to topstitch it down (partially to keep it on the inside of the garment, and partially because of all the topstitching already on the dress), and didn’t need a giant flap of interfacing beyond my topstitching. Even though I topstitched the facing, I also understitched it first – it helps everything roll to the inside and press flat before that final line of stitching.

Vogue 8664 - Birthday Dress
Also topstitched: the lapped zipper, both edges of the midriff band, around the arms (where I sewed down the bias facing), the pocket edges, and the sleeve and skirt hems.

Vogue 8664 - Birthday Dress
I just love the way the neckline facing looks! It’s so dainty!

Vogue 8664 - Birthday Dress
Here is the arm hole facing. It is sewn in the exact same way as I sew bias facing for a sleeveless dress.

Vogue 8664 - Birthday Dress
For garments with very visible seams that need to be matched up across a zipper, you can’t beat a lapped zipper. It makes things sooo much easier to match, as you can see it while you’re sewing (as opposed to an invisible zipper, which is sewn on the wrong side).

Vogue 8664 - Birthday Dress
And that’s it! A bossy birthday dress 🙂 I’m happy to report that I did finish this in time for my birthday – woohoo! Also, these are the last photos I have of my hair this color, fyi. I actually dyed it over the weekend (right after I took these pictures, of course, ugh), and now it’s purple! Stay tuned for that 😉

Consider this a Sew Bossy success! I can’t wait to see what Rachel dreams up for her fabric, because I know whatever she makes is going to be amazing (like everything else she makes, gah). Thanks to Heather Lou for dreaming up this fun challenge, and to Rachel for agreeing to pair up with me!

How bout you? Ever participate (or would you participate) in Sew Bossy? Does it give you a mini heart attack to imagine someone else telling you what to make? Spill!

Completed: Runway-Inspired Separates

25 Mar

So, everyone at the Mood Sewing Network decided a couple of months ago that we would challenge ourselves to make pieces that were inspired by the Spring 2014 runway. Real talk: this shit sent me into a panic. Runway? I can honestly say I have never even so much as glanced at a series of runway photos, let alone determined an outfit based on what I saw (I’m not saying this in an ~ooh, I’m so cool I just don’t even pay attention to fashion~ way, more like, yo clueless!). Furthermore, it’s difficult for me to grab “inspiration” from something without just blatantly copying it. I spent an entire month agonizing over designers, pouring over runway sets at style.com (holy crap, there are a lot of them) and wringing my hands over what to make.

Butterick 5526 & Kelly skirt, made with Mood Fabrics

Then I discovered Alberta Ferretti.

Alberta Ferretti Spring 2014

I still don’t know who this designer is, exactly, but the entire runway show is magical. Bright, saturated colors! Crisp white accents! Flowers! Stripes! This is the kind of inspiration I can get behind! I decided to make myself a *wearable* (emphasis on wearable ;)) version of my favorite look.

Butterick 5526 & Kelly skirt, made with Mood Fabrics

Figuring out the fabric and patterns I would use was almost as difficult as picking a designer! I knew I wanted to make a striped skirt with pleats similar to the runway version, because I just really love how that turned out (plus, who doesn’t love a good striped skirt?), but finding a good striped fabric on the Mood Fabrics website was haaard. I mean, they have all sorts of good stripes to choose from – but very little in that specific combination of wide, irregular stripes in bright saturated colors. I know, I know – this is supposed to be an inspiration, not a literal interpretation. But dangit, I wanted those irregular stripes!

Butterick 5526 & Kelly skirt, made with Mood Fabrics

I’m not going to tell you how long I spent picking through the Mood website with a fine-tooth comb; let’s just say I probably know every apparel fabric they sell now. I did finally find my big prize, though – this amazingly bright orange stripe cotton sateen is the clear winner. Woohoo! Of course, it clashes with my hair like big time crazy bad, but whatever, I picked all this shit out pre-blue LT. Anyway, I just love love LOVE the bright colors of the stripes – it’s not quite the same colors as the inspiration skirt – it’s way more happy springy! Yay spring colors!

Butterick 5526 & Kelly skirt, made with Mood Fabrics

I was originally going to make the fabric in a skirt that is more similar to the runway inspiration – no button front + pleats all the way around – but at the very last minute (like, right before I cut into the fabric, lolz), I changed my mind and decided to go with a pattern I knew I would actually wear and love. Enter the Kelly skirt! Cutting that shit took forever, btw. I agonized for a long time on how to cut the stripes – where each color and wide stripe should hit. I used the inspiration photo to help me decide how to cut the waistband (it was originally going to be a mess of stripes on it’s own, but I like it as one solid, thick stripe!), and was careful to match up the stripes along the side seams, the button front, and the pockets. Like I said, it took forever, but once I got the pieces cut, the actual assembly took no time at all.

Butterick 5526 & Kelly skirt, made with Mood Fabrics

The fabric is described as a lightweight cotton sateen, but it’s weighty enough to work as a bottom weight. There is definitely some texture in the weave, and it stretches quite a bit. I made sure to stabilize the waistband and button placket so the fabric would keep it’s shape in those areas, and used a long stitch on my machine for all the topstitching. It presses very well – really easy to get a sharp crease in there, yeah! – but it also tends to leave pin holes. For areas that needed to be pinned together and topstitched (such as the button band and inside of the waistband), I fused the pieces with a long strip of stitch witchery instead of pinning; this keeps everything in place and makes topstitching SO much easier! Especially if you tend to miss spots and only discover them after you’ve finished topstitching the seam, which means they gotta be ripped out and restitched so you catch the entire fold (er… not that I would know anything about that…). That shit’s not a problem at all when you’ve got Stitch Witchery on your side. Yay, Stitch Witchery!

Butterick 5526 & Kelly skirt, made with Mood Fabrics

Since my skirt is so bright and colorful, I went the boring route with my top and made a classic button-down shirt. I seriously considered adding embellishment – or even making it into a crop top, because, why the fuck not? – but in the end, I stuck with the classic tried and true. Mainly because my wardrobe is sorely lacking a solid white button down with sleeves, so I know this shirt will get quite a bit of wear with other pieces to mix and match. I used this Theory lightweight cotton shirting – which, if you were wondering, took almost as much agonizing as find the perfect stripe. There are SO MANY WHITE SHIRTING FABRICS available at moodfabrics.com! SO FUCKING MANY. Like, how do you even choose? I figured that I’ve had really good experiences with all the Theory denims I’ve bought, so the shirting fabric must be just as excellent. Which ended up being true – this shit is soft as angel’s wings, presses and stitches beautifully, and it’s right along that line of being *almost* sheer because it’s so lightweight. A skin-colored bra is a must with this fabric. The only drawback is that since it’s 100% cotton, it does wrinkle like crazy. Like, when I pulled it out of the dryer, it was a hot mess of wadded wrinkled ball I don’t even know what. Good thing it presses well! 🙂

Butterick 5526 & Kelly skirt, made with Mood Fabrics

For my pattern, I used Butterick 5526. Like I said, I knew I wanted a classic button-down shirt but nothing in my stash was exactly what I wanted – everything was either a relaxed fit, or had something twee like a peter pan collar or an abundance of ruffles cascading down the front. Which is fine – clearly I like these patterns enough to even have them in my stash – but I wanted something super basic. Butterick 5526 perfectly fit the bill – I went with the princess-seamed version with 3/4 sleeves, and I’m actually a little surprised at how much I like it. I made the size 6 with no muslin, with the hopes that the princess seams would give me enough room to play around with the fitting. It actually came out perfect straight out of the envelope – I KNOW, RIGHT? – although next time, I will shorten the sleeves because they are stupid long. They’re supposed to be 3/4 and they come to right above my wrists – in that weird spot that’s not quite long sleeve, but rather looks like I measured my arms wrong. Wah wah! I’ll just wear these rolled up, I guess. I also may reduce some of the ease out of the sleeve cap in the next version; these were pretty hard to ease in smoothly and there are still tons of wrinkles. But, for the most part – it ain’t bad!

Butterick 5526 & Kelly skirt, made with Mood Fabrics

I did try to jazz up the shirt a little bit by adding topstitching, but for the most part – it’s just a plain jane backdrop to an awesomely loud skirt. I love it!

Butterick 5526 & Kelly skirt, made with Mood Fabrics

Ok, now I have to tell you my secret – I didn’t start sewing this until Saturday morning! On top of that, it had to be finished and photographed before dark on Sunday – and I had a wedding to attend on Saturday night. I spent so long agonizing over my designer inspiration, then the fabric, then the pattern – that by the time I had everything (mostly)figured out, it was time for me to get on a plane and head to NY. When I got home on Monday, I had another more urgent deadline that needed to be taken care of asap (more on that later), which put this project on the backburner for a few days. Needless to say – I was pretty stressed come Saturday morning! I like to think I’m pretty efficient when it comes to making things quickly, but even that’s a stretch for me, especially two garments. I’ll be honest – I was tempted to half ass this one, just for the sake of time, but I decided early on that it wasn’t even worth my while if I didn’t end up making something that would be wearable past this photoshoot. Which means I forced myself to slow down – I made time for fitting, for the details like topstitching, for fixing mistakes (oh yeah, I totally sewed that collar stand on backwards the first time NO BIG DEAL), for eating lunch. But hey, look – not only did I actually get it done, but I actually made something nice without cutting corners.

Butterick 5526, made with Mood Fabrics

Butterick 5526, made with Mood Fabrics
I mean, check out that topstitching!

Butterick 5526, made with Mood Fabrics

Kelly skirt, made with Mood Fabrics
Lots of topstitching on the skirt too, woohoo 🙂

Kelly skirt, made with Mood Fabrics

Kelly skirt, made with Mood Fabrics

I know my outfit isn’t quite as fashion forward as what I could have done, but I am elated with how both pieces turned out and I can’t wait to give them some proper wear to welcome spring in with loving arms. Come on, spring! I know you’re lurking back there somewhere, time to come out of hiding!

Butterick 5526 & Kelly skirt, made with Mood Fabrics

One last thing – most of y’all are probably aware by now, but just in case you weren’t… By Hand London is going to start printing fabrics on-demand! How freaking awesome is that?? They need some help with costs to get production started, so they’ve got a Kickstarter going to raise funds. You can get some pretty sweet loot in exchange for your money – from tote bags, to coffee mugs, to free patterns, to private sewing lessons – but even $5 helps. Every little bit adds up! I am so so excited for this new venture that the BHL ladies are seeking out, and I really hope they meet their goal so it can become a reality (especially if it means I can start printing wildly tacky fabric to my heart’s desire). You can check out the Kickstarter here – watch the super cute video, and I dare you not to fall in love. I dare you.

Completed: A Belladone for Bicycling

9 Sep

Ok, time to confess something really dorky: I’ve been looking for the perfect bicycle-print fabric for years now. It’s actually become something of an obsessive manhunt – trying to avoid the quilting cottons, the cruisers and penny farthings, the hideous color combinations. You’d think with bicycles being these super cutesy Pinterest-approved photo prop (forreal, I’m sick of looking at pictures of people using their bikes as props! Ride that shit already!), there would be a bigger selection of this type of print. You’d think. I never found it, though.

UNTIL RECENTLY.

bicycle fabric

Isn’t this biciclette fabric adorable?? It’s from Bubiknits‘ shop on Spoonflower. I’ve always wanted to try my hand with a piece of Spoonflower fabric – but honestly, every time I try to browse the choices, I get overwhelmed with so many options. And I’m not gonna try to design my own because, ha, no. Let’s just not even discuss. So when Giusy emailed me and asked if I would like a couple of yards of any fabric from her shop as a gift, I immediately zeroed in on that bicycle print in organic cotton sateen. I had no idea what I was going to do with it, except that it would be a dress.

Bicycly Belladone

A Belladone, to be exact!

Bicycly Belladone

I should apologize in advance for how bad these pictures ended up. Turns out white doesn’t photograph too well in bright sunlight. Who woulda thought? Just imagine the bicycles and we will get to the close-ups soon enough.

Bicycly Belladone

Obviously, this ain’t my first Belladone rodeo. That stripey dress is actually 100% the reason why I decided to make my bicycle dress with the same pattern – it is my favorite dress to cycle in! It’s very comfortable, the skirt is the perfect width needed for riding (but not so floofy that it causes wardrobe malfunctions) and I like to think that it’s pretty enough that it makes the Mary Poppins Effect a reality on my commute. Plus, the dress is finished with bias tape – visible or invisible – which I thought would provide a nice contrast against the white/yellow of the main fabric. As much as I love the colorway, it unfortunately washes me out, so I needed something a little darker to sit next to my face.

Bicycly Belladone

I can’t really say I started this dress with any real direction in mind. Originally, I wanted the contrast to be turquoise, but when I actually got the fabrics side-by-side, I didn’t like the look of the two colors together… too light for my tastes. Navy seemed like the perfect choice (and yes – that’s navy. I know it looks black, but it’s navy.). I used leftover navy cotton sateen from my lace trench (I swear, that fabric… it’s like the gift that keeps on giving. I STILL HAVE MORE OF IT, TOO) and made a few yards of bias tape to enclose all the edges along the top of the dress. I actually applied all this bias tape by hand, so the stitches would be invisible. I think it adds a bit of polish to the overall effect, even if it did mean making this dress took twice as long. I also applied a strip of interfacing to each diagonal edge, as well as staystitching, to make sure the edges don’t get distorted over time.

Bicycly Belladone

Of course, taking a light dress and adding dark trim to the bodice meant that the thing ended up looking top-heavy. I added more dark contrast to the waistband, as well as a couple of inches above the hem, which I think ties the dress together. To finish, I added 2 self-covered buttons at the center front.

Bicycly Belladone

It’s so perfect, I could marry it.

Bicycly Belladone

And the back! Don’t you love the back!?

Bicycly Belladone

One more picture, sorry 🙂

Bicycly Belladone

Here you can see the bicycles! Aren’t they sweet 🙂

Bicycly Belladone

Since I’d already made this pattern before, I didn’t need to make any major modifications (other than the aforementioned contrast additions). I did sew the side seams at the waist with a 1/2″ seam allowance (instead of the pattern’s 5/8″); I noticed that my stripey dress can get a little tight if I’ve eaten a lot of food, so an extra bit of wiggle room is appreciated 🙂

Bicycly Belladone

I also pressed the pleats so they were centered over the stitching lines (instead of pressed to one side). This gives them more of a box-pleat look, as opposed to a soft tuck.

Bicycly Belladone

Can you see the stitching on the outside, huh, can you? NEITHER CAN I!

Bicycly Belladone

Bicycly Belladone

The inside waistband is faced with more bicycles 🙂 And yay, yellow zipper!

Bicycly Belladone

Sewing that strip of navy around the bottom was super easy. I sewed on my hem facing as usual, then centered the seam binding over the stitching and stitched it down on both sides.

Bicycly Belladone

Working with this fabric was an absolute dream – and wearing it is even better 🙂 I know Spoonflower’s fabrics tend to skew toward the pricey side, but this is some good stuff – organic cotton sateen with the subtlest sheen, the colors are rich and saturated, and it’s very easy to sew and press. Plus, the design choices! Gah!

Bicycly Belladone

Thank you again, Giusy, for the amazing fabric! If anyone was wondering… yes, I have taken this dress for a bike ride, and yes, it was a little magical 😉

One last thing – and I swear, it’s important – I just heard through the grapevine that Colette Patterns is running in second place in the Martha Stewart American Made Competition. The #1 spot is currently being held by a scrapbooking company, boo! If you’ve got a minute to spare, go vote for them (you can login with your Facebook if you’re lazy like me, and you do not have to be a US resident to cast a vote!). Colette Patterns will be dumping the entire $10k prize back into their employees as bonuses, which is pretty fucking amazing and I think totally deserving of winning. Plus, do we really want to see them get beat out by a scrapbooking company? NOPE!

Go forth and vote! Every little checkmark counts 😉

Completed: the Organic Hawthorn

7 Aug

First of all, thanks to everyone who voted for me in the Colette Hawthorn Contest – I somehow ended winning second place! Such a wonderful surprise, and do check out those other winners – because, guys, I’m not worthy.

With that being said, I love this pattern and I’ve already made a second dress.

Navy Hawthorn

I realized that my wardrobe was severely lacking some basic, work-appropriate, tattoo-covering clothing (we are fairly casual here at my office, but I think it’s good to have a few pieces that err more on the professional side should I need it for meetings or important clients dropping in), and a Hawthorn with sleeves pretty much fits the bill here.

Navy Hawthorn

It’s modest and sleek without being frumpy, vintage-inspired without being costumey. Win!

Navy Hawthorn

I am super happy with how it turned out, however, I am NOT happy with those bust dart points. I promise you they look 1000% worse in the pictures than they do in real life – according to these photos, I have two sets of eyes D: I resewed the dart tips more times than I care to admit – lowering them, raising them, tapering them more subtly – as well as pressing the everloving fuck out of them. No dice. Like I said, they’re not as bad in real life as they look here, but now I can’t stop staring at them oh god I’m sorry.

Navy Hawthorn

Anyway, dart issues aside – we’ve already discussed the pattern, so today we are going to talk about the fabric!

Navy Hawthorn

This is organic cotton sateen, from my pals at Organic Cotton Plus (my second review for this – they liked my my first review so much, they came back for a second round :P). I’ve not had much experience with cotton sateen – most of what I’ve seen has been the sort of fabric I shy away from. Think super shiny (if you like shiny, that’s totally fine, but personally I always feel like I’m wearing a prom dress!), too much stretch, and much too stiff for my liking. This stuff is NOTHING like what I described, though. Don’t let the boobie-eyes deter you; there ain’t much shine on this fabric, other than a spectacular luster that comes from high-quality cotton and a gorgeously deep pigment.

Navy Hawthorn

The fabric has a great drape – it just floats and creates the most lovely folds. It’s pretty lightweight, with no stretch, which makes it ideal for this pattern. And since it’s cotton, it’s super comfortable to wear. It also wrinkles like crazy, because of the aforementioned cotton, but I’m ok with a few wrinkles – I’d rather have wrinkles than pools of sweat from polyester!

Navy Hawthorn]

This is a great basic if you want to make something in a solid color but feel bored with the idea of, well, solid colors.

Navy Hawthorn

Both the buttons and the monogram are from the flea market. I think they both add something special to the dress, while still keeping it office-appropriate.

Navy Hawthorn

I love the monogram! It’s actually metal, and has sharp bars at the back that pierce the fabric and bend to keep it in place. Which means it’s never coming off this dress… except to wash, I guess. I’m not sure how old it is, but it’s pretty sweet! I’ve been hoarding it for a few months now, waiting on the perfect shirtwaist backdrop.

Navy Hawthorn

Soo, as you can see here, I tried splitting the dart on this version, following the tutorial at the Coletterie. I’m not totally happy with how the darts turned out – they are too close together at the top (and I suspect that, while they likely aren’t 100% of my nipple-eye problems, they likely contribute to it, ugh). I didn’t realize how they looked until after I’d put the bodice front together- and cut up all my fabric. Shoulda made a muslin, shoulda woulda coulda.

Navy Hawthorn

Oh well!

Navy Hawthorn

Quick, look at this! Shiny!!

Navy Hawthorn

I trimmed the hem with matching rayon seam binding, and catch-stitched it down for a clean finish (and yeah, that took forrrever haha). I’m mostly including this picture because it really shows the color best. It’s so rich!

Navy Hawthorn
Navy Hawthorn

The dart points aren’t as prominent here – this is much more accurate of how they look in real life. Still… how do I fixxxx thiisssss????

Navy Hawthorn

Navy Hawthorn

I think this dress will end up getting a lot of wear this fall! I can’t wait to pair it with future Kelly Green cardigan – navy and green is one of my favorite color combinations at the moment. I better get knittin’!