
Happy Monday, everyone! We are officially kicking off the OAL (Outfit Along) this morning, so I hope you’re ready for it! As I mentioned in the announcement post, we won’t actually start the sewing until later this month, on 6/22, since I’ll be traveling outside of the country and won’t have much internet access (and I hate the thought of putting up a tutorial and then not being around to answer questions! Lame!). However, I figured I’d help get you guys rolling in the meantime with choosing your fabric, size, and cutting. Then when I’m back, we can get straight into sewing so you can finish these dresses before the deadline at the end of July! Sound good?
Of course, if you don’t need the sewing tutorials, then you are absolutely free to start the sewing whenever you’d like! This just goes for those of y’all who are waiting for tutorials 🙂 For this year, I won’t be doing a full photo step-by-step of the entire pattern – but if you need those, most of the steps are similar to the ones from The 2014 OAL, so you can always browse through the tag for the tutorials. Things like sewing princess seams, sleeves or bias binding, and inserting a lapped zipper. All good stuff! Since it’s already up on the blog, I don’t see any point in reinventing the wheel (or subjecting those of y’all who aren’t following the OAL to a bunch of repeat tutorial posts, because, boo on that).
The tutorials I’ll be covering on this here blog are changing out the lining for bias facing (which can get a little weird around that back cutout, but don’t worry, I got your back!) and adding pockets. I will only be sewing View A, with the back cutout and no sleeves (that’s a lie, I’m still debating if I want to add the little cap sleeves. Decisions, decisions!). Again, the ~official~ dress pattern for the OAL is McCall’s 6887, but you are totally welcome to sew whatevererrrrr pattern you like!
First of all, here’s the fabric I’ve chosen for my dress!

This is some uhhhh-mazing Ikat cotton that I picked up from Mood Fabrics in NYC when I was there… um… March 2014. Ha! I’ve been apprehensive to sew it up because the print-matching looked to be a nightmare, and also, the fabric is pretty thick and I wasn’t entirely sure what kind of garment it would work with. I think it’ll be really nice for this dress; it has a good structure for the skirt, and the print is so fun! I haven’t decided what color bias binding to use for the insides – common sense would tell me black or white, but I’m thinking I might look for some turquoise or hot pink 🙂 Something to add a little splash of color to the inside 🙂

Here it is with my yarn for the sweater portion – this is good ol’ Cascade 220 (my one true yarnlove), in a gorgeous mint color.
Don’t know what kind of fabric to choose for your dress? First of all, think about how you want the finished dress to look – do you want a bit of structure in the skirt and bodice, or do you want everything to hang in soft folds? You will want to choose a fabric with a weight and drape that work with what you have in mind. For this particular pattern, I really like how it looks with more structured fabrics – such as linen, cotton eyelet, cotton sateen, or even quilting cotton! This blog post I wrote for last year’s OAL goes over all the details for choosing and weight and drape, and shows you the differences between several fabrics. I’d recommend checking that out first, if you’re confused!
Here are some fabrics I’ve pulled off the ‘nets that would be lovely for this pattern –
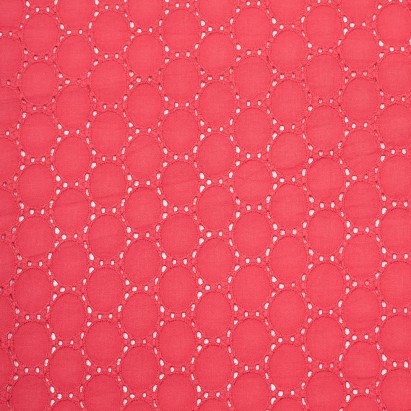
Italian Red Coral Eyelet – from Mood Fabrics
This would be a great choice for adding a lining – or if you want to skip the lining and still go with bias binding finishes, make sure you get an appropriate underlining. You could also sew a matching slip 🙂

Tropical Cotton Sateen – from Mood Fabrics
Busy prints are great for hiding wonky seams, if you’re concerned about neatness 🙂 If you plan on sewing this pattern with a stretch fabric, you may want to consider sizing down (make a muslin out of similar weight/stretch fabric first, to check!).
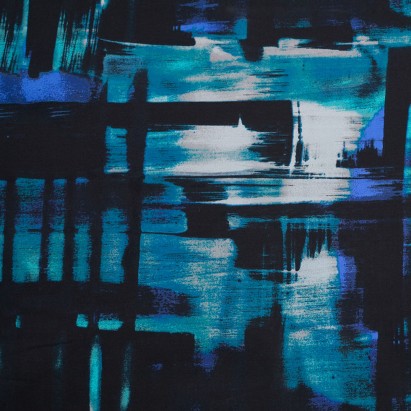
Abstract Cotton Sateen – from Mood Fabrics
I couldn’t resist. This fabric is AMAZING.
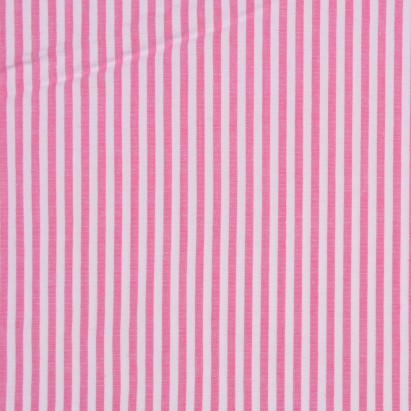
Red and White Striped Cotton Seersucker – from Mood Fabrics
Easy to sew and lovely to wear, cotton seersucker is a great option if you live in a hot climate. I love the classic red and white stripes!
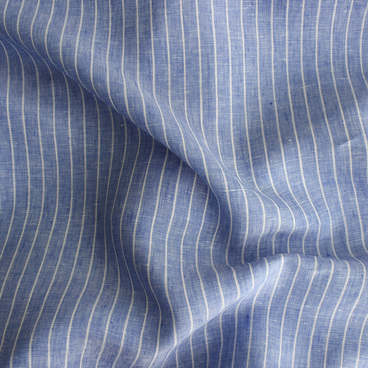
Pinstriped Linen from Blackbird Fabrics
Another good option for hot climates. This linen is similar to the stuff I used to make my linen pajamas 🙂
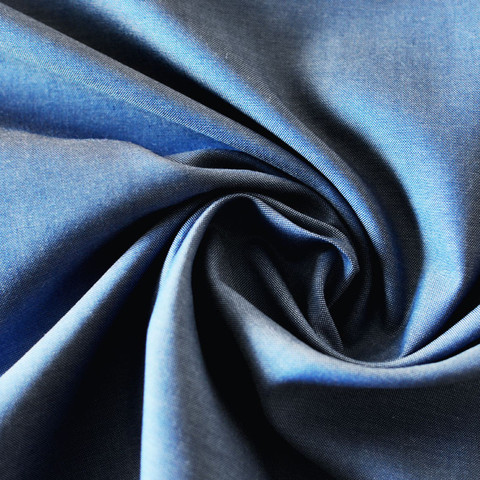
Denim Chambray Cotton Shirting – from A Fashionable Stitch
Ain’t nothing that says you have to use shirting to make shirts. Make yourself a comfy little dress instead 🙂
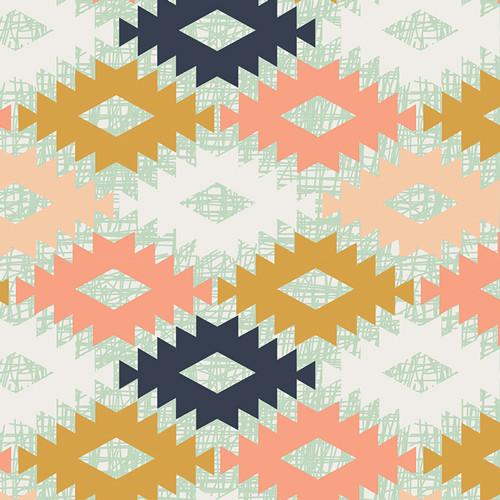
Art Gallery Fabrics: Arizona from Grey’s Fabric
Quilting cotton is a surprisingly good choice for this pattern, since it has the weight and drape that looks best with the bodice and skirt – and you have aaaalll kinds of fun prints to choose from 😀 I’ve never personally sewn with Art Gallery Fabrics, but everyone on the internet seems to go apeshit over them. At any rate, this is one helluva fun print!
A few notes about fabric:
– As I mentioned, if you’re sewing stuff that’s on the sheer side and you don’t want to mess with a lining, make sure you get an appropriate underlining fabric. I prefer to use white cotton voile or batiste (or black, or, whatever color looks best with my fabric), as it doesn’t add too much weight. If you aren’t sure about the weight, hold it with a piece of your main fabric and see how you like the way it feels. I won’t be covering underlining in this OAL, but I have a tutorial on my blog if you need help!
– Those of y’all sewing stripes or directional prints (meaning if you turn it the other way, it’s quite obviously upside-down) – make sure you buy extra fabric! Depending on the width of your fabric and the size you’re cutting, 1/2 yard – 1 yard will do.
– Prewash your fabric, however you plan on sewing your final garment. For me, that’s a cold wash and a low tumble dry (I hang my dresses to dry once they’re done – only because I hate ironing! Ha. But I always pre-shrink in the dryer just in case it accidentally gets tossed in there later down the line!).
– For your bias facings (and pockets, for that matter!), you may want to use a lighter fabric if your main fabric is a bit bulky. This is the case with my Ikat – I don’t want bulky facings, so I’m getting something lighter. Again, cotton batiste or voile is a really good choice for this, as is quilting cotton or cotton shirting. You can use almost anything, but remember that you’re dealing with skinny strips cut on the bias, so maybe don’t try the silk right now (unless you’re feeling really brazen!). Also, get something that presses well – like cotton or rayon. You will be pressing the hell out of your facings, and you want something that will respond to that. Polyester is not a good choice for this. I always stash-raid for this kind of thing, but if you’re buying, you’ll need about 1/2 a yard (and you’ll have tonssss left over to make even more bias binding, so get something you really love 🙂 ). Of course, you also buy those pre-made bias tapes – I don’t care for them, because I think the fabric is too stiff to look nice (and the color selection is very limited), but it’s definitely a lazy option if you don’t want to make your own. You’ll need the kind that is 1″ wide.
– To make your dress, you will also need interfacing, an invisible zipper (I prefer this dress finished with an invisible zipper, but you can try a lapped zipper if you’d like) and at least 3 buttons for the back, if you’re making the scoop back version.
For choosing your size, again, I will refer to you to Last year’s post in the OAL. Scroll past all the fabric, and there’s a section on choosing your size based on the finished measurements. McCall’s patterns can have quite a bit of ease in them, so this is a more accurate way of choosing the correct size. This is how I size *all* of the patterns I make, and it has yet to let me down 🙂 As an example – my body measurements put me into a size 10, but I sew the 6 (graded to 8 at the waist) for my finished garment, and it fits perfectly. Check those finished measurements!
If this is your first time making the pattern, I would strongly advise you to make a muslin mock-up of at least the bodice so you have a good idea of how the finished garment will fit. This gives you a good opportunity to make any necessary adjustments before cutting into your fabric. It’s also important if you’re sewing the version with the scoop back – I found the scoop came up higher than my bra band, and this may be the case for you as well. Can’t fix it once you’ve already sewn it up! For the muslin, you can make the whole dress if you’d like – but I just sew up the bodice and leave off any finishing. Pin the back shut as best you can to get a good assessment of the fit.
Once you’ve got your size and muslin done, THEN it’s time to cut your fabric! Refer to this post about cutting and marking fabric (also from last year’s OAL hahahaha sorry) if you need any help 🙂 You will be following the cutting guidelines that are included in your pattern; make sure you follow them carefully so you cut the correct number of pieces. The side skirt piece should be cut TWICE on the double layer, for a total of 4 pieces.

You may also want to consider adding a little extra fabric allowance below the scoop back, just to give yourself more bra coverage (I added about 1/2″). There is also a 5/8″ seam allowance there, and we’ll be sewing at 1/4″ to apply the bias, so keep that in mind as well. Your muslin will tell you exactly how much you need to add (if any at all!) to cover your bra band. Or maybe I just wear my bra band low, ha.
FINALLY, if you’re cutting stripes or plaids and need help matching – here’s another tutorial link for that. Man! I’m so glad I already wrote all these tutorials haha!
Ok, whew, I think that about covers it! Do you have any questions about the prep work that I haven’t covered in this post? Let me know before I ditch town on Thursday 6/4 and I’ll be happy to answer them as best I can 🙂 Have you chosen your fabric and yarn yet? Let’s have a look, please! 🙂


