Tag Archives: skinny bitch curvy chick

Completed: Cozy Loungewear

7 Dec

It’s officially that time of year – black and grey layers from head to toe. My favorite!

Colette Oslo Cardigan - front

I feel like I spend the beginning of every winter on the prowl, looking for pieces that will keep my warm and comfortable, without looking like a complete slob (only, like, 30% slob. I have my limits, you know). Every year, I wear said pieces until they are ratty beyond repair, so each new season means new duds. Honestly, none of the pieces in this post are particularly earth-shattering, which is why you get a 3-fer post, ha.

Colette Oslo Cardigan - side

Colette Oslo Cardigan - side

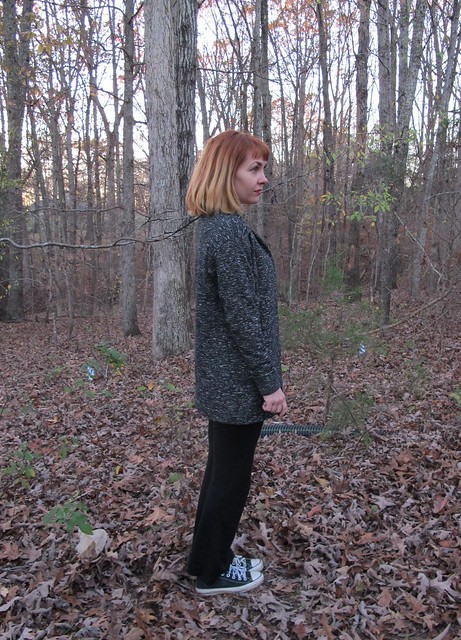
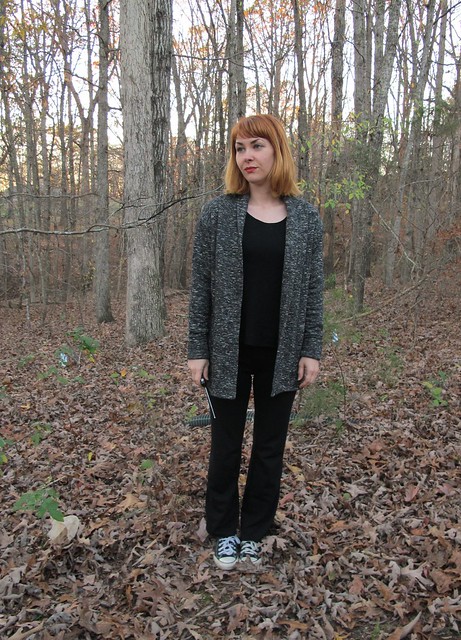
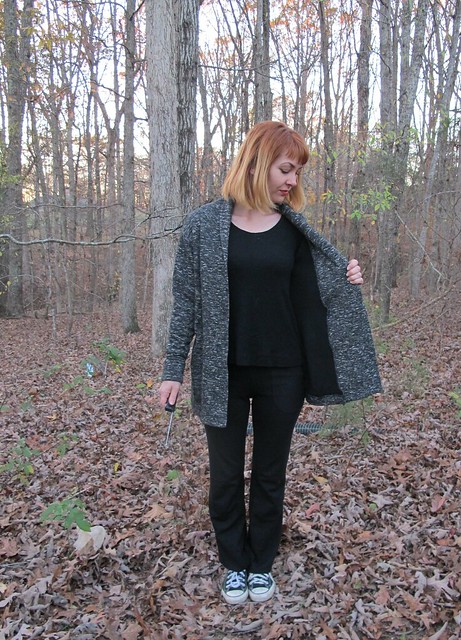
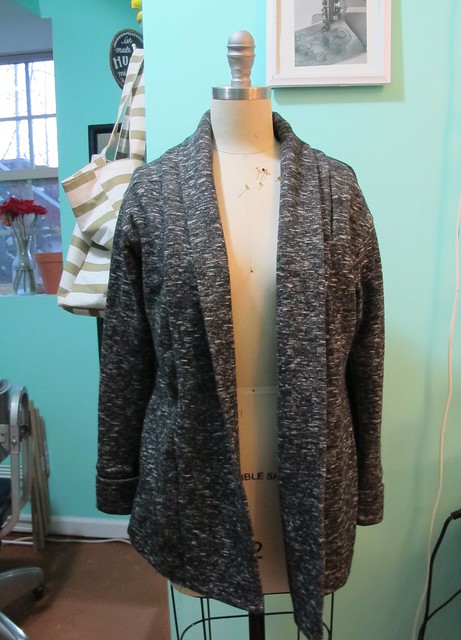
The grey/black cardigan is hands-down the coziest cardigan I have ever made – it even works as a light coat! The pattern is the Oslo from Colette’s Seamwork Magazine. I didn’t care much for the pattern when it was first released, however, I kept noticing cool versions popping up and eventually became mildly obsessed with the idea of making my own. I love the long, butt-covering length, as well as the big shawl collar. In September, Oslo was granted the glory of being “Pattern of the Month,” which knocked the price down to $5 and thus justified my immediate purchase.

Colette Oslo Cardigan - back

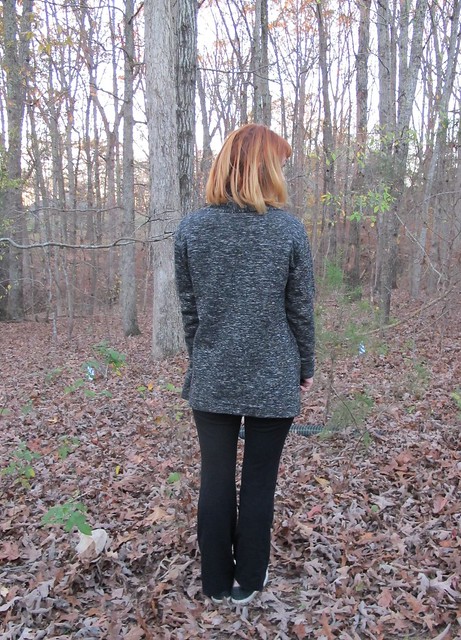
Anyway, I can see why everyone and their mom has made an Oslo – it’s a great pattern! It’s a super simple, super quick make, and the resulting garment is a great layering piece that I find vaguely reminiscent of those knit duster cardigans we all wore back in the late 90s (I bought mine at Rave. SUP.). It works especially well with heavier knits – which is great, because I keep buying them but I never know what to make them into! I don’t want a super heavy tshirt. I’ll wear a super heavy cardigan/duster hybrid, though, hell yeah I will.

Colette Oslo Cardigan - inside

Speaking of heavy knits, this was certainly one of those! I bought this double-cloth Italian wool sweater knit months ago, and while it’s really awesome – it’s also super thick. It’s basically two layers of wool knit – black on one side, grey on the other – fused together to make one really heavy layer. It makes for the perfect Oslo, because it’s super warm, but I had no idea what to do with it when I originally bought it. Also, it was kind of expensive, so I only bought 1.5 yards. I BARELY had enough yardage to eek this out – I had to do some piecing at one shoulder, and cut everything on the single layer, but I managed!

Colette Oslo Cardigan - front

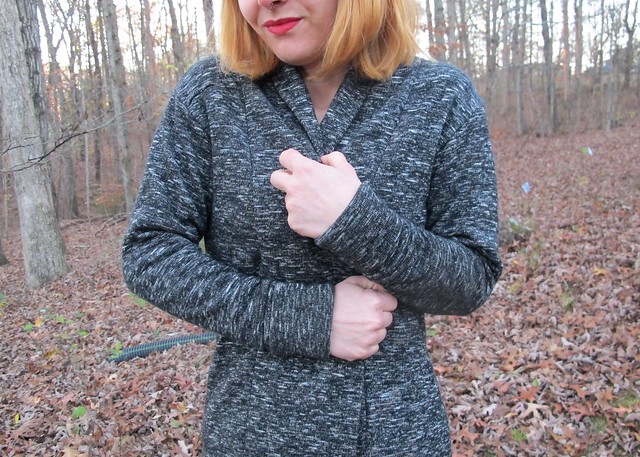
Tetris-ing the shit out the cutting layout took a long time, but the actual sewing part did not take long at all! I used my serger for everything – shit got REAL bulky when I was attaching the shawl collar, but other than that was smooth sailing. I cut the size XS and sewed the pattern as drafted with folded back cuffs, although I didn’t add the buttons. I wish I’d had enough fabric to add front patch pockets, as I feel like that’s the only thing this pattern is missing.
Vespa Patterns Grail tshirt - front

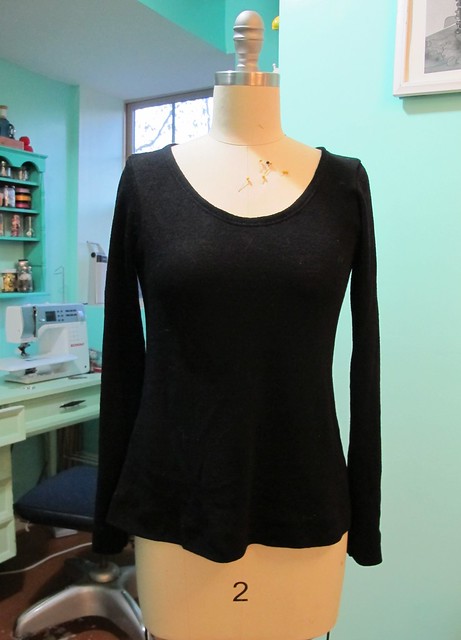
The next piece is a boring ol’ black tshirt! Haha! Well, I used a new pattern to make this – so that makes things a little less boring 🙂

Vespa Patterns Grail tshirt - front

This is the Grail tshirt from Vesta Patterns, a new company in the pattern world. These patterns are drafted and produced for 3 different body shapes, so that you don’t have to do so much futzing with the flat pattern for a good fit. I’ve been super interested in the idea but haven’t had a chance to try out the patterns, despite having them in my arsenal for a few months now. I have both the patterns for E & S (well, I had A too, but I gave it to an A-shaped friend 😉 ), so I started with the E in a size Small. The patterns are drafted to have a bit of ease, which I found to be too much for my personal fit preferences – I had a bit of excess from the underarm down to the waist, but that was easy to nip in before I hemmed the sleeves and bottom. Next time, I may go down a size for a closer fit, or use a more stable fabric like the pattern suggests. That being said, I am really impressed with how well and proportional the neckline and shoulders fit!

Vespa Patterns Grail tshirt - back

Like the cardigan, construction was straightforward and simple. The pattern doesn’t include a lot of information for construction – the steps are written out, but they are short, concise, and don’t include pictures or line drawings. Having made zillions of tshirts in my time, this does not phase me. I don’t need a full booklet with step-by-step instructions for sewing a shoulder seam, you know? But if you need the hand-holding, you may want to consider finding a tutorial online or consulting a book for further assistance.

The one construction element about this pattern that differs from most knits that I’ve sewn, is how the neckline was finished. Strips of fabric are sewn as a sort of binding around the neckline, wrapping the raw edges. It’s similar to how I did the binding on my Mission Skater dress, although without the serged edge. I think it makes a really nice, clean finish that looks really good from the outside. I hemmed the sleeves and bottom at 1″, and just used the zigzag on my sewing machine.

Vespa Patterns Grail tshirt - front

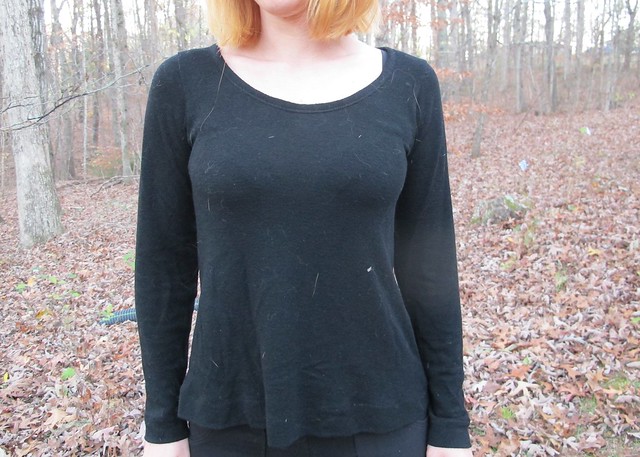
I stayed on the wool bandwagon with this top, and used another wool knit to make it up. I found this weird “black cozy knit” (their description, not mine) on the Mood website – appears to be sold out now. Y’all, this was a WEIRD fucking fabric! I don’t know what I was expecting to get, but what I received was what I would describe as a wool crepe knit. It has that crepey, spongey texture – but it’s a true knit, and stretches as so. I’ve never seen fabric like this before. It’s borderline semi-sheer, but works well for a tshirt. Because of the crepey texture, it has a fantastic drape – perfect for a loose-fitting shirt. It’s also surprisingly not itchy. Just, well, cozy 🙂 It also attracts cat hair like a magnet, sooo, sorry bout that!

SBCC Pinot pants - front

Finally, pants! These are the Pinot Pants from SBCC Patterns and they are my FAVORITE lounge pants ever ever. These are just basically yoga-style pants – not true yoga pants, as they don’t have a crotch gusset, but they do have the flared leg and elastic waistband. I have actually practiced yoga in these pants (not my preferred style of yoga pants – I like slim leggings – but I went to yoga with Jenny when I was in Boston, and hey, I actually had yoga pants in my suitcase!), and they worked just fine. Terrible fabric choice for hot yoga, but I had a great range of movement hahaha.

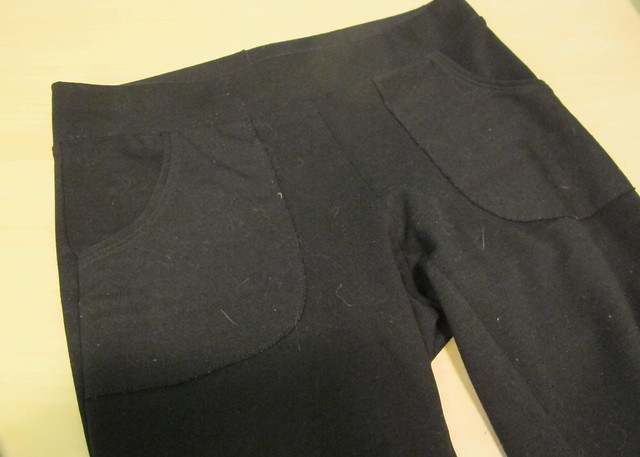
I made the size XS and cut a longer inseam so I’d have some length to play with (which I immediately cut off, and now they’re a smidge too short. Wah!). I added the free pocket add-on, which was the best decision ever! There aren’t any instructions for attaching these, but I just topstitched them on with a straight stitch (and left the edges raw – other than the top opening edge, which is finished with a self-fabric band). Leaving the edges raw is fine with this sort of fabric, as it’s not prone to unraveling or fraying (and, speaking of raw edges – these pants are unhemmed. Like I said, I cut them too short as it is and I couldn’t afford to lose any length! haha!). I also left off the elastic waistband, and instead used some heavy-duty power mesh in it’s place. Betsy had mentioned once that she preferred power mesh over elastic for a flat, yet stretchy, waistband, and I was immediately intrigued. I actually have some heavy power mesh that is way too heavy for general lingerie (I believe it’s probably good for shapewear, though), so I used that in the waistband. Just cut a waistband layer in the mesh, basted it to the wrong side of the fabric waistband, and sewed as normal. It holds as well as elastic does, but it’s flat like a traditional yoga waistband. I love it!

For fabric, I used black nylon/rayon ponte de roma, which is AWESOME and I wish I had more! It holds shape really nicely and doesn’t stretch out. Like I said, it’s not so great for shit like actual yoga – it retains heat a little too well – but for general lounge pants, it’s perfect.

Colette Oslo Cardigan - on dressform

Vespa Patterns Grail tshirt - on dressform

Vespa Patterns Grail tshirt - neckline detail

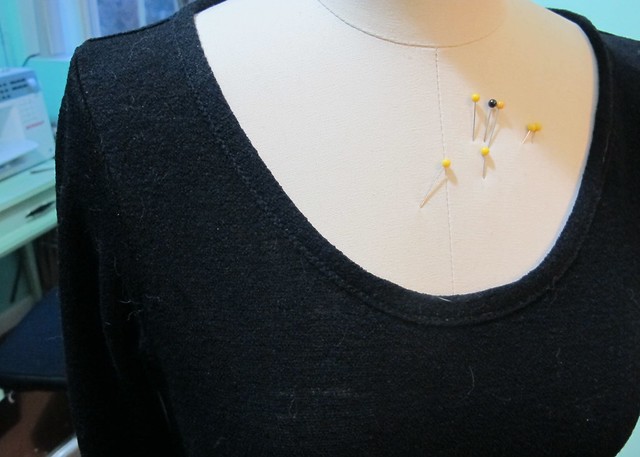
You can really see the texture of the knit here. And check out that bound neckline!

Colette Oslo Cardigan - flat

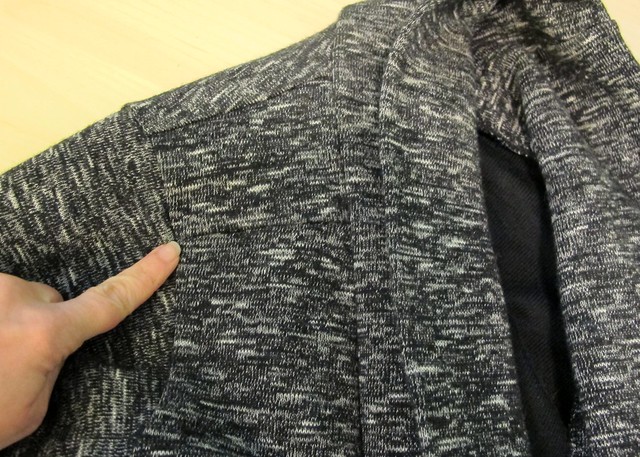
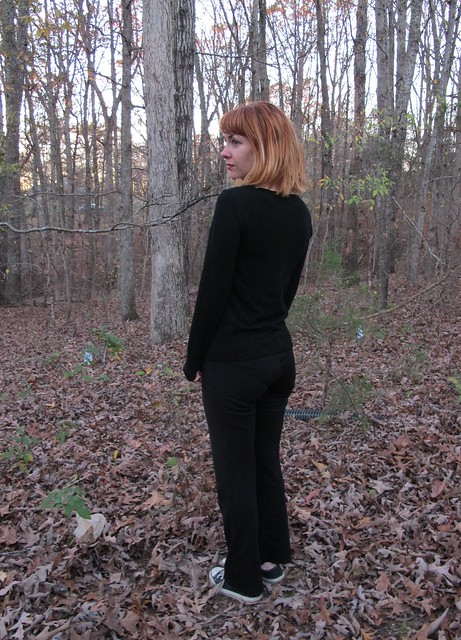
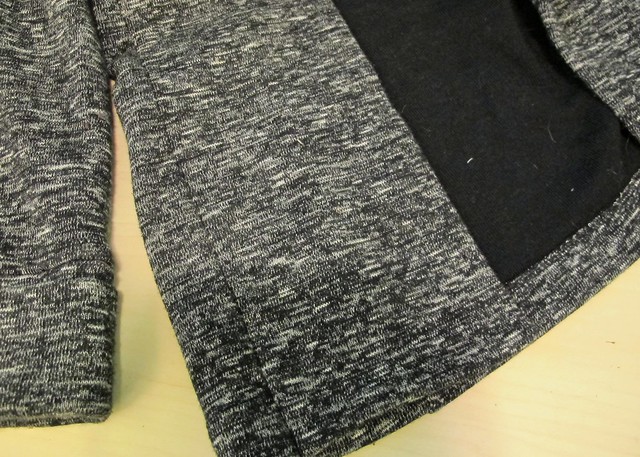
Here is where I had to piece the shoulder area of my Oslo, in order to get the pattern pieces to fit on my limited yardage. You can’t really tell it’s there when I’m wearing it.

Colette Oslo Cardigan - flat

SBCC Pinot pants - flat

Ok, that’s it! Sorry for the overwhelming amount of black + cat hair, ha.

Colette Oslo Cardigan - front

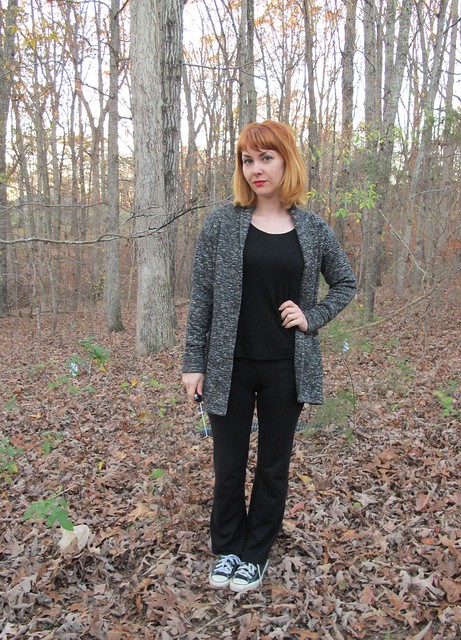
This is the kind of ensemble I reach for when I’m feeling crappy (sick, sad, hungover, etc) but still need to look somewhat presentable out of the house. As much as I love my plaid flannel Carolyn pajamas, they definitely look like pajamas! With these pieces – either all worn together, or individually with other garments – they keep the comfy factor without compromising the yes-i-put-on-pants-to-leave-the-house element. I consider that a win!

Completed: A Cardigan, a Skirt, and a Tshirt!

30 Apr

Woohoo y’all get a damn TRIFECTA of garments for today’s post! Lucky you!

Striped Cabernet Cardigan + Yellow Hollyburn

For my monthly Mood Sewing Network post, this month I wanted to focus on that amazing striped sweater knit that you’re probably staring at (you should be staring at it, it’s fucking awesome). But I felt really boring just making *a* sweater (a sweater that took maybe 2 hours, tops, to complete), so I overcompensated and made my entire outfit. Yay!

Striped Cabernet Cardigan + Yellow Hollyburn

We’ll start with the cardigan because it truly is the star of this outfit. It’s another SBCC Cabernet cardigan, this time with my minor adjustments made to the flat pattern (you can see my leopard Cabernet cardigan here, btw!). Since I’ve already made the pattern once, there’s not really anything new to report in terms of construction.

Striped Cabernet Cardigan + Yellow Hollyburn

Striped Cabernet Cardigan + Yellow Hollyburn

I bought the navy and white striped fabric while I was at the Mood Fabrics flagship store in NYC in March. I got soooo much good stuff while I was there, but this particular piece really takes the cake. I swear, if the bolt hadn’t been so heavy, it probably would have jumped off the shelf and fallen directly into my arms. We were like star-crossed lovers when we caught sight of one another.

ANYWAY, gushing aside – what we have here is a cotton double knit that works and feels like the perfect sweater knit. It’s wonderfully thick and squishy, and while it does drape a little bit, it also hold it’s shape quite well. It was really the perfect fabric for this pattern, as it responds really nicely to pressing and topstitching. I was careful in my cutting to not only match up the stripes at the side seams, but also the stripes blending into the sleeve cuffs and hem bands. The neckband is actually the same striped fabric – I just positioned the pattern piece so that the widest navy stripe was the only thing that showed when it’s folded in half. I knew I wanted a solid color at that neckband, but I didn’t want to try to color match, because nope.

Striped Cabernet Cardigan + Yellow Hollyburn

Because the striped knit is so thick, it was a bit of a beast to manhandle. Cutting it was painful (I REALLY need to get my scissors sharpened, dammit!) and the sewn seams were lumpy and wavy before I pressed them. It’s super important to press if you’re dealing with a fabric like this – the flatness is what makes the finished piece look so polished. Topstitching down the seam allowances also helped. As with my last cardigan, I used the straight stitch on my machine and a walking foot. The rest of the seams are serged.

Striped Cabernet Cardigan + Yellow Hollyburn

The skirt is another one of my beloved Hollyburn skirts. I cannot stress this enough, but I LOOVE this pattern. SO MUCH. As soon as I finished the denim polka dot Hollyburn, I started lurking hard for a yellow twill to make another one. I really love this neon delight of a yellow, but it’s hellish looking against my skin – so obviously, the next best thing is a skirt.

I found the fabric also while I was in NYC, also at the Mood Fabrics flagship store (sorryyyyy not sorry). I actually spent a good deal of time looking for this one – I knew I wanted yellow twill, but the stuff in the twill section wasn’t quite up to snuff. Too pale, too lightweight, too much of something. This particular fabric was actually located in the denim section – I imagine there is someone, somewhere, who has made an amazing pair of jeans with this fabric.

Striped Cabernet Cardigan + Yellow Hollyburn

This is a stretch cotton twill with lots of lycra in the content, giving it a super heavy stretch. Even though it’s on the lighter side (heavy enough to be considered a bottomweight, however), it has plenty of body that gives this skirt a great structure. The only downside to all that lycra is that it made the fabric really hard to get a good press. I ended up topstitching all the seams to keep them flat, about 1/4″ distance (as opposed to my usual 1/8″). The wider topstitching paired with this fabric really gives it a nice denim-y look, which I like. I thought about topstitching around the pocket bags to give those definition too, and “thought,” I mean I tried it and it looked absolutely terrible so I ripped it out. Don’t do that.

Striped Cabernet Cardigan + Yellow Hollyburn

The back closes with a simple lapped zipper, and all the inside seams are serged. Basic stuff!

Striped Cabernet Cardigan + Yellow Hollyburn

Finally, the most basic of the basics – my tshirt!

Striped Cabernet Cardigan + Yellow Hollyburn

This is SUCH a simple tshirt that it hardly bears a mention, however, we’re here and it’s here so let’s just roll with it. The fabric is this sheer white slubbed rayon jersey, which was WAY more sheer than I was expecting but it’s sort of awesome. It’s suuuuper soft, drapey, and the texture of the fabric makes it a tiny bit more interesting than your average plain white tshirt. I used my always-tweaking-almost-done-tweaking Frankenpattern’d tshirt to make this. The neckline is bound using Megan Nielsen’s bound neckline method, which is hands-down my FAVORITE way to finish a neckline on a slinky knit like this. It just looks really really good, and it’s nice and sturdy. I love the traditional method, of course, but some of the more drapey fabrics don’t do so hot with that method because you have to REALLY stretch them to keep them from being floppy, which ends up with a tight neckline that’s practically gathered.

Speaking of slinky knits, binding that neckline was about the only easy part of sewing this tshirt. Talk about the slinkiest knit ever! It was worth it, though, because I can always use more white tshirts. Even if they are see-through. And yes, the pocket is totally in the wrong place and I’m totally not picking it off because I don’t think the fabric can survive that kind of trama.

Detail shots:

Striped Cabernet Cardigan + Yellow Hollyburn

Striped Cabernet Cardigan + Yellow Hollyburn

Striped Cabernet Cardigan + Yellow Hollyburn

Striped Cabernet Cardigan + Yellow Hollyburn

Striped Cabernet Cardigan + Yellow Hollyburn

Striped Cabernet Cardigan + Yellow Hollyburn

Striped Cabernet Cardigan + Yellow Hollyburn

Striped Cabernet Cardigan + Yellow Hollyburn

(that’s a Sewn with Mood Fabrics tag, by the way! 🙂 )

Striped Cabernet Cardigan + Yellow Hollyburn

Striped Cabernet Cardigan + Yellow Hollyburn

PHEW.

Ok, one more picture:

Striped Cabernet Cardigan + Yellow Hollyburn

Only including this one because I look like I’m about to eat whatever is in my line of vision haha.

** Note: All fabrics for this project were provided to me in exchange for a review post as per my involvement with the Mood Sewing Network.

Completed: Leopard Cabernet Cardigan

13 Apr

Good morning, everyone! Lots of changes happening in my world over the past couple of weeks – as you know, we moved out to the country, about 20 miles west of Nashville in beautiful Kingston Springs, TN. Our house sits on a 5 acre plot of land surrounded by woods, and wow, spring is gorgeous here! The leaves are finally starting to poke out – I can’t wait until all the trees are green! As I mentioned before, my best friend bought the house, and Landon and I are occupying the lower level apartment. We are still settling in, but making good progress. I promise I will share sewing room photos as soon as the space is ready. It’s still a work in progress – for one, I need to finish painting (I mean, Landon needs to help me finish painting because I am SO OVER painting by myself!), and I need to get some rugs because the floors are coooold. So it’s not quite ready for it’s ~big reveal~, but it is totally usable for makin’ shit! Which is what I’ve been doing since the second the space was finally unpacked. And here is evidence of my first completed garment in the new place! It’s not anything fancy, but it fills a fabulous gap in my wardrobe 😉

SBCC Cabernet Cardigan

Oh, right, that’s the other big change – I changed my hair color back to something a bit more normal! 🙂 My stylist and I have been talking about this for a few months – even before I went to London in November, we were planning. I was starting to get really sick of doing the upkeep myself – redying the roots, dealing with fading, hair color rubbing off on everything, etc etc – and I knew I wanted my hair to look relatively normal for when we go to Peru in June. I actually had all this done the day before we moved at the end of March. It took about 7 hours (woof) and we’re still not done – there’s a little bit of green showing through in certain spots. I need to go back later this week and get another fill or whatever, but my scalp was just done. I gotta say – I’m REALLY happy with how the color turned out! My stylist is seriously a hair magician. And while I’m not delusional enough to think that my hair is 100% undamaged as a result, it’s still in pretty outstanding condition, considering what we put it through. Eventually, I’d like to lighten everything up to a brighter, more coppery red (still natural, but less brown), as well as let her do some fun stuff with highlights. But that’s all in due time! For now, I’m loving this red-brown 🙂

Ok, back to sewing stuff!

SBCC Cabernet Cardigan

This leopard beauty is the Cabernet Cardigan from Skinny Bitch, Curvy Chic patterns. I was REALLY excited when this shit was released because I love wearing v-neck cardigans. I really like the way they look both buttoned and unbuttoned – which is the one minor complaint I have about my Jenna cardis – the crew neck just feels like it looks really weird when it’s unbuttoned, at least on me. Also, this pattern very closely mimics the poor v-neck cardigan I ripped up to use as a pattern (which was totally in vain, because that shit DID NOT WORK. But I guess it’s ok bc the cardigan in question was destined for the scrap heap anyway, since it was holey-er than, like, the Pope at that point), so yay! V neck cardis all day, erryday!

SBCC Cabernet Cardigan

See? Looks totally legit unbuttoned. Also, I promise I’m wearing a shirt under the cardigan – it’s just a white v-neck, and the sun was VERY bright that morning. So I look nakey, but honestly, I’m not that exciting of a person.

You can’t see much of the details of this piece due to the (admittedly fabulous) fabric that I used, but it has some nice and simple finishing. The sleeves and hem are finished with a wide band (same with the Jenna cardi) and the neckline also has a folded-over band. The difference between this cardigan and the Jenna is in the neck band – on the Cabernet, it’s one long piece that is interfaced only where the buttons/button holes go, and stretched just at the back of the neck. It’s also a wider band than the one on the Jenna, which means the button holes were a helluva lot easier to get in there without fucking them up.

SBCC Cabernet Cardigan

This cardigan also features the cutest little teensy pockets! Yay pockets!

SBCC Cabernet Cardigan

SBCC Cabernet Cardigan

Not a lot of changes went into the sizing of this pattern. SBCC drafts for petite proportions, so the length of both the body and the sleeves are pretty spot-on for me. I cut the size XXS, based on the pattern suggestion, but ended up taking about 1/2″ out of each side seam because I felt that even the slim version was still a bit boxy on me. This was totally a hack alteration – I’d already finished the cardigan at that point (and Instagrammed it, so you know that shit’s forreal), and rather than pull off the bottom band and do things properly… I just nipped in the sides with my serger and continued the seam down to the bottom of the band. Better to have a slightly subpar finish than a cardigan that I never wear, right?

SBCC Cabernet Cardigan

Since this was my first rodeo with the pattern, I followed the instructions as written. I topstitched everything with a straight stitch, as recommended – I was afraid it would look kind of homemade and tacky, but I think it actually looks really nice! Since the cardigan is an easy fit that doesn’t reply on much stretch (unlike, say, a tshirt), I don’t have to worry about the stitches popping. Everything else was finished on my serger, and I used regular lightweight fusible woven interfacing for the neckband. All in all, I think this took maybe 2 hours to sew, start to finish. It’s a quick little make and it’s already getting very regular rotation in my wardrobe.

Also, speaking of instructions – the booklet that comes with the pattern is super cute! (well, the printed version, which I’m totally glad I sprang for the couple of extra dollars because yay for not having to print and tape PDF patterns!) It’s about the same size as a standard piece of paper, and the pages are stitched together along one edge. The illustrations are large and very clear, and the instructions are very much direct and to the point. There are no cutting layouts included, and not a lot of hand-holding involved (i.e., no beginning section telling you how to work with knit fabrics, for example. Kind of refreshing, honestly! I think there’s enough of that out there as it is, ha). So if you’re a super beginner and want to try this pattern, but need some help with sewing knits – definitely research beforehand. It’s an easy pattern, though, and I think it’s totally doable for the beginner knit-sewer.

SBCC Cabernet Cardigan

SBCC Cabernet Cardigan

The super fabulous leopard print ponte was one of my scores from when I was in NYC last month. It was one of the very few things I had specifically on my list to pick up – leopard print ponte, yellow stretch twill, and stone washed stretch denim, to be precise (sadly, I did not find the stonewashed stretch denim. Everything available right now is dark indigo or black – wtf? Do y’all seriously not want me 90s-mom’ing it up or something?). I actually met up with Renee during my first shopping expenditure that weekend (who is just as awesome in real life as she is on her blog – maybe even more so, actually, because she came bearing a selfie stick), and while we were in Metro Textile, I asked Kashi for leopard print ponte and everyone laughed at me for being way too specific. Well, joke’s on all y’all because I found my damn ponte the next day – in Mood Fabrics, no less! (although I did get some amazing shit from Kashi. Just wait for it.). This ponte in particular is a bit more lightweight than usual, which is nice for this warmer weather. It’s stretchy, but it’s really easy to work with. My scissors did not particularly enjoy trying to cut through all the thickness, but I’m pretty sure it’s because they desperately need sharpening.

I also realize and completely acknowledge that this v-necked leopard print cardigan kiiiind of makes me look like one of those Ladies Who Lunch, but I’m totally ok with that. I like eating lunch with my lady friends.

SBCC Cabernet Cardigan

So yeah! So much newness up here today – new cardigan, new hair, new background in mah photos. I am LOVINGGGG these woods; it’s so quiet and serene out here, and you can actually see the stars at night. And we’re still a relatively short drive from Nashville, which is nice for when I need my hot chicken fix 😛

One last thing – the Sewing for Fashion Designers giveaway winner!

winner1

Congratulations, Vickie C! I will be in touch to get that book mailed out to you ASAP 🙂 The rest of y’all – as always, the book can be pre-ordered on Laurence King’s website and Amazon 🙂 Thanks for your support, y’all are the best!