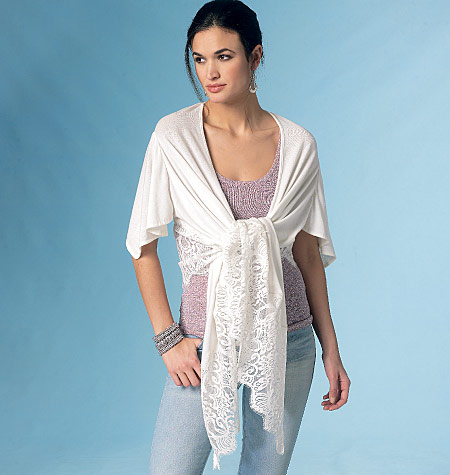
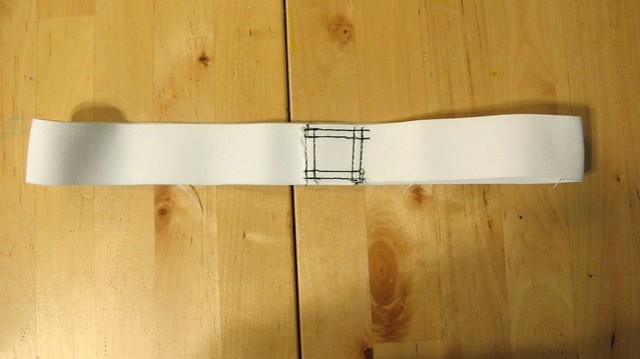
Tag Archives: vogue patterns

New Vogue Sewing Patterns: A Roast

29 Apr

Ooooh y’all looks like we’ve been blessed with a lil’ treat this month – new Vogue Patterns are out and they are something else. It’s almost like they’ve been saving the crazy ones and decided to give us a treat to take our minds off the world basically being a dumpster fire otherwise.

Before we get into it – I want to address the question that I get asked all the time, which is why I don’t write these reviews anymore. Ummm y’all I don’t know if there is another Vogue website I’m not seeing but honestly the stuff they have been releasing for the past few years has been pretty inoffensive. I look every single season and I really don’t see anything that warrants being made fun of. Lots of boring and meh stuff for sure, but none of the crazy WTF-were-y’all-thinking shit that we used to see in their catalogues. It’s not a conspiracy. No one told me to stop posting. I’m not holding out to be mean. I really just… don’t see the WTF much these days. That’s it, that’s the tea.

That being said, oh there’s plenty of it this season. Let’s take a look!


Vogue 1702 / Claire Shaeffer
It finally happened. Science has found to way to breed pants with skirts and created this hybrid monstrosity. But have we gone too far?


Vogue 1694 / Marcy Tilton
It’s a strange fabric choice but TBH I kind of like it.


Vogue 1697
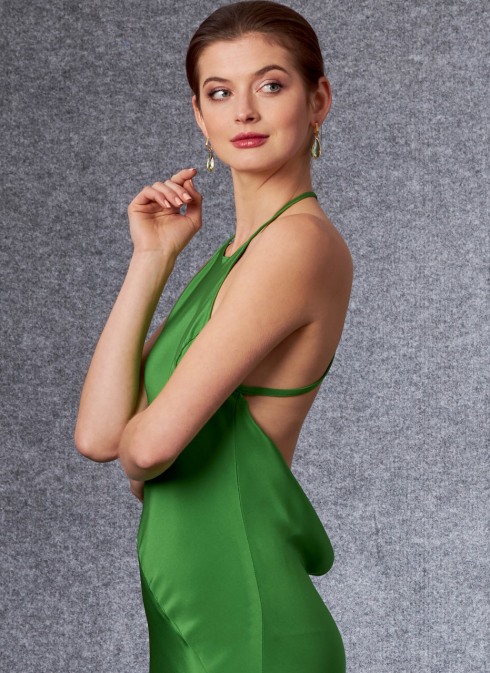
Cute dress or whatever, but who is responsible for styling this shoot? The way the bias has draped at her lower back looks like a fucking jelly roll.


Vogue 1692 / Júlio César NYC
Ok, Angelina.


Vogue 1704 / Rachel Comey
Hot air balloon sleeves: A must-have for the season’s fashion.


Vogue 1707
Who approved that button placement? It looks like God put her nipples in the wrong spot.


Vogue 1710 / Rachel Comey
Jesus, Mary, and Joseph what the FUCK am I looking at here??


Vogue 1708
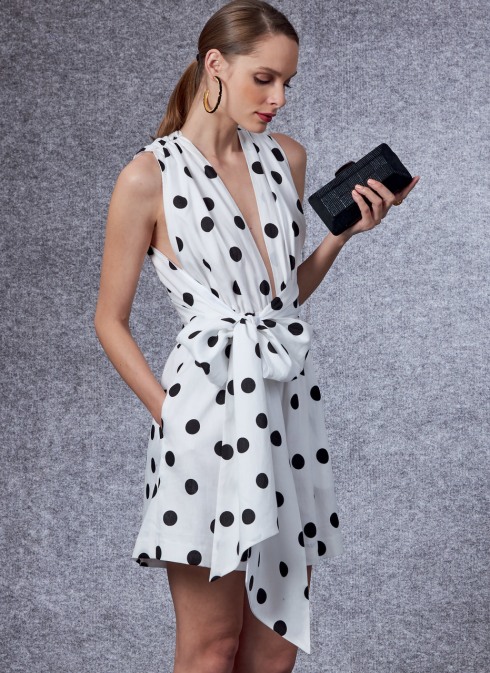
So I guess this is supposed to be a jumpsuit where the “bodice” is just long ties that you can wrap however. It’s a cute idea in theory I guess but in reality it looks like she quit sewing the garment halfway through and is trying to Little Mermaid her way into pretending like it’s a whole ass dress.


The back is cute, tho.


Vogue 1706
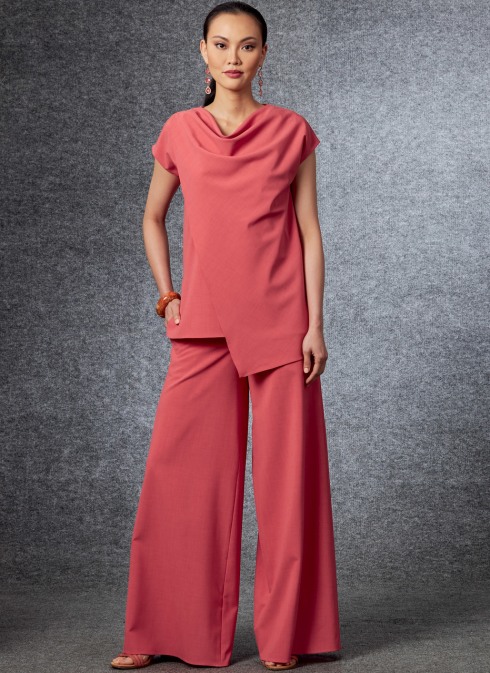
Hospital scrubs, but make it fashion.


Vogue 1700

Who wore it better?


Vogue 1703
I don’t hate the pattern, I just want to talk shit about the stripe placement.


Vogue 1695 / Today’s Fit By Sandra Betzina
Bonus – the bow doubles as a pillow!


Vogue 1705
Thanks, I hate it.


Vogue 1701
† THE POWER OF CHRIST COMPELS YOU! †

That’s all for this round! Thanks to Vogue Patterns for giving us some entertainment during these shitty, shitty times. Which one was your favorite?

This one is mine. Elbow windows! WITH RUFFLES. I cannot even tell you how long I’ve spent laughing at this.

Completed: Vogue 2442 Calvin Klein Jeans

7 Jan

Alright y’all, I’m back with one more jeans post – the ~Designer Jeans~ Edition!

Thanks to Vogue 2442, I was able to make my own pair of Calvin Klein jeans 😀

Before we get too far into the post, though, I just want to acknowledge how absolutely stupid this envelope cover is. You can barely see any of the details of the jeans (although the butt close-up is helpful, and to be completely transparent here, it’s a nice butt), and I don’t know why that woman is holding her leg up like that because you definitely can’t do it in these jeans. Nothing about this cover art (or lack thereof) makes me want to try this pattern, but nevertheless, I persevered. For science.

Anyway, here are mine!

Vogue 2442 Calvin Klein Jeans made with Art Gallery Fabrics denim

I went down a little rabbit hole last fall while looking at vintage jeans. I reaaaaaally wanted some vintage Calvin Kleins, if only for the brag factor, but my budget currently doesn’t allow me to spend hundreds of dollars on someone’s used jeans (RIP, the vintage market). I considered sewing them, but recalled looking up vintage CK patterns years ago and they were going for obscene wads of money. Just out of curiosity, I checked again – and was surprised to see that there are plenty to choose from for $10-$20. Calvin Klein licensed his name to Vogue patterns a bunch throughout the 80s and 90s, occasionally offering a jeans pattern. There were loads of mom jeans to choose from (including a truly horrifying Vogue 2851, I mean, come on) but I went with the OG, the Vogue 2442 from 1980. In the effort of being as science-y as possible, I re-measured myself and chose the size that closely matched my measurements – in this case, the 8.

Vogue 2442 Calvin Klein Jeans made with Art Gallery Fabrics denim

It took me a while to find a suitable denim to make these up – I wanted something non-stretch (as the pattern calls for – this was before stretch denim was really a thing!), but not too heavy, and a lighter wash. A bunch of the stuff I was coming up with ended up being way too lightweight, or had too much stretch, so this project ended up being shelved for longer than I would have liked.

Vogue 2442 Calvin Klein Jeans made with Art Gallery Fabrics denim

As you can see, I did end up finding a great denim – from Art Gallery Fabrics, of all places! I’ll admit that Art Gallery Fabrics wouldn’t be my first thought when it comes to denim, but they’ve been expanding their denim gallery and I was curious to see what the offerings entailed. There is a great selection of lightweight (4.5oz, like what you’d use to make a button-down top or a sundress) denims, both printed and dyed various colors. The heavier denims clock in at 10oz (which is the lighter end of a pants-weight denim, and my personal preference), and come in a smaller selection of colors, nonstretch only.

After playing with some swatches, I chose the Crosshatch Textured Denim, in the Bubbling Brook colorway. My other choice was the Solid Textured Denim in Bluebottle Field, but that was sold out, so hopefully I can try it out in the future!

Vogue 2442 Calvin Klein Jeans made with Art Gallery Fabrics denim

Vogue 2442 Calvin Klein Jeans made with Art Gallery Fabrics denim

Anyway, about the Crosshatch Textured Denim! First off, you probably noticed that my jeans don’t exactly have a crosshatched design on them – that’s because you are looking at the wrong side of the fabric, baby! I actually don’t mind the crosshatch look, but upon receiving the fabric I fell in LURVE with the less contrasty wrong side of the fabric, so that’s what I went with on my jeans! My sewing project, my rules! The denim was pretty stiff and definitely not soft upon first receiving; but did get really soft and supple after just one wash. Be warned that it frays a lot, though – you’ll want to make sure you finish your seams (whether serging, or zigzaging, or even binding them) because otherwise the inside of your garment will get real hairy, real fast. If that bothers you, I mean. You do you.

Vogue 2442 Calvin Klein Jeans made with Art Gallery Fabrics denim

Other than the fraying part, this denim was easy to work with. I recently got an Oliso Steam Iron (yes, the little iron that stands up when you stop touching it and yes it never ever stops being hilarious, no matter how much I use it) and this was my first real project to use it on. It doesn’t get quite as melt-your-hands-off-hot as my industrial gravity feed iron does (granted, this is cotton, so it doesn’t really need to be beaten into submission haha), but it heats up quickly, delivers a satisfying steam burst, doesn’t auto shut off every 2 minutes, oh, and IT STANDS ON IT’S OWN LITTLE FEET. My only regret in life is that I can’t find my stick-on googly eyes, because this iron needs eyeballs. Ok moving on.

Oliso Iron!

Oliso Iron!

Oliso Iron!

So, more about the pattern itself! Like I said, I went with the size 8, which was based on my current measurements. I did not make any prior fitting adjustments or a muslin before cutting my fabric – I just went for it! I wanted to see what would happen! (this might be my new motto for 2020). Fit-wise, this was almost perfect right out of the envelope. I did end up making a few minor tweaks before I attached the waistband – because I am extra, and I like fiddling with things! – but if I hadn’t done anything at all these still would have absolutely been wearable.

Vogue 2442 Calvin Klein Jeans made with Art Gallery Fabrics denim

Vogue 2442 Calvin Klein Jeans made with Art Gallery Fabrics denim

Vogue 2442 Calvin Klein Jeans made with Art Gallery Fabrics denim

Adjustments I made:
– Removed 1/2″ from the inner thighs, keeping the crotch length intact
– Scooped 1/8″ from the front crotch curve
– 5/8″ wedge at the center back yoke + waistband
– Cut 5″ total off the hem (I have a 28″ inseam, y’all lmao)

Sorry I didn’t take before photos, but these were all minor tweaks that didn’t translate very well in a photograph. Also, when I’m fitting, I don’t want to stop to take a bunch of weird ass selfies. Sorry, not sorry! Looking at these photos, I see I could have removed a little more from the inner thighs (as evidenced by the horizontal wrinkles pointing directly at my butt), but I can assure you this is a big improvement from the start, and I actually think they look worse in the photos than in real life! But, you know, it’s good enough. I spent far too much of my past sewing days overfitting myself to the point of frustration (and sometimes, actual discomfort). Nowadays, when I feel like I’m done fiddling with it, I just stop. As long as it’s not actually uncomfortable, I think it’s good enough! It has been very liberating and I encourage y’all to consider the same outlook 🙂

The instructions on this pattern certainly were interesting! As someone who’s made loads and loads (and loads) of jeans, these were a little more based on the home-sewer, rather than how RTW jeans are made (granted, I don’t have access to vintage jeans at this time, but the 1980s isn’t exactly the same type of vintage as, say, the 40s, and generally the construction methods back then were more similar to how they are now, i.e., serging seam allowances and such). As this is an older pattern, it wasn’t common for the average home sewist to have a serger – so the instructions include turning under edges, or finishing seams with a zigzag or overcast stitch. Interestingly, there is NO interfacing called for in this pattern (I interfaced the fly facing + outer waistband, out of habit and because I know that gets the me the result I like), but they do have you add twill tape to the top and bottom edges of the curved waistband to keep it from stretching out (that was a no from me, dawg). The other weird thing I noticed was that they have you double topstitch the side seams, and not the inseam. I also skipped that part (I prefer a stronger inseam, thnx) and did it my own way. However, I did follow the instructions for the most part.

Vogue 2442 Calvin Klein Jeans made with Art Gallery Fabrics denim

Vogue 2442 Calvin Klein Jeans made with Art Gallery Fabrics denim

Vogue 2442 Calvin Klein Jeans made with Art Gallery Fabrics denim

Vogue 2442 Calvin Klein Jeans made with Art Gallery Fabrics denim

The pattern includes a back pocket topstitching design, front pocket stays (pocket lining is also from Art Gallery Fabrics, fyi!), and a two-piece curved waistband. The pants are fitted at the waist, hips and thighs, and then the leg goes straight down (which is not what the line drawing suggests; they look a little more tapered on the envelope). Since my denim is such a light color, I opted for a pale brown topstitching thread (my beloved Gutterman Mara 70), rather than gold or copper. I alter a lot of jeans for clients and one thing I’ve noticed is that most jeans use brown thread, not gold or copper! My rivets and buttons are from the Garment District (I think these rivets might actually be for bags, but whatever, I like them); I had 1 extra rivet so I attached it to one corner of the back pocket. I saw this on a pair of jeans the stylist I work with was wearing, and while I normally hate rivets on back pockets, I thought it was kinda cute.

Vogue 2442 Calvin Klein Jeans made with Art Gallery Fabrics denim

Vogue 2442 Calvin Klein Jeans made with Art Gallery Fabrics denim

Vogue 2442 Calvin Klein Jeans made with Art Gallery Fabrics denim

Vogue 2442 Calvin Klein Jeans made with Art Gallery Fabrics denim

My only issue with this pattern is the two-piece curved waistband. Since it’s in two pieces, that means there a seam at the center back – great for fitting, but it also means a lot of bulk at the center back when the inner and outer waistband are sewn together (and then later, a belt loop is sewn on top of that). I also admit that I was running on fumes by the time the waistband facing was attached, so it’s not my best work. But, it’s on the inside, so who cares!

Vogue 2442 Calvin Klein Jeans made with Art Gallery Fabrics denim

Overall, I enjoyed making this pattern and I think the finished jeans turned out great! I love the high waist (better for wearing crop tops with!), and the straight legs are a big style departure from my usual look. I love the lighter wash and subtle texture of the AGF denim, and I love love LOVE how soft it is! I don’t feel like I even really need to break these in, which is wonderful! If you’ve been looking for a good non-stretch, not-too-heavy denim, definitely check out what Art Gallery Fabrics has to offer!

** This post was sponsored by Oliso. All fabrics were provided by Art Gallery Fabrics. As always – all thoughts, opinions, and weird ideas are my own! **

Vogue Spring 2018

12 Apr

New Vogue patterns are out! This season, they were kind enough to give us a nice mixture of awesome and wtf.

V1587_01
Vogue 1587 / Nicola Finetti
I’m just gonna go out and say it – this is one of the ugliest dresses I’ve ever seen. Those ~statement sleeves~ combined with the cold shoulder look + strappy top just give the effect of droopy boobs trying to pretend like they don’t know each other. Oh, and don’t forget the unintentional culottes thanks to that weird curved hem. Seriously, who is wearing this shit? This designer has tons of cute stuff, but somehow manages to only license the ugliest shit for Vogue patterns. Whyyyy.

v1589
Vogue 1589 / Guy Laroche
Despite the waterfall boob, I was gonna let this one slide. Then I saw the COMPLETELY OPEN BACK. Again- who is wearing this shit? How does the back stay in place? Do you get sideboob if you’re not careful? Does bending a certain way risk buttcrack? Asking the important questions here.

v1577
Vogue 1577 / Guy Laroche
Who wore it better?

V1591_01
Vogue 1591 / Rebecca Vallance
Ok, I actually like this. It’s not my style (not into the jumpsuit or the open back jam), but it’s super cute and I think this is one of the best versions of this sort of look I’ve seen yet. It’s pretty trendy but it’s still quite wearable, and the model looks great.

V9318_01
Vogue 9318
Want to take your “secret pajama” dressing to the next level? Cut out the middleman and just wear a pillowcase!

V9319_01
Vogue 9319
Fuck me, I am actually super into this. This is absolutely nothing practical about this look whatsoever but I would wear the shit out of it.

V1585_05
Vogue 1585 / Rachel Comey
Vogue 1585: The Dress With the Built-In Fart Catcher

V1583_01
Vogue 1583
I initially thought this top had a hoodie, and I was 100% digging it, but now I see it’s just a sad excuse for a sailor collar and I don’t know what to trust anymore.

V9317_02
Vogue 9317 / Marcy Tilton
When your shirt doesn’t fit right and you’d rather try to hack some afterthought darts than re-fit the entire thing.

V9314_01
Vogue 9314 / Kathryn Brenne
Is this… an updated Walkaway Dress??  How did it manage to look worse?

V9315_a
Vogue 9315
Not all heroes wear capes, but these bitches ain’t letting that stop them.

V9316_01
Vogue 9316
Hello, I am your present.

V9323_03
Vogue 9323 / Elizabeth Gillett
Mostly just including this so we can discuss THAT SWIMSUIT. I am disappointed that it’s not included in the pattern (although I do like the cover-up options!), because I’m curious to know what kind of interior structure is included to give the model that amazing cleavage. Seriously, she’s basically got a butt under her chin. Incredible.

V9306_02
Vogue 9306
Let me tell you exactly what this reminds me of:

What did you love (or hate!) about this collection? Are you just here to complain about my swearing (spoiler: save yourself the effort, I don’t careeeeeee)? How do you feel about 9320? My opinions on this one are mixed, and I can’t tell if I just like it because of the fabric choices they used.

Vogue Patterns: Spring 2018

25 Jan

Well I was planning on posting a sewing project today, but Vogue just released their newest seasonal offering of sewing patterns and I actually have opinions for once! Yay! I swear, the last several offerings have been very… vanilla. Which is great for them, but not so great for snarky posts. Hence why these tend to be so infrequent. It’s hard to poke fun when there’s nothing to poke fun at 🙂

Anyway, let’s get on it!

V9303
Vogue 9303 / Marcy Tilton
Featuring a handy snack pocket, perfect for stashing some tots.

V1579
Vogue 1579 / Badgley Mischka
I mean, I hate the cold-shouldered look too but c’mon man you don’t have to be so dramatic about it.

V1581
Vogue 1581 / Tom & Linda Platt
When you cut your hem crooked and try to pretend like you did it on purpose and it’s actually a design element.

V1576
Vogue 1576 / Tom & Linda Platt
Ever wanted to pretend like you were a flying squirrel? Well, I’ve got a pattern for you…

V9307
Vogue 9307 / Julio Ceaser
You could hide an entire turkey in those sleeves.

V9292
Vogue 9292
Even the model looks bored with this pattern.

V9296
Vogue 9296
Aaaaaaaand now she looks high.

As a side note: I know I am going to get a lot of backlash for this, but I cannot wait until this cold shoulder look goes out of style. It just reminds me of this fucking Replicant shirt I used to own when I was in highschool:


Yeah, I thought those little tiny shoulder slits were suuuper cool. Also, the shirt was very sparkly haha.

Ok, moving on!

V1575
Vogue 1575
Ok, for real I actually like these pieces separate. But together, they look too art teacher chic. And not, like, fun art teacher chic but like… frumpy grumpy art teacher who doesn’t allow actual artistic expression and maybe even took over finishing your project for you because she was such a fucking control freak about it. That kind of art teacher. Anyone else have one of those? Just me?

V9299
Vogue 9299
Really?

V9304
Vogue 9304 / Kathryn Brenne
I don’t even know where to start with these. The front yoke just looks like she’s wearing her pants backwards, especially combined with those weird-ass pockets. The real kicker is how they are sewn on – the corners are loose, left to flap casually in the breeze.

I do like that sweater, though.

New Vogue Sewing Patterns! (+ a survey)

31 Jan

Hey everyone! I’m finally home from Egypt and nearly settled back to normal life. I will be writing a post about my trip after I finish sorting through the photos – in short, it was AMAZING and I had the best time!!! – and I also have my monthly MSN project to share! But in the meantime, I wanted to give a shoutout on behalf of my friends at the McCall Pattern Company.

MPC Logo

As you likely already know, MCP is responsible for McCall’s, Butterick, Vogue, and Kwik Sew sewing patterns. They are a small-ish company (smaller than you’d think, especially considering the massive number of patterns they publish each year) headquartered in NYC (which I visited a couple of years ago and it was pretty freaking awesome!), and make up 3 of what we consider the Big 4 when it comes to sewing patterns. I’ve sewn on their patterns for a long time – the majority of my sewing career, which spans a couple of decades – and the Vogue patterns especially are a key part to getting me where I am now in my craft. I learned so much from those designer instructions, and have made some really cool stuff! I know we – well, I, anyway haha – looove to poke fun at the ridiculous and awful Vogue offerings. It became a regular thing on my blog for a while there, and the only reason why I stopped writing those posts was because the patterns stopped being really terrible for the most part haha. It’s like, I dunno, they actually listened to us or some shit :P. Anyway, two things for this post today.

First, the McCall Pattern Company is currently on the manhunt for some feedback, for their on-going efforts to better support the sewing community. They want to know what you love, what you hate, and how they can better serve the people who are purchasing (or stopped purchasing, for whatever reason) their product. They reached out to me to see if I would share their survey with y’all, my readers, in order to expand their reach to a more diverse audience (and thus give them more data to work with that will result in – we should hope, anyway – a better product that delights all of us!). As much as I like to pick on them for the lols, I do truly love and respect this company, and I appreciate everything they do to keep those sewing patterns in rotation every season (and give us something to laugh at if said sewing patterns are terrible). I want to see them succeed and I selfishly want those products to get even better bc, duh, that absolutely benefits me (and you!). So with that being said – if you have 5-10 minutes and feel like talking about yourself, do us all a solid and fill out this survey. We all love talking about ourselves, this should be easy 😉 Click here to take the survey, and we all thank you in advance! ♥

On a second note – how about we talk about those new Vogue sewing patterns? Because they just released a new batch, woohoo! As I mentioned before, I stopped writing these posts because honestly the patterns stopped being really terrible. Which is great for us – and the company, ha – but not really conductive to those quarterly bouts of entertainment. Fair warning, the majority of the stuff in this collection is actually quite nice, but there are a few wtf ones thrown in there for good measure. Ah, Vogue, always keeping us on our toes.

V1537 1

V1537 2
Vogue 1537 / Kay Unger
LOVE this cocktail dress / jacket combo. It’s like a modern version of those vintage ones that I’m always drooling over. I love dresses’ shape – fitted, high neckline, interesting back view. And I like that the jacket is a slightly more modern shape than being straight-up vintage. The whole ensemble is just beautiful.

V1536
Vogue 1536 / Tom & Linda Platt
Love this one too. Simple dress, somewhat of a statement jacket (looks normal from the front, with a party in the back. Wait. Did I just describe a mullet?). Although I’m not sure if that jacket would look fucking stupid with anything other than that dress, but, it looks AWESOME with that dress so let’s just enjoy that small victory.

V1539
Vogue 1539 / Nicola Finetti
I want to like this, I do, but I also want to hate it. I think it’s the print on the print, which is a good idea in theory (I’ve always loved a sheer layer atop a solid layer of the same print, its interesting, dimensional, and beautiful), but not with that particular print. Also, those shoes are just awful. Go ahead and fight me over that.

V1535
Vogue 1535 / Badgley Mischka
I LOVE THIS AND I NEED AN EXCUSE TO MAKE AND WEAR IT ASAP OMG. I’d be the most elegant superhero in the entire fucking ballroom, y’all.

V1533
Vogue 1533 / Bellville Sassoon
I almost hyperventilated when I saw this dress, holyyyy shit. It is absolutely breathtaking. Ever since I crept hardcore on all the designer clothes at Bergdorf Goodman earlier this month, I’ve a brand-new appreciation for really interesting and artistic garments. This dress falls square into that category, and is exactly why I love Vogue Sewing Patterns.  I wish I was fancy enough to justify an excuse to make and wear this. Hell, I might do it anyway, and figure out the event later haha. I don’t use this term often, but homegirl looks fierce.

V1534
Vogue 1534 / Badgley Mischka
Ok, so the pattern for this dress is reasonably simple – it’s just a lined halterneck bodice with a contrast waistband, and a floor-length skirt. There’s nothing really spectacular about it. But I do love the fabrics that were used for this garment – its an absolutely beautiful dress. This is a great example of fabric choice making or breaking a garment. The sparkles are really appealing to my magpie tendencies.

V9241
Vogue 9241 / Kathryn Brenne
Katheryn. What the fuck is this shit. What the fuck are you doing.

V1531 1
Vogue 1531 / Julia Alarcon
I came here all riled up to hate this dress, but honestly, I really love it. It can definitely go terribly, horribly wrong depending on how that cowl gets worn – but when it’s good, it is real good. I love that giant collar and all the ways you can drape it around your neck to make the dress look completely different.

And while we’re talking about horribly wrong things…
V1531 3

SORRY, PALATE CLEANSER:
v1531 2

V1530
Vogue 1530 / Sandra Betzina
Ok, who’s brilliant idea was it to use auto upholstery fabrics to make this dress?

V9239
Vogue 9239
Hey look, another example of fabric choice making or breaking a garment. In this case, broke as fuck. Those bell sleeves look absolutely stupid when sewn up in a fabric that has that much body.

V9238
Vogue 9238
I just hate this so much.

V9246
Vogue 9246
GUYS WHY ARE THESE SHOES BACK IN STYLE, DID WE NOT LEARN OUR LESSON THE FIRST TIME AROUND?

V1540
Vogue 1540 / Sandra Betzina
Ok, Sandra, fine. You win this one. This one is nice. I’ll give you that.

V9245
Vogue 9245
Yikes.

V9243
Vogue 9243
I call this one, ‘Birthday Cake Couture.’

V9249
Vogue 9249 / Ta Fa
Is… this a pattern for a rectangle of fabric? Really? We’re doing that now?

V9248
Vogue 9248
Finally, a version of Trump with hands that are proportional in size to the rest of his body 😛


What did you think of the new Vogue patterns? Anything grab your eye and skip to the front of your queue? Anything make you cower in fear? Did you remember to take the survey? Let’s talk about it!

Save

Save

Save

Save

New Vogue Sewing Patterns: Winter 2015

5 Oct

If you haven’t heard, Vogue Patterns just released a new collection of sewing patterns a few days ago. I haven’t had a chance to really sit down and take a look at them as I’ve been out of town the last week (where I had a wonderful time teaching in Portland, Maine, and hanging out in Boston with Jenny. Couldn’t have asked for a better week! Hope to post more about it later 🙂 ), but man, this was a nice welcome back. Ha.

Surprisingly (or not, depending on your stance with Vogue), most of the patterns in this collection are relatively tame (and a few are even sorta tasty). I’m a firm believer that winter clothes are far superior to summer clothes (layers and cozy wools and tights and scarves and don’t even get me started on sparkly holiday dresses, wheee!), which may have something to do with my opinion on the new pieces.

V1475
Vogue 1475 // Badgley Mischka
Like this shiny piece of opulence. Ain’t no place in my life for a sparkly evening gown, but man, I really like this. I even like the fabric – I think it works really well with the style of the dress.

V1474
Vogue 1474 // Tom and Linda Platt
Or how about a bias floor-length gown made in a yummy silk charmeuse? Yes, please!

V9145
Vogue 9145 // Claire Shaeffer
YOU CAN JUST GET ON MY BODY ASAP.

V1468
Vogue 1468 // Nicola Finetti
Obviously there’s nothing particularly ground-breaking about this design (and I’m starting to get sick of the exposed metal zipper trend on EVERYTHING, sorry not sorry), but I like all the options for colorblocking and using different textured fabrics. Also, do I spy a new designer in the line-up?? YAY.

V1477
Vogue 1477 // Sandra Betzina
Love knit tops with interesting neckline detail like this.

V1479
Vogue 1479 // Isaac Mizrahi
I know these oversized coats are supposed to be really trendy right now, but they’re just a little too 80s-Power-Career-Woman-With-Strong-Shoulders to me.

V9160
Vogue 9160
“Excuse me! My eyes are up here!”

V1469
Vogue 1469 // Lia Lia
Even the skinniest model wearing the prettiest dress can’t escape a bad piping placement.

V1471
Vogue 1471 // Nicola Finetti
Really beautiful dress, but it should have been worn by a model with similar proportions. The waistline is way too high, yeesh. And if I’m way off my rocker and that’s the way the dress is supposed to look… double yeesh.

V9149
Vogue 9149
“We need to figure out a way to re-release this pattern but make it seem new.”
“What if we add a tail?”
“Say no more.”

Those were pretty tame. However, Vogue wouldn’t be Vogue without a little random fuckery thrown in.

V9159
Vgoue 9159
“You promised when making these pieces that you’d never wear the two of them together. The lie detector test determined that was a lie.”

V9153
Vogue 9153 // Marcy Tilton
I swear to god, every Marcy Tilton pattern is starting to look the exact same.

V9156
Vogue 9156
I totally had a pair of purple fuzzy zebra print pants when I was in high school. I guess this answers what ended up happening to them.

V9162
Vogue 9162 // Kathryn Brenne
I guess buttflaps are also making a comeback this year.

V9163
Vogue 9163
“Bitch, be cool.”

V1478
Vogue 1478 // Sandra Betzina
“Well, at least I wouldn’t skin a collie to make my backpack.”

V9164
Vogue 9164 // Kathryn Brenne
“I wish this was a hamburger instead.”

V1473
Vogue 1473 // Bellville Sassoon
Bellville Sassoon gives you wiiiiiiiings!

V9165
Vogue 9165 // Mary Jo Hiney Designs
This has to be the weirdest accessory pattern Vogue has ever released. Custom decorative boxes – complete with a notions list that rivals the entire stock of your local Joann’s. Also, the 9 year old me in is amused that the designer’s name is “hiney.” That is all.

And SPEAKING OF FUCKERY – I saved the very best for last!

V1472
Vogue 1472 // Zandra Rhodes
Every single thing about this outfit is insane. I couldn’t tell if that was a skirt or really low-crotch harem pants, until I looked at the line drawing – and was delighted to also discover that the look includes suspenders (to keep the skirt up, I imagine. That thing looks heavy af). And in case you don’t feel sexy when wearing an entire bolt of fabric, there’s a lovely midriff cut-out – the perfect space to allow for a little post-holiday-dinner belly expansion.

What did you think about the new Vogue collection? Anything gorgeous that needs to be a part of your wardrobe? Any random fuckery that makes you want to tear your eyes out? How do you like them new designers? Ahh, Vogue, it’s like you’re giving me Christmas 4x a year. I loves you.

Completed: The Summer DVF Wrap Dress

17 Aug

What? Did you think I was going to make it an entire year without busting out this pattern? Ha ha! Forget about it!

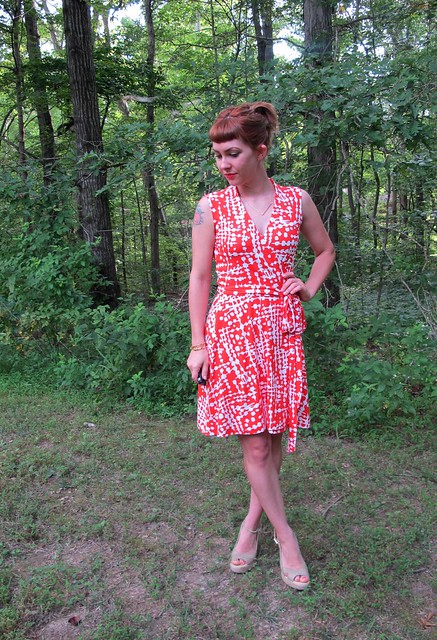
Vogue 1610 // DVF(No idea why I’m standing pigeon-toed in this photo, eh.)

ANYWAY. If you’ve been following my blog for a while now, you’ll know that I loveeeee me some knit wrap dress action. Specifically, some Diane Von Fürstenberg knit wrap dress action. I just think she makes the prettiest dresses and I can’t get enough of them (and by “them,” I mean “knock-offs”) in my closet! I have a few that I made last year – The Wearable Muslin, The Silk Jersey and The Chic Black Wool. And now, here’s #4: The Bold Graphic Print. Just in time for the last few weeks of summer! Vogue 1610 // DVF

I have an original copy of Vogue 1610, which is a (vintage) Vogue American Designer pattern (this one featuring Diane Von Fürstenberg, obviously). I found it – in my size, no less – at an estate sale for around $1 a few years ago. It’s a beautiful pattern that really lends itself well to all the hacking and modifying I’ve put it through. It’s certainly a bummer that Vogue won’t re-release this pattern for the modern sewist – and before you start pointing fingers, this has nothing to do with Vogue and everything to do with DVF not renewing the license. I’m pretty sure the McCall Pattern Company wants to re-release some DVF love just as much as you want to buy it (I mean, can you imagine how much $$ they’d make? Who can say no to that?), but it’s not really up to them to decide. Seems like the designer just doesn’t want her name on sewing patterns anymore 😦 DIANE, WHYYYY.

Anyway, back to my dress!

Vogue 1610 // DVFVogue 1610 // DVF

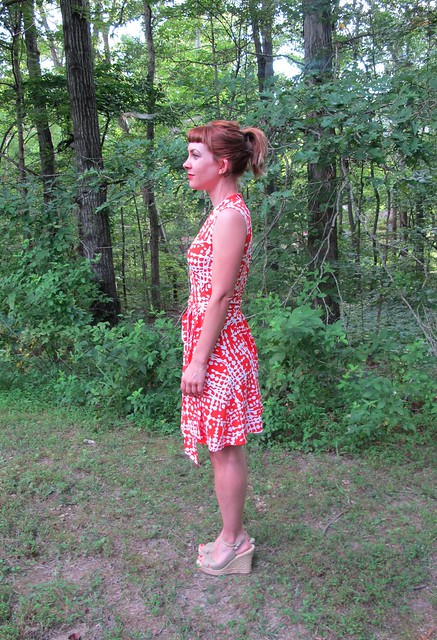
Taking a cue from the black wool version, I kept the original bodice from the pattern and changed out the skirt for a simple wrap skirt (specifically, I used Tilly’s Miette skirt and just made it so the wrap is in the front). I added 1″ to the overlap, so I’d have a little bit of fabric to fold back and topstitch. I like the gathered skirt that the pattern is drafted for, but I wanted this version to be a little more sleek. I originally planned this dress to include small cap sleeves – I was going to take them off my Lady Skater dress pattern – but when I tried the dress on sans sleeves, I really liked the way it looked so I kept it as-is.

Vogue 1610 // DVFI also kept a slightly longer skirt length (I know, I know… nothing about “practically knee-length” qualifies as “long,” but considering I’ve basically been exposing ass cheeks all summer, this is long for me), again, something I liked when I tried it on during construction. Vogue 1610 // DVF

Vogue 1610 // DVFI also tried something different with the front band. Normally, I sew it on like how you finish the neckline of a tshirt – stretching the band so that it fits snugly against the bust when worn. However, I lurked in on some actual DVF wrap dresses while I was in Harrod’s last year in London, and noticed that they finish their necklines a little differently. No knit bands to be found anywhere – most of them use a binding or a facing. I was keen to try this myself, so that’s what I did. I cut the band as usual and interfaced it with a lightweight knit fusible (so it has a little bit of structure, but it’s still quite stretchy). I finished one edge, sewed the facing to the outside of the garment, flipped it to the inside and understitched, and then topstitched 1″ away from the edge on the outside. I was 100% certain that I’d fucked up the dress beyond repair at that point – the back had some puckers and everything just looked kind of strange – but it all sorted itself out once I put it on and my body stretched it into shape. The addition of the interfacing gives the neckline a little bit of height, almost – especially around the neck itself. The facing is much smoother and sleeker than any band. And I can pull the dress apart a little and show some 1970s ~natural cleavage~ if I feel so inclined. Yeehaw! Vogue 1610 // DVF

Vogue 1610 // DVFNot really much else to report on construction – much of the same old, same old. I used my serger to construct, my Bernina (+ walking foot // ballpoint needle) to topstitch. For the arm holes, I just serged them and turned the hem under and topstitched with a straight stitch. So easy! I think I finished this whole thing in less than 3 hours. Vogue 1610 // DVF

Isn’t the fabric so good? When I saw it on Mood Fabrics recently, it immediately screamed WRAP DRESS and it knew it had to be mine. Sometimes, I find buying knit fabric online to be a bit of a gamble – you can’t really tell weight/hand/stretch recovery (not to mention color) from a photo and description, and occasionally I end up with stuff that wasn’t at all what I was expecting. This fabric definitely exceeded my expectations – it’s so beautiful! Very dense with a good stretch (and an awesome recovery; I wore this all day last week and it didn’t bag out at all), and the color is super saturated. It’s a little on the heavy side – but not bulky. It feels very fluid and luxurious. I wish all knits were like this. This stuff is awesome! Also, the color is “poppy” which I kept seeing as “poppy,” so, like, there’s that.

Vogue 1610 // DVFHere’s a shot of the inside. Super clean finish, yay! Vogue 1610 // DVFI think the color and style of this dress will be good for transitioning into the fall months here – where we want to pretend like it’s tall boot and wool hat weather, but it’s actually still 90+ degrees. Which means I can wear this and look cool, but still be cool. Also, I am not ready for summer to end just yet – I have a few more projects left to finish!

Note: The fabric for this dress was purchased with my allowance for the Mood Sewing Network. All comments on this blog post are just, like, my opinion, man.

Vogue Spring/Summer ’15 Sewing Patterns

10 Apr

New Vogue Sewing Patterns were just released the other day! What better way to celebrate their arrival (and give myself a little more time to procrastinate getting my shit together, mostly because I CAN’T FIND MY CAMERA REMOTE, ARGH), than to rip apart the latest offerings? 😀
V1451Vogue 1451 // Donna Karan
“Hey, Ambular. Was that you going through my laundry?”
V1450Vogue 1450 // Guy Laroche
“As if! Like I would really wear something from Judy’s.”
V1444Vogue 1444 // DKNY
I know there is a whole class of sewists dedicated to making sure that their insides look as pretty as the outside (both hands raised bc I’m totally part of that camp!), but this shit is taking that to the next level.
V1446Vogue 1446 // Rebecca Taylor
Did seriously no one bother to tell this poor girl about the toilet paper stuck to her shoe?
V1454Vogue 1454 // DKNY
Vogue 1454: Includes butt canopy.
V1447Vogue 1447 Tracy Reese
REALLY cute dress pattern, awkward fabric choice.
V9100Vogue 9100
koolaidFirst thing that comes to mind every time I see that damn ripped paper background.
v9108Vogue 9108 // Marcy Tilton
As usual, Marcy Tilton does not disappoint.

V9117Vogue 9117
I’m having a really hard time trying to figure out the storyline behind this photo. Was she working on home renovations before going to lunch?
V1452Vogue 1452
Ladies, if this ensemble isn’t fabulous enough for you, just know that you can also make it out of stretch velour.
V1453Vogue 1453
Sandra Betzina, what the fuck have you done now?
V9115Vogue 9115
Kimono-no-no.
V9114Vogue 9114
The perfect pocket for stashing your extra tots.
V9111Vogue 9111
“I have given up.”
V9120Vogue 9120
Introducing the Bellow Bag: For all your accordion-hiding needs.
And finally, check out this trifecta of fuckery: Vogue 9121
V9121aA) Tragic fabric choice? Check.
V9121bB) Unnecessarily long dangly? Check.
V9121cC) Saggy boob illusion? Check.
Vogue. Please don’t ever stop.


(psst! If you haven’t done so already, don’t forget to enter the Sewing for Fashion designers giveaway! Entries close on Monday morning 😉 )

Tutorial: An Easy Elastic Waistband

29 Jan

Hey dudes! Real quick before I jump into tutorial-land this morning – New Vogue Sewing patterns are out! Over the past couple of weeks, I’ve had quite a few people ask me when I would be posting my review. Not gonna happen, guys – at least not for this set, and no, not because of anything to do with me+The McCall Pattern Company. Have you seen the new patterns? There’s really nothing to make fun of! Which is good, because it shows that Vogue is listening to our pleas, I guess, but no jokies for us this time around. The only pattern I see that I really don’t like at all is this Koos Van Den Akker monstrosity that calls itself V1441– but, again, it’s Koos Van Den Akker, which should explain everything. Kind of hard to poke fun at something that’s intentionally designed to look crazy, you know? 🙂 In the news of things I do like – there’s V9077, which is a dress I don’t completely understand, but I think I like it anyway. Aaaaand, that’s about all that warrants any mention from the new collection. Sorry if you were expecting more! Trust me, you don’t want to see a post of me trying to pull humor out of a humorless situation 🙂 Feel free to turn this into a debate on whether or not I’ve sold out to Vogue (the answer is no, but, I REALLY love a good conspiracy theory, and I’m sure some of y’all do too!)

Ok, so, onward to the tutorial!

wb

I’ve had a few requests for this, so here ya go – my tutorial for attaching an elastic waistband to your leggings (or skirt, or whatever. I ain’t here to judge your love for elasticized comfort!). While the usual method of leaving a hole in the seam and feeding the elastic through is definitely non-brainer easy, I prefer this particular method as it doesn’t allow the elastic to twist at all – not while you’re feeding it through the hole (that ALWAYS happens to me, ugh!), and not while you’re wearing and washing them. It stays in place and that’s pretty awesome! Also bonus is that you don’t have a tiny hole to close up afterwards. Whoop whoop!

Anyway, I learned this method from Katie of Papercut Patterns, and it’s definitely my favorite way to elastic the shit out of my waistbands. It is my understanding that she updated that the Ooh La Leggings pattern has been updated to include this method, so this is mainly for those of us who have an older copy of the pattern and/or want to elasticize something else. It does require a little bit of finesse while sewing, but it ain’t nothing you can’t handle 😉 This is also a great method if you are using an elastic that is too wide and thus needs to be cut down – I started with 3″ wide elastic, but I needed 1″, so I just cut right down the middle (well, ish). Since the elastic is going to be attached to the fabric by machine, it’s ok to cut is as the stitches will prevent it from unraveling over time 🙂 Just make sure your elastic has a very tight weave – if it’s a loose weave, it’s best to leave it uncut as there ain’t nothing that’ll keep that shit from unraveling!

Elastic Waistband Tutorial

Start by cutting your elastic to the desired size (I prefer about 4″ of negative ease at my waist, but it’s a matter of personal preference!), including an additional 1″-2″ for overlap. Pin the elastic with the inch overlap so it makes a circle.

Elastic Waistband Tutorial

Sew down all four edges where the elastic overlaps, making sure it’s secure. Ideally, you’d use a zigzag stitch for this – but my machine was already threaded with the double needle, so I used a double needle. I have yet to have a problem with this stitch, so there’s that! I like to stitch over each area twice to be really sure that it’s secure – you don’t want your elastic coming apart after you’ve sewn it into your pants!

Elastic Waistband Tutorial

Divide the elastic into 4 equal sections, either by using a ruler or just folding it in half and half again. Mark each point with a pin, making sure one section is in the center of the part you just overlapped and sewed. If your pattern does not include notches for dividing the waist into 4 equal sections, you’ll want to do so now as well on your garment.

Elastic Waistband Tutorial

On the INSIDE of your garment, match the 4 elastic sections with the 4 pants sections, keeping the overlapped elastic at the center back. If you trimmed down the width of your elastic, it is a good idea to match this area to the raw edge of your fabric, so it will be sewn and enclosed later. You will notice that the elastic is not quite as long as the garment in each section – that’s ok, we will stretch to fit in the next step 🙂

Elastic Waistband Tutorial

Using a serger (or a sewing machine with a zigzag stitch), attach the elastic to the garment. Go slowly and focus on one section at a time, stretching as much as you need to to get the pieces to fit. If you are using a serger, be careful not to trim off too much of your elastic edge – if at all possible, try not to trim off any. Keeping your elastic one uniform width will help with accurate topstitching later.

Elastic Waistband Tutorial

Your garment should look like this – on the inside, attached at the top, elastic loose at the bottom.

Elastic Waistband Tutorial

Now fold the elastic to the inside one time, which will completely encase it with fabric. Pin into place if needed – I like to pin again at the 4 equal sections (this part doesn’t have to be exact, you can just eyeball it).

Elastic Waistband Tutorial

Using a twin needle or a zigzag stitch, topstitch the elastic into place along the previously sewn edge. Gently stretch the elastic in each section, the same way you did when first attaching it. I’ve found that it’s easiest if I hold both the front and back with my hands, and gently guide the fabric as I sew. Stop with the needle down as you finish each section, readjust, and start the next section. Backstitch at the end.

If you’re using a twin needle, you’ll need to topstitch from the right side – this is where keeping the elastic a uniform width is handy. I mark my machine with a post-it note (I’m not adorable enough to use Washi tape, which I see everyone else using haha) to keep everything aligned so I catch the edge of the elastic as well as sew a straight line, but you can also feel it through all the layers. If you are using a zigzag stitch, you can get away with sewing on the wrong side so you can keep an eye on the elastic – but do try to sew a straight line, otherwise, it’ll be real obvious haha.

Elastic Waistband Tutorial

Elastic Waistband Tutorial

And that’s it! Not too hard, huh? Like I said, I really love this method because it keeps the elastic from twisting – it stays in place foreeeever! Also, the overlap at the center back is a handy way to quickly tell front from back just by feeling it – which, I don’t know about you, but I don’t sew tags in my clothes, so that’s pretty freaking useful! Only downside is that you’ll really have a lot of work to do once the elastic eventually wears out, but I personally think it’s worth it, if only to prevent elastic twist!

Let me know if you have any questions! Or if you just want to discuss those new Vogue patterns. Maybe you see something ridiculous that I overlooked??

V1419 Sewalong: Steps 64-86

10 Nov

Good morning, sewalongers! This is the week we finish up our coats – woohoo!! (and those of y’all who are not following the sewalong – this is the last week you have to skip a boring sewalong post! Woohoo!). Can you just feel the excitement radiating in the air? 😉

So, the good news is – this is the final construction post before we have our sharextravaganza next week. The bad news – it’s a HELLUVA post. Lots and lots of pictures (in advance: I’m soooo sorry! Tried to cull them down as much as possible. On the flip side, none of them are of me 😉 lolololol), lots of little fiddly steps here. On the flip side, this is all finishing – which means when it’s done, the coat is done – but expect this to take some time, especially since there is lots of hand sewing in this section.

Anyway, onto finishing!

The first thing you will want to do is sew the bias facing to both of the opening edges of the coat front, as well as along the neckline and across the hem. I’m not going to go into detail of how to do the facing – we’ve all done enough bias facing on this coat, I think most of us can do it in our sleep at this point 😉 – but I did want to mention a couple little tips that helped me.

V1419 Ralph Rucci Sewalong
Once I sewed the facing on and trimmed down the seam allowances, I pressed all the raw edges toward the facing, using lots of steam.

V1419 Ralph Rucci Sewalong
Then simply press the facing to the inside of the coat. You will want to hand baste this in place, which will give you greater control when top stitching (especially important at those coat front edges).

V1419 Ralph Rucci Sewalong
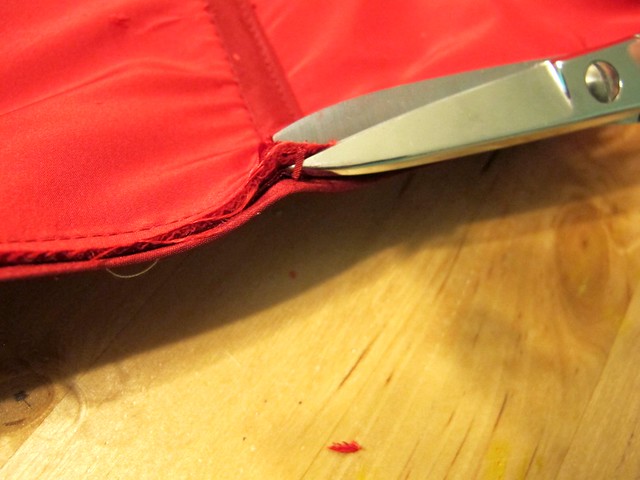
At the hem and neckline, you may find that where you are intersecting seams tends to be *very* bulky – like, so bulky that you can barely turn the facing to the inside. I used my scissors to chop out as much of the bulk as possible (being careful not to cut into the stitching line or outside of the seam allowances), and them hammered them down like crazy with my clapper, to make things very flat.

Actually, if you have a clapper – it’s a good idea to smack down those edges after you’ve top stitched them, to flatten them as much as possible and give them a nice sharp crease. This will make your coat look much more professional 🙂

Now, for the button holes! Fair warning – these took foreveeeeer to finish! Lots of fiddly pieces, lots of fiddly hand stitching. I know at this point, most of y’all are probably over this coat and just want to finish so it can be worn, but please take your time with these steps. The button holes are one of the most visible parts of the coat, and you don’t want them to look sloppy!
V1419 Ralph Rucci Sewalong
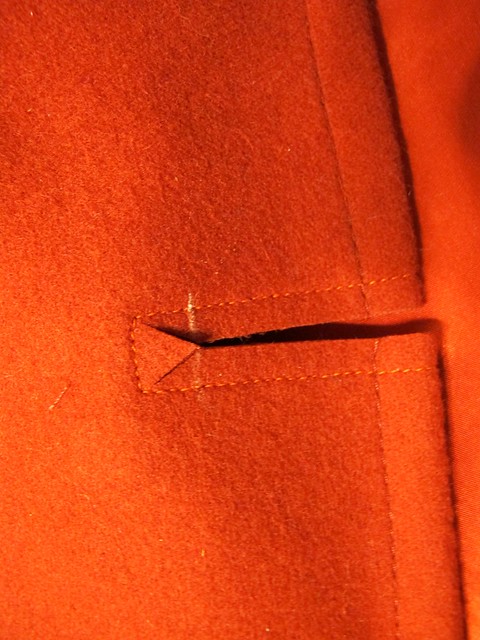
Remember when we sewed around the edges of where the button holes would go? Now you need to cut right in the middle of those stitches. I first used chalk to mark where the V would start, and then cut along the lines indicated. Cut right up to the stitching, but not through it.

V1419 Ralph Rucci Sewalong
You will have a little V flap at the inside end. Fold this to the inside and press.

V1419 Ralph Rucci Sewalong
To make the button hole binding, find those 4 bias pieces you cut, and press down one long edge about 1/4″. You will want to cut the binding into 20 pieces – 4 pieces will be 2.5″ long, and 16 pieces will be 2.75″ long. You should have enough binding to cut exactly the number of pieces needed (if for some reason you screw up and need more binding – just salvage a piece of leftover facing, and cut it in half at the fold. Y’all have lots of bias facing left over, right? I do hahaha). Fold in 1/4″ at short edges of each little piece and press. Yes, this part takes forever. Sorry.

V1419 Ralph Rucci Sewalong
On the bottom of your button hole, pin a piece of binding with the right sides facing and the raw edges matching. The edge that meets the front edge of the coat should be flush, the edge against the end of the button hole should extend a bit farther. Be aware of what binding goes on what button hole – the 2.5″ binding is for the top 2 button holes (on the left and right side of the coat front); the remaining binding is for the remaining button holes.

V1419 Ralph Rucci Sewalong
I went ahead and pinned the top binding as well, because I am impatient.

V1419 Ralph Rucci Sewalong
Sew the binding to the coat, stitching along your original stitching lines. I found it easier to do this from the inside, so I could make sure I was sewing in the correct place. When you get to the end of your stitching line – where the stitching pivots to the end of the button hole – stop and back stitch. Do not go any farther than the existing stitching line.

V1419 Ralph Rucci Sewalong
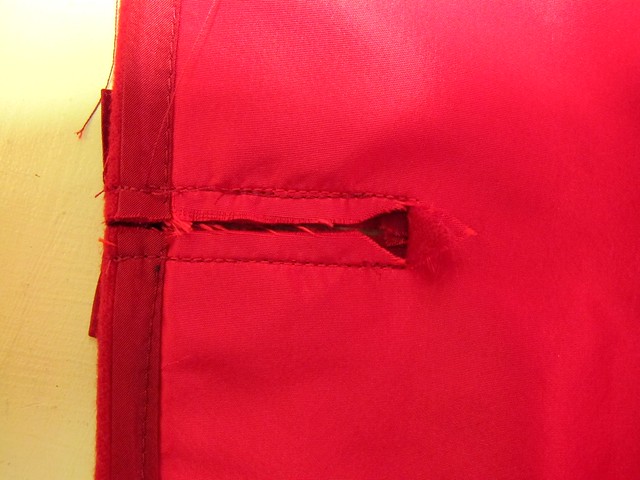
Your binding should look like this on the outside of your coat. Notice that the stitching does not go all the way across to the tip of the binding. This is good; it means we can pull the end of the binding to the inside.
V1419 Ralph Rucci Sewalong
Here it is from the inside.

V1419 Ralph Rucci Sewalong
Starting at the open end, fold the binding to the inside and pin into place. I pinned both top and bottom because – again, impatient. You could also work with one side at a time. Whatever is easier!

V1419 Ralph Rucci Sewalong
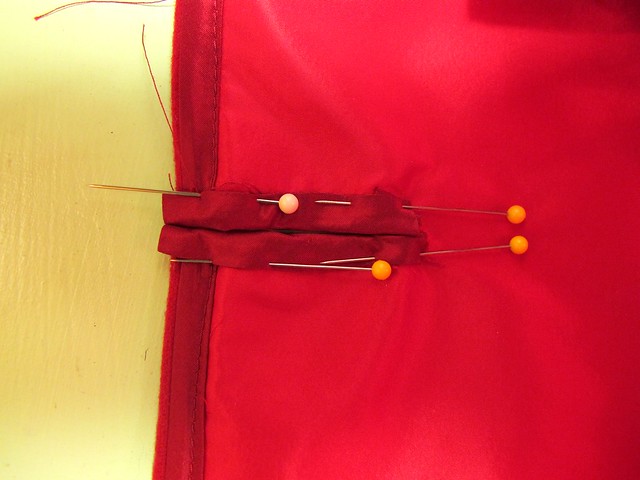
For the end of the binding that is by the V you clipped, pull all the binding to the inside of the coat and pin down. This should cover the V completely, but if not, you can always clip whatever is sticking out 🙂
V1419 Ralph Rucci Sewalong
Repeat for the bottom (or top). Your finished pinned button hole should look like this.

V1419 Ralph Rucci Sewalong
Here it is from the outside.

The next thing you nee to do is slipstitch alllllll those bindings invisibly to the inside of the coat. Yep! This part takes forever! I also stitched my bindings so the edges encased the edge of the coat front, as well as slip stitched the open ends together with a few stitches. When you get to where the binding covers the triangle, be sure to catch that in your stitches so the button hole is secure. Check from the front occasionally to make sure everything looks good, especially making sure that triangle is pushed all the way to the inside of the coat and not sticking out.

V1419 Ralph Rucci Sewalong
Once you’ve finished the torture that is slipstitching ALL THAT BINDING, give everything a good press (and maybe a smack with the clapper, too, if it needs it. Mine did!). We’re not done yet!

V1419 Ralph Rucci Sewalong
Next up is thread bartacks! Start by marking where the bartacks will go – you will have 4 total for each button hole – left and right (so a total of… 40. Woof.). There will be a bartack at each end of the button hole, plus another bartack 1/2″ from each end. I marked mind with chalk.

V1419 Ralph Rucci Sewalong
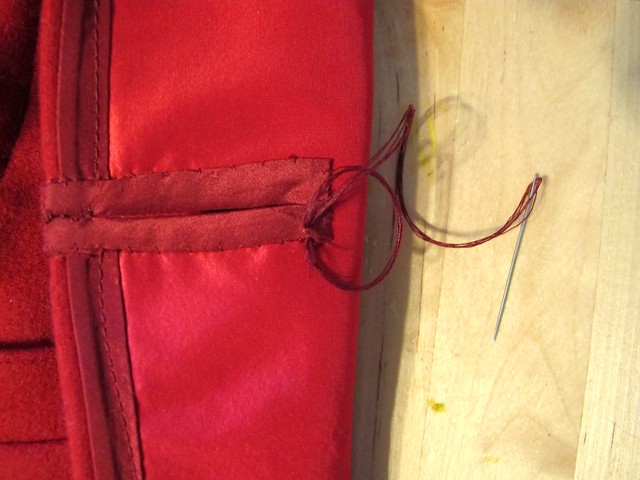
The bartacks will go faster/look better if you thread up with multiple strands. I used 3 strands of thread, and then doubled my needle, for a total of 6. You can also use embroidery floss – I just didn’t have any of the right color on hand.
V1419 Ralph Rucci Sewalong
Starting on the inside, make a small knot with your thread, or tack it in a couple spots to secure it. I made a small loop and then pulled the needle through it.
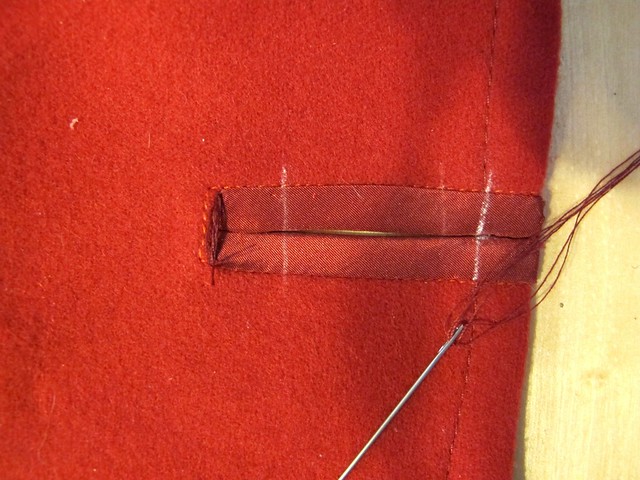
V1419 Ralph Rucci Sewalong
Pull the needle to the outside and stitch across the button hole to the other side, letting the thread connect the two sides. Make another knot on the inside (or, again, secure with a few stitches), and then pull the needle back to the outside.

V1419 Ralph Rucci Sewalong
To make the bartacks, loop your thread like so.

V1419 Ralph Rucci Sewalong
Then pull the needle through the loop to create a knot (same concept as a button hole stitch, or a blanket stitch).

V1419 Ralph Rucci Sewalong
Pull the loop until it knots at the end. Repeat this over and over until you have a chain of knots that completely covers the thread. This is your bartack. Do this 4 times for every button hole. Also, have a glass of wine while you’re doing this – you’ll be sitting for a hot minute 😉

V1419 Ralph Rucci Sewalong
Some bartack tips:
– You will get better as you do these! I recommend starting with the button side first, at the bottom button hole, so your practice attempts won’t be as easily seen 🙂 Of course, you could practice on scraps first – but, naw, not me!
– Don’t pull the knots too tight, or you will distort them and they won’t be as pretty 😦
– Try to make your knots in the same direction as you go – this will keep them uniform and hopefully prevent twisting!
– If at all possible, try to do these in one sitting. The repetition means you will get better as you do it, so if you complete them all in one sitting, you won’t need to go through multiple learning curves (than if you picked it up several times during the week).
– The original Rucci coat has the bartacks continue on the back side of the bound button holes as well. The instructions for this pattern only call for the bartacking in the front (which is what I did). If you want to mimic the original and bartack the back of the button holes – well, don’t let me stop you 🙂
– Don’t get too hung up on perfection – yes, you want these to look nice, but at the same time, most of them will be covered by the buttons. Not worth killing yourself over!

V1419 Ralph Rucci Sewalong
Once you’ve finished your loops, time to sew on those buttons! Sew the buttons in the middle of the binding on the left front, catching both bindings in the stitches. For the top button, sew it 1/2″ away from the edge (it won’t be quite in the middle).

V1419 Ralph Rucci Sewalong
You can also go ahead and sew those back buttons on the belt. The pattern actually has you make button holes first – which of course you can do, but I omitted mine.
One word of note about the belt – don’t try to cinch it in too tight, or you’ll create gathers on the coat sides. Pin the belt closed first, and try it on to make sure everything is smooth and flat.

Finally, all that’s left is the sleeves. Go ahead and hem them with the bias facing – same concept as the other hemming and facing we did in these steps.

V1419 Ralph Rucci Sewalong
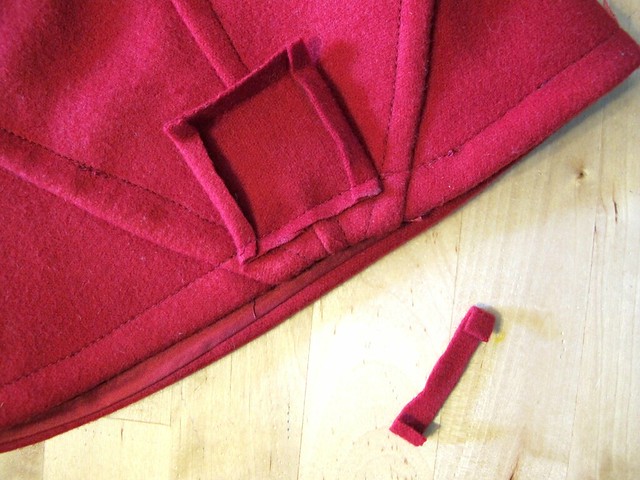
The last thing we will do is make these little sleeve binding pieces, to cover the edge where all the crazy sleeve seams intersect. Cut 2 pieces that are approximately 1.5″ long by 1″ tall (or possibly taller, if your fabric is very thick and bulky – I cut mine 2″x2″, because my fabric required the extra room!). Fold one long edge under 1/4″ and press, and both short edges as well.
V1419 Ralph Rucci Sewalong
Sew the binding to the outside of the sleeve, with the right sides facing, at the point where all the seams intersect. Sew right along your topstitching line. If your fabric is bulky, you may want to trim down the seam allowance of this binding piece.

V1419 Ralph Rucci Sewalong
Turn the binding to the inside, wrapping around the sleeve hem and being sure that all folded edges are tucked under. Slipstitch around the 3 edges and press. Again, this is a good time to use your clapper to really flatten those seams. Gah, you guys must think I have stock in clappers at this point hahaha.

V1419 Ralph Rucci Sewalong
Your finished sleeve will look like this. Yes, some of my top stitching is wonky. Oh well!

Whew! That’s all for this post – AND THIS COAT! How’s everyone coming along with their coats? I’ve been loving all the progressing (and some completed!) coats that are popping up in the Flickr Group. You’re SO almost done!! If you want to show off your coat in our Parade of Coats next week (which, obvs, you should!), you have a few options – you can upload to the the Flickr Group, and you can also upload to the Pinterest Fan Gallery. Be sure to use the hashtag #v1419Sewalong so you’ll appear in our Tagboard, where we will also be pulling finished coat photos. Can’t wait to see everyone’s coats!! 😀