Completed: The Tye-Die Moneta (+ announcements)

11 Aug

Good morning, y’all! I have a couple announcements to make today, and I also have this dress I made a couple weeks ago, so I’m just going to kill two birds with one stone and combine them into the same post-

Tie-Dye Moneta

First up: The Dress

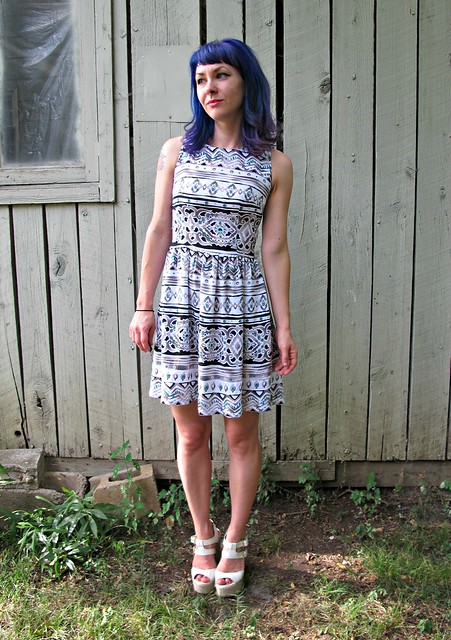
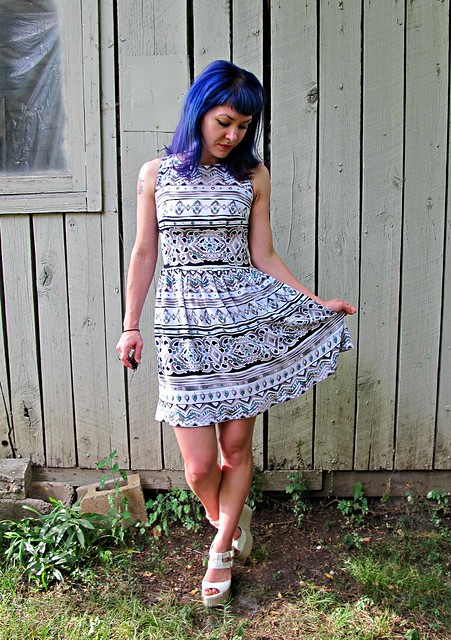
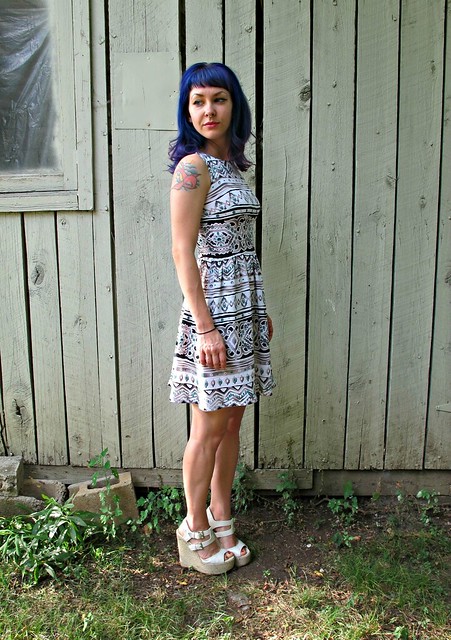
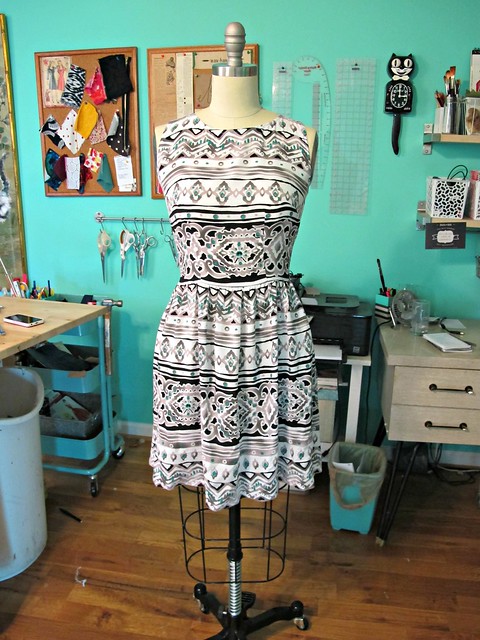
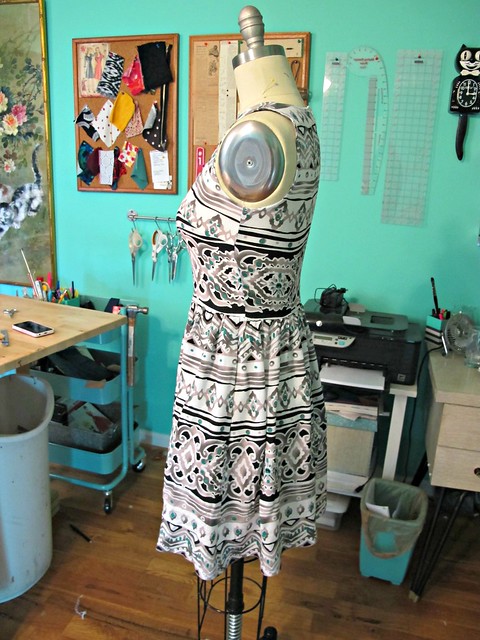
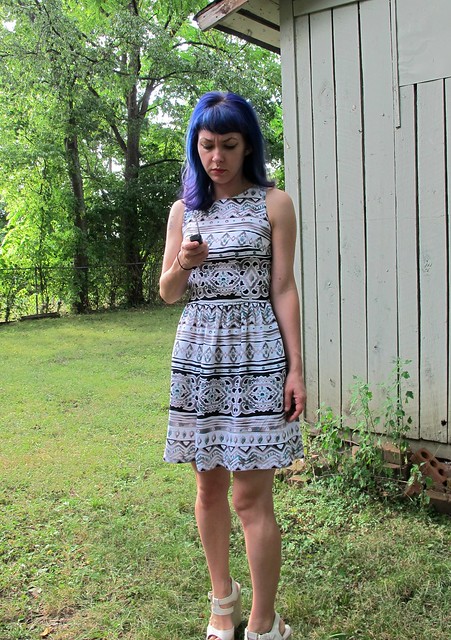
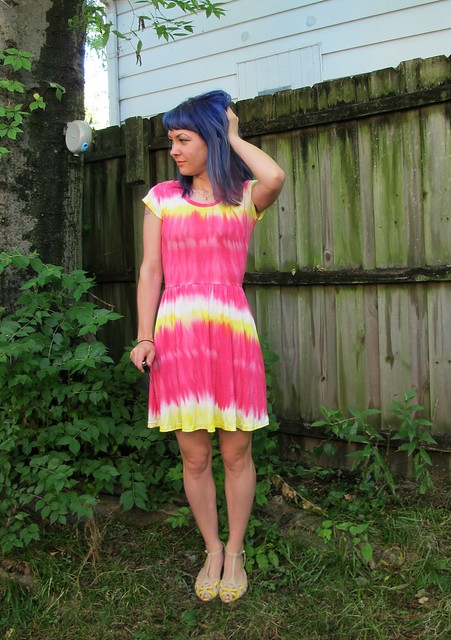
This is another rendition of the Colette Moneta, in a very un-Colette finished dress because this baby is TIE-DYE! Landon kind of hates it; I think he thinks it looks tacky. Whatever!

I actually bought the fabric like that (I’m not at the point of tie-dying my own clothes… yet.) – it’s this cotton/viscose jersey from Mood Fabrics. The colors and style are pretty much unlike anything I EVER wear, so I’m not sure why I was so drawn to it – but I was! I originally had this earmarked for a maxi dress, but I realized it would make a pretty cool short dress with all those dyed stripes.

Tie-Dye Moneta
Tie-Dye Moneta

As far as Monetas go, this one is pretty bastardized. I don’t know if I can even call it a Moneta-proper, because I changed so much of the pattern. The bodice and skirt are Moneta, but I scooped the neckline using the Lady Skater neckline as a guide and added a neck binding. I started with the short sleeves included in the Moneta, but they were all kinds of wrong – too long, too loose (they kind of look like tshirt sleeves) – so I cut them until they were capped and hemmed them a second time.

Tie-Dye Moneta

Speaking of hemming, I broke my twin needle halfway through the skirt of this, so the second half is a zigzag hem. Haha! Whatever, it’s a comfy knit dress. Ain’t no one gonna look at my hem – right?

Tie-Dye Moneta

I realy like how the tie-dye colorblocking (and stripe matching!) turned out! I tried to keep the white away from my waist, and the yellow away from my face. The overall effect turned out pretty cool, though, it’s almost dip-dyed ๐Ÿ™‚

Tie-Dye Moneta

Well, that’s enough of that! Now I’ve got some housekeeping to attend to –

NEW YORK MEET-UP: I’m gonna be in NYC this week! Yay! I’m teaching a pants making class at Workroom Social this weekend, and I’ll be trolling around the city this Friday beforehand! To my extreme delight, my homegirl Heather Lou (yes, THAT Heather Lou!) is gonna be lurking in the city THE SAME WEEKEND, so we have got some fabric shopping and hanging to take care of it! I plan on hitting up the Garment District around 3pm on Friday 8/15, and then finding a spot to chill in Bryant Park around 7 or 7:30 (whenever we get kicked out of the Garment District, I guess). I’m open to anyone who wants to join for hang-time, so lemme know if you’d like to stop by! Send me an email and I’ll keep you updated on the deets ๐Ÿ™‚

OTHER CLASSES: I just confirmed that I’ll be teaching again at Watkins College of Arm, Design & Film in the fall! I have two classes this year – Intro to Fashion Sewing (9 weeks, Tuesdays) and Intro to Sewing Knits (6 weeks, Thursdays). Any local Nashvillians who are interested in attending should check out the full catalog and can register here.

THE SEWING PARTY: Finally – I’ll be teaching an online class at The Sewing Party! Don’t know what The Sewing Party is all about? From their website:
The Sewing Party Logo
โ€œThe Sewing Partyโ€ is the first ever online-all-day DIY event in history!

On November 8, 2014, thousands of DIY-ers will gather for a fun-filled day of sewing and crafting classes taught online by leading bloggers and educational experts. Itโ€™s all about Connecting. Crafting. And Creating.

Attendees will have access to more than 30 online classes available on the day of the event and for an additional 90 days. There is truly something for everyone! Classes include home dรฉcor, fashion sewing, quilting and upcycling, crafting, costume design, techniques for turning your craft into an entrepreneurial venture, and more!

Space is limited and likely to fill up fast! For just $40, โ€œThe Sewing Partyโ€ participants can attend classes; chat with participants from across the country; interact with top bloggers and educational experts who are teaching; and explore the latest crafting and sewing tips, techniques and products in our marketplace.

This upcoming event is going to be SO FUN, omg! I’ve signed up to teach a class on inserting zippers (both lapped and invisible) so if you’ve ever wanted a little help with getting those perfect zips (or maybe you’re just curious to see how I am on film – I know I am! Curious and TERRIFIED haha!), you should definitely come join my class! There are lots of cool classes to check out during the event – a few being taught by some of my favorite bloggers and friends, including Jennifer, Madalynne, and Devon. I seriously can’t wait! November cannot come soon enough, that’s for sure ๐Ÿ™‚

I guess that’s it! Have a great Monday, everyone!

Completed: Reupholstered Chairs

8 Aug

Soooo this is a little different from what I usually offer up here for my Mood Sewing Network posts – we are gonna talk about home decor fabric today! ::evil laugh:: No wait, come back, I promise it’s not all bad!

Forreal, though, I’ve known about Mood Fabric’s home fabric offerings since, well, the beginning of my Mood-time. And while I’ve never been one to futz much with home decor sewing (I mean, c’mon, wouldn’t we rather all sew clothes for ourselves?), I did have some chairs that needed to be recovered. Like, two years ago. When I bought them.

So, in celebration of Mood Fabric’s new home decor storefront opening (which I’m really excited to visit when I’m in NYC next week! Eep! Next week!), I bring you my chairs that are badly in need of a facelift.

Reupholstered Chairs - before

Lookit that bad boy!

Reupholstered Chairs - before

No, that’s not even the worst – look at THIS! Can you believe I sat on that rank-ass looking thing for over 2 years? Yeah. I blame it on not being able to commit to the perfect fabric. Either that, or laziness. Probably both.

So, finding a good home decor fabric is hard, y’all. The ~free spirited artist~ in me wants something with bright colors and textures and maybe peacocks… but the tiny adult in me knows I should pick something more subdued that will continue to work with my ever-changing decor. I think I found a nice middle ground, though, with this chartreuse geometric cut velvet fabric. Even though it’s chartreuse, it’s pretty mild by home-decor standards (the color doesn’t necessarily “match” my curtains, but it goes well enough), and the geometric design gives it a bit of fun texture and visual interest without assaulting your senses. I like it!

Soo, that brings us to the next step – the upholstering.

Well, first off, let me just say this – it’s really easy, at least with a simple chair like this. Those of you who are diehard professional re-upholsterers, please avert your eyes. I’m sure I’m doing everything wrong here, oh well!

Chairs reupholstered with fabric from Mood Fabrics
PART ONE: THE DESTRUCTION
First, we have to remove the chair pad from the chair frame. It should unscrew from the bottom. Take everything apart and stash the screws somewhere safe so you don’t lose them (I should note that I didn’t lose a screw from this chair – it only had 3 to begin with! Someone else’s problem!) (and DUH I only put 3 screws back in the chair. Like I have time to find a 4th screw lololol)

Chairs reupholstered with fabric from Mood Fabrics
Flip the pad over so you can see the staples, and start yanking them out. If you have a staple remover, that would be helpful. If not, you can use a flat head screw driver. Ideally, you want to remove all the staples – not just the ones holding the fabric down. Or you can just be sloppy and rip off the fabric, but seriously, dude, removing staples is kind of fun.

Chairs reupholstered with fabric from Mood Fabrics

Once you’ve completely dissembled your chair seat, you should have something like this. Wooden chair seat pad thing, fabric cover, and padding.

Chairs reupholstered with fabric from Mood Fabrics
PART 2: LAYING THE FOUNDATION
Using your fabric cover as a guide, cut out squares of the new upholstery fabric to size. If you don’t have the old fabric to use, then measure for a 4″ overlap on all sides (so my 16″ pads needed 20″ square covers). Padding can be cut to the same size as the chair seat. I initially cut off the selvedge of my fabric because I thought it looked nicest that way, but when I started ripping the rest of the seats I realized that the original upholsterer left the selvedges on. So my remaining 3 chairs have fabric selvedge, which helps with fraying.

While I did decide to add some new padding to my chairs, I did not completely replace the padding that was there. Upon inspection, it seemed to be in pretty good shape (apart from the whole falling-out-of-the-chair aspect, anyway), so I just added a layer to the top for some extra squish and called it a day. If you are completely replacing your padding, you may want to cut multiple layers.

Chairs reupholstered with fabric from Mood Fabrics
PART 3: THE REBIRTH
Now we get to staple! Stack your padding and fabric with the wooden seat base centered at the bottom. Starting in the middle of one side, staple the fabric to the seat. Now move to the side opposite where you just stapled, pull the fabric taunt, and staple in the center. Continue working around the base of the chair, opposite sides at a time, until all 4 sides are stapled down securely. I found it was easier to do one set of sides at a time (as opposed to working all the way around at once).

Chairs reupholstered with fabric from Mood Fabrics
To miter the corners, fold as shown and staple as you go.

Chairs reupholstered with fabric from Mood Fabrics

Your finished seat should look like this. Woohoo!

Chairs reupholstered with fabric from Mood Fabrics
Now screw it back on the chair frame and sit in that chair like the boss you are!

Chairs reupholstered with fabric from Mood Fabrics

THAT IS DAMN SEXY

Chairs reupholstered with fabric from Mood Fabrics

AMIRITE OR AMIRITE?

Chairs reupholstered with fabric from Mood Fabrics

For serious, though, I’m a little embarrassed at how stupidly easy this whole ordeal was. From disassembling, to cutting, to stapling, to screwing, heck – even sweeping the floor – this all took about an hour. That’s it! For four chairs!

Chairs reupholstered with fabric from Mood Fabrics

Chairs reupholstered with fabric from Mood Fabrics

I want to say I should have done it sooner, but damn – I don’t think I would have picked as good a fabric. Sometimes it does pay to wait! Also, this was a fairly inexpensive project – I only needed a yard and a half of fabric (again, my chair seats are 16″ square and I had 4 of ’em). My fabric was $45 a yard, which is stupid pricey, but the batting was only $8 a yard. All together, the cost of the fabric was less than $80 – I already had the staple gun, but it’s a cheap one that cost less than $10. You could obviously make this a much cheaper project with less luxe fabric or not buying batting, but considering I paid $100 for the table & chairs (plus a matching buffet in the living room – told ya our flea market was wonderful. Oh! My old lady dining room curtains are from there, too!), I don’t think that’s a very bad deal at all! Again, for full disclosure – I received credit for this fabric in exchange for my monthly contribution to the Mood Sewing Network. I got to pick the fabric and project on my own, though ๐Ÿ™‚

What about y’all? Anyone have experience with upholstery or other home decor sewing – or is that something you’d prefer to leave to someone else to do? I made someone lined curtains once (for the 12ft ceilings in his swanky loft), and UGHHH NEVER AGAIN.

Completed: Kitty Zinnia!

6 Aug

You know what I love almost as much as I love bike fabric?

IMG_9372

KITTY FABRIC ๐Ÿ˜€ ๐Ÿ˜€ ๐Ÿ˜€

Kitty Cat Zinnia + Nettie Crop Top

This ain’t just any ol’ cat fabric though – this is freaking silk chaurmeuse, all the way from LA.

Kitty Cat Zinnia + Nettie Crop Top

When I was in NYC earlier this year, I mentioned to Trice how I was looking for non-quilting weight novelty fabrics – especially something with cats on it. Trice, being the sneaky lady she is, emailed me several months later and said she was going to send me something. I don’t know what I was expecting- but it was NOT this! I mean that in the best way, obviously. I love how the fabric isn’t super loud-in-your-face-cat-print (although, let’s be real – that wouldn’t necessarily be a bad thing), I love that it’s black and white, and I love that it’s fucking SILK CHAURMEUSE. What the what? Talk about an amazing gift from an amazing person!

Kitty Cat Zinnia + Nettie Crop Top

I didn’t have a whole lot of fabric to work with – maybe a yard and a half, tops, and it was pretty narrow. A Colette Zinnia seemed like the perfect fit- I have a similar short, pleated silk skirt (I wore it in the photos for my Owls Sweater), and I wear it all the time, especially in the winter.

The Zinnia calls for a loooot of yardage, but I was able to barely eek by. I shortened the skirt by about 4″, which allowed it to fit on the narrow width of the fabric, and cut the pockets out of some bemberg rayon that I had in my stash. It was a close call for sure, but I made it work! I also cut it with the shiny side on the inside, because I thought the matte side looked a little less, I dunno… costumey?

Kitty Cat Zinnia + Nettie Crop Top

Most of the sewing was pretty uneventful. I did have to lengthen the topstitching on the pleats – the pattern has them about 2.5″ deep, but the skirt looked suuuuuper floofy right about my hips, so I lengthened them a couple more inches and that helped. It’s still pretty floofy, but I mean- it’s a cat skirt. It’s already ridiculous enough, you know?

(Yep, my bra band totally gives me back fat hahaha. Actually, I probably have back fat too.)

Kitty Cat Zinnia + Nettie Crop Top

I mean, LOOK HOW SWIRLY IT IS THO.

Kitty Cat Zinnia + Nettie Crop Top

More kitties! Isn’t this seriously the coolest print? Everyone I told about it kind of gave me a weird look until I showed them a picture- and then even cat haters were all, “ooh I want me some of that!”

Kitty Cat Zinnia + Nettie Crop Top

I obviously needed a cool top to go with my super cool skirt, so I made a quickie crop top to wear with it. This is the Closet Case Files Nettie, made in some rayon knit from Mood (leftover from this Jalie top from forever ago).

To crop the shirt, I just cut it along the bottom lengthen/shorten line. I had previously added 2″ length to my pattern, so that ended up being the perfect crop top length. I also tried my hand at widening the shoulders, since they are super narrow on me… I used a tutorial from Colette on shoulder adjustments, but I guess I didn’t add enough width because they’re still SUPER narrow. Unfortunately, I think this crop top has a very short lifespan in my closet because the shoulders are too narrow for it to be comfortable (the sleeves ride up as I move my arms and the shoulders raise and it just doesn’t look good). It’s pretty obvious in this picture how far the shoulder seam is from my shoulder – plus, the arm hole is still way too high. Gonna have to go back and retweak that pattern again, I guess. Ah well! Sewing!

Also, I know you can totally see my bra lumps through this shirt. DGAF.

Kitty Cat Zinnia + Nettie Crop Top

It’s hard to see any detail at all in this print, but don’t say I didn’t try ๐Ÿ™‚

Kitty Cat Zinnia + Nettie Crop Top

Thanks again, Trice, for the amazing fabric! Guys, she also sent me a BUNCH of bra straps – which means I guess I better start exploring the world of sewing lingerie, yeah? Forreal, though, I just downloaded my first Ohhh Lulu bra pattern. Wish me luck!

What about you? Found any good (literal)animal print, lately?

OAL: The Winners!

4 Aug

Hey everyone! Sorry, one more OAL post ๐Ÿ™‚

I had SO much fun co-hosting the OAL this year with Andi, and I love that we had so many participants (66 posted completed outfits on the Ravelry thread!). I can’t even tell you how much I loved following along with everyone’s progress, and seeing what cool outfits came out of it! I really love the variety of sewing and knitting patterns that showed up in the OAL (some having already moved over to my to-make queue ;)). Such a fun time and I’m really glad I got to host! Thanks to everyone who participated! Y’all are the best! โ™ฅ

logo

Andi & I wanted to sweeten the deal with an opportunity for prizes, so let’s get to that! Our official sponsor for the OAL is Indie Stitches, who generously donated prizes for each of the winners. Those who win get a free pattern of these choosing from Indie Stitches, plus a free knitting pattern of their choosing from the Untangling Knots shop. For the drawing, we compiled a list of all the posts on the OAL Finished Outfits thread that were submitted before the deadline on 7/31 and included a full outfit. The names were put on a numbered spreadsheet, which we used random.org to pull the winning numbers. So, without further ado – our 4 OAL winners~~

help_pj_medium2
Karen’s Helen bed jacket & PJ’s
Damn, that’s such a good idea – why didn’t I think of that? Classy pjs and a bed jacket for lounging, instead of my ratty workout shorts and an even rattier quilt.

P1020012
Roisin’s Myrna cardigan & Vogue 8998
ROISIN! I swear I did not choose her name on purpose; this was purely luck of the draw. I love her little pink Myrna and the fabric for that dress is such a perfect match!

41866102
Kristi’s Myrna & Simplicity 1803//McCall 6696
Such a pretty and classic combination! You can’t see too well in these photos, but go look at her Ravelry page – the top of the dress bodice is outlined in pink piping, which looks fabulous! And the inside is just gorgeous ๐Ÿ™‚

image_medium2
Martinalici’s Featherweight cardigan & Washi dress
Love this – especially that hand-embroidered collar! Also, that Featherweight Cardigan is going in my queue asap ๐Ÿ™‚

Woohoo! Congratulations, ladies! Keep an eye out for an email from me ๐Ÿ™‚

For those who didn’t win, I still have a lil’ somethin’ for ya – a discount code! Use the code OAL2014 for 15% off your purchase at Indie Stitches shop. This code is valid for 48 hours, so through 7AM August 6 (whew! Is it August already?).

Thanks again to everyone who played along, I hope you had as much fun as we did! To see all the finished outfits in all their glory, check out the OAL Finished Outfits Ravelry thread, the Official Unofficial Flickr Group and the hashtag #oal2014 ๐Ÿ™‚

Completed: The Emery Dress, An Aztec Delight

1 Aug

You know who has the best Emery dresses? Angie. Specifically – her Arizona Emery is the thing jealous dreams are MADE of. I love the tough/cool spin-off an otherwise sweet looking pattern.

So… you know what that means. I copied her.

Rayon Emery

Fuck yea I did. Sorry, Angie!

Rayon Emery

Well, to my credit- not entirely. I did pick a lighter fabric (in both color and weight), and I left the sleeves off because… do I have to say it? I’m gonna say it. SUN’S OUT, GUNS OUT. Sorry y’all! Summertime in this place means I got the right to BARE ARMS amirite lolololol

Anyone? Guys?

Rayon Emery

So anyway, this is the Emery dress. I figured I better make it again, considering I put so much fucking effort into all those muslins when I was first trying to fit it. Might as well make it worth my while! Fortunately, the fitting kinks all worked out by this point, so this dress was a matter of cutting and assembling. I did have to take in quite a bit at the center back, but that’s accounting for the fact that my fabric has a slight stretch to it. Not a lot, but just enough to mean some things gotta be sized down a smidge. I think I was a little toooo aggressive at the upper back, because now the shoulders pull, but eh. Live and learn.

Rayon Emery
Rayon Emery

“What’s that fabric,” you say? Well, I’m so glad you asked! This little piece of happiness came my way courtesy of Fashion Fabrics Club. I was really curious to try it, considering how ridiculously cheap it was – would it prove to be worth my sewing while? Or would the day end in tears?

The specific fabric in question is this white/grey Aztec stripe. It’s a floaty rayon challis, so lightweight that the full 2 yards barely weighed anything. Look at the price – this shit was $5.75 a yard. How is that possible? I have no idea! I don’t have a helluva lot experience with rayon challis, but I do have a little, and this stuff is pretty similar to the others I’ve used – just as lightweight and shifty as the rest. To it’s credit, though, it is pretty dreamy to wear in the heat. It is very breathable, dries fast (if you sweat a lot like I do)(sorry), and the print hides aforementioned sweat (sorry again). The only drawback is that is does stretch out over the course of the day, since the heat of your body relaxes the fibers. That’s not a huge deal – and when it’s hot outside, you may even welcome the extra ease – plus a quick wash shrinks things right back up.

Rayon Emery

Cutting this stuff was a BEAST. Omg! The dress pattern only has like 5 pieces (and one of them doesn’t count because they are pockets, and who matches pockets? Not me!), but it took me forever to get everything cut out since the fabric kept shifting around. I got most everything lined up, but unfortunately, the center back had to take the pattern-matching fall. I actually didn’t even notice this until I was going through the photos. Whoops! I think I actually cut it off the match – because everything else (waist seam, top seam, etc) matches perfectly. Oh well, just one of those things!

Rayon Emery

On the flip side, sewing it wasn’t too bad. I noticed that the fabric does have a tendency to snag and run if you’re not careful (as with other rayon challises I’ve used), so I used my silk pins and a 70/10 microtex needle. That’s about the extent of my carefulness with this fabric. I threw it in the wash on cold, dried it in the dryer, and steamed the hell out of it with my iron. I know you’re supposed to be more careful with rayon, but I have rayon dresses that have been washed+dried for years and they seem to be holding up fine. FWIW, I generally keep my rayon dresses out of the dryer and just hang them – they wrinkle a lot less that way – but I always use the dryer during prewashing just in case the finished dress accidently gets thrown in a dryer load. Don’t wanna have a surprise shrinking incident!

Rayon Emery
Rayon Emery

I’m pretty proud of how my print matching turned out (minus that center back mistake, I mean). Also love how that print placement turned out at the bodice front. I actually didn’t plan that at all, but it’s a nice surprise! Even if it does look like I’m wearing an Aztec wrestling belt ๐Ÿ˜›

Rayon Emery
Rayon Emery
Rayon Emery

I opted to leave the dress unlined so it would be as lightweight as possible. To finish, I used self bias facing at the neckline and arm holes. Oh yeah, and because it’s sleeveless, I raised the underarm by about 1/2″ and cut about 1/2″ off the edge of the shoulders. Didn’t want this to look like a muscle tank!

Rayon Emery

Also, this dress totally broke my camera remote. Well, maybe not “broke,” but it definitely stopped working, which kind of sucks. This is what I look like when that happens, in case you were wondering.

Rayon Emery

So there ya go! Thanks so much to Fashion Fabrics Club, for letting me try some of their (literally)cool rayon, and thanks to Angie for the inspiration for my awesome new dress!

Who are you lurking on these days for a shameless rip-off? Fess up!

** Disclaimer: I was not compensated for this post, although I did receive the fabric for free. I guess I also got the pattern for free too. Hey-o, free dress! ๐Ÿ™‚

Completed: Bikey Maritime Shorts

31 Jul

I love it when a single piece of clothing incorporates a bunch of my favorite things at once.

Bikey Maritime Shorts

Bicycles? Check.
Maritime shorts? Check.
Roisin? FUCK YEA.

Bikey Maritime Shorts

I know they look like polka dots from a distance, but seriously there are teeny-tiny little bicycles all over these shorts and OMG SO CUTE.

Bikey Maritime Shorts

I’m a sucker for bicycle printed fabric – this is a true fact, and I don’t think I even need to say it, because most of y’all are probably nodding your heads (and/or rolling your eyes) from how often I mention it. That’s ok, I’ll say it again – bicycle fabric rules! This stuff is extra special, though, because it came as a gift from my homegirl, Roisin. Recently on her honeymoon in Paris, Roisin posted this shit on Instagram after a fabric shopping bender (seriously… she went home with some really beautiful stuff) and I nearly had a heart attack over the BICYCLE PRINTED DENIM. Because she’s an amazing sport, Roisin offered to go back to the fabric store and pick me up my own 3m length. On her freaking honeymoon! Do you see why this lady is amazing? Because she’s amazing.

Bikey Maritime Shorts

And because of her, I now am the proud owner of these cute little bike shorts! Yay!

Bikey Maritime Shorts

I’ve made this pattern – the Maritime shorts – a million times, so there’s not a lot left to say about them. I cut my usual size, and sewed these up as normal. I knew I wanted to stick with a good tried-n-true to be absolutely positive that we would have no fitting issues here, especially after all that trauma I had trying to make jorts. Speaking of which, I think I figured out the issue with the zipper – after inspecting the zipper of my jeans (the ones I bought, not me-mades), I noticed that the fly extension is tacked down right at the base of the zipper, which takes a lot of the strain when you’re pulling them off and on. It’s amazing that something as simple as reinforcing the extension with a bartack really makes such difference but it does. After realizing this, I checked the pattern and it does instruct you to tack the extension down. I guess I skipped over it in my jeans haste? I dunno. But hey, now you can learn from my mistake! ๐Ÿ˜€

Bikey Maritime Shorts

Sorry ’bout all the wrinkles. I took these photos after wearing the shorts all day, so most of them are from sitting and moving around. While this fabric is a denim, it’s pretty lightweight for shorts, so it tends to wrinkle. The fabric softened up quite a bit after prewashing, and also set a few wrinkles in permanently (such as the one you see by the side seam).

Bikey Maritime Shorts

Some additional notes:
– I debated on topstitching with a contrasting thread – either white or gold – but ultimately decided to let the bikes take center stage and kept the topstitching navy. I love how it’s subdued and classy – well, as classy as a pair of short shorts covered in bicycles can be ๐Ÿ˜›
– My pocket lining is Liberty fabric, left over from my recently Liberty make! I know it doesn’t exactly match the denim, but I couldn’t resist pairing these two special fabrics together – after all, they’re both from some of my favorite bloggers, so it seemed only natural ๐Ÿ™‚
– You may have noticed that I didn’t finish the edge of that fly extension. Actually, I did. It’s just up under the waistband because I’m fucking stupid haha. Oh well!

Bikey Maritime Shorts

I tucked my chambray button-down in so you could really see the way the shorts look, and I surprised myself because I actually kind of dig the way it looks (even if it does scream ~Fashion Blogger on Pinterest~, which we all know I most certainly am NOT haha!). For the most part, though, I wear the shirt untucked, as in the above photo.

Bikey Maritime Shorts

The best part – those lil’ shorts use barely any fabric at all, which means I still have about 2m left to play with! I’m debating what to do with the remaining yardage. It’s too heavy to be any sort of top (well, any sort of top that I would wear) and I’m not keen on making a matching pair of pants… but a dress, perhaps? What pattern would you suggest?

Thanks again, Roisin, for being such a star and making these cute shorts a reality! When I finally get my butt to London, I owe ya a drink ๐Ÿ™‚ Or two ๐Ÿ™‚

Completed: My Finished OAL Dresses!

28 Jul

Good morning, everyone! I hope your AM is filled with lots of sunshine, like mine, and coffee, unlike mine (because, *ahem* someone forgot to mention we were out after he made a pot yesterday). Anyway, that’s neither here nor there – you came here to see finished dresses and sweaters, right? Let’s get to it!

OAL 2014: Completed Simplicity 1803 + Myrna Cardigan

Fair warning – this is a pretty picture-intensive post. I have two dresses to show plus a cardigan! (You’re so lucky that I don’t have two sweaters. I tried, but the second one is technically a vest right now soooo…). While I could theoretically stretch this out into 3 posts, I actually really hate it when people do that so I’m just dumping it all in one glorious picture-filled OAL extravaganza! Hope you don’t mind looking at my mug ๐Ÿ˜‰

Speaking of which… you probably noticed the change in scenery, not to mention actual decent looking photos. That’s because I didn’t take them! Ha! All photo credit for this post goes to my lovely friend, Jenna, of Kitty Cat Stevens (you may recognize her photos from last year; she took those ace ones of my Lace trench). She really did an amazing job with these and I just love how they turned out!

OAL 2014: Completed Simplicity 1803 + Myrna Cardigan

Dress #1 was made with a lightweight cotton from Mood Fabrics (purchased at the NY location while I was there in March). The bodice is view C with cap sleeves, a softly pleated skirt and a lapped zipper.

OAL 2014: Completed Simplicity 1803 + Myrna Cardigan

OAL 2014: Completed Simplicity 1803 + Myrna Cardigan

OAL 2014: Completed Simplicity 1803 + Myrna Cardigan

LOOKS SO GOOD WITH MY HAIR.

OAL 2014: Completed Simplicity 1803 + Myrna Cardigan

OAL 2014: Completed Simplicity 1803 + Myrna Cardigan

Dress #2 was made with a gorgeous rayon challis from Grey’s Fabric. I used the same pattern, swapped out the bodice for view B with bias-faced arm holes, a softly gathered skirt and an invisible zipper.

OAL 2014: Completed Simplicity 1803 + Myrna Cardigan

OAL 2014: Completed Simplicity 1803 + Myrna Cardigan

OAL 2014: Completed Simplicity 1803 + Myrna Cardigan

OAL 2014: Completed Simplicity 1803 + Myrna Cardigan

OAL 2014: Completed Simplicity 1803 + Myrna Cardigan

OAL 2014: Completed Simplicity 1803 + Myrna Cardigan

The hem on this one is finished with rayon seam binding. So pretty!
OAL 2014: Completed Simplicity 1803 + Myrna Cardigan

OAL 2014: Completed Simplicity 1803 + Myrna Cardigan

Finally – here’s Myrna herself! I guess I can talk a little more about this part of the project since I haven’t really mentioned it much on my blog (unlike that entire OAL full of posts, ha).

OAL 2014: Completed Simplicity 1803 + Myrna Cardigan

Can I just say – I LOVE THIS CARDIGAN. It was super fun and super easy to knit, not to mention super fast (how many more times can I say super in this post?). According to my Ravelry, I finished it in just under a month.

I went with the size XS, getting gauge with size 6 needles (which is typical for me + worsted weight yarn + Andi’s patterns).

OAL 2014: Completed Simplicity 1803 + Myrna Cardigan

The yarn is (super?)AMAZING, isn’t it? Something I picked up from my local yarn store, Haus of Yarn– I knew I wanted neon yellow to go with the fabric for dress #1, so I took a swatch with me and went lurkin’. Maybe it’s just my yarn store (granted, we have more in this city – actually, a surprising number of really good yarn stores – but this particular store is less than two miles from my house, so obviously I like shopping here best haha), but they never seem to have the color I want in the weight/fiber I prefer! In this case, they only had a couple options for neon yellow worsted weight wool. Because I am an adult, I picked the most expensive option – this is Jill Draper Makes Stuff, and the color is Daffodil. At $26.50 per skein, it was definitely a splurge, but I only needed 2 skeins for this sweater so I figured it was worth it ๐Ÿ™‚ Spoiler: It totally was! This yarn was a dream to work with – so soft and squishy, with a beautiful saturated color gradient. I don’t know if this particular yellow looks any good on me, but I also don’t give a fuck because it makes me happy.

OAL 2014: Completed Simplicity 1803 + Myrna Cardigan

I knit the pattern 100% as written, and had no issues. Blocked it with a bit of gentle shampoo (I keep meaning to get that special wool washing/no rinse shit they sell at my LYS, but since I went over budget with the yarn I had to put it back. Maybe next time. Maybe never lolz). True story: I forgot to finish the keyhole until after I’d blocked the whole thing, so I had to go back and keep knitting. I’m glad I did, though – I was on the fence about the keyhole because it looks kind of wonky at first, but once it’s finished it really does make a world of difference!

OAL 2014: Completed Simplicity 1803 + Myrna Cardigan

The button bands are stabilized with Petersham ribbon. Because this cardigan has a v-neck, I steamed the Petersham with a gentle curve to mimic the shape of the neckline, and stopped it a little above the top button hole (so, before you ask: no, it doesn’t go all the way around the neck). I used this tutorial from Sunni’s blog for guidance – she’s using it to hem a skirt, but it’s the same concept with the neckline, with a less aggressive curve. The vintage glass buttons are from my stash, previously purchased at the flea market.

OAL 2014: Completed Simplicity 1803 + Myrna Cardigan

I love how well the sweater goes with dress #2, because that was not planned at all! I didn’t decide to make a second dress until I’d already started the sewalong, and knit about half of the sweater. They do look good together, though. Yay for unintentional matching!

How are y’all doing with your OAL garments? Almost finished? Remember – the deadline to enter is this Thursday, July 31. Don’t forget to post your finished outfits in the Ravelry thread, which will give us all full lurking capabilities and also enter your ass to win some prizes. We also have the Offical Unoffical Flickr Group if you don’t use Ravelry/only finished a dress – but please be aware that your two pieces need to be uploaded to the Ravelry thread to be eligible for the contest ๐Ÿ™‚ I’m loving all the dresses and sweaters I’ve seen so far, and I need to see MORE PLS.

Feeling inspired? Here’s a link to all the tutorials covered during the OAL:
1: Choosing Your Fabric and Size
2: Cutting and Marking Your Fabric
3: Sewing the Bodice
4: Sewing Sleeves or Bias Facing
5: Attaching the Skirt
6: Inserting a Lapped Zipper (see also: My Method for Invisible Zippers)
7: Hemming & Finishing
How to Stabilize a Buttonband with Petersham Ribbon (not part of the official OAL, but useful nonetheless!)
FINALLY, you can see my Myrna Ravelry notes here.

OAL 2014: Completed Simplicity 1803 + Myrna Cardigan

Whew! That’s a lotta post for a coffee-deprived Monday morning! ๐Ÿ˜‰

Review: My New Dressform!

25 Jul

Hey everyone! I have a review for y’all today! I know – blecch ughhhh, review posts are the worst, amirite? But I think this one is actually pretty relevant to everyone’s interests (unlike a good 90% of the review offers I am constantly being offered. Like, once a company offered me padded butt underwear. lolwut!), so bear with me here.

Check out the new lady in my life-

Dressform - The Shop Company

Gorgeous, right? This gal comes courtesy of The Shop Company, who reached out to me about a month ago and asked if I’d like a form in exchange for review. In the interest of full disclosure – I did not pay for this form, although I have been wishful shopping for one for a couple years now (and The Shop Company was actually on my list, after reading Gertie’s review). I currently have a form, but it’s a terrible piece of shit so obviously I jumped at the chance for a nicer model.

Dressform - The Shop Company

I was given full realm to choose any professional form from the site, which I ultimately went with the Professional Female Form with Collapsible Shoulders (although I totally lurked the Full Body form with arms and legs, until Landon told me he’d bury it in the backyard the minute I left the house). Like I said, I’ve been faux-shopping for a form for a while now, so I knew exactly what I wanted and this one checked off all the boxes.

Before we dive too deep into the new form, we should probably talk about my old form – a Dritz My Double (I’m not even going to link you to it, it’s so terrible). I’ve had it for a few years and it’s just really awful – extremely rickety, lightweight, and poorly designed. Every time I moved it, part of the tripod would fall out (which actually happened when I finally dragged it out to the shed the other day. FUCK YOU, DRITZ DRESSFORM). After about a year of use, the “cover” (I use this word lightly because it was really just cheap fabric glued to a plastic core) started to peel off – not to mention, it’s red. Who the hell chooses a red dressform? That shit clashes with everything. The Dritz form claimed to be adjustable, but that never really worked and it also adjusted across all size points (so, say, you couldn’t make it pear-shaped, since increasing the hip size would also make the bust and waist increase). The shoulders didn’t collapse, so getting garments on and off that thing was a nightmare. You couldn’t stick pins in it. Plus, it was ugly. Ugly forms are the worst, amirite?

So what’s so cool about this new form from The Shop Company, and why is it any better than the old one I was using? GUYS, LET ME TELL YOU.

Dressform - The Shop Company

It’s solidly built. The base is extremely heavy (which made for bringing the box inside very entertaining, I’ll have you know)(also, I’ll have to know that I literally fit inside the box because, yes, I tested. What?), so there’s no danger of it tipping over. The wheels roll smoothly, the metal skirt cage doesn’t bend, and all the little metal-looking parts are actually metal – not painted plastic. I have pinned the shit out of the cover over the course of the month, and you can’t even tell – no snags, no pin holes, no marks. I’ve used professional dress forms in the past, and this one feels pretty comparable to the almighty Wolf form – at a fraction of the cost.

Dressform - The Shop Company

Not only does it have markings to aid in draping/fitting/patternmaking, but many of them are raised (including the side seams), so you can feel them straight through the fabric.

The form also raises and lowers via a pedal at the base. Interestingly, I lowered mine as far as it will go… laughed at how short it was…. and then realized it was exactly my height o_O hahahaa whoops!

Dressform - The Shop Company

THE SHOULDERS ACTUALLY COLLAPSE. You have no idea how much this delights me! Sometimes I just stand there and snap the shoulders in and out because it’s fun as shit. Don’t judge me.

Side note: Up until very recently, I couldn’t wrap my head around the concept of collapsible shoulders. Like… what are they collapsing into…? I only learned what that entailed when I was working at Muna’s and I started playing with her dressforms. So, the above image is what it looks like when you collapse the shoulders of your form. You just push them in and they snap into place. It makes getting on garments SO much easier, plus, like I said – it’s fun!

Dressform - The Shop Company

You can also stick pins in it! Not directly straight in – they have to go in at an angle (as with most professional forms; the core is still solid and unpinnable). But hey, they stick and they stay and it’s pretty awesome.

Chambray Colette Hawthorn

Oh, right, and it’s beautiful! I mean, seriously, look at that gorgeous dress form! It’s currently modeling my Chambray Hawthorn, but seriously, any piles of rags would look beautiful on this thing.

Old Form/New Form

I’m sure you’ve noticed me using the form since I got it – I’ve had it for about a month at this point. I waited this long to post a review because I figured the review would be much more accurate if I’d actually used it for a bit before gushing. The form actually came in while I was writing posts for the OAL, which means I switched that shit out in the middle of posts. This is actually a really good example of the difference a nice form makes when displaying your garments – check out my old form on the left, and the new form on the right. Doesn’t it make a world of difference?

Dressform - The Shop Company

The only downside I can think of to this form is that the sizing is pretty limiting. It’s not adjustable, and it’s a straight size that only goes up to a 20. However, for my size and body shape, the 2 is a pretty close match. I am of the camp that you can’t really use a form for intense fitting purposes (you’ll never 100% mimic your body with a form – and even if you do with, say, a literal body double, it still is rigid in areas that squish), so a close match is good enough for me. Of course, you can always pad out the form (I have used the Fabulous Fit system in the past, but good ol’ batting and a new knit cover will also work) if you need to add some additional curves. I use my form to display clothing, take photos, make minor fitting adjustments, help with design decisions while sewing, hang half-finished garments so they don’t turn into a cat bed, and to creep Landon out. For all these purposes, it works great.

Also – the price is pretty freaking amazing. It’s $225, which is insane for a form this nice. As a comparison – Wolf forms retail for around $850, and like I said, this one is pretty comparable. On the flip side, the cheapie ones from Joann tend to list around $260 – and while you can get a coupon to knock down the price, I’d really recommend saving your money for this nicer one. More expensive up front, but much much cheaper in the long run.

I am so excited about this new form – mostly because I actually have a legit recommendation now when people ask what kind of form I use! ๐Ÿ™‚ Thanks so much to The Shop Company for providing me with this form! If you’re in the market for a new form, definitely check them out – they have male forms, fully pinnable forms, creepy forms with arms, and even child forms. Something for everyone ๐Ÿ™‚

What about you? Do you have a dress form? Are you happy with it? Also – what should I name my form? The old one was Dolly. Should this be Dolly 2? Help.

* Disclosure: I received this form from The Shop Company for free, in exchange for a review. I know this review sounds really gushy and biased, but I promise it’s 100% honest; the product is just that good. I was not additionally compensated for this post. Also, despite the number of links in this post – none of them are paid affiliate links. Click away, y’all ๐Ÿ™‚

Completed: Simplicity 1425

22 Jul

Today’s outfit inspiration comes from a completely new realm for me – watercolor painting!

Eyelet Peplum Top & Thurlow Shorts made with Mood Fabrics

Remember that watercolor class that I signed up for earlier this summer? Well, here’s a shot of one of the paintings I did in my final class (no, it wasn’t a fashion illustration class, but the teacher was open to letting us paint whatever wanted – and she was tickled that I went with fashion illustration, ha!). I had some swatches from Mood Fabrics that I knew I wanted to turn into an outfit for my next MSN post, but the outfit inspiration didn’t come until my pen er, watercolor hit the paper ๐Ÿ™‚

Eyelet Peplum Top & Thurlow Shorts made with Mood Fabrics

Let’s start at the top and work our way down! I used Simplicity 1425 for the pattern, and cut the most simple version (sleeveless, no yoke, no collar). I cut the size 4 and took a little in at the waist, as well as made my normal gaping-upper-back alteration that seems to be a running theme for me when it comes to sewing Simplicity patterns.

Eyelet Peplum Top & Thurlow Shorts made with Mood Fabrics

My fabric is this beautiful white cotton eyelet from Mood fabrics, which I underlined with this bright white cotton batiste (also from Mood Fabrics), for modesty and some opacity. It’s still a little on the sheer side – as in, I have to watch what color undergarments I’m wearing! – but the two fabrics together make such a fun light and airy top.

Also, I just noticed that there is a fly on my boob in this picture (at least, I’m pretty sure it’s that fly that was buzzing around). Gross.

Eyelet Peplum Top & Thurlow Shorts made with Mood Fabrics

Sewing was very simple and straightfoward – not to mention fast! Seriously did all this (minus the initial muslin) in the space of a Saturday afternoon. Not too bad! I underlined all the pieces by hand with silk thread (it’s not totally necessary to use silk thread, but it does make it easier to pull out the basting when you attach the seams – which, if you’re as anal-retentive as I am about sewing, you will totally appreciate that, ha!) and I used a 70/10 Microtex needle to prevent puckering, since the fabric is so lightweight. Most of the inside seams are serged, although I did finish the armholes and neckline with bias facing (cut from the same batiste). I can’t really speak for the instructions on this pattern as I didn’t use them at all, but the overall finished top is pretty nice!

Eyelet Peplum Top & Thurlow Shorts made with Mood Fabrics

For an extra lil’ punch, I stuck an exposed separating zip right up the center back. Kind of toughens up the overall sweetness of the eyelet, yeah? ๐Ÿ™‚ This pattern was actually written for there to be buttons down the back – which is a cute idea in theory, but they only called for 3. THREE. How that doesn’t look like a fucking hot mess when you’re wearing the top and moving around is beyond me. I imagine that would gape a lot! So I swapped out my buttons for a fun zipper and I’m loving the way it turned out.

Eyelet Peplum Top & Thurlow Shorts made with Mood Fabrics

Getting the zipper in was kind of an adventure in itself. I tried googling around for directions on inserting an exposed zipper (I mean, I had a vague idea of how to do it, but I always like to check and see if my technique is right first), but everything I was pulling up was for close-ended zippers. Since my zip is separating (you know, so I can get the top off and on without destroying something in pure rage during the process), those particular tutorials were kind of a moot point. In the end, I kind of winged it, but I think it worked out!

Eyelet Peplum Top & Thurlow Shorts made with Mood Fabrics

As far as the style of the top – well, I like it. I know it’s super trendy- especially with the dang exposed zipper! – but I’m ok with being trendy. I think peplum tops are super cute and the white eyelet will go with lots in my summer wardrobe. Plus, I can tuck that peplum into high-waisted skirts, so it’s like two tops in one! Woohoo!

Eyelet Peplum Top & Thurlow Shorts made with Mood Fabrics

Eyelet Peplum Top & Thurlow Shorts made with Mood Fabrics

Now for the shorts! I used my beloved Sewaholic Thurlow pattern, matched up with my other beloved plum organic cotton twill from Mood Fabrics. My love affair with that organic cotton twill should be well known at this point, I hope. That stuff is amazing. Soft and cottony with a bright, saturated color… a dream to sew, and a dream to wear. I’ve made so much with this particular fabric in different colorways – including moreeee Thurlows! – and I’m sorry y’all have to see it again. Just kidding, I’m not sorry! These shorts rule! Get you some of that organic cotton twill, you won’t regret it!

Eyelet Peplum Top & Thurlow Shorts made with Mood Fabrics

I don’t really know how much more I can talk about these shorts until y’all tell me to shut up. I’ve seriously made them so many times, it’s kind of like autopilot at this point. I found that I did have to take quite a bit of excess out of the legs this go-round… I think I might be getting too un-curvy to wear this particular pattern ๐Ÿ˜ฆ I’m already at the smallest size, so it’s not like I can size down. I’m hoping my adjustments will work for future Thurlow shorts, but I’m kind of afraid to try the pants at this point since there is soo much that needs to be changed now, ugh. I reckon I could find another pants patterns to sub out, but wah! I want to keep making Thurlows forever!

Eyelet Peplum Top & Thurlow Shorts made with Mood Fabrics

Anyway, fitting issues aside, these shorts were a delight to put together. I played around with the topstitching on this pair and I really love how the it looks so gorgeous and crisp against this fabric. I tried topstitching around the welts this time – something I’ve seen in RTW and always wanted to try – and I think it looks pretty nice!

Eyelet Peplum Top & Thurlow Shorts made with Mood Fabrics

Oh, and check out that fun lining! Yeah girl! That comes courtesy of this crazy/awesome psychedelic cotton voile print, which is unfortuanately sold out now (but take a look at the other cotton voiles from Mood Fabrics. Sweet!). I love putting crazy prints in my pants because, dude, why not? Business in the front, party on the inside. Or something like that!

Since we’re on a roll with all these detail shots, here are some of the top:

Eyelet Peplum Top & Thurlow Shorts made with Mood Fabrics

I took waaay too many pictures, but there was so much detail to capture! Sorry bout that!

So I guess the next question is – does she have that outfit from the fashion illustration?

Eyelet Peplum Top & Thurlow Shorts made with Mood Fabrics

Fuck yeah I do! Ok, maybe not so much the shoes, but I’ve got the purse! Ha! This shit’s from Kate Spade – I bought it after I was having a really rough week (retail therapy totally works, y’all.). It was on sale, but it is still also the most expensive purse I’ve ever bought – and it’s totally worth it! I knew I couldn’t find that lemon fabric anywhere, so I justified it with the purse hahah ๐Ÿ™‚

Eyelet Peplum Top & Thurlow Shorts made with Mood Fabrics

Just for fun, here I am trying to strike a pose like my fashion illustration. Hmm… probably should stick to painting, not posing! ๐Ÿ™‚

Completed: McCall’s 5803

21 Jul

For the past couple of weeks, I’ve been slowing reorganizing my pattern stash. You guys, I had no idea how much shit I had stuffed in those boxes until I really started culling through them. Let’s just say I’ve made 3 trips to my local comic book store to buy more packs of 100 backing boards and clear sleeves. It’s kind of disgusting when I think about how many patterns I have (although, to be fair, most of them are old vintage ones I picked up at our flea market for next to nothing because they would have gotten thrown away otherwise oh god), and even more so when I realize I have so many that I haven’t even thought about since I took them home. On the flip side, I’ve been rediscovering a lot of cool ones!

McCall 5803 - Liberty

This is McCall’s 5803 – it’s an old OOP Lizzy McGuire (lol yep) pattern that I’ve had for god knows how long. I’ve actually made this one before – in the form of a Plaid Clusterfuck – and I’ve always (well, when I remembered about it hahahahaha) wanted to made a more demure version, since I love the shape of the arm holes and button placket (and I’d love one with a proper collar and not just the stand). I swear, every time I wore that Plaid shit, I would think, “Man, I wish this didn’t have the ruffles.” So as soon as I rediscovered it, I knew I could make it happen.

McCall 5803 - Liberty

My original version of this top included a big ol’ 1.5″ FBA, which was no longer needed to get a good fit (I don’t even have the original one; I sold it last year when I realized it didn’t fit me at all anymore). Since I’m too much of a stubborn ass to trace my patterns and preserve the original, that meant I had to remove the FBA by carefully peeling up tape and carefully repiecing tissue together. It worked, for the most part I guess, but something tragic happened at the waist because this baby is apparently painted on. Despite a tissue fit (and my stubborn ass thinking, “noooooo I don’t need a muslin, I’ve made this before lololol) and everything. Argh.

I also didn’t bother to staystitch the neckline (whyyy), so it stretched out a little on one side. To remedy this, I pulled that side lower while marking the button spacing, which is why it’s not even at the bottom (you probably didn’t even notice that until I said something, oh well). These types of shirts are generally hemmed during the beginning of construction, so I couldn’t fix the unevenness when I was doing the buttons, if that makes sense. I should probably unpick the hem and fix it now, but eh. It doesn’t bother me as much as it should.

McCall 5803 - Liberty

McCall 5803 - Liberty

I know these pictures make it hard to see what’s going on. I’m sorry ๐Ÿ˜ฆ You can click on them to make them bigger through Flickr, if that helps.

McCall 5803 - Liberty

I let out some of the side seams to try to add a little more tummy room, and that helped a little. I’ve also just recovered from a couple weekends of eating some of the worst shit for me ever – I don’t necessarily diet, but I try to maintain regular exercise and eat things that are beneficial to my health/body and that seems to work well enough for me. After a couple of weekends of eating cupcakes and cookies and fried deliciousness in a to-go box, though, I was feeling tired and bloated and definitely like a stuffed sausage when I put this damn shirt on. I put the shirt aside for a week (wadded up in the corner, because that’s how I roll), I think it looks a bit better now that my body is back to normal. It’s definitely still pretty tight, but at least the busy print hides most of the wrinkles! Ha!

McCall 5803 - Liberty

Speaking of this busy print – isn’t it beeeeeautiful!? Ahh!! It was a gift from Sunni, who sent me a box of some of the most lovely fabrics earlier this year. I guess I never blogged about that, but we decided during Project Sewn that we both deserved a little treat and decided to have a fabric trade! She sent me all kinds of amazing shit – stuff that I’m now just sitting on because it’s almost too good to cut (and I’m waiting for divine inspiration)! That woman has some fabulous taste – and this is the first piece I actually made something with.

McCall 5803 - Liberty
The goodness you are looking at right now is actually Liberty of London shirting cotton (I told you, that woman has some fabulous taste!) from Sunni’s personal stash. Ahh!!! I’ll admit – and y’all can chase me with pitchforks if you’d like – but I’ve never really cared much for Liberty fabrics. Sorry! I think the prints are lovely, but they also remind me way too much of my Laura Ashley bedroom from my childhood. Too girly and floraly and, well, y’all look pretty in them but I’d rather not. I’d rather be clothed in NEON! But anyway, I’ve always been curious to try it because sewists don’t only rave about the prints – they rave about the quality of the cotton as well. You know I love trying new things for science, so I was pretty excited to have my own piece to play with when I got Sunni’s package. And I do think this print is super beautiful – it’s floral, sure, but it’s not all ditzy and super pastel girly like the Liberty I always see. It’s much more along the lines of my style, and I knew it would make a fabulous top.

McCall 5803 - Liberty

I’m so glad I made this work, because I would have been really really angry at myself if it had ended up being a wadder! I could probably stand to let out a couple more seams, but everything is topstitched, so it’s really a matter of me getting the energy to go through all that unpicking and retopstitching. Argh! Anyway, at least I left off the ruffles this time ๐Ÿ˜‰

McCall 5803 - Liberty

Anyway, here she is in all her glory! Beautiful print, topstitching (that will be the end of me), and those gorgeous buttons. If those look familiar, it’s because I used them on my Audrey in Unst cardigan. Not the same ones – my cardigan still has buttons – but from the same batch. My sister-in-law helped me pick them out for the cardigan, and I bought them from a vendor at our flea market. He had all kinds of cool vintage buttons – I think he said these are vegetable protein from the 20s? – and she actually went back afterwards and bought up the rest for me for Christmas. So awesome ๐Ÿ™‚ So obviously, they were perfect for this shirt – both in specialness and general matchy-ness ๐Ÿ™‚

McCall 5803 - Liberty

Construction-wise, nothing new to report here. I finished the arm holes with self bias facing and topstitched with a slightly longer stitch length so the stitches would be more defined.

McCall 5803 - Liberty

So, what’s the verdict on Liberty of London? Well – y’all sewists are right, this shit is a JOY to sew up! It presses well, it doesn’t show pin holes, it’s easy to cut, and the fraying is minimum. It also just feels absolutely luscious. I totally understand the rabid fangirling over this shit. I don’t know if there is much Liberty in my future – after all, it’s still hideously expensive – but considering this shirt barely took any yardage, I could probably squeeze out a special piece for another special top ๐Ÿ™‚

So, THANK YOU, Sunni, for the amazing gift of this gorgeous fabric (not to mention the chance to get to sew on it!)! Have any of y’all ever sewn with Liberty? Are there any cool non-floral prints that I’m blindly overlooking?