WHAT UP FOLKS it’s time for my yearly home decor sewing post 😛
I actually don’t mind this sort of sewing – it’s certainly not something that I would do for income (past Lauren has been there, done that. Ooh, fun fact – I sewed curtains for this guy’s house once for a feature in Better Homes & Gardens lol y’all I can’t make this shit up), but it’s a fun sort of puzzle that requires some mental energy upfront (good) with lots of mindless making once you’ve passed that peak (even better). And, while it’s definitely not cheaper than buying something from Target, it is definitely the least expensive way to have custom soft goods in your home. There is a reason why this shit costs so much to have made – it’s a lot of work!
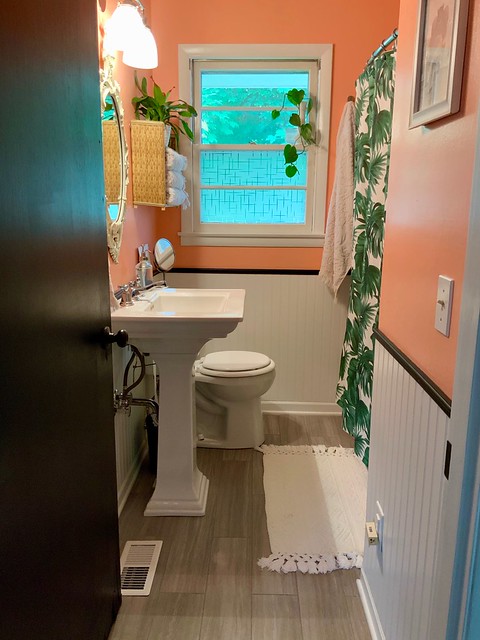
Anyway, I’ll get back to the whole point of this post! My updated bathroom! Let’s start with a series of before photos:
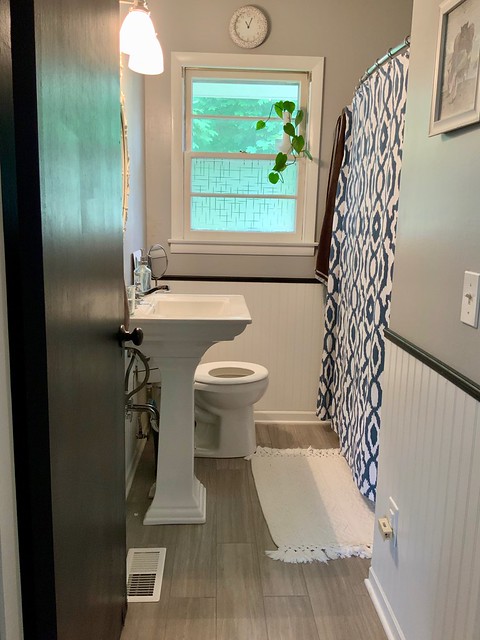

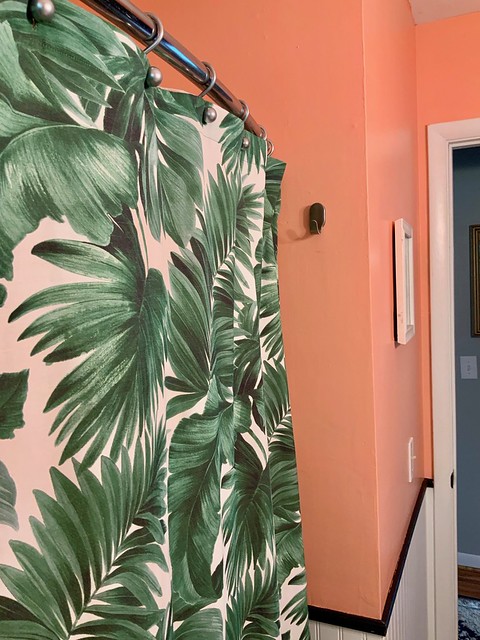
This pretty close to how the bathroom looked when I first moved into my house. By the time this photo was taken, I had already made a few changes – for once, I changed out the mirror (the original one was just some cheap $25 mirror with a black frame that I’m sure the sellers slapped in at the last minute). I also added a curved shower rod and some hooks to hang towels and toilet paper. Those updates were fine for while I was still unpacking and setting up, but now that the house is in a “normal” state I am ready to really get started on the fun updates!
The main thing I wanted to do was repaint the room. The sellers had everything painted this same shade of gray, I guess to help sell the house to make it look a little more modern and trendy. They also painted all the doors, and some of the window frames, black. Don’t get me wrong – it’s a reasonably inoffensive gray, and I totally get if that’s your thing. More power to you, etc. But, gray is NOT my thing, and now that I can I’m gonna paint every fucking room in this house. It’s been a slow process (I currently have the kitchen & studio changed to white, plus now this room), mostly delayed due to paint color debates. The idea for this coral came pretty quickly, and once I’d decided on the color I got to go on the adventure of finding the right decor items to finish out the space. At some point I’d love to change the flooring to something less grey – however, that laminate is brand-new and I don’t see a point in ripping up a perfectly functional floor so the grey floor stays for now.
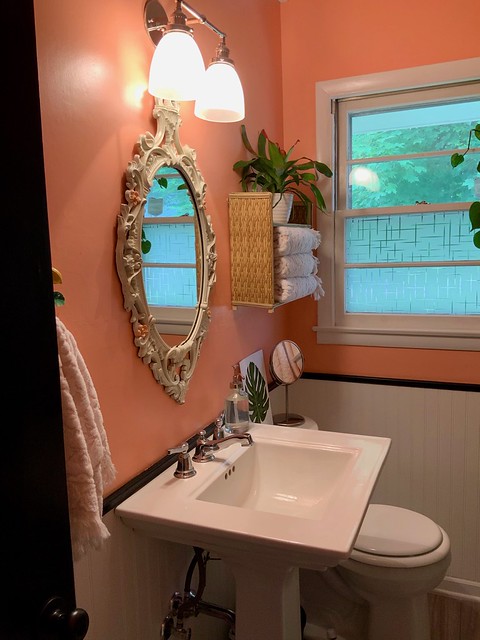
The paint color is “Simply Coral” by Behr (edit: Update, the paint is actually by Valspar. I don’t know why I said Behr!) (I know, riveting name choice there). I painted this on a Saturday afternoon, leaving it overnight to do the 3rd coat first thing in the morning. Yes, 3 coats! Despite this gray being fairly light, it did take a bit of effort to get full coverage! Which wasn’t too bad, due to the wainscotting and shower liner taking up most of the wallspace in this tiny room. Also, I feel like it’s worth noting that I actually took some extra effort with this project, including taping off the edges (I am actually really good at edging with an angled brush, but there were so many tight angles in this room that it made sense to take the extra time to tape everything off. Just so we are clear, I still managed to get paint on the ceiling and door trim haha), waiting for the paint to properly dry between coats, and actually doing that third coat (even though 2 would have been “good enough.”). Since I know I’m going to be in this house for an indefinite amount of time – and any poorly done projects will eventually need to be fixed by, well, ME – I really want to do things right!
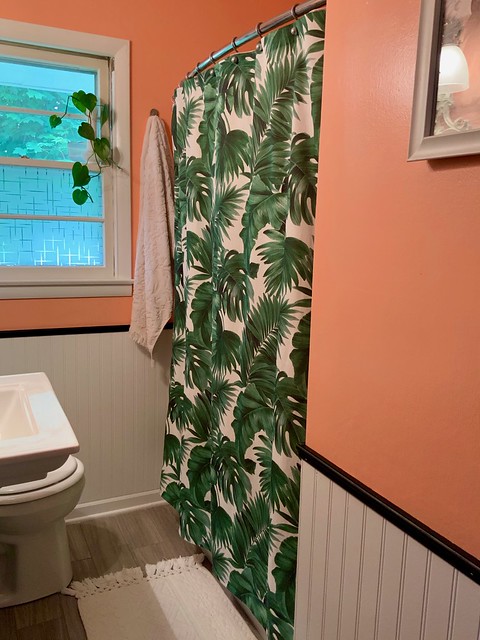
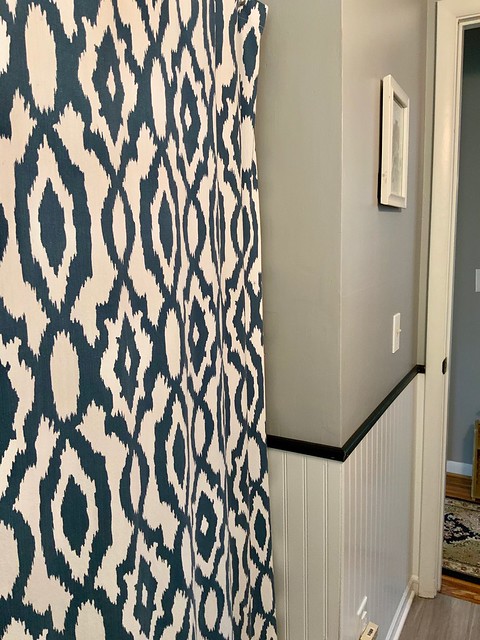
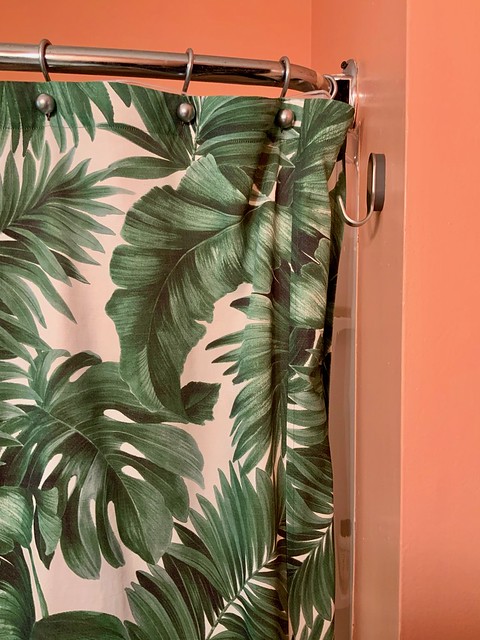
Anyway, sorry to go on so long about painting! There is a sewing purpose to this post, I swear! Because I made the shower curtain! I actually was not planning on doing this – I am perfectly happy to pay someone else (i.e., a manufacturer) to do my home decor sewing so that I don’t have to. However, I had a specific vision in mind that was apparently impossible to fill! Everything I found was either the wrong colors, bad proportions (I didn’t want leaves that were, like, 5′ long haha) or just didn’t look quite right. The few that I did find that were passable were either 1. Printed directly on plastic, which imho just looks really cheap and was not the look I was necessarily going for! or; 2. Quite expensive (more than twice what I was willing to pay), but not necessarily good enough to warrant the splurge. I am happy to pay extra if I’m getting exactly what I want, but in this case I was not. After a couple weeks of looking, I came to terms with the fact that I’d probably have to sew my own and took a look at some of the home decor offerings on Mood Fabrics. And – lo and behold – my perfect fabric was waiting for me! This tropical home decor print ticked off all the right boxes – medium weight with a nice hanging drape, a beautiful texture that adds some visual interest, and a print with the right colors, proportions, and randomness. This fabric actually comes in a few colors, but I chose the dark green because I thought it would look best with my coral.

I bought 3.5 yards, which put me right at my limit for my monthly allowance. This amount was sufficient, however, a full 4 yards would have been perfect in retrospect. Due to minor fabric limitations, I didn’t have *quite* enough to get the full length that I wanted (more on that in a minute), but I am still pretty happy with the end result!
Before I started sewing, I had to do some basic math so I’d know what dimensions to cut everything to. Funny, this actually isn’t the first shower curtain I’ve ever made – I recall sewing a black one about 10 years ago for a bathroom redo (actually, I’m pretty sure that’s around the same that I bought these curtain hooks HAHA)– but it has definitely been a looong time time I have embarked on this endeavor, and furthermore, I’m definitely a better seamstress now than I was back then!
To start, I measured my current shower curtain and wrote those numbers down (68″ wide by 71.5″ long, which I think is pretty standard). I then added in seam allowances, which gave me cutting dimensions of 69.5″ wide and 75.5″ long. My fabric is only 55″ wide, which meant I did not have quite enough for the full width. And, while 3.5 yards sound like an ass load of fabric – when you cut it in half lengthwise, you only end up with 63″ in length and you will recall that I needed nearly 10″ more than that for my length. Hence why getting the full 4 yards – or even a little more than that – would have been more sufficient. Oh well! I knew going into this that I would need to piece my fabric, but upon receiving the whole piece I realized that the scattered and random print would not lend itself well to matching, which meant a seam right down the middle of the curtain would look pretty shitty. So instead, I pieced along either side of the curtain, adding side panels that were approximately 7.25″ wide. Having them on either side makes them look intentional, I think, and doesn’t make the unmatched design look as jarring. I sewed these on with flat-felled seams, which, again, I think makes it look a bit more intentional.
To preserve as much length as possible, I used leftover fabric (after piecing the sides) to add facings to the top and bottom of the curtain. By using a 1/4″ seam allowance, I only lost about 1/2″ in total which keeps the curtain from being too short. With the hem being 1″ and the top taking about 3″ of fabric (as it is turned the full amount twice), I was able to save quite a bit of length by doing this! I think adding a trim to the bottom – such as a pom pom trim or even a fringe! – would look really cute as well as add some length, but I haven’t found anything I like yet so, current length certainly works for now 🙂
Anyway, once I had my dimensions figured out and my plan written down, the sewing part was very easy and relatively mindless! I pressed all my edges and topstitched with matching thread, added my facings and understitched and topstitched, then sewed the button holes along the top edge for the curtain hooks. I used my old curtain to help me get the spacing right, and then sat and waited while my machine sewed 12 buttonholes. LOL. Interestingly, I did not use interfacing for this part. The original curtain does not use it, so I decided to go with their lead. Since the fabric at the top is turned twice, there are plenty of layers behind the buttonhole for stability. And since I am not using the buttonhole very frequently, there’s not a lot of wear happening up there so I think the uninterfaced part is fine. Time will tell!
All in all, I spent about 3 hours on this project. That included all the measuring, cutting, and sewing. Obviously with the cost of the fabric, this was not a money-saving project – but it could be, if you used less expensive fabric. For me, it was a way to get exactly what I wanted and I could not be more thrilled with the outcome. I especially loved figuring out ways to solve the puzzle of getting this to work with the amount of fabric that I had.
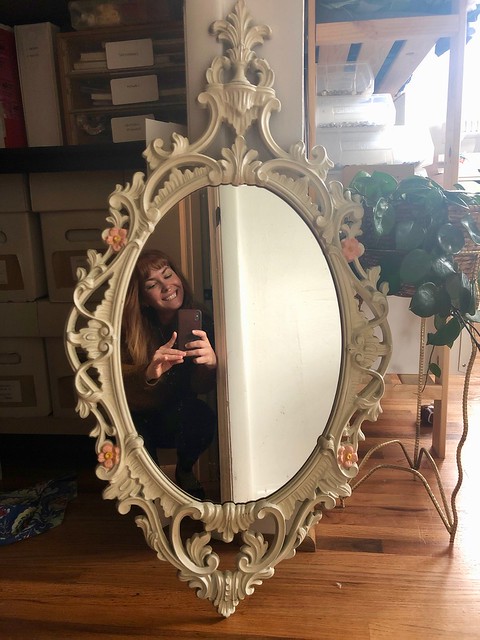
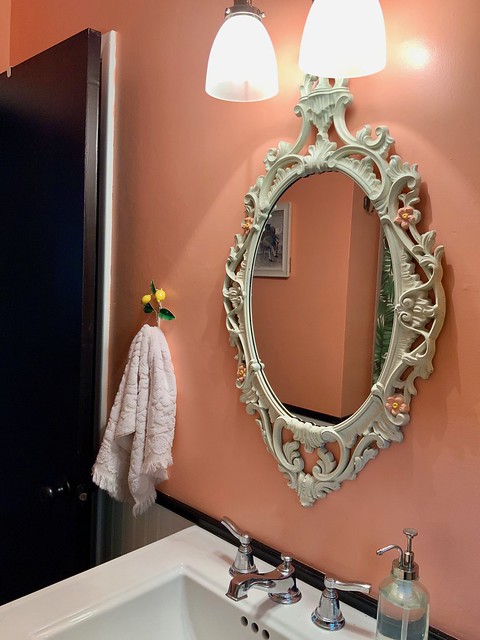
Oh! One last update I did – I added some color to the mirror. I’ve actually had that mirror for many years (I bought in my early 20s, from a thrift store for a solid $24.99), and it’s changed colors a few times as well as moved from room to room. It’s also gone through a few repairs, but it still hanging out strong! Like I mentioned, the original mirror in this bathroom was really boring and uninspiring, but as soon as I saw it I knew I could replace it with something more fun! I wasn’t terribly thrilled with how the plain creamy white frame looked in the bathroom, so for fun I used my coral paint to color in the flowers. It’s a very slight update but I really love the way it looks!
This was a really fun project to work on, and surprisingly not too expensive when all was said and done! Here’s a cost breakdown of all my updates:
– Paint: $36 – I only needed about 1/2 a gallon (Lowes)
– Shower curtain: c/o Mood Fabrics (price would have been $104.95 without my allowance, though!)
– New bath rug: $24.99 (Walmart)
– Towels: Approximately $100~ (Target) (I don’t have an accurate amount since I bought them in phases, so this is just an estimate. Also, new towels definitely aren’t necessary but I have been wanting to replace mine for a while so I used this as an excuse! Buying towels specifically to match my bathroom sure feels grown-up lol)
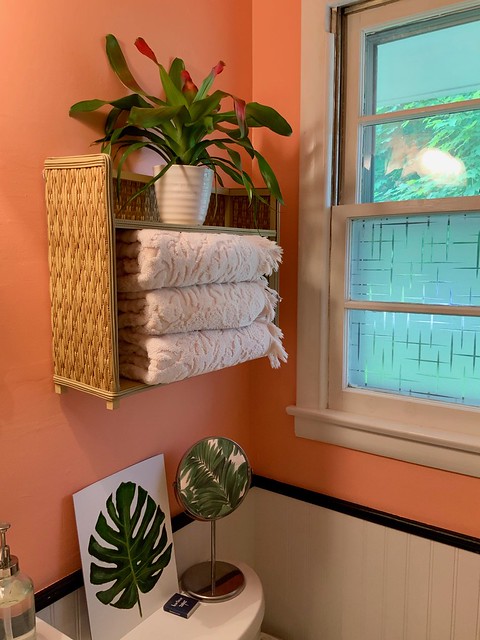
– Wicker Shelf: $8 (Nashville Flea Market) (fun story: I offered the guy $10 for this shelf and he haggled me DOWN to $8! What!!)
Plants: The one on the windowsill was a cutting from my mom, in a vase that I got from a wedding. So, free! The one on the shelf was $9 from Lowes.
Make-up Mirror: $4.99 (Ikea)
Towel hooks (silver): $.499 (Ikea)
Hand towel hook (lemon): $1 (Nashville Flea Market)
Window Privacy film: $13 (Amazon)
Monstera Leaf Painting: Painted by me! Eventually I’d like to build a simple frame and hang it on the wall.
I also changed out the light fixture globes, although I don’t have a before photo of what used to be there! (I tried to find a photo and Google is failing me… imagine a shallow glass shade. Believe me when I say it looked terrible.) These came from Habitat for Humanity and were $6 for both. Eventually I’d like to replace these with something that looks like flowers, but they are good enough for now!
ANYWAY I guess that about wraps this post up! I am really happy with how the bathroom turned out – it brings me joy just to be in there now! And as an added bonus, coral is a SUPER flattering color for me, so I basically am always feeling my look when I’m getting ready in the morning haha.
I’m not sure what room I want to work on next, but I’m excited regardless – I feel like this house is one big neverending art project, and I am here for it!
** Note: The fabrics used in this project were provided to me in exchange for my participation in the Mood Sewing Network. All opinions are my own!