Tag Archives: sweatshirt

Completed: Pinnacle Sweatshirt

11 Dec

Have y’all seen the new Geo Collection from Papercut Patterns? It’s no big secret that I am a DIEHARD Papercut Fangirl, but this recent collection really blew me away more than usual (which is saying a lot!). I love everything that was released and have many plans!

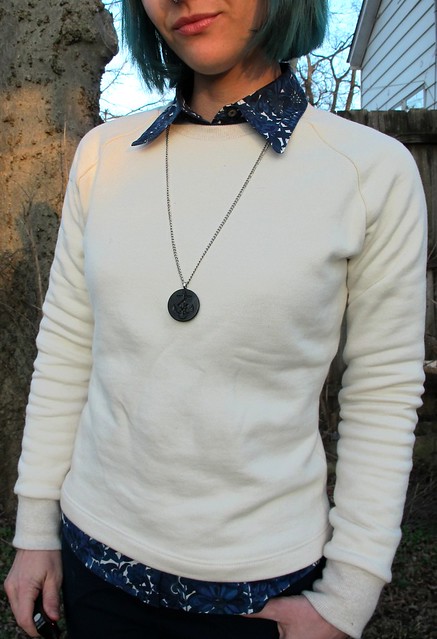
To start, I wanted to try out the Pinnacle Top. I find this pattern really interesting as it can be made with either a woven or a knit, which really changes the finished look! I love the geometric design on the front, and the pattern itself has some crazy looking pieces that come together in a very origami-like fashion. Pretty standard of Papercut Patterns, which is part of what I find so appealing about them!

Pinnacle Sweatshirt made with Mood Fabrics

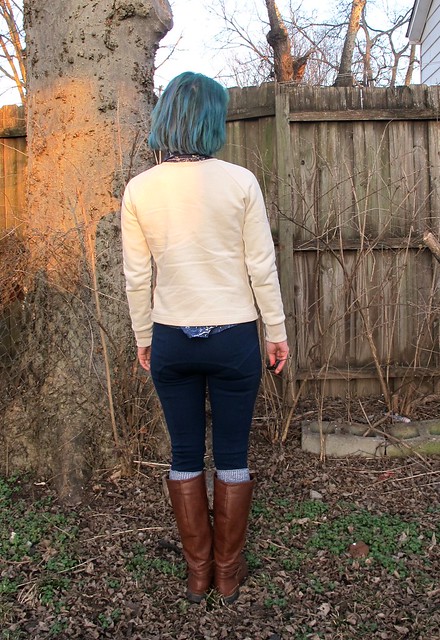
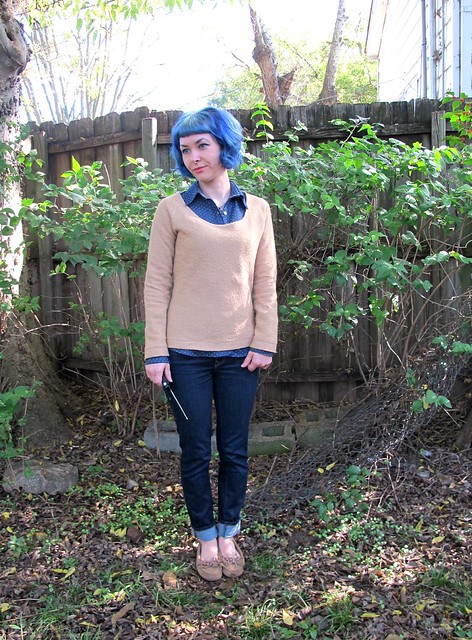
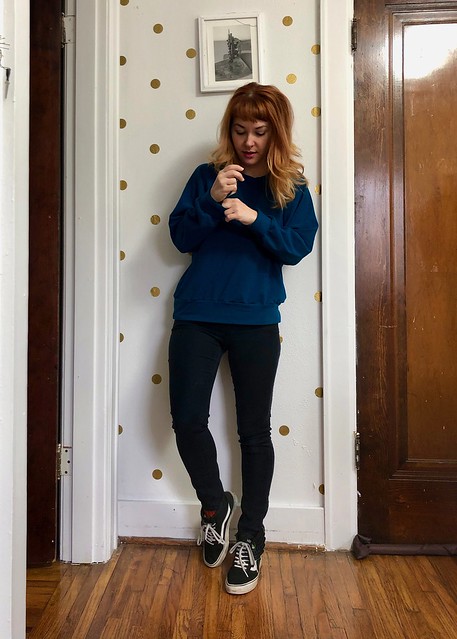
I really want to try the v-neck version of this pattern, in a soft linen or even a drapey silk – but for this time of year, the sweatshirt is king. I love that I can sew my own sweatshirts, which gives me the ability to add cool design features or use fancy fabrics. Nothing like the basic stuff I wore when I was a kid! And this pattern looked like it would be fun to put together, and I assumed correctly.

Pinnacle Sweatshirt made with Mood Fabrics

Pinnacle Sweatshirt made with Mood Fabrics

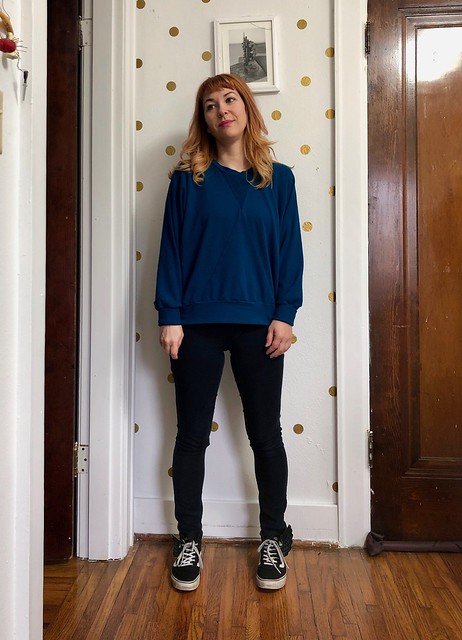
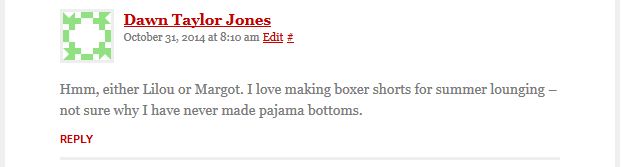
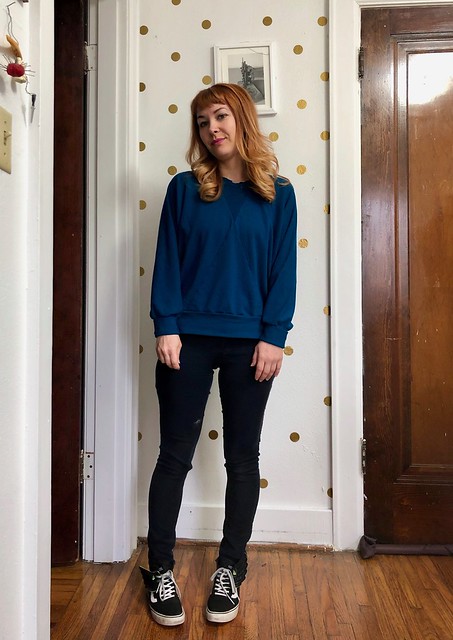
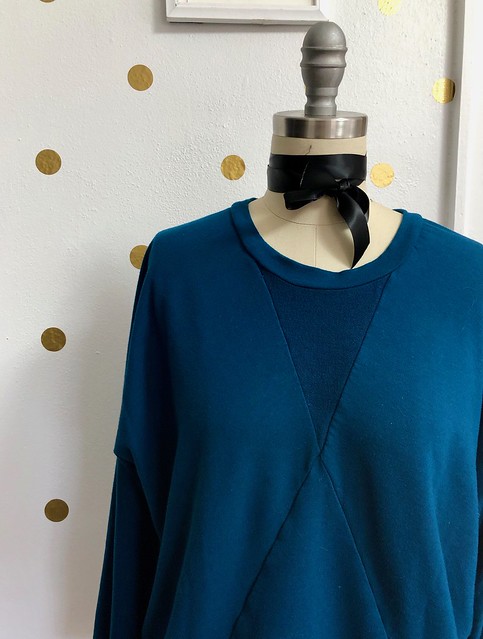
I had this super soft bamboo French Terry in my stash that I purchased from Mood Fabrics earlier this year… it comes in a load of amazing colors, and while I WANTED to stick with my TNT black/grey colorways, I went a little wild and ended up with 2 yards of Moroccan Blue. Almost more like a teal, this is a very deep, rich blue. I love it and I’m happy to report it’s seamlessly worked its way into coordinating with *most* of my wardrobe (unlike some colors that I try out and then realize I have nothing to wear them with!).

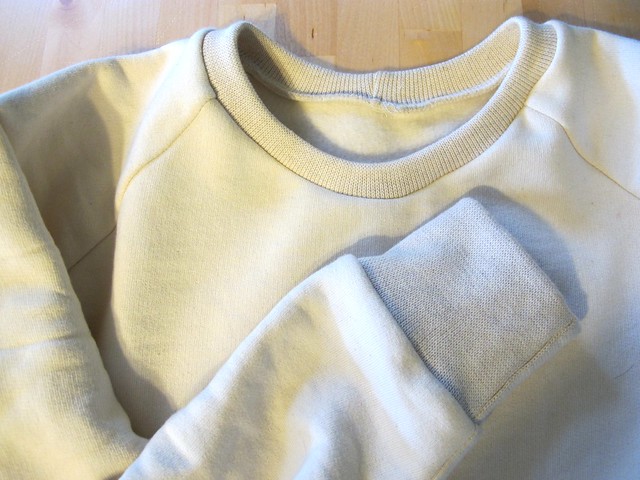
The fabric itself is amazing. Like I said, it is super soft on both sides, thanks to the bamboo. The terry loops are very fine and small, which means the fabric isn’t bulky – but it is dense and heavy. It also has a great amount of 4 way stretch, which makes me think this would be an ideal fabric for lounge pants (leggings, joggers, whatever keeps ya warm on the couch). At $20/yard, it certainly is not cheap – but it’s super fucking wide (I still have quite a bit left from my 2 yard cut after making this sweatshirt) and it washes and wears great. The only downside I have noticed is that it does wrinkle when you store it folded in the drawer – which is easily solved by tossing it in the dryer for a few minutes before wearing (and bonus, it’s like PUTTING ON A HUG! omg you guys why I am I so alone). Traveling or don’t have a dryer? Laying it out flat in the bathroom while taking a hot shower also does the trick!

Pinnacle Sweatshirt made with Mood Fabrics

I’m sorry, I don’t know how I ended up with so many of what is basically the same picture. It’s either feast or famine when it comes to me and my camera, deal with it.

Pinnacle Sweatshirt made with Mood Fabrics

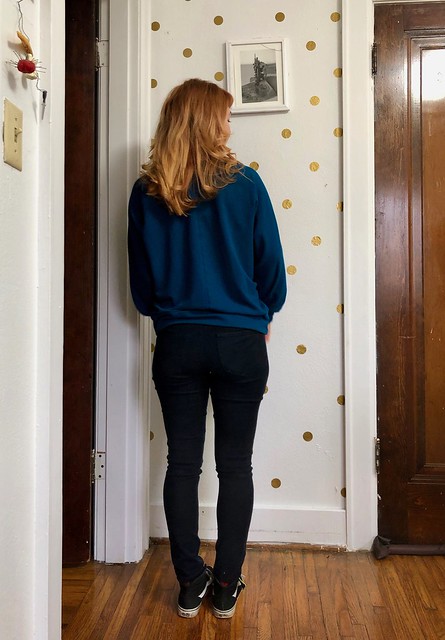
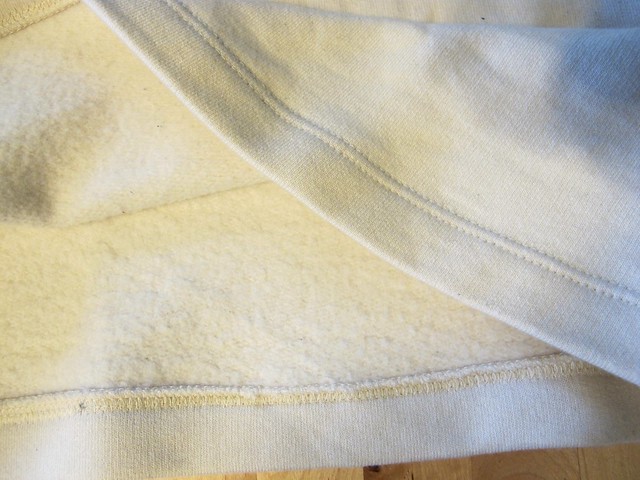
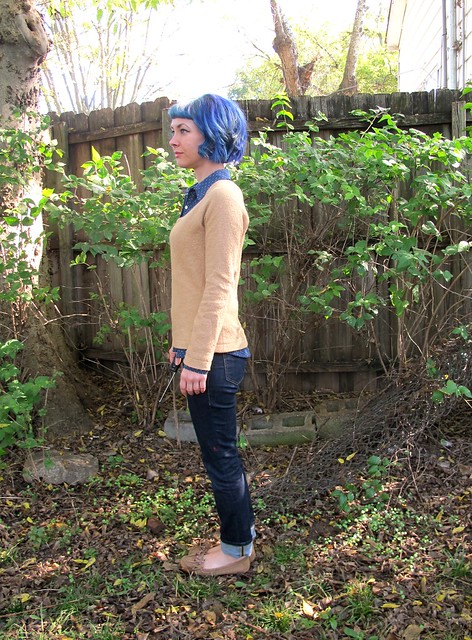
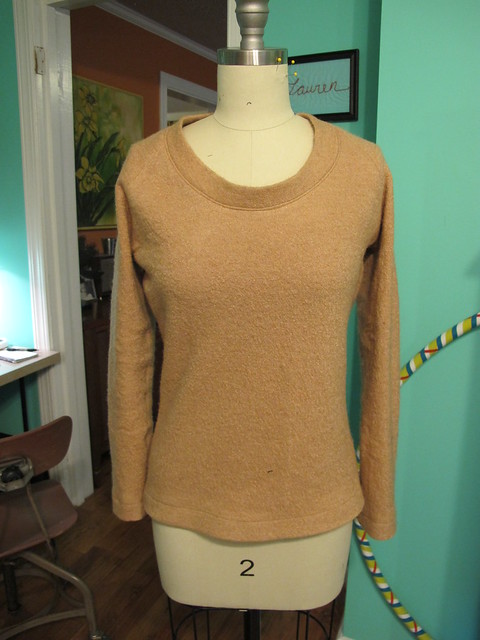
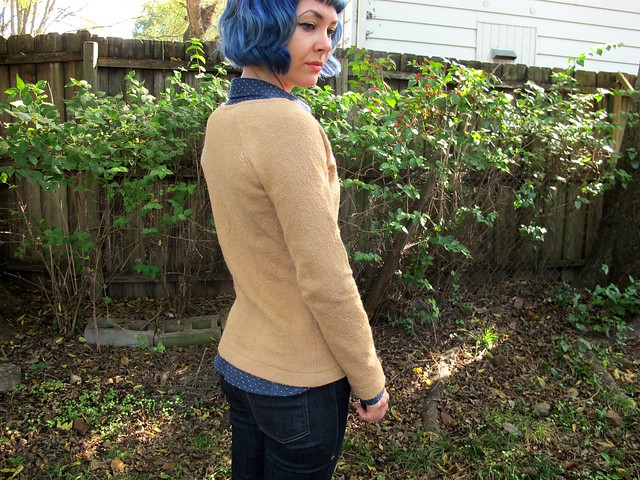
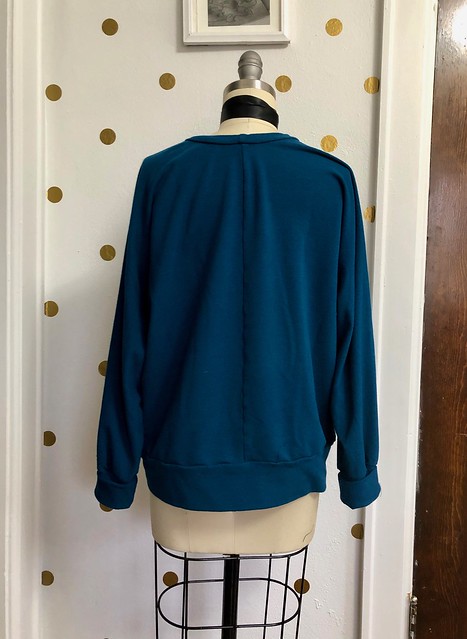
So, the pattern piece for this shirt is really interesting! It’s GIGANTIC (which means you really do need to pay attention to the fabric requirements), and goes together in a way that makes a shirt with no shoulder seams. The pieces are assembled with center front seams (in the form of this cool-ass triangle) and a center back seam, then closed with side seams (which gives you the chance to tweak the fit a little if needed). I made mine with one piece of fabric, although the geometric design on the front would lend itself well to colorblocking. For a little added interest, I used the wrong side out on the top triangle of my shirt, so you can see the texture of the French terry there, but the shirt in general is pretty monochromatic otherwise.

I sewed a size XS based on my measurements, which gives a nice, roomy fit. For future makes, I may side down to the XXS as I feel like I’m swimming a little in this version.

Pinnacle Sweatshirt made with Mood Fabrics

Pinnacle Sweatshirt made with Mood Fabrics

Pinnacle Sweatshirt made with Mood Fabrics

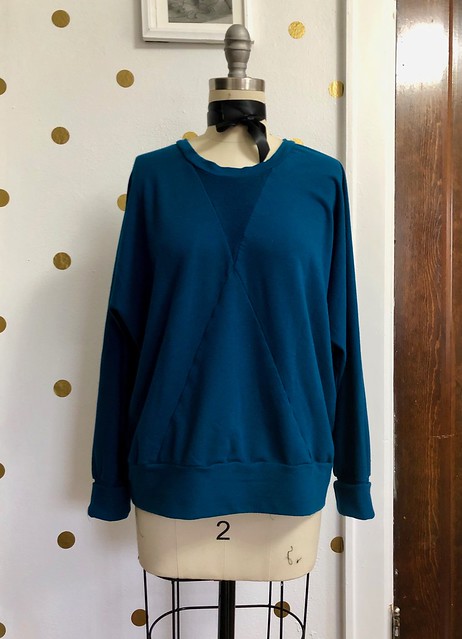
Construction-wise, not much to report here. I sewed this almost entirely my serger, which made this a really fast and efficient make. My one tip is to be careful with where the seams intersect at the center front, and baste them in place (either by machine or by hand) before sewing them for real. The seamlines matching are pretty essential to this shirt looking good, and if you baste them first, you can rip them out if they don’t match up!

Pinnacle Sweatshirt made with Mood Fabrics

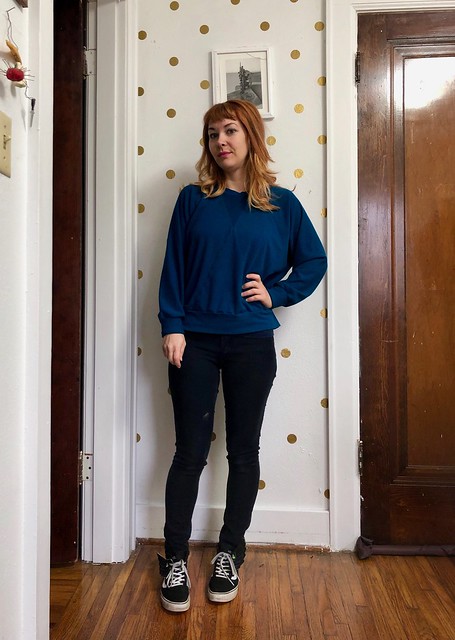
I’ve been wearing this sweatshirt a lot since I finished it – it’s perfect for staying cozy around the house, but also looks pulled-together if I need to step out or have an unexpected delivery. Secret pajamas are always a go in my world!

*Note: The fabrics used in this post were provided to me by Mood Fabrics, in exchange for my participation in the Mood Sewing Network. All opinions are my own!

Completed: Fleecy Fraser Sweatshirt

2 Mar

Ok, so, apologies in advance for posting a really boring sweatshirt today, but, I feel like this post is warranted for two reasons – really awesome fabric, and a previously overlooked version of a pattern.

Honestly, this might be my new favorite fabric at Mood (up there in the ranks with their Bamboo Jersey and Organic Cotton twill). AND they have plenty of colors still in stock (although as of this posting, currently sold out of this particular green – sorry!)! It’s a Christmas Miracle!

Sewaholic Fraser Sweatshirt made with stretch fleece from Mood Fabrics

In all seriousness, though, I wanted to really focus on the fabric for this post. I promise it’s a really good one and worth the praise! I found this Moss Bamboo and Cotton Stretch Fleece on the Mood Fabric’s website a few months ago, via swatch (I always take advantage of my free swatches and usually end up throwing random stuff in my cart before I place my order! I have discovered some REALLY cool fabrics that way that I might have otherwise overlooked). I’m not even kidding when I say it’s one of my new favorite fabrics – they have loads of colorways and it’s nice and wide (60″) so you need less yardage.

Sewaholic Fraser Sweatshirt made with stretch fleece from Mood Fabrics

Sewaholic Fraser Sweatshirt made with stretch fleece from Mood Fabrics

Sewaholic Fraser Sweatshirt made with stretch fleece from Mood Fabrics

Sewaholic Fraser Sweatshirt made with stretch fleece from Mood Fabrics

The fabric is comprised of 66% bamboo, 28% cotton, and 6% spandex. That little bit of spandex is essential for giving the fabric a great stretch with a fabulous recovery. Plus, I really love bamboo fabrics – they are soft, easy to wash and wear, and they are antimicrobial so they have fantastic stink-reducing properties!

This fabric is considered a sweatshirt fleece, meaning it is has one side that is nice and smooth and the opposite side is soft and brushed. Unlike your typical sweatshirt fleece, it’s a slightly lighter weight with a softer drape. It is also a 4 way stretch, which, WEIRDLY (don’t ask me why, I couldn’t tell you) has more stretch along the grain rather than the crossgrain (if I recall, 40% at the cross grain and something like 80% along the grain). It’s soft (did I mention that it’s soft? Because it is FUCKING SOFT), it snaps back into shape, and it comes in a nice array of colors – what isn’t there to love?

Sewaholic Fraser Sweatshirt made with stretch fleece from Mood Fabrics

Sewaholic Fraser Sweatshirt made with stretch fleece from Mood Fabrics

This sweatshirt is actually the second garment I made using this fleece – my first garment was a pair of black Virginia leggings. I don’t have any photos of those – let’s be real, they are black leggings and basically impossible to photograph – but I wear them ALL THE TIME (here is a photo on my Instagram – I’d already been wearing them for 3 days at that point haha). Think of your favorite fleece leggings or tights – and then just imagine them in bamboo instead of poly (so no stink and no pilling). Because of the spandex, the fabric doesn’t bag out – meaning no baggy knees or butts. Also, in retrospect – they look pretty much the same as the pants I am wearing (the Cecilia Pant from Elizabeth Suzann – aka my MAGIC PANTS seriously you guys these pants are magical), so maybe I should have just worn the leggings for this photo!

So anyway, about this project! After my success with the leggings, I bought 2 more yards of this hunter green colorway without a real idea of what I wanted to make with it. I knew I wanted a sweatshirt, but a plain sweatshirt seemed like such a cop-out. So I went with the Sewaholic Fraser Sweatshirt.

I will be completely honest – I did NOT like this particular view of the Fraser when I first saw it (or, to be even more honest – any subsequent versions that I’ve seen since). I dunno, the super contrast yoke just looks unflatteringly Western to me (and I typically love me some Western wear) – very costume-y, very Wonder Woman. I had no intentions of ever sewing up that version (I do like the other versions – you can see the one I made with a collar here), but weirdly, I thought of it when I was trying to decide what to do with this fleece. I thought it might look good with the contrast just being the wrong fuzzy side of the fabric, so the color still matched but there would be some subtle texture differences (again, just like my version with the collar).  I’m actually pretty pleased with the end result – it’s still a nice sweatshirt but with a little more interest… and it doesn’t look costume-y. And I have worn it every day this week, no lie, so obviously it’s a massive success in my book haha.

Sewaholic Fraser Sweatshirt made with stretch fleece from Mood Fabrics

Sewaholic Fraser Sweatshirt made with stretch fleece from Mood Fabrics

I made a size 0 and slimmed down the hips (Sewaholic Patterns are designed for pear-shaped women, and I’ve found I don’t need the extra room down there). I also cut this on the lengthwise grain, instead of the crossgrain – remember when I said the fabric had more stretch on the lengthwise grain? I think it would work either way, but I wanted a reeeeeally stretchy, comfy sweatshirt! Shortened the sleeves about 1″… they are still slightly long, but in my experience it’s better to keep them long and allow for a little more shrinkage, then re-hem if necessary. I have waaaay too much bracelet-length sleeves as a result of not being aware of this for the first half of my sewing career haha.

I did have to pay careful attention to the stitching at the center front V, as well as matching the sleeve contrast seam to the bodice contrast seam – for those, I based first on my sewing machine (much easier to take the stitches out if you mess it up) before using my serger. I used the single needle chainstitch on my coverstitch machine to topstitch the contrast, to give it a little more dimension. Other than that, a very quick and easy sew! I did notice the the fleece flattens when you press it, but it’s easy to fluff back up with your fingers.

Sewaholic Fraser Sweatshirt made with stretch fleece from Mood Fabrics

Anyway, that’s all for this one! A simple project, but also a big gushy heart-eyes love song about some amazing fabric! Now, quick, y’all need to buy it before I snap up the rest of this stuff! 🙂

** Note: The fabric used for this post was provided to me by Mood Fabrics, in exchange for my participation in the Mood Sewing Network. All opinions are my own!

Completed: The Fraser Sweatshirt

26 Dec

Gonna keep this one short and sweet today!

Fraser Sweatshirt

Also, in case you were wondering – yes, I took these immediately after the photos from my last post. Just pulled the sweatshirt on over what I was already wearing! Haha!

This is the Fraser Sweatshirt from Sewaholic Patterns. I have actually made this top before – I used a beautiful marled French Terry from Metro Textiles and it’s soooo soft and cozy – but this is my first post about it. I don’t normally dedicate a post strictly to something as plain at a knit top, as I personally find it a little boring – but I do think this one deserves its own very short post. So there you go. I finished this way back in August and have worn it loads since.

Anyway, Fraser! I think this pattern got a bit overlooked – I certainly overlooked it at first. It’s pretty similar to the Renfrew Top – albeit with a higher neckline, a little more ease (to allow for sewing out of a bulkier fabric) and some style variations. I didn’t care much for the style variations, personally – not a fan of that western contrast yoke, and really falling out of love with twee collars on everything. I liked the plain version, and like I said – I made it up and really enjoy wearing it – but I don’t know if the plain version alone really justifies buying the pattern if you already have the Renfrew (FWIW, Tasia gifted me these patterns, although she did made it very clear she was not expecting a review post in exchange). With that being said, I loved Amanda’s collared version the second I saw it, and filed it away for future consideration.

For fabric, I used a grey sweatshirt knit that has been in my stash for a few years. I’m not 100% on where it’s from, but my best guess is that I bought it at Paron’s in NYC. It’s a little lighter and stretchier than a true sweatshirt fleece – it almost feels like scuba with fleece on one side.

Fraser Sweatshirt

Fraser Sweatshirt

I wanted my collar to be more subtle than straight-up color-blocking, so I simply used the wrong side of my main fabric. In theory, it seemed like a really cool idea – the wrong side is fuzzy, so there’d be some unexpected texture there. In practice, it looks very much the same as the right side, unless you’re actually touching it. So my inset collar is even less of a contrast than I was anticipating, although I don’t think this is a bad thing. I actually do like the way it turned out!

Anyway, I topstitched around the collar with a straight stitch to really bring out the seam lines and help everything lay flat. I love the effect, especially how it looks with another collared shirt peeking out from underneath, inception-style 😛

Fraser Sweatshirt

Fraser Sweatshirt

Pattern-wise, not much to report. I made a size 0, which is my usual Sewaholic size. I assembled the shirt with a serger, although I used my sewing machine to sew the collar in first so I could easily unpick if I messed something up (I just went over the seams again with my serger once I knew everything was good). Actually, the serged seams on the collar look REALLY cool and I almost let that be the right side… maybe for the next top. Who knows!

I did have to do a little tracing to get those long sleeves. The pattern comes with 3 sleeve options, but the long sleeves have that yoke on top of them. The yoke-less sleeves are 3/4 and short, both of which I feel are useless for a sweatshirt. I simply combined the top of the 3/4 sleeve with the bottom of the yoked sleeve, to make a plain long sleeve. Not difficult to do at all.

Interestingly, I found the hips to be too wide in the first version I made of this pattern – there were super A-line on me (not surprising, considering I’m not a pear shape and this pattern is drafted for someone who is) and I had to take in the sides quite a bit to make them more straight – but on this current version, they are fine. I am guessing my fabric choice had something to do with this, because I didn’t alter the actual pattern pieces. This knit is way softer and stretchier than the French terry I used for my first version, which makes the sides hang better.

Fraser Sweatshirt

Anyway, I don’t have anything else to say about this top sooooo I guess that’s it!

Completed: Cozy Organic Sweatshirt (+ discount code!)

16 Feb

Nothing very exciting on the blog here today, I’m afraid. I spent my Valentine’s Day with whatever cold bug is currently being passed around (and, ugh, I’ve never been so tired in all my life MAKE IT STOP), and I don’t really feel like doing much of anything now, which is a huge bummer because we have been blessed with a pretty awesome snow day this morning (for real, my street is a literal sheet of ice and my gate is frozen shut. Couldn’t leave even if I wanted to). Still, have a small project that I finished before I came down with the Evil.

Undercover Sweatshirt + Ooh La Leggings

Yep, I made a sweatshirt (and ponte Ooh La Leggings, although the post isn’t focused on those. But I did make them, so there’s that!)! How boring! But, you know, when you make everything you wear (and have been doing so for more than a couple of years), you will end up sewing boring staple pieces. For the current me, that means cozy long-sleeved tops that I can wear with pants. This is a big gap in my wardrobe, as past me never wore pants quite as much as current me (probably something to do with the office job that I quit; I had a space heater under my desk! I MISS THAT!), but, it is what it is. And now I need some tops, dammit. The thin jersey ones I have just aren’t cutting it, no matter how many I layer.

I used the Undercover Hood pattern from Papercut Patterns as my base, size XS, just taking in the side seams ever so slightly to make it a little more fitted. I obviously omitted the hood and added a ~self drafted~ neckband (I use the term “self drafted” very loosely, as it’s really just a rectangle… but, whatever.). I also left off the bottom hem band; mainly because I ran out of ribbing, but I think the simple turned under and topstitched hem actually makes this sweatshirt look a little less casual, so that’s a win. I can’t decide if wearing it with a collared shirt (that’s another B5526 underneath, fyi) looks classy, or if that’s just the 80s child in me trying desperately to emerge. Thoughts?

Undercover Sweatshirt + Ooh La Leggings

The main fabric is some lovely brushed sweatshirting fabric from Only Organic, a company based out of France (let me tell you, I felt REALLY cool picking up that box at the post office when it arrive. No, seriously!). I was offered a meter of fabric to try out, and I immediately zeroed in on this stuff because it seemed like the perfect blank canvas to customize for my needs.

You’ll notice that I did no customizing whatsoever. This is a plain, cream-colored sweatshirt we have here. I will admit that I considered adding something to the front – a stenciled phrase, some gold pyramid studs, something – to give it a little more ~pizazz, but I ultimately realized that I’m not really one for wearing graphic tshirts (or sweatshirts), and it seemed kind of stupid to fancy up something just for blogging purposes. So, boring sweatshirt. Sorry, not sorry. At least I know it’s something I’ll actually wear now.

Undercover Sweatshirt + Ooh La Leggings

Anyway, half-asses apologies aside – this is a great marriage of pattern and fabric! I’ve made the Undercover Hood before a few times – but usually with a drapier fabric, and never as a straight up sweatshirt. I like the way this one fits; it’s comfortable and fitted but it’s not skin tight. The fabric is LUXURIOUSLY soft and fleecy – I’m actually wearing it as I type this, and it’s doing a damn fine job of keeping me warm in my cold ass, snowed-in house, so there’s that. I do question whether or not it’s a good idea to wear a white sweatshirt, knowing how clumsy I am – but, eh, I’ll cross that bridge when I come to it. At least I know it’s dyeable 🙂

Undercover Sweatshirt + Ooh La Leggings

Undercover Sweatshirt + Ooh La Leggings

You can see the fleecy goodness of the fabric better here. For ribbing, I used some cream ribbing that I had in my stash – it’s not a perfect match, but it’s close enough, and I love the subtle color changes.

Undercover Sweatshirt + Ooh La Leggings

If you’ve managed to stick it to the end of the post, I have a fabric discount code for ya! Use the code “lladybird” for 10% off your order at Only Organic. Like I mentioned, this company is based out of France, so all my organic-lovin’ pals on the other side of the pond – rejoice! Woot woot!

Now, answer me this – I know sweatshirts have recently had their moment in the spotlight for being ~cool~ and ~luxe~, but does a plain white sweatshirt even pretend to portray that or do I look I belong in a Kmart circa 1995? Also, who wants to take bets on how soon I spill coffee down the front of this thing? I’ve worn it three times since completion and at this point, I feel like I’m flirting with disaster.

** Note: I was given 1 meter of the cotton sweatshirt fleece from Only Organic, however, all thoughts and opinions are my own.

Completed: Boiled Wool SJ Sweater

7 Nov

I’m just gonna come out and say it: “boiled wool” is the grossest fabric name. It just sounds disgusting – like some kind of rubbery, overcooked fabric food that you’re only putting in your body because there is literally nothing else in the house and you are starving to death. Am I right? Am I right?

Wool SJ Sweater

When it comes to fabrics, though, boiled wool is pretty amazing. I had some spend some time working with it – sewing up a storm at Elizabeth Suzann‘s, making sweaters and kimonos and coats (so, so, so many coats. I am the coat whisperer now, y’all). After spending so much quality time handling this fabric – pressing (boiled wool loooves steam) and sewing (where the stitches just sink right in) – I found myself anxious to buy some and make a luxe sweater/sweatshirt for myself. So I bought some – off Elizabeth herself (she lets me ride the coattails of her wholesale orders and, um, you guys, I’m not even going to tell you how little I paid for this wool. NOT EVEN.).

Wool SJ Sweater

It was a borderline agonizing choice, but I ultimately decided to get the camel color (next time, though, I will be getting some black. And some moss. Dammit, I want them all!) because I had ~visions~ of it looking gorgeous with my polka dot chambray button-down. Doesn’t it? I also love camel because I feel like it looks equally good with black and brown (and navy, for that matter!).

Wool SJ Sweater

As I mentioned, I’ve had some time to work with this fabric and get an idea of how to handle it. They very first thing I did was prewash the yardage – the same way I wash/block my handknits. I soaked it in gentle wool wash (I use Soak, which I actually buy from my local yarn store, but here it is on Amazon), used a towel to wring out the excess, and then laid it flat to dry in the yard. This particular boiled wool (and maybe all boiled wools?) shrinks up quite a bit after it’s been washed, giving the fabric more of a felted quality than it is when you first pull it off the roll. You can also steam-shrink the fabric (which is what we do at the studio), but I knew I’d be washing this stuff here on out, so I wanted to get all the shrinkage eliminated before I started sewing.

Wool SJ Sweater

For construction, there is not much different you need to do from sewing, say, a very stable ponte knit. I just used a regular 70/10 needle (not even ballpoint – the wool is felted so it’s not necessary to preserve the knitted loops or anything) and sewed everything on the sewing machine. I left my seams unfinished and pressed them open with lots of steam. I think the open seams look a little neater this way, plus, they’re not as bulky as they’d be if I serged them. Again, since the wool is felted – nothing is going to unravel. Even for the hems, I just turned up the allowance and topstitched it down.

Wool SJ Sweater

The only part I struggled with (and I’m still not 100% happy about, if we’re being honest here) was the neckline. Not because it was difficult to sew – but because I didn’t know how I was going to finish it! At Elizabeth’s, we just turn the hem allowance under and topstitch. This is absolutely fine for finishing boiled wool – but we’re talking crewneck sweaters here, and mine is obviously very scooped. I needed a finish that would pull in the neckline just a little – like a ribbing. Except I didn’t want a ribbing, because I wanted this sweater to be ~fancy.

The first thing I did was try to turn the hem allowance under, and then sew clear elastic into the neckline like an invisible banding. That did not work out. I don’t have any photos, but it looked like shit and you have to trust me.

The next thing I did was try to use the boiled wool as a self-fabric band for the neckline. It sort of stretches, so it sort of works.

Wool SJ Sweater

This picture makes it look way better than it did in reality. What you don’t see here is that the binding would NOT lay flat – especially at the center front. It is standing almost straight up in some sections, like the weirdest little funnel not-collar. Believe me, I pulled and stretched as hard as I could to encourage the neckline to ease smaller (and thus lie flat), and then steamed the beejezus out of it, but there’s only so much you can do with boiled wool. It’s not a true knit, so you can’t really treat it as one. Furthermore, the inside just looked raggedy with the self fabric neckline. Too many unfinished seam allowances (I know, I know, I just said the unfinished edges were fine – but even I have neckline limits, ok), too bulky, and noooope!

nope

Wool SJ Sweater

My solution was to apply a bias facing to the neckline, stretching the bias to get it to lie snug and thus pull the neckline in. I used this method to sew it on, and the bias is a piece of silk charmeuse that I got from Elizabeth’s scrap pile (surprisingly – it was the result of a botched dye job, although it matches the wool quite beautifully, so yay for me!). I think this netted the best result, although I think the neckline is still a little wide for this sweater. Oh well. That’s just my fault for choosing this pattern. Better luck next time!

Wool SJ Sweater

The pattern I used is the SJ Tee from my beloved Papercut Patterns. I raised the neckline a couple of inches – not that you can tell! – but the rest of the pattern is sewn as-is, using my previous adjustments. Other than the bias faced neckline, I didn’t make any construction changes. Oh, no, wait, I did leave off the sleeve ribbing. I just turned that hem allowance under and topstitched it down! The boiled wool does not have nearly as much stretch as a standard knit, however, this pattern is a little loose-fitting on me as it is, so I think it turned out fine. If you want to make this in a wool and retain the design ease, I’d recommend sizing up.

Wool SJ Sweater
Wool SJ Sweater
(sorry ’bout the color discrepancy! The less-washed out photos show the true color. And that yellow tag is there to remind us NOT to wash this sweater with the laundry, since it’s wool 🙂 )

Wool SJ Sweater

As you can see, this sweater is not ideal for a completely 100% no-gape neckline. That’s ok, though, since I’ll likely be wearing it with something underneath (this boiled wool is soft, but it’s still a little bit itchy!). I am pretty happy with how this turned out – I like the shape, the raglan sleeves, and how lush the fabric is (aka makes it look expensive. Ha!) – but I’m still iffy on the neckline. I think it’s too wide. It looks ok with the collared shirt underneath, but… eh. I don’t know. Obviously I can’t do much to change this current sweater – so I’ll be wearing it regardless – but for future makes, I need to refigure that silhouette. What do you think? Too much of a scoop? Am I way out of left field and overthinking?

Speaking of the collared shirt – I still haven’t made any changes to the sleeves. I decided to wait until it’s been laundered a few times – that way, if it shrinks, I won’t be up shit creek. In the meantime, I do like the fit/length of the sleeves under a sweater, so there’s that!

Wool SJ Sweater

At any rate, I’m pretty happy with boiled wool! Gross name and all 🙂 Tell me – have you ever sewn with boiled wool? Would you? Or do you think the name just sounds nasty? 🙂

Last thing – time to announce last week’s giveaway winner! After a harrowing 208 comments, random number generator chooses….

winner2
winner1

Yay! Congratulations, Dawn! I will be in touch to get that book to you – so you can start making those pajama bottoms asap! First time for everything 😉 (also, can we kill that rumor that Random.org never chooses the first or last number? Because, clearly, not the case!).

Thanks to everyone who entered, and thanks for all your lovely comments on the post (and thank you, Roost Books, for letting this giveaway be possible!). If you’re still itching to buy yourself a small piece of Tilly, you can buy Love at First Stitch from Amazon, or directly from the magic-maker herself.

Happy Friday, everyone! 🙂