Tag Archives: shutters and shuttles

Completed: The Shutters & Shuttles Sway Dress (+ a Giveaway!!)

14 Dec

I’m so excited to finally be able to share this project with y’all!

Shutters & Shuttles Sway Dress - front

Over the summer, I’ve been in cahoots with Allison of Shutters & Shuttles to collaborate a fabric + dress design. She reached out to me after I made my Scout Tee using some of her fabric, and we thought it would be fun to match up a custom fabric with a pattern, as well as having a little giveaway too!

If you’re not familiar with Shuttles & Shuttles, they are a small company that produces handwoven and hand-dyed fabric, made entirely in Nashville, TN. Allison produces all the fabric herself using a 60″ AVL mechanical dobby loom, and makes all sorts of fabric goods – from rugs, to blankets, to yardage (some of which is produced into small batches of ready-to-wear clothing). Some of her fabrics appear in limited-edition Elizabeth Suzann collections, which is how I came to be familiar with the line (and spoiled rotten by getting to sew them!). Suffice to say, I’m a big fan of Shutters & Shuttles and I just love everything that comes out of Allison’s studio. It’s a bonus to be able to say that I literally know who made my fabric 🙂 So obviously I am pretty excited about this collaboration!

Shutters & Shuttles Sway Dress - front

The awesome part about working with a fabric designer is that you actually get to design the fabric. What a novel idea, amirite?! 😉 Allison has a swatch book showing all the designs and colors that she’s made – everything from intricate designs woven into the fabric, to a simple weave with a beautiful hand-dyed watercolor effect. You know how the first time you went into a fabric store, you were likely overwhelmed from all the sheer possibility staring at you from every direction? Well, I kind of had the same feeling – except multiplied! It was REALLY hard to choose a design; I wanted one of everything all at once! Ultimately, though, I knew this piece was pretty special and I wanted to do my garment the justice of allowing it to be worn frequently. We ended up with a fairly simple design, which I just think is absolutely gorgeous. A medium weight cotton yarn, dyed a deep rich navy blue, woven with a heavy slubbed texture. The fabric has a lot of dimension and texture, and the color is a perfect backdrop to show that off. It’s a warm, heavy fabric – it feels like I’m wearing a blanket. Sooo, obviously I made a blanket dress. Yes!

Shutters & Shuttles Sway Dress - side

Shutters & Shuttles Sway Dress - side

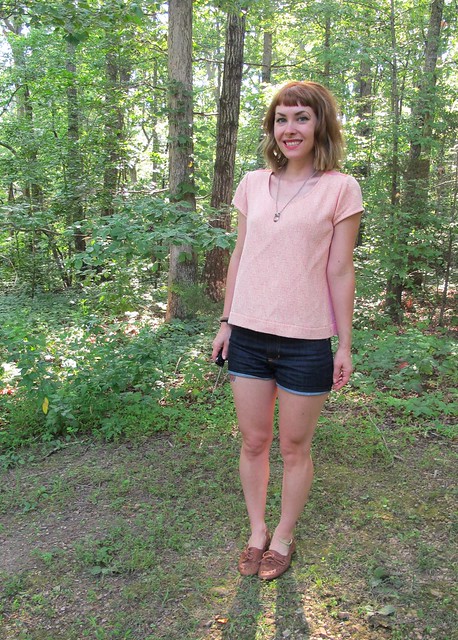
Wanting to stick with something tried and true (like, this NOT the project to allow for any mishaps!), I made another Papercut Patterns Sway dress. Yep – my second navy Sway dress in 2015. Hey, what can I say – at least I’m predictable 😉 This is definitely a winter-weight dress, as the fabric is so robust and heavy. It’s a great match for this pattern, as it hangs and drapes beautifully into an exaggerated tent shape. Since the pattern design is so simple, it really gives the fabric a chance to take center stage. BUT, since the fabric is also (relatively) simple, this is a good staple dress that can be worn different ways, like a good pair of jeans. It looks great with a collared shirt, with a simple long sleeved shirt, or with a turtleneck. I’m wearing it here with my grey wool Renfrew cowl, which I really love! Super cozy, y’all!

Shutters & Shuttles Sway Dress - pockets

This being a really simple dress that I’ve already made before, there’s not much new to talk about construction-wise. I serged all my seams independently, then pressed them open and catch-stitched each side down to keep them flat. That alone was the bulk of the time it took to make this – that’s a lot of hand-sewing! I also slip-stitched the hem for an invisible finish, and WHEW THAT TOOK FOREVER. Totally worth it for the finished effect, though. Since the fabric is really heavy and thus puts a lot of strain on the shoulders, I used a heavier fabric for the front and back facings, as well as interfaced them (using self-fabric would have been way too thick). Actually, the fabric I used is the same linen that I made my first Sway dress with – ha! It was a good color match 😉 I also made sure to add pockets – also out of the linen!

Fit-wise, the only change I made was to raise the armholes by about 1/2″ as I felt like they were too low on my first dress. This being a winter dress, I will likely always wear it with a top underneath – so low armholes aren’t much of a problem, but I’m glad I raised them anyway!

Shutters & Shuttles Sway Dress - back

As with my first Sway, this dress is designed to be worn forwards or backwards. I really like it with the v at the back, but wearing it with the v in the front + a vneck tshirt – that’s a nice look, too! The only issue this poses is when it comes to hemming – it’s hard to get a perfectly even hem all the way around, because once you flip the dress around, protruding boobs hike the hemline up a little! I straightened things out as best I could, but I’ve also come to terms with the fact that the hem will never be 100% perfectly even. Oh, who am I kidding – my hems are never even. WHATEVER.

Shutters & Shuttles Sway Dress - front

Shutters & Shuttles Sway Dress - back

Shutters & Shuttles Sway Dress - neckline

Working with this fabric was SUCH a joy! It’s so easy to cut and handle, and the cotton content means that it takes pressing like a champion. I do recommend catching down all your seam allowances, as it helps keep things nice and flat so you get a good sharp press on the outside. One thing that Allison and I discussed was whether or not this fabric is suitable to sew if you don’t have a serger for finishing the raw edges. Obviously, serging would be first choice – the fabric is prone to fraying, so serging that eliminates the possibility of unraveling and blends is really nicely with the fabric texture. That being said, the fraying isn’t super terrible – the fabric is a tight weave, so it hold it’s own pretty well. I do think finishing your raw edges is pretty important, but even just a simple pass with a zigzag stitch would work fine. Something gorgeous like a bound or Hong Kong seam finish would be perfect, although I didn’t take that extra step personally (I did consider it! But only consider it, ha!). For places that I didn’t serge – such as inside the all-in-one facing – I shortened my stitch length a couple mm’s to give the seam a little more strength.

All that being said, don’t let a lack of overlocker deter you from using this fabric! It’s a lot more durable than you think, like, it’s not going to completely unravel itself just from you looking at it. This isn’t some crazy bouclé, after all 😉 haha!

Shutters & Shuttles Sway Dress - inside

Shutters & Shuttles Sway Dress - fabric close up<

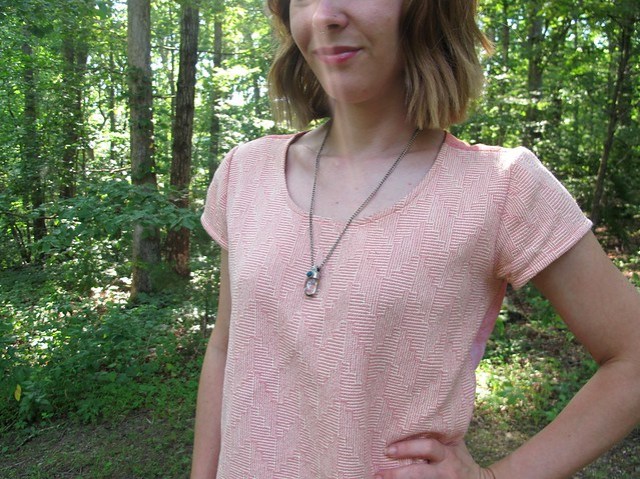
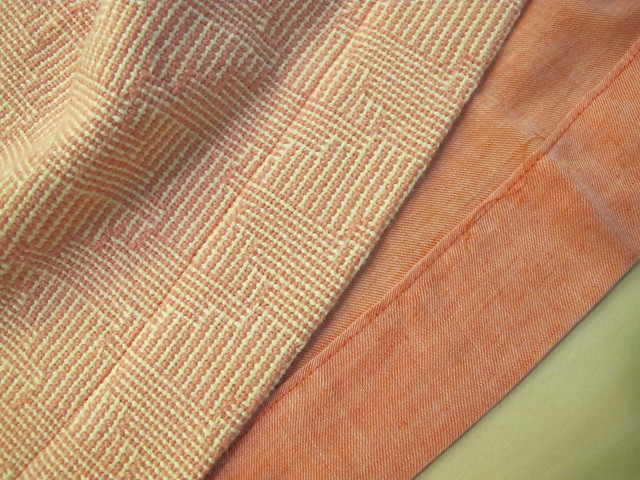
Here’s a close-up of the fabric’s color and texture. Isn’t it delicious?!

Oh! As a fun little bonus, when I came to pick up my fabric – there was this cool white border print taking up about the first 1/2 yard or so. Allison said she’d tied the navy threads onto the white that was already on the loom to start off (forgive me if I’m totally butchering this explanation – I’ve never woven fabric before!), and played around with a fun design before the white ran out and went into solid navy. She offered to cut it off, but I wanted to try to use it because it is SO cool looking! There wasn’t a lot of the design to play with – it’s about half a yard, going along the width of the fabric. I was able to eek out a simple scarf, though:

Shutters & Shuttles Scarf

aka A BLANKET FOR MY NECK.

Shutters & Shuttles Scarf

I really wanted to wear the two pieces together, but I have spared you.

Shutters & Shuttles Scarf

I really agonized over how to finish the raw edges of this scarf. The short edges are selvedge, so they are fine as-is. I thought about doing a rolled hem, but I realized that the fabric is so textured and cushy, it actually hides serging really well. Look at the blue edge – can you see the serging? Just barely! So yeah, I just serged my edges and called it a day! Insta-scarf!

Shutters & Shuttles Sway Dress - front

Ok, I think you guys have put up with my blabber long enough for one post – let me blab about this giveaway now! Allison wove some extra yardage of this lovely blue cotton, which means that one of you get a piece! Yay!

GIVEAWAY IS NOW CLOSED

The giveaway is for a piece of plain weave, hand-dyed, hand-woven blue cotton fabric from Shutters & Shuttles and made in Nashville, TN. The fabric is approximately 60″ wide, and you get 1.5 yards – which is plenty to do something fun with! Oh, and it’s pre-washed! (although you may want to wash it separately by itself the first few times, in case the dye decides to bleed) Wanna throw your name in the bucket? Just leave a comment on this post and tell me what you would make if you won the fabric! This is an awesome, warm, heavy cotton fabric that would do well for something like my Sway dress- it would also make a lovely circle skirt, or even a REALLY comfy pair of loose pants! Or maybe you want to be boring and make a bunch of scarves? 🙂 I won’t judge you! (note, the cool white border won’t come on your piece. That was a one-off that I selfishly kept for myself, not even gonna apologize for that!)

The giveaway is open WORLDWIDE and I will close the comments one week from today, on December 21, 2015 at 7:00 AM CST. In the meantime, you should check out the Shutters & Shuttles site, including all the inspirational things in the shop. Oh! Speaking of which – if you want to buy something, use the code LLADBIRD for a 15% discount – good through 12/25/15 (meaning, you can still totally buy yourself a great Christmas gift 😉 Including this exact yardage, YAY!).

GIVEAWAY IS NOW CLOSED

Shutters & Shuttles Sway Dress

MASSIVE thanks to Allison + Shutters & Shuttles for doing this collaboration with me, because this fabric is fucking awesome!! Now, which one of y’all is gonna be my fabric twinsie? 🙂 Good luck!!!

Completed: Scout Tee + Gorts

10 Aug

Today’s post features a two-fer – a top AND shorts! Woohoo! Be prepared for a slight photo overload ahead.

Scout TeeI’ll start with the top. This is the Scout Tee from Grainline Studio. It’s your basic woven tshirt with a scoop neck and a relaxed, boxy fit below the bust. I know everyone and their mom has made this pattern already, and I’m only a few years behind on the bandwagon! Honestly, the pattern didn’t appeal much to me until recently – I generally prefer to wear more fitted shapes, especially at the waistline. This was a bigger deal in the past when I had a larger bust – but the girls have shrank over the years, which has made me feel a little bolder about experimenting with different shapes and silhouettes, since I don’t feel like my waist is being quite as swamped as it was in the past. Plus, loose styles are waaaay more comfortable in the summer heat, since they allow a better airflow (I know most of you are thinking, “No shit, Sherlock,” but I have ignored this for most of my adult life! Cut me some slack!). Scout Tee

Anyway, I quite like this style on me! I guess it’s still not the most “flattering,” but I’m kind of getting to the point where I don’t care quite as much about flattering. That’s one major difference I’ve noticed about being 30 vs being 20 – I don’t really give a shit about looking ~sexy~ every time I leave the house. I’m also sure my long-term relationship has a stake in this as well, but I’ve been in long relationships in the past and my attitude was definitely the opposite. Wearing loose-fitting anything – especially around my waistline – is a pretty new style territory for me, one that I’m starting to slowly explore and actually wear out in public. Also, it’s damn comfy.

Scout TeeBack to the pattern! I cut the size 0 and shortened the hem by a couple of inches to give it a more cropped length (but long enough so that it still covers the waistband of my pants). The pattern was really easy to put together – it’s just a front and a back, little cap sleeves, and a neckline bound with a bias facing. I like that it fits through the shoulders and the bust, then falls straight down to the hem. Even though it’s loose, it doesn’t look sloppy. One thing I noticed is that the shoulders tend to pull toward the front – since I used a different fabric for the back, this is a lot more noticeable. It doesn’t bother me at all – I actually like the way it looks, to be honest – but I’m also not sure if it’s part of the pattern, or a fitting issue. Thoughts?

(ps, sorry about the wrinkles – like most of my makes lately, these were taken after a full day of wearing) Scout Tee

The fabric is what really makes this top shine, though! It is GORGEOUS, amirte?! This is a pretty special piece – it’s handwoven here in Nashville! The company who makes this beautiful cotton fabric is Shutters & Shuttles. I don’t know if they even sell yardage anymore, but they used to. I believe they sell yardage to local designers, which – ding ding ding! – is where I got my little piece from. Back when Elizabeth Suzann used to sell limited-edition tops made with this beautiful handwoven fabric (and other colors/styles of fabric as well), she had a whole stash of it. Eventually, the limited edition ended and Elizabeth’s line moved in a different direction. And then she destashed the studio, and this piece ended up in that stash bag I was telling y’all about. It was a very small piece, so it took me a while to figure out what to do with it. A lot of Georgia Tees were made using Shutters & Shuttles fabric, and they all looked awesome, so I followed that lead with my own boxy tee. Scout Tee it was! Except that I didn’t have *quite* enough fabric to cut both fronts and backs, so the fabric sat on my shelf for several months while I looked for a good color match.

Scout TeeWhen I made my coral B5526, the coral voile was stored right next to this fabric, and I realized that they were perfectly matched. Which was lucky enough in itself, because this is a really weird (albeit beautiful) coral to try to match. I bought another yard on my next Mood order, and used the voile to cut the back of this tee. I also used the voile for the bias facing at the neckline – it’s a much lighter weight with less bulk than the handwoven cotton, so it sits on the neckline a little better (plus it looks pretty on the inside!). Scout Tee

I got these little tags in an order from Grey’s Fabric awhile back, and I think they are so cute! I wanna be a crafty fox!

Scout TeeTo crop the hem, I just folded up an extra-deep hem allowance and topstitched it. One, because I like the way the shirt hangs with the extra weight at the hem, and two, because I wasn’t sure if this whole slightly-cropped-tshirt thing was going to be my jam next summer. I might change my mind and want it to be longer (or even shorter, I dunno), so I left the hem allowance there as a bit of a safety measure. And also a big ol’ dangly thread, it seems.

Now for the shorts! Ginger Gorts

I made Jorts – or Gorts, as I am calling these (jorts is a really annoying way to say jean shorts, in case you were wondering!)! Remember when I utterly failed at that shit last year? Man, those shorts look fucking stupid in retrospect. What was I thinking? And if you were wondering – I never wore them beyond that blog post. They were just tooo uncomfortable and I was terrified the zipper was going to bust. They sat guiltily in my dresser for a few months before I finally chucked them.

Anyway, I’m glad I failed at that shit because I learned some very important Sewing Life Lessons:
1. Don’t make jorts out of a pattern intended for trouser shorts. It looks fucking stupid. Better to start with a jeans (pants) pattern and cut it short accordingly.
2. Jorts need fancy jean topstitching, or they aren’t proper jorts. And, they look stupid.
3. Until you figure things out otherwise, jorts need some stretch in the fabric, else they won’t be comfortable.
4. For zipper security, there needs to be a bartack connecting the fly shield to the front of the pants. This is EXTREMELY important. That’s why my zipper kept breaking on the fail pair – pulling the shorts on and off was putting way too much stress on the bottom of the zipper, which caused it to break. I eventually figured this out by inspecting a pair of my jeans – the bartack that hits right at the curve of the fly topstitching is intended to take the stress off the zipper, so you can pull on and off your tight pants. I had left that bartack off, which made my pants weak right at the crotch (kind of like most men lololol amirite)(sorry).

So, with those lessons in mind, I re-attempted the jorts. These are way better! Not perfect, but better. I know they look pretty wrinkly in these photos, but again, those are wearing wrinkles – not fitting wrinkles. Well, maybe a couple of them are fitting wrinkles. I am human, after all.

Ginger GortsI call these Gorts because I used the Ginger jeans pattern to make them! Ahahaha aren’t I clever! I just love this pattern and I spent a solid chunk of my time in Peru dreaming about making more jeans because I just looove all the detail that goes into the topstitching – but knowing that I don’t need jeans right now, because it’s way too hot! So I was happy to compromise with shorts instead. To make the pattern shorts-appropriate, I just measured the inseam of my favorite shorts and cut that length + 1″ from the inseam of the pattern. In retrospect, I should have added a little more length so that I would have a proper cuff (I didn’t plan these to have a cuff, but they were too long once I’d already hemmed them and I didn’t feel like-rehemming). Maybe next time! Also, if I go with the future cuff, I need to widen the bottom of the shorts at the hemline, because they are a little tight at the thigh (cuffs need to be wider so that when they flip up, they are the right width. This is hard to explain without pictures, so here’s an example in this book I found. Thanks, Google Books!). Giving them a good stretch when I put them on helps, though. Ginger Gorts

For fabric, I used a stretch denim from Mood Fabrics. The weight was perfect, but the stretch was a little less than what the pattern calls for (which I determined the unscientific way by comparing it to the denim I used to make my first pair of Gingers). I added 1/4″ to the side seams to accommodate for this, but they are still a little bit stiff. The other bummer is that this fabric has a severe bleeding problem – the first time I wore these jeans, they rubbed indigo dye all over the inside of my purse. I was carrying the only nice purse I’ve ever owned, which HAPPENS to be white. Wah!! I was able to get the majority of the discoloration off with a stain remover, but now I’m afraid to sit on anything remotely light-colored. I washed the denim a second time with a cup of vinegar in the wash to set the dye, but they are still rubbing off a little.

All in all, though, I’d say these are a good practice run! When I finally make my fancy Ginger jeans with the Cone Mills denim kit that I bought earlier this year, I am hoping that I’ll have enough leftovers to make some solid Gorts. We’ll see! Pants first!

Anyway, photos:

Ginger GortsGinger Gorts

Ginger GortsGinger Gorts

Every time I make jeans, I want to experiment with different colored topstitching thread & serger thread – but I always punk out at the last minute. With these, I used bright blue thread for the button hole – baby steps! It also matches the lining and the serger thread.

Ginger GortsOh, right, and the backside of the button hole is emerald green 🙂 Ginger Gorts

For the topstitching, I used my new 1/4″ foot. THAT THING IS AWESOME. There’s a dull blade that sits exactly 1/4″ from the needle, to help you align your stitching and ensures erfect parallel lines every time. Totally worth the $$$ I spent on it. Although I should probably focus on my bartacks next – those clearly need a bit more work. My machine doesn’t have a setting for bartacks, so I have to trial-and-error with experimental zigzagging.

Ginger GortsGinger Gorts

Ginger GortsYou can also see that I changed up the positioning of the rivets – they are only on the front pockets. The pattern has you put 2 rivets on the back pockets, which I did with my first pair, but I never really liked the way it looked. RTW jeans don’t typically have rivets on the back pockets – ok, ok, SOME DO, but not the majority! – and I thought it made them look sort of homemade. I also recall reading, like WAY back in the past, that the original Levi’s didn’t have rivets on the back pockets because they would get too hot when the gold miners sat next to a fire. Full disclosure, it was a research paper on the history of jeans/Levi’s that my cousin wrote for one of her classes in high school, and I found it because I was snooping in her room when she wasn’t home (what? She had a really cool Barbie Dream House that she wouldn’t let me play with). That one statement was really fascinating to me and has stuck with me through the years (although I don’t remember anything else about the paper). This would have been around 1992-1993, so yeah, a while ago (and yes, I realize we are talking about a paper written by a high schooler, back before you could use the internet for research – so obviously I can be completely off my mark here). A quick Google tells me that the rivets also scratched cowboy’s saddles, which might be another reason why the back pockets ones were eliminated. Either way, I think they look weird and out-of-place on the back pockets. So front pocket rivets only for me! Scout Tee

And that’s it for this outfit! Tell me – has your style relaxed as you aged? Do you find yourself experimenting with new silhouettes, or do you stick with the tried and true? How do you feel about rivets on the back pockets of jeans? Do you think the cowboys were onto something?