Tag Archives: pauline alice

Completed: The Quart Coat, in Alexander McQueen Fabric

14 Dec

Well y’all. This post has been a LONG time coming – hopefully it was worth the wait!

Quart Coat made with Alexander McQueen fabric

I made a coat! Big whoop, amirite? It’s been a minute since I sewed a real coat – I just don’t live in a climate that warrants a serious need for multiple coats. Which is a bummer because I really LOVE sewing me some coats! And I actually sewed two this year – but I just want to talk about this one first. Like I said, it has been a long time in the making!

I received this fabric way back in May of 2016, actually! It took me a solid year to decide what I wanted to make with it, then nearly another year to actually start the project. And while I finished this earlier in 2018 (in February, it appears) – it has taken me this long to get some photographs of it! So yeah, this might be my longest project to date!

Quart Coat made with Alexander McQueen fabric

So – a little bit about the fabric! This fabric is actually Alexander McQueen coating from a prior collection. It is 100% wool, solid black, and has laser printed skulls all over that you really only see in certain lighting. I wasn’t able to find what this fabric was used for in AM’s collections, but it’s essentially a medium weight (on the lighter side of medium weight, to be specific) coating. It’s super, super amazing.

The coating was actually given to me – you know, back in 2016 – courtesy of my friend Anokhee. She originally bought it from Darrell Thomas Textiles in Ottawa, Canada (where she also teaches!). If you are thinking “wow Lauren that’s a really fucking generous gift” YOU WOULD BE ABSOLUTELY RIGHT. I was floored when I received the fabric, and am honestly still a bit dazzled every time I wear my coat. I didn’t really know Anokhee that well when she sent me the fabric – we were email/internet buddies, seeing as she lives in Canada and I’m in Nashville – but this year, I actually got to hang out with her several times when I was in Canada to teach my Jeans Workshops at Darrell Thomas Textiles! I’ve even sat in her hot tub, so, basically, yes she’s an amazing friend.

And speaking of Darrell Thomas Textiles – if you follow me on Instagram, you’ve probably seen this name pop up a few times. Darrell’s shop gets some of the BEST high-end designer fabric I’ve ever seen, and I’ve been really lucky to be the recipient of a few special pieces, as well as be able to shop there in person! In addition to this McQueen fabric, I’ve gotten some amazing Dolce & Gabbana prints (stay tuned for a blog post on one of them!), as well as pieces from Burberry, Louis Vuitton, and other gorgeous pieces that aren’t necessarily attributed to a specific designer but are still stunning as hell. While these pieces definitely, absolutely are not cheap – they are unique, special, and high-quality. I realize this post just sounds like a giant advertisement, so I’m gonna stop now, but – just wow. Check out his Instagram if you want some eye-candy to creep on.

Ok, back to my coat!

Quart Coat made with Alexander McQueen fabric

Quart Coat made with Alexander McQueen fabric

Quart Coat made with Alexander McQueen fabric

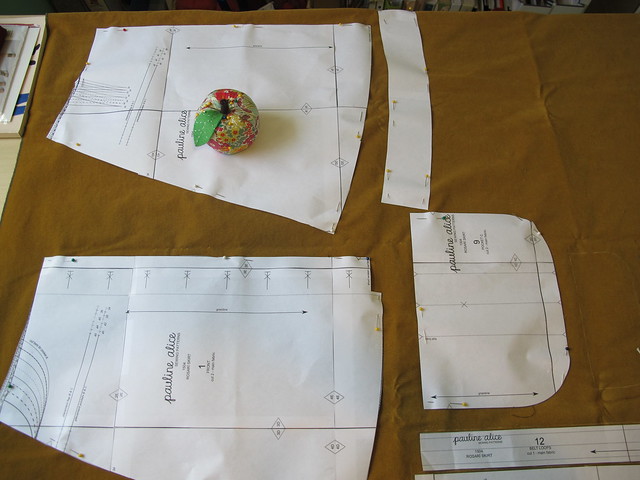
So, yes, I hemmed and hawed when it came to cutting this fabric! First, I couldn’t decide on a pattern. Then, I went through a lot of second-guessing with the fit, post-muslin. Once I powered through and cut all the (many, many) pieces, the actual construction of this garment went pretty quickly (according to my Instagram – it took about two weeks!). I don’t generally second-guess myself and I rarely treat my fabric like it is some kind of precious gold, but in this case, I am glad I took my time to figure out exactly what I wanted because the finished coat is basically perfect as far as I’m concerned!

The pattern I chose is the Quart Coat from Pauline Alice Patterns. I love the military look of this style, and I felt it would pair well with my McQueen fabric. Especially since my fabric can look either solid black or covered in skulls, depending on the light!

I cut a 36, and my preliminary muslin looked preeetty good except that there were some light pulls near the bust, which is usually indicative of needing a full bust adjustment. For the life of me, I could NOT find a way to add room at the bust with these particular pattern pieces! The princess seams come out of the arm hole, not over the bust, and every tutorial I found (or reference in my dozens of fit books) only covered the latter. And half of them wanted to add a dart – which I didn’t want in my coat. I tried several different things and agonized for months. I knew this fabric was expensive, hard to come by, and I wanted to do it right! But you know what? I ultimately decided, fuck it, and went ahead and cut the coat. Part of this was because the drag lines were indeed really subtle – super minor. The other part was me realizing that muslin doesn’t have the same “give” that regular garment fabrics do, and there was a good chance those minor fitting issues would be resolved by simply using a different fabric. I’m not always right, but I was right in this case. The wrinkles disappeared, the coat looks fabulous, and life goes on.

After getting past that and cutting aaaaalll those pieces, I was ready to sew! I actually started a little log to keep track of how long my progress was taking. JUST THE PREP ALONE (cutting, marking, underlining, etc) took 8.5 hours! I stopped keeping track after that (ha!) but I always tell this to people when they suggest I do some custom sewing for them. Bitch, u can’t afford me.

Quart Coat made with Alexander McQueen fabric

Quart Coat made with Alexander McQueen fabric

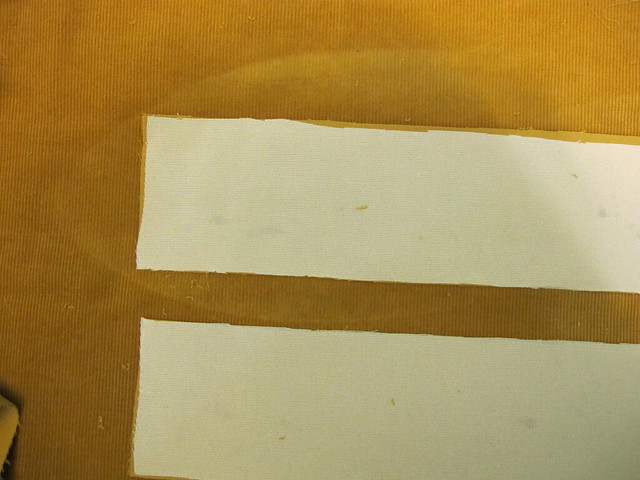
Since the coating is on the lighter weight side, I opted to underline all my pieces with a cotton flannel. This adds a layer of support (necessary as this is a quite structured coat) as well as additional warmth. I used a Robert Kaufman Mammoth Flannel for this purpose; I had purchased it with the intention of another project that I ended up scrapping. If you’re curious, this is the specific flannel I used inside my coat haha. While I find Mammoth Flannel to be really reasonably priced (and it is SO NICE!), it is a bit expensive to use as underlining. That said, I already had the fabric so I didn’t see any point in buying something else, even if it did cost less.

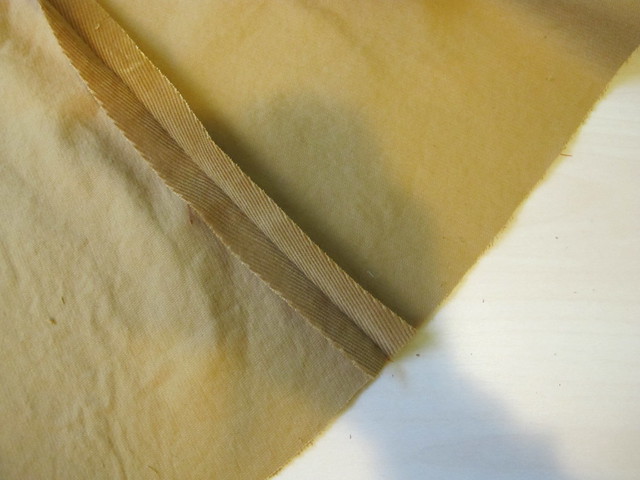
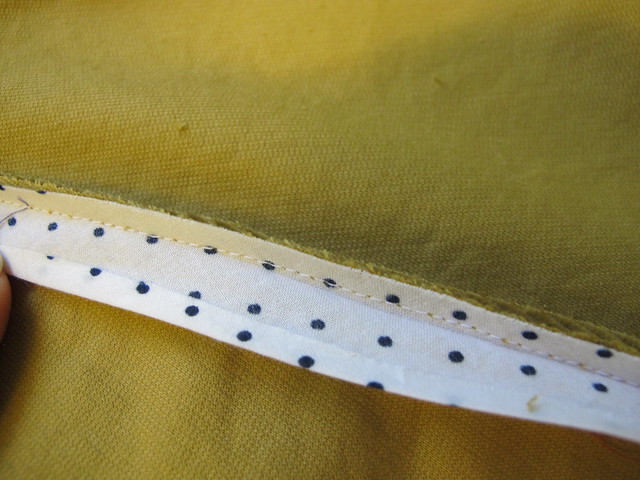
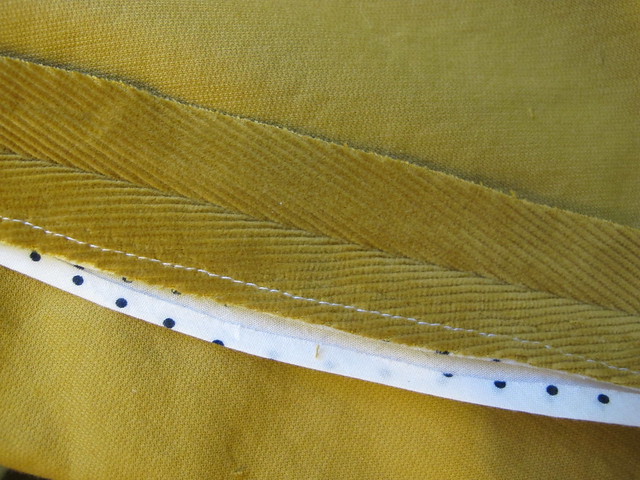
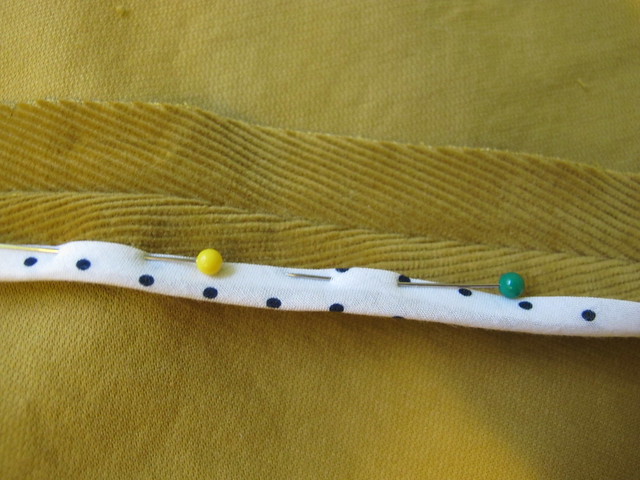
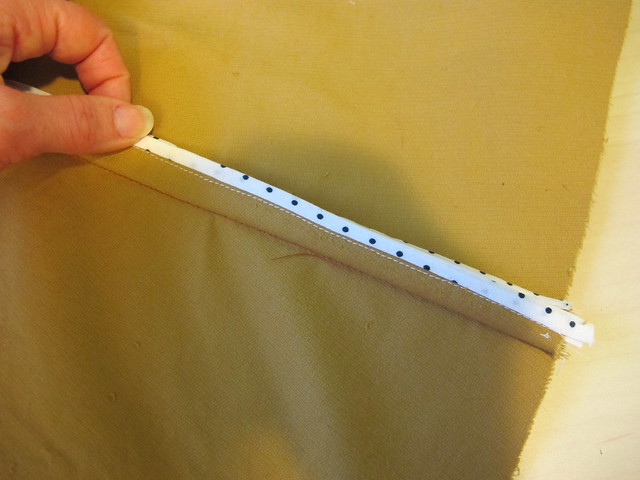
Underlining definitely took the longest. I like to underline by hand, which means a looong time of sitting at my cutting table, with endless hand-basting. I use cotton thread (silk is nice too, but cotton is what I had on hand!) and create long basting stitches, which are then removed as the pieces are sewn together. After the pieces are sewn by machine, I trimmed all the flannel from the seam allowances and then catchstitched the seam allowances down (again, by hand) to keep them nice and flat. It’s a lot of extra effort, but this fabric deserves that effort!

The lining is a solid black silk charmeuse, which I bought at Mood Fabrics on one of my many trips to NYC. I love, love LOVE using silk charmeuse for coat linings – it’s heavy and warm, and it looks expensive as hell. Just the way silk charmeuse catches the light when you wave it around delights me to no end. Why I chose black – well, I had considered using a fun lining color, like red or teal. But while shopping, nothing at the store really appealed to me. I also feel like most RTW (not all, but a lot of them) use coordinating and matching linings, rather than contrast. I wanted my coat to look like it could have come from the shop, and also, black on black just looks good.

Since my coat was all black, that gave me a little freedom to choose something more contrasting for the buttons and sleeve zippers – so I went with BRIGHT SHINY GOLD!!! I just love how this turned out, I think it really adds a luxurious touch that isn’t over-the-top. My buttons are from Mood Fabrics (they are actually Marc Jacobs hahahaah!), and my zippers are from Sil Thread (in the NYC Garment District). I spent a long time trying to find hardware that had the same tone and brightness, so they match well.

Quart Coat made with Alexander McQueen fabric

A few things about the construction – one, I definitely put the pleats in backwards. Whoops! It doesn’t bother me, but, if you noticed that – yes, I am aware. I did not do any traditional/heavy tailoring with this garment. Part of this is because I just wanted to finish the damn thing – and part of it is because I’ve learned I don’t really like wearing heavily tailored coats. I dunno, they just feel a little too precious to me, and I’m scared I’ll mess them up somehow! Also, my padstitching always ends up going wonky if the coat gets stored with the lapels in the wrong place, and I can’t ever seem to steam them back into submission. So while this coat has some basic tailoring – the fronts are interfaced (with a fusible weft, before I added the underlining), there is a back stay, and I added both shoulder pads and sleeve heads – I left off the fancy stuff like horsehair, padstitching, and bound button holes (just machine ones here!). Sacrilegious? Sure. Whatever you say.

I don’t know what else to say about this project, so just have a photo dump:

Quart Coat made with Alexander McQueen fabric

Quart Coat made with Alexander McQueen fabric

Quart Coat made with Alexander McQueen fabric

Quart Coat made with Alexander McQueen fabric

Quart Coat made with Alexander McQueen fabric

Quart Coat made with Alexander McQueen fabric

Oh! Here’s another piece from Darrell Thomas Textiles – one of my precious Burberry wools! I actually have two of these (the other one is the classic tan, which I believe they just got a new shipment in at the shop), both of which I made into simple blanket scarves. I started with a yard of fabric, which I cut in half lengthwise and then seamed together (with a flat-felled seam) to create a rectangle that is 28″ wide by 70″ long. I then hemmed the two long sides with a 1/2″ seam folded twice and edgestitched down. On the tan scarf, I also hemmed the short ends – and on this one, I teased out a little fringe! I have always wanted one of these Burberry scarves – and while the fabric was not cheap (I don’t remember the exact amount, I think it’s somewhere in the realm of $150-$170 CAD per yard), it is definitely cheaper than buying from Burberry! And it’s basically a giant blanket, which is the best thing ever 🙂

Quart Coat made with Alexander McQueen fabric

So, there’s the long story saga of my Alexander McQueen coat! Cheers to you if you’re still here reading 🙂 Big thanks to Anokhee for her incredibly generous gifts – both the fabric and for introducing me to the wonder that is Darrell Thomas Textiles! Another giant thanks to my student Elisa, who graciously took these photos for me during my workshop at Stitch Sew Shop earlier this month! In closing, I will leave you with this beautiful cheese plate that we destroyed immediately after:

and a cheese plate <3

Have a great day, everyone!

Completed: Wool Crepe Mirambell Skirt

30 Nov

Look – it’s two of my favorite things, rolled into one! Wool crepe + rust orange. YES!

Mirambell Skirt

I haven’t sewn with wool crepe in ages, which is weird because I consider it one of my favorite fabrics. Since my life is so… casual now, I really just wear a lot of pants, tshirts, and button ups. Dresses only happen if they are knit, and anything remotely resembling a suit hasn’t graced my body in about 5 years. Lol, remember when I worked in an office and had to dress up for work? Yeah. That was a long time ago.

Anyway, wool crepe! I love it! I love how squishy and soft it is, I love how it drapes and hangs off the body, I love the rich color. I love working with it – it’s easy to cut, easy to sew, rarely frays, and responds to pressing like a fucking dream. I love wearing it because it’s warm and comfortable, but also looks polished. Wool crepe, where have you been? Why did I forsake you? I’m so sorry.

Mirambell Skirt

This wool crepe is from Mood Fabrics, which I found in the store when I was in NYC a few months ago. There is a nice selection of wool crepes online if you aren’t local, but I love the opportunity of being able to go to the store and actually see/feel the fabrics before committing to one. This particular fabric is the result of a rare instance where I went to Mood with a specific fabric I was looking for (my lists are usually pretty vague – x amount of knit for a tshirt, for example) and amazingly, somehow managed to find (despite the selection in that store, I feel like they rarely have the specific things I want haha. Which is why I usually end up with vague lists!). But, no – for this skirt, I wanted wool crepe in either rust orange or saffron yellow. And I actually found it! Amazing!

Mirambell Skirt

Mirambell Skirt

The pattern I used is the Mirambell Skirt from Pauline Alice. It’s actually the second version I made – my first one was a sheer navy cotton/silk blend. It’s beautiful; maybe someday I’ll get around to blogging about it lol. Anyway, I originally bought the pattern specifically for that fabric – I was envisioning something similar, and then the pattern appeared on my radar a few days later. The pattern features a high waist with a curved waistband, topstitched pleats, and shaped pockets. There are two versions – one that closes with an invisible zipper, and one with buttons down the front. It is, admittedly, pretty similar to the Colette Zinnia, which I have made twice before (see: one, two). Between the two, I absolutely prefer the Mirambell. I always felt like the shape of the Zinnia was a little off – it tends to flare right about the hips, which is weird. Even topstitching the pleats further down did nothing to rectify this. Also, the inseam pockets on the Zinnia contribute to that flare – which isn’t an issue with the Mirambell, since the shape of the pockets makes them life more flat. The Mirambell does have a shaped waistband, but that can easily be straightened if you hate it. Anyway, my two cents!

I made a size 36, with no further fitting adjustments. The waist is just perfect on me – it’s fitted, but not uncomfortably tight. I love the length, although I’ll tell ya I was tempted to make it incredibly short.

One thing I did change was to add a lining, because I tend to wear wool crepe during tights season and it’s just easier to add a lining than deal with a slip. This is not included in the instructions, but it was easy to figure out (I’d already done this for my aforementioned prior version anyway, so I knew what I was getting into). I used china silk (originally from Mood, and languishing in my stash for the past year or so) and cut a second skirt out of it (I taped the pocket piece to the skirt front since there’s a slash where the pocket goes on the outside… man I hope that makes sense haha), 2″ shorter than the skirt I cut out of my crepe. I assembled each skirt individually as instructed (omitting the pockets on the lining), and then attached the lining to the waist seam of the outer skirt before attaching the waistband. Easy and effective! China silk is not my favorite fabric to work with as it’s INCREDIBLY shifty, but occasionally I’ll take one for the team if I feel like the end result will be worth it. This was one of those instances. The entire making of this skirt was just really fun and satisfying.

Mirambell Skirt

Here is the inside with the lining. Sorry about the wrinkles, that’s just the nature of silk.

What else? I finished all my seams with pinking shears, since the wool doesn’t fray and it was also going to be lined. I love using pinking shears, they feel so quaint and sweet haha.

Mirambell Skirt

Mirambell Skirt

Mirambell Skirt

Mirambell Skirt

Mirambell Skirt

Mirambell Skirt

Overall, a very happy skirt that combines my favorite color *and* my favorite fabric! Double bonus in that it looks so good with my polka dot chambray button up I made back in 2014. I’ve been trying to stick with a general color palette so that my pieces coordinate (and I don’t have any weird closet orphans), and this skirt is a great addition to that.

*Note: The fabrics used for this project (skirt) were provided to me by Mood Fabrics, in exchange for my participation in the Mood Sewing Network.

Completed: Plaid Rosarí Skirt

29 Nov

Y’all. I love this skirt pattern.

Plaid Rosari Skirt - front

I’ve made it in corduroy, stretch twill, and Cone Mills denim, and I’ve had my sights on making a plaid version as well. Nothing like channeling your inner Cher Horwitz with a plaid mini amirite? This pattern is especially great for plaids as it doesn’t involve a lot of matching – just center front, center back, and the side seams – and you can add some ~visual interest~ by cutting the pockets and waistband on the bias.

If you didn’t already figure it out, this is the Rosarí Skirt from Pauline Alice Patterns. I made the mini version in a size 34, and added curved front pockets and a lining (this is not covered in the pattern, but it was pretty easy to figure out).

The plaid fabric is from Mood Fabrics. It is listed as a cotton flannel, but I think “flannel” is a bit of a stretch. It is VERY slightly flanneled if you look at it really really closely, I guess. Honestly, it just looks like a plaid shirting to me. It’s definitely cotton, just the flannel part isn’t exactly accurate. While I had visions of a cozy flannel skirt when I ordered the fabric, I think the smooth cotton works just fine. Probably makes it look a bit less like pajamas, ha. With that being said – if you are wanting to order any of this fabric, definitely get a swatch first!

The lining is Bemberg Rayon that I had in my stash (I’d say it was a miracle that I had a perfect color match, but ha ha have y’all seen my stash?), and the buttons are also old stash (I think they are originally from the flea market, though, probably).

Plaid Rosari Skirt - front

Plaid Rosari Skirt - side

Plaid Rosari Skirt - side

Plaid Rosari Skirt - back

Sewing this up was really easy and mostly uneventful, considering I’ve already made this pattern so many times. Like I said, I added a lining so that I could wear this with tights – the one thing that bums me out about my other Rosarí skirts is that they stick to tights and ride up (generally right in between my legs, which is sooo attractive I know) (I ended up making a teeny half-slip out of stretch silk charmeuse to wear with those – so problem solved! This is the tutorial I followed, FYI!). To add a lining, I cut the lining from the front and back pattern pieces, and sewed them together like a lining skirt. Then I attached them to inside along the top edge of the plaid pieces (also assembled together), and then treated everything as one piece. The lining is basically flat-lined to the outer fabric, except the side and back seams are enclosed. The front button band and hem are turned to the inside as per the pattern and topstitched down.

The only part that was eventful about this sewing – the fit! I was nearly finished – like, button holes sewn in and marking button placement nearly finished – and I tried the skirt on to mark those damn buttons. That’s when I realized that it was too tight – way too tight. I could get it to close, but it was less “cute plaid skirt” and more “sausage stuffed in a casing,” if you know what I mean. I couldn’t figure out why it was too small – did I gain weight? did I fuck up the seam allowances somewhere? – because, again, I’d made this skirt several times, all in the same size, and THOSE still fit just fine (I went in my closet and tried them all on to be sure haha). Then I threw it on the cutting table and plotted how I was going to fix this mess.

Well, first of all – I figured out why it was too small. See, all 3 previous versions were made using stretch fabric. Due to the addition of the lining, this skirt didn’t have any give to allow for a little more room (actually, the fabric itself wasn’t very stretchy either, so – that factors in as well). I probably also fucked up a seam allowance somewhere, idk.

To fix the skirt and actually make it wearable, I removed the waistband entirely. I let out the side seams until the skirt fit comfortably (I think I ended up with 3/8″ seam allowances – I don’t remember), in both the outer and the lining. Then I cut a new waistband and reattached everything. As you can see, it now fits. Success!

Here are a lot more photos. Sorry about that giant-ass wrinkle on the right, by the way.

Plaid Rosari Skirt - on dressform

Plaid Rosari Skirt - on dressform

Plaid Rosari Skirt - on dressform

Plaid Rosari Skirt - flat

Plaid Rosari Skirt - flat

Plaid Rosari Skirt - flat

Plaid Rosari Skirt - flat

I guess that’s it for this post! Moral of the story – even if you’ve made a pattern numerous times, always ALWAYS check that fit as you go! Your fabric can really change the fit of the garment. I generally do this when I sew, but the ONE time I did not, I ended up regretting it!

Plaid Rosari Skirt - front

Completed: Black Twill Rosarí Skirt

23 May

I’m really behind on posting my projects – I finished this skirt almost two months ago, LOL WHOOPS. To add insult, I took these photos around that time as well – and have since changed my hair color :3 (spoiler: it’s still red). But these will do for now! Let’s just appreciate Past Lauren in this post, yeah?

Black Stretch Twill Rosari Skirt

Another Rosarí skirt! How predictable of me. What can I say – when I like a pattern, I like it enough to make it over and over and over until everyone gets sick of it (everyone except meeeee, that is). This is my second version (you can see my first version in mustard corduroy here), and I’ll just go ahead and admit that there is a third version that’s currently waiting to be posted. Don’t look at me like that. I wanted to try all the views offered in the pattern. ha!

Black Stretch Twill Rosari Skirt

This version is the same size as my previous – 34 – with the D pockets. I am not normally drawn to things like pockets with exposed zippers, but I saw a really cool version during my daily Instagram lurking and that shit immediately moved to the top of my sewing queue. Made in black fabric (which, honestly, a black summer-weight skirt is missing from my wardrobe. Well, not anymore!) with matching snaps down the front, it kind of has a cool rocker vibe… as long as you don’t look at the person wearing it :B

Black Stretch Twill Rosari Skirt

Black Stretch Twill Rosari Skirt

I found the fabric while I was in NYC at Mood Fabrics. It is a bottom weight black cotton twill with a really generous stretch. I actually bought a lot of twill while I was there because I’ve found that I don’t like ordering stretch fabrics (for bottoms, anyway) online. I find it really unpredictable in terms with what I end up receiving (I like my pants fabric to have a LOT of stretch), and nine times out of ten I can’t be arsed to wait on a swatch and/or that shit sells out way too fast. My new strategy is to wait until I get into the Garment District (which at this point has morphed into twice a year, yay) and then just stock up my suitcases. And then fly Southwest cos, 2 free checked bags woohoo.

ANYWAY, I am all about this stretch twill! It’s nice and heavy and it has enough stretch so that the skirt can be fitted but still super comfortable. The only downside is that is shows cat hair REAL fucking bad. I think that tends to be the case with all black fabrics, but this one seems to have a special cat hair magnet. I am not the kind of person who stresses over lint and cat hair, but I actually bought a lint remover specifically for this skirt. It is that bad. And, yet, there is still fuzz all over the skirt in these photos. Oh well.

Black Stretch Twill Rosari Skirt

Black Stretch Twill Rosari Skirt

I kept the style of the skirt fairly simple because I wanted the focus to be on those pockets! The zippers are from Sil Thread in NYC, which is my favorite place to buy zippers… they cost around $1 each (more or less, depending on length) and come in a nice range of colors and metal finishes. They didn’t have quite the right length, so I just shortened them at the bottom (basically catching the zipper teeth in my topstitching and *then* cutting the excess of). Even with shortening the zipper, doing that exposed zipper pocket thing was super easy. The pocketing is used to make a facing for the cutout, and then you just slap in the zipper and topstitch it down.

Black Stretch Twill Rosari Skirt

Black Stretch Twill Rosari Skirt

Black Stretch Twill Rosari Skirt

Same as with my corduroy version, I used a professional snap setter (courtesy of Elizabeth Suzann studios) to set the snaps down the center front. I’ve used the Dritz kits before (both the hand held one that looks like a hold punch and also the little metal thing you use with a hammer) and they work ok for what they are. That being said, I have access to one of those honkin’ big cast iron ones that they use in factories, so obviously I am gonna take advantage of that haha.

The only downside to these big industrial snap setters is that they mean BUSINESS. As in, you better be real sure of your placement because that shit ain’t going nowhere once it’s set. My coworkers warned me of this, and I smugly went ahead and set the first snap at the waistband… upside down. Whoops. Thankfully, I was able to pry it out with the help of a flathead screwdriver and seam ripper, but believe me when I say that I was really sweating for a minute there.

Black Stretch Twill Rosari Skirt

Oh hey, I didn’t even show y’all the cool POCKET LINING!

Black Stretch Twill Rosari Skirt

This lil’ piece of awesome is also from Mood Fabrics – you can find it here. It’s labeled a stretch twill, so I bought a yard of it last year to make some cRaZy shorts. Unfortunately, I wasn’t thrilled with the weight (it’s a bit on the light side) and the fact that it was printed off grain and thus hard to match the print. I gave up and stashed it, and have only now found a use for it. It makes REALLY FUN pocket lining! And since it’s stretch, it stretches with the outer fabric. I thought I would be real clever and sew it wrong side facing out, so that the inside of my skirt looked super fun. The only downside is that now the inside of my pockets don’t look super fun… they’re just kind of, fabric wrong side white. Oh well. It’s not like I walk around with my pocket zippers flapping open.

If you can see in the picture, I also used the same fabric to make a bound edge for the waistband facing. I really love the way that looks, and it’s so much easier than trying to fold up the seam allowance of the facing and get everything all even when you topstitch it down.

Black Stretch Twill Rosari Skirt

I guess that’s about all the Rosarí chat I have in me today! How about those zippered pockets, tho? 😉

In Progress: Corduroy Mini Skirt

22 Mar

IMG_2367

Following up on part one of my Spiegel 60609 sewing project for March (here is that post, in case you missed it!), let’s get to part 2! The bottom half 🙂

bdg-corduroy-button-front-mini-skirt-mustard-6

My original inspiration came from a skirt I saw at Nordstrom a couple of months ago – the most adorable a-line mini skirt, made in mustard corduroy with pocket flaps and snap closures down the front (above is an image of it – I think. It’s been a while and I’m forgetful!). I liked it enough to actually try it on (which was weird enough in itself – I haven’t been in a fitting room in ages, ha), but the fit wasn’t very good so it didn’t leave the store with me. Instead, I thought I’d try to make my own (surprise!).

I found this mustard cotton corduroy on the Mood Fabrics website and immediately set about finding a good skirt pattern for the fabric (unfortunately, that fabric is already sold out – sorry! I guess a lot of us snapped it up at the same time – it’s really the perfect shade of mustard, and a nice light weight with a subtle stretch. Just gorgeous!). Lots of googling around led me to eventually settle on the Rosarí skirt as it included pretty much all the elements of the original inspiration skirt, minus the separate side panels and with big (usable) pockets instead of just flaps. Honestly, it totally looks like something I’ve already made, I still wanted to give it a try. The patterns were just different enough to justify a second purchase, and plus, I’ve been wanting to try a Pauline Alice pattern.

Going by the finished measurements, I cut a size 34 and made the mini length with pocket C. Spoiler: The fit is really excellent and I’m totally gonna make this again with those zippered pockets. Anyway, back to the corduroy!

Corduroy Mini Skirt - cutting

One of the most important things to keep in mind when dealing with corduroy is the very visible nap. On fabrics with a pile (basically… hairs. Velvet, velour, corduroy, even fake fur – are all examples of fabric with a pile), the hairs lie in a particular direction, which is referred to as “nap.” If you run your hands up or down the pile, you can feel the pile. The pile can change color very subtly depending on the direction of the nap, so it’s extremely important to cut everything in the same direction – or else you run the risk of your pieces looking like they are slightly different colors. For my skirt, I made sure to lay all my pieces with the top facing the same end of the yardage, as shown in the picture.

Corduroy Mini Skirt - pressing naps

Another issue with naps and piles is that it’s *really* easy to crush the pile with your iron if you’re not careful. To prevent, this, the fabric can’t be pressed against a flat surface (like the ironing board, or the iron itself). One way to do this is to use a velvet needleboard, which has a million tiny wires to make a not-flat surface that the pile can lay against while you press. However, needleboards are freaking expensive (that one is $40, there, I just saved you a click haha)! They are fun to use, but ain’t kind on the wallet. So the cheap alternative is to just use a scrap piece of your napped fabric, and lay it right side up on your ironing board. You can press all your pattern pieces with the right side down, against the scrap fabric, and that provides enough texture to keep the nap from crushing. I had about 1/4 yard leftover from cutting my skirt, so I had a nice big piece to lay on my ironing board for pressing. Look at the picture above – do you see the iron imprints around my interfaced pieces? That’s what happens if you don’t protect the nap before pressing!

So those are two big things to keep in mind if you’re sewing with corduroy (or any other napped fabric, for that matter). Mind the nap 🙂 And just FYI – some napped fabrics (especially velvet and faux fur) require a little more finesse with sewing as they don’t like to feed evenly through the sewing machine. That being said, I didn’t have any problems with this particular fabric. Normally, I would use a walking foot – but the feed dogs on the Spiegel 60609 did a good job on their own, no extra foot required. Yea!

Since this is a really straightforward pattern with very few seams, I thought it would be fun to go the extra mile and do some pretty seam finishing on the inside 🙂 I decided to bind my seams with bias tape, which not only looks nice, but prevents the seam allowances from unraveling as the skirt gets washed/worn. This particular corduroy frays like a MOTHER, so it’s a very necessary step. I could have used my serger, but this looks prettier (and I didn’t have matching thread, ha!)!

Corduroy Mini Skirt - bound seams

You can use pre-packaged bias tape to bind your seams, but I like to make my own because it’s a bit softer (and you get a waaaay better selection of colors and prints). This particular fabric has showed up on soooo many of my makes – I made a truckload of bias strips with it and it’s like the gift that keeps on giving! 🙂 I will be so sad when it runs out hahaha. Anyway, I like the Clover 1/2″ bias tape maker – I find the width is great for this finish, and the Clover brand ones in particular work really well. I’ve tried cheaper bias makers and they just don’t work as well for me. This one is tight enough at the opening to really fold the bias, and then it’s easy to press it flat so it stays that way.

Corduroy Mini Skirt - bound seams

For this skirt, I did a Hong Kong bound finish – so both sides of the seam allowance are bound and then pressed open. You can also press the seam allowances to one side, and bind them together.

Corduroy Mini Skirt - bound seams

On the first seam allowance, sew the bias binding to the underside (the side that is against the garment when it’s pressed into place),  keeping your stitching line right along the pressed crease of the binding.Corduroy Mini Skirt - bound seams

Corduroy Mini Skirt - bound seams

Pull the unsewn side of the bias around so it comes to the top and just covers the stitching line you created. Pin into place, and then topstitch close to the fold. Repeat for the opposite seam allowance, then press the seam allowances open.

Corduroy Mini Skirt - bound seams

Here is what the underside of the seam allowance looks like. I do the first pass on the underside, so any stray topstitching is hidden when the seam allowances are pressed open 🙂

Corduroy Mini Skirt - bound seams

And here are both sides bound 🙂

Corduroy Mini Skirt - bound seams

AND HERE IS THE WHOLE DAMN SKIRT 😀

I love this finish! It’s definitely a time-consuming addition, but it’s not so bad when the garment in question only has 3 seams to bind 🙂 And it looks soooo pretty on the inside!

Corduroy Mini Skirt - grading seam allowances

Last corduroy tip! This fabric tends to be really bulky, so it is important to really grade down your seam allowances in any part where there are multiple layers – such as the waistband. I trim my seam allowances down at staggering heights so that there isn’t a giant bulky ridge showing from the outside once the skirt is complete.

Corduroy Mini Skirt

And that’s it! Here’s a little sneak of the pretty insides 🙂 I also bound the lower edge of the waistband – instead of turning it under 1/4″ to hide the raw edge – as I’ve always liked the way that looks in dress pants hahaah. Oh, and my snaps were set using a professional snap setter (cos I work for a clothing manufacturer!)! They look GOOD.

Corduroy Mini Skirt

Corduroy Mini Skirt

Some shots of the finished skirt on my form 🙂 I’ve already worn the hell out of this thing – the fit is great, I love the mini length, and the mustard color goes with pretty much everything in my closet. It looks EXTRA good with black and white polka dotted silk, though 🙂 I will be sharing the completed outfit next week!