Tag Archives: completed

Completed: Scout Tee + Gorts

10 Aug

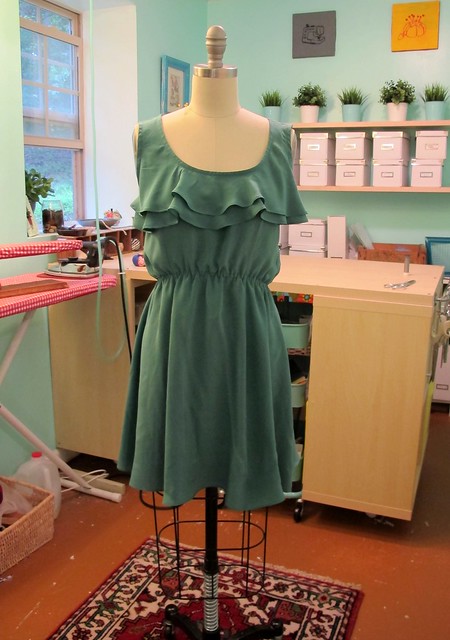
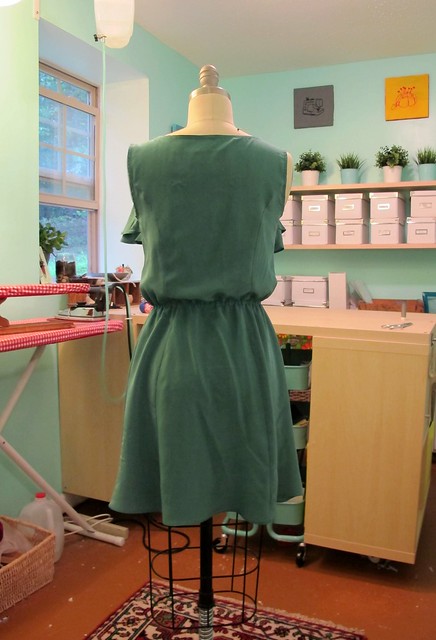
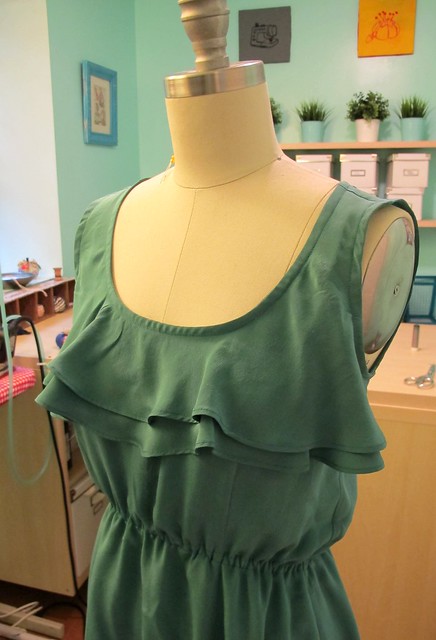
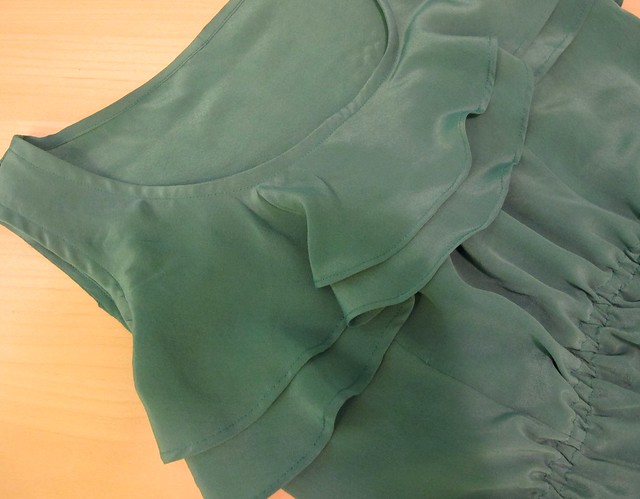
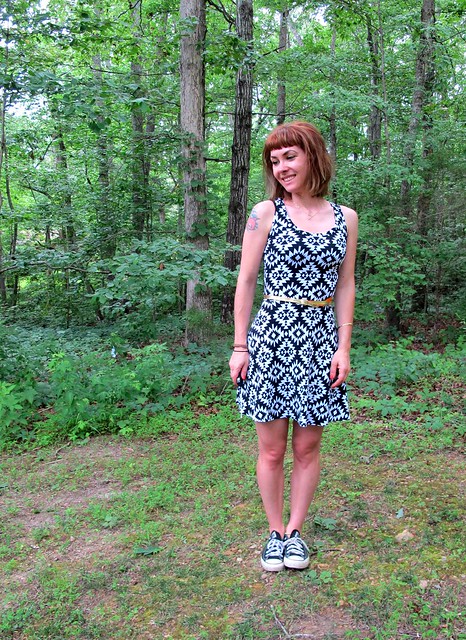
Today’s post features a two-fer – a top AND shorts! Woohoo! Be prepared for a slight photo overload ahead.

Scout Tee
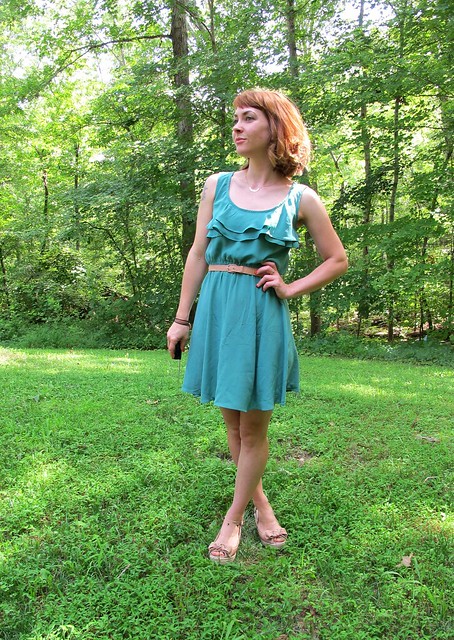
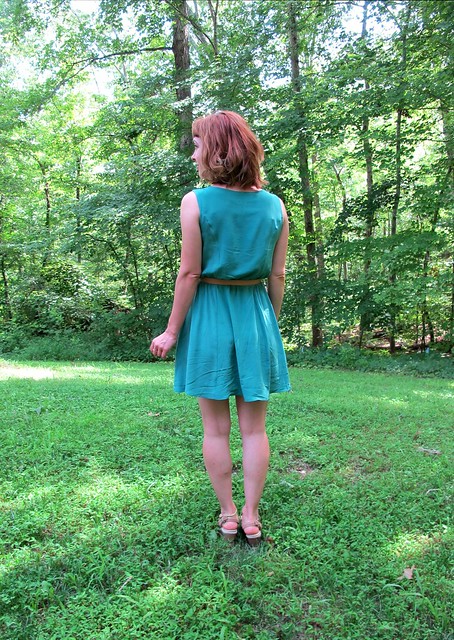
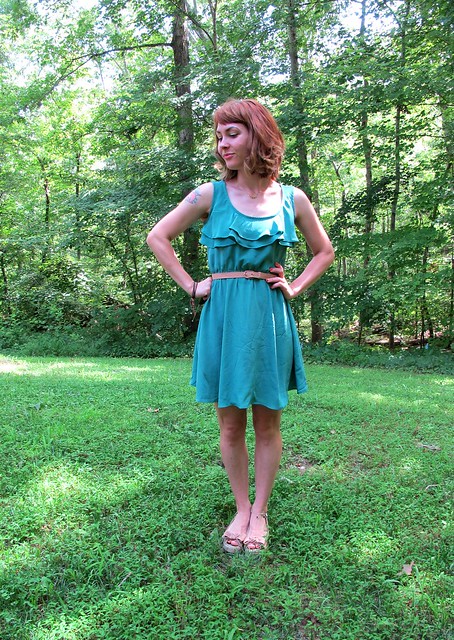
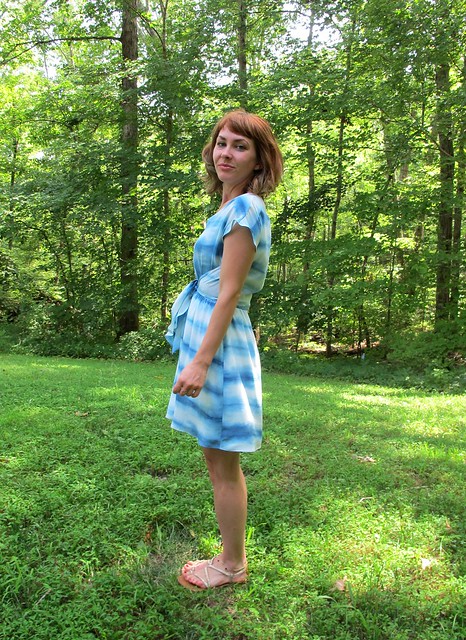
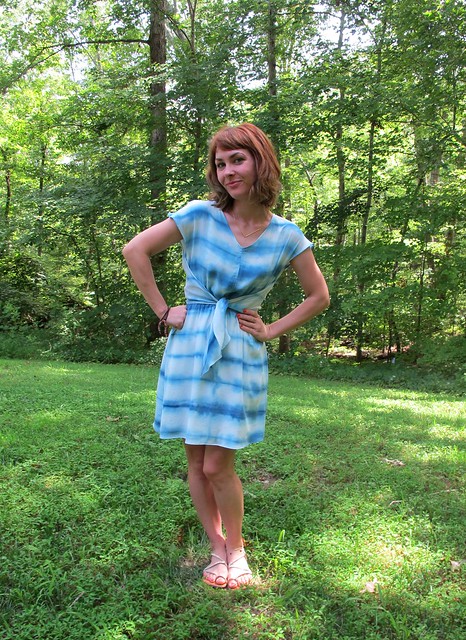
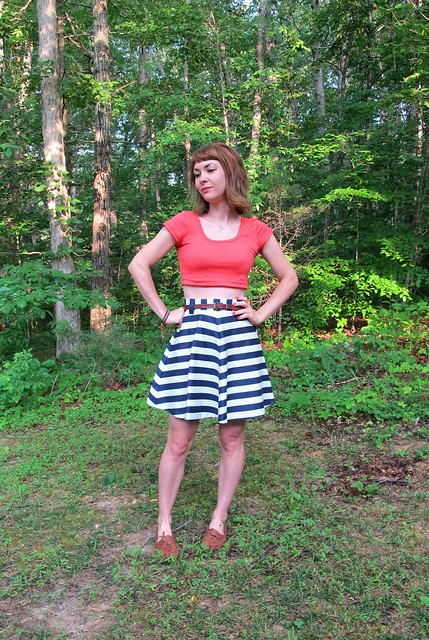
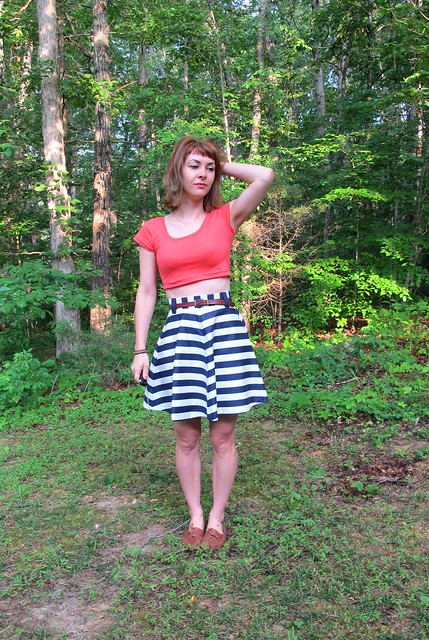
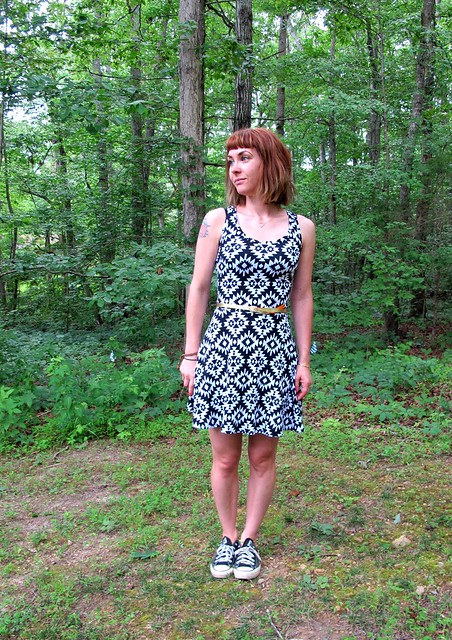
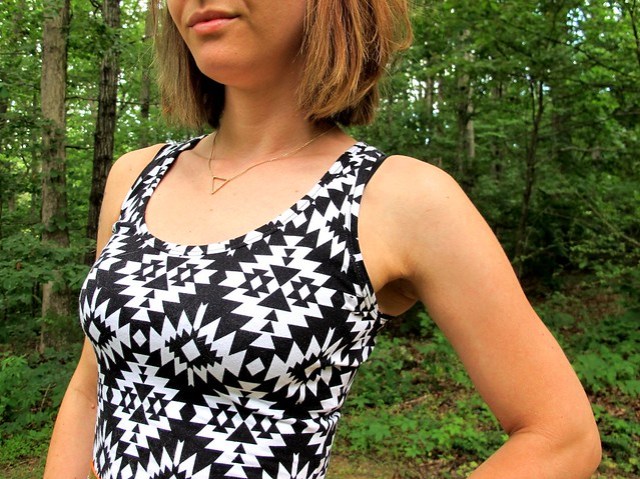
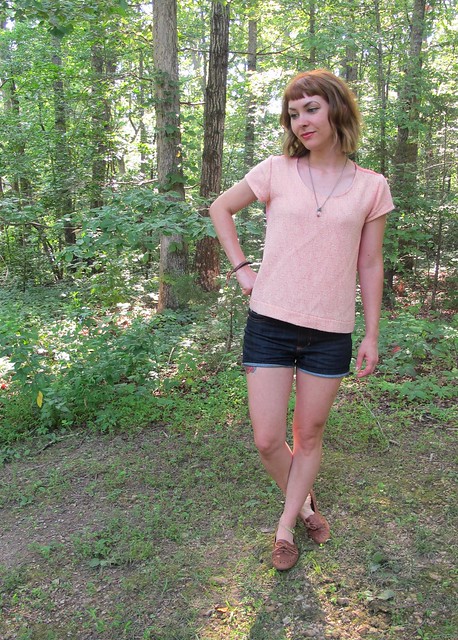
I’ll start with the top. This is the Scout Tee from Grainline Studio. It’s your basic woven tshirt with a scoop neck and a relaxed, boxy fit below the bust. I know everyone and their mom has made this pattern already, and I’m only a few years behind on the bandwagon! Honestly, the pattern didn’t appeal much to me until recently – I generally prefer to wear more fitted shapes, especially at the waistline. This was a bigger deal in the past when I had a larger bust – but the girls have shrank over the years, which has made me feel a little bolder about experimenting with different shapes and silhouettes, since I don’t feel like my waist is being quite as swamped as it was in the past. Plus, loose styles are waaaay more comfortable in the summer heat, since they allow a better airflow (I know most of you are thinking, “No shit, Sherlock,” but I have ignored this for most of my adult life! Cut me some slack!). Scout Tee

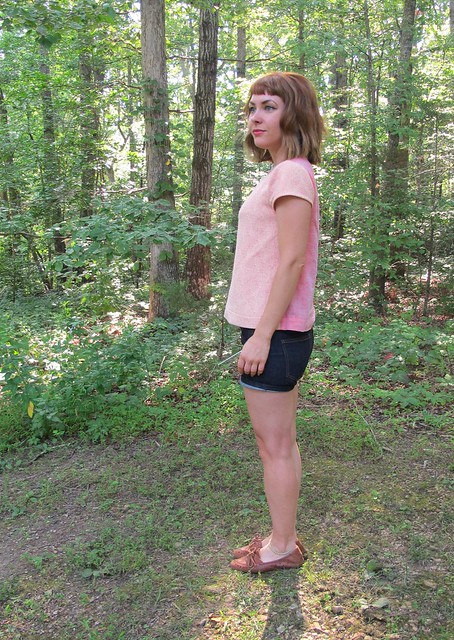
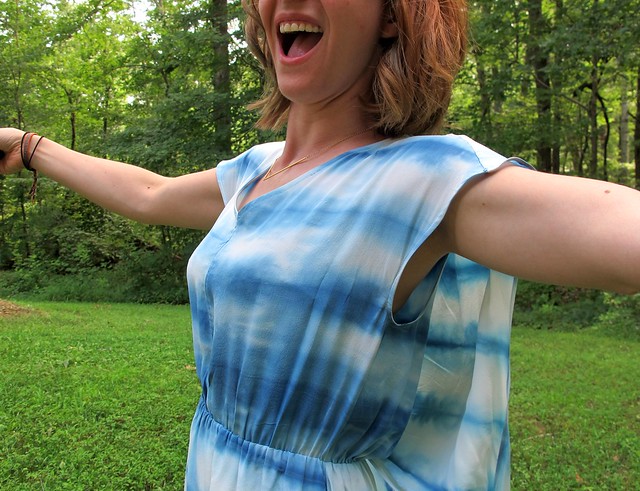
Anyway, I quite like this style on me! I guess it’s still not the most “flattering,” but I’m kind of getting to the point where I don’t care quite as much about flattering. That’s one major difference I’ve noticed about being 30 vs being 20 – I don’t really give a shit about looking ~sexy~ every time I leave the house. I’m also sure my long-term relationship has a stake in this as well, but I’ve been in long relationships in the past and my attitude was definitely the opposite. Wearing loose-fitting anything – especially around my waistline – is a pretty new style territory for me, one that I’m starting to slowly explore and actually wear out in public. Also, it’s damn comfy.

Scout Tee
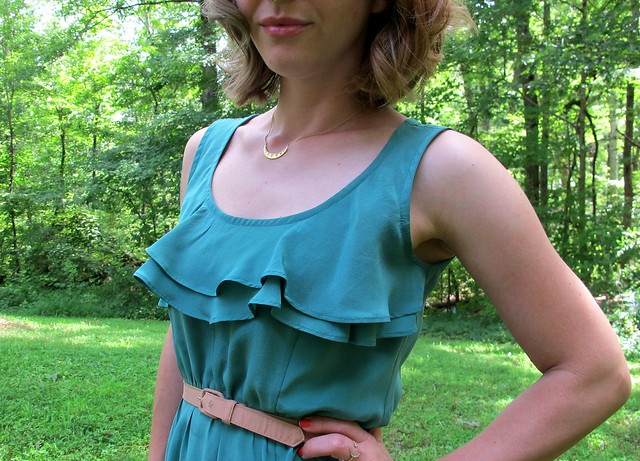
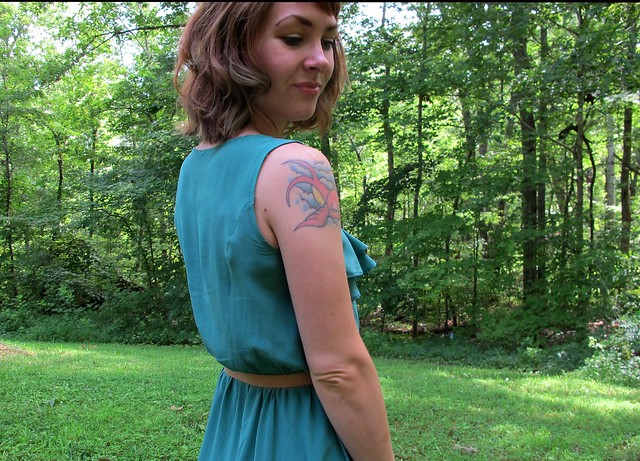
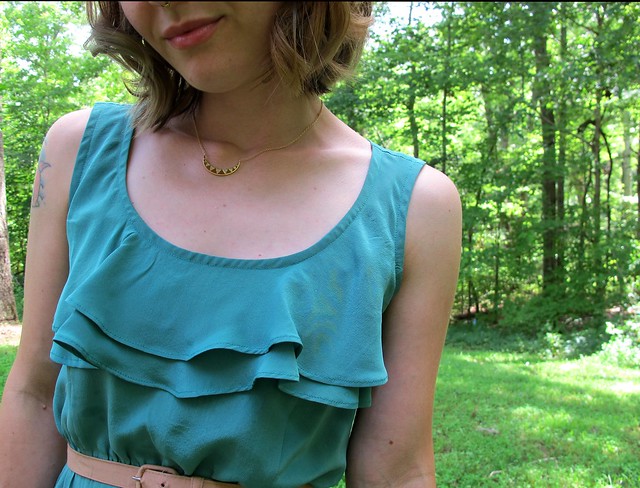
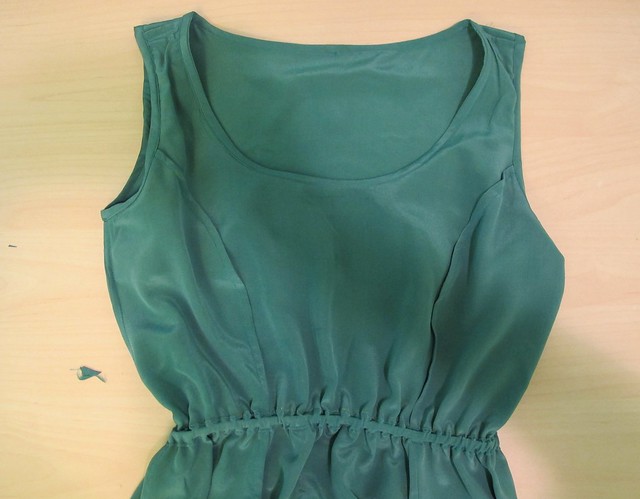
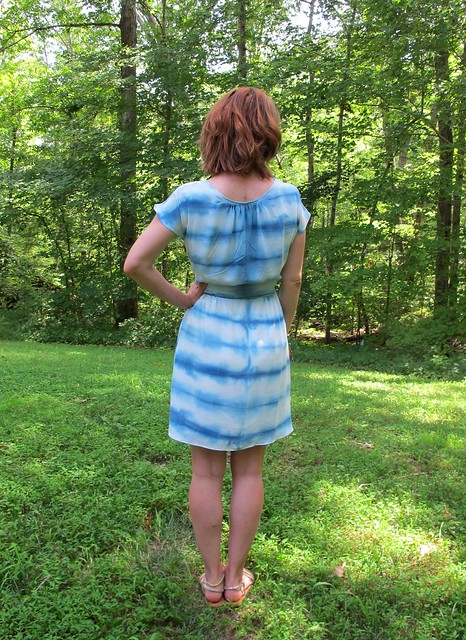
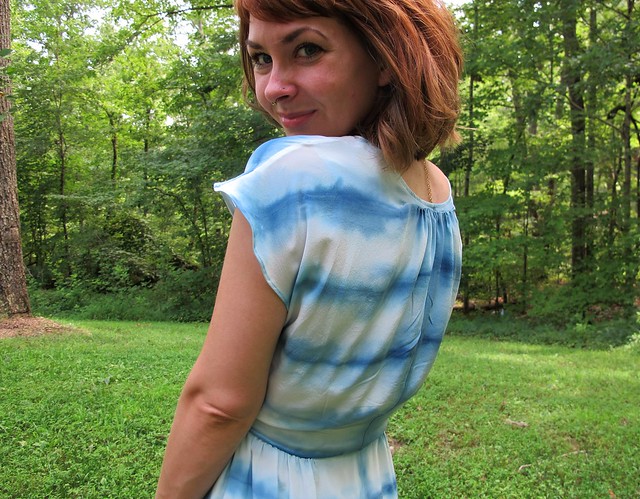
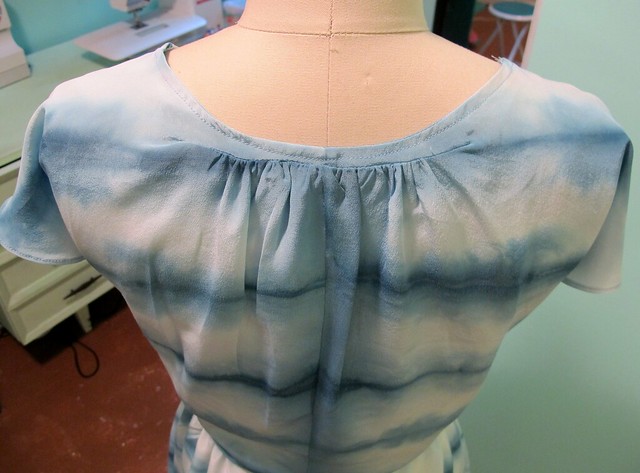
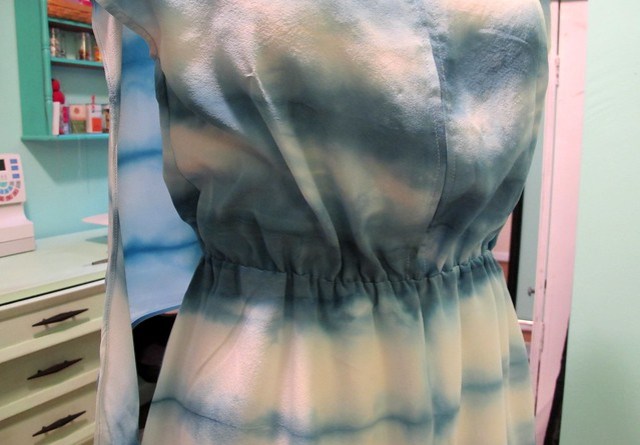
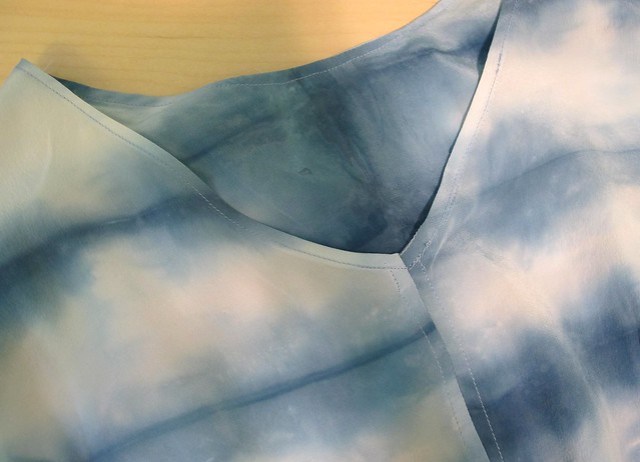
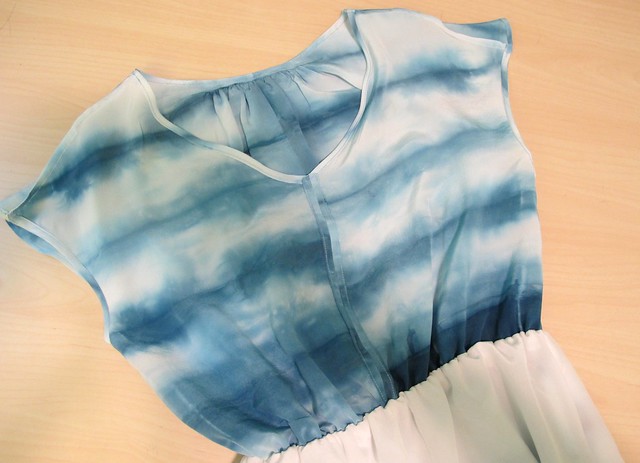
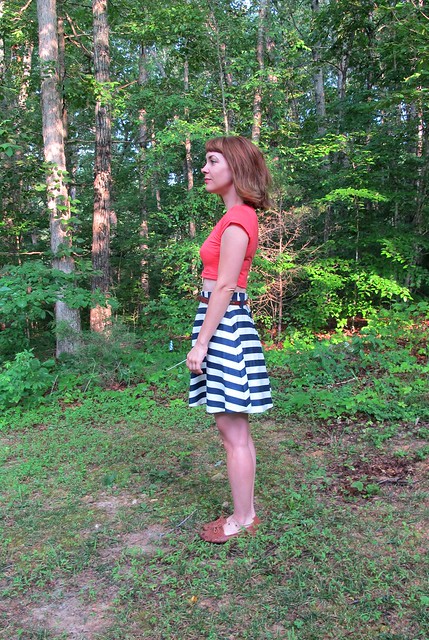
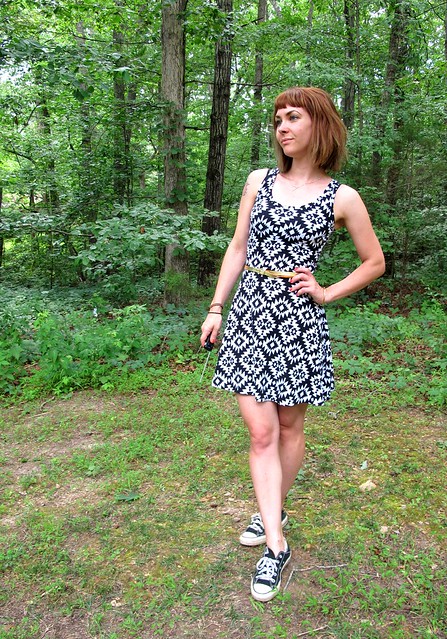
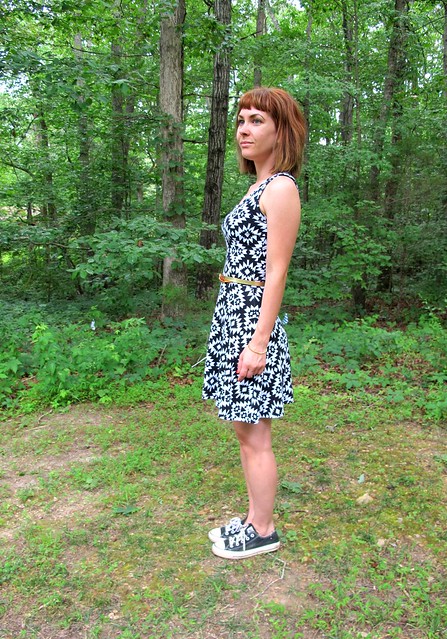
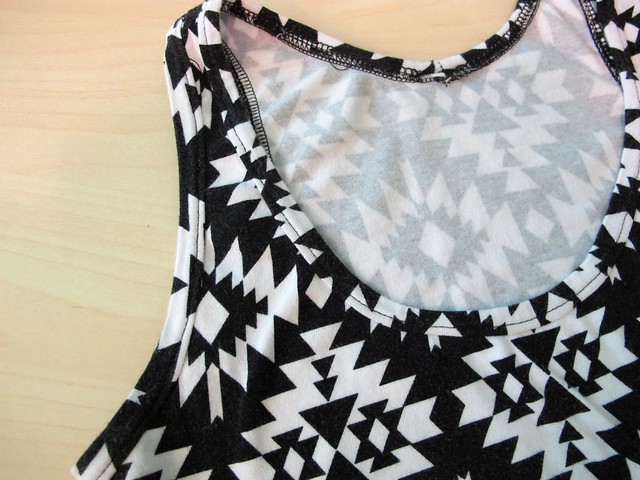
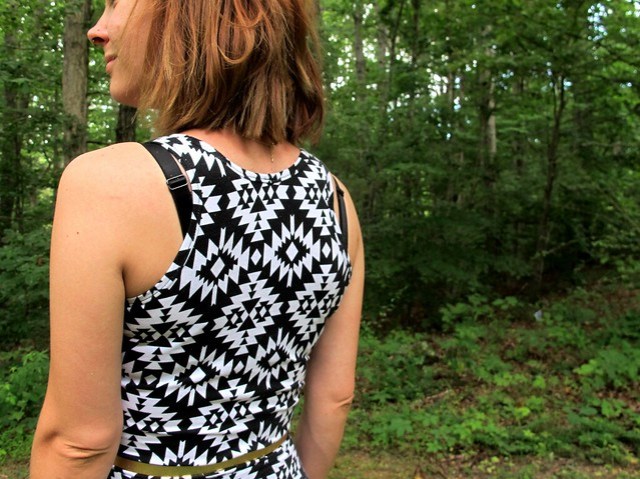
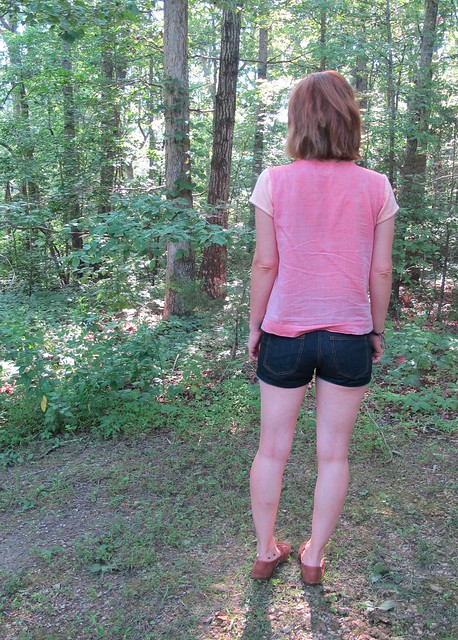
Back to the pattern! I cut the size 0 and shortened the hem by a couple of inches to give it a more cropped length (but long enough so that it still covers the waistband of my pants). The pattern was really easy to put together – it’s just a front and a back, little cap sleeves, and a neckline bound with a bias facing. I like that it fits through the shoulders and the bust, then falls straight down to the hem. Even though it’s loose, it doesn’t look sloppy. One thing I noticed is that the shoulders tend to pull toward the front – since I used a different fabric for the back, this is a lot more noticeable. It doesn’t bother me at all – I actually like the way it looks, to be honest – but I’m also not sure if it’s part of the pattern, or a fitting issue. Thoughts?

(ps, sorry about the wrinkles – like most of my makes lately, these were taken after a full day of wearing) Scout Tee

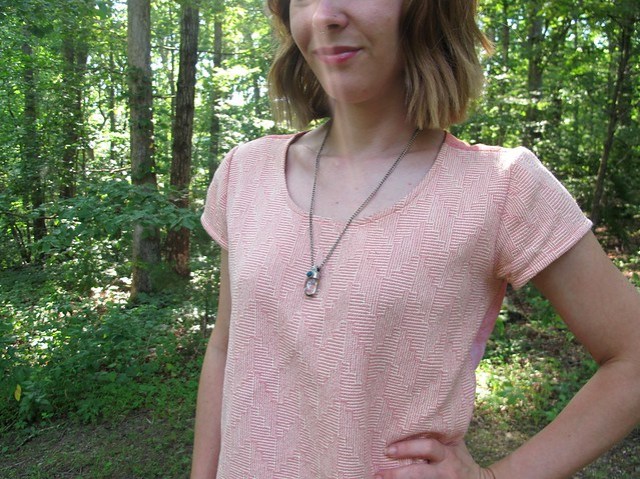
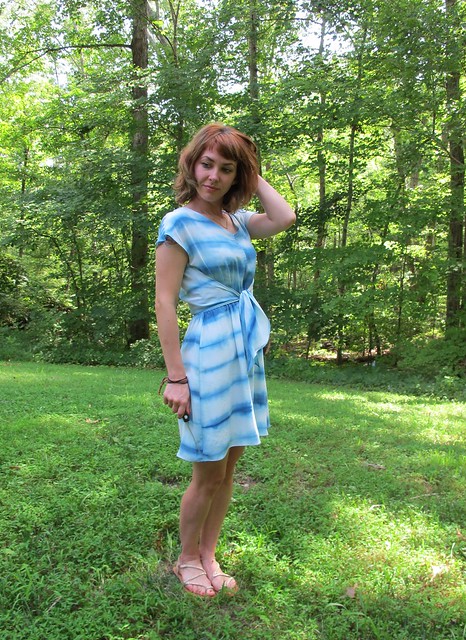
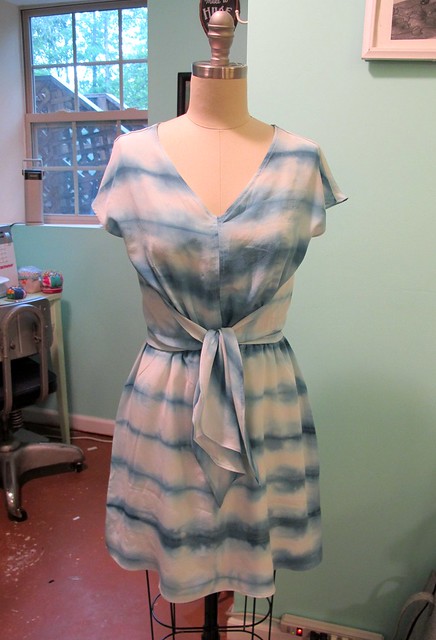
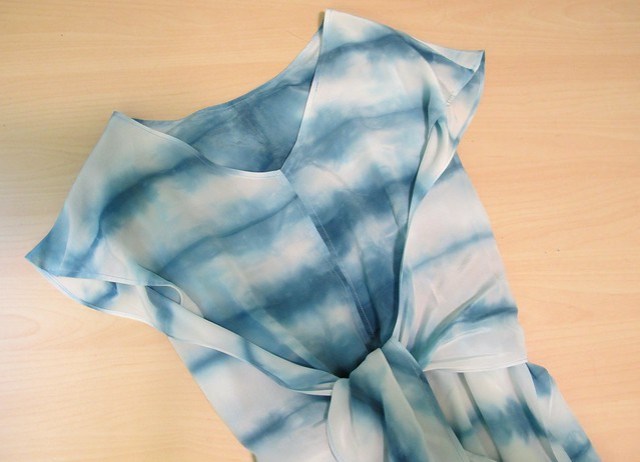
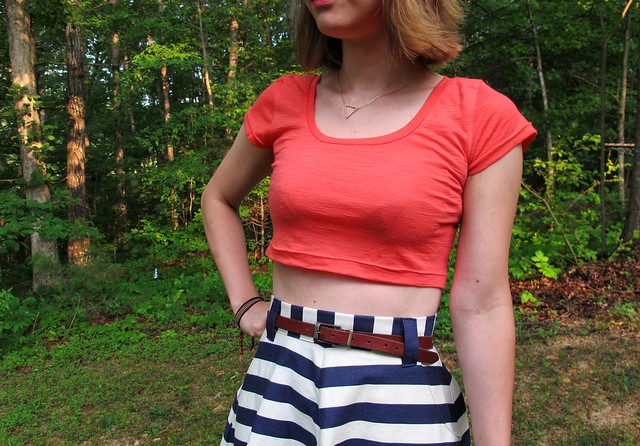
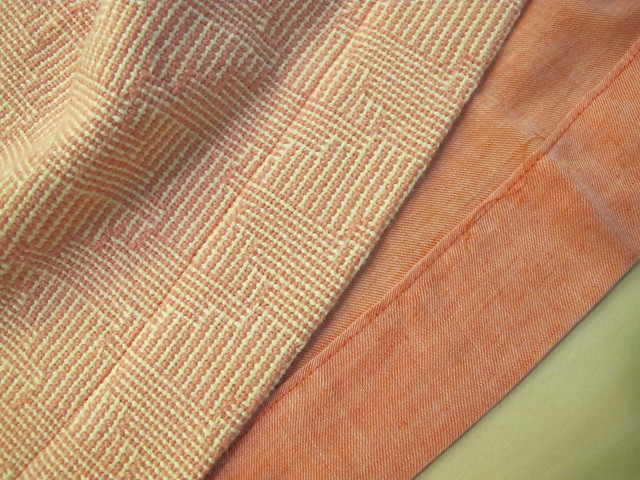
The fabric is what really makes this top shine, though! It is GORGEOUS, amirte?! This is a pretty special piece – it’s handwoven here in Nashville! The company who makes this beautiful cotton fabric is Shutters & Shuttles. I don’t know if they even sell yardage anymore, but they used to. I believe they sell yardage to local designers, which – ding ding ding! – is where I got my little piece from. Back when Elizabeth Suzann used to sell limited-edition tops made with this beautiful handwoven fabric (and other colors/styles of fabric as well), she had a whole stash of it. Eventually, the limited edition ended and Elizabeth’s line moved in a different direction. And then she destashed the studio, and this piece ended up in that stash bag I was telling y’all about. It was a very small piece, so it took me a while to figure out what to do with it. A lot of Georgia Tees were made using Shutters & Shuttles fabric, and they all looked awesome, so I followed that lead with my own boxy tee. Scout Tee it was! Except that I didn’t have *quite* enough fabric to cut both fronts and backs, so the fabric sat on my shelf for several months while I looked for a good color match.

Scout Tee
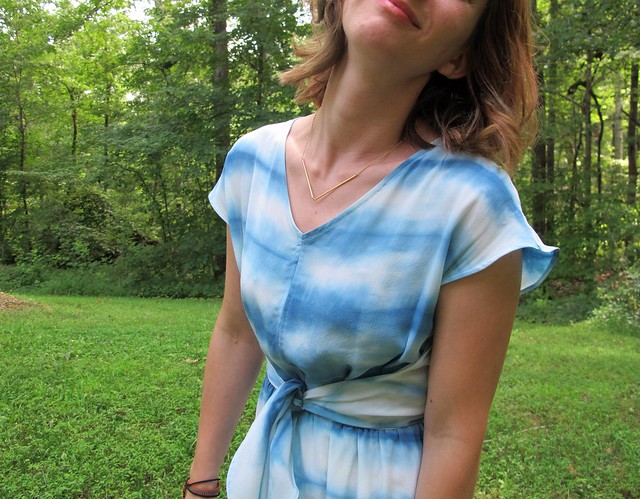
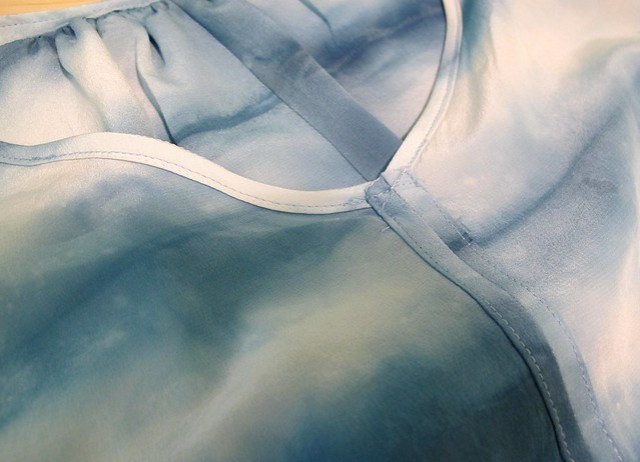
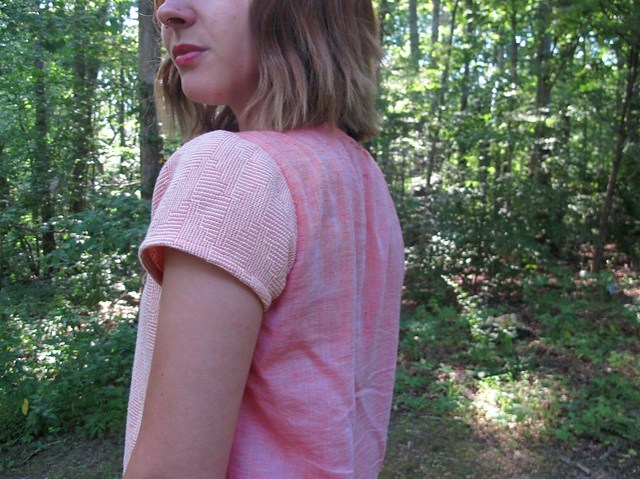
When I made my coral B5526, the coral voile was stored right next to this fabric, and I realized that they were perfectly matched. Which was lucky enough in itself, because this is a really weird (albeit beautiful) coral to try to match. I bought another yard on my next Mood order, and used the voile to cut the back of this tee. I also used the voile for the bias facing at the neckline – it’s a much lighter weight with less bulk than the handwoven cotton, so it sits on the neckline a little better (plus it looks pretty on the inside!). Scout Tee

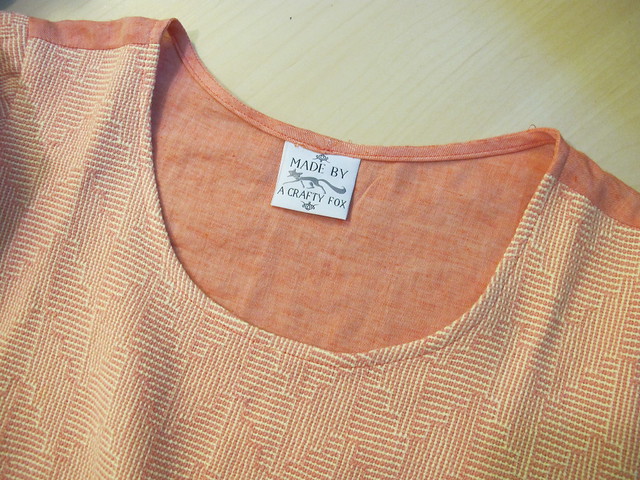
I got these little tags in an order from Grey’s Fabric awhile back, and I think they are so cute! I wanna be a crafty fox!

Scout TeeTo crop the hem, I just folded up an extra-deep hem allowance and topstitched it. One, because I like the way the shirt hangs with the extra weight at the hem, and two, because I wasn’t sure if this whole slightly-cropped-tshirt thing was going to be my jam next summer. I might change my mind and want it to be longer (or even shorter, I dunno), so I left the hem allowance there as a bit of a safety measure. And also a big ol’ dangly thread, it seems.
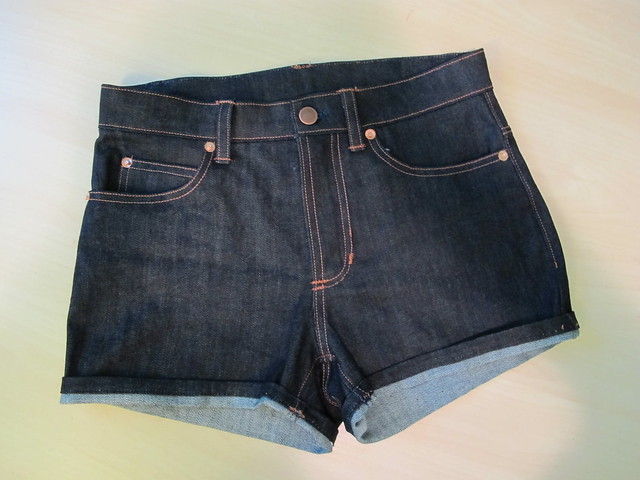
Now for the shorts! Ginger Gorts

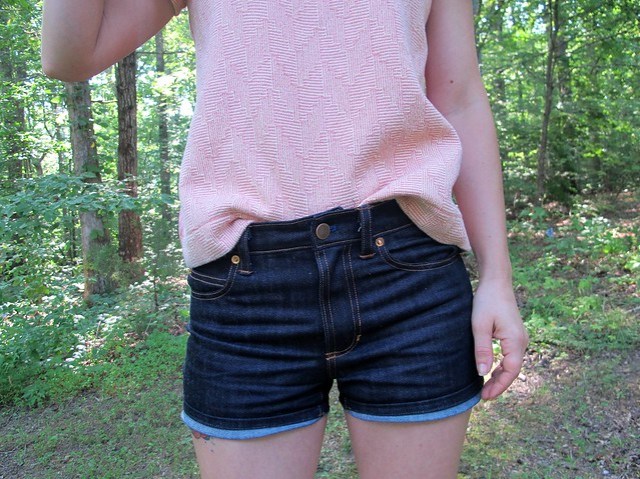
I made Jorts – or Gorts, as I am calling these (jorts is a really annoying way to say jean shorts, in case you were wondering!)! Remember when I utterly failed at that shit last year? Man, those shorts look fucking stupid in retrospect. What was I thinking? And if you were wondering – I never wore them beyond that blog post. They were just tooo uncomfortable and I was terrified the zipper was going to bust. They sat guiltily in my dresser for a few months before I finally chucked them.

Anyway, I’m glad I failed at that shit because I learned some very important Sewing Life Lessons:
1. Don’t make jorts out of a pattern intended for trouser shorts. It looks fucking stupid. Better to start with a jeans (pants) pattern and cut it short accordingly.
2. Jorts need fancy jean topstitching, or they aren’t proper jorts. And, they look stupid.
3. Until you figure things out otherwise, jorts need some stretch in the fabric, else they won’t be comfortable.
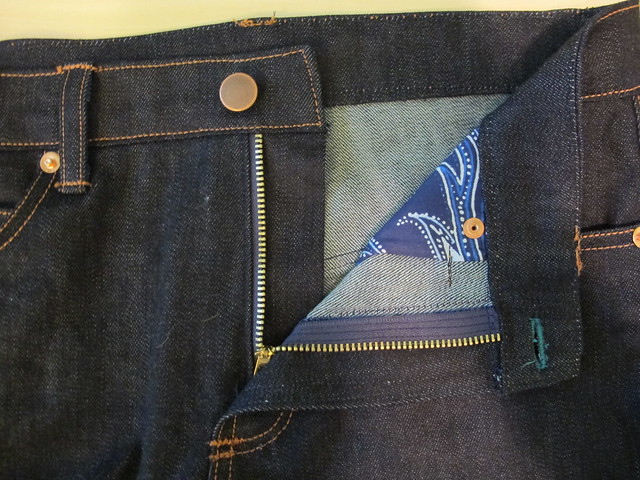
4. For zipper security, there needs to be a bartack connecting the fly shield to the front of the pants. This is EXTREMELY important. That’s why my zipper kept breaking on the fail pair – pulling the shorts on and off was putting way too much stress on the bottom of the zipper, which caused it to break. I eventually figured this out by inspecting a pair of my jeans – the bartack that hits right at the curve of the fly topstitching is intended to take the stress off the zipper, so you can pull on and off your tight pants. I had left that bartack off, which made my pants weak right at the crotch (kind of like most men lololol amirite)(sorry).

So, with those lessons in mind, I re-attempted the jorts. These are way better! Not perfect, but better. I know they look pretty wrinkly in these photos, but again, those are wearing wrinkles – not fitting wrinkles. Well, maybe a couple of them are fitting wrinkles. I am human, after all.

Ginger Gorts
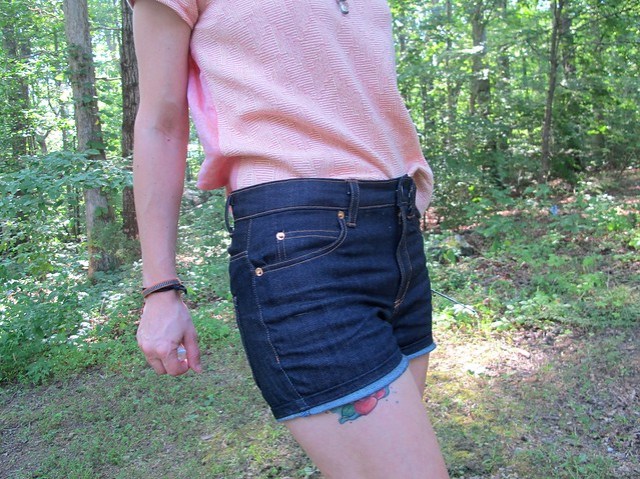
I call these Gorts because I used the Ginger jeans pattern to make them! Ahahaha aren’t I clever! I just love this pattern and I spent a solid chunk of my time in Peru dreaming about making more jeans because I just looove all the detail that goes into the topstitching – but knowing that I don’t need jeans right now, because it’s way too hot! So I was happy to compromise with shorts instead. To make the pattern shorts-appropriate, I just measured the inseam of my favorite shorts and cut that length + 1″ from the inseam of the pattern. In retrospect, I should have added a little more length so that I would have a proper cuff (I didn’t plan these to have a cuff, but they were too long once I’d already hemmed them and I didn’t feel like-rehemming). Maybe next time! Also, if I go with the future cuff, I need to widen the bottom of the shorts at the hemline, because they are a little tight at the thigh (cuffs need to be wider so that when they flip up, they are the right width. This is hard to explain without pictures, so here’s an example in this book I found. Thanks, Google Books!). Giving them a good stretch when I put them on helps, though. Ginger Gorts

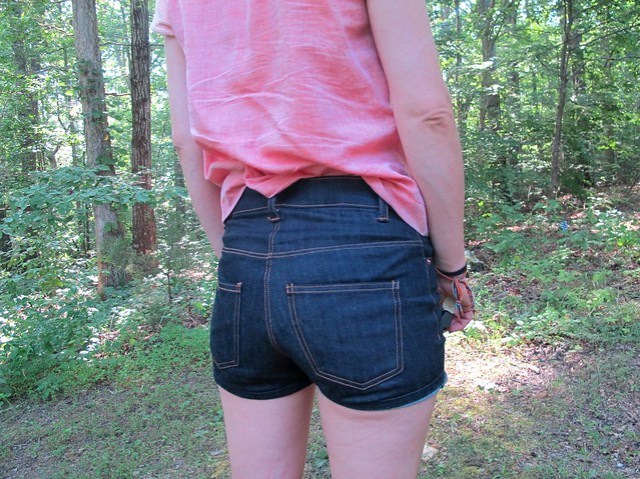
For fabric, I used a stretch denim from Mood Fabrics. The weight was perfect, but the stretch was a little less than what the pattern calls for (which I determined the unscientific way by comparing it to the denim I used to make my first pair of Gingers). I added 1/4″ to the side seams to accommodate for this, but they are still a little bit stiff. The other bummer is that this fabric has a severe bleeding problem – the first time I wore these jeans, they rubbed indigo dye all over the inside of my purse. I was carrying the only nice purse I’ve ever owned, which HAPPENS to be white. Wah!! I was able to get the majority of the discoloration off with a stain remover, but now I’m afraid to sit on anything remotely light-colored. I washed the denim a second time with a cup of vinegar in the wash to set the dye, but they are still rubbing off a little.

All in all, though, I’d say these are a good practice run! When I finally make my fancy Ginger jeans with the Cone Mills denim kit that I bought earlier this year, I am hoping that I’ll have enough leftovers to make some solid Gorts. We’ll see! Pants first!

Anyway, photos:

Ginger GortsGinger Gorts

Ginger GortsGinger Gorts

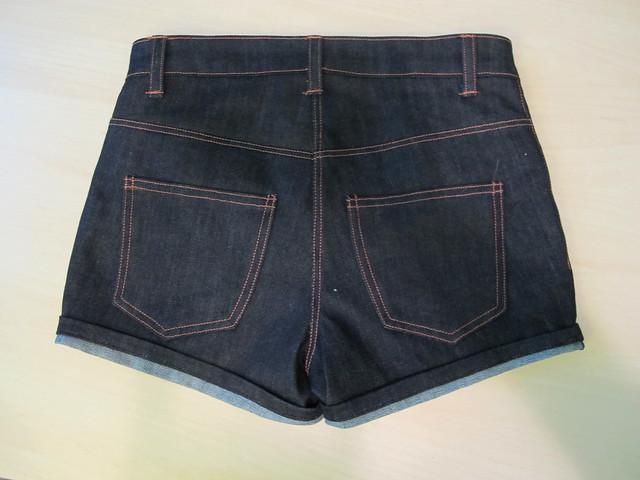
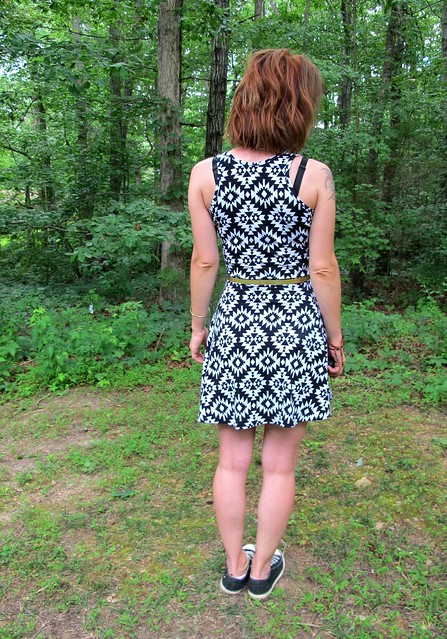
Every time I make jeans, I want to experiment with different colored topstitching thread & serger thread – but I always punk out at the last minute. With these, I used bright blue thread for the button hole – baby steps! It also matches the lining and the serger thread.

Ginger GortsOh, right, and the backside of the button hole is emerald green 🙂 Ginger Gorts

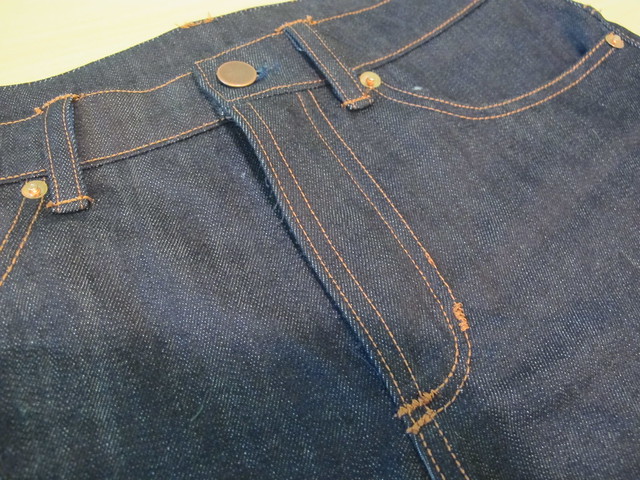
For the topstitching, I used my new 1/4″ foot. THAT THING IS AWESOME. There’s a dull blade that sits exactly 1/4″ from the needle, to help you align your stitching and ensures erfect parallel lines every time. Totally worth the $$$ I spent on it. Although I should probably focus on my bartacks next – those clearly need a bit more work. My machine doesn’t have a setting for bartacks, so I have to trial-and-error with experimental zigzagging.

Ginger GortsGinger Gorts

Ginger Gorts
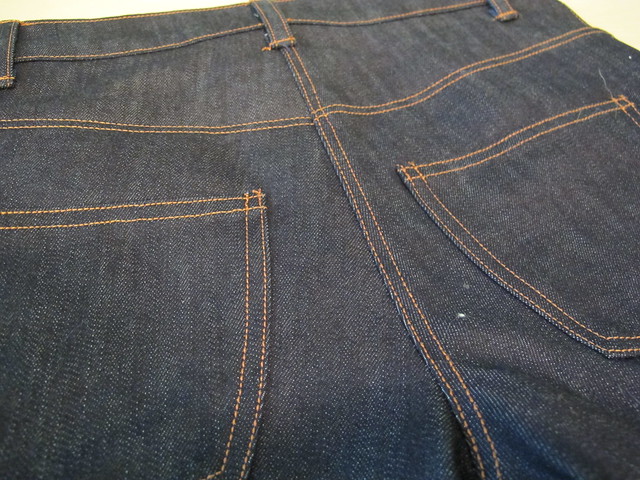
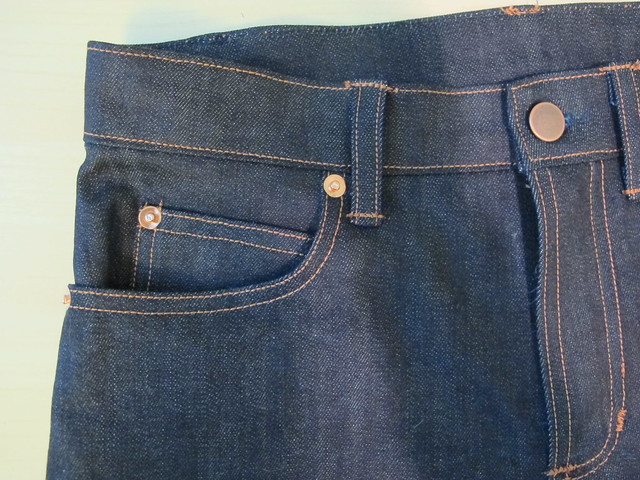
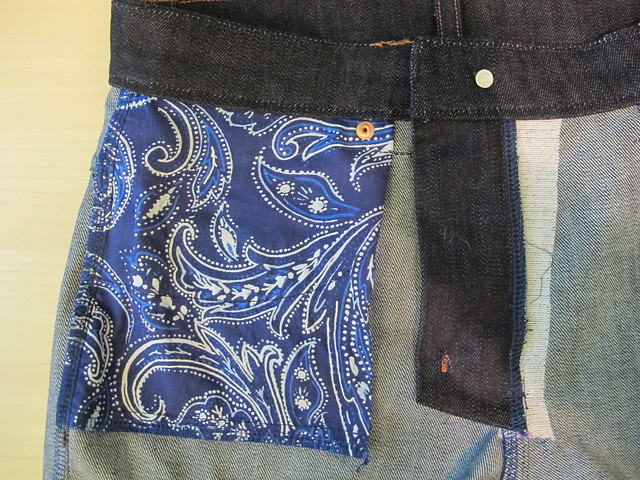
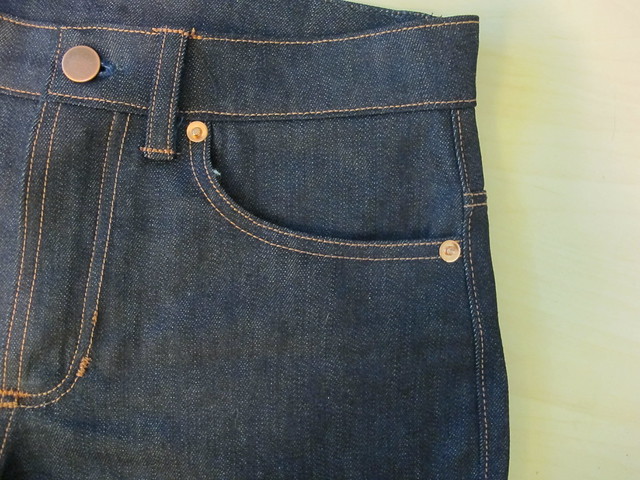
You can also see that I changed up the positioning of the rivets – they are only on the front pockets. The pattern has you put 2 rivets on the back pockets, which I did with my first pair, but I never really liked the way it looked. RTW jeans don’t typically have rivets on the back pockets – ok, ok, SOME DO, but not the majority! – and I thought it made them look sort of homemade. I also recall reading, like WAY back in the past, that the original Levi’s didn’t have rivets on the back pockets because they would get too hot when the gold miners sat next to a fire. Full disclosure, it was a research paper on the history of jeans/Levi’s that my cousin wrote for one of her classes in high school, and I found it because I was snooping in her room when she wasn’t home (what? She had a really cool Barbie Dream House that she wouldn’t let me play with). That one statement was really fascinating to me and has stuck with me through the years (although I don’t remember anything else about the paper). This would have been around 1992-1993, so yeah, a while ago (and yes, I realize we are talking about a paper written by a high schooler, back before you could use the internet for research – so obviously I can be completely off my mark here). A quick Google tells me that the rivets also scratched cowboy’s saddles, which might be another reason why the back pockets ones were eliminated. Either way, I think they look weird and out-of-place on the back pockets. So front pocket rivets only for me! Scout Tee

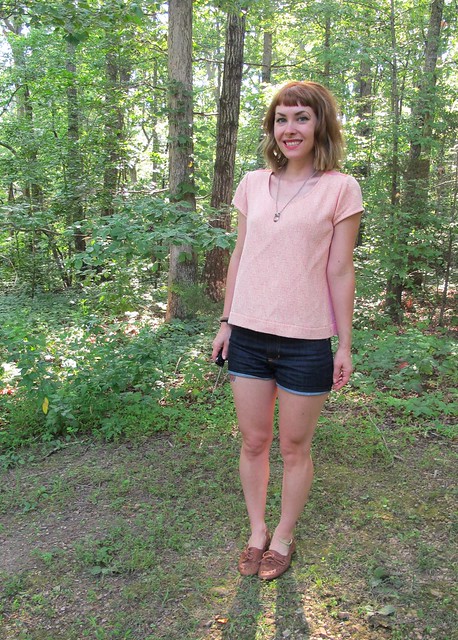
And that’s it for this outfit! Tell me – has your style relaxed as you aged? Do you find yourself experimenting with new silhouettes, or do you stick with the tried and true? How do you feel about rivets on the back pockets of jeans? Do you think the cowboys were onto something?

Completed: A (modified) Silk Crepe Saltspring

7 Aug

The Summer of the Silk Dress continues! Today’s offering is one that I’ve had rolling around in my head for… wow, almost 2 years now. Okay, Lauren!

Silk crepe SaltspringI also got REALLY bored with taking pictures in the back yard, and ventured into the garden for these. Our garden is adorable, not that you can tell much from this one little corner. I’m hanging out with my tomato plants and potatoes over here. And I helped build that fence! Drove in those fucking fence posts LIKE A BOSS. boss Anyway, I digress! Silk crepe Saltspring

The pattern I used is the Sewaholic Saltspring dress, with just a minor modification that makes for a major difference in the end result. Ever since I sewed this pattern as a tester, I’ve wanted to make a version without the bloused overlay. I think the overlay is pretty, but I never liked the way it looked on me. I do, however, like little spaghetti strap sundresses and y’all KNOW I love me some elastic waists, so I thought I could switch things up a little to get what I wanted. Too bad it took me 2 years to actually do it. Better late than never, anyway!

Silk crepe SaltspringSilk crepe Saltspring

All I did was use the bodice front & back lining pieces, and omitted the bodice overlay pieces. Because of this, I had to figure a different way to finish the edges and attach the straps – so I just used my ol’ fave, the self bias binding. For the straps, I sewed on enough bias to extend several inches past each end of the underarm, and then continued my stitching all the way to the tips of the bias after I folded it over (this means the raw edges of the bias are exposed on the straps, BUT, bias doesn’t fray so it’s not an issue). For the elastic casing, I just sewed the waistline with the normal 5/8″ seam allowance and folded it under itself a couple times and topstitched to make a casing.

Silk crepe SaltspringThis was a very easy dress to make. It’s SUPER casual (especially with my bright white bra straps hollering out, lolol), but it’s exactly what I wanted. And I personally think that it looks a lot better than the OG version! Silk crepe Saltspring

The fabric I used here is another silk crepe from my stash. Silk crepe is absolutely my favorite silk to sew and wear – it’s really easy to work with and the colors are always so beautiful and saturated. As long as you pre wash and dry that shit in the machine, it’s also really easy to care for. I just throw mine in the wash on cold and hang it to dry (mostly because I don’t like to iron wrinkles out haha. But I always pre-dry just in case it accidentally gets thrown in the dryer at some point!).

I mean, check out that beautiful fluid drape! Ughh it’s so good.

Silk crepe SaltspringThis is another silk crepe from the Elizabeth Fabric Grab Bag. I think this one was from her personal stash, and came dyed that color (as in, she didn’t dye it herself). It feels amaaaazing. I have a bunch left over and I MIGHT make pajamas out of it. Maybe. I kind of want to live in it forever. Silk crepe Saltspring

I think for a first-time make of this rendition, this one turned out really great (and exactly the way I wanted it to look!). There’s not anything that I would change about it, except that I did go back and add some thread belt loops at the side seams. My belt kept falling in these photos and it looks stupid. Now it stays in place!

Silk crepe SaltspringSilk crepe Saltspring

Silk crepe SaltspringSilk crepe Saltspring

Silk crepe SaltspringAs usual, the construction consists of a lot of French seams. I can’t get enough of those when it comes to silk! I wanted to add the pockets to this dress (considering that I always steal the pocket pattern piece to use for my other dresses, it seemed only fair to give it a shot with an actual Saltspring), so I had to figure out how to French seam those suckers in. Turns out it’s pretty much the same as French-seaming anything – just a little more fiddly to iron. But yay for it working out! Silk crepe Saltspring

I gotta say, these silk dresses have been a serious GODSEND for the past couple weeks that I’ve had to drive around without any a/c. Apparently I’m sweating straight through them, but, whatever. It’s not like I can see my back.

As a side note – NYC Fashion Week is next month! If you’re planning on going to the city during the events (oh please oh please take me with you) and want to try something a little different, definitely check out the Fashion Week tours at Seek NYC. This tour sounds massively interesting – learning the history of the NYC’s garment manufacturing & retail industries, visiting fashion landmarks and fabric/trim shops, touring with a professional designer, checking out a sample sale, and learning the evolution of Fashion Week, to name a few highlights. The group tour is $55, and you can take 15% off if you use the code BIRD (offered 9/10/15 – 9/17/15). Not in town during Fashion Week but want to check out a private tour of the Garment District? You can also use that code to take $15 off a private tour, and that’s good all the way through 12/1/15. If you’ve taken one of these tours, I want to hear all about it! I’ve wanted to take one for about a year now because they sound really cool, but each time I’m in the city the weather is either awful for a walking tour, or I’m too busy running around otherwise.

Completed: Silk Leopard Print Boylston Bra

5 Aug

Man, I am SO far behind in terms of what I made vs actually posting it. This is from 2 weeks ago. Ain’t mad about it!

Silk leopard print Boylston braThe pattern here is the Boylston bra, which is the newest pattern from Orange Lingerie. I think I mentioned this before, but I’ve been waiting for a hot minute for this pattern to debut – Norma showed me a photo of one of her samples when I met with her in Paris (man, that sounds so fancy! I wish I was that fancy irl haha) and I was super excited about the idea of making a bra with a woven fabric. Also, tiny prints. You need a tiny print so that it doesn’t get lost in these little pattern pieces. And isn’t everything tiny automatically twice the fun? Yes.

Another big selling point of this bra vs the Marlborough is that the Boylston has been designed to be made with foam cups (you can also make it without foam cups and just have a soft, lined bra, if that’s your jam!). At the time of my snooping, I wasn’t terribly interested in foam cups (I am now, though), but I loved the idea of a lined bra, again, made with a tiny print. Also, the balconette shape is new to me – I don’t think I’ve ever actually owned a bra with this silhouette because I’ve never found one that fit properly. So obviously it was time to try something new! Silk leopard print Boylston bra

Since I’ve already made the Marlborough bra a number of times (one two three, etc etc), and I was pretty comfortable with the fit, I compared the pieces of the two patterns together to see if there were any similarities. Both the bridge and the back band on the Boylston and the Marlborough are almost exactly the same. The cradle is also pretty similar. Obviously the cups and straps are different, but I felt pretty confident that I could cut my usual size in the Boylston and not have any weird surprises. So I made my bra up in a 30D, same size as the Marlborough was for me. I also applied my Marlborough back band changes to the Boylston pattern – I figured if the bands were drafted the same, then they would probably need the same LT-alterations (mostly shifting the curve so that the straps hit the right spot, and extending it to be slightly longer. Which means technically this band isn’t a 30, but, whatever. It fits me now, that’s all that matters). The cup wrinkles you see on the dressform aren’t there in real life; she’s just a slightly different size than I am.

Silk leopard print Boylston braI tried to wait & hang around to see if anyone else made this pattern before I dove in, so that I could steal their ideas without having to figure things out on my own. But, y’alls is too slow for me! I waited a couple agonizing weeks and said, fuck it. Cut that sucker up, stitched her together, new bra by the end of the day. Yay! Silk leopard print Boylston bra

I wanted to try something super duper fancy for this bra, so I made it out of silk! The outer is this leopard print silk charmeuse from Mood Fabrics, and it’s REALLY nice stuff! I used the shiny side facing out – normally, I prefer the matte side of silk, but the shiny side definitely looks more bra-like (and I’d guess will also wear better under clothing, since it’s ~slick~). For the cups, I did try out foam for the first time – and I’m a total convert. Bra foam RULES, you guys!! Making the little cups was really fun (and having little foam boobies floating around the sewing room is a total thrill, let me tell you) and they definitely make this bra look way more RTW than anything else I’ve ever made. I’ve hated foam bras for quite a while now – mostly because of that weird half-grapefruit shape that they all come in. My boobs definitely aren’t shaped like that, so they never fill out the bra correctly – there’s always a giant gape at the top half of the cup. What’s nice about this pattern is that the cup is seamed, so you get a more natural shape which in turn makes the foam cup fit better. I bought this foam from Sweet Cups Bra Supply (which is the US version of Bra Maker’s Supply – cheaper shipping, but the selection isn’t quite as extensive, wah) and I really like the way it feels, as well as how it sewed. One of those little foam pieces was plenty for this bra – I estimate that I have enough to cut at least 2 more bras, maybe 3. So it’s not terribly expensive, either.

While this bra pattern was designed to work with foam, the pattern isn’t actually drafted to be foam-friendly – you have to do that yourself (does that make sense? The stye works with foam, but the pattern needs a couple of tweaks for the best sewing results.). Part of my waiting around for someone else to make this pattern was that I could not figure out how to seam up the foam on the bra – wouldn’t the seam allowance be bulky? I did some lurking and found this make a foam cup bra series on Cloth Habit, which answered pretty much all of my foam questions. I retraced the cup pieces onto light plastic and removed the seam allowances, and followed Amy’s tips for sewing everything together and trimming down the foam within the seam allowances to reduce bulk. I’m really pleased with the results. I think this bra looks totally professional.

Silk leopard print Boylston braAs with my other bras, I used firm powernet for the back band and lined the bridge with the same powernet. All the elastics and notions are from my stash (mostly from the Garment District, but I buy my underwires from the aforementioned Sweet Cups because I love their wires! In fact, I love everything I’ve bought from that site. Their quality is the best!). Interestingly, I had *exactly* enough of all the elastics I used – nothing more, nothing less. Dunno how that happened, but I won’t argue with it! The cups are lined with the foam, and thanks to the elastic and underwire channeling, the only seam you see is the side seam that connects the bridge to the band. I serged that seam with a 3 thread overlock; next bra I make, I might experiment with binding it or even adding a lightweight boning. So many options! Silk leopard print Boylston bra

Silk leopard print Boylston braSilk leopard print Boylston bra

I worried about the straps getting stretched out of shape, since they’re silk and all (a double layer, but still). The edges are finished with elastic, though, so that helps them keep their shape. I’ve worn this bra a LOT since I finished it. I’m actually wearing it right now as I type this 😉 hahaha!

Silk leopard print Boylston braThe only thing I will change for the next bra is that damn seam allowance at the top of the cups. Instead of following Amy’s advice and using 1/8″, I used the pattern’s 3/8″ and as a result, the foam is really bulky and there’s definitely a ridge at the top of my bra. Using a smaller seam allowance would have eliminated that. Oh well! Silk leopard print Boylston bra

Here are the foam cups. Aren’t they adorable! They are sewn up with a basic zigzag stitch, the pieces butted together with no overlap. I’ve seen some people cover their foam cup seams, or use a satin stitch to piece them together – but I like the basic ol’ zigzag. It’s strong enough, not very noticeable, and super quick!

Final thoughts – this is by far the prettiest, best-fitting bra I have ever made. I think the shape is really beautiful and modern, but not Victoria’s Secret’s idea of modern (no big half-grapefuit foam cups, PLS). I don’t have any photos of me wearing this one, sorryyyyy, but I’ll make an attempt for the next one (as of this writing, I have 2 cut and ready to be sewn, so it’s safe to say that there will be more of these in my life!). I LOVE that the pattern is made for non-stretch fabrics, and thanks to the foam cup – you could make this bra out of almost anything. Which has definitely got me thinking hard and lurking into the depths of my fabric stash! The fabric straps are pretty, and bonus – they use less elastic than normal elastic straps (so, again, yay for using scraps!). I also think the cup piecing could lend itself to some gnarly colorblocking. We’ll see! I also wonder if this pattern could be converted to a strapless? The shape is pretty similar to the RTW strapless that I own; except the cups have less coverage on this one.

As far as how easy the pattern was to make – well, I definitely did not make it any easier on myself thanks to my fabric choice! Silk charmeuse is hard enough to deal with on a good day, but we are talking about teensy little pattern pieces here. A couple were cut off-grain and had to be recut. I didn’t have too much of a problem assembling and topstitching, but I’ve also made a few bras at this point so I’m pretty confident in those skills. The only construction part that was hard was getting the elastic around the underarm and up the strap. That curve was difficult to navigate. I don’t think this is a hard pattern, per se, but I don’t know if I’d make it my first bra pattern. Definitely not in silk charmeuse with foam cups, at any rate. Maybe start with the Watson or the Marlborough first 🙂 The instructions were good, pretty similar to the ones for the Marlborough. I did notice that Norma added grainlines to the pattern pieces, which indicate the stretch direction so cutting is easier. That was a MASSIVE help! I do wish there were more markings on the pieces themselves – mostly, top and bottom markings. I’m not really sure if my cups are upside-down or not, because there’s really no way to tell.

Tried a new bra pattern tonight! This is the Boylston from @orange_lingerie, sewn up in silk charmeuse with foam cups! Another nail-biter till the end (will it fit?? will it fit??), but I'm happy to report that it fits awesomely. Now to put foam cups in e

Ok, who else has bought this pattern and when are you gonna make it?! Guysss! I need to see more Boylston bras up in here, please and thank you!

OAL2015: The Winners!

3 Aug

Hey everyone! One more OAL post for this year 🙂

OAL_Banner

This was my second year co-hosting the OAL with Andi Satterlund, and I think it’s safe to say that we both had a most excellent time! There was a great turnout of participants (61 outfits in the official Ravelry thread!) and I really enjoyed following along with everyone’s progress and lurking all those beautiful finished outfits! Thanks so much to everyone who joined in – whether you made a whole outfit, just sewed or knit one piece, or watched and cheered along from the sidelines. Y’all are the best! ♥

While making an outfit is a pretty sweet deal in itself, Andi & I wanted to draw out the fun even more by offering prizes to 4 random winners who posted completed outfits in the thread. This year, we doubled up and have two sponsors who have generously donated prizes, so I’d like to take a minute and acknowledge them! The first sponsor is Indie Stitches, who you might remember also donated prizes last year. Based in Australia, Indie Stitches sells both paper patterns and downloads, and offers selections from a huge plethora of indie designers, all of which are super good! Our other sponsor is The McCall Pattern Company, who owns and manages 3 of the famous Big 4 pattern companies (McCall’s, Vogue and Butterick, as well as Kwik Sew). I absolutely adore the McCall Pattern Company, even when I’m poking fun at them (and adore them even more for being basically the best sports ever about it!), so I’m pretty thrilled to have them on as a sponsor for OAL2015!

Both Indie Stitches and The McCall Pattern Company have offered to donate one pattern to each of the 4 winners. The winners will also get two patterns of their choosing from the Untangling Knots shop. So you will get to keep on making outfits! Yay!

Now for the winners! These were pulled from the official Ravelry thread and drawn by random number generator.

kari1276
Kari // Vianne cardigan + Carolina Mae dress

Can you believe that this is Kari’s second sewing project?? That dress fits beautifully and I just love the fabric! Also loving the idea of a black Vianne – that’s definitely a sweater you can wear with anything 🙂

feminizzle
Ann Marie // Vianne cardigan + self-drafted dress

I love the colors in Ann Marie’s outfit! That orange Vianne is especially beautiful with all the subtle color gradation. The addition of a waistband on the dress is a really nice touch!

egwene2211
Angela // Myrna cardigan + V8726

Another first-timer here – this is Angela’s first cardigan! I think it turned out awesome and, again, love that orange! The colors of her cardigan & dress remind me of sherbert 🙂 Yum!

irish1970
Jeri // Cancun Lacy Box top + Angie dress

Love everything about Jeri’s outfit, but ESPECIALLY that little lacy top! Ahh!! I never realized how much I needed a lace-knit crop top until right this second. It looks great on Jeri, both with and without the dress. The whole outfit looks so cool and comfortable, perfect for summer!

Congratulations, OAL winners! Expect some emails to get those prizes out 🙂 I’m so happy to wrap up another successful OAL, and even happier to have a few new knitting and sewing patterns to add to my never-ending queue! Starting with that lace crop top. haha!

Thanks again to everyone who participated! Thanks to Andi for hosting along with me this second year, and big thanks to our sponsors Indie Stitches & The McCall Pattern Company for the great prizes! If you’d like to see more OAL garments, check out the official Ravelry thread, as well as the hashtag #OAL2015 on Twitter & Instagram 🙂

Completed: OAL2015 (M6887 dress + Vianne sweater)

31 Jul

MY GOD, you guys. I am so happy I got this finished in time for the OAL deadline! I’ve had the dress finished for a couple of weeks now, but I worried about that sweater as the time drew closer! I ended up needing to take a couple marathon days in order to finish, but I did finish! And now I’ve got an outfit to show y’all!

OAL2015 - M6887I’ll start with the dress. Again, this is McCall’s 6887, which I used cotton ikat fabric from Mood Fabrics to make it up with (this isn’t a Mood Fabrics allowances fabric; I bought this on my own dime while I was in NY last year). I used the version with the back cut-out, as well as the cap sleeves, omitted the lining in favor of bias facing, and added pockets. I’m not going to go into detail about the construction, since there’s a whole series of blog posts on the making of this dress! You can see them all here:

We are just gonna look at pictures instead. Btw, I walked through a lot of spiderwebs to take these. Appreciate me, dammit. OAL2015 - M6887

OAL2015 - M6887OAL2015 - M6887

OAL2015 - M6887OAL2015 - M6887

OAL2015 - M6887Now for the sweater part! OAL2015 - Vianne

Vianne is a sweet little top-down cardigan with lace details and a open mesh back. It’s supposed to be knitted up in DK weight yarn, but I used Cascade 220 worsted weight and was able to get gauge using size 6 needles. I knit the size XS, and the only modification I made to the pattern was to knit full-length sleeves. As in, I followed the sleeve directions and just kept knitting/decreasing until they were long enough. I’ve found that I don’t have much need for 3/4 sleeves – if I’m cold enough to wear a sweater, I am cold enough to need the full sleeve – so I went with long sleeves. I did keep the mesh back, though. The mesh back is awesome. I found the mesh+lace a little confusing to follow, so I used a bunch of stitch markers to stay on track and that helped a lot.

While I normally finish my buttonbands with a strip of petersham ribbon for stability, I did not do that with this cardigan. Vianne is a looser fit on me, and the button bands are so wide that they don’t really stretch when they are buttoned. So I left off the petersham and just sewed the buttons directly on the ribbing. One thing I will say about using a stabilizer with your button band – it makes sewing on the buttons a helluva a lot easier! Oh well! Anyway, the buttons are vintage glass from my stash – I’ve had them for YEARS and been hoarding them for a special project, which I’m happy to have finally found! I only had 4 buttons, so I left off one of the button holes. And by “left off,” I mean I originally knit it and then later closed it up with a slipstitch haha.

OAL2015 - VianneOAL2015 - Vianne

OAL2015 - VianneOAL2015 - Vianne

OAL2015 - VianneOAL2015 - Vianne

OAL2015 - VianneOAL2015 - Vianne

OAL2015 - VianneOAL2015 - Vianne

OAL2015 - VianneAs with all of Andi’s patterns, I REALLY enjoyed knitting this sweater! The yarn was so nice to work with (after a long Cascade 220 hiatus, I’m happy to be home! And I’m really happy to find a local source that is still selling it – Ewe & Company, who happen to be located here in Kingston Springs! What are the odds?) and the color is my favorite. The only thing I didn’t like was feeling rushed at the end, but that’s my own damn fault for not pacing myself earlier during the OAL. I’m glad I got it finished in time, at any rate!

As a side note, wrangling the last sleeve of the sweater got me really wanting to start doing seamed knitting. I’ve always been a fan of in-the-round, because it’s so easy, but I’m starting to feel a little comfortable and I’m kind of craving a bit of a challenge. It would be fun to learn how to properly seam a sweater. Not to mention all the pattern possibilities that open up when you’re not hung up on just one particular construction style!OAL2015 - M6887

Anyway, that’s it! Here is Vianne on Ravelry (spoiler: not any more info than what you see here!). Don’t forget to post your finished outfit in the OAL 2015 FO Thread on Ravelry for a chance to win prizes! We have prize donations from Indie Stitches and The McCall Pattern Company, as well as from Andi Satterlund herself (winner’s choice with all of these, so you won’t get stuck with something you don’t want!), and there will be 4 winners. Also, if you have blog posts to share with your FO, post them here so I can see! I need to get my lurk on 😉

Completed: McCall’s 6952

27 Jul

I think this summer will forever be known as the Summer of the Silk Sundress, well, for me, anyway. That seems to be all I want to sew/wear – not that I’m complaining!

McCall's 6952So, here’s my newest addition to the closet – McCall’s 6952. I think this pattern is actually from last year, but I only just discovered it this year. As far as dress patterns go, it’s pretty basic – wide shoulder straps (aka BRA FRIENDLY STRAPS), princess seams, and an elastic waist. The dress doesn’t even require a zipper; you can just slip it over your head. And I don’t know what is with me and elastic waists lately, but it’s basically all I want to wear these days. I’m not pregnant or anything. I’m just constantly in search of comfort haha. McCall's 6952

Simple is good, though, if you want a nice plain backdrop for showing off amazing fabrics. Or not even cool printed amazing fabrics – sometimes a luxe silk in an incredible color is amazing enough, you know?

McCall's 6952McCall's 6952

The silk I used here is another fabric gift that I’ve been too terrified to actually use. Sunni sent it to me last year in a big grab box of fabrics – any of y’all who lurk her blog or perused her store (which I’m really bummed to hear about it’s closing!) know that woman has got some taste when it comes to fabric. I believe this silk crepe was actually dyed by her, even. Of course. And she sent me like 4 yards (or something generous like that) and here I’ve been too skeered to actually use it.

McCall's 6952This pattern seemed like a good place to start. The dress isn’t super close-fitting, so I didn’t have to worry about fitting issues (other than the length of the straps, which were surprisingly almost perfect for me). I originally noticed the pattern because I really like view A – with the plain front and cut-out back – but I decided to make view B for this dress – with the cool little ruffled boobie flounce. My boobs need all the help they can get, y’all. McCall's 6952

McCall's 6952Construction-wise, I didn’t follow the instructions at all. The instructions have you line the dress, but I like wearing as few layers as possible when it comes to summer heat. So I just finished the neckline and arm holes with self bias binding (jeez, I sound like a broken record. I should rename this The Summer of Self Bias Binding haha). All hems are rolled by machine, and the inside is entirely finished with French seams. The elastic casing is a strip of bias binding, with the elastic threaded through. McCall's 6952

And I totally prewashed/dried this silk in the machine so this is some shit that will never see the dry-cleaners. Machine washed silk FTW!

McCall's 6952McCall's 6952

McCall's 6952Fit-wise, I only needed a couple very minor adjustments (minor enough where I was able to fit them as I sewed). The shoulders were almost perfect, but I did raise them by about 1/4″. I also ended up taking about 2″ off the hem, as I think the shorter length is a bit more flattering on me. McCall's 6952

McCall's 6952I am thinking this will be a good pattern match for the cool fabric that I bought in Peru. The plain version with the cut-out back, I mean. Right?? I better do it before I change my damn mind again haha. McCall's 6952

Completed: Hand-Dyed Blue Silk Vogue 1395

24 Jul

Ahh, Vogue 1395. First, I made you up in cherries, and it was good. Then, I modified the shit out of you and made you up in silk plaid gingham, and it was good. And now, we’ve come full circle back to square one. And that’s good, too.

Vogue 1395, hand-dyed silkSometimes, ya just gotta stick with the ol’ TNT’d version, amirite? Vogue 1395, hand-dyed silk

I am also realizing that I took way too many pictures for a dress that will essentially warrant the same post as the cherry original, but, you know, whatever. My blog, my rules. I was having a good hair day that day. And my back yard looks BEYOND gorgeous. I will never tire of all that green!

Vogue 1395, hand-dyed silkVogue 1395, hand-dyed silk

Speaking of gorgeous- how about that hand-dyed silk that I used? I can’t take any credit for it (other than the actual sewing of the garment) – it was given to me by Elizabeth after a big studio clean-out. She made me an entire grab bag, full of mostly silks – some stamped, some natural, some dyed (in both solid colors and what you see here), and all of them amazing. I think a lot of this was leftover from discontinued collections, but some of it was from her personal stash. Needless to say, this is a woman with fabulous taste in fabric and I was really happy with everything she gave me. I also spent WAY too long agonizing over what to make with it! It was so special and I was afraid to cut into it only to later regret using it in case I later ended up having better idea.

Vogue 1395, hand-dyed silkThis piece of hand-dyed silk crepe was probably my favorite. It’s so thick and lush and it has an amazing drape. I love the soft colors so much. Pairing it up with V1395 seemed like the best idea – a pattern that I already know fits and sews up well, that I know I love to wear. I actually made this way before I even left for Peru – so, it’s been in my closet for more than a month at this point. ha. Vogue 1395, hand-dyed silk

Vogue 1395, hand-dyed silkI can’t think of anything else to say about the pattern that I haven’t already gone over in my previous posts. The giant arm hole issue has now, thankfully, been fixed, although the neckline is strangely a bit wider than it is in the cherry version (probably due to fabric choice – this crepe is a heavier than the silk cherries). I didn’t follow much in order of construction – this is made with French seams and machine-rolled hems, both of which were a lot easier than what the pattern directions were asking me to do. I also used my own method for applying the binding, again instead of following the directions. The finishing on this dress is definitely an improvement over the last dress.Vogue 1395, hand-dyed silk

Here, you can see both the arm hole and how the dress looks untied. As well as what I guess is now my superhero pose. Damn, that arm hole still looks low. It’s ok, though, because the overwrap covers it when it’s tied.

Vogue 1395, hand-dyed silkVogue 1395, hand-dyed silk

Vogue 1395, hand-dyed silkVogue 1395, hand-dyed silk

I love all the little details on this dress… especially the elastic waist. Totally buffet-friendly! 🙂

Vogue 1395, hand-dyed silkVogue 1395, hand-dyed silk

Vogue 1395, hand-dyed silkVogue 1395, hand-dyed silk

The skirt in this pattern is lined, and while I tried to get away with not lining it – I realized that the silk is pretty freaking see-through. It’s not so bad on the top, because of the overlay, but the skirt was pushing being almost sheer. For these sorts of linings, I prefer to use china silk, as it’s really thin and lightweight. Of course, I had NONE of that on hand and I didn’t feel like ordering any, so the lining I used is just white silk crepe. It makes the skirt a bit thicker and heavier than I’d prefer, but at least it’s not see-through!

Vogue 1395, hand-dyed silk

I always have a hard time cutting into fabric that is given to me – sometimes it takes me YEARS to actually settle on a pattern. I’m always paranoid that I’ll have an even better idea later down the line, and be pissed at myself for already using the fabric. But that’s kind of a crappy way of looking at things – I mean, it’s not like the fabric is doing me any good just sitting on the shelf, you know? So it feels good to get past that and actually use some of the gorgeous stuff that’s been given to me!

With that being said – I have a few more pieces that I finally cut & sewed that were also on the “too nice to actually use for something” list, so watch this space for those! Who else has dream fabric that they’re afraid to cut into? Maybe we should start a support group!

Completed: McCall’s 7119

22 Jul

Allow me to introduce you to my ridiculous summer sundress for 2015.

McCall's 7119I guess it’s not really that ridiculous, but it feels a little over-the-top (for me, that’s a good thing haha). This is totally the time of year for getting away with this sort of loud dressing, but I haven’t really taken advantage of it until now! McCall's 7119

McCall's 7119I used McCall’s 7119 to make this, which was originally sent to me by the McCall Pattern Company (contrary to popular belief, I usually buy my Big 4 patterns because I live in the mystical land of $1 Joann sales, but I’ll take free, too haha). I really love the photo on the envelope and was dying to make my own. I was not, however, dying to plunk down $$ for the 3 yards of fabric necessary to make this sucker up. Damn wrap dresses and long maxi-lengths! As if! McCall's 7119

Anyway, I noticed that this blue cotton poplin paisley went on massive sale at Mood Fabrics for all of $4.99 a yard, and I realized that it was perfect – both in weight and cost – for the dress I was wanting to make. I’ve never been a huge fan of paisley – I’ve made a couple garments in the past with beautiful pieces of paisley fabric, yes (and I have a couple more pieces in my stash as of this writing), but for the most part, I’ve always considered it to be kind of an ugly print. Mostly because it reminds me of the horrible ties that my dad used to work to work in the early 90s haha. Sorry, dad! This paisley, though, is definitely much prettier (or that could be the $5 price tag talking to me, I dunno!). I think it’s due to the monochromatic color scheme, which tones down the tack and lets you focus on the pretty design. Or, again, could be that $5 price tag. Whatever.

McCall's 7119Despite this fabric being inexpensive, it’s not cheap. It has a really nice hand and drape, the colors are beautiful and saturated, and it’s opaque enough to not warrant a lining. The right and wrong side are almost identical, which is good for this sort of dress – as you can see the wrong side through the back hem dip. The fabric cut & sewed like a dream, and it is fairly good at resisting wrinkling (see: these photos after a day of wearing). It also feels reeeeeal nice in this heat, a bonus! McCall's 7119

McCall's 7119The pattern was easy enough to make up – I finished it over a long marathon sewing weekend. I started with a size 6 at the bust and an 8 at the waist/hip, based on the finished measurements. I did make a quick little muslin mock-up of just the bodice, to see how the fit was before I cut into my fabric. The bodice fit well enough, except that the center front gaped like crazy! Surprisingly, the easiest fix was also the most efficient fix – I raised the shoulders by 3/8″, and then took 1/4″ off the side seams starting at the underarm and tapering into the existing seamline below the bust dart. I do think the bust darts are a little high – I should have lowered them after raising the shoulders – but the fit is pretty nice as-is, and the print is busy enough to where you can’t see it. Also, I don’t know what the horizontal fold/wrinkle is doing over my boob. I think it’s from how I’m standing, because it’s normally not there. Except, of course, in these pictures, and it’s making my eye twitch. Argh!

The last fitting alteration I made was right at the end – where I took off a massive amount of skirt length. I don’t even know how much, because I kept chopping and chopping. I started with about 4″ off the pattern tissue itself – because the measurements on the back showed that the back dip would drag the floor on me (I’m 5’2″, so, yeah). Upon finishing the dress – well, apart from the hem and closing up the facings – I realized it was still waaaay too long and the whole thing – print+style combo – was totally overwhelming on me. I just kept cutting that hem, and curving into the front wrap (definitely don’t cut too much off the front wrap or you’ll end up with something very indecent!) until the length looked good. McCall's 7119

To sew this up, I used a brand new 70/10 Microtex needle and navy thread. The seams are all French seams – except where the hole is in the side seam (to feed the waist tie through), that one is just turned under and topstitched. I finished the neckline facing with tiny little invisible hand stitches, and the bottom hem is machine rolled. I think that’s it? Pretty straightforward pattern if you ask me!

McCall's 7119McCall's 7119

McCall's 7119McCall's 7119

McCall's 7119I don’t know what possessed me to drag the dressform outside for these photos. I mean, they look really nice, but holy hell that thing is heavy! Never doing that again lolol McCall's 7119

McCall's 7119Here’s the inside – look where my fingers are pointing, you can see the hole for the waist tie. There is also a tiny snap right at the bust where the wrap crosses over, to prevent any northern wardrobe malfunctions. Due to the  wrap, a big gust of wind will definitely show some leg at the skirt. I’m ok with this, though. Legggsssssss. Also, see how similar the right and wrong side look? Because of my finishing, it’s actually hard to tell when the dress is inside-out! I have to look for the French seams 🙂 haha! McCall's 7119

Overall, I enjoyed working with this pattern and I’m definitely not opposed to making it up again – although probably a different view, because this particular one is a little fancy for my daily use. I’d like to try the shorter, mullet-less skirt with some contrast on the facings. Maybe in a silk? Fancy without really being fancy, yeah?

Note: Every month, Mood Fabrics gives me an allowance to purchase fabric with, in exchange for writing a post on the Mood Sewing Network. This fabric was purchased with that allowance. The pattern was also given to me by the McCall Pattern Company. I like to think it’s because they love me, because I am forever an optimist 🙂

Completed: Um… another Hollyburn :]

17 Jul

Y’all, I don’t know how many times is too many to make the same damn pattern over and over again… but here’s Hollyburn #5. Hahaha.

Striped Hollyburn

I am pretty sure I don’t have anything else to say about the making of this pattern, considering I’ve sewn (and posted about) it soo many times. This particular rendition with the wide navy stripes has actually been in the plans since my very first Hollyburn skirt. Ever since I made my solid denim version, I’ve been on the hunt for a good striped fabric to make my dream striped flared skirt. Actually, I think I’ve been on the hunt for that fabric since way before this pattern was a little twinkle in Tasia’s eye. It’s been a couple of years, at least. And yet I’ve never been able to find what I’ve been looking for – medium weight cotton fabric with 1″ wide navy and white stripes – despite all odds being that that should be a common enough fabric. I’ve found similar stuff – but the stripes were too narrow, the wrong color, or the fabric was the wrong weight.

Striped Hollyburn

So let me tell you about where I found THIS fabric. Back when I still lived in the ‘burbs in West Nashville (ok, it wasn’t the suburbs because we were like 5 miles from the city, however, it’s more ‘burby than where I am now in the woods of Kingston Springs, so there’s that!), I went to a yard sale at the neighbor’s house 2 doors down. That whole experience was an adventure in itself – the woman living there was in her 90s and had lived in that house since she was 6. SIX!! Oh man, and she had the BEST neighborhood gossip. She also had this amazing little garden paradise of a backyard – all overgrown in the most beautiful way, and totally private and lush and green and dammit I was so jealous of that garden. AND she told me a bunch of ghost stories. Most awesome lady ever. Anyway, the yard sale was kind of like going to the flea market – lots of odds & ends and antiques and random stuff, all collected and resold for extra cash. I sniffed out the bag of fabric hidden in the shadows of the carport (I am telling you, I have a nose for this sort of thing) and found my dream fabric lurking at the bottom. Not just my dream fabric – but somewhere around 15 yards of it. Which I bought the whole lot of for $1. Apparently, this fabric lived a previous life as a kind of faux curtain/drape, arranged just so by some famous interior designer.

Striped Hollyburn

This is a really nice home decor weight cotton fabric. Unwashed, it has a little bit of a sheen to it and quite a bit of body. I tore off about 4 yards and washed it – just to see what would happen – which made is lose the sheen and gave it much more drape. It was really easy to sew and press. AND I still have over 10 yards of this stuff! Striped dresses in my future, yeah? I’m just ashamed that it’s taken me a year to get to sewing it. Too much ahead in the queue, I guess.

Striped Hollyburn

Check out how well those stripes line up at the pockets! Yeah buddy! In an effort to make this post at least somewhat useful, here is how I did that:

Striped Hollyburn

After cutting out the front skirt pieces, I laid them on top of the pocket/pocket facing piece (for this pattern, it’s all-in-one. If you’re using a pattern that has 2 separate pieces, choose accordingly) and traced along the pocket edge. Then I used a ruler to draw the pocket lines as they continue from the skirt front to the pocket facing, so that the lines were unbroken.

Striped Hollyburn

Here’s what my pattern piece looked like. Not shown but SUPER helpful – it’s a good idea to mark the colors of the lines as well, so you don’t end up with inverted stripes 🙂

Striped Hollyburn

Then just lay the pattern piece on your fabric and arrange it until the lines of the print match up with the lines you drew on the pattern piece 🙂 Easy!

Striped Hollyburn

I also made sure to pin each stripe before I sewed my pieces together, which made for very accurate stripe-matching.

Striped Hollyburn

I guess that’s it! Easily the cheapest garment I’ve ever made 🙂 Now tell me – what’s the sewing-related yard sale haul you’ve ever been lucky enough to experience? I think this $1 mass of fabric might go right up there with the $1 DVF Vogue Designer Original pattern (that happened to be in my size, no less) score.

Completed: The Mission/Skater Mash-up

10 Jul

Now HERE’S an obvious gap in my summer wardrobe that’s finally been filled! A knit tank dress!

Knit tank dress

I think we can all agree that wearing knit dresses is the ultimate in comfort/secret pajamas. Especially when it’s nasty hot outside!! I looove my knit dresses in every season, but most of them have sleeves and I don’t like wearing sleeves when it’s more than 95 degrees outside. No way.

Knit tank dress

Since I wasn’t seeing a pattern that fit the look I was going for (and I’ll be honest – I didn’t search very hard. I have a LOT of patterns in my stash and I’d rather mash ’em up whenever possible), I used 2 patterns from my stash to create this awesome mash-up Frankenpattern. Most of this pattern – the skirt, the bodice sizing and proportions – were taken from the Lady Skater dress pattern, which is my favorite knit dress pattern ever and is basically the gift that keeps on giving. For the neckline and arm hole finagling, I copied that straight from the Mission Maxi dress pattern. The result you see here is a fitted racerback tank top with a flared skirt attached to it. Which is exactly the look I was going for. Whew.

Knit tank dress

I am all about some Frankenpattern magic, and it’s 1000x easier when you’re working with a knit fabric. Much easier to tweak with the fit, and much more forgiving if you decide to forgo a muslin (like I did. Yay! Consider this my wearable muslin, ha). Plus, if you already have a garment that fits the way you like – in my case, the bodice of this skater dress is ACE – then it’s super easy to change up the neckline/sleeve options/skirt and have a totally different garment that still fits the way you like. I love buying new patterns, but I REALLY love knocking out projects that don’t require too much fit futzing. The only fitting I had to do with this dress was take a little bit out of the underarm side seam – maybe 1/4″ on each side. Since there aren’t sleeves there, the sides need to be a little more fitted so they don’t pooch out.

Knit tank dress

I guess the one downside to this is that you don’t have a set of instructions that are tailored to your garment – but that’s never been a problem for me, as I just kind of pick and choose what techniques to use from which pattern (or I ignore the instructions completely and forge my own method). Again, this dress is a knit, so it’s pretty straight forward. I stabilized the waistline with 1/4″ woven elastic, which keeps it from sagging over the course of the day (truth: these photos were taken on day #2 of wearing this dress. Pretty good recovery there, I’d say!). The neckline and arm holes are finished with the same method outlined in the Mission Maxi instructions – it’s similar to applying bias facing, but you’re not pressing that last 1/4″ under. Instead, you just finish the edge and topstitch it down. Here’s a photo of the guts so you can see –

Knit tank dress

Clear as mud, yeah? 🙂 It resembles a coverstitch, sort of. More like a binding and less like the knit bands that are used on the Lady Skater (and it feels a bit sturdier, which made me feel ok about not stabilizing the shoulder seams). Oh, and I did all my topstitching with a straight stitch/single needle (on my regular sewing machine). A twin needle or zigzag would be fine for this, but I like the way the single needle looks. Since this isn’t an area that gets a lot of stretch, it’s ok to use a stable stitch here. I also did the same with the hem – just sewn with a straight stitch. Again, as long as it doesn’t need to stretch, it’s fine to use a non-stretch stitch!

Knit tank dress

The cotton knit fabric is from Mood Fabrics in NYC, which I bought at the store while I was there in March. I wasn’t sure what I was going to make with it (honestly, I was probably thinking Lady Skater at the time), but I was prettttty happy to use it for this dress! I didn’t bother to match the print – it’s a casual dress, and meh – and I think it looks fine.

Knit tank dress

Here’s the back, again! I like the shape of this racerback because it’s a bit more covered than your standard beater tank. Of course, my bra straps still show – again, meh, whatever. I didn’t bother hiding them for this post, mostly because I don’t hide them in real life and I’m just tryin’ to kEeP iT rEaL~

noragrets

Knit tank dress

Conclusion: this dress was easy to make, is comfortable to wear, and SECRET PAJAMAS. Expect to see more of these as I churn them out.

LLadybird_175_175

One last thing! I wanted to direct your attention to my newest sponsor – Wawak Sewing! Unfamiliar with Wawak Sewing? They’re a giant sewing supply company – offering everything you need for your sewing studio, from Gutermann thread (Mara 100 is the jam – 1000+ yards for $2.50, oh yes oh yes) to invisible zippers (24″ for 88¢? Don’t mind if I do) to professional boiler irons (ok, that’s probably waaay too much iron for the average home seamstress, but we use these at the studio – as well as when I worked at Muna Couture – and they are seriously incredible) to hymo canvas (for tailoring! I always get my hymo/horsehair interfacing from here because the price is unreal). A lot of the items can be bought in bulk, and the price is pennies on the dollar for what you’d pay at a brick & mortar store (I’m not just talking about cheaper than Joann’s – some of this stuff is cheaper than places in the Garment District, but you get the same quality). Plus, shipping is less than $5 (and free if you buy more than $100 worth of stuff)! I highly recommend you get a free catalog because it’s really fun to flip through – like the Toys’R’Us catalog, except for grown-ups 🙂 They occasionally have sales and discounts, so it’s worth it to be on their mailing list! International peeps – you can also join this sewing party, but you’ll need to call or email to place your order (and I’m going to assume your shipping might be a little more than $5, ha).

I’ve been a loyal customer/rabid fan of Wawak Sewing for years – I started with them back when they were still Atlanta Thread Company – and I’ve had nothing but great experiences with both the service and the products. So I’m pretty thrilled to have them on board as a sponsor, as well as to join their affiliate program (sooo any purchase you make after clicking these links is gonna net me a small commission, fyi!). And you should be thrilled, too, because right now through 9/30/15, you can get 10% off your order of $50 or more at Wawak Sewing if you use the code WLB915. Can’t beat that with a stick! Thanks, Wawak Sewing! ♥