Tag Archives: button-up

Completed: Fancy Silk Georgette + Brocade

2 Feb

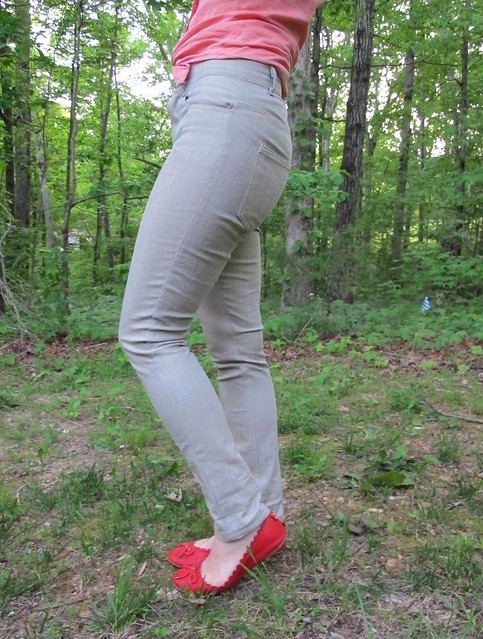
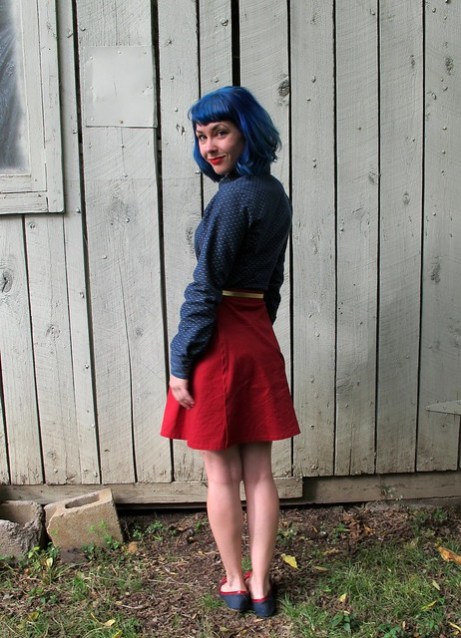
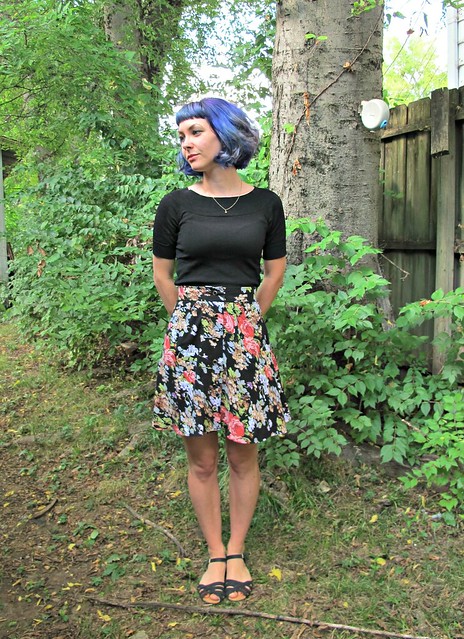
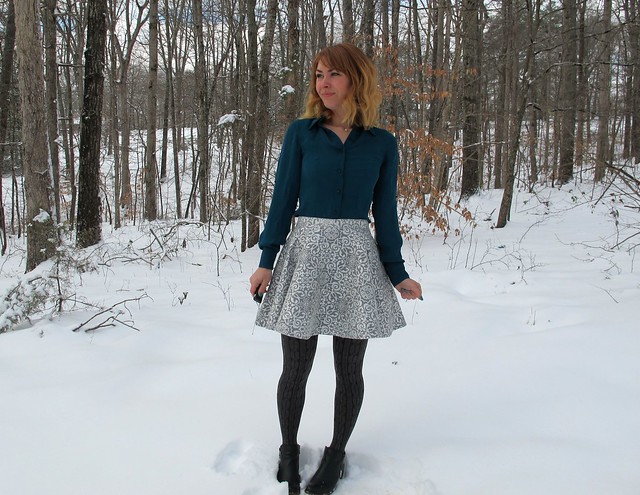
Here’s something a little different than my normal meat-and-potatoes (mmm… meat and potatoes) sort of dressing – FANCY GARB. YAY!!

Silk Georgette B5526 + Stretch Brocade Circle Skirt

Also: SNOW! Like, holy shit it snowed soooo much last weekend! I had a nice snow-in for a few days (it’s true that Tennessee all but shuts down when the snow comes in – but, before you make fun: we don’t have snow tires, we don’t know how to drive in it, and the roads are not properly salted or cleared so they’re actually pretty dangerous. Also, come and deal with our 100* heat in August ffs. Ok, soapbox off haha), which was even better considering that I basically was in a Winter Wonderland. We ended up with a little over 6″ – y’all, I can’t even remember the last time I saw that much snow. Shit was crazy. Also, it all melted within like 3 days, and then the temps went back up to 65*. Yay I love Tennessee and it’s fickle weather haha.

Anyway, I wasn’t planning on taking snow pictures – it was obviously very very cold outside, and so bright that I could barely keep my eyes open (sorry in advance for all the squinty haha). But the indoor lighting was just terrible, so I took one for the team and tromped outside. You are welcome.

Ok, back to the real subject of this post!

Silk Georgette B5526 + Stretch Brocade Circle Skirt

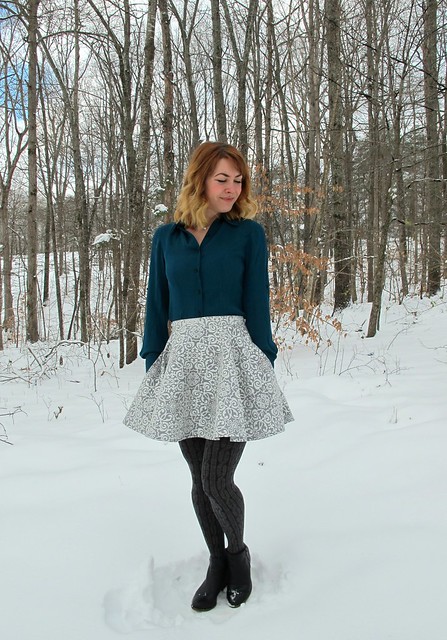
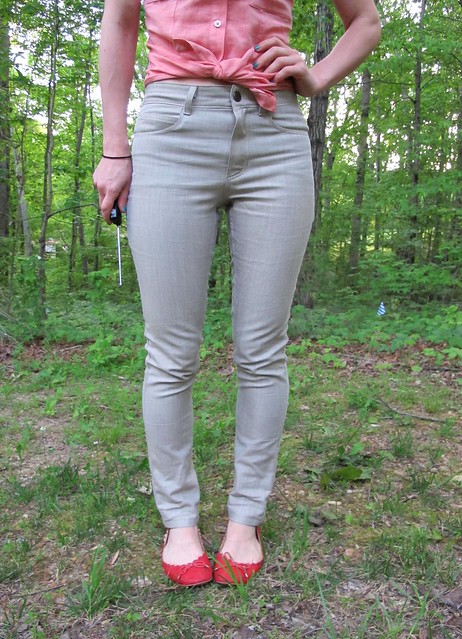
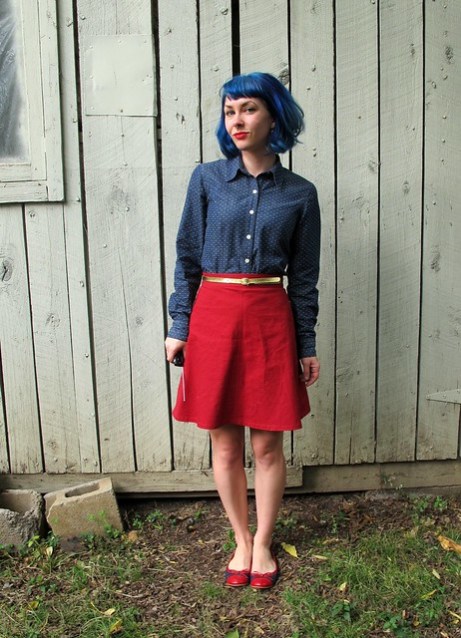
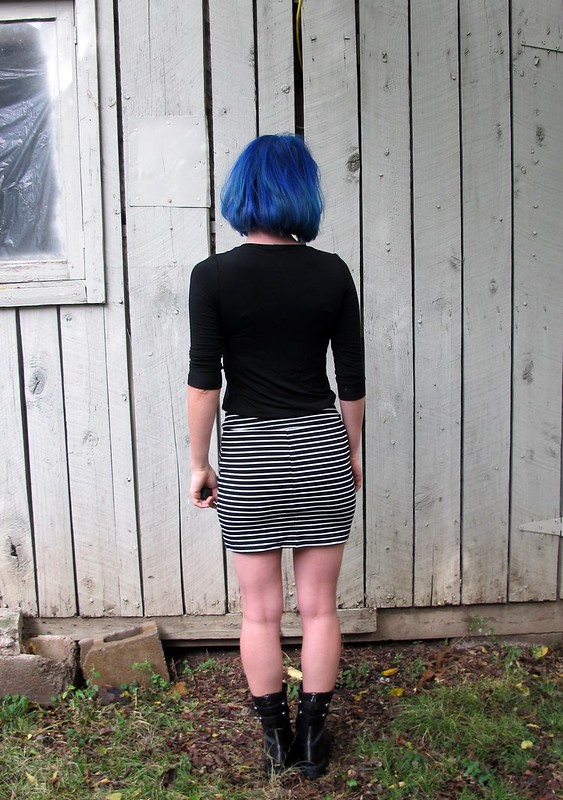
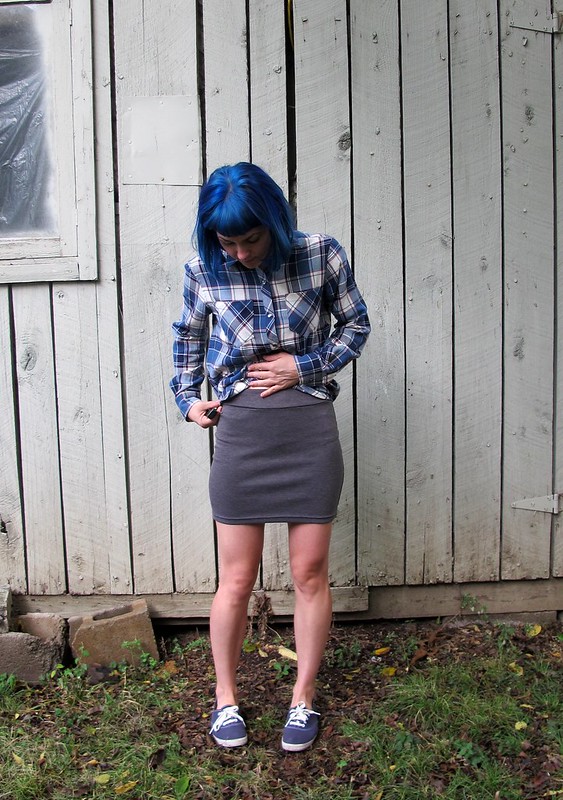
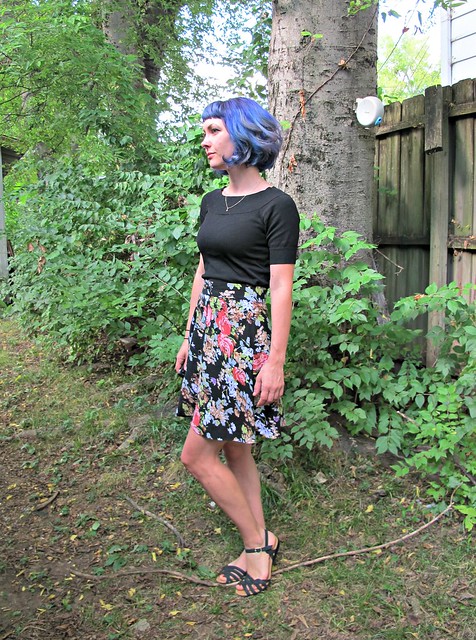
I made these two pieces about a month apart, so I didn’t actually wear them together for NYE – although I definitely wanted to. Considering I didn’t start sewing for the party until a few days before the end of the year, I knew that shirt would not turn out nice if it was rushed. So I focused on the fancy skirt, and wore it with a fuzzy black sweater knit Renfrew (you can see a photo of the outfit on Instagram). It was the perfect New Year’s Eve outfit for my plans – reasonably warm, yet stylish, and had these big pockets so I could carry my phone, wallet and flask without worrying about a purse. Which, by the way, my phone ended up leaving my pocket at some point that night (I think it was more that it didn’t *make* it to the pocket, rather than leapt out on it’s own accord). Here’s the New Year’s Miracle, though – someone found it – in a pile of trash on Lower Broadway, apparently – and then returned it to me the next day. How awesome is that?! 2016, you’re off to a promising start! ♥

Silk Georgette B5526 + Stretch Brocade Circle Skirt

Silk Georgette B5526 + Stretch Brocade Circle Skirt

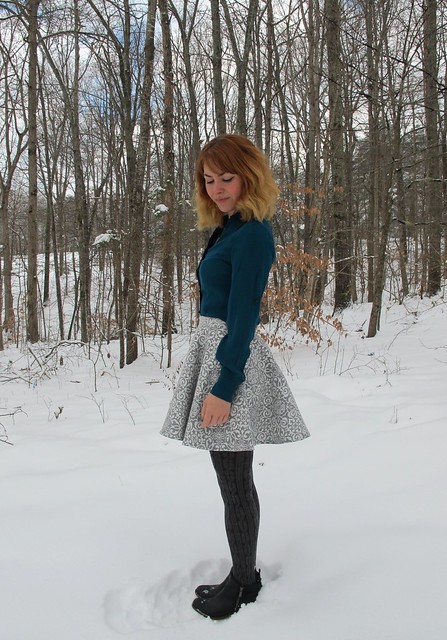
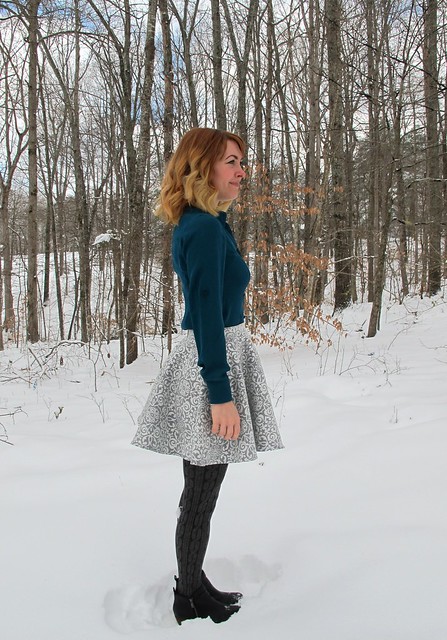
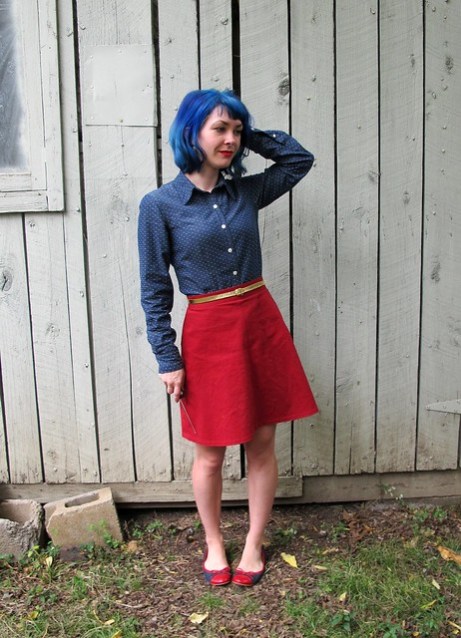
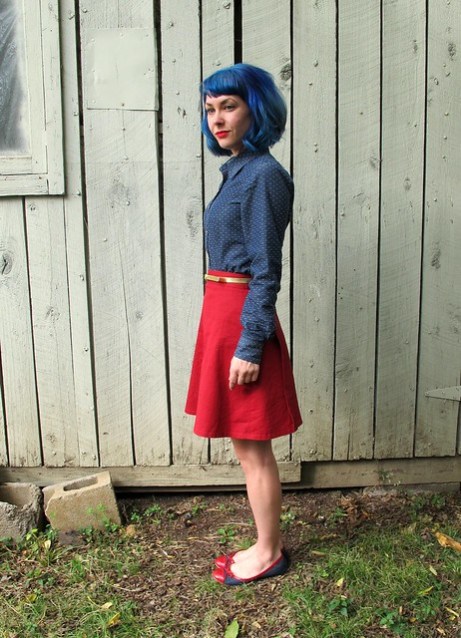
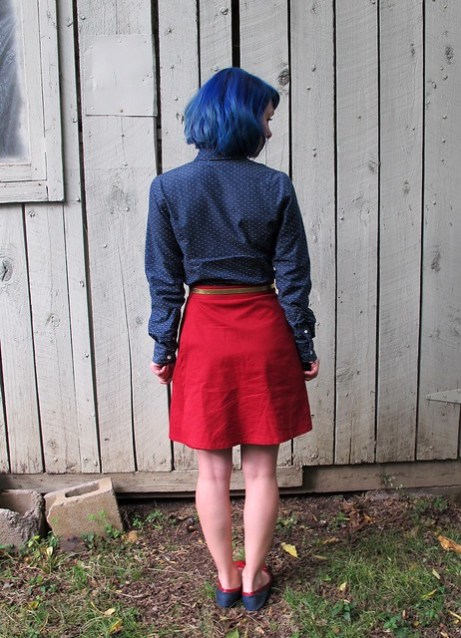
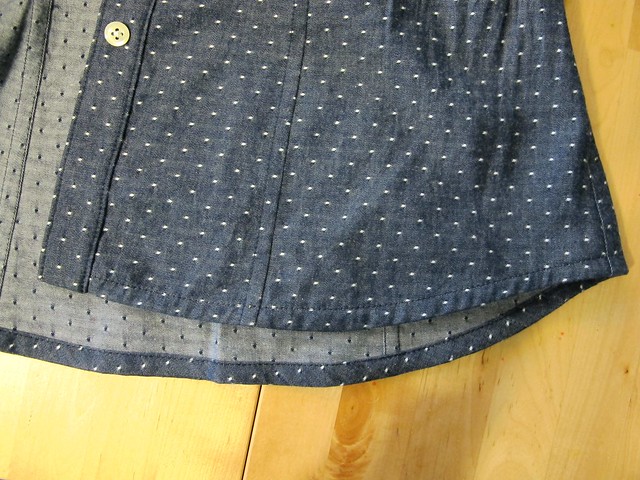
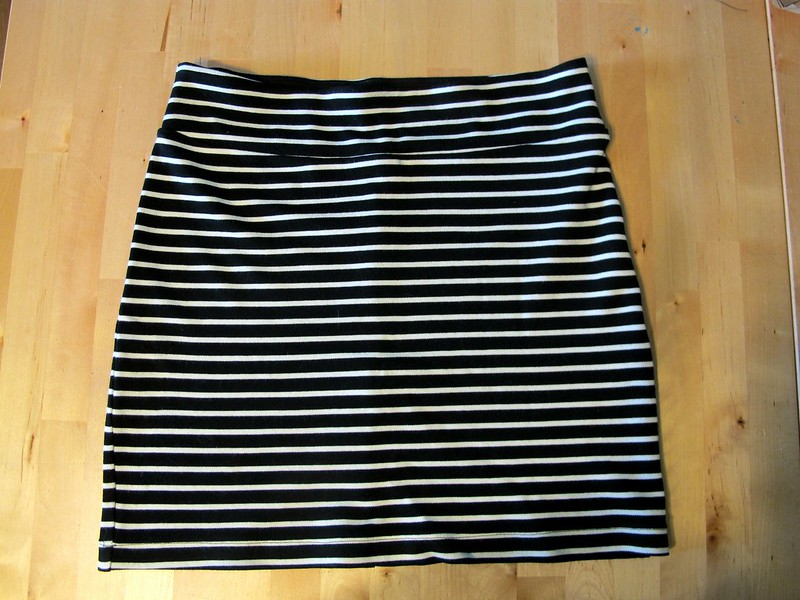
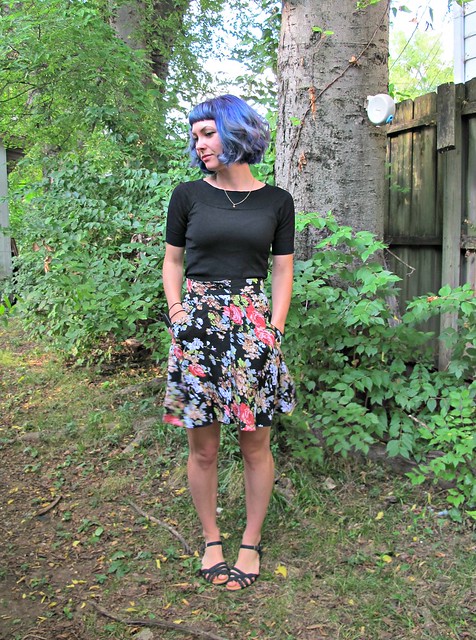
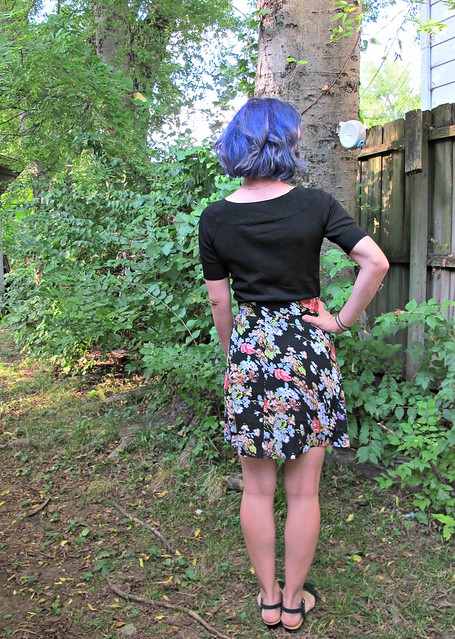
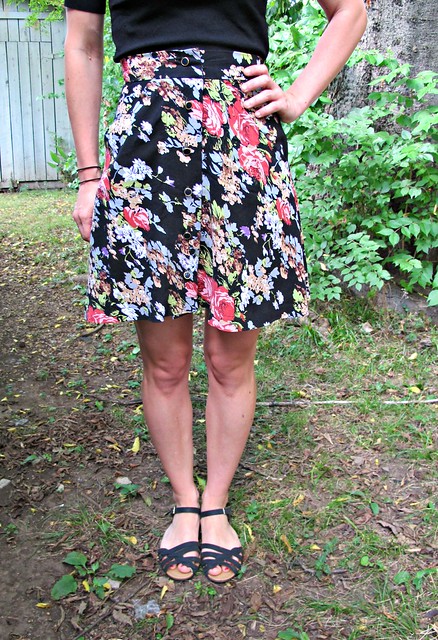
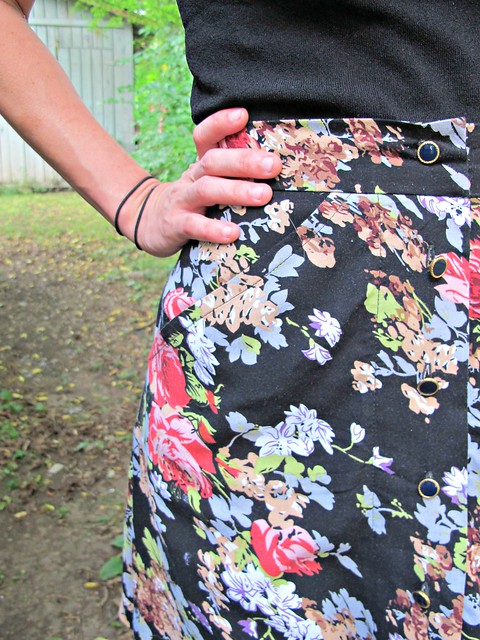
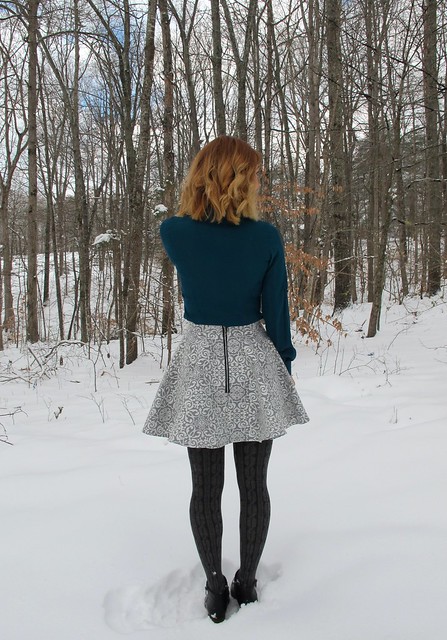
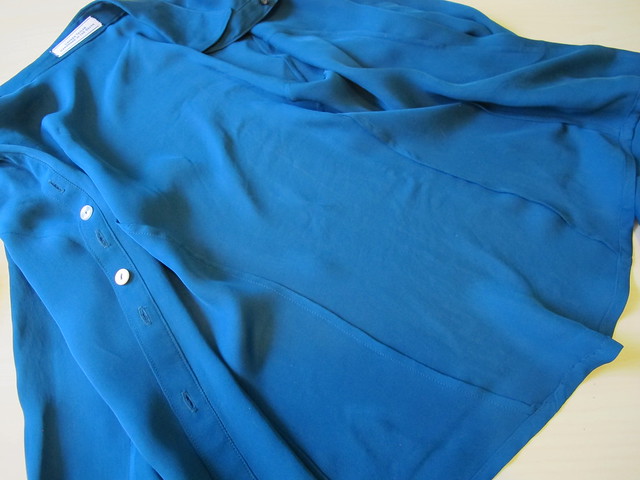
The metallic stretch brocade that I used for this skirt has been in my stash for a long time – over a year, at least (if not longer). I never knew what to do with it – it’s kind of thick, it has a really heavy stretch, and it’s pretty freaking fancy. I figured a pencil skirt or bodycon dress would be suitable, but I rarely wear stuff like that. When I was planning my NYE outfit, I decided to find a use for this stuff. I’ve been on a circle skirt kick lately, so that’s what I went with. I used my self-drafted circle skirt pattern (I used Casey’s circle skirt tutorial aaages ago, which I can’t seem to get a valid link to now 😦 There’s also the By Hand London circle skirt app, which does the maths for you!), pieced to include side seams and a center back seam. This was mainly due to fabric restrictions – I had only a yard of this fabric. It’s super wide, though, so I was just barely able to squeeze it out. I also knew I wanted an exposed zipper and side seam pockets, which mean seams were necessary. The waistband was cut so the greatest amount of stretch ran along the length; I stabilized it with a piece of stretch interfacing to retain that comfy-ass stretch. Yeah man, it’s comfy.

Silk Georgette B5526 + Stretch Brocade Circle Skirt

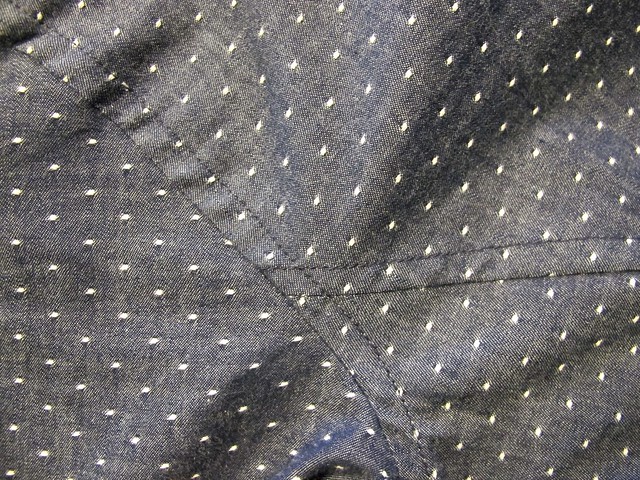
Sewing was easy, and relatively straightforward. My only complaints are that this fabric frays like a MOTHER, and it’s basically all polyester so it’s a nightmare to get a good press. For the fraying, I serged each seam separately to minimize the fuzz potential. For the pressing, I just used my super awesome, super hot gravity feed iron and then just held the seams in place with my clapper until they cooled. One thing I will note is that my iron has a shoe (basically a cover that acts as a press cloth), which keeps things from melting. If your iron does not have a shoe, you’ll want to use a press cloth on poly fabrics + high heat. Otherwise, melting will happen!

Silk Georgette B5526 + Stretch Brocade Circle Skirt

Silk Georgette B5526 + Stretch Brocade Circle Skirt

Silk Georgette B5526 + Stretch Brocade Circle Skirt

Silk Georgette B5526 + Stretch Brocade Circle Skirt

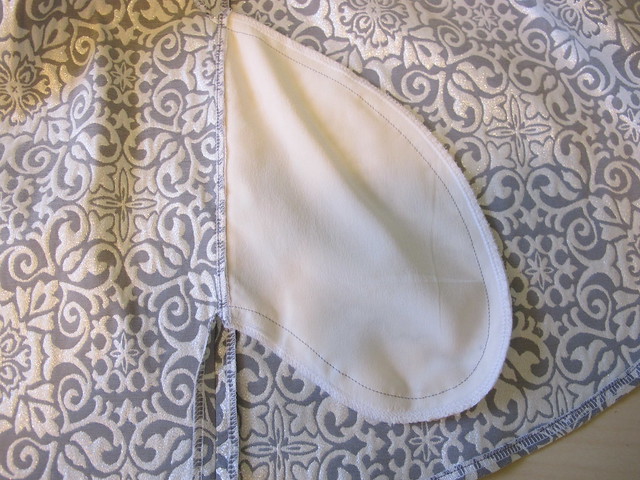
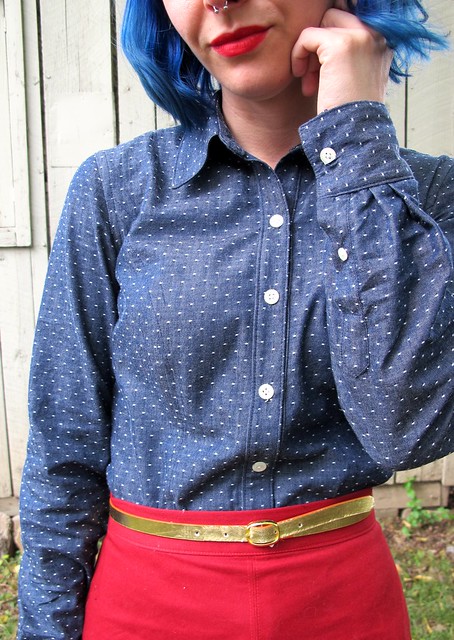
I thought an exposed metal zipper would look cool next to the fancy brocade, so I pulled a metal zip from my stash and used Megan Nielsen’s method to insert it (these are the same instructions that are included with the Brumby pattern, fyi). The pockets are silk crepe, also pulled from my stash. Nothing like using silk pockets to stow your whiskey amirite 🙂

Silk Georgette B5526 + Stretch Brocade Circle Skirt

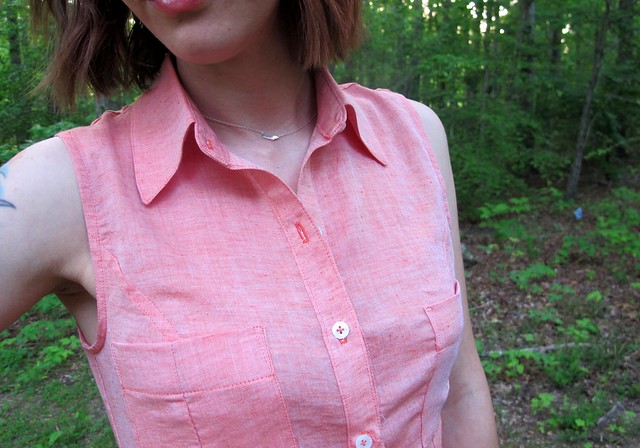
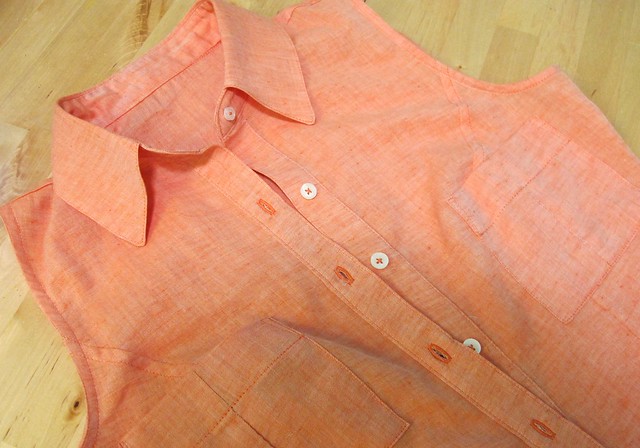
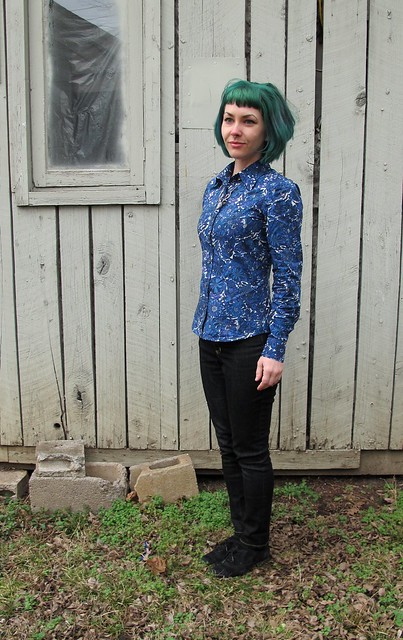
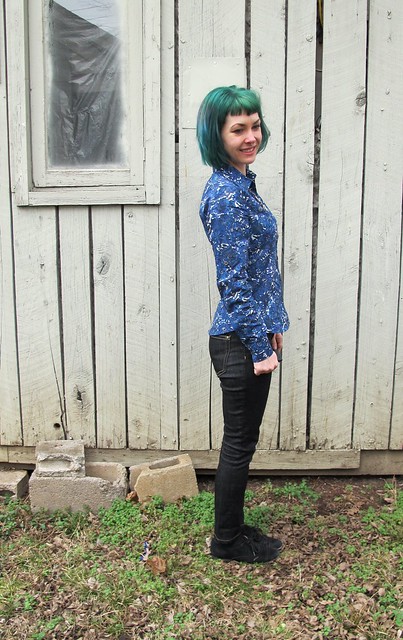
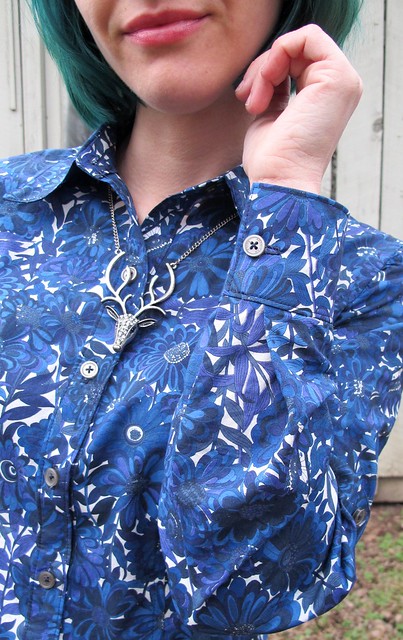
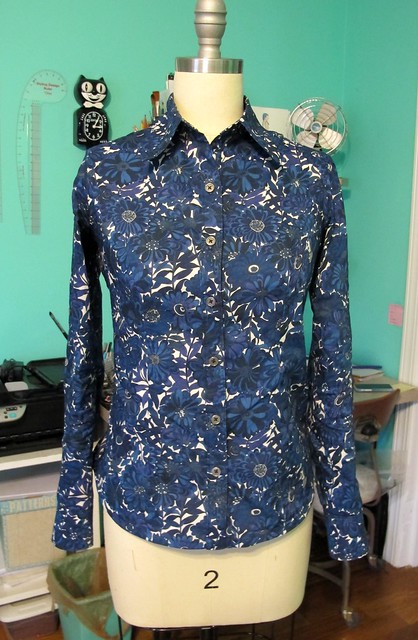
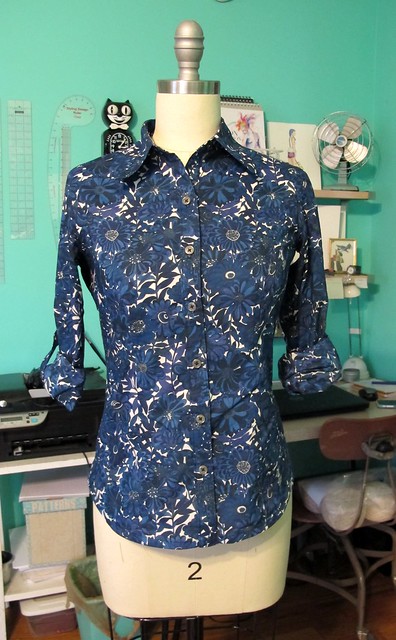
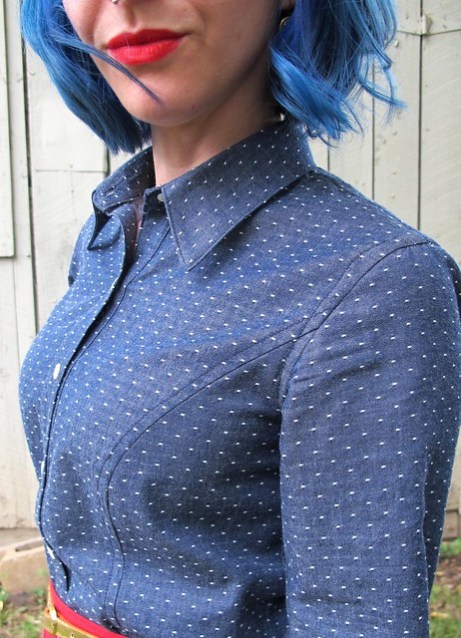
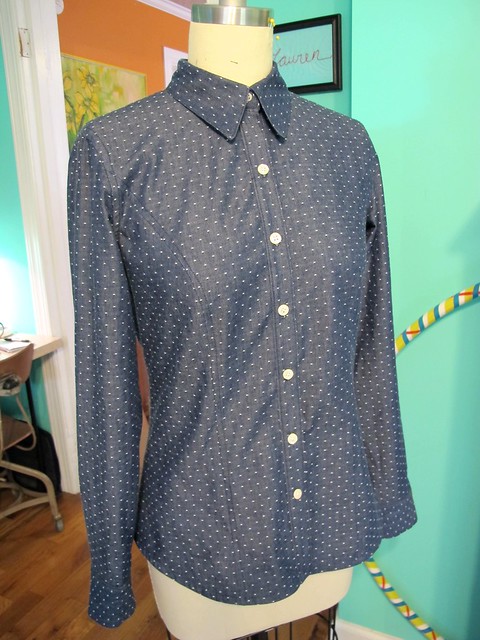
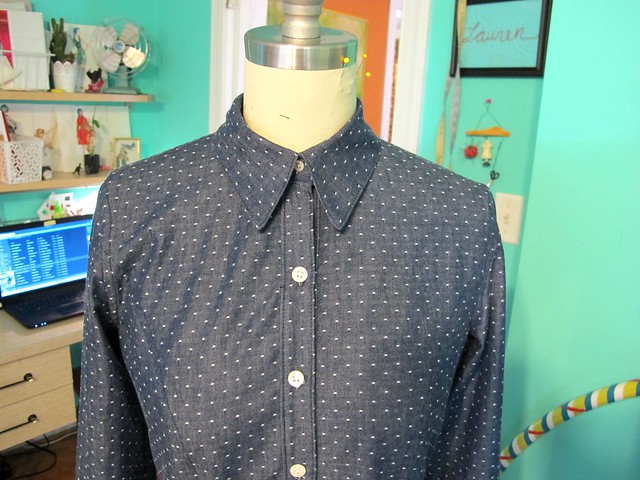
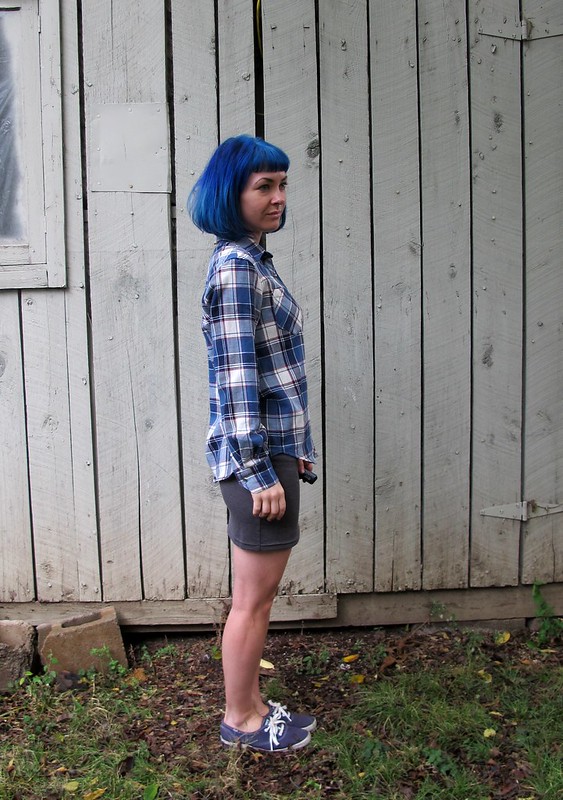
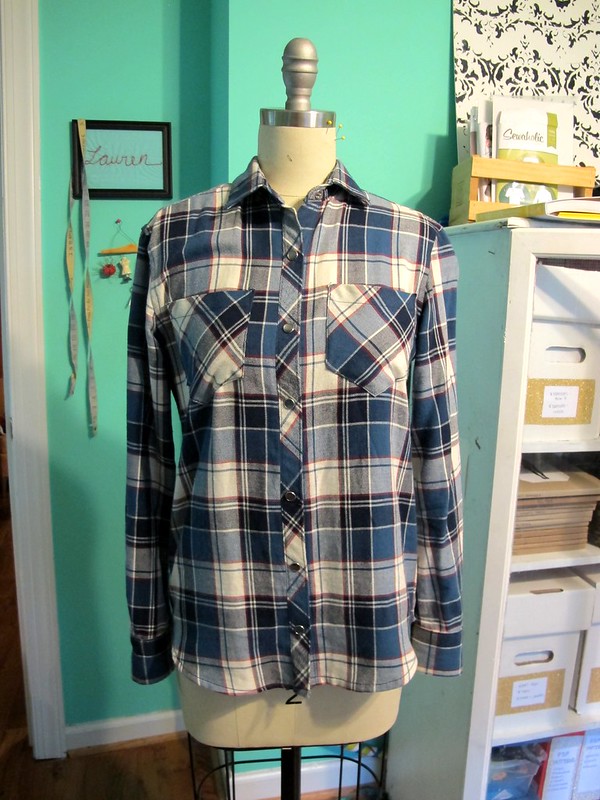
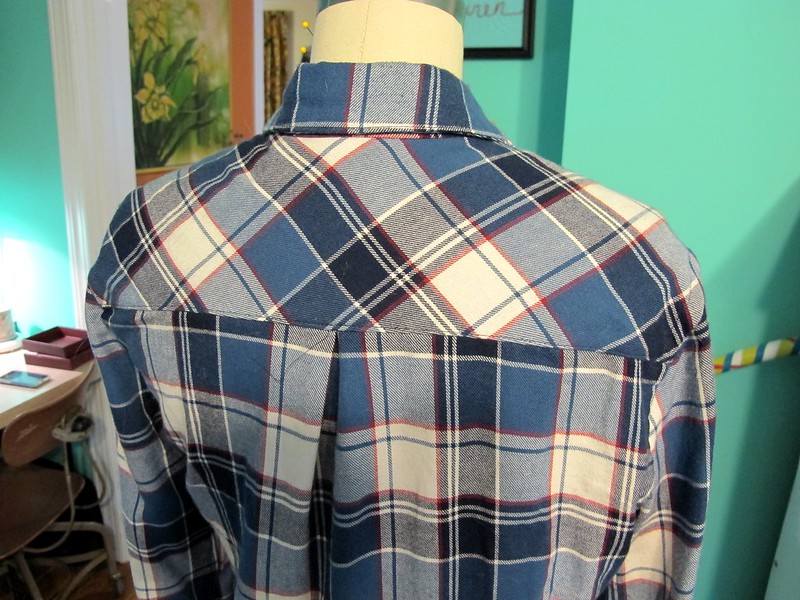
This past month, I finally gathered up all my cojones and made the intended matching shirt. Remember when I made Butterick 5526 in silk Georgette? I want to hate that shirt so bad – it’s pretty poorly constructed, I mean, that fabric was EVIL – but every time I put it on, I can’t deny that I like the way it looks. I want more floaty button-ups in my closet. I figured enough time had passed to forget the trauma, and I tried again, this time with much more success.

Silk Georgette B5526 + Stretch Brocade Circle Skirt

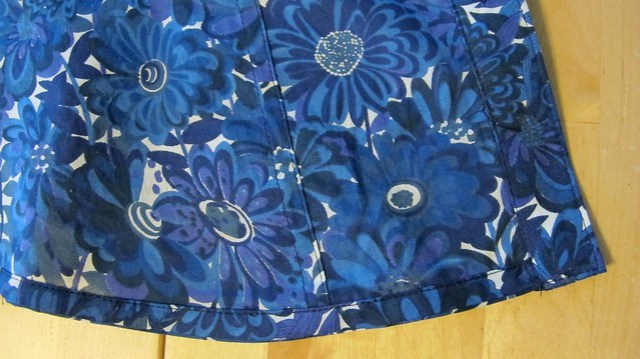
There are two major factors that contributed to the success of this version of B5526 in silk Georgette. First of all, I chose the fabric in-person, rather than blindly ordering online. Which means I don’t have a link for the exact fabric I used – I bought it at the Mood Fabrics in NYC when I was there in November. I have since ordered some swatches from the website, and it’s definitely not the same fabric as what I have here. Mine is more like a double Georgette – it’s much thicker, and less see-through (I’m not wearing anything under this top, except a bra. I think it’s a nude bra, but I’ve worn a black one underneath too and no one has noticed, HA!). That alone made a world of difference in handling the fabric. I also prewashed it in the washing machine/dryer (just a cold wash, ma’am!), which helped beef it up a little more. The second factor is that I used a spray stabilizer on my fabric before cutting or sewing. I’ve heard of people using a spray stabilizer – and allegedly, you can also soak your fabric in unflavored gelatin for the same effect, although I haven’t personally tried this yet – but I never cared to try it myself because I wanted to be able to tackle the fabric without any outside help. Also, a can of that shit is like $12, which is way too rich for my blood (says the girl who is currently looking at $45/yard silk faille lolwut). It just seemed silly and unnecessary. I always felt like using outside tools like that almost negated my skills as a seamstress, but you know what? That’s not true. It’s not any different than using a special presser foot to get good edgestitching. Whatever works… it just works. And that’s ok.

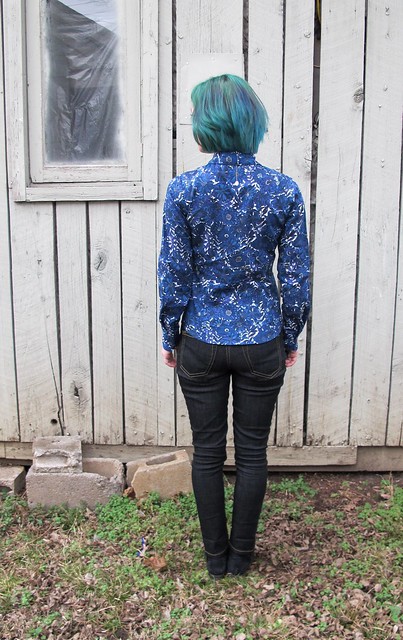
I am not going to go into too much talk about using spray stabilizer because this was my first experience with it – and I want to try it a few more times before I give it a big write-up (aka I don’t want to eat my words later haha). But I will say that it REALLY changed how the fabric handled, in a good way. Instead of it slipping around like butterfly wings, it held more like a silk organza. It made cutting things straight much more easy, and the shirt fits better as a result. I think my topstitching looks really good, and all those fiddly pieces weren’t quite as fiddly. Spray stabilizer isn’t going to turn your silk into quilting cotton – you still need some finesse with those fine layers – but it helps tremendously. It won’t work for anything that you can’t wash it out of – such as a coat lining (unless, I guess, you assembled the lining separately and then wash/dry it before putting it in the coat?) – but it’s perfect for this sort of project. These photos are post-washing, so it has the proper drape, fyi. I soaked it in the sink with some lingerie wash, hung it to dry, and then re-pressed. I have since worn the shirt and washed it in the normal wash, and it’s held up fine.

Silk Georgette B5526 + Stretch Brocade Circle Skirt

Silk Georgette B5526 + Stretch Brocade Circle Skirt

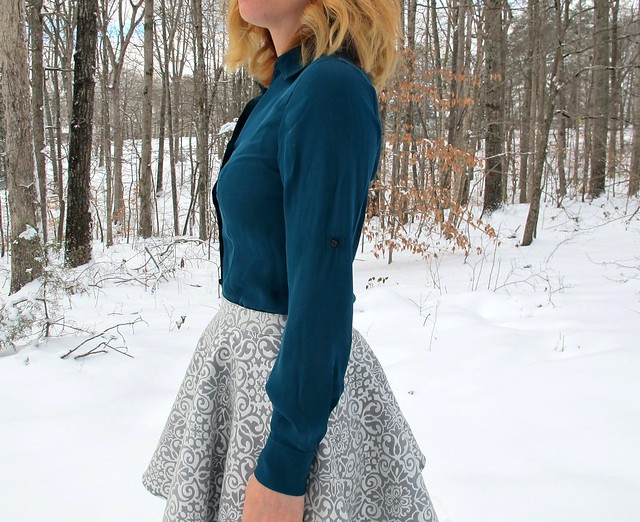
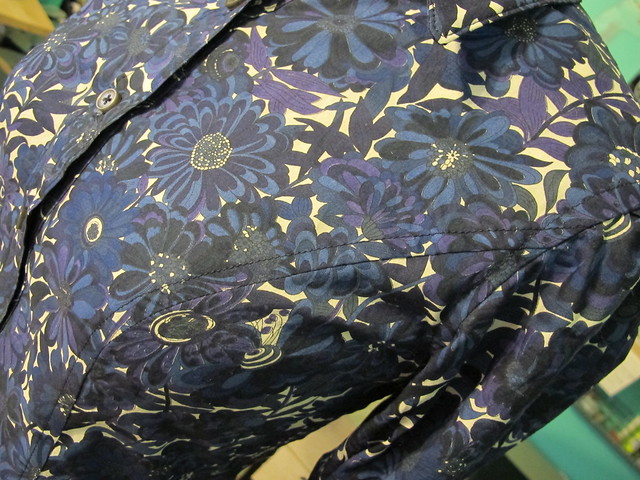
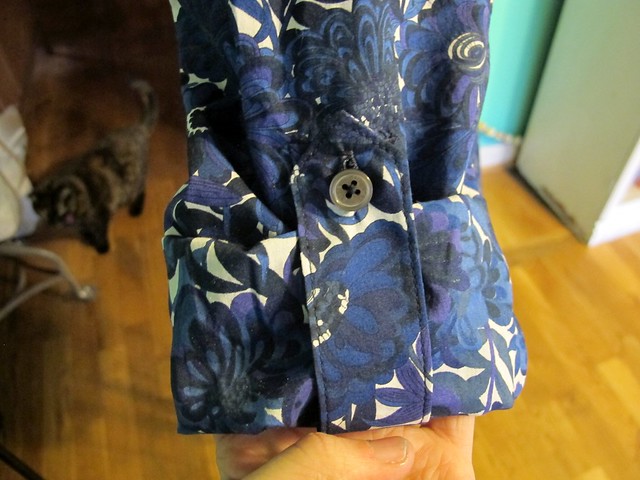
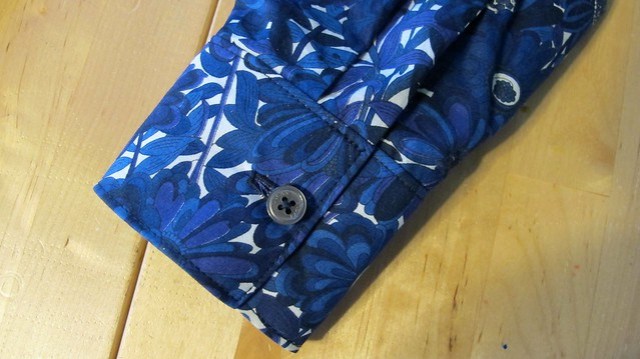
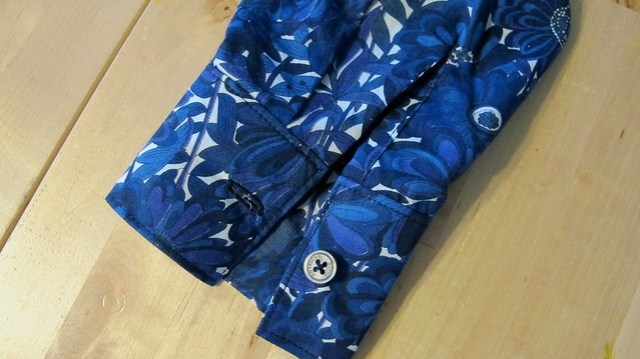
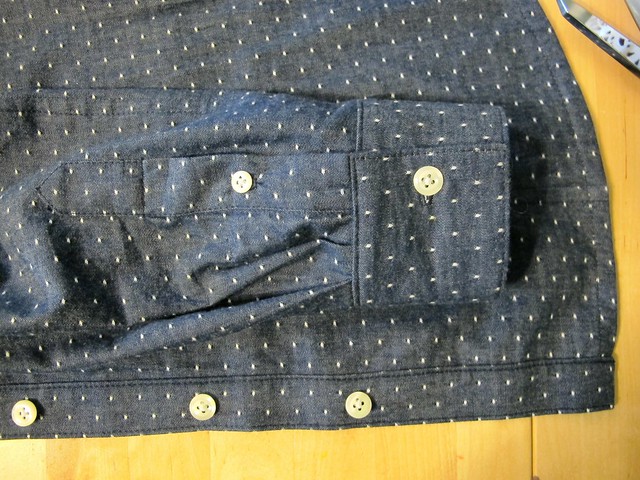
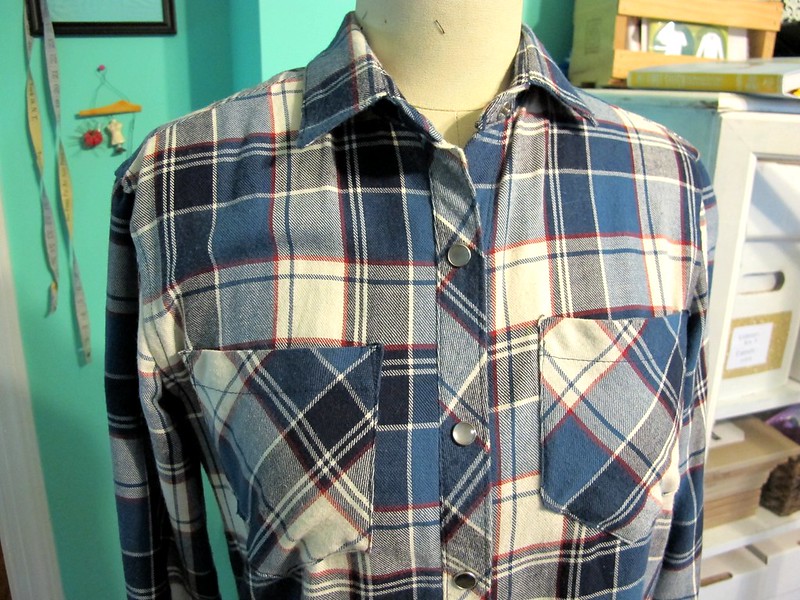
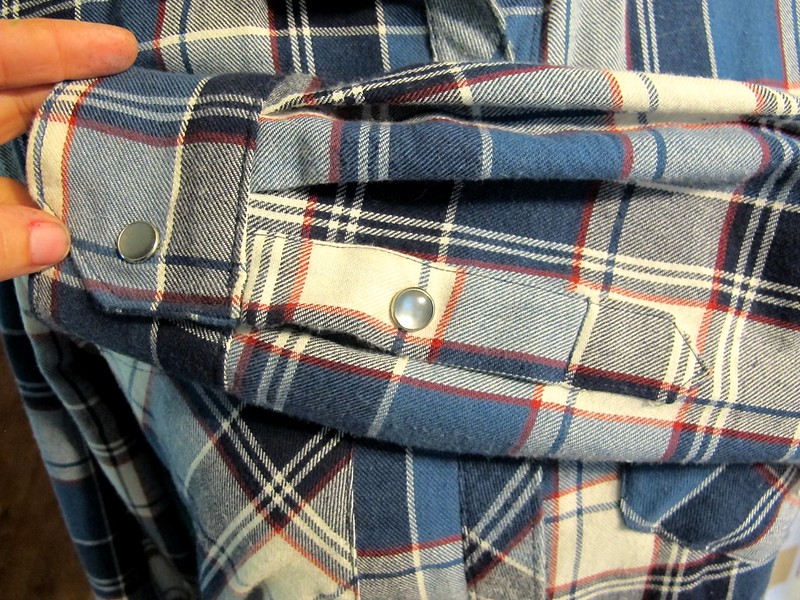
All that being said, I don’t think there’s much else to say about the sewing of this shirt. I’ve made it like a dozen times at this point, so there’s nothing new for B5526. The shirt is constructed with French seams and I used a very lightweight interfacing to stabilize while retaining that beautiful drape. I added buttons and button tabs to the sleeves, so I can wear this shit into the warmer weather. Yay!

Silk Georgette B5526 + Stretch Brocade Circle Skirt

Silk Georgette B5526 + Stretch Brocade Circle Skirt

Silk Georgette B5526 + Stretch Brocade Circle Skirt

Silk Georgette B5526 + Stretch Brocade Circle Skirt

Silk Georgette B5526 + Stretch Brocade Circle Skirt

Silk Georgette B5526 + Stretch Brocade Circle Skirt

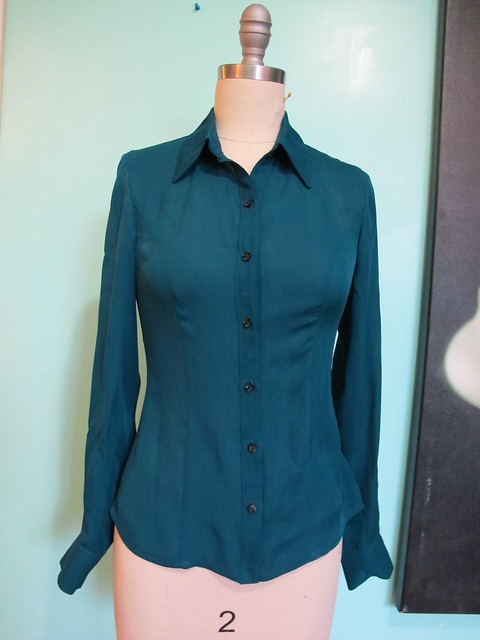
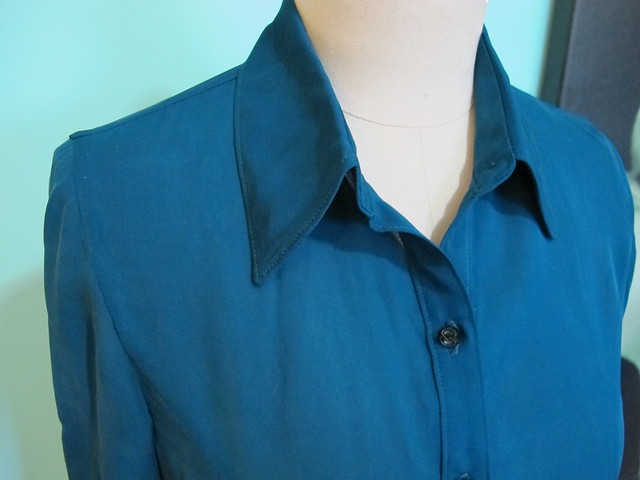
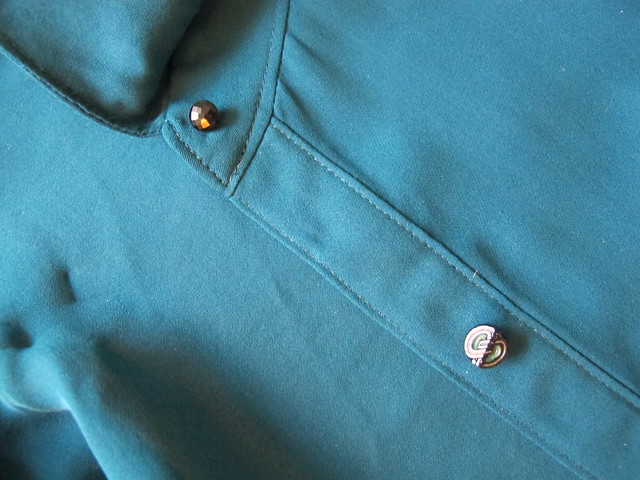
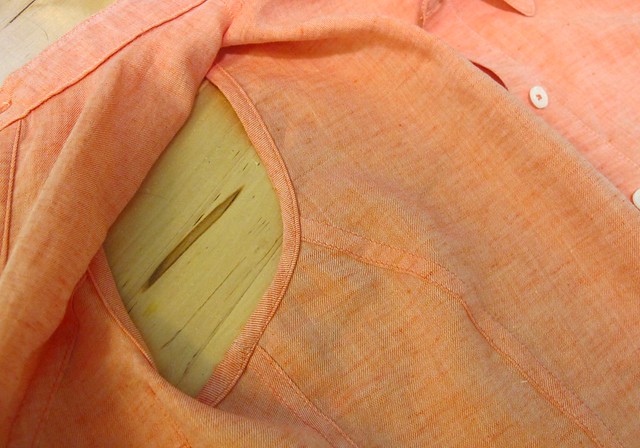
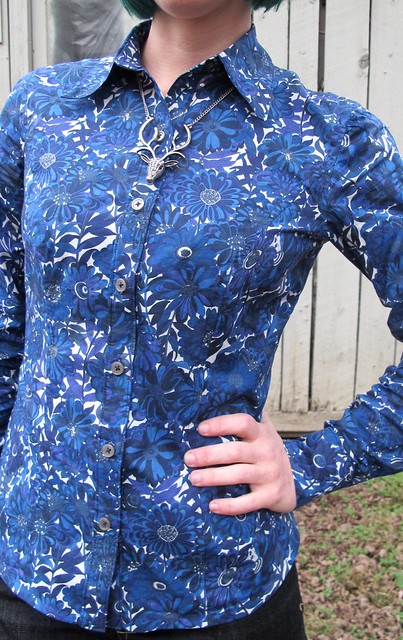
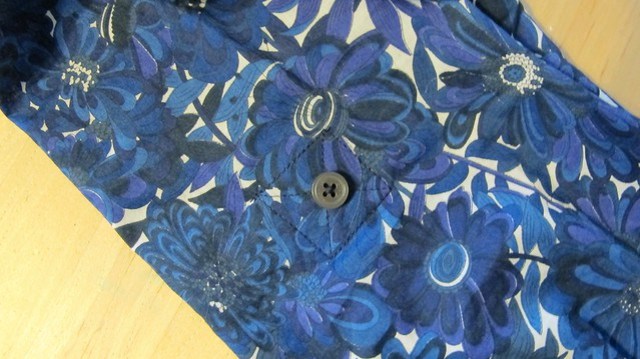
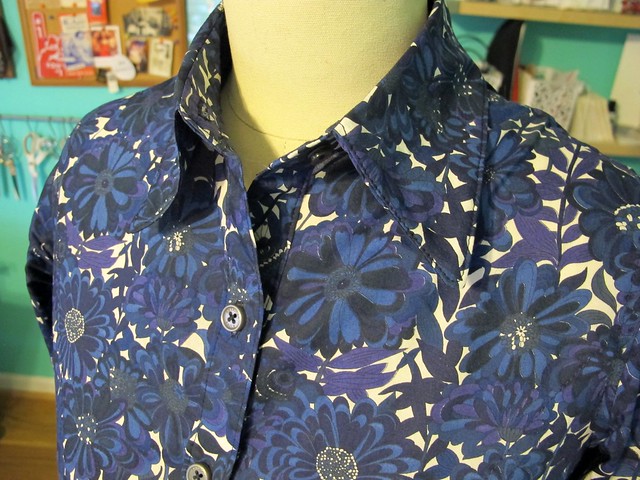
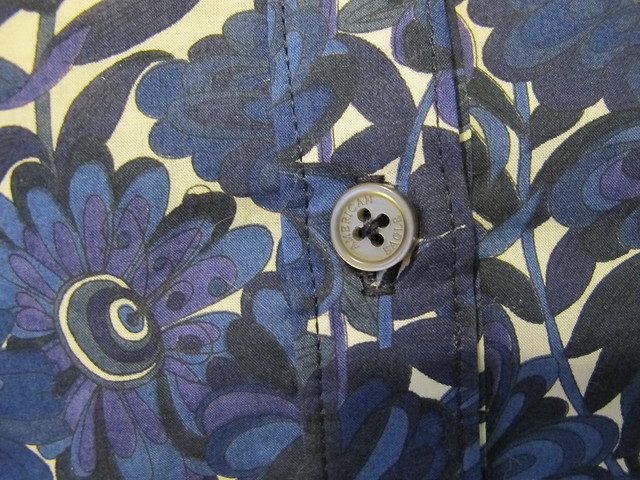
I finally go to use some of my fancy vintage glass buttons for this top – yay! I didn’t have quite enough, so I had to mix them. There are beautiful black/green/gold Art Deco buttons for the front placket and sleeve tabs, and then solid black faceted buttons for the cuffs and collar. The white buttons you see on the inside of the placket prevent gaping at the boobs (I can’t take credit for this tip – I got it from Emmie and Jane). Speaking of which, if I’m getting boob gape… that probably means I need to start doing a FBA to my pattern. Sigh. Or else just keep adding hidden buttons hahaha.

Silk Georgette B5526 + Stretch Brocade Circle Skirt

I think I’ve run out of things to talk about with this outfit, so I’ll wrap up. What’s your best tip for sewing the slinky? Have you tried spray stabilizer? Hey, how was your New Year’s Eve, anyway?

Note: Fabrics were purchased with my monthly allowance for the Mood Sewing Network. Also, there are affiliate links in this post FYI. Click at yo’ own risk.

Completed: The American Flannel Archer

28 Dec

Another Archer for my winter wardrobe! Yay!

Flannel Archer shirt

I actually finished this shirt nearly 2 months ago, but here I am just now getting around to posting it. I’d apologize for the delay, but honestly, I’m not sorry. It is what it is. On the flip side, I’ve been able to wear it plenty since completion, so I can actually comment on the fit from the perspective of wearing it all day. On the other hand, I’ve already made a bunch of Archers so it’s not like this is some kind of breaking news in my personal pattern collection.

Flannel Archer shirt

Flannel Archer shirt

Since I’ve made this pattern multiple times (see: one two three… well damn, there’s another one somewhere but I can’t find it oh well), I’ll spare you the nitty gritty. Like my previous versions, I cut a size 0, sewed the side seams at 5/8″ and flat-felled all the seams for a nice clean finish on the inside. The buttons are just standard shirting buttons that I had in my stash, and I matched the plaid everywhere except on the back yoke and the pockets, which are cut on the bias. Oh, and I used the pocket piece from my Negroni pattern. It looks like it belongs on a western shirt, and I like that.

Flannel Archer shirt

I really love this fabric, but this particular shirt almost didn’t happen. See, back when I bought flannel from fabric.com for my Carolyn Pajamas, I added a few yards of this Robert Kaufman Mammoth Plaid flannel to my cart so I’d qualify for free shipping (because I just love saving money when it means I have to spend more money first :P). A few days after I placed the order, I received an email from Fabric.com saying that they didn’t have the 3 yards I requested, but they did have 3 cuts (totaling around 1.5-2 yards) of a smaller amount if I wanted that. I didn’t think I’d be able to cut a shirt – let alone plaid-match – out of that small of an amount, so I picked a different plaid from the site and asked them to just change my order. When I received my order processing notification, it said I was only getting 1 yard of the new flannel (not 3, like I’d asked for in the email). I had to call the company and sort things out, and while all this was happening – they completely sold out of my back-up flannel! Argh!! Obviously, that shit wasn’t in the cards for me. I told them to cancel the second cut of flannel and just send me the original piece that I needed to finish my pajamas (which they thankfully still had! Pretty sure I bought the last of it). I was refunded for the 3 yards that were out of stock and I got free shipping too. Cool!

And then they ended up giving me the off-cuts anyway, for free. Just threw them in the package where I was surprised (but also happy because, YAY FREE FABRIC) to find them hanging out with my actual order. That’s cool, I ain’t complaining.

Flannel Archer shirt

Flannel Archer shirt

Since I had the fabric, I decided to try my original plan and make that Archer. Like I said, had 3 cuts – one was a full yard, one was a half yard, and the last was a bit less than half a yard (I’m sorry I don’t remember the exact amounts, but it was a while ago and my order history on the site doesn’t reflect the freeb). It took some ninja cutting skills to cut everything so that the plaid lines matched, but I did manage for the most part. Cutting everything on the single layer helped immensely. That being said, I was still a tiny bit short on one of the fronts, so I ended up having to piece it and there is an extra seam. It’s only a little noticeable, but, again, free flannel shirt. Not complaining.

Flannel Archer shirt

You can see the piecing here, sort of. The top seam that I’m pointing to is the actual shoulder seam. The bottom seam is the result of piecing. By carefully matching the plaids and flat-felling the seam, I was able to get it to blend pretty well.

Flannel Archer shirt

Another minor complaint is that I wasn’t able to properly match the sleeves. The lines of the plaid are uninterrupted, which is good, but the sleeves themselves are not sleeve twins. Again, fabric restrictions. Again, free flannel shirt. Not complaining.

Flannel Archer shirt

Here’s a crappy picture of the inside, in all it’s flat-felled glory. Yay!

Flannel Archer shirt

This flannel shirt is a bit different than my other ones, since the fabric is SO thick. It almost feels like I’m wearing a light jacket, as opposed to a shirt. It’s pretty awesome and super snuggly. The fit is a little more boxy, too, since this fabric doesn’t drape as well as a shirting plaid flannel. I’m pretty ok with that, though! It works well with leggings (shown here with navy Ooh La Leggings which btw FAVORITE comfy lounge legging pattern, hands down!), but also looks good with jeans. I almost wish I’d put in pearl snaps instead of regular buttons, because I really like Hulking out of my clothes, but I think the fabric is just too thick for pearl snaps. But at least I resemble an American Flag! Can’t be mad about that, not one bit.

Oh, right, and I have some winners from the Shutters & Shuttles giveaway a couple of weeks ago! First, thanks for all your awesome comments on that post – Allison and I both really enjoyed reading through them and see what you’d do with the fabric 😀 (even if it just makes me want more of that fabric now so I can steal your ideas). Second, the plural “winners” is not a typo – there are two of you! A little belated Christmas bonus and all that 🙂 Sooo congratulations are in order to both shesewsswell and Samantha! I hope you ladies love this fabulous fabric, and I cannot WAIT to see what you make up with it! ♥

Completed: Another B5526 + Ginger Jeans Get-up

18 May

So sorry to dump this on y’all yet again – another collared shirt + jeans outfit combination. Yawn.

Gingers & B5526

Well, to backtrack – yawn for you, but 😀 😀 😀 😀 😀 for me hahahaha. I will never get tired of this outfit combination. Or, at least, not anytime soon. Maybe never is too strong of a word to use here.

Gingers & B5526

What’s mildly frustrating about writing a long-term blog (at the time of this posting, I’ve accumulated nearly 500 entries since I started waaaay back in 2009, WTF) is that you eventually reach a point when you’re just making the same thing over and over again (well… those of us who don’t make our blog our full-time income fall in this category. I’m sure if I was sponsored out the wazzoo and had all the time I spend at work to spend making content for my blog, it would be a different story, ha.). After re-assessing my wardrobe at the end of 2014 and realizing that I *still* had shitloads of clothing that I made simply for the new and shiny, I have made it a big point to really be honest with myself about whether or not I’ll actually wear something that I make. Like most people, I have a pretty predictable style. And like many sewers, I don’t want to spend a lot of time reinventing the wheel with new patterns if I can get the look I’m going for with an old TNT. So this translates to repeats upon repeats upon repeats.

So, while you might be yawning about the majority of the stuff that’s been posted in 2015… I gotta say, I am elated with the way my closet is looking these days!

Gingers & B5526

Gingers & B5526

With all that being said, there’s not much to report on either of these pieces since I’ve made them soooo many damn times. Jeans + collared shirt is totally my go-to when I want to feel comfortable but still look like I made an effort in the AM. I’ve found my TNT patterns and I feel good about the way they fit and the construction methods that I use.

Gingers & B5526

Gingers & B5526

The top was made using my beloved Butterick 5526. Y’all, I don’t know if I’ll ever sew another button up pattern again! (we all know that’s a lie) I’ve gotten to the point with this one where I can bang one out in a couple of days, which is really nice when you’re coming up on a looming Mood Sewing Network deadline, ha. The fabric is this amazing tigerlily orange cotton voile from Theory, which is a bit more of a coral-y pink than it is orange in real life (I don’t know how the color translates on your screen, but on the Mood Fabrics website it’s definitely pretty muted. The real color is much closer to what you see in my photos. It’s BEAUTIFUL). It has a beautiful chambray weave, which gives the color lots of dimension. This fabric was so so nice to work with – ok, it was a shifty bitch to cut, but once I got past this point, it handled and pressed like a boss. It’s also super comfortable to wear on even the hottest day.

Since the fabric does have a tendency to fray, I used flat-felled seams every where in my shirt. I also left off the sleeves and finished the armhole with self bias binding – it makes the shirt really casual and, again, awesome for hot weather. The pockets are the same pockets that come with the pattern, but I made them slightly smaller because the original size was a little overwhelming on me. Buttons are from my stash; they’re just your standard white shirt buttons. Oh! And the matching thread also came from Mood Fabrics – I noticed that when I was ordering my fabric, there were thread suggestions at the bottom of the page. I figured I’d try out the service – you know, for science – and I’m super pleased with the color match. Even more pleased that I was saved a trip to the fabric store. Mostly because those tend to be very dangerous places for my wallet, ha.

Gingers & B5526

Gingers & B5526

The good thing about running a long-term blog and making a bunch of pattern repeats is that you will eventually bore of just making things that are passable to wear in public, and start focusing on really honing your skills to the next level. Or, at least, that’s how it worked out for me. Look at those clean finished insides! I should wear this shit wrong-side out.

Gingers & B5526

I did shorten the length of the shirt by about 2″ – I think the original length was just sliiiightly too long for my height. This way I can wear it untucked or tied at the waist. If I do a half tuck, it doesn’t pooch out all weird like some of my longer shirts tend to do. As always, I finish my shirt hems with self bias facing. I think it makes for a much cleaner finish, and it’s must easier to press and sew those curves with the bias tape instead of trying to wrangle the hem itself.

Gingers & B5526

Gingers & B5526

For my jeans, I used my now-favorite-ever-pants-pattern, the Ginger Jeans. I’ve made this a few times before (and I definitely don’t plan on stopping – I finally was able to invest in one of the denim kits because YAY) and I’m just really happy with the way this pattern fits my body. The fabric is a cool metallic gold stretch denim. I was actually looking for white denim to make this up, despite me being a stain magnet when it comes to white. At any rate, this denim’s wrong side actually is white flecked with very subtle bits of gold, and these very well almost became white jeans. I talked myself out of it because I was afraid the not-quite-pure-white would make the jeans look like they were dirty, plus again, stain magnet. So I stuck with the gold side. Also, this denim doesn’t have as much stretch as my other denims, so the jeans are a bit tight. I had to let the side seams out to 3/8″ or else I would have never gotten these things over my ass. They’re still a bit tight – mostly around the calves – but I’m hoping that they will loosen up a little with wear.

Gingers & B5526

Gingers & B5526

Gingers & B5526

Not much to report on construction. I used a combination of flat-felled and serged seams (as how most RTW jeans are made) and a triple stitch to really make the topstitching stand out. I would have loved to use topstitching thread, but I couldn’t find a good match with what is admittedly kind of a weird denim color. It’s gold, but it’s also kind of beige. Fortunately, Mood Fabrics REALLY came through with that thread match, as you can see in these close-ups.

What else? I did not interface the waistband (I like my jeans with an uninterfaced waistband; it’s much more comfortable. Not sure how that would work with a lower rise, but for the high rise version, it’s perfect). The jeans button is from Pacific Trimming, and the cotton pocket lining is left over from this crazy blue dress.

I will admit right now that this outfit inspiration came way of my boss’ closet. Since I do all her laundry for her (if you are new to this blog and that sounds REALLY WEIRD, I should probably point out that I’m a personal assistant 🙂 ha!), I’m always lurking on her clothes and I’m always finding inspiration in some of the strangest ways. She has a similar coral chambray shirt – hers has sleeves and a lace inset at the yoke, though – and white jeans. And I wanted that outfit for me. So I made it 😛

Gingers & B5526

So, hey, in other news that doesn’t involve me making my fifty billionth b5526 – I’ve got an article out in the current issue of Seamwork Magazine! If you haven’t heard of Seamwork, it’s a sewing magazine that is published online by the masterminds behind Colette Patterns. The magazine is free to read and there are optional pattern downloads with each issue (the patterns you pay for, however). ANYWAY, my article is all about visiting Nashville! I had so much fun writing a city guide about my favorite city in the entire world, and I hope you have fun reading it (and are inspired to come visit because, hey, Nashville is awesome! Really really awesome!). You can read The Seamworker’s Guide to Visiting Nashville at Seamwork. My first published article! Yay!

Completed: Floral Butterick 5526

4 Feb

What’s that, you say? This is Butterick 5526 overkill?

deal with it
noragrets

~I DO WHAT I WANT~

B5526 Floral

In all seriousness, though, I did have a small internal debate about posting yet another shirt of the pattern I’ve talked about to death, but ultimately – I mainly use this blog as a sort of digital diary of my projects (truth: the entire purpose behind my tagging system & the Lurk My Closet pages are specifically so I can quickly find old projects without having to spend a lot of time searching haha), and I think this particular shirt has earned a spot in the archives. I’m really pleased with the resulting fit and finish, and I feel really good about the particular fabric I used (print aside – although, I gotta say, it’s pretty gorgeous!).

B5526 Floral

B5526 Floral

Unfortunately, that means I have less to talk about as I think I’ve pretty much milked this shit for all it’s worth. Fortunately, I feel really really confident in my shirtmaking skillz. I’ve pretty much got my construction down to a science, I know what fabrics are best suited for this style + the way I like it to look, and, dammit, I just really really love shirtmaking. So precise! So clean! So wearable every day basics!

B5526 Floral

As I mentioned, this is Butterick 5526, sewn up in a beautiful cotton shirting that I bought on Goldhawk Road in London. A lot of people have pointed out that the print resembles a Liberty print – and, while I agree, I also am pretttty sure it’s not the real deal. For one, I don’t remember exactly how much I paid for it, but I know it was less than the £25 they charge per meter at the Liberty store. Also, the selvedge is blank, if not missing entirely. That being said, it’s a very fine, soft shirting cotton – so maybe it fell off the truck? Maybe it’s an end bolt? An ~inspired~ knock-off? I dunno.

At any rate, it’s gorgeous. I just love the colors – the florals are a little less girly here, a little more of that 60s groovy that I’m really drawn to lately. The fabric itself is soft and has just enough drape to really make the shirt hang nicely. I’ve learned that I don’t care for true cotton shirtings in this pattern – when they’re stiff, I don’t think they look right on me. Give me something softer with a little bit of drape, like a cotton voile!

B5526 Floral

I don’t have any ~special tips~ for working with this fabric. Same as it ever was – just use a new needle, take your time with cutting and sewing, enjoy the ride, etc etc.

B5526 Floral

Oh, I think I nailed down a good sleeve length! Butterick 5526 in polka dot chambray (that’s my favorite one and I wear it ALL THE TIME. I have to hide it from myself so I don’t have too much of a good thing, ha) started out with sleeves too long, and I debated shortening them – but after a conversation with Landon, he brilliantly pointed out that they might shrink up a little after a couple of washes (even with prewashing, this can happen – which is always something I consider with pants, but never shirts. Which is why all my flannels have sleeves that are too short now haha). So I decided to leave the sleeves long and wait – and I’m so glad I did, because that’s exactly what happened. They shrank and are the perfect length now. So for this shirt, I used the same sleeve length and I think it’ll shrink up just right. The placket fits and it’s the right length (unlike my silk georgette B5526, wah), which is pretty prime if you ask me.

B5526 Floral

The only change I made to this version was to remove a few inches of length. I’ve always felt that my collared shirts were a little too long, at least when worn over my higher-waisted pants (and no matter what I do, they look weird tucked in. Half tuck, full tuck, no tuck, doesn’t matter. I get this weird tuck gut and, ugh), so I copied the length from my Liberty button up and transferred it to this pattern. I am MUCH happier with the length now; I think it works better with my proportions.

B5526 Floral

The shirt is constructed entirely with flat-felled seams. Here is a flat-felled boob for your perusal.

B5526 Floral

B5526 Floral

I also added sleeve tabs, so I could roll up the sleeves when the weather decides to warm up. Didn’t want to choose between long or short sleeves, so I chose both! Also, bonus background cat. I think she was screaming for me to feed her at that point (I’m sure you can tell just by looking at my portly feline that she is indeed not starving, but she would lead you to believe otherwise).

B5526 Floral

Here it is with the sleeves rolled up. I love these tabs because I think the rolled up sleeves look neater when buttoned into place. Of course, that means there is a visible button and some stitching on the outside of the sleeve, but I can deal with that. I was curious as to whether I’d find the tab annoying when it’s not being used (aka rubbing against my arm on the inside of my sleeve), but I have some pajamas that use the same concept and they don’t bother me at all.

B5526 Floral

B5526 Floral

B5526 Floral

B5526 Floral

Did you notice the buttons? Here’s a close-up:

B5526 Floral

Haha! I always save the buttons from Landon’s shirts when they are getting thrown away (we are talking super worn out to the point of not being worthy of donated), since I tend to be pretty conservative with my button choices and, hey, free buttons. I almost didn’t want to go with these because I’m not crazy about the branding on them, but, whatever. They match the print really well. Can’t argue with that. And I do love American Eagle – or, at least I did when I was a teen (yes, this is the same teen/same time when I was wearing black vinyl pants. What can I say, I like their take on the classics haha), I haven’t been in there recently enough to form an judgement opinion.

B5526 Floral

That’s all I got! Kind of a boring post, but quite a useful garment. I am really enjoying making the same pattern over and over – no need to reinvent the wheel with my fitting, and it’s kind of fun to see the obvious improvements with each make. I’ve had a few people ask me if I have plants to make the new Sewaholic Granville Shirt, and while the pattern looks beautiful, I think I’m just going to stick with what I know I already love and has been fitted to my liking. Again, not trying to reinvent the wheel here! Although, I’ve been watching the shirtmaking posts with great interest. There’s always so much to learn, I love it!

As a side note – those are my Ginger jeans I’m wearing in these photos. I’ve been wearing them off and on for about 2 weeks, and they’ve held up their shape really nicely. I’m actually pretty surprised – most of my handmade pants need to be washed after about 2 wears because they stretch out all crazy and don’t recover until they hit the dryer. The denim I used for these jeans is nowhere near the quality of my I+W jeans, but I don’t have any complaints (except for that I didn’t consider shrinkage when drying, and now they are a tiny bit short. On the flip side – this might be the first time pants have ever had too short of an inseam on me, which is sort of exciting it’s in own way). Now if only I had more… Heather, will you pls go denim shopping with me again? Thnx.

Completed: The Bruyère Top

29 Dec

Now that’s one plaid flannel top that definitely doesn’t look like something a man would wear, amirite.

Deer & Doe Bruyere

This is the Bruyère top from Deer & Doe. I’ve actually had this pattern for quite a while – I bought it immediately after it’s release. I LOVE the cute and feminine twist it gives to a plain button down, and I knew it’d be beautiful in a plaid flannel. I’ve been sitting on it for this long because I haven’t been able to find the right plaid flannel – either the plaid was unbalanced (get out of my nightmare), or the colors were ugly, or the flannel was shitty. Or maybe a combination of the three. Either way, no Bruyère for me 😦

Deer & Doe Bruyere

This plaid flannel actually came from the same place that the pattern did – aaaaaall the way from Paris, France! Yup! It was the first piece of fabric I bought during my shopping spree, from Les étoffes du Sentier. The shop had a 3 meter minimum, but it was only 5€ a meter and I figured 3 is a safe number for a button up, so I went with it. It’s a nice soft cotton plaid flannel and I like how the colors are so un-girly, especially with this pattern. And, bonus – even after plaid-matching, I have leftovers to make something else with! Yes!

Deer & Doe Bruyere

First, though, check out those matched side seams! Ahhh yeah!!

Deer & Doe Bruyere

And the other side!

Deer & Doe Bruyere

And the back!

Deer & Doe Bruyere

Hi!

Deer & Doe Bruyere

Seriously, though, I’m pretty happy with how this turned out (if you couldn’t tell 😛 ). I cut the size 34, and the only fitting change I made was to remove a little bit of length from the peplum and sleeves, because I am so short. Other than that, it fits pretty well! I’m surprised at much much I like the collar – I was afraid it would look flat and dumb, but the flannel gives it some lovely body.

For cutting the plaid, I cut on the single layer and cut the waistbands, cuffs, placket and back yoke on the bias. Since the bias tends to stretch, I also cut my second yoke on the straight grain, as well as a second set of waistbands. Further, I interfaced my waistbands (to be really sure they don’t stretch out), as well as the cuffs, collar, and placket. I’m not sure why these aren’t included in the instructions, but my guess is to keep the overall look of the shirt very soft and unstructured. Which is fine, but, I do think anything that has a button will need a little extra help from interfacing. I’d definitely make some test button holes before you commit, at any rate!

Deer & Doe Bruyere

I spent a really long time trying to decide how to order the construction steps for this. The instructions are fine as they are – the process for attaching the placket/collar/facing is very clever (and clean!) and it works. However, I’m a diehard who wanted flat felled seams. In addition – I wasn’t 100% on the fit of the side seams, and I wanted to sew that last so I could tweak it after attaching the placket (when sewing flat felled shirt seams, once generally attaches the sleeves before sewing the side seams. Sewing a flat felled seam in the round just sounds like a painful thing I don’t want to do). Because of how the shirt is assembled per the instructions, you can’t really switch them out – you have to have the hem sewn to add the placket, but the side seams need to be sewn to add the hem. I know this sounds really vague and probably doesn’t make sense, but if you look at the instructions for this shirt vs ones for, say, the Negroni, it will. Anyway, this is what I ended up doing:
– I left the side seams open and sewed about 2″ of the shirt hem by the placket
– Followed the instructions for adding the collar, placket and facing
– Attached the sleeves with flat-felled seams
– Sewed the side seams with flat-felled seams
– Finished the remainder of the hem

That worked out great! My shirt is finished with flat-felled seams and it looks beaaaaaauuuutiful on the inside as well as the out 😀

Deer & Doe Bruyere

What else? Well, I added PEARL SNAPS. God, I love those things – nothing like being able to Hulk out of our clothes at the end of the day amirite. I feel like the very top needs a pearl snap (it’s not marked on the pattern), however, I couldn’t get the prongs through all the layers so no pearl snap there!

Deer & Doe Bruyere

Here’s the inside. I finished the edge of my facing with pinking shears – I think anything else would show a ridge on the right side. Of course, I probably should have first sewed a line of stitching before pinking, because it’s already fraying like crazy, but whatev.

Deer & Doe Bruyere

Deer & Doe Bruyere

I guess that’s it! Glad I finally got this finished – plaid flannel shirt of my dreamssss ♥

Deer & Doe Bruyere

Hope everyone had a Merry Christmas! Just a couple days left until the end of the year – aiee!

Completed: Butterick 5526, in silk georgette

15 Dec

Ah, Butterick 5526. I just can’t quit you.

White Silk Double Georgette B5526

This pattern is truly a TNT//tried’n’true for me at this point. I’ve made it several times – in various fabric weights and drapes, always tweaking the fit as I go – and it’s turned out to be my very favorite shirt pattern. I am pretty sure I’m repeating myself at this point, but JUST IN CASE YOU WEREN’T READING THE FIRST TIME – I fucking love this pattern!

Since I’ve already beat this pattern to the ground as far as shirting fabrics are concerned, I figured I might give myself a little challenge for the next make. And by “challenge,” I mean went temporarily insane and decided to make this up in some silk georgette.

White Silk Double Georgette B5526

White Silk Double Georgette B5526

And it turned out pretty good! Just don’t look too close 😉 Silk georgette is a slippery little beast, after all. Also, sorry about all the creases – I took these photos after wearing the shirt all day with a sweater over it. Turns out silk REALLY likes to set itself some creases!

White Silk Double Georgette B5526

I was bound and determined to have this ready in time for my London adventure – I just knew the shirt would look great under my various sweaters, as well as on it’s own (well, with a tank underneath it. It’s pretty sheer on it’s own! It’s not so noticeable in these photos, but… trust me.). The fabric is very thin, lightweight and drapey – which meant I could even get away with wearing it under a ponte tshirt. I knew silk would be a good bet because it’s so warm, plus, it would give me an entirely different look from my white cotton B5526 (nothing wrong with that shirt, by the way – except that the weird sleeve length means I can’t wear it with long sleeves. Which is why I’m making a second white button up. No judgement here). Based on my experience with the birdy silk geogrette of my dreams (and no, I still haven’t cut into my remaining yardage – too many options to choose from, can’t decide, HALP), I thought I’d give the fabric another try. At any rate, at least it won’t be shiny satin silk. I hate that stuff when it’s not part of a lining. Sorry.

I bought this silk double georgette from the Mood Fabrics website, sight unseen, only to find out that… well, it wasn’t *quite* the same as the bird silk. It’s much thinner – it’s basically sheer. I understand that the description explicitly states that, yet I still ignored it. It also has quite a bit of stretch, which is not ANYWHERE in the description. Whoops. Shoulda ordered a swatch, but I didn’t have time to wait. And I didn’t have time to buy something else, so I dealt with the cards fabric I was given.

White Silk Double Georgette B5526

Like I said, it’s mostly good. The worst part of the process was cutting this beast – talk about a PAIN IN MY ASS. The fabric is so shifty and I swear those pieces were moving around just to torment me. I usually don’t have too much of a problem with cutting shifty fabrics – I just rip the cut edge to get a straight line, match the selvedges and pin the hell out of them (buying a decent-quality fabric that’s already on grain really helps, fyi. If you’re going to go sheer/shifty, don’t cheap out!), and then pin all my pattern pieces as well. That simply did not work as well for this fabric. It basically didn’t want to be made into a shirt, and it fought with me every step of the way.

But I ended up winning, so there’s that.

White Silk Double Georgette B5526

To sew, I used my finest needle (70/10 Microtex) and my walking foot (since, again, shifty fabric). I used French seams for every part of this shirt and omitted most of the topstitching. I say most because I did topstitch the button band, but it ended up causing so much shifty drama that I decided to skip the rest and finish the collar stand by hand.

For the hem, I used bias facing, since the thought of rolling that hem made me want to cry. Bias facing was certainly easier, but it’s not really my best work on this shirt. For one, I didn’t have the right fabric – I was completely out of georgette (used up the whole yardage cutting the pieces, go me) and I don’t have any lightweight white silk in my stash. I did have some peach-colored silk (the same stuff I used to finish my boiled wool SJ sweater neckline), which worked out since it matches my skin tone at least. I must have done some crazy witchcraft distortion on the hem because it is now VERY wavy. But, you know what? Fuck it. I plan on wearing this thing tucked in for the most part anyway.

Also, it wasn’t until after I finished the shirt that I remembered I wanted to try to draft a v-neck for it. HA HA HA! Obviously that did not happen! Better luck next time!

White Silk Double Georgette B5526

Anyway, whatever. It’s pretty. I finished it on time. I wore the shirt out of it in London. People there probably think I don’t have any other clothes. Yay!

Have some close-ups and I will point out my mistakes so we can laugh together:

White Silk Double Georgette B5526

The tag is accurate. It is also hiding a big pleat in the collar stand facing that mysteriously grew longer than the interfaced side (I dunno, either).

White Silk Double Georgette B5526

I was ridiculously proud of how nice the sleeve plackets turned out, until I tried on the shirt and discovered that the sleeves were somehow too long (they still are, if you didn’t notice). I trimmed them as much as I dared, and as a result – my placket is maaaaybe 1″ long. It’s the saddest little weenie placket ever. I mean, it’s not the worst deal because I can still roll my sleeves up, but… yeah. Fuck you, weenie placket.

White Silk Double Georgette B5526

Here is my faced hem. Hey, it actually looks pretty nice in this picture!

White Silk Double Georgette B5526

Ok, I think that’s it! I do love the shirt – it hasn’t deterred me from my beloved B5526, or even silk georgette for that matter (I will try you again, and I WILL conquer your ass. I will also buy a swatch first, because, ~*YOLO*~). Despite the dramz that occurred to make this shirt (and also the fact that it took like 2 months to complete because I was right in the midst of the V1419 sewalong, argh), I feel pretty good about it. It’s definitely a good staple for the ol’ closet, and it served me well in London.

Sidenote: I did also make the shirt I’m wearing in these photos. It’s a Colette Mabel and I used this incredible black virgin wool sweater knit that is now sadly sold out of the Mood website. It’s super thick and cozy and I LOVE it. That is all.

Completed: Polka Dot Chambray Butterick 5526

21 Oct

HAHAHAHAHA I bet you guys are sooo sick of seeing me in renditions of this pattern, huh? 🙂

Polka Dot Chambray Button down

SUP Butterick 5526. My heart, my soul, my official tried’n’true button down pattern. I don’t know how many times it has to be before it’s considered “the charm,” but I’m pretty sure this is legit the nicest button down I have ever made. I am so pleased with myself right now!

Polka Dot Chambray Button down

Since I’ve made this pattern, um, a lot (see: 1 2 3)(ok that’s not a lot, but it sure feels like a lot!), I’m pretty well-versed in the fitting and construction of this dude. It’s practically an autopilot pattern for me – apart from selecting the fabric & buttons, I don’t really have to think much while I’m putting this together. It’s like my hands have repeated the process so much, they don’t need any instruction from my brain at this point.

Polka Dot Chambray Button down

So, I’m sorry if you’re bored with looking at this pattern. Deal with it.

Polka Dot Chambray Button down

Seriously, though, I did have to figure out those damn sleeves, because all my previous versions have some awkward lengthage going on. My last attempt at making them full-length ended up with them being some weird purgatory of not-quite-long-but-not-quite-short – like the highwaters of shirt sleeves (do we still make fun of highwaters, or is that the cool thing to wear now? I just looked down and realized the jeans I am wearing are cuffed to the length of highwaters, SHIT!!). Since I actually want to wear this top underneath sweaters – and hence why I made a second chambray button down when the first one is actually quite wonderful (spoiler: dem sleeves, tho) – I needed to figure that shit out once and for all. And, look ma! They’re the right length! Finally!

Polka Dot Chambray Button down

Although, now I can’t decide if they are… too long? They look bunched up when my arms are hanging. However, when I reach my arms out – they are exactly the right length (as in, any shorter, and they would ride up to be too short and expose too much wrist). Thoughts? This is why I always roll up my sleeves (and jeans, for that matter) – I can’t find a happy hem length! Anyway, what is the point of making all your clothes if you can’t even hem them correctly?

Also, I think the sleeves might be a bit loose? Or do they look ok? Thoughts on that?

Dammit, this totally isn’t a TNT pattern, is it? 😛

Polka Dot Chambray Button down

Anyway, whatever, let’s talk about the victories! Check out that sexy sexy sleeve placket. I used the placket for the Negroni (which, honestly, that pattern piece + instructions are alone worth the price of the pattern) instead of what was included with 5526. Lurrrrve it.

Polka Dot Chambray Button down

I also sucked it up big time and flat-felled every single seam on this shirt – the princess seams, the side seams, the arm holes (thanks to Negroni for those sweet instructions – see? Negroni, you rule!) – everything! What you see here is a beautiful and clean-finished top that doesn’t have ANY serging on the inside. Just miles and miles of flat-felled seams and gorgeous topstitching. Ugh, so good.

Polka Dot Chambray Button down

Don’t you love the fabric? I picked this up at one of our local fabric stores, Textile Fabrics. They were having a 40% off sale, so I treated myself to this and some soft fleecy knit. I was originally going to use this to make the Bruyere, until I realized I didn’t want to look exactly like the pattern cover (which is beautiful, don’t get me wrong!). I’m more of a plaid flannel kinda gal, for which I’m still stubbornly holding out for the perfect one to reveal itself to me. Textile Fabrics, unfortunately, couldn’t deliver on that front – but they did have polka dot chambray, so that’s ok enough in my book. Speaking of which, I think this is Robert Kaufman fabric. Don’t quote me on that, though!

Polka Dot Chambray Button down

Anyway, it’s a very lovely fabric – and it was soo nice to work with! Very soft and smooth, easy to cut and sew, SUPER easy to press (which is important with this style of shirt). The topstitching just sinks right in.

Polka Dot Chambray Button down

Again – placket! Sorry the cuff looks uneven. I promise it’s not. Buttons are these dress shirt buttons from Fashion Sewing Supply – part of my neverending stash.

Polka Dot Chambray Button down

I’m just including this because it looks so damn good – topstitched intersecting flat-felled seams (arm hole & princess seam). Also, if you were wondering – flat-felling princess seams really is not any more difficult than flat-felling straight seams. I don’t know why I put it off like it’s impossible to do. It’s not. It’s definitely more time consuming than just serging your raw edges, but the end result looks SO nice.

Polka Dot Chambray Button down

Finally – can we talk about how good this hem looks? Y’all, shirt hems have always been the bane of my sewing existence. I could never figure out how to get them to be straight and even with that giant curve. They ALWAYS look like shit. Not anymore, though! This time, I was inspired by Rochelle and tried using bias facing at the hem. I made self-bias strips with my fabric, and then applied it the same way I bias face sleeves & necklines (I did this before attaching the placket, as per the instructions). Since I used self-fabric for the bias, the end result looks like a simply turned up and stitched – except I didn’t, and this was SO MUCH EASIER. Plus, it give a nice bit of weight to the hem, which I like. Consider me a convert! Bias facing FTW!

Polka Dot Chambray Button down

So yay! I’ll consider this shirt a success – even if the sleeves are a little iffy. At any rate, I’m serious when I say it’s the best-made shirt I’ve ever constructed (if you see me in the wild and compliment it, there’s a good chance I’ll rip it off my body so I can show off the insides. TRUTH.). Little things like this make me happy! I think that’s the best part about sewing with a pattern you know and love – instead of focusing on new instructions and fit, you can zero all your attention on improving your technique.

Oh, and if you were wondering – that’s my Tie-less Miette I’m wearing in the photos. The shoes (because everyone always asks) are from the clearance rack at Nine West and no, I did not buy them to match this outfit. Ha! 😛

Two more things!

1. My lovely sponsor (and OG to the LLADYBIRD Sponsor Game), Sweet Little Chickadee, is closing up shop for the time being 😦 We will miss her (I will miss her! Where do I buy my patterns from now?! I got candy with those orders hahaha), but on the flip side – this means closeout saaaaale! 😀 From now till whenever the shop runs out, use the code SHOPCLOSING to get 25% off your entire purchase. Apparently there are also some sweet flat-rate shipping options at checkout, so you may save there, too! Please keep in mind that you are buying from a one-woman shop who is running a sweet freaking sale, so please be patient if your order takes a couple days to ship out. Not a bad payoff for 25% off, though, yeah? Now go forth and help Juli clear out that inventory!

2. Affiliate links. I wrote this blurb out in my last post, but realized after the fact that not everyone reads sewalong posts (I’m guilty of this too – those posts can be boring if you’re not following along). I definitely want y’all to be aware of my use of affiliate links, because I think it’s important, so I’m copying this verbatim into this post. Sorry if you’re reading this twice  🙂
Side note/disclaimer: Ok, so I decided to start occasionally using affiliate links on this blog. Sorry if you hate me! 🙂 I am currently only affiliated with Amazon, and I promise I will only be linking things that I personally use and recommend – such as those scissors & that clapper. Y’all will never ever ever see me link something just for the sake of linking it – that’s just crappy. However, please keep in mind that any purchases you make through these links will net a small kickback to me, which I will likely spend immediately on yarn & fabric (and thus pour back into this blog, in the form of content for y’all to read!). Also, no sneaky linkies – I will always describe the item I’m linking so you don’t have to click to see them, if affiliate links squick you out 🙂 I won’t be posting this disclaimer at the end of all my posts, as it seems a little redundant, but you can always view it in my About Me page. That’s all! Thanks for supporting my blog, dudes! ♥

Ok, that’s it! Have a lovely Tuesday, guys!

Completed: Two Colette Mabels

8 Oct

I totally skipped all the hullabaloo that came out when the Colette Patterns Mabel skirt was released – but that’s ok! I’m here now, reporting for duty!

Colette Mabel & Sewaholic Renfrew

I actually made two – just to be safe!

Colette Mabel & Grainline Archer

Let’s start with a basic Mabel lowdown. I made the grey version first, out of some leftover ponte knit that I used to make a pair of Ooh La Leggings (not pictured – because neither photographed nor blogged, but they are basically the same thing as these black ponte leggings except, you know, grey). I actually have no idea why I bothered saving that little piece of fabric, because it was about half a yard and thus not enough to do anything with – and the ponte is pretty thick, which means it wouldn’t work for something like, say, colorblocking a tshirt (which can be a good use of leftover knit scraps, if you tend to get hoardy like I do). Anyway, it’s a good thing I did, because I had exactly enough to make a little Mabel mini! Yay! I love it when these things work out!

Colette Mabel & Grainline Archer

Colette Mabel & Grainline Archer

Mabel Mini 1 is view A, size XS. I sewed the pattern exactly as per the directions, except I opted to understitch the waistband lining (I used my machine’s lightning bolt stitch – kind of like a very short zig zag stitch), to keep it from sticking out. The seams of the skirt were sewn on my serger, and the hem is done with a twin needle. From cutting, to sewing, to hemming – this entire thing took… I dunno, maybe 30 minutes? It was VERY fast.

I didn’t really use the instructions – I mean, it’s a knit skirt, it doesn’t need much introduction – but they looked to be pretty good, based on my glance over. Like the Moneta pattern, they include lots of tips and info on how to sew knits with a regular machine, which is always nice. The only thing I did not like about this pattern was taping it together (I have the PDF). Holy shit, talk about too many pages! My disdain for PDFs is no secret (I get why other people like/need them… no defense necessary 🙂 But for me? Nope, no way! Can’t do it!), so maybe I’m biased – but this one seemed to be unnecessarily large & unwieldy. My advice: get the paper pattern. Ha!

Colette Mabel & Sewaholic Renfrew

Anyway, speedy instaskirt is the reason why I obviously needed to jump right into Mabel Mini 2 immediately after 😛

Colette Mabel & Sewaholic Renfrew

I made a couple very minor changes for this one – I took in the center back and side seams by about 3/8″ (in retrospect, I should have taken in more, because it’s still a little loose around the waist and thus rides down farther than I want the rise to sit), as well as the waistband by the same amount. I used the last of my black striped ponte from Mood Fabrics NYC store. Again – 30 minute skirt. Talk about fast fashion, amirite.

Colette Mabel
Colette Mabel
Colette Mabel

For both skirts, I used a lightweight black rayon jersey (the same jersey that my black tshirt is made out of, incidentally. That tshirt is a Renfrew, by the way!) to line the waistband. I considered using a self-lining – but decided the fabric was a smidge too bulky, so I went with a lighter weight lining, which ended up being a Good Decision.

Oh yeah! I made that plaid flannel button down too! SUP!

Grainline Archer

This was made using the Archer pattern. I actually finished it waaaay back in… March. Yep. I got it in my head that I needed to make a new plaid Archer to wear when I went to NY, so I nearly killed myself trying to finish the shirt in something crazy like 2 days. I did end up finishing it – and bringing it to NY to wear – and I learned two things about the experience:
1. My life did not suddenly become more fabulous because I had a new shirt to wear while on vacation; and
2. Pushing myself to the point of exhaustion to finish something for a self-imposed deadline is not fun at all. Seriously – it’s shitty, it makes me anxious for no reason, and I didn’t enjoy any part of sewing that shirt. Which is sad, because button downs are one of my favorite things to sew! I love how precise the stitching is, and all the little details that make it special. I unfortunately didn’t get to enjoy any of that because I was too rushed trying to hurry up and finish (when, realistically, I should have either started earlier, or accepted that I just wouldn’t finish before I left), and yeah, that’s just lame.

So, with that being said – no more unnecessary last-minute vacation sews with shitty deadlines! If I need clothing that quickly, I will buy it (lol jk I’LL NEVER BUY CLOTHES AGAIN)(ok, seriously, kidding with that last part… mostly.). So far, I’ve done a decent enough job of putting this into practice, so that’s good!

Grainline Archer

And, for what it’s worth – I do like the shirt. I could have done a better job with it – the topstitching is not my best, and the grain is all wonky because the plaid fabric was hideously off grain (like, to the point where I actually cut the entire shirt twice. Yes. I did that. And it’s still pretty bad) – but it is what it is. It’s snuggly, it’s warm, and I also just realized that I made it to match the leggings that I made with the rest of that grey ponte fabric hahaha omg my life is fabulous.

Grainline Archer

Anyway, I hope you liked my Archer story. Have some pearl snaps.

Grainline Archer

And a sleeve placket while we’re at it!

Ok, so here’s my dilemma – and I’m hoping y’all can help me. I HAVE NO IDEA WHAT TO WEAR WITH THESE SKIRTS. I feel like everything I put on just gives me weird proportions! The tops I’m wearing here are ok, I guess, but that’s about the extent of what my closet can offer. Most of my other tops just look… weird? I think the biggest problem is the waist line- it kind of hits at a strange place:

Colette Mabel & Grainline Archer

See what I mean? It’s about right at my belly button – which isn’t quite high waisted, and not quite low waisted. I can’t tuck anything in – partially because it’s very lumpy under the ponte, and partially because the waistline hits at a sort of wide point on my body. Untucked, most stuff just looks sloppy or gives me that weird long-abdomen proportion that we just loved soo much in the early 00s (y’all know what I’m talking about!). So yeah, can’t figure that one out. Any suggestions? Should I stick with more fitted, cropped sweaters (such as what the model is wearing on the website)? HELP ME I CAN’T ADULT.

Colette Mabel & Sewaholic Renfrew

Anyway, let’s talk! Answer one or more of the following:
– What shirts should I be wearing with these skirts?
– Have you ever made yourself sick by rushing to complete a garment before going somewhere?
– What happened when you finished it? Did a unicorn grant you 3 wishes or did you just realize that life was still doing life things and dammit is it Monday already?
– Seriously, though, what should I wear with these skirts?

** Necessary disclaimer: I received the Colette Mabel skirt from Sarai of Colette patterns, gratis. No review was requested – but as always, all opinions are my own. All fabrics in this post were purchased by me 🙂 I do get a monthly Mood allowance, but that doesn’t mean that I don’t also spend plenty of my own money there! Just wanted to clear that up 🙂

Completed: Butterick 4066

5 Sep

Ummmm so this may or may not be the third garment I’ve posted this week that is made of rayon challis.

Butterick 4066

No shame.

Butterick 4066

These pictures are also horrifyingly bad and blown out, but… meh. We all know y’all don’t come here for the ~dazzling photography. Again: No shame.

Butterick 4066

I picked up this copy of Butterick 4066 while I was last at the flea market in July. The cover art is a little outdated (and not in a cool vintage way, but rather, I feel like I can probably smell my Mamaw’s house if I lean in too close. Wait, just kidding, my Mamaw’s house smells great. That shit probably smells like someone else’s Mamaw’s house, maybe), but the line drawings looked promising enough – almost like the Kelly skirt and Hollyburn skirt had a secret affair that ended up with a little love child.

Butterick 4066

It’s hard to see, thanks to my terrible photos, but the skirt has pockets, a smooth A-line shape with no darts or tucks, and buttons down the front. I used this shameless 90s black floral rayon challis from Fashion Fabrics Club, as I knew the shape would look great with a drapey fabric (just like my Crazy Paisley Hollburn).

Butterick 4066

My skirt pattern was just a smidge too big (not the fault of the pattern itself – my copy is a size too big, since we don’t normally get to be choosy when it comes to buying vintage patterns!), but that was easily fixed by taking in the side seams before attaching the waistband. The big challenge was cutting off length – a LOT of length. Even after I’d shortened the shortest version of the pattern tissue by a good 6″, I had to go back after making the skirt and hack off another 4″! Shortening the length did wonders for the overall look of the finished skirt – before, it was pretty dowdy and outdated looking (mostly due to fabric choice, I mean – we are talking about the 90s here), but I think it looks pretty cute now! Shorter skirts FTW!

Butterick 4066
Butterick 4066

I finished the seams with my serger and used these pretty black and gold buttons that I had lurking in my stash.

Butterick 4066

I love how the finished skirt turned out – and I think it’ll transition really nicely for our “fall”**, since it’s so cool and lightweight, but still has those nice dark fall/winter colors. That being said, it’ll look great with tights and a sweater, too 🙂 (maybe with a silk slip, though! It’s not very warm!) I’m interested to try pairing this print with black and white stripes – I can imagine it in my head, but until I start sewing up the striped knits I got while I was in Mood last month, your guess is as good as mine.

** Tennessee Fall: Beyond gorgeously colorful (visiting Tennessee in the fall should be on every single one of y’alls bucket lists), but still blazing hot and, yes, we absolutely make fun of those dumbasses who insist on wearing wool caps and jeans tucked into tall boots while marinating in giant pools of sweat. I mean, COME ON LADY, it’s 90* outside FFS! You aren’t fooling anyone!

One last thing – Giveaway Winner! Lucky number is…

winner1

winner2

Congratulations, Sue Martin! I love your method of sneaky inspiration by way of shop dressing rooms – something I’m too chicken to do myself (I got major stink-eye once while manhandling a rack of dresses in Buckle and I’m kind of traumatized now haha). As far as adding hours in the day – well, let me know when you figure it out! 🙂 haha!

Thanks to everyone to entered the giveaway – and thanks to Laurence King for providing us with a copy to giveaway! Friends, if you’d like to buy your own copy of Casual Sweet Clothes, use the code LLADYBIRD35 to get 35% off! The code is good through 10/1/14 🙂