Tag Archives: pockets

OAL2015: Adding Pockets // Assembling the Skirt

29 Jun

Good morning, everyone! Time for another dose of OAL goodness!

OAL_Banner

Today is pretty simple – we’ll just be adding (optional) pockets and assembling the skirt pieces. If you don’t want to add pockets, just skip this post and follow the instructions that came with the pattern. Let’s get to it!

OAL 2015
For now, the only skirt piece we will be dealing with is piece #15, the side front. You should have 4 of these pieces cut in total. The side that I’m pointing to – with the double notches – is the side that we will be focusing on for these next steps. Finish the edges of all 4 side front pieces (only on the side with the double notches).

OAL 2015
If you haven’t already done so, you’ll need to cut out 4 pocket pieces from your fabric (you can use self-fabric, but I was on a pink kick so mine are contrasty!). The pattern doesn’t come with a pocket pattern piece, so feel free to swipe one from another pattern you own – mine is from the Saltspring Dress. Finish all edges of the pocket pieces.

OAL 2015
On the finished edge of each side front piece, measure 3″ down from the top and mark with a pin. This is where we will be attaching the pockets.

Note: Depending on your height and proportions, you may want to sew your pockets more or less than 3″ from the waist. I looked at several patterns with pockets – as well as a few of my dresses that have pockets in a good spot – and the average seems to be somewhere between 2.5″-3.5″, with 3″ being a comfortable distance for me. However, if you’re unsure – I recommend checking some of your patterns, or measuring a couple existing garments, to see what works for *you*.

OAL 2015
Pin 1 pocket piece to 1 skirt side front (4x), with the top of the pocket 3″ away from the top of the skirt and right sides facing.

OAL 2015
Sew the pocket to the skirt piece at 3/8″ and understitch the seam allowances toward the pocket. Using a smaller seam allowance and understitching will help with keeping that pocket inside the skirt and hidden.

OAL 2015
Now you can pin 2 skirt/pocket pieces, right sides together, starting at the top of the skirt and going all the way around the pocket and to the bottom of the skirt. Repeat for the other pocket.

OAL 2015
Stitch at 5/8″, lowering your needle and pivoting where the pocket meets the skirt at the top and bottom (I can’t seem to explain this very clearly so just look at the photo!).

OAL 2015
At the top & bottom of each pocket bag, clip diagonally in the corner just to the stitching (but not through the stitching). This will enable you to press the seams above and below the pocket open, as well as make your pocket bag lay better inside the skirt.

OAL 2015
Press the seams open above and below the pocket bag, and press the pocket to one side (it should go toward the center front, so press in opposite directions for each of your two assembled skirt pieces).

OAL 2015
OAL 2015
Here it is finished! Yay, sneaky pink pocket 😀

OAL 2015
And here is how it looks on the inside 🙂

Once you’ve finished adding the pocket bags, you can attach the front to the side fronts (one on each side of the front) and the two back pieces to the opposite side of the side fronts. Finish your seams as desired and press. Finally, finish the center back seams (again, I just serged mine).

That’s it! Next week, we’ll attach the skirt to the bodice and deal with that back cut-out. Making progress! 🙂

Let me know if you have any questions about anything I covered in this post! How are we doing this week, OAL-gers? 🙂

Completed: Butterick 4066

5 Sep

Ummmm so this may or may not be the third garment I’ve posted this week that is made of rayon challis.

Butterick 4066

No shame.

Butterick 4066

These pictures are also horrifyingly bad and blown out, but… meh. We all know y’all don’t come here for the ~dazzling photography. Again: No shame.

Butterick 4066

I picked up this copy of Butterick 4066 while I was last at the flea market in July. The cover art is a little outdated (and not in a cool vintage way, but rather, I feel like I can probably smell my Mamaw’s house if I lean in too close. Wait, just kidding, my Mamaw’s house smells great. That shit probably smells like someone else’s Mamaw’s house, maybe), but the line drawings looked promising enough – almost like the Kelly skirt and Hollyburn skirt had a secret affair that ended up with a little love child.

Butterick 4066

It’s hard to see, thanks to my terrible photos, but the skirt has pockets, a smooth A-line shape with no darts or tucks, and buttons down the front. I used this shameless 90s black floral rayon challis from Fashion Fabrics Club, as I knew the shape would look great with a drapey fabric (just like my Crazy Paisley Hollburn).

Butterick 4066

My skirt pattern was just a smidge too big (not the fault of the pattern itself – my copy is a size too big, since we don’t normally get to be choosy when it comes to buying vintage patterns!), but that was easily fixed by taking in the side seams before attaching the waistband. The big challenge was cutting off length – a LOT of length. Even after I’d shortened the shortest version of the pattern tissue by a good 6″, I had to go back after making the skirt and hack off another 4″! Shortening the length did wonders for the overall look of the finished skirt – before, it was pretty dowdy and outdated looking (mostly due to fabric choice, I mean – we are talking about the 90s here), but I think it looks pretty cute now! Shorter skirts FTW!

Butterick 4066
Butterick 4066

I finished the seams with my serger and used these pretty black and gold buttons that I had lurking in my stash.

Butterick 4066

I love how the finished skirt turned out – and I think it’ll transition really nicely for our “fall”**, since it’s so cool and lightweight, but still has those nice dark fall/winter colors. That being said, it’ll look great with tights and a sweater, too 🙂 (maybe with a silk slip, though! It’s not very warm!) I’m interested to try pairing this print with black and white stripes – I can imagine it in my head, but until I start sewing up the striped knits I got while I was in Mood last month, your guess is as good as mine.

** Tennessee Fall: Beyond gorgeously colorful (visiting Tennessee in the fall should be on every single one of y’alls bucket lists), but still blazing hot and, yes, we absolutely make fun of those dumbasses who insist on wearing wool caps and jeans tucked into tall boots while marinating in giant pools of sweat. I mean, COME ON LADY, it’s 90* outside FFS! You aren’t fooling anyone!

One last thing – Giveaway Winner! Lucky number is…

winner1

winner2

Congratulations, Sue Martin! I love your method of sneaky inspiration by way of shop dressing rooms – something I’m too chicken to do myself (I got major stink-eye once while manhandling a rack of dresses in Buckle and I’m kind of traumatized now haha). As far as adding hours in the day – well, let me know when you figure it out! 🙂 haha!

Thanks to everyone to entered the giveaway – and thanks to Laurence King for providing us with a copy to giveaway! Friends, if you’d like to buy your own copy of Casual Sweet Clothes, use the code LLADYBIRD35 to get 35% off! The code is good through 10/1/14 🙂

OAL: Attaching the Skirt

30 Jun

Good morning, OALgers! Today we are going to attach the skirts to our bodices – which means we’ll have semi-dress-looking things by the end of this post! Yay!

While this post is shorter, picture-wise, than the previous posts for this OAL (and thank God for that! The rest of the sewing from here on out is much easier), there are a few things I want to cover here:
– Moving the pockets from the front princess seam, to the side seam
– Converting the gathers to pleats
– A different way to sew gathers

Ready? Let’s start with moving those stupid pockets. Ideally, you’d do this before you cut your fabric out, but it’s really no biggie if you’re doing this right before you sew the pockets in (as I tend to do). Just make sure your marking tool doesn’t bleed through the pattern tissue, or consider removing your fabric from the pattern pieces just to be extra sure.

If you don’t want to move the pockets, that’s perfectly fine – you can skip this step. Just be warned that they are right down the front of the dress – in what I thought was a pretty awkward spot. I don’t know who had the brilliant idea to put the pockets there on this pattern, but as far as I’m concerned, pockets belong in side seams (or over a butt, which is another nice place to put a pocket I suppose), so that’s where I am moving mine to.

OAL - Attaching the Skirt
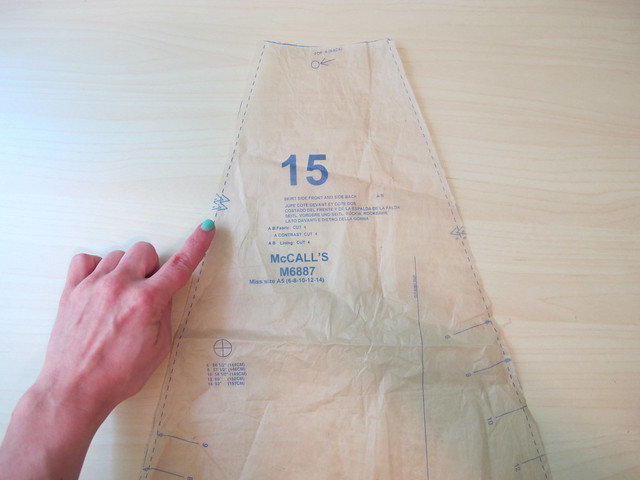
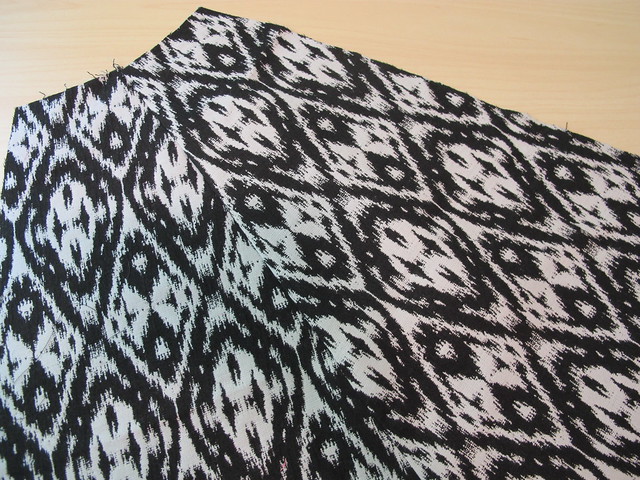
Start by locating your skirt pieces – the skirt front and skirt side front will have dots marked where the pockets should go. You’ll also want the skirt back piece, as we are going to move some markings over there. I X’d out the old pocket markings (the ones printed on the pattern), so I wouldn’t get confused as to which markings to use.

OAL - Attaching the Skirt
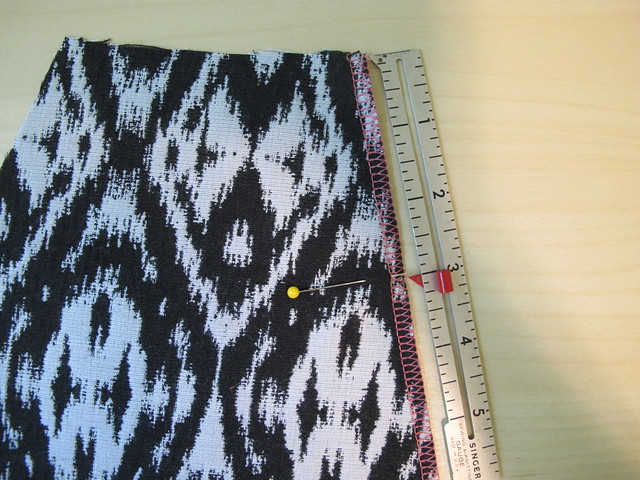
Starting with the skirt side front, measure from the top how far down the pocket marking is – about 3.5″ in this case.

OAL - Attaching the Skirt
Now move to the opposite side of the pattern piece (where there aren’t any pocket markings) and make a dot the same distance from the top.

OAL - Attaching the Skirt
Measure the distance between the two dots and mark the second dot as shown on the side seam.

OAL - Attaching the Skirt
Repeat for the skirt back, marking on the seam that is NOT indicated to be the center back. It’s also a good idea at this point to lay your pieces together so you can be sure the markings match up and your pockets are nice and even.

Ok, onto adding the pockets! These next steps are the same regardless of what seam your pockets are being inserted into…

OAL - Attaching the Skirt
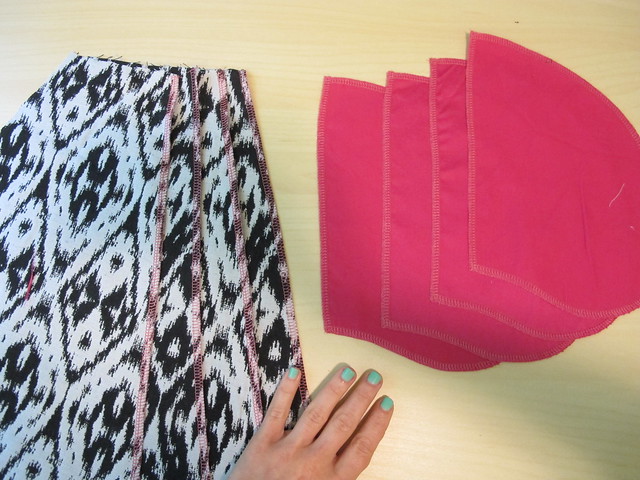
If you’re using a machine to finish your edges, go ahead and do that now. Finish all the raw edges of each of side of each skirt piece, as well as all edges of each of the 4 pocket pieces. If you’re pinking, you can finish as you go.

OAL - Attaching the Skirt
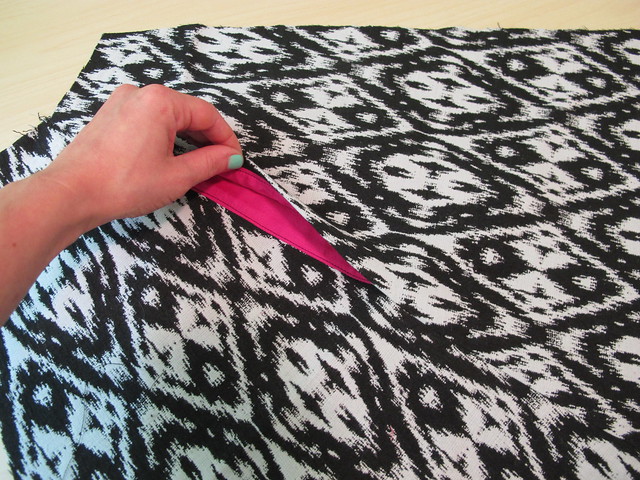
Match the markings on the pocket to the markings on each of the 4 skirt pieces with right sides together, and pin. Sew the pocket in place (from top to bottom), using a 3/8″ seam allowance. The smaller seam allowance will help that pocket stay hidden to the inside of the skirt.

OAL - Attaching the Skirt
You should have 4 skirt pieces with a pocket sewn on each one. Take the pieces to the ironing board and press all the seam allowances toward the pocket. If you want to understitch the pockets (I always do), you may do so now.

OAL - Attaching the Skirt
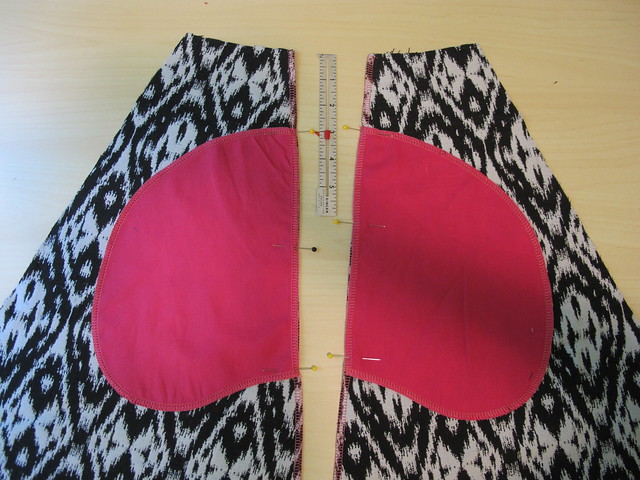
Now match up one skirt back piece with one skirt side front piece (or skirt front with skirt side front), right sides together, and pin the skirt seam above and below the pocket, as well as around the pocket itself. Excuse the cat tail 😛

OAL - Attaching the Skirt
Using a 5/8″ seam allowance, sew the skirt and pockets in one long swoop of stitching. Start at the top and sew until you get to the pocket markings.

OAL - Attaching the Skirt
Lower your needle, raise the presser foot, and pivot the fabric until you can continue to sew around the pocket. When you get to the second set of pocket markings, lower the needle and pivot again, then continue down the side seam of the skirt.

OAL - Attaching the Skirt
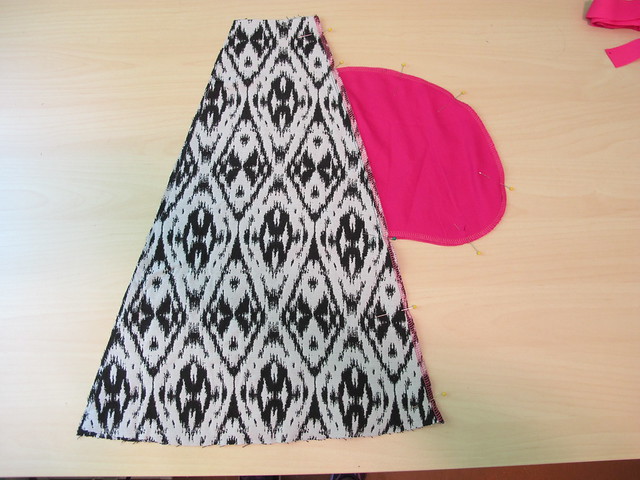
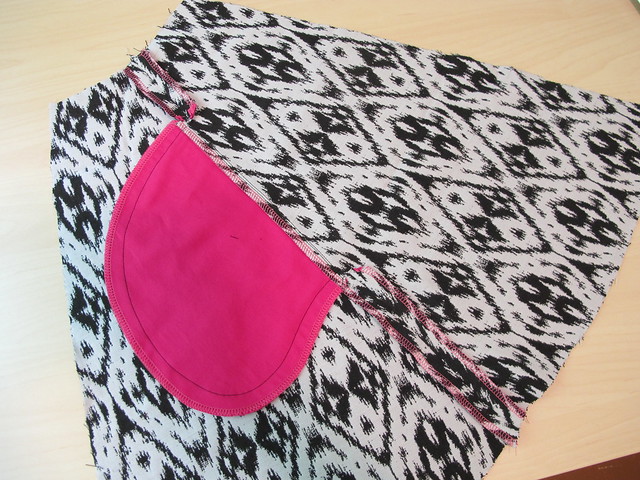
You should have two skirt pieces that look like this.

OAL - Attaching the Skirt
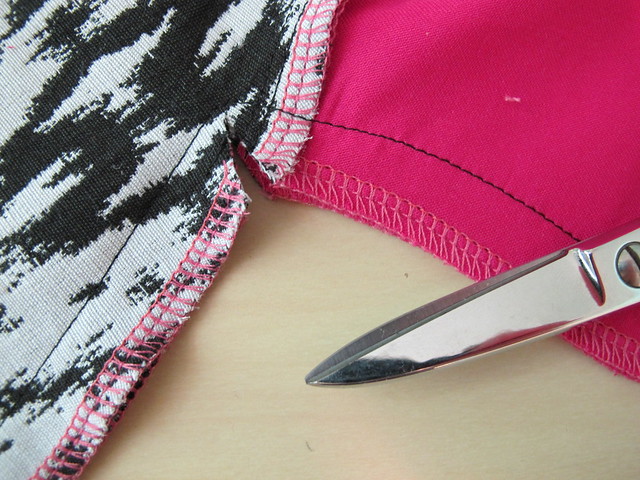
To press the pockets, start by clipping the seam allowance connecting the pocket to the skirt, as shown. Be careful not to snip your stitching lines!

OAL - Attaching the Skirt
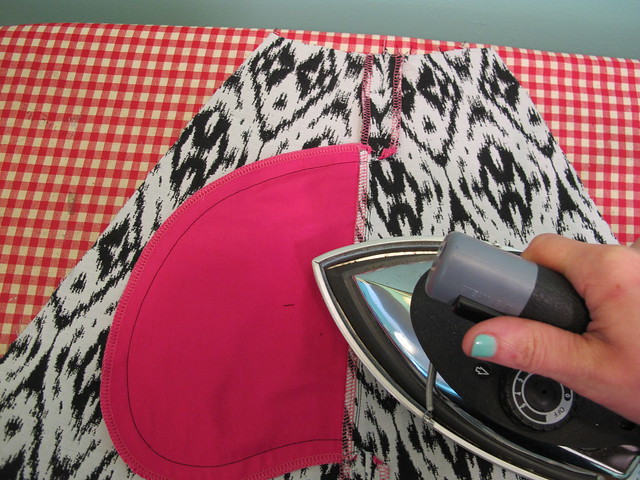
Now press the pocket toward the skirt side front (or skirt front), and press open the seam allowances that are above and below the pocket.

OAL - Attaching the Skirt
Sew the last skirt pieces (depending on where you pockets are, you will either be attaching the front or the skirt backs) and press all the seam allowances open. Your skirt should look like this.

For converting the gathers to soft pleats:
OAL - Attaching the Skirt
Pin the skirt to the bodice at all seams and notches (so bodice side seam to skirt side seam, etc).

OAL - Attaching the Skirt
You should have a good amount of excess between each pinned section.

OAL - Attaching the Skirt
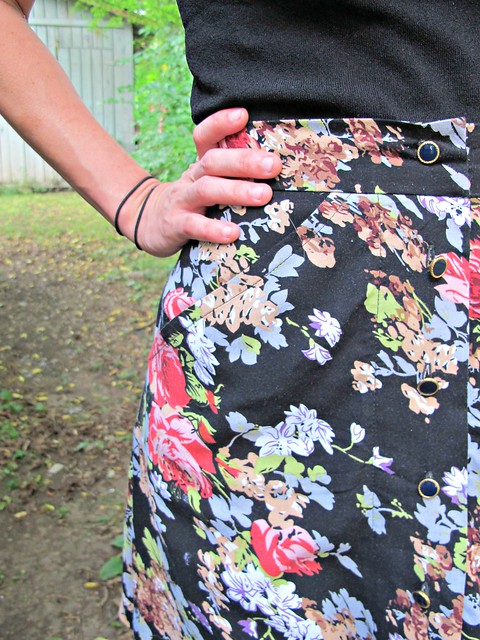
Working in one section at a time, pinch the excess and manipulate it into small pleats, then pin into place. I like to start with one section and then immediately do the same section on the opposite side (so, center front right then center front left, etc), so I can be sure that my sections are mirrored with the same numbers of pleats that are facing in the same direction. For my dress, I had 1 pleat in the front section, 2 in the section between the side seam and the princess seam at the front, and 3 at the back skirt piece, with all pleats pointing to the center front.

OAL - Attaching the Skirt
Once you’ve pinned your pleats to your liking, baste the entire edge into place and double check from the outside that the pleats are even, mirrored, and facing in the same direction. Then stitch, finish the seam allowance, and press the seam toward the bodice.

OAL - Attaching the Skirt
And done!

For gathering the skirt, read on!

Now, there are a few ways you can gather your skirt. You can do the standard long basting stitches that you pull to gather (using 1, 2, or 3 rows, depending on your preference) – which works perfectly fine, but I always find that my threads snap and that just drives me crazy. I’m going to show you another way to gather, which I find easier, more efficient, and works REALLY well if you’re dealing with a bulky or heavy fabric.

OAL - Attaching the Skirt
You need a long string to gather with. I actually like to use thin crochet thread, but silk thread, button hole twist, really thin yarn – hell, even unflavored dental floss – will all work just as well. For this skirt, I’m using button hole twist because I’ve somehow managed to lose my crochet thread. Oh well. Anyway, cut a length that is a few inches longer than the width of your ungathered skirt.

OAL - Attaching the Skirt
This next part probably won’t make a lot of sense, but just bear with me! Lay your thread on the right side of your fabric, a little less than your seam allowance (so for this skirt, 1/2″ from the edge). Set your sewing machine to do a wide zig-zag stitch and carefully sew over the thread, making sure the needle doesn’t actually puncture the thread – it should just zig zag across either side of the thread.

OAL - Attaching the Skirt
It’ll look like this when you’re done.

OAL - Attaching the Skirt
Now, pin your skirt to your bodice, again matching up all seams and notches.

OAL - Attaching the Skirt
There will be quite a bit of excess between each pinned section. To gather, just pull the thread you zig zagged over and distribute the gathers as you like. Twist the excess thread around a pin at each end of the skirt, to keep it in place so you can manipulate the gathers.
(I don’t know why this photo won’t show. You can see it if you click on it and go straight to Flickr. It’s just a picture of how to twist the thread around your pins.)

OAL - Attaching the Skirt
This is a MUCH easier way to gather than the standard basting stitch, as you’re much less likely to break your thread (and thus have to start over again). The best way I’ve found to do this is to pull the threads until the skirt is the same width as the bodice, twist the ends around a pin so the gathers stay in place, and then slide the skirt fabric around and redistribute the gathers until they are even across every section. Leave yourself at least 5/8″ wide ungathered sections of the skirt at the center back – it’ll make it easier to insert your zipper.

OAL - Attaching the Skirt
Once you’ve got the skirt the way you like it, sew into place at your 5/8″ seam allowance (you can baste first to check the outside, if you like). I sew mine with the gathers facing up, so I can keep an eye on them and make sure they’re not doing anything crazy while they’re being sewn.

OAL - Attaching the Skirt
Once sewn, just give the gathering thread a nice pull and it should slip right out of the zig zag stitches – which means you can totally use it again 🙂 Now finish the seam allowance and press it toward the bodice, being careful not to flatten the gathers.

OAL - Attaching the Skirt
And done! Yay!

Two more things-
– A few of y’all were asking if we were planning on opening a Flickr Group for you to share your OAL photos. While Andi & I weren’t intending on doing so – the Official Hangout Thread is on Ravelry – we realized that some of y’all might only be doing the sewing portion and/or don’t have a Ravelry account. SO. We’ve created the Official Unofficial OAL Flickr Page, which you can join and post to (photos or discussions) if you feel so inclined! Please keep in mind that this page is strictly for sharing/discussion purposes – i.e., anything solely posted here will not be included in the prize drawing (if you want prizes, you gotta post your finished outfit on the FO thread on Ravelry), but share away! We absolutely don’t want to leave anyone out 🙂
– Also, don’t forget to enter to win the Fashionary Sketchbook giveaway, if you haven’t already done so. Giveaway ends on Wednesday!

As always, let me know if you have any questions! 🙂

Thurlow Sew-Along: Sewing the Front Pockets

29 Oct

Ok folks! D-Day has arrived, time to get workin’ on some trousers!

A quick note: You’ll notice that I didn’t post a sew-along schedule. This is because I am not sure how frequent (or infrequent) the posts need to be! I plan on working each full step per post, with a few days thrown in between so everyone can get their pants rolling, but do let me know if you’re feeling like everything is moving too fast and you need a minute to catch your breath 🙂 Of course, these posts will always be here for future sew-alongers! So please don’t feel like you have to rush through to appease the Thurlow Gods 🙂


Today we are sewing the front pockets of our trousers, sections 2-3.

We start with the pocket facing and pocket piece – 7 & 8.
FP1
Finish the curved edges of both pieces, as shown.
If you have not already decided how you would like to finish your raw edges, consider this your kick in the butt! As you can see, I serged mine (what can I say – I’m a lazy seamstress at heart), but no worries if you don’t have a serger. Sunni has a whole mess of seam finishes right here and any of these will work. Personally, I think those bound seams look super yummy. Do what you want, though!

FP2
Grab your front pocket lining – piece 9 – and lay your pocket piece & facing on top, with the right sides all facing up and the weird notches & crannies all matching.

FP3
We are going to stitch these pieces down to the pocket lining, veryyyy close to the edge, as indicated by the dashed lines. The whole point of this is so when we put the pocket lining in the pants, you will only see the facing pieces from the outside.
Also: horse butt.

FP4
Grab a trouser front and lay it out, right side facing up.

FP5
Place your pocket lining over the trouser front, right sides together, matching the diagonal line. Stitch all the way across with a regular 5/8″ seam allowance.

FP6
Trim, grade, and understitch this seam.

FP7
Flip the whole thing back and give is a good press. If you would like, you can topstitch the pocket at this point.
What we are looking at now is the WRONG side of the trouser front, with the right side of the pocket lining facing up.

FP8
Pick up the loose end of the pocket lining…

FP9
And fold it along the fold line (this should be indicated by notches), matching the edges at the opposite side.

FP10
Sew the bottom of the pocket lining only, as indicated by the red dashes. Finish this seam.

FP11

FP12
Baste pocket edges along the top and side.

If your pocket has a little bit of ~body to it, that’s ok! It’s not supposed to lie completely flat 🙂

You should end up with something like this.
FP13
Yay! A pocket!

FP14
Yay! A pocket facing!

Now that wasn’t so hard, eh? 🙂

We’ll start on the welt pockets in a few days (dun dun DUN!). If you have any questions, do let me know & I’ll do my best to answer 🙂

Thurlow Sew-Along: Adjusting the Pockets

23 Oct

This is gonna be short & sweet!

When I sewed up my first pair of Thurlows, the only complaint was that the back pockets weren’t deep enough to accomodate my phone or wallet. Which, I mean, back pockets pretty much ONLY exist for a phone or wallet as far as I’m concerned.

Original Thurlow pocket
Can we all just step back for a second and have a moment of silence for this tragedy that is unfolding.

Original Thurlow pocket
Measuring the pockets shows that they are only about 2.5″ deep. If this is all gravy in your world, do solider on with the unaltered pattern. If not, I hope you saved a bit of tissue because we have pattern pieces to slash and tape!

Modified Thurlow pocket
Here is my modified pattern piece. What you want to do is add length both above and below the fold line, to ensure that the pocket still folds up properly once we stick in the pants (hurr durrr). This is pretty easy – just slash a straight line above the fold line, tape in a gob of tissue paper (or you can use regular paper, IDGAF. I use tissue since I have tons on hand & it makes everything easy to fold back up!) and then repeat below the aforementioned fold line. To fit my iPhone, I added 2.5″ to each slash.

Modified Thurlow pocket
When you’re done hacking, fold the tissue on the fold line (notice that the bottom matches up to the top notch – not the top of the tissue). This is how deep your pocket will be. My phone fits, yay!

Modified Thurlow pocket
And here is an action shot, courtesy of my second pair of Thurlows.

If your muslins are ready, go ahead and cut your fabric – you did prewash… right?! 😉 If you are planning on making your trousers in a plaid or striped fabric and fancy a bit of bias-cut on the welts & waistband (because YAY for not having to match those parts!), Liz has a great tutorial on altering pattern pieces for a bias grainline. For the actual matching at the side seams and everywhere else, Check out Tasia’s tutorial for matching plaids. If you are smart & opted for a solid, non-directional fabric – lucky you! You can just follow the cutting layout included in the pattern 🙂

We will start sewing on Monday!