Tag Archives: silk

Completed: Vogue 1395, Modified!

3 Jun

I reckon I have time for one last post before I leave! 😛

Plaid Silk V1395

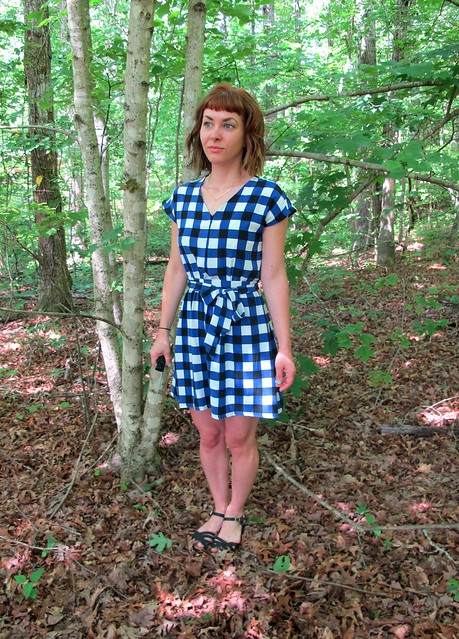
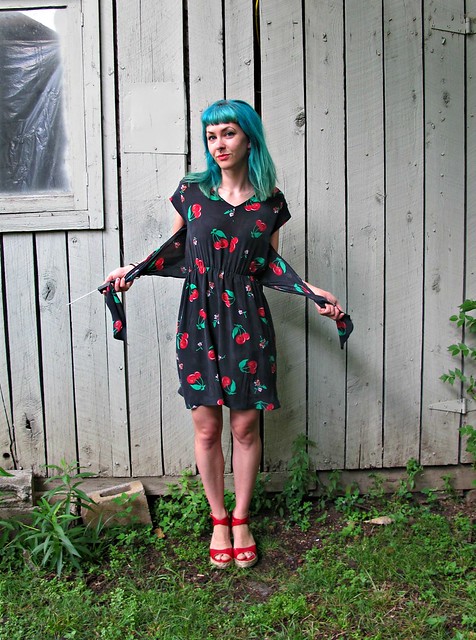
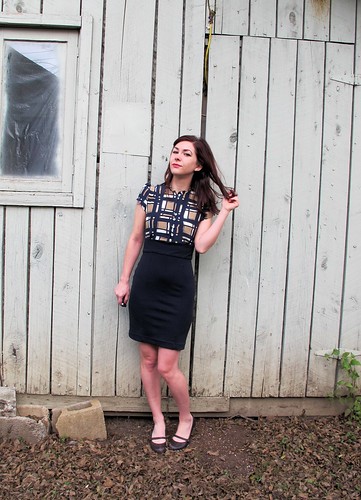
May this dress be forever known as one of the bitchiest I’ve ever sewn. Sewing silk crepe is a challenge enough of it’s own – but throwing plaid into the mix? I don’t know what I was thinking when I bought this fabric (probably something like, “Ooh! Plaid silk crepe! My favorites! lololol”), but the fact that I not only sewed it up but actually finished the dang project is something of a miracle for me. It certainly didn’t give me an easy time.

Plaid Silk V1395

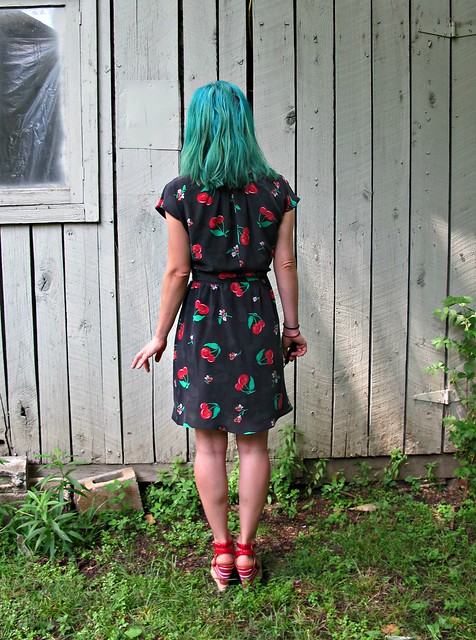
The pattern I used is Vogue 1395, which is a Rebecca Taylor design from last summer. I’ve made the pattern before in cherry printed silk crepe, and it’s one of my favorite summer dresses. It’s SUPER comfy, but still pretty cute! I knew I wanted to make a second one, but I wanted to try to figure out a way to make it without the back overlay. I love the back overlay, but it can shift over the course of the day and kind of make the arm holes hang weird. Plus, I wanted to improve on my first version (namely, the low arm holes that had to be emergency-raised and thus the seams are pretty wonky).

Plaid Silk V1395

Plaid Silk V1395

First, my pattern modifications. Remembering those awful armholes, I shortened the depth by a good 1.5″ or so. I actually wanted to shorten them more, but I was afraid I’d really fuck up the pattern, so I erred on the side of less. This gives the arm holes a much better depth (much more suited to my petite proportions), although you can still see a tiny bit of bra if I move a certain way. Ah, c’est la vie.

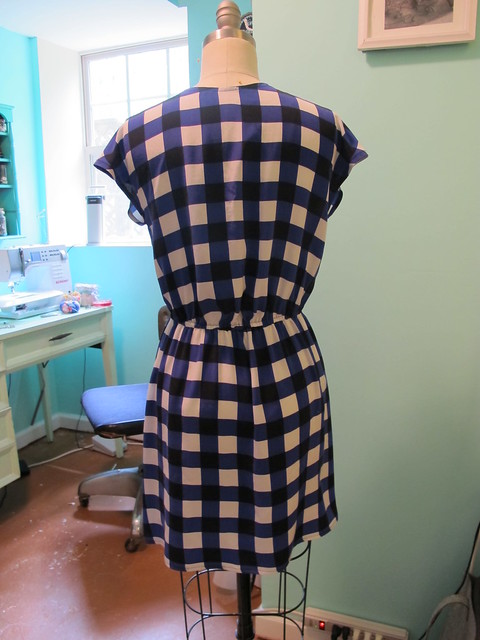
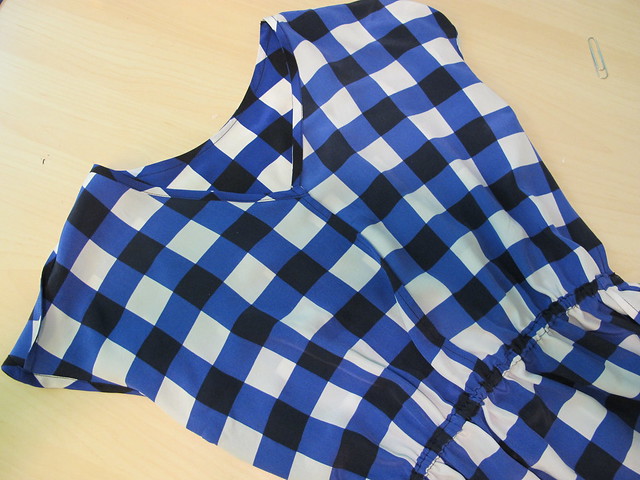
I kept the front bodice the same (other than the arm holes). I re-traced the back bodice and copied the shoulder width from the overlay to the shoulder area of my new back bodice (the OG back bodice in the pattern has narrow shoulders, and the overlay matches the front piece. This probably doesn’t make sense if you haven’t seen the pattern pieces). I redrew the bottom armscye to have a little curve, similar to the front (the overlay also doesn’t have that – it just goes straight, since it’s supposed to pull across to the front). Aaaaand that’s about it! Pretty easy modifications.

Plaid Silk V1395

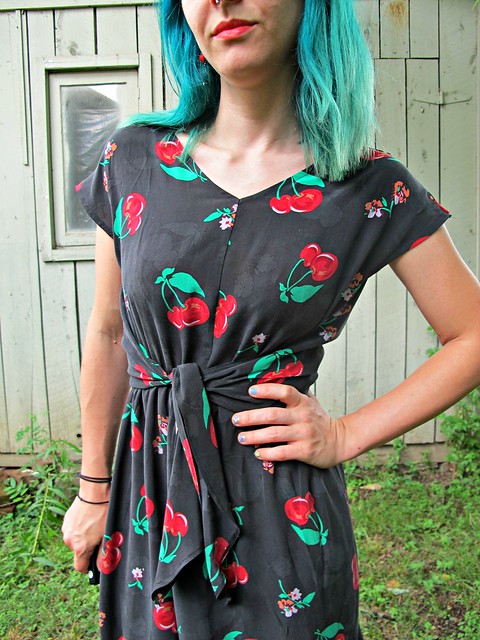
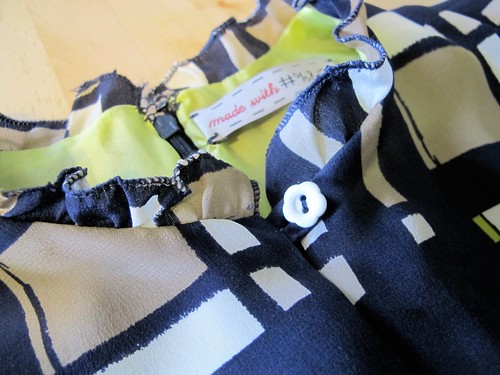
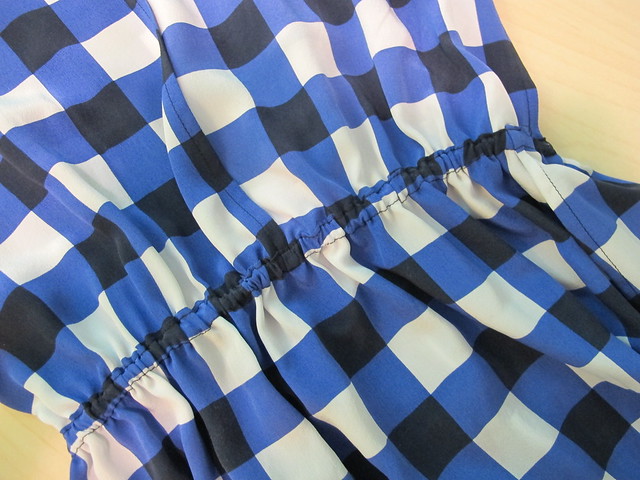
Sewing up the actual pattern – again, with modifications, since I was omitting the overlay, as well as the skirt lining – was simple. Sewed the front and back together at the shoulders and side seams, added the bias binding for the necklines and arm holes, and then sewed the front closed. I sewed the skirt side seams, attached the skirt to the bodice, and then folded up the seam allowance and topstitched it down to create a casing for the elastic waist. The skirt has a simple rolled hem, and all the interior seams are french seams. Because of the bias binding, there’s quite a bit of topstitching on this dress, which I really like.

Sewing – and cutting, for that matter – silk crepe actually isn’t that difficult. Of course, it’s marginally harder than sewing, say, quilting cotton, but it’s not this terrible beast that you have to wrangle and beg and plead with. The spongey texture of the crepe gives the silk something to grab onto, so it doesn’t really shift much while sewing. It can be a little floaty when you’re trying to cut it, but I just make sure my table has enough space to hold the whole yardage and that helps a lot. You’ll want to use a sharp, new needle for sewing, and silk pins for pinning.

Plaid Silk V1395

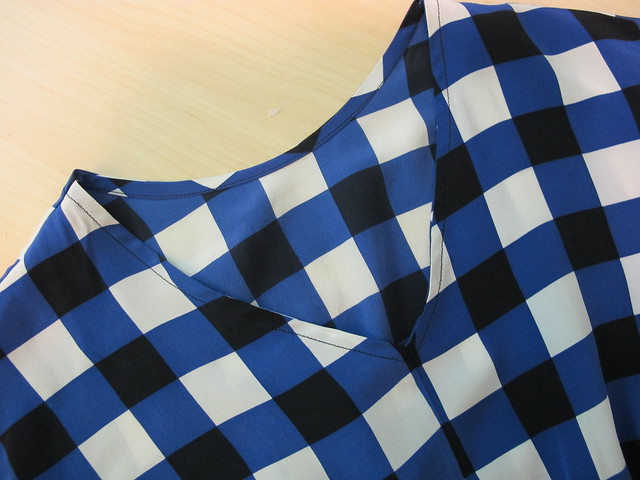
What gave me the most trouble with this damn dress was the fact that it’s a plaid fabric. Cutting was a NIGHTMARE – like I said, silk crepe is sorta shifty at best, but as long as you’re staying on grain and getting the pattern pieces straight, it’s not too bad. Throw in strong horizontal lines and some plaid that has to match, and then it becomes an epic journey. I gave up on trying to match the plaid perfectly, and instead just focused on getting the lines to match across the seamlines. This was something I also had to focus on while sewing – again, a little shifting and/or growing is ok when you’re sewing a solid color or a busy print, but for these strong lines, you have to pay attention to make sure everything matches up at the seams. I pinned the shit out of things and used a walking foot while sewing, but man, thank god there are only a handful of seams in this dress. Otherwise, I might have ended up flipping a table over out of sheer rage.

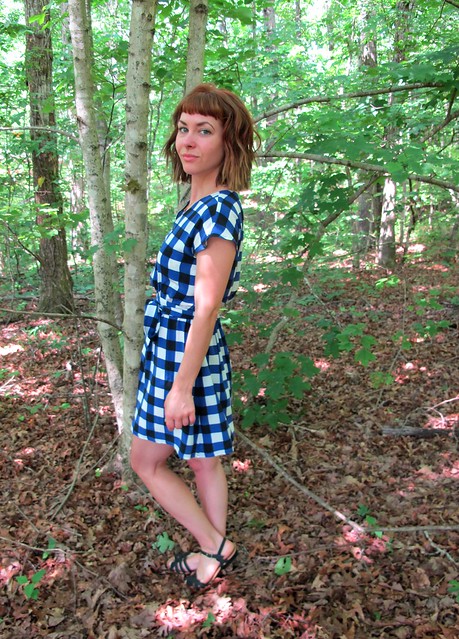
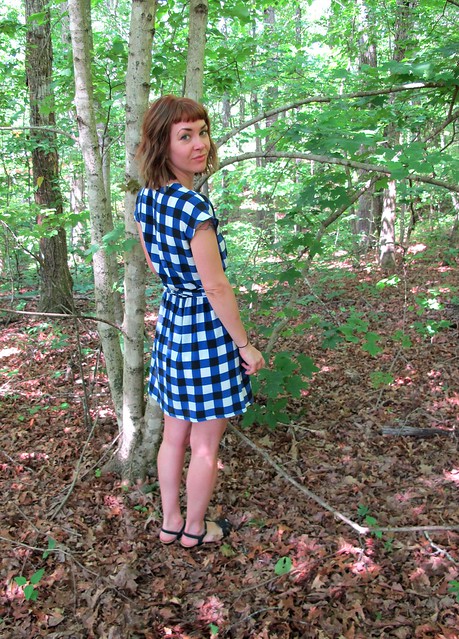
Overall, though, everything matches up pretty well! The center front seam is a bit unfortunate looking with how the plaids lined up – but whatever. The back bodice does not quite match the back skirt – the lines are unbroken, but they’re the wrong lines (whoops). The elastic waist really helps to hide that, though, and at least it’s not at the front! The shoulder seams don’t match at all, but that’s the nature of the beast this pattern. Ya gotta pick your battles.

Plaid Silk V1395

Plaid Silk V1395

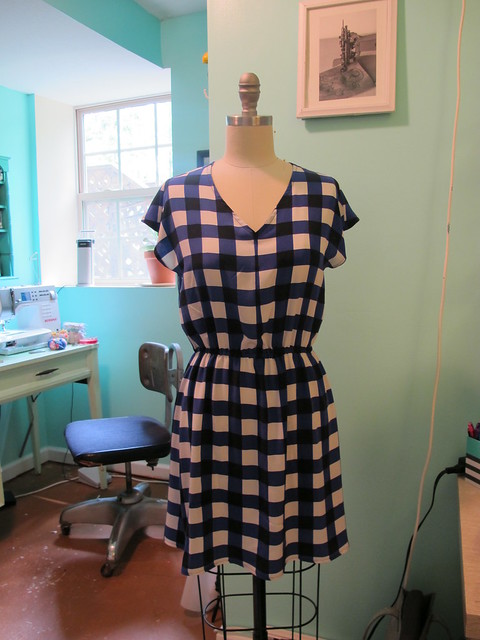
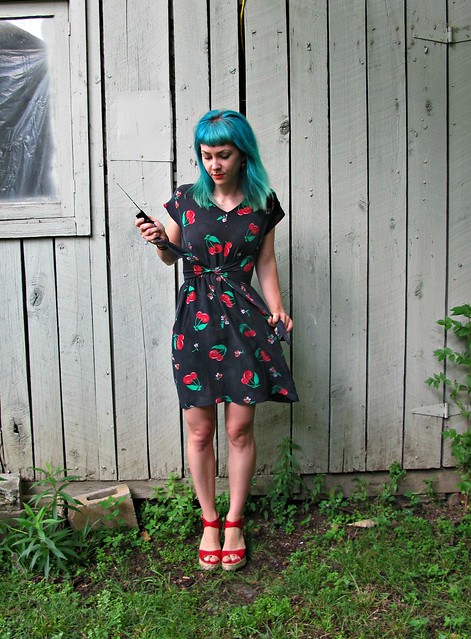
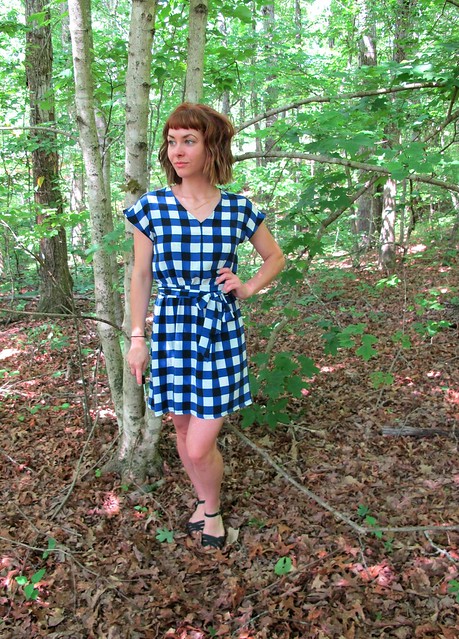
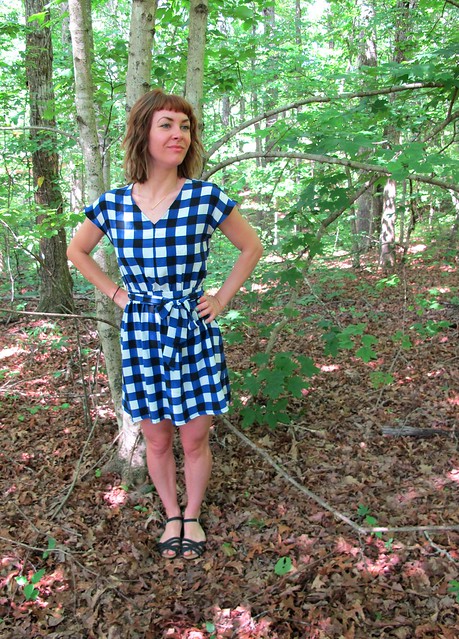
When I finished the dress, I was a little underwhelmed with how it looked on me – I wasn’t a fan of how the bodice bloused over the elastic (the overlay ties over it and flattens things, but since I didn’t have the overlay, I had the blousiness). Belts are usually my solution for this, but those looked strange, too. So I made a little self-fabric tie, out of my remaining scraps. The dimensions are as much as I could get away with from the scraps. I just sewed a tube with bias ends and turned it right side out.

I also didn’t like the length, so I cut it REALLY short. Go ahead, judge me 😛
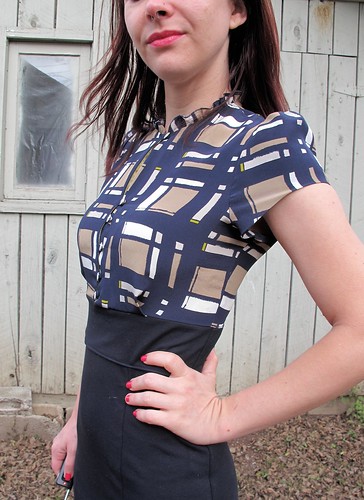
Close-up shots:

Plaid Silk V1395

Plaid Silk V1395

Plaid Silk V1395

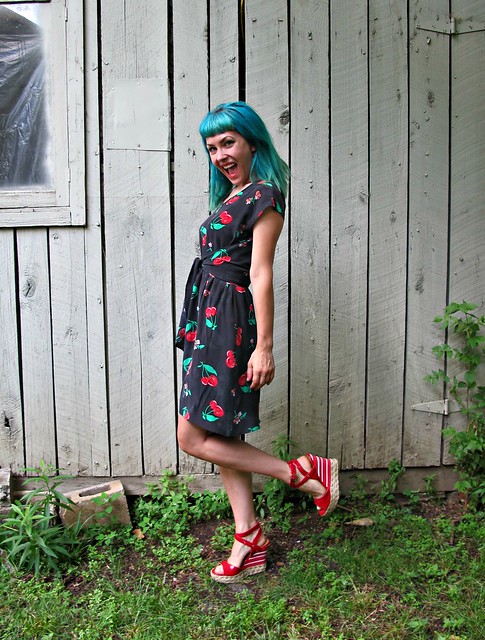
Final thoughts of this dress – love it, was totally worth the effort. The plaid matching, while not perfect, is good enough for me. I really love this silk print and I’m glad I pushed through to finish, although I don’t think I’ll be picking up any more plaid silk crepe anytime soon. Sewing this pattern made me want another of the unmodified version, though, so I made one last night – and it turned out beeeeyoutiful! You can see the Instagram peek here. Stay tuned in a couple weeks for that blog post, I guess!

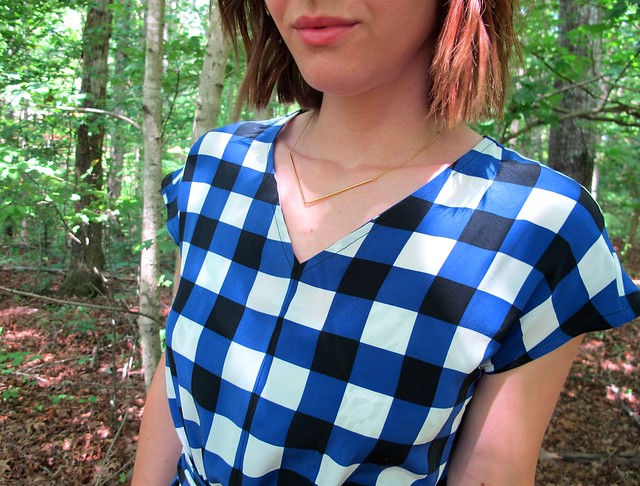
I took these pictures in the woods because the sun was SUPER bright, and it’s awesome how much coverage the trees give! This is right outside my door, too. Amelia was sitting at the screen, complaining at me. The woods surrounding our house are on a bit of an incline, hence the slight bobble-head vibe I’m throwing here. Also, in case you were wondering and/or freaking out – I’m not allergic to poison ivy 🙂 haha 🙂 I don’t think any shows in these photos, but it’s aaaalll over the place back there!

Plaid Silk V1395

With all that being said, I’m taking a blog sabbatical for the next couple of weeks! My trip to Peru leaves tomorrow afternoon, and we will be gone through 6/18. I am not sure if I will have internet access while I’m away – definitely will be off for at least a week while I’m in Iquitos, because there’s no reception where I’m staying – but I’m not bringing my computer, so I can’t really answer emails. Fair warning in advance if you try to email me or holler with a question, because it’ll probably go unanswered the whole time I’m gone! I’m looking forward to spending some time unplugged and exploring another continent with my bestie, though!

See y’all in a couple of weeks!

Completed: Butterick 5526, in silk georgette

15 Dec

Ah, Butterick 5526. I just can’t quit you.

White Silk Double Georgette B5526

This pattern is truly a TNT//tried’n’true for me at this point. I’ve made it several times – in various fabric weights and drapes, always tweaking the fit as I go – and it’s turned out to be my very favorite shirt pattern. I am pretty sure I’m repeating myself at this point, but JUST IN CASE YOU WEREN’T READING THE FIRST TIME – I fucking love this pattern!

Since I’ve already beat this pattern to the ground as far as shirting fabrics are concerned, I figured I might give myself a little challenge for the next make. And by “challenge,” I mean went temporarily insane and decided to make this up in some silk georgette.

White Silk Double Georgette B5526

White Silk Double Georgette B5526

And it turned out pretty good! Just don’t look too close 😉 Silk georgette is a slippery little beast, after all. Also, sorry about all the creases – I took these photos after wearing the shirt all day with a sweater over it. Turns out silk REALLY likes to set itself some creases!

White Silk Double Georgette B5526

I was bound and determined to have this ready in time for my London adventure – I just knew the shirt would look great under my various sweaters, as well as on it’s own (well, with a tank underneath it. It’s pretty sheer on it’s own! It’s not so noticeable in these photos, but… trust me.). The fabric is very thin, lightweight and drapey – which meant I could even get away with wearing it under a ponte tshirt. I knew silk would be a good bet because it’s so warm, plus, it would give me an entirely different look from my white cotton B5526 (nothing wrong with that shirt, by the way – except that the weird sleeve length means I can’t wear it with long sleeves. Which is why I’m making a second white button up. No judgement here). Based on my experience with the birdy silk geogrette of my dreams (and no, I still haven’t cut into my remaining yardage – too many options to choose from, can’t decide, HALP), I thought I’d give the fabric another try. At any rate, at least it won’t be shiny satin silk. I hate that stuff when it’s not part of a lining. Sorry.

I bought this silk double georgette from the Mood Fabrics website, sight unseen, only to find out that… well, it wasn’t *quite* the same as the bird silk. It’s much thinner – it’s basically sheer. I understand that the description explicitly states that, yet I still ignored it. It also has quite a bit of stretch, which is not ANYWHERE in the description. Whoops. Shoulda ordered a swatch, but I didn’t have time to wait. And I didn’t have time to buy something else, so I dealt with the cards fabric I was given.

White Silk Double Georgette B5526

Like I said, it’s mostly good. The worst part of the process was cutting this beast – talk about a PAIN IN MY ASS. The fabric is so shifty and I swear those pieces were moving around just to torment me. I usually don’t have too much of a problem with cutting shifty fabrics – I just rip the cut edge to get a straight line, match the selvedges and pin the hell out of them (buying a decent-quality fabric that’s already on grain really helps, fyi. If you’re going to go sheer/shifty, don’t cheap out!), and then pin all my pattern pieces as well. That simply did not work as well for this fabric. It basically didn’t want to be made into a shirt, and it fought with me every step of the way.

But I ended up winning, so there’s that.

White Silk Double Georgette B5526

To sew, I used my finest needle (70/10 Microtex) and my walking foot (since, again, shifty fabric). I used French seams for every part of this shirt and omitted most of the topstitching. I say most because I did topstitch the button band, but it ended up causing so much shifty drama that I decided to skip the rest and finish the collar stand by hand.

For the hem, I used bias facing, since the thought of rolling that hem made me want to cry. Bias facing was certainly easier, but it’s not really my best work on this shirt. For one, I didn’t have the right fabric – I was completely out of georgette (used up the whole yardage cutting the pieces, go me) and I don’t have any lightweight white silk in my stash. I did have some peach-colored silk (the same stuff I used to finish my boiled wool SJ sweater neckline), which worked out since it matches my skin tone at least. I must have done some crazy witchcraft distortion on the hem because it is now VERY wavy. But, you know what? Fuck it. I plan on wearing this thing tucked in for the most part anyway.

Also, it wasn’t until after I finished the shirt that I remembered I wanted to try to draft a v-neck for it. HA HA HA! Obviously that did not happen! Better luck next time!

White Silk Double Georgette B5526

Anyway, whatever. It’s pretty. I finished it on time. I wore the shirt out of it in London. People there probably think I don’t have any other clothes. Yay!

Have some close-ups and I will point out my mistakes so we can laugh together:

White Silk Double Georgette B5526

The tag is accurate. It is also hiding a big pleat in the collar stand facing that mysteriously grew longer than the interfaced side (I dunno, either).

White Silk Double Georgette B5526

I was ridiculously proud of how nice the sleeve plackets turned out, until I tried on the shirt and discovered that the sleeves were somehow too long (they still are, if you didn’t notice). I trimmed them as much as I dared, and as a result – my placket is maaaaybe 1″ long. It’s the saddest little weenie placket ever. I mean, it’s not the worst deal because I can still roll my sleeves up, but… yeah. Fuck you, weenie placket.

White Silk Double Georgette B5526

Here is my faced hem. Hey, it actually looks pretty nice in this picture!

White Silk Double Georgette B5526

Ok, I think that’s it! I do love the shirt – it hasn’t deterred me from my beloved B5526, or even silk georgette for that matter (I will try you again, and I WILL conquer your ass. I will also buy a swatch first, because, ~*YOLO*~). Despite the dramz that occurred to make this shirt (and also the fact that it took like 2 months to complete because I was right in the midst of the V1419 sewalong, argh), I feel pretty good about it. It’s definitely a good staple for the ol’ closet, and it served me well in London.

Sidenote: I did also make the shirt I’m wearing in these photos. It’s a Colette Mabel and I used this incredible black virgin wool sweater knit that is now sadly sold out of the Mood website. It’s super thick and cozy and I LOVE it. That is all.

Completed: Vogue 1419 (At Last!)

18 Nov

Well, no that the V1419 Ralph Rucci Sewalong has officially wrapped, I guess I can finally show y’all my coat! For those who didn’t catch my post on the Mood Sewing Network yesterday to see my completed coat a day early – your patience is finally being rewarded, including some never-before-seen shots that weren’t included in the original post! How exciting!

Anyway, coat!

V1419 Ralph Rucci Coat - Completed!

Considering how much I went over the making of this coat at length (see all my posts tagged v1419 here), I won’t be going over the construction so much in this post. If you want more info, feel free to check the tag – or just holler out some questions in the comments (I don’t expect anyone who didn’t actually sew along with the sewalong to have actually read the posts – they were pretty intense, and I find sewalong posts kind of boring if I’m not part of the action, you know? Anyway, snaps to you if you did read the posts! I hope you learned some new coat-making tips and tricks 😉 ). Here’s a general rundown of the basic information, for those who are dropping in for the Big Reveal:
Pattern: Vogue 1419
Fabric: From the Mood Fabrics flagship NYC store – I enlisted the help of my favorite Mood dude, George, to assist me in finding my perfect red wool coating – and he knocked it out of the park! This coating is red virgin wool, it’s nice and thick with a great amount of body to give the coat it’s lovely shape. The wool itself is soft and easily malleable (very necessary for all the crazy intersecting seams of this pattern!), and the color is just PERFECT! The pattern itself does not call for lining, but I did add a layer of bright red silk taffeta as an underlining, to help the coat slide on and also as an additional layer of warmth. The contrast (inside binding, bound button holes, belt trim) is also silk taffeta, in a darker red that matches the wool coating. I think it gives a nice bit of textural interest and keeps the coat from being just straight up loud and red. Both silk taffetas were also purchased from the Mood Fabrics store in NYC, and the colors were chosen with the help of George.
Notions: Just thread and buttons! I had my buttons custom-made here in Nashville by a local lady who sells them through Textile Fabrics. Since my coating is SUPER thick (way too thick for those sad little button kits that you can buy), it needed some heavy-duty machinery to get the fabric on. I’ve used this service in the past for previous coat buttons, and the quality is excellent.
Sizing & Alterations: I cut the size 6 and sewed the coat exactly as drafted, except at the waistline where I used a 1/2″ seam allowance instead of the standard 5/8″ (just to give myself a tiny bit of eating room 😉 ). I only altered the length – removed 3″ from the hemline and 1″ from the sleeve length.

V1419 Ralph Rucci - Inspiration Watercolor

Here’s my original inspiration, in watercolor 🙂

V1419 Ralph Rucci Coat - Completed!

I think it turned out pretty close, if not better! 🙂

V1419 Ralph Rucci Coat - Completed!

Don’t you love the photos? These were taken by my friend and fellow knitter, Alannah Arnold, who was almost as excited about this coat as I was! Alannah and I meet with a group of ladies every Monday for a casual (and, um, booze-filled, haha!) knitting night at my favorite local bar. She’s listened to me talk about this coat for weeks at this point – and offered to take photos once it was done. Which is awesome, because they turned out WAY better than anything I could have shot in front of my shed!

I met with her in East Park, in East Nashville, to take these photos. That’s a feat in itself – anyone who knows me, knows I will kick and scream when it comes to crossing the river into East Nashville. Never mind that driving into East Nashville is like driving into Brooklyn – it’s actually not that bad (unless there’s a Titans game – if then, forget about it!), it’s just fun to complain about 🙂 Regardless, East Nashville has the prettiest fall trees, and this park is undeniably beautiful. So, I made some sacrifices (har har) and ended up with a pretty great set of pictures to match my pretty great coat! Yay!

V1419 Ralph Rucci Coat - Completed!

Ooh, and I even found a Porsche while I was at it 🙂 haha!

V1419 Ralph Rucci Coat - Completed!

V1419 Ralph Rucci Coat - Completed!

V1419 Ralph Rucci Coat - Completed!

V1419 Ralph Rucci Coat - Completed!

V1419 Ralph Rucci Coat - Completed!

V1419 Ralph Rucci Coat - Completed!

V1419 Ralph Rucci Coat - Completed!

V1419 Ralph Rucci Coat - Completed!

If I haven’t already made it completely obvious – I’m SO happy with my finished coat! Sewing it up was so satisfying, and absolutely worth it. It is very dramatic and theatrical – so it’s a bit excessive for daily wear. I don’t think I’ll be bringing this to London, unfortunately, as it’s definitely not very practical (it’s too fitted to really accommodation multiple layers, plus I could see those bell sleeves getting real annoying real fast after 2 weeks of daily wear). However, it is the PERFECT topper for all these upcoming holiday parties that are just around the corner 😉

Let’s also not forget how this is one of few instances where sewing can actually save you money – this coat cost less than $200 in materials, whereas the original designer version has been rumored to run closer to $10,000. Sure, making a little cotton sundress will probably set you back more than whatever you would paid from a mall retailer – but knocking off couture? That’s where the savings really start to show 😉

I will leave you with this photo of me, wearing my knock-off designer coat, throwing leaves in front of a rich person’s house. Probably the same person who owns that Porsche, to be honest:
V1419 Ralph Rucci Coat - Completed!

Be sure to check out the McCall Pattern Company blog to see Meg’s completed coat, if you haven’t already done so! Big thumbs up to everyone who participated in the sewalong – and big, huge thanks to Meg for agreeing to cohost this beast of a sewalong alongside me. Couldn’t have done it without you! 🙂 Don’t forget to use the hashtag #V1419sewalong so it will show up on this tagboard. We encourage you to upload your photos to the V1419 Flickr group, the Vogue Patterns Facebook page, and pin it to the Pinterest board

Didn’t join the sewalong but still want to make your own designer Ralph Rucci? Check out my V1419 tag and the McCall Pattern Company Blog for all the posts pertaining to this sewalong. I can’t wait to see everyone’s finished coats!

What do you think? Would you ever tackle a crazy long intense project like a coat? What about THIS coat? Man, I love making coats!

Disclaimer: My pattern was provided to me free of charge from the McCall Pattern Company, and the fabric was provided from Mood Fabrics as part of my monthly allowance for participating in the Mood Sewing Network. Still, I definitely made this entire coat myself – sooo, that should count for something 😉

Completed: The Rigel Bomber Jacket

14 Nov

This jacket has been a LONG time in the making. Totally worth the wait, tho.

Rigel Bomber Jacket

My dream bomber jacket! ♥

I swear, ever since Katie released the Rigel Bomber jacket for Papercut Patterns, I have noticed this style popping up EVERYWHERE. Talk about being on point with style trends! I knew I wanted to make the jacket when I first saw the pattern last winter – it’s a great, casual jacket and I love the short length (sometimes my Minoru just feels a touch too long, depending on what I’m wearing with it – not to mention, the cotton/poly fabrics mean it’s not the best choice for super cold temperatures!). It’s totally different from any other pattern I own, so obviously I wanted to make it. Once I saw Clare’s Rigel bomber making it’s rounds – and then saw the dang thing in person during our trip to NYC earlier this year – it became Very Important that I have one in time for this current winter. Especially since I tried hers on and it looked ace on me. As you do.

Rigel Bomber Jacket

Since I was in bomber-mode for the duration of that particular shopping trip, I made it a point to source the notions I knew I’d have the hardest time finding – rib knit and a separating zip. In the mecca that is the Garment District of New York City, these things are relatively easy to find (well, at least compared to the Limited Fabric Options of Nashville, ha!). I found both of these things at Pacific Trimming – the rib knit came from the very back corner of the store, and the zipper is a Riri zipper! I chose the colors, specified the custom length according to my pattern, and paid something insane like $20 for it. I don’t actually remember how much the zipper cost, because I mostly blocked it out of my mind – but suffice to say, it cost significantly more than the $5 zips you can pick up just about anywhere.

Rigel Bomber Jacket
Rigel Bomber Jacket

I do want to talk about the Rigel a little more before I start going on a tangent about my notions, though. I sewed up the XXS – one, because that’s my Papercut size, and two, it’s the same size as Clare’s and I liked the way hers fit on me. I did not make any length or fitting adjustments to the pattern, just sewed it straight out of the envelope. The instructions on this pattern are great – you are guided through the steps of adding a single welt pocket, attaching the ribbing, and inserting the open-ended zip. The only part of the instructions that leaves a bit to be desired is the lack of lining – which most blog posts I’ve read have mentioned. My assumption here is that Katie wanted the pattern to be as quick and simple as possible, and adding a lining to this sort of jacket is either going to be complicated (at least to write out the instructions for) or involve a lot of hand-sewing. It’s not terribly hard to add a lining, but it does require some brain aerobics before you start sewing.

Rigel Bomber Jacket

Part of what took this jacket so long to incubate was that I couldn’t decide on a fabric! I bought my zipper and ribbing before anything else, so matching a wool fabric (yes, it had to be wool) to all that gold was a little tricky. Not to mention, my notions were a bit special – if not expensive – so I wanted to make something that I’d love and actually wear. I hemmed and hawed for MONTHS over what fabric I wanted to use… this double-faced black wool coating was my #1 contender. I actually got a swatch of it back in the spring… and it’s been pinned to my bulletin board ever since (sometimes I just make myself look at a fabric for a long time, and if I don’t get sick of it – it’s mine!). I finally bought it last month, which is actually REALLY lucky because it’s sold out now! I like how the embroidered floral design gives the fabric some interest and texture, while still keeping it relatively plain (so it doesn’t compete with my trims).

Rigel Bomber Jacket

I will mention that the fabric description is a bit off. I guess it doesn’t matter at this point, since the fabric is sold out – but it definitely feels more like a light to medium weight fabric, NOT a heavy coating. The wrong side is brushed with long fuzzy strands of fabric fiber, and this fabric SHEDS LIKE A BITCH. Even though my jacket is lined, I serged every single seam of the wool because I couldn’t otherwise control the shedding. I really don’t recommend trying this fabric if you can’t serge the raw edges – a plain straight stitch won’t prevent it from eventually disintegrating.

Also, on a bit of a bummer-town note – this fabric doesn’t really wear well. It’s already starting to pill and look kind of old 😦 So this jacket might not have a super long lifespan as it is. Good thing I can always salvage that ridiculously expensive zipper! :DDD

Rigel Bomber Jacket

I don’t know why I’m winking in this photo (just imagine me taking my pictures with a remote and tripod and things get even creepier with the winking ahaha)? Anyway, here’s the lining! I lined the entire jacket with gold china silk, which goes really nicely with my gold accents. I love the warm combination of silk+wool – it’s lightweight, and while it probably won’t work well in the Arctic, it’s fine for our mild winters (or a mild spring up north).

I will deviate for a second here to talk about the lining. As I mentioned, the instructions don’t tell you how to do this. Further, while there are lots of posts scattered around the internet on how to line the Rigel, none of them were exactly what I wanted (NO raw edges, no hand sewing). I wanted to try bagging the lining – which, spoiler alert, that shit totally worked! I used to do this all the time when I worked for Muna last year, but my memory was a little spotty, especially since we never used written instructions for anything (I like instructions when I’m sewing – even if it’s just a checklist – so I don’t forget to do something important!). I used Jen’s tutorial on bagging a jacket lining to jolt my memory, which was extremely helpful. Here are the steps I took to get my lining in that dang jacket:
1. First, I drafted some lining pieces – using the facings as a guide, I removed that amount from the jacket pieces (the front, the back, and the sleeves), and added 3/8″ seam allowances. I also added an ease pleat to the back piece, but I haven’t ripped open the basting yet because I found that I don’t need it. Someday, it will pop open and scare me, probably.
2. I constructed the entire jacket – up to the ribbing and zipper. The lining was completely assembled, with the facings attached.
3. I sewed the two jackets together at the neckline and zipper, as instructed by the pattern (for attaching the facing), and pressed and understitched.
4. I sewed the bottom of the zipper and facing, as instructed by the pattern (some of the lining may later need to be unpicked to get it to turn correctly, this is ok!)
5. I sewed the lining to the seam allowance of the ribbing at the bottom, right sides together.
6. I attached the lining to the sleeve hems at the ribbing, right sides together.
7. At this point, I had a giant Möbius tube of jacket+lining with everything attached and no openings anywhere. It was slightly horrifying – and exactly on track. This is when you rip open a section of the underarm lining that’s already been stitched, and pull the entire jacket through the hole.
8. Press everything, and then sew up the hole. I actually close up my hole from the inside by machine as much as I can, and then sew the remaining inch or so shut on the outside (I tried to take pictures to show how I do this, but it’s really hard to understand if you’re not actually seeing it in action. Needless to say, my closed-up hole is only about an inch long, instead of the 4″ tear I had to make to get the jacket pulled through it).
9. The little sections at the bottom where the facing meets the ribbing will need to be sewn shut by hand.

Rigel Bomber Jacket
Rigel Bomber Jacket

AND JUST LIKE THAT – A COMPLETELY BAGGED LINING WITH NO VISIBLE SEAMS! Woohooo!

Rigel Bomber Jacket

Ok, now we can talk about all the fun trimmings!

Rigel Bomber Jacket
Rigel Bomber Jacket

What I neglected to tell you guys about this ribbing is that is actually has sparkly gold stripes. It is amazing! Pacific Trimming sells these in 1 yard pieces – and I needed two pieces. They’re about $8 a piece, if I recall correctly (they won’t cut them down, at least, they wouldn’t when I was there!). Also, when I pressed them, they smelled like a fart (I actually wrote this in my sewing notebook, so it must be important and worth mentioning, I guess). Must be all the polyester?

The Riri zipper looks really nice with the sparkly gold, I think! I still haven’t decided if it was worth the obscene price I paid. On one hand, it was really cool to be able to pick the zipper based exactly on my specifications – color, length, everything. It does feel solid and it is really satisfying to zip up (Riri zippers are referred to as the ~Rolls Royce~ of zippers, I’m told). That being said – $20 for a zipper? Yeah. I dunno. It sure is pretty, though!

Have a photo dump:

Rigel Bomber Jacket
Rigel Bomber Jacket
Rigel Bomber Jacket
Rigel Bomber Jacket
Rigel Bomber Jacket
Rigel Bomber Jacket
Rigel Bomber Jacket

God, I’m sorry about that.

Rigel Bomber Jacket

Anyway, I LOVE my new jacket and I’m so glad I took my time with choosing the right fabric (as well as figuring out that lining!) because the end result was so worth the wait. I’ve been wearing this thing constantly since I finished it – just in time for the weather to get cold, it seems. I’d love to make a patterned version of this one – either with some floral wool (LIBERTY?!), or something polka dotted! Can’t have too many bombers amirite. I even have a couple more pieces of rib knit that I apparently bought during that shopping trip that I completely forgot about. They are black with white stripes. Thanks, past Lauren! ♥

Oh! And my pants are those Jamie Jeans I made a couple of months ago. Just mentioning it because I ended up taking in the inseam a little bit more after that last post, so you can see what they look like now. I think the fit is much better! I’ve found I can usually go about 3-4 wearings between washings on these, before the knees bag out enough to drive me crazy.

Lastly, I will leave you with this outtake. Not sure what I was doing there, but it made me laugh, so hopefully it’ll make you laugh too! 😀

Rigel Bomber JacketHave a great weekend, y’all!

V1419 Sewalong: Cutting and Prepping

13 Oct

Good morning, sewalongers! (sewalongees?) Today we are going to go over the final prep work before we start sewing (next week! Eep!). This is the last slow post of the sewalong, which gives you another week to perfect your muslin and choose your fabric. Of course, these posts will also be up indefinitely so don’t feel like you have to rush to keep up!

blog-sewalong-image-650x563

The very first thing you need to do – yes, before you do anything else with that lovely fabric – is pretreat your fabric. How you pretreat your fabric will depend on the fiber you chose, as well as how you plan on cleaning the coat in the future. For those of you who are sewing wool (like meee!), this means you need to get any shrinkage out of your fabric *before* you cut the pattern pieces – otherwise, once you start steaming that bad boy, you may end up shrinking pieces and that’s no good. There are lots of ways to pretreat wool – and none of them involve washing the fabric (please don’t do that!). You can either steam the piece yourself (this involves lots of steam and probably a lot of time), take it to the dry cleaner and have them pretreat it (this involves money)(and also dry cleaning), or you can shrink it up in the dryer (which is what I do). Here’s a blog post outlining the entire process, but basically – you just need to throw your wool in the dryer (finish the edges if necessary to prevent unraveling), add a couple of towels that are soaked in hot water (and then wrung out, so they’re not dripping) and blast the dryer on high heat for however long it takes before everything is dry. Easy! This is the method I use for all my wool fabrics. If you are at all hesitant, try it out on a swatch first 🙂

For other fabric types that are not wool – you may not need to pretreat (unless you plan on washing the coat in the washing machine? If then, defintely prewash that shit!). If using a cotton or silk, you may want to at least steam the crap out of it just to be sure there is no shrinkage. Polys should be fine and not shrink at all.

Once you’ve pretreated your fabric in whatever way need, then it’s time to cut! I’m not going to go over cutting here – I assume anyone brave enough to tackle sewing a coat is probably fine to cut fabric without guidance 🙂 – but if you need a refresher, here is an old post I wrote about cutting and marking your pattern pieces. One thing I did notice while I was cutting my fabric – I was able to reconfigure the layout and use slightly less fabric. Don’t be afraid to change up the layout if your fabric is wide enough, just be sure that you are keeping all the pattern pieces on the proper grain.

If you are including an underlining for your coat, you will need to cut out pieces 2, 3, 4, 7, 8 & 9 from your underlining fabric.

For the contrast – specifically, all those bias pieces – I found it easier to draw the pattern pieces directly on the fabric, rather than try to pin a bunch of stuff and then try to cut a straight line and nope.

V1419 Sewalong: Prep

The long, straight pieces – I just measured them and use a ruler and marking pencil to draw them on my taffeta. For the big bias contrast pieces (those giant parallelograms), I pinned down the pattern piece, traced around the edges with my marking pencil, and then used a ruler to draw in the lines 2″ apart (as they are on the pattern piece). I did all this on the flat fabric before I cut anything out, and I think it made things a lot easier!

Once you’ve cut out all your pattern pieces, you will need to apply the underlining (assuming you are underlining – if not, skip ahead and start marking your pieces). Underlining is very easy. It is also very time-consuming – so I recommend watching some crappy TV or something equally entertaining while you do it 🙂 For this sewalong, I won’t be going over underlining, but here is a tutorial if you need one. Some things to keep in mind:
– Sometimes you can get away with basting the pieces together by machine. This coat is not the time to try that method. Because the pieces are very large, you run the risk of shifting your fabric – which will give you bubbles or hang weird if you’re not careful. Try to keep things as flat as possible. Meaning: sit at a table, underline by hand. Watch a movie. Drink some wine. Whatever makes you happy!
– I use silk thread to underline, because it removes very easily. I also happen to have several spools on hand in strange colors, so that’s a big part of the reason. I realize silk thread is a bit expensive, so don’t feel like you have to break your budget on some thread that’s about to get pulled out as soon as you sew a seam. Use whatever you got! I would recommend using a threat in a contrasting color, just so it’s easier to see/remove.
– Feel free to use giant stitches. You’re just basting the pieces together to keep them from shifting when you sew them. Big stitches are ok – and they’re easier to remove!
– Sew well within your seam allowances, especially if your fabric shows pin holes (mine does!).
– I like to underline first, *then* mark the pattern pieces on the wrong side. You can also mark, then underline. Up to you – I just think the former is easier! Don’t freak out if you accidentally snip your basting when you cut notches – it’s ok!

V1419 Sewalong: Prep
See? I did it too. No big deal!

Once you’ve finished underlining (or have skipped ahead), you will need to mark your pieces. It is very important to get every stitch line (for the welts and the button holes), dot and notch – it’ll make things muuuuch easier to match up when we start sewing. You may want to use wax tracing paper and a rotary wheel for the lines, and a marking pen (or tailor’s tacks) for the dots. Just snip the notches. We won’t judge you.

Ok, bias binding! This is the same method outlined on the Coletterie, btw – except you are starting with a parallelogram piece, and not creating one from a square (if that makes sense).

V1419 Sewalong: Prep
You should have 3 parallelograms with 2″ diagonal lines drawn on the wrong side of the fabric. Matching the notches and markings, pin the two angled edges together, right sides together, to form a strange off-center tube. The edges will not match at the ends.

V1419 Sewalong: Prep
Sew the seam you just pinned. I used 1/4″ because – well, that’s what I always use. I think this pattern was drafted for 5/8″ – even at the bias binding – and if you sew with that amount, you will need to trim it down to 1/4″ after sewing.

V1419 Sewalong: Prep
Press the seam open.

V1419 Sewalong: Prep
Starting at once end, begin cutting along the line you drew. You should end up with a looooong string of continuous bias. Do this for all 3 parallelograms.

V1419 Sewalong: Prep
Once you’ve finished cutting all your bias strips, fold them in half with the wrong sides together and press.
(I promise that big yellow spot on my ironing board cover is not pee. That’s actually what happens when you put your iron on top of a piece of tailor’s wax. Whoops.)

V1419 Sewalong: Prep
You should end up with a big pile of bias strips. Mine kind of look like intestines. Cool.

Finally, you will want to staystitch and reinforce your coat pieces as directed in the instructions (steps 1-3 & step 35). For both – use a slightly shorter stitch length (I use 2.0 vs my standard 2.5) and be sure to backstitch at both ends. For staystitching, sew 1/2″ away from the edge. For reinforcing, sew along the stitching line at 5/8″.

Here are the pieces you will be prepping. Lines marked in blue are reinforcement stitching, lines marked in yellow are staystitching.

V1419 Sewalong: Prep

V1419 Sewalong: Prep

V1419 Sewalong: Prep

ONCE LAST THING: Once you’ve reinforced all those tricky edges, you need to clip the seam allowances all the way to the dot.

V1419 Sewalong: Prep

V1419 Sewalong: Prep
Clip to the stitching line, but do not clip the stitching line. This will make it easier to sew those tricky sleeve seams.

And that’s it! Whew! Sorry for the post overload today. Oh, I almost forgot – here’s my fabric!

wool coating
These are the swatch cards I got from Mood. The wool coating I chose is piece piled on the very top (4th one down). It’s a nice, thick virgin wool coating.

taffeta underlining and contrast
I am using 2 different silk taffetas – the brighter red will be the underlining, and the darker red is the binding and contrast.

How are we doing this week, seawlongers? Any questions about the cutting or prep?

Fall/Winter Sewing Plans for 2014

10 Oct

It just occurred to me that I haven’t share any seasonal sewing plans in… well, a while. Which is lame, because these are some of my favorite types of posts (both to write *and* to read) – I mean, who doesn’t like lurking inside someone’s brain, even if it’s just to see what they plan on doing over the next couple of months? Too creepy? Naw.

Anyway, now that London/Paris is looming on the horizon (less than 2 months! Omg less than a month and a half! Eee!), it’s really time that I start figuring out what I’ll be bringing with me (and making, for that matter! Don’t want to end up with another frantic last-minute sewing disaster, ugh). Especially since my luggage space will be very limited – I’m only allowed to bring one suitcase with me overseas (well… I use the word “allowed” loosely here. I can bring two suitcases if I want to – but I get to pay $130 for the second one! LOL GURL NO.), and I want to fabric shop while I’m there! So, I will be packing a capsule wardrobe, one that mixes and matches with itself, for maximum outfit options, as well as warmth. This is much different than how I usually travel (as I fly Southwest, where you can bring 2 bags free – so why the hell not, you know?), but I’m up for the challenge! 🙂 Adulting and all that 🙂

I’ve already made/chosen a couple of pieces to base my capsule around, as well as chosen my theme (like Devon, I think all vacation wardrobes should have themes, because, duh) – Minimalist Parisian Chic. Mostly because my capsule will be very minimal – or, as minimal as I can get it down to, because I am still one of those people who delights in overpacking – with lots of black. Not much on the Parisian Chic side (I’m sure Parisian women will be horrified when they see what I wear to stomp around their city, ha!), but it has a nice ring to it 🙂

Anyway – to start – I have these black Jamie jeans that I made a couple of weeks ago:
Jamie Jeans + SJ Sweater Made with Mood Fabrics
I haven’t decided yet if I’ll be bringing the star sweater. It’s a little bulky! On the flip side, regarding the jeans – I just finished wearing them for the 5th time in a row (sans wash), and they’ve stayed very close to their original shape. No bagging out, woohoo! So that makes me feel good, because I’ll be wearing these a LOT come London.

Stripey Renfrew
I will also be bringing my Imogene + Willie slim jeans (pictured here), because they are basically the best jeans ever. Oh, and probably that stripey Renfrew top. Can’t have enough tshirts!

Now for the sewing plans! Sidenote: By the time of publishing this post, I’ve already finished more than half these makes. Whoops! Guess y’all see where my priorities lie when it comes to posting vs sewing hahaha. Oh well!

Ikat Lady Skater
The Cowl-Necked Skater Dress
I’ve had this idea in my head for a while now – a Lady Skater dress // Renfrew top mash-up! This cotton Ikat knit fabric (purchased at The Fabric Studio here in Nashville) will be the perfect match for this dress – like a giant, snuggly Christmas sweater! I actually don’t know if I’ll be bringing this one to London, due to bulk factor (my capsule really only allows for one dress, which I’m thinking will be the one below – but we’ll see!), but the plans were too good to keep to myself 🙂

DVF Wool wrap
The Wool Wrap dress
Another big mash-up – I’m starting with the DVF Wrap dress pattern, but adding long sleeves (stolen from the Lady Skater, naturally) and swapping out the gathered skirt for a wrap A-line (Miette Wrap skirt – I’m looking at you). The black wool knit fabric was picked up at Mood in NY a couple of months ago – it’s SO soft! Like, cashmere soft. I’m so in love ♥

Silk v neck
The Silk Button-down
I already have a nice white button-down – made from the same pattern, Butterick 5526 (my favorite!) – but it’s not really cold weather appropriate, due to the length of the sleeves. Since they are 3/4, they don’t really layer nicely with my long sleeve sweaters! I’d love to make another one, but up the ante with some beautiful silk double georgette, and modify the neckline to be more of a v shape (likely using this V-Neck variation tutorial by Jen!)

Chambray Button down
The Polka Dot Chambray Button-down
Another thing I already have one of, but need a winter version. This one will be made using a gorgeous cotton polka dot chambray, picked up here locally at Textile Fabrics.

SJ Sweater
The Wool Sweater
Button downs need a nice sweater, yeah? I want to try sewing a sweater, using the SJ Tee as a basis (with a higher neckline, and omitting all bindings). The fabric I have is a lovely camel-colored boiled wool, that I bought from Elizabeth Suzann (aka I totally jacked her wholesale order hahaha). I think it’ll look equally good over both those button down shirts I have planned!

rigel bomber
The Bomber Jacket
I know – I’m already planning a pretty sweet coat. However, the weather in London (and Tennessee, for that matter!) can be fickle, so I’d like to bring a lighter-weight jacket for days when the temperature isn’t as low. I’ve been meaning to make the Rigel Bomber for, well, months now. Just been waiting on the perfect fabric – and I think I found it! Check out this black wool coating – to be paired with gold china silk for the lining.

Other plans I have (no photos, sorry! Use that imagination of yours, ha!)
– Need some thin long sleeve shirts for layering – maybe just a couple out of wool knit, such as this textured black wool jersey (that’s apparently already sold out?! Wah!). I wear these pretty much daily in the winter – and sometimes I like to sleep in them if it’s really cold – so it’ll be nice to have a few to choose from.
– Speaking of sleeping – I need some new pajama pants! Currently lurking Margot pj pants in Tilly’s book, Love at First Stitch, since they seem to be a pretty quick/easy make (I really want to make the Tofino pants, but right now I need quick and easy!). I picked up some really fun orange plaid flannel to make them with – I know, that fabric is ridiculous, which is exactly why I chose it. It’s nothing like I already own! When it comes to pjs, why not, you know?
– I would like to make a flared A-line wool skirt to make as well – thinking about using the Delphine pattern (also from Love at First Stitch), because I love the shape. A little stuck on fabric selection, though! My go-to is usually wool crepe, but that will be too drapey for this shape. Thoughts? I need it to be 100% wool (pretty nitpicky about this, sorry!) and I’m looking for lipstick red. Budget is no more than $25 a yard (and obviously I’d be delighted if it was less than that!)
– Bras! I want to finish at least one bra before I leave – using the Marlborough pattern and one of my kits from Bra Maker’s Supply. Obviously I want new bras, but even more – Norma will be in Paris while I’m there, and you better believe I’m going to drag her into a bathroom and make her assess and critique my fit. Haha! Man, sewing people are weird 😛

I think that’s it for now! It feels good to get everything listed out in one place. I’m hoping I can get all this done before I leave – but if not, no worries. It’s not like I’m lacking clothing or anything as it is!

As a side note, I was just notified that one of my lovely sponsors, Indie Sew, is holding a pretty sweet contest where you can win a YEAR of free patterns! Fuck yes! You can read all about the contest and the reasoning behind it on this blog post, but the general gist is that Indie Sew wants to help you transform your entire wardrobe into handmade and end the cycle of cheap/fast fashion. And what better way to jump start a new handmade wardrobe than with some FREE FREAKING PATTERNS AMIRITE? Such a cool idea, and I really really hope the winner shares their journey via blog or social media so we can follow along! Anyway, soapbox rant over – go throw your name in the hat!

What’s on the table for your fall/winter sewing plans? Do you have any capsule wardrobe suggestions for me? Tips for packing light? Are you going to judge me if you see me wearing the same thing for 3 days in a row while I’m on my trip? 🙂

Completed: The Sureau Dress

8 Sep

You know what rules? When you have a brilliant strike of inspiration that comes together perfectly – from fabric, to pattern, to completed project.

Deer & Doe Sureau dress

AKA this dress.

Deer & Doe Sureau dress

I’ve been holding onto this silk cotton voile from Mood Fabrics since the beginning of this year (it’s sadly long gone from the site now, but they have lots of other options – including this gorgeousness. Ok, that doesn’t have silk, but it belongs in my fabric stash nonetheless). I had originally planned to make an Aubepine dress with it – but changed my mind at the last minute and ordered the Sureau instead, also from Deer & Doe (I still have the Aubepine & still plan to make it, but I’m thinking I would like it better in a dark/solid color, possibly even a lightweight knit. We’ll see!)

Deer & Doe Sureau dress

I LOVED sewing this dress! Too bad the pictures are kind of shitty. I promise it’s much prettier in real life – the voile is floaty, slightly sheer, and fucking ethereal. The colors are amazing and very fall-like, but the lightweight fabric keeps things from getting too sweaty.

Deer & Doe Sureau dress

You’ll notice that my version differs quite a bit from Deer & Doe’s – I had to make a few changes – both fitting and design – to get the look I wanted.

For fitting changes, I made a muslin and made the following adjustments:
– The front neckline was slightly gaping, so I removed a 3/8″ wedge (similar to this method)
– The upper back was a little loose, so I removed about 3/8″ from the center back, starting at the top and tapering to nothing at the bottom.
– Shortened the shoulders 1/2″
– Added 1/4″ to the side seams

Deer & Doe Sureau dress

I also made a couple of major design changes! The main one was that I lengthened the sleeves to be full length, and added a cuff and placket (stolen from Archer pattern). Unfortunately, I didn’t correctly measure the sleeve length – which seems to be a common mistake that I ALWAYS ALWAYS make, argh! – so they’re a tiny bit on the short side 😦 Bummer! Fortunately, the sleeve placket means I can roll them up, so there’s that.

The other ridiculously hilarious issue with the sleeves is that they are sewn on backwards – and I did that shit on purpose! Let me back up a little. When I altered the sleeve pattern to include the placket, I used my Grainline pattern as a guide. I didn’t think to make sure that I was tracing the placket to the correct side of the sleeve, so – you guessed it – the placket ended up on the front of the sleeve. Didn’t realize this until I’d already attached the cuffs and everything, derp (and didn’t have enough fabric to recut because, come on, that would make too much sense). I weighed out the options, and decided that a backwards sleeve cap was easier to forgive than a placket in the wrong place, so the back of the sleeve is now at the front, and vice versa. Fortunately, the sleeves are fairly loose & the cap is slightly gathered, so it’s not obvious that I inserted them incorrectly, and I still have plenty of room for movement. That being said, y’all all know my secret now. Don’t tell anyone.

Deer & Doe Sureau dress

The other design change was adding that cute little half collar! I used this tutorial to draft my little collar, and interfaced one layer of the fabric before sewing them together. I hemmed and hawwed over whether or not to include it – but ultimately, Landon & I both agreed that the dress looked weirdly unfinished without the collar at the neckline, at least with this particular fabric.

Deer & Doe Sureau dress

Because the fabric is so lightweight, I took extra care with the construction. All seams – including the waistline and sleeves – are sewn with a French seam, for a durable and elegant finish. The facings are finished with pinking – any other finishing would result in showing through the fabric. The instructions don’t have you interface any part of the dress, but I added interfacing to the facings, sleeve cuff, collar, and both front placket pieces (both the front and the placket facing). Again, the fabric is super lightweight, so it needed a little more support from the interfacing. Specifically, I used the Pro Sheer Elegance Couture fusible interfacing from Fashion Sewing Supply. I like that is gives a little needed support, but it doesn’t actually change the drape of the fabric. I had black on hand, which was perfect for my emerald fabric as white would have slightly shown through.

Also, ugh, guys, I know it’s REALLY short. Wasn’t planning on that! My fabric shortages meant that I couldn’t lengthen anything, and once I got the dress sewn up – I realized it would look way better with a deep 2″ hem. Which means the dress is now rill short (again, didn’t have enough fabric left to face the hem, which is how I would have normally solved that issue), but I plan on mostly wearing it with tights and/or boots sooo it’s not too bad.

Deer & Doe Sureau dress

Deer & Doe Sureau dress

Pretty much everything to do with this dress – other than my frantic last-minute pattern ordering – came out of my stash! Fabric, buttons, interfacing, even the thread – I love it when that happens!

Deer & Doe Sureau dress

Deer & Doe Sureau dress

There’s a cute little lapped zipper in the side of the dress 🙂

Deer & Doe Sureau dress

And that damn deep hem! Ha! I topstitched it because, I figured the rest of the dress has lots of topstitching, so it woudn’t look out of place 🙂

Deer & Doe Sureau dress

And that’s it! I like to wear the dress with a belt – I’m still not sold on how I look with gathered skirts (even slightly gathered, like this one), but I think the belt breaks things up nicely 🙂 I also wear it with the sleeves rolled up, because, again – they are too short (even if they look ok in the photos, trust me, once I start moving around, it’s evident that they are too short)(maybe someday I’ll have sleeves the right length. Sigh.). It’s pretty short, but not so short that I flash cheek when I bend over (as several people have been kind enough to observe and report on).

I’ll count this one as a success! 🙂 Next question – whyyy have I not been sewing Deer & Doe patterns? They are SO GOOD. I actually just ordered the Bruyere and am anxiously awaiting it’s arrival (as is apparently most of the sewing world :P). I have plaid flannel dreams for that bad boy. Man, I love sewing ♥

Completed: Kitty Zinnia!

6 Aug

You know what I love almost as much as I love bike fabric?

IMG_9372

KITTY FABRIC 😀 😀 😀

Kitty Cat Zinnia + Nettie Crop Top

This ain’t just any ol’ cat fabric though – this is freaking silk chaurmeuse, all the way from LA.

Kitty Cat Zinnia + Nettie Crop Top

When I was in NYC earlier this year, I mentioned to Trice how I was looking for non-quilting weight novelty fabrics – especially something with cats on it. Trice, being the sneaky lady she is, emailed me several months later and said she was going to send me something. I don’t know what I was expecting- but it was NOT this! I mean that in the best way, obviously. I love how the fabric isn’t super loud-in-your-face-cat-print (although, let’s be real – that wouldn’t necessarily be a bad thing), I love that it’s black and white, and I love that it’s fucking SILK CHAURMEUSE. What the what? Talk about an amazing gift from an amazing person!

Kitty Cat Zinnia + Nettie Crop Top

I didn’t have a whole lot of fabric to work with – maybe a yard and a half, tops, and it was pretty narrow. A Colette Zinnia seemed like the perfect fit- I have a similar short, pleated silk skirt (I wore it in the photos for my Owls Sweater), and I wear it all the time, especially in the winter.

The Zinnia calls for a loooot of yardage, but I was able to barely eek by. I shortened the skirt by about 4″, which allowed it to fit on the narrow width of the fabric, and cut the pockets out of some bemberg rayon that I had in my stash. It was a close call for sure, but I made it work! I also cut it with the shiny side on the inside, because I thought the matte side looked a little less, I dunno… costumey?

Kitty Cat Zinnia + Nettie Crop Top

Most of the sewing was pretty uneventful. I did have to lengthen the topstitching on the pleats – the pattern has them about 2.5″ deep, but the skirt looked suuuuuper floofy right about my hips, so I lengthened them a couple more inches and that helped. It’s still pretty floofy, but I mean- it’s a cat skirt. It’s already ridiculous enough, you know?

(Yep, my bra band totally gives me back fat hahaha. Actually, I probably have back fat too.)

Kitty Cat Zinnia + Nettie Crop Top

I mean, LOOK HOW SWIRLY IT IS THO.

Kitty Cat Zinnia + Nettie Crop Top

More kitties! Isn’t this seriously the coolest print? Everyone I told about it kind of gave me a weird look until I showed them a picture- and then even cat haters were all, “ooh I want me some of that!”

Kitty Cat Zinnia + Nettie Crop Top

I obviously needed a cool top to go with my super cool skirt, so I made a quickie crop top to wear with it. This is the Closet Case Files Nettie, made in some rayon knit from Mood (leftover from this Jalie top from forever ago).

To crop the shirt, I just cut it along the bottom lengthen/shorten line. I had previously added 2″ length to my pattern, so that ended up being the perfect crop top length. I also tried my hand at widening the shoulders, since they are super narrow on me… I used a tutorial from Colette on shoulder adjustments, but I guess I didn’t add enough width because they’re still SUPER narrow. Unfortunately, I think this crop top has a very short lifespan in my closet because the shoulders are too narrow for it to be comfortable (the sleeves ride up as I move my arms and the shoulders raise and it just doesn’t look good). It’s pretty obvious in this picture how far the shoulder seam is from my shoulder – plus, the arm hole is still way too high. Gonna have to go back and retweak that pattern again, I guess. Ah well! Sewing!

Also, I know you can totally see my bra lumps through this shirt. DGAF.

Kitty Cat Zinnia + Nettie Crop Top

It’s hard to see any detail at all in this print, but don’t say I didn’t try 🙂

Kitty Cat Zinnia + Nettie Crop Top

Thanks again, Trice, for the amazing fabric! Guys, she also sent me a BUNCH of bra straps – which means I guess I better start exploring the world of sewing lingerie, yeah? Forreal, though, I just downloaded my first Ohhh Lulu bra pattern. Wish me luck!

What about you? Found any good (literal)animal print, lately?

Completed: Vogue 1395

18 Jun

Confession: I don’t like cherries. Not for eating, anyway.

Vogue 1395

What I DO love are cherry prints, though (or any fruit, for that matter!). It probably makes me look like a total asshole wearing a fruit I won’t even eat (I’m currently having flashbacks to my high school days, back when I used to make fun of kids for wearing band tshirts of bands they’d never actually listened to. No, really, who does that?? High school kids, that’s who), but you know what? No fucks given. Go ahead and judge me.

Vogue 1395

Whatever, anyway, my point is – I like wearing cute prints. Cute prints can be hard to find though – and when you do find them, at lot of them tend to be printed on, like, quilting cotton. Or worse – silk chiffon (seriously, who the fuck is buying up all those crazy silk chiffon prints? I am so intrigued!). I feel like 3/4 of my sewing time is spent just trying to source cute prints that are printed on the type of fabric I actually like to sew and wear.

Vogue 1395

Sooo, with that being said – I was pretty excited to find this Anna Sui cherry print at Mood Fabrics. Not only is it basically the cutest fabric in the history of ever – it’s silk crepe! So glorious! Unfortunately for y’all, they are also completely sold out of it. Whomp whomp.

Vogue 1395

Immediately after securing a length of this stuff for my very own, I zeroed in on Vogue 1395 as my dream match pattern. Pretty cute, right? Vogue has really been stepping up their game with the last pattern release – as in, they had more than one wearable pattern this time (yay, Vogue!). Vogue 1395 intrigued me with it’s loose fit and strange overlay, and I thought the casual shape would look really nice with such a sweet fabric.

Vogue 1395

Sewing up this pattern (and fabric, for that matter) was pretty easy, although I did make some changes to the construction. The pattern calls for you to sew everything with a double-stitched seam – as in, literally two lines of stitching next to each other, and then finished. I couldn’t wrap my head around that one – why? for extra… strength? what? – so I compromised and used french seams for construction. I figured – hey, it’s technically a double-stitched seam, right? Plus, a french seam just looks way more elegant than a serged seam.

The armholes and neckline (sorry, didn’t take a photo, whoops) are finished with self-made bias binding (aka SILK CREPE bias binding). It looks really beautiful, if I do say so myself. It was also way less of a bitch to sew on than you’d think – despite the fact that we’re talking about bias silk crepe here. I used a lot of steam and manhandled that shit into submission. I also didn’t follow the directions on the pattern for adding the binding – they kind of had a weird method of construction, and I have a better one (sorry, but it’s true. Stay tuned for a photo tutorial during the OAL!). One big awesome plus is that the bias binding is applied flat, so you don’t have to worry about it stretching out and not fitting the area it’s binding – you can just cut the excess off! Hells yeah!

Vogue 1395

Size-wise, I cut the smallest size, which is an 8 in this design (anyone know why some patterns go all the way down to a 4 and some stop at 6 or 8? What’s up with that?). It fits ok – the arm holes, though. Whoa. Those arm holes were TERRIBLE. When I say they showed my bra, I don’t mean they just showed the very top edge. I mean they showed the ENTIRE SIDE of my bra (and a little bit below it!). Suffice to say, the arm holes were way too low! The back overlay does cover some of that, but it’s a moot point once you start moving around.

I fixed my dress in the most MacGyver way possible – I just pulled the shoulders up and gave them a new seamline. This was actually really easy thanks to my french seams, haha! I ended up pulling off about 1.5″ from the top of the shoulders – which yeah, that’s a lot! – and now the dress fits a hell of a lot better. The neckline obviously raised a lot too, but that’s ok – I kind of like it higher, I think it looks better with the shape/length. Plus, now I can bend over without fearing the gapeage.

Vogue 1395

Trying to figure out how the dress is pieced together? It’s really simple – there’s a front and back bodice (unlined, so make sure your fabric is opaque!), and the back bodice has an overlay that is only stitched down about 4″ at the center back. The slightly curved skirt is lined (I used china silk), and there is an elastic waist.

Vogue 1395

The back overlay crosses the side seams and ties at the front, which gives the dress a little bit of shape (that you can totally loosen after you’ve eaten a bunch of cupcakes because, fuck yeah, elasticized waist). Keep in mind that the wrong side of the ties show – it’s just a rolled hem all the way around, no lining – so you want to make sure you use a fabric that is relatively the same on both sides. The wrong side of this fabric is a little lighter than the right side, but it’s hardly noticeable.

Vogue 1395

What else did I change about the instructions? Well, I hated the way they had you hem stuff – lots of basting, pressing, and trimming. BOOORING! I used my rolled hem foot and finished much faster (with better results to boot!). I also could not FOR THE LIFE OF ME figure out how they had you attach the shoulders of all 3 layers. It just plain didn’t make sense, and I was french seamin’ that shit anyway (this was before the Armhole Disaster), so I did it my way and used french seams. Best way, I think!

Vogue 1395

Vogue 1395

Per usual, I threw both silks in the washing machine on cold before cutting, so now I don’t have to dryclean this guy! Yay! Talk about a casual day dress. I did notice that the black faded quite a bit on this silk crepe – so it’s more like, I dunno, light black or dark grey – but I don’t even care. It’s worth it just to know that I don’t have to schlep out to the dry cleaner every time I want to wear this. Which, btw, I would never do, because dry cleaning is the worst. Not because it’s terrible for the environment (although I reckon that’s a factor), but because I actually have to GO somewhere and PAY for it. Ew! Nope!

Vogue 1395

Anyway, cute new summer dress for meeee! I love it when my casual duds crossover into involving luxe fabrics. THIS, my friends, is why I sew.

As a sidenote – my pal Beth is gearing up to release her first pattern, and she needs testers! I know a lot of y’all were dying to dip your toes in to the tester pool, so here’s your chance to shine! Check out this blog post to see the skirt pattern in question (it’s super cute – I was actually on the list to test this, but my schedule this month has blown up all crazy so I had to bow out) and go ahead, throw your name in the hat 🙂 You know you wanna 🙂

Completed: The Sugar Plum Dress (+ a Giveaway!)

25 Nov

This dress is SO awesome and sneaky. Looks like two pieces, but wait- there’s more! It’s actually one dress! Sugar Plum dress made with Oscar de la Renta silk and ponte knit from Mood Fabrics I LOVE these kinds of dresses! Looks like a silk blouse with a high-waisted pencil skirt, without the bother of keeping a shirt tucked in all day and making sure things match in the morning (because, ew, all I wanna do is sleep right now). Extra bonus – the skirt is a ponte knit, so it’s actually a COMFY pencil skirt. Are y’all feeling my excitement right now?? Sugar Plum dress made with Oscar de la Renta silk and ponte knit from Mood Fabrics This is the Sugar Plum, from Lolita Patterns. Full disclosure: Amity sent me this pattern free to try it out and see how I liked it. I guess you probably gathered at this point my reaction to the finished dress – ummm, amazing! I love how it’s totally appropriate for a professional environment (not that I need clothes like that anymore, but, you know, I still like to dress up ;)), but it’s still beautiful and feminine and unique. The pattern is really fun to put together – lots of tiny pieces, clever seam finishes, the kind of stuff that makes me 😀 Since it doesn’t require a lot of fabric to make up the top half (less than a yard!), I splurged on this amazing Oscar de la Renta silk print from Mood Fabrics. I also bought this navy blue ponte knit for the skirt (omggg so comfy) and lime green china silk for the lining for a bit of a color pop. Sugar Plum dress made with Oscar de la Renta silk and ponte knit from Mood Fabrics This is view B, without the front flounces. I sewed up a size 2. The top fit with no alterations, although I did need to take the skirt in a bit to get it fitted (it’s actually a bit toooo fitted now, whoops. Good thing it’s a knit lol). I did use a much stretchier fabric than suggested by the pattern, so I’m not surprised. The pattern has you use a stretch woven, and pontes tend to be a little more like an actual knit. Based on the way the skirt fits, I suspect you could also use a non-stretch woven and just cut the panels on the bias for the same fitted/comfortable effect. I skipped the pockets and the sleeve gathering detail for a more simple look. Sugar Plum dress made with Oscar de la Renta silk and ponte knit from Mood Fabrics The more I sew with silks, the more I find myself not wanting to make up anything else. The most important thing I’ve learned when it comes to sewing lightweight/slippery/silky fabrics is to make sure that your cutting is super accurate, then the sewing is a piece of cake (or, at least, as much of a piece of cake as it can be!). I always rip my fabric along the cross grain first, to ensure that the edges are perfectly straight, and then pin the selvedges together before I lay down my pattern pieces. This prevents the silk from shifting as I cut it. When it’s time to cut, make sure your scissors are nice and sharp, and try to cut the entire length of the blades (instead of timid little snips). One thing I loove about ordering from Mood Fabrics is that I know the fabric is going to already be on-grain, so I don’t have to worry about straightening the grain before I cut. Just rip the cut edge, pin, and cut those pattern pieces! Sewing with the ponte was much easier than the silk, obviously. I used a serger for all the skirt seams, and my regular sewing machine (treating it like a woven) to attach the silk top to the ponte waistband. I love this ponte because it’s quite a bit more stretchy than other pontes I’ve tried, which means it’s extra extra comfortable. Just be careful when you press it – it definitely gets a shine, so use a press cloth. I keep a big square of silk organza specifically for this purpose. It absorbs the heat of the iron so my fabric underneath doesn’t shine, and it’s sheer so I can actually see what I’m doing 🙂 Sugar Plum dress made with Oscar de la Renta silk and ponte knit from Mood Fabrics Sugar Plum dress made with Oscar de la Renta silk and ponte knit from Mood Fabrics I really enjoyed working on this pattern – lots of tiny details to make me feel challenged as a seamstress, but not so much that I got overwhelmed with the process. A lot of indie patterns run on the easy/beginner side – which is fine, I know there are lots of people who want something simple to make up, and it’s easier to complicate a pattern than simplify it. But sometimes it’s nice to have something that I feel is aimed at a slightly higher level, without me having to run through the steps and find ways to make it harder for myself. Wow, I just made me sound like a total weirdo. What can I say, I like a challenge! Sugar Plum dress made with Oscar de la Renta silk and ponte knit from Mood Fabrics I did make a pretty crappy mistake toward the end of this dress. I was sewing in the invisible zipper and could not get the waistband seams to match up. I was tired, hungry, getting grouchy (you can see where this is going), and I thought, “One more try and then I’m outta here.” While picking out the zip, I somehow managed to detach the teeth from the zipper tape. WHYYYYY. I know I tell y’all that I have millions of zippers in my stash, and I do, but none of them are invisible. I actually have to go out of my way and buy one whenever I need it (because I’m too stubborn to keep those in stock, apparently), which usually ends up with me going to Walmart because they sell invisible zippers and they’re open at 3am when I suddenly need one. So I pretty pissed about destroying this zip, and trying to avoid another trip to Walmart. I ended up cutting the zipper right above where I sliced it open, and just finished the dress with a super duper short zipper – it ends about halfway down the waistband. Since the skirt is so stretchy, this works, kind of. It’s funny to watch me pull it on, ha! And you know the worst part? THE WAISTBAND PIECES STILL DON’T MATCH UP. Whatever, I’m over it! Sugar Plum dress made with Oscar de la Renta silk and ponte knit from Mood Fabrics Sugar Plum dress made with Oscar de la Renta silk and ponte knit from Mood Fabrics I love the little details on this dress that make it so special – the ruffled collar (hemmed using the rolled hem on my serger), the tiny buttons with the tiny button loops, and that BRIGHT LIME GREEN LINING. Really, it’s like a party when I take the dress off! Sugar Plum dress made with Oscar de la Renta silk and ponte knit from Mood Fabrics Sugar Plum dress made with Oscar de la Renta silk and ponte knit from Mood Fabrics Sugar Plum dress made with Oscar de la Renta silk and ponte knit from Mood Fabrics By the way, don’t ever search Oscar de la Renta on the Mood Fabrics site unless you plan on dropping some serious dough on some seriously incredible fabrics. I just fell down the rabbit hole – again! – and discovered violet boucle, boucle with sparkly lurex (!!!), silk floral and some freaking polka dot silk taffeta. I want, I want it all! Sugar Plum dress made with Oscar de la Renta silk and ponte knit from Mood Fabrics

Now time for the fun part – a giveaway! Amity has generously offered a copy of Sugar Plum to one lucky winner, yeeeah!! Still having reservations? Just know that the sizing goes aaaaall the way up to 24 (yes!) and there is an entire sew-along on the blog for anyone who needs some hand-holding. You have no excuses, people! To enter, just leave a comment on this post and let me know what you’d make your Sugar Plum up in (Personally, I’m lurking on a second version with a leopard blouse and a denim skirt, like, ahem, Leila’s. Yes. Exactly like that. Sorry boo!). This giveaway is open to WORLDWIDE and I will close the entries a week from today, Monday, December 2 8:00AM CST. Good luck!

GIVEAWAY IS NOW CLOSED.