Tag Archives: marking

V1419 Sewalong: Cutting and Prepping

13 Oct

Good morning, sewalongers! (sewalongees?) Today we are going to go over the final prep work before we start sewing (next week! Eep!). This is the last slow post of the sewalong, which gives you another week to perfect your muslin and choose your fabric. Of course, these posts will also be up indefinitely so don’t feel like you have to rush to keep up!

blog-sewalong-image-650x563

The very first thing you need to do – yes, before you do anything else with that lovely fabric – is pretreat your fabric. How you pretreat your fabric will depend on the fiber you chose, as well as how you plan on cleaning the coat in the future. For those of you who are sewing wool (like meee!), this means you need to get any shrinkage out of your fabric *before* you cut the pattern pieces – otherwise, once you start steaming that bad boy, you may end up shrinking pieces and that’s no good. There are lots of ways to pretreat wool – and none of them involve washing the fabric (please don’t do that!). You can either steam the piece yourself (this involves lots of steam and probably a lot of time), take it to the dry cleaner and have them pretreat it (this involves money)(and also dry cleaning), or you can shrink it up in the dryer (which is what I do). Here’s a blog post outlining the entire process, but basically – you just need to throw your wool in the dryer (finish the edges if necessary to prevent unraveling), add a couple of towels that are soaked in hot water (and then wrung out, so they’re not dripping) and blast the dryer on high heat for however long it takes before everything is dry. Easy! This is the method I use for all my wool fabrics. If you are at all hesitant, try it out on a swatch first 🙂

For other fabric types that are not wool – you may not need to pretreat (unless you plan on washing the coat in the washing machine? If then, defintely prewash that shit!). If using a cotton or silk, you may want to at least steam the crap out of it just to be sure there is no shrinkage. Polys should be fine and not shrink at all.

Once you’ve pretreated your fabric in whatever way need, then it’s time to cut! I’m not going to go over cutting here – I assume anyone brave enough to tackle sewing a coat is probably fine to cut fabric without guidance 🙂 – but if you need a refresher, here is an old post I wrote about cutting and marking your pattern pieces. One thing I did notice while I was cutting my fabric – I was able to reconfigure the layout and use slightly less fabric. Don’t be afraid to change up the layout if your fabric is wide enough, just be sure that you are keeping all the pattern pieces on the proper grain.

If you are including an underlining for your coat, you will need to cut out pieces 2, 3, 4, 7, 8 & 9 from your underlining fabric.

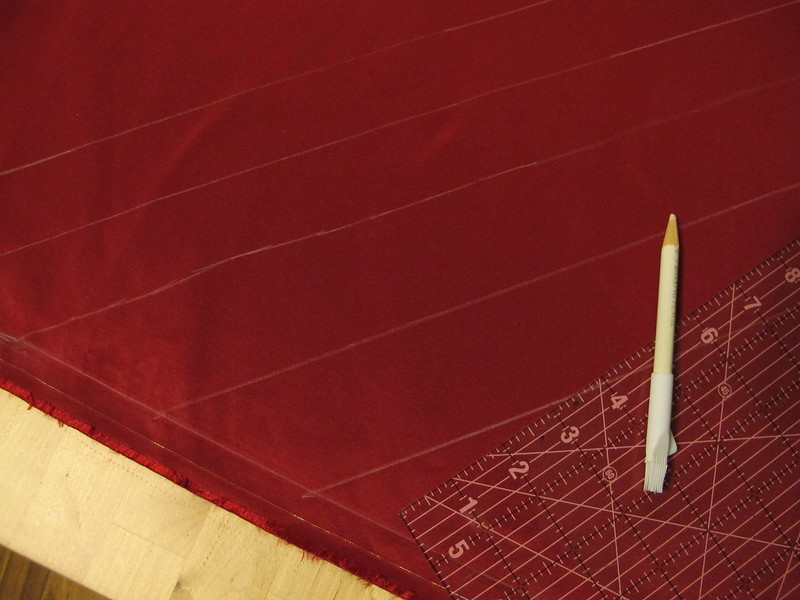
For the contrast – specifically, all those bias pieces – I found it easier to draw the pattern pieces directly on the fabric, rather than try to pin a bunch of stuff and then try to cut a straight line and nope.

V1419 Sewalong: Prep

The long, straight pieces – I just measured them and use a ruler and marking pencil to draw them on my taffeta. For the big bias contrast pieces (those giant parallelograms), I pinned down the pattern piece, traced around the edges with my marking pencil, and then used a ruler to draw in the lines 2″ apart (as they are on the pattern piece). I did all this on the flat fabric before I cut anything out, and I think it made things a lot easier!

Once you’ve cut out all your pattern pieces, you will need to apply the underlining (assuming you are underlining – if not, skip ahead and start marking your pieces). Underlining is very easy. It is also very time-consuming – so I recommend watching some crappy TV or something equally entertaining while you do it 🙂 For this sewalong, I won’t be going over underlining, but here is a tutorial if you need one. Some things to keep in mind:
– Sometimes you can get away with basting the pieces together by machine. This coat is not the time to try that method. Because the pieces are very large, you run the risk of shifting your fabric – which will give you bubbles or hang weird if you’re not careful. Try to keep things as flat as possible. Meaning: sit at a table, underline by hand. Watch a movie. Drink some wine. Whatever makes you happy!
– I use silk thread to underline, because it removes very easily. I also happen to have several spools on hand in strange colors, so that’s a big part of the reason. I realize silk thread is a bit expensive, so don’t feel like you have to break your budget on some thread that’s about to get pulled out as soon as you sew a seam. Use whatever you got! I would recommend using a threat in a contrasting color, just so it’s easier to see/remove.
– Feel free to use giant stitches. You’re just basting the pieces together to keep them from shifting when you sew them. Big stitches are ok – and they’re easier to remove!
– Sew well within your seam allowances, especially if your fabric shows pin holes (mine does!).
– I like to underline first, *then* mark the pattern pieces on the wrong side. You can also mark, then underline. Up to you – I just think the former is easier! Don’t freak out if you accidentally snip your basting when you cut notches – it’s ok!

V1419 Sewalong: Prep
See? I did it too. No big deal!

Once you’ve finished underlining (or have skipped ahead), you will need to mark your pieces. It is very important to get every stitch line (for the welts and the button holes), dot and notch – it’ll make things muuuuch easier to match up when we start sewing. You may want to use wax tracing paper and a rotary wheel for the lines, and a marking pen (or tailor’s tacks) for the dots. Just snip the notches. We won’t judge you.

Ok, bias binding! This is the same method outlined on the Coletterie, btw – except you are starting with a parallelogram piece, and not creating one from a square (if that makes sense).

V1419 Sewalong: Prep
You should have 3 parallelograms with 2″ diagonal lines drawn on the wrong side of the fabric. Matching the notches and markings, pin the two angled edges together, right sides together, to form a strange off-center tube. The edges will not match at the ends.

V1419 Sewalong: Prep
Sew the seam you just pinned. I used 1/4″ because – well, that’s what I always use. I think this pattern was drafted for 5/8″ – even at the bias binding – and if you sew with that amount, you will need to trim it down to 1/4″ after sewing.

V1419 Sewalong: Prep
Press the seam open.

V1419 Sewalong: Prep
Starting at once end, begin cutting along the line you drew. You should end up with a looooong string of continuous bias. Do this for all 3 parallelograms.

V1419 Sewalong: Prep
Once you’ve finished cutting all your bias strips, fold them in half with the wrong sides together and press.
(I promise that big yellow spot on my ironing board cover is not pee. That’s actually what happens when you put your iron on top of a piece of tailor’s wax. Whoops.)

V1419 Sewalong: Prep
You should end up with a big pile of bias strips. Mine kind of look like intestines. Cool.

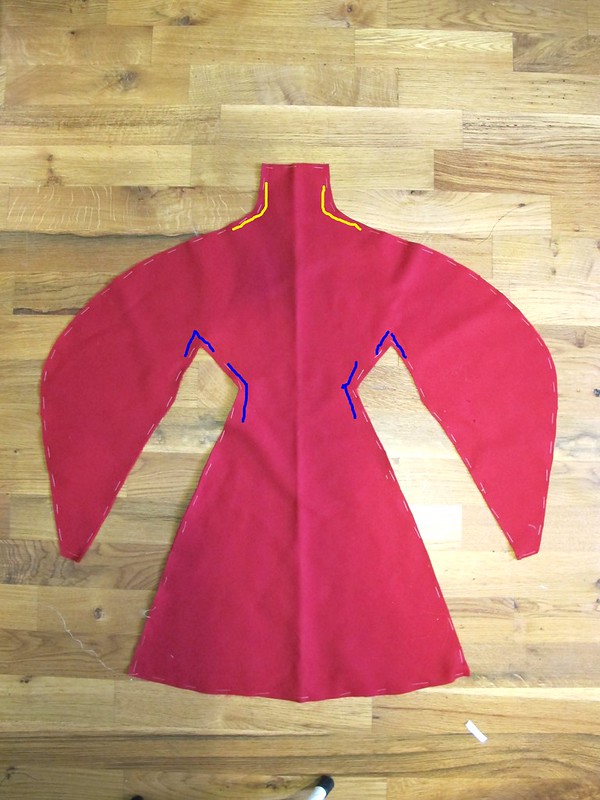
Finally, you will want to staystitch and reinforce your coat pieces as directed in the instructions (steps 1-3 & step 35). For both – use a slightly shorter stitch length (I use 2.0 vs my standard 2.5) and be sure to backstitch at both ends. For staystitching, sew 1/2″ away from the edge. For reinforcing, sew along the stitching line at 5/8″.

Here are the pieces you will be prepping. Lines marked in blue are reinforcement stitching, lines marked in yellow are staystitching.

V1419 Sewalong: Prep

V1419 Sewalong: Prep

V1419 Sewalong: Prep

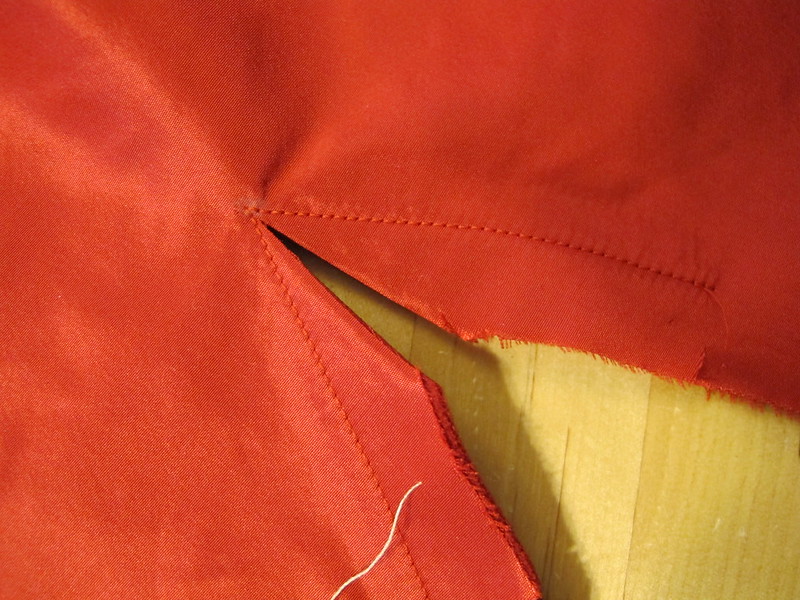
ONCE LAST THING: Once you’ve reinforced all those tricky edges, you need to clip the seam allowances all the way to the dot.
V1419 Sewalong: Prep

V1419 Sewalong: Prep
Clip to the stitching line, but do not clip the stitching line. This will make it easier to sew those tricky sleeve seams.

And that’s it! Whew! Sorry for the post overload today. Oh, I almost forgot – here’s my fabric!

wool coating
These are the swatch cards I got from Mood. The wool coating I chose is piece piled on the very top (4th one down). It’s a nice, thick virgin wool coating.

taffeta underlining and contrast
I am using 2 different silk taffetas – the brighter red will be the underlining, and the darker red is the binding and contrast.

How are we doing this week, seawlongers? Any questions about the cutting or prep?

OAL: Cutting and Marking Your Fabric

9 Jun

Hey guys! Today we are going to cut and mark our fabric for our dresses! Woohoo!

I’m going to go out on a limb here and say that most people don’t like this part of the sewing process. I get it – you’re ready to start sewing, but first you gotta futz with those tissue pattern pieces, cutting, and marking all the little dots and clipping all the little notches. Such a pain when you really just want to get to the fun part!

I personally don’t mind cutting – I actually find the process a little fun – I listen to dancey music and use the opportunity to get pumped about my project. CUTTING PARTY WOOHOO! While I do like to get everything with cutting done in one session (and marking, too, if I have the time), I do not try to rush the process. I’ve found that rushing just causes more harm than good – you get sloppy, you cut things inaccurately or off-grain. No good! Please don’t try to rush through this – take your time (trust me, y’all, we’ve got plenty of time here) and just try to enjoy the process. You might surprise yourself!

One thing I’ve found that I do mind, though, is taking photos while trying to cut – and I think it really shows in my pictures here, unfortunately. If anything about this post is unclear, please do not hesitate to post your question in the comments and I will get back to you as soon as I can!

OAL - Cutting and Marking Fabric
If you haven’t already done so, check your pattern instructions to see what pieces you cut and how many of each. I always like to look at this first, just to be sure I don’t end up with some unfortunate surprise (such as realizing too late that a certain piece needed to be cut 4 times, and I’ve already cut up all my fabric. WHOOPS!).

Make sure your fabric is prewashed and that you have pressed all the wrinkles out. You may also press your pattern pieces (dry iron, no heat) if you prefer, but I’ve found these thin tissue patterns can usually be smoothed out enough to skip the ironing. Up to you!

OAL - Cutting and Marking Fabric
Now for the fabric! The first thing you want to do is make sure that your cut edges are nice and straight. This will help you keep the folded fabric straight, and thus, cut the pattern pieces on grain. See how the cut edge of my fabric is wavy? We are going to fix that.

OAL - Cutting and Marking Fabric
Cut a little snip about 1″ below the cut edge of your fabric (or 1″ lower than the lowest dip, if it’s super wavy like mine)

OAL - Cutting and Marking Fabric
And then just rip straight across the edge. Ah! Doesn’t that feel nice? Totally my favorite part of cutting HAHA!

OAL - Cutting and Marking Fabric
Now that the edges are straight, you may fold the fabric lengthwise, wrong sides together*, and lay it on your cutting table. At this point, I also like to pin my cut edges together, as well as the selvedges – it keeps the fabric from shifting around, which is especially helpful if you are cutting something that tends to slip around. Make sure the fabric is completely smooth all the way to the fold (no wrinkles or anything); else you may end up cutting an inaccurate piece. If your fabric is twisting, try shifting the cut edges until everything lies smooth.

*You may also fold your fabric right sides together, if you prefer. My stance on this is that the fabric is easier to mark on the wrong side if it is folded with wrong sides together (as you can just open the two pieces and mark them at the same time; it’s also easier to use wax paper+tracing wheel this way), so this is the way I fold/cut. Also, if you fold with the right sides out, you get to stare at your pretty fabric while you cut it. Bonus! 🙂

OAL - Cutting and Marking Fabric
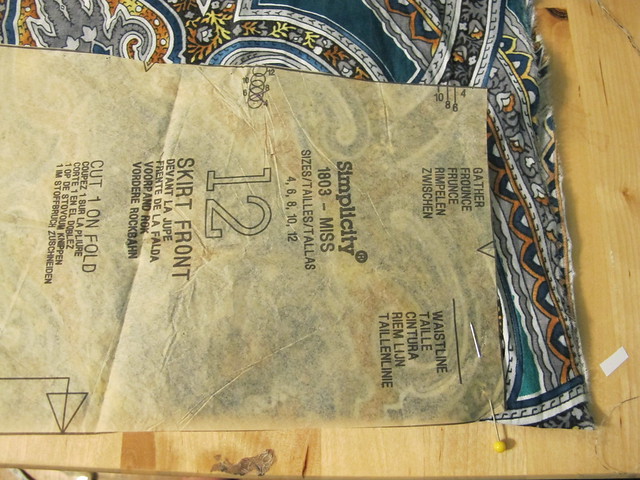
Once your fabric is folded and completely flat, you can start pinning down the pieces! I like to start with the pieces that need to go on the fold – as you can see in my poorly-cropped picture, this is indicated by an arrow (it’s also in the cutting instructions of the pattern, fyi). I do this because otherwise I’ll forget! Not good! For pieces on the fold, butt your pattern piece right up to the fold of the fabric and pin all the way around.

OAL - Cutting and Marking Fabric
A note on pinning – how you choose to pin your pieces is entirely up to you. Some people completely omit pins and just use pattern weights and trace the pieces, or a rotary cutter. That is perfectly fine if that’s your jam. I personally like pins and scissors, so this is what I will be demonstrating for this sew-along. I like to pin parallel and about 1/4″ away from the pattern piece. I also use a lot of pins – the more the merrier! – as I find it helps me cut more accurately. Don’t be afraid to go overboard on the pins, is what I’m saying here.

OAL - Cutting and Marking Fabric
One other thing I’d like to bring up is the topic of grain – and making sure that your pieces are all cut on grain. What is grain? Grain is the direction of the threads that make up a woven fabric. Lengthwise runs parallel to the selvedge, crosswise is perpendicular, and bias runs at a 45 degree angle. Grain is EXTREMELY important when cutting your fabric – if you cut things off grain, you run the risk of your dress doing some funny things. Ever worn a pair of jeans where the seam kept trying to twist around your leg? That’s what happens when something is cut off grain. We want to be sure that everything is cut accurately on grain – i.e., the lengthwise grain goes straight up and down your body. This is super super simple to do, but you’d be surprised how many people don’t bother with it (for more information on grain, check out this Threads article)

In the picture above, I’m pointing at the grainline on the pattern piece. This line needs to run parallel to the selvedge of your fabric to ensure that your fabric is cut on grain.

OAL - Cutting and Marking Fabric
All you need to do is make sure that the grainline printed on your pattern piece is the same distance from the selvedge all the way across. I like to use a clear ruler for this – you can see straight through it, which makes it easy to adjust the pattern piece until it’s straight. I start in the middle, check the distance the grainline is from the selvedge (in this case, it’s 4.5″), stick a pin to hold the pattern piece in place, and then check that the distance at each end of the grainline is also 4.5″ (and stick another pin in there to keep the piece from shifting). Once I’m sure the entire grainline on that one pattern piece is completely straight and parallel to the selvedge, then do I finish pinning and cut.

It sounds like a lot of extra work, but it’s really not – and you’ll absolutely see the results (or, rather, won’t – because your garment won’t be hanging funny!). This also means that you can plan your cutting layout howeverrrr you want – as long as you keep the pieces on grain. The pattern instructions do include a suggested cutting layout – and if this is your first time making a pattern, I definitely suggest that you follow it, just to keep things simple – but it’s not always the most economical way to cut your fabric. As long as you’re keeping all your pieces on grain, feel free to see if you can find a better way to get the most out of your fabric 🙂

Ok! So that being said – time to finish pinning and cutting! Go ahead and pin the rest of your pieces down to the fabric (you may follow the cutting layout in the pattern if you need some guidance), and make sure you have everything pinned before you start cutting!

When you cut, keep the fabric completely flat on the table (or floor, but it’s better for your back/sanity if you can at least find a temporary table space to cut on!) with your shears at a 90 degree angle. Slice completely through the entire length of the shears – no timid little baby cuts! – and use your opposite hand to hold the fabric down so it stays flat on the table. Try to be as accurate as possible with your cutting, and take your time going around curves and sharp points.

OAL - Cutting and Marking Fabric
Once you’ve cut aaaall your pattern pieces (yes, all of them! Remember, there are 4 pocket pieces to cut!), time to mark! For notches (the little triangles printed sporatically on the edges of the pattern pieces), I just take a tiny snip all the way to the point of the notch. I know some people cut the notch outward, like a little triangle. That’s fine if you want to do that, but I find it too time-consuming and less accurate than just a simple snip.

OAL - Cutting and Marking Fabric
For marking dots – such as where the sleeve is attached to the bodice – I like to stick a pin in the pattern piece, directly through the center of the dot. Gently pull the two pieces of fabric apart, and mark where the pin enters each piece of fabric.

For marking dots and the stitching lines on the bodice (the notched version), you can use wax paper and a tracing wheel. I didn’t take any photos of this, but it’s pretty self-explanatory. Lay the paper with the wax side facing down on the wrong side of the fabric, and just trace over the lines of the dart with the tracing wheel. Easy!

Ok, that’s all for today! If you’ve still got a little bit of sewing stamina left, go ahead and cut out your interfacing pieces as well. We start sewing next week! Yay!