Tag Archives: ponte knit

Completed: Navy Ponte Morris Blazer

10 Nov

Continuing on the Navy Train (although not really, bc I actually made this shit ages before I made my Navy Twill Gingers), here is what I guess we can consider the other half to my ~casual navy suit~ – the blazer!

Navy Ponte Morris Blazer

Navy Ponte Morris Blazer

Although, unlike most blazers – this one is made of a ponte knit, which makes it about as comfortable to wear as a knit hoodie. I dunno about y’all, but this is basically a huge score as far as I’m concerned.

Navy Ponte Morris Blazer

Navy Ponte Morris Blazer

Navy Ponte Morris Blazer

The Morris Blazer from Grainline Studio has been out for a while (and yes, I completely acknowledge that my finished blazer looks exactly like the shop sample no regrets), but I initially disregarded it as an option for my wardrobe as I haven’t bothered to wear a blazer since pretty much my very first office job. Even when I was working in office environments up until I switched to a more casual work life a few years ago, I eschewed the (often uncomfortable, often ill-fitting) blazer in favor of simple and much more comfortable cardigans. Actually, I had a really beautiful black wool blazer that I bought on sale at Bebe when I was in high school (lol anyway, but you’d lol even harder if you knew me in high school because my preferred places to shop were generally Hot Topic and the kid’s section of Goodwill hahahahah oh teenagers) that I wore the hell out of, and it was sadly stolen right my desk when I was 19, at the T-Mobile call center I was working at. To whoever stole that thing: fuck you. Also, I hope you couldn’t fit into it. I was really really small back then, like 90 lbs small. My clothes from back then were fucking comical… and also the reason why I learned how to sew in the first place. Alterations! Yay!

ANYWAY MOVING ON.

What eventually caught my attention about the Morris Blazer is that it is a much more casual take on the traditional blazer – obviously you can’t wear this in a corporate environment, but it’s still a step up from that aforementioned hoodie. It is intended to be made using a stretch woven fabric, and the blazer is unlined. I’d seen some people make it out of a ponte knit, which really piqued my interest because I am all about some ponte knit and its secret pajama properties.

I used a navy nylon Ponte de Roma from Mood Fabrics – it’s currently sold out in this colorway, but they have other colorways and it tends to go back in stock pretty frequently, FYI. I have also bought this ponte in the black & wine colors – it is great! Nice and thick, a good heavy stretch in 4 directions, and it remains opaque and holds its shape quite nicely. It washes really well and I haven’t noticed any pilling on any of my pieces. The rayon content makes it feel a bit nicer than the pure poly stuff, but the spandex/nylon additions give it that good recovery so it doesn’t bag out of shape over the course of the day.

I initially was a tiny bit concerned about using this fabric, as the Grainline website really suggests against using knits with a 4 way stretch – this pattern is intended for 2 way stretch wovens, so that the blazer doesn’t stretch and sag downward against the facing. I couldn’t find a good knit fabric that was heavy enough, had the intended stretch amount, *and* came in the color I wanted, however. So I threw caution to the wind and just used this stuff. I’ve been wearing the finished product for about 2 months and I reckon it turned out fine. So, in case you were wondering about 2 way vs 4 way stretch with this pattern!

Navy Ponte Morris Blazer

Navy Ponte Morris Blazer

I made the size 0, which is my usual size for Grainline patterns. I lengthened the sleeves to full-length – bracelet length is pretty, but I’ve decided there is no place in my life for that nonsense (either I’m cold enough to need full sleeves, or don’t want sleeves at all. My sleeve opinions are very black and white haha). I had also originally raised the armholes by about 1″, since I found the armholes in my Lark tee to be about that much too low (if you’re wondering why you don’t remember that post, it’s cos I haven’t written it yet haha), but lowered them back down to the original size when I tried on the blazer without sleeves. I used fusible tricot knit to interface the facings (I did not interface the entire front section, which is suggested in the sew along if you use a 4 way stretch as I did), and sewed most of the construction on my serger, with all topstitching done on my regular machine with a straight stitch.

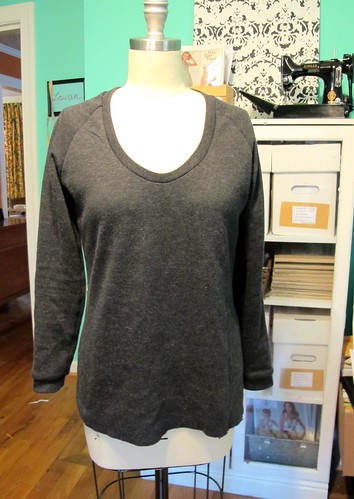
Overall, I found this pattern really easy to follow. There is some interesting seam wizardry going on to create that shawl collar out of the shoulder seams, but none of it is particularly difficult. I like how the hems are all faced, and I like the topstitching detailing – especially at the bottom hem, which I know some people weren’t a fan of. I like that the knit fabric makes as comfortable as wearing a ratty hoodie, without actually looking like a ratty hoodie. I wasn’t sure if I would like that it didn’t have closures – I am the sort of person who never wears things open; if there are zippers or buttons, they are done up – but it hangs really nicely and I rather like how smooth and streamlined it is. One thing to note is that the facing is not tacked down at the front of the blazer, except at the shoulders and where it is caught in the hem. I read some reviews that people did not like how it flipped out, however, I haven’t found this to be an issue with my blazer.

Navy Ponte Morris Blazer

Navy Ponte Morris Blazer

Navy Ponte Morris Blazer

Navy Ponte Morris Blazer

Navy Ponte Morris Blazer

I have worn this quite a bit over the past couple of months – it’s a nice protection against the freezing a/c blasts Tennesseans love to subject people to, and a pleasant style change from the basic cardigans I usually carry around. I think this pattern combined with the Pinot pants would make an awesome ponte fake suit – you know, kind of dressed up from a distance but TOTAL LEISURE COMFORT in reality haha.

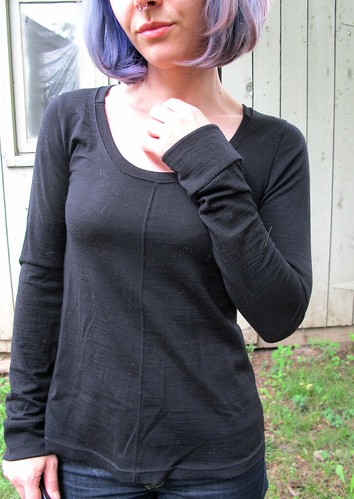
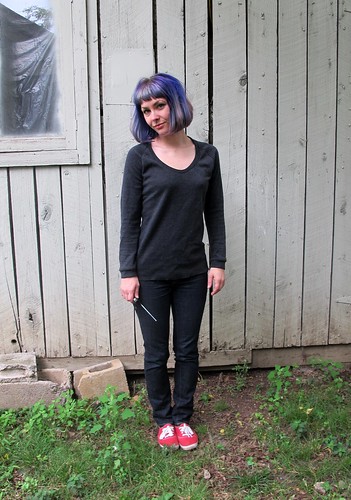
Also, in case you were curious -I also made the rest of my outfit! The jeans are Cone Mills Ginger jeans, and my tshirt is a Renfew made with bamboo knit ♥ that knit is another fabric I buy over and and over again – because it’s awesome! It’s super soft, incredibly stretchy without being sheer, and has an amazing recovery. It’s also super wide, so I can cut a long sleeve shirt out of a single yard of fabric. It tends to go in and out of stock quickly, but it looks like they just restocked the website. FYI!!

Completed: Some Tshirts!

26 Sep

Oh hey, head’s up – this post is all cake and no frosting. No apologies, though! Lord knows I can never have enough Tshirts.

Rather than bore y’all with a bunch of posts featuring patterns I’ve made before, though, I’ve compiled a trio of 3 different tshirt patterns – ranging from Free to You Gotta Pay For That Shit – for science and comparison purposes. Who doesn’t love a good Tshirt debate, amirite? Also, I took these pictures before I redyed my hair, fyi. Just in case you were curious, haha.

LET’S TALK ABOUT TSHIRTS NOW, GUYS.

Plantain Tee

First up is the Plantain Tshirt, from Deer & Doe Patterns. This is that free pattern I was telling y’all about. This is a great beginner tshirt pattern – there aren’t a lot of pieces, it includes some new techniques for beginners (such as sewing the neck binding), the instructions are very clear, and the fitting is quite loose at the bottom. I was initially afraid that I wouldn’t like this shape on me AT ALL, but I’m surprised at how much I love it!

Plantain Tee
Plantain Tee

Even though it’s a free pattern, I think it’s far from being a “crappy” pattern, if that makes sense. The sizing is perfect – I sewed up a straight 34, with no tweaks. I used the last scraps of my black merino wool from Organic Cotton Plus to sew this up – I like how the wool gives the bottom some structure (and the wrinkles? Not as much a fan of those, but I’ll live :P). And it’s SO COZY. Cozy tshirts, FTW!

Plantain Tee

I did make a couple of changes to the design of the pattern itself – the main one being that seam that runs down the front and back of the top. This was done out of necessity, as I didn’t have enough fabric to cut on the fold. I simply added a seam allowance and created a CF and CB seam. I topstitched the seams so they’d look more intentional, ha. I also added cuffs to the sleeves – because, I dunno, I like them! There’s a bit of piecing at the neckline binding as well. Since I was making this out of leftover scraps, I didn’t have a long enough piece to cut continuous binding. I don’t think it’s that noticeable, and hell, I’ll deal with some seams if that means I get a merino wool top out of it amirite.

Stripey Renfrew

Next up is my tried-and-true tshirt allstar – the Renfrew from Sewaholic Patterns! I LOVE this pattern, a fact that I believe is pretty well documented. Renfrew is favored by me because I think it most resembles what we think of when we think of a tshirt – slightly fitted, set-in sleeves, and 3 neckline options (in addition to the scoop, there’s also a cowl and a v-neck), as well as sleeve length options. The pattern is written to have a band of self-fabric at the sleeve cuffs and hem, in addition to the neckline. I’ve found that I prefer to hem my tshirts (rather than use the fabric band), and some of the more casual ones I like to hem the sleeves as well. One thing to keep in mind – should you decide to join me in my tshirt anarchy – is to add that length to the sleeves and hem before you cut them out. Otherwise, they might end up short! Ask me how I know about THAT 😉

Stripey Renfrew

Fitting-wise, this is a great pattern, although I did make a lot of tweaks to get to the point I am now. It’s been a long time since I tweaked, but if I recall – this is a size 0, with additional ease removed from the waist. I also shortened the shoulders a smidge and made them slightly narrower. All those tweaks paid off, because this is a pattern I reach for again and again when I need a tshirt. At any given time, if you see me in a tshirt – ask me if it’s a Renfrew, the answer will probably be yes! Seriously! Oh, and my fabric is a striped ponte from Mood Fabrics (the store, not online).

SJ Tee

The last top in this trifecta is the SJ Tee from Papercut Patterns. Another new-to-me top, and I admit this is more like a sweatshirt than a true tshirt (but mostly due to fabric choice). It’s kind of like a sexy sweatshirt, tbh – raglan sleeves and WHOA SCOOP NECK. Forreal, make this in something too stretchy and you’ll end up in boobie city. Again – want to ask me how I know about that? 🙂 haha!

SJ Tee

I’m surprised at how much I like the fit of this, considering that I don’t normally go for things so loose. I did end up taking the CB in by about 1″ – I’d already sewn the neck binding in at that point, so the seam runs clear from the bottom to the top of the binding, oops. But that made a HUGE difference in the fit, especially at the back. I used the size XXS and – other than the chunk taken out of the CB – it’s relatively unchanged. Oh, and I did shorten the cuffs so they’d look more like a sweatshirt. The fabric I used here is the last of my wool knit from Mood Fabrics (the same knit I used to make my grey Jenna cardi), and I had JUST ENOUGH. It’s amazing how much I love such a simple sweatshirt, by the way – I’ve been wearing it every night. It’s so cozy!

Here are the three patterns as modeled on my form:
Plantain Tee
Plantain Tee

Stripey Renfrew
Renfrew Top

SJ Tee
SJ Tee

I think it’s really interesting how something so simple as a damn tshirt can yield such different results, based on pattern and fabric choice. These are all pretty basic designs in the grand scheme of things, but they’re different to stand on their own. Obviously there are many, many more tshirt patterns out there (off the top of my head, these come to mind: Ensis, Briar, Bronte, Coco, and Lord, don’t get me started on dresses that can be hacked into tees), but I stuck with these three because I feel they’re the most basic/versatile. Also, let’s be real – if I fall down a tshirt rabbit hole, it might be months before this post sees the light! Ha!

Stripey Renfrew

Out of all these, I think my favorite is the Renfrew, just because it’s so damn versatile and I love how it fits (not to mention, the slim fit is ideal for layering). It might also have something to do with the Renfrew being my first love – can’t ever abandon her now 😉

I can’t stop thinking about that SJ tee too, though – I already have some future plans for her, including camel-colored boiled wool. Yum!

Plantain Tee

What’s your opinion on tshirt patterns? Do you have a favorite – and if so, dish please!

(psst! Don’t forget to enter the Sewtionary Giveaway, if you haven’t already done so! Entries close on Monday morning!)

Completed: The Sugar Plum Dress (+ a Giveaway!)

25 Nov

This dress is SO awesome and sneaky. Looks like two pieces, but wait- there’s more! It’s actually one dress! Sugar Plum dress made with Oscar de la Renta silk and ponte knit from Mood Fabrics I LOVE these kinds of dresses! Looks like a silk blouse with a high-waisted pencil skirt, without the bother of keeping a shirt tucked in all day and making sure things match in the morning (because, ew, all I wanna do is sleep right now). Extra bonus – the skirt is a ponte knit, so it’s actually a COMFY pencil skirt. Are y’all feeling my excitement right now?? Sugar Plum dress made with Oscar de la Renta silk and ponte knit from Mood Fabrics This is the Sugar Plum, from Lolita Patterns. Full disclosure: Amity sent me this pattern free to try it out and see how I liked it. I guess you probably gathered at this point my reaction to the finished dress – ummm, amazing! I love how it’s totally appropriate for a professional environment (not that I need clothes like that anymore, but, you know, I still like to dress up ;)), but it’s still beautiful and feminine and unique. The pattern is really fun to put together – lots of tiny pieces, clever seam finishes, the kind of stuff that makes me 😀 Since it doesn’t require a lot of fabric to make up the top half (less than a yard!), I splurged on this amazing Oscar de la Renta silk print from Mood Fabrics. I also bought this navy blue ponte knit for the skirt (omggg so comfy) and lime green china silk for the lining for a bit of a color pop. Sugar Plum dress made with Oscar de la Renta silk and ponte knit from Mood Fabrics This is view B, without the front flounces. I sewed up a size 2. The top fit with no alterations, although I did need to take the skirt in a bit to get it fitted (it’s actually a bit toooo fitted now, whoops. Good thing it’s a knit lol). I did use a much stretchier fabric than suggested by the pattern, so I’m not surprised. The pattern has you use a stretch woven, and pontes tend to be a little more like an actual knit. Based on the way the skirt fits, I suspect you could also use a non-stretch woven and just cut the panels on the bias for the same fitted/comfortable effect. I skipped the pockets and the sleeve gathering detail for a more simple look. Sugar Plum dress made with Oscar de la Renta silk and ponte knit from Mood Fabrics The more I sew with silks, the more I find myself not wanting to make up anything else. The most important thing I’ve learned when it comes to sewing lightweight/slippery/silky fabrics is to make sure that your cutting is super accurate, then the sewing is a piece of cake (or, at least, as much of a piece of cake as it can be!). I always rip my fabric along the cross grain first, to ensure that the edges are perfectly straight, and then pin the selvedges together before I lay down my pattern pieces. This prevents the silk from shifting as I cut it. When it’s time to cut, make sure your scissors are nice and sharp, and try to cut the entire length of the blades (instead of timid little snips). One thing I loove about ordering from Mood Fabrics is that I know the fabric is going to already be on-grain, so I don’t have to worry about straightening the grain before I cut. Just rip the cut edge, pin, and cut those pattern pieces! Sewing with the ponte was much easier than the silk, obviously. I used a serger for all the skirt seams, and my regular sewing machine (treating it like a woven) to attach the silk top to the ponte waistband. I love this ponte because it’s quite a bit more stretchy than other pontes I’ve tried, which means it’s extra extra comfortable. Just be careful when you press it – it definitely gets a shine, so use a press cloth. I keep a big square of silk organza specifically for this purpose. It absorbs the heat of the iron so my fabric underneath doesn’t shine, and it’s sheer so I can actually see what I’m doing 🙂 Sugar Plum dress made with Oscar de la Renta silk and ponte knit from Mood Fabrics Sugar Plum dress made with Oscar de la Renta silk and ponte knit from Mood Fabrics I really enjoyed working on this pattern – lots of tiny details to make me feel challenged as a seamstress, but not so much that I got overwhelmed with the process. A lot of indie patterns run on the easy/beginner side – which is fine, I know there are lots of people who want something simple to make up, and it’s easier to complicate a pattern than simplify it. But sometimes it’s nice to have something that I feel is aimed at a slightly higher level, without me having to run through the steps and find ways to make it harder for myself. Wow, I just made me sound like a total weirdo. What can I say, I like a challenge! Sugar Plum dress made with Oscar de la Renta silk and ponte knit from Mood Fabrics I did make a pretty crappy mistake toward the end of this dress. I was sewing in the invisible zipper and could not get the waistband seams to match up. I was tired, hungry, getting grouchy (you can see where this is going), and I thought, “One more try and then I’m outta here.” While picking out the zip, I somehow managed to detach the teeth from the zipper tape. WHYYYYY. I know I tell y’all that I have millions of zippers in my stash, and I do, but none of them are invisible. I actually have to go out of my way and buy one whenever I need it (because I’m too stubborn to keep those in stock, apparently), which usually ends up with me going to Walmart because they sell invisible zippers and they’re open at 3am when I suddenly need one. So I pretty pissed about destroying this zip, and trying to avoid another trip to Walmart. I ended up cutting the zipper right above where I sliced it open, and just finished the dress with a super duper short zipper – it ends about halfway down the waistband. Since the skirt is so stretchy, this works, kind of. It’s funny to watch me pull it on, ha! And you know the worst part? THE WAISTBAND PIECES STILL DON’T MATCH UP. Whatever, I’m over it! Sugar Plum dress made with Oscar de la Renta silk and ponte knit from Mood Fabrics Sugar Plum dress made with Oscar de la Renta silk and ponte knit from Mood Fabrics I love the little details on this dress that make it so special – the ruffled collar (hemmed using the rolled hem on my serger), the tiny buttons with the tiny button loops, and that BRIGHT LIME GREEN LINING. Really, it’s like a party when I take the dress off! Sugar Plum dress made with Oscar de la Renta silk and ponte knit from Mood Fabrics Sugar Plum dress made with Oscar de la Renta silk and ponte knit from Mood Fabrics Sugar Plum dress made with Oscar de la Renta silk and ponte knit from Mood Fabrics By the way, don’t ever search Oscar de la Renta on the Mood Fabrics site unless you plan on dropping some serious dough on some seriously incredible fabrics. I just fell down the rabbit hole – again! – and discovered violet boucle, boucle with sparkly lurex (!!!), silk floral and some freaking polka dot silk taffeta. I want, I want it all! Sugar Plum dress made with Oscar de la Renta silk and ponte knit from Mood Fabrics

Now time for the fun part – a giveaway! Amity has generously offered a copy of Sugar Plum to one lucky winner, yeeeah!! Still having reservations? Just know that the sizing goes aaaaall the way up to 24 (yes!) and there is an entire sew-along on the blog for anyone who needs some hand-holding. You have no excuses, people! To enter, just leave a comment on this post and let me know what you’d make your Sugar Plum up in (Personally, I’m lurking on a second version with a leopard blouse and a denim skirt, like, ahem, Leila’s. Yes. Exactly like that. Sorry boo!). This giveaway is open to WORLDWIDE and I will close the entries a week from today, Monday, December 2 8:00AM CST. Good luck!

GIVEAWAY IS NOW CLOSED.

Completed: Plaid Flannel Archer (+ Draping winner!)

10 Oct

Finally, a successful Archer button-up – in my dream plaid flannel, no less (seriously, I keep eyeballing all the other colors… do I take the plunge and buy them all?? Because I want to!)

Lumberjack Archer; Ponte Leggings

I am pretty proud of this shirt, so let’s be honest – there are lots of pictures in this post.

Lumberjack Archer; Ponte Leggings

Although the more I look at these pictures, the more they appear to just be the same picture at a slightly different angle or pose. Oops 😦

Lumberjack Archer; Ponte Leggings

ALSO, please forgive my awful editing and how the color changes in every picture. I bought a new photo editing software with my new laptop (Corel Paintshop Pro, if you’re curious!) and I’m still trying to get used to it 🙂 BUT HEY, I can edit out zits and stuff now, so that’s pretty freaking awesome!

Lumberjack Archer; Ponte Leggings

Anyway, ok, let’s talk about this Archer I made! Using my failed linen Archer as a wearable muslin, I shortened the sleeves by about 1″ and left the body length intact (you’ll recall that the linen one I ended up cutting too short. Or maybe you don’t recall, see if I care). I think my sleeves are still a little long, but I also anticipate this shrinking more in the dryer (I only washed the flannel once before cutting, sorry, I was just excited!) so hopefully they won’t end up too short!

Lumberjack Archer; Ponte Leggings

I also made the pocket smaller! No rhyme or reason to how I did it, I just eyeballed until it looked “right.”

Lumberjack Archer; Ponte Leggings

Making this shirt was super fun, from cutting (what can I say… I love matching up plaids haha) all the way through sewing. I forgot how much I love sewing really precise things like button-down shirts. Makes me want to sew another shirt for Landon, maybe. What’s funny is I actually caught myself starting to rush through the construction of this – not because I was on a deadline, but because it’s starting to get cold and I wanted to wear this shit nooooooow – and I decided to force myself to slow down by sewing flat-felled seams instead of just serging the seam allowances off. Even the arms are flat-felled. I’m so glad I did, because the end result turned out pretty fabulous if I do say so myself.

Lumberjack Archer; Ponte Leggings

I cut the back yoke, pocket, and front button band on the bias. Everything else is straight and painstakingly matched. The only boo-boo I made was that I put the button band on the wrong side – oops! I originally chose the opposite side of the flannel as the right side, then changed my mind when I started sewing. Since the front pieces are not mirrored, this meant I had to compromise my button band side. Oh well, I am just pretending that it’s actually a men’s shirt, haha!

Lumberjack Archer; Ponte Leggings

At any rate, the side seams match up beautifully. Look at that shit!

Lumberjack Archer; Ponte Leggings

I changed out the buttons for pearl snaps, so I can hulk my way out of this shirt when the urge strikes. Funny thing about those pearl snaps – they actually started out white, and while it looked ooookay, it also just looked like I bought the wrong color pearl snap. I can’t get black snaps locally (and DAMMIT that I SAW them in Chicago and was like “nah I don’t need that” lol oh Lauren, hindsight is 20/20 or some shit) and I couldn’t wait sooo… I painted these with black nail polish. Black glitter nail polish, to be precise. Hey, it works!

Lumberjack Archer; Ponte Leggings

Lumberjack Archer; Ponte Leggings

I sewed the size 0, as I did last time, except the side seams are sewn at 5/8″ instead of the pattern’s 1/2″. This makes for a slightly (very slightly) smaller fit.

Lumberjack Archer; Ponte Leggings

The collar stand turned out fucking perfect, which I’m VERY proud of! I followed Andrea’s tutorial and I had no unpicking with that method. I’m sold, and Andrea, I owe ya a beer for that. Thanks bb♥

Lumberjack Archer; Ponte Leggings

I also changed out the sleeve plackets and used the ones from the Negroni pattern. I just think these look so much better with the flannel check, plus they are more conductive for rolling up sleeves. I also find this type of placket easier to sew. Man, I love sewing plackets.

Lumberjack Archer; Ponte Leggings

Oh, I also made my leggings! You can’t really see any detail because they are black, wah, but I did make them! I used the Ooh La Leggings pattern and a black ponte knit from Mood Fabrics. My take on ponte leggings – AWESOME. So so awesome!! I actually wore these when I traveled to/from Chicago (so, 18+ hours total) and they were SO comfortable – and they actually look like pants! Guys, I am so sold on these.

I don’t have much else to say, so have some pictures –

Lumberjack Archer; Ponte Leggings

Glitter buttons, yeah? 🙂

Lumberjack Archer; Ponte Leggings

Collar stand pride~

Lumberjack Archer; Ponte Leggings

Lumberjack Archer; Ponte Leggings

Placketz

Lumberjack Archer; Ponte Leggings

Flat-felled seam, curved hem

Lumberjack Archer; Ponte Leggings

Proof that these are actually leggings and not some black blob.

Lumberjack Archer; Ponte Leggings

This outfit has basically become my fall uniform. Seriously! The flannel is so warm and cozy – and easy to throw on if I’m chilly (which is always. Yes, I have worn this shirt every day since I finished it, don’t judge me). I am really happy with how both turned out, and definitely plan on making more. Question – is it really dorky to make me & Landon matching plaid flannel shirts? Because I’m totally about to go there.

One last thing – We have a winner for the Draping book! Random number generator, who do you choose?

random

yaywinner

Congratulations, Jennifer Stephenson! I can’t wait to see what vintage recreations you end up making!

Completed: The Wild Side of Butterick 5078

27 Mar

Apologies in advance for the lame post title. This dress, though, is NOT lame. Unless you think leopard is lame, and if that’s the case – I’m afraid we can’t be friends at this point, so you need to GTFO, bye.

Leopard Knit Dress
This is my third (!!!) make of Butterick 5078 – and likely not my last, although it probably should be for right now. I love this pattern, although I’ve had to make a few modifications to get it exactly where I want it – shortening the skirt, eliminating the waist runching, and streamlining the sewing process. It appears to work well with a variety of fabrics, from slinky to ones with lots of body. Now that’s a versatile pattern, yeah?
(ooh I just noticed how crooked that picture is. My tripod doesn’t stand straight, so I usually have to straighten them in editing… and I guess I didn’t straighten that one enough. Sorry! I’m also not fixing it, mwahaha)

Leopard Knit Dress
My fabric is a lovely knit ponte from Mood fabrics – it has a nice heft and body to it (unlike the rayon jersey I used for my slinky 5078), as well as a good amount of stretch, even though it’s also quite stable. This fabric was a joy to work with, especially when it came time for my twin needle topstitching. Usually I have to play around with the tension and stitch length to get a good smooth stitch without that weird bump down the middle, but with this stuff the stitches just sank right in. It also presses really well – which yeah, pressing a knit seems kind of weird, but I like to press my hems before I topstitch as I find it makes it easier to sew. And while it’s nice and cozy, I also think it’ll be totally suitable for warmer months.

Leopard Knit Dress
As I mentioned before, I switched up the construction order for this to makes things easier. I basically just sewed everything flat, and then swooped up the side seams at the very end. This is what I love so much about knits – having those open side seams means it’s really easy to suck everything if you need to size it down a little. Which I ended up doing, since the super stretch of the fabric made the dress too big originally. I also narrowed the width of the midriff section, as the skirt is very heavy and the weight was pulling it down.

Leopard Knit Dress
Also, I wasn’t thinking when I bought this stuff (well I was thinking, but more along the lines of “OOH LEOPARD OOH SEXY DRESS LET ME WRAP MYSELF IN THIS HERE BOLT OF FABRIC), and I only bought a yard and a half. It would’ve been enough if the bodice wasn’t cut on the bias. Whoops! I spent foreeeeever trying different cutting layouts to get this to fit on my piece of fabric. In the end, I shortened the sleeves to elbow-length, took an additional 2” off the skirt, and now the bodice back has a seam (it’s supposed to be cut on the fold – can you see that seam tho? It kind of looks, oh, camouflaged trololol).

Leopard Knit Dress
Sewing the actual dress took barely any time at all, though. Seriously. It took me 45 minutes to stitch the thing together.

Leopard Knit Dress
Leopard Knit Dress
Here it is without the belt. You all know I’ve been on a major belt kick lately, but this looks pretty good sans belt, too!

Leopard Knit Dress
Consider me a ponte convert! Special thanks to Carolyn, she dragged me to the section I would have otherwise ignored. Now I wish I had one of everything that was in there, gah.

Leopard Knit Dress
Man, I love leopard print. It really goes with everything… expect maybe more leopard print. I probably shouldn’t wear my leopard coat with this, eh?