Tag Archives: Imogene+Willie

Completed: The Stacie Jean Jacket

16 Oct

Hot on the heels of my 70s denim skirt and Cone Mills Ginger jeans, I have ONE MORE denim piece to share with y’all and then I swear I’m done (well, for now anyway haha). I made a jean jacket! Skirt, pants, jacket – my dreams of wearing a full Canadian Tuxedo are finally realized 😛

Stacie Jean Jacket - front

I have wanted a new jean jacket for several years now. I had a really ace one back when I was a teenager – it fit just the way I liked and the color was spot on. I covered it with patches, buttons and pyramid studs (again, I was a teenager) and wore it for nearly a decade. It even survived Hurricane Katrina – not without a few new mold-induced holes, but y’know, ~punk rock~ or whatevs. I actually still have it, but it’s pretty old, and I’m definitely not cool enough to wear it anymore. Anyway, that was the best denim jacket. Denim jacket #2, the desperate replacement, was fairly subpar and primarily bought out of necessity rather than because I actually liked it. It never fit right, and the wash is one of those weird faded green-indigos that always looks dirty. It’s gone through a couple of alterations to both size and length, which somehow made it look both better and worse at the same time. I’ve been wanting to replace it for years, but it seems like all the stuff I find in stores has a really odd fit or is pre-destroyed/ripped/faded, which I’m not a huge fan of. And while I’ve never been opposed to making one myself, I never came across a pattern for one. Well, until now, anyway!

The pattern is the Stacie Jean Jacket from Style Arc patterns. I’ve never sewn a Style Arc pattern before – although I’ve heard wonderful things about them. They’re a bit expensive to ship from Australia, and you only get one size with your pattern (and since it’s a new-to-me company, what if I get the wrong size arghh). All that being said, Style Arc now has an Etsy shop, where you can download PDFs that come in packs of 3 sizes. Praise! Not to mention, as someone who abhors taping together a bunch of pieces paper, the PDFs are pretty small and easy to manage. You can only print one size at a time (they aren’t nested), but it does make it easier to see what lines to cut and reduce the anguish of wasting a bunch of paper on sizes larger than you need.

Stacie Jean Jacket - front

ANYWAY, all that unnecessary backstory behind, I bought the 4/6/8 pattern and printed/cut the size 6, which was based on my measurements on the size chart (finished measurements aren’t given with this pattern, so that was a big ol’ element of trust right there! Well, not horribly because I did make a muslin!) I waffled a little bit before actually sewing it up – or even making a muslin – because the instructions are SO SPARSE. I don’t feel like I need a bunch of hand-holding in my sewing these days, and I rarely even look at the illustrations in an instruction book anymore, but man alive there is literally like, a paragraph, for making the whole coat. All the sentences are really brief, and there are no reminders for stuff like finishing seams or what direction to press them in. No diagrams at all, unless you count the topstitching guide on the second page. Seriously, the instructions are 3 pages long – the first page is the cover, and the last page is the topstitching guide. And half of the second page is a map of all the pattern pieces. So yeah, not a lot of hand-holding with this one! Do you ever look at a new pattern (sewing or knitting) before starting it and get overwhelmed with all the direction since it’s a bit out of context? That’s how I felt about this pattern. Woof. I knew a muslin would be totally necessary, not just for fit, but also to make sure I understood how to put the dang thing together. I was NOT about to spend my weekend ripping out topstitching.

Stacie Jean Jacket - side

It wasn’t until I was in Maine, teaching at the bomb-ass A Gathering of Stitches for my sewing retreat last month, that one of my students (appropriately named Staci 😉 ) showed me her Stacie Jean jacket. It was absolutely beautiful and I was immediately inspired. She reassured me that the jacket was easy to construct, and that the sizing was accurate. So, as soon as I got home, I started on my muslin.

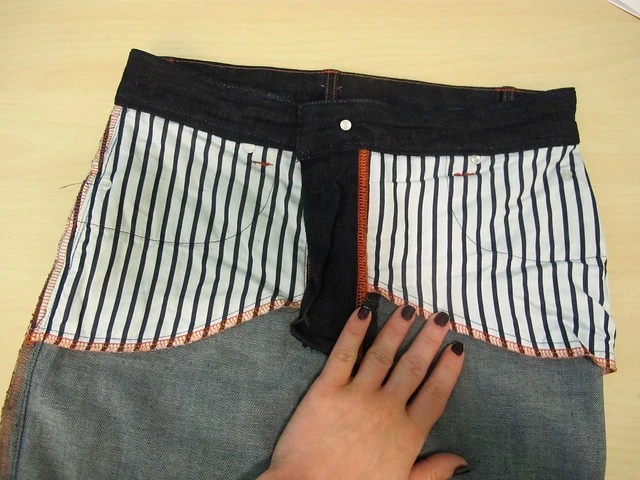
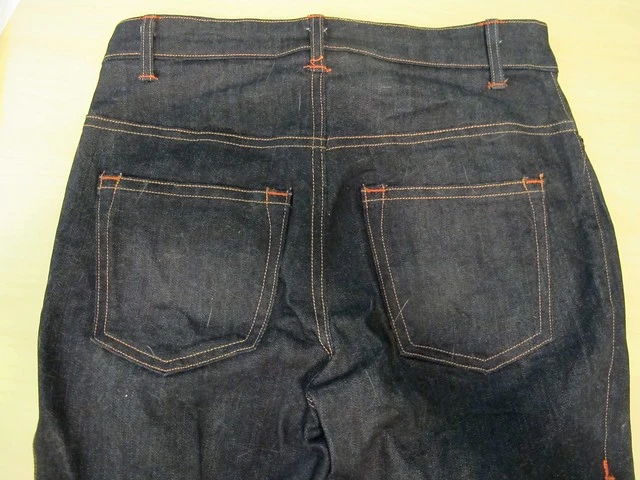
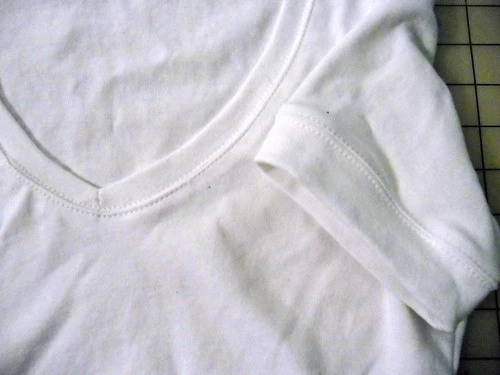
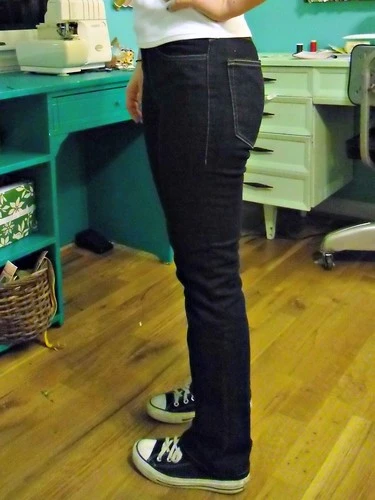
I’m really glad that I took the time to make a muslin, because I ended up needing to make some changes around the armscye. I tried to take photos to share in this post, but you can’t really see the fitting issue. I could certainly feel it, though! The armscye was totally the wrong size and my arm movement was severely restricted. I could barely reach in front of me, and everything pulled at the bicep. I googled around and tried to figure out how to fix this issue, but that was hard since I wasn’t really sure what was causing the problem to begin with. Finally, I just sliced the sleeve out of the arm hole and re-pinned and sewed and added fabric scraps to the holes until things started to feel right. I also compared the pattern piece to my current denim jacket (which, although I’m not happy with it as a whole, I will say at the arm holes fit really well hahaha). Look at this!

Stacie Jean Jacket - pattern adjustments

So, clearly, the arm holes were WAY too big for me. Once I figured this out, I was able to adjust the pattern pieces to be the correct (smaller)size for me, plus reduce the height of the sleeve cap so that it would fit the new arm hole. Using a combination of my pinned/basted/pieced muslin pieces and the existing jacket, I added in paper to raise the underarm and add more so that the arm hole didn’t cut too far away from my actual underarm. I also added about 1/4″ to the shoulder, since it seemed a bit narrow on my muslin.

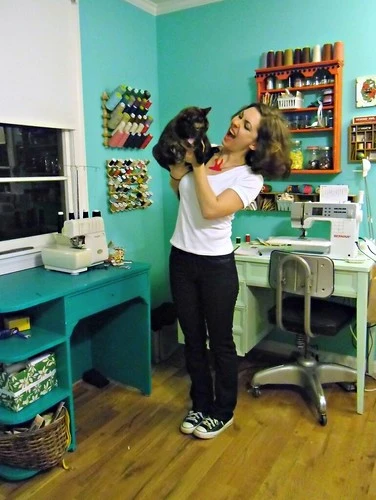
Also, totally wearing my muslin in that photo. Ha!

Stacie Jean Jacket - pattern adjustments

Stacie Jean Jacket - pattern adjustments

Stacie Jean Jacket - pattern adjustments

I wish I could give y’all specific directions or a link to a tutorial on how I figured all this out, but it was really a matter of pinning and basting and ripping and trying things on over and over until the fit felt right. I can’t even really share photos because this was a fitting issue that was more focused on the way the garment felt, rather than how it looked. Sorry! I will say that I used this post to figure out how to reduce the sleeve cap, but the arm hole itself was pure trial and error.

While I was rooting around in pattern malarkey and destroying arm holes, I also made a few more fitting changes based on the rest of the muslin. I removed 2″ from the length of the jacket, because I liked the length of my muslin without the bottom band added. I also removed a buuuuunch of length from the sleeves – as drafted, even with the turnback, they were a good 2″ too long. However, I also wanted to add a proper cuff (the pattern has a deep sleeve hem so you can turn it back, but I wanted an actual cuff with a button and placket), so I removed another 2″ at the bottom. I drafted a simple cuff (lol “drafted,” aka I drew a rectangle on some paper) and added a little bit of width at the bottom of the sleeve hem to accommodate the placket.

After all was said and done – I made a second muslin to verify that all my changes didn’t completely ruin the pattern. Everything worked! Yay!! Finally, time to cut into some denim!

Stacie Jean Jacket - back

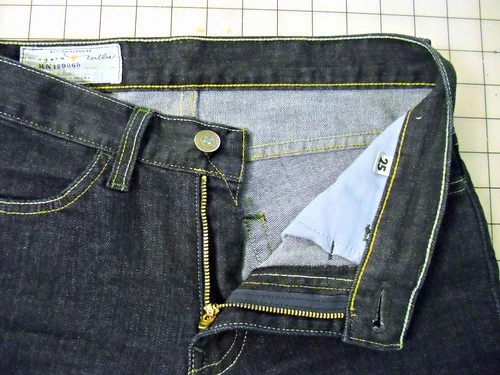
My denim is a piece I’ve had squirreled away in my stash for a couple of years now. I bought it at one of the big Imogene + Willie yard sales, and it’s a beautiful heavy, high-quality selvage denim. I got about 4 yards for $5 (whoop!). I tried to make jorts with it last year (that was a big ol’ fail btw), then realized I like my bottoms to have a little bit of stretch, which this denim has none of. I’ve been hanging onto this yardage for way too long considering I didn’t know what I’d do with it, but a denim jacket is a pretty perfect project for this kind of fabric. Of course, I’m used to my old jacket being so soft now, so the stiffness of this new one feels really off. I may wash it a few times to try to soften it up.

Stacie Jean Jacket - front

Muslin horrors aside, sewing this jacket was super fun! Like I’ve mentioned before again and again, I really enjoy working with denim and I love all the detail that goes into sewing jeans (or denim jackets, for that matter 😉 ). It’s a good thing I like topstitching, because this jacket has a LOT of it. Fortunately, there is a topstitching guide included in the pattern, which shows you diagrams of where to put what. I also had my old jacket out for reference, which came in handy with that sleeve placket. There is no interfacing in this jacket, although I did put a narrow strip in the facing behind the button holes and buttons – just to stabilize it a bit. It’s not the entire width of the facing. The collar and everything are uninterfaced. Over time, everything should wear in and soften up really nicely.

Stacie Jean Jacket - front

I primarily added the cuffs + placket because I like to wear my sleeves rolled up. The sleeves on this pattern are certainly wide enough to do this without needed a cuff that opens, but I just didn’t like the way that felt. I’m glad that I made the changes to the sleeve, but now I kind of feel like the sleeves are a bit too loose-fitting. The sleeves on my RTW jacket are definitely a lot tighter. That being said, I also can hardly wear a long sleeve top under that jacket without some serious bunching, so I’m going to hold off and wear this jacket around a little before I decide whether or not to narrow the sleeve. I would kind of like to be able to wear a sweater under this. The jacket is sewn with the sleeves inserted flat, then sewn up the side seams like how you’d do a tshirt (interestingly, the sleeve head has no ease whatsoever), so reducing the sleeve width will be pretty simple if I decide to do that in the future. Well, I’ll have to remove the cuff and redo the placket, but I’m sure I can manage.

Stacie Jean Jacket - front

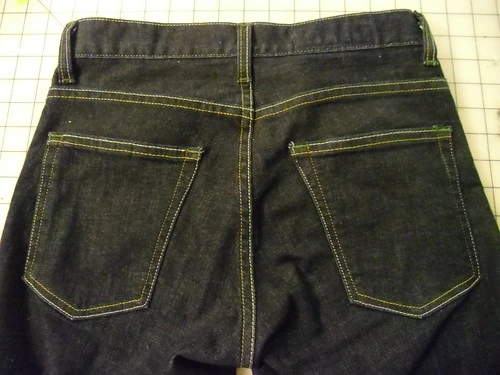
One thing I wish this jacket included is pockets for those pocket flaps! Alas, they are merely mock pocket flaps – they don’t open to anything (or, rather, they don’t open at all – that shit it nailed shut straight through the button ahahaha). My RTW jacket has little welt pockets under the flaps, which I wanted to copy, but trying to figure out those sewing steps – in addition to the sleeve changes and all that fitting drama – was making me feel dizzy so I opted to keep it pocket-less. Also, I’m pretty sure I’ve never used those pockets on my jacket. So it seemed kind of pointless to go crazy adding a pocket I didn’t even need.

Stacie Jean Jacket - front

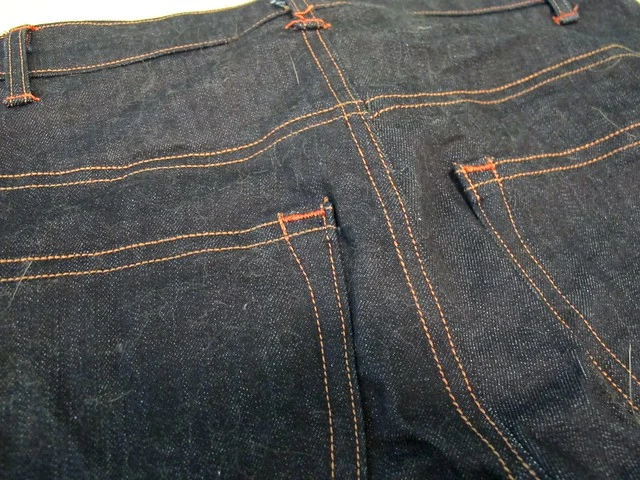
Topstitching!! My favorite!! I used a denim needle and some lovely jeans topstitching thread for all the topstitching. I actually just used a single needle to get the double topstitching – one the first pass, I used my edgestitching foot with my needle moved all the way to one side, which made the stitching line 1/8″ from the edge. For the second pass, I used my 1/4″ foot and centered it on the first stitching line. I’m sure you could use a twin needle for this, but I don’t have any that could handle that heavy denim and thread. Plus, I don’t mind the extra work of sewing the same lines twice 🙂

Stacie Jean Jacket - front

Stacie Jean Jacket - back

Sorry these pictures are so blown out! Honestly, all the photos on this post are bad, but I don’t care enough to retake them 😛

Stacie Jean Jacket - cuff and placket

Stacie Jean Jacket - cuff and placket

Here is the sleeve placket. Based on the placket of my RTW jacket (and also, Landon’s denim jacket haha), it is just a little extension cut out at the bottom of the sleeve. Maybe 1/2″ wide and 2″-3″ high. You sew the sleeve closed up to wear the placket starts, then turn under the extension twice and topstitch it down. The cuff is literally just a rectangle.

Stacie Jean Jacket - inside

The inside of the jacket is sewn with black thread (I have two sewing machines so I can use both when I’m making anything with jeans – one is threaded for piecing, and the other is threaded for topstitching) and the seams are serged.

Stacie Jean Jacket - inside

More frustrating than the fitting conundrum was sewing these FUCKING button holes! LORD!!! I can’t even tell you how many I had to rip out – my machine just plain did NOT want to put button holes in this jacket! Working on those things legit drove me to drink that day. At least I finished, them! And then I got to hammer out my frustrations with the buttons, which is always a plus 🙂 The buttons are some of the bag of 25 that I bought from Taylor Tailor, btw!

Stacie Jean Jacket - inside

Finally, I added this little hanging loop to the center back neckline, to make the jacket easier to hang! It’s just a little strip of the selvage, folded and topstitched and crammed into the collar seam 🙂

Stacie Jean Jacket - back

Overall, I’m really pleased with how the jacket turned out (well, other than the width of the sleeves, but I’m gonna sit on that and see how I feel after I’ve worn some long-sleeve shirts under it. I might feel differently about it in a couple of months!)! Despite all my fit-bitching at the beginning of the post, I think this is a great pattern and I definitely recommend it if you’re looking to make your own denim jacket and can be adventurous about the lack of instructions. While I did indeed have problems with the arm hole fit, I googled the shit out of this pattern and haven’t come across anyone else with the same fit issues. This leads me to believe this is a fit issue specific to my particular body shape, and not an indication that the pattern is terrible. Just need to put that out there!

Will I make this pattern again? You bet! I’d love to do a shrunken version in white denim, maybe for next spring 🙂

Completed: Fancy Cone Mills Ginger Jeans

9 Oct

I’ve been swimming through muslin hell this whole week (crazy me decided to even make a SECOND MUSLIN to verify all my changes, wtf who am I turning into amirite), but fortunately, I have an old make from pre-Maine that I can share with y’all! Jeans! Yay!

Cone Mills Ginger Jeans - frontCone Mills Ginger Jeans - front

Cone Mills Ginger Jeans - front

Remember when we were all scrambling around to buy those fancy Cone Mills Denim kits with our Ginger Jeans earlier this year (and last year too, for that matter)? I’m so happy that I made space in my budget for one, because Cone Mills denim is awesome. It’s the same denim they used to make Imogene + Willie jeans (which I can personally vouch for as I own 2 pairs – they wear really well and hold their shape beautifully, which means I never need to wash them in order to shrink ’em back down at the end of the day), and although the kit wasn’t cheap – it is certainly cheaper than buying the actual jeans. By the way, if you’re thinking, “Where the hell is this kit so I can buy one???” I’m sorry to be the one to tell you that they were on limited pre-order, and have been sold out for a while now 😦 Hopefully there will be more where that came from!

EDIT I have just been informed that Threadbare Fabrics sells Cone Mills Denim! Yay!! I apologize in advance for those who end up emptying their bank accounts after reading this post 🙂

Anyway, the point of that somewhat sales-y sounding paragraph was to say that I finally used one of the pieces of my denim for this pair of pants. I received the kit way back in April and have been anxious to sew it up, but I wanted to wait until it was actually something closer to pants-season before I got too excited.

Also, just a head’s up before we delve too far into this post – sorry in advance for all the weird bobble-head shots. I didn’t realize my camera was tilted so much, and I don’t care enough to retake the photos. Also, there be VPL in most of these pictures. Not sorry about that! Deal with it!

deal with it

Cone Mills Ginger Jeans - side

The denim itself is what really counts when it comes to a good pair of jeans. You want a material that is a good medium weight (not too light, but also not too heavy) and if it has stretch, an awesome recovery. The single thing that’s plagued me the most when it comes to making my own pants is finding material with a good recovery! I hate having my pants bag out by the end of the day – it’s annoying enough for every day life, and utterly useless if you’re traveling and don’t have access for a quick wash (or just plain don’t own a washer and dryer, which was totally my situation up until we moved this year!). Plus, washing denim too much can fade out the color and cause the fibers to break down faster. I like my jeans to be a really deep, dark indigo blue, so fading isn’t my first choice. Figuring out fabric recovery is really difficult to do without actually wearing the fabric – which means you have to sew it first. So whenever someone gives me a head’s up on some good stretch bottomweight, I tend to snap it up without hesitation. I knew the Cone Mills denim was good stuff, so I’m glad I was able to get my hands on some before it sold out.

Cone Mills Ginger Jeans - back

This certainly is not my first pair of Ginger Jeans – I’ve made a classic indigo denim pair, a red cotton twill pair, a gold denim pair, a version of jeggings and shorts version. What can I say – when I like a pattern, I tend to stick with it 🙂 And I REALLY like this pattern – it’s a nice, classic jeans pattern with all the good details you see in store-bought jeans, minus the shitty denim and strange fitting issues.

Having made this pattern numerous times made me feel confident enough to break into my mega-expensive denim for the pair you see here. I knew I already had the fit pretty good, so I could focus more on visual details with this version. That being said, there are a few changes to this pair that aren’t evident in my previous makes.

Cone Mills Ginger Jeans - front

The biggest change is that I went up one size, to a 4. While I like the fit of the 2 (all my other Gingers are 2s, fyi!), I’ve gained a little bit of weight over the summer and I got this weird paranoia that I was in denial about my size. Those 2s are great and super comfortable, but the legs are so tight that they look painted on. I was horrified at the thought of people thinking I was trying to squeeze into a too-small size, so I went up to the next size. I think the 4 definitely fits better, but the are a little different. Namely – those wrinkles at the knee. What is the deal with those? The calves aren’t too tight (they are looser than the tightness on my 2s, and my 2s don’t wrinkle like that), so that’s not the issue. Maybe they’re too loose at the knee and need to be taken in a bit? Thoughts? Btw, the wrinkles look worse in photos than they do in real life!

Cone Mills Ginger Jeans - side

Cone Mills Ginger Jeans - back

Since I was going up one size and I don’t trace, I had to reprint the pattern. I know Heather updated the Ginger jeans pattern at some point last year, and I had both an original version (that I got when it was first released) and an updated version (that came with my purchased denim kit). I printed the new version so I could try it and compare to the original one. I don’t recall exactly what changes were made to the jeans, but there are some slight differences in the rise and the shaping around the crotch and hips. The waist is definitely a lot higher than it is in the original version – and this was after I shortened the crotch. The major difference in the updated version is the pocket bags – instead of normal jeans pocket bags, there is a drafted pocket stay (also called an instant tummy tuck).

Cone Mills Ginger Jeans

With a pocket stay, the pocket bags go all the way across the front into the fly. This helps pull everything in and give you a smooth line in the front (hence the tummy tuck name). I wasn’t sure if it would be comfortable, but I tried it anyway and I’m glad that I did! I don’t care about smooth lines or whatever (I mean, c’mon, I’m basically always rocking dem VPLs. Death to thongs!), but what I do love is that the pockets stay in place when you pull your pants on. You know how tight pants always have to get the pockets shoved back down after you go to the bathroom? Not with these babies! Plus, since the pocketing isn’t folded over anywhere, there isn’t a weird bump at the coin pocket. I never was a fan of that.

Damn, shoulda pressed those insides before taking the photo. That fly shield wrinkle looks awful.

Cone Mills Ginger Jeans - front

Cone Mills Ginger Jeans - side

Cone Mills Ginger Jeans - side

Cone Mills Ginger Jeans - back

All the topstitching and jeans-y details are what really made these fun to sew up! I just love the way jeans topstitching thread looks when sewn up against denim, so good. I kept my I+W jeans on hand and used their stitching colors as inspiration for this pair (here’s an old post where I took close-ups of the jeans right after I bought them, if you’re curious). The kits came with the zipper, button, rivets, copper topstitching thread and denim needles. However, you can buy all that stuff individually as well – Taylor Tailor has most of it in his supply shop for really reasonable prices. I did buy the orange topstitching thread from Taylor Tailor, which I think looks awesome next to the gold topstitching.

Now that I’ve overloaded you with pictures of my butt and crotch, here are some flat jeans shots.

Cone Mills Ginger Jeans

Cone Mills Ginger Jeans

As you can see, I used the orange topstitching thread pretty sparingly – just for the bartacks and belt loops. I can’t say I thought of this myself, as I pulled the inspo straight from my I+W jeans. They also use a third topstitching color in the second line of stitching, which is not something I did with this pair. Also note that the I+W jeans don’t use rivets, but I did use them here. I love hammering those things in and I think they really finish off the jeans nicely. I just kept them on the front pockets and coin pocket – I don’t like the look of rivets on the back pockets.

Cone Mills Ginger Jeans

Cone Mills Ginger Jeans

Cone Mills Ginger Jeans

Again, using my I+W jeans as inspiration – I flat-felled only the back yoke seam, and serged + topstiched the leg seams (this will make it way easier to take in the legs if I need to, so yay!). I used orange thread in my serger, which mimics the orange bartacks. I LOVE the way it looks!

Cone Mills Ginger Jeans

Cone Mills Ginger Jeans

Whew! Sorry about all that cat hair!

Cone Mills Ginger Jeans

This is my absolute favorite little detail of these pants – the side leg bartack is a little L for Lauren 🙂 On my I+W jeans, they have a little + sign on one leg in place of a bartack, and I thought, hey I can do that with an L. It’s only on one side, and it’s quite subtle unless you already know it’s there.

Cone Mills Ginger Jeans - side

Welp, that ended up being a super long post! Do you see now why I love making jeans so much? All the little details are so fun and make the end result look extremely professional. Not to mention, all the customization options – from fit, to denim, to topstitching details. I’m so glad Heather released the Ginger pattern and I’m even happier than we were able to get some of that fancy-ass denim to make it up with! I still have one more piece for one more pair of jeans – and I’m thinking I might do the low-rise version next. Could be fun!

Fall/Winter Sewing Plans for 2014

10 Oct

It just occurred to me that I haven’t share any seasonal sewing plans in… well, a while. Which is lame, because these are some of my favorite types of posts (both to write *and* to read) – I mean, who doesn’t like lurking inside someone’s brain, even if it’s just to see what they plan on doing over the next couple of months? Too creepy? Naw.

Anyway, now that London/Paris is looming on the horizon (less than 2 months! Omg less than a month and a half! Eee!), it’s really time that I start figuring out what I’ll be bringing with me (and making, for that matter! Don’t want to end up with another frantic last-minute sewing disaster, ugh). Especially since my luggage space will be very limited – I’m only allowed to bring one suitcase with me overseas (well… I use the word “allowed” loosely here. I can bring two suitcases if I want to – but I get to pay $130 for the second one! LOL GURL NO.), and I want to fabric shop while I’m there! So, I will be packing a capsule wardrobe, one that mixes and matches with itself, for maximum outfit options, as well as warmth. This is much different than how I usually travel (as I fly Southwest, where you can bring 2 bags free – so why the hell not, you know?), but I’m up for the challenge! 🙂 Adulting and all that 🙂

I’ve already made/chosen a couple of pieces to base my capsule around, as well as chosen my theme (like Devon, I think all vacation wardrobes should have themes, because, duh) – Minimalist Parisian Chic. Mostly because my capsule will be very minimal – or, as minimal as I can get it down to, because I am still one of those people who delights in overpacking – with lots of black. Not much on the Parisian Chic side (I’m sure Parisian women will be horrified when they see what I wear to stomp around their city, ha!), but it has a nice ring to it 🙂

Anyway – to start – I have these black Jamie jeans that I made a couple of weeks ago:
Jamie Jeans + SJ Sweater Made with Mood Fabrics
I haven’t decided yet if I’ll be bringing the star sweater. It’s a little bulky! On the flip side, regarding the jeans – I just finished wearing them for the 5th time in a row (sans wash), and they’ve stayed very close to their original shape. No bagging out, woohoo! So that makes me feel good, because I’ll be wearing these a LOT come London.

Stripey Renfrew
I will also be bringing my Imogene + Willie slim jeans (pictured here), because they are basically the best jeans ever. Oh, and probably that stripey Renfrew top. Can’t have enough tshirts!

Now for the sewing plans! Sidenote: By the time of publishing this post, I’ve already finished more than half these makes. Whoops! Guess y’all see where my priorities lie when it comes to posting vs sewing hahaha. Oh well!

Ikat Lady Skater
The Cowl-Necked Skater Dress
I’ve had this idea in my head for a while now – a Lady Skater dress // Renfrew top mash-up! This cotton Ikat knit fabric (purchased at The Fabric Studio here in Nashville) will be the perfect match for this dress – like a giant, snuggly Christmas sweater! I actually don’t know if I’ll be bringing this one to London, due to bulk factor (my capsule really only allows for one dress, which I’m thinking will be the one below – but we’ll see!), but the plans were too good to keep to myself 🙂

DVF Wool wrap
The Wool Wrap dress
Another big mash-up – I’m starting with the DVF Wrap dress pattern, but adding long sleeves (stolen from the Lady Skater, naturally) and swapping out the gathered skirt for a wrap A-line (Miette Wrap skirt – I’m looking at you). The black wool knit fabric was picked up at Mood in NY a couple of months ago – it’s SO soft! Like, cashmere soft. I’m so in love ♥

Silk v neck
The Silk Button-down
I already have a nice white button-down – made from the same pattern, Butterick 5526 (my favorite!) – but it’s not really cold weather appropriate, due to the length of the sleeves. Since they are 3/4, they don’t really layer nicely with my long sleeve sweaters! I’d love to make another one, but up the ante with some beautiful silk double georgette, and modify the neckline to be more of a v shape (likely using this V-Neck variation tutorial by Jen!)

Chambray Button down
The Polka Dot Chambray Button-down
Another thing I already have one of, but need a winter version. This one will be made using a gorgeous cotton polka dot chambray, picked up here locally at Textile Fabrics.

SJ Sweater
The Wool Sweater
Button downs need a nice sweater, yeah? I want to try sewing a sweater, using the SJ Tee as a basis (with a higher neckline, and omitting all bindings). The fabric I have is a lovely camel-colored boiled wool, that I bought from Elizabeth Suzann (aka I totally jacked her wholesale order hahaha). I think it’ll look equally good over both those button down shirts I have planned!

rigel bomber
The Bomber Jacket
I know – I’m already planning a pretty sweet coat. However, the weather in London (and Tennessee, for that matter!) can be fickle, so I’d like to bring a lighter-weight jacket for days when the temperature isn’t as low. I’ve been meaning to make the Rigel Bomber for, well, months now. Just been waiting on the perfect fabric – and I think I found it! Check out this black wool coating – to be paired with gold china silk for the lining.

Other plans I have (no photos, sorry! Use that imagination of yours, ha!)
– Need some thin long sleeve shirts for layering – maybe just a couple out of wool knit, such as this textured black wool jersey (that’s apparently already sold out?! Wah!). I wear these pretty much daily in the winter – and sometimes I like to sleep in them if it’s really cold – so it’ll be nice to have a few to choose from.
– Speaking of sleeping – I need some new pajama pants! Currently lurking Margot pj pants in Tilly’s book, Love at First Stitch, since they seem to be a pretty quick/easy make (I really want to make the Tofino pants, but right now I need quick and easy!). I picked up some really fun orange plaid flannel to make them with – I know, that fabric is ridiculous, which is exactly why I chose it. It’s nothing like I already own! When it comes to pjs, why not, you know?
– I would like to make a flared A-line wool skirt to make as well – thinking about using the Delphine pattern (also from Love at First Stitch), because I love the shape. A little stuck on fabric selection, though! My go-to is usually wool crepe, but that will be too drapey for this shape. Thoughts? I need it to be 100% wool (pretty nitpicky about this, sorry!) and I’m looking for lipstick red. Budget is no more than $25 a yard (and obviously I’d be delighted if it was less than that!)
– Bras! I want to finish at least one bra before I leave – using the Marlborough pattern and one of my kits from Bra Maker’s Supply. Obviously I want new bras, but even more – Norma will be in Paris while I’m there, and you better believe I’m going to drag her into a bathroom and make her assess and critique my fit. Haha! Man, sewing people are weird 😛

I think that’s it for now! It feels good to get everything listed out in one place. I’m hoping I can get all this done before I leave – but if not, no worries. It’s not like I’m lacking clothing or anything as it is!

As a side note, I was just notified that one of my lovely sponsors, Indie Sew, is holding a pretty sweet contest where you can win a YEAR of free patterns! Fuck yes! You can read all about the contest and the reasoning behind it on this blog post, but the general gist is that Indie Sew wants to help you transform your entire wardrobe into handmade and end the cycle of cheap/fast fashion. And what better way to jump start a new handmade wardrobe than with some FREE FREAKING PATTERNS AMIRITE? Such a cool idea, and I really really hope the winner shares their journey via blog or social media so we can follow along! Anyway, soapbox rant over – go throw your name in the hat!

What’s on the table for your fall/winter sewing plans? Do you have any capsule wardrobe suggestions for me? Tips for packing light? Are you going to judge me if you see me wearing the same thing for 3 days in a row while I’m on my trip? 🙂

Completed: Jorts Fail

28 May

Jean shorts (or jorts, as I like to call them – because it’s ridiculous and hipster and sounds completely stupid) are something that have been on my to-sew list for a looong time. Super long. In fact, my jort supply has long run dry – I used to get those the old-fashioned way, by waiting until summer to hack the legs off my jeans so they’d be warm weather appropriate (and later realizing my huge mistake come fall – argh! Whyyyy!!). Jean shorts are an American thing – and I haven’t worn a proper pair in years. No wonder I always see pictures of bald eagles crying:

zWCcW

Anyway. Back to jorts. I knew I wasn’t going to get them by way of cut-offs (I love my jeans too much to do that to them!), so I figured I’d make a pair from scratch and call it a day.

Jorts

My denim is a bit special – I actually bought it during Imogene + Willie‘s big yard sale. I went because I knew they’d have markdowns on jeans (although, when I finally got there, they’d put all the pants away due to threat of rain, wah), but I didn’t realize they’d also have leftover yardage of fabric! For cheap! I got 4 yards of this ridiculously amazing denim for $5 – yes, it’s super narrow (it is selvedge denim, after all), but still. That’s cheap as shit.

Jorts

The denim was really nice to work with. I always complain that good-quality denim is really difficult to find for the home sewer – either it’s too lightweight, it has too much stretch, it has awful stretch recovery, it feels cheap, the color is awful, etc etc. And while I have found some really great denims that make fabulous skirts and dresses, I’m not so convinced when it comes to pants. This fabric, though, is really good. It’s very sturdy and luxurious, with absolutely no stretch.

Jorts

Jorts

Honestly, I think the lack of stretch is what did me in. These jorts are, unfortunately, a fail for me. Wah!

Jorts

They look WAY better in these pictures than they look in real life – so much, I’m almost second-guessing my fail label. But, no, they’re pretty bad.

Jorts

Jorts

I had a somewhat traumatizing experience while making these. Things were going along great – I’d unearthed my Featherweight to do the topstitching (which is BEAUTIFUL, btw! Well. Beautiful where it’s not crooked lolz), I was having a lovely time stitching that denim, I was confident in my TNT shorts pattern, Grainline Maritime shorts. I love my Thurlows, but these are a fab casual shorts pattern if you don’t want all the fuss of the lining and welt pockets! I’ve made them a couple of times before, and while I’m not going to discuss the sizing and construction in detail on this post, you can read all my thoughts on the pattern here and here.

Anyway, I decided to try them on before attaching the waistband, and the zipper immediately popped in half.

“Well, that was probably a shitty zipper. It looked kind of old, probably just gave up on life right as I was pulling them on. I’ll put in another zipper, should be fine.”

So I unpicked the zipper, inserted a new one (have you tried to insert a zipper into a front fly that’s already been assembled? It’s… weird. Not a fan.), attached the waistband, and was getting ready to stitch down the waistband facing when I decided to try the shorts on again.

Oh, right. I popped that fucking zipper too. DAMMIT!

This is when I took an emergency trip to the fabric store (guys, I never do this – but desperate times call for desperate measures and I am DESPERATE for some jorts ok) and bought the strongest denim zipper I could find. I figured the shorts were probably straining against the bottom of the zipper because there was no give in the fabric, so I decided to let out as many seams as I could. I gave myself as much extra room as I could squeeze out, and then reinserted the (third!!!) zipper and finished the waistband.

Then I tried them on. Meh.

Jorts

Jorts

The fit is just… weird. I’m guessing my emergency unpick didn’t work as well as I had anticipated, so now I’ve got some weird lumps in seams that shouldn’t have weird lumps. They also just feel vaguely uncomfortable – I get that selvedge denim is pretty tough, and needs to be worn in a bit before it’s actually comfortable, but I don’t like it. Not in shorts, anyway. I know it looks like they are painted on, but they are honestly not that tight (except I guess somewhere around the base of the zipper, where it strains when I pull them on). Then there’s that whole issue with me being terrified that I’m going to snap this zipper every time I pull them off.

Jorts

Jorts

Jorts

Here’s a closer photo of the shorts and the way they fit. You can see they’re kind of off – it’s not horrible, but it’s enough to bother me. Actually, I think the thing that bothers me the most is the fact that the damn waistband isn’t lined up. I have NO idea how that happened – it matched up perfectly the first time I attached it (right before I popped the second zipper), but it looks terrible. Oh well.

Jorts

Aside from the fit – and the laughingly terrible waistband assembly, seam pucker and all (fyi, that’s where I gave up) – the construction is something I’m moderately proud of. While I didn’t go as far as doing flat-felled seams (and thank GOD for that, since I ended up unpicking them. Well, it didn’t help in the end. But, you know), I did topstitch them with proper denim thread. It looks so good!

Jorts

Well, I guess it would look better if the topstitching were straight, haha! Oh well! Like I said, I used my Featherweight to do all the topstitching – I figured it would be better than unthreading my Bernina every couple of seams. I’m really glad I did, because being able to switch machines made things go a lot faster. Plus, the Featherweight just produces some of the prettiest topstitching! Now I understand why people flip their shits over these machines. They’re pretty fun!

Jorts

Of course, that machine handles entirely differently than the Bernina I’m so used to, so I definitely went through a bit of a curve with this project. My topstitching isn’t straight, but that’s ok. It was a good practice and I’m over these shorts anyway 🙂

I’m totally ashamed to admit that I’ve barely used that Featherweight since I bought it, btw. I used it to make a failed Amy Butler bag right after purchase, and after that it just sat on my cabinet as decoration… until I pulled it out to make these failed shorts. And now I’m wondering if this is a jinxed machine ohgod.

Jorts

Anyway, here’s that damn fly that gave me so much trouble. At least I have lots of practice sewing flys now! Haha!!

Jorts

Sorry for all the unclipped threads and general messy inside. I think I just mentally gave up on this project after the first zipper broke.

Jorts

So, overall – these jorts are definitely a fail for me. Not entirely happy with the fit, I think the topstitching looks sloppy, the back pockets are weirdly in the wrong place, they’re uncomfortable, the stupid waistband looks stupid, but most importantly… I will always always be afraid I’m going to break that zip when I’m taking the shorts off. Not worth the stress. Also, as a side note, that’s my Briar I’m wearing and I’m thinking it looks too big and droopy on me now 😦 Sad.

I’m not entirely bummed with this project, because I had a good time making them (despite the multiple zipper incidents) and I definitely learned a lot during the process. This probably makes me look bad now, considering I just announced my pants making extravaganza, but you know what? Mistakes happen. None of us are immune to the occasional sewing fail, and even if I don’t get a completed outfit out of it, I at least come away with the knowledge to improve on future makes and not repeat those mistakes. I’m also really happy that I reunited with my Featherweight! Maybe I’ll get around to actually fulfilling my sewlution of using that machine to make an entire garment. Sure, it was set for 2013, but… better late than never, right? 🙂

Completed: White Tshirts. Yes, Tshirts.

1 Feb

At the risk of really beating this dead horse to the ground- I like making solid, every day basics. Boring shit like plain pants, tshirts, solid knit dresses, and I’ve got my eye on making underwear as well. I mean, making a bunch of party dresses is super fun, don’t get me wrong – but there are only so many frilly/froofy dresses I can fill my closet with before I start pulling my hair out on Saturday morning whining that I don’t have anything to weeeear. And I, too, have read Overdressed, which basically punched me in the face the same way that Fast Food Nation punched the rest of the world in the stomach. I can’t even walk in the mall anymore now without yelling about polyester and stitch lengths. It’s insane and no one wants to go shopping with me these days… not that I do much “shopping” as it is.

So, I’m ok with sewing my own basics. I like that I make a tshirt for roughly the same cost as something from the mall, except I can control the fit as I like it and I also know the hem stitches aren’t going to fall out the first time I throw it in the wash. Maybe making tshirts is simple and the exact opposite of exciting, but sometimes I’m having a bad day and I just want to make something without thinking to much about it – and for me, that perfect something is the tshirt. Some people bake when they’re in a bad mood. I make tshirts.

A couple of weeks ago, I was contacted by Organic Cotton Plus and asked if I would like to sample some of their organic fabrics. Yeah! I chose the white interlock knit and set to work making some basics. In organic because, yeah, I be fancy.

Organic Renfrew- V-Neck
I used my beloved Renfew pattern and made two tops. Here’s the v-neck -probably could have stood to make that v a little more, uh, v-like, but it ain’t too bad for a first attempt. The secret, I’ve learned, is to sew the neck band on a regular sewing machine first, and then serge the edges after. Otherwise, the blades of the serger will chop a big ol’ hole in the middle of your tshirt when you try to pivot (and disabling the blades just makes a huge mess, oh god). I know this because I actually tried to do the v-neck version several months ago, and it failed. Also, I realize I just lied to y’all about this being a first attempt. I’m sorry, I’ll never lie to you again~.

Organic Renfrew- V-Neck
I made no changes to the pattern (other than my initial fitting changes), except I did not add the hem band. I just hemmed the bottom with a double needle and used my walking foot.

Organic Renfrew- V-Neck

Organic Renfrew- V-Neck

Organic Renfrew - Scoop Neck
I also made a scoop neck!

Organic Renfrew - Scoop Neck
Making tshirts is FUN!

Organic Renfrew - Scoop Neck
I actually really really love this fabric. It is the *perfect* weight for a basic Renfrew – super soft, a bit of stretch (but not all slinky like jersey – which I love, but there is a time and a place for slinky jersey) with a good hefty weight. Even though it’s white, it’s actually quite opaque – the scoop-neck top has neon yellow twill tape on the shoulders. Can you see it? NOPE. I’m pretty sure I could get away with wearing a neon bra under these and on one would be the wiser.

Organic Renfrew
Plus, the fabric is less than $9 a yard. So yes, a teeny bit more expensive than F21 – but it’s also light years nicer, as well as ethically-sourced. Which I’m totally willing to pay extra for.

Organic Renfrew

Organic Renfrew

Organic Renfrew

And while we’re on the subject of paying extra for ethical fashion… didja see my new jeans?

Imogene Stretch
WELL LOOK AT THEM.
Before you get all excited and start freaking out, I didn’t make these. As much as I wish I was a jean-making-master like Taylor Tailor, I can’t make a good pair of jeans to save my life. I don’t even think it’s a matter of fit anymore – I just don’t like the denim that is currently available. As much as I love love love my Thurlow jeans, I rarely wear them because the fabric just sucks. They stretch out so much over the course of the day, they are huge and baggy by the time I take them off – and I’ve sized them down twice now. Ugh. So I give up. Jeans, you win. I will buy you from now on.

Imogene Stretch
So here’s the deal – like, I dunno, every single woman I know, standard jeans just don’t fit me right. They are too big in the waist, too tight in the thighs, and the length is always much too long (and I’m too lazy to hem my own jeans, let’s be real here). I guess I could fix the waist issue by wearing a belt, but I hate wearing belts with pants, not to mention I don’t even own any belts that fit around my hips. Plus, the denim is just shitty. I bought some GAP jeans a couple of years ago and they’re already getting holes – and I barely even wear them! So I recently got rid of all my jeans – I had almost a dozen pairs – and bought one pair. I only own one pair of jeans now, and here they are.

Imogene Stretch
These are made by Imogene and Willie, and they are the Imogene Stretch. I’m not going to sugar coat – they were fucking expensive. Actually, these jeans are the most expensive piece of clothing I have ever owned. This is also the first piece of new/non-sale clothing I’ve bought in several years (and yes, I bought them with my own money. Ha, I WISH I+W would give me free jeans!). So, why would I spend $200+ on one pair of jeans, you might ask?
– They are made here in Nashville, TN, by a small business. I like supporting small businesses. I like knowing my money is going back into my community.
– The materials are amazing. The denim is high-quality and wears beautifully (and it’s woven in the USA! Yeah!). I also get 3 free repairs, should I happen to gouge a hole in them or some shit.
– The fit is better than any pair of pants I’ve ever owned. I dunno about you, but I’d rather own one pair of well-fitting pants than a dozen pairs of ill-fitting pants. I have no waist gap, the legs fit perfectly, and the length was hemmed to my exact measurements when I bought them.
– THEY LOOK DAMN GOOD ON ME.

Also, the workmanship is just beautiful-
Imogene Stretch
The topstitching is three different colors. Can you see it?

Imogene Stretch

Imogene Stretch

Imogene Stretch

I’m not posting this because I secretly want everyone to stop shopping at fast fashion places (ok, I kinda do – in a perfect world. But that’s not really attainable right now, and not everyone has that kind of budget! ;)). I mean, I just bought a pair of Keds the other day. Whatever. But… know when to pick your battles. Know what matters to you, and what you can let slide. And personally for me – I’ll make what I can, and buy local when I can find and afford it, and not feel bad if I occasionally have to buy shoes at Macy’s. Small changes eventually equal big changes.

Organic Renfrew

Organic Renfrew

~*~Disclosure: I was not financially compensated for this post, although I did receive a fabric sample from Organic Cotton Plus to review & keep. All opinions on this product are my own.