Good morning, sewalongers! (sewalongees?) Today we are going to go over the final prep work before we start sewing (next week! Eep!). This is the last slow post of the sewalong, which gives you another week to perfect your muslin and choose your fabric. Of course, these posts will also be up indefinitely so don’t feel like you have to rush to keep up!
The very first thing you need to do – yes, before you do anything else with that lovely fabric – is pretreat your fabric. How you pretreat your fabric will depend on the fiber you chose, as well as how you plan on cleaning the coat in the future. For those of you who are sewing wool (like meee!), this means you need to get any shrinkage out of your fabric *before* you cut the pattern pieces – otherwise, once you start steaming that bad boy, you may end up shrinking pieces and that’s no good. There are lots of ways to pretreat wool – and none of them involve washing the fabric (please don’t do that!). You can either steam the piece yourself (this involves lots of steam and probably a lot of time), take it to the dry cleaner and have them pretreat it (this involves money)(and also dry cleaning), or you can shrink it up in the dryer (which is what I do). Here’s a blog post outlining the entire process, but basically – you just need to throw your wool in the dryer (finish the edges if necessary to prevent unraveling), add a couple of towels that are soaked in hot water (and then wrung out, so they’re not dripping) and blast the dryer on high heat for however long it takes before everything is dry. Easy! This is the method I use for all my wool fabrics. If you are at all hesitant, try it out on a swatch first 🙂
For other fabric types that are not wool – you may not need to pretreat (unless you plan on washing the coat in the washing machine? If then, defintely prewash that shit!). If using a cotton or silk, you may want to at least steam the crap out of it just to be sure there is no shrinkage. Polys should be fine and not shrink at all.
Once you’ve pretreated your fabric in whatever way need, then it’s time to cut! I’m not going to go over cutting here – I assume anyone brave enough to tackle sewing a coat is probably fine to cut fabric without guidance 🙂 – but if you need a refresher, here is an old post I wrote about cutting and marking your pattern pieces. One thing I did notice while I was cutting my fabric – I was able to reconfigure the layout and use slightly less fabric. Don’t be afraid to change up the layout if your fabric is wide enough, just be sure that you are keeping all the pattern pieces on the proper grain.
If you are including an underlining for your coat, you will need to cut out pieces 2, 3, 4, 7, 8 & 9 from your underlining fabric.
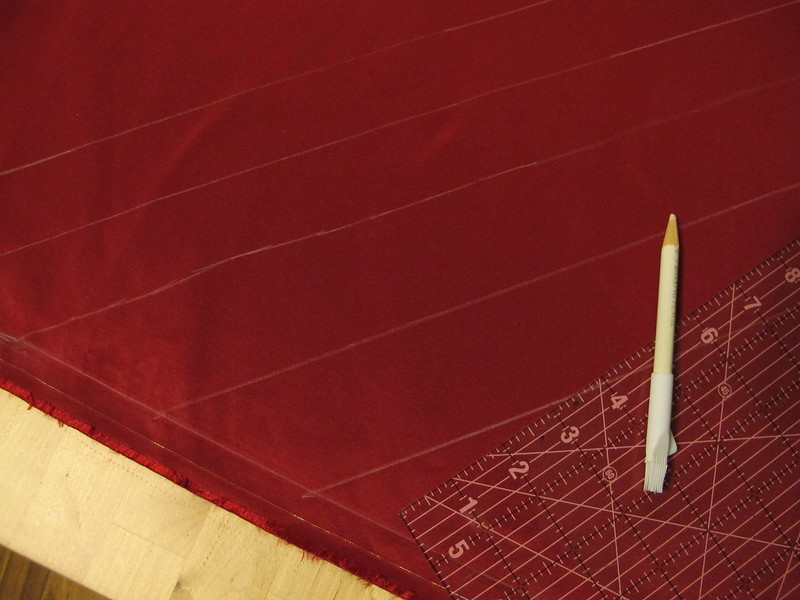
For the contrast – specifically, all those bias pieces – I found it easier to draw the pattern pieces directly on the fabric, rather than try to pin a bunch of stuff and then try to cut a straight line and nope.
The long, straight pieces – I just measured them and use a ruler and marking pencil to draw them on my taffeta. For the big bias contrast pieces (those giant parallelograms), I pinned down the pattern piece, traced around the edges with my marking pencil, and then used a ruler to draw in the lines 2″ apart (as they are on the pattern piece). I did all this on the flat fabric before I cut anything out, and I think it made things a lot easier!
Once you’ve cut out all your pattern pieces, you will need to apply the underlining (assuming you are underlining – if not, skip ahead and start marking your pieces). Underlining is very easy. It is also very time-consuming – so I recommend watching some crappy TV or something equally entertaining while you do it 🙂 For this sewalong, I won’t be going over underlining, but here is a tutorial if you need one. Some things to keep in mind:
– Sometimes you can get away with basting the pieces together by machine. This coat is not the time to try that method. Because the pieces are very large, you run the risk of shifting your fabric – which will give you bubbles or hang weird if you’re not careful. Try to keep things as flat as possible. Meaning: sit at a table, underline by hand. Watch a movie. Drink some wine. Whatever makes you happy!
– I use silk thread to underline, because it removes very easily. I also happen to have several spools on hand in strange colors, so that’s a big part of the reason. I realize silk thread is a bit expensive, so don’t feel like you have to break your budget on some thread that’s about to get pulled out as soon as you sew a seam. Use whatever you got! I would recommend using a threat in a contrasting color, just so it’s easier to see/remove.
– Feel free to use giant stitches. You’re just basting the pieces together to keep them from shifting when you sew them. Big stitches are ok – and they’re easier to remove!
– Sew well within your seam allowances, especially if your fabric shows pin holes (mine does!).
– I like to underline first, *then* mark the pattern pieces on the wrong side. You can also mark, then underline. Up to you – I just think the former is easier! Don’t freak out if you accidentally snip your basting when you cut notches – it’s ok!

See? I did it too. No big deal!
Once you’ve finished underlining (or have skipped ahead), you will need to mark your pieces. It is very important to get every stitch line (for the welts and the button holes), dot and notch – it’ll make things muuuuch easier to match up when we start sewing. You may want to use wax tracing paper and a rotary wheel for the lines, and a marking pen (or tailor’s tacks) for the dots. Just snip the notches. We won’t judge you.
Ok, bias binding! This is the same method outlined on the Coletterie, btw – except you are starting with a parallelogram piece, and not creating one from a square (if that makes sense).

You should have 3 parallelograms with 2″ diagonal lines drawn on the wrong side of the fabric. Matching the notches and markings, pin the two angled edges together, right sides together, to form a strange off-center tube. The edges will not match at the ends.

Sew the seam you just pinned. I used 1/4″ because – well, that’s what I always use. I think this pattern was drafted for 5/8″ – even at the bias binding – and if you sew with that amount, you will need to trim it down to 1/4″ after sewing.

Starting at once end, begin cutting along the line you drew. You should end up with a looooong string of continuous bias. Do this for all 3 parallelograms.

Once you’ve finished cutting all your bias strips, fold them in half with the wrong sides together and press.
(I promise that big yellow spot on my ironing board cover is not pee. That’s actually what happens when you put your iron on top of a piece of tailor’s wax. Whoops.)

You should end up with a big pile of bias strips. Mine kind of look like intestines. Cool.
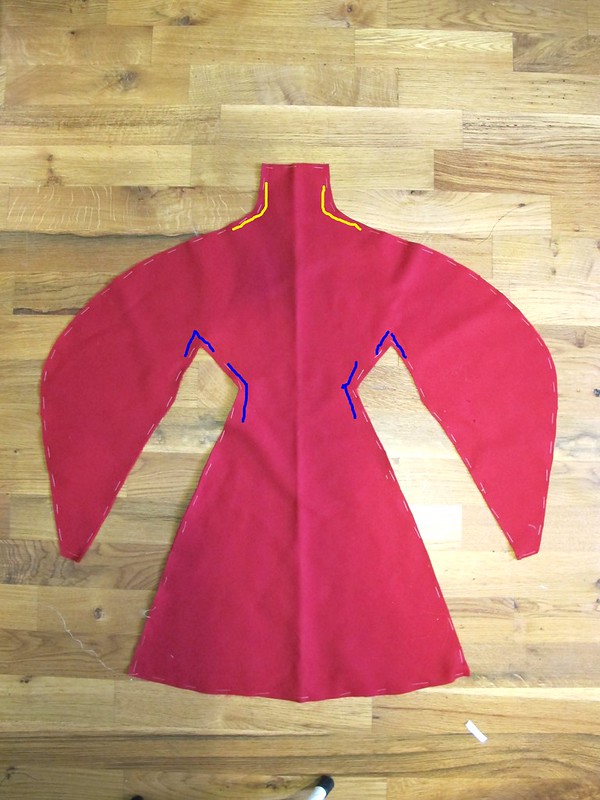
Finally, you will want to staystitch and reinforce your coat pieces as directed in the instructions (steps 1-3 & step 35). For both – use a slightly shorter stitch length (I use 2.0 vs my standard 2.5) and be sure to backstitch at both ends. For staystitching, sew 1/2″ away from the edge. For reinforcing, sew along the stitching line at 5/8″.
Here are the pieces you will be prepping. Lines marked in blue are reinforcement stitching, lines marked in yellow are staystitching.
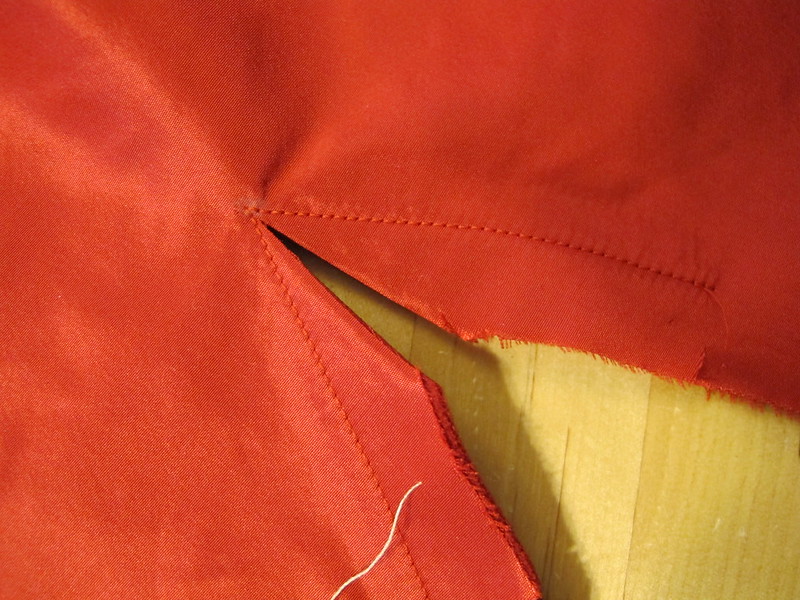
ONCE LAST THING: Once you’ve reinforced all those tricky edges, you need to clip the seam allowances all the way to the dot.

Clip to the stitching line, but do not clip the stitching line. This will make it easier to sew those tricky sleeve seams.
And that’s it! Whew! Sorry for the post overload today. Oh, I almost forgot – here’s my fabric!

These are the swatch cards I got from Mood. The wool coating I chose is piece piled on the very top (4th one down). It’s a nice, thick virgin wool coating.

I am using 2 different silk taffetas – the brighter red will be the underlining, and the darker red is the binding and contrast.
How are we doing this week, seawlongers? Any questions about the cutting or prep?


