Tag Archives: georgette

Completed: McCall’s 6952, Peru-Style!

14 Jul

I’m so happy that I finally got to use this fabric!

McCall's 6952

This piece of lovely came aaaall the way from Peru, when I was there for 2 weeks last year. Coming into the country with only a backpack meant I had to be really careful about what I bought and brought home (I did end up buying a small bag to carry some stuff back. And I wore my new alpaca blanket like a cape for the flight home. NO REGRETS), including fabric. Not that there were a lot of places to buy fabric in Peru, at least not what I came across. Gamarra is a big garment district that did come up in my searches, but everyone I spoke to said it would be really dangerous for me to go. Our host in Lima took me to a small strip of fabric stores during our last few days there – sorry, I’m not sure where it was exactly or what the stores were called! Anyway, I knew I could really only justify buying one piece, and this one definitely jumped out at me.

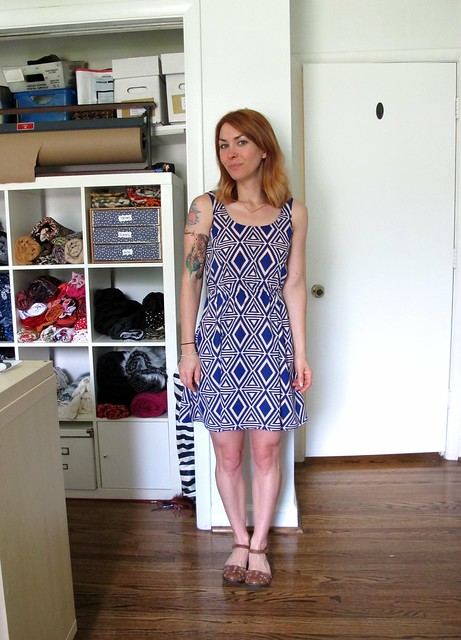
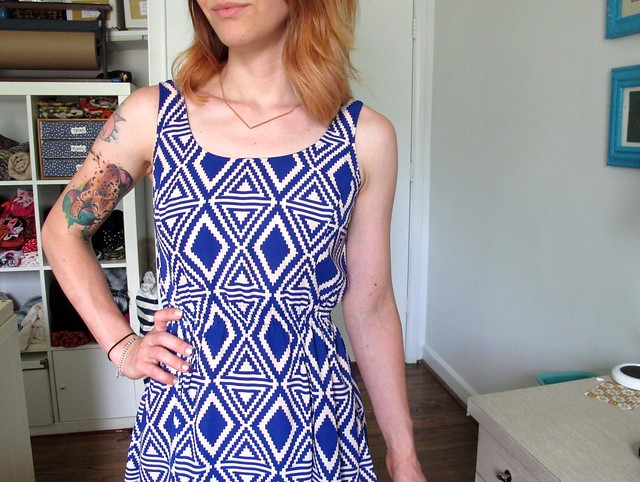
Even just buying the fabric was an adventure. The store we went into didn’t have any people working who spoke English, and my Spanish is mostly limited to being able to say hello and ask where the bathroom is 🙂 (and our host didn’t speak English either! She was seriously a trooper and treated us to such a nice time, even with the language barrier) I eventually was able to ask for, find, and buy 1.5m of this fabric. It’s a double georgette, some sort of silk blend (definitely with some acrylic, based on my burn test). I thought the print was really pretty and certainly have never seen anything like it at the stores here in America! Plus, it reminds me of all the beautiful tiles I saw while walking around Iquitos. It’s a lovely piece of fabric and a perfect reminder of my time in Peru. With all that at stake, though, it did take me over a year to figure out what to sew it into 🙂 Especially since I had such a small piece!

McCall's 6952

McCall's 6952

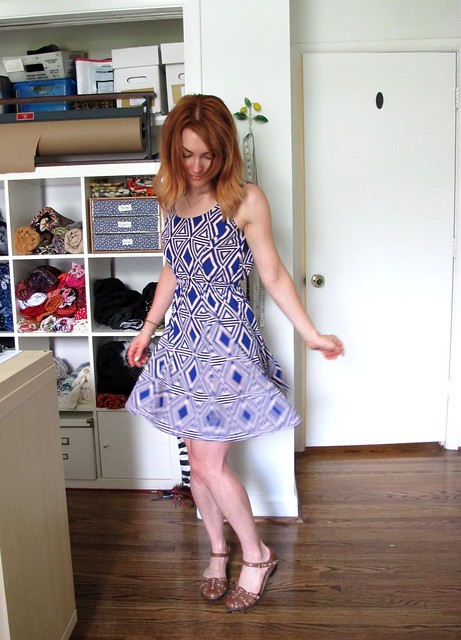
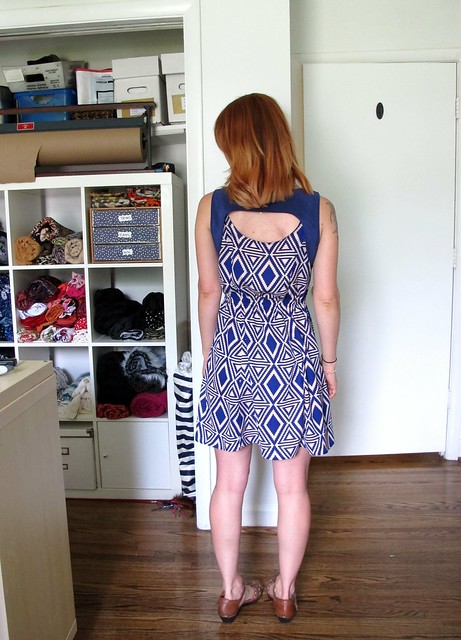
I have enjoyed wearing my green silk version of McCall’s 6952, so I decided to use that pattern again for this dress! This time, I made the version with the plain neckline and back cutout, to mimic the geometric pattern on the fabric. I used blue silk crepe from my stash to do the back contrast (the same fabric I used to make this dress, actually); it’s not a perfect match but it’s close enough!

McCall's 6952

Cutting the pattern pieces was a BEAST. After I’d already had my heart set on using *this* pattern with *this* fabric, and after I’d already cut a couple of pieces… I realized there was a very strong line in the print that would need to be matched. Since the pattern has Princess seams – both front and back – that meant a lot of pattern Tetris to get everything to line up. I ended up cutting everything on the single layer, which is a really good way to squeeze out every last drop of your yardage. Even with that, I still couldn’t get all the lines to match up across every seam – specifically, when it came to the side seams, decisions had to be made. I figured the princess seams were more important than the side seams, so I let those go a little haywire. Honestly, I doubt anyone would even notice that the print doesn’t match across the side seams – but I wanted to do it right, even if I’m the only person who sees it. That’s why I sew. I like the challenge, even if it makes my eyes cross and gives me a reason to drink at the end of the night 🙂

McCall's 6952

McCall's 6952

Speaking of challenges, the construction of this dress had it’s fair share of those, too! Since I already went the extra mile with the cutting and print-matching, I continued that trend and gave the inside of the dress the respect it deserved. Lots of French seams all over the inside of this garment, which are both strong and beautiful. Since the fabric had a fairly high synthetic content, it was a little difficult to press – I just used high heat (my iron has a silicone shoe, which acts as a press cloth and prevents scorching on stuff liek this) and then held everything down with my clapper while it cooled, which gave me a nice sharp press. Instead of using the facing pieces to finish the arm holes and neckline, I used bias facing that I made with the silk crepe, which I just find to be a more refined finish (plus, I wasn’t sure how to finish that facing edge without there being a lump across my chest – the fabric frays too much to use pinking shears, and a serged or turned under edge would be too bulky for this lightweight fabric).

McCall's 6952

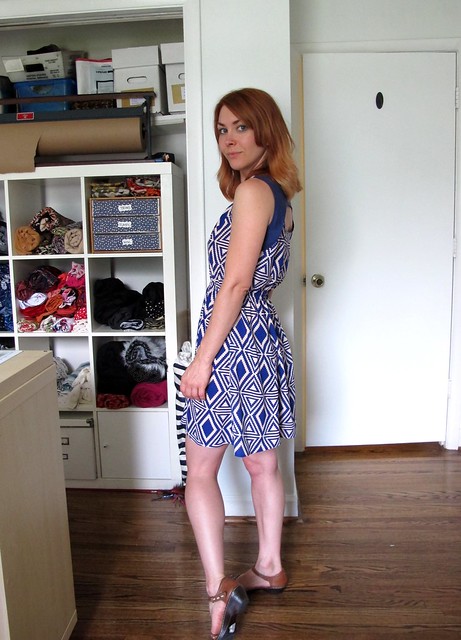
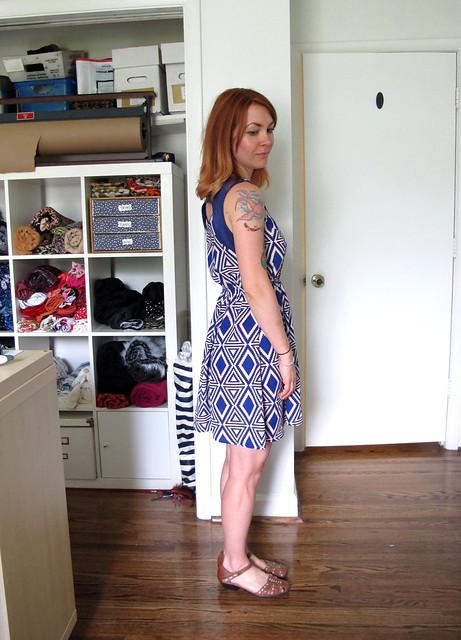
I wasn’t sure how the back cutout was gonna work – I didn’t do a muslin (unless you count that green silk version – but it had a plain back, so it was only a half-assed muslin ya know), so things were pretty up in the air as far as whether this would work out or if it would be a gaping mess in the back. (My tip is to always have a Plan B should things not work out – in my case, uhhh, this would make a fabulous skirt! haha!) It actually turned out pretty nice, though, so I’m happy about that! The back piece is interfaced to give it some strength and smoothness, and also faced so the inside is clean and pretty. I think random cutouts are starting to not be trendy anymore, but I don’t care. I think it’s fun. LOOK AT MY BACK U GUYS.

McCall's 6952

McCall's 6952

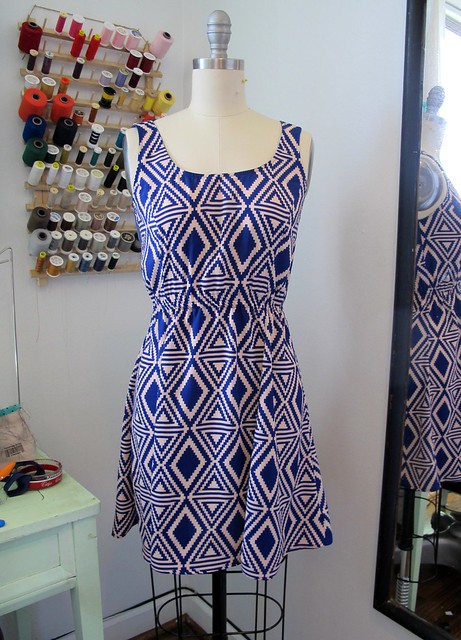
The other change I made was the elastic at the waist. The pattern calls for 1/4″ elastic, applied in a casing. I like the 1/4″ elastic ok, but it doesn’t allow for a belt to sit very well over it (and I am not a huge fan of how narrow elastic waists look, at least on me). I used a 3/4″ elastic on this dress instead, which meant I had to widen the casing that it goes in (not a problem; it’s just bias strips. Which, again, I made myself – out of that blue silk crepe), but that’s about it. I also topstitched right through the middle of the elastic, which keeps it from twisting around and also just looks cool. I am thinking the waistline could be a hair lower, but this is good enough. I ain’t ripping that shit out!

McCall's 6952

McCall's 6952

McCall's 6952

Anyway, that’s all for this little dress! It’s pretty casual, which I love, and the pattern is simple enough that all the focus is really on that awesome fabric (until you see the back cutout and then it’s extra awesome!). I try not to hoard my special fabrics any longer than it takes to decide on a project for them, simply because them sitting on the shelf doesn’t exactly give me a lot of joy. There is, however, joy in wearing said fabric. Every time I wear this dress, I think about those awesome 2 weeks I had in Peru.

McCall's 6952

Completed: The Gabriola Maxi Skirt

28 Apr

Guys. I love maxi skirts. Love love loveeee. I’ve always been told that short gals aren’t supposed to wear them, as it’s supposed to make us look shorter… but you know what? I’m short. The length of my skirt is not going to change the fact that plenty of people can use the top of my head as an armrest. I’m ok with being short, so I proudly wear my maxis.

Apart from the silk crepe de chine Anna maxi I made last year, though, there haven’t been a lot of maxis in my handmade radar these days. Which is a damn shame, considering how FUN they are to wear (speaking of that Anna maxi… I wore it to prom this year. Yes, you read that right.). There are a few sewing patterns lurking around, but most are either designed for knits or in the shape of a damn tube. So you can imagine that I was pretty excited when Sewaholic came out with a maxi skirt pattern. PRAISE JESUS, the maxi of my dreams!

Gabriola Maxi Skirt

I know I can always count on Tasia to dream up some classic pattern with a twist – and this one is no exception. Gabriola is designed with angled panels that sit closely at the waist and hip, flaring out to a dramatic skirt that hits the floor. No straight tube here! The pattern is pretty simple to construct, assuming you are using a stable woven fabric.

My particular rendition was not so simple. It took me a good two weeks to get this completed, and I considered punching a lot of things in the process. It was TOTALLY worth it, though – look at that floaty drape! Yeeeeahh!!!

Gabriola Maxi Skirt

I based this skirt off another maxi I owned and wore the shit out of for a good two years. The maxi in question was a vintage skirt I found at the thrift store (or, rather, Lauren found and generously let me have it before I ripped it out of her hands). I LOVED that skirt. It was silk georgette, lined in sheer polyester – it was so floaty and fun to wear, and it went with practically everything in my closet. Unfortunately, it doesn’t fit me anymore – and I had no intentions on trying to resize it to fit. I’d rather just give the skirt a new home and make another one! So that’s exactly what I did (and the skirt is quite happy in it’s new home, thanks for asking ;)).

I found this fabric while I was in NY… it’s one of the few pieces that I *didn’t* buy from Mood Fabrics, ha! It was from Fabrics For Less, and I paid $5 a yard for it. It’s polyester georgette, and quite sheer, so I also grabbed some navy china silk lining from my good pal Sam at Chic Fabrics.

Gabriola Maxi Skirt

Like I said, sewing this skirt up was a BEAST. I technically had to sew two, since it needed a lining. The polyester georgette was not difficult to sew – the crepe texture gave it some good grip, so it didn’t slide around much. It did fray like crazy, though, and it resisted pressing. I had to use high heat (my iron has a shoe, so poly can totally handle that shit) and hold the seams open with a clapper while they cooled. Even then, it doesn’t look completely pressed. Wah.

Gabriola Maxi Skirt

The china silk was the real hardass of this project. I’ve said before that sewing china silk handles about as well as sewing butterfly wings (or… so I’d imagine) and I 100% stand by that statement. That shit is sooo difficult! It’s thin, it’s lightweight, and it wants to go flying everywhere except under the presser foot at the seam allowance. On the flip side, it does press quite well 🙂 So, sewing the lining was rough. Not rough enough for me to swear off china silk forever – it is a great lightweight lining and it feels AMAZING – but hey, don’t make your first Gabriola out of china silk. Just don’t.

Gabriola Maxi Skirt

I also french-seamed every single one of those long skirt panels. Again – this is the skirt that took forever. Again – totally worth it.

Gabriola Maxi Skirt

Gabriola Maxi Skirt

As far as the rest of the construction – nothing groundbreaking here. I sewed the size 0 and cut about 5″ off the finished length. I did not french seam the yoke pieces; just pinked the edges and pressed them open – since the skirt is fully lined, you don’t see any raw edges. I guess I could have done that with the panel seams too, instead of essentially sewing them twice, but whatever. I finally got to bust out my sheer fusible interfacing for the waistband (I used black), and I love how it adds stability without a bunch of bulk. I swapped out the standard zipper for an invisible zip, and I closed the top with a hook and eye. It’s far from being my best make – the fabric shiftiness, combined with the polyester’s inability to press, makes for some wonky seaming on my part – but it’s pretty lovely nonetheless and I am totally happy with how it turned out.

Gabriola Maxi Skirt

I hemmed it a little on the short side, just so I can walk up stairs without tripping.

So… do you want to see the swish? YES YES YOU DO.

Gabriola Maxi Skirt

Gabriola Maxi Skirt

GOD, I love it!

Gabriola Maxi Skirt

Here you can better see the yoke detailing. Unfortunately, I can’t get rid of that weird wrinkle at the point – it’s not a pucker, the fabric is completely flat. It’s just wrinkled. No amount of steaming/clapping would get it out. You don’t notice it so much when I’m wearing the skirt, so that’s good!

Gabriola Maxi Skirt

The invisible zip went in flawlessly.

Gabriola Maxi Skirt

The instructions for this skirt do not include adding a lining. Here’s what I did for my lining:
– Sewed the lining the same as the skirt, minus the waistband
– After inserting the invisible zip into the skirt, I sewed the right side of the lining to the zipper tape (remember sewing down the facing in my invisible zip tutorial? Same thing, except no need to worry about turning the corner at the top since the waistband hasn’t been attached yet).
– Flip the whole thing right side out and baste the top of the lining to the top of the skirt
– Attach the waistband as usual
And voila! Fully lined with a clean finish and no hand sewing! Yay!

Gabriola Maxi Skirt

Here she is in all her glory 🙂

Gabriola Maxi Skirt

I’m so glad I was able to replace my beloved navy/white polka dot maxi skirt with something that actually fits now! Y’all will be seeing a LOT of this during Me-Made-May! Also, I am totally digging this pattern. Thinking about making a super trendy version with some silk georgette and a shorter lining. We’ll see!

Oh! One more thing before I forget-

Workroom Social is hosting a Pop-up studio in Manhattan May 2-4! There are 3 sewing workshops that will be running (hosted by some of my favorite NY ladies – Sonja, Oona and Fleur!), plus a sit-and-sew with Jennifer, plus a big ol’ sewing swap/meet and greet party (with proceeds going to Rational Animal).

It is my understanding that y’all in Manhattan don’t like to trek out to Brooklyn (and vice versa), so now you have no excuses – Brooklyn is coming to you! 😀 If you are in the area, you should definitely GO – because I’m already totally jealous and butthurt that I can’t be there too 🙂 You can get all the info and RSVP here!

Completed: Some Fabulous Silk Birds

17 Jul

I am just going to preface this post with a warning: This is my VERY favorite thing I’ve ever made. Forget everything else up to this point. This here, this is the winner.

Also, I tried REALLY hard to cull down the number of pictures, but there are still a lot. Sorry, not sorry.

Marc Jacobs Birds

I initially saw this fabric on the Mood Fabrics Instagram (which, if you’re not lurking that – WHY NOT, THEY POST THE BEST FABRICS!!). Isn’t it fabulous? I immediately called the store and had them set aside 4 yards for me. When I finally had it shipped all the way to Nashville, I was amazed at just how wonderful it was in person. The designer is Marc Jacobs, and it’s a soft silk Georgette with a gorgeous drape and some incredibly saturated color.

Of course, I had no idea what I was going to do with 4 yards of bird silk Georgette. I hoarded it for about 2 months, while plotting and planning.

Marc Jacobs Birds

I had a Sewing Epiphany while on the way to work one morning (does anyone else have those? Aren’t they so awesome?) and realized that the print would work perfectly with a 40s style dress – and the drapiness of the silk would be a 100% match for McCall’s 6113. Yes, the same pattern I used for last month’s Mood dress. What can I say – I love this pattern, and I want to make a million of it’s babies.

Marc Jacobs Birds

Since this was my first time sewing with silk Georgette, I spent a few weeks devising a game plan and learning all I could about this fabric before slicing into my yardage. Georgette – or, at least, this Georgette – is on the sheer side, so it was going to need some sort of underlayer to keep things opaque. I didn’t want to underline the dress and compromise the flow of the fabric, so I decided to make a slip to wear underneath. Bonus: this is quite handy on a windy day! Already tested that theory 😛

Marc Jacobs Birds

I used french seams to construct the entire dress, except at a few sections where it was impossible to sew them – such as the curved yokes. For those parts, I pinked the seams to keep them from fraying. I also stabilized the fabric underneath the yokes with a piece of black silk organza. Since the Georgette is so lightweight and that area gets so much stress, I wanted to give it as much support as possible. I also found the use of my walking foot quite helpful while assembling the dress – it kept the layers from shifting (and me from crying tears of frustration).

Marc Jacobs Birds

Despite having made this dress twice already (my red wool crepe version, plus a boring ol’ muslin), I still encountered some construction challenges unrelated to the fabric. For one, the sleeves gave me HELL when I was trying to set them in. I don’t even understand how it happened – they eased in perfectly with the crepe, but for some reason, it just didn’t work with the Georgette without including a lot of unwanted puckers. I was stumped and let the dress simmer for a few days on my dressform. I even considered leaving it sleeveless, no lie.

Marc Jacobs Birds

Fortunately, I remembered that Casey posted a tutorial on excess sleeve ease on her blog a couple years ago, so I followed the instructions for redrawing the sleeve cap and crossed my fingers.

Marc Jacobs Birds

I am happy to say that it worked! I’m so glad I was able to figure it out – the sleeves really make the dress!!

Marc Jacobs Birds

Marc Jacobs Birds

Marc Jacobs Birds

I just think this pattern is SO PERFECT for such a bright print! Isn’t it beautiful?

Marc Jacobs Birds

I even got super fancy and put a (non-functional) fancy button where the front of the dress fastens.

Marc Jacobs Birds

Marc Jacobs Birds

Marc Jacobs Birds

Marc Jacobs Birds

Now, let’s talk about my slip! I am going to post pictures which I realize is essentially me in my underwear, so bear with me here.

Silk Slip

I’m not going to lie – like 99.9% of the reason why I decided to go with the matching slip was so I’d have a chance to get my hands on some 4-ply Silk Crepe. I’ve heard some amazing stories about the stuff, but never had a chance to try it for myself. It tends to run on the expensive side (truth, this silk crepe cost more than the silk Georgette!), but a slip doesn’t require a whoooole lot of yardage, so I sucked it up and put in my order. I didn’t know what to expect when the package arrived at my door.

Silk Slip

People. This stuff is INCREDIBLE. Throw out any mean thoughts you had about silk and focus on the 4-ply. It’s not at all slippery – even when I was cutting bias pieces, the fabric stayed put. It’s nice and robust and opaque, and it feels amazing against the skin. It presses beautifully and sews like a dream. I was extremely skeptical before I properly introduced myself, but I really think it deserves the hype.

Silk Slip

To make the slip, I used the free Ruby Slip pattern. I spent a lot of time redrafting shit to get it to fit right, and it was kind of a nightmare and I kind of almost gave up (no hate on the pattern itself – I’m just VERY particular about how my slips fit!). I started with the size 8, made a lot a lot a lot of changes, and I’m just going to list them here:
– The original bodice was very small, so I added a 1/2″ FBA using the sew-along tutorial. Truth, I tried to get away with not doing this (I wear a DD cup, but let’s be real here – the only thing “big” about my boobs is the proportion, not the actual size, kwim? I could totally fit into like a C cup if the band was small enough), but my first muslin informed me otherwise.
– I then redrafted the bodice to include a center front seam and underbust gathers, following this tutorial.
– My second muslin showed that now the bodice was too big at the center front, and the gathers were sitting in such a weird place… I looked like I had puffy nipples. So awesome, except not. I wish I could tell y’all I did some mathematical pattern drafting magic and fixed it, but honestly I pinned that fucker to my dress form and manipulated it until I had a decent fit. I pinned out a chunk of the center front seam, redistributed the gathers, and chopped about 1″ width off the back midriff. I readjusted the side seams of the skirt (that shit fit almost perfect with no adjustments, thank god) and crossed my fingers.
– Since the new back midriff was slightly (I’m talking 1/2″ or less) smaller than the skirt, I cut that piece on the bias and carefully eased the two pieces together. I think the result is pretty good – it fits my small back, and the bias makes it easy to pull on and off!
– I also cut about 5 1/2″ off the hem of the skirt. It was long, and I need this slip to be shorter than my skirts!

Silk Slip

Silk Slip

Finally, I added some beautiful lace around the top and the hem, and a little self-made bow in the middle of the bodice. The straps are just satin ribbon outfitted with strap adjusters and rings – very easy to put together.

Marc Jacobs Birds

Now, here’s the real question: I still have like a yard (maybe more) of this bird fabric left. WHAT SHOULD I DO WITH IT?