Tag Archives: rib knit

Completed: Augusta Hoodie // Anima Pants

22 Aug

I know it’s still like 8000 degrees here in the South, but I’m already thinking ahead to the next season! This year, I want to be ready when the cold starts creeping in – even though you & I both know that won’t realistically happen here until, like, December (if not later!).

With that being said, I started this project WAY THE FUCK back in May – you know, when summer was the creeper. Took me this long to finish it, but whatever!

Prepare yourselves. This is a two-part project, so there are a bunch of pictures.

Organic French Terry Augusta Hoodie

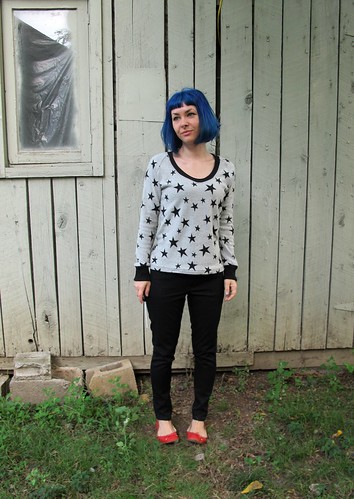
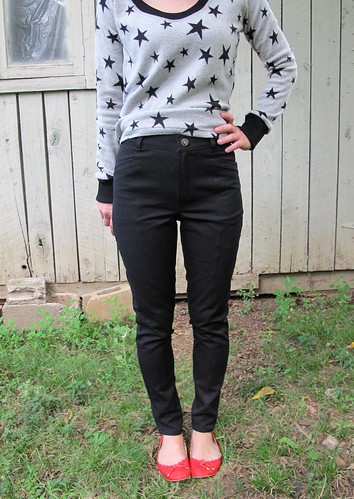
First part – the one I started in May (or was it April? omg.) is this sweet-ass track jacket hoodie combo! The pattern is the Augusta Hoodie from Named. I don’t tend to sew a lot of patterns from this company – I find most of the styles a bit outside of my personal style preferences (like the Inari dress that everyone is going apeshit over and I JUST CAN’T GET BEHIND THAT SORRY), but occasionally I’ll come across something that makes *me* go apeshit (see: my beloved Jamie Jeans LOVE U). As was the case with this jacket! The pattern was given to me as a gift by my lovely friend Carla; it has taken me over a year to decide what to make it up with, but I think it was worth the wait!

Organic French Terry Augusta Hoodie

Organic French Terry Augusta Hoodie

Organic French Terry Augusta Hoodie

Organic French Terry Augusta Hoodie

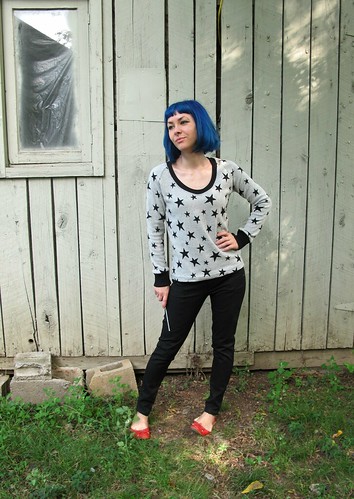
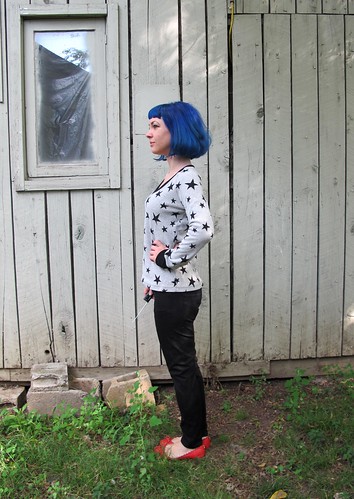
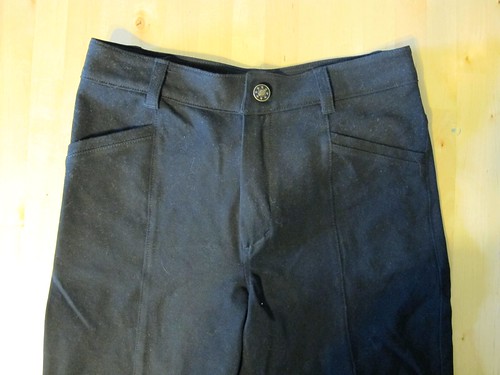
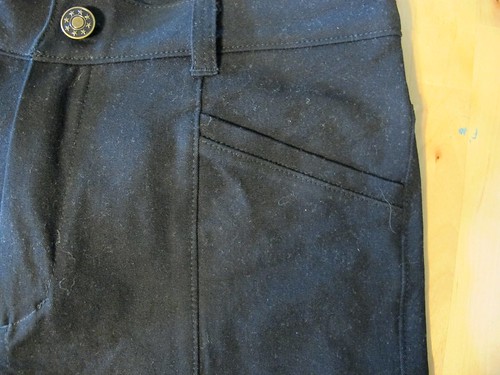
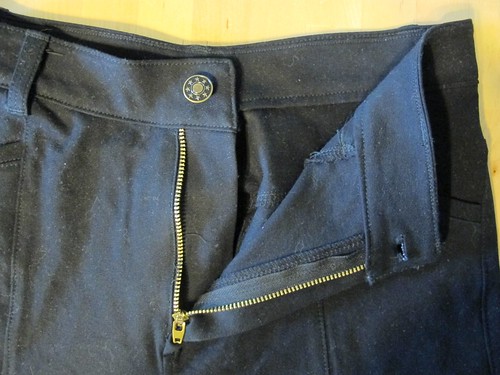
The Augusta Hoodie is a combo track jacket/hoodie with welt pockets, front snaps, and seaming that is perfect for some crazy colorblocking (even though I totally went the boring route). I made a size 32, and adjusted the sleeve length as I found them a bit long (a normal alteration for me).

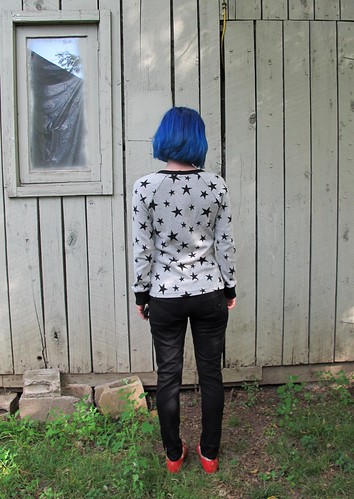
Pattern construction wasn’t too terribly difficult – Named has gotten much better with their pattern instructions (they used to be quite sparse) and I had no problems with any of the steps, including the welt pocket. The jacket is unlined, but there is a facing so you get a nice clean edge at the front. The hood is lined, which I left off because my fabric was so thick. I also added a drawstring to the hood, cos I liked the way it looked. Ideally, I would have done this before finishing the hood – and used my machine to sew grommets around where the drawstring goes. Instead, I decided to do it after the hoodie was completely finished, and thus just popped a couple holes in the hood with my scissors and hoped for the best, ha.

Organic French Terry Augusta Hoodie

Organic French Terry Augusta Hoodie

Organic French Terry Augusta Hoodie

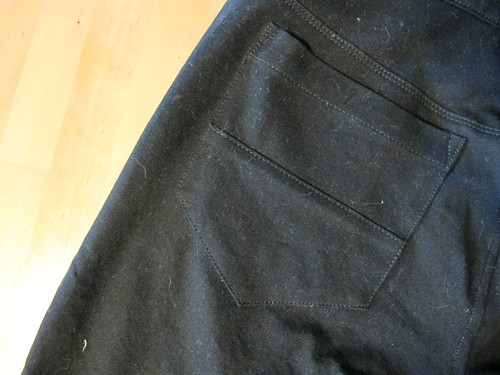
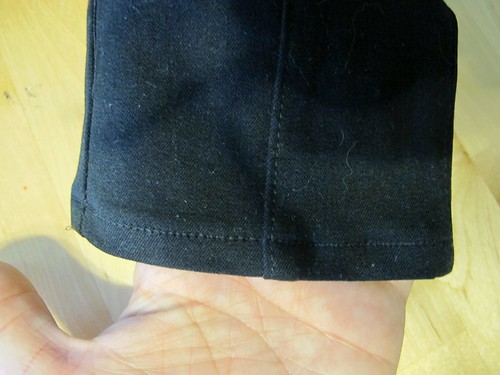
The fabric is a super thick, super heavy cotton French Terry from Organic Cotton Plus. I went with the Cranberry color, although they have tons of other color options for French Terry. This fabric is amazingly thick and soft and will be wonderful to wear when the temperatures start dropping. The piped sleeve seams are done with strips of rib knit fabric, just flat – there is no piping in there (only cos I didn’t have any on hand and I didn’t feel like waiting for any to ship). The ribbing at the bottom and cuffs is actually two different kinds of fabric – I originally planned to use the aforementioned rib fabric from OCP, to keep everything consistent, but it was way way WAY too lightweight to work with this thick fabric. I ended up painstakingly ripping off the bottom band (which was serged on) and replacing it with a sturdy rib knit from Mood Fabrics, which holds up much better with the thick French terry. Of course, I fucked up my measurements and didn’t buy enough, so the cuffs is an entirely different rib knit that is a lighter weight (but heavier than the rib fabric from OCP). I don’t remember where that rib came from as it was in my stash, but I’m sure it was also from Mood. If you look closely, you can see that they are two slightly different shades of white, but I am choosing to ignore that. Also, rib is a weird word when you type it over and over. RIB.

Sewing with this fabric wasn’t necessarily difficult, but it did require some finesse because it is SO THICK. Cutting was kind of awful – my scissors are still pretty dull (yup, haven’t gotten them sharpened yet. How long have I been meaning to do this? 2 years?), and they didn’t have the easiest time chopping through all that thickness. It actually hurt my hand to cut through double layers, but also I am a huge baby. I sewed the majority of this on my serger – French Terry sheds like crazy, and serging helps keep that at minimum – and there were a few sections of massively thick layers where I had to coax the handwheel to get things to keep moving. My snaps are set using an industrial snap-setter – again, I have access to this from my old job (in sewing production) – I have NO idea how you’d set snaps in this otherwise! I guess the pattern calls for a lighter fabric, which would certainly be easier to work with. Overall, I wouldn’t say it was hard – it just required being slower and more patient. Which is infinitely easier when you are sewing something way the fuck out of season and know you won’t be able to wear it for months regardless 🙂

Organic French Terry Augusta Hoodie

Organic French Terry Augusta Hoodie

Organic French Terry Augusta Hoodie

Organic French Terry Tracksuit

Organic French Terry Tracksuit

This track jacket reminds me of the stuff we used to wear back in the early 2000s, which I was still super active in the Nashville Hardcore scene. We were ALL ABOUT track jackets and hoodies, which looked real good with our tight jeans and Saucony Jazz shoes 😉 I definitely had a baby blue track jacket for years, which I loved everything about except that the fit was just a little boxier than what I wanted. So, here I am reverting back to my 16 year old self. Maybe should buy some Sauconys and relive the memories of the mosh pit or some shit.

Organic French Terry Anima Pants

Organic French Terry Anima Pants

Organic French Terry Anima Pants

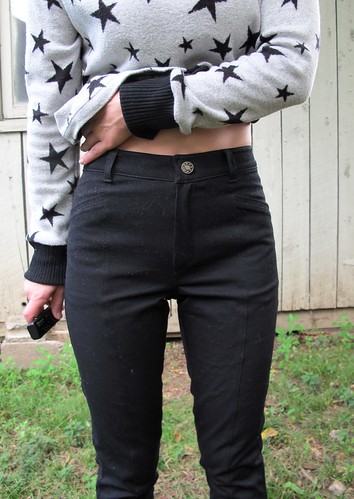
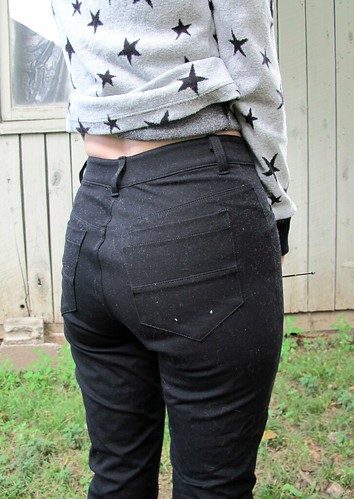
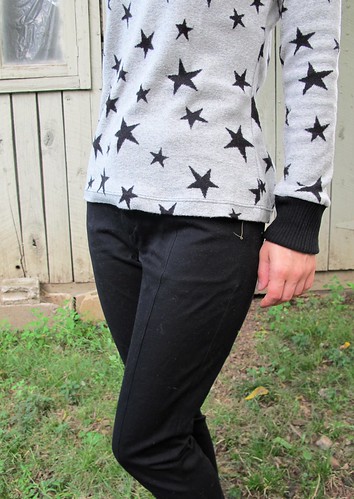
Anywayyyy, after I finished the jacket, I realized I had enough French terry left over to make a pair of pants. Sweet! Like I said, this fabric is really thick and cushy, and I figured it would make a nice and warm pair of pants for lounging around the house.

I used the Anima Pants pattern from Papercut Patterns, sewn in a size XXS with about 2″ of length taken off. This was a very easy and straightforward pattern – basically just a knit pant with pockets, cuffs at the hem, and an elastic waistband with a drawstring. I did have minor troubles getting the elastic waistband sewn in – I think mostly due to fabric choice, as again, SO THICK OMG – but it’s fine, just a bit wonky looking. Whatever! For the white ribbing, I used a white cotton interlock knit, also from Organic Cotton Plus, which I so happened to have in my stash (the knits I used on the hoodie didn’t have enough yardage for these pants). It is leftover from these tshirts, btw. I can’t believe that shit was still hanging around my stash, but I ain’t gonna argue with that!

I am quite happy with how the pants fit, as well as how comfy and cozy they are. I am not especially happy to see that I have basically made an unintentional pair of Santa pants, but, it is what it is. I wasn’t planning on wearing these out of the house anyway (sorry, the whole ~athleisure~ trend is another thing I just cannot get behind), so I’m not terribly concerned about it. At least I have the perfect outfit to wear this Christmas.

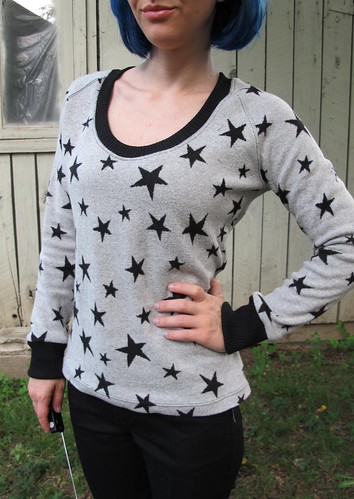
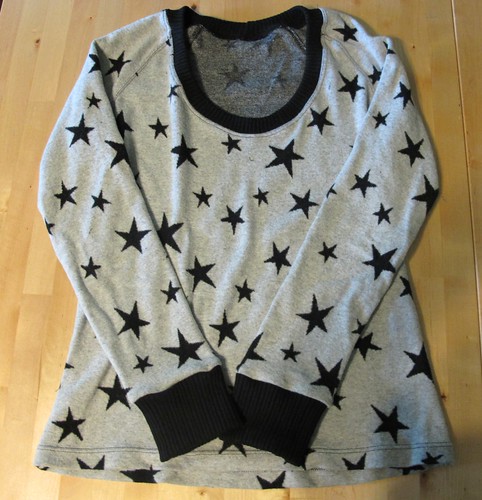
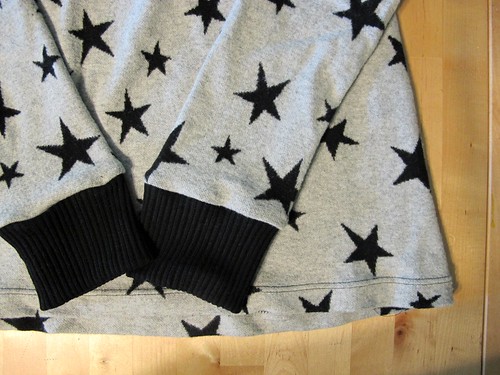
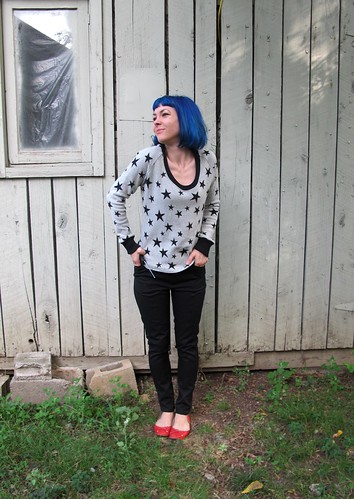
(Btw, in case you were wondering – I also made my top. It’s a Papercut Patterns SJ Tee, sewn in a lightweight jersey fabric and cropped.

Organic French Terry Anima Pants

Organic French Terry Anima Pants

I should add, another thing I had no intention of doing was actually wearing these two pieces together.

Organic French Terry Tracksuit

Because I definitely look more like a late 90s Puff Daddy in this ensemble HAHA

Organic French Terry Tracksuit

I will let y’all know when my rap album drops, ok? Holler.

**Note: The French terry was given to me by Organic Cotton Plus, in exchange for a review. All rap opportunities are 100% my own.

Sweaters & Skinnies for Fall!

24 Sep

Ok, I’ll admit – when I first started working on this outfit, the air was a LOT more fall-like than it currently is at the moment. Stupid fickle season, ha!

Jamie Jeans + SJ Sweater Made with Mood Fabrics

Anyway, I’m totally a trooper so I’m modeling this outfit for y’all nonetheless (photos taken early morning before the temperatures got too high, because, woof.). My first real cold-weather makes – like I said, it’s a little early in the season here, but I like to get a head start so I can actually start wearing this stuff when the weather cools down 🙂 This outfit – or at least the skinnies – is also part of my London wardrobe. I’m officially less than 2 months out, EEEEEP! – so it’s time to really start cranking down and getting my wardrobe act together. Since I’m very limited in suitcase space, I’m trying to capsulate everything to mix and match. So I can bring less clothes, so I can bring home more fabric 🙂 You know – priorities!

ANYWAY, I have a lot of ground to cover with these two pieces, so let’s get started! Sorry in advance for the big photo overload!

Jamie Jeans + SJ Sweater Made with Mood Fabrics

Let’s start with the sweater. I bought this fabric last month while I was in NYC. This was my first non-spring trip to the city, which meant my fabric shopping was focused on woolens and winter weights (instead of summer fabrics, which I am usually bee-lining for in March). I immediately found this star printed WOOL sweater knit, and promptly flipped my shit over it. It’s SO fabulous – and soft! Even softer than you can imagine, forreal. At $25 a yard, it wasn’t the cheapest sweater knit – but stars and wool? Totally worth it. Plus, it’s not like a sweater takes a lot of yardage – at least not for me. I bought a yard and a half (and I have some leftover.. hmm, what to make with?).

Jamie Jeans + SJ Sweater Made with Mood Fabrics

The pattern I used to make this bad boy was actually suggested by Devra (who also bought some of the prized star wool knit, after I peer pressured her into it 😉 ) – the SJ Tee from Papercut Patterns. I made a wearable mock-up before the real deal – which I will show y’all later this week – so I was able to figure my fitting before cutting into my precious wool knit. I cut a size XXS and took 1″ out of the center back. The length is the long version (aka, not cropped) and the sleeves are long as well.

Jamie Jeans + SJ Sweater Made with Mood Fabrics

I used rib knit to finish the neckline and cuffs – it was in my stash, I have no idea where it came from. This knit was way stretchier than the sweater knit, so I had to keep retrying the neckline to get it to lie flat. I ended up cutting the rib to half the length of the neckline and stretched the everloving shit out of it – it could still stand to be a little tighter, but this will do. The neckline also can’t stand to be a little lower, it’s already a little risque (which I LIKE!). The cuffs are a bit looser than I’d prefer, but I wanted to be able to push the sleeves up, like so.

Jamie Jeans + SJ Sweater Made with Mood Fabrics

I sewed the entire sweater on my serger – you could use a sewing machine (this particular knit does not unravel or shed), but serger is faster 🙂 I did use a twin needle to topstitch the raglan lines, as well as the neckline & hem. Really loved topstitching this sweater; the stitches just sink right in and look soooo good!

Jamie Jeans + SJ Sweater Made with Mood Fabrics

For the black skinnies, I used a really great stretch twill. I’ve had some hits and misses when it comes to stretch bottom weights – they tend to be a weird weight (either too heavy, or not heavy enough), and the stretch can bag out over time. One thing I’ve learned is that you need a pretty high spandex/poly content to get them to snap back into shape – 5-10% – and you need to make sure they are bottom weight. I actually made Heather Lou source this fabric for me, also in the Mood store. We were initially looking for black denim, couldn’t find a good one (I still don’t really know what constitutes as a good one- you’ll have to ask her! I just blindly followed, ha), and decided on the twill. We did end up finding a black denim, fyi, but not at Mood. Once I sew that one up, I’ll share more about it 🙂

Jamie Jeans + SJ Sweater Made with Mood Fabrics

Anyway, this twill is great! It’s pretty similar to what you get with stretch RTW pants – thick enough for a bottom weight, but not tooooo thick (I still only used an 80/12 needle, so no heavy denim shit or whatev). The stretch is crazy good, and it actually snaps back into shape. I can’t give y’all a true verdict on a full day’s worth of wear – the weather jumped back up to hot, so I haven’t had a chance to wear these yet. However, I tried the jeans on a LOT during construction, and they haven’t bagged out yet. So that’s a good sign!

The only drawback to this stuff is that it attracts cat hair like a magnet. It’s not as bad in real life as it is in photos (else I would have lint-rolled that shit, I mean, come on), but it also doesn’t bother me that much. When you have a cat and you wear black pants, cat hair is sorta just a way of life, you know?

Jamie Jeans + SJ Sweater Made with Mood Fabrics

The pattern I used to make the skinnies is the Jamie Jeans, from Named. I’ve actually had this pattern in my stash for a few months – my friend Carla bought me these (plus a few other Named patterns) as an early birthday gift earlier this year. Then I was a total ass and didn’t do anything with them until just now 😛 Hey, it’s been too hot! Anyway, I’m glad I put these off because there is no way I would have had such stretch twill success if it hadn’t been for Heather doing that side of the shopping for me. So there’s that.

Jamie Jeans + SJ Sweater Made with Mood Fabrics

Anyway, this was my first experience with Named. My understanding is that a few things have changed since they initially released this pattern – for one, the instructions include some diagrams now (they used to be text-only), and the prices are a little more competitive. The pieces also aren’t quite as overlapped as they were the first go-round – because, ugh, tracing patterns, ugh. I only had to trace the waistband for these. Everything else was, thankfully, not super overlapped.

I started with the size 2, and made these initial modifications, based on my muslin:
– Added 1″ to the back crotch, for butt room
– Removed 2″ of length at the legs
– Removed 5/8″ at the center back yoke, blending to 1/4″ at the bottom (where the pants meet the yoke)
– Removed 1/4″ from the center back, blending to nothing

Once I started sewing, I ended up doing a few more fit adjustments. I don’t know why these weren’t prevalent in my muslin – perhaps my fabric wasn’t quite stretchy enough? At any rate, these are my additional modifications (and now you know why I pulled them on and off so many times!):
– Sewed the side seams at 1/2″
– Took a 1″ wedge out of the center back of the waistband, tapering to nothing at the bottom
– Removed an additional 3/4″ from the length
– Did some crazy witchcraft to reshape the crotch to be a J (again, NO IDEA why this wasn’t an issue with the muslin, but argh – at least I fixed it? Mostly.).

Things I will change for my next rendition:
– Need to remove some length from the front crotch – you can see that it’s slightly too long (it’s not toooo bad – I doubt anyone will point and be all “HA HA YOUR CROTCH IS TOO LONG HA HA!” But I know it’s there and hey, it bothers me, ok?). Maybe 3/8″ish.
– Rescoop that J a little more out of the crotch. It’s still not perfect, but it’s damn good considering that I did this while the pants were already mostly assembled (for those of you who are all, “Wtf is this J crotch you keep talking about?” Here’s the post where I talk about my pants adjustments, including J crotches. Also, in case you were wondering- those crotch rulers *do* work. I found one in Elizabeth’s studio last week, immediately stuck it on my crotch – and hey, there’s a J! Cool!)
– Need to take a little pinch of fabric out of the inner leg seam – maybe 1/2″

Despite my nitpicky fit adjustments, these aren’t so bad! I’ll still totally wear the shit out of them, at any rate.

Jamie Jeans + SJ Sweater Made with Mood Fabrics

Constructing these was REALLY fun! The instructions – honestly, they’re kind of useless about 70% of the time, but I’ve made enough pants to where I don’t really need them. The seams are all finished with my serger – except the crotch seam, which is flat-felled – and I made use of my edgestitching foot to get all that beautiful topstitching. For the waistband, I used fusible tricot knit interfacing – I fused both the outside and the facing, to give it some stability but retain that lovely stretch. The button & jean zip are both from Pacific Trimming in NYC.

Jamie Jeans + SJ Sweater Made with Mood Fabrics

I really love the back pockets! And hey, that double line of stitching at the yoke? That was done with a single needle, twice. No twin needle!

Jamie Jeans + SJ Sweater Made with Mood Fabrics

For the hem, I used the lightning bolt stitch, so it would retain some stretchiness. It looks pretty similar to a straight stitch, but it, you know, stretches.

What else? Here are some sweater close-ups:

Jamie Jeans + SJ Sweater Made with Mood Fabrics

YUM!

Jamie Jeans + SJ Sweater Made with Mood Fabrics

One last thing – here’s the little watercolor fashion illustration I made for this outfit. GOD, I love painting watercolors! So much fun!

Jamie Jeans + SJ Sweater Made with Mood Fabrics

Ok, I guess that’s it! Now if the cooler weather could please come back – I hate working up a sweat while I drink my morning coffee 🙂 Oh, and in case you were wondering – that’s a fresh dye job you’re looking at, in regards to my hair! I love how neon electric is is 🙂 Yay for fun-colored hair!

PS: Ralph Rucci V1419 Sewalongers – in case you missed it, there’s a new post up on the McCall blog regarding the sewalong. Just some general housekeeping, including blog buttons (yes!) and social media chat. The burning question this week – for general sewalong chat outside of our blogs, do y’all prefer to use a Facebook page or a Flickr Group? Trying to decide which platform to us. Let us know which side you swing!

Completed: The Lola Sweatshirt Dress

27 Nov

I keep complaining about the cold, being the delicate flower that I am, but for some reason I also keep finding myself in dresses on a daily basis. What’s a girl to do?
Lola Sweatshirt Dress

DUH, MAKE THAT SHIT OUT OF SWEATSHIRT FLEECE.

Lola Sweatshirt Dress

Pair it up with some merino leggings and you’ve got yourself a nice stew outfit!

Lola Sweatshirt Dress

This is Lola from Victory Patterns. A dress pattern specifically designed to look like a sweatshirt, who woulda thunk!

Lola Sweatshirt Dress

I don’t feel like I have much to say about this pattern, but I’ll try anyway. I cut the size 2, although I did take in the lower bust seams (toward the empire waist seam) and the upper skirt seams for a slightly closer fit. Actually, I recut the entire skirt because the first time just wasn’t doing it for me – I had shortened it, added the ribbed band at the bottom, and it just looked… weird. Don’t get me wrong, it’s a cute look (lord know I’ve made millions of these types of fitted knit dresses with bands at the bottom, lolz, back when I used to ~sell~), but with this fabric/ribbing/on ME, it didn’t look good. So off it went, and I had to cut a new skirt because my shortened skirt was tooo short for even me. Bummer, because I had been thinking about making Landon a sweatshirt with the remaining fabric, as it’s a color that he really likes. BUT NOT ANYMORE, SORRY LANDY.

Lola Sweatshirt Dress

So, I left off the bottom band. I also left off the pockets, as I felt like they added unnecessary bulk. Of course, now I find myself reaching for said nonexistent pockets – oh well! Perhaps the next version of this dress will include them, I dunno.

Lola Sweatshirt Dress

At any rate, this was super quick to make up, especially since I used my serger for nearly every seam. And it looks pretty cute, if I do say so myself, although I think I prefer to wear this color with burgundy tights instead of brown. My favorite part is the little V at the neckline, it really makes it look like a proper sweatshirt! I debated flipped the fabric to show the wrong side as suggested in the pattern, but it just looked like I had sewn the V on backward and ain’t nobody got time for that.

Lola Sweatshirt Dress

Next time, I will try this in a ponte knit, like my homegirl Sonja already did (you should probably know by now that I spend most of my sewing life trying to emulate her and her makes, it’s tru). With the sweatshirt fleece, it’s pretty casual – which is nice!, but it would also be nice in a not-casual fabric too. I might even try doing the ribbing in a matchy color, instead of the contrast I’ve got going on here.

Lola Sweatshirt Dress

Speaking of which….

Lola Sweatshirt Dress

So, the pattern calls for actual rib knit to finish those edges. Guys, where the fuck do you even find that shit? I saw a giant (like, bigger than me) pile of assorted rib knit odds and ends while I was in Chicago at the Textile Discount Outlet, and obviously I grabbed an armful (eh, they were like a quarter apiece, sue me), but all the greens I got were all wrong. And not all wrong in a cool contrasty way, they were all wrong in a “I tried to match this but I done goofed” way. So much for that! I’m a big fan of finishing knit edges with self-fabric, but this fleece is not terribly stretchy, so what did I do?

Lola Sweatshirt Dress - ribbing

Oh yeah. I went there. RIP American Flag Sweater, hope u enjoy your new life as a pillow!~*~*~*~

Lola Sweatshirt Dress

Basically, I just cut the rib knit off the sweater (including the bottom hem rib knit, but we all know how that did not work out) and treated it like it was the kind you purchase by the yard. It sews in the same way as those knit bands I looove, although I would rly rly recommend using a serger for this particular task, since it likes to shed. A lot! And it looks pretty profesh! Good idea to file away for those huge novelty sweaters you have but don’t ever wear (am I the only one with a stash of those? All right), especially since you can sew the sides up and make it into a pillow :3 lol my couch is so patriotic now.

Lola Sweatshirt Dress

So there’s that! No flat shots because I’m wearing this as I type this post, heh heh heh! Sorry, not sorry! If you were wondering, YES, I did get a hair cut! Got me some bangs, and I think I love them! I also should point out that every time I typed “sweatshirt” in this post, nine times out of ten it came up as “sweatshit.” Where is my mind. I need a vacation.

EDIT Looks like Victory Patterns is running a Black Friday sale woohoo! Take 30% off your entire order with the code “happyanny”! Thanks to everyone who alerted me of this, yay for saving money! haha!