
Good morning, everyone! Time to get some sewin’ done for this OAL!
Before we get into the post, a few things I wanted to mention:
– Unlike previous years, I will not be doing a full step-by-step of sewing the pattern. Part of the reason is because this is a really easy pattern and the instructions are super straightforward and simple to understand on their own.
– Now, before you freak out – there IS a sewalong for the Hollyburn skirt! Not hosted on this blog, but a sewalong nonetheless! You can find it here on Lavender Lane. So if you reeeally need the help and the instructions just aren’t cutting it for some reason or another, there is that option!
– Instead of step-by-steps, I am splitting the OAL sewing stuff into 2 posts – today and next week – both with modification tutorials. I will also include links to relevant tutorials from older posts as they are needed. That way, those of you who are not following the OAL and/or don’t care about sewalong posts (I’ll be honest – I skip over them too!) – this is less for you to skip over 🙂 And for those who are here for the OAL and love reaching sewalong posts – they’re still here! 🙂
– And DUH, I’ve made like a zillion of these skirts – so feel free to ask me questions as well! Either in the comments, or you can email me! Don’t worry! I got ya covered!
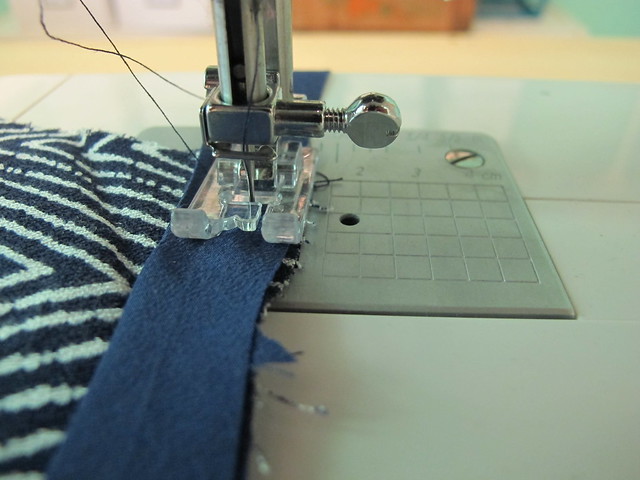
– FINALLY, I should mention that I’m using my Spiegel 60609 sewing machine to construct my Hollyburn, so you’ll see it in the photos! I wanted to see how it handled my mega-shifty fabric 🙂
Ok, back to the OAL!

Before you do anything, it’s a good idea to prewash your fabric in the same manner you will be washing/drying it once the garment is complete. Some fabric reeeeally likes to shrink, so you want to get that out of the way before it’s cut! I am using this cool zigzag rayon crepe from Style Maker Fabrics and it certainly shrunk a LOT! It’s a bit shifty to work with, but I think the payoff will be pretty sweet – it has the dreamiest, swishiest drape! I found that my increasing my stitch length just a hair (the standard stitch length on the Spiegel 60609 is a little short for sewing really delicate and shifty fabrics, I’ve learned) and using lots of pins was enough to keep the fabric in check for the most part.
Some notes on cutting:
– Here is a post I wrote for the 2014 OAL on cutting and marking. Different pattern, same concept.
– It is entirely possible to make this pattern with a striped or plaid fabric! You will need extra fabric to allow for matching and it may take longer to cut, but it can be done! Depending on your stripe/plaid, you may only be able to match 2 seams instead of 4 – if this is the case, match the center front and center back seam. Mismatched side seams are less noticeable 🙂 Here is my tutorial for matching plaids. Also relevant: my tutorial on matching the stripes at the pocket.
– This pattern calls for you to cut the waistband on the straight grain (parallel to the grain line). If your fabric has a bit of stretch, though, you may want to consider cutting on the cross grain (perpendicular to the grain line). This is what I did 🙂 Keep in mind that if you cut on the cross grain, you’ll want to interface the waistband with a tricot interfacing to retain that stretch. I personally love the PROtricot at Fashion Sewing Supply, but most fabric stores have something similar 🙂
– If your fabric is super drapey and you don’t want the pockets to bag out, you may consider eliminating them entirely (go ahead, gasp or whatever). This is what I did on my skirt, to allow for a smooth front. You can always add in-seam pockets if you’d like.
Eliminating the pockets is super easy:

You’ll need your pocket piece and your skirt front piece.

Fold the pocket piece in half along the foldline, matching the notches.
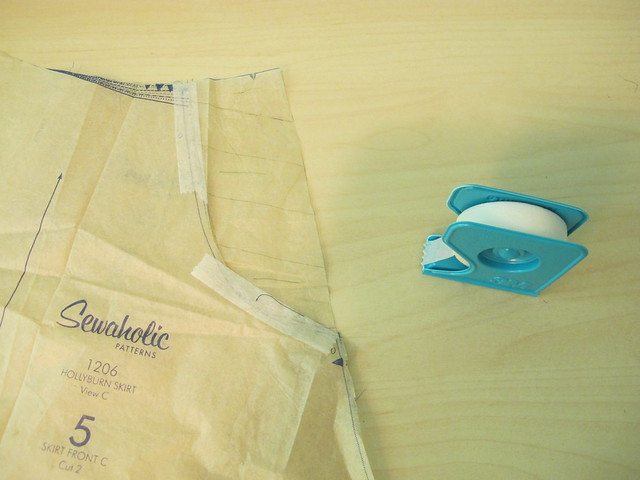
Lay the pocket piece behind the skirt front at the pocket opening, again matching the notches. Then just tape it down into place – I am using surgical tape because it peels off easily without tearing the paper (I can’t take credit for this – I got it in my goody bag at A Gathering of Stitches. Sam makes the BEST goody bags!), but you can also use regular tape, painter’s tape, pins, or even just trace off the pattern pieces. Whatever works!
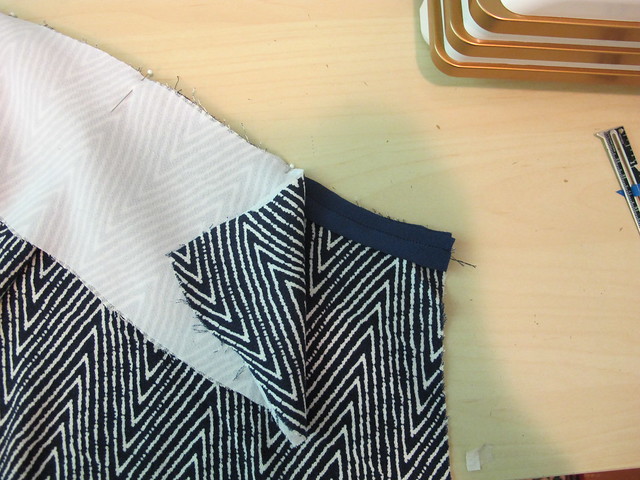
Next steps are to construct the skirt as per the directions. Sew the pockets (if you still got ’em!). Sew the center front and side seams at 5/8″, but leave the center back seam open. If you would like to finish your seams, now is the time. I used my serger to overlock the seams after I sewed them, and then I pressed them open. Finally, staystitch the waist of your skirt (just a straight stitch about 1/2″ from the edge) to keep it from stretching out.
At this point, I decided to add flat piping to my waistband seam. So you get a tutorial!

I started with a strip of bias-cut silk crepe that was 1.5″ wide. The width of your piping will determine how wide to cut your bias – you’ll want 2x the finished width, plus 2x seam allowance. Cut enough bias to go all the way across the waist of your skirt. Fold the strip in half, length-wise, with the WRONG sides together, and press.
I promise I will get a new ironing board cover eventually. Ew, that yellow stain. haha.
If you don’t know how to cut bias, here are two really great tutorials: continuous bias (my favorite!) and bias strips.

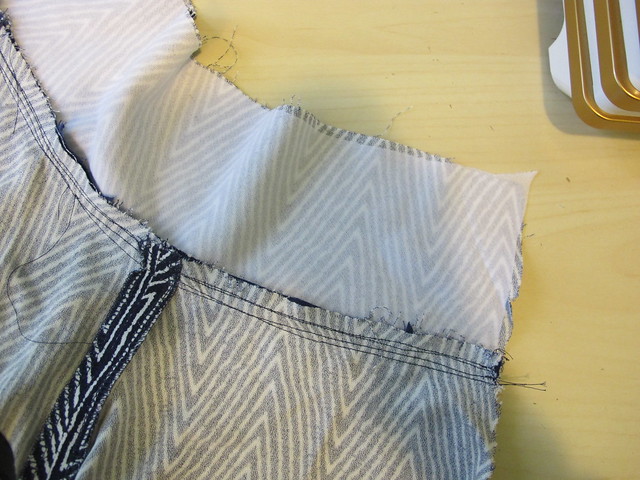
Lay the folded bias along the waist edge of your skirt, matching raw edges at the top, and pin into place.
Sew the bias in place just within the seam allowance (I sewed at 3/8″) to hold it there. You can use a basting stitch for this step; it’ll get a second sewn pass in a minute!
Lay your interfaced waistband on top of your skirt, with right sides facing and raw edges matching. The bias strip should be sandwiched between the two.

Now sew your second pass to secure all the layers at 5/8″. Make sure to shorten your stitch back to it’s normal setting if you were basting 🙂 I ended up sewing another line a little more than the seam allowance, because I wanted the piping a little bit narrower.

Check the right side to make sure that everything looks good. I have no idea how I managed that unintentional perfect pattern matching, but hey, I’ll take it!
Press all the seam allowances up toward the waistband, using lots of steam so the piping lays nice and flat. If your fabric is bulky, you may want to trim down your seam allowances and/or grade them (trimming them in staggering layers) to prevent bulk from showing from the outside.
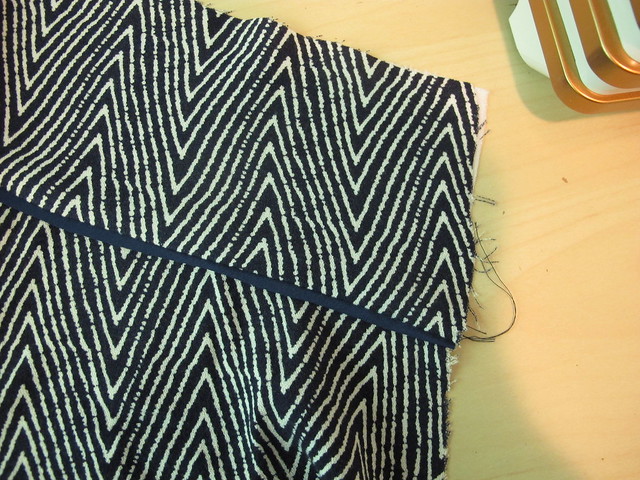
Now admire your pretty, flat piping! Isn’t that dainty? 🙂
Ok, that’s all for this week! Let me know if you have any questions about these steps 🙂 Next week, we sew in the zipper and finish the thing! Woohoo!


Love the look of the piping. As always, your explanations combined with your photos make it so incredibly understandable and approachable that I can see myself doing what ever it is you are teaching. After all, you were the one who helped me overcome my fear of hidden zippers…thank you so much for that. Cheers, Michele
It makes me so happy to hear of your hidden zipper success!! I’m so glad to know that you find my tutorials useful 🙂
Piping?! Oh now, I want piping! Lol. Oh well, another trip to the fabric store. I was dazzled by the pattern matching. Such a great effect. Thanks for providing links for the past OAL, Lauren. I can be a lazy prepper and it was a good reminder to slow down and set yourself up for a successful project.
Off subject, your posts inspired my first bra making attempt. Went with Bra Makers Supply Kit…looks wise it turned out amazing. The fit is crap, but with a few tweeks, I’ll get there, so thanks for that!
You are so welcome! And YAY for your first bra! Isn’t it crazy how easy it is once you’ve slapped one together?
Great post Lauren. Thanks for all the helpful links. There is an excellent waist modification tutorial on A Fashionable Stitch for those of us with contoured waists. The straight waistband gaped on the top part for my first Hollyburn. Then I did the adjustment for my next 3 and they fit like a dream now.
Oh, good tip on the contoured waistband tutorial! I didn’t even think about that as the straight waist fits me fine, but it is definitely a good option for more contoured waists. Thank you! 🙂
Lauren, you don’t put string/rope in your piping? I do flat piping A LOT, even in my knits!, but I fear the ropey kind.
Anyways, I named my bust form after you. Not in a creepy-mannequin-stalker sorta way, but because she looks like a Lauren. Plus, it’s the name of one of my first sergers, so there’s that. She’s petite and you’re right, getting a *real* one with collapsible shoulders is the tits. I should’ve listened 🙁.
I’m saving for a new Bernina and a Babylock Imagine, so I had to cut corners. The hubs gets so mad about this shit. Oh wells.
I normally do piping with the string it in (i like that it’s raised haha), but for this one, I did flat piping. They both go in pretty much the same way I guess!
Also, I am so pleased to have a dressform named after me! Haha! I’m always trying to get people to name their kids after me, this is close enough lol 🙂