Completed: The Lola Sweatshirt Dress

27 Nov

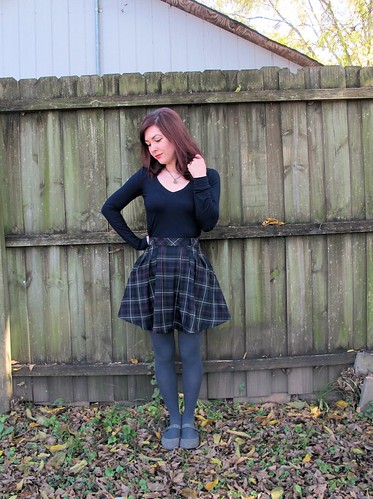
I keep complaining about the cold, being the delicate flower that I am, but for some reason I also keep finding myself in dresses on a daily basis. What’s a girl to do?
Lola Sweatshirt Dress

DUH, MAKE THAT SHIT OUT OF SWEATSHIRT FLEECE.

Lola Sweatshirt Dress

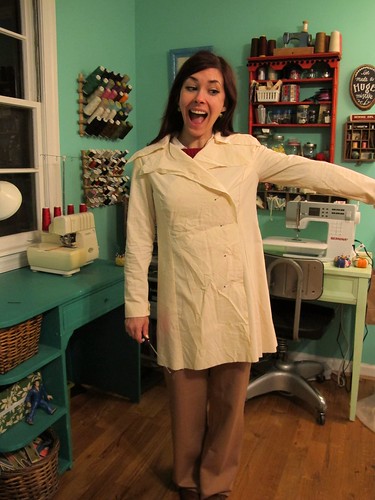
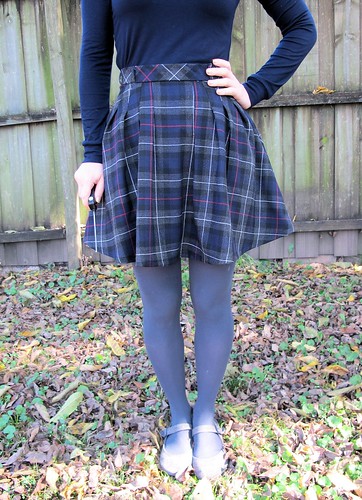
Pair it up with some merino leggings and you’ve got yourself a nice stew outfit!

Lola Sweatshirt Dress

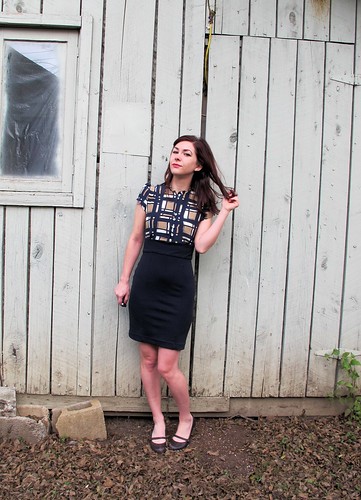
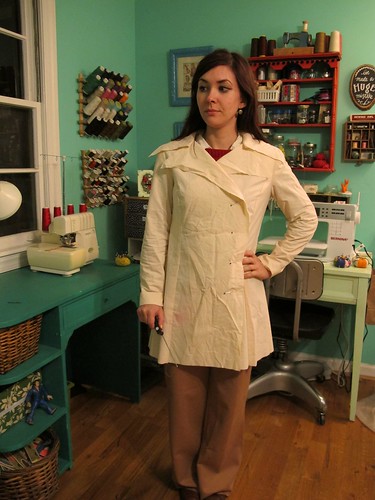
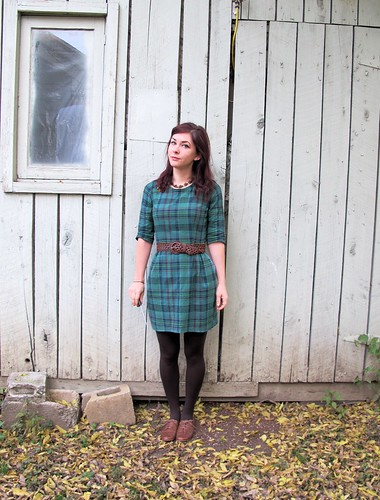
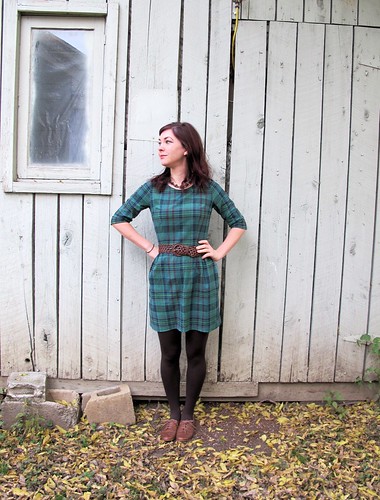
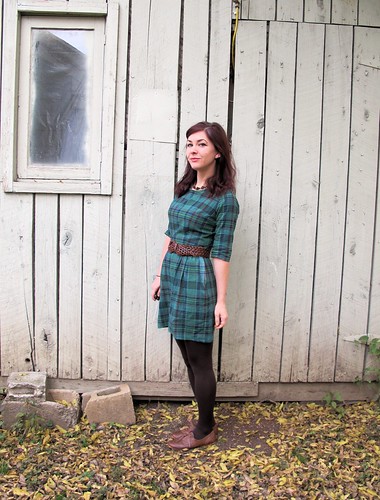
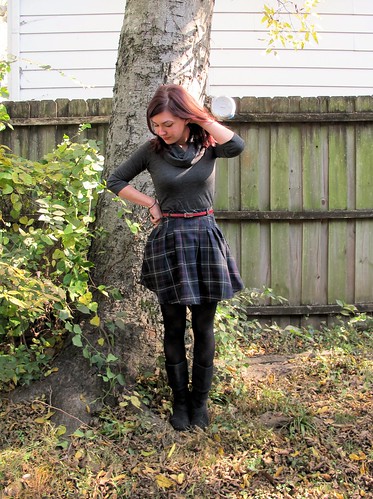
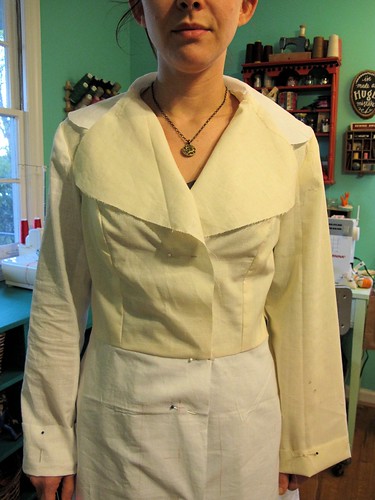
This is Lola from Victory Patterns. A dress pattern specifically designed to look like a sweatshirt, who woulda thunk!

Lola Sweatshirt Dress

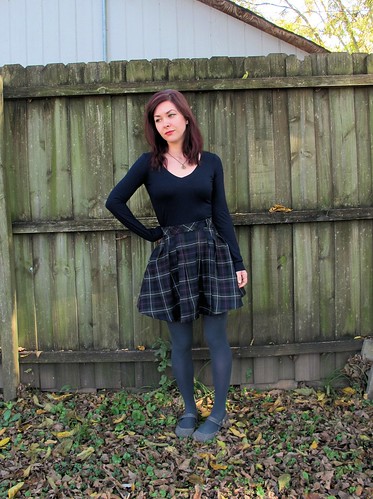
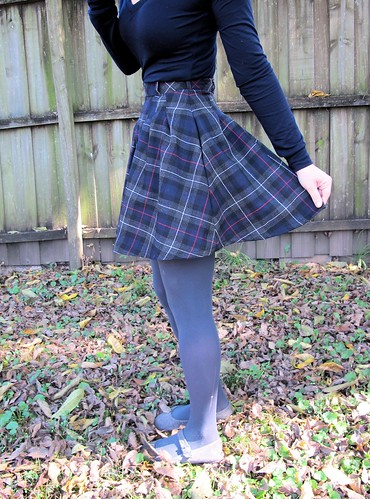
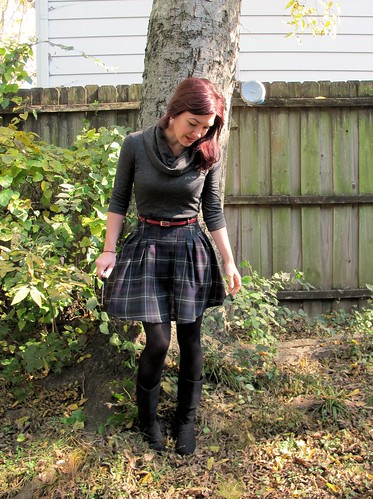
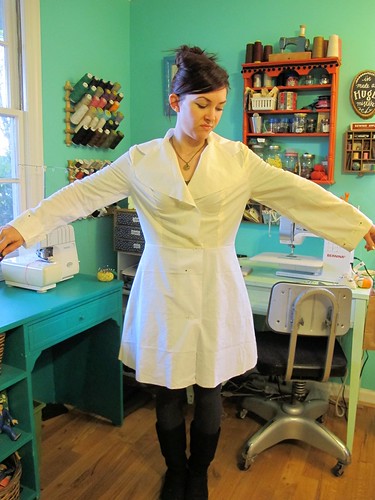
I don’t feel like I have much to say about this pattern, but I’ll try anyway. I cut the size 2, although I did take in the lower bust seams (toward the empire waist seam) and the upper skirt seams for a slightly closer fit. Actually, I recut the entire skirt because the first time just wasn’t doing it for me – I had shortened it, added the ribbed band at the bottom, and it just looked… weird. Don’t get me wrong, it’s a cute look (lord know I’ve made millions of these types of fitted knit dresses with bands at the bottom, lolz, back when I used to ~sell~), but with this fabric/ribbing/on ME, it didn’t look good. So off it went, and I had to cut a new skirt because my shortened skirt was tooo short for even me. Bummer, because I had been thinking about making Landon a sweatshirt with the remaining fabric, as it’s a color that he really likes. BUT NOT ANYMORE, SORRY LANDY.

Lola Sweatshirt Dress

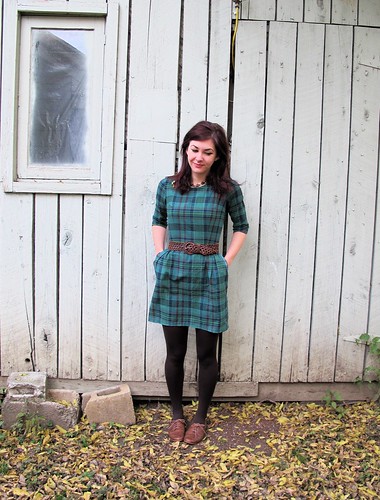
So, I left off the bottom band. I also left off the pockets, as I felt like they added unnecessary bulk. Of course, now I find myself reaching for said nonexistent pockets – oh well! Perhaps the next version of this dress will include them, I dunno.

Lola Sweatshirt Dress

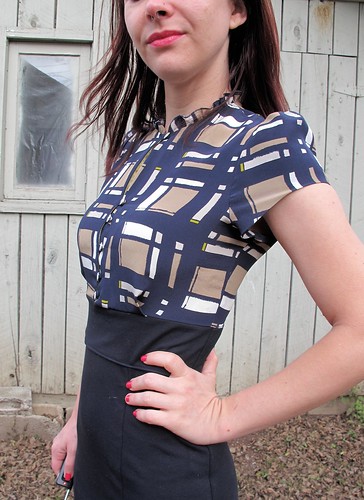
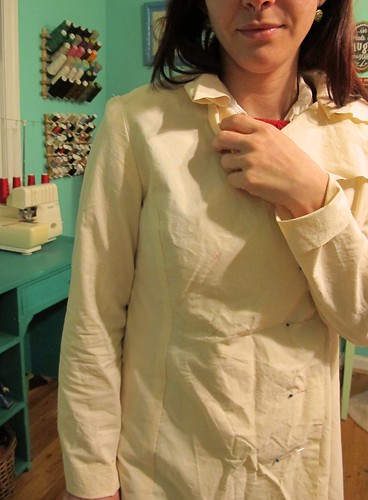
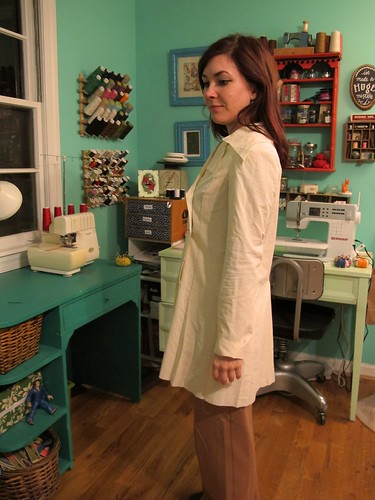
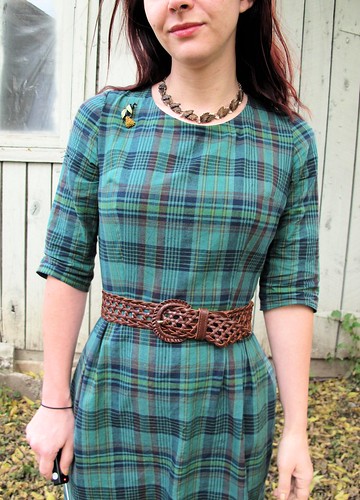
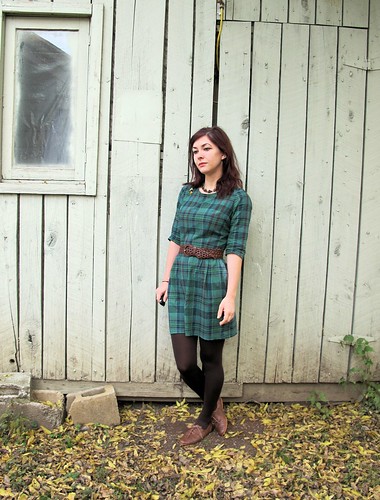
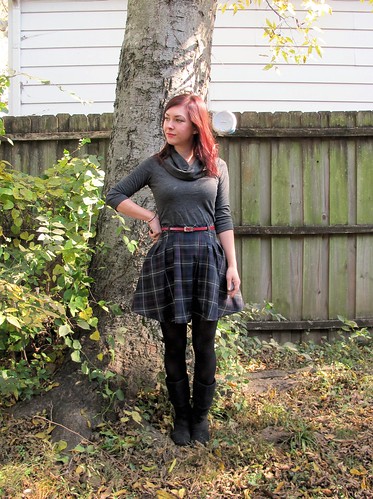
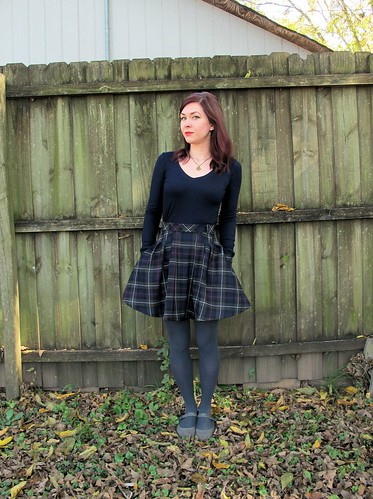
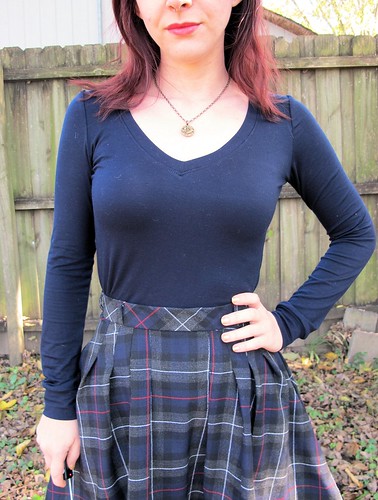
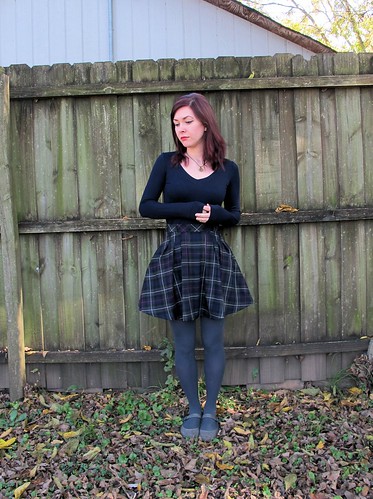
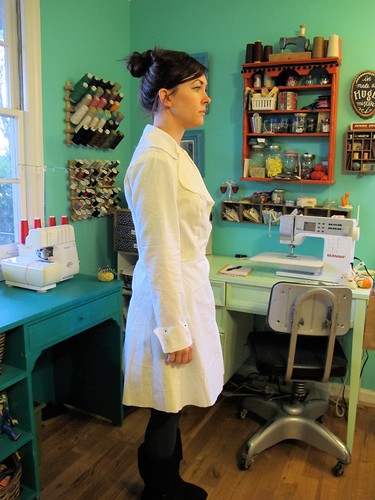
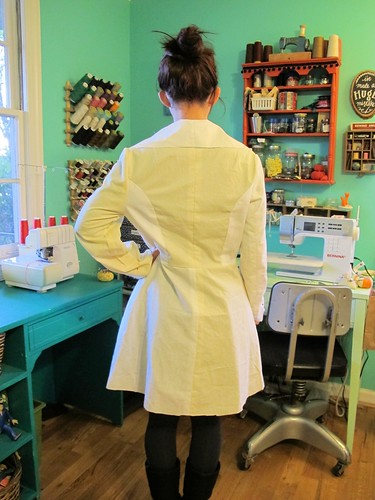
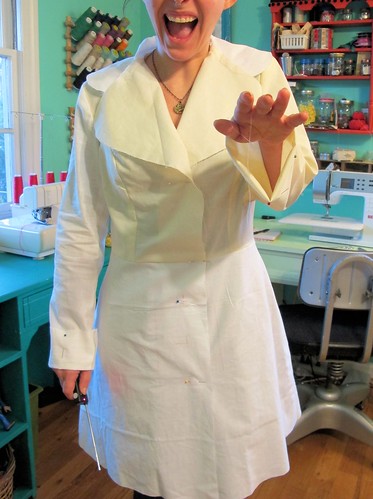
At any rate, this was super quick to make up, especially since I used my serger for nearly every seam. And it looks pretty cute, if I do say so myself, although I think I prefer to wear this color with burgundy tights instead of brown. My favorite part is the little V at the neckline, it really makes it look like a proper sweatshirt! I debated flipped the fabric to show the wrong side as suggested in the pattern, but it just looked like I had sewn the V on backward and ain’t nobody got time for that.

Lola Sweatshirt Dress

Next time, I will try this in a ponte knit, like my homegirl Sonja already did (you should probably know by now that I spend most of my sewing life trying to emulate her and her makes, it’s tru). With the sweatshirt fleece, it’s pretty casual – which is nice!, but it would also be nice in a not-casual fabric too. I might even try doing the ribbing in a matchy color, instead of the contrast I’ve got going on here.

Lola Sweatshirt Dress

Speaking of which….

Lola Sweatshirt Dress

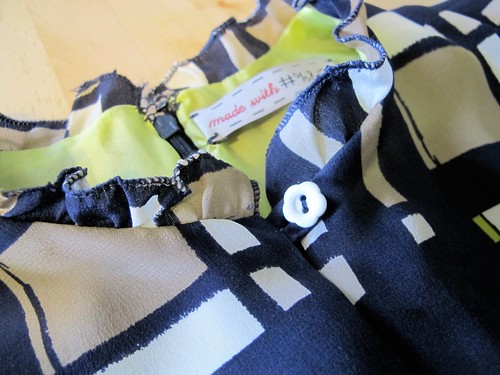
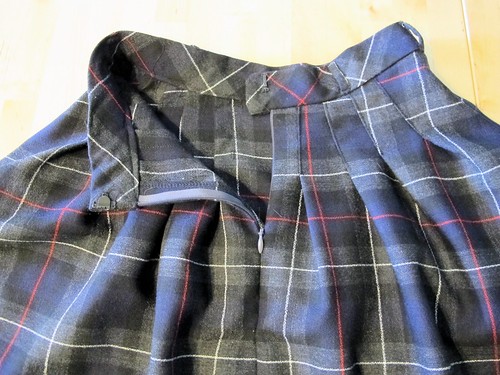
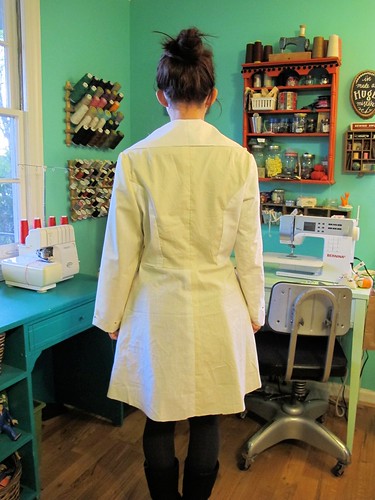
So, the pattern calls for actual rib knit to finish those edges. Guys, where the fuck do you even find that shit? I saw a giant (like, bigger than me) pile of assorted rib knit odds and ends while I was in Chicago at the Textile Discount Outlet, and obviously I grabbed an armful (eh, they were like a quarter apiece, sue me), but all the greens I got were all wrong. And not all wrong in a cool contrasty way, they were all wrong in a “I tried to match this but I done goofed” way. So much for that! I’m a big fan of finishing knit edges with self-fabric, but this fleece is not terribly stretchy, so what did I do?

Lola Sweatshirt Dress - ribbing

Oh yeah. I went there. RIP American Flag Sweater, hope u enjoy your new life as a pillow!~*~*~*~

Lola Sweatshirt Dress

Basically, I just cut the rib knit off the sweater (including the bottom hem rib knit, but we all know how that did not work out) and treated it like it was the kind you purchase by the yard. It sews in the same way as those knit bands I looove, although I would rly rly recommend using a serger for this particular task, since it likes to shed. A lot! And it looks pretty profesh! Good idea to file away for those huge novelty sweaters you have but don’t ever wear (am I the only one with a stash of those? All right), especially since you can sew the sides up and make it into a pillow :3 lol my couch is so patriotic now.

Lola Sweatshirt Dress

So there’s that! No flat shots because I’m wearing this as I type this post, heh heh heh! Sorry, not sorry! If you were wondering, YES, I did get a hair cut! Got me some bangs, and I think I love them! I also should point out that every time I typed “sweatshirt” in this post, nine times out of ten it came up as “sweatshit.” Where is my mind. I need a vacation.

EDIT Looks like Victory Patterns is running a Black Friday sale woohoo! Take 30% off your entire order with the code “happyanny”! Thanks to everyone who alerted me of this, yay for saving money! haha!

Completed: The Sugar Plum Dress (+ a Giveaway!)

25 Nov

This dress is SO awesome and sneaky. Looks like two pieces, but wait- there’s more! It’s actually one dress! Sugar Plum dress made with Oscar de la Renta silk and ponte knit from Mood Fabrics I LOVE these kinds of dresses! Looks like a silk blouse with a high-waisted pencil skirt, without the bother of keeping a shirt tucked in all day and making sure things match in the morning (because, ew, all I wanna do is sleep right now). Extra bonus – the skirt is a ponte knit, so it’s actually a COMFY pencil skirt. Are y’all feeling my excitement right now?? Sugar Plum dress made with Oscar de la Renta silk and ponte knit from Mood Fabrics This is the Sugar Plum, from Lolita Patterns. Full disclosure: Amity sent me this pattern free to try it out and see how I liked it. I guess you probably gathered at this point my reaction to the finished dress – ummm, amazing! I love how it’s totally appropriate for a professional environment (not that I need clothes like that anymore, but, you know, I still like to dress up ;)), but it’s still beautiful and feminine and unique. The pattern is really fun to put together – lots of tiny pieces, clever seam finishes, the kind of stuff that makes me 😀 Since it doesn’t require a lot of fabric to make up the top half (less than a yard!), I splurged on this amazing Oscar de la Renta silk print from Mood Fabrics. I also bought this navy blue ponte knit for the skirt (omggg so comfy) and lime green china silk for the lining for a bit of a color pop. Sugar Plum dress made with Oscar de la Renta silk and ponte knit from Mood Fabrics This is view B, without the front flounces. I sewed up a size 2. The top fit with no alterations, although I did need to take the skirt in a bit to get it fitted (it’s actually a bit toooo fitted now, whoops. Good thing it’s a knit lol). I did use a much stretchier fabric than suggested by the pattern, so I’m not surprised. The pattern has you use a stretch woven, and pontes tend to be a little more like an actual knit. Based on the way the skirt fits, I suspect you could also use a non-stretch woven and just cut the panels on the bias for the same fitted/comfortable effect. I skipped the pockets and the sleeve gathering detail for a more simple look. Sugar Plum dress made with Oscar de la Renta silk and ponte knit from Mood Fabrics The more I sew with silks, the more I find myself not wanting to make up anything else. The most important thing I’ve learned when it comes to sewing lightweight/slippery/silky fabrics is to make sure that your cutting is super accurate, then the sewing is a piece of cake (or, at least, as much of a piece of cake as it can be!). I always rip my fabric along the cross grain first, to ensure that the edges are perfectly straight, and then pin the selvedges together before I lay down my pattern pieces. This prevents the silk from shifting as I cut it. When it’s time to cut, make sure your scissors are nice and sharp, and try to cut the entire length of the blades (instead of timid little snips). One thing I loove about ordering from Mood Fabrics is that I know the fabric is going to already be on-grain, so I don’t have to worry about straightening the grain before I cut. Just rip the cut edge, pin, and cut those pattern pieces! Sewing with the ponte was much easier than the silk, obviously. I used a serger for all the skirt seams, and my regular sewing machine (treating it like a woven) to attach the silk top to the ponte waistband. I love this ponte because it’s quite a bit more stretchy than other pontes I’ve tried, which means it’s extra extra comfortable. Just be careful when you press it – it definitely gets a shine, so use a press cloth. I keep a big square of silk organza specifically for this purpose. It absorbs the heat of the iron so my fabric underneath doesn’t shine, and it’s sheer so I can actually see what I’m doing 🙂 Sugar Plum dress made with Oscar de la Renta silk and ponte knit from Mood Fabrics Sugar Plum dress made with Oscar de la Renta silk and ponte knit from Mood Fabrics I really enjoyed working on this pattern – lots of tiny details to make me feel challenged as a seamstress, but not so much that I got overwhelmed with the process. A lot of indie patterns run on the easy/beginner side – which is fine, I know there are lots of people who want something simple to make up, and it’s easier to complicate a pattern than simplify it. But sometimes it’s nice to have something that I feel is aimed at a slightly higher level, without me having to run through the steps and find ways to make it harder for myself. Wow, I just made me sound like a total weirdo. What can I say, I like a challenge! Sugar Plum dress made with Oscar de la Renta silk and ponte knit from Mood Fabrics I did make a pretty crappy mistake toward the end of this dress. I was sewing in the invisible zipper and could not get the waistband seams to match up. I was tired, hungry, getting grouchy (you can see where this is going), and I thought, “One more try and then I’m outta here.” While picking out the zip, I somehow managed to detach the teeth from the zipper tape. WHYYYYY. I know I tell y’all that I have millions of zippers in my stash, and I do, but none of them are invisible. I actually have to go out of my way and buy one whenever I need it (because I’m too stubborn to keep those in stock, apparently), which usually ends up with me going to Walmart because they sell invisible zippers and they’re open at 3am when I suddenly need one. So I pretty pissed about destroying this zip, and trying to avoid another trip to Walmart. I ended up cutting the zipper right above where I sliced it open, and just finished the dress with a super duper short zipper – it ends about halfway down the waistband. Since the skirt is so stretchy, this works, kind of. It’s funny to watch me pull it on, ha! And you know the worst part? THE WAISTBAND PIECES STILL DON’T MATCH UP. Whatever, I’m over it! Sugar Plum dress made with Oscar de la Renta silk and ponte knit from Mood Fabrics Sugar Plum dress made with Oscar de la Renta silk and ponte knit from Mood Fabrics I love the little details on this dress that make it so special – the ruffled collar (hemmed using the rolled hem on my serger), the tiny buttons with the tiny button loops, and that BRIGHT LIME GREEN LINING. Really, it’s like a party when I take the dress off! Sugar Plum dress made with Oscar de la Renta silk and ponte knit from Mood Fabrics Sugar Plum dress made with Oscar de la Renta silk and ponte knit from Mood Fabrics Sugar Plum dress made with Oscar de la Renta silk and ponte knit from Mood Fabrics By the way, don’t ever search Oscar de la Renta on the Mood Fabrics site unless you plan on dropping some serious dough on some seriously incredible fabrics. I just fell down the rabbit hole – again! – and discovered violet boucle, boucle with sparkly lurex (!!!), silk floral and some freaking polka dot silk taffeta. I want, I want it all! Sugar Plum dress made with Oscar de la Renta silk and ponte knit from Mood Fabrics

Now time for the fun part – a giveaway! Amity has generously offered a copy of Sugar Plum to one lucky winner, yeeeah!! Still having reservations? Just know that the sizing goes aaaaall the way up to 24 (yes!) and there is an entire sew-along on the blog for anyone who needs some hand-holding. You have no excuses, people! To enter, just leave a comment on this post and let me know what you’d make your Sugar Plum up in (Personally, I’m lurking on a second version with a leopard blouse and a denim skirt, like, ahem, Leila’s. Yes. Exactly like that. Sorry boo!). This giveaway is open to WORLDWIDE and I will close the entries a week from today, Monday, December 2 8:00AM CST. Good luck!

GIVEAWAY IS NOW CLOSED.

DIY Thanksgiving Table Spread

18 Nov

The next project for my holiday crafts personal challenge comes courtesy of Thanksgiving. I’ll be honest – I was a little terrified of this challenge. For one, I don’t host Thanksgiving dinner at my house – that’s what parents are for! Go to their house, eat all their food, leave the mess (but take some of the food home with you because, duh, poor and stuff). So table decorations just seem like a moot point in a home that won’t have dozens of people admiring my hard work (or secretly wondering if I’m as insane as I come across in my decorating scheme).

While complaining about this to my mom, she immediately started gushing about some handmade table runner she saw in a local gift shop, and saying it didn’t come in any color combinations that worked with her personal decor and that’s what she would make if she were participating in this project. So I had the brilliant idea to have her help me make this project – and then gift her the finished runner, since it’ll get more use on her dining room table (and, you know, people will actually see it ;)).

So, welcome to my second installment of Holiday Crafting, featuring supplies from JoAnn Fabric and Crafts, with special guests Mom’s Hands and Mom’s Dining Room.

Turkey Tablescapes

My mom is such a decorating whiz, isn’t she? Gah, her dining room is beautiful.

We made this table runner in a short afternoon (I think it took 2 hours, tops, and that included figuring out the construction steps and taking photographs! Honestly, decorating that tablescape took waaay longer, ha!) for a minimal cost. The best part about this project is that you can choose any fabrics and embellishments you like, to really make it your own!

To make this table runner, you will need 2 yards of burlap for the base, plus half a yard each of your contrasting ruffle fabric. We also bought 2.5 yards of 7.5″ wide ungathered lace.

You will need to prewash your fabrics and press them nice and flat before cutting. My mom used baking soda in the wash with her burlap, to make it smell less like a hippie. For a 81″x42″ dining table, we cut our pieces as follows-
Burlap (or other fabric base): Since our burlap was 50″ wide, we cut it lengthwise down the middle and sewed the two pieces together to make a finished piece that is 24″ wide by 96″ in length
Ruffles: 8.5″ tall by 45″ length, cut 2
Lace: 7.5″ tall by 45″ length, cut 2

Turkey Tablescapes

The VERY first thing you need to do is finish those edges of the burlap before they fray all over the place. We used the serger – a 4 thread overlock with a dense stitch width so the unraveling is kept to a minimum. Don’t be afraid to really cut off some width from those pieces – it’ll give the thread something to grab on so it doesn’t immediately fall off. Serge all cut edges, including the sides and the ends, as well as any piecing you may have needed to do.

Don’t have a serger? Use a narrow zigzag stitch, or even consider binding the edges with premade matching bias tape.

Turkey Tablescapes

If you had any piecing, press the seams open with a hot steam iron so they lay nice and flat. The good thing about burlap is that the seam is virtually invisible from the outside! We left the serged edges as-is – they’re not terribly noticeable, as you can see, plus they provide some additional texture to the edges – but you can turn under the edge and stitch a narrow hem if that’s your thing.

Turkey Tablescapes

Hem your ruffle pieces on both edges (at the top edge of this ruffle, we used a rolled hem – again, from the serger – and the bottom is serged and folded under and topstitched because, lazy.). You can also fray your fabric by stitching a line of small stitches about 1/2″ from the edge and using a pin to encourage the fraying.

Across the top of each ruffle piece, sew a line of long basting stitches (the longest stitch on your machine) 1/2″ from the edge and leave some looong thread tails. Do not backstitch either end of the stitching.

Turkey Tablescapes

To create a ruffle, grab one of the thread tails with one hand, and hold the fabric with the other.

Turkey Tablescapes

Holding the thread tail still, gently coax the fabric into a gather.

Turkey Tablescapes

Continue gathering until your ruffle is the desired amount of gathered goodness, then wrap the thread tails around a pin stuck in the fabric so they stay put.

Turkey Tablescapes
Turkey Tablescapes

(I just love that bunny pincushion. I have it’s twin, but you couldn’t tell by just looking at it – mine is so old and used, it’s grey and threadbare and missing some body parts, ha!)

Once you’ve made your ruffles, you can get started on the fun part! Lay your ruffles on the burlap and arrange them so they look the way you want them to.

Our ruffles ended up being placed as follows:
Bottom burlap ruffle – 1/2″ from bottom edge
Middle lace ruffle – 2″ above burlap edge
Top white ruffle – 3.5″ above lace ruffle

It is also a good idea at this point to lay the runner on your table to ensure that everything is in the right place before you start stitching.

Turkey Tablescapes
Turkey Tablescapes

Now you can sew! Just use a normal stitch length and sew straight down the basting/gathering line you created, being careful to make sure the gathers are evenly distributed. I find it helpful to set my machine to put the needle down every time I stop sewing; then I can raise the presser foot and redistribute the ruffles if needed.

Turkey Tablescapes

“God, Mom, stop taking pictures of me.”

Here’s how we sewed on the ruffles:
Turkey Tablescapes
Turkey Tablescapes

Since the two bottom ruffles are covered by ruffle hem goodness, we just laid them on top of the burlap and stitched down the middle of the gathering line.

Turkey Tablescapes
Turkey Tablescapes

The top ruffle was stitched upside down and then flipped over itself for a clean edge on top of the runner (the rolled hem was originally going to be exposed, which is why so fancy, but we decided it looked a liiiiittle too crafty, so it was moved to the underside).

Turkey Tablescapes

Once your ruffles are sewn down, give them a good steam with a hot iron. Don’t actually press them – just hover the iron a couple inches above and steam steam steam. We don’t want to flatten them, just help them stay in place.

Turkey Tablescapes

And that’s it! Pretty easy, huh? I probably spent longer writing this tutorial than it takes to actually make the table runner!

Now, I told y’all we spent foreeeeever decorating the table… and then took like 100 pictures. So now you have to look at them. Sorry, not sorry!

Turkey Tablescapes

Turkey Tablescapes
(those candlesticks are totally supposed to be waxy ears of corn. My mom does not understand why I think they are so hilarious).

Turkey Tablescapes
Turkey Tablescapes

It’s not a real #turkeytablescapes without some turky S&P shakers, yeah?
Oh, yeah, and those little red ears of corn are popcorn! My dad grew them in his garden this year, aren’t they soo cute?

Turkey Tablescapes
Turkey Tablescapes

Turkey Tablescapes

I am including this picture of the chandelier/ceiling because I want everyone to know that I helped hang that… ceiling wallpaper stuff, probably about 15 years ago. I remember being SO mad at my dad for making me help (it was rough! I had to stand on a ladder and hold things on the ceiling and ugh, it took forever), and complaining, “NO ONE IS EVEN LOOKING AT THE CEILING, WHAT IS THE POINT, WHYYYYY”. So there. Look at the ceiling. LOOK AT IT.

Turkey Tablescapes

Finally, this was our helper for the afternoon – Sweetie, my mom’s Siamese. I know Siamese cats are weird, but this cat is real weird. I love her.

So that’s it! I’m so glad I was able to incorporate one of my holiday crafts into a mother/daughter crafternoon (ha, Landon hates that word), as well as give my mom something I know that she’s thrilled to use.

Turkey Tablescapes

Want to make your own? Snag this coupon and save some dough, yo!

bloggerNovemberCoupon

As always, you can see more fun #turkeytablescapes at the Celebrate the Season website.

The Vogue Coat: Muslin #2

15 Nov

Well well, 3 posts in one week! That doesn’t happen too often, huh? Hopefully y’all aren’t tooooo sick of hearing from me, because I have lots to say apparently!

Starting with yet ANOTHER muslin post. Forreal, tho, y’all were so helpful in my last muslin post, that I’m sticking my hand back in the cookie jar again. A little help, yes yes?

Coat Muslin, part 2

First things first, you probably noticed that this coat looks entirely different – that’s because it’s a different pattern altogether! I ended up scrapping the original Vogue pattern plan – a shame, because I really wanted to use it (it was a gift from a reader, and I like to make use of awesome things, see), but there’s no point in trying to make something work that needs, well, that much work. Especially considering all the modifications I’d have to make beyond just sizing – including drafting a new lining, facing, and undercollar. No, no thank you.

So I dug around in my stash and pulled out Vogue 7666, which happens to actually be in my size. And to make things extra exciting, this pattern has all sorts of fun goodies in the instructions for creating a beautiful hand-tailored coat – things like separate lining pieces, instructions for padstitching, a marked roll line, etc. Fun!

Coat Muslin, part 2

I made up a quickie muslin and here are the pictures! Based on everyone’s suggestions, I am wearing this muslin with a sweater underneath, and I slipped some shoulder pads in the muslin as well. The shoulder pads may be on the large size, I dunno, they were in my stash.

Coat Muslin, part 2

I think it fits much better than the first, off the bat. Look, the arm holes are normal!

Coat Muslin, part 2

I can’t tell if the shoulders need to be narrowed a little, though?

Coat Muslin, part 2
Coat Muslin, part 2

Back and sides look ok.

Coat Muslin, part 2

I know the back looks a little loose, but I honestly can’t go much smaller without making the coat difficult to move around in.
Also, ignore that weird shit going on at the bottom half – there will be a back vent there, but I didn’t bother sewing it in the muslin, ha.

Coat Muslin, part 2

I know the collar and lapels are kind of weird and pointy, but I like them! Keep in mind that they will be a little bit smaller – the 5/8″ seam allowance is there, and once I get the facing installed there will be notches and topstitching and all that.

I also need button help! What would you choose? I really love these black glass buttons from Mood Fabrics – one, two, three or four?

Or do you have a better suggestion? My only requirements are that they are black (sorry, but I think anything other than black is just going to look off with my fabric choice), 1″ with shank, and they reeeeally need to be $3.50 or less because I need 8! Again, you can see my fabric and pattern in this Instagram picture.

Coat Muslin, part 2

Sooo, to sum up: coat muslin #2, y/n? See any fitting changes I need to address before I start slicing in to my beautiful coating?

Pattern Testing: The Sigma Dress

13 Nov

Umm, have you guys seen the new Constellation Collection from Papercut Patterns? Obviously, I’m biased here, but it’s pretty freaking amazing! Katie has really killed it this time, with the release of six fabulous new patterns – including a bomber jacket (which, duh, totally making that). I was lucky enough to test a pattern in this round, so I ended up making the Sigma Dress. Want to see? 🙂

Sigma Dress

The Sigma is a simple dress that can be made up in a variety of views/fabrics to create a different dress each time. What I love best about this pattern is the pure simplicity of it – it can be embellished however you please. Add a sweet detachable collar, sew it up in a fabulous brocade for the holidays, tough it up with an exposed zipper – it’s super versitale! And, I should point out, it’s a great pattern to sew up in a lovely plaid 😉

Sigma Dress

My Sigma has the skirt from variation 2 (small gathers at the waist; kind of hard to see in this fabric, ah!) and a weird mishmash of sleeves from both variations. I reeeeeally wanted this dress to have long sleeves, but I totally borked up the cutting, like, immediately (I blame it on the kidney stone), so I just made the sleeves as long as my fabric would allow me to. Soo, elbow-length it is!

Sigma Dress

I cut the size XXS, based on my measurements, and it was a near-perfect fit straight out of the envelope. I did have to add two small 1/4″ darts at the back neckline because it gaped a little, but that’s a pretty typical measurement for me. I also sewed in a lapped zipper at at 5/8″ seam allowance (these patterns use a 3/8″ seam allowance), to tighten the waist seam and also because I didn’t want to math.

Sigma Dress

Fair warning, this baby is SHORT! This is the actual length you see on me, and I’m 5’2″. Katie and I discussed the length, well, at length (hee, we’re like a mini-focus group), and she ultimately decided to keep the original short length because it’s cute as hell and add lengthen/shorten lines to the skirt so you can get on with your bad self and make it whatever length you want!

Sigma Dress
Sigma Dress

See that strange lightened area around the pocket? Yeeeah, that was where I applied interfacing to the wrong side of the skirt, sewed up the pocket, stuck it on the dressform and realized my stupid fabric was identical right/wrong side and I had used the wrong side as the right side. Meaning, my unbalanced plaid did not match at ALL at the waistline. After mulling over it for a couple of days, I carefully shredded off the interfacing and tried to wash the glue off, but as you can see – a little still remains. It’s not totally noticeable, but it *is* there. Something to keep in mind if you’re making this up in a plaid – make sure you’re using the correct side of the fabric 😉

Sigma Dress

“Wait, did someone say pockets? In this dress??”

Sigma Dress

Yep! Yay for pockets!

Sigma Dress

If you were wondering about my fabric choice, it’s really not anything special – some lightweight cotton plaid I got from a friend (who I think originally bought it at an estate sale). It’s actually a bit toooo lightweight for this dress, as it loves to wrinkle up whenever it has the opportunity. But, you know, that’s the beauty of this pattern – you can make it in practically anything. Anything!

Sigma Dress
Sigma Dress

I also think the neckline is just perfect for showcasing those little choker-esque necklaces that I can never figure out what to pair with.

This was my first experience testing for Katie (although not my first rodeo with her patterns, yeehaw!), and it was a very pleasant experience! I really liked that she had the patterns printed and shipped directly to us, as opposed to sending out PDFs to be printed and assembled at home. For one, I hate printing PDFs (and I don’t even have access to a printer anymore after quitting my office job, sooo it’s not like I could print even if I wanted to. Ok, I could go to a copy shop but you and I both know that’s not gonna happen), and for two, I’m not really sure how accurate they are when it comes to testing purposes. Seems like an easy way to fuck things up, size-wise, in my opinion.

Sooo, now that I’ve waxed poetic about this pattern for an entire post, who else is excited to get their hands on it? Or anything from the new collection? I think the next sewalong we have on the Papercut blog will be for this dress – just because I reeeeeally want to play around with different looks (which you can’t really do with a tester pattern, I mean, not the slicing and hacking type of playing :)). Speaking of which, we have a La Sylphide sewalong going on right now if anyone is keen to join!

Sigma Dress

Right now, through 11/15, you can get 15% off this pattern (or any pattern in the new collection) with free shipping! This is a great opportunity to try out a Papercut Pattern, if you’ve been on the fence before. Not to mention, Katie added a new size so they go up to XL now 🙂 What are you waiting for??

Vogue Patterns 2013 Winter Collection

11 Nov

Happy Monday, everyone! I just want y’all to know that I passed my kidney stone over the weekend (and yes, it’s a big deal, and yes, I know y’all were just sitting on the edge of your seats waiting for an update), so let’s celebrate! Vogue has graciously decided to gift us with a new season of patterns! Hope you made a strong cup of coffee for this one.

V8943
Vogue 8943
This is inoffensive, it just looks exactly like a lace dress they released a couple of years ago.

V8947
Vogue 8947
Galaxy dress, much?

V8952
Vogue 8952
Briar, much?

V8950
Vogue 8950
Ensis Tee, much?

V1368
Vogue 1368
Again, it’s not bad, but the styling is something else. A matching skirt and top set made in bright purple with tinsel running through it? Oook, Vogue.

V8951
Vogue 8951
What’s with the buttflap, tho?

V8944
Vogue 8944
Ok, THAT is cute.

V8949
Vogue 8949
Oooh, this too!

V8946
Vogue 8946
Someone pls explain to me why you would take a pattern with a million tucks and pleats and other interesting details, and make it up in the busiest fabric you can find.

V1372
Vogue 1372
For the Michelin man in all of us.

V1373
Vogue 1373
Don’t worry about the other arm, she can totally handle the cold.

V8960
Vogue 8960
Oh, sorry, I didn’t realize the ugliest part of the 90s was back.

V8957
Vogue 8957
OH GOD, THE 80S TOO.

V1377
Vogue 1377
This is probably the only time you will ever hear me say this, but this is least-worst Koos Van Den Akker pattern I’ve ever seen.

V8961
Vogue 8961
Woof.

V1378
Vogue 1378
Just being nitpicky – I don’t think that’s a flattering length.

V8953
Vogue 8953
Still being nitpicky, but this is not a winter top?

V8955
Vogue 8955
I don’t hate this, I just hate that it is PANTS. Whyyyyyy.

V8945
Vogue 8945
Nope.

V8954a
V8954b
Vogue 8954
lol, this is seriously one of the worst ones in this collection. Like, wtf is even going on here? That shit looks like a SPIDERWEB.

V1375
Vogue 1375
Hm, ok.

V1376
Vogue 1376
Vogue: Still trying to make the danglies happen.

V8964
Vogue 8964
I guess it wouldn’t be a proper Vogue photoshoot without a random shirtless man.

V8966
V8966a
V8966b
V8966c
V8966d
Vogue 8966
That’s it, I quit.

Completed: the Zinnia Skirt

8 Nov

Who doesn’t love to wear wool in the winter time?

Zinnia Skirt made with plaid wool from Mood Fabrics

I feel like a broken record when I start singing the praises of wool, but foreal you guys – this stuff is awesome. It’s super warm and cozy, breathes very well (so you don’t get overheated in all that warm and cozy-ness), and it’s also antimicrobial, which means it naturally repels odors. Which means now you know why I wear so much wool and still manage to keep up with the laundry – it doesn’t need to be washed very frequently! Airing out is fine for day-to-day. Yay for being lazy!

Zinnia Skirt made with plaid wool from Mood Fabrics

So obviously, I was ready to bust the wool out just as soon as the temperatures started dipping. I’ve had my eyeball on that Zinnia pattern, and I paired it up with this beautiful lightweight wool plaid suiting from Mood.

Zinnia Skirt made with plaid wool from Mood Fabrics

I didn’t take any special precautions when sewing this – it’s wool, it’s just easy! The stitches sink in (bad for unpicking, but great for hemming since you can’t see the top stitching ;)), it presses beautifully, and as weird as this is gonna sound – it was really fun to cut, too. My scissors just sliced right through that yardage. I love the colors and it looks just as good paired with black as it does with navy. Double duty fabric and all that.

Zinnia Skirt made with plaid wool from Mood Fabrics

For the skirt, I cut the size 2 (although I did end up taking in the waist so maybe the 0 would have been better). I left the skirt unlined and shortened the hem by about 3″ so I could have a mini. The waistband is cut on the bias and, despite what you might think you see, I promise that the plaid matches up at the side seams 🙂

Zinnia Skirt made with plaid wool from Mood Fabrics

See?

Zinnia Skirt made with plaid wool from Mood Fabrics

Oh yeah, and I did totally just change shirts. We’ll discuss those in a second.

Zinnia Skirt made with plaid wool from Mood Fabrics

So. About working with this skirt in a plaid fabric. It works – kind of. Matching those side seams was HELL ON EARTH and I’m not really sure why. There are only two pattern pieces, for fuck’s sake! That was also the same day I got my kidney stone (which, if you’re still wondering… it’s still here. Just hangin’ out. Ugh ugh ugh), so I blame it on the pain meds. Anyway, I don’t really think this patterns works very well with a stripe – at least not the stitched-down-pleats version. They just look like a hot mess at the front and back. Might want to save your plaids – or at least your large-scale plaids – for another project.

Zinnia Skirt made with plaid wool from Mood Fabrics

I also had to drastically shorten the hemline – like I said, 3″ and WOO IT’S A MINI – because the longer length just looked dumpy as hell on me. Which means my plans for using a border print probably won’t work with this pattern, at least not the print I had in mind. It’s just too tall for the skirt length.

Zinnia Skirt made with plaid wool from Mood Fabrics

Also, the fabric I chose maaaay be a little too much for this pattern – seeing as how it sticks out like I have a teeny petticoat underneath it, ha – but I actually like the flared look.

Renfrew top made with wool knit from Mood Fabrics

Oh yeah, my tops! This is a Calvin Klein wool jersey, also from Mood Fabrics (attached link isn’t the same color – looks like they’re sold out of the grey, SORRY – but it’s the same fabric type) and it is deeeelicious. So soft and cozy, and not itchy at all! I used the Renfrew pattern and made the cowl version with 3/4 sleeves. I just love the way the fabric drapes at the cowl – it has enough body so it’s not droopy, yet it’s also not huge and standing up on it’s own or anything.

Also, sorry about the rouge leaf. Didn’t see that during the photos, haha!

Renfrew top made with rayon knit from Mood Fabrics

I made the navy v-neck because I felt like my contribution was a little boring, and also because I wanted to see how good navy looks with this skirt (it does! it does!). I used a rayon jersey from Mood Fabrics that’s been in my stash for ages – originally considered for leggings, until I realized that it was a tiny bit too sheer aka I would be baring my bum. I’m so glad I found a use for it, though, because it is some of the most luxurious fabric I have ever handled! It may just be a rayon knit, but it’s silky smooth and amazing. I really wish I had it in every color! I’m also, like, stupid proud of how that V turned out, by the way.

As usual, I took waaay too many pictures, so I’m just going to dump the rest here.

Zinnia Skirt made with plaid wool from Mood Fabrics

Zinnia Skirt made with plaid wool from Mood Fabrics

Zinnia Skirt made with plaid wool from Mood Fabrics

Renfrew top made with wool knit from Mood Fabrics

Renfrew top made with rayon knit from Mood Fabrics

Zinnia Skirt made with plaid wool from Mood Fabrics

Zinnia Skirt made with plaid wool from Mood Fabrics

The tiny belt loops are my favorite part! So tiny and cute!

Zinnia Skirt made with plaid wool from Mood Fabrics

See what I mean about the plaid? It looks like a hot mess at the pleats. Oh well.

Zinnia Skirt made with plaid wool from Mood Fabrics

One last thing – I wanted to thank y’all for all your advice regarding my muslin, as well as my kidney stone. I’ve decided to set the muslin aside for now; I may revisit it in the future but I think my coat for 2013 will have to be a totally different pattern! So I guess I’ve got that to figure out. As far as the kidney stone… well, it’s still there, taking up residence. Y’all will probably be able to hear me scream from the rooftops once it finally emerges haha. A few people urged me to to go the doctor, and I did want to follow up and let y’all know that I went to both a doctor and a specialist last week, got the x-rays as well as a variety of medications. There’s not much else we can do at this point beyond surgery or shooting lasers (which my uninsured ass is reeeeally trying to avoid), which means I gotta shoot it out! For the past couple days I’ve been on an essential oil regimen, and tonight I will be trying some Coke/asparagus concoction that sounds fucking disgusting but is supposed to work. Anyway, sorry for the TMI, keep thinking happy kidney stone thoughts! haha!

Zinnia Skirt made with plaid wool from Mood Fabrics

Vogue 2765, The Muslin

4 Nov

I’m afraid I don’t have a finished object to show y’all today. For exactly one week now, I’ve been dealing with a kidney stone that will NOT leave my body. Seriously, I’ve had these before and they generally pass within a day or two, but these little shits have made a home inside me, I guess, and no amount of water (or other weird home remedy, yes, I drank the olive oil and lemon juice, eww) will expel them. I hate peeing into a screen, I hate taking painkillers, and I hate this little segment of my life right now. I missed half a week of work last week, and get up to go to the bathroom about every twenty minutes on average. Shit blows.

Anyway, enough about me and my TMI, let’s talk more about… me! While I didn’t make anything finished, I did finish the muslin for my Vogue coat! Let’s have a look see.

V2765 Muslin

To be honest, I’m a little underwhelmed. It’s just so… meh. But then again, it’s a coat muslin made with a patchwork of different muslin fabrics, two different sleeves, and I’m not wearing a sweater under it. I was, but I took it off for the pictures because I don’t know why. I guess I wanted to make sure that it still looked good when it was loose. It’s not like I always wear a sweater 24/7, this is Tennessee we are talking about here.

I can’t tell if it really looks ok or if I’m just delusional. Help me.

V2765 Muslin

My pattern was a size too big to start, so I sewed most seams with a 3/4″ seam allowance and I think that really helped with pulling in the fit. It still looks a little loose, but this is also lightweight muslin and not a heavy coating.

V2765 Muslin

The underarms, though. Yikes. Need to raise that quite a bit.

V2765 Muslin

So, more about those sleeves. The right side is the original pattern piece. It’s terrible. I actually left it on so we could laugh at it together. The left sleeve is a two piece sleeve from my Fabiani coat (whyyy can’t I just wear that this winter? Wish it still fit 😥 ). I definitely like the two piece better, but it needs some tweaking as it’s a bit tight when I have on a bulky underlayer. I sewed it with the same 3/4″ seam allowance, so I think the normal 5/8″ will be fine.

V2765 Muslin
V2765 Muslin

Ahaha! See how bad the underarms are? Granted, that’s the shitty sleeve, where the problem was actually worse.. but still. It’s bad either way.

V2765 Muslin

Speaking of the original sleeve, this is why it’s so bad. It is a straight line from underarm to wrist – no tapering whatsoever. So the cuff, you can see straight to the elbow. Who thought that was a good idea?! God, it’s so terrible.

Anyway, I’m still on the fence about this, although I will say that leaving it alone overnight on my dressform (which, if you were wondering, is almost entirely what I use the dressform now these days. Putting shit on it so I can decide if I hate it the next day) gave me a ~fresh eye~. I guess I just want to make sure I’m not off my rocker here.

To recap, the fabric I’m using is this black and white checkered coating (which I’m almost having second thoughts about because, ughhh princess seams) and I haven’t settled on a lining, but I’m leaning heavily toward tango red. Also haven’t picked buttons (lolol I’m a hot mess), but I’m thinking toggles would be FUN.

Soo, what do you think? Vogue 2765, yea or nay? See any other fitting issues I failed to mention (beyond the underarms)? Want to sew a coat along with me (I’m going the “barely tailored” route)? Have any well-wishes you’d like to share with a lady who needs to exorcise this demonkidney stone? I’m all ears!

Completed: Winter Tania Culottes

28 Oct

I wasn’t sure if the Tania Culottes could be winterized, but they can. THEY TOTALLY CAN.

Winter Tania Culottes

And they look really good in the process!

Winter Tania Culottes

I made these using a piece of fabric I’ve had in my stash for a few years… it looks like wool suiting, but it’s actually 85/15 linen and silk. The silk addition is nice because it means the fabric doesn’t wrinkle. I guess it would be more suitable (lolz) for summer wear, but summertime is not suit fabric time, regardless of fiber content, as far as I’m concerned.

Winter Tania Culottes

Anyway, it’s a remnant from my local fabric store. It was pretty funny when I bought it, because the ladies at the register kept exclaiming, “WHAT is that? Where did you find that? Oh, it’s so amazing! And it’s so cheap!” and I’m all, “Back off bitches, I found it first.” I’d totally elbow someone over fabric, let’s just be honest.

Winter Tania Culottes

Making these wasn’t much different than sewing them with cotton. There is no lining – I reckon I could’ve popped one in (there’s a short blurb at the end of the instructions on how to do this), but I didn’t have any lining on hand and this fabric isn’t very grabby like a wool tends to be. I did take in a bit extra at the side seams, since my first Tanias are slightly loose. I nipped in the side seams at 3/4″ and the waistband fit is perfect on these.

Winter Tania Culottes

I was initially hesitant to make these up in this fabric, since it’s sorta drapey but it’s not sooo drapey like a rayon or a cotton voile would be (not to mention the fabric is much thicker), but I’m actually really happy with how the silhouette turned out. It’s so flippy and full!

Winter Tania Culottes

I have a similar miniskirt (from American Eagle, oh lol) that I’ve been meaning to replace as it doesn’t fit right anymore… and this is a perfect replacement! The longer length means I can wear it to work, and the higher waistline means I can wear it with my cropped sweaters.

Winter Tania Culottes

Not to mention, it’s essentially a pair of drapey shorts – so I can also wear this shit on my bike!

Winter Tania Culottes

(O shit, I never realized how cool these tights are!)

Winter Tania Culottes

The only blip I had with sewing these was the hemming… I couldn’t fit the bulk of the fabric under my rolled hem foot, and I will be DAMMED if I am going to sit and blindstitch all that yardage at the bottom. So I serged the edges and folded them under once with a quick topstitch. The fabric is so busy, you can’t really see the serging. And I finished my hem fast! Evening the hem out was also way easier, thanks to the stability of the fabric.

Winter Tania Culottes

Doesn’t they look so good with my cropped Chuck? Ugh, I love this sweater so much, but the length makes it difficult to pair it up with just anything. These two, though – they are a match made in heaven.

Winter Tania Culottes

I’m happy that I finally found a use for this stash fabric, and winterized one of my favorite summer patterns! Tanias year-round for everyone!

Winter Tania Culottes

Oh, and check this out – my little photo companion for the day 🙂

Winter Tania Culottes

This is Nimue, isn’t she the cutest little thing? She’s a corgi puppy – no, we didn’t adopt a pet (I wish! But I want cats. Moreeee catssssss), I was just watching her for the afternoon. She was very good, although she preferred cuddling up on the couch with me most of the time 🙂

Skully Applique Pillow

24 Oct

Halloween Project

So, I have some pretty sweet furniture, at least in my living room. I’ve got this sexi velvet couch as well as this beautiful midcentury armchair (snagged from my friend and fellow blogger Lisa, after she herself snapped up the couch of her dreams). Oh, and that ace ottoman, which I got for a DOLLAR at the Goodwill Outlet. Score of the year right there!

I’m also, like, really really bad at decorating. Once I get shit on the walls, it’s over. I don’t really decorate for holidays, other than put up a Christmas tree, and I definitely don’t do decor crafts. Whyyy suck up that time when I could be making clothes, amirite?

Halloween Project

I’m taking a step toward my inner Martha Stewart and making at least one craft for the three major upcoming holidays – starting with Halloween. Rather than decorate the front of my house (which would be too easy; we already have enough spiders that the whole front is covered in spider webs. I wish I was kidding about that. Hey, I guess we don’t have other bugs at least), I decided to give my sweet yellow chair an update with a fresh new throw pillow featuring a skull. This also meant I got to try out applique, which is something I’ve been meaning to do for, oh, like a decade. Ha!

Want to make your own – pillow or otherwise? Good, because I wrote a tutorial on that too. I’m on a roll, guys.

This is actually pretty simple, the only time-consuming part is the machine applique, which can easily be left off since the Heat’N’Bond is pretty permanent. All my supplies are from Jo-ann Fabric and Craft stores – quilting cotton (my only excuse ever to peruse those aisles. Ahh, the colors!), Heat’N’Bond, and a 14″ pillow form. Oh, and embellishments! Can’t forget those 😉

You will need to cut 3 pieces for the pillow – one for the front and two for the envelope back. For a 14″ square pillow, I cut the front at 15.5″ square and the two back pieces are 15.5″ x 12″ and 15.5″ 6.5″.

Halloween Project 1

Start by drawing (or tracing, or photocopying, or whatever) the image that you want to applique on the pillow. Try to keep it simple, with the detail impact coming from the negative space, not a bunch of lines. Do you want to sew over a bunch of lines? Neither did I. Negative space!

I sketched out my skull’n’bonez based on a few images I saw on the internet, and then traced over it with a marker.

Halloween Project 2

Cut out your design and admire. Doesn’t he look sassy!

Halloween Project 3

Before you cut your appliques, you need to fuse the heat n bond to the back of the fabric (this makes it easier, and means less goo on your ironing board after the fact). Cut a piece big enough to catch all your pieces, and follow the directions on the package for best results – mine just had me iron it face-down for 10 seconds. Easy!

Halloween Project 4
Halloween Project 5

Trace your pattern on the fabric, cut, and peel off the paper layer. Arrange it on the pillow top as you like, and fuse it down. The Heat’N’Bond keeps everything from shifting, which means a much easier time appliquing. Of course, at this point, you could leave as-is and not bother with the stitching, but whyyy? It looks so good!

Halloween Project 6

Ok, this is the fun part – applique! This is really a trial and error saga, depending on your machine, but here are a few tips:
– Test your applique stitch on a few scraps of fabric (use leftover fused pieces if you wanna be real fancy) to make sure that you like your stitch. For my machine, I used a narrow width zigzag with a slight adjustment to make it longer.
– This stuff is gonna goo up your needle. Sorry, but them’s the breaks. Make sure you remember to change it out after you are finished, otherwise you’ll end up forgetting and gooing up the next garment you sew. Not that that’s happened to me or anything…
– Try to keep the stitch within the edge of your applique pieces – it looks neater.
– For curves, just go slowly. For corners, stop the machine at the end of the line, put the needle down and pivot the fabric, and then continue stitching.

Halloween Project 8
Halloween Project 9

Before you get all flustered trying to get the ~perfect stitch, remember – this is a Halloween project! It’s supposed to be a little messed up 😉

Halloween Project 10

From here, you can leave the applique as-is or add some more embellishment. I decided to add some sequins to my skull’s eyeballs and nose because SPARKLES. I used this Aleen’s glue pen to anchor everything down.

Halloween Project 11

We are going to make an envelope back for our pillow now. Take your two back pieces and press them flat.

Halloween Project 12

Turn under one long edge of each piece and hem.

Halloween Project 13

(Ack! Sorry these photos are so blurry, hopefully you get the idea)
Take the smaller piece and lay it over the top of front piece, right sides together, matching up the edges and the corners.

Halloween Project 14

Larger piece goes on the bottom half, again, right sides together with all sides matching.

Halloween Project 15

Sew around all four edges…

Halloween Project 16

Clip your corners…

Halloween Project 17

Flip right side out and stuff your pillow inside.

Halloween Project

You’re done!!

Time for a sexy skull pillow photoshoot!

Halloween Project

Halloween Project

Halloween Project

I know this is a ~craft~ project, but this method could also be used for clothing (like we could all applique CAT SWEATERS. Oh god, guys, let’s.). I was planning on making myself a matching skull sweatshirt so I could match my living room, but time slipped out of my fingers and well, maybe later. I say this pillow is for Halloween, but let’s be real – you’ll probably see it on the couch during Christmas, and beyond. Welcome to my life.

Want to make one for your own #spookyspaces? Have a coupon! I got ya back!
JF13_Halloween_Coupon
Don’t say I never did anything for ya 😉