
Ok, y’all, time to wrap up this trio of holiday crafts. You saw my Halloween contribution and the joint effort with my mom for Thanksgiving… what could be in store for the winter holidays, you might ask?

Thinking about the given theme, and what was was needed for my personal holiday decor (Christmas, specifically), I decided to make a gorgeous tree skirt since I’ve been covering my tree stand with a giant fabric scrap for the past couple of years. Before I bore y’all to tears, I must point out that this skirt is quite special in the fact that it does double duty-

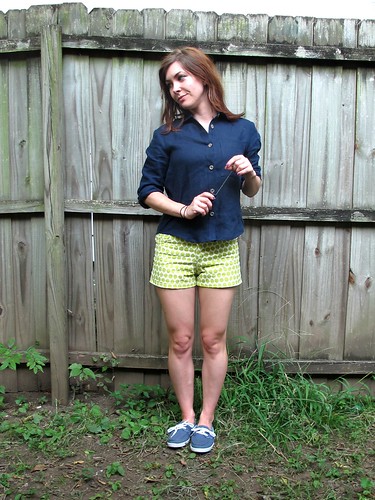
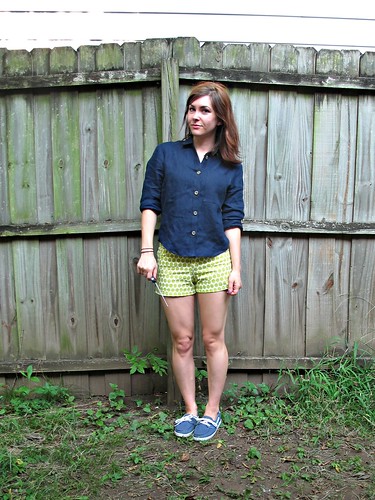
YEP. You can totally wear it as a skirt for humans!

I am beyond excited about this project (seriously, it woke me up in a glorious epiphany in the middle of the night!) and hopefully y’all feel the same way. I mean, really, who doesn’t want a little kitsch in their Christmas? 😉

I mean, for god’s sake, I managed to get pictures in the snow. It never snows here (although it does snow on my blog, as a lot of you noticed ;)). It was clearly meant to be.

Want to make your own? It’s SO easy!
Just a head’s up: this tutorial required lots and lots of pictures and words, so feel free to skip if it’s not your bag. You have been warned!
First things first – let’s talk about what sort of shape works best for this type of skirt. What we want to make is a circle skirt. I’ve seen people call skirts circle skirts when they really aren’t – a circle skirt is literally a circle with a smaller circle cut in the middle of it. It doesn’t have gathering, and the edge of the hem is curved completely all the way around (i.e., no straight lines). Like this:

Mmm, looks like a donut.
You can make a circle skirt that is a seamless, continuous circle, like what you see above. However, for our purposes, we do need at least one seam so we can get the skirt over the tree. So your pattern will actually look like this, with seams:

You know, like a Poké Ball.
This pattern is really easy to draft. Seriously, the hardest part is just finding a big enough piece of paper for it (I tape lots of paper together, personally). I won’t be going over how to draft a circle skirt, but I can point you to this excellent tutorial on how to draft a circle skirt, by Casey. This is the tutorial I used to draft my pattern, and it’s really easy to understand and execute. You can make the skirt as long or short as you want it – mine is 18″. Once you have drafted your pattern, you can measure the amount needed for trim and fabric. If you’re buying before you draft, a good ballpark is 4+ yards for the main fabric, and at least 4-5 yards for any trim you sew along the hemline. This is a great project for those gorgeous quilting cottons that you can’t bear to use for apparel purposes – I got mine from JoAnn, and it was on sale whoop whoop.

Once you have drafted your pattern, you should have two pieces of fabric that look like this. The straight edges are your side seams, and the little curve in the middle is where your waist sits.
I tried to take photos to explain this, but it ended up being waaay too difficult, so here’s a little hand-drawing diagram instead!

Sew up one side seam of your skirt. On the unsewn side, you will sew velcro so the skirt can open and close. How long you make the velcro is up to you – I suggest making it go all the way down to the hem, to make it easier to put it on the tree (since the skirt will open all the way). However, if you’re like me and your swear you bought velcro but it somehow managed to not come home with you and you have to dig through your stash to find some little leftover pieces that equal maaaybe 12″ total… you can do that to, and just sew the remaining seam closed. At the top, instead of a waistband, you will sew a length of ribbon to finish the top of the skirt. If you are concerned about the skirt not staying closed while you are wearing it, you may also sew a hook and eye to keep things secure (or even make a drawstring casing for cinching it tight when it’s around the tree), but I can assure you that the ribbon does a pretty good job of not untying itself, at least on me 🙂
A few little tips for constructing the skirt-

I like to staystitch the waistline curve before I do anything- just sew a line of short stitches (if your machine sews at 2.5, reduce the stitch length to 2.0) just inside the seam allowance. Since the waistline is cut on the bias, it will stretch out of shape if it’s not secured beforehand.

To attach the velcro, first finish your seams in whatever method you prefer (mine are serged, and oops didn’t change the serger thread haha) and press under the seam allowance on one side.

Keeping close to the edge, sew the loop side of your velcro to the side seam that is not turned under (this will be the underlap of the velcro) and the hook side of the velcro to the wrong side of the turned under seam.


If your velcro does not extend to the hemline and you need to close the remainder of the seam, overlap the folded under seam allowance with the underlap and pin down.

Then topstitch!
After you have attached your velcro, you can sew the ribbon to the skirt waistline. No photos for this step, but I think it’s pretty self-explanatory.
Let your skirt hang for at least 24 hours, to allow the bias to settle before you hem it – otherwise you may end up with an uneven hemline.
Then comes the fun part… embellishing! Seriously, I had sooo much fun trolling the aisles at JoAnn, trying to find the ~perfect~ sparkle trims. I ended up with pom-pom fringe (I think I used about 4 yards – again, MEASURE FIRST. That hem takes up a lot of yardage!), sequins, and glitter ribbon.

I sewed the pom-pom fringe to the bottom of my skirt by machine.

Since I couldn’t get my hands on any red, I improvised by adding a line of red sequins on top of the fringe. These are just hot-glued on; ain’t nobody got time for dealing with sequins.

My favorite part about this skirt, though (other than the fact that I can WEAR IT), are the 3-D poinsettias! I made these using felt and hot glue and it’s super, super easy, once you make a little template.

Start by drawing a petal shape that is approximately half the the desired poinsettia size. Mine is about 2.5″ long.

Now draw a circle. This doesn’t have to be perfect; it’s just a guideline for the petals.

Trace your petal shape over the circle, with the four points touching in the center of the circle.

Cut the template out and flip it over so no one can see the shame.

To assemble the poinsettias, cut two pieces of felt using the template, four additional petals (cut slightly smaller than the first petal shape), a circle for the inside, and a leaf (the leaf is just two petals with the points touching, cut as one in green felt).

Stack the template pieces like so and glue together.

Then glue on your four petals.

Attach the center (I know, traditionally, poinsettias have white centers, but my fabric had gold centers SO GOLD IT IS).

Then glue on the leaves. Done!
To make my poinsettias extra fancy, I added some beads in a bottle at the center and a healthy dose of glitter spray paint.

I put my skirt on the form with a petticoat, and just stuck the poinsettias on until I was happy with their placement (since they’re felt, they will temporarily stick without glue), then I hot glued them on.

And that’s it! It’s a tree skirt/me skirt!


I am wearing mine with a petticoat for maximum fluff, fyi.
The best part about this project?

It’s SOOOO twirly!
So I guess that’s it! I feel pretty #fabulouslyfestive, what do you think? I realize this project is probably a bit too twee for most adults, but it would be perfect for kids. Aren’t kids the best excuse for dumping a load of tacky, or is that just me?

If you managed to sit all the way through this giant post, so awesome! Here’s a coupon just for you 😉

Thanks to JoAnn Fabric and Crafts for letting me get my DIY Crafty on this season, and thanks everyone for hanging in there with me for some non-clothing-related sewing. As always, if you’d like to see more crafty goodness, you can check out the Celebrate the Season website.

Happy Holidays, y’all!


