
Good morning, everyone! I guess I’m back to posting about sewing things… it was a nice hiatus, anyway! I had a lovely vacation, a very relaxing weekend at home, and now working on a new big sewing project (a coat for Landon!). In the meantime, I have a small backlog of projects that I’ve been meaning to post, so obviously I will start with the most recent one first, because it is my most favoritest.
LOLA LOLA, I LOVE LOLA.
Y’all remember the Lola sweatshirt dress, right? Gah, sometimes I feel like – with the influx of new patterns coming out at such a rapid pace (which is not necessarily a bad thing – but it can get overwhelming at times!), we forget about the really good ones that are just a little bit older. And by older – sometimes that’s as “old” as a few months! So I’ve made it a point to re-visit some of my favorites and make them up in new fabrics. I mean, they’re a favorite for a reason, yeah? 🙂 (but don’t worry – I’ll obviously still sew up new releases as well because, ooh, new and shiny!).
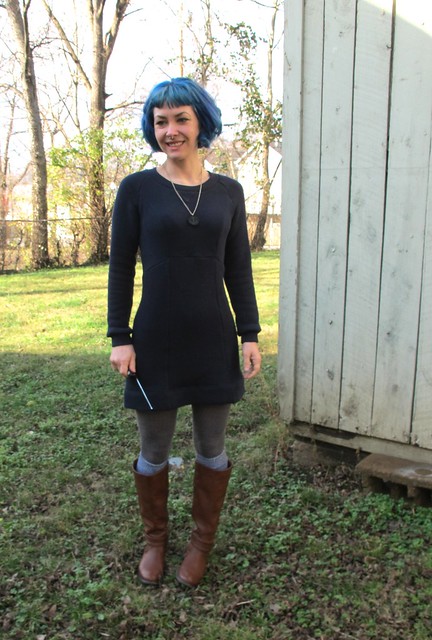
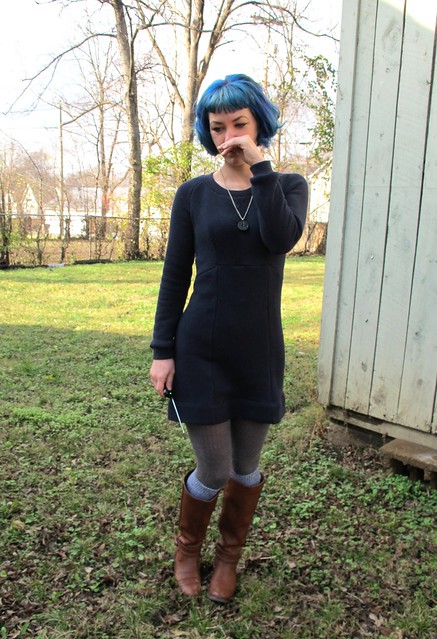
Anyway, Lola was always one of my favorites! A really fun and flattering twist on the sweatshirt – here’s a princess-seamed sweatshirt dress! I’ve made this pattern twice before (see: one and two), so I knew it was a winner. Side note: While version 1 gets worn aaaallll the time (love that dress!), version 2 is gone. The cheap fabric I used meant that the dress was constantly pilling and just looked old and shitty, so I removed it from my house. So that’s that. Also, wow, I sort of almost miss having brown hair now.


Since I’ve already made this pattern before, this was a very quick and satisfying sew. I sewed up the size 2, and then made further adjustments to get the fitted/streamlined look you see here. I started by using 5/8″ seam allowances (the pattern calls for 3/8″, but I’m a little bit smaller than the smallest measurements so this helped with sizing down a little), and then took in the waist another 1/2″ or so at every seam. Speaking of which, I really ought to adjust my pattern pieces for this shit because I go through this damn trying on/adjusting/trying on/adjusting rigamarole EVERY DAMN TIME I make this dress! Maybe that should be my New Year’s resolution – adjust my pattern pieces when I do fitting changes haha. That would save me a lot of trouble.
One thing to keep in mind if you’re making this pattern – if you want to adjust the fit at the waist, try on the dress before you attach the skirt. From there, you can pinch out the princess seams to get the fit you like (just remember to do the same to the skirt pieces so the seams match up!), but be careful not to overfit, as this really isn’t that type of dress.
Other changes I made to the pattern: I lengthened the sleeves to full-length (and redrafted the cuff piece accordingly), left off the hem band (and sewed a deep 2″ hem), and left off the pockets. Actually, those are the same changes I made to my last 2 dress. Whateverrr!
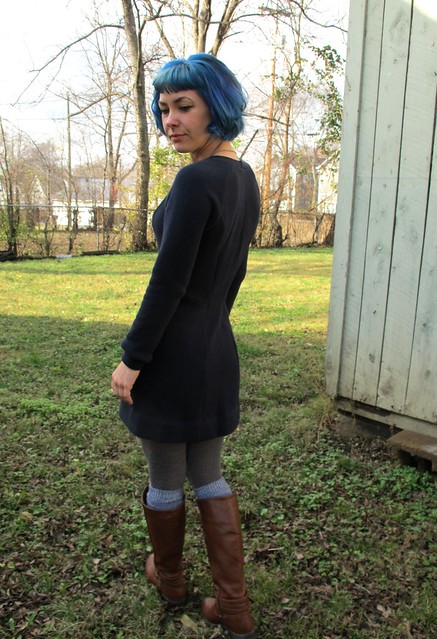
Also, wtf is going on with my hair in the last picture? And why do I look so… disgruntled?
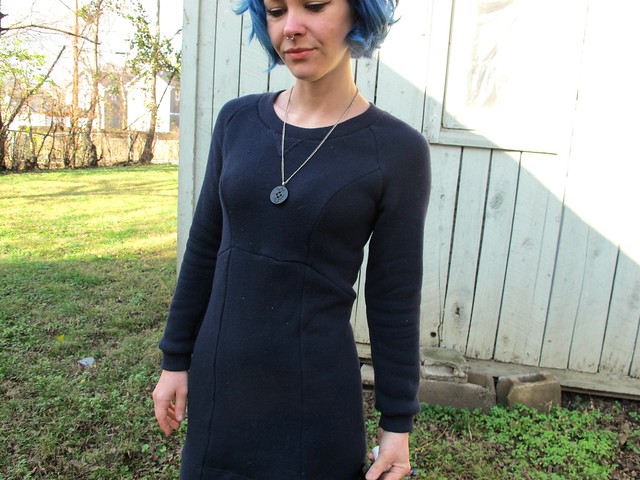
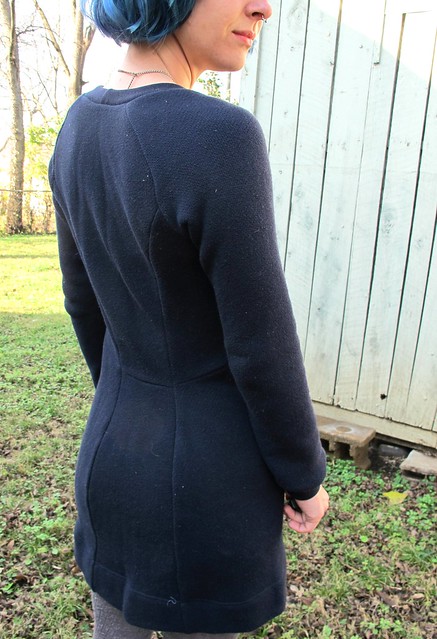
The fabric that I used for this dress is pretty fabulous! I’ve mentioned before that I get fabric from Elizabeth Suzann’s wholesale orders (ah, the perks of working in sewing!) – that’s where this stuff came from. It’s French Terry, and it came with MATCHING RIB KNIT, which I used for the neckline and cuffs. The right side of the French Terry is a smooth knit with defined stitches, and the wrong side has the most beautiful, plush loops that make this shit SO FUCKING COZY. We use it at Elizabeth Suzann to make sweaters and sweater dresses – although there, we sew the fabric wrong-side out because it looks so cool (see the Billie Sweater). For me, though, I wanted my dress to be warm and cozy – so the loops stayed to the inside. Funny, after sewing all those sweaters – this side looks rather plain 🙂 It is, however, easier to see the cool seaming details this way, so that’s good!
Sewing this fabric was fine, if not a little messy (French Terry will shed like NO OTHER, so I would really hesitate to sew this without a serger – you need some way to finish the seams). Because the fabric is so thick, my serger had some difficulties at first with stitch tension – everything was super wavy. I just upped the differential feed to the max and tweaked the stitch size, and that spaced out the stitches enough so that the seams lie flat. Speaking of which, pretty sure that’s the first time I’ve ever had to tinker with the settings on my serger. For the most part, it does everything automatically without my input (it’s a BabyLock Imagine, in case you were curious. The queen of sergers!).
Sorry these pictures are kind of crappy/all over the place. I guess I’m out of habit at this point, ha!
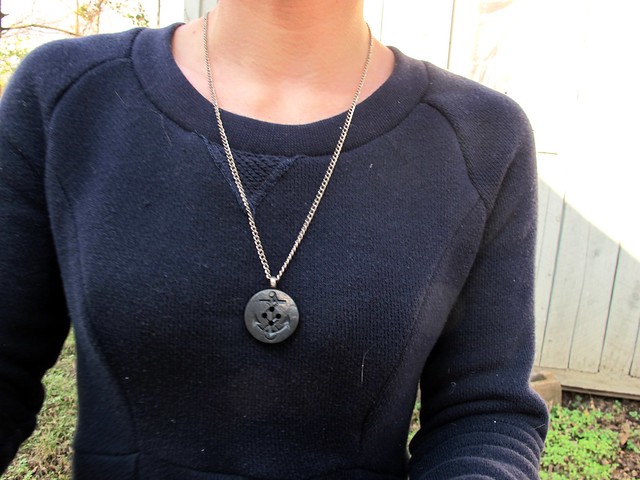
Here’s an accidental picture that really showcases the fabric! I used the wrong side for the little sweatshirt V. And check out that ribbing! Love it when it matches 😀
I guess that’s it! Really glad to have another cozy winter dress to add to my arsenal – and this one is pretty freaking cozy (while still being cute!).
One last thing – ChatterBlossom (one of my sponsors + an all-around gorgeous gal) is currently having a holiday sale! Use the code LLADYBIRD15 for 15% off your purchase, good through 12/15 (so, soon!). Whether you need a last-minute gift for someone – or for yourself (I always buy myself Christmas gifts, because I always ALWAYS get myself the best presents! Such as this necklace, ahem) – definitely check her out! I love Jamie’s stuff, and the detail in some of the pieces (such as this elephant or this mosquito) is INSANE. Actually, that’s a ChatterBlossom piece I’m wearing in these photos – the navy anchor button 🙂 Love it!


