Tag Archives: v1419 sewalong

Completed: Vogue 1419 (At Last!)

18 Nov

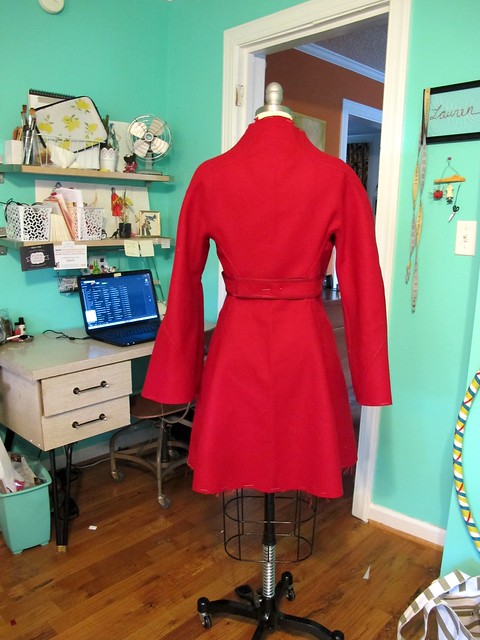
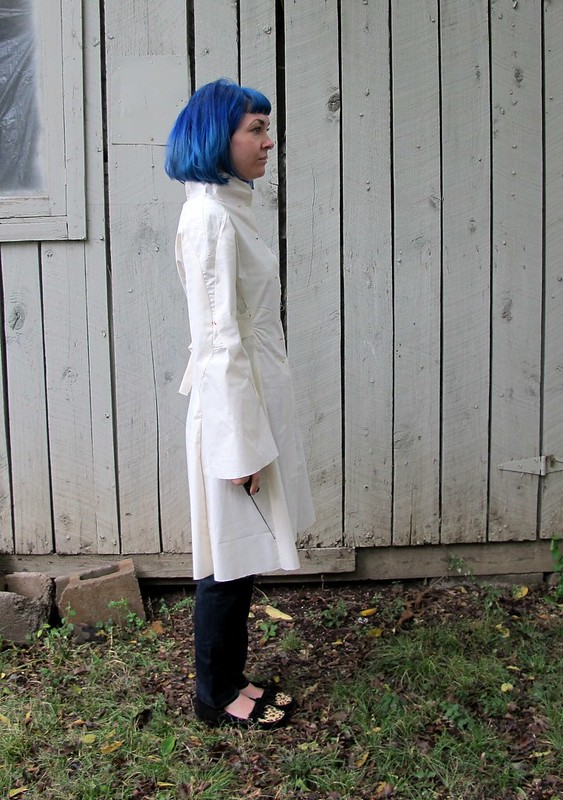
Well, no that the V1419 Ralph Rucci Sewalong has officially wrapped, I guess I can finally show y’all my coat! For those who didn’t catch my post on the Mood Sewing Network yesterday to see my completed coat a day early – your patience is finally being rewarded, including some never-before-seen shots that weren’t included in the original post! How exciting!

Anyway, coat!

V1419 Ralph Rucci Coat - Completed!

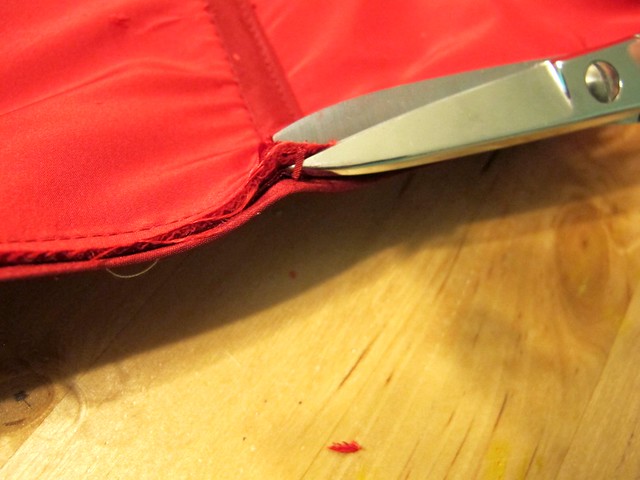
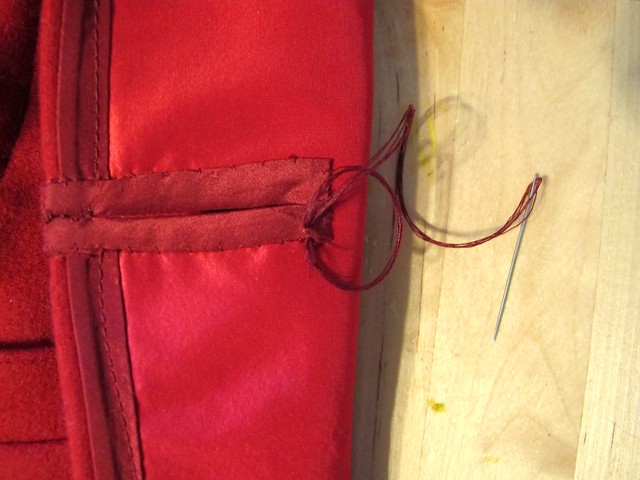
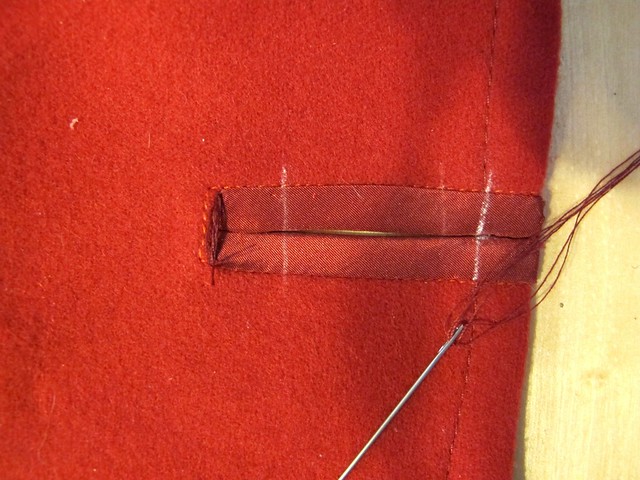
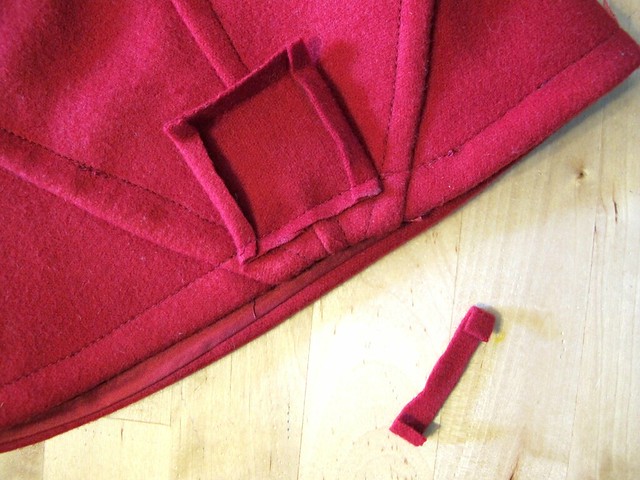
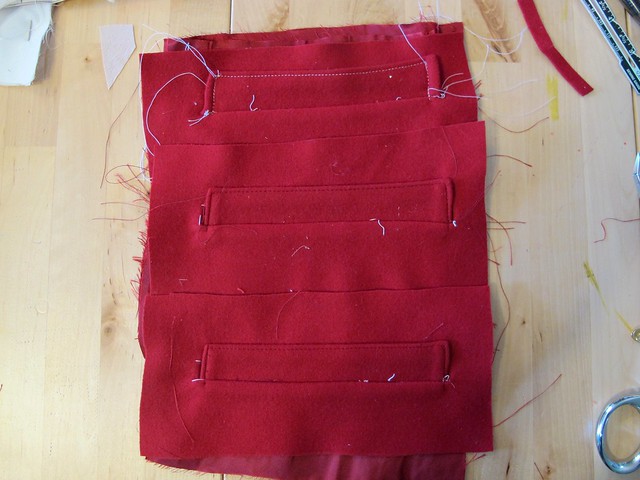
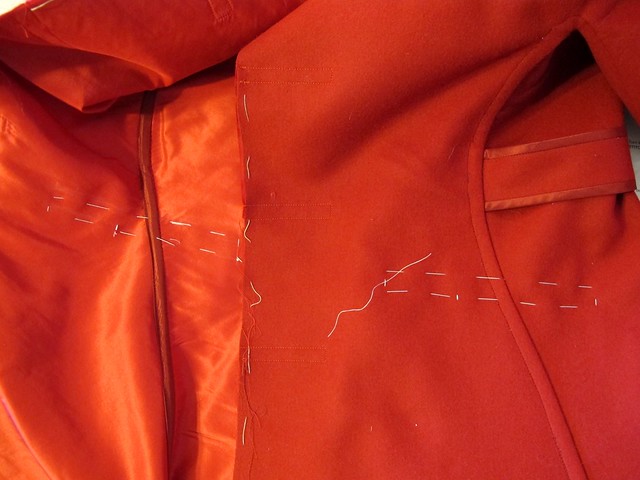
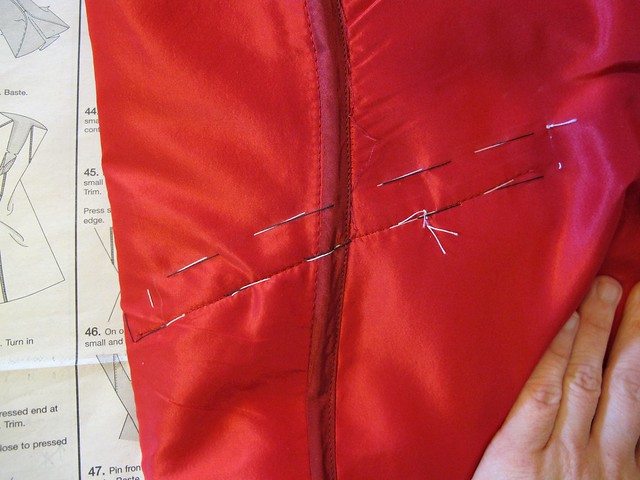
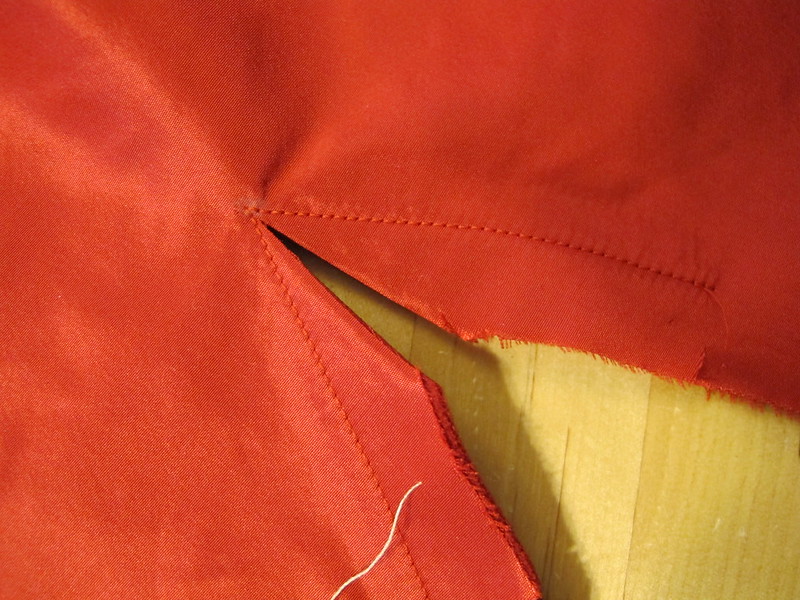
Considering how much I went over the making of this coat at length (see all my posts tagged v1419 here), I won’t be going over the construction so much in this post. If you want more info, feel free to check the tag – or just holler out some questions in the comments (I don’t expect anyone who didn’t actually sew along with the sewalong to have actually read the posts – they were pretty intense, and I find sewalong posts kind of boring if I’m not part of the action, you know? Anyway, snaps to you if you did read the posts! I hope you learned some new coat-making tips and tricks 😉 ). Here’s a general rundown of the basic information, for those who are dropping in for the Big Reveal:
Pattern: Vogue 1419
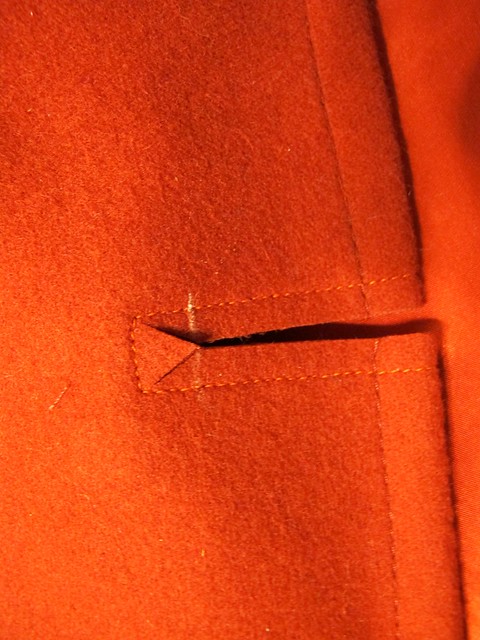
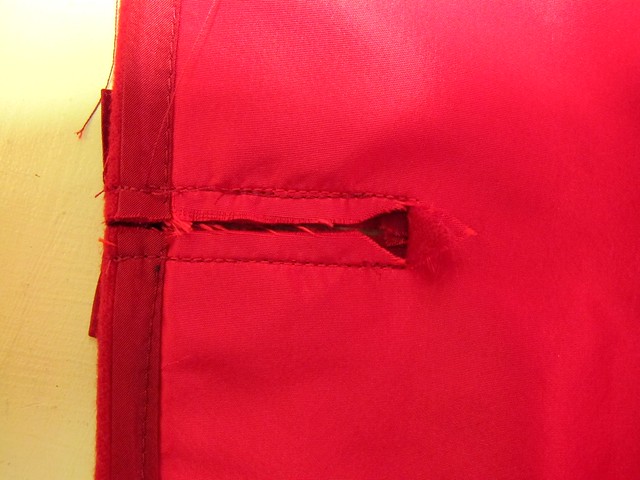
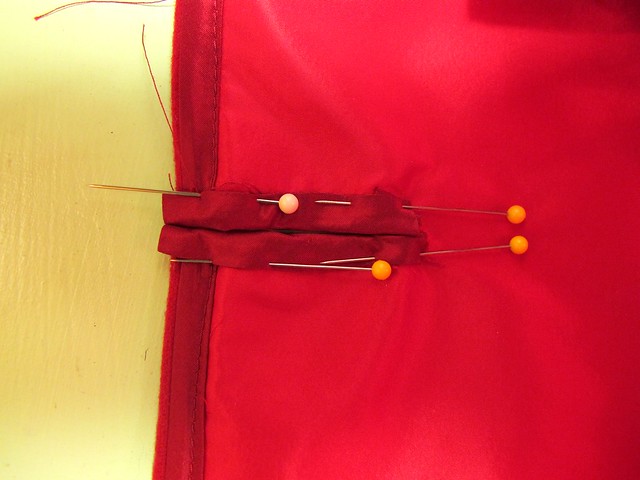
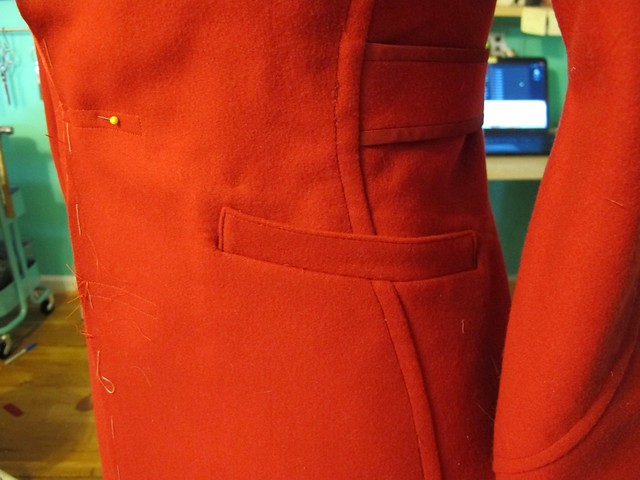
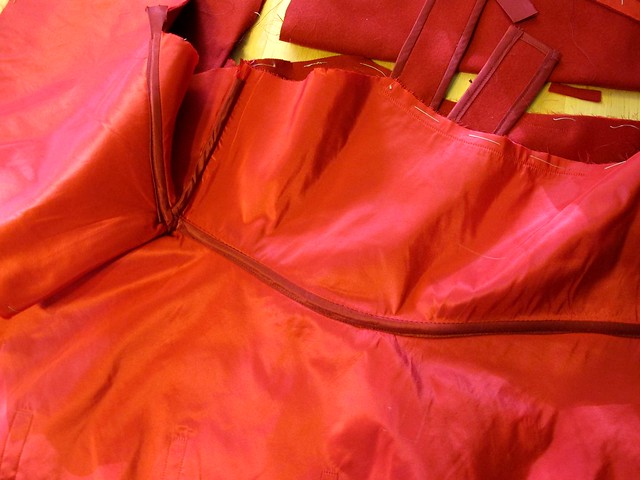
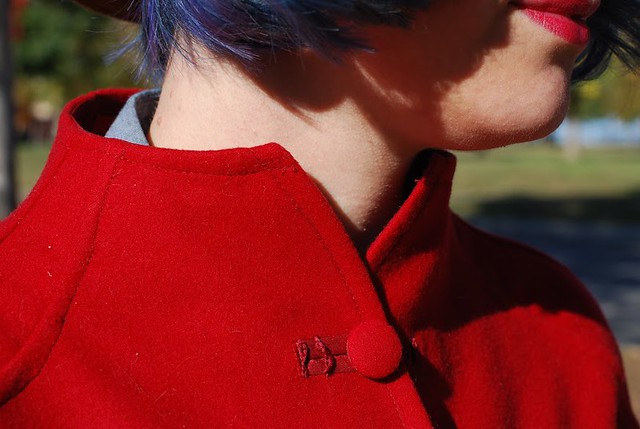
Fabric: From the Mood Fabrics flagship NYC store – I enlisted the help of my favorite Mood dude, George, to assist me in finding my perfect red wool coating – and he knocked it out of the park! This coating is red virgin wool, it’s nice and thick with a great amount of body to give the coat it’s lovely shape. The wool itself is soft and easily malleable (very necessary for all the crazy intersecting seams of this pattern!), and the color is just PERFECT! The pattern itself does not call for lining, but I did add a layer of bright red silk taffeta as an underlining, to help the coat slide on and also as an additional layer of warmth. The contrast (inside binding, bound button holes, belt trim) is also silk taffeta, in a darker red that matches the wool coating. I think it gives a nice bit of textural interest and keeps the coat from being just straight up loud and red. Both silk taffetas were also purchased from the Mood Fabrics store in NYC, and the colors were chosen with the help of George.
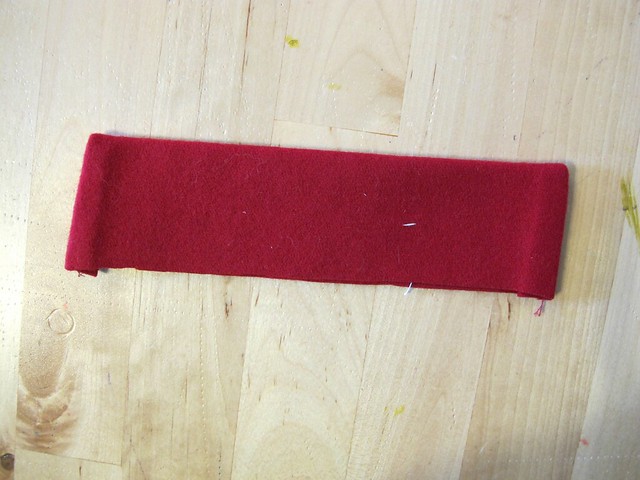
Notions: Just thread and buttons! I had my buttons custom-made here in Nashville by a local lady who sells them through Textile Fabrics. Since my coating is SUPER thick (way too thick for those sad little button kits that you can buy), it needed some heavy-duty machinery to get the fabric on. I’ve used this service in the past for previous coat buttons, and the quality is excellent.
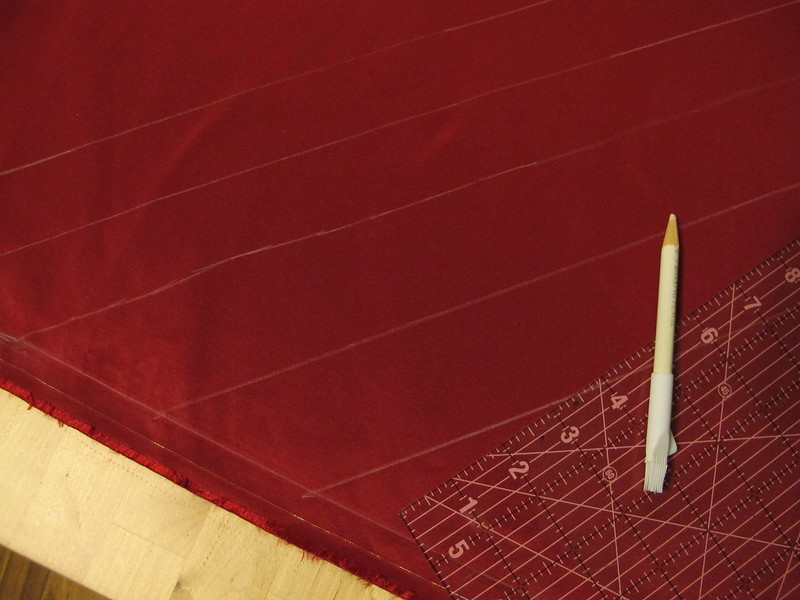
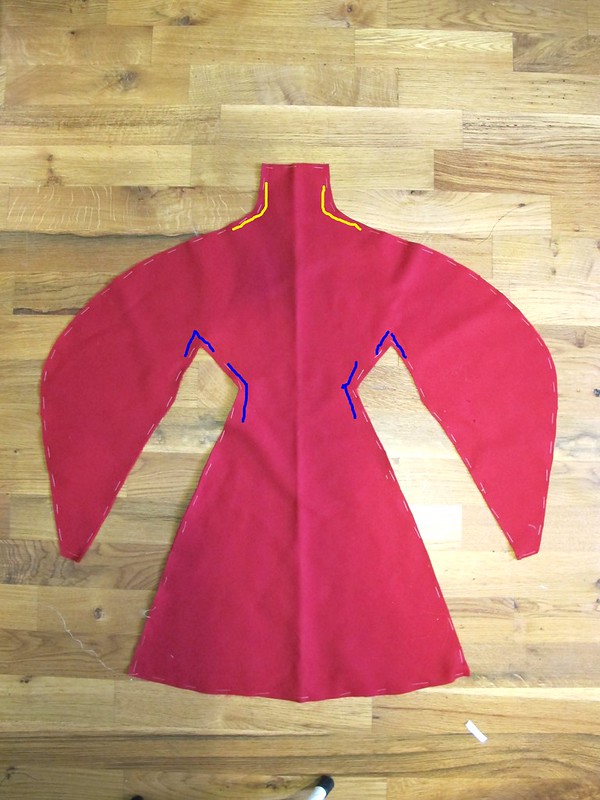
Sizing & Alterations: I cut the size 6 and sewed the coat exactly as drafted, except at the waistline where I used a 1/2″ seam allowance instead of the standard 5/8″ (just to give myself a tiny bit of eating room 😉 ). I only altered the length – removed 3″ from the hemline and 1″ from the sleeve length.

V1419 Ralph Rucci - Inspiration Watercolor

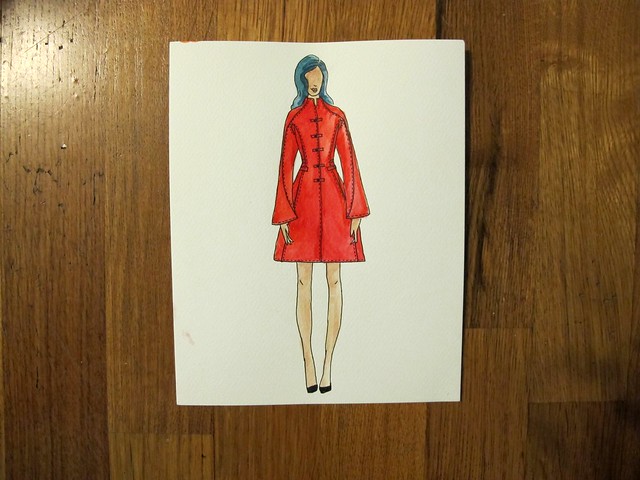
Here’s my original inspiration, in watercolor 🙂

V1419 Ralph Rucci Coat - Completed!

I think it turned out pretty close, if not better! 🙂

V1419 Ralph Rucci Coat - Completed!

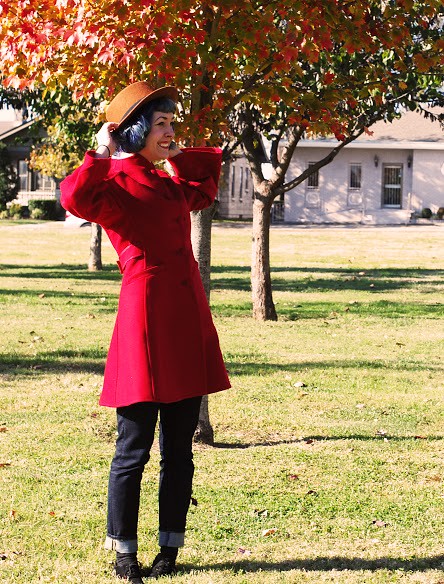
Don’t you love the photos? These were taken by my friend and fellow knitter, Alannah Arnold, who was almost as excited about this coat as I was! Alannah and I meet with a group of ladies every Monday for a casual (and, um, booze-filled, haha!) knitting night at my favorite local bar. She’s listened to me talk about this coat for weeks at this point – and offered to take photos once it was done. Which is awesome, because they turned out WAY better than anything I could have shot in front of my shed!

I met with her in East Park, in East Nashville, to take these photos. That’s a feat in itself – anyone who knows me, knows I will kick and scream when it comes to crossing the river into East Nashville. Never mind that driving into East Nashville is like driving into Brooklyn – it’s actually not that bad (unless there’s a Titans game – if then, forget about it!), it’s just fun to complain about 🙂 Regardless, East Nashville has the prettiest fall trees, and this park is undeniably beautiful. So, I made some sacrifices (har har) and ended up with a pretty great set of pictures to match my pretty great coat! Yay!

V1419 Ralph Rucci Coat - Completed!

Ooh, and I even found a Porsche while I was at it 🙂 haha!

V1419 Ralph Rucci Coat - Completed!

V1419 Ralph Rucci Coat - Completed!

V1419 Ralph Rucci Coat - Completed!

V1419 Ralph Rucci Coat - Completed!

V1419 Ralph Rucci Coat - Completed!

V1419 Ralph Rucci Coat - Completed!

V1419 Ralph Rucci Coat - Completed!

V1419 Ralph Rucci Coat - Completed!

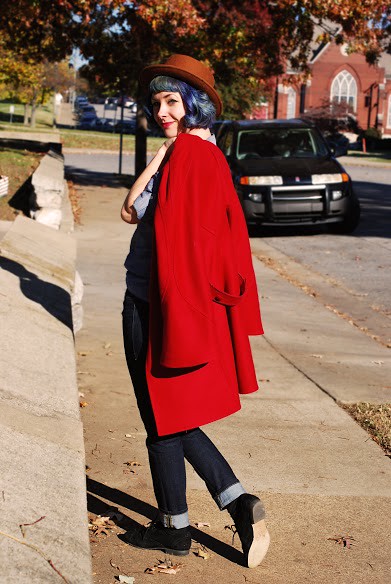
If I haven’t already made it completely obvious – I’m SO happy with my finished coat! Sewing it up was so satisfying, and absolutely worth it. It is very dramatic and theatrical – so it’s a bit excessive for daily wear. I don’t think I’ll be bringing this to London, unfortunately, as it’s definitely not very practical (it’s too fitted to really accommodation multiple layers, plus I could see those bell sleeves getting real annoying real fast after 2 weeks of daily wear). However, it is the PERFECT topper for all these upcoming holiday parties that are just around the corner 😉

Let’s also not forget how this is one of few instances where sewing can actually save you money – this coat cost less than $200 in materials, whereas the original designer version has been rumored to run closer to $10,000. Sure, making a little cotton sundress will probably set you back more than whatever you would paid from a mall retailer – but knocking off couture? That’s where the savings really start to show 😉

I will leave you with this photo of me, wearing my knock-off designer coat, throwing leaves in front of a rich person’s house. Probably the same person who owns that Porsche, to be honest:
V1419 Ralph Rucci Coat - Completed!

Be sure to check out the McCall Pattern Company blog to see Meg’s completed coat, if you haven’t already done so! Big thumbs up to everyone who participated in the sewalong – and big, huge thanks to Meg for agreeing to cohost this beast of a sewalong alongside me. Couldn’t have done it without you! 🙂 Don’t forget to use the hashtag #V1419sewalong so it will show up on this tagboard. We encourage you to upload your photos to the V1419 Flickr group, the Vogue Patterns Facebook page, and pin it to the Pinterest board

Didn’t join the sewalong but still want to make your own designer Ralph Rucci? Check out my V1419 tag and the McCall Pattern Company Blog for all the posts pertaining to this sewalong. I can’t wait to see everyone’s finished coats!

What do you think? Would you ever tackle a crazy long intense project like a coat? What about THIS coat? Man, I love making coats!

Disclaimer: My pattern was provided to me free of charge from the McCall Pattern Company, and the fabric was provided from Mood Fabrics as part of my monthly allowance for participating in the Mood Sewing Network. Still, I definitely made this entire coat myself – sooo, that should count for something 😉

V1419 Sewalong: Steps 64-86

10 Nov

Good morning, sewalongers! This is the week we finish up our coats – woohoo!! (and those of y’all who are not following the sewalong – this is the last week you have to skip a boring sewalong post! Woohoo!). Can you just feel the excitement radiating in the air? 😉

So, the good news is – this is the final construction post before we have our sharextravaganza next week. The bad news – it’s a HELLUVA post. Lots and lots of pictures (in advance: I’m soooo sorry! Tried to cull them down as much as possible. On the flip side, none of them are of me 😉 lolololol), lots of little fiddly steps here. On the flip side, this is all finishing – which means when it’s done, the coat is done – but expect this to take some time, especially since there is lots of hand sewing in this section.

Anyway, onto finishing!

The first thing you will want to do is sew the bias facing to both of the opening edges of the coat front, as well as along the neckline and across the hem. I’m not going to go into detail of how to do the facing – we’ve all done enough bias facing on this coat, I think most of us can do it in our sleep at this point 😉 – but I did want to mention a couple little tips that helped me.

V1419 Ralph Rucci Sewalong
Once I sewed the facing on and trimmed down the seam allowances, I pressed all the raw edges toward the facing, using lots of steam.

V1419 Ralph Rucci Sewalong
Then simply press the facing to the inside of the coat. You will want to hand baste this in place, which will give you greater control when top stitching (especially important at those coat front edges).

V1419 Ralph Rucci Sewalong
At the hem and neckline, you may find that where you are intersecting seams tends to be *very* bulky – like, so bulky that you can barely turn the facing to the inside. I used my scissors to chop out as much of the bulk as possible (being careful not to cut into the stitching line or outside of the seam allowances), and them hammered them down like crazy with my clapper, to make things very flat.

Actually, if you have a clapper – it’s a good idea to smack down those edges after you’ve top stitched them, to flatten them as much as possible and give them a nice sharp crease. This will make your coat look much more professional 🙂

Now, for the button holes! Fair warning – these took foreveeeeer to finish! Lots of fiddly pieces, lots of fiddly hand stitching. I know at this point, most of y’all are probably over this coat and just want to finish so it can be worn, but please take your time with these steps. The button holes are one of the most visible parts of the coat, and you don’t want them to look sloppy!

V1419 Ralph Rucci Sewalong
Remember when we sewed around the edges of where the button holes would go? Now you need to cut right in the middle of those stitches. I first used chalk to mark where the V would start, and then cut along the lines indicated. Cut right up to the stitching, but not through it.

V1419 Ralph Rucci Sewalong
You will have a little V flap at the inside end. Fold this to the inside and press.

V1419 Ralph Rucci Sewalong
To make the button hole binding, find those 4 bias pieces you cut, and press down one long edge about 1/4″. You will want to cut the binding into 20 pieces – 4 pieces will be 2.5″ long, and 16 pieces will be 2.75″ long. You should have enough binding to cut exactly the number of pieces needed (if for some reason you screw up and need more binding – just salvage a piece of leftover facing, and cut it in half at the fold. Y’all have lots of bias facing left over, right? I do hahaha). Fold in 1/4″ at short edges of each little piece and press. Yes, this part takes forever. Sorry.

V1419 Ralph Rucci Sewalong
On the bottom of your button hole, pin a piece of binding with the right sides facing and the raw edges matching. The edge that meets the front edge of the coat should be flush, the edge against the end of the button hole should extend a bit farther. Be aware of what binding goes on what button hole – the 2.5″ binding is for the top 2 button holes (on the left and right side of the coat front); the remaining binding is for the remaining button holes.

V1419 Ralph Rucci Sewalong
I went ahead and pinned the top binding as well, because I am impatient.

V1419 Ralph Rucci Sewalong
Sew the binding to the coat, stitching along your original stitching lines. I found it easier to do this from the inside, so I could make sure I was sewing in the correct place. When you get to the end of your stitching line – where the stitching pivots to the end of the button hole – stop and back stitch. Do not go any farther than the existing stitching line.

V1419 Ralph Rucci Sewalong
Your binding should look like this on the outside of your coat. Notice that the stitching does not go all the way across to the tip of the binding. This is good; it means we can pull the end of the binding to the inside.

V1419 Ralph Rucci Sewalong
Here it is from the inside.

V1419 Ralph Rucci Sewalong
Starting at the open end, fold the binding to the inside and pin into place. I pinned both top and bottom because – again, impatient. You could also work with one side at a time. Whatever is easier!

V1419 Ralph Rucci Sewalong
For the end of the binding that is by the V you clipped, pull all the binding to the inside of the coat and pin down. This should cover the V completely, but if not, you can always clip whatever is sticking out 🙂

V1419 Ralph Rucci Sewalong
Repeat for the bottom (or top). Your finished pinned button hole should look like this.

V1419 Ralph Rucci Sewalong
Here it is from the outside.

The next thing you nee to do is slipstitch alllllll those bindings invisibly to the inside of the coat. Yep! This part takes forever! I also stitched my bindings so the edges encased the edge of the coat front, as well as slip stitched the open ends together with a few stitches. When you get to where the binding covers the triangle, be sure to catch that in your stitches so the button hole is secure. Check from the front occasionally to make sure everything looks good, especially making sure that triangle is pushed all the way to the inside of the coat and not sticking out.

V1419 Ralph Rucci Sewalong
Once you’ve finished the torture that is slipstitching ALL THAT BINDING, give everything a good press (and maybe a smack with the clapper, too, if it needs it. Mine did!). We’re not done yet!

V1419 Ralph Rucci Sewalong
Next up is thread bartacks! Start by marking where the bartacks will go – you will have 4 total for each button hole – left and right (so a total of… 40. Woof.). There will be a bartack at each end of the button hole, plus another bartack 1/2″ from each end. I marked mind with chalk.

V1419 Ralph Rucci Sewalong
The bartacks will go faster/look better if you thread up with multiple strands. I used 3 strands of thread, and then doubled my needle, for a total of 6. You can also use embroidery floss – I just didn’t have any of the right color on hand.

V1419 Ralph Rucci Sewalong
Starting on the inside, make a small knot with your thread, or tack it in a couple spots to secure it. I made a small loop and then pulled the needle through it.

V1419 Ralph Rucci Sewalong
Pull the needle to the outside and stitch across the button hole to the other side, letting the thread connect the two sides. Make another knot on the inside (or, again, secure with a few stitches), and then pull the needle back to the outside.

V1419 Ralph Rucci Sewalong
To make the bartacks, loop your thread like so.

V1419 Ralph Rucci Sewalong
Then pull the needle through the loop to create a knot (same concept as a button hole stitch, or a blanket stitch).

V1419 Ralph Rucci Sewalong
Pull the loop until it knots at the end. Repeat this over and over until you have a chain of knots that completely covers the thread. This is your bartack. Do this 4 times for every button hole. Also, have a glass of wine while you’re doing this – you’ll be sitting for a hot minute 😉

V1419 Ralph Rucci Sewalong
Some bartack tips:
– You will get better as you do these! I recommend starting with the button side first, at the bottom button hole, so your practice attempts won’t be as easily seen 🙂 Of course, you could practice on scraps first – but, naw, not me!
– Don’t pull the knots too tight, or you will distort them and they won’t be as pretty 😦
– Try to make your knots in the same direction as you go – this will keep them uniform and hopefully prevent twisting!
– If at all possible, try to do these in one sitting. The repetition means you will get better as you do it, so if you complete them all in one sitting, you won’t need to go through multiple learning curves (than if you picked it up several times during the week).
– The original Rucci coat has the bartacks continue on the back side of the bound button holes as well. The instructions for this pattern only call for the bartacking in the front (which is what I did). If you want to mimic the original and bartack the back of the button holes – well, don’t let me stop you 🙂
– Don’t get too hung up on perfection – yes, you want these to look nice, but at the same time, most of them will be covered by the buttons. Not worth killing yourself over!

V1419 Ralph Rucci Sewalong
Once you’ve finished your loops, time to sew on those buttons! Sew the buttons in the middle of the binding on the left front, catching both bindings in the stitches. For the top button, sew it 1/2″ away from the edge (it won’t be quite in the middle).

V1419 Ralph Rucci Sewalong
You can also go ahead and sew those back buttons on the belt. The pattern actually has you make button holes first – which of course you can do, but I omitted mine.
One word of note about the belt – don’t try to cinch it in too tight, or you’ll create gathers on the coat sides. Pin the belt closed first, and try it on to make sure everything is smooth and flat.

Finally, all that’s left is the sleeves. Go ahead and hem them with the bias facing – same concept as the other hemming and facing we did in these steps.

V1419 Ralph Rucci Sewalong
The last thing we will do is make these little sleeve binding pieces, to cover the edge where all the crazy sleeve seams intersect. Cut 2 pieces that are approximately 1.5″ long by 1″ tall (or possibly taller, if your fabric is very thick and bulky – I cut mine 2″x2″, because my fabric required the extra room!). Fold one long edge under 1/4″ and press, and both short edges as well.

V1419 Ralph Rucci Sewalong
Sew the binding to the outside of the sleeve, with the right sides facing, at the point where all the seams intersect. Sew right along your topstitching line. If your fabric is bulky, you may want to trim down the seam allowance of this binding piece.

V1419 Ralph Rucci Sewalong
Turn the binding to the inside, wrapping around the sleeve hem and being sure that all folded edges are tucked under. Slipstitch around the 3 edges and press. Again, this is a good time to use your clapper to really flatten those seams. Gah, you guys must think I have stock in clappers at this point hahaha.

V1419 Ralph Rucci Sewalong
Your finished sleeve will look like this. Yes, some of my top stitching is wonky. Oh well!

Whew! That’s all for this post – AND THIS COAT! How’s everyone coming along with their coats? I’ve been loving all the progressing (and some completed!) coats that are popping up in the Flickr Group. You’re SO almost done!! If you want to show off your coat in our Parade of Coats next week (which, obvs, you should!), you have a few options – you can upload to the the Flickr Group, and you can also upload to the Pinterest Fan Gallery. Be sure to use the hashtag #v1419Sewalong so you’ll appear in our Tagboard, where we will also be pulling finished coat photos. Can’t wait to see everyone’s coats!! 😀

V1419 Sewalong: Steps 51-63

3 Nov

Good morning, Sewalongers! We only have a couple weeks left before the sewalong is complete – are you feeling excited? You should! Especially since this week is all about the welt pockets 😀

Meg will be covering the steps this week for creating your own beautiful welt pockets, so be sure to check out The McCall Blog for tutorials. Again, I’m just here to cheerlead and give some tips this week. I spent pretty much my entire Sunday wrestling with these pockets, but the good news is that they turned out quite lovely! And I have some advice to share, so listen up!

V1419 Ralph Rucci Sewalong
First and foremost, whether this is your first welt or your 50th welt, you absolutely need to practice making a welt pocket using your coat fabrics before you start hacking into the coat. It’s important to do this with your coating fabrics in particular, as they may act differently than other fabrics you’ve used in the past for welts. My wool coating fabric is pretty bulky, so I was able to sort out issues in my practice rounds, instead of on the coat itself.

I know, making practice welts kind of sucks! I’m SO glad I did it, though, because I don’t think my welts would have turned out nearly as nice if I hadn’t practiced a few times first. You don’t need much for the practice – I used a piece of coating that was about 8″x4″, a similarly sized piece of my contrast taffeta (for the pocket facing – don’t worry about cutting a pocket out of your fabric for the other side – unless you just reaaally think you need to practice sewing pockets), and one fabric welt. After my third practice welt, I felt confident enough to do the real thing on the coat.

V1419 Ralph Rucci Sewalong
For marking your coat pieces – here are a couple of tips. First of all, I wouldn’t necessarily rely on tracing the markings off the pattern. You can trace them to get a general *idea* of where the pockets need to hit, but for doing the actual marking (or cleaning up your markings, or re-adding them if they mostly rubbed off during the coat construction), just use a ruler and a piece of chalk. The welt is a rectangle, after all 🙂 The welt is 6″ long by 1/2″ wide, and the circle marking is approximately 2″ from the corner on the bottom line (please re-check these measurements against your pattern before marking – I’m going based on my size, which may be different than yours!). I used a straight ruler and this Clover chaco liner (well, mine is white, but same difference) for my markings. I like this particular liner because it doesn’t pull the fabric when it marks, and the chalk dust comes out very easily. I also like how fine the line comes out. Just a preference!

Once you’ve marked your rectangles (I don’t bother marking the center line or the v’s – but go ahead and mark those if you wish), it’s a good idea to thread-trace the markings with long basting stitches. I use silk thread for this purpose – I like how easy it is to remove, and I love that it doesn’t show a marking when you press over it. You may also use cotton thread if you don’t want to spring for silk (a spool is about $4, so not terribly expensive but also not really cheap!) – or even regular polyester, but definitely check that it doesn’t leave marks when it’s pressed. I also mark my dots with simple tailor’s tacks – just loop the thread over the marking a couple of times. Thread-tracing these markings means that they’ll be visible from *both* sides of the coat, and that they won’t rub off as you handle them. Thread trace the rectangles on both the coat and the pocket facing (the contrast).

One more thing: once you’ve thread-traced the welts on your coat, it’s a good idea to try the coat on and make sure they are an even height. Mine were ever-so-slightly off, but I was able to catch it before sewing on uneven welts. That would have been lame!

V1419 Ralph Rucci Sewalong
When making your welts, if your fabric is thick – try trimming the seam allowances with your scissors at an angle. This will make one seam allowance slightly longer than the other, which will prevent a ridge from showing when it’s turned right side out. Position the welts so that the shorter trimmed side faces the outside of the coat.

Also, with the welts – don’t aggressively trim and clip the seam allowances to nothing! You need a little bit there so the corner will have some structure when it’s turned right side out. I trim mine to a little less than 3/8″.

V1419 Ralph Rucci Sewalong
When turning the welts right side out, push the seam allowance to one side, like so.

V1419 Ralph Rucci Sewalong
Carefully turn the entire thing right side out, and gently use a point presser (or a knitting needle, or a butter knife, or whatever you have on hand) to push the corner out to a sharp angle. Then press, being careful not to drag the iron around – you don’t want to distort your welt.

V1419 Ralph Rucci Sewalong
Yay, sharp corners! As a side note – this was one of the practice welts that did not have the edges trimmed at an angle. See the ridge showing through? Yuck.

V1419 Ralph Rucci Sewalong
When it’s time to sew the pocket facing to the welt+coat, you’ll be glad you did those thread tracings. I checked both sides constantly to be sure that I was exactly on the lines for both coat & pocket facing. I also went the extra mile and hand-basted the facing on, using a different color of silk basting thread. This took foreeeeever, but it’s super precise and I think it’s a big reason why my pockets turned out so nice. Then you can just sew right on top of the basting lines and not have to worry about pins getting in the way (or, in my case – distorting the fabric because of the sheer amount of bulk in that area).

Once you’ve sewn everything down for reals, remove all the basting and thread tracing. Cut and clip as indicated in the pattern – and don’t be afraid to get VERY close to the stitching line when clipping those v’s for the welt. This will prevent the coat from having a crease or fold at the corners where the welt intersects. Then just press the hell out of everything. It can be a little tricky, just because there is so much coat going on – just use lots of steam and take your time. I found that I got the best press when I used the top edge (the handle part) of my clapper and laid whatever section I was pressing over it. The narrow surface meant that the iron was pressing only the parts I wanted to press, and not pressing wrinkles into the rest of the coat.

V1419 Ralph Rucci Sewalong
Once I had everything pressed and done, I basted the welts shut while I finished the pockets, so they wouldn’t gape and flap and potentially stretch out.

V1419 Ralph Rucci Sewalong
Sewing the pocket and binding is pretty easy. The only thing I changed was that I stitched in the ditch to attach the binding, rather than slip-stitching by hand. Just a personal preference! Bonus for those of us who are using underlining – when it’s time to invisibly sew the pocket to the coat, you can just grab the underlining and not worry about your stitches being invisible from the outside. Yay!

V1419 Ralph Rucci Sewalong
Here’s the finished pocket on the inside. Doesn’t it look luxe?

V1419 Ralph Rucci Sewalong
And, of course, my beautiful welts. I am so happy with how they turned out! Definitely worth the effort!

Don’t forget to check out The McCall Blog for Meg’s tutorial on sewing the welts! My biggest tip? TAKE YOUR TIME. Don’t try to rush this section and expect pristine welts. That in mind, you also should not be too scared to actually do this part! They’re just welts – practice a few times, follow the directions, utilize hand-basting, and you’ll be fine 🙂 If all else fails, you can always throw a patch pocket over the mess 😛 haha! (no, seriously, I tell myself this EVERY TIME I make welt pockets!)

How is everyone doing this week with the coat? Any questions?

V1419 Sewalong: Steps 23-50

27 Oct

Good morning & happy Monday, sewalongers! This week, we’ll be sewing up a large chunk of the coat – finishing the main construction, in fact! By the time you are done with step 50, you will be able to actually try on your coat 😀 Woohoo!! I know a post with 27 steps seems ridiculously long, and it sort of is – but keep in mind that at least a third of those steps are just instructing you how to sew on the bias binding. So it’s really not that bad! Although, I will be the first to warn you – this part can be a little time-consuming. You can do it, though! Just take your time and definitely take a nice break if you feel yourself getting overwhelmed/frustrated 🙂

This week, for my sewalong post, I’ll be doing the same sort of post as from last week and just giving some general tips and cheerleading. I don’t think this part of the sewing really requires step-by-step directions – which, due to the sheer size of the coat, is kind of difficult to do as it is – and the directions on this pattern are insanely good anyway. Seriously, they’ve really restored my faith in Vogue patterns with this coat.

That being said, let’s jump in!

As with last week, you will need to follow the steps outlined in the pattern for constructing the coat. Don’t try to skip a step, or jump ahead – the instructions are written in a way to give you the best result with as little hair-pulling as possible (hair-pulling will still probably happen, though, just fyi). Be sure that you have clearly marked your pattern pieces with all notches and symbols – it is critical with this pattern that everything is marked to give you the very best results. Trust me! Also, pay attention to the side that you are sewing the bias binding (and thus which side you will end up topstitching), as we want our topstitching and everything to be symmetrical on the finished coat.

The sleeve dart will be bound with the bias tape, just as all the seams are. If you are having issues keeping the seam allowance at the bottom (where the tip of the dart just kind of wanders off the edge of the fabric), try sewing with the bias binding on the bottom, with the raw edge at your 5/8″ mark. You can also mark the bias tape at 5/8″ in that area, but I found just using the guidelines on the machine’s throat plate was good enough for me 🙂

V1419 Ralph Rucci Sewalong

Don’t forget to staystitch your sleeve where directed (the blue lines in that photo… hopefully your sewing is straighter than my computer drawing skills 😉 ). This is essential for attaching the sleeve to the coat.

V1419 Ralph Rucci Sewalong
For attaching the coat front and back to the sleeves, here are a few tips I have picked up:

  • Use a basting stitch to attach the pieces together first. When you sew the binding, you will use a normal stitch length, so basting is fine for this part. The basting will come in handy if you need to unpick anything (either because you didn’t sew over the basting, or you got a pucker, or whatever).
  • Some of this pieces have GIGANTIC curves and require some crazy easing. Feel free to clip as much as you need to get everything to lie flat. I personally didn’t clip at all – I just put the bigger side on the bottom when I sewed and let the feed dogs ease everything. Absolutely make sure you check for puckers before moving on to the next step.
  • When attaching the binding, I found it easiest to sew with the binding on the bottom, so I could be sure I was sewing over my basting line (and thus have less to unpick).
  • Clip those seam allowances aggressively – like 1/8″. This will not only give you enough room to fold over the binding for topstitching, but it will also allow those curved areas to lie flat without needing to clip (obviously, if you clipped the seam allowances to attach the pieces together, you’ll probably cut most of that off. That’s ok! 🙂 ).
  • As I have mentioned before, I found the topstitching much easier if the binding was basted down by hand first. If you baste right along the edge of the binding, you can sew inside the stitching line and be sure that you caught the fold. Further, it means you don’t have to worry about pins 🙂
  • Again, do NOT be afraid to beat those seams into submission if they are feeling bulky.

20121202-210149

At some point during this section, you will find yourself wrangling a whole lotta coat and you might feel a little overwhelmed. Stay with it! You can do this!

V1419 Ralph Rucci Sewalong

Once you’ve attached the front and back at the top of the sleeve, you will end up with something like this.

V1419 Ralph Rucci Sewalong

Make sure you spread it out on the floor so you can really appreciate how completely ridiculous everything looks.

The next few steps are going to seem REALLY weird, but just roll with it-

V1419 Ralph Rucci Sewalong

First, you will attach your coat front to coat back at the side and skirt seams. Once finished, you will end up with something that resembles a coat with armpit vents. This is actually a great time to try the coat on, BTW – I pin basted a few seams together just to be sure things were rolling smoothly along (what can I say – even with a muslin, I’m paranoid). I ended up sewing this seam at 1/2″ seam allowance instead of 5/8″, just to give myself a tiny bit more waist room.

V1419 Ralph Rucci Sewalong

The next step will have you sew up the section right above the waist and below the gusset, and then apply the binding.

V1419 Ralph Rucci Sewalong

Finally, you get to close up the sleeves! Yay!

Ok, so Laura tweeted me about step 50 being impossible.

images

It’s definitely not impossible – but is DOES require some finesse! If you’ve ever flat-felled a sleeve seam (while it was attached to the rest of the shirt), you are probably familiar with this kind of sewing wrangling. Basically, you will sew very slowly – like an inch or two at a time – being sure to lower the needle every time you stop to readjust (lowering the needle is pretty important, else your coat may shift which will result in a wonky line), so you can be sure you’re sewing through one layer of coat. It *is* possible to sew this seam, you just need patience 🙂 I basted my binding into place by hand (if you’ve been pinning up to this point, you may want to consider basting for just this one seam – it’ll make things a LOT easier if you don’t have to deal with pins) and sewed from the wrong side, so I could keep an eye on my binding and make sure I was catching it. This doesn’t result in the prettiest topstitching ever, but, you know what? It’s an underarm seam. Ain’t nobody gonna be looking at that anyway.

Anyway, here’s my coat up to this point:

V1419 Ralph Rucci Sewalong

V1419 Ralph Rucci Sewalong

We are getting there!

As a side note, it was brought to my attention last week that I sewed the binding on my belt incorrectly. WHOOPS! The binding should actually all face to the inside – there are photos on the McCall blog for clarification. I decided to leave mine because I like the way it looks, but just fyi if you are going for something that is closer to the original!

How are y’all feeling about your coats this week? Any burning questions about this set of steps? Holler at me in the comments!

V1419 Sewalong: Steps 4-22

20 Oct

Good morning, sewalongers! This is the week we actually start sewing our coats – aren’t you sooo excited!?! 😀 Meg will actually be covering this week’s set of steps over on the McCall Blog later this week (she had a family emergency last week, so please be patient if it takes her a couple of days to have the post up), but I thought I’d post here with some tips and progress updates (and personal cheerleading, in case you need it 😉 ).

This first set of steps will get you acquainted with attaching the binding, as well as starting some basic construction on the coat – the back belt, the underarm gusset, and attaching the side to the front. It is fairly straightforward – you may not even need the sewalong once you start reading the instructions – although you do need to be very precise. Don’t be afraid to go slow and maybe even do some hand basting on the trickier parts. You got this!

Ok, here are my ~top tips~ for this section:

V1419 Ralph Rucci Sewalong
If you underlined your coat, you will want to remove the basting stitches after you sew each piece together. This is where the silk thread/hand basting comes in handy – it should be very easy to pull out 🙂

V1419 Ralph Rucci Sewalong
Underlining or not, if your coat fabric is thick, you will definitely want to trim and grade the seam allowances as much as possible when it comes time to apply the bias binding – otherwise, you may have problems getting it to lie flat. I use my Gingher duck-billed applique scissors for this; the flat side keeps any errant fabric from getting caught and accidentally snipped. Obviously you can use regular scissors – just be mindful of where you cut 🙂 I grade down my coating fabric first – as close as I can to the stitching line, without compromising the strength of the stitches – and then trim the remaining seam allowances once I’m ready to fold over the binding.

SPEAKING OF THE BINDING…

V1419 Ralph Rucci Sewalong
Trim off those little triangles before you start applying. It’ll make things a tiny bit easier.

V1419 Ralph Rucci Sewalong
When attaching the binding to the belt, I used my #10 Edgestitching foot to stitch in the ditch on the right side…

V1419 Ralph Rucci Sewalong
Which turned out freaking GORGEOUS, by the way.

V1419 Ralph Rucci Sewalong
The rest of the binding is actually applied flat to the coat, with the topstitching visible on the right side. It can be pretty difficult to get everything even on both sides (catching the binding at the fold on the inside, while still keeping an even topstitching distance on the right side). The pattern has you baste the binding down first, which is a great idea. The only thing I’d add to that is to baste it by hand – yes, I know machine basting is faster, but guess what? It’s also a HUGE PAIN IN THE REAR to remove. Do yourself a favor and baste by hand. Use silk thread if you got it. I basted right along the edge of the binding with dark blue silk thread (so it was visible)(sorry, no photos of this), and then topstitched right inside my basting line on the outside, using one of these little seam guides so I could keep the stitching line straight. Afterwards, you will want to beat the crap out of your seams to get them to lie nice and flat. I give everything a healthy dose of steam, and then smack it with my clapper (I use this clapper & point presser, but honestly, you could use a hunk of wood if you’re feeling cheap. Just make sure you sand it reeeeeeally well so you don’t get a surprise splinter in your coat!).

V1419 Ralph Rucci Sewalong
Oh yeah, and I realized about halfway through this sewing session that it’s probably a good idea to keep a container around to hold all my trimmed seam allowances. There is a LOT of trimming going on around here, and for some reason, I’m incapable of hitting the trash can. Whatever.

Anyway, once you have finished through step 22, you should have something like this –

V1419 Ralph Rucci Sewalong
It’s a coat… front… thing! Yeah!!! Not so bad, huh? 🙂

Head over to the McCall Blog for Meg’s step-by-step of this part of the process (hopefully up later this week!). In the meantime – how are we doing? Anyone have questions on this section of the sewalong?

Side note/disclaimer: Ok, so I decided to start occasionally using affiliate links on this blog. Sorry if you hate me! 🙂 I am currently only affiliated with Amazon, and I promise I will only be linking things that I personally use and recommend – such as those scissors & that clapper. Y’all will never ever ever see me link something just for the sake of linking it – that’s just crappy. However, please keep in mind that any purchases you make through these links will net a small kickback to me, which I will likely spend immediately on yarn & fabric (and thus pour back into this blog, in the form of content for y’all to read!). Also, no sneaky linkies – I will always describe the item I’m linking so you don’t have to click to see them, if affiliate links squick you out 🙂 I won’t be posting this disclaimer at the end of all my posts, as it seems a little redundant, but you can always view it in my About Me page. That’s all! Thanks for supporting my blog, dudes! ♥

V1419 Sewalong: Cutting and Prepping

13 Oct

Good morning, sewalongers! (sewalongees?) Today we are going to go over the final prep work before we start sewing (next week! Eep!). This is the last slow post of the sewalong, which gives you another week to perfect your muslin and choose your fabric. Of course, these posts will also be up indefinitely so don’t feel like you have to rush to keep up!

blog-sewalong-image-650x563

The very first thing you need to do – yes, before you do anything else with that lovely fabric – is pretreat your fabric. How you pretreat your fabric will depend on the fiber you chose, as well as how you plan on cleaning the coat in the future. For those of you who are sewing wool (like meee!), this means you need to get any shrinkage out of your fabric *before* you cut the pattern pieces – otherwise, once you start steaming that bad boy, you may end up shrinking pieces and that’s no good. There are lots of ways to pretreat wool – and none of them involve washing the fabric (please don’t do that!). You can either steam the piece yourself (this involves lots of steam and probably a lot of time), take it to the dry cleaner and have them pretreat it (this involves money)(and also dry cleaning), or you can shrink it up in the dryer (which is what I do). Here’s a blog post outlining the entire process, but basically – you just need to throw your wool in the dryer (finish the edges if necessary to prevent unraveling), add a couple of towels that are soaked in hot water (and then wrung out, so they’re not dripping) and blast the dryer on high heat for however long it takes before everything is dry. Easy! This is the method I use for all my wool fabrics. If you are at all hesitant, try it out on a swatch first 🙂

For other fabric types that are not wool – you may not need to pretreat (unless you plan on washing the coat in the washing machine? If then, defintely prewash that shit!). If using a cotton or silk, you may want to at least steam the crap out of it just to be sure there is no shrinkage. Polys should be fine and not shrink at all.

Once you’ve pretreated your fabric in whatever way need, then it’s time to cut! I’m not going to go over cutting here – I assume anyone brave enough to tackle sewing a coat is probably fine to cut fabric without guidance 🙂 – but if you need a refresher, here is an old post I wrote about cutting and marking your pattern pieces. One thing I did notice while I was cutting my fabric – I was able to reconfigure the layout and use slightly less fabric. Don’t be afraid to change up the layout if your fabric is wide enough, just be sure that you are keeping all the pattern pieces on the proper grain.

If you are including an underlining for your coat, you will need to cut out pieces 2, 3, 4, 7, 8 & 9 from your underlining fabric.

For the contrast – specifically, all those bias pieces – I found it easier to draw the pattern pieces directly on the fabric, rather than try to pin a bunch of stuff and then try to cut a straight line and nope.

V1419 Sewalong: Prep

The long, straight pieces – I just measured them and use a ruler and marking pencil to draw them on my taffeta. For the big bias contrast pieces (those giant parallelograms), I pinned down the pattern piece, traced around the edges with my marking pencil, and then used a ruler to draw in the lines 2″ apart (as they are on the pattern piece). I did all this on the flat fabric before I cut anything out, and I think it made things a lot easier!

Once you’ve cut out all your pattern pieces, you will need to apply the underlining (assuming you are underlining – if not, skip ahead and start marking your pieces). Underlining is very easy. It is also very time-consuming – so I recommend watching some crappy TV or something equally entertaining while you do it 🙂 For this sewalong, I won’t be going over underlining, but here is a tutorial if you need one. Some things to keep in mind:
– Sometimes you can get away with basting the pieces together by machine. This coat is not the time to try that method. Because the pieces are very large, you run the risk of shifting your fabric – which will give you bubbles or hang weird if you’re not careful. Try to keep things as flat as possible. Meaning: sit at a table, underline by hand. Watch a movie. Drink some wine. Whatever makes you happy!
– I use silk thread to underline, because it removes very easily. I also happen to have several spools on hand in strange colors, so that’s a big part of the reason. I realize silk thread is a bit expensive, so don’t feel like you have to break your budget on some thread that’s about to get pulled out as soon as you sew a seam. Use whatever you got! I would recommend using a threat in a contrasting color, just so it’s easier to see/remove.
– Feel free to use giant stitches. You’re just basting the pieces together to keep them from shifting when you sew them. Big stitches are ok – and they’re easier to remove!
– Sew well within your seam allowances, especially if your fabric shows pin holes (mine does!).
– I like to underline first, *then* mark the pattern pieces on the wrong side. You can also mark, then underline. Up to you – I just think the former is easier! Don’t freak out if you accidentally snip your basting when you cut notches – it’s ok!

V1419 Sewalong: Prep
See? I did it too. No big deal!

Once you’ve finished underlining (or have skipped ahead), you will need to mark your pieces. It is very important to get every stitch line (for the welts and the button holes), dot and notch – it’ll make things muuuuch easier to match up when we start sewing. You may want to use wax tracing paper and a rotary wheel for the lines, and a marking pen (or tailor’s tacks) for the dots. Just snip the notches. We won’t judge you.

Ok, bias binding! This is the same method outlined on the Coletterie, btw – except you are starting with a parallelogram piece, and not creating one from a square (if that makes sense).

V1419 Sewalong: Prep
You should have 3 parallelograms with 2″ diagonal lines drawn on the wrong side of the fabric. Matching the notches and markings, pin the two angled edges together, right sides together, to form a strange off-center tube. The edges will not match at the ends.

V1419 Sewalong: Prep
Sew the seam you just pinned. I used 1/4″ because – well, that’s what I always use. I think this pattern was drafted for 5/8″ – even at the bias binding – and if you sew with that amount, you will need to trim it down to 1/4″ after sewing.

V1419 Sewalong: Prep
Press the seam open.

V1419 Sewalong: Prep
Starting at once end, begin cutting along the line you drew. You should end up with a looooong string of continuous bias. Do this for all 3 parallelograms.

V1419 Sewalong: Prep
Once you’ve finished cutting all your bias strips, fold them in half with the wrong sides together and press.
(I promise that big yellow spot on my ironing board cover is not pee. That’s actually what happens when you put your iron on top of a piece of tailor’s wax. Whoops.)

V1419 Sewalong: Prep
You should end up with a big pile of bias strips. Mine kind of look like intestines. Cool.

Finally, you will want to staystitch and reinforce your coat pieces as directed in the instructions (steps 1-3 & step 35). For both – use a slightly shorter stitch length (I use 2.0 vs my standard 2.5) and be sure to backstitch at both ends. For staystitching, sew 1/2″ away from the edge. For reinforcing, sew along the stitching line at 5/8″.

Here are the pieces you will be prepping. Lines marked in blue are reinforcement stitching, lines marked in yellow are staystitching.

V1419 Sewalong: Prep

V1419 Sewalong: Prep

V1419 Sewalong: Prep

ONCE LAST THING: Once you’ve reinforced all those tricky edges, you need to clip the seam allowances all the way to the dot.

V1419 Sewalong: Prep

V1419 Sewalong: Prep
Clip to the stitching line, but do not clip the stitching line. This will make it easier to sew those tricky sleeve seams.

And that’s it! Whew! Sorry for the post overload today. Oh, I almost forgot – here’s my fabric!

wool coating
These are the swatch cards I got from Mood. The wool coating I chose is piece piled on the very top (4th one down). It’s a nice, thick virgin wool coating.

taffeta underlining and contrast
I am using 2 different silk taffetas – the brighter red will be the underlining, and the darker red is the binding and contrast.

How are we doing this week, seawlongers? Any questions about the cutting or prep?

V1419 Sewalong: My Muslin

6 Oct

Good morning, V1419 Sewalongers – and Happy Muslin Day! Yes, today is all about the muslin – a very important part of coat construction (some of y’all make refer to it as a toile, same difference!). After all, you don’t want to spend all this time and money making a coat that doesn’t fit once it’s finished… do you? (if the answer to that is no, then, um… do you want to share some of your spare time and money with?? haha!)

Meg is handling All Things Muslin over at The McCall Pattern Company blog, so check out her post for advice and tips. Me, I’m just here to be your personal cheerleader this week – as well as share my muslin! Wanna see?

V1419 Muslin

V1419 Muslin

V1419 Muslin

V1419 Muslin

V1419 Muslin

V1419 Muslin

Some notes & thoughts:
– I started with the size 8, which seems to fit pretty well right out of the envelope! The small bit of pulling you see under the bust is not noticeable in real life (and, god, these pictures are awful. I took them three times and these are the best you’re gonna get. Something about shooting a *white* muslin is just… ugh. And yes, I even tried against a not-white background. No dice, looked worse. Deal with this.), and some of the wrinkles were actually pressed into the muslin. I think that, overall, this looks good, and I will be making no further adjustments other than shortening the length and the sleeves. Thoughts?
– Notice when I said I made a size 8? That’s at least 1-2 sizes bigger than what I usually cut in Vogue patterns – this lady runs a little snug! For what it’s worth, my body measurements correspond very closely to the size measurements for the 8 (I’m about 1/2″ bigger all around). If you’re hung up on sizing, I suggest start with the size that works for your measurements and make a mock to see what direction to take the fitting. I know this goes against everything I’ve ever told y’all about using the finished measurements to start, but maybe Vogue has been hearing our cries about the extra ease? 🙂
– I used a medium weight muslin to make this mock-up, and it’s a bit more drapey than the fabric that I chose. This is fine, as I’ve tried on the original and I like the way the dramatic shape looks on me – but if you’re still debating whether or not to use a drapey fabric, try making the muslin with a fabric that has a similar hand to get a feel for how you like it.
– When trying on your muslin, make sure you are wearing the same types of clothing you plan on wearing with the finished coat – for me, that’s a long sleeve tshirt and jeans. If you try this on with a lightweight tank top, for example, the fit will be totally different (and, um, might not work with a big sweater!). Speaking of big sweaters – this style of coat is NOT the thing to wear with your giant chunky knit warmest wool pullover. It’s supposed to be very sleek and fitted – the type of fabulous coat that you would wear over a cocktail dress. If you have your heart set on making this an every day winter coat to wear over multiple layers, you may want to consider sizing up to accommodate the extra bulk.
– Need to make some adjustments? Not a big deal! While this pattern does not have traditional style lines, it *does* mark the bust apex and waistline, so that will give you a general idea where to add your adjustments. Due to the time restraints we have for this sewalong, we will not be covering flat pattern adjustments. A few people have asked whether or not this particular pattern can handle a FBA (full bust adjustment) – and the answer is yes! You’ll need to first remove the lower skirt portion of the coat, as well as the sleeves, make your FBA (I like to use the method explained in Fit for Real People)… then rotate out the dart you create to retain the original lines of the pattern, and reattach the sleeves and skirt (smoothing and blending your lines as needed). Don’t know how to rotate out a dart? Here are some links that you may find useful: The Mahogany Stylist, Vicki Kate Makes, The Sewaholic Blog (with extra links!). Alternately, there are zillions of tutorials online of how to do a FBA/rotate a dart – just Google and pick your favorite!
– For length adjustments – you can actually just hack it right off the bottom of the sleeve/length. Which is exactly what I plan on doing, fyi.
– If you’re one size in your bust and another at the waist, you can grade the sizes together to get a better fit. There’s a brief write-up on how to do this here on my blog, but essientally you’re just drawing a line to connect size x to size y to seamlessly blend between the two.

Finally – we have an Offical V1419 Coat Sewalong Flickr Group! Whoop whoop! The group is open, so please feel free to join and upload your photos to share with everyone – fabric selections, muslins, anything V1419 coat related! Additionally, there are forums if you need to ask questions or advice on fitting or selecting fabric. Meg & I will be manning the group and forums as needed, but please feel free to jump in and help if you see a question that you know the answer to! 🙂

Oh, and don’t forget the Mood Fabrics discount code, if you haven’t already purchased your fabric. “lladybird1013” is good through 10/13/14 for 10% off your order (not including PV codes or dress forms). If you missed the V1419 fabric selection post, you can see it here.

Don’t forget to read up on Meg’s muslin post over at the McCall blog! How is everyone’s muslins coming along?

V1419 Sewalong: Fabric Selection

29 Sep

Vogue Patterns V1419 Ralph Rucci coat pattern sewalong

Good morning & happy Monday, sewalongers! Today, we are going to talk about my favorite part of coat-making (or, really – any sewing project 🙂 ) – fabric selection! Forreal, I could spend all day perusing fabrics and never feel like I’ve seen enough!
(psst – if you’re just here for the discount code, it’s at the bottom of this post 🙂 FYI)

Before we get too ahead of ourselves, though, let’s take a minute and look at the original garment:

coat inspiration

A couple things that immediately come to mind when I see this picture-
1. As far as coats go, there is not a lot of ease in this guy. This is not your wear-everywhere-and-pile-the-thick-sweaters-underneath sort of coat – it’s very fitted and the shape is quite dramatic. Something to keep in mind while choosing your fabric!
2. To get that dramatic shape, we need a choose a fabric with quite a stiff drape and a very firm hand. The original coat is made of a sort of heavy wool garbadine backed with a stiff wool flannel. The resulting fabric is very substantial – stiff and sturdy enough to hold it’s shape. If you make this coat in a fabric with a softer drape, you will not get the same end result. This could be good or bad, depending on how you want the finished coat to look!

Still having problems wrapping your head around the whole drape factor? Don’t know if you even want a coat that’s this dramatic and structured? Go ahead and start your muslin, using a fabric that is a similar weight to what you have in mind (if you can’t find muslin fabric with a stiff enough drape, try inexpensive cotton twill or even home decor fabric). That will give you a good idea of the drape you need to get the coat you want. For more information on fabric drape, check out this post I wrote a couple months ago!

Now let’s talk about possible fabric choices! With all big projects like this, I URGE you to swatch before you commit to anything! You don’t want to spend a lot of money on coating fabric, only to find out that the drape wasn’t as stiff as you were anticipating (been there, done that! And you can’t return fabric most of the time, argh!). Especially when it comes to the contrast for this coat – you want to make sure the colors work together, that the coating is the right weight/drape/hand, and that you actually *like* the way it looks in real life. I’m recommending these fabrics based on the website descriptions, but please don’t take my word for the gospel until you’ve actually touched it in real life.

Also, please keep in mind that this coat is UNLINED. You will want to choose a fabric that can easily slide over your arms – or you will need to underline the coat with something that serves that purpose. As far as I know, there’s not a way to completely line this particular coat (with all the insides hidden and all that). We will be covering underlining in this sewalong, we will NOT be covering lining. Consider yourself warned!

FOR WINTER-WEIGHT COATS WITH A STIFF DRAPE:
virgin wool
For a dense and warm coat with a nice stiff hand, you can’t go wrong with virgin wool. This fabric is not quite as stiff as the original – it will still hold that nice bell shape at the sleeves and skirt, but with softer folds. Virgin wool is actually what I bought for my coat – in a beautiful lipstick red 🙂

felt
Another great option that will provide lots of warmth and structure is wool felt. Definitely swatch this – you don’t want it to be too thick for all those seams!

boiled wool
Similar to wool felt but not as dense is heavy flannel coating. Check out that purple!

wool twill
I really love wool twill for a nice dense coating. Wool twill comes in many weights, so make sure it’s heavy enough to give the structure this coat needs.

wool twill
Here’s another nice, heavy wool twill – this one is from Marc Jacobs!

wool coating
Classic wool coatings, such as this dark turquoise solid coating will also work, as long as they are stiff enough to give the effect you want.

plum coating
This plum coating is pre interfaced!

velvet
Looking forsomething a little more fancy? Up the luxe factor with this italian velvet.

metallic brocade
Another great fabric option for this pattern (one that I believe Meg is using for her coat – although hers is this beautiful double-sided brocade!) is brocade. I love this metallic brocade!

brocade
Also, this floral brocade if you’re dying to stand out a little more.

silk brocade
Or you could go all out with this bright pink ribbed silk brocade, because YES.

FOR WINTER-WEIGHT COATS WITH A SOFTER DRAPE:
silk wool
How gorgeous is this silk wool? This fabric would give you a much softer drape than the ones above – think less of an exaggerated bell shape for the skirt and sleeves, and softer folds at the arms.

cashmere
Of course, you can’t go wrong with black cashmere coating – a true classic!

cashmere-wool
Doesn’t this wool cashmere coating just look SO snuggly? It’d be like wearing a blanket 24/7.

boiled wool
For a lighter wool weight with a very soft drape, consider boiled wool. I just love this bright purple color!

FOR A LIGHTER-WEIGHT COAT:
cotton twill
Those of y’all with milder winters – no worries, I’ve got ya covered! You have a few options for making this coat in a lighter weight, while still retaining the dramatic shape. First up – consider cotton twill! I love this organic cotton twill – especially that hot pink color, yes! – but any cotton twill will work as long as it’s heavy enough to hold it’s shape. Try to avoid anything with lycra (or any stretch), as it will make sewing this coat more difficult.

silk faille
You could also make a very beautiful, very dressy lightweight coat out of silk faille.

cotton sateen
Want the shine of the silk without the price tag? Try cotton sateen – again, be sure you are getting one with no stretch and a heavier weight.

denim
I’m thinking this coat would also look really cool (in a super casual way) if it was made up in denim! Am I crazy? Give it some gold topstitching and brass buttons and it’s like the fanciest denim jacket in the world. This heavyweight Theory denim even comes pre-interfaced!

Obviously there are many, many more options for coating – including non-natural fibers (I’m not linking these because I personally don’t like to wear or sew with polyester anything! Sorry!) – but this should be enough to get the ideas flowing. In the meantime, let’s talk about underlining and contrast fabrics.

FOR UNDERLINING AND/OR CONTRAST:
For my coat, I knew I needed to underline with something because I’d otherwise have a difficult time pulling the coat on. I initially thought about using silk chaurmeuse, because I just love it, but ultimately decided to stick with the stiff drape theme and use silk taffeta. Silk taffeta is also recommended for all the contrast (as is chaurmeuse, but just between you and me – I don’t recommend the latter. Unless you just looove sewing bias chaurmeuse binding; in that case, don’t let me stop you!), so I actually bought two colors. I love silk taffeta! Obviously, you can use poly taffeta if that’s all your budget allows – but I like the added warmth that silk provides, so that’s why I went with that. Anyway, if you are underlining – you will want to buy the same amount of underlining as you are coating fabric. For contrast, buy whatever the pattern instructs you to buy.

silk taffeta
Check out this kelly green silk taffeta from Oscar de la Renta! Swanky! For something a little more understated, there is also this caviar black silk taffeta from Ralph Lauren.

poly taffeta
Love the look of silk taffeta but hate the price? There are also some beautiful polyester taffetas available, including this cool checked taffeta. This coat really isn’t suitable for plaids as the outside fabric – but as far as the contrast is concerned? Go for it!

For those of y’all who are not underlining and only need contrast for the binding, you might also consider shantung or dupioni. On a super budget? Check out cotton sateen.

Another thing to consider with the contrast fabric – there is contrast on both the outside of the coat (for the bound button holes, belt, and pocket), as well as the inside (bound seams). Keep in mind that, while the pattern is written for all contrast to be the same fabric – you don’t have to sew your coat that way. Use the fancy stuff for the outside, and bind the inside with something fun (even a woven cotton, if that’s your thing.). You’re the designer here! Just make sure to swatch so you know that you like the way your contrast looks next to your main fabric.

Couple more things, while on the fabric subject!
– Concerned about warmth, but don’t want to make the coat too bulky? Stick with natural fibers (wool coating, silk underlining) and consider interlining your coat with silk organza for an additional layer of warmth.
– Found your dream fabric but it’s just a *smidge* too drapey? Get some good interfacing and block-fuse that baby! Fashion Sewing Supply has a great super crisp interfacing, or even fusible hair canvas. FYI, this coat does not call for interfacing at all – so you only need to buy it if your fabric requires some extra heft.

Whew! I think that’s enough fabric talk for today. For sticking through it this far, I’ve got a discount for ya! Use the code “lladybird1013” to get 10% off your entire order at Mood Fabrics (not including PV codes or dress forms). This code is good through 10/13/14, so you’ve got time to swatch 🙂

I promise I will share photos of my fabric as soon as I receive it (still stalking the mailbox, daily. Ha!). In the meantime – what about you? What fabrics are you eyeballing? Do you have any fun ideas for the contrast? Is your coat a lighter weight? Let’s talk!

One last thing – time to announce the Sewtionary Giveaway winner! Lucky number generator says:

winner1

winner2

Congratulations, Jin! Crossing your scissors apparently worked 🙂 I’ll be in touch to get that book out to ya asap 🙂 Everyone else – if you’d like to pick up your own copy of the Sewtionary, you can order a signed copy at the Sewaholic website. The Sewtionary is also available on Amazon!