Tag Archives: tips and tricks

Bramaking: Tips & Tricks I’ve Learned Along the Way

28 Aug

bra making

Since I started my bra making adventure nearly a year ago (woah, has it really been that long??), I’ve picked up a few tips along the way, as well as figured out a handful of shortcuts myself. This post has been a long time coming, and I’m not really sure why it’s taken me ages to get it all written out – but better late than never, yeah? 🙂 I certainly don’t claim to be an expert on lingerie making (I’ll leave that title to people like Norma, Maddie, and Amy), but I’ve made enough to figure out a general idea of what does and doesn’t work, as well as navigate the really confusing parts that can confuse a beginner (like me!). Anyway, I hope some of y’all novice and afraid-to-dive-in-just-yet bra makers find this useful!

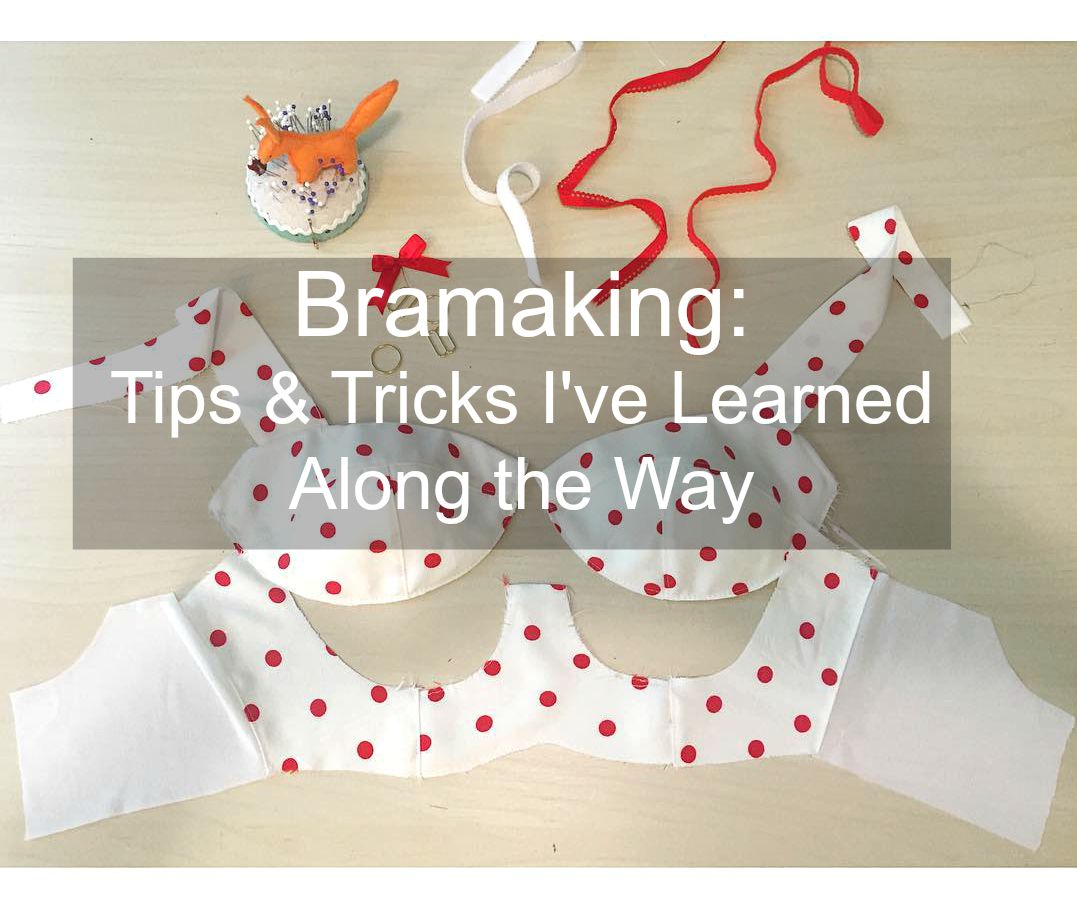
The first thing I want to address in this post is all those weird little notions and bits that you need to collect in order to make a proper bra. There are tons of places where you can basically pay someone to source all that stuff for you (kits I’ve used and loved: Bra Makers Supply, Grey’s Fabrics, Blackbird Fabrics. Obviously there are TONS more out there, those are just the ones I’ve personally tried!), which is pretty awesome and definitely what I recommend for at least your first couple of bras. The only thing I found confusing with the kits (at first, anyway) was that they don’t really tell you which elastic is for what. Further, while the pattern will tell you what materials to buy – it can be hard to visualize how everything goes together if you haven’t actually sewn up a bra before. I know I had a hard time wrapping my head around all that info at first! So I’ve made a couple ~findings guides~ of some of the more popular bra patterns, pointing to each notion so you can get an idea of where they go on the finished bra. I know some of these labels are a bit “No shit, Sherlock” (such as where the hook & eye go – haha!), but, whatever. No finding left behind blah blah blah.

bramaking - boylston findings guide

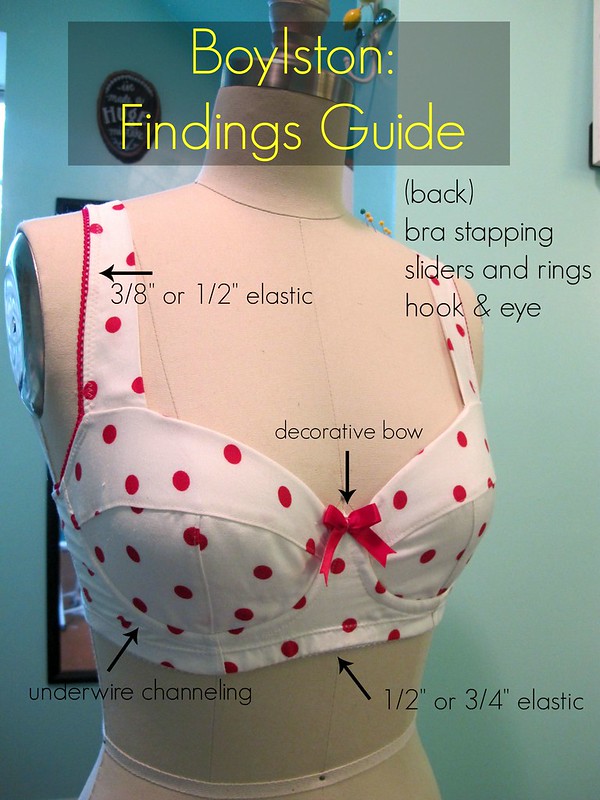
Boylston bra pattern // my polkadot Boylston bra

bramaking - marlborough findings guide

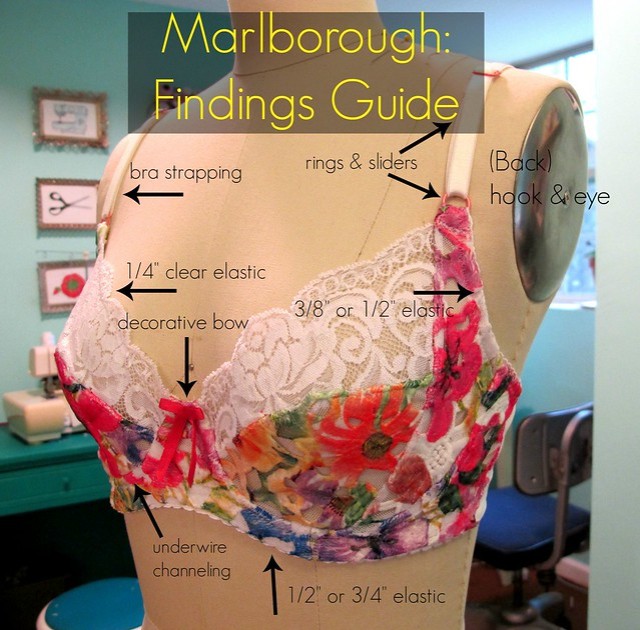
Marlborough bra pattern // my floral/lace Marlborough bra

bramaking - watson findings guide

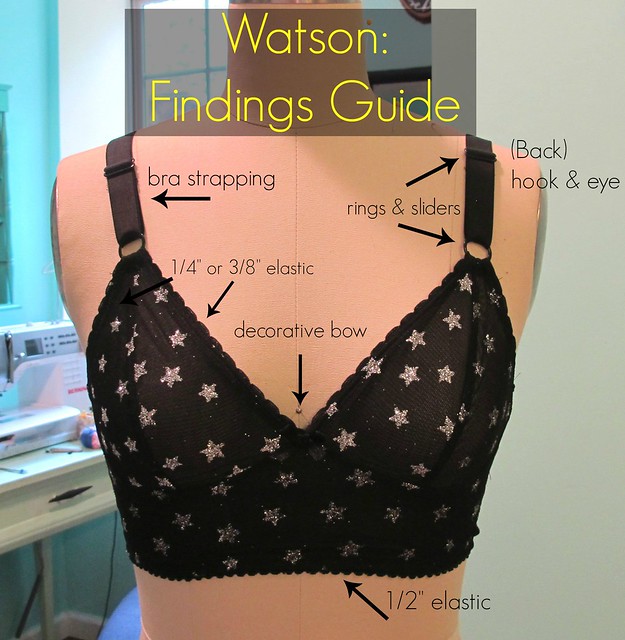
Watson soft bra & bikini pattern // my #starwatch Watson bra

Some additional notes on elastics:

  • Kit sizes: You may have noticed that some kits come in sizes Small and Large. This took me a while to completely understand – but the difference in kit sizes have nothing to do with the amount of fabric included (or, maybe they do, but it’s not something I’ve noticed). It’s more so whether you need the wider elastics and 3 row hook & eye, or narrower elastics and 2 row hook & eye. *Generally* speaking, sizes D and above require the large kit, and sizes C and below use a small kit. That being said, it’s up to your personal preferences – I wear a DD, but I’m perfectly comfortable in a small kit (keep in mind that I’m a small DD, so a small kit won’t really work for the super blessed/endowed. My ~ideal kit~ has the narrower elastics, 1/2″-5/8″ strapping, and 3 row hook & eye). Some people prefer the look of the narrower elastics, and some people like the security of the wider findings. Your bra, your choice 🙂 But anyway, point being – when in doubt of kit size, choose based on your cup size!
  • Elastic width: Most patterns will include this information with the fabric/elastic requirements. Generally speaking, you want the wider elastic for the bottom band (so, depending on cup size – this is usually 1/2″ to 3/4″) and the narrower elastic for the underarm and/or top of the cup (that’s the 3/8″ to 1/2″, sometimes 1/4″). Like I said, I like the narrower elastics personally for me, but feel free to play around with widths if you aren’t feeling the pattern suggestion. The pattern you sew will be drafted for that width of elastic and hook & eye, so if you change the width too much, you’ll need to adjust accordingly.
  • Type of elastic: Ideally, you want to use plush-back elastic for all your lingerie sewing. This type of elastic has a wrong side that is slightly fuzzy (hence the name) and is intended to be soft against the skin. Of course, you can use any pretty lace edged elastic and/or stretch lace, but bear in mind that anything without the plush back may not be super comfortable to wear.
  • Bra strapping / rings & sliders : This is going to sound really fucking obvious, but make sure you buy the right rings & sliders to correspond with your strapping! I did not even think of this when I was going crazy buying bra notions, but those suckers need to match in width or they’ll look stupid (or be too tight to slide). Same as with the elastics, strap width is determined by cup size. Wider straps will give you more support, so if you’re rockin’ the DD and up, you probably don’t want to use 3/8″ strapping.

And while we’re talking about kits, the fabric can also be a little confusing! What pattern piece gets cut out of which fabric?

  • Main fabric: Totally dependent on bra pattern, of course, but generally you’ll cut the cups, bridge and frame out of the main fabric. The grainline on the pattern indicates the direction of greatest stretch on the fabric. Give the fabric a pull to figure out what that is. It might not be the same as what we consider to be the grainline when sewing normal clothes.
  • Lining fabric (tricot): For most patterns, this is used the stabilize the bridge. You can also use lining fabric to line the cups, if you so desire.
  • Powernet: Use this to cut your back band. You can also line with powernet, if your main fabric is a little bit too stretchy for the pattern. You can *also* use powernet to line the bridge, if you don’t have lining fabric on hand. Powernet is awesome!
  • Lace: Usually just the upper cup of the pattern. If you want to cut the entire cup, you may need to line or stabilize it (with the lining or powernet) if it’s too stretchy. For any flatlining, I like to temporarily baste the pieces together with a spray adhesive and then handle them as one (a tip I learned from Maddie).

Now I’m going to share with you my favorite PROTIPS for actually assembling the whole thing together. bramaking - pinning curvesPROTIP #1: Pinning

I know, the urge to pin the everloving shit out of every single piece runs strong and true. But bramaking is a little different, and you gotta fight those urges. Especially when you are sewing a convex curve to a concave curve, it’s actually easier to do if you don’t have to navigate an army of pins along the way. I pin the beginning and end of the seam, and any notches/seamlines that need to match. Also, try sewing with the bigger piece (the convex curve) on the bottom layer. The feed dogs of your sewing machine will help ease it in to the smaller curve.

bramaking - securing stitchPROTIP #2: Starting & stopping, part 1

One of the things I find the most difficult about sewing lingerie is beginning and ending those teeny little pieces with their itty bitty seam allowances. It’s hard enough trying to cram everything under the foot and get it going without having the machine eat it, but then you have to worry about backtacking each end as well. And this really isn’t a step you can’t skip, because you don’t want your seams to unravel when you start handling them. My solution is to use the “securing stitch.” This might have a different name, depending on your machine (and those of y’all who are using mechanical machines – sorry! You can’t sit with us). Essentially, it automatically backtacks a few stitches at both the beginning and end of each seam. Every machine is different, so you may want to pull our your user manual for this one – but on my Bernina, to backtack the end, you just hit the reverse button and it does it automatically (the beginning starts the seam with a backtack). It’s been a total lifesaver for me and my seams are always secure as a result. bramaking - needle down
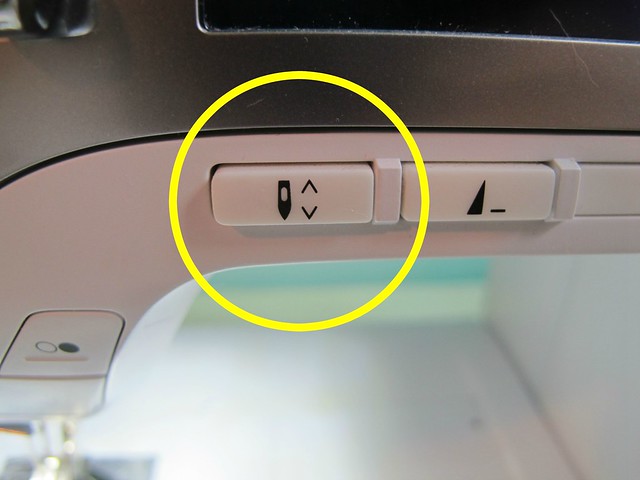
PROTIP #3: Starting & stopping, part 2

Another thing to use if your machine has the capabilities (again, those of y’all with the mechanical machines – YOU CAN’T SIT WITH US) (just kidding ilu use the handwheel for this) – the needle down button! OMG this is forreal the #1 reason why I own a computerized machine. I just hit this button before I start sewing, and every time I take my foot off the pedal, the needle automatically goes down and stays there. It’s brilliant for readjusting layers or turning corners, and you stitch line won’t go wonky from stopping in the middle. I actually use this button for most of my sewing, not just exclusively to bramaking.

bramaking - starting the seamPROTIP #4: Starting & stopping, part 3

Back on the subject of tiny seam allowances and hungry feed dogs. The easiest way to keep your fabric from getting sucked down into the machine at the beginning of a seam is to grab both thread tails and *gently* pull as you start sewing the first couple of stitches. This is especially important if you’re using the securing stitch – once it’s done securing, you can let the tails go and sew on with your life. Don’t pull the tails too hard, just gently guide them to prevent the fabric from getting jammed down into the machine, and make sure you catch the tails for both the bobbin and the needle (for some reason, it looks like I’m only holding one in the above picture, wtf). This is a good tip for working with slinky fabrics, too, even if you’re not making a bra.

bramaking - 1/4
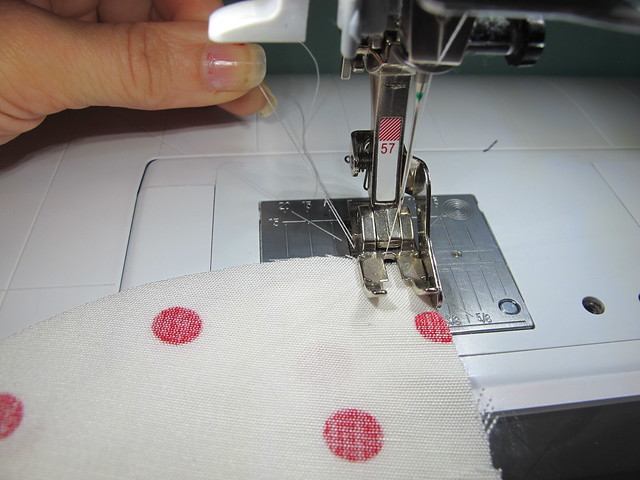
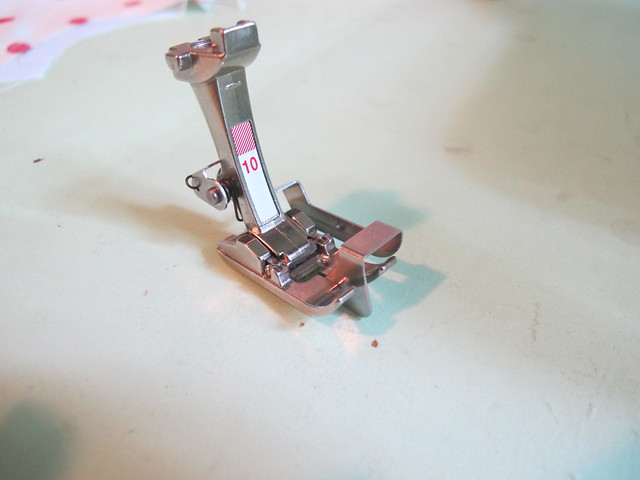
PROTIP #5: Keeping 1/4″ seam allowances

Most lingerie patterns have teeny little 1/4″ seam allowances, which can be kind of hard to keep consistent. Unfortunately, you REALLY can’t fudge this one because it can drastically alter the size of the finished bra if you’re not careful. My solution to this was to buy a special foot with a 1/4″ guide. It is the best thing ever. It’s also useful for topstitching (especially jeans!) and making the most adorable and perfect little 1/4″ French seams.

bramaking - using 1/4Here it is in action. The dull blade runs against the raw edge of the fabric, keeping the needle exactly 1/4″ from the edge. bramaking - 1/4
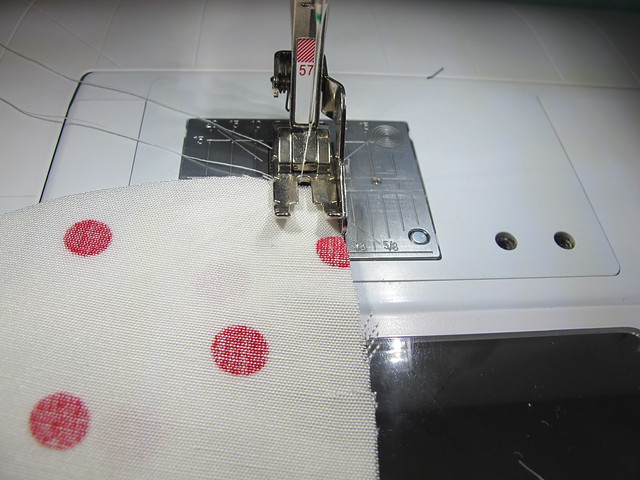
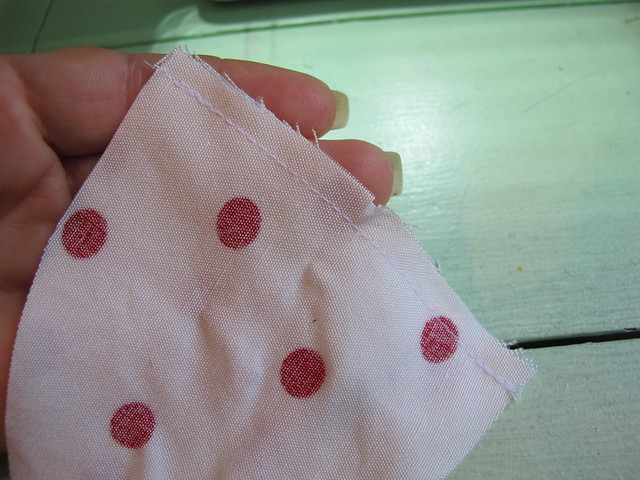
And here is my finished seam. Ah! Perfectly 1/4″ from the edge, every time. Ooh, see my backtacking, too? Thanks, securing stitch!

bramaking- edgestitching footPROTIP #6: Perfect topstitching This is my secret weapon for topstitching, lingerie or not. It’s a special foot and it’s called the edgestitching foot. Besides the 1/4″ foot, it’s the best thing ever. You can also use it to understitch and stitch in the ditch, with little to no tears of frustration and/or wonky stitch lines.bramaking - edgestitching/topstitching
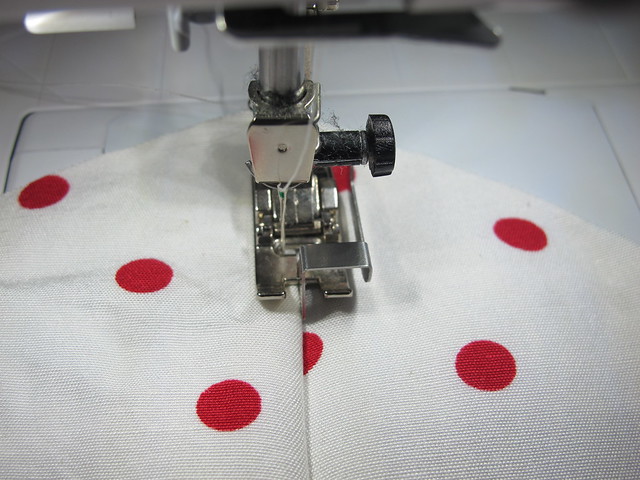
Here it is in action. The dull blade goes right in the center, and you can move the needle either right or left as needed. If you keep the blade against your seamline and move the needle all the way to one side, you’ll end up with a perfect 1/8″ topstitching line. I find this easier than trying to line up part of my foot with the seamline; for whatever reason, shit always goes wonky when I try to do that.

bramaking - topstitched seam
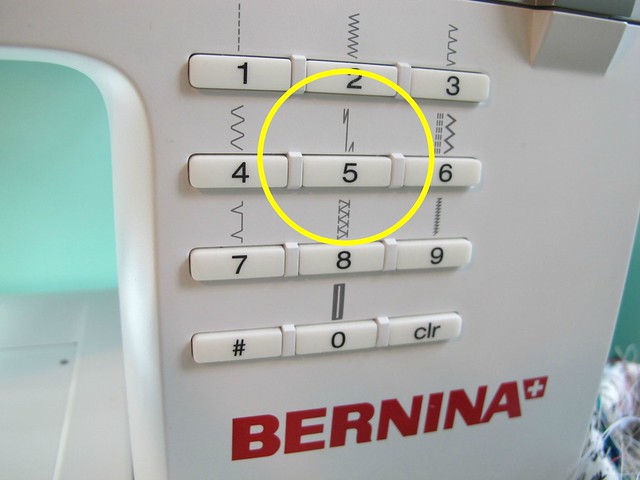
Here is the finished topstitching. One thing to note – I don’t backtack my topstitching if it’s going to intersect with another piece. I only backtack construction seams (otherwise they’ll pull apart at the ends). Since I use a different stitch for each of these steps, that means I can keep my settings saved for each step and just flip between stitches. Which is super handy, because that means I don’t need to re-enter all my preferences each time I move from constructing to topstitching. I use stitch #1 for topstitching (with a slightly longer stitch length and the needle moved all the way to one side), and stitch #5 for constructing.
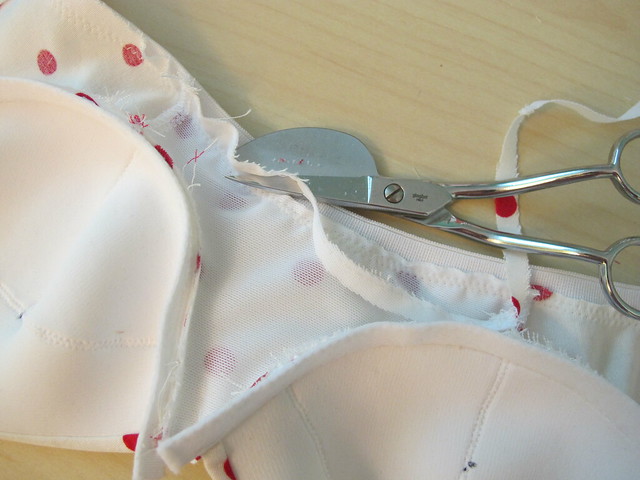
 bramaking - duckbill/applique shearsPROTIP #7: Trimming
Always trim seam allowances before flipping down elastic for the final topstitching. Some patterns tell you to do this, some don’t. I find it looks a lot cleaner (and it easier to handle in general) if the seam allowances aren’t flapping around while you’re trying to finagle a good zigzag topstitch. I also like to trim my seam allowances under the wire casing as well. You can use any ol’ scissors to do this, but I like using duckbill applique scissors. The way they are constructed makes trimming down seam allowances almost foolproof and you’re less likely to cut a hole in the seam allowance that you’re trying to avoid. These scissors are awesome for non-bra things, too (I bought them looong before I got into sewing lingerie) – coat making, grading seam allowances, applique. They also look kind of crazy and I like that a lot.

Ok, I think that’s enough for one post! I hope y’all find these tips useful and that it encourages you to start that bra making journey if you were considering it! To me, it’s one of those learning experiences that seems really intimidating until you actually start doing it – kind of like learning how to drive a standard transmission (and just like driving a standard, once you learn – it’s REALLY hard to stop doing it! Well, for me, anyway. I think it’s fun!).

I know I only just grazed the surface with these tips here, so – what are your best tips for sewing lingerie?

V1419 Sewalong: Steps 51-63

3 Nov

Good morning, Sewalongers! We only have a couple weeks left before the sewalong is complete – are you feeling excited? You should! Especially since this week is all about the welt pockets 😀

Meg will be covering the steps this week for creating your own beautiful welt pockets, so be sure to check out The McCall Blog for tutorials. Again, I’m just here to cheerlead and give some tips this week. I spent pretty much my entire Sunday wrestling with these pockets, but the good news is that they turned out quite lovely! And I have some advice to share, so listen up!

V1419 Ralph Rucci Sewalong
First and foremost, whether this is your first welt or your 50th welt, you absolutely need to practice making a welt pocket using your coat fabrics before you start hacking into the coat. It’s important to do this with your coating fabrics in particular, as they may act differently than other fabrics you’ve used in the past for welts. My wool coating fabric is pretty bulky, so I was able to sort out issues in my practice rounds, instead of on the coat itself.

I know, making practice welts kind of sucks! I’m SO glad I did it, though, because I don’t think my welts would have turned out nearly as nice if I hadn’t practiced a few times first. You don’t need much for the practice – I used a piece of coating that was about 8″x4″, a similarly sized piece of my contrast taffeta (for the pocket facing – don’t worry about cutting a pocket out of your fabric for the other side – unless you just reaaally think you need to practice sewing pockets), and one fabric welt. After my third practice welt, I felt confident enough to do the real thing on the coat.

V1419 Ralph Rucci Sewalong
For marking your coat pieces – here are a couple of tips. First of all, I wouldn’t necessarily rely on tracing the markings off the pattern. You can trace them to get a general *idea* of where the pockets need to hit, but for doing the actual marking (or cleaning up your markings, or re-adding them if they mostly rubbed off during the coat construction), just use a ruler and a piece of chalk. The welt is a rectangle, after all 🙂 The welt is 6″ long by 1/2″ wide, and the circle marking is approximately 2″ from the corner on the bottom line (please re-check these measurements against your pattern before marking – I’m going based on my size, which may be different than yours!). I used a straight ruler and this Clover chaco liner (well, mine is white, but same difference) for my markings. I like this particular liner because it doesn’t pull the fabric when it marks, and the chalk dust comes out very easily. I also like how fine the line comes out. Just a preference!

Once you’ve marked your rectangles (I don’t bother marking the center line or the v’s – but go ahead and mark those if you wish), it’s a good idea to thread-trace the markings with long basting stitches. I use silk thread for this purpose – I like how easy it is to remove, and I love that it doesn’t show a marking when you press over it. You may also use cotton thread if you don’t want to spring for silk (a spool is about $4, so not terribly expensive but also not really cheap!) – or even regular polyester, but definitely check that it doesn’t leave marks when it’s pressed. I also mark my dots with simple tailor’s tacks – just loop the thread over the marking a couple of times. Thread-tracing these markings means that they’ll be visible from *both* sides of the coat, and that they won’t rub off as you handle them. Thread trace the rectangles on both the coat and the pocket facing (the contrast).

One more thing: once you’ve thread-traced the welts on your coat, it’s a good idea to try the coat on and make sure they are an even height. Mine were ever-so-slightly off, but I was able to catch it before sewing on uneven welts. That would have been lame!

V1419 Ralph Rucci Sewalong
When making your welts, if your fabric is thick – try trimming the seam allowances with your scissors at an angle. This will make one seam allowance slightly longer than the other, which will prevent a ridge from showing when it’s turned right side out. Position the welts so that the shorter trimmed side faces the outside of the coat.

Also, with the welts – don’t aggressively trim and clip the seam allowances to nothing! You need a little bit there so the corner will have some structure when it’s turned right side out. I trim mine to a little less than 3/8″.

V1419 Ralph Rucci Sewalong
When turning the welts right side out, push the seam allowance to one side, like so.

V1419 Ralph Rucci Sewalong
Carefully turn the entire thing right side out, and gently use a point presser (or a knitting needle, or a butter knife, or whatever you have on hand) to push the corner out to a sharp angle. Then press, being careful not to drag the iron around – you don’t want to distort your welt.

V1419 Ralph Rucci Sewalong
Yay, sharp corners! As a side note – this was one of the practice welts that did not have the edges trimmed at an angle. See the ridge showing through? Yuck.

V1419 Ralph Rucci Sewalong
When it’s time to sew the pocket facing to the welt+coat, you’ll be glad you did those thread tracings. I checked both sides constantly to be sure that I was exactly on the lines for both coat & pocket facing. I also went the extra mile and hand-basted the facing on, using a different color of silk basting thread. This took foreeeeever, but it’s super precise and I think it’s a big reason why my pockets turned out so nice. Then you can just sew right on top of the basting lines and not have to worry about pins getting in the way (or, in my case – distorting the fabric because of the sheer amount of bulk in that area).

Once you’ve sewn everything down for reals, remove all the basting and thread tracing. Cut and clip as indicated in the pattern – and don’t be afraid to get VERY close to the stitching line when clipping those v’s for the welt. This will prevent the coat from having a crease or fold at the corners where the welt intersects. Then just press the hell out of everything. It can be a little tricky, just because there is so much coat going on – just use lots of steam and take your time. I found that I got the best press when I used the top edge (the handle part) of my clapper and laid whatever section I was pressing over it. The narrow surface meant that the iron was pressing only the parts I wanted to press, and not pressing wrinkles into the rest of the coat.

V1419 Ralph Rucci Sewalong
Once I had everything pressed and done, I basted the welts shut while I finished the pockets, so they wouldn’t gape and flap and potentially stretch out.

V1419 Ralph Rucci Sewalong
Sewing the pocket and binding is pretty easy. The only thing I changed was that I stitched in the ditch to attach the binding, rather than slip-stitching by hand. Just a personal preference! Bonus for those of us who are using underlining – when it’s time to invisibly sew the pocket to the coat, you can just grab the underlining and not worry about your stitches being invisible from the outside. Yay!

V1419 Ralph Rucci Sewalong
Here’s the finished pocket on the inside. Doesn’t it look luxe?

V1419 Ralph Rucci Sewalong
And, of course, my beautiful welts. I am so happy with how they turned out! Definitely worth the effort!

Don’t forget to check out The McCall Blog for Meg’s tutorial on sewing the welts! My biggest tip? TAKE YOUR TIME. Don’t try to rush this section and expect pristine welts. That in mind, you also should not be too scared to actually do this part! They’re just welts – practice a few times, follow the directions, utilize hand-basting, and you’ll be fine 🙂 If all else fails, you can always throw a patch pocket over the mess 😛 haha! (no, seriously, I tell myself this EVERY TIME I make welt pockets!)

How is everyone doing this week with the coat? Any questions?

V1419 Sewalong: Steps 23-50

27 Oct

Good morning & happy Monday, sewalongers! This week, we’ll be sewing up a large chunk of the coat – finishing the main construction, in fact! By the time you are done with step 50, you will be able to actually try on your coat 😀 Woohoo!! I know a post with 27 steps seems ridiculously long, and it sort of is – but keep in mind that at least a third of those steps are just instructing you how to sew on the bias binding. So it’s really not that bad! Although, I will be the first to warn you – this part can be a little time-consuming. You can do it, though! Just take your time and definitely take a nice break if you feel yourself getting overwhelmed/frustrated 🙂

This week, for my sewalong post, I’ll be doing the same sort of post as from last week and just giving some general tips and cheerleading. I don’t think this part of the sewing really requires step-by-step directions – which, due to the sheer size of the coat, is kind of difficult to do as it is – and the directions on this pattern are insanely good anyway. Seriously, they’ve really restored my faith in Vogue patterns with this coat.

That being said, let’s jump in!

As with last week, you will need to follow the steps outlined in the pattern for constructing the coat. Don’t try to skip a step, or jump ahead – the instructions are written in a way to give you the best result with as little hair-pulling as possible (hair-pulling will still probably happen, though, just fyi). Be sure that you have clearly marked your pattern pieces with all notches and symbols – it is critical with this pattern that everything is marked to give you the very best results. Trust me! Also, pay attention to the side that you are sewing the bias binding (and thus which side you will end up topstitching), as we want our topstitching and everything to be symmetrical on the finished coat.

The sleeve dart will be bound with the bias tape, just as all the seams are. If you are having issues keeping the seam allowance at the bottom (where the tip of the dart just kind of wanders off the edge of the fabric), try sewing with the bias binding on the bottom, with the raw edge at your 5/8″ mark. You can also mark the bias tape at 5/8″ in that area, but I found just using the guidelines on the machine’s throat plate was good enough for me 🙂

V1419 Ralph Rucci Sewalong

Don’t forget to staystitch your sleeve where directed (the blue lines in that photo… hopefully your sewing is straighter than my computer drawing skills 😉 ). This is essential for attaching the sleeve to the coat.

V1419 Ralph Rucci Sewalong
For attaching the coat front and back to the sleeves, here are a few tips I have picked up:

  • Use a basting stitch to attach the pieces together first. When you sew the binding, you will use a normal stitch length, so basting is fine for this part. The basting will come in handy if you need to unpick anything (either because you didn’t sew over the basting, or you got a pucker, or whatever).
  • Some of this pieces have GIGANTIC curves and require some crazy easing. Feel free to clip as much as you need to get everything to lie flat. I personally didn’t clip at all – I just put the bigger side on the bottom when I sewed and let the feed dogs ease everything. Absolutely make sure you check for puckers before moving on to the next step.
  • When attaching the binding, I found it easiest to sew with the binding on the bottom, so I could be sure I was sewing over my basting line (and thus have less to unpick).
  • Clip those seam allowances aggressively – like 1/8″. This will not only give you enough room to fold over the binding for topstitching, but it will also allow those curved areas to lie flat without needing to clip (obviously, if you clipped the seam allowances to attach the pieces together, you’ll probably cut most of that off. That’s ok! 🙂 ).
  • As I have mentioned before, I found the topstitching much easier if the binding was basted down by hand first. If you baste right along the edge of the binding, you can sew inside the stitching line and be sure that you caught the fold. Further, it means you don’t have to worry about pins 🙂
  • Again, do NOT be afraid to beat those seams into submission if they are feeling bulky.

20121202-210149

At some point during this section, you will find yourself wrangling a whole lotta coat and you might feel a little overwhelmed. Stay with it! You can do this!

V1419 Ralph Rucci Sewalong

Once you’ve attached the front and back at the top of the sleeve, you will end up with something like this.

V1419 Ralph Rucci Sewalong

Make sure you spread it out on the floor so you can really appreciate how completely ridiculous everything looks.

The next few steps are going to seem REALLY weird, but just roll with it-

V1419 Ralph Rucci Sewalong

First, you will attach your coat front to coat back at the side and skirt seams. Once finished, you will end up with something that resembles a coat with armpit vents. This is actually a great time to try the coat on, BTW – I pin basted a few seams together just to be sure things were rolling smoothly along (what can I say – even with a muslin, I’m paranoid). I ended up sewing this seam at 1/2″ seam allowance instead of 5/8″, just to give myself a tiny bit more waist room.

V1419 Ralph Rucci Sewalong

The next step will have you sew up the section right above the waist and below the gusset, and then apply the binding.

V1419 Ralph Rucci Sewalong

Finally, you get to close up the sleeves! Yay!

Ok, so Laura tweeted me about step 50 being impossible.

images

It’s definitely not impossible – but is DOES require some finesse! If you’ve ever flat-felled a sleeve seam (while it was attached to the rest of the shirt), you are probably familiar with this kind of sewing wrangling. Basically, you will sew very slowly – like an inch or two at a time – being sure to lower the needle every time you stop to readjust (lowering the needle is pretty important, else your coat may shift which will result in a wonky line), so you can be sure you’re sewing through one layer of coat. It *is* possible to sew this seam, you just need patience 🙂 I basted my binding into place by hand (if you’ve been pinning up to this point, you may want to consider basting for just this one seam – it’ll make things a LOT easier if you don’t have to deal with pins) and sewed from the wrong side, so I could keep an eye on my binding and make sure I was catching it. This doesn’t result in the prettiest topstitching ever, but, you know what? It’s an underarm seam. Ain’t nobody gonna be looking at that anyway.

Anyway, here’s my coat up to this point:

V1419 Ralph Rucci Sewalong

V1419 Ralph Rucci Sewalong

We are getting there!

As a side note, it was brought to my attention last week that I sewed the binding on my belt incorrectly. WHOOPS! The binding should actually all face to the inside – there are photos on the McCall blog for clarification. I decided to leave mine because I like the way it looks, but just fyi if you are going for something that is closer to the original!

How are y’all feeling about your coats this week? Any burning questions about this set of steps? Holler at me in the comments!

V1419 Sewalong: Steps 4-22

20 Oct

Good morning, sewalongers! This is the week we actually start sewing our coats – aren’t you sooo excited!?! 😀 Meg will actually be covering this week’s set of steps over on the McCall Blog later this week (she had a family emergency last week, so please be patient if it takes her a couple of days to have the post up), but I thought I’d post here with some tips and progress updates (and personal cheerleading, in case you need it 😉 ).

This first set of steps will get you acquainted with attaching the binding, as well as starting some basic construction on the coat – the back belt, the underarm gusset, and attaching the side to the front. It is fairly straightforward – you may not even need the sewalong once you start reading the instructions – although you do need to be very precise. Don’t be afraid to go slow and maybe even do some hand basting on the trickier parts. You got this!

Ok, here are my ~top tips~ for this section:

V1419 Ralph Rucci Sewalong
If you underlined your coat, you will want to remove the basting stitches after you sew each piece together. This is where the silk thread/hand basting comes in handy – it should be very easy to pull out 🙂

V1419 Ralph Rucci Sewalong
Underlining or not, if your coat fabric is thick, you will definitely want to trim and grade the seam allowances as much as possible when it comes time to apply the bias binding – otherwise, you may have problems getting it to lie flat. I use my Gingher duck-billed applique scissors for this; the flat side keeps any errant fabric from getting caught and accidentally snipped. Obviously you can use regular scissors – just be mindful of where you cut 🙂 I grade down my coating fabric first – as close as I can to the stitching line, without compromising the strength of the stitches – and then trim the remaining seam allowances once I’m ready to fold over the binding.

SPEAKING OF THE BINDING…

V1419 Ralph Rucci Sewalong
Trim off those little triangles before you start applying. It’ll make things a tiny bit easier.

V1419 Ralph Rucci Sewalong
When attaching the binding to the belt, I used my #10 Edgestitching foot to stitch in the ditch on the right side…

V1419 Ralph Rucci Sewalong
Which turned out freaking GORGEOUS, by the way.

V1419 Ralph Rucci Sewalong
The rest of the binding is actually applied flat to the coat, with the topstitching visible on the right side. It can be pretty difficult to get everything even on both sides (catching the binding at the fold on the inside, while still keeping an even topstitching distance on the right side). The pattern has you baste the binding down first, which is a great idea. The only thing I’d add to that is to baste it by hand – yes, I know machine basting is faster, but guess what? It’s also a HUGE PAIN IN THE REAR to remove. Do yourself a favor and baste by hand. Use silk thread if you got it. I basted right along the edge of the binding with dark blue silk thread (so it was visible)(sorry, no photos of this), and then topstitched right inside my basting line on the outside, using one of these little seam guides so I could keep the stitching line straight. Afterwards, you will want to beat the crap out of your seams to get them to lie nice and flat. I give everything a healthy dose of steam, and then smack it with my clapper (I use this clapper & point presser, but honestly, you could use a hunk of wood if you’re feeling cheap. Just make sure you sand it reeeeeeally well so you don’t get a surprise splinter in your coat!).

V1419 Ralph Rucci Sewalong
Oh yeah, and I realized about halfway through this sewing session that it’s probably a good idea to keep a container around to hold all my trimmed seam allowances. There is a LOT of trimming going on around here, and for some reason, I’m incapable of hitting the trash can. Whatever.

Anyway, once you have finished through step 22, you should have something like this –

V1419 Ralph Rucci Sewalong
It’s a coat… front… thing! Yeah!!! Not so bad, huh? 🙂

Head over to the McCall Blog for Meg’s step-by-step of this part of the process (hopefully up later this week!). In the meantime – how are we doing? Anyone have questions on this section of the sewalong?

Side note/disclaimer: Ok, so I decided to start occasionally using affiliate links on this blog. Sorry if you hate me! 🙂 I am currently only affiliated with Amazon, and I promise I will only be linking things that I personally use and recommend – such as those scissors & that clapper. Y’all will never ever ever see me link something just for the sake of linking it – that’s just crappy. However, please keep in mind that any purchases you make through these links will net a small kickback to me, which I will likely spend immediately on yarn & fabric (and thus pour back into this blog, in the form of content for y’all to read!). Also, no sneaky linkies – I will always describe the item I’m linking so you don’t have to click to see them, if affiliate links squick you out 🙂 I won’t be posting this disclaimer at the end of all my posts, as it seems a little redundant, but you can always view it in my About Me page. That’s all! Thanks for supporting my blog, dudes! ♥

Conquering Knits: A Self-Help Guide

23 Feb

Chevron Renfrew

So you wanna sew some knits, huh? Maybe you picked up the Renfrew pattern and haven’t worked up the courage to slice into the pattern tissue yet. Or maybe you’ve been romanced & wooed by all the amazing printed knit fabrics out there. Or maybe you’re just ready for a new challenge that doesn’t involve zippers! Whatever you reason, it’s time to talk knits. Get a coffee and get comfy, this is gonna be a long ‘un.

First off, let me say something very important.

Knits are not scary or super difficult to work with!

I don’t know who is responsible for freaking out millions of sewers to be afraid of knit fabrics, but I wish I did know so I could stick some needles in his (or her!) face. Knit fabrics are actually MUCH easier to work with than a basic woven fabric. Yes, you have to pay special attention to the grainline, but aren’t you doing that anyway with your other sewing projects? 😉 Yes, knits do curl up – but they don’t unravel! Yes, you have to use a special stitch & needle to keep your seams from getting too wavy and/or snapping – but what’s so scary about that?

Here is what is so awesome about knits. I made you a list.
– Don’t wanna hem? Don’t hem! That shit ain’t going nowhere.
– No tedious fitting! Cut your size correct size based on the pattern measurements and let the stretch of the knit do all the work handling those sexy curves you were blessed with.
– No zippers, buttonholes, or closures in general! Pull that shit over your head and get on with your life!
– Finding the grainline is easy – just follow the direction of the greatest amount of stretch.
– Knits are great for using teeny tiny scraps – you can piece the hell out of them (call the seams a ~design feature~) and use them for things like side panels, cuffs and collars, contrasting yokes, colorblocking, insets, creating stripes, pockets, etc. As long as you are paying attention to that grainline, you are pretty much limitless with what you can make!
– You are not limited to *only* using knit yardage to make tshirts – use your pattern to resize a large shirt! Add zippers and hoods or just play with the colors to jazz it up!
– While you don’t need a serger to sew knits, it’s your bestest excuse for buying one 🙂

Now that I’ve gotten you all excited about your new life with knits, let’s talk about those stitches.


Whether or not you plan on using a serger to sew up knits, you will want to keep a pack of Ballpoint Needles on hand. These are perfect for knits because the tip is slightly rounded, which means they push between the loops of the fabric, rather than pierce little holes to make their way through – this is bad for knits!

Stripey - topstitching
You may also want a twin needle for topstitching – especially if you don’t have a coverstitch machine (Does anyone here have a coverstitch machine? Can I borrow it?). Twin needles are awesome because they will do a perfect row of double stitching on top, and a neat little zig-zag on the bottom. You can get these in all sizes, weights – including ballpoint! – and stitch widths. I use them in place of the zig zag for my top stitching, as I think it looks a little more professional. Keep in mind these are for topstitching only; the stitches they produce are not strong enough to handle seams. You do need two spools of thread to use a double needle; wind some thread onto a bobbin if you don’t have a second spool on hand.

Special stitches are used to construct knits (assuming you aren’t using a serger – if you are, high five!) – you want the stitch to stretch with the fabric, or else you’re going to hear a lot of popping when you pull on your new tshirt. A straight stitch won’t do. And by “special stitches,” I am referring to the good ol’ zig zag stitch. If you want to make your seams a little more sturdy, adjust the zig zag width to be slightly more narrow – but not too narrow, or you’ll make the stitch too dense to actually stretch. Play around with a few scraps of your fabric and see what works best for you.

If your machine is computerized and has the ability to end a stitch in the “needle-down” position, go ahead and engage that – it it helpful for stretching as you sew, without risking pulling everything off the sewing machine. If your machine doesn’t have this feature, just turn the handwheel until the needle is down before you start pulling on your fabric.

If you have a walking foot or dual feed, these are also very nice for keeping the knits from getting too ripply. If you don’t have anything like that, no worries! You can still sew up some pretty knits 🙂

stripery dress with pink colorblocks

Knit Tips!

When sewing with woven (aka non-stretchy) fabrics, you can kind of fudge the grainlines. It’s not ideal, but the garment will still work as long as you’re not trading bias for straight. With that being said, this does NOT work with knits! It is important to place your pattern on the fabric according to the stretch direction (if you’re not sewing up a 4-way stretch jersey or whatever), otherwise you may not be able to get that shirt over your head.

You want your stretch to run horizontally across the body, not vertical. For neck/sleeve bands, the stretch needs to run the length of the band. I know this sounds really “Well no shit, Sherlock” but you’d be amazed at how many failed knit projects I chucked in the trash due to not figuring out where stretch was necessary. Learn from my mistakes.

Sewing on knit bands with a serger

Using the stretch to your advantage is the easiest way to get your knit garments looking supa fly. I am a big fan of foregoing an actual hem on my knits and just making little neck and arm and hem bands to keep everything nice & clean. However, these can really make or break a garment – especially if they end up too loose & floppy when sewn in. The bands need to be a bit shorter than the edge that they are being sewn onto, especially when dealing with necklines & arms. This allows the band to curve nicely and lie flat, without the use of additional stitches to hold it down. If you are sewing up your Renfrew top with something more stretchy than a stable knit, you will want to cut your neckband pieces down an inch or so to take advantage of that nice stretch. When you sew up your pattern, carefully stretch the band to fit – you should just be able to pull gently. It helps to sew with the band on top, so you can control how much you pull.

If you do want to make a hem on your knit that doesn’t involve bands, you can do a nice basic hem using your twin needles. Patty’s Knit 101 post has a lot of great info for this!

Knit - stabilizing shoulders
Make sure you stabilize your shoulders – otherwise you will risk stretching them out. A little piece of twill tape or clear elastic is perfect for this. I like to pin mine to the back, centered on the seam, and then top stitch with a double needle. Quick and gets the point across!

PROTIP: Knits look wavy when they are laying flat on a table. This does not mean you failed at sewing. Nine times out of ten, when you put the garment on, the fabric will stretch to accommodate and smooth itself out. Don’t stress unnecessarily over a wavy seam!

white/purple plaid sweater dress

I think that about covers the basics – really, the best way to learn is to just jump in & play around with fabrics & stitches! Try starting out with something really basic & easy – the Renfrew is a great, hand-holding pattern. You could even use it to resize a larger tshirt, which will help you get more comfortable with stretchier fabrics & that zig zag stitch. Don’t worry if your first few attempts leave a little to be desired – it takes practice!

Fabric Stash - knits
A giant stash of knit fabrics to play with doesn’t hurt either 🙂

I am by no means a professional, but I’ve definitely sewn up my share of knit fabrics 🙂 Have any questions you don’t see covered here? See any designs you want a tutorial on? Leave a comment & I’ll see what I can do!